Bluetooth USB Adapter - D-Link | Building Networks for … 120...7 Installing the Bluetooth...
62
2 Rev.2.1 (09/25/2002) DBT -120 Bluetooth USB Adapter
Transcript of Bluetooth USB Adapter - D-Link | Building Networks for … 120...7 Installing the Bluetooth...

2
Rev.2.1 (09/25/2002)
DBT-120Bluetooth USB Adapter

3
Contents
Introduction .................................... 5
Package Contents ............................. 6
Installing Bluetooth Software............ 6
Hardware Installation ....................... 8
Introduction to Bluetooth Software.... 9
Bluetooth Software Basic Operations 14
Client Applications ......................... 20
Local Services ................................ 29
Configuration Panel ........................ 31
Security......................................... 52
Troubleshooting ............................. 56

4

5
IntroductionIntroduction to Bluetooth
The term “Bluetooth” refers to a worldwide standard for the wirelessexchange of data between two devices within a short range. In order toexchange data, two Bluetooth devices must establish a connection. Beforea connection is established, one device must request a connection withanother, where the second device accepts (or rejects) the connection. Theoriginator of the request is known as the client. The device that accepts (orrejects) the request is known as the server. Many Bluetooth devices canact as both client and server. A client Bluetooth device runs a softwareprogram that requests a connection to another device as part of its normaloperation. For example, the program may request a connection to aremote computer, a printer, or a modem.Becoming a Bluetooth client normally requires an action by the deviceoperator, such as an attempt to browse a remote computer, print a file, ordial out on a modem. Every Bluetooth device that provides a service mustbe prepared to respond to a connection request. Bluetooth software isalways running in the background on the server, ready to respond toconnection requests.
Introduction to the D-Link Bluetooth USB AdapterThe D-Link Bluetooth USB Adapter is the best solution for quick and easyaccess to Bluetooth enabled devices without cables or wires. It is a class2/3 low power device and is bundled with Bluetooth Access Point Softwarewith allows you to connect to several Bluetooth devices at once. Thewireless transmission range of the D-Link Bluetooth USB Adapter is about45 feet. A PC configured as the Bluetooth server can support up to 7Bluetooth client devices with IP addresses automatically assigned whenthey connect. After finishing the steps outlined in this manual, you will have the ability toshare information, obtain network access and take the full advantage of a"connected" environment.

6
Package ContentsAfter opening the D-Link Bluetooth Adapter package, check what’s in the package,then refer to the Installation Guide for the fastest way to get up and running withthe Bluetooth USB Adapter.
The following items should be found in the Bluetooth USB Adapter box:• D-Link DBT-120 Bluetooth USB Adapter• USB Extension Cable• Installation CD with Manual & Software• Installation Guide
Installing Bluetooth SoftwareUninstalling a previous version of Bluetooth software:
If you are installing the Bluetooth software for the first time, please skip thissection.Any previous versions of the Bluetooth software must be uninstalled before installingan upgraded version.
Please uninstall the software by completing these steps:1) Close any open programs and insert the Driver CD into your CD-ROM Drive.2) The Autorun screen will appear. Click on Install Bluetooth Software.3) The Welcome screen informs you the previous version of BTW you have
installed. Click on the Next button to continue.4) Click on the Remove button from “Remove the Program” screen.5) When the files have been removed, you will be presented with a screen
informing of its completion.a. Click on the Finish button, a pop-up dialog box will show on the screen.b. Click on the Yes button to reboot your PC.
You have now completely uninstalled the previous version of the Bluetooth software.

7
Installing the Bluetooth software:Be sure to install the Bluetooth software prior to plugging in the USBAdapter to a USB port. If you have connected the Bluetooth adapter to yourcomputer, please remove it, cancel any hardware wizards that may show up,restart your computer and start here.
1) Close any open programs and insert the Driver CD into your CD-ROM Drive.2) The Autorun screen will appear. Click on Install Bluetooth Software.3) The Welcome screen informs you that the WIDCOMM Bluetooth Software
Setup program is ready to begin. Click on the Next button.4) In the License Agreement screen, click on the radio button to the left of I
accept the terms in the license agreement. Click on the Next button.5) In the Device Information screen:
a. Enter a device nameb. Select a device typec. Click on the Next button.
6) In the Destination Folder screen you are asked to confirm the DestinationFolder for the application software. If you would like, you may change thedestination folder to another location as the directory. Click on the Next button.
7) The Ready to Install the Program screen informs you that the driver is readyfor installation. Click on the Install button to continue.Note: Please click on the OK button from the Driver Signature Notice dialogbox to proceed with driver installation in Windows 2000 and XP operatingsystems.
8) When the files have been copied, you will be presented with a screen informingof its completion.
a. Click on the Finish button, a pop-up dialog box will show on thescreen.
b. Click the Yes button to reboot your PC.9) After you reboot your PC, the Bluetooth Icon will reside in the Windows
system tray.

8
Hardware InstallationThe Bluetooth USB Adapter is plug-&-play. After you have the software installed andhave rebooted your PC, you can plug the Bluetooth USB Adapter directly into yourlaptop’s or desktop’s USB port. Or you can plug one end of the USB cable to yourcomputer and plug the Bluetooth USB Adapter to the other end of the USB cable.When you plug the USB Adapter to the USB port, the green LED on the USB Adaptershould light up.
You may be prompted by a “Add New Hardware Wizard”, Click “Next” on each screenwith the driver CD in your CD-ROM drive to finalize the installation.
Note: The system will show a series of configuration messages in the Windowssystem tray only when you have the software and hardware installed for the firsttime. When you unplug and plug the USB Adapter subsequently, the systemwon’t show the above bubble messages again.

9
Introduction to Bluetooth SoftwareThe Bluetooth Adapter bundles with the Widcomm Bluetooth Access Point Softwareas the management software. The Bluetooth Software is the solution for theseamless integration of Bluetooth technology into personal computers. The softwareprovides an easy interface to manage the Bluetooth Adapter.
Introduction to Bluetooth SoftwareMost Bluetooth-enabled devices have the capability to act as:
• A Bluetooth server—these devices provide one or more services, such asaccess to the Internet, to other Bluetooth devices.
• A Bluetooth client—these devices use the service(s) provided by Bluetoothservers.
Bluetooth devices that can act as both server and client can often do both at thesame time.The Bluetooth software provides:
• Clients with the means:o To locate other Bluetooth devices in the immediate vicinity (inquiry)o Discover the services that those devices offer (discovery)o Connect to, use, and disconnect from those services.
• Servers with the means to include/exclude individual services in the list ofservices they provide to clients.
• Extensive security, including:o Authorizationo Authenticationo Encryption

10
The services supported by Bluetooth Software are:• Bluetooth Serial Port - establishes a Bluetooth wireless connection
between two devices. The connection may be used by applications asthough a physical serial cable connected the devices.
• Dial-up Networking - allows a Bluetooth client to use a modem that isphysically attached to the Bluetooth server.
• Fax - allows a Bluetooth client to wirelessly send a fax using a device that isphysically attached to the Bluetooth server.
• File Transfer - establishes a Bluetooth wireless connection that allows yourcomputer to perform file system operations on another Bluetooth-enableddevice—browse, drag/drop, open, print, cut/copy, paste, delete, rename,etc.
• Information Exchange - establishes a Bluetooth wireless connectionbetween two devices so that they can exchange personal informationmanager data such as business cards, calendar items, email messages,and notes.
• Information Synchronization - establishes a Bluetooth wireless connectionbetween two devices and uses the connection to synchronize PersonalInformation Manager data between the two devices.
• Network Access - establishes a Bluetooth wireless connection between theclient and a server that is physically connected to the Local Area Network.If the client has permission (user name and password for the LAN), thewireless connection can be used as if the client were hardwired to the LAN.
Note: All Bluetooth servers do not necessarily provide all of these services.
To determine the services provided by a Bluetooth device:
1. On the client, in the Folders panel of My Bluetooth Places, select EntireBluetooth Neighborhood.
2. In the right panel of Entire Bluetooth Neighborhood, right-click anywhereexcept on a device name and select Refresh from the pop-up menu.
3. In the Folders panel of My Bluetooth Places, right-click a device and selectDiscover Available Services from the pop-up menu to update the availableservices list. The available services will be displayed in the right panel of MyBluetooth Places.

11
Bluetooth Device IdentityEvery Bluetooth device has a unique 48-bit binary Bluetooth Device Address(BDA) burned into its EEPROM (embedded into the device). This address cannotbe changed by the end-user.A device’s BDA is usually displayed in hexadecimal format; 00:D0:B7:03:2E:9F isa valid BDA.Each Bluetooth device also has an operator-configurable, user-friendly name tohelp distinguish it from other Bluetooth devices. The user-friendly name may be upto 99 alphanumeric characters in length and may contain spaces. My PersonalComputer is a valid user-friendly name.
Icons Used For Bluetooth Devices and ServicesBluetooth icons provide at-a-glance feedback about a device or service’s status bychanging color.• Device icons for Windows 98SE, 2K and ME.

12
• Device icons for Windows XP.
Service icons are gray or yellow in color (or gray with yellow accents) in their“normal” state. In the “connected” state the primary color of the icon (gray oryellow) changes to green.

13
• Service icons for Windows 98SE, 2K and ME.

14
• Service icons for Windows XP.
Services may be unavailable because they are in use or because the necessaryhardware (such as a modem for Dial-up Networking) is not installed.
Bluetooth Software Basic OperationsFind Bluetooth Devices
You can double click on the Bluetooth icon in the Windows system tray or
double click on the My Bluetooth Places on your desktop to launch
the My Bluetooth Places Explorer.

15
Bluetooth Software ExplorerOpen the Bluetooth menu from the above screen and select Search for Devices.The system will start to look for Bluetooth devices in the vicinity and display thedevices it finds in the right panel of My Bluetooth Places.The Bluetooth Software can be configured to automatically search for devices on aregular basis. From Configuration Panel/Discovery Tab, check the box of “Lookfor other Bluetooth devices”. You can set a searching time so that the device willsearch other Bluetooth devices at a regular time.Note: If you find that some devices are within connection range but do not showup in the list of devices found, the possible causes are:• Your device is configured to report only specific types or classes of devices• The unlisted device is configured to be non-discoverable

16
Find a ServiceIn the Folders panel of My Bluetooth Explorer, right-click on the device name andselect Discover Available Services from the pop-up menu. The services the deviceprovides will show up in the right panel.
In the Folders panel of My Bluetooth Explorer, right-click on the device name andselect Discover Available Services from the pop-up menu. The services thedevice provides will show up in the right panel.
Bluetooth Software Explorer – Available Services
The services supported by Bluetooth software are:• Bluetooth Serial Port - establishes a Bluetooth wireless connection between
two devices. The connection may be used by applications as though aphysical serial cable connected the devices.
• Dial-up Networking - allows a Bluetooth client to use a modem that isphysically attached to the Bluetooth server.
• Fax - allows a Bluetooth client to wirelessly send a fax using a device that isphysically attached to the Bluetooth server.
• File Transfer - establishes a Bluetooth wireless connection that allows yourcomputer to perform file system operations on another Bluetooth-enableddevice—browse, drag/drop, open, print, cut/copy, paste, delete, rename, etc.
• Information Exchange - establishes a Bluetooth wireless connection betweentwo devices so that they can exchange personal information manager (PIM)data such as business cards, calendar items, email messages, and notes.

17
• Information Synchronization - establishes a Bluetooth wireless connectionbetween two devices and uses the connection to synchronize PersonalInformation Manager data between the two devices.
• Network Access - establishes a Bluetooth wireless connection between theclient and a server that is physically connected to the Local Area Network. Ifthe client has permission (user name and password for the LAN), the wirelessconnection can be used as if the client were hardwired to the LAN.Note: All Bluetooth servers do not necessarily provide all of these services.For example, network gateways only provide access to the Local AreaNetwork (the Network Access service).
Setup a New ConnectionThrough the connection wizard, you can walk through the process of setting up anew Bluetooth connection with another device. You can double click on the AddBluetooth Connection shortcut in the right panel of My Bluetooth Places or right-click on the Bluetooth icon in the Windows system tray, select Services from thepop-up menu, and then select Connection Wizard from the submenu.
Setup a new connection1. On the first Connection Wizard screen:
a) In the Select a Service drop-down menu, select the type of connectionthat will be established. (The specific service will be selected later, ifnecessary.)b) In the “Select a device that provides the service” drop-down menu, selectthe device that will provide the service. (To update the list of devicesdisplayed, click the Search Devices… button.)c) Optional: select the “Require secure encrypted connection” option toenable an Authentication and Encryption for this connection.
2. Click the Next button:• If more than one service of the type selected in the Select a Service drop-
down menu (above) exists on the selected device, for example, multipleBluetooth Serial Ports, then the Select Bluetooth Service dialog boxappears. Select the specific service to be used, and then click the OKbutton to close the Select Bluetooth Service dialog box.
• If only one service of the type selected in the Select a Service drop-downmenu (above) exists on the selected device, the next Connection Wizardscreen appears.
3. If “Require secure encrypted connection” was selected above, a security screenmay appear:

18
• To establish a paired relationship with the remote device while using thiswizard, enter your Personal Identification Number in the PIN Code field ofthe security screen, and then click the Next button.
• To establish the paired relationship with the remote device the first time thisconnection is used, leave the PIN Code field blank in the security screen,and click the Next button.
• Note: The Security screen WILL NOT appear if the devices have beenpaired.
4. On the last Connection Wizard screen:• The top of the screen provides basic information about the new
connection—the name of the device that will provide the service and thename of the service that will be provided. If this information is NOT correct,click the Back button to return to the previous screen, and from that screenselect the correct service and device.
• In the “Connection Name:” field, enter a descriptive name for theconnection, for example, “BT Serial Connection to Andy’s Desktop.”
Bluetooth TrayThe Bluetooth Tray icon resides in the Windows System Tray, which isnormally located in the lower-right corner of the screen. Bluetooth Tray providesfast access to many routine Bluetooth operations.From the Bluetooth Tray you can:
• Access My Bluetooth Places - double-click the Bluetooth icon.• Access the Bluetooth Configuration Panel - right-click the Bluetooth
icon, select Setup, and then select Configuration from the submenu.• Access the Bluetooth Security dialog box - right-click the Bluetooth
icon, select Setup, and then select Security from the submenu.• Access the Bluetooth Connection Wizard - right-click the Bluetooth icon,
select Services, and then select Connection Wizard from the submenu.• Exchange Business Cards with another Bluetooth Computer - right-
click the Bluetooth icon, select Services, and then select Business CardExchange from the submenu.
• Search for, and connect to, a specific service - right-click the Bluetoothicon, select Services, and then select the desired service from thesubmenu. An additional submenu will appear that contains one or moreoptions, including:Find Devices…orOther Devices and one or more device names. The device name(s) will bepresent if this computer has used this service, and connected via thistechnique, at least once before. If a device name is present in thesubmenu, selecting that device will re-initialize the connection.

19
The services that can be searched for and connected to from the Bluetooth Trayare:
• Bluetooth Serial Port(s)• Dial-up Networking• Fax• File Transfer• Information Synchronization• Network Access.
Send to BluetoothThis feature is used to send information to another Bluetooth device. Data typesinclude:
• Files from Microsoft Explorer• Documents from Microsoft Office applications, including:
o Wordo Excelo Accesso PowerPoint.
• Contacts, appointments, tasks, messages, and notes from MicrosoftOutlook.
To use Send to BluetoothIn the application:
• Microsoft Explorer - select one or more files to be transferred. Folderscannot be transferred.
• Microsoft Office - only the document in the active window can betransferred.
• Microsoft Outlook - select one or more items to be transferred. From Microsoft Explorer, go to the File menu, select Send To and then select Bluetooth from the fly-out menu.
• Select Others to display the Select Device dialog box,Or …
• Select a device from the sub-menu.• Click the OK button to send the data. A dialog box displays progress.

20
Client ApplicationsNetwork Access
The Network Access service permits a Bluetooth client to use a Local AreaNetwork connection that is physically attached to another Bluetooth device (theserver).Possible Network Access servers include:
• Bluetooth-enabled computers that have a hardwired Ethernet connection.• Stand-alone Bluetooth Network Access Points.
The Bluetooth server must be specifically configured to provide the NetworkAccess service.Note: After a Bluetooth device is configured as a Network Access server it cannotact as a Network Access client until it has been re-configured to act as a NetworkAccess client.
Network Access Server-side Setup for Windows2000You must configure one computer to serve as a Bluetooth server, and then otherBluetooth client devices in the vicinity can access available services the serverprovides. Being a Bluetooth Network Access server, the computer must have ahardwired Ethernet connection and be specifically configured to provide the NetworkAccess service.
• From the Windows Start menu scroll to Settings and select Control Panel.On the Control Panel screen, double click on the Network and Dial-upConnections.
• On the Network and Dial-up Connections screen, right-click on the LocalArea Connection icon, and select Properties from the pop-up menu.
• On the Local Area Connection Properties screen, click on the Sharingtab; select Enable Internet Connection Sharing for this connection andclick on the OK button to close the screen.
Now, you have successfully configured your PC or laptop to the Bluetooth server soBluetooth client devices in the vicinity can link to the Bluetooth server.
Network Access Server-side Setup for WindowsXP:• From the Start menu scroll to Control Panel. In the Control Panel screen,
double click on the Network and Dial-up Connections icon.• On the Network and Dial-up Connections screen, right-click on the Local
Area Connection icon, and select Properties from the pop-up menu.• On the Local Area Connection Properties screen, click on the Advanced
tab; select Enable Internet Connection Sharing for this connection andclick on the OK button to close the screen.

21
Network Access Server-side Setup for Windows 98SE & Windows ME:If the Bluetooth sever is running in Windows 98SE or Windows ME, you have toinstall an Internet Protocol Routing software. There are lots of trial versions of InternetProtocol Routing software in the Internet. For example: A downloadable trial versionof Sygate Home Network is available on the Sygate Technologies Inc. website athttp://www.sygate.com/.
Installing and configuring the Sygate Home Network:• Please follow the on-screen descriptions to install the Sygate Home Network.
Note: check the box of Server Mode on the Installation Setting dialog boxduring installation.
• Click on the OK button from the Sygate Network Diagnostics screen.• Click on the Yes button from the Reboot dialog box to restart your computer.
After you reboot your PC, click on the OK button from the Thank You ForTrying Sygate screen. The Sygate Manager screen will show up.
• Click on the Advanced button from the Sygate Manager screen and click onthe Configuration icon. The Configuration screen will show up.

22
• In the right panel of the Configuration screen, choose Select Manually fromLocal Network Connections and select the 0000:Bluetooth PAN Driver. Besure to check the Enable Address Server (DHCP) from the Options item.
• On the left side of the Configuration screen, check Ethernet and select theLAN card the PC is using.
Now, you have successfully configured your PC or laptop to the Bluetooth serverso Bluetooth client devices in the vicinity can link to the Bluetooth server.
Bluetooth Serial PortThe Bluetooth Serial Port service allows two Bluetooth devices to establish awireless connection through virtual communications ports and then use thatconnection as if it were a hardwired serial cable between the devices.
To establish a Bluetooth serial port connection:Connections are initiated from the client:
1. On the client, in the Folders panel of My Bluetooth Places, select Entire Bluetooth Neighborhood.

23
2. In the right panel of Entire Bluetooth Neighborhood, right-click anywhereexcept on a device name and select Refresh from the pop-up menu.
3. In the Folders panel of My Bluetooth Places, right-click the server to whichyou wish to connect and select Discover Available Services from the pop-upmenu to update the available services list. The available services will bedisplayed in the right panel of My Bluetooth Places.
Bluetooth Software Explorer – Available Services
4. In the right panel of My Bluetooth Places, double-click Bluetooth Serial Port.A dialog box appears that contains the communications port number assigned tothis connection by the client. The application that will use this connection mustbe configured to send data to this port.Depending on the security configuration, the dialog box that providescommunications port information may not appear until after Authentication andAuthorization have been accomplished.The application on the server must be configured to use the correctcommunications port.To determine the communications port being used by the service:
• On the server, in the Folders panel of My Bluetooth Places, right-click MyDevice and select Properties from the pop-up menu
• In the Bluetooth Configuration Panel, select the Local Services tab.• Double-click the Bluetooth Serial Port service to display its Service
Properties dialog box. The Service Properties dialog box shows thecommunications port the connection is using.

24
To close a Bluetooth serial port connectionConnections are normally closed from the client:
• On the client, in the Folders panel of My Bluetooth Places, select (highlight)the device that is providing the Bluetooth Serial Port service.
• In the right panel of My Bluetooth Places, right-click Bluetooth Serial Portand then select Disconnect Bluetooth Serial Port from the pop-up menu.
Though not recommended, connections can also be closed from the server:• On the server, in the Folders panel of My Bluetooth Places, select (highlight)
My Device.• In the right panel of My Bluetooth Places, right-click Bluetooth Serial Port
and then select Stop to close the service. The service must be re-startedbefore it will be available to remote devices (right-click Bluetooth Serial Portand select Start from the pop-up menu).
Dial-Up NetworkingThe Dial-up Networking service permits a Bluetooth client to use a modem that isphysically connected to a different Bluetooth device (the server).After the Bluetooth wireless connection is established the client can use theserver’s modem as if it were a local device on the client.
To establish a Dial-up Networking sessionConnections are initiated from the client:1. On the client, in the Folders panel of My Bluetooth Places, select Entire
Bluetooth Neighborhood.2. In the right panel of Entire Bluetooth Neighborhood, right-click anywhere
except on a device name and select Refresh from the pop-up menu.3. In the Folders panel of My Bluetooth Places, right-click the server that will
provide the Dial-up Networking Service and select Discover AvailableServices from the pop-up menu to update the available services list. Theavailable services will be displayed in the right panel of My Bluetooth Places.
4. In the right panel of My Bluetooth Places, double-click Dial-up Networking.5. In the Connect to dialog box, fill in your user name, password, and the phone
number to be dialed, and then click the Dial button. Select the SavePassword check box and the dialog box will not appear for subsequentconnections to the same phone number.
You can now open a web browser and connect to the Internet.

25
To close a Dial-up Networking connection• On the client, in the Folders pane of My Bluetooth Places, select (highlight)
the device that is providing the Dial-up Networking service.• In the right pane of My Bluetooth Places, right-click Dial-up Networking and
then select Disconnect Dial-up Networking from the pop-up menu.
FAXThe Fax service allows a Bluetooth client to wirelessly send a fax using a devicethat is physically attached to a Bluetooth server.
Send a FaxConnections are initiated from the client:
• On the client, in the Folders panel of My Bluetooth Places, select EntireBluetooth Neighborhood.
• In the right panel of Entire Bluetooth Neighborhood, right-click anywhereexcept on a device name and select Refresh from the pop-up menu.
• In the Folders panel of My Bluetooth Places, right-click the server that willprovide the Fax service and select Discover Available Services from thepop-up menu to update the available services list. The available services willbe displayed in the right panel of My Bluetooth Places.
• In the right panel of My Bluetooth Places, double-click Fax.
After the Fax connection is established, open or create the document to be faxedand use the “Print” or “Send to FAX Recipient” option available in mostapplications.
The Fax connection closes automatically when the transmission is complete.
File TransferThe File Transfer service allows one Bluetooth device to perform file operations onthe default File Transfer directory (and the folders and files it contains) of anotherBluetooth device.To perform an operation on a folder or file
On the machine from which the File Transfer service will be used:1. In the Folders panel of My Bluetooth Places, select Entire Bluetooth
Neighborhood.2. In the right panel of Entire Bluetooth Neighborhood, right-click anywhere
except on a device name and select Refresh from the pop-up menu. In the Folders panel of My Bluetooth Places, right-click the device you want to
transfer files with and select Discover Available Services from the pop-upmenu to update the available services list. The available services will be

26
displayed in the right panel of My Bluetooth Places.3. In the Folders panel of My Bluetooth Places, click the plus ( + ) sign in front of
Public Folder to expand that folder. If there are additional folders inside theexpanded folder, those additional folders may have to be expanded.
Folder contents are displayed in the right panel of My Bluetooth Places.
Types of File Transfer operationsIn the right panel of My Bluetooth Places, right-click a folder item and select anoption from the pop-up menu. A dialog box (the title varies, depending on theoperation being carried out) appears and the status line (bottom of the dialog box)indicates the operational step that is being carried out.The types of operations that can be accomplished are:
• Open:o Files—are opened in the application associated with them.o Folders—are expanded to show their contents.o Print—sends the selected server file to the client’s default printer.
• Send to:o 3.5" Floppy Drive—copies the selected item(s) from the server to
the client’s 3.5" floppy drive.o My Shared Folder—copies the selected item(s) from the server to
the default File Transfer folder on the client.• Cut - copies a folder and its contents, or individually selected files in a folder,
to the Windows clipboard. When the clipboard contents are pasted to a newlocation, the originally selected file(s) on the server are deleted.
• Copy - copies a folder and its contents, or individually selected files in afolder, to the Windows clipboard.
• Delete - deletes selected file(s) and/or folder(s) on the server.• Rename - allows you to change an empty folder’s name.• Properties - displays the file or folder’s properties dialog box.
Other options may appear (depending on the context the menu appears in):• Update - updates the contents of a folder• New Folder - creates a new folder on the server• Abort FTP Operation - aborts an in-process File Transfer operation.

27
Information ExchangeThe Information Exchange service provides a way to send and receive MicrosoftOutlook items to and from another Bluetooth device, such as a Personal DigitalAssistant or notebook computer.
Information Exchange TabThe supported Outlook items are
• Business cards (*.vcf and *.vcd)• Calendar entries (*.vcs)• Notes (*.vnt)• Messages (*.vmg)
There are three types of operations:• Send—sends an object to another device.• Receive—requests an object from another device.• Exchange—sends a client object and receives a server object.

28
The default location of your business card and the location where received itemsare placed can be configured in the Bluetooth Configuration Panel.
To send, receive or exchange an object:On the client, in the Folders panel of My Bluetooth Places, right-click the Inboxicon of the remote device. Select an option from the pop-up menu. Business cardsare sent, received or exchanged without further intervention.To send Calendar Items, Notes, and Messages, navigate to the folder thatcontains the item you want to send, select the item, and then click Open.
Information SynchronizationThe Information Synchronization service is used to synchronize information (e.g.,a Personal Information Manager database) between a Bluetooth client and aBluetooth server.Bluetooth Software supports synchronization with devices that support IrMC v1.1and exchange the v2.1 vCard format.
Four data types are supported:• Business cards• Calendar items• Email messages• Notes
The first time Information Synchronization is used with a new application it maytake a few minutes to synchronize the database; the data from both devices mustbe merged, duplicate entries deleted, and then the updated database copied backto both devices.Subsequent uses of Information Synchronization, for the same application, aremuch faster— only the changes that have been made since the databases werelast synchronized must be exchanged.Microsoft Outlook is the only Personal Information Manager supported in thisrelease of Bluetooth Software. Outlook permits duplicate entries, so all duplicatesmay not be exchanged in the synchronization process.Note: Only Outlook’s default contacts folder is synchronized. Items in sub-foldersare not synchronized. Items that are moved from the default folder to a sub-folderwill appear to have been deleted when the next synchronization takes place.
Use Information Synchronization• On the client, in the Folders panel of My Bluetooth Places, select Entire
Bluetooth Neighborhood.• In the right panel of Entire Bluetooth Neighborhood, right-click anywhere
except on a device name and select Refresh from the pop-up menu.

29
• In the Folders panel of My Bluetooth Places, right-click the server with whichyou will synchronize and select Discover Available Services from the pop-up menu to update the available services list. The available services will bedisplayed in the right panel of My Bluetooth Places.
• In the right panel of My Bluetooth Places, double-click InformationSynchronization.
A dialog box displays synchronization progress and, when the process iscomplete, indicates that synchronization has successfully completed.The connection closes automatically when synchronization is complete.
Local ServicesLocal Services are those services that a Bluetooth server is capable of providing.The services provided by Bluetooth Software are:
• Bluetooth Serial Port• Dial-Up Networking• Fax• File Transfer• Information Exchange• Information Synchronization• Network Access
The names of all the services are displayed even though the server may not becapable of supporting all services. For example, when a server provides a servicethat is hardware-dependent, that server must be capable of local action, i.e., aDial-up Networking server must have a working modem, a Fax server must have afunctional fax modem, and a Network Access server must be physically connectedto the Local Area Network.All services start automatically by default when Bluetooth Software is initialized.Automatic start-up can be turned off for individual services (Go to BluetoothConfiguration Panel >Local Services tab > double-click the service name.) If aservice is not configured to start automatically it can still be started manually (right-click the service and select Start from the pop-up menu).
Stop a local serviceRight-click the service and select Stop from the pop-up menu. Stopped servicesare not available for use by clients.With Local Device selected, the Details view of Explorer provides basic informationabout each local service:

30
• Service—the name of the service• Startup—Automatic or Manual• Status:
o Started(COM#)—the service is running and ready to use COM#o Not Started—the service is not running (not available to clients)o Connected(COM#)—the service is in use, the local port is COM#
• Device name if connected:o Empty field—the service is not connectedo A device name and/or Bluetooth Device Address - identifies the
device that is using the service.To interrupt a connection from the server side:
• Right-click the local service and select Stop from the pop-up menu.• Right-click the local service and select Start from the pop-up menu to re-
start the service.

31
Configuration PanelThe Bluetooth Configuration Panel provides access to settings for Bluetoothservices, hardware and security and for event notification.
Access the Bluetooth Configuration Panel
From the Windows Control Panel, double-click on the Bluetooth Configuration icon.-or-
In the Windows System Tray, right-click the Bluetooth icon, select Setup and thenConfiguration from the fly-out menu.

32
Accessibility TAB
Accessibility Configuration SettingsThe Accessibility tab of the Bluetooth Configuration Panel lets you specify whichremote devices may access this computer.
Accessibility TabNote: Security settings configured in the General, Local Services, and ClientApplications tabs may also affect which devices have access to this computer.
• Allow other devices to discover this computer: Select “Let otherBluetooth devices discover this computer” to permit remote Bluetoothdevices to find and report this computer. If “Allow No devices to connect”(below) is selected, this option is not available.
• Control the types of devices that are allowed to connect to thiscomputer:From the Allow drop-down-menu, select:o All devices to connect—all remote devices are permitted to connect
to this computer.
33
o No devices to connect—no remote devices are permitted to initiate aconnection with this computer. However, this computer can still initiateconnections (as a client) with remote Bluetooth devices.
o Only-paired devices to connect—only devices that have been pairedwith this computer are allowed to connect to it.
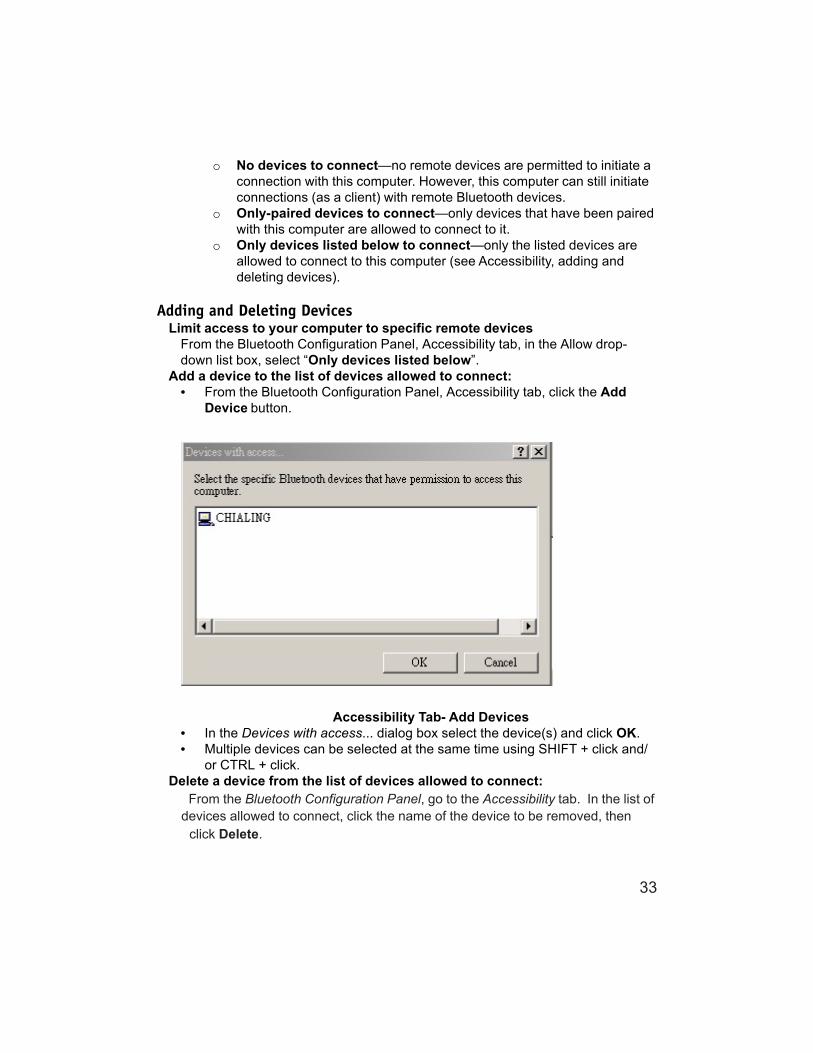
o Only devices listed below to connect—only the listed devices areallowed to connect to this computer (see Accessibility, adding anddeleting devices).
Adding and Deleting DevicesLimit access to your computer to specific remote devices
From the Bluetooth Configuration Panel, Accessibility tab, in the Allow drop-down list box, select “Only devices listed below”.
Add a device to the list of devices allowed to connect:• From the Bluetooth Configuration Panel, Accessibility tab, click the Add
Device button.
Accessibility Tab- Add Devices• In the Devices with access... dialog box select the device(s) and click OK.• Multiple devices can be selected at the same time using SHIFT + click and/
or CTRL + click.Delete a device from the list of devices allowed to connect:
From the Bluetooth Configuration Panel, go to the Accessibility tab. In the list of devices allowed to connect, click the name of the device to be removed, then click Delete.

34
Discovery TABDiscover Configuration Settings
The settings on the Discovery tab of the Bluetooth Configuration Panel determinewhether your computer looks for other Bluetooth devices automatically, how oftenit looks and what type of devices it looks for.
Discovery TabPeriodic Search for Devices
When “Look for other Bluetooth devices” is selected, Bluetooth for Windowsautomatically searches for devices every X minutes. X is an integer from 1 to 60.To change the time between auto inquiries, highlight the existing time and enter thenew time.Note: When My Bluetooth Places is first opened it performs an initial automaticsearch for devices even if “Look for other Bluetooth devices” is not enabled.

35
Determine the devices that will be reportedBluetooth for Windows can screen out devices that you do not need access to.The options are:
• Report all Bluetooth devices• Report only selected Bluetooth devices
Select the desired option from the drop-down list.
Discovery, Adding Specific DevicesLimit the type of remote devices reported
Bluetooth for Windows can report only specific devices, specific class(es) ofdevice(s), or specific type(s) of device(s) within a class. Discovered devices canbe mixed-and-matched; you can discover one or more specific devices, classes ofdevices and types of devices within a class at the same time.Note: When Bluetooth for Windows is configured to report only specific devices, itreports ONLY those devices.
Report only specific devices• From the Bluetooth Configuration Panel, on the Discovery tab, select
“Report only Selected Bluetooth devices” from the drop-down list andthen click the Add Device button.

36
Discovery Tab – Discoverable Devices• In the Discoverable devices... dialog box, highlight the device to be
discovered and click the OK button. Multiple devices can be selected at thesame time using SHIFT + click and/or CTRL + Click.
Note: To add a device to the list of devices to be discovered, that device mustbe within range of the Bluetooth radio; devices that are not within radio rangewill not appear in the list of devices in the Discoverable devices... dialog box.
Report only a specific class of device• From the Bluetooth Configuration Panel, in the Discovery tab, select
“Report only Selected Bluetooth devices” from the drop-down list andthen click the Add Device button.
• In the Discoverable devices... dialog box, select “Allow this computer todiscover all devices of a specific class or a specific type of devicewithin a specific class.”
Discovery Tab – Discoverable Devices

37
• From the Class drop-down list, select a class of devices to be discovered.• Click the OK button.
Report only a specific type of device within a class• Configure Bluetooth for Windows to report the class of device to which the
type of device belongs (follow the steps in “Report only a specific class ofdevice,” above, but do NOT click OK.)
• In the Discoverable devices... dialog box, from the Type drop-down menuselect the specific type of device to be reported.
• Click OK.
Discovery, Deleting Specific DevicesRemove a device from the list of devices to be discovered
In the Bluetooth Configuration Panel, select the Discovery tab, select the device tobe removed and click Delete.Note: If “Report only selected Bluetooth devices” is not selected, the Delete buttonwill not be available.
Temporarily override the discovery of specific devicesIn the Bluetooth Configuration Panel, from the Discovery tab, select “Report allBluetooth devices.” The specifically selected devices will be discovered alongwith all other devices.To re-enable specific device discovery re-select “Report only selected Bluetoothdevices.”Note: When all devices are deleted an error message will appear if “Report allBluetooth devices” is not selected.
General Configuration SettingsThe settings on the General tab of the Bluetooth Configuration Panel determinedevice properties and basic system security settings.

38
General Tab
Identity section
• Computer Name- enter a unique name to identify this computer to otherBluetooth devices in the vicinity; this field cannot be left blank.
• Computer type- select either Desktop or Laptop from the drop-down menuto help identify this computer to other Bluetooth devices in the vicinity.
Bluetooth Security Section
• High-requires Bluetooth devices to authenticate (enter a PersonalIdentification Number (PIN)) before allowing a connection to be established.Your computer and the connected Bluetooth device will exchange data usingencrypted links.

39
• Medium-the default security setting is configured at the service-level.Service level security means that each individual service must have itssecurity settings (Authentication, Authorization and Encryption) setindependently.
Note: If the security mode is Medium and service-level security is not configured,any Bluetooth device will be able to discover your computer and use it services.
Hardware ConfigurationThe Hardware tab of the Bluetooth Configuration Panel provides basic informationabout the Bluetooth hardware installed on this computer and access to theAdvanced Settings dialog box, if required:
Hardware Tab
• Devices:
o Name: the name of the device
o Type: the type of device, e.g., USB.

40
• Device Properties:
o Manufacturer: the name of the company that manufactured thedevice selected in the Devices section of this dialog box.
o Firmware Revision: the manufacturer’s firmware version number.
o Device status: indicates that the device is operating properly or thatthere is a problem/conflict.
o Device Address: the Bluetooth Device Address (BDA or BD_Addr)programmed into this device when it was manufactured.
o HCI Version: the version number of the Bluetooth Specification thatthe Host Controller Interface complies with.
o HCI Revision: the revision number of the Bluetooth Specificationthat the Host Controller Interface complies with.
o LMP Version: the version number of the Bluetooth Specification thatthe Link Manager Protocol complies with.
o LMP Sub Version: the sub-version number of the BluetoothSpecification that the Link Manager Protocol complies with.
• The Advanced button: displays the Advanced Settings dialog box, whichallows you to select the country code and transmission power settings. Thisoption is not available on all systems.

41
Hardware Advanced Settings Dialog BoxWhen available, this dialog box is reached from the Hardware tab of the BluetoothConfiguration Panel.Depending on the country in which the hardware is sold and/or in which it will beused, the Advanced button may not be present.
Hardware Tab - AdvancedFrom this dialog box you can set the:
• Country Code:
o North America, Europe (except France), and Japan
o France and China
• Maximum Transmission Power:
o High
o Medium
o Low.

42
Click the Apply button to implement the changes. A dialog box appears withnotification that the Bluetooth device attached to this computer must be resetbefore the change(s) will take effect.
• Click the Yes button to reset the Bluetooth device. All open Bluetoothconnections will be closed.
• Click the No button to save the changes -The changes will be applied thenext time the Bluetooth device is reset or restarted.
Information Exchange Configuration SettingsThe settings on the Information Exchange tab of the Bluetooth Configuration Panelallow you to configure the following:

43
Information Tab• The highest-level directory on this computer that a remote device has
permission to access.
• The path to your electronic business card.
• The path to the directory that will be used to save incoming:
o Business cards
o Notes
o Messages
o Calendar items.
File TransferMy Shared Directory: the directory configured in this section is the highest-leveldirectory to which a remote Bluetooth computer has access. This directory and itssub directories are displayed in the remote device’s My Bluetooth Places.Click the Browse button and navigate to the directory that will be used as MyShared Directory.
Send Business CardMy Business Card: the path to the directory on this computer that contains yourelectronic business card.Select the “Send Business Card on Request” option to allow remote devices toobtain your business card.Click the Browse button and navigate to the directory that contains your businesscard.
Receive Business CardMy Inbox Directory: the path to the directory on this computer where inboundPersonal Information Manager items such as Business cards, Notes, Calendarentries and messages will be saved.Select the types of items you wish to accept by placing a checkmark in theappropriate boxes, then click the Browse button and navigate to the directorywhere they should be saved.Select the “Save Object in Personal Information Manager” option to saveincoming objects directly in the PIM if you have installed the PIM application.When this option is selected, the path specified in My Inbox Directory is not used.

44
Local Services TABLocal Services Configuration Settings
The settings on the Local Services tab of the Bluetooth Configuration Paneldetermine the configuration of the services provided by your computer to remotedevices. Each service can be configured individually for security, name, and othersettings.The Local Services tab also includes options to add and delete user-defined serialservices.
Local Service Tab

45
Bluetooth for Windows Local Service Names• Bluetooth Serial Port
• Dial-Up Networking
• Fax
• File Transfer
• Information Exchange
• Information Synchronization
• Network Access
Property settings which are common to all of the local servicesAlthough each of these settings can be set individually for each service, all localservices have the setting for:
• Authentication
• Authorization
• Encryption
• Startup
• Service Name
Some local services have additional property settingsSome services have an additional setting that is specific to that service.
• Network Access - as an additional setting for the maximum number ofconnections allowed at any time.
• Dial-Up Networking - as an additional setting for selecting the modem thatwill be used by the service.
• Fax - as an additional setting for selecting the modem that will be used bythe service.
• Bluetooth Serial Port - as an additional setting for selecting thecommunications that will be used by the service.

46
Local Device, Add A User Defined Bluetooth Serial PortMost applications that use a serial connection can also use the wireless BluetoothSerial Port service to transfer data; the Bluetooth Serial Port is a replacement forthe physical cable and is transparent to the application.Bluetooth for Windows has one pre-configured Bluetooth Serial Port, but additionalBluetooth Serial Ports can be added when needed.
Add an additional Bluetooth Serial Port• From the Bluetooth Configuration Panel, Local Services tab, click the Add
Serial Service button.• In the Service Properties dialog box, modify the properties:
o Enter a unique name (less than 99 alphanumeric characters).o Select the appropriate security settings.o If you want the service to start automatically when Bluetooth for
Windows initializes, select Startup.o From the COM Port drop-down menu select a communications port that
is not assigned to any other service.• Click OK.
Property settings which are common to all of the local servicesAlthough each of these settings can be set individually for each service, all localservices have the setting for:
• Authentication
• Authorization
• Encryption
• Startup
• Service Name

47
Some local services have additional property settingsSome services have an additional setting that is specific to that service.
• Network Access - as an additional setting for the maximum number ofconnections allowed at any time.
• Dial-Up Networking - as an additional setting for selecting the modem thatwill be used by the service.
• Fax - as an additional setting for selecting the modem that will be used bythe service.
• Bluetooth Serial Port - as an additional setting for selecting thecommunications that will be used by the service.
Local Device, Remove a User Defined BluetoothSerial Port
From the Bluetooth Configuration Panel, Local Services tab, select (highlight) theport to be removed and then click the Delete button.
Note: The Delete button is only available when the Bluetooth Serial Port service ora user-defined serial port service is selected.

48
Local Services PropertiesChange local service properties
From the Configuration Control Panel, Local Services tab, double-click the servicename.Make the changes by selecting or clearing the appropriate boxes and click the OKbutton.The service properties that may be changed are:
• Startup - when enabled, starts the service when Bluetooth for Windowsinitializes. The default setting is enabled. If Startup is not enabled the servicecan still be started manually.
• Authorization - when enabled, requires confirmation by the server operatorbefore a remote device is allowed to connect to this service. The defaultsetting is disabled. Authentication (see below) is automatically enabled whenAuthorization is enabled.
• Encryption - when enabled, encrypts data exchanged by the Bluetoothserver and the Bluetooth client. The default setting is disabled. Encryptionapplies to the Bluetooth connection ONLY. Data transmitted to/from amodem, Local Area Network, etc., is NOT affected by this setting.Authentication is automatically enabled when Encryption is enabled.
• Authentication - when enabled, requires that the client and serverexchange a passkey or Link Key before a connection is established. Thedefault setting is disabled. Devices are paired automatically whenauthentication is complete.
• Service Name - Enter a service name (one to 99 alphanumeric characters)in this field. In most cases the default service name will serve. However, inenvironments where there is more than one device of the same type or onedevice provides more than one service of the same type (this is onlypossible for the Bluetooth Serial Port service), the service name can becustomized.

49
Notifications TABNotifications Tab Configuration Settings
The Notifications tab of the Bluetooth Configuration Panel lets you associate asound (Windows *.wav file) with specific Bluetooth events.
Notification TabSounds can be associated on an individual basis with several events, including:
• When a PIN code is required
• When a remote device attempts to access:
o Files on this computer
o A Bluetooth port

50
o The Dial-up network service
o The LAN Access service
o The Fax service.
• When a remote device attempts to send:
o Information items
o Synchronization information.
Associate a sound with a Bluetooth eventFrom the Bluetooth Configuration Panel, Notifications tab:
• In the Notify column of the Events list, select the check box associated withthe event.
• In the Sound area of the Notifications tab, click the Browse button andnavigate to the sound file (*.wav) to be used for notification.To preview the sound file, click the play ( ) button.
• Click the OK button to close the Bluetooth Configuration Panel.Note: The sound will not play, even though it has been assigned, unless the Notifycheck box is selected.

51
Version Info ConfigurationVersion info
Version Info TabThe Version Info tab of the Bluetooth Configuration Panel displays the name andversion number of the software components of Bluetooth for Windows.There are no options to configure on this tab.

52
SecuritySecurity Introduction
Each service that the server provides can be configured to require:• Authorization -The server operator must acknowledge all connection
attempts before a connection is established.• Authentication -The server requires a Personal Identification Number (PIN)
code or a Link Key before a connection is established.• Encryption - All data sent between the Bluetooth client and Bluetooth server
is encrypted. The encryption key is based on the Authentication Link Key;Encryption requires that Authentication be enabled.
The default security setting for Authorization, Authentication and Encryption isdisabled.Devices can also be paired, a process that eliminates the need to enter a PINcode every time access is attempted.
AuthenticationAuthentication is used to verify identity; it requires a passkey or Link Key from theremote device. When a remote device attempts access a visual and/or audiowarning notifies the local operator.The local operator can open a dialog box that provides:
• The user-friendly name of the device attempting access• The name of the local service that the remote device is attempting to access• A place for the local operator to enter a passkey.
The operator of the remote system must enter the identical passkey or access isdenied.If the notification is ignored, access is denied after a preset timeout.When devices are paired, those devices automatically exchange a Link Key andAuthentication is carried out without operator intervention.
AuthorizationAuthorization is Yes or No, go-no-go security.A visual and/or audio warning alerts the server operator that a remote device isattempting to connect.The server operator responds by clicking the Bluetooth icon in the Windowssystem tray to open

53
a dialog box that displays:
• The user-friendly name of the device attempting to connect
• The local service to which the remote device is attempting to connect.
The server operator may grant or deny access to the service by clicking an on-screen button.If the server operator ignores the Authorization notification access will be deniedafter a preset timeout.
EncryptionEncrypting translates data into an unreadable format using a secret key orpassword. Decrypting the data requires the same key or password that was usedto encrypt it.Encryption in Bluetooth for Windows is based on the same passkey or Link Keythat is used for Authentication. If Authentication is not enabled the key is notavailable and encryption will not take place.Note: To use Encryption, Authentication must be enabled.
Enable Encryption for a service• Right-click a service name and select Properties from the pop-up menu to
display the Bluetooth Properties dialog box.
• Select the Encryption option. If Authentication is not enabled it will beautomatically turned on when Encryption is selected.
• Click the OK button to close the dialog box and apply the change.
Levels of SecuritySecurity for local services may be configured on an individual basis.
The configuration options are• Startup-Automatic or Manual• Authorization• Authentication• Encryption
To access the security settings for a local service, in the Bluetooth ConfigurationPanel, from the Local Services tab, double-click the service name.Note: Bluetooth-enabled devices from different vendors may handle security in aslightly different manner.

54
Link KeyLink Key is a unique, internally generated, access code. Link Keys are generatedautomatically when devices are Paired or when Authentication is enabled.
Link Keys are created by combining• The Passkey
• The Bluetooth Device Address
• An internally generated random number.
Pairing DevicesPairing allows you to avoid entering access information each time a connection isattempted. Paired devices share a unique Link Key, which they exchange whenconnecting.Note: The mate of a pair will always appear in My Bluetooth Places, even if themate is not turned on or is out of connection range.
Paired devices remain paired even when• One of the devices is not powered up
• A service connection is interrupted or the service stopped
• One or both devices are rebooted.
When Authentication is enabled devices are paired the first time they attempt toconnect, after a successful passkey exchange.
To pair devices before attempting a connection• In the Windows System Tray, right-click the Bluetooth icon, then Setup and
select Security from the fly-out menu.• The Bluetooth Security dialog box appears and Bluetooth for Windows
performs a device inquiry to update the list of devices in the area. After theinquiry is complete:o In the Found Devices Panel of the dialog box, click the name of the
device to be pairedo Click the Execute Pairing button.
• In the Bluetooth Passkey Request dialog box, enter the Bluetooth Passkey• Click the OK button.
Note: The check box on the main screen, when selected, permits all services toconnect without Authorization.

55
Remove PairingWhen devices are paired, the configuration information is saved on both devices.Devices remain paired until the relationship is broken on both devices.
To break a paired device relationship• In the Windows System Tray, right-click the Bluetooth icon, then Setup and
select Security from the fly-out menu.
• From the Bluetooth Security dialog box, in the Paired Devices list, select adevice, click the Delete button and then click the Done button.
Note: Pairing must be broken on both devices.
PasskeyA Passkey is an alphanumeric string of up to 16 characters in length. Passkeysare also called PIN codes, or Personal Identification Numbers.
In Bluetooth for Windows, passkeys are used in the Authentication and Encryptionprocess.
Request DialogSecurity Request Dialog Box
A Bluetooth Authorization or Bluetooth Passkey Request dialog box may appear(depending on security settings) when a connection is attempted if eitherAuthorization or Authentication is enabled. The method of notification depends onthe version of Windows:
• Windows 2000, Windows ME and Windows XP - A bubble message isdisplayed over the Bluetooth icon in the Windows System Tray
• Windows 98SE - The Bluetooth for Windows icon in the Windows SystemTray blinks.
Regardless of the version of Windows, click the Bluetooth icon in the WindowsSystem Tray and then follow the on-screen instructions. The instructions vary,depending on the security configuration of the system.If the security notification is ignored the connection request will fail after a presettimeout.
The dialog box provides• Device Name: the user-friendly name of the device attempting to connect.• Request to access: the service the remote device is attempting to access.• Buttons for responding are as follows:
o OK - allow the connection

56
o Cancel - deny the connectiono Advanced (click the See Also button, below, for more information).
• A check box that, when enabled, grants (authorizes) the connecting deviceaccess to all of the services on this computer.
Security Request Dialog Box, Advanced ButtonThe check box on the main page of the Bluetooth Authorization and BluetoothPasskey Request dialog boxes (“Check this box to ALWAYS allow this device toaccess ALL the services of your computer”), when enabled, grants permission(authorizes) the device attempting to connect to access all services on thiscomputer when attempting to connect in the future.
To limit the services the connecting device may use:• Click the Advanced button
• In the expanded dialog box, select the services that the connecting device isauthorized to use. When a service is selected, that service will NOT requireauthorization in the future (no prompt will appear when a connection isattempted)
Note: Regardless of whether the main dialog box is for Authorization orAuthentication, these options pertain to Authorization; they do not affectAuthentication.
• Click the Authorize or Authenticate button.
TroubleshootingQ: Cannot connect to a paired device?A: Paired devices are always displayed in My Bluetooth Places, even if the remote
device is out of range or not powered up.Verify that the remote member of the pair is within radio range and powered upand then attempt the connection again.
Q: Cannot discover services on an un-paired remote device?A: The remote device may not be powered up or may be out of range.
• Verify that the remote device is powered up.• Verify that the remote device is in Connectable mode (Bluetooth
Configuration Panel -> Accessibility tab).• Perform a Search for Devices to verify that the device is within range.

57
Q: Dial-up Networking service does not start?A: The Dial-up Networking service will not start unless a properly configured modemis attached to the server.
• Verify that the modem is usable as a local device from the server.• In the Bluetooth Configuration Panel, Local Services tab, double-click the
Dial-up Networking service:o Click the down arrow in the Modem field and select
the modem that will be used to dial outo Click the OK buttono Click the OK button to close the Bluetooth
Configuration Panel.
Q: How do I determine the Bluetooth Device Address (BDA) of my hardwaredevice?A: In the Bluetooth Configuration Panel, on the Hardware tab, in the Devices section,select the device. In the Device Properties section of the dialog box, the fourth entry,Device Address, is the BDA of the selected Bluetooth device.
Q: How do I determine the version number of the Bluetooth Specification thatthe Host Controller Interface (HCI) complies with?A: In the Bluetooth Configuration Panel, on the Hardware tab, in the DeviceProperties section, the fifth entry provides Bluetooth Specification complianceinformation for the Host Controller Interface.The sixth entry contains the Specification Revision information for the HostController Interface, if appropriate.
Q: How do I determine the version number of the Link Manager Protocol(LMP)?A: In the Bluetooth Configuration Panel, on the Hardware tab, in the DeviceProperties section, the seventh entry provides Link Manager Protocol versionnumber information. The eighth entry contains the Link Manager Protocol sub-version number information, if appropriate.
Q: How do I find information about the Bluetooth hardware attached to mycomputer?A: In the Bluetooth Configuration Panel, select the Hardware tab.
Q: How do I test a Network Access connection?A: If the client is hardwired to the LAN, unplug the hardwired connection to ensurethat the test checks the wireless connection rather than the hardwired connection.

58
If the server has access to the Internet, open a browser on the client and connect tothe World Wide Web.You may also Ping the server from the DOS prompt.
Q: Why do I get an Unknown Port message when I attempt to use a BluetoothSerial Port?A: The Unknown Port error message usually means an attempt was made toconnect a port that was in use.Additional Bluetooth Serial Ports can be added if they are required.
Q: When I start to install the Bluetooth software, the system pops up amessage “- 1155 : Bluetooth software 1.2.1.xx.msi not found.” How can I fixthis problem?A: This installation problem may occur because of an earlier version of WindowsInstaller in your system. Please go to the downloads page of Microsoft web site anddownload the newer windows installer to update your system.
• For Windows98SE and ME see “Windows Installer 2.0 Redistributable forWindows 9X”, available at
• http://www.microsoft.com/downloads/release.asp?ReleaseID=32831
• For Windows NT 4.0 &2000 see “Windows Installer 2.0 Redistributable forWindows NT4.0 and 2000”, available at http://www.microsoft.com/downloads/release.asp?ReleaseID=32832

LIMITED WARRANTY D-Link provides this limited warranty for its product only to the person or entity who originally purchased the product from D-Link or its authorized reseller or distributor.
Limited Hardware Warranty: D-Link warrants that the hardware portion of the D-Link products described below (“Hardware”) will be free from material defects in workmanship and materials from the date of original retail purchase of the Hardware, for the period set forth below applicable to the product type (“Warranty Period”) if the Hardware is used and serviced in accordance with applicable documentation; provided that a completed Registration Card is returned to an Authorized D-Link Service Office within ninety (90) days after the date of original retail purchase of the Hardware. If a completed Registration Card is not received by an authorized D-Link Service Office within such ninety (90) period, then the Warranty Period shall be ninety (90) days from the date of purchase.
Product Type Warranty Period Product (excluding power supplies and fans) One (1) Year Power Supplies and Fans One (1) Year Spare parts and spare kits Ninety (90) days
D-Link’s sole obligation shall be to repair or replace the defective Hardware at no charge to the original owner. Such repair or replacement will be rendered by D-Link at an Authorized D-Link Service Office. The replacement Hardware need not be new or of an identical make, model or part; D-Link may in its discretion may replace the defective Hardware (or any part thereof) with any reconditioned product that D-Link reasonably determines is substantially equivalent (or superior) in all material respects to the defective Hardware. The Warranty Period shall extend for an additional ninety (90) days after any repaired or replaced Hardware is delivered. If a material defect is incapable of correction, or if D-Link determines in its sole discretion that it is not practical to repair or replace the defective Hardware, the price paid by the original purchaser for the defective Hardware will be refunded by D-Link upon return to D-Link of the defective Hardware. All Hardware (or part thereof) that is replaced by D-Link, or for which the purchase price is refunded, shall become the property of D-Link upon replacement or refund.
Limited Software Warranty: D-Link warrants that the software portion of the product (“Software”) will substantially conform to D-Link’s then current functional specifications for the Software, as set forth in the applicable documentation, from the date of original delivery of the Software for a period of ninety (90) days (“Warranty Period”), if the Software is properly installed on approved hardware and operated as contemplated in its documentation. D-Link further warrants that, during the Warranty Period, the magnetic media on which D-Link delivers the Software will be free of physical defects. D-Link’s sole obligation shall be to replace the non-conforming Software (or defective media) with software that substantially conforms to D-Link’s functional specifications for the Software. Except as otherwise agreed by D-Link in writing, the replacement Software is provided only to the original licensee, and is subject to the terms and conditions of the license granted by D-Link for the Software. The Warranty Period shall extend for an additional ninety (90) days after any replacement Software is delivered. If a material non-conformance is incapable of correction, or if D-Link determines in its sole discretion that it is not practical to replace the non-conforming Software, the price paid by the original licensee for the non-conforming Software will be refunded by D-Link; provided that the non-conforming Software (and all copies thereof) is first returned to D-Link. The license granted respecting any Software for which a refund is given automatically terminates.
What You Must Do For Warranty Service:
Registration Card. The Registration Card provided at the back of this manual must be completed and returned to an Authorized D-Link Service Office for each D-Link product within ninety (90) days after the product is purchased and/or licensed. The addresses/telephone/fax list of the nearest Authorized D-Link Service Office is provided in the back of this manual. FAILURE TO PROPERLY COMPLETE AND TIMELY RETURN THE REGISTRATION CARD MAY AFFECT THE WARRANTY FOR THIS PRODUCT.
Submitting A Claim. Any claim under this limited warranty must be submitted in writing before the end of the Warranty Period to an Authorized D-Link Service Office. The claim must include a written description of the Hardware defect or Software nonconformance in sufficient detail to allow D-Link to confirm the same. The original product owner must obtain a Return Material Authorization (RMA) number from the Authorized D-Link Service Office and, if requested, provide written proof of purchase of the product (such as a copy of the dated purchase invoice for the product) before the warranty service is provided. After an RMA number is issued, the defective product must be packaged securely in the original or other suitable shipping package to ensure that it will not be damaged in transit, and the RMA number must be prominently marked on the outside of the package. The packaged product shall be insured and shipped to D-Link, 53 Discovery Drive, Irvine CA 92618, with all shipping costs prepaid. D-Link may reject or return any product that is not packaged and shipped in strict compliance with the foregoing requirements, or for which an RMA number is not visible from the outside of the package. The product owner agrees to pay D-Link’s reasonable handling and return shipping charges for any product that is not packaged and shipped in accordance with the foregoing requirements, or that is determined by D-Link not to be defective or non-conforming.
What Is Not Covered:
This limited warranty provided by D-Link does not cover:
Products that have been subjected to abuse, accident, alteration, modification, tampering, negligence, misuse, faulty installation, lack of reasonable care, repair or service in any way that is not contemplated in the documentation for the product, or if the model or serial number has been altered, tampered with, defaced or removed;
Initial installation, installation and removal of the product for repair, and shipping costs;
Operational adjustments covered in the operating manual for the product, and normal maintenance;
Damage that occurs in shipment, due to act of God, failures due to power surge, and cosmetic damage; and
Any hardware, software, firmware or other products or services provided by anyone other than D-Link.
Disclaimer of Other Warranties: EXCEPT FOR THE LIMITED WARRANTY SPECIFIED HEREIN, THE PRODUCT IS PROVIDED “AS-IS” WITHOUT ANY WARRANTY OF ANY KIND INCLUDING, WITHOUT LIMITATION, ANY WARRANTY OF MERCHANTABILITY, FITNESS FOR A PARTICULAR PURPOSE AND NON-INFRINGEMENT. IF ANY IMPLIED WARRANTY CANNOT BE DISCLAIMED IN ANY TERRITORY WHERE A PRODUCT IS SOLD, THE DURATION OF SUCH IMPLIED WARRANTY SHALL BE LIMITED TO NINETY (90) DAYS. EXCEPT AS EXPRESSLY COVERED UNDER THE LIMITED WARRANTY PROVIDED HEREIN, THE ENTIRE RISK AS TO THE QUALITY, SELECTION AND PERFORMANCE OF THE PRODUCT IS WITH THE PURCHASER OF THE PRODUCT.
Limitation of Liability: TO THE MAXIMUM EXTENT PERMITTED BY LAW, D-LINK IS NOT LIABLE UNDER ANY CONTRACT, NEGLIGENCE, STRICT LIABILITY OR OTHER LEGAL OR EQUITABLE THEORY FOR ANY LOSS OF USE OF THE PRODUCT, INCONVENIENCE OR DAMAGES OF ANY CHARACTER, WHETHER DIRECT, SPECIAL, INCIDENTAL OR CONSEQUENTIAL (INCLUDING, BUT NOT LIMITED TO, DAMAGES FOR LOSS OF GOODWILL, WORK STOPPAGE, COMPUTER FAILURE OR MALFUNCTION, LOSS OF INFORMATION OR DATA CONTAINED IN, STORED ON, OR INTEGRATED WITH ANY PRODUCT RETURNED TO D-LINK FOR WARRANTY SERVICE) RESULTING FROM THE USE OF THE PRODUCT, RELATING TO WARRANTY SERVICE, OR ARISING OUT OF ANY BREACH OF THIS LIMITED WARRANTY, EVEN IF D-LINK HAS BEEN ADVISED OF THE POSSIBILITY OF SUCH DAMAGES. THE SOLE REMEDY FOR A BREACH OF THE FOREGOING LIMITED WARRANTY IS REPAIR, REPLACEMENT OR REFUND OF THE DEFECTIVE OR NON-CONFORMING PRODUCT.
GOVERNING LAW: This Limited Warranty shall be governed by the laws of the state of California.

Some states do not allow exclusion or limitation of incidental or consequential damages, or limitations on how long an implied warranty lasts, so the foregoing limitations and exclusions may not apply. This limited warranty provides specific legal rights and the product owner may also have other rights which vary from state to state. Trademarks Copyright 1999 D-Link Corporation. Contents subject to change without prior notice. D-Link is a registered trademark of D-Link Corporation/D-Link Systems, Inc. All other trademarks belong to their respective proprietors. Copyright Statement No part of this publication may be reproduced in any form or by any means or used to make any derivative such as translation, transformation, or adaptation without permission from D-Link Corporation/D-Link Systems Inc., as stipulated by the United States Copyright Act of 1976. CE Mark Warning This is a Class B product. In a domestic environment, this product may cause radio interference, in which case the user may be required to take adequate measures Warnung! Dies ist in Produkt der Klasse B. Im Wohnbereich kann dieses Produkt Funkstoerungen verursachen. In diesem Fall kann vom Benutzer verlangt werden, angemessene Massnahmen zu ergreifen. Advertencia de Marca de la CE Este es un producto de Clase B. En un entorno doméstico, puede causar interferencias de radio, en cuyo case, puede requerirse al usuario para que adopte las medidas adecuadas. Attention! Ceci est un produit de classe B. Dans un environnement domestique, ce produit pourrait causer des interférences radio, auquel cas l`utilisateur devrait prendre les mesures adéquates. Attenzione! Il presente prodotto appartiene alla classe B. Se utilizzato in ambiente domestico il prodotto può causare interferenze radio, nel cui caso è possibile che l`utente debba assumere provvedimenti adeguati. FCC Warning This equipment has been tested and found to comply with the limits for a Class B digital device, pursuant to part 15 of the FCC Rules. These limits are designed to provide reasonable protection against harmful interference in a residential installation. This equipment generates, uses and can radiate radio frequency energy and, if not installed and used in accordance with the instructions, may cause harmful interference to radio communications. However, there is no guarantee that interference will not occur in a particular installation. If this equipment does cause harmful interference to radio or television reception, which can be determined by turning the equipment off and on, the user is encouraged to try to correct the interference by one or more of the following measures: -Reorient or relocate the receiving antenna. -Increase the separation between the equipment and receiver. -Connect the equipment into an outlet on a circuit different from that to which the receiver is connected. -Consult the dealer or an experienced radio/ TV technician for help.

Index
A
Access the Bluetooth Configuration Panel 31Accessibility TAB 32Adding and Deleting Devices 33Authentication 52Authorization 52
B
Bluetooth Device Identity 11Bluetooth Serial Port 22Bluetooth Tray 18
D
Dial-Up Networking 24Discovery, Adding Specific Devices 35Discovery, Deleting Specific Devices 37Discovery TAB 34
E
Enable Encryption for a service 53Encryption 53
F
FAX 25File Transfer 25Find a Service 16Find Bluetooth Devices 14
G
General Configuration Settings 37
H
Hardware Advanced Settings Dialog Box 41Hardware Configuration 39
I
Icons Used For Bluetooth Devices and Services 11

Information Exchange 27Information Exchange Configuration Settings 42Information Synchronization 28Installing Bluetooth Software 6
L
Levels of Security 53Link Key 54Local Device, Add A User Defined Bluetooth Serial 46, 47Local Device, Remove a User Defined Bluetooth Seri 48Local Services Configuration Settings 44Local Services Properties 48Local Services TAB 44
N
Network Access 20Network Access Server-side Setup for Windows 98SE 21Network Access Server-side Setup for Windows2000 20Network Access Server-side Setup for WindowsXP: 20Notifications TAB 49
P
Paired devices remain paired even when 54Pairing Devices 54Passkey 55Property settings which are common to all of the l 45, 46
R
Remove Pairing 55Request Dialog 55
S
Security Request Dialog Box, Advanced Button 56Send a Fax 25Send to Bluetooth 19Setup a New Connection 17Some local services have additional property setti 45, 47Stop a local service 29
T
To close a Dial-up Networking connection 25To establish a Dial-up Networking session 24To limit the services the connecting device may us 56

To pair devices before attempting a connection 54Types of File Transfer operations 26
U
Uninstalling previous version of Bluetooth softwar 6
V
Version Info Configuration 51