Blue Lagoon UV-C Ionizer 20.000 - 40.000 -...
7
The easy and friendly way to disinfect your pool Blue Lagoon UV-C Ionizer 20.000 - 40.000 - 75.000 0901_014_ManualBL_UVC_Ionizer.indd 1 20-01-2009 16:13:16
Transcript of Blue Lagoon UV-C Ionizer 20.000 - 40.000 -...
The easy and friendly way to disinfect your pool
Blue Lagoon UV-C Ionizer
20.000 - 40.000 - 75.000
0901_014_ManualBL_UVC_Ionizer.indd 1 20-01-2009 16:13:16

2
1
2
3
4N
K
V
U
T
W
Q
S
O
P
P
I
L
R
0901_014_ManualBL_UVC_Ionizer.indd 2 20-01-2009 16:13:17

3
5
6
7
9
+ -
8
A A
B B
B
0901_014_ManualBL_UVC_Ionizer.indd 3 20-01-2009 16:13:17
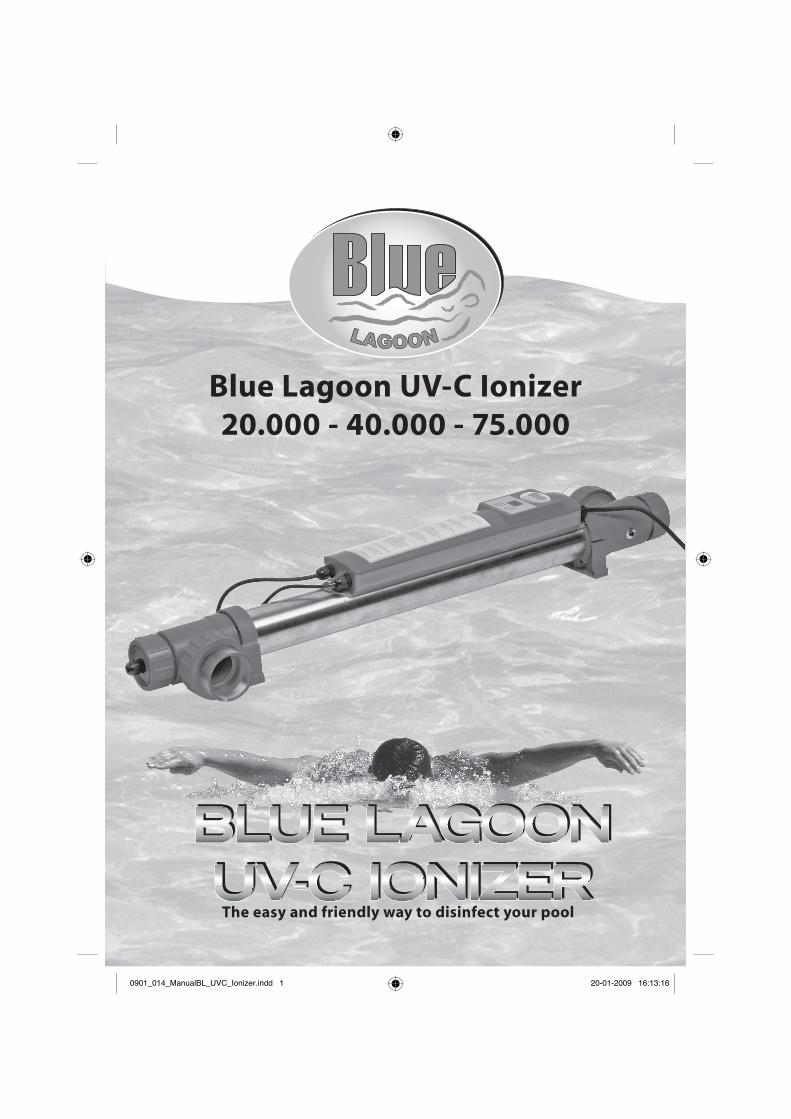
Blue Lagoon UV-C Ionizer 20.000 - 40.000 - 75.000 GB
Please read through these instructions for use carefully before installing this device.
Operation
The Blue Lagoon UV-C Ionizer will clean the water in your swimming pool through copper electrolysis combined with UV-C radiation. The
Blue Lagoon UV-C Ionizer is placed on the piping system after the swimming pool !lter. The swimming pool water then "ows through the
housing of the Blue Lagoon UV-C Ionizer. A UV-C lamp and a copper unit, or ionizer, are positioned within the housing, and the copper unit
discharges a minimal amount of copper into the water "owing through the housing. These copper ions (Cu2+) in the water have a positive
charge and destroy the cell walls of bacteria, viruses and other primitive organisms. As the cell wall is thereby damaged, these organisms are
no longer able to take up any nutrients, and are therefore unable to multiply. The process of applying a positive charge to copper is called
copper electrolysis. The copper in the water acts as a disinfecting bu#er in your swimming pool and, in terms of results, can be compared
with the e#ect of chlorine. The UV-C lamp that is positioned in the Blue Lagoon UV-C Ionizer generates UV-C light. This UV-C light produces
UV-C radiation with a wavelength of 253.7 nm, ensuring that bacteria, viruses and other primitive organisms are destroyed. Due to the length
of the device, the water is exposed to this high level of radiation for a longer time, which destroys the DNA of bacteria, viruses and micro-
organisms. The interior of the device made of 316L stainless steel, which ensures an additional re"ection of the UV-C radiation, increasing the
e$ciency by up to 35%.
Research has shown that UV-C light disinfects swimming pool water up to 80%, while copper disinfects up to 20% of the swimming pool
water. Assuming that these values are 100% correct, the combination of UV-C with copper electrolysis makes it possible to swim safely
without having to use any chemicals. Thanks to the Blue Lagoon UV-C Ionizer, your swimming pool water will be disinfected e$ciently and
safely, and the quality of your water will remain excellent.
Use
After the Blue Lagoon UV-C Ionizer has been installed on your piping system, the UV-C lamp will switch on immediately after it has been
plugged into the socket. Before switching on the ionizer, the water must !rst be tested in order to establish the current copper value in your
swimming pool. The ideal copper content is situated between 0.4 and 0.7 ppm. The test strip will indicate whether the copper content is too
high or too low.
The ionizer is switched on by pressing the “+” button on the display (V) (see drawing 2 & 6). The status of the copper emission will appear
in red on the screen. This can be a !gure between “0” and “99”. If you set the ionizer to “00”, it will be switched o# and will no longer emit
copper. The initial starting position of the display depends on the swimming pool size and on the result of the test strip when you made your
!rst water test. If the copper content is too low after the !rst test, you can increase the displayed !gure to, for example, 30 or higher by using
the “+” button. Test the water again after one week, and, if the test strip still indicates that the copper value is low, increase the !gure on the
display again. If the test strip indicates a correct value between 0.4 and 0.7 ppm, there is no need to change anything to the display. If the
copper value is too high, turn the displayed value to “00” using the “-“ button in order to stop the emission of copper into the water. If you
test the water again after one more week, the result of the test strip will indicate whether you should switch the ionizer on again or not. You
will ultimately be able to establish the correct copper level in your swimming pool by regularly testing and increasing or diminishing the
displayed value.
The ionizer will switch o# automatically every 2 weeks, and the !gures on the display of the device will then no longer be lit up. The UV-C
lamp will continue to operate as long as the power is connected. Whenever the ionizer switches o#, you must test the water using the
supplied test strips. The device can be switched on again with the “+” button, and the position to which the display was set before switching
o# automatically will appear on the display again. Once you have switched the ionizer on, you will not be able to switch the display o# again
yourself, and it will switch o# again automatically after 14 days. If you have made a mistake, or if you do not wish to use the ionizer, simply
set the display position to “00”.
During the !rst month of use, the water of the swimming pool must be tested every week until you !nd the correct level. After one month,
the testing can be reduced to once every two weeks. The PH value can also be tested with the test strips. A PH value between 7.0 – 7.6 is the
optimum value for copper electrolysis.
Chlorine may still be used if desired, but naturally at a very low dosage, because the Blue Lagoon UV-C Ionizer is already disinfecting the pool
water. It is important to always use inorganic chlorine – calcium hypochlorite - HTH chlorine (granular, sticks or pastilles) in combination
with an ionizer. Other types of chlorine will not work in combination with copper electrolysis.
4
0901_014_ManualBL_UVC_Ionizer.indd 4 20-01-2009 16:13:17
Replacement lamp and copper unit
The UV-C lamp and the copper unit can be used over 2 swimming seasons if used 12 hours a day for 6 months a year. The UV-C lamp and the
copper unit must be replaced if the !gure “88” starts to blink on the Blue Lagoon UV-C Ionizer display. A replacement set can be ordered from
the distributor from whom you have purchased the original device. Each type of device has its own replacement set with regard to the UV-C
lamp type. If you replace the UV-C lamp and the copper unit, you can reset the display by pressing the “+” and the “-” button simultaneously
for 3 seconds.
Replacement set: Copper, Blue Lagoon 30 Watt lamp & test strips, article number: B200011
Replacement set: Copper, Blue Lagoon 40 Watt lamp & test strips, article number: B200012
Replacement set: Copper, Blue Lagoon 75 Watt lamp & test strips, article number: B200013
Advantages of UV-C treatment:
- Ensures fresh, clean and clear water
- Disinfects water e$ciently and safely
- Protects your pool from germs
- Keeps the formation of mould, bacteria and algae under control
- Can reduce the use of chlorine and other chemicals by 100%
- Bound chlorine is broken down by UV-C light
- More environmentally-friendly than traditional methods.
Characteristics of the Blue Lagoon UV-C Ionizer:
- Enables swimming without the use of chlorine
- Up to 80% disinfection by UV-C
- Up to 20% disinfection by copper electrolysis
- 316L stainless steel housing yields up to 35% more UV-C as a result of re"ection
- UV-C lamp and copper unit are su$cient for 2 swimming seasons
- Easy installation and maintenance
- 2-year guarantee with respect to manufacturing faults
- The Blue Lagoon UV-C Ionizer is earthed
Safety
This device produces harmful radiation. Direct contact could jeopardise the eyes and skin. Only check the operation of the UV-C lamp
via the transparent components of the unit.
- Do not use the device if any of the components are damaged (in particular the quartz glass).
- Always switch the device of if no water is "owing through it.
- Ensure that the plug remains dry.
- Only use approved safety wall sockets.
- With regard to safety, only connect the device to a group with a residual current-operated circuit-breaker with a cut-o# power of less than 30 mA.
- If necessary, have an electrical technician install a suitable connection if none of the connections that are present comply with the requirements.
- Remove the device if there is a risk of freezing during the winter months.
- Once the device has been switched o#, the lamp will remain hot for approximately 10 minutes.
- The cable of the device cannot be replaced. In case of damage to the power cable, the complete electrical unit must be replaced. The plug
of the device cannot be replaced and may never be removed.
- It is very important that the water is tested! If the copper content is too high, this could cause discoloration in your swimming pool, and to
swimsuits, nails and blonde hair. If the copper content is too low, the water will not be su$ciently disinfected. Please comply with the
recommended level of 0.4 to 0.7 ppm. Put a note in your telephone/agenda to make sure that you remember.
- The stainless steel housing of the device is not suitable for salt water baths with a high salt content. If the salt content is too high, the steel
will oxidise and damage the housing beyond repair.
5
0901_014_ManualBL_UVC_Ionizer.indd 5 20-01-2009 16:13:17
Installation of the earth cable (Drawing 1)
1 Pull the cable (B) through the strain relief (F) before !tting the synthetic strain relief (F) onto the earth bolt (A). Position the strain relief
(F) at approximately 10 cm from the eye (H) of the earth cable (B).
2 Place the eye (H) of the cable (B) onto the earth bolt (A) that is !tted to the housing.
3 Then place a toothed lock washer (C), a hexagon nut (D) and another toothed lock washer (E) on top of the eye (H).
4 Fit the strain relief (F) on top, creating a loop of Ø 5 cm.
5 Finally place the lock nut (G) onto the earth bolt (A).
6 Once the various nuts have been placed onto the earth bolt (A) in the correct sequence, they can be tightened with a spanner or a ring
spanner number 8. Do not tighten too !rmly, otherwise you may crack the strain relief. (The transparent nut that was screwed on the earth
bolt (A) on delivery has no further use, and can be discarded).
Installation of the device (Drawing 2)
Never submerge this device in water. The installation must always take place outside of the pool. Ensure that there is always water "owing
through the unit when the lamp is on. The Blue Lagoon UV-C Ionizer must never be installed behind the PH regulator or the salt electrolysis
system in your swimming pool installation. The ideal location is behind the pump and the !lter.
1 Determine where the device will be installed.
2 Fit the unit into the circuit using the three-part couplings (I).
3 Fit the supplied pipe clips (O) in !xed positions, press the unit into the pipe clips and tighten the three-part coupling (I). Ensure that there is
su$cient space available (+/- 1 metre) to remove the lamp (K) / quartz glass (M) for replacement and/or to carry out maintenance.
4 Carefully slide the Blue Lagoon UV-C lamp into the quartz glass (M). Fit the lamp (K) into the lamp holder (L) and tighten the nut (N) onto
the unit by hand.
5 Activate the pump and check the system with regard to "ow-through and leakage. Pay attention to the correct position of the sealing rings
(P), both with regard to the connections and the quartz glass (see Drawing 2).
6 Place the UV-C device plug into a wall socket that is !tted with a safety ground and a earth leakage current circuit-breaker (ELCB). Check
that the lamp is on by looking through the transparent sections of the device.
7 The device will be completely switched o# if the plug is removed from the socket.
8 Make sure to leave a free area of +/- 1 metre in order to be able to remove the lamp (K) / quartz glass (M) for the purpose of replacement
and/or maintenance. There must be a minimum space of 30 cm at the bottom for the replacement of the copper unit (U).
Dismantling / Maintenance / Replacement of copper & lamp
Always switch o# the power supply during maintenance/dismantling of the device. The device must be cleaned every 3 months. If there is an
increase in algae and/or scale, the quartz glass tube (M) in which the lamp is positioned must be cleaned. It is possible that the copper unit
becomes exhausted more quickly due to external in"uences. You should therefore also check the copper unit when cleaning. In the case of
normal use, the special Blue Lagoon UV-C lamp and the copper unit must be replaced after 2 swimming seasons. The internal stainless steel
housing can be cleaned with a soft brush.
1 Unscrew the three-part couplings (I) and drain the water from the device.
2 Unscrew the screw-cap (N) and pull it up a little, together with the lamp. Carefully remove the lamp from the lamp holder (K). When the
lamp is unscrewed, pull it carefully from the quartz glass. As these parts are very fragile, and caution is essential.
3 Carefully remove the quartz glass (M) using a large, "at screwdriver (see Drawing 3). Never use force!
4 Clean the quartz glass with a suitable agent. We recommend using a cleaning agent based on citric acid. Always use a soft cloth to clean
the glass in order to prevent scratches.
5 Pay attention to the correct position of the sealing rings (P) when replacing the quartz glass in the housing, and carefully introduce the end
of the quartz glass into the inlet (Q) (see Drawing 4). Never use force!
6 To replace the copper unit (U) (see Drawing 3), unscrew the protective cover (R) of the connector (S) with a screwdriver and disconnect
the wiring from the connector. Then unscrew the screw cap (T) at the bottom of the device. Carefully remove the copper unit using a large,
"at screwdriver (see Drawing 3). Never use force! Place a new copper unit into the device and reconnect the wiring via the connector (see
Drawing 5). Make sure that the colours of the cables correspond: blue with blue, brown with brown. Finally tighten the screws of the
connecter. Re-!t the protective connector cover. Ensure that the black casings of the two cables are inserted far enough into the connector,
and screw the lid tightly back into place.
6
0901_014_ManualBL_UVC_Ionizer.indd 6 20-01-2009 16:13:17
7 Please read through the Chapter “Installation and Dismantling” before dismantling a new housing or the electrical unit. The electrical unit
of the device is situated in the display box (W) on the device. This display box is glued and cannot be opened. If the electrical unit is
replaced, the entire box must be unscrewed and the wiring must be disconnected from the device (see Drawings 1 & 5). Unscrew the screw
top (N) and carefully remove the lamp holder from the lamp. Any loose parts, i.e. of the earth etc., must be carefully kept, as these are not
supplied with a new housing or electrical unit. In case of doubt with regard to the connection, consult a recognised !tter.
The Blue Lagoon UV-C Ionizer is available in the following types:
Blue Lagoon UV-C Ionizer 20,000 litres / 30 Watt (230V; 50/60Hz) article number: B200001
Blue Lagoon UV-C Ionizer 40,000 litres / 40 Watt (230V; 50/60Hz) article number: B200002
Blue Lagoon UV-C Ionizer 70,000 litres / 75 Watt (230V; 50/60Hz) article number: B200003
Technical speci!cations 20,000 l 40,000 l 70,000 l
Terms of guarantee
You made an excellent choice in selecting this product. The device has been assembled carefully and in compliance with all applicable safety
regulations. For reasons of quality, the supplier has only made use of high-quality materials. The supplier provides a guarantee for the device
covering material and manufacturing faults for a duration of 2 years from the date of purchase. The lamp and the quartz glass are not
included in this guarantee. Claims under the guarantee can only be considered if the product is returned post-paid together with a valid
purchase receipt. No claim can be made under the guarantee in the case of errors in the installation or operational, improper use, non-
compliance with the safety regulations, poor maintenance, damage or in the case of unauthorised modi!cations. In the case of a claim under
the guarantee, the supplier reserves the right to either repair the device or replace it entirely, as he sees !t. Consequential damage is
excluded from the guarantee. Complaints regarding transportation damage will only be considered if the damage was established or
con!rmed on delivery by the carrier or the postal authorities. A claim can only be made against the carrier or the postal authorities if this has
been done.
7
0901_014_ManualBL_UVC_Ionizer.indd 7 20-01-2009 16:13:17