BLS for Healthcare Providers - National CPR Association · BLS for Healthcare Providers ... during...
57
1 BLS for Healthcare Providers FOLLOWS 2010 ECC/ILCOR GUIDELINES Updated with 2015 Guidelines
Transcript of BLS for Healthcare Providers - National CPR Association · BLS for Healthcare Providers ... during...

1
BLS for Healthcare
Providers
FOLLOWS 2010 ECC/ILCOR GUIDELINES
Updated with 2015 Guidelines

2
Table of Contents PART ONE
Welcome
The Five Fears that Impede the Performance of CPR
Basic Anatomy and Physiology
The Heart
The Lungs
The Brain
The Body s Cells
Cardiovascular Disease
Heart Attack
Stroke
PART TWO
Guideline Changes
The Adult Chain of Survival
The Team Approach
Chest Compressions for Adults
One Rescuer Adult CPR
Airway/ Breathing
Using a Face Mask
Using a Bag-Valve Device
The Jaw Thrust Maneuver
Two Rescuer Adult CPR (without an AED)
Using an AED
Special Circumstances
Two Rescuer Adult CPR with an AED
PART THREE
CPR for Children (age 1 year to puberty)
The Pediatric Chain of Survival
One Rescuer CPR for Children (aged 1 year to puberty)
Two Rescuer CPR for Children (aged 1 year to puberty)
PART FOUR
CPR for Infants (up to 12 months of age)
One Rescuer CPR for Infants (up to 12 months of age)
Two Rescuer CPR for Infants (up to 12 months of age)
AED Use in Child/Infant CPR
PART FIVE
CPR with an Advanced Airway
Mouth-to-Mouth Breaths
Rescue Breathing
PART SIX
Treatment of Choking
Treatment of Choking in Victims 1 Year of Age and Older
Choking in the Conscious Adult or Child (victims 1 year of age and older)

3
Choking in the Conscious Infant
Choking in the Unconscious Adult or Child (victims 1 year of age and older)
Choking in the Unconscious Infant
Moving Victims
The Recovery Position
PART SEVEN
CPR Certification Skills Review
CPR Exam Questions

4
Welcome!
We re excited that you ve decided to take CPR, and that you ve chosen us to direct
your learning experience.
Despite technological advances and new scientific discoveries, heart disease
remains the number one cause of death globally, with 17.3 million deaths per year;
38.7% of cases of out of hospital cardiac arrests (OHCA) are witnessed by a
bystander (AHA, 2015). Learning CPR can save lives- you can save a life.
In this course, you will learn:
The Chain of Survival and your place within the chain
How to provide high quality chest compressions for adults, children and
infants
How to initiate early use of an AED (automated external defibrillator)
How to provide rescue breathing for victims of respiratory arrest
How to provide CPR with 2 rescuers
How to assist victims of choking
Let s get started!
5
PART ONE
In This Section:
The Five Fears that Impede the Performance of CPR
Basic Anatomy and Physiology
The Heart
The Lungs
The Brain
The Body s Cells
Cardiovascular Disease
Heart Attack
Stroke

6
The Five Fears
Many bystanders are reluctant to perform CPR. There are many reasons why
bystanders are reluctant to get involved. Let s take a look at some of these reasons
so that you can understand why they have no real basis of support.
Fear of Disease: Use universal precautions when the possibility exists of coming
into contact with bodily fluids. Use gloves, mask, and/or gown when you have them
available. The benefit of initiating lifesaving resuscitation in a patient in
cardiopulmonary arrest greatly outweighs the risk for secondary infection in the
rescuer or the patient. Nevertheless, use of simple infection-control measures
during CPR and CPR training can reduce a very low level of risk even further
(Mejicano & Maki, 1998).
Fear of Lawsuits: These laws state that a person acting in good faith who is
rendering reasonable first aid will not be held accountable for damages to the
person to whom the aid is rendered, unless gross and willful misconduct are
involved. Good Samaritan laws may differ for professional health care providers
from state to state. Implied consent means that there is an assumption that if an
unconscious person were able to request care, they would do so.

7
Fear of Uncertainty: People sometimes fear that they won t remember what to
do. Remembering the correct number of compressions or the number of
compressions to ventilations is not as important as the willingness to respond and
to push hard and fast. Hands-only CPR is designed to provide simple life support.
Fear of Harming the Victim: A victim in need or clinically dead can only be
helped by your intervention efforts. You can t hurt someone who is dead, and any
injuries you may unknowingly cause (such as injured ribs) can be dealt with in a
surviving victim of cardiac arrest.
Fear of Injury to Self: As you will learn, scene safety is of utmost importance,
and checking the scene for safety should be your first action when you come across
an unconscious victim. If the scene is not safe for you to enter, you must not enter.

8
This will only result in more victims. Under no circumstances should you risk
becoming a victim. Instead, you should call for help (activate EMS).

9
BASIC ANATOMY AND PHYSIOLOGY
Before you learn how to perform CPR, it s important to understand how the heart,
lungs, brain and cells perform. Here is a brief review of these systems.
THE HEART
The heart consists of four chambers, the right and left atria (singular: atrium) and
the right and left ventricles. The atria are located above the ventricles, as can be
seen in the above diagram. The heart is a muscular organ supplied by the coronary
arteries. It is located below your breastbone (sternum) and, in an adult, is
approximately the size of your fist.
The heart pumps blood that has been deoxygenated by supplying the body s tissues
into the lungs, and when that blood has been oxygenated again in the lungs, it exits
the lungs to the left side of the heart, where it is pumped out into the tissues once
again, to provide oxygen.
Your body has about 5 liters of blood, which circulate through this system
approximately 3 times per minute.

10
What is known as the cardiovascular system is composed of the heart, arteries,
capillaries, and veins.
THE LUNGS
Your lungs are spongy, air-filled sacs, with one lung located on either side of the
chest. The trachea, which is sometimes called the windpipe, conducts air down into
the lungs through the bronchi, which are smaller tubular branches. The bronchi
then divide into smaller and smaller tubules called bronchioles. Air is exchanged in
the alveoli, which are tiny sacs that allow oxygen and carbon dioxide to move
between the lungs and the bloodstream via tiny capillaries.
Your lungs take in oxygen to supply your body s organs and tissues. They release
carbon dioxide, a waste product, into the atmosphere when you exhale.

11
Room air at regular atmospheric pressure contains 21% oxygen. Our bodies utilize
approximately 4-6% of that oxygen and release about 16% back into the
atmosphere, along with carbon dioxide, when we exhale.
THE BRAIN
Your brain needs a constant supply of oxygen. Without oxygen, brain cells begin to
die in 4 to 6 minutes.
On average, the brain weighs three pounds, and uses 20% of the body s oxygen.
The medulla is located in the brain stem and controls automatic bodily functions,
including consciousness and respiratory and cardiovascular function.

12
THE BODY’S CELLS
All of the body s tissues are made up of cells.
All cells require oxygen to carry out their normal functions. They also require
nutrients. Oxygen deprivation, or hypoxia, will cause cells to die within a few short
minutes.
The body s cells use oxygen and produce carbon dioxide as a waste product. Carbon
dioxide must be eliminated through the lungs through ventilation.
Red blood cells transport oxygen throughout the body.

13
CARDIOVASCULAR DISEASE
As mentioned previously, cardiovascular disease is the number one cause of death
worldwide. While it is important to learn what to do when cardiovascular disease
leads to a heart attack or stroke, it is equally as important, if not more so, to
understand how to prevent cardiovascular disease from occurring in the first place.
There are numerous factors that can increase an individual s risk of heart attack.
Some of these factors can be controlled (modifiable risk factors), while others
cannot (non-modifiable risk factors.
Modifiable risk factors, or factors that can be controlled to a certain degree by an
individual, include:
cigarette smoking
hypertension
obesity
sedentary lifestyle (lack of exercise)
high cholesterol
high blood sugar (in diabetes)
poor diet (diet high in sugar, fat)
stress
Non-modifiable risk factors, or risk factors that individuals cannot change, include:
age
sex
genetics/hereditary factors (i.e. hereditary high cholesterol or
hyperlipidemia)
race (i.e., certain groups may be at higher risk for hypertension, or high blood
pressure)
CARDIOVASCULAR DISEASE IS THE NUMBER ONE CAUSE OF DEATH IN THE
UNITED STATES, ACCORDING TO THE CENTER FOR DISEASE CONTROL (CDC).
THE CDC ESTIMATES THAT MORE THAN 650,000 AMERICANS DIE FROM
CARDIOVASCULAR DISEASE (1 in 4 DEATHS) EACH YEAR IN THE UNITED
STATES.
Cardiovascular disease damages the heart and blood vessels, and frequently causes
heart attack and/or stroke. Americans of all ages should focus on prevention of
cardiovascular disease by eating healthy foods, exercising 30 minutes (at least) each
day, controlling weight, minimizing stress, consuming healthy fats and oils, and
avoiding cigarette or cigar smoking.
14
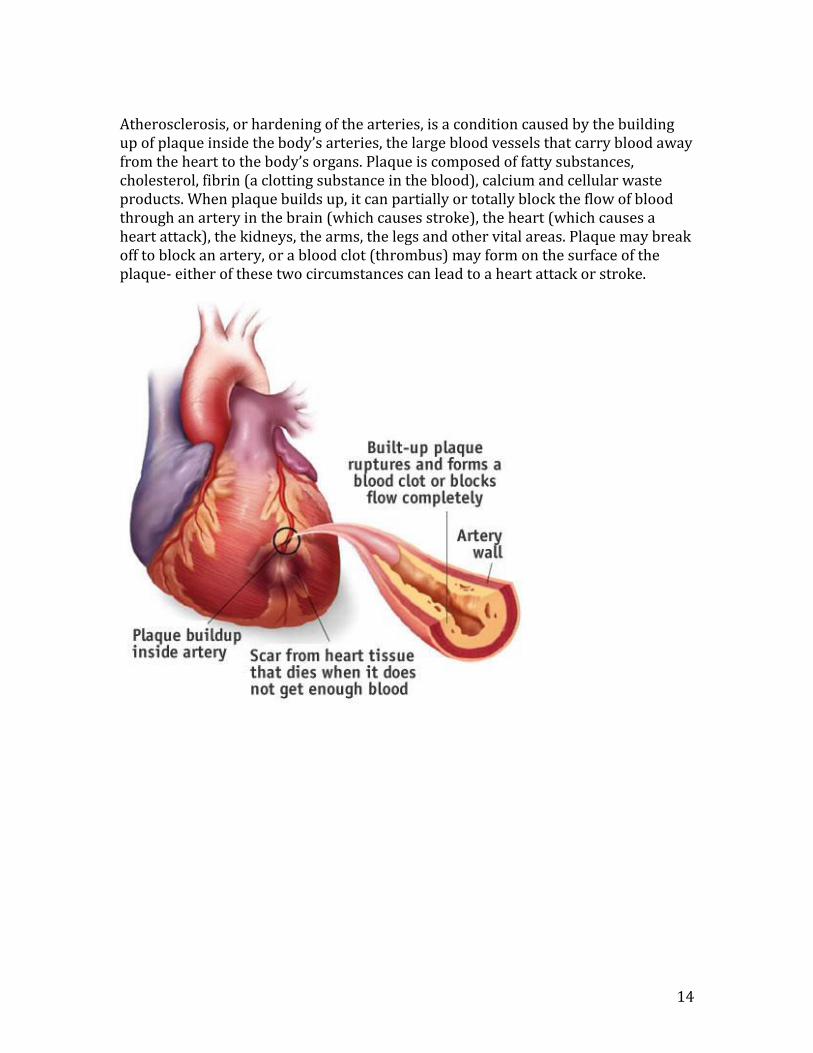
Atherosclerosis, or hardening of the arteries, is a condition caused by the building
up of plaque inside the body s arteries, the large blood vessels that carry blood away
from the heart to the body s organs. Plaque is composed of fatty substances,
cholesterol, fibrin (a clotting substance in the blood), calcium and cellular waste
products. When plaque builds up, it can partially or totally block the flow of blood
through an artery in the brain (which causes stroke), the heart (which causes a
heart attack), the kidneys, the arms, the legs and other vital areas. Plaque may break
off to block an artery, or a blood clot (thrombus) may form on the surface of the
plaque- either of these two circumstances can lead to a heart attack or stroke.

15
HEART ATTACK
A heart attack often presents with one or more of the following symptoms:
Chest tightness, pressure, or discomfort
Nausea
Sweating
Shortness of breath
Fatigue
Weakness
Pain in the jaw or arm
Pallor (pale color of the skin)
Women and people with diabetes often present with atypical symptoms, such as
nausea and vomiting or back pain. About one-third of patients report no chest pain
at all.
WHAT CAN YOU DO?
Recognize the symptoms and signs of a heart attack.
Call 911.
Don t let the patient drive him or herself to the hospital
Keep the patient calm and seated in a position that is comfortable.
Offer 1 adult aspirin or 2 baby aspirin- aspirin should be chewed before
swallowing to speed absorption (Note: do not give if the patient has already
taken aspirin or if the patient has an allergy to aspirin)
Be prepared to start CPR if it becomes necessary

16
STROKE
You should suspect stroke if a patient or victim presents with:
Severe headache with no known cause
Numbness or weakness of the face, arm or leg on one side of the body
Drooping eyelid or mouth on one side
Confusion or trouble understanding
Difficulty speaking (slurred speech or difficulty finding words)
Loss of balance or coordination
Dizziness
Trouble with vision (i.e. blurred or double vision, loss of vision in one eye)
WHAT CAN YOU DO?
Know the signs and symptoms of a stroke
Call 911
Don t give the patient food or drink
Keep the patient calm and quiet
Monitor the patient
Be prepared to begin CPR if it becomes necessary
A stroke is caused by one of two mechanisms: it can be caused by a ruptured blood
vessel in the brain (called a hemorrhagic stroke) or by a blockage in one of the
arteries that causes loss of blood flow and oxygen to a part of the brain (called an
ischemic stroke). Ischemic strokes are more common. Remember that Time is
brain, and act quickly. Stroke is the 3rd leading cause of death in the United States.

18
PART TWO
In This Section:
Guideline Changes
The Adult Chain of Survival
The Team Approach
Chest Compressions for Adults
One Rescuer Adult CPR
Airway/ Breathing
Using a Face Mask
Using a Bag-Valve Device
The Jaw Thrust Maneuver
Two Rescuer Adult CPR (without an AED)
Using an AED
Special Circumstances
Two Rescuer Adult CPR with an AED

19
Guideline Changes
For anyone who has taken CPR prior to 2010, there have been a few key changes
since the 2010 Guidelines were instituted. These changes include:
Changing from the ABCs (Airway-Breathing-Circulation) to a C-A-B sequence
of steps. This was one of the major changes that took place in 2010, when
research showed that decreasing the delay in beginning chest compressions
lead to a higher incidence of ROSC (return of spontaneous circulation).
Rescuers are now trained to provide interventions in the following order: 1)
Chest Compressions, 2) Airway, and 3) Breathing. Decreasing the delay in
beginning compressions increases survival rates.
The removal of Look, listen and feel for breathing. It is often hard for even
trained providers to identify effective breathing. It is no longer
recommended to look, listen and feel to determine whether a victim is
breathing. Rather, if the victim is not responsive, has no pulse, and is not
breathing or is breathing in an irregular fashion (i.e. only gasping), begin CPR
immediately!
Emphasis on high-quality CPR. High-quality CPR is defined as:
o Compression rate of 100- 120 beats per minute on all victims;
o Compression depth of AT LEAST 2 inches in adults (no greater than
2.4 inches), and at least 1/3 the anterior-posterior diameter of the
chest in children and infants (about 1.5 inches in infants and 2 inches
in children);
o Allowing the chest to completely expand (recoil) after each
compression (do not lean on the chest between compressions);
o Not interrupting CPR except to use an AED (keep interruptions in
chest compressions to less than 10 seconds);
o Avoiding excessive ventilations;
o Above all else, PUSH HARD AND FAST!
Since many responders (even professionals) are unable to feel or palpate a
pulse quickly, the recommendation is to feel for a pulse for NO MORE THAN
10 seconds. If you can t feel a pulse or if you re not sure you can feel a pulse,
begin CPR.
A manual defibrillator is preferred to an Automatic External Defibrillator
(AED) for infants. If trained first responders are not present and you don t
have a manual defibrillator, the next best option is an AED with a pediatric
dose attenuator. If an AED with a dose attenuator is not available, you CAN
use an adult AED on an infant.
20
It has been recognized that health care professionals should call for
assistance when they come upon an unconscious victim, but they may also
simultaneously assess breathing and check for a pulse before fully activating
the emergency response system. This may encourage efficiency in
assessment and response, rather than following a step-by-step response.
Health care professionals may tailor their response to an unconscious victim
by altering the response sequence to fit the situation or scenario (using an
AED immediately when one is close by and the arrest is witnessed, or
providing ventilations first when the cause of arrest is known to be an anoxic
event (i.e. drowning).
Rescuers should provide 1 breath every 6 seconds when an advanced airway
is in place and compressions are ongoing continuously (rather than trying to
remember a range of ventilations for adults, children and infants).

21
The Adult Chain of Survival
The Adult Chain of Survival represents a continuum of care, from early
recognition of the victim in cardiac arrest to post-resuscitation care to
provide the best chance of survival from cardiac arrest. In the diagram
above, the first two of five steps are visualized The five links in the Adult
Chain of Survival include:
Early recognition of cardiac arrest
Activation of the Emergency Response System
Early CPR, with an emphasis on high-quality chest compressions
Early defibrillation
Comprehensive post- cardiac arrest care
Note that in the diagram above, the first two of the five steps (early
recognition of cardiac arrest and activation of the emergency response
system) have been combined to acknowledge the fact that these steps
often occur simultaneously when multiple rescuers are present.

22
THE TEAM APPROACH
In many situations, there may be only one rescuer who will carry out the normal
sequence of assessments and actions. However, in many situations, there is often
more than one rescuer trained and willing to help.
This is when a team approach can be used. The first rescuer should take the role of
team leader and delegate tasks. One rescuer can provide compressions, one can
prepare to give breaths with a bag-valve mask, and one can prepare the AED. By
working together, the most efficient care can be given to the patient.
Chest Compressions for Adults
Chest compressions are the most
important component of CPR. Chest
compressions are an attempt to
mimic the normal activity of the
heart. When a rescuer presses
down on a victim s chest, blood is
forced out of the heart and into the
arteries. When pressure on the
chest is released, blood is allowed
to return to the heart. A small
amount of oxygen will be present
in the bloodstream for several
minutes after the heart ceases to
beat, just enough to keep the brain
alive. Compressions can keep vital
organs functioning until higher
level care is available.
Adult Chest Compressions
To perform compressions on an
adult, place the heel of your non-
dominant hand on the victim s
chest between the nipples. Then
place your other hand on top of the
first and interlace your fingers. The
heel of your hand should be
pressing on the bottom two-thirds
of the sternum, avoiding the
xiphoid process (the small bony
prominence at the very bottom of
the sternum (breastbone). You

23
should be as close to the victim s side as possible, with your knees against the
victim s side (this will help prevent back injury). Lock your elbows and press down
hard, depressing the sternum at least 2 inches (5 cm), but no more than 2.4 inches
(6 cm). Your shoulders should be positioned directly over your hands in a straight
line. Push hard and fast 100 to 120 times per minute, counting out loud as you do so.
It s important that you allow the chest to recoil (return to it s normal, relaxed
position) in between compressions. If you do not allow the chest to recoil, the heart
will not fill completely, which means that less blood (and therefore oxygen) will be
pumped out of the heart to vital organs with the next compression.
Performing compressions is exhausting. Most people find that they become very
fatigued after providing compressions for 2 or 3 minutes. When a person
performing compressions becomes fatigued, there is a tendency to compress less
firmly and more slowly; for this reason, it is recommended that rescuers trade off
doing compressions every 2 minutes to prevent fatigue and optimize the quality of
compressions. If you are alone, you will have to do the best you can- keep
performing compressions until help arrives or you are physically unable to do so.

24
One Rescuer Adult CPR
If you are alone and come across an individual who is down, follow the steps below.
If someone else is in the area to assist, use the Two Rescuer sequence.
Stay Safe: If you come upon an individual who may need CPR, look around and
make sure you and the victim are in a safe place. If the victim is in water or on a
road, try to move the victim to a safer area. If you are in a safe area, do not try to
move the victim as he/she may have other injuries that you cannot see. Simply roll
him over onto his back. Make sure the victim is on a firm surface, in case
compressions are needed.
Assess the Victim: To quickly assess the victim, shake his shoulder and yell at him.
Check for breathing. If he/she is not breathing, or is not breathing normally (i.e.,
only gasping), you must summon help.
Activate the Emergency Response System and Find an AED: Yell for help. If someone
responds, tell him to call for help by dialing 9-1-1. If you are in an area where an AED
may be available, tell him to go find the AED. Make sure you tell the person to return to
assist you as soon as possible. If you are alone, call for help by dialing 9-1-1 and run to
get the AED if you know where one is nearby. If you do not know where an AED is,
begin CPR immediately.
Begin CPR
1. Check for a pulse on the side of the neck. Feel for a pulse for at least 5
seconds but NO MORE THAN 10 seconds. To check for a carotid pulse, slide 2
or 3 fingers into the groove between the windpipe and the neck muscles at
the side of the neck.
2. If there is no pulse (or if you are unsure if there is a pulse), begin CPR
starting with chest compressions. Provide 30 chest compressions, followed
by two breaths. NOTE: If you are not comfortable giving rescue breathing
and/or you do not have a mask available, do Compression Only CPR.
a. Use the heel of one hand on the lower half of the breastbone in the
middle of the chest.
b. Place the other hand on top of the first hand.
c. Straighten your arms and lock your elbows so that your body weight
is over your hands.
d. The most important part of CPR is to remember to push HARD and
FAST. Each compression should be AT LEAST two inches deep (but no
more than 2.4 inches) and the rate should be 100-120 compressions
per minute.

25
e. Be sure to let up on the pressure on the sternum after each
compression (chest recoil) so the chest can re-expand and blood can
flow back into the heart. The purpose of CPR is to help the blood flow
through the heart and into the rest of the vital organs; if you allow the
chest to re-expand, more blood will flow into the heart and will be
available to deliver to the rest of the body.
f. Count out loud as you do compressions. When you have done 30
compressions, try to open the victim s airway by doing a head
tilt/chin lift. Note that if you are doing Compressions Only CPR, you
can skip this step.
i. With your non-dominant hand, push on the victim s forehead
to tilt the head back.
ii. With your dominant hand, place your fingers under the bony
part of the lower jaw and gently lift the jaw to bring the chin
forward. Be sure you lift up on the bony part of the jaw and
not the soft tissue under the jaw so you don t block the victim s
airway. Do not use your thumb to lift the jaw. Allow the
victim s mouth to remain slightly open.
iii. If you think the person s neck may be injured, avoid the head
tilt/chin lift. Use the jaw thrust maneuver if you have been
trained to do so.
g. If you have a barrier device to use between your mouth and the
victim s face, use it. Although the risk of infection from performing
CPR is very, very low, it is expected that healthcare workers use a
barrier device when providing CPR. This includes the use of face
masks or bag-mask devices (see next section). Give each breath
slowly – each breath should last one second. Make sure the chest
rises with each breath. Repeat, giving a second breath.
h. Start another cycle of chest compressions. Remember, push HARD
and FAST. Alternate chest compressions (30) and giving breaths (2)
until help arrives.

26

27
Airway/ Breathing
Face masks provide a barrier between the rescuer and the victim. Some masks are
equipped with a one-way valve that allows the rescuer s breaths to enter the
victim s airway, but prevents the victim s expired air from coming in contact with
the rescuer s airway. These masks also prevent contact with vomitus and blood,
which could pose an infection risk to the rescuer. It takes practice to learn how to
use these masks effectively to provide ventilations.
Using a Face Mask:
a) Position yourself at the victim s side. If you are a lone (single) rescuer,
positioning yourself at the victim s side will allow you to provide both
ventilations and compressions without having to move.
b) Position the mask on the victim s face. Masks are usually triangular in shape,
and you will notice that the mask has a pointy end- this end goes over the
bridge of the victim s nose.
c) Seal the mask against the victim s face. To do this, take the hand that is
closest to the top of the victim s head and place it along the edge of the mask.
Some people find it easier to form a C with their index finger and thumb and
use these digits to grasp the mask around the base of the mouthpiece. With
the thumb of your other hand, apply pressure along the bottom edge of the
mask. Then place the remaining fingers of your second hand along the bony
edge of the jaw and lift the jaw upwards. Open the airway by performing a
head-tilt chin-lift procedure. While you lift the jaw, ensure that you are
sealing the mask all the way around the outside edge of the mask to obtain a
good seal against the victim s face.
d) Deliver air over 1 second, ensuring that the victim s chest rises.
e) If the victim s chest does not rise, reposition the mask and try to get a better
seal. Remember, you should be lifting the victim s jaw into the mask, rather
than simply pushing the mask down onto the victim s face.
f) Provide 2 ventilations over 1 second each with the mask after every 30
compressions.
g) If the victim has a pulse but is not breathing, provide rescue breathing by
providing 1 breath every 5 to 6 seconds (10-12 breaths/minute). Check for a
pulse every 2 minutes- if there is no pulse, start chest compressions along
with ventilations at a rate of 30:2.

28
Using a Bag-Mask Device:
A bag-mask device (or BVM, bag-valve mask) consists of a mask attached to a
reservoir bag. They are commonly used to provide positive-pressure ventilations
during CPR. They can be attached to an oxygen source to provide 100% oxygenation
during resuscitation. As with the face mask, it takes practice to be able to use a bag-
mask device. It can also be very difficult for one person to use a bag-mask device;
therefore, it is recommended that use of a bag-mask device be used only when there
are two rescuers available.
The steps to using a bag-mask device are as follows:
a) Position yourself at the top of the victim s head- this allows room for the
second rescuer to provide compressions.
b) Place the mask of the bag-mask device on the victim s face, using the bridge
of the patient s nose as a guide to correct positioning.
c) Use the E-C clamp technique to hold the mask in the correct position while
you lift the jaw to obtain an open airway. To perform the E-C clamp
technique, take the index finger and thumb of your non-dominant hand and
form them into a C around the top of the mask. Your other fingers of the
same hand are used to lift the jaw (the E part of the E-C clamp technique.
d) Squeeze the bag to deliver a breath- each breath should be delivered over 1
second. Watch for chest rise. If you do not observe chest rise, you do not have
a tight seal. If this occurs, reposition the mask and try again. Be careful not to
overinflate the lungs- each breath should result in visible and natural chest
rise.
e) Provide 2 ventilations after every 30 compressions. If the patient has a pulse
but is not breathing, provide one breath every 5-6 seconds (10-12

29
breaths/minute) and check for a pulse every 2 minutes. If the victim loses
their pulse, you will need to begin chest compressions.
The Jaw Thrust Maneuver
If you suspect that a victim may have a neck or spinal cord injury (i.e., the victim has
fallen, been in a motor vehicle accident or suffered another mechanism of injury that
could result in injury to the neck or spinal cord), you should not use the head tilt-
chin lift maneuver to open the victim s airway. This could further damage the neck
or spinal cord. Instead, you should use the jaw thrust maneuver to open and
maintain the victim s airway.
To perform this maneuver:
a) Place your hands on either side of the victim s head. Rest your elbows on the
surface that the victim is laying on.
b) Put the fingers of both your hands under the angle of the victim s lower jaw
and lift so that the jaw slides forward.
c) Use your thumb to push the lower lip away from you if the victim s lips close.

30
Two Rescuer Adult CPR (without an AED)
If you come across a victim who is down and another person is available to help,
send that person to activate the Emergency Response System and find an AED while
you assess whether the victim needs CPR. When you have determined that the
victim requires CPR, start CPR beginning with compressions. When the second
person returns (without an AED in this case):
You should continue chest compressions and count the compressions aloud
each time you compress the victim s chest.
The second rescuer should keep the person s airway open using the head tilt-
chin lift maneuver. The second rescuer should give two rescue breaths after
every 30 compressions, using a face mask or a bag-mask device.
You and the second rescuer should switch positions/roles about every two
minutes so neither one of you gets tired. If you are counting out loud, two
minutes is about 5 cycles of thirty compressions and two breaths. You
should change positions sooner if the person doing compressions becomes
too tired to perform high-quality compressions.
31
Using an AED
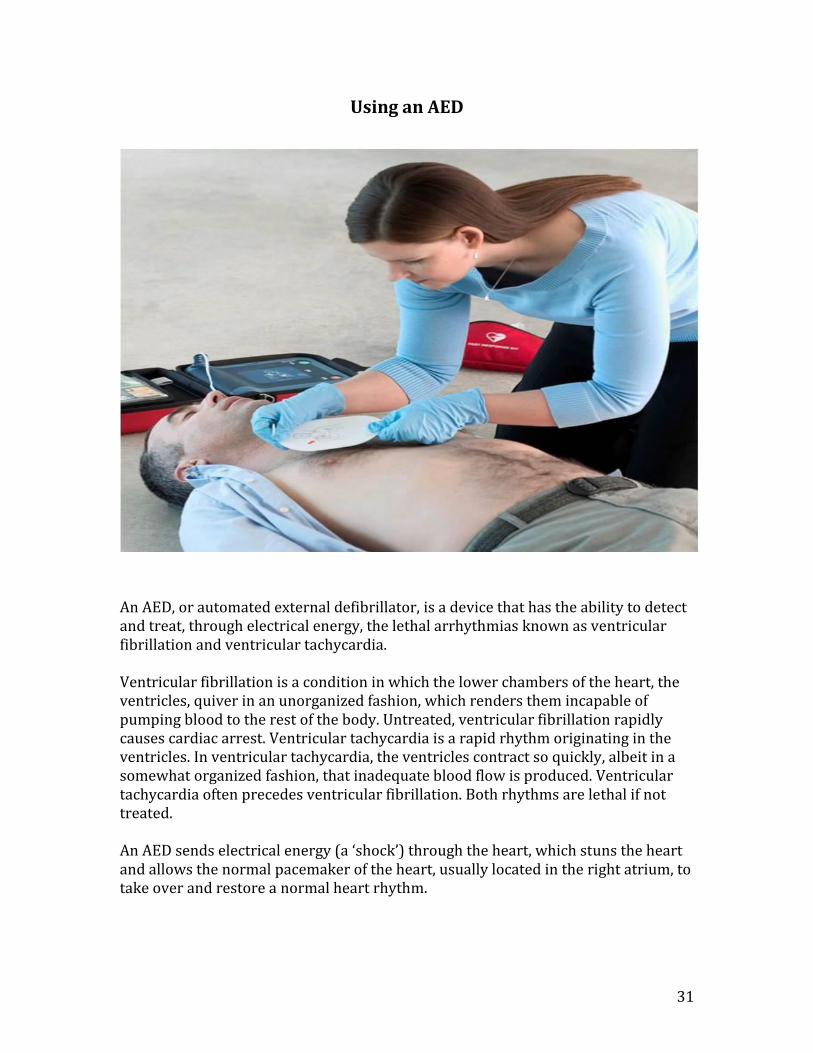
An AED, or automated external defibrillator, is a device that has the ability to detect
and treat, through electrical energy, the lethal arrhythmias known as ventricular
fibrillation and ventricular tachycardia.
Ventricular fibrillation is a condition in which the lower chambers of the heart, the
ventricles, quiver in an unorganized fashion, which renders them incapable of
pumping blood to the rest of the body. Untreated, ventricular fibrillation rapidly
causes cardiac arrest. Ventricular tachycardia is a rapid rhythm originating in the
ventricles. In ventricular tachycardia, the ventricles contract so quickly, albeit in a
somewhat organized fashion, that inadequate blood flow is produced. Ventricular
tachycardia often precedes ventricular fibrillation. Both rhythms are lethal if not
treated.
An AED sends electrical energy (a shock ) through the heart, which stuns the heart
and allows the normal pacemaker of the heart, usually located in the right atrium, to
take over and restore a normal heart rhythm.

32
Early defibrillation is key to survival in cardiac arrest. For each minute that
defibrillation is delayed, the chance of survival is reduced by 10%. (after 10 minutes,
few people are successfully resuscitated.)
Early defibrillation can increase survival rates to greater than 50%. Rescuers should
immediately begin chest compressions, and use the AED as soon as it is available
and ready to use.
AEDs can be found wherever crowds of people gather- swimming pools, airports, malls, sporting arenas, schools, hotels…More and more businesses are also investing in these life-saving machines. In some communities, private AED owners are
registering their AEDs with ambulance dispatch, so that they can be easily located
by bystanders when needed. Make it a point to learn where the AEDs in your
neighborhood or town are located- you never know when you might need one!
AEDs have been designed to be extremely user friendly . All you need to do as a
rescuer is turn on the machine (the most important step) and listen as the machine
guides you through the steps to use the AED safely and effectively. Although there
are many brands of AEDs on the market, they all work in a similar fashion and are
designed to be used by lay rescuers.
When an AED becomes available (i.e., when you or another rescuer have retrieved
it), place it at the victim s side, closest to the rescuer who will operate it. In this way,
the other rescuer can continue performing CPR until the AED is ready to analyze and
deliver a shock (if needed).

33
There are four universal steps to using any AED. These will be highlighted in the
following list of steps so they are easily recognizable.
The steps to use an AED are as follows:
1. Turn on the machine. This is the most important step- turning on the
machine will enable the AED unit to guide you through the next steps. To
turn on the AED, open the top of the carrying case and push the ON button.
Note: some models will turn on automatically when you lift the lid of the
carrying case.
2. ATTACH AED pads to the victim s bare chest. Expose the patient s chest. Dry
it off if wet, shave excessive hair if possible. Choose adult pads for victims
who are 8 years of age or older. Peel off the adhesive backing. Place one pad
on the upper right chest just below the collarbone. Place the other pad on the
patient s lower left ribcage, a couple of centimeters beneath the armpit. Some
pads are marked- there will be a red heart on the pad that is to be placed on
the victim s left side (the heart side).
Press pads firmly onto the patient s chest. Then attach the connecting cables
to the AED unit. Note: some cables will come preconnected.
3. Analyze the rhythm. If the AED unit instructs you to, CLEAR the victim
while the machine is analyzing the victim s heart rhythm. This means you
should ensure that no one is touching the victim, including yourself. The
rescuer performing chest compressions or giving breaths will need to stop at
this point. Note: some AEDs will begin to analyze the victim s rhythm
independently; for others, you will need to push the ANALYZE button.
Analyzing the victim s rhythm will take up to 10 seconds, so don t be alarmed
by this.
4. Push to shock. If a shock is advised, the machine will clearly state SHOCK
ADVISED, STAND CLEAR . You should ensure that no one is touching the
victim, including yourself. You need to look around to make sure no one is
touching the victim s body while stating CLEAR or some similar message
that warns others a shock is to be delivered. Once you are certain that no one
is touching the victim, push the SHOCK button. You will notice that the
victim s muscles contract strongly.
If a shock is not necessary (the rhythm is not ventricular fibrillation or
pulseless ventricular tachycardia), the AED will state NO SHOCK ADVISED
and tell you to resume CPR
After approximately 5 cycles of compressions and ventilations, or 2 minutes
of CPR, the AED will instruct you to repeat steps 3 and 4- analyze the rhythm
and push to shock if the rhythm requires a shock and the AED instructs you
to do so.
Continue CPR alternating with analysis of the rhythm until help arrives (i.e.
EMS)

34
Special Circumstances
There are times when using an AED may present special challenges. Here s what to
do when faced with one of the following:
The victim has a hairy chest- ideally, you should use a razor to shave the
areas that will be covered by the AED pads. If a razor is not available and the
AED machine is prompting you to CHECK PADS or CHECK ELECTRODES, try
pressing down firmly on the AED pads to ensure good contact with the skin.
If the machine continues to prompt you, quickly pull off the pads- this should
remove enough hair to allow a new set of pads to adhere firmly to the
victim s skin. Many AED machines are coming equipped with a razor in the
carrying case to combat this problem. If you happen to own an AED, ensure
that a razor is included in the case.
The victim is in water- if the victim is in water, pull the victim to a dry area.
You are not in danger of getting a shock if the victim is in water. Water is a
great conductor of electricity, so if the victim is in water, the shock will be
dispersed across the skin of the victim, and the victim will not receive the full
dose of electrical energy required to convert them to a normal rhythm. If the
victim s chest is wet, quickly dry the chest with a towel or your sleeve;
however, the chest does NOT need to be completely dry. If the victim is lying
in a small puddle or in snow, you can safely use the AED without moving the
victim.
The victim has an implanted pacemaker or defibrillator- obviously, if the
victim has one of these devices, it must have failed! You will recognize these
devices as a small lump under the skin on the chest, usually the upper chest
on either side. Some older models may be implanted in the abdomen. They
are generally about the size of a deck of cards or smaller. You will also be
able to see a scar over the area. If the victim has one of these devices, avoid
placing the AED pad directly over it; doing so may block delivery of the
shock.
The victim has a medication patch on their chest- many medications can
now be delivered transdermally (through the skin). These includes pain
medications, hormones, smoking cessation drugs, nitroglycerin and others.
Do not place an AED pad over one of these patches. If it won t delay delivery
of a shock, remove the patch and wipe the skin before applying the AED pad.
These patches may cause the skin to burn under the AED pad if left in place,
or they may block delivery of the shock.
Now you know what to do should you encounter one of these special circumstances.

35
Two Rescuer Adult CPR with an AED
We ve learned a lot so far! Thus far, we ve learned how to perform compressions,
maintain the airway and use an AED on an adult victim. Now it s time to put it all
together. The following steps outline how to perform CPR with an AED when there
are two rescuers present.
When you come across a victim who is down and there are two rescuers present:
Rescuer 1 checks for response and breathing- tap the victim on the shoulder
and ask if they are okay. At the same time, observe the victim s chest for
breathing. If the victim is not breathing, or is breathing abnormally or only
gasping, stay with the patient and prepare to perform the next steps.
Rescuer 2 activates the emergency response system and leaves to retrieve
an AED.
Rescuer 1 checks for a carotid pulse for 5 to not more than 10 seconds. If a
pulse is not felt, or the rescuer is not sure if there is a pulse, the rescuer will
expose the chest (in preparation for AED use) and begin CPR, starting with
chest compressions. Rescuer 1 will continue cycles of chest compressions
and ventilations with a pocket mask or bag-mask device until Rescuer 2
returns with an AED.
Rescuer 2 arrives with an AED and places it on the side opposite to Rescuer
1, who is performing chest compressions. Rescuer 2 powers on the AED and
attaches the pads to the victim s chest, also attaching the cables to the AED
unit if necessary. Rescuer 1 should continue CPR while the pads are being
placed, right up until it is time to analyze the victim s heart rhythm.
Rescuer 2 CLEARS the victim, ensuring neither rescuer is touching the
victim, and waits for the AED to ANALYZE, or pushes the ANALYZE button
when prompted by the AED to do so.
Rescuer 2 pushes the SHOCK button if a shock is indicated, making sure that
the victim is CLEAR beforehand.
If no shock is needed, or after the victim has been shocked, Rescuer 2 should
resume chest compressions (as Rescuer 1 may be fatigued by this time) while
Rescuer 1 manages the victim s airway and delivers breaths using the face
mask or bag-mask device.
After approximately 5 cycles of CPR, or 2 minutes, the AED will state that the
victim s rhythm should be ANALYZED. During analysis, which can take up to
10 seconds, Rescuer 2 and Rescuer 1 should switch positions, so that
Rescuer 1 CLEARS the victim, pushes SHOCK if a shock is advised, and
immediately resumes chest compressions (or performs chest compressions if
no shock is advised). Rescuer 2 then takes over management of airway and
breathing. Rescuers should switch positions every 2 minutes when it is time
to ANALYZE the victim s heart rhythm. This will prevent rescuer fatigue and
ensure that rescuers are able to provide high-quality chest compressions at
the proper rate and depth. CPR and analysis with the AED should continue
until EMS arrives.

36
PART THREE
In This Section:
CPR for Children (age 1 year to puberty)
The Pediatric Chain of Survival
One Rescuer CPR for Children (aged 1 year to puberty)
Two Rescuer CPR for Children (aged 1 year to puberty)
37
CPR for Children (age 1 year to puberty)
Performing CPR on a child victim is similar to performing CPR on an adult, with a
few key changes:
Compression to ventilation ratio- when there is only one rescuer, the
compression-ventilation ratio is the same as for adults- 30:2. However, when
two rescuers are present, the compression-ventilation ratio changes to 15:2.
Depth of compressions- for children, rescuers should compress to 1/3 the
depth of the chest. For most children, this will be about 2 inches.
Hands- rescuers may use one hand or two to compress the chest of a child.
The number of hands used will depend on the size of the child. It does not
matter how many hands you use, as long as you are compressing the chest
adequately (1/3 the depth of the chest). If you find you are compressing the
chest too hard (greater than 1/3 the depth of the chest, or 2 inches), simply
remove one hand.
When to call EMS- it is far more common for children to experience a
respiratory arrest prior to going into cardiac arrest, unless the child has a
congenital heart problem; in adults the opposite is true- cardiac arrests are
more common due to cardiovascular disease. Therefore, the goal is to
intervene before the child goes into cardiac arrest. For this reason, when to
call EMS is dependent upon whether you witnessed the child s arrest. If you
did NOT witness the child s arrest (unwitnessed arrest) and you are alone,
you should provide CPR for 2 minutes prior to calling EMS and finding an
AED. If you witness the arrest (i.e., the child suddenly collapses), you should
call EMS and get an AED before returning to the child to start CPR.
The Pediatric Chain of Survival
The Pediatric Chain of Survival is similar to the Adult Chain of Survival, but it has an
extra link. Because children are more prone to respiratory arrest and shock, it is
essential to recognize airway and breathing problems before they occur to prevent
cardiac arrest and ensure survival and full recovery. For this reason, an extra link in
the chain of survival- prevention- has been added. Therefore, the Pediatric Chain of
Survival includes:
Prevention of respiratory/cardiac arrest
Early high-quality CPR
Activation of the Emergency Response System
Early advanced life support
Comprehensive post- cardiac arrest care

38
One Rescuer CPR for Children (aged 1 year to Puberty)
Note that puberty is defined as the presence of underarm or chest hair in boys and
any breast development in girls.
If you are the only person available to help a child, do the following:
1. Assess the child for responsiveness by shaking their shoulders and calling
their name/asking if they are okay. Check his/her breathing- if breathing is
absent or abnormal (i.e., gasping), shout for help.
2. If someone answers your call for help, send that person to call EMS and get
an AED if you know where one is. Note: if you witnessed the child s collapse,
leave the child to activate EMS and retrieve an AED if you know where one is
located.
3. Check the child s pulse for at least 5 but no more than 10 seconds.
Depending on the age of the child, you might be able to feel a carotid pulse in
the side of the neck. In younger children with shorter and chubbier necks,
you can palpate the femoral artery in the groin area, midway between the
pubic bone and the hip bone and just below the crease where the leg meets
the abdomen.
4. If within 10 seconds you cannot feel a pulse, are not sure you can feel a pulse,
OR the heart rate is below 60 beats a minute with signs of poor perfusion
(pale skin, bluish discoloration on the face or extremities, or delayed
capillary refill) begin CPR with 30 compressions followed by 2 breaths.
Breaths should be delivered with a face mask or a bag-mask device in the
same way as for adults- perform a head tilt-chin lift to open the airway, place
the mask on the child s face using the bridge of the nose as a guide, seal the
mask to the child s face and lift the jaw into the mask. Each breath should go
in over 1 second and should cause visible chest rise. Avoid excessive
ventilation- chest rise should appear natural and gradual rather than sudden
and forceful. Masks should fit correctly and should not extend below the
child s chin or cover the eyes.
5. After about 2 minutes of compressions, if someone has not already done so,
you should leave the child to call 911 and get an AED (if you know where one
is).
6. Use the AED as soon as possible.

39
Two Rescuer CPR for Children (aged 1 year to puberty)
When two rescuers are present, performing CPR on a child is the same as
performing CPR on an adult, except that the compression ventilation ratio when 2
rescuers are present drops to 15:2. One or two hands may be used to compress the
chest to a depth of 1/3 the diameter of the chest.
We ll discuss using an AED on a child later on. For now, we ll move on to CPR for
infants.

40
PART FOUR
In This Section:
CPR for Infants (up to 12 months of age)
One Rescuer CPR for Infants (up to 12 months of age)
Two Rescuer CPR for Infants (up to 12 months of age)
AED Use in Child/Infant CPR

41
CPR for Infants (up to 12 months of age)
CPR for infants is similar to CPR for adults and children. There are a few differences
as follows:
Checking for responsiveness: never shake an infant as this may cause brain
damage. To check for responsiveness in an infant, tap the soles of the feet
while calling to the infant in a loud voice.
Pulse check location- for an infant, it is easiest to check for a pulse using the
brachial artery. To locate the brachial artery, place 2 or 3 fingers on the
inside of the upper arm between the shoulder and elbow. Press the fingers
gently for 5 to 10 seconds to feel for a pulse. Pushing too firmly may occlude
the infant s pulse.
Depth of compressions- compress the infant s chest to one-third the depth of
the chest, or approximately 1 ½ inches.
Compression delivery technique- 2 finger technique: when one rescuer is
present, the chest is compressed using two fingers on the lower half of the
sternum, avoiding the xiphoid process (the very end of the sternum where it
narrows). To landmark, place 2 fingers in the center of the infant s chest, just
below the nipple line. Push down on the infant s chest one-third the depth of
the chest, or approximately 1 ½ inches. Allow the chest to fully recoil (return
to its neutral position) in between compressions. Compressions should be
delivered at a rate of 100-120 compressions/minute.
2 thumb-encircling hand technique: When two rescuers are present, the
compression: ventilation ratio drops to 15:2, the same as in children. To
perform this technique, position yourself at the infant s feet. Place your
thumbs side by side on the center of the infant s chest just below the nipple
line. Encircle the infant s chest so that the fingers of both hands support the
infant s back. Use your thumbs to deliver compressions at the appropriate
depth and rate (100-120 compressions/minute; 1/3 of the depth of the chest
or approximately 1 ½ inches). This position allows another rescuer to
support airway and breathing without getting in the way of the rescuer
performing chest compressions, and is therefore the preferred technique
when two rescuers are present. This technique also allows for more
consistent chest compressions and superior blood flow and blood pressure
compared to the 2-finger technique.

42
Compression: ventilation ratio- The compression: ventilation ratio for 1
rescuer CPR in infants is 30:2, the same as for single rescuer CPR in adults
and children. When two rescuers are present, the compression: ventilation
ratio drops to 15:2, the same as in children.
When to call EMS- it is far more common for infants to experience a
respiratory arrest prior to going into cardiac arrest, unless the infant has a
congenital heart problem; in adults the opposite is true- cardiac arrests are
more common due to cardiovascular disease. Therefore, the goal is to
intervene before the infant goes into cardiac arrest. For this reason, when to
call EMS is dependent upon whether you witnessed the infant s arrest. If you
did NOT witness the infant s arrest (unwitnessed arrest) and you are alone,
you should provide CPR for 2 minutes prior to calling EMS and finding an
AED. If you witness the arrest (i.e., the infant suddenly becomes
unresponsive), you should call EMS and get an AED before returning to the
child to start CPR.
One Rescuer CPR for Infants (up to 12 months of age)
If you are the lone rescuer of an infant:
1. Assess the child for responsiveness by tapping the soles of the infant s feet
while calling his/her name loudly. Check for breathing- if there is no
breathing or the infant is breathing abnormally or only gasping, call for help.
2. If someone responds to your call for help, ask them to call 9-1-1 (activate
EMS) and find an AED.
3. Check the infant s brachial pulse for at least 5, but no more than 10, seconds.
Place 2 or 3 fingers on the inside of the upper arm between the shoulder and
elbow. Press the fingers down gently for 5 to 10 seconds to feel for a pulse.
Remember: pushing too firmly may occlude the infant s pulse.
4. If you are not sure you can feel the pulse, the pulse is absent or the infant s
heart rate is below 60 beats per minute with signs of poor perfusion (pale or
bluish discoloration in the face, extremities or nail beds), start CPR,
beginning with 30 compressions followed by two breaths.
a. Place the infant on his back on the ground or on a firm surface.

43
b. Place 2 fingers in the center of his chest just below the nipple line; do
not press on the end of the breastbone.
c. Provide 100-120 chest compressions per minute to a depth of 1/3 the
depth of the chest or approximately 1 ½ inches.
d. The principles of providing breaths for infants are the same as for
children and adults. Use the correct sized face mask or bag-mask
device for the infant (the mask should cover the mouth and nose
without extending past the chin or covering the eyes). Each breath
should go in over 1 second and should cause visible chest rise. A
breath should require only a small puff of air into the mouthpiece of
the device to cause chest rise- avoid excessive ventilations. Lastly,
rather than performing a head tilt-chin lift maneuver to open the
infant s airway, the infant s head should be placed in sniffing
position with the infant s head tilted just enough that the nose
appears to be sniffing the air. In this position, the external ear canal
should be level with the top of the infant s shoulder. Avoid
hyperextending the neck- you also want to avoid allowing the chin to
fall down towards the neck. You can do this by placing one hand on
the infant s forehead while you perform chest compressions. In this
way, the infant s airway will remain open and will not close off.
5. After about two minutes of compressions (five cycles of 30 compressions and
2 breaths), leave the child to call 911 and get an AED if you know where one
is (and someone has not already done so). Then return to the infant to
continue CPR.
6. Use the AED as soon as it is available.
Two Rescuer CPR for Infants (up to 12 months of age)
If there are 2 rescuers available:
1. Rescuer 1- Assess the child for responsiveness by tapping the soles of the feet
and calling to him/her loudly. Check for breathing- if the infant is not
breathing or is breathing abnormally or only gasping, send Rescuer 2 to
activate EMS and bring the AED (if one is available).
2. Rescuer 1- Check the infant s brachial pulse for at least 5, but not more than
10, seconds. Place 2 or 3 fingers on the inside of the upper arm between the

44
shoulder and elbow. Press the fingers down gently for 5 to 10 seconds to feel
for a pulse. Remember: pushing too firmly may occlude the infant s pulse.
3. Rescuer 1- If you are not sure you can feel the pulse, the pulse is absent or
the infant s heart rate is below 60 beats per minute with signs of poor
perfusion (pale or bluish discoloration in the face, extremities or nail beds),
start CPR, beginning with 30 compressions followed by two breaths.
a. Place the infant on his back on the ground or on a firm surface.
b. Place 2 fingers in the center of the infant s chest just below the nipple
line; do not press on the end of the breastbone.
c. Provide 100-120 chest compressions per minute to a depth of 1/3 the
depth of the chest or approximately 1 ½ inches.
d. The principles of providing breaths for infants are the same as for
children and adults. Use the correct sized face mask or bag-mask
device for the infant (the mask should cover the mouth and nose
without extending past the chin or covering the eyes). Each breath
should go in over 1 second and should cause visible chest rise. A
breath should require only a small puff of air into the mouthpiece of
the device to cause chest rise- avoid excessive ventilations. Lastly,
rather than performing a head tilt-chin lift maneuver to open the
infant s airway, the infant s head should be placed in sniffing
position with the infant s head tilted just enough that the nose
appears to be sniffing the air. In this position, the external ear canal
should be level with the top of the infant s shoulder. Avoid
hyperextending the neck- you also want to avoid allowing the chin to
fall down towards the neck. You can do this by placing one hand on
the infant s forehead while you perform chest compressions. In this
way, the infant s airway will remain open and will not close off.
When the second person returns, change the ratio of compressions to ventilations to
15:2.
4. Rescuer 2 should place the thumbs of both hands on the lower half of the
infant s breastbone, while being careful not to press on the end of the
breastbone (xiphoid process). Put the fingers of both hands around the
infant s chest. Use the fingers to encircle the infant s back to provide support.
Use the thumbs to depress the sternum approximately 1/3 the depth of the
chest, or approximately 1 ½ inches. Compress at a rate of 100-120
compressions per minute.
45
5. Rescuer 1 should provide breaths as described above.
6. Continue CPR at a ratio of 15 compressions to 2 breaths and switch roles
every 2 minutes to avoid fatigue.
7. Use the AED when available.
AED Use in Child/ Infant CPR
As you might expect, using an AED on children and infants requires some special
consideration.
Some AEDs have been modified so that they can deliver different shock dosages to
adults and to infants and children. If you use an AED that is pediatric-capable, it will
have special features that you will need to know about in order to operate the AED.
For example, some AEDs may come with child pads, which are smaller in size. In
some AEDs, there may be a key or switch that you will need to activate to use the
AED on children or infants; in others you will plug the child AED pads into a
separate receptacle when using the AED on infants or children. All AEDs typically
come with instructions, so when all else fails, read the instructions! Turning the
Machine ON will cause the AED to begin voicing instructions as well.
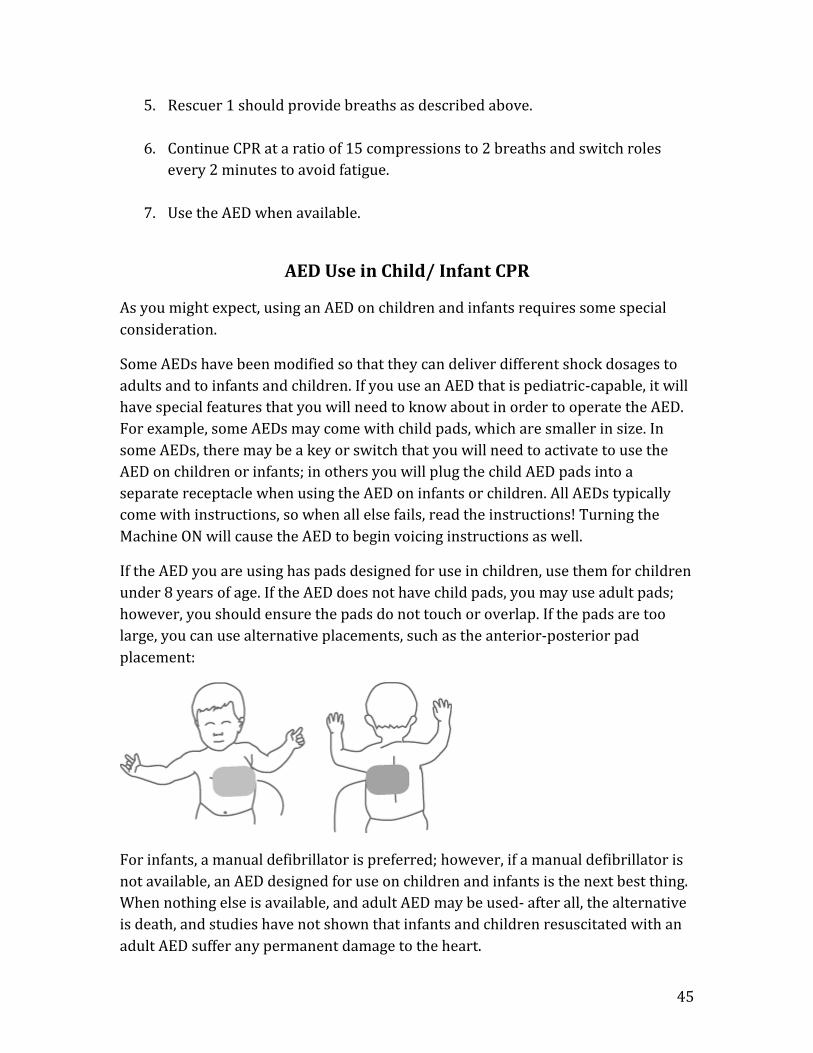
If the AED you are using has pads designed for use in children, use them for children
under 8 years of age. If the AED does not have child pads, you may use adult pads;
however, you should ensure the pads do not touch or overlap. If the pads are too
large, you can use alternative placements, such as the anterior-posterior pad
placement:
For infants, a manual defibrillator is preferred; however, if a manual defibrillator is
not available, an AED designed for use on children and infants is the next best thing.
When nothing else is available, and adult AED may be used- after all, the alternative
is death, and studies have not shown that infants and children resuscitated with an
adult AED suffer any permanent damage to the heart.

46
PART FIVE
In This Section:
CPR with an Advanced Airway
Mouth-to-Mouth Breaths
Rescue Breathing

47
CPR with an Advanced Airway
When there is no advanced airway in place, rescuers must pause compressions to
deliver breaths using a face mask or bag-mask device. Once an advanced airway is in
place, there is no longer a need to pause compressions to deliver breaths.
Why is this? If the chest is compressed during ventilations, most of the air (and thus
oxygen) delivered would be forced out of the victim s mouth before it could enter
the lungs. An advanced airway means that air is reliably delivered to the lungs,
regardless of whether a rescuer is applying force to the chest at the same time a
breath is being delivered.
Advanced airways include:
Laryngeal mask airways (LMAs)
Supraglottic airway (Combitube or King LT)
Endotracheal (ET) tube
When an advanced airway is in place, compressions are delivered at a rate of 100-
120 compressions per minute. Breaths are delivered over 1 second simultaneously
at a rate of 1 breath every 6 seconds (10-12 breaths per minute).

48
Mouth-to-Mouth Breaths
Although it is necessary to use a pocket mask or bag-mask device to deliver breaths in the
healthcare setting, there are times when these devices may not be necessary. Should a
cardiac arrest occur at home, you would likely not hesitate to perform mouth-to-mouth
breathing for a relative or loved one; you might choose to give mouth-to-mouth to a
friend as well. In cases such as these, you will likely decide the benefit outweighs the risk
to your own health.
To provide mouth-to-mouth breaths to an adult or child:
1. Use the head tilt-chin lift to hold the victim’s airway open.
2. Using the hand on the victim’s forehead that is maintaining the head tilt-chin lift,
pinch the victim’s nose closed using the thumb and index finger.
3. Inhale a regular breath, then cover the victim’s mouth with your own, creating a
tight seal.
4. Give one breath over 1 second, watching to see if the chest rises.
5. If the chest doesn’t rise as you give the breath, repeat the head tilt-chin lift.
6. Give a second breath over 1 second and watch for chest rise.
7. If the second breath fails to go in, go immediately to chest compressions.
To provide breaths to an infant:
1. Use a head tilt-chin lift to maintain an open airway (sniffing position), being
careful not to hyperextend the neck, which could block the airway
2. Place your mouth over the victim’s mouth AND NOSE to create a tight seal.
3. Blow into the infant’s nose and mouth over 1 second, with just enough volume
and force to cause the chest to rise with each breath. Be careful not to ventilate
too forcefully, as doing so may cause lung damage.
4. If the chest does not rise, repeat the head tilt-chin lift and try to ventilate the
victim again. You may need to try to provide breaths at a few different positions
before you achieve airway patency (airway is in an open position).
5. If the infant is older and you cannot cover both the infant’s mouth and nose, pinch
the nostrils closed and place your mouth over the victim’s to form a tight seal-
just the same as you would do for a child or adult.
You may wonder how mouth-to-mouth or mouth-to-mouth-and-nose breathing can
sustain the victim. In actual fact, your expired air contains about 17% oxygen- this is just
enough oxygen to meet the victim’s needs.
When providing mouth-to-mouth or mouth-to-mouth-and-nose breathing, it is important
not to provide breaths that are too forceful or too rapid. Doing so may cause air to enter
the stomach rather than the lungs, which can cause gastric inflation. Gastric inflation may
result in vomiting, and an unconscious victim may develop pneumonia if vomitus makes
its way to the lungs. To avoid gastric inflation, give each breath slowly over 1 second and
deliver just enough air to make the chest rise.

49
Rescue Breathing
Respiratory arrest is defined as the cessation of breathing. During respiratory arrest, as
well as inadequate breathing, the victim will still have some amount of cardiac output,
which you will be able to detect as a palpable pulse.
It is important to be able to recognize respiratory arrest, or impending respiratory arrest,
which may be seen as slow, irregular or gasping respirations. These abnormal respirations
are inadequate to support life. Respiratory arrest inevitably leads to cardiac arrest if not
treated, therefore healthcare providers should intervene quickly to prevent this
deterioration by providing rescue breathing.
The table below provides a summary of rescue breathing guidelines for different age
groups.
Rescue Breathing for Adults Rescue Breathing for Children and
Infants
1 breath every 5 to 6 seconds (10-12
breaths/minute)
1 breath every 3 to 5 seconds (12-20
breaths/minute)
Each breath should last 1 second
Did the chest rise? If not, try again
Be sure to check the victim s pulse every 2 minutes and begin chest compressions
combined with breaths if needed
50
PART SIX
In This Section:
Treatment of Choking
Treatment of Choking in Victims 1 Year of Age and Older
Choking in the Conscious Adult or Child (victims 1 year of age and older)
Choking in the Conscious Infant
Choking in the Unconscious Adult or Child (victims 1 year of age and older)
Choking in the Unconscious Infant
Moving Victims
The Recovery Position

51
Treatment of Choking
Choking in the Conscious Adult or Child (older than 1 year of age)
1. STAND (OR KNEEL) BEHIND THE VICTIM AND WRAP YOUR ARMS
AROUND THE VICTIM S WAIST.
2. PUT ONE FOOT IN BETWEEN THE VICTIM S FEET AND ONE FOOT
BEHIND YOU-THIS POSITION PROVIDES STABILITY SHOULD THE
VICTIM BECOME UNCONSCIOUS AND YOU NEED TO EASE THE VICTIM
TO THE GROUND.
3. PLACE YOUR FIST WITH THE THUMB SIDE IN JUST ABOVE THE VICTIM S
BELLYBUTTON AND BELOW THE STERNUM (BREASTBONE).
4. GRAB YOUR FIST WITH YOUR OTHER HAND.
5. ADMINISTER ABDOMINAL THRUSTS, PULLING INWARD AND UPWARD
UNTIL THE FOREIGN OBJECT COMES OUT OR THE PATIENT BECOMES
UNCONSCIOUS. EACH THRUST SHOULD BE FORCEFUL, DISTINCT AND
SEPARATE.
Choking in the Conscious Infant
1. SIT OR KNEEL WITH THE INFANT IN YOUR LAP.
2. IF NOT DIFFICULT TO DO, REMOVE THE INFANT S CLOTHING TO
EXPOSE THE INFANT S CHEST.

52
3. REST THE INFANT S BODY ON YOUR FOREARM WITH THE INFANT S
HEAD LOWER THAN THE BODY. SUPPORT THE JAW AND HEAD WITH
YOUR HAND. REST YOUR FOREARM ON YOUR THIGH OR LAP TO
PROVIDE SUPPORT.
4. GIVE 5 BACK BLOWS FORCEFULLY WITH THE HEEL OF YOUR HAND
BETWEEN THE INFANT S SHOULDER BLADES.
5. SUPPORT THE BACK OF THE INFANT S HEAD WITH THE PALM OF YOUR
HAND AND THE INFANT S JAW AND HEAD WITH THE OTHER PALM
WHILE TURNING HIM OVER (FACE UP) ONTO YOUR OTHER FOREARM.
KEEP THE INFANT S HEAD LOWER THAN ITS BODY. REST YOUR
FOREARM ON YOUR THIGH FOR SUPPORT.
6. GIVE 5 CHEST THRUSTS, JUST AS YOU WOULD WHEN PERFORMING
CHEST COMPRESSIONS IN CPR. CHEST THRUSTS SHOULD BE
DELIVERED AT A RATE OF 1 CHEST THRUST PER SECOND AND SHOULD
BE GIVEN WITH ENOUGH FORCE TO DISLODGE A FOREIGN BODY.
7. REPEAT BACK BLOWS/CHEST THRUSTS UNTIL THE OBJECT COMES OUT
OR THE VICTIM LOSES CONSCIOUSNESS.
NOTE: FOR PREGNANT OR OBESE PATIENTS, GIVE CHEST THRUSTS INSTEAD OF
ABDOMINAL THRUSTS.

53
Choking in the Unconscious Adult or Child
1. IF YOU ARE CARINIG FOR SOMEONE WHO IS CHOKING AND THEY LOSE
CONSCIOUSNESS, LOWER THE VICTIM GENTLY TO THE GROUND.
2. ACTIVATE EMS/CALL 9-1-1
3. BEGIN CPR< STARTING WITH CHEST COMPRESSIONS- DO NOT CHECK FOR
A PULSE.
4. EACH TIME YOU OPEN THE AIRWAY TO PROVIDE VENTILATIONS, OPEN
THE VICTIM S MOUTH AND CHECK FOR THE OBJECT> IF YOU CAN SEE THE
OBJECT, TURN THE VICTIM s HEAD TO THE SIDE AND SWEEP IT OUT OF
THE VICTIM S MOUTH WITH YOUR INDEX FINGER. NEVER PERFORM A
BLIND FINGER SWEEP- THIS MAY FORCE THE OBJECT FARTHER DOWN
THE VICTIM S AIRWAY.
5. IF YOU DO NOT SEE THE OBJECT, ATTEMPT TO PROVIDE BREATHS. IF
BREATHS WILL NOT GO IN, RESUME CHEST COMPRESSIONS.
6. AFTER APPROXIMATELY 5 CYCLES OF COMPRESSIONS AND VENTILATIONS,
ACTIVATE EMS/CALL 9-1-1 IF NOT ALREADY DONE.
7. IF THE OBSTRUCTION IS RELIEVED, CHECK RESPONSIVENESS, BREATHING
AND PULSE. PROVIDE RESCUE BREATHING OR CPR AS REQUIRED. IF THE
VICTIM IS RESPONSIVE, THEY SHOULD BE TAKEN TO HOSPITAL TO RULE
OUT ANY INJURY CAUSED BY ABDOMINAL OR CHEST THRUSTS.
Choking in the Unconscious Infant
1. CALL FOR HELP. IF SOMEONE RESPONDS, SEND THEM TO ACTIVATE
EMS/CALL 9-1-1
2. PLACE THE INFANT ON A FLAT, FIRM SURFACE.
3. BEGIN CPR, STARTING WITH COMPRESSIONS. EACH TIME YOU OPEN THE
AIRWAY TO DELIVER BREATHS, LOOK TO SEE IF THE OBJECT IS VISBLE. IF
THE OBJECT IS VISIBLE, TURN THE INFANT S HEAD TO THE SIDE AND USE
YOUR INDEX FINGER TO SWEEP THE OBJECT OUT OF THE INFANT S
MOUTH. NEVER PERFORM A BLIND FINGER SWEEP, AS THIS MAY FORCE
THE OBJECT FARTHER DOWN INTO THE AIRWAY.
4. AFTER 5 CYCLES OF COMPRESSIONS AND VENTILATIONS (OR ATTEMPTED
VENTILATIONS), ACTIVATE THE EMERGENCY RESPONSE SYSTEM IF NOT
ALREADY DONE.
5. IF THE OBSTRUCTION IS RELIEVED, CHECK RESPONSIVENESS, BREATHING
AND PULSE. PROVIDE RESCUE BREATHING OR CPR AS REQUIRED. IF THE
VICTIM IS RESPONSIVE, THEY SHOULD BE TAKEN TO HOSPITAL TO RULE
OUT ANY INJURY CAUSED BY ABDOMINAL OR CHEST THRUSTS.

54
MOVING VICTIMS
It is generally not recommended that a rescuer move a victim unless there is a direct
danger to the victim s (or rescuer s) life, or if it is necessary to provide care. Try to
immobilize the spine and protect the head, neck, and back if it is necessary to move
a victim.
Recovery position
An unconscious victim who is breathing and has a pulse should be assisted into the
recovery position to protect the airway.
This position keeps the airway open, prevents aspiration of fluids into the lungs and
allows fluid (such as saliva or blood that could occlude the airway) to drain from the
mouth.
1. Extend the victim s arm that is closest to you above the victim s head.
2. Place the victim s leg that is farthest away from you over his other leg.
3. Place the victim s arm that is farthest from you across his chest.
4. Supporting the head and neck, roll the victim towards you.
5. Position his or her top leg so the knee props up the victim s body
6. Place the victim s hand or arm under his/ her chin to aid in keeping the
airway open.
55
PART SEVEN
In This Section:
CPR Certification Skills Review
CPR Exam Questions
56
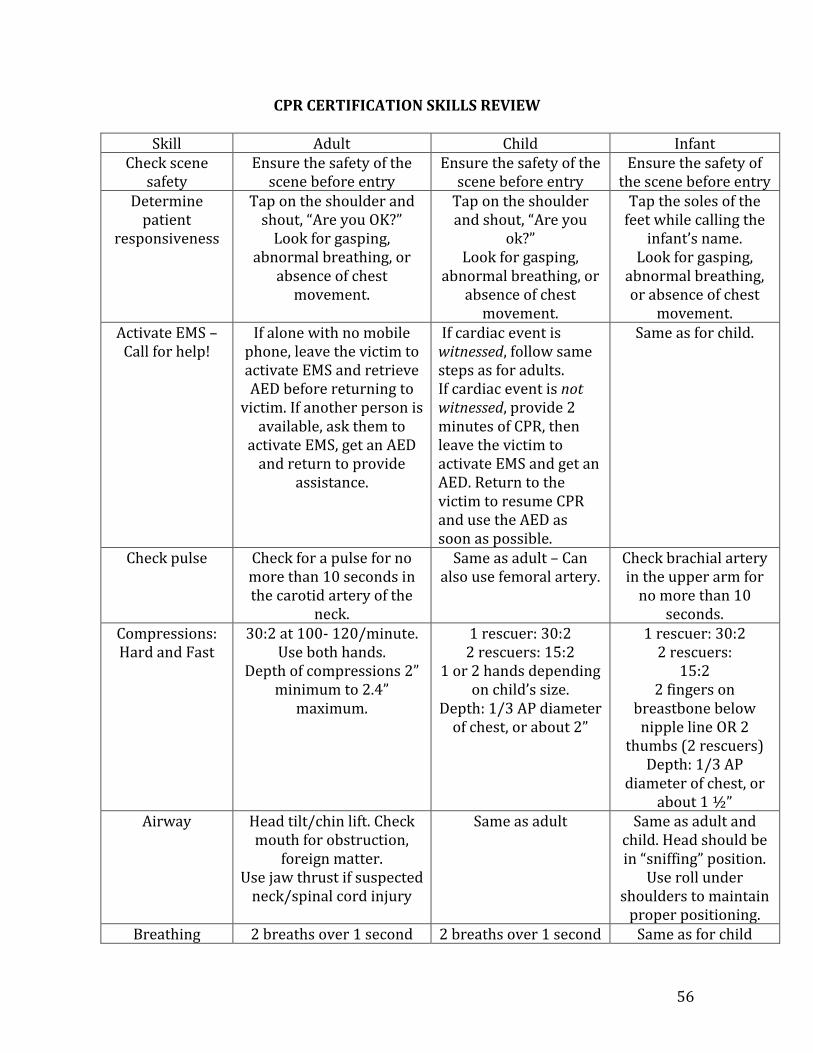
CPR CERTIFICATION SKILLS REVIEW
Skill Adult Child Infant
Check scene
safety
Ensure the safety of the
scene before entry
Ensure the safety of the
scene before entry
Ensure the safety of
the scene before entry
Determine
patient
responsiveness
Tap on the shoulder and
shout, Are you OK?
Look for gasping,
abnormal breathing, or
absence of chest
movement.
Tap on the shoulder
and shout, Are you
ok?
Look for gasping,
abnormal breathing, or
absence of chest
movement.
Tap the soles of the
feet while calling the
infant s name.
Look for gasping,
abnormal breathing,
or absence of chest
movement.
Activate EMS –
Call for help!
If alone with no mobile
phone, leave the victim to
activate EMS and retrieve
AED before returning to
victim. If another person is
available, ask them to
activate EMS, get an AED
and return to provide
assistance.
If cardiac event is
witnessed, follow same
steps as for adults.
If cardiac event is not
witnessed, provide 2
minutes of CPR, then
leave the victim to
activate EMS and get an
AED. Return to the
victim to resume CPR
and use the AED as
soon as possible.
Same as for child.
Check pulse Check for a pulse for no
more than 10 seconds in
the carotid artery of the
neck.
Same as adult – Can
also use femoral artery.
Check brachial artery
in the upper arm for
no more than 10
seconds.
Compressions:
Hard and Fast
30:2 at 100- 120/minute.
Use both hands.
Depth of compressions 2
minimum to 2.4
maximum.
1 rescuer: 30:2
2 rescuers: 15:2
1 or 2 hands depending
on child s size.
Depth: 1/3 AP diameter
of chest, or about 2
1 rescuer: 30:2
2 rescuers:
15:2
2 fingers on
breastbone below
nipple line OR 2
thumbs (2 rescuers)
Depth: 1/3 AP
diameter of chest, or
about 1 ½
Airway Head tilt/chin lift. Check
mouth for obstruction,
foreign matter.
Use jaw thrust if suspected
neck/spinal cord injury
Same as adult Same as adult and
child. Head should be
in sniffing position.
Use roll under
shoulders to maintain
proper positioning.
Breathing 2 breaths over 1 second 2 breaths over 1 second Same as for child
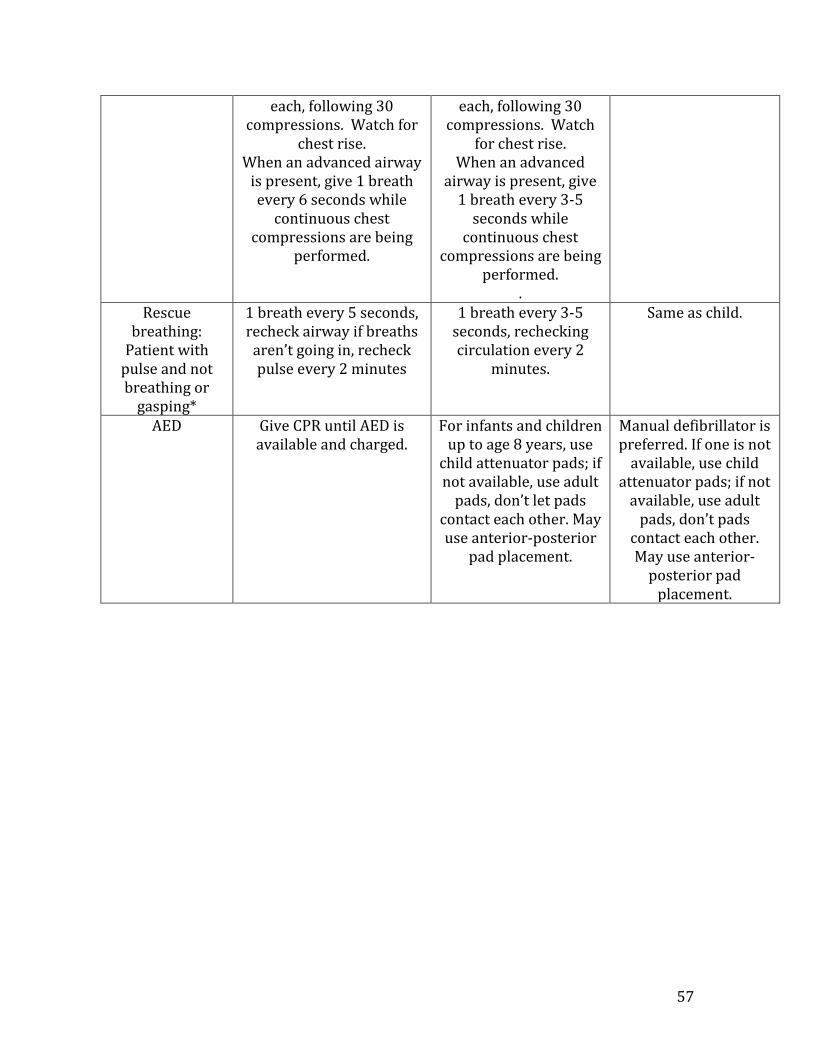
57
each, following 30
compressions. Watch for
chest rise.
When an advanced airway
is present, give 1 breath
every 6 seconds while
continuous chest
compressions are being
performed.
each, following 30
compressions. Watch
for chest rise.
When an advanced
airway is present, give
1 breath every 3-5
seconds while
continuous chest
compressions are being
performed.
.
Rescue
breathing:
Patient with
pulse and not
breathing or
gasping*
1 breath every 5 seconds,
recheck airway if breaths
aren t going in, recheck
pulse every 2 minutes
1 breath every 3-5
seconds, rechecking
circulation every 2
minutes.
Same as child.
AED Give CPR until AED is
available and charged.
For infants and children
up to age 8 years, use
child attenuator pads; if
not available, use adult
pads, don t let pads
contact each other. May
use anterior-posterior
pad placement.
Manual defibrillator is
preferred. If one is not
available, use child
attenuator pads; if not
available, use adult
pads, don t pads
contact each other.
May use anterior-
posterior pad
placement.