Blackboard Connect 5 Training Session Presented by: Rebecca Castañeda, Director for Federal...
48
Blackboard Connect 5 Training Session Presented by: Rebecca Castañeda, Director for Federal Programs August 13, 2015
-
Upload
shon-dalton -
Category
Documents
-
view
215 -
download
0
Transcript of Blackboard Connect 5 Training Session Presented by: Rebecca Castañeda, Director for Federal...
Blackboard Connect 5Training Session
Presented by:Rebecca Castañeda,
Director for Federal ProgramsAugust 13, 2015
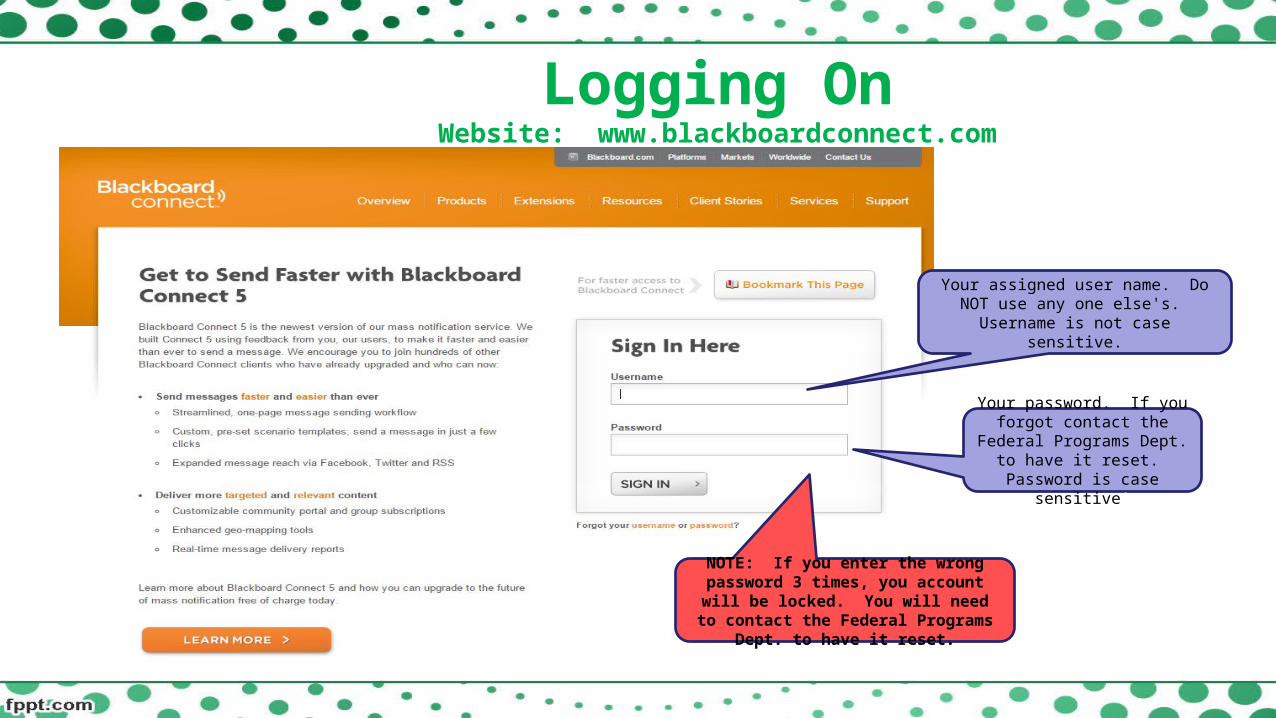
Logging OnWebsite: www.blackboardconnect.com
Your assigned user name. Do NOT use any one else's. Username is not case
sensitive.
Your password. If you forgot contact the Federal
Programs Dept. to have it reset. Password is case
sensitive!
NOTE: If you enter the wrong password 3 times, you account will be locked. You
will need to contact the Federal Programs Dept. to have it reset.

Next screen…..click on Message Center or send a message
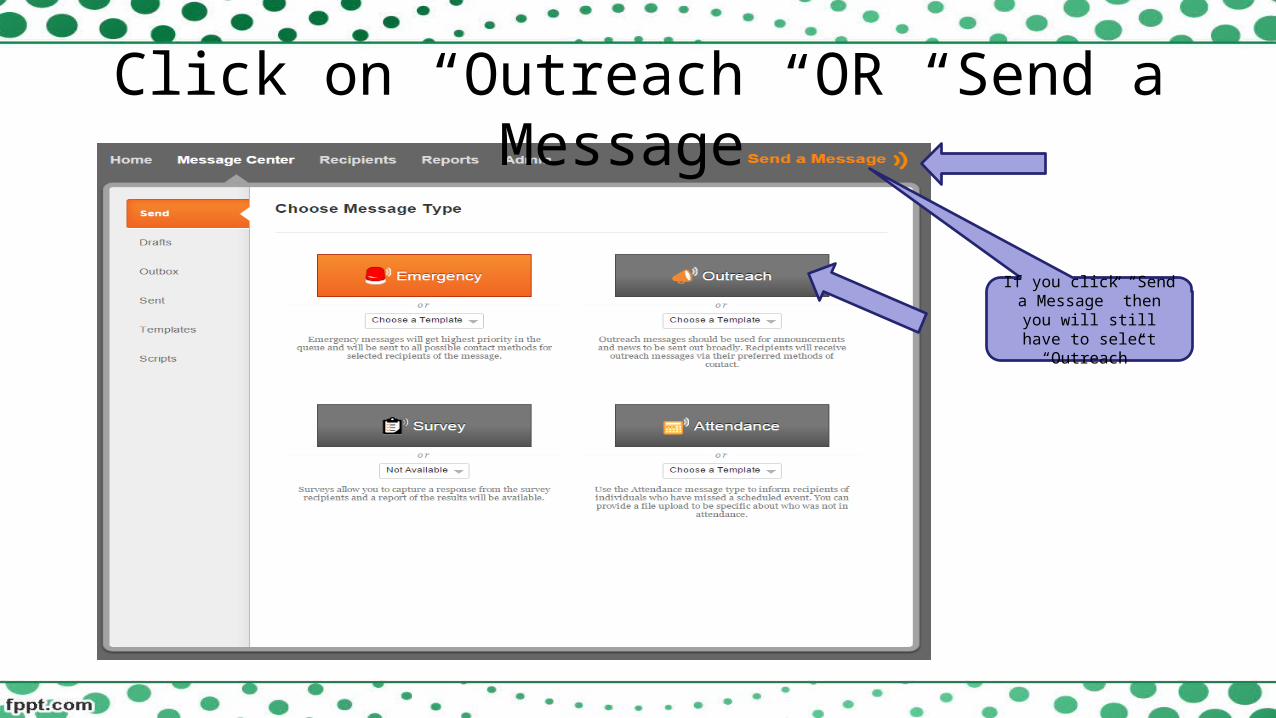
Click on “Outreach” OR “Send a Message”
If you click “Send a Message” then you will
still have to select “Outreach”

Step 1: Type in the Name of the Message
(This is only for your use)
Step 2: Who is this message going to?

Step 2A: Click on Site (Campus staff will only be able to see your campus on this drop down list.
DISD administrative staff will see all campuses.)
By clicking on the “+” next to each field, you can break down who you are sending it to
even more.

You can create your own groups from individuals at your assigned campus.
(Football, Band, Choir, etc.)
Your campus employees are under “Faculty” NOT
“Staff”

STEP 3: Click here to select all. (Don’t click here if you
are selecting any other fields until you are done selecting.)
If you don’t click on “Select All” you will not be able to send
the message.
This is what you will see when you click on
“select all”
STEP 4: Click “Done” to continue
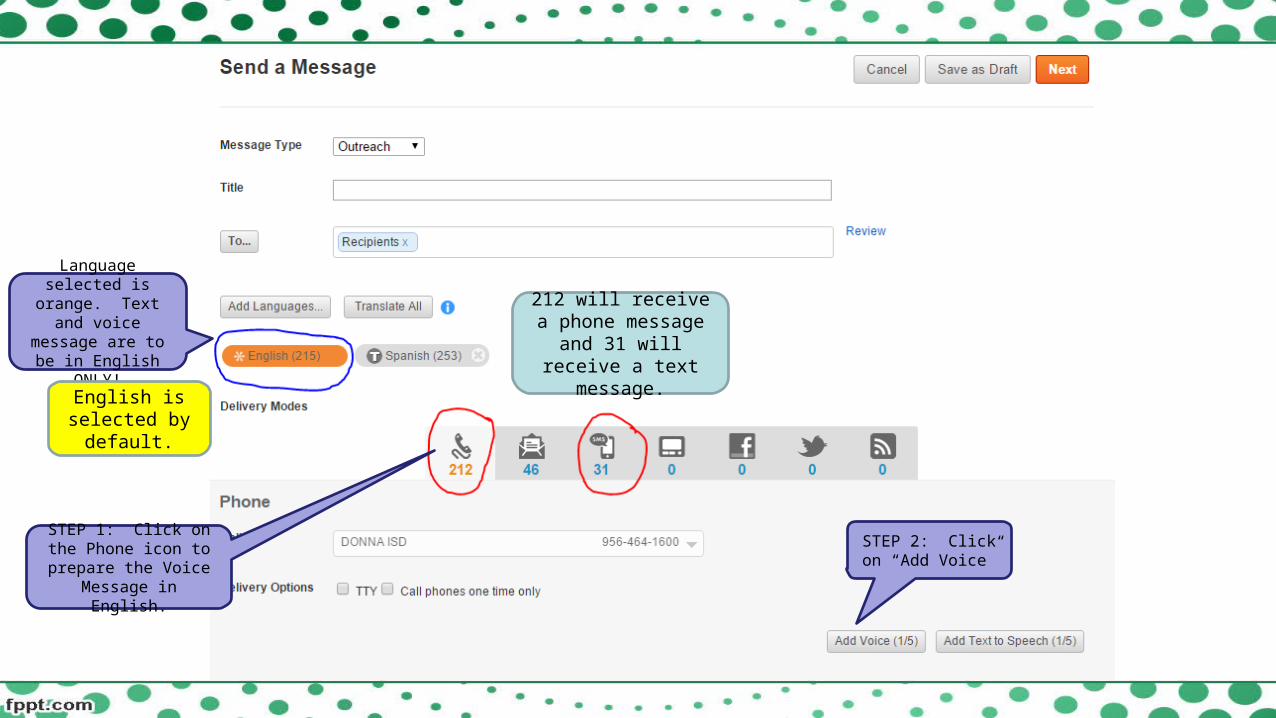
Language selected is orange. Text and voice message are
to be in English ONLY!
212 will receive a phone message and 31 will receive a text
message.English is
selected by default.
STEP 1: Click on the Phone icon to prepare the Voice Message in
English.
STEP 2: Click on “Add Voice”
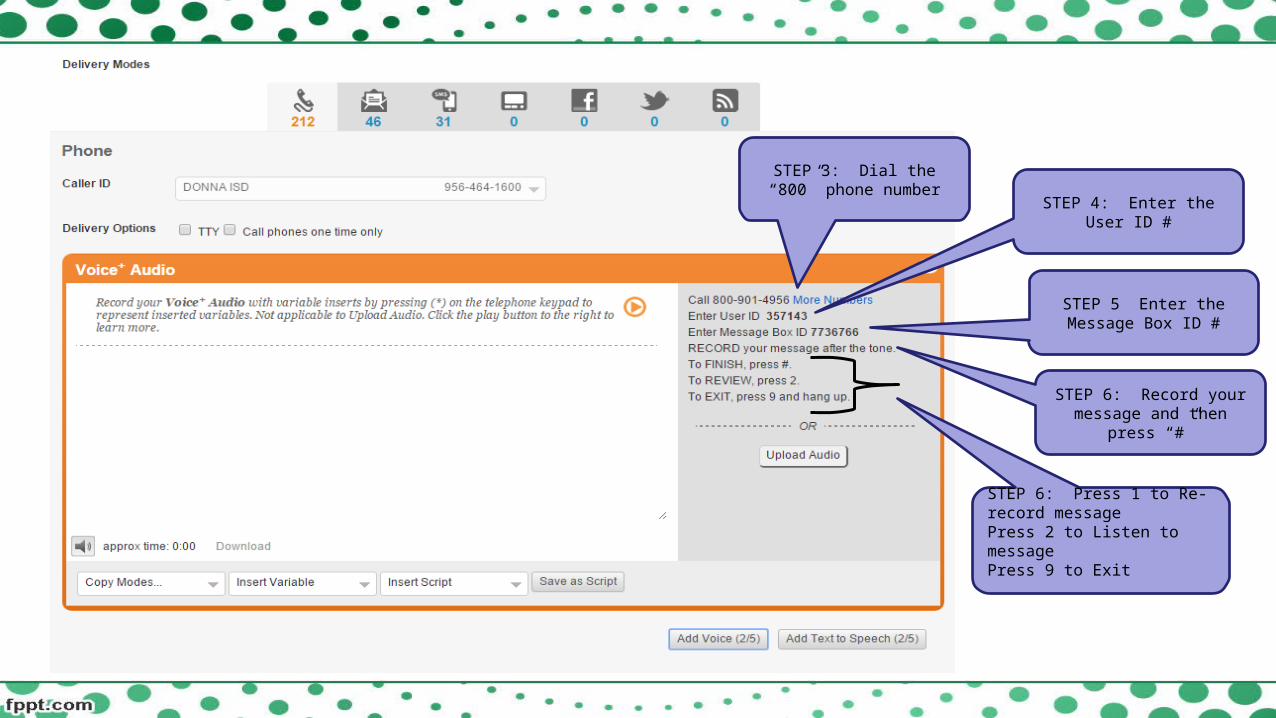
STEP 3: Dial the “800” phone number
STEP 4: Enter the User ID #
STEP 6: Record your message and then press “#”
STEP 6: Press 1 to Re-record messagePress 2 to Listen to messagePress 9 to Exit
STEP 5 Enter the Message Box ID #
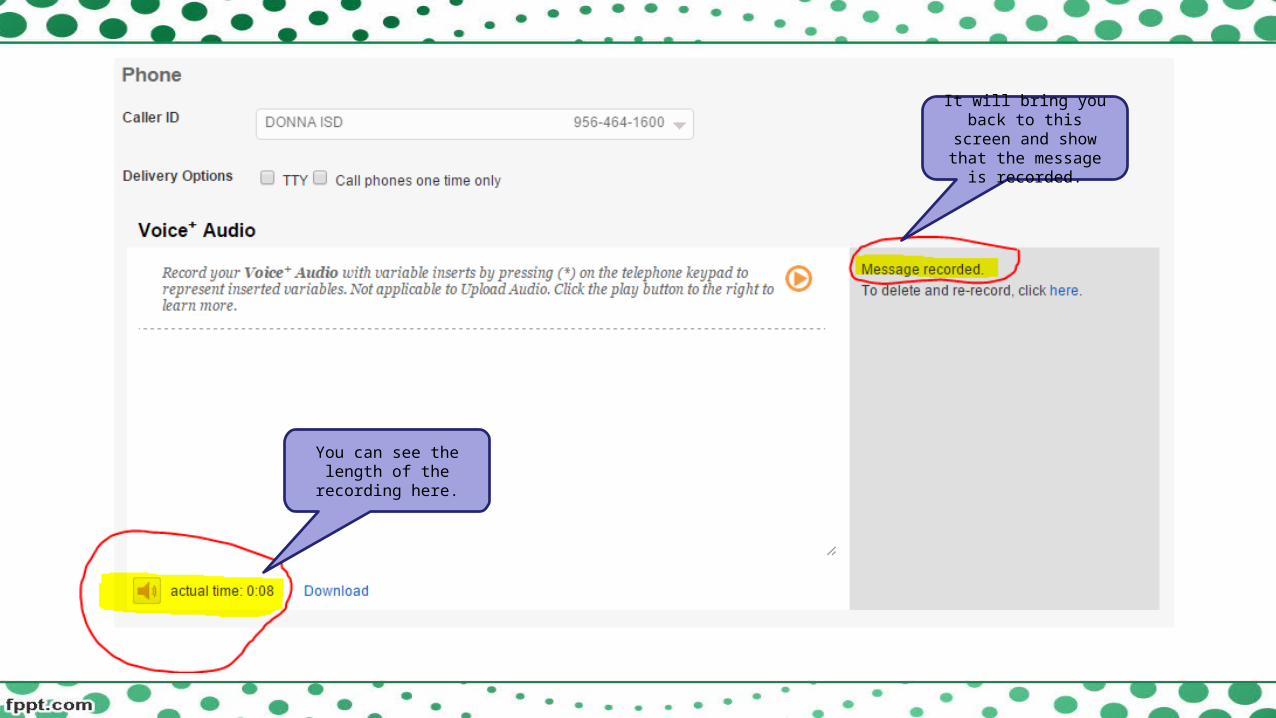
It will bring you back to this screen and show that the message is
recorded.
You can see the length of the recording here.
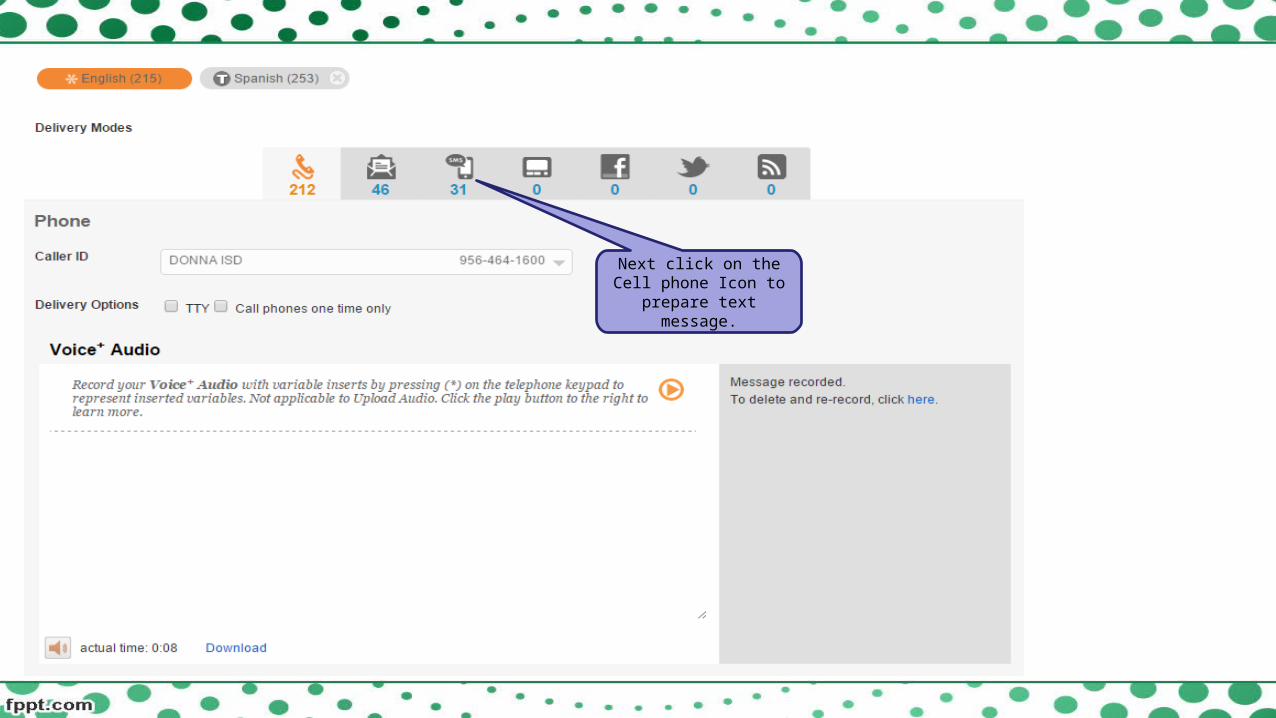
Next click on the Cell phone Icon to prepare
text message.
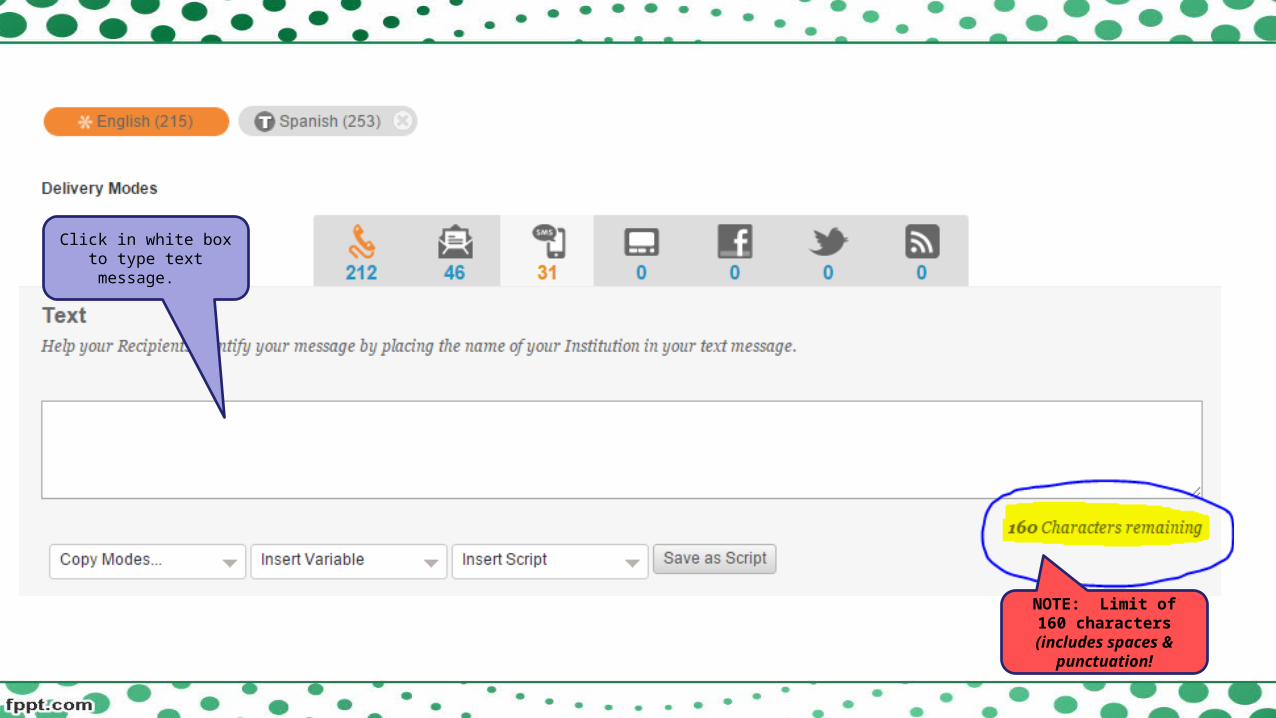
Click in white box to type text message.
NOTE: Limit of 160 characters (includes
spaces & punctuation!
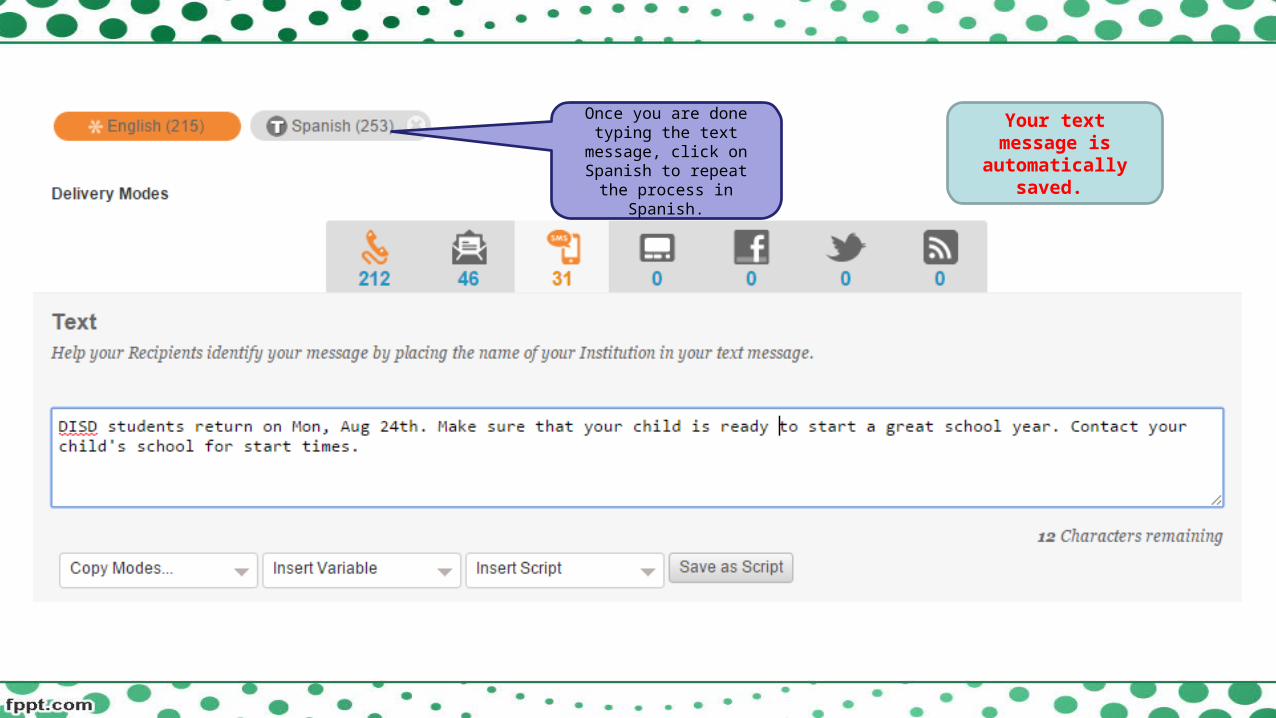
Once you are done typing the text message, click on
Spanish to repeat the process in Spanish.
Your text message is automatically saved.
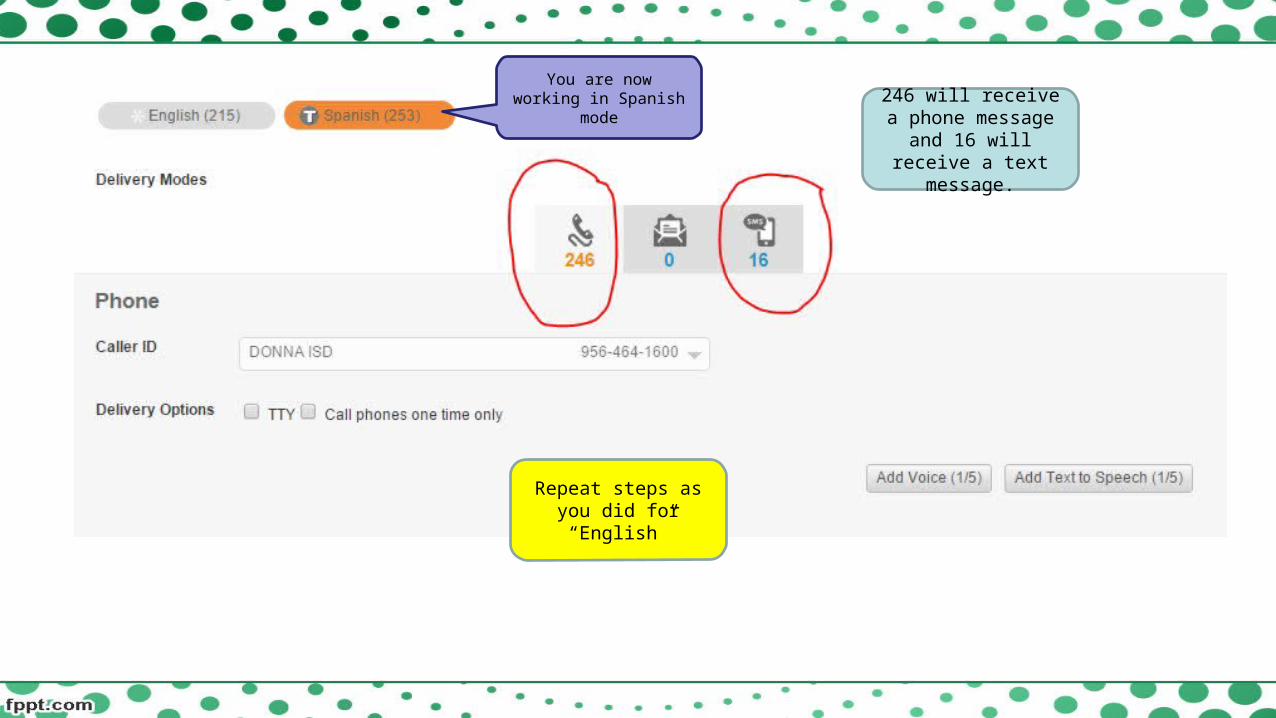
246 will receive a phone message and 16 will receive a text
message.
Repeat steps as you did for “English”
You are now working in Spanish mode
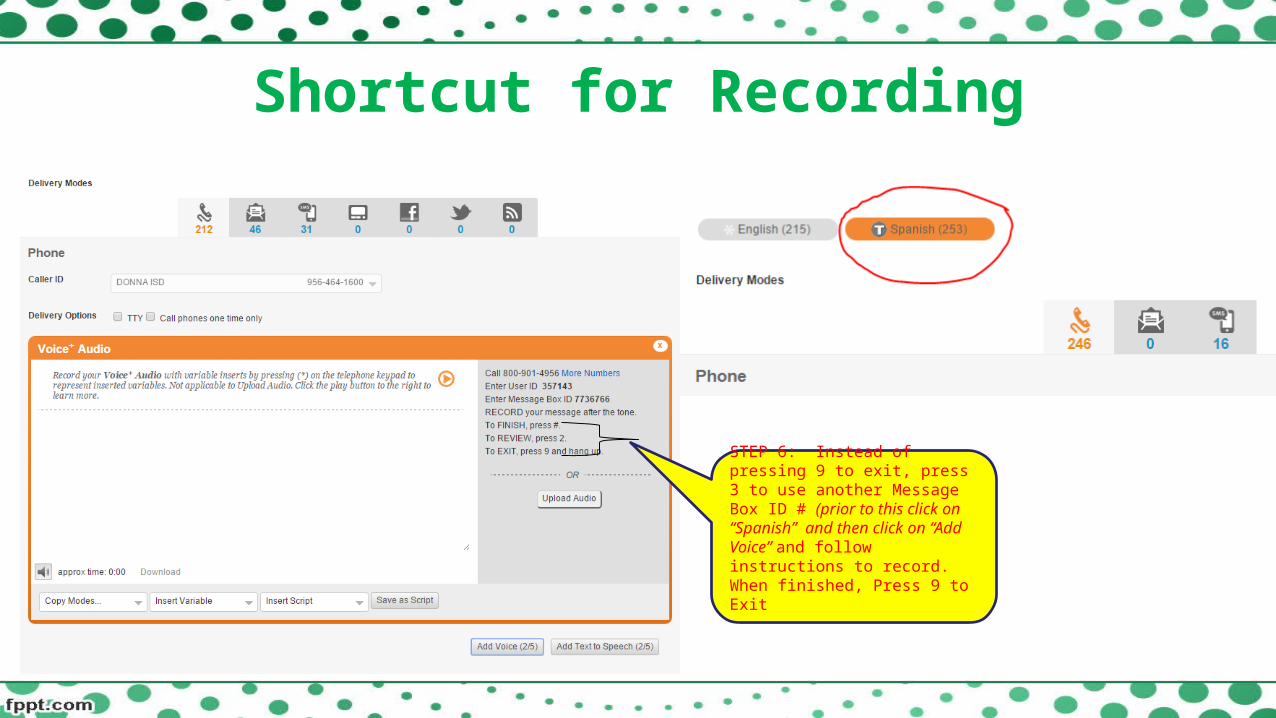
Shortcut for Recording
STEP 6: Instead of pressing 9 to exit, press 3 to use another Message Box ID # (prior to this click on “Spanish” and then click on “Add Voice” and follow instructions to record.When finished, Press 9 to Exit
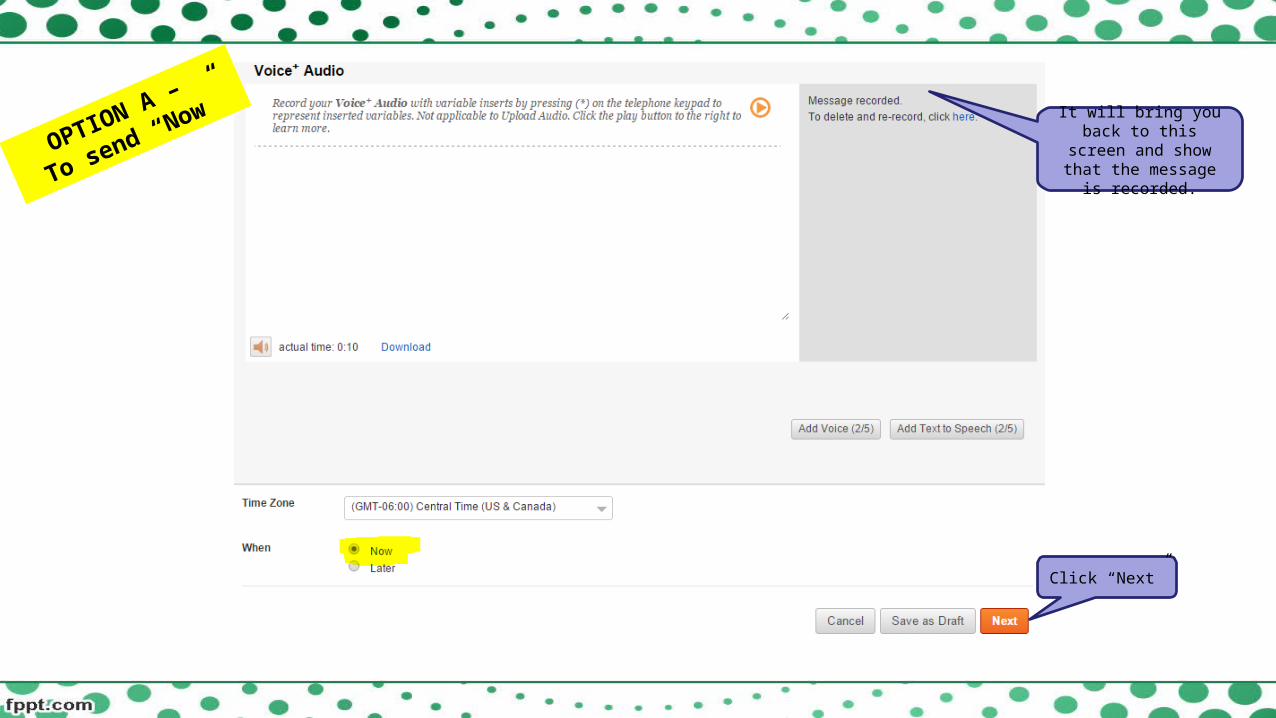
OPTION A –
To send “Now”It will bring you back to this screen and show that the message is
recorded.
Click “Next”

Final review before Sending
REVIEW and Click “Send”
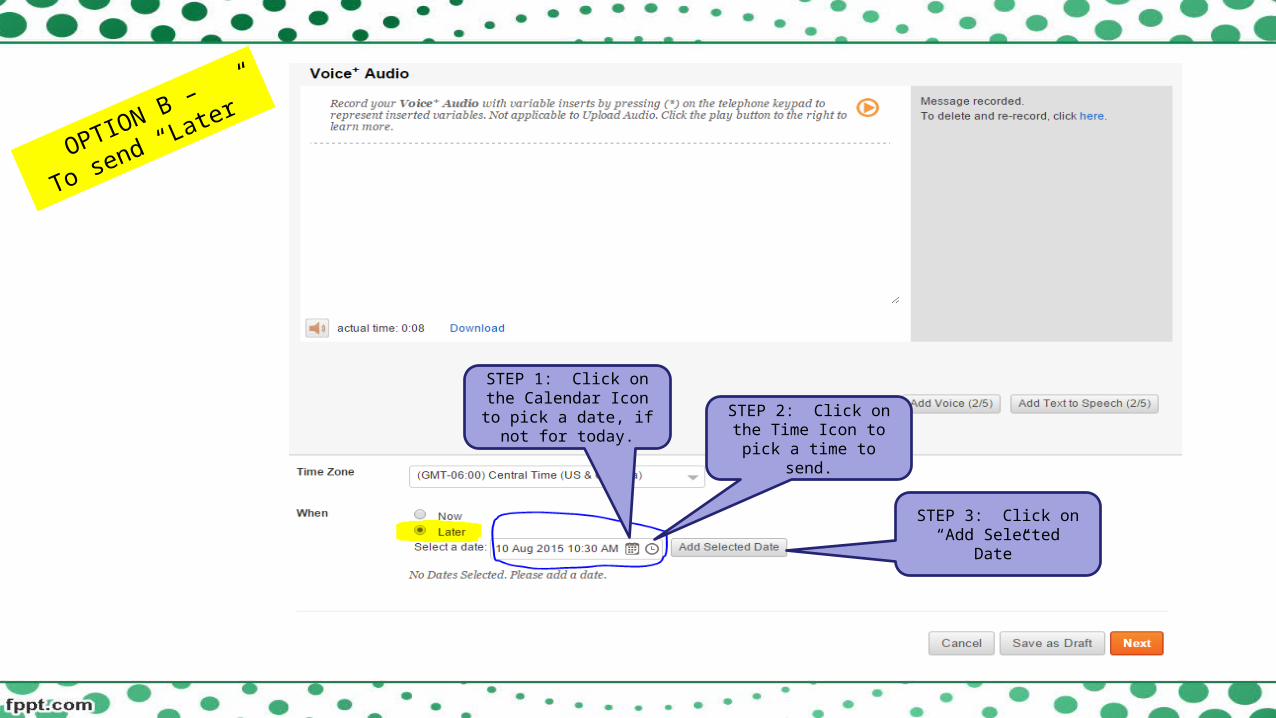
OPTION B –
To send “Later”
STEP 1: Click on the Calendar Icon to pick a
date, if not for today. STEP 2: Click on the Time Icon to pick a time
to send.
STEP 3: Click on “Add Selected Date”
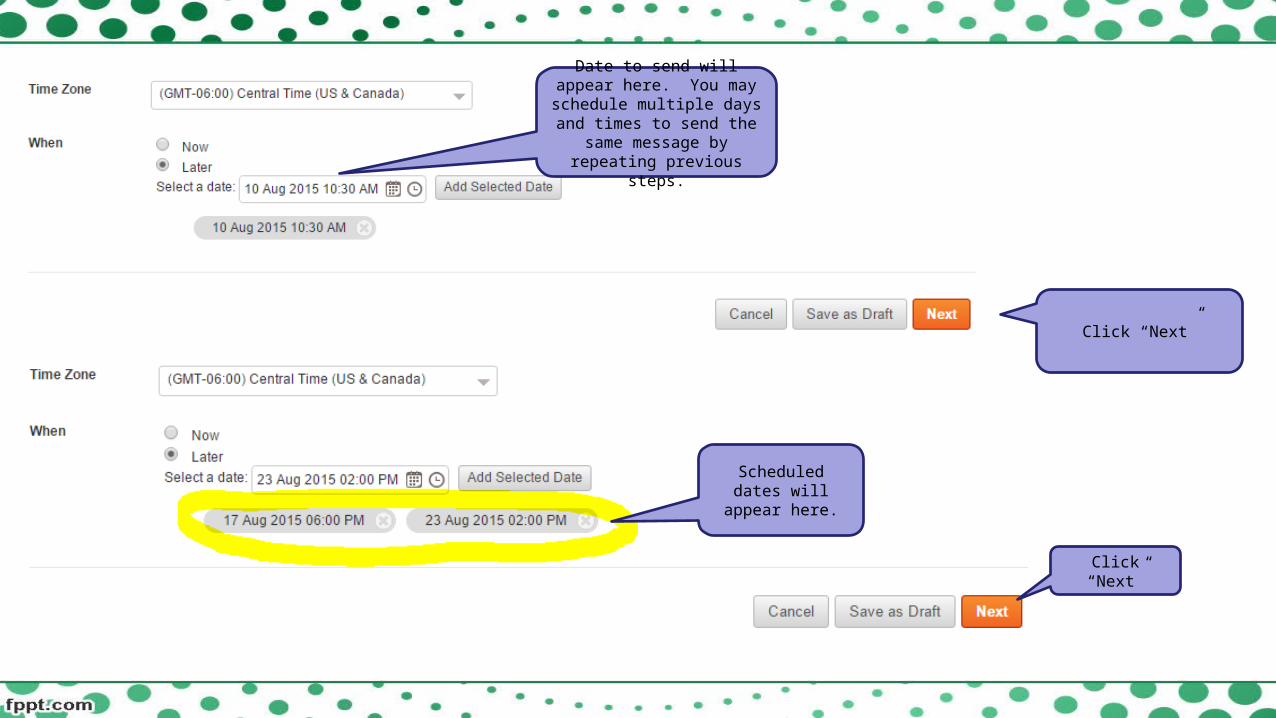
Date to send will appear here. You may schedule
multiple days and times to send the same message by repeating previous steps.
Scheduled dates will appear here.
Click “Next”
Click “Next”
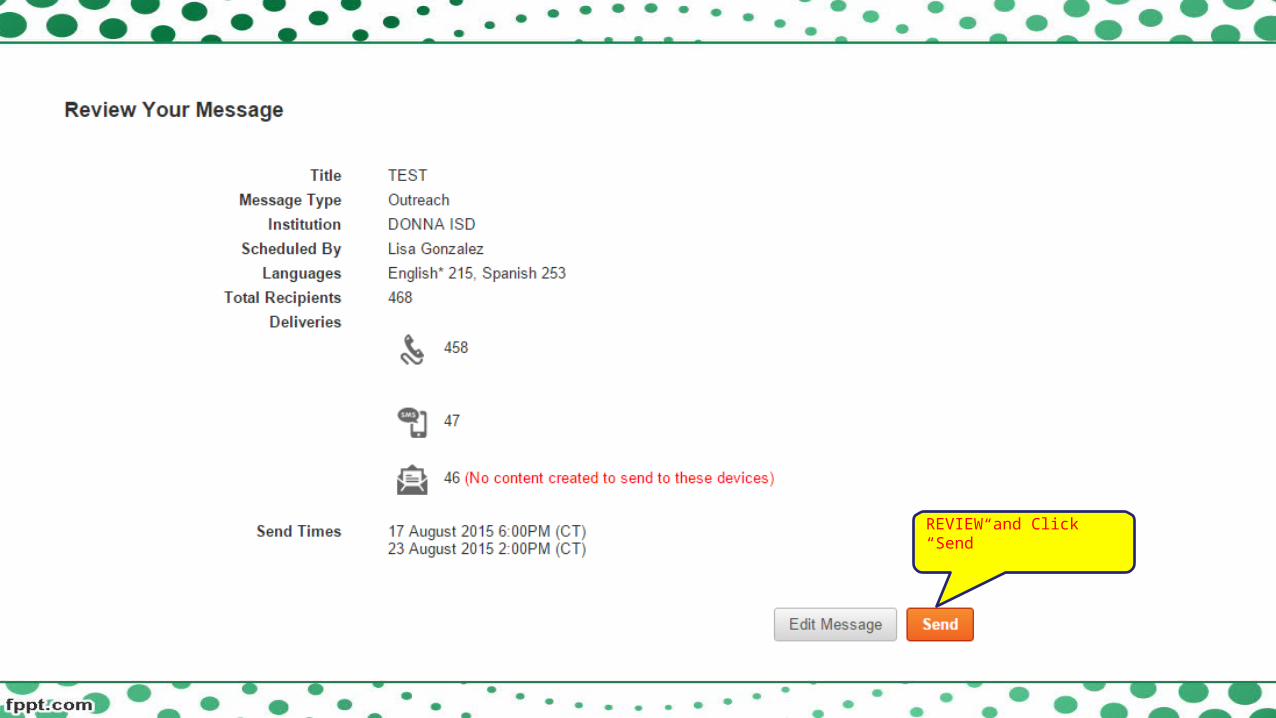
REVIEW and Click “Send”
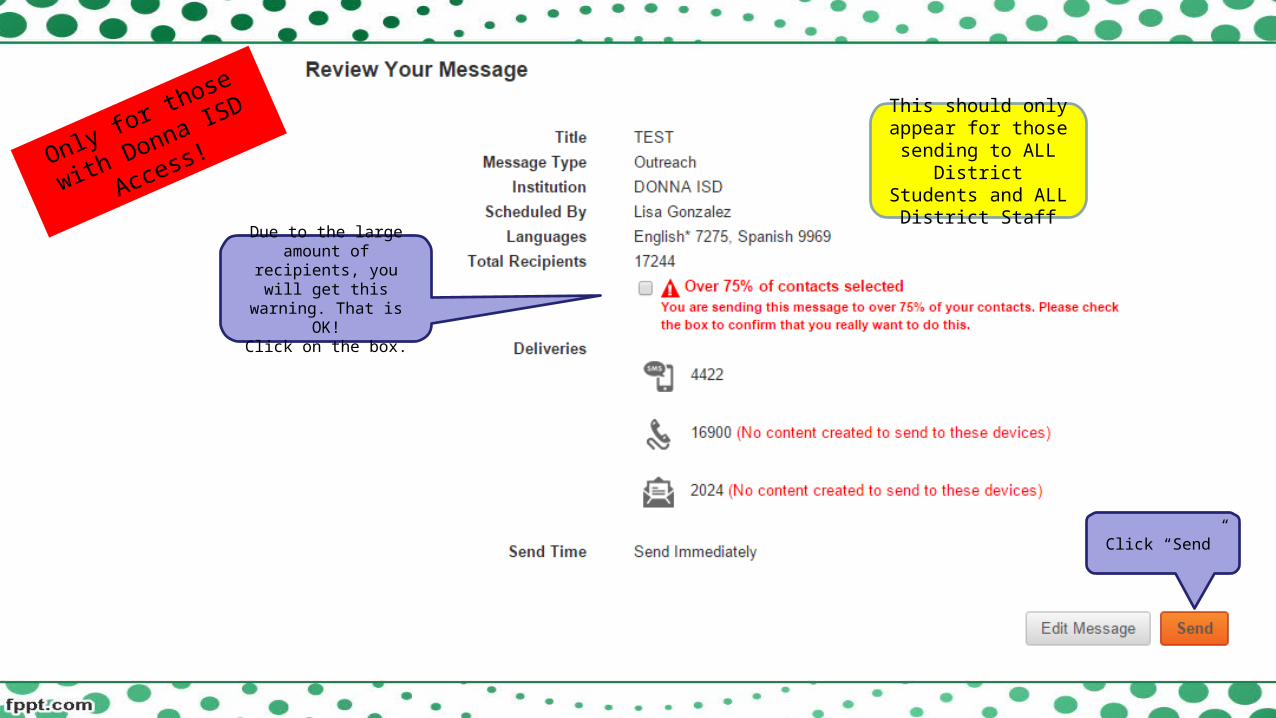
Only for those with
Donna ISD Access!
Due to the large amount of recipients, you will get this warning. That is OK!
Click on the box.
Click “Send”
This should only appear for those
sending to ALL District Students and ALL
District Staff
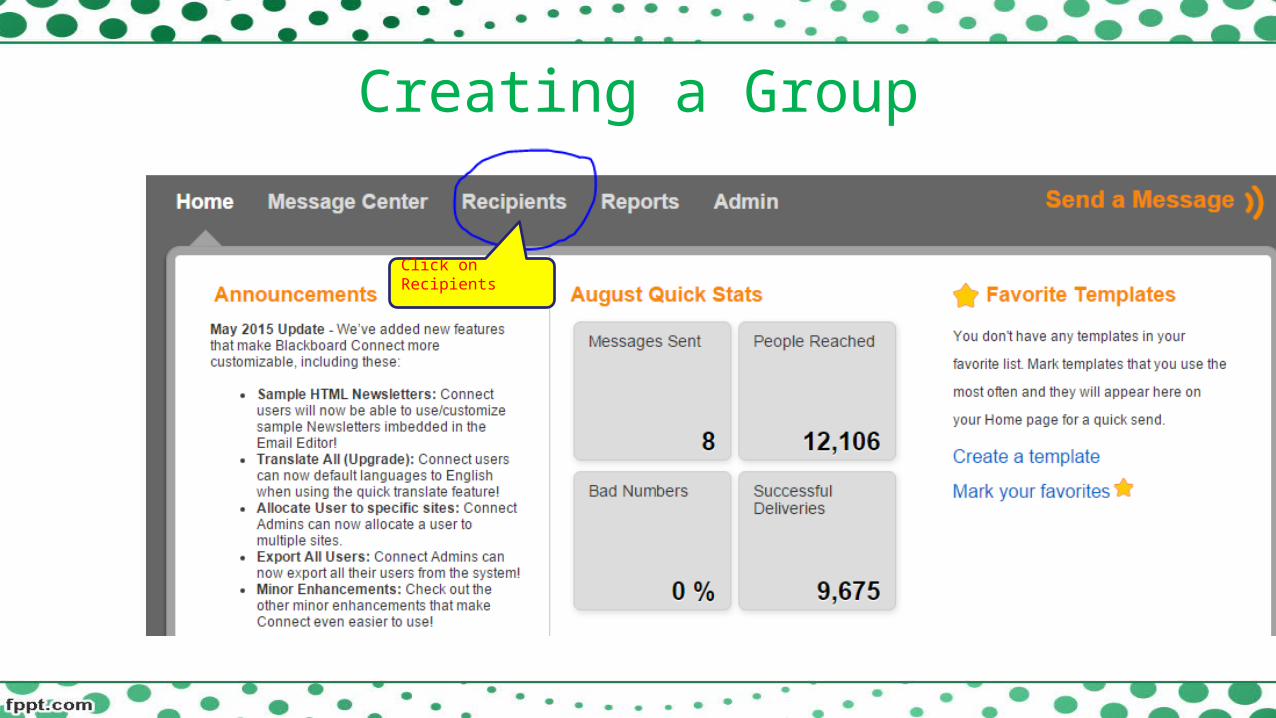
Creating a Group
Click on Recipients

STEP 1: Click on “Groups” STEP 2: Click on
“New Group”
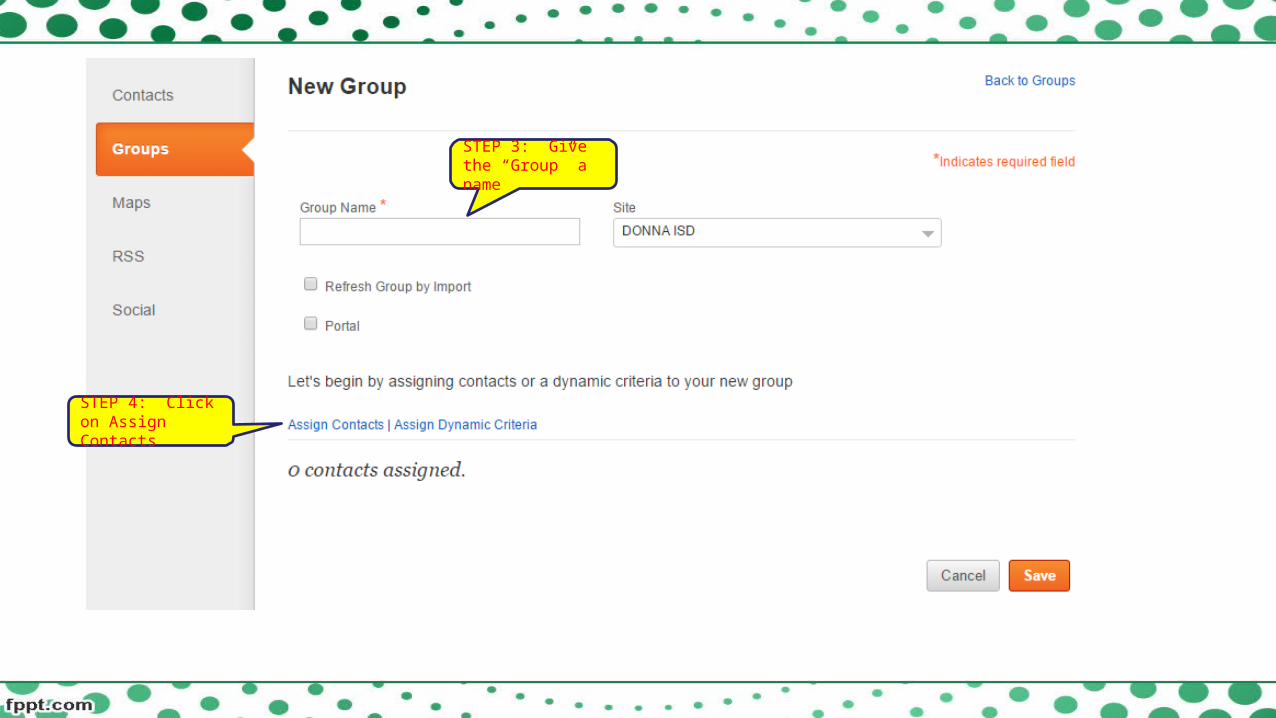
STEP 3: Give the “Group” a name
STEP 4: Click on Assign Contacts
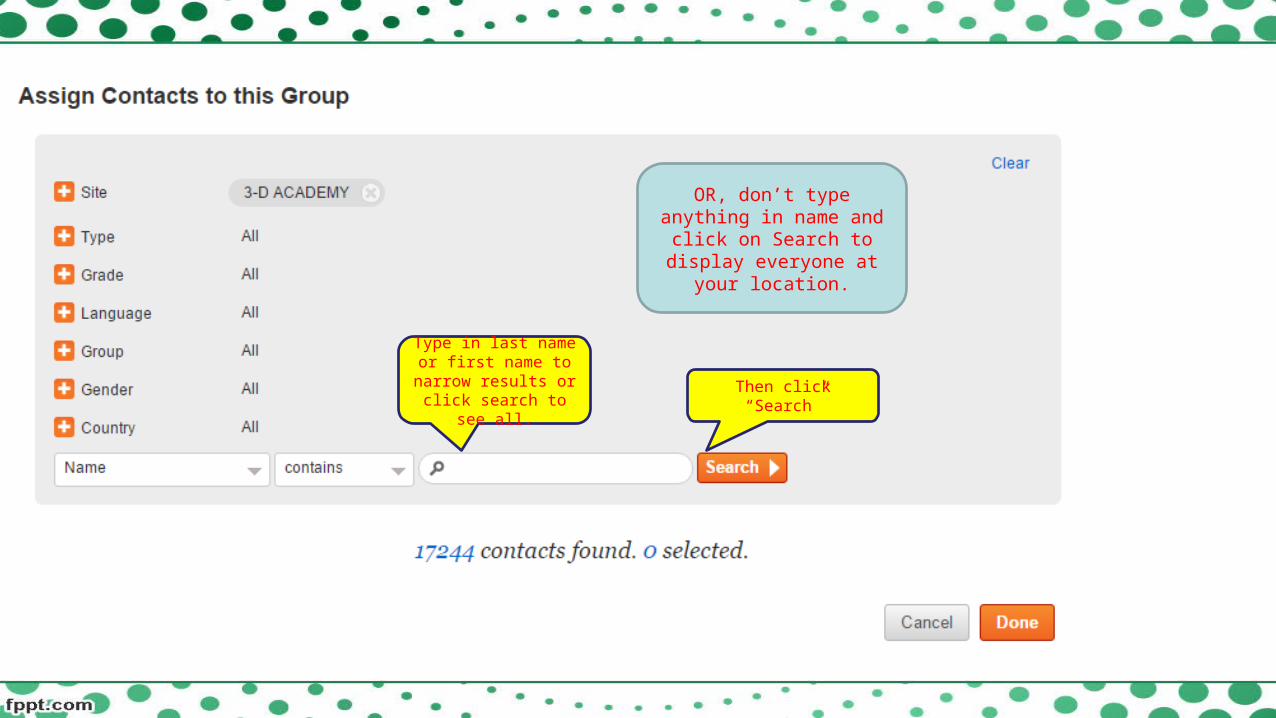
Type in last name or first name to narrow
results or click search to see all.
Then click “Search”
OR, don’t type anything in name and click on Search to display everyone at your
location.
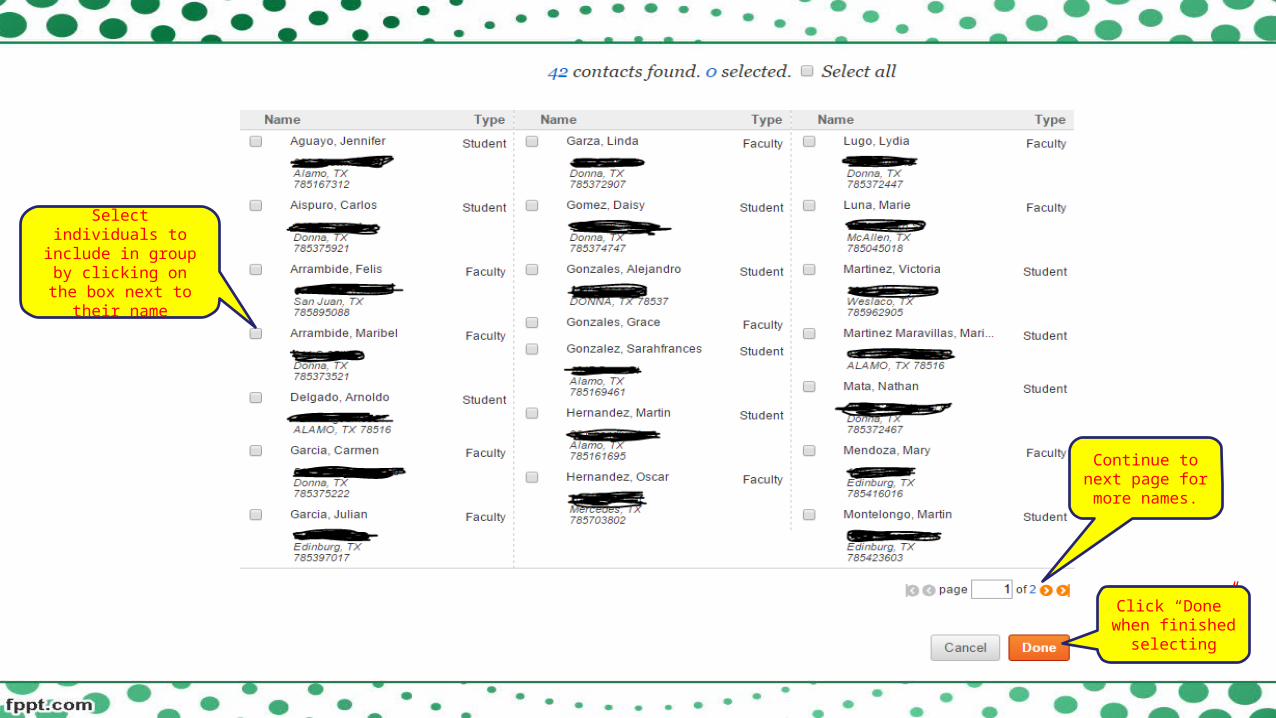
Select individuals to include in group by
clicking on the box next to their name
Click “Done” when finished
selecting
Continue to next page for more
names.
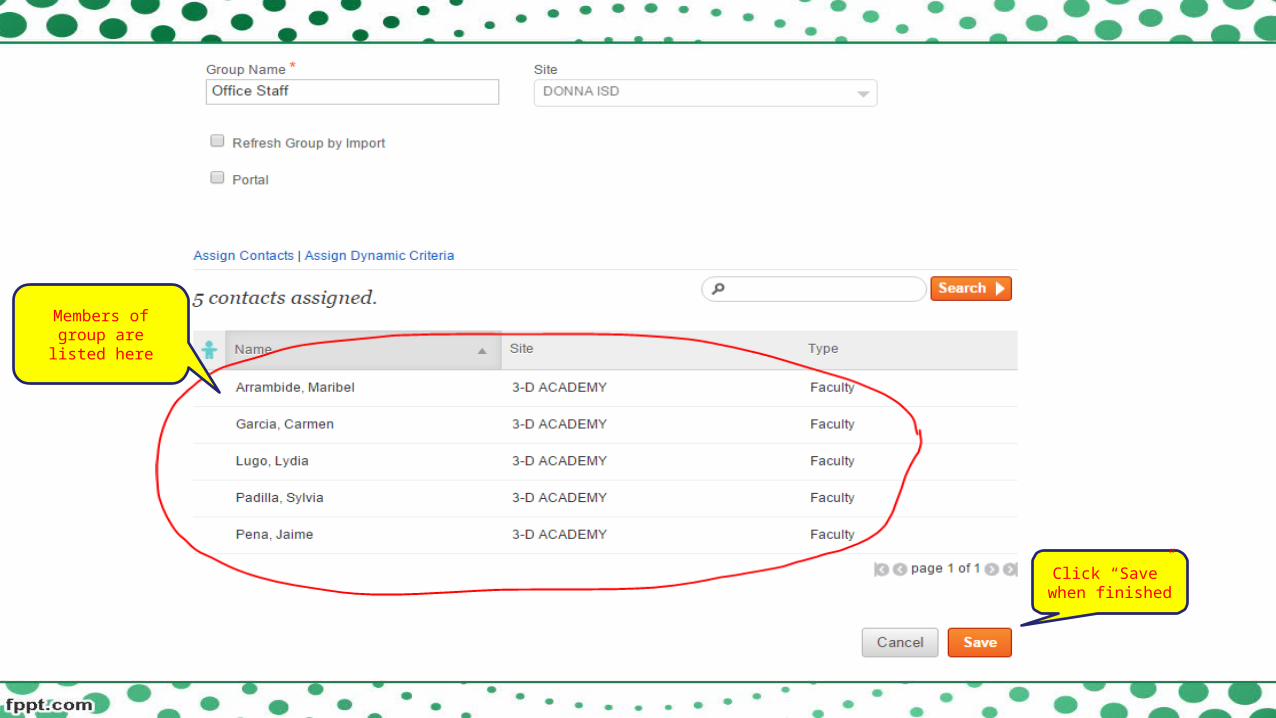
Members of group are listed here
Click “Save” when finished

Uploading a ‘CSV” file• Create list in Excel• Import Call list – 2 required columns
• Referencecode (Student ID #) – No space• Institution (Campus Name as it appears in
Blackboard)
• Upload direct contacts - 3 required columns with the following headings:
• lastname (as is, no spaces; can list last and first name)
• Homephone (as is, no spaces)• Smsphone (as is, no spaces)
• Phone numbers must indicate area code• No other information is needed• Does NOT have to be in alphabetical order• Save as “CSV (Comma delimited)
Sample
lastname homephone smsphone
Ansiso, Maria Imelda 9564641234 9564641234
Balderas, Graciela 9564611234 9564631234
Cantu, Margarita 8711239456 9561231234
Direct upload could be used by Coaches, Band or Choir Teachers who are assigned during the day to one campus but coach at a different campus.

STEP 1: Click on “To”
STEP 2: Click on the down arrow next to
Contacts
STEP 3: Select “Upload Direct
Contacts”

STEP 4: Click on “Select File” to browse your computer for file
to upload
STEP 5: After you select your file. Make sure that it gives you
a number of recipients in the Direct Contacts Uploaded.
Click “Done” to proceed

How to Review ReportsClick on “Message Center”
Click on “Sent”

Click here to review. Square with magnifying glass will
appear when you scroll over the message.
Click on “View Detailed Results”
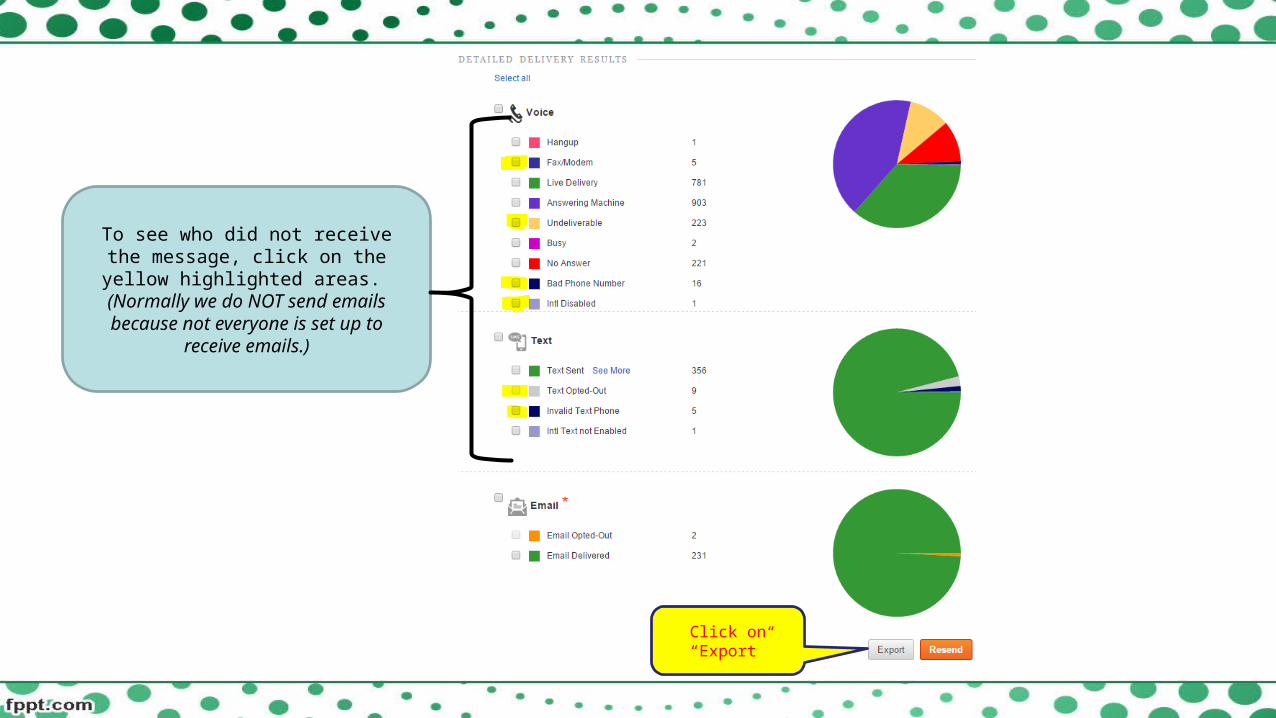
To see who did not receive the message, click on the yellow
highlighted areas. (Normally we do NOT send emails because not
everyone is set up to receive emails.)
Click on “Export”
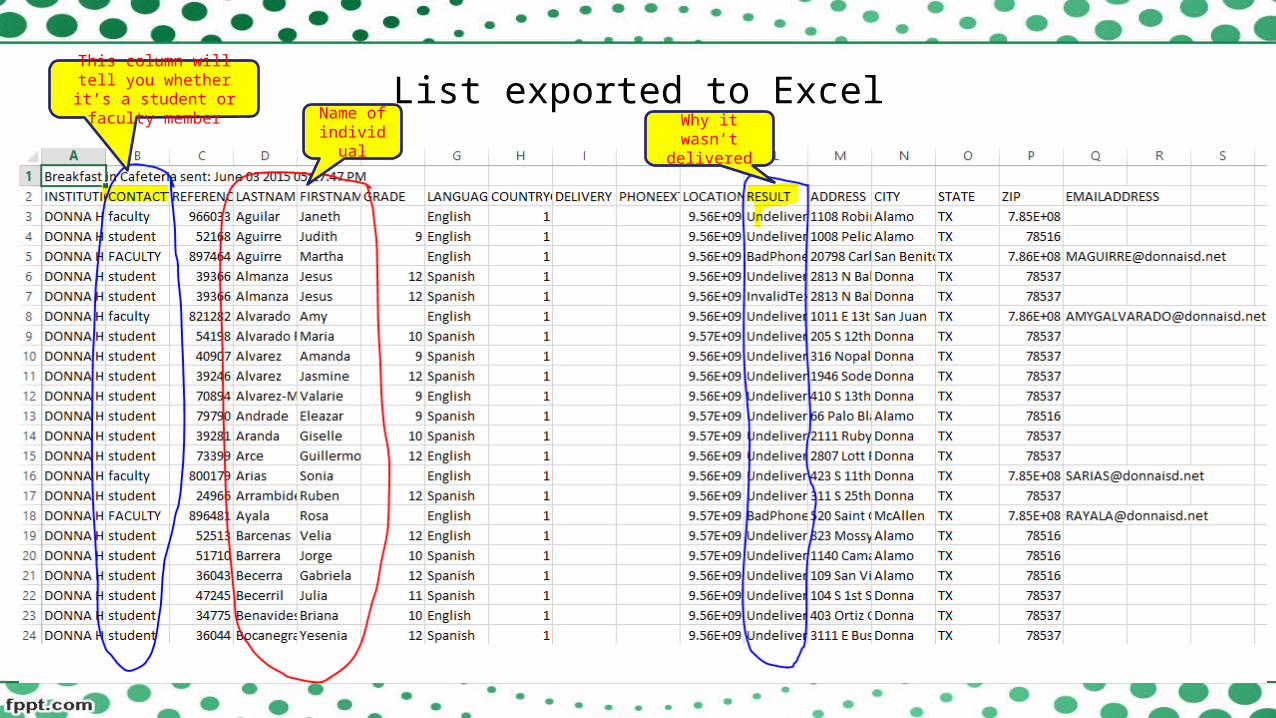
List exported to ExcelThis column will tell you whether it’s a student or
faculty memberName of individual
Why it wasn’t delivered
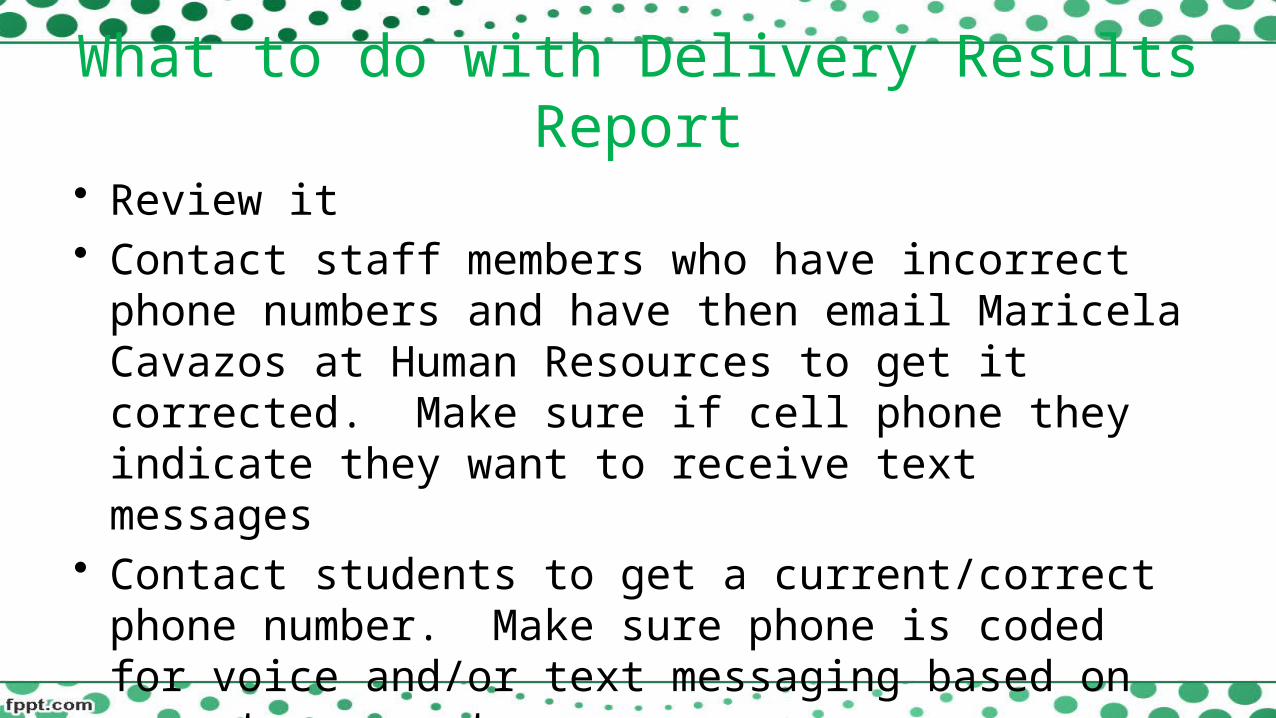
What to do with Delivery Results Report
• Review it• Contact staff members who have incorrect phone
numbers and have then email Maricela Cavazos at Human Resources to get it corrected. Make sure if cell phone they indicate they want to receive text messages
• Contact students to get a current/correct phone number. Make sure phone is coded for voice and/or text messaging based on parents request.
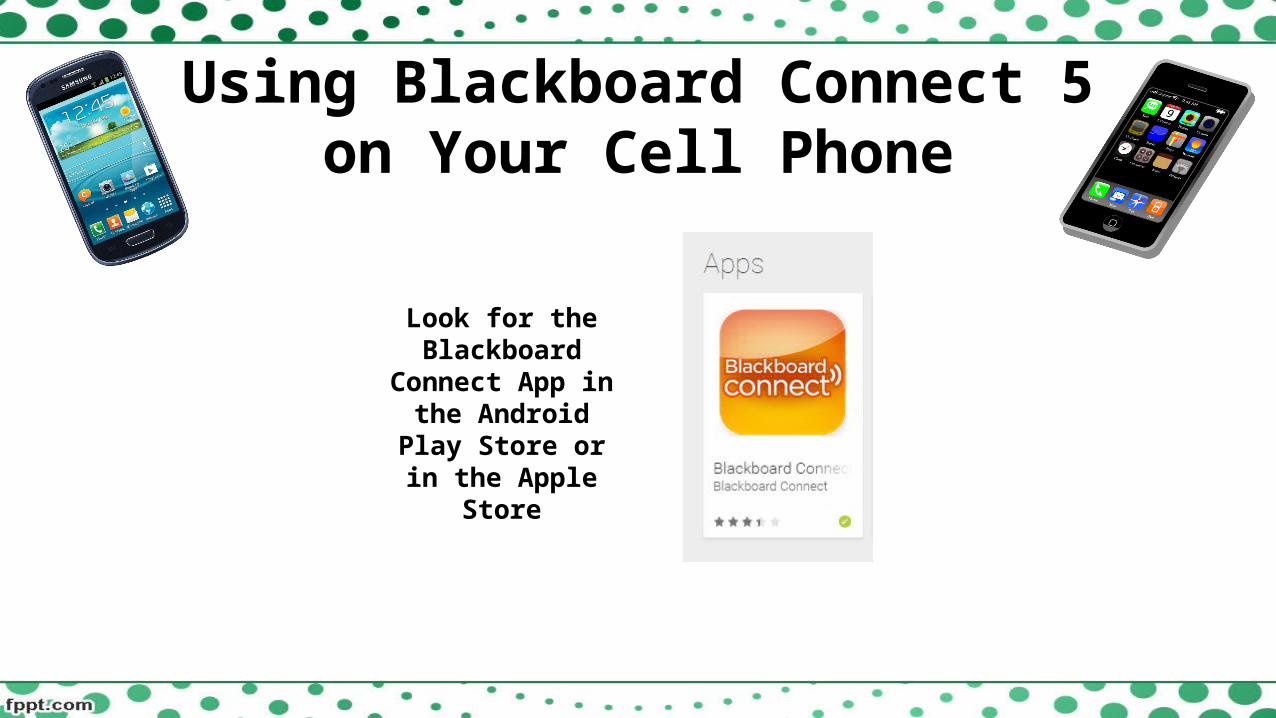
Using Blackboard Connect 5on Your Cell Phone
Look for the Blackboard
Connect App in the Android Play
Store or in the Apple Store
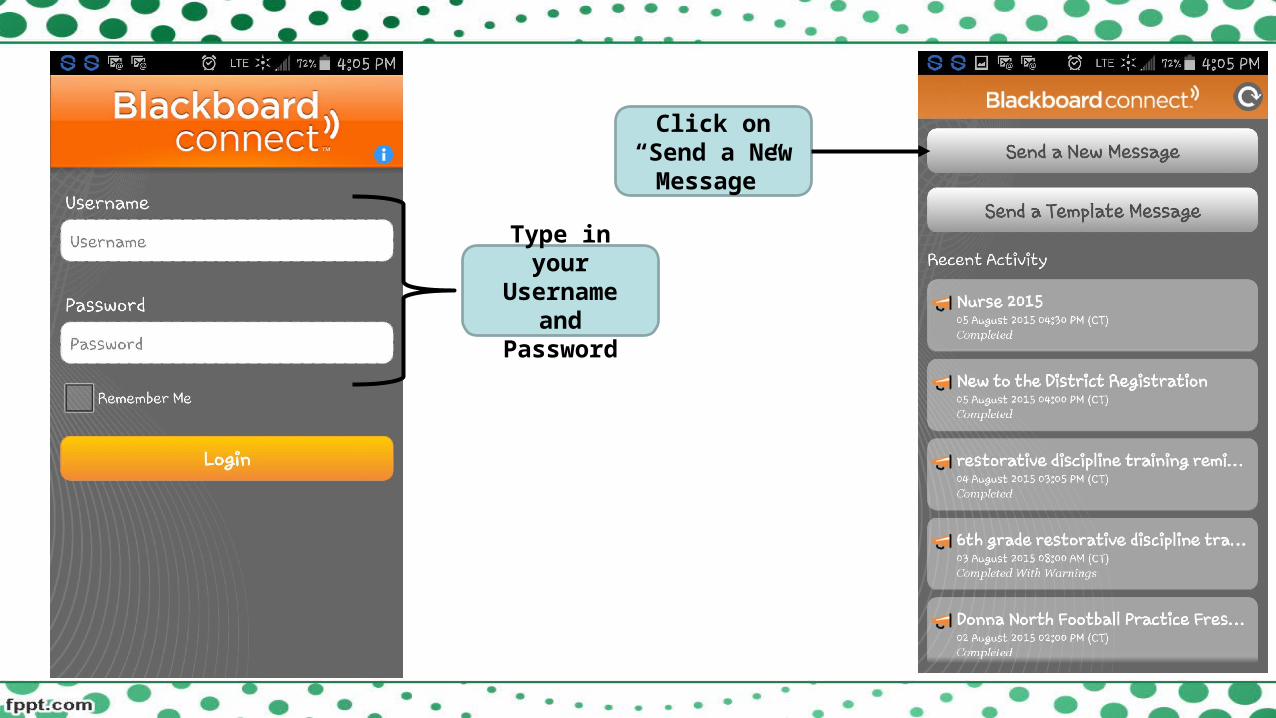
Type in your Username and
Password
Click on “Send a New
Message”

Give your message a
“Title”
Click on “Groups”
Click on “Select
Contacts”
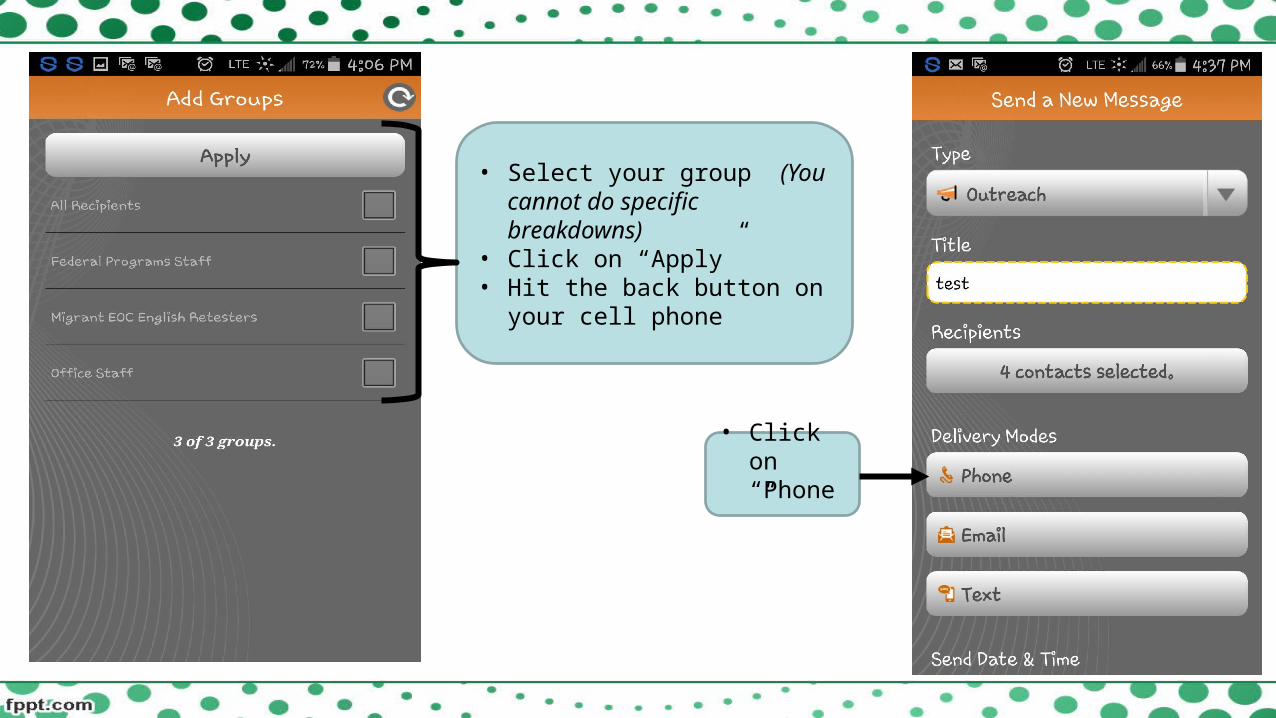
• Select your group (You cannot do specific breakdowns)
• Click on “Apply”• Hit the back button on your
cell phone
• Click on “Phone”
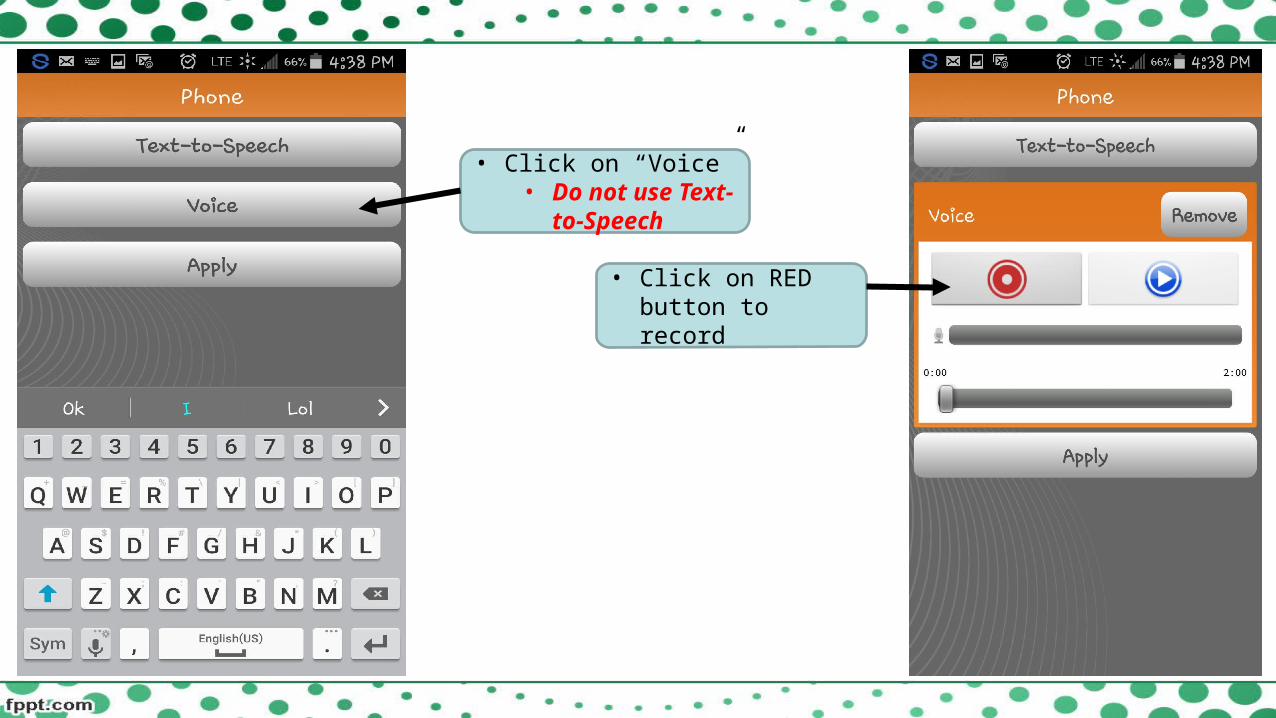
• Click on “Voice”• Do not use
Text-to-Speech
• Click on RED button to record

• Click on BLACK button to stop recording
• Click on “Apply” to continue
• Click on BLUE button to play and listen to recording
• Click on “Text” to compose text message

• Type your text message (Limit 160 characters)
• Click “Apply” to continue
• Click “Select Delivery Date & Time”
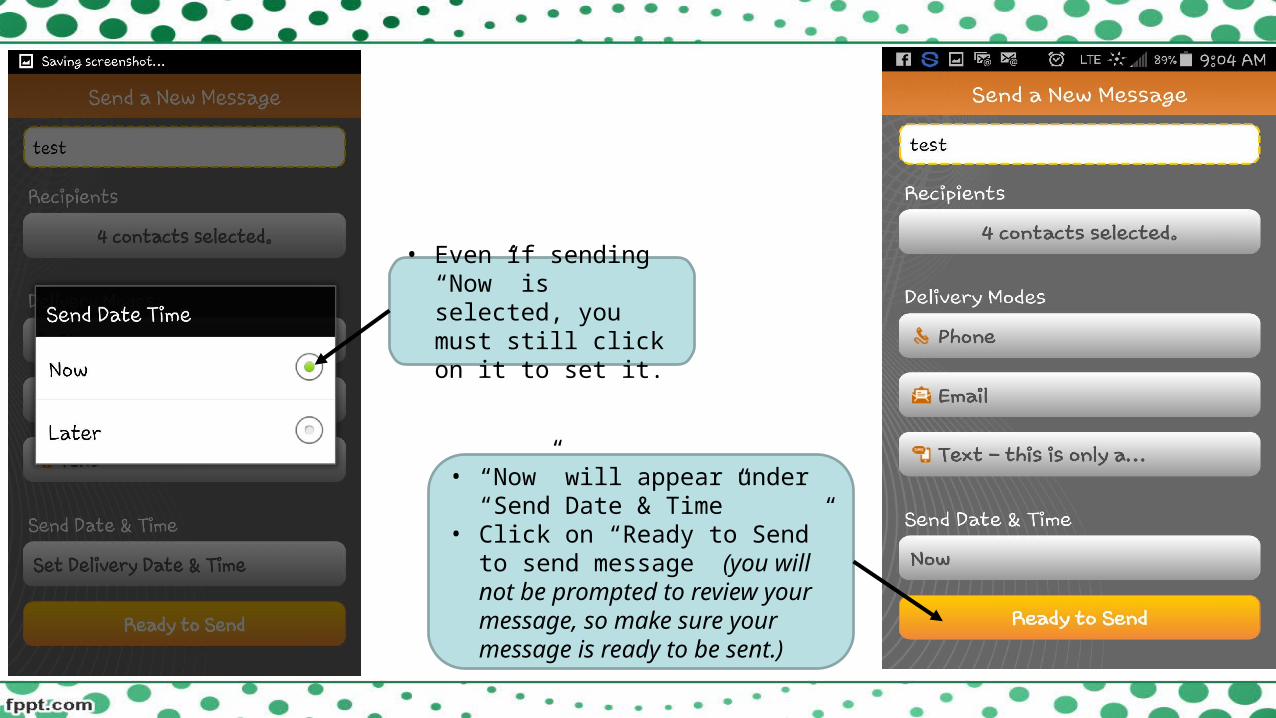
• Even if sending “Now” is selected, you must still click on it to set it.
• “Now” will appear under “Send Date & Time”
• Click on “Ready to Send” to send message (you will not be prompted to review your message, so make sure your message is ready to be sent.)
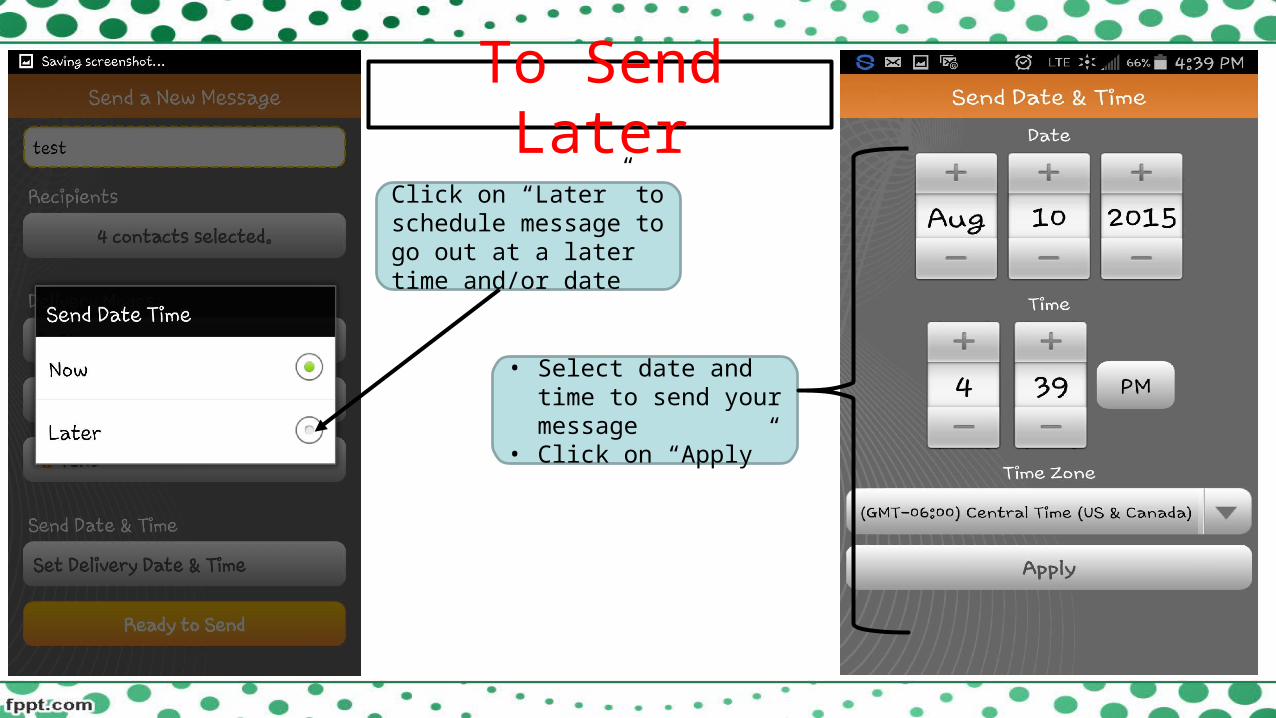
To Send Later
Click on “Later” to schedule message to go out at a later time and/or date
• Select date and time to send your message
• Click on “Apply”
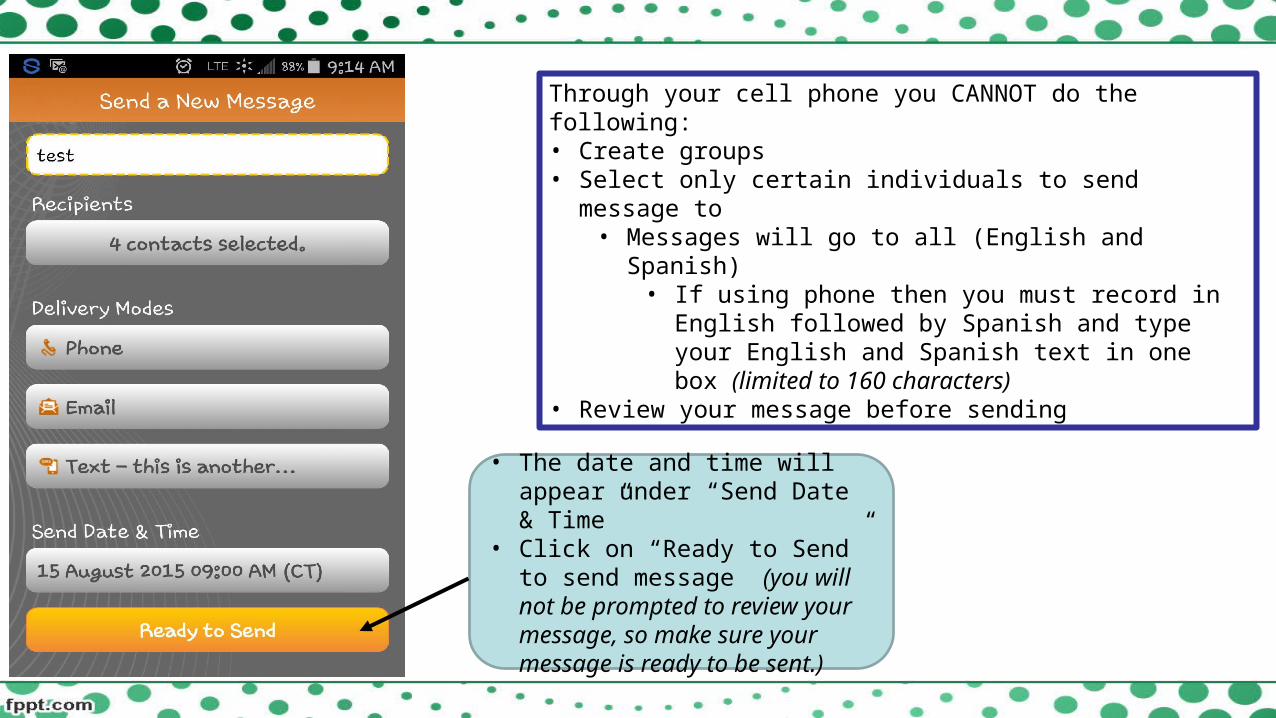
• The date and time will appear under “Send Date & Time”
• Click on “Ready to Send” to send message (you will not be prompted to review your message, so make sure your message is ready to be sent.)
Through your cell phone you CANNOT do the following:• Create groups• Select only certain individuals to send message to
• Messages will go to all (English and Spanish)• If using phone then you must record in English
followed by Spanish and type your English and Spanish text in one box (limited to 160 characters)
• Review your message before sending
AS A COURTESY….When sending out a message please make sure your front office staff knows that you are sending a message and what the message is about.
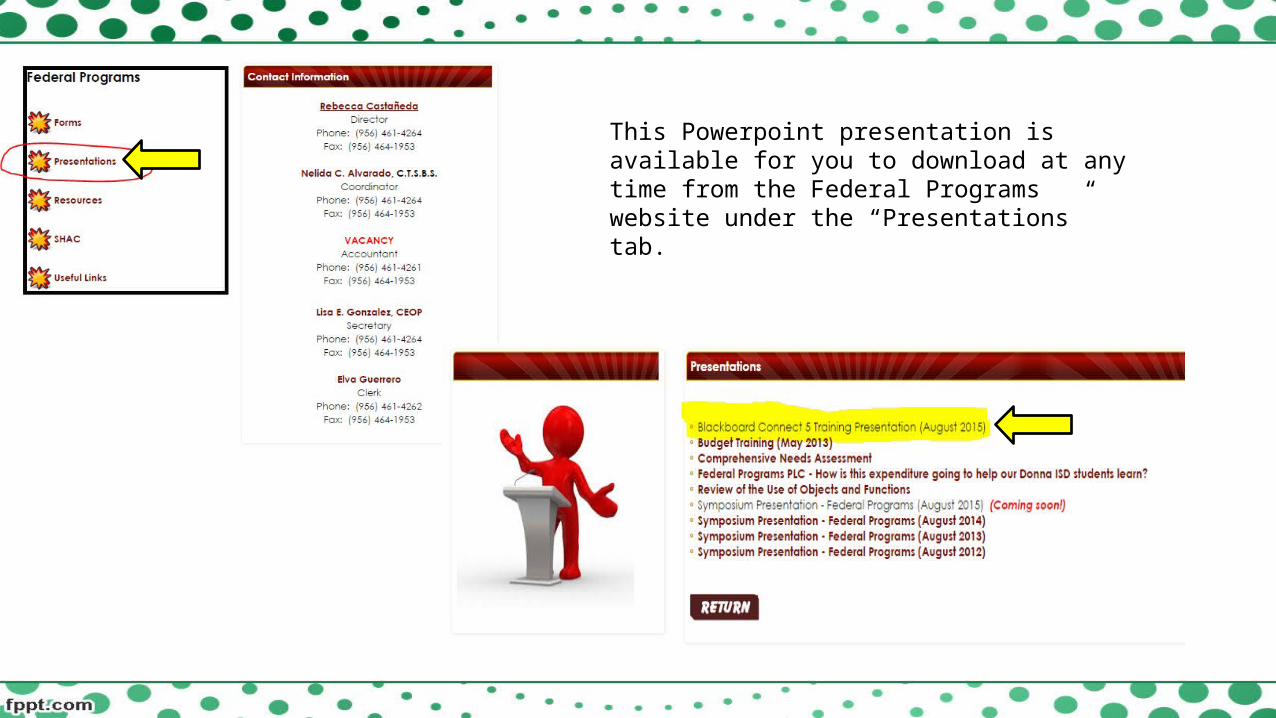
This Powerpoint presentation is available for you to download at any time from the Federal Programs website under the “Presentations” tab.