Biosafety. Use and Care of Microorganisms This area of science, may involve many dangers and hazards...
61
Biosafety
-
Upload
georgia-sparks -
Category
Documents
-
view
213 -
download
0
Transcript of Biosafety. Use and Care of Microorganisms This area of science, may involve many dangers and hazards...

Biosafety

Biosafety
Use and Care of MicroorganismsThis area of science, may involve many dangers and hazards while experimenting. It is the sole responsibility of all teacher(s)/sponsor(s) to teach students proper safety methods and sterile techniques.
Roles and Responsibilities of Students & AdultsThe Instructor is responsible for working with the student to evaluate any possible risks involved in order to ensure the health and safety of the student conducting the research and the humans or animals involved in the study.

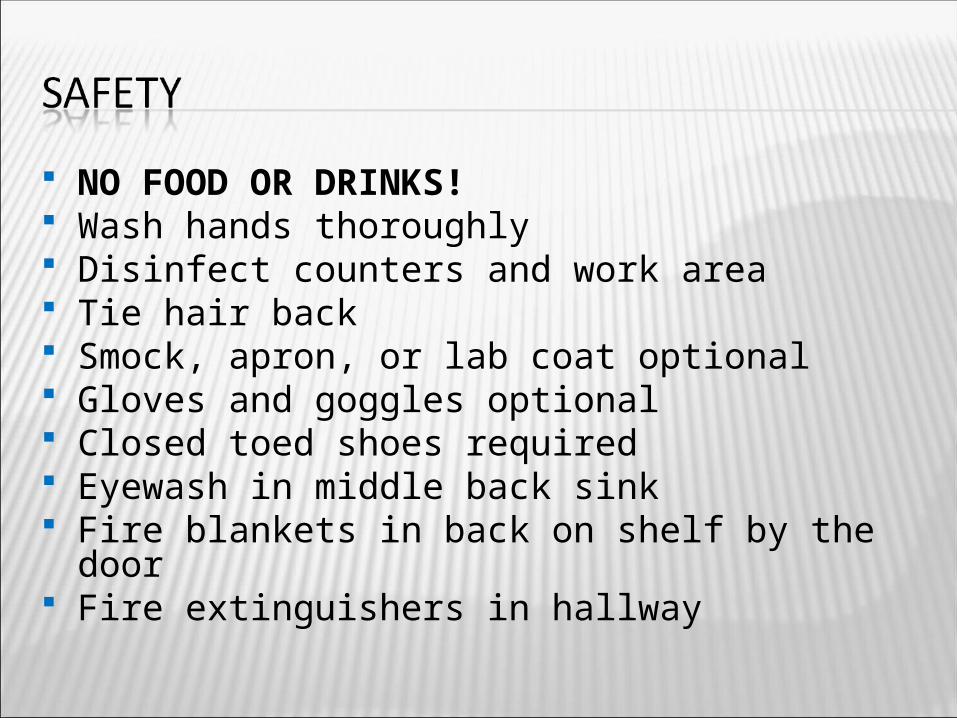
NO FOOD OR DRINKS! Wash hands thoroughly Disinfect counters and work area Tie hair back Smock, apron, or lab coat optional Gloves and goggles optional Closed toed shoes required Eyewash in middle back sink Fire blankets in back on shelf by the door Fire extinguishers in hallway
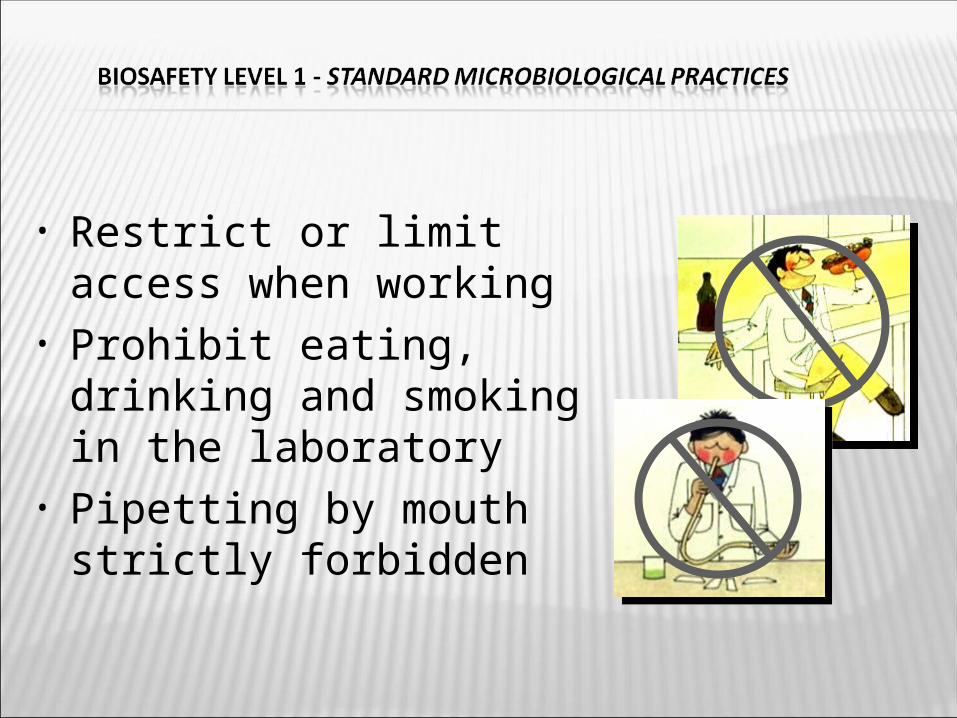
• Restrict or limit access when working
• Prohibit eating, drinking and smoking in the laboratory
• Pipetting by mouth strictly forbidden

• Always thoroughly wash hands upon entering and leaving lab
• Keep work areas uncluttered and clean• No food in lab refrigerator• Minimize splashes and aerosols• Disinfect work surfaces daily• Maintain insect & rodent control program
• Sterilization• Disinfection
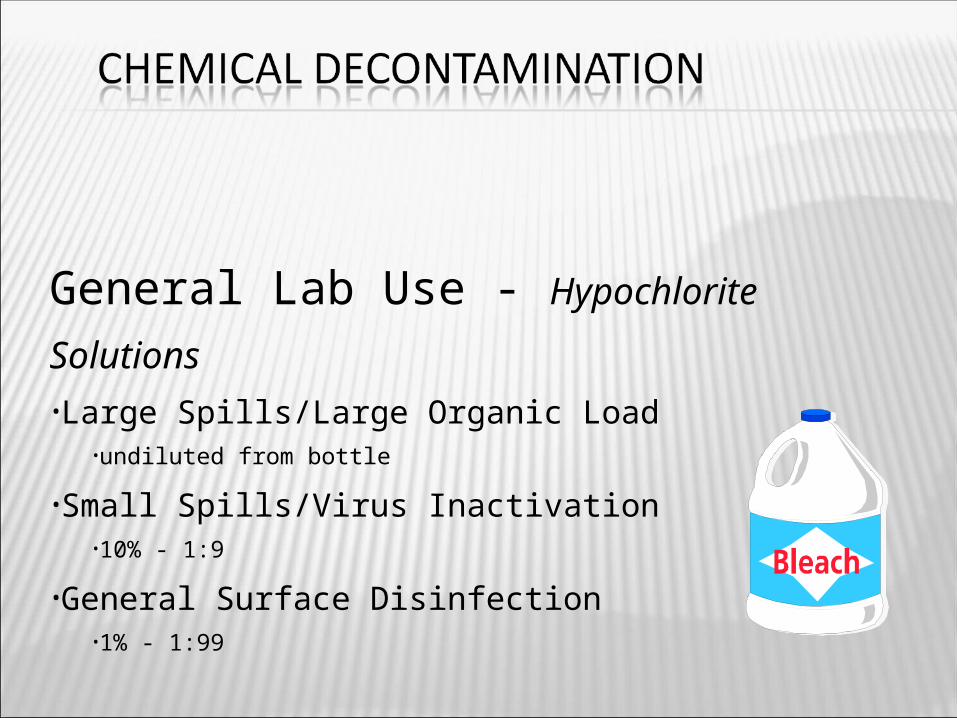
General Lab Use - Hypochlorite Solutions•Large Spills/Large Organic Load
•undiluted from bottle
•Small Spills/Virus Inactivation•10% - 1:9
•General Surface Disinfection•1% - 1:99
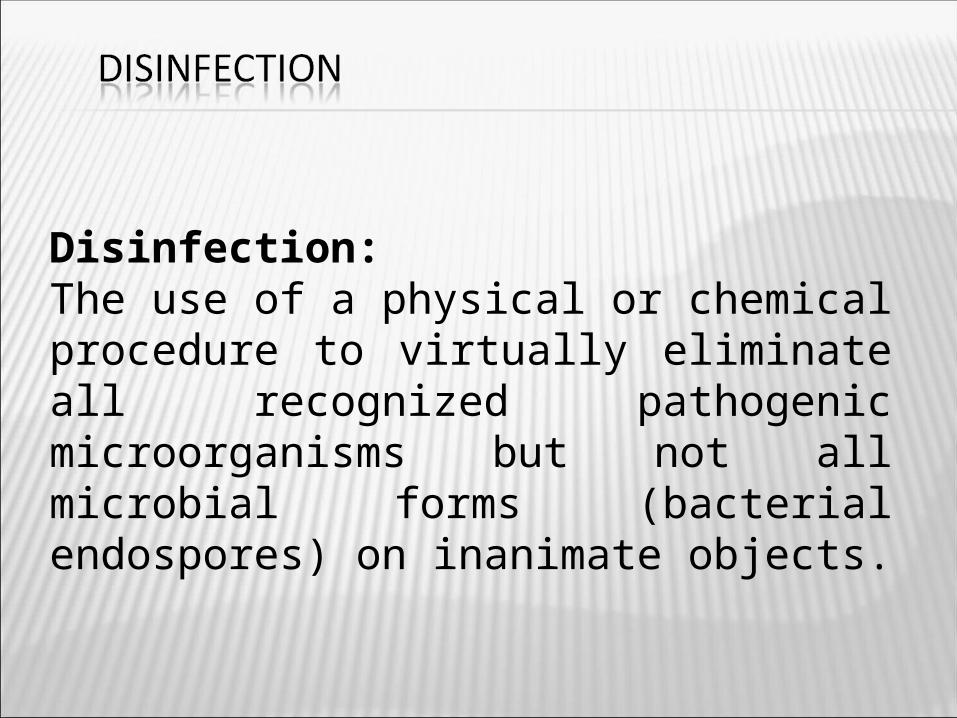
Disinfection:The use of a physical or chemical procedure to virtually eliminate all recognized pathogenic microorganisms but not all microbial forms (bacterial endospores) on inanimate objects.
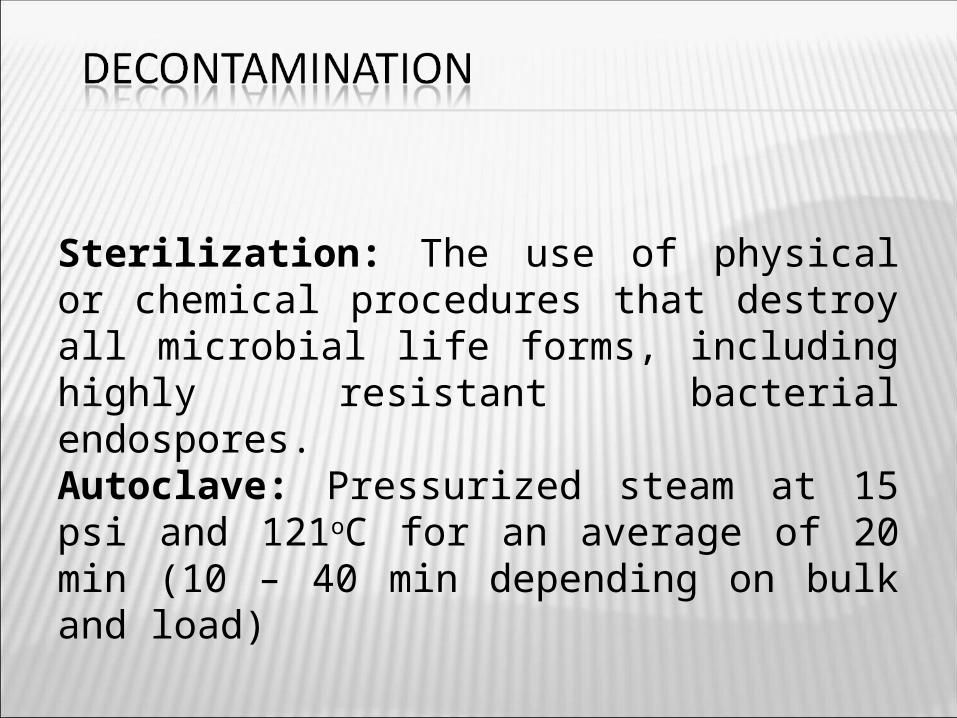
Sterilization: The use of physical or chemical procedures that destroy all microbial life forms, including highly resistant bacterial endospores. Autoclave: Pressurized steam at 15 psi and 121oC for an average of 20 min (10 – 40 min depending on bulk and load)

• Get the instructor, do not pick up glass!• Wear disposable gloves • Cover large blood spill with paper towels and soak
with 1% (10000 ppm) of household bleach and allow to stand for at least 5 minutes
• Small spill - wipe with paper towel soaked in 1% bleach
• Discard contaminated towels in infective waste containers
• Wipe down the area with clean towels soaked in a same dilution of household bleach

• Microscope (with accessories)• Inoculation loops• Source of flame (Bunsen burner)• Microscope slides and Cover slips• Gram staining kits (can purchase from science supply store)• Petri dishes and proper growth media • Incubators • Autoclave
• Clorox bleach, like you buy at the supermarket, diluted to 5-10% or disinfectant provided in lab.
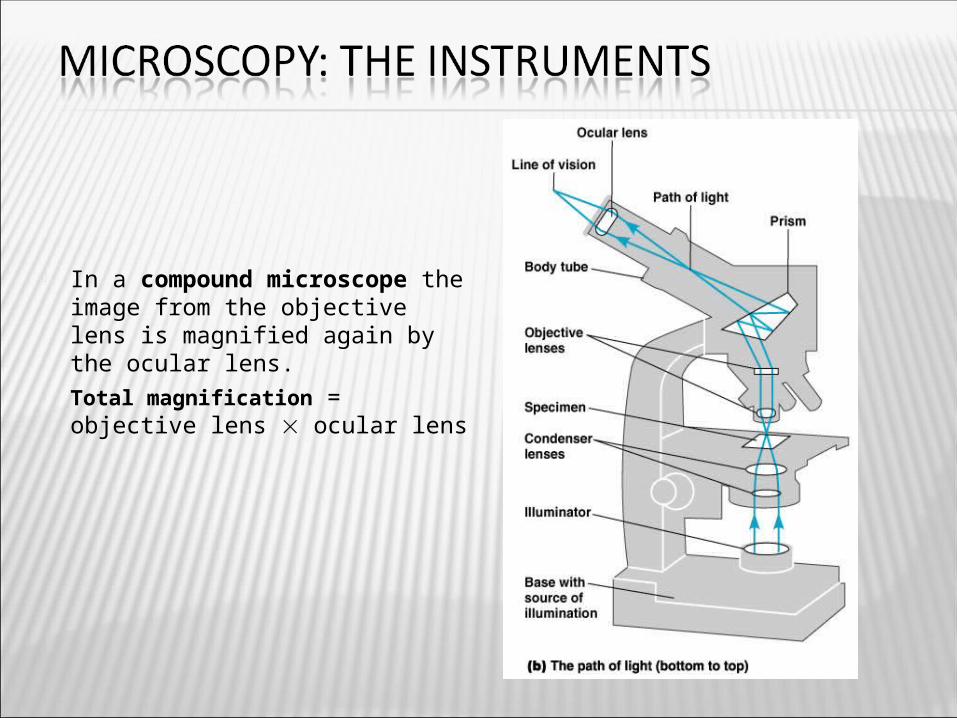
In a compound microscope the image from the objective lens is magnified again by the ocular lens.
Total magnification =objective lens ocular lens
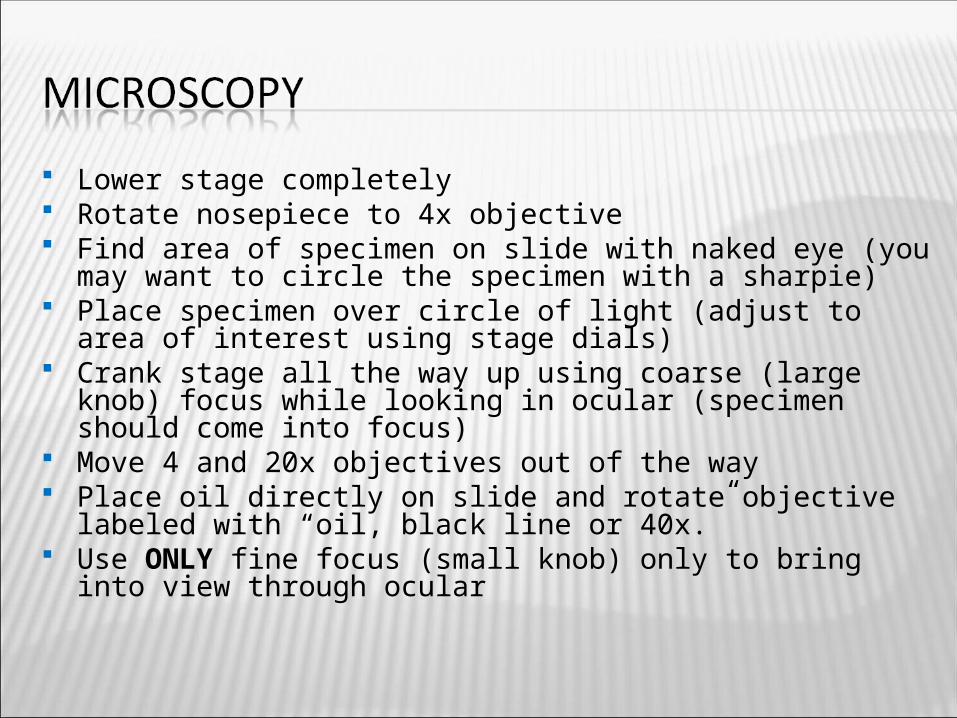
Lower stage completely Rotate nosepiece to 4x objective Find area of specimen on slide with naked eye (you may want to
circle the specimen with a sharpie) Place specimen over circle of light (adjust to area of interest using
stage dials) Crank stage all the way up using coarse (large knob) focus while
looking in ocular (specimen should come into focus) Move 4 and 20x objectives out of the way Place oil directly on slide and rotate objective labeled with “oil, black
line or 40x.” Use ONLY fine focus (small knob) only to bring into view through
ocular
• Required for all microbiology preparations to assure that contaminants are not introduced.
• On a personal note, aseptic technique assures that infectious agents are not spread to you, fellow students, or the laboratory surfaces.
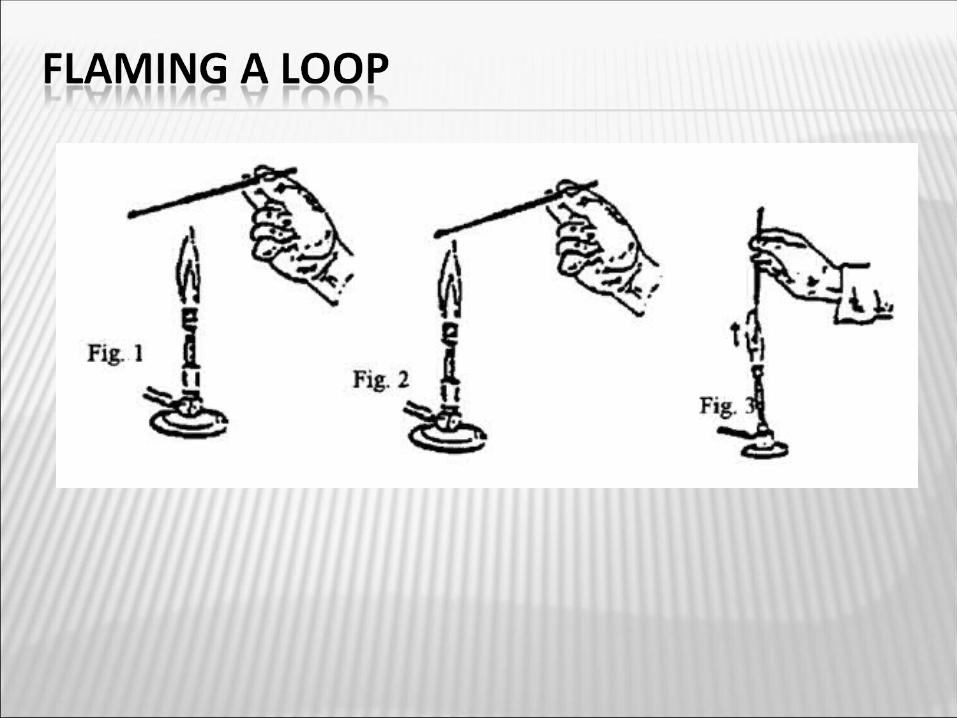
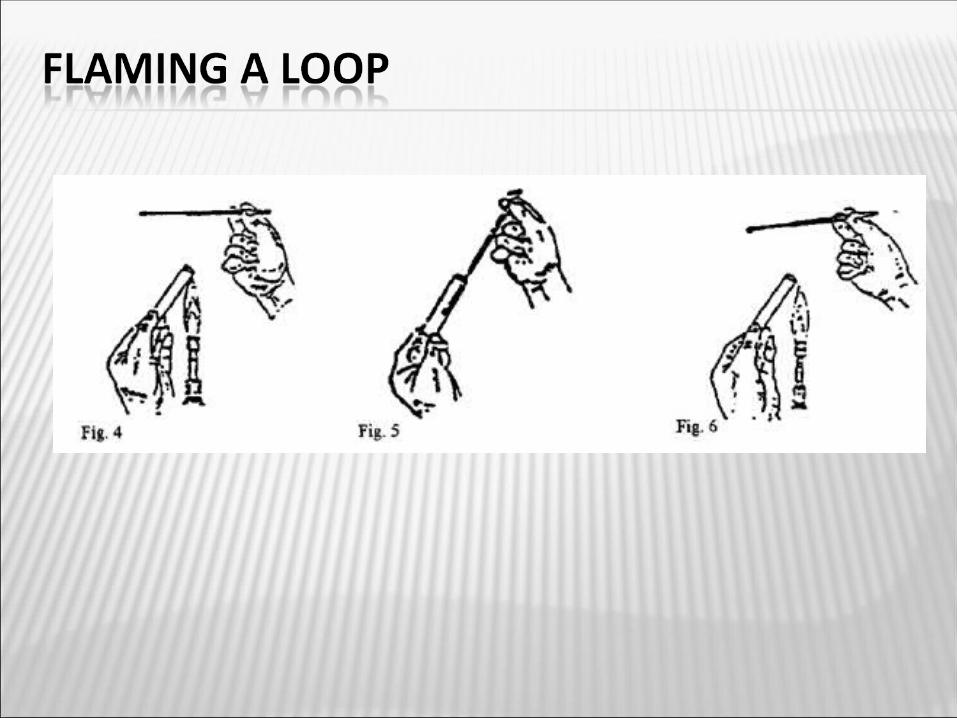
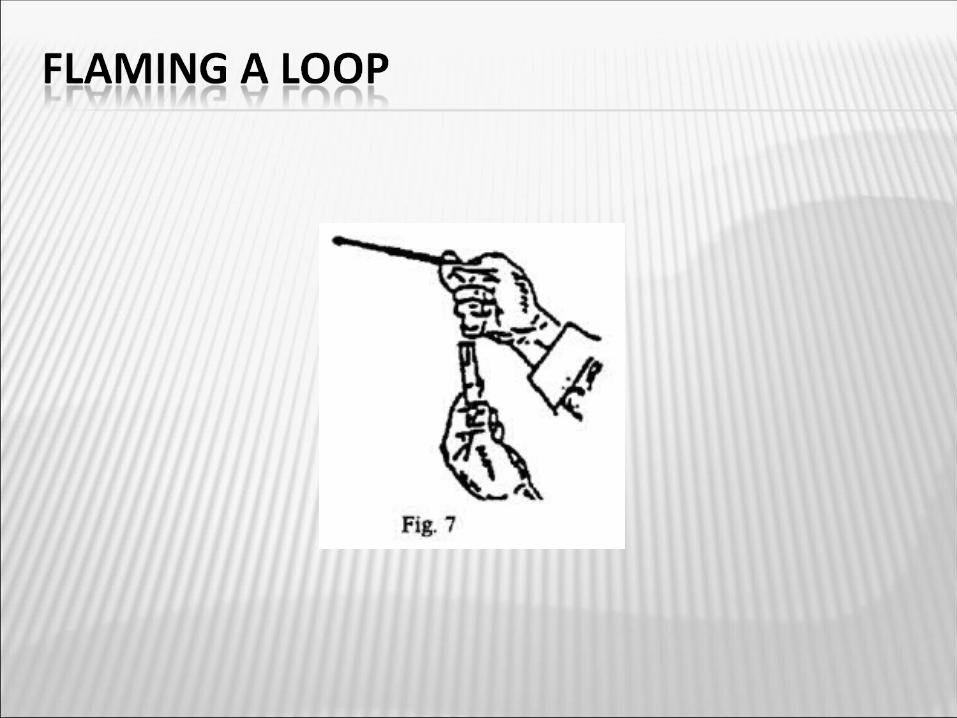
• The inoculating loop is usually used for making transfers of bacterial cultures (see next few slides for technique).
• Allow the loop to cool sufficiently so that any organisms to be tested will not be killed by the hot wire, but do not allow the loop to contact anything during the cooling period or contamination will result.
• Learn to remove and replace the caps or lids efficiently without setting them on the countertop or leaving the cover off too long.
• After the transfer is completed the loop must be sterilized again. Follow the procedure outlined on the following slides to prevent splattering of infectious materials.
• It is probably easier to work while sitting down. • Attention to details and practice will allow you to work both rapidly
and accurately.

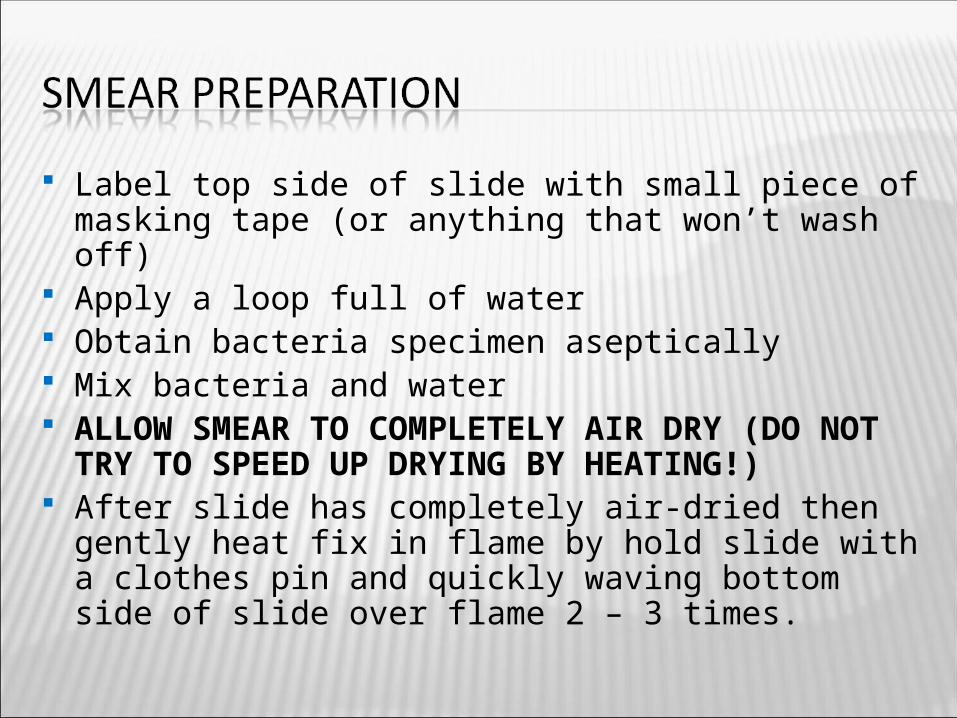
Label top side of slide with small piece of masking tape (or anything that won’t wash off)
Apply a loop full of water Obtain bacteria specimen aseptically Mix bacteria and water ALLOW SMEAR TO COMPLETELY AIR DRY (DO NOT
TRY TO SPEED UP DRYING BY HEATING!) After slide has completely air-dried then gently heat fix
in flame by hold slide with a clothes pin and quickly waving bottom side of slide over flame 2 – 3 times.
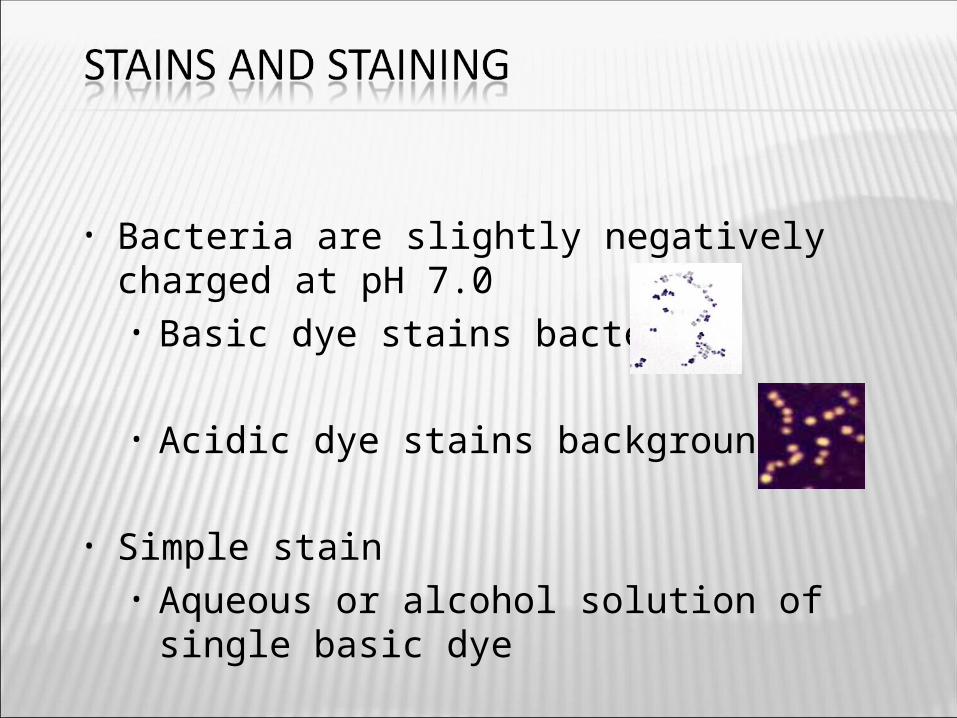
• Bacteria are slightly negatively charged at pH 7.0• Basic dye stains bacteria
• Acidic dye stains background
• Simple stain• Aqueous or alcohol solution of single basic
dye
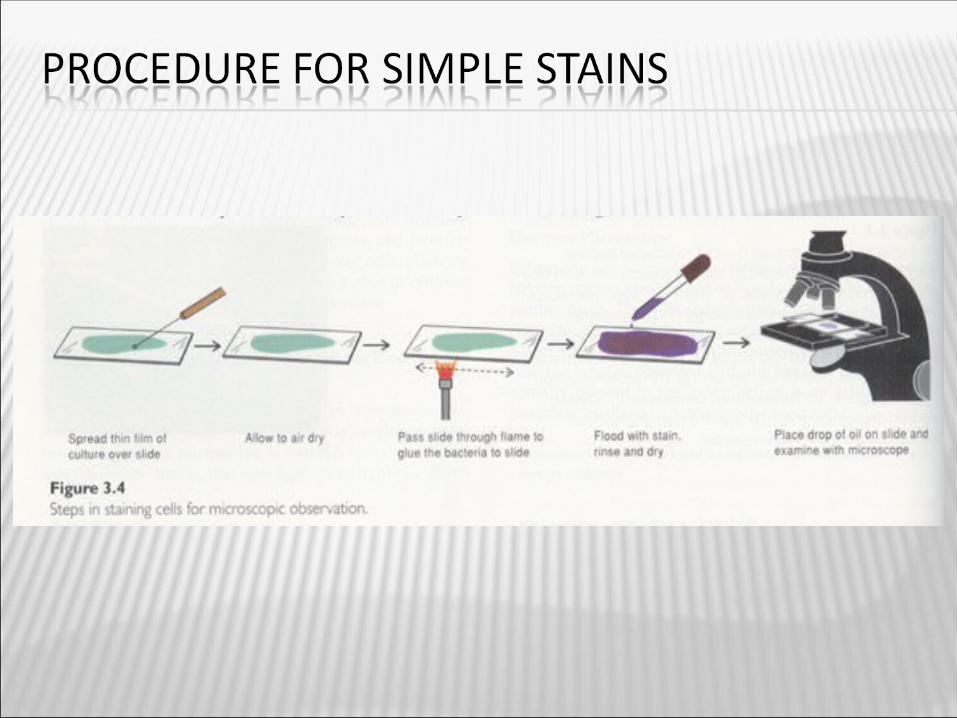

Prepare slide and air dry (circle specimen on bottom of slide with sharpie to enable finding specimen when you put it on the scope)
Heat fix Apply methylene blue Let stand for 60 sec Rinse with water Dry slide

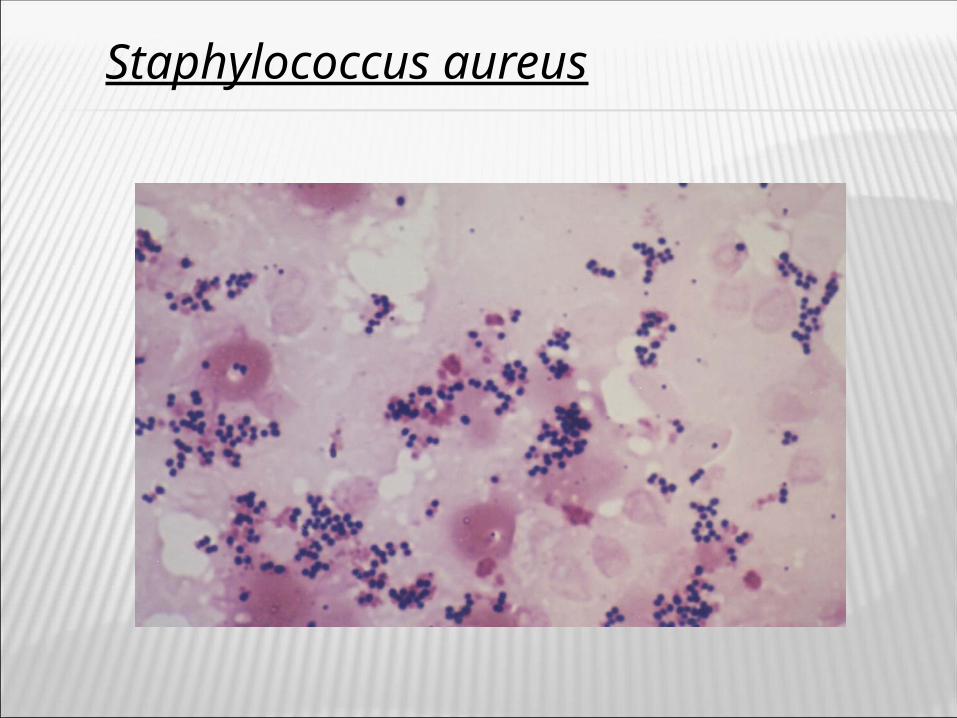
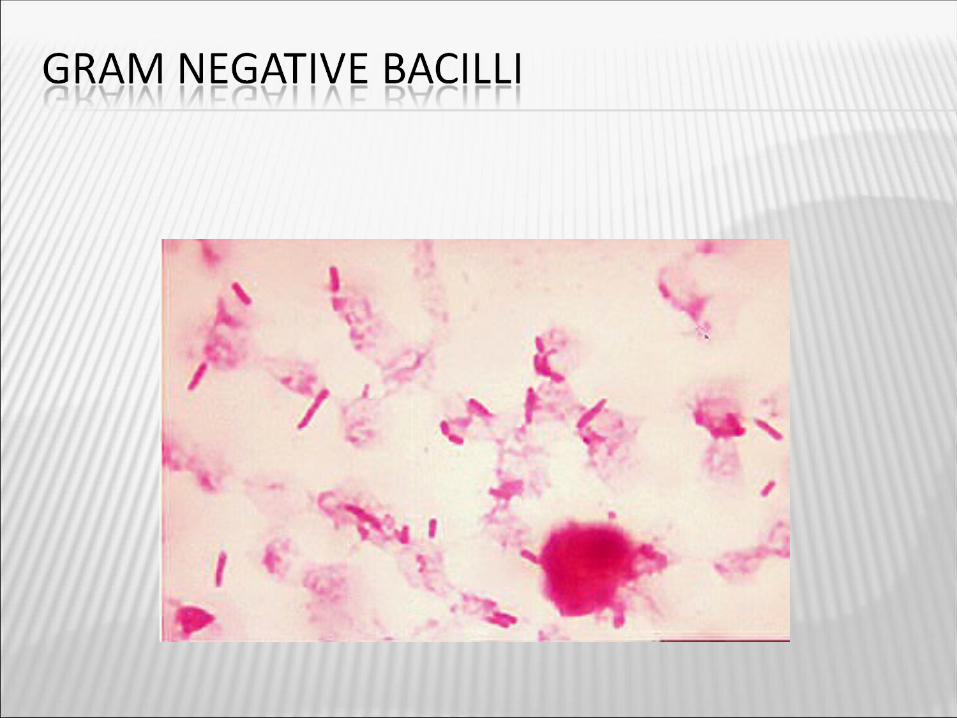
• Gram stain• Crystal violet: primary stain• Iodine: mordant• Alcohol or acetone-alcohol:
decolorizer• Safranin: counterstain• Gram positive: purple• Gram negative: pink-red
Staphylococcus aureusStaphylococcus aureus
Escherichia coliEscherichia coli
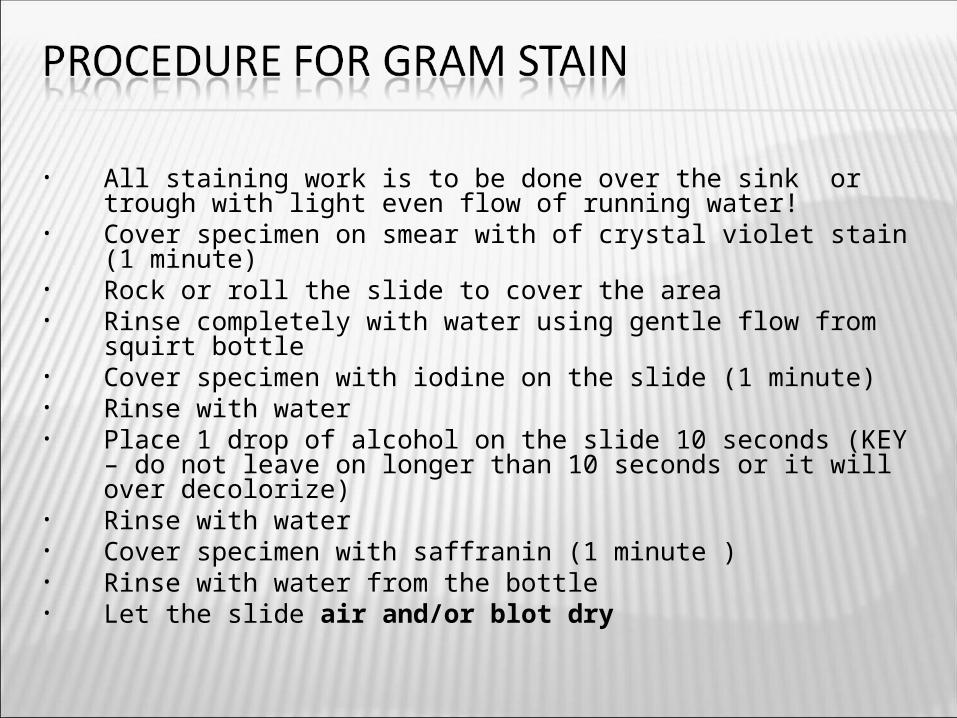
• All staining work is to be done over the sink or trough with light even flow of running water!
• Cover specimen on smear with of crystal violet stain (1 minute) • Rock or roll the slide to cover the area • Rinse completely with water using gentle flow from squirt bottle• Cover specimen with iodine on the slide (1 minute) • Rinse with water• Place 1 drop of alcohol on the slide 10 seconds (KEY – do not leave on
longer than 10 seconds or it will over decolorize) • Rinse with water• Cover specimen with saffranin (1 minute )• Rinse with water from the bottle • Let the slide air and/or blot dry

Streptococcus spp.
Staphylococcus aureus

• Diagnostic bacteriology is concerned with the isolation and identification of bacteria in a specimen from a patient.
• These specimens, unless from a normally sterile site of the body, rarely contain a single bacterial type, but are mixtures of the disease-producing bacteria and the host's normal or indigenous flora.
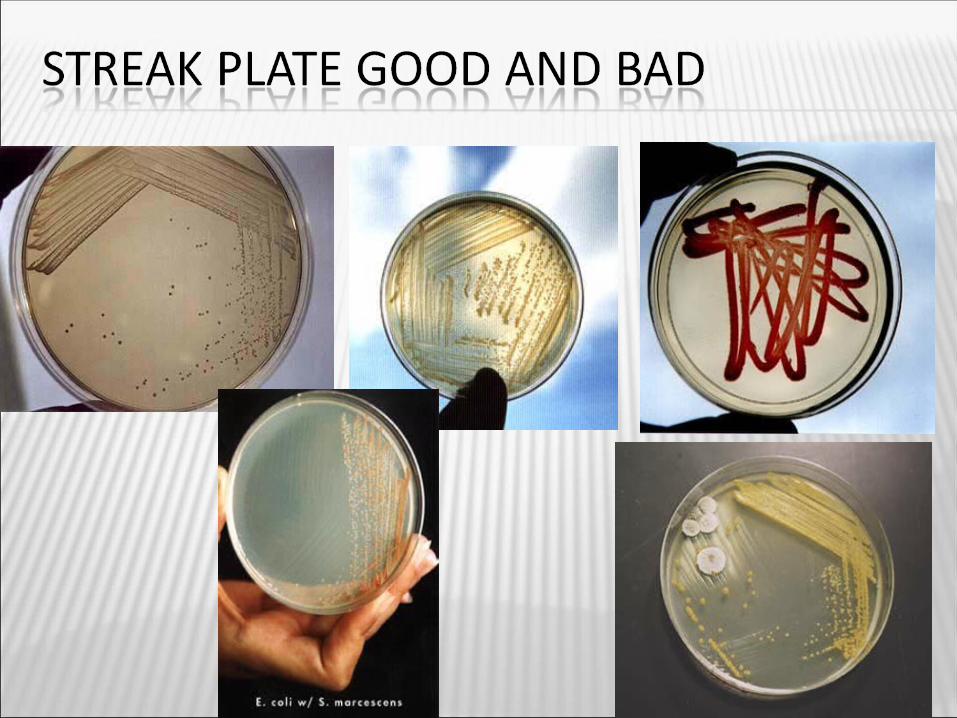
• Since accurate studies of the biochemical and the antigenic properties of a bacterial species are possible only through the use of pure cultures, it is necessary to have a reliable and rapid method that will permit the isolation of possible pathogenic organisms.
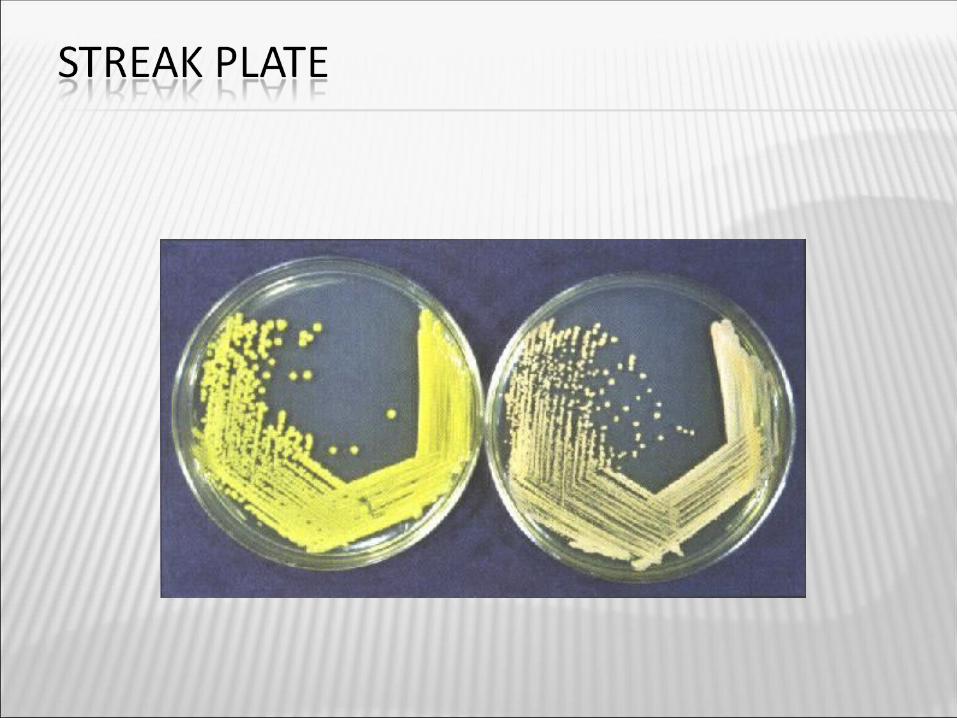
• An inoculum from the specimen is streaked on solid agar in a manner, which physically separates most of the bacterial types, permitting them to form discrete colonies.
• This procedure is facilitated whenever possible by the use of either a selective medium that inhibits the growth of species not sought or by the use of a differential medium, which imparts a recognizable appearance to the colonies of the type sought.
• Upon transfer of this mixed colony to a medium without the inhibitors, both types of bacteria may grow, and a pure culture will not be obtained.
• Consequently, it is often necessary to streak a second plate of the same selective medium with a colony from the first selective plate in order to obtain a pure culture of the bacterial species that you are attempting to isolate.
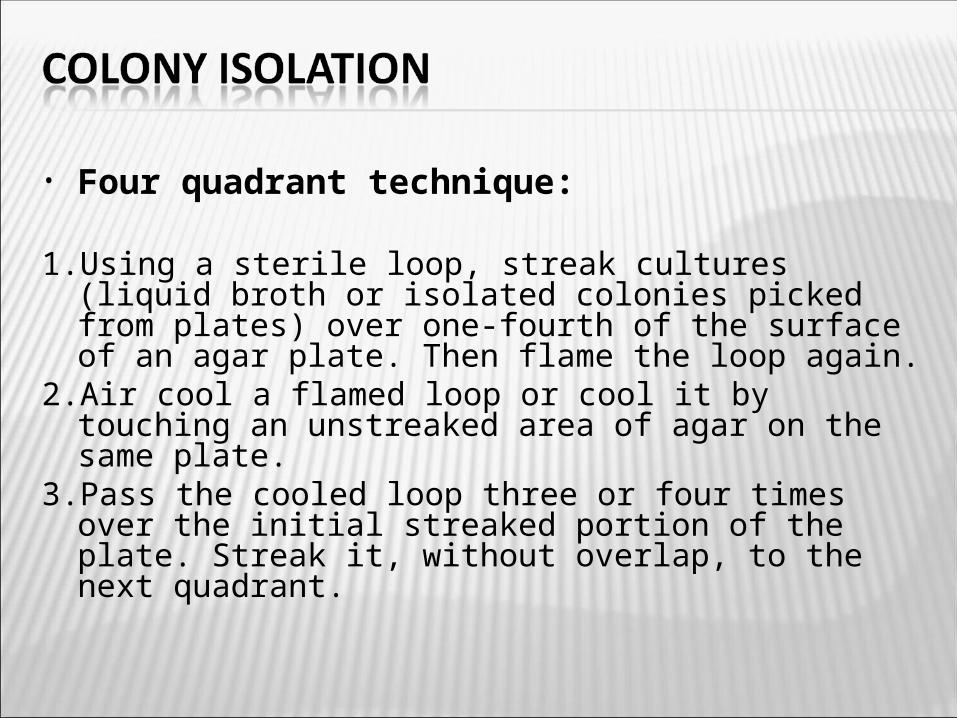
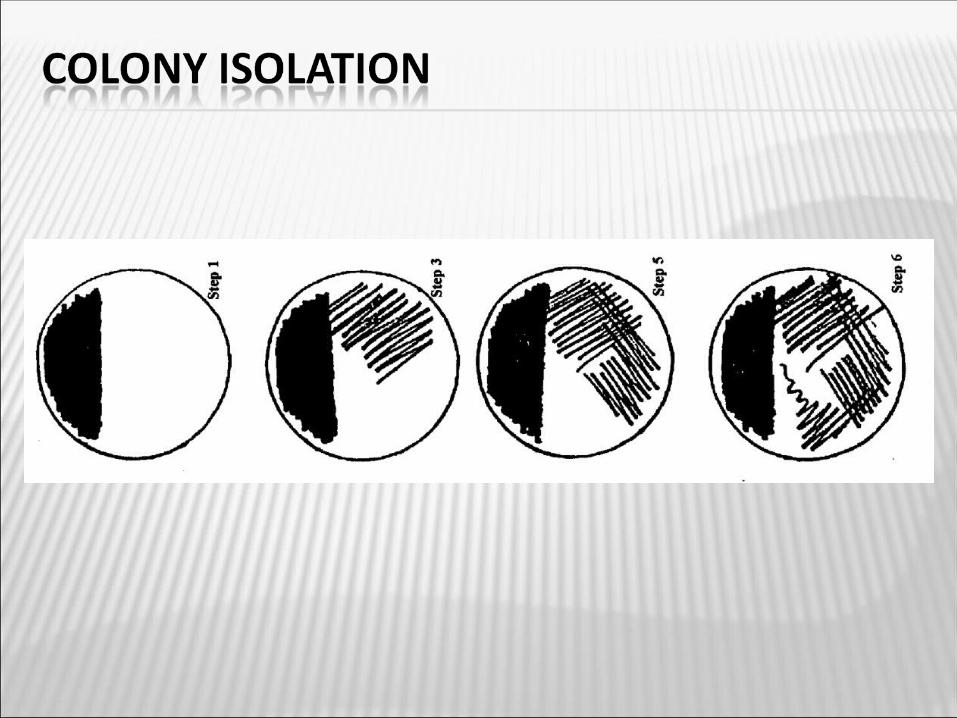
• Four quadrant technique:
1. Using a sterile loop, streak cultures (liquid broth or isolated colonies picked from plates) over one-fourth of the surface of an agar plate. Then flame the loop again.
2. Air cool a flamed loop or cool it by touching an unstreaked area of agar on the same plate.
3. Pass the cooled loop three or four times over the initial streaked portion of the plate. Streak it, without overlap, to the next quadrant.
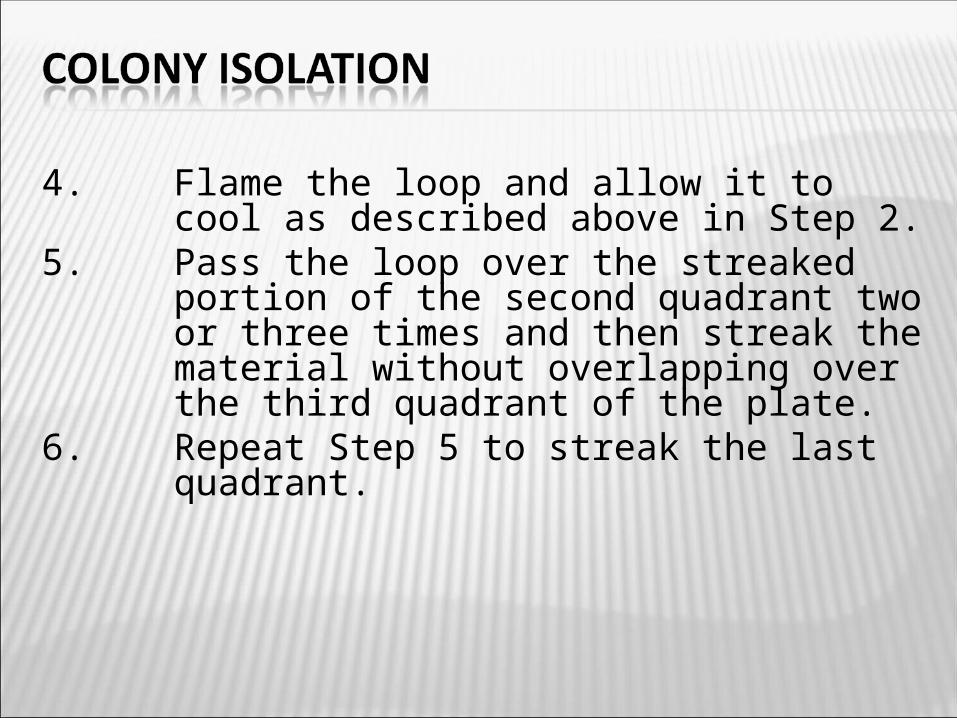
4. Flame the loop and allow it to cool as described above in Step 2.
5. Pass the loop over the streaked portion of the second quadrant two or three times and then streak the material without overlapping over the third quadrant of the plate.
6. Repeat Step 5 to streak the last quadrant.

1. Place a very small drop of water on your clean slide.2. Using aseptic technique remove a colony from a plate or cells
from your slant. Be careful to just gently touch the surface of your culture with the inoculating loop.
3. Transfer inoculum to center of water drop on slide. Mix in a circular motion to equally spread specimen to the size of about a dime.
4. You must allow specimen to then air dry! This may take a while (5-20 min). You will ruin your smear if you try to accelerate drying by rapidly heating an in a flame.
5. Now wave the slide through a flame 3-4 time. This fixes the bacteria to the slide
6. Let the slide cool 7. Place in the metal tray or in the rack
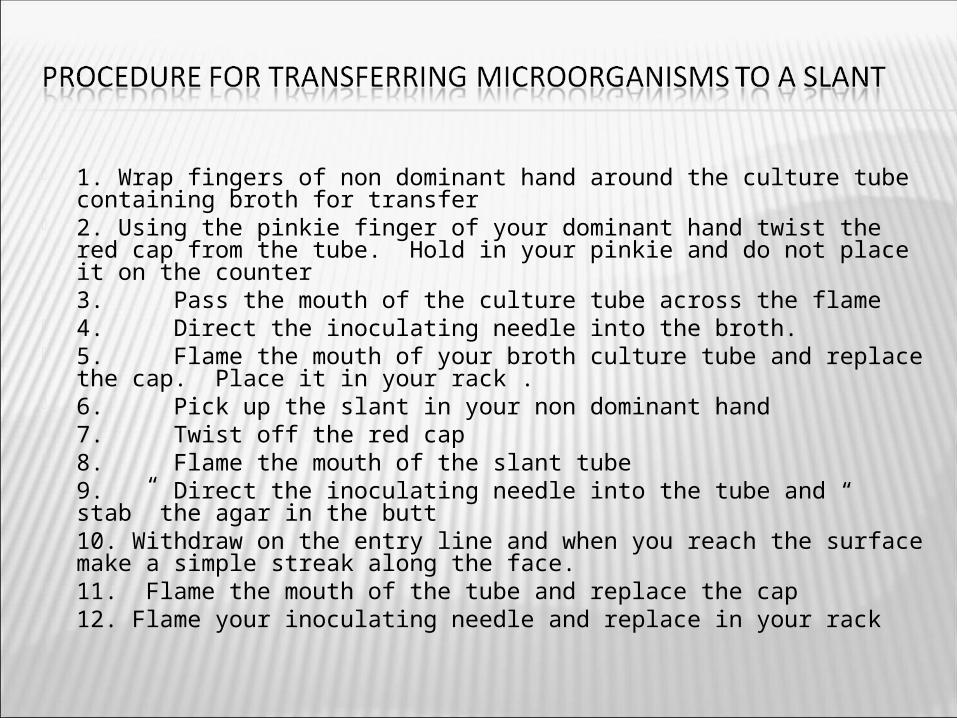
1. Wrap fingers of non dominant hand around the culture tube containing broth for transfer
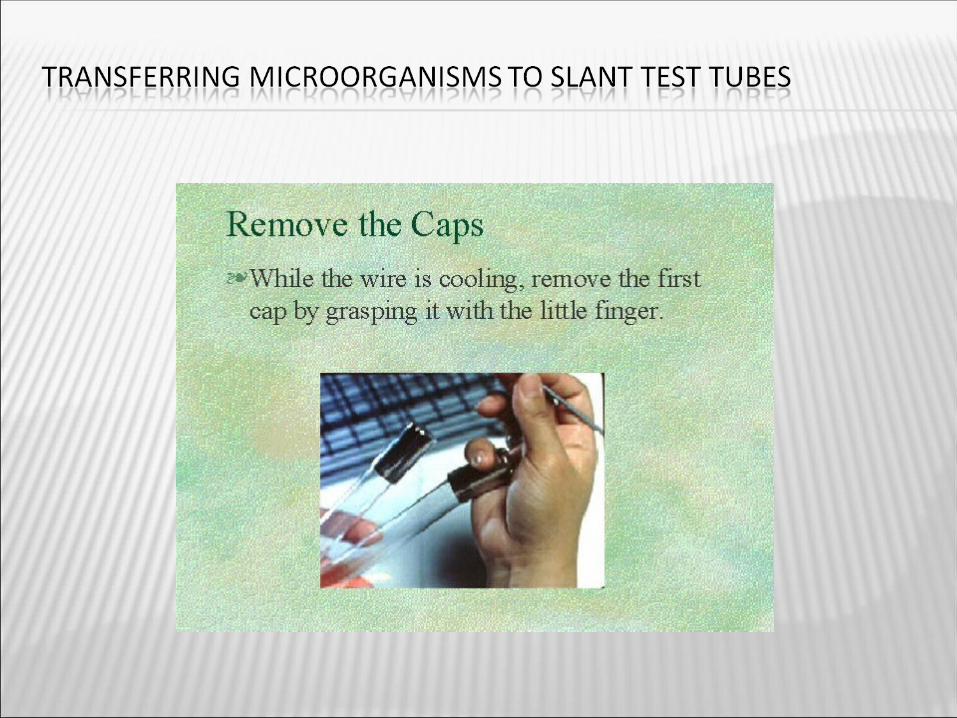
2. Using the pinkie finger of your dominant hand twist the red cap from the tube. Hold in your pinkie and do not place it on the counter
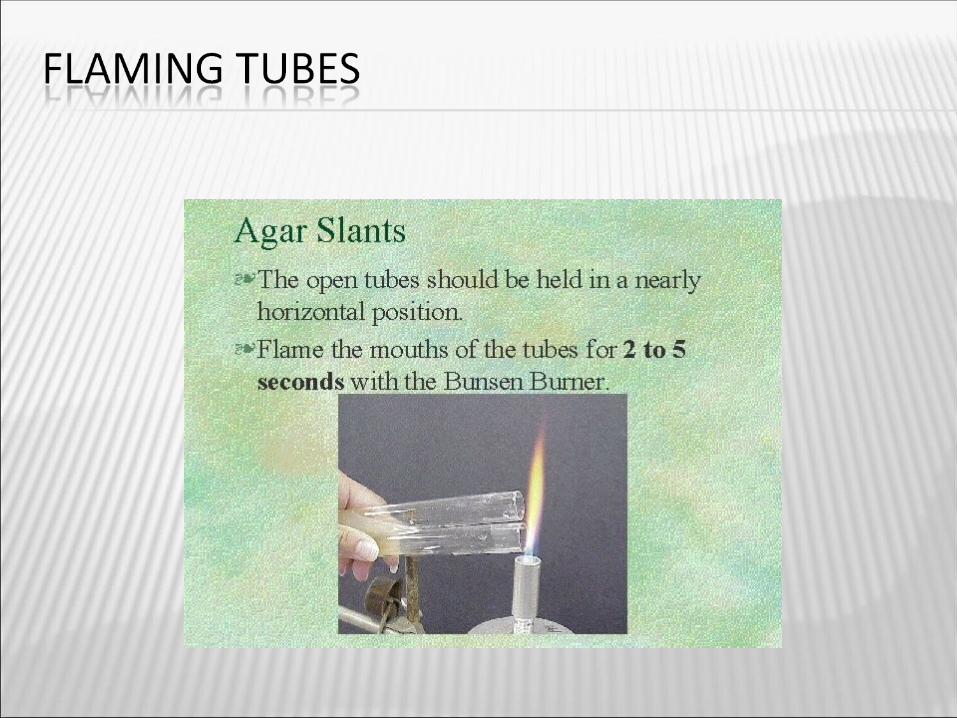
3. Pass the mouth of the culture tube across the flame 4. Direct the inoculating needle into the broth. 5. Flame the mouth of your broth culture tube and replace the cap. Place it in
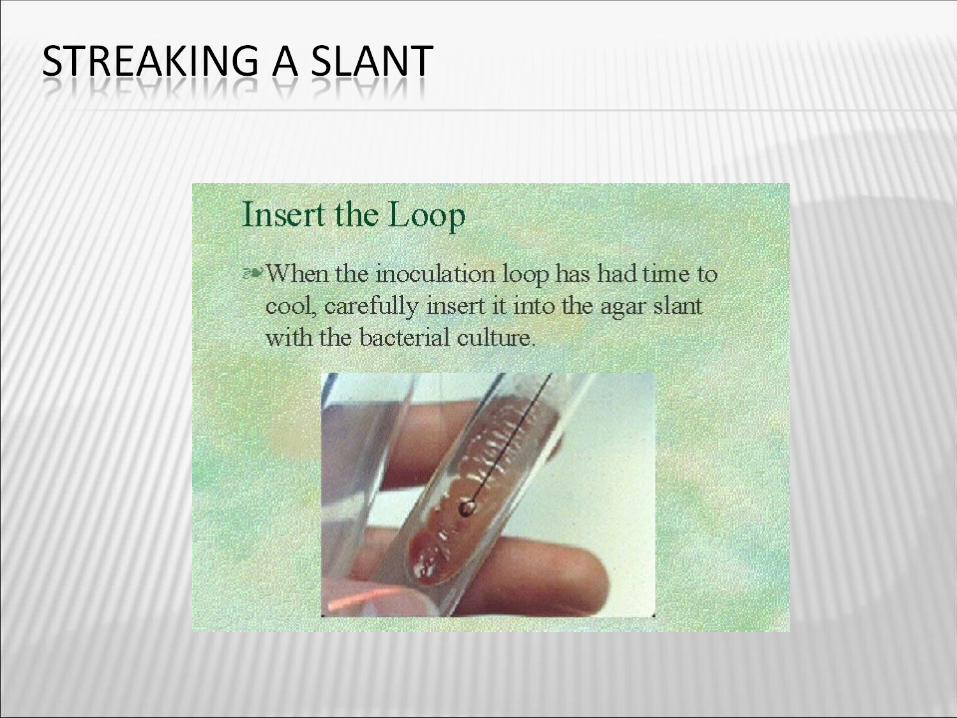
your rack . 6. Pick up the slant in your non dominant hand 7. Twist off the red cap 8. Flame the mouth of the slant tube 9. Direct the inoculating needle into the tube and “ stab” the agar in the butt 10. Withdraw on the entry line and when you reach the surface make a simple
streak along the face. 11. Flame the mouth of the tube and replace the cap 12. Flame your inoculating needle and replace in your rack
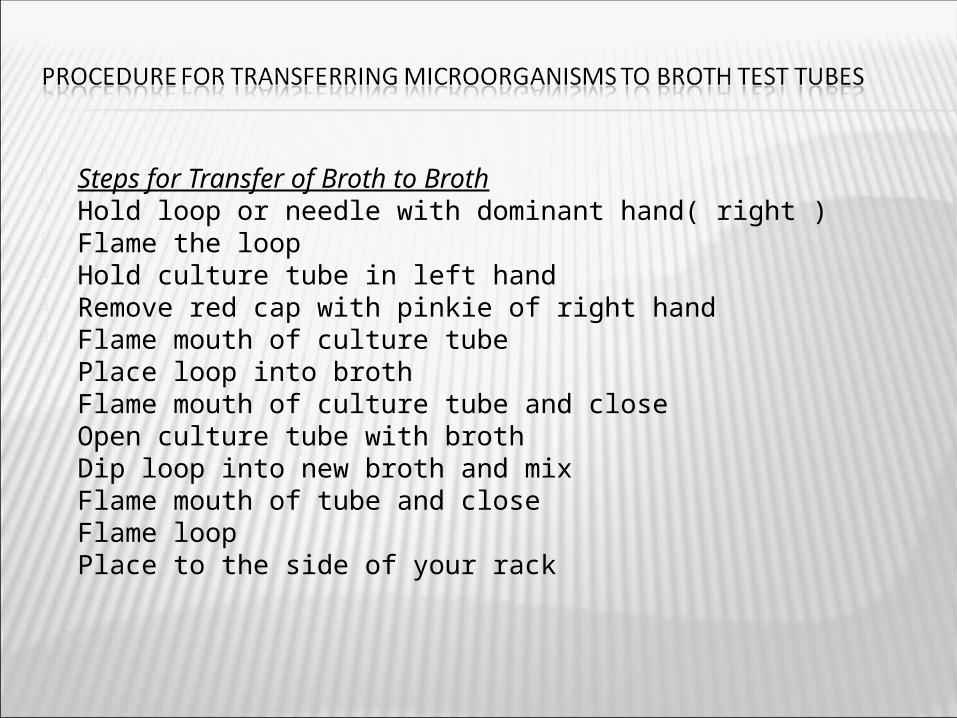
Steps for Transfer of Broth to Broth Hold loop or needle with dominant hand( right ) Flame the loop Hold culture tube in left hand Remove red cap with pinkie of right hand Flame mouth of culture tube Place loop into broth Flame mouth of culture tube and close Open culture tube with broth Dip loop into new broth and mix Flame mouth of tube and close Flame loop Place to the side of your rack

• Colony morphology• Color• Shape• Margin• Elevation
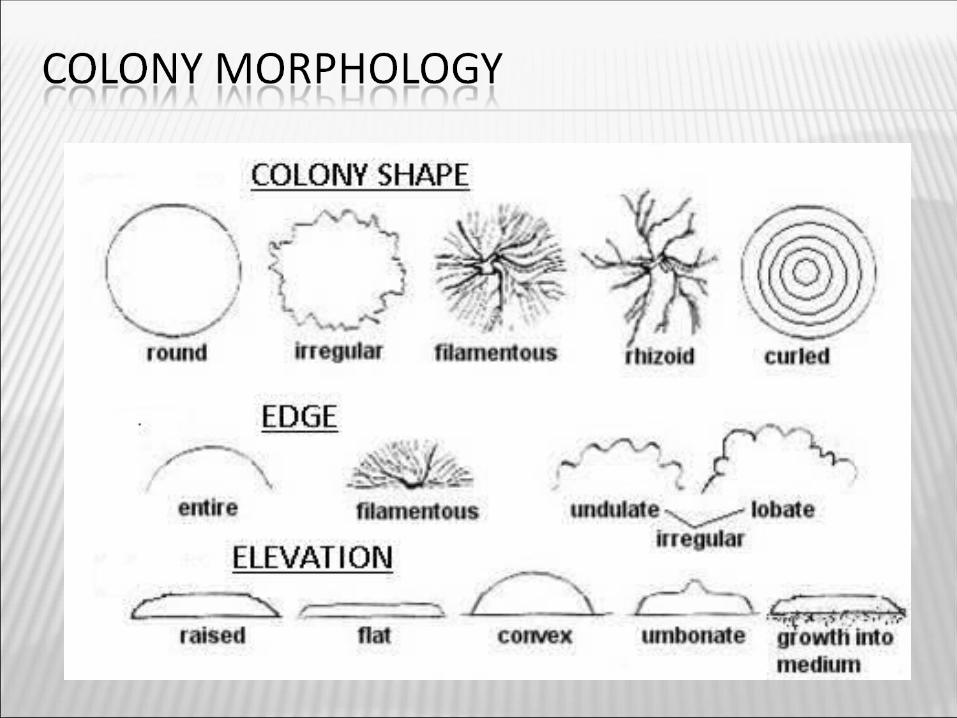
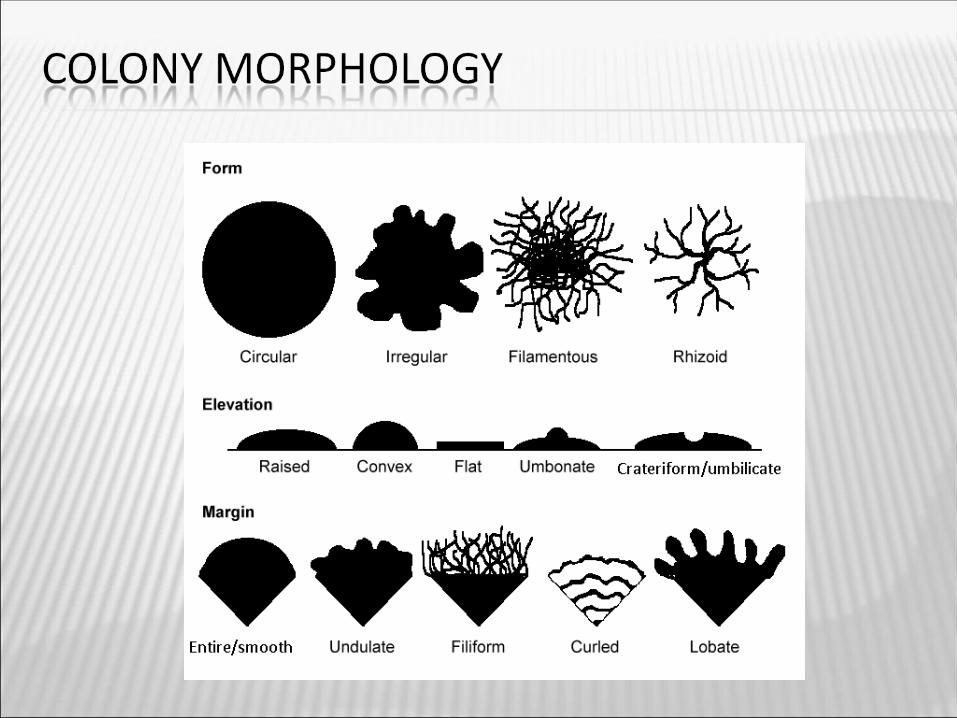
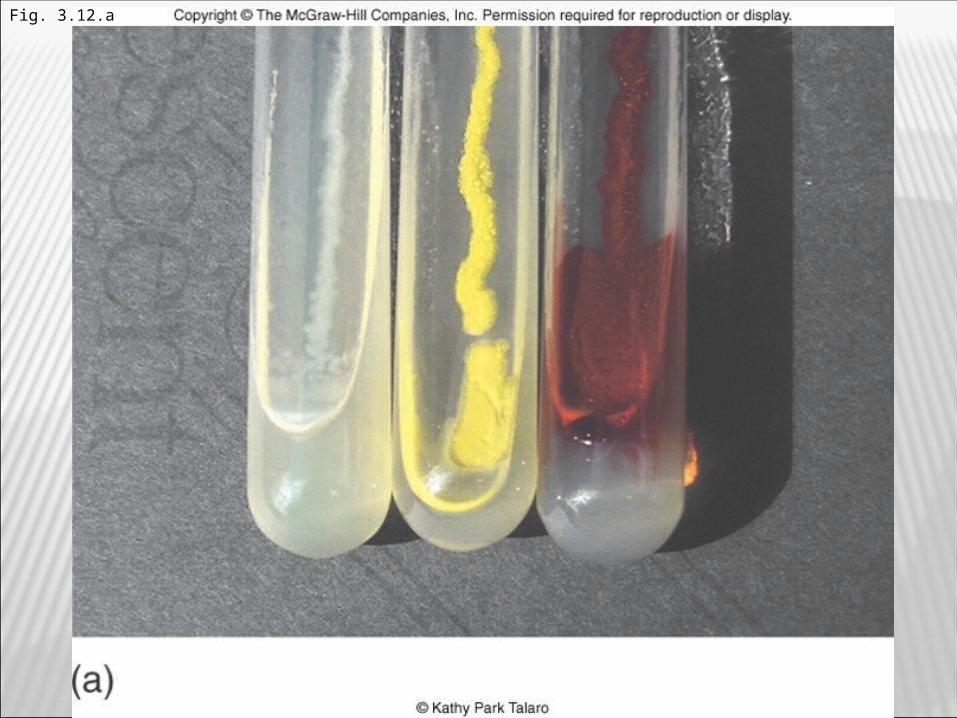
Fig. 3.12.a
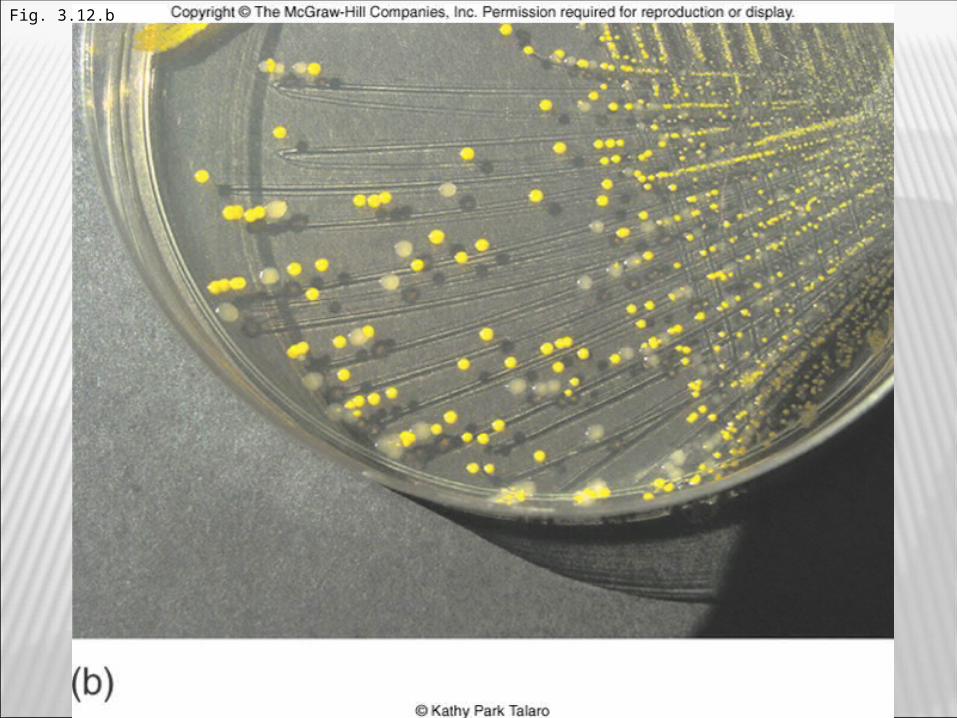
Fig. 3.12.b
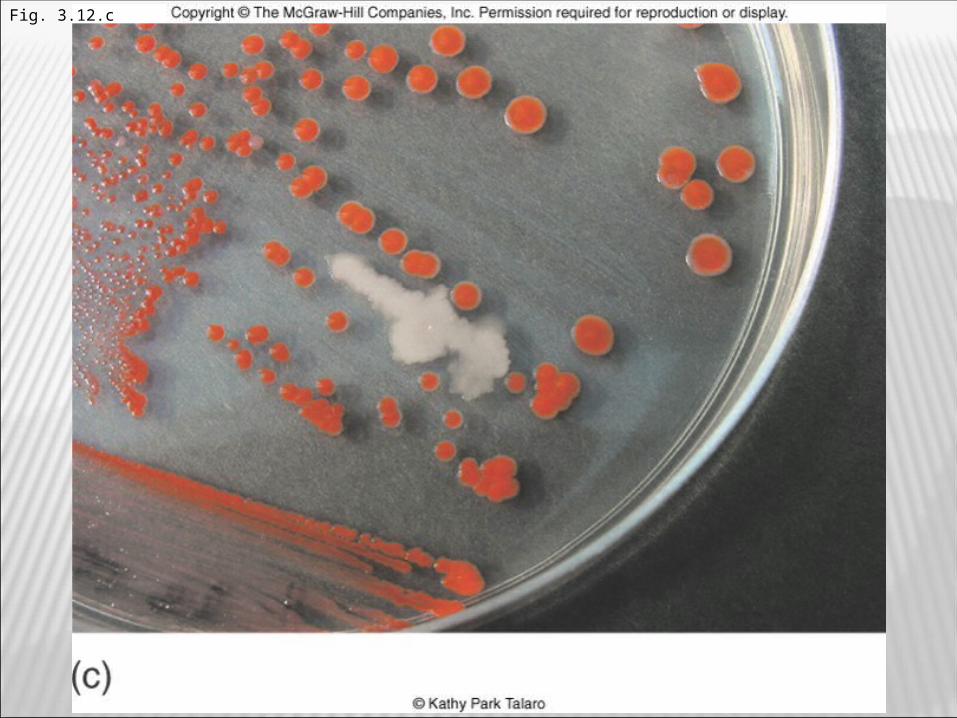
Fig. 3.12.c
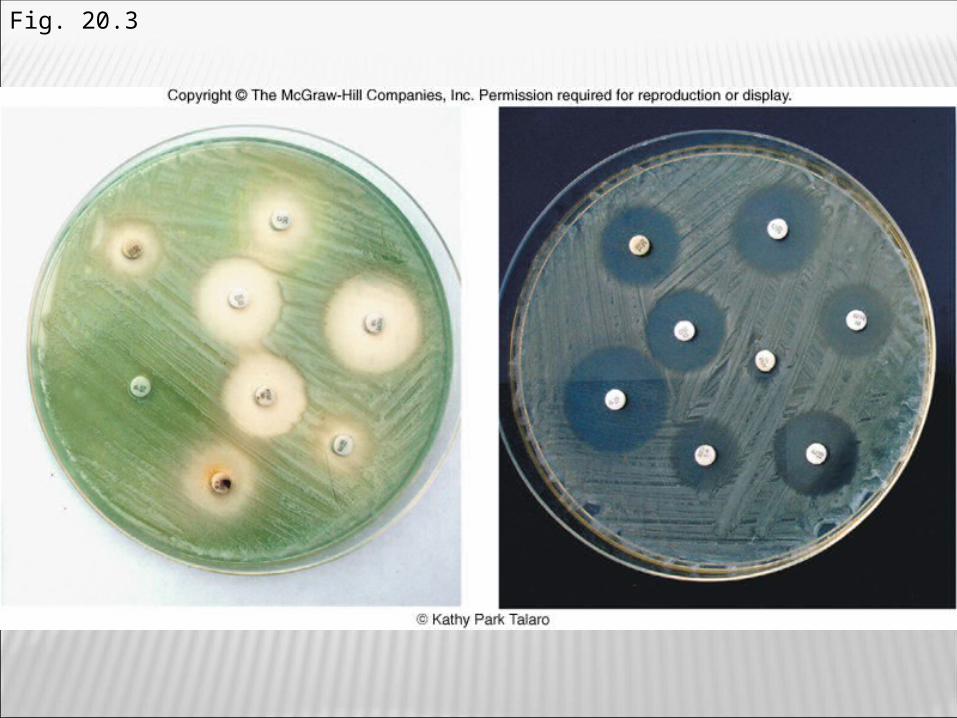
Fig. 20.3
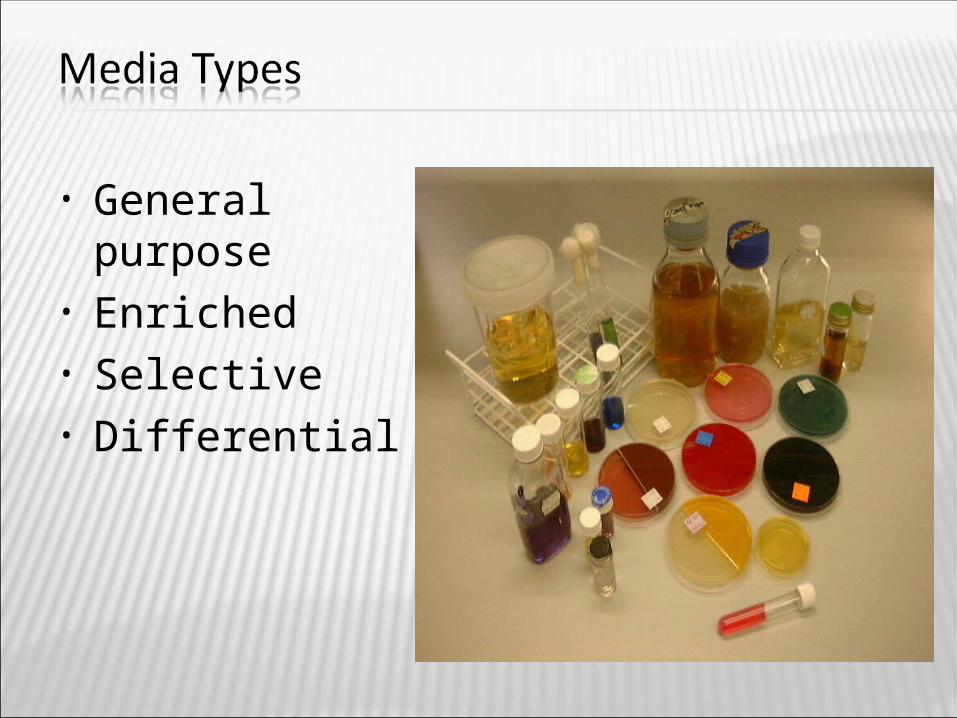
• General purpose• Enriched• Selective• Differential
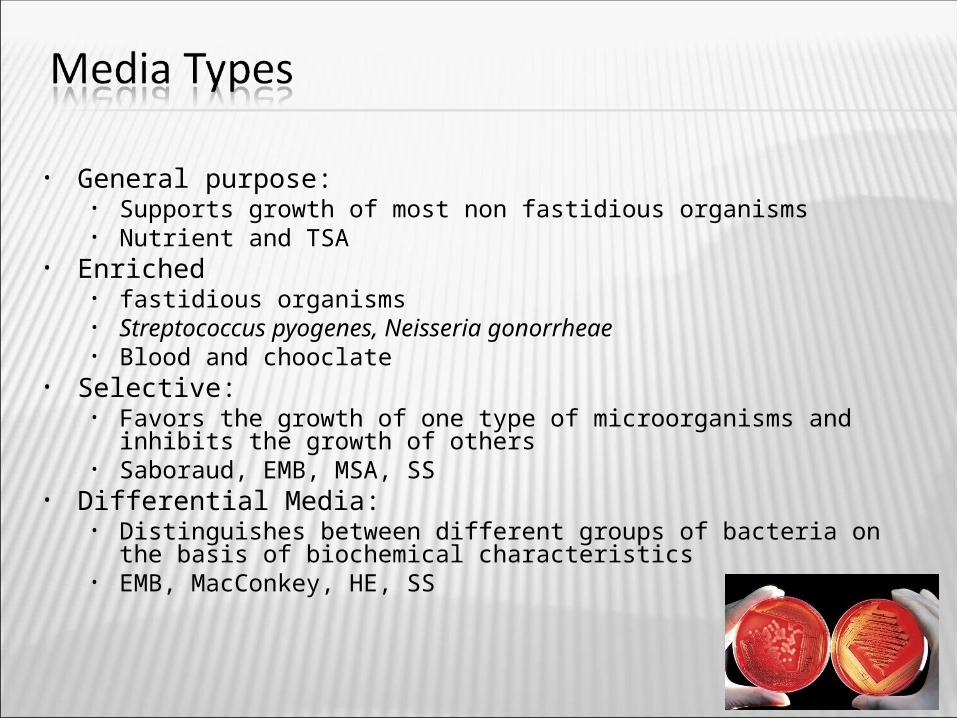
• General purpose:• Supports growth of most non fastidious organisms• Nutrient and TSA
• Enriched • fastidious organisms• Streptococcus pyogenes, Neisseria gonorrheae• Blood and chooclate
• Selective:• Favors the growth of one type of microorganisms and inhibits the growth of
others• Saboraud, EMB, MSA, SS
• Differential Media:• Distinguishes between different groups of bacteria on the basis of biochemical
characteristics• EMB, MacConkey, HE, SS
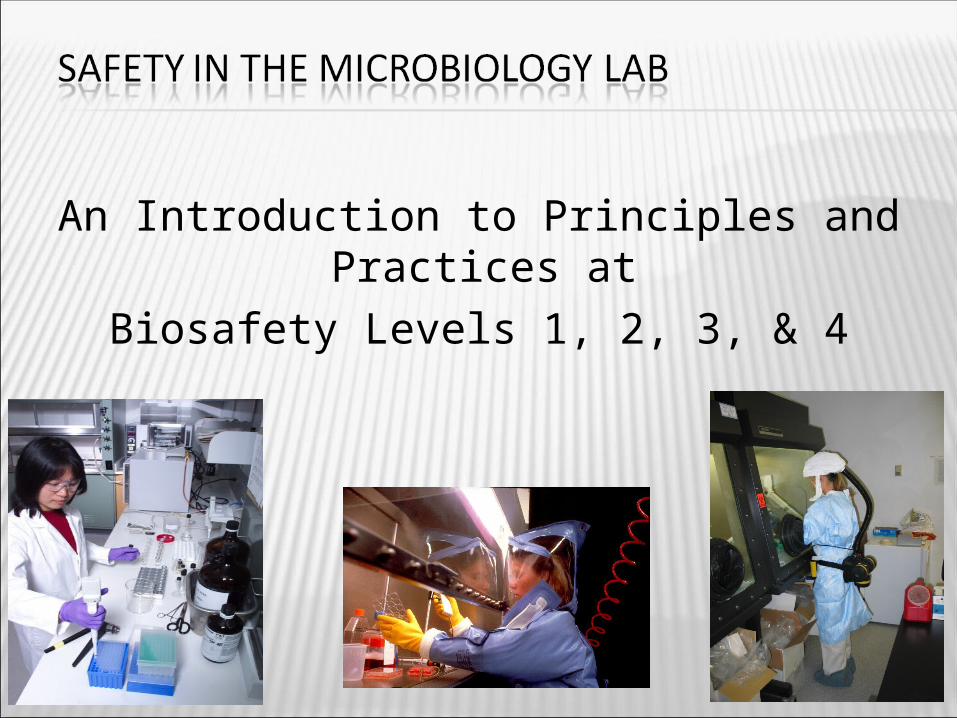
An Introduction to Principles and Practices at
Biosafety Levels 1, 2, 3, & 4

• How are microorganisms categorized?• By genetics to show how they are related• By tissues they infect to show how they
cause disease• By pathogenicity and communicability (also
known as their BioSafety Level)

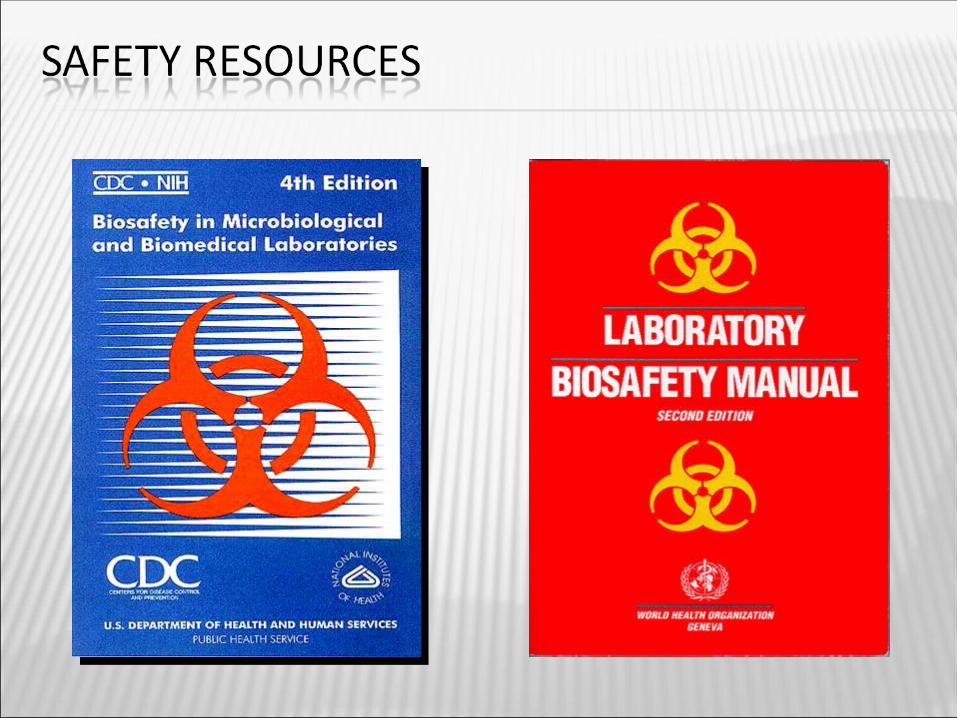
• Besides federal law and regulations other guidelines exist for the use and control of microorganisms:• CDC/NIH Biosafety in Microbiological and
Biomedical Laboratories (BMBL)• WHO (World Health Organization) Biosafety
Manual• USDA (United States Department of
Agriculture) protocols

Microbes placed in 4 categories: Biosafety Levels (BSL 1-4)
• Microbiology Laboratories are set up and maintained to meet a specific containment level. The designated level conveys information about infection potential and engineering controls implemented to protect workers.
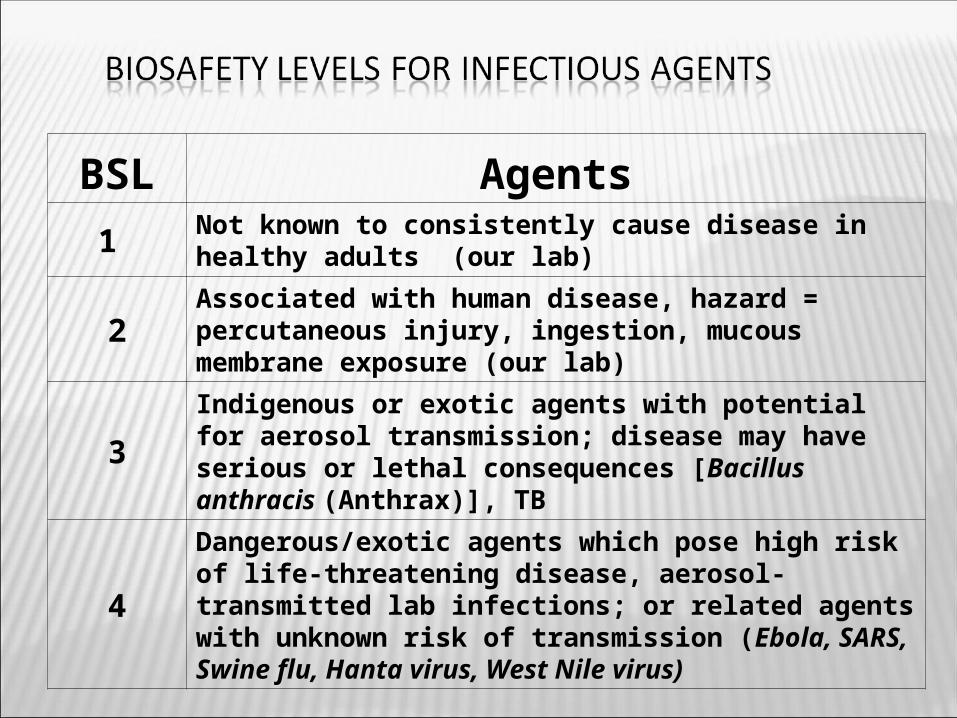
BSL Agents
1 Not known to consistently cause disease in healthy adults (our lab)
2 Associated with human disease, hazard = percutaneous injury, ingestion, mucous membrane exposure (our lab)
3Indigenous or exotic agents with potential for aerosol transmission; disease may have serious or lethal consequences [Bacillus anthracis (Anthrax)], TB
4
Dangerous/exotic agents which pose high risk of life-threatening disease, aerosol-transmitted lab infections; or related agents with unknown risk of transmission (Ebola, SARS, Swine flu, Hanta virus, West Nile virus)
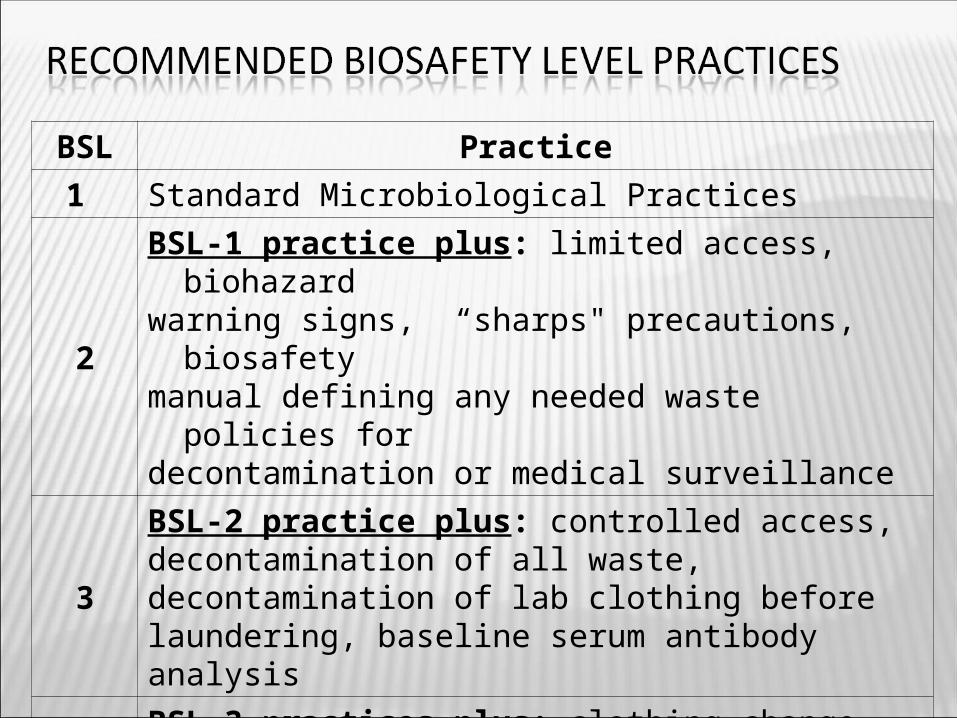
BSL Practice
1 Standard Microbiological Practices
2
BSL-1 practice plus: limited access, biohazard warning signs, “sharps" precautions, biosafetymanual defining any needed waste policies for decontamination or medical surveillance
3BSL-2 practice plus: controlled access, decontamination of all waste, decontamination of lab clothing before laundering, baseline serum antibody analysis
4BSL-3 practices plus: clothing change before entering, shower on exit, all material decontaminated on exit from facility
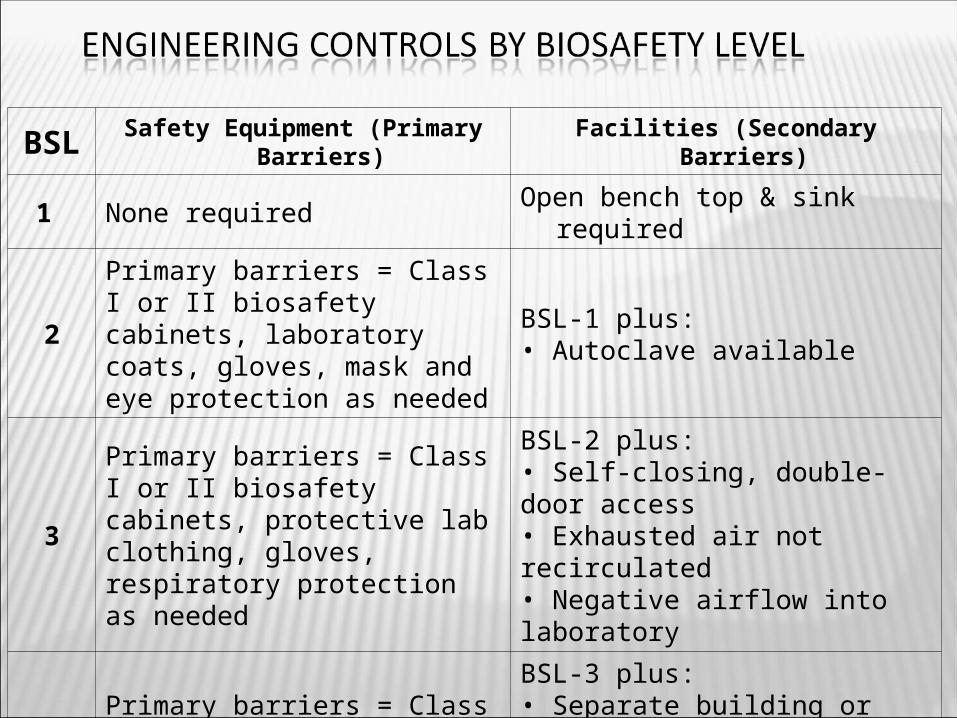
BSL Safety Equipment (Primary Barriers) Facilities (Secondary Barriers)
1 None required Open bench top & sink required
2
Primary barriers = Class I or II biosafety cabinets, laboratory coats, gloves, mask and eye protection as needed
BSL-1 plus: • Autoclave available
3
Primary barriers = Class I or II biosafety cabinets, protective lab clothing, gloves, respiratory protection as needed
BSL-2 plus:• Self-closing, double-door access• Exhausted air not recirculated• Negative airflow into laboratory
4
Primary barriers = Class III BioSafety cabinets in combination with full-body, air-supplied, positive pressure suit
BSL-3 plus:• Separate building or zone• Dedicated exhaust, vacuum, and decontamination systems