Bio Uv instructions-1 -...
14
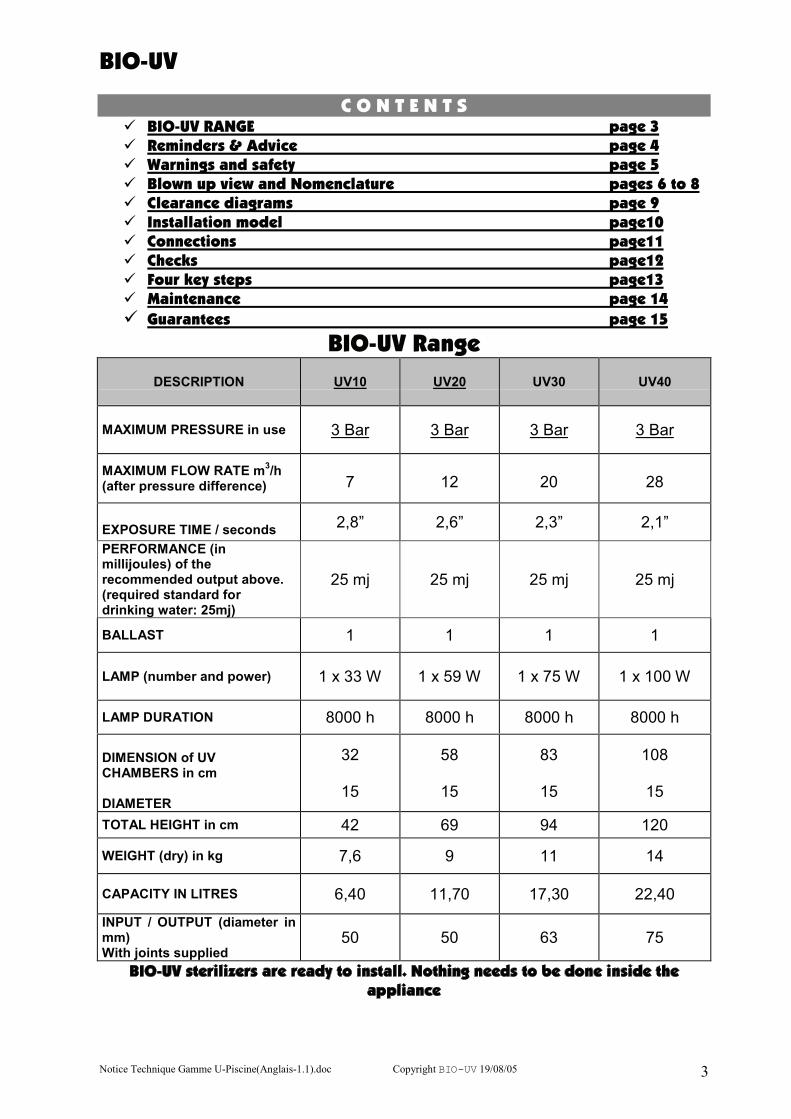
BIO-UV Notice Technique Gamme U-Piscine(Anglais-1.1).doc Copyright BIO-UV 19/08/05 3 CONTENTS BIO-UV RANGE page 3 Reminders & Advice page 4 Warnings and safety page 5 Blown up view and Nomenclature pages 6 to 8 Clearance diagrams page 9 Installation model page10 Connections page11 Checks page12 Four key steps page13 Maintenance page 14 Guarantees page 15 BIO-UV Range DESCRIPTION UV10 UV20 UV30 UV40 MAXIMUM PRESSURE in use 3 Bar 3 Bar 3 Bar 3 Bar MAXIMUM FLOW RATE m 3 /h (after pressure difference) 7 12 20 28 EXPOSURE TIME / seconds 2,8 2,6 2,3 2,1 PERFORMANCE (in millijoules) of the recommended output above. (required standard for drinking water: 25mj) 25 mj 25 mj 25 mj 25 mj BALLAST 1 1 1 1 LAMP (number and power) 1 x 33 W 1 x 59 W 1 x 75 W 1 x 100 W LAMP DURATION 8000 h 8000 h 8000 h 8000 h DIMENSION of UV CHAMBERS in cm DIAMETER 32 15 58 15 83 15 108 15 TOTAL HEIGHT in cm 42 69 94 120 WEIGHT (dry) in kg 7,6 9 11 14 CAPACITY IN LITRES 6,40 11,70 17,30 22,40 INPUT / OUTPUT (diameter in mm) With joints supplied 50 50 63 75 B I O - U V s t e r i l i z e r s a r e r e a d y t o i n s t a l l . N o t h i n g n e e d s t o b e d o n e i n s i d e t h e a p p l i a n c e
Transcript of Bio Uv instructions-1 -...
BIO-UV
Notice Technique Gamme U-Piscine(Anglais-1.1).doc Copyright BIO-UV 19/08/05 3
C O N T E N T S� BIO-UV RANGE page 3� Reminders & Advice page 4� Warnings and safety page 5� Blown up view and Nomenclature pages 6 to 8� Clearance diagrams page 9� Installation model page10� Connections page11� Checks page12� Four key steps page13� Maintenance page 14
� Guarantees page 15
BIO-UV Range
DESCRIPTION UV10 UV20 UV30 UV40
MAXIMUM PRESSURE in use 3 Bar 3 Bar 3 Bar 3 Bar
MAXIMUM FLOW RATE m3/h
(after pressure difference) 7 12 20 28
EXPOSURE TIME / seconds2,8� 2,6� 2,3� 2,1�
PERFORMANCE (inmillijoules) of therecommended output above.(required standard fordrinking water: 25mj)
25 mj 25 mj 25 mj 25 mj
BALLAST 1 1 1 1
LAMP (number and power) 1 x 33 W 1 x 59 W 1 x 75 W 1 x 100 W
LAMP DURATION 8000 h 8000 h 8000 h 8000 h
DIMENSION of UVCHAMBERS in cm
DIAMETER
32
15
58
15
83
15
108
15
TOTAL HEIGHT in cm 42 69 94 120
WEIGHT (dry) in kg 7,6 9 11 14
CAPACITY IN LITRES 6,40 11,70 17,30 22,40
INPUT / OUTPUT (diameter inmm)With joints supplied
50 50 63 75
BIO-UV sterilizers are ready to install. Nothing needs to be done inside theappliance

BIO-UV
Notice Technique Gamme U-Piscine(Anglais-1.1).doc Copyright BIO-UV 19/08/05 4
REMINDERS & RECOMMENDATIONS
Bearing in mind the operating environment ofa swimming pool, it is vital to review thebasic rules concerning the variousparameters such as hydraulicity, filtration andwater balance that, whatever the type ofwater treatment used, help obtain thedesired results while at the same timereducing the amount of chemicals used andavoiding unpleasant, costly disasters.
Prevention = comfort and moneysaved
Pool hydraulics:Water must circulate throughout the pool.The number of backflows, skimmers oroverflow intakes must be sufficient for suchcirculation and eliminate any �dead� zones.Pump power must be sufficient to cope withthe volume of water in order to be able totreat the whole pool in a reasonable amountof time (4 to 5 hours).Pipe diameter should also be large enoughto cope with the volume of the pool.
Poor hydraulicity = development of bacteriaand algae.
Filtration : filtration is a key element in
water treatment.Its role is to remove suspended substancesand various particles from the filtered body ofwater.
Good filtration helps save on disinfectantproducts.
A filter needs maintenance: wash the
reverse side of the filter at least once perweek.It should be cleaned and de-scaled once ayear with a special product (eg: BIO-UVFILTRE) that removes lime-scale deposits andthe substances that seal it.FILTRATION TIME MUST BE ADHEREDTOBasic rule: half the water temperature.If over 28°, filter continuously.
Flocculation: when using sand filtration,
Parameters for balanced water:PH indicates the water�s alkalinity or acidity. It isusually a good idea to keep it at around 7 (neutralPH).- If lower than 7: acid water, aggressive to skin andpool lining.- If higher than 7.4: possible discomfort for swimmers(smarting eyes), algae and lime-scale depositsdevelop, inefficient flocculation�
TH: this indicates the hardness of the water, i.e.calcium and magnesium content.For a reading higher than 25°F, add a limesequestrant once per season (e.g.: BIO-UV ANTI-CALCAIRE).Very hard water leads to scaling and damages pipe-work.Water that is too soft (acidic) may be corrosive.
TAC: this shows the water�s bicarbonate andcarbonate content, i.e. its alkalinity. The level shouldbe between 10 and 15 ° F, and can be changed byusing suitable products (TAC+ OR TAC-).
Various substances present in the water:- Algae: these plants can grow in the pool. Largequantities are carried in the air. To get rid of them, adisinfectant alone would be used up before deployingits anti-bacterial action. We therefore recommendusing, in addition to REMANENTS, an algaecide or
BIO-UV ALGICIDE SUPER CONCENTRATE- Organic matter: brought in by swimmers, natureand the environment, not harmful, they should bekept down by filtration and other treatmentprocedures.- Micro-organisms: bacteria, viruses and fungi arecarried into the pool in the same way as othersubstances and can be harmful to health. The role ofthe ultraviolet BIO-UV appliance is to destroy them.The addition of REMANENT provides remanence inthe pool and prevents them from developing between2 runs through the BIO-UV appliance.- Metal ions: iron, copper, manganese� these maybe found in large quantities in water from boreholes,or after crop spraying ((copper sulphate spraying).These ions may also damage liners and colour thewater�We recommend that you do not use boreholewater to fill your pool.However, it is possible to confine these ions by usingcertain specific products.- Phosphates and nitrates: they are present inhighly variable quantities and encourage algae todevelop.They may be an indication of ground water pollution.Do not use borehole water.

BIO-UV
Notice Technique Gamme U-Piscine(Anglais-1.1).doc Copyright BIO-UV 19/08/05 5
Warnings and safety:
� NEVER LOOK AT A ULTRAVIOLET LAMP WHILE IT IS ON WITHOUTWEARING PROTECTIVE GLASSES, THIS MAY RESULT IN SEVERERETINAL DAMAGE OR EVEN BLINDNESS
� NEVER UNSCREW THE STAINLESS STEEL BINDING NUT (16) WHENFILTRATION IS WORKING. THE QUARTZ TUBE MAY BE SHOT OUT OFITS RECEPTACLE AT HIGH SPEED AND INJURE YOU.
Before accessing the connection terminals, ensure that all supply circuits are disconnected.If the cable is damaged, it should be replaced with a cable or special unit available from theAfter Sales Service.
For your safety as an installer and/or user:
1. Read all the instructions in this manual beforeswitching on the BIO-UV appliance.
2. WHEN REPLACING THE LAMP OR CARRYING OUT ANNUAL CLEANING OF THEQUARTZ TUBE, MAKE SURE THAT THE ELECTRICAL ELEMENTS ARE IN PLACE ANDCORRECTLY ATTACHED BEFORE SWITCHING ON THE APPLIANCE.MAKE SURE THAT THE NUT, WASHER AND O-RING (16 � 15 � 14, providingwaterproofing) ARE PROPERLY POSITIONED, OTHERWISE THE QUARTZ TUBE MAY BESHOT OUT OF ITS RECEPTACLE AT HIGH SPEED AND INJURE YOU.
3. To avoid electric short circuits, do not place the electric wires or the BIO-UV appliance in thepool water or in any other maintenance or cleaning fluid.
4. Unplug the BIO-UV appliance before carrying out any maintenance or cleaning operation.
5. Allow the ultraviolet lamp to cool before handling it.
6. Do not touch the ultraviolet lamp with bare hands, as these would leave impurities that shortenthe life of the lamp. . If you do touch it: clean with alcohol or white vinegar.
7. Do not use the BIO-UV steriliser if the electricity supply wire is worn or damaged.
8. Do not re-start the system until the appliance�s electric unit and upper electrical box arecorrectly back in place.
9. Do not use the BIO-UV steriliser for any other use than that for which it was designed.

BIO-UV
Notice Technique Gamme U-Piscine(Anglais-1.1).doc Copyright BIO-UV 19/08/05 6
STERILIZER � BLOW UP VIEW
BIO-UV
Notice Technique Gamme U-Piscine(Anglais-1.1).doc Copyright BIO-UV 19/08/05 7
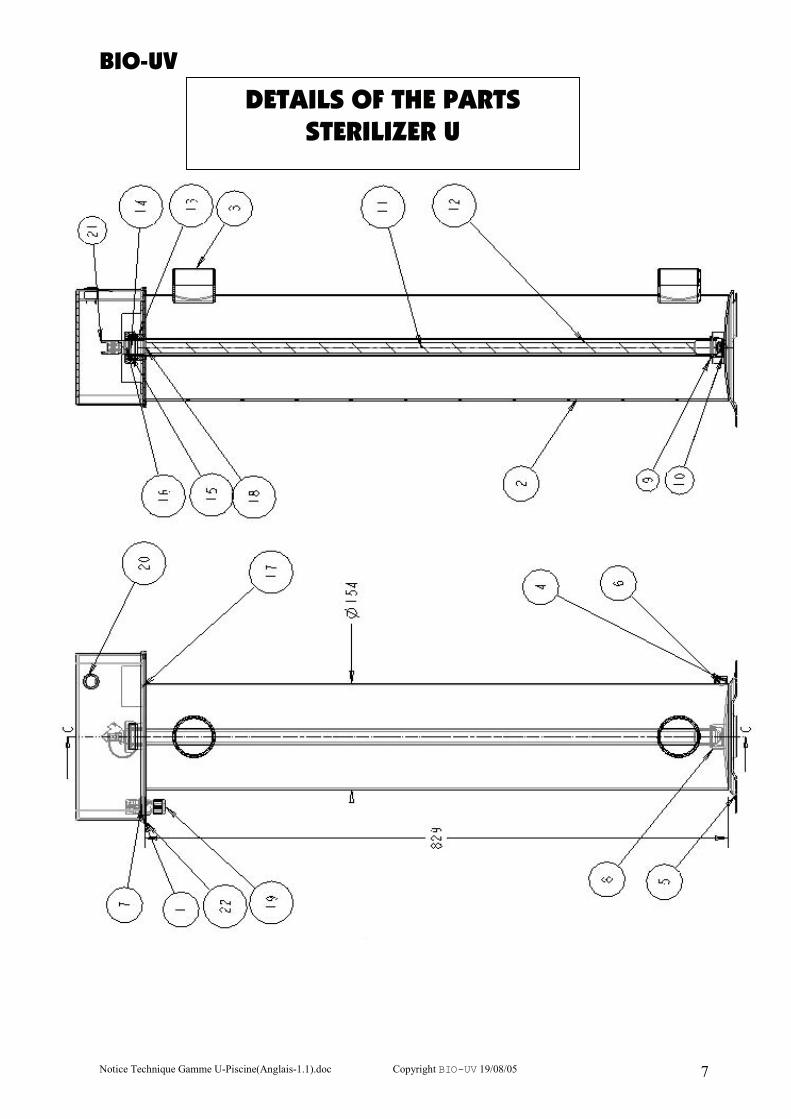
DETAILS OF THE PARTSSTERILIZER U

BIO-UV
Notice Technique Gamme U-Piscine(Anglais-1.1).doc Copyright BIO-UV 19/08/05 8
Nomenclature
N° Qty Reference Designation1 1 UI-1-005 A Top
2 1 UI-1-010 Body
3 2 UI-1-015 Sleeve
4 1 UI-1-017 Sleeve purge
5 1 UI-1-018 B Bottom
6 1 UI-1-023 Purge plug
7 1 UI-1-024 Terminal
8 1 UI-2-004 Support Guide
9 1 UI-2-008 Plug 14x
10 1 UI-2-009 Plug 14
11 1 UI-3-004 Quartz tube
12 1 UI-3-008 UVc lamp
13 1 UI-4-004 Tip
14 1 UI-4-005 O-ring joint
15 1 UI-4-007 Washer
16 1 UI-4-009 Stainless steel nut
17 1 UI-5-002 Ballast
18 1 UI-5-003 Switch
19 1 UI-5-004 Padding
20 1 UI-5-005 Indicator light
21 1 UI-5-071 Socket
22 1 UI-6-004 Cover

BIO-UV
Notice Technique Gamme U-Piscine(Anglais-1.1).doc Copyright BIO-UV 19/08/05 9
Type A B C D E F G H I J K
UV10 423.5 255.5 173 82.5 313 154 235 115 249 174 1"1/2
UV20 693.5 525 443 82.5 583 154 235 115 249 174 1"1/2
UV30 939.5 721.5 689 82.5 821 154 235 115 249 174 2"
UV40 1193.5 1025.5 943 82.5 1083 154 235 115 249 174 2"1/2
Clearance for U range sterilisers (dimensions in mm)
CLEARANCE

BIO-UV
Notice Technique Gamme U-Piscine(Anglais-1.1).doc Copyright BIO-UV 19/08/05 10
INSTALLATION GUIDE
.
Install the BIO-UV appliance in the pump house, taking care to respect safety areas outside volume0.1 and 2 in line with current installation regulations .
Make sure you choose a position where the lamp can be takenout � the AVAILABLE HEIGHT in the pump house should beDOUBLE the total height of the appliance.Unless the lamp is laid down to change the bulb and clean thequartz tube.
The BIO-UV appliance should be installed on the backwashes after the filter and before theheating (if necessary).
The appliance�s water inlet should preferably be at the bottom and the outlet to the pool therefore atthe top. (It may be positioned horizontally).
The union joints to ease fitting and removal are supplied in diameters of 50 (UV10-20) and 63(UV30) - (UV40 = 75 diameter).If a bypass is used for heating, the BIO-UV appliance should be installed before the bypass.
Using the connection collars (50, 63 or 75) fix the REMANENT and liquid pH injectors and the pHanalysis probe in order, see above diagram.
BIO-UV
POOL
FILTER PUMP
HEATING
UNION JOINT Ø50 or 63 or 75 (UV40)
BACKFLOW
BIO-UVDOSAGEPUMPREMANENTINJECTION
pH REGULBIO-UV
INJECTIONPH- or PH+
PH PROBE
BYPASS VALVE
BYPASS VALVE
BYPASS VALVE

BIO-UV
Notice Technique Gamme U-Piscine(Anglais-1.1).doc Copyright BIO-UV 19/08/05 11
CONNECTION
The ultraviolet BIO-UV appliance is dependent on the filtration system andtherefore has to work at the same time.It is connected to the electricity unit on the filtration time delay, at 220 V.(Caution: 380 V).
The whole installation should be protected by a 30mA differential trip-switch.UV ELECTRICAL DIAGRAM
Disconnect the BIO-UV steriliser before any electrical work
The BIO-UV appliance has been wired for an earthconnection
UV10
UV20/30/40
SWITCH
PHASENEUTRAL
SWITCH
EARTH
UV LAMP SOCKET
UV LAMP SOCKET
STARTER DOOR
LAMP
INDICATOR
PHASE NEUTRALEARTH
LAMP
INDICATOR
LIGHT

BIO-UV
Notice Technique Gamme U-Piscine(Anglais-1.1).doc Copyright BIO-UV 19/08/05 12
CHECKS PRIOR TO START-UP:
- Check that the electrical connection in the filtration box is correct.- Check that the upper part of the appliance has been correctly repositioned.- Check that union joints and collars are in the right place and fitting tightly to the
backflows.
PREPARING THE POOL STARTING UP
For new pools or fresh water
- After filling (use mains water supply) check thatthe filter and skimmers are clean, put in a shockdose of hydrogen peroxide (active oxygen), 1L/10m3, to make everything really clean (filtrationsystem in operation).- Carefully balance the water�s various keyparameters:TAC, pH and add a lime-scale sequestrant if thewater is hard or very hard. This will make the waterwell balanced and less likely to cause lime-scalebuild-up, so disinfectants will be used up moreslowly and will work more effectively.- Check that the skimmers are opening and suckingin correctly.
- Position the backflow ducts facing slightlyupwards. As pollution arrives via the surface, it willbe taken rapidly towards the skimmers. Make surethat water is circulating optimally around all parts ofthe pool to avoid �dead areas� where algae love tosettle.
For old water:
Water that has had 4 or 5 years of chlorine,bromine, PHMB, etc:- After thoroughly cleaning the pool, skimmers,filtration system and pump pre-filter, add somefresh water.- Concerning the filter, changer the filter medium if it is more than 5 years old.Otherwise, open it to check that it is clean and apply a suitable cleaning product.- Then, carry out the same operations as for freshwater.
When you have checked the assembly of theBIO-UV steriliser and the BIO-UV dosagepump (see instructions):- Set the timers.- Adjust filtration times to the temperature ofthe water.- Check that the switch under the UVchamber case is in the ON position- Place the REMANENT container with thenumber of picots desired on the dosagepump timer.- Start filtration and after a few seconds theindicator will show whether the UV lamp isoperating correctly.
The BIO-UV appliance disinfects thewater.REMANENT makes the waterdisinfectant.The whole system is automatic.
Don�t forget to check pH every week if theequipment is not fitted with BIO-UV pHautomatic regulator.

BIO-UV
Notice Technique Gamme U-Piscine(Anglais-1.1).doc Copyright BIO-UV 19/08/05 13
THE 4 ESSENTIAL STEPS
1)- WATER BALANCE
2)- FILTRATION
3)- CONTROLLING ALGAE
4)- REMANENCE
THE pH MUST BE KEPT AT BETWEEN 7 AND 7.4
PH+
PH-
THE TAC MUST BE KEPT AT BETWEEN 10 AND 15°F
TAC +
TAC-
FILTRATION
PERMANENT
FLOCCULATION
(for sand filters)
DISINFECTION
AND DESCALING
OF THE SAND
FILTER
ANNUALLY
UVC
STERILISER +SPECIAL ALGICIDE
OR SUPER
CONCENTRATE =
EFFICIENT CURATIVE
AND PREVENTIVE
ACTION
UVC
STERILISER +
BROMINE
OR
OXYGEN REMANENT
OR
BIO-UV REMANENT
=
HEALTHY AND
CLEAR WATER
WEEKLY FILTER
WASHING
BIO-UV SHOCK
ONCE MONTHLY

BIO-UV
Notice Technique Gamme U-Piscine(Anglais-1.1).doc Copyright BIO-UV 19/08/05 14
MAINTENANCE(see exploded view p5)
The ultraviolet lamp is designed to last 8000hours or 1000 switch-ons, i.e. around 2 years foran outdoor, seasonally-used pool or 1 year foran indoor pool operating 24 hours a day.In order to avoid premature wear we recommendone start-up per day, i.e. one filtration cycle. Thisalso saves the filtration pump from wear.
Changing the lamp:It is essential to work with the lamp andfiltration switched off.Whether installed vertically or horizontally,check that there is sufficient clearance toremove the lamp.
Dismantling (see parts diagram page 5)- Dismantle the technical unit (22).- Take the 4 PIN connector (21) and gently drawthe lamp upwards while rotating it.- As soon as the lamp has come up by a fewcentimetres, remove the connector, take hold ofthe ceramic base and remove the lamp from thequartz tube while keeping it straight.This operation should be carried outcarefully.
Do not drop the lamp into the quartz tube, itmay break and damage the quartz.
Reassembly- Pick up the new lamp. Make sure that youtouch only the upper and lower ceramic bases. Ifyou touch the lamp, clean it with alcohol and asoft cloth.
- Slide the lamp into the quartz tube, keeping avery straight line.- When it is ¾ of the way in, attach the bulb byits 4 pins to the connector (21) making sure it isfacing the right way (guide pin). Do not force it.- Slide the lamp all the way into the quartz tube.- Refit the box (22)
Cleaning the quartz tube:
Every year, you should check that the quartz tubehas not been turned opaque by lime deposits. Thetube should be perfectly transparent so that itdoes not restrict the passage of ultraviolet rays.
- Stop the filters and work with the lampswitched off.- Close all the valves on the installation.
Removing the quartz tube
CAUTION: The guarantee does not coverbreakage.
- Remove the lamp (see previous paragraph).- Place it on a soft surface, where it will not riskbreakage.- Unscrew the stainless steel nut by hand (16),- Remove the white plastic washer (15),-Insert your thumb or finger inside the tube andgently slide it until the O-Ring (14) is freed fromits housing.- Pull the quartz tube right out of the appliance,keeping a very straight line.If the tube is clean and perfectly transparent: put itback it following the instructions below.If you can see white lime-scale deposits, the tubemust be cleaned with a soft cloth and whitevinegar or an acid. The quartz must not bescratched, as this will affect the ultravioletrays.
Putting back the quartz tube:
- Carefully slide the tube into the appliance,keeping a very straight line.- With your finger inside the tube, place the quartzon its base at the bottom of the appliance. Thequartz should protrude slightly (by the thickness ofthe O-Ring). It must not drop right to the bottom. Ifthe quartz is correctly positioned in the base, youshould feel suppleness when you apply slightpressure (pneumatic effect).- Moisten the O-Ring (14) and position it round thetube. Use your fingernail to push it into its housing.(Do not use tools).- Place the white plastic washer (15) inside thestainless steel thread.- Re-tighten the stainless steel nut (16) by hand.- Refit the lamp (see previous paragraph).- Refit the box (22).- Switch back on.

BIO-UV
Notice Technique Gamme U-Piscine(Anglais-1.1).doc Copyright BIO-UV 19/08/05 15
GUARANTEES
Units in the BIO-UV range are guaranteed subject to the following conditions:
- 5 years for the stainless steel reactor (materials and welding)except in the event of use in a highly corrosive environment (brackish or very salty,e.g.: seawater),
- 2 years for all other components, excepting the UV lamp (1 year and/or 1000switch-ons) electrical components are not guaranteed against over voltage andlightening damage.
Caution! The quartz tube and the lamp are not guaranteed againstbreakage.
- Faulty parts must be returned to BIO-UV, with details of the unit type and serialnumber, for exchange after technical evaluation.
- Shipping costs will be shared between the retailer and BIO-UV.
- The guarantee runs from the day of installation: this date must be notified to BIO-UV by returning the guarantee validation form by post or fax (see following page).
Caution: If the guarantee validation form is not returned within 3 monthsfollowing purchase of the unit, BIO-UV will use the month and year of manufactureof the unit as the guarantee start date.
If the instructions for installation and use are not followed, BIO-UV cannot accept responsibility and the guarantees will beconsidered null and void.
CONCLUSION
The BIO-UV system offers unparalleled water quality, comfort and peace of mind.
Easy installation, low maintenance and after-sales support maximise itsreliability.
Physical treatment of water by UV-C light offers a process that isenvironmentally friendly, producing no harmful chemical residues, benefiting
both users and nature.
How to contact the BIO-UV teamBIO-UV SA
ZA La Petite Camargue34400 LUNEL
Tel + 33 (0)4 99 133 911 Fax + 33(0)4 99 133 919
www.bio-uv.com Email: [email protected] name, Designs and Patents registered � Exclusive Products

BIO-UV
Notice Technique Gamme U-Piscine(Anglais-1.1).doc Copyright BIO-UV 19/08/05 16
GUARANTEE VALIDATION
� USER UNIT TYPE(check the relevant boxes)
Name: ....................................................................... � UV10
First name: ............................................................... � UV20
Address: ................................................................... � UV30
.................................................................................. � UV40Post code and city: ...................................................Tel: ...........................................................................
Unit serial number: ....................................................
What type of application is the steriliser used for? (check the relevant boxes)
� Swimming poolPool volume: ...................m3
Type of filtration: sand
diatom
cartridge
Is the unit installed with a pH regulator (BIO-UV pH)? Yes No
Is the unit installed with a dosage pump (BIO-UV TEMPO)? Yes No
� Spas
�Ornamental pool (Fish)
� Other (please give details): ...........................................................................................
� INSTALLER
Name: .......................................................................First name: ...............................................................Address: .....................................................................................................................................................Post code and city: ...................................................Tel: ...........................................................................
Date of installation: ...................................
Please complete the above and return the document (within 3 months of purchase)to the following address:
BIO-UV SA
ZA La Petite Camargue34400 LUNEL
Or by fax: + 33(0)4 99 133 919