BGC gimbal & Pixhawk SToRM32 Gimbal...
11
BGC gimbal & Pixhawk SToRM32 Gimbal Controller The SToRM32-BGC is a relatively low-cost 3-axis brushless gimbal controller that can communicate with ArduPilot (Copter, Plane and Rover) using MAVLink. With 3-axis control and MAVLink interface, the SToRM32 offers more capabilities and than the Tarot Gimbal. MAVLink is a richer communications format that PWM and may be used in the future to provide additional information to the gimbal including centrefugal force corrections leading to better performance during aggressive maneuvers. Please refer to the SToRM32-BGC wiki pages for more detailed information including where the gimbals can be purchased. This gimbal has been tested with a DYS 3-axis brushless gimbal . Note Support for this gimbal is included in Copter 3.3 (and higher) for gimbals running v067e (or higher). Connecting the gimbal to the Pixhawk
Transcript of BGC gimbal & Pixhawk SToRM32 Gimbal...
BGC gimbal & Pixhawk
SToRM32 Gimbal Controller
The SToRM32-BGC is a relatively low-cost 3-axis brushless gimbal controller that can
communicate with ArduPilot (Copter, Plane and Rover) using MAVLink.
With 3-axis control and MAVLink interface, the SToRM32 offers more capabilities and
than the Tarot Gimbal. MAVLink is a richer communications format that PWM and may
be used in the future to provide additional information to the gimbal including
centrefugal force corrections leading to better performance during aggressive
maneuvers.
Please refer to the SToRM32-BGC wiki pages for more detailed information including
where the gimbals can be purchased. This gimbal has been tested with a DYS 3-axis
brushless gimbal.
Note
Support for this gimbal is included in Copter 3.3 (and higher) for gimbals
running v067e (or higher).
Connecting the gimbal to the Pixhawk
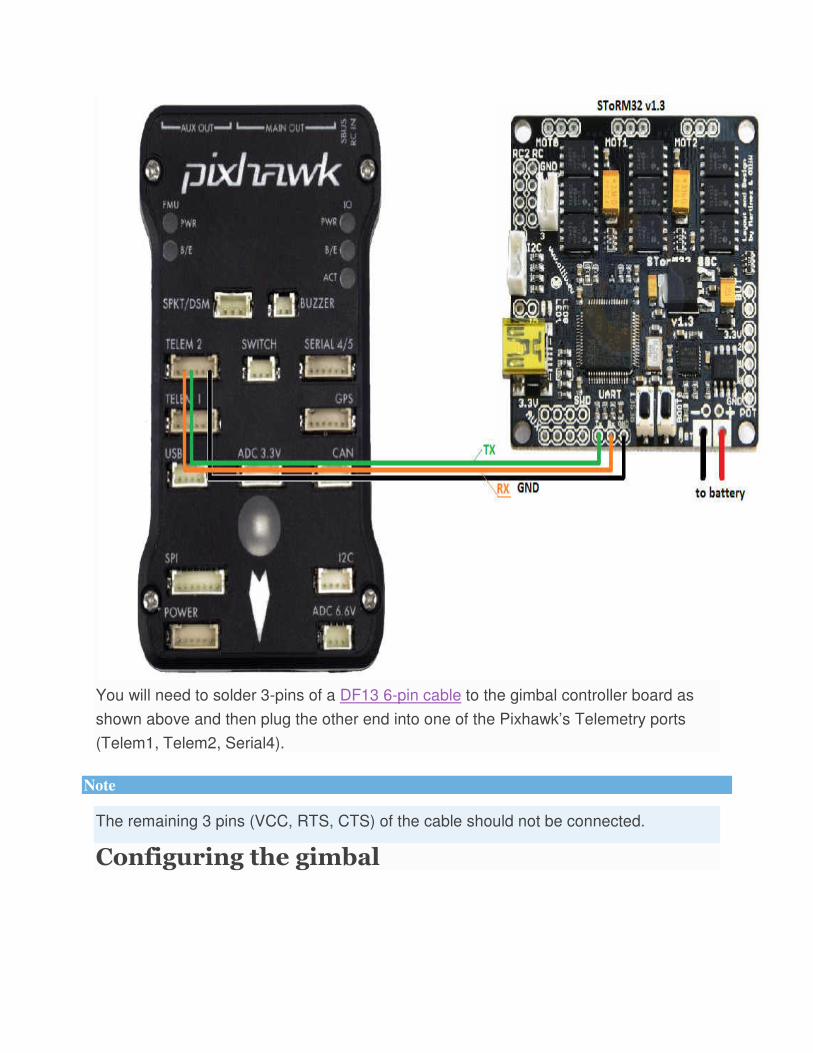
You will need to solder 3-pins of a DF13 6-pin cable to the gimbal controller board as
shown above and then plug the other end into one of the Pixhawk’s Telemetry ports
(Telem1, Telem2, Serial4).
Note
The remaining 3 pins (VCC, RTS, CTS) of the cable should not be connected.
Configuring the gimbal
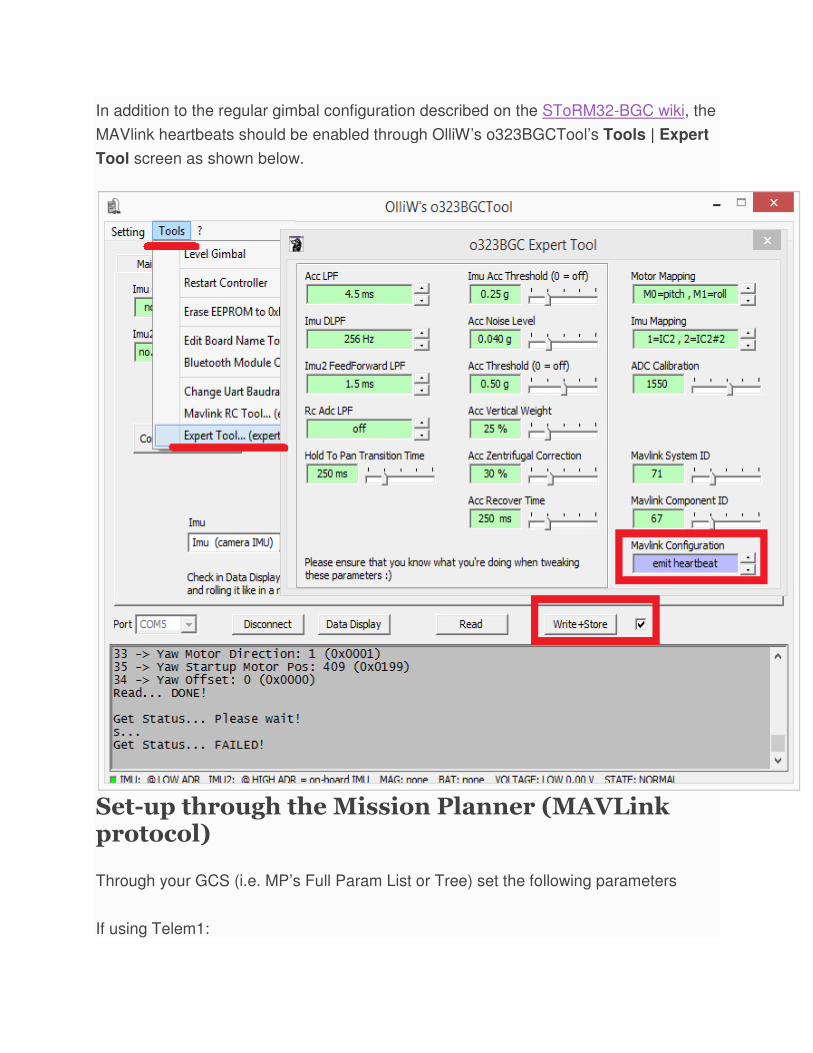
In addition to the regular gimbal configuration described on the SToRM32-BGC wiki, the
MAVlink heartbeats should be enabled through OlliW’s o323BGCTool’s Tools | Expert
Tool screen as shown below.
Set-up through the Mission Planner (MAVLink protocol)
Through your GCS (i.e. MP’s Full Param List or Tree) set the following parameters
If using Telem1:

• SERIAL1_BAUD = "115"
• SERIAL1_PROTOCOL = "1"
• BRD_SER1_RTSCTS = "0"
If using Telem2:
• SERIAL2_BAUD = "115"
• SERIAL2_PROTOCOL = "1"
• BRD_SER2_RTSCTS = "0"
If using Serial4:
• SERIAL4_BAUD = "115"
• SERIAL4_PROTOCOL = "1"

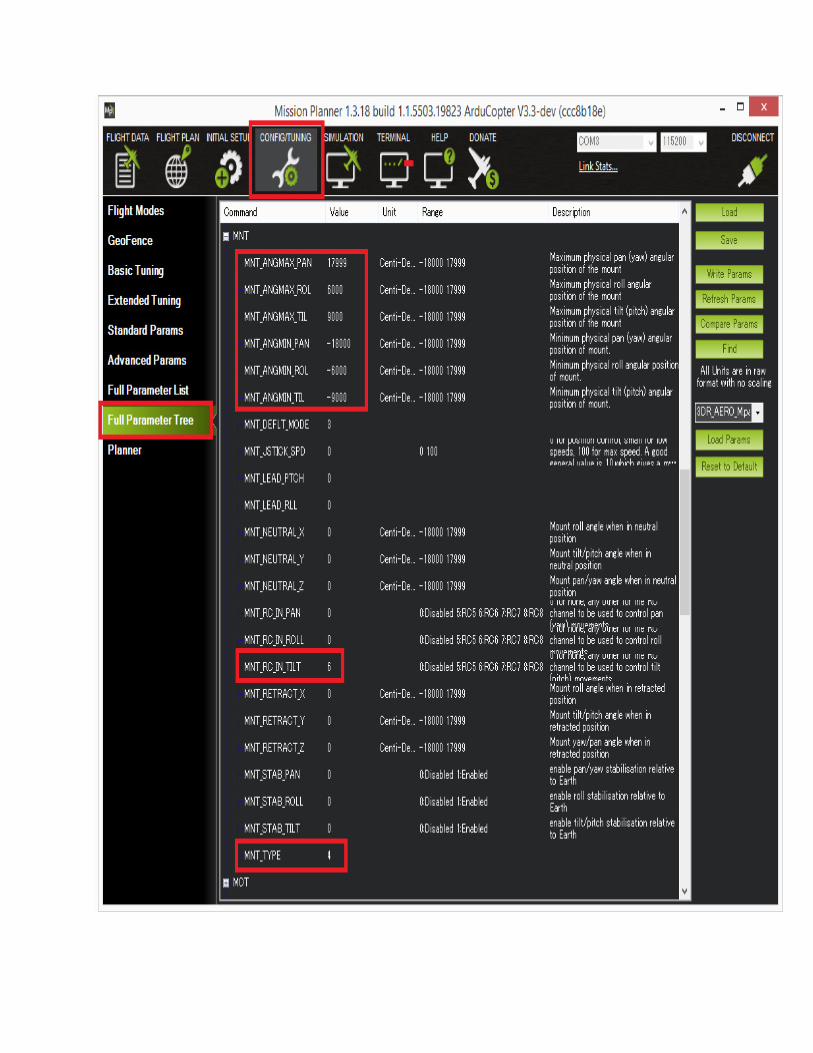
Set MNT_TYPE to “4” to enable the SToRM32 gimbal driver (the Pixhawk must be rebooted
for this change to take effect).
Set MNT_RC_IN_TILT to “6” if you wish to control the gimbal’s tilt (aka pitch angle) with your
transmitters ch6 tuning knob.
Set
the MNT_ANGMAX_PAN, MNT_ANGMIN_TIL
N_ROL to match the range of your gimbal. For example, the screenshot below shows a
setup in which the gimbal has:
• 360 of yaw rotation (MNT_ANGMIN_PAN
to “4” to enable the SToRM32 gimbal driver (the Pixhawk must be rebooted
for this change to take effect).
to “6” if you wish to control the gimbal’s tilt (aka pitch angle) with your
MNT_ANGMIN_TIL, MNT_ANGMIN_ROL and MNT_ANGMIN_PAN, MNT_ANGMIN_TIL
to match the range of your gimbal. For example, the screenshot below shows a
setup in which the gimbal has:
MNT_ANGMIN_PAN = -18000, MNT_ANGMAX_PAN = 17999)
to “4” to enable the SToRM32 gimbal driver (the Pixhawk must be rebooted
to “6” if you wish to control the gimbal’s tilt (aka pitch angle) with your
MNT_ANGMIN_TIL, MNT_ANGMI
to match the range of your gimbal. For example, the screenshot below shows a
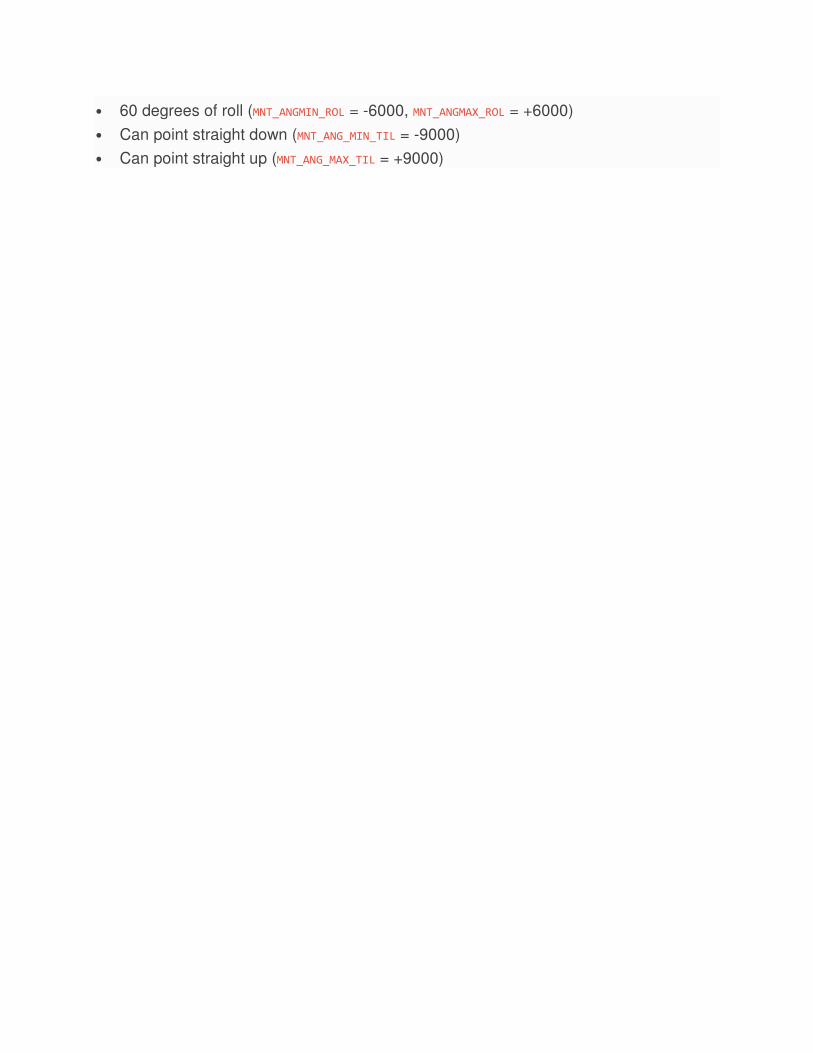
• 60 degrees of roll (MNT_ANGMIN_ROL = -6000, MNT_ANGMAX_ROL = +6000)
• Can point straight down (MNT_ANG_MIN_TIL = -9000)
• Can point straight up (MNT_ANG_MAX_TIL = +9000)
Set-up through the Mission Planner (SToRM32 serial protocol)
The custom SToRM32 protocol was added as an alternative to the MAVLink protocol
and has the same features. To use the serial protocol use all the same settings as
above except set the SERIALX_PROTOCOL to “8” (where “X” is “1”, “2” or “4”
depending upon which Pixhawk serial port the gimbal is connected to).
When Configuring the Gimbal controller the “MAVLink configuration” should be set to
“no heartbeat”.
Testing the gimbal
For instructions for testing the gimbal moves correctly please check the similar section
for the Tarot gimbal.
The video below shows the SToRM32 being tested on Copter3.3. It demonstrates a few
features that would not be possible on a 2-axis gimbal like the Tarot Gimbal.
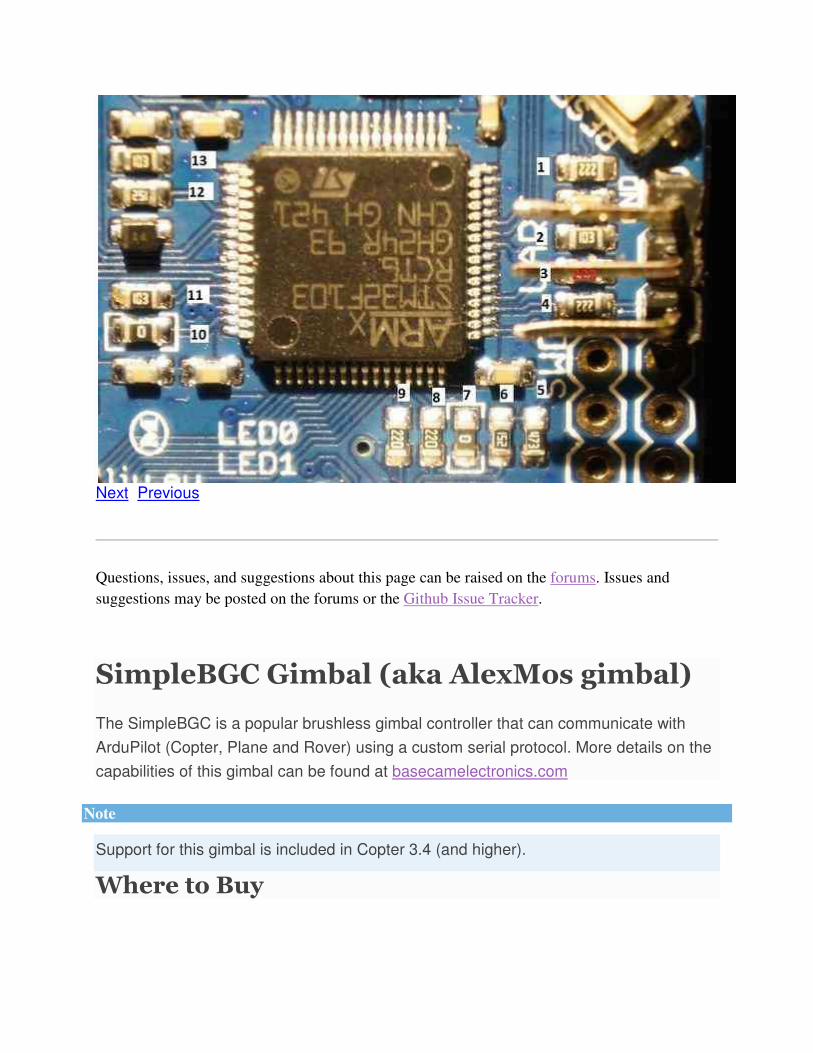
Resistor issue on some boards
Some in-depth analysis here on rcgroups turned up that some SToRM32 boards need
resistor #4 (shown in pic below) shorted (i.e. a wire soldered over the top of the resistor
to turn it into a regular wire) in order for the gimbal controllers messages to get through
to the Pixhawk.
Next Previous
Questions, issues, and suggestions about this page can be raised on the forums. Issues and
suggestions may be posted on the forums or the Github Issue Tracker.
SimpleBGC Gimbal (aka AlexMos gimbal)
The SimpleBGC is a popular brushless gimbal controller that can communicate with
ArduPilot (Copter, Plane and Rover) using a custom serial protocol. More details on the
capabilities of this gimbal can be found at basecamelectronics.com
Note
Support for this gimbal is included in Copter 3.4 (and higher).
Where to Buy
The SimpleBGC controller and accompanying 2-axis and 3-axis gimbals can be
purchased from basecamelectronics.com and many other retailers.
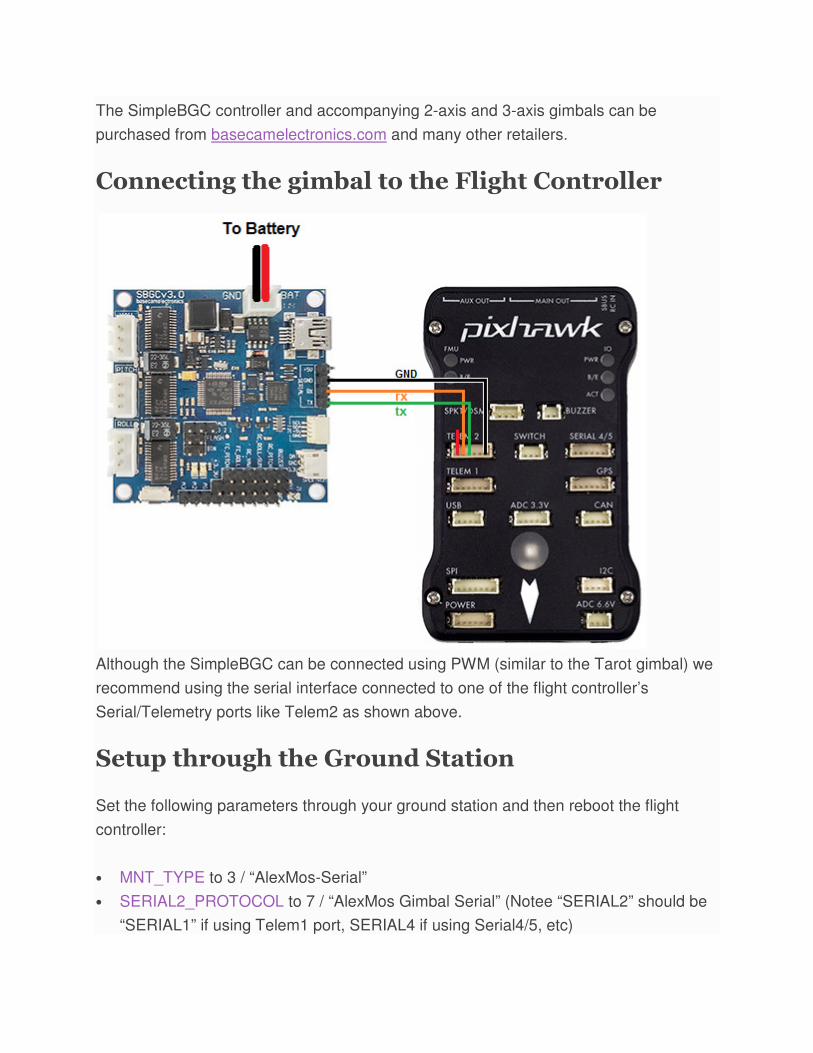
Connecting the gimbal to the Flight Controller
Although the SimpleBGC can be connected using PWM (similar to the Tarot gimbal) we
recommend using the serial interface connected to one of the flight controller’s
Serial/Telemetry ports like Telem2 as shown above.
Setup through the Ground Station
Set the following parameters through your ground station and then reboot the flight
controller:
• MNT_TYPE to 3 / “AlexMos-Serial”
• SERIAL2_PROTOCOL to 7 / “AlexMos Gimbal Serial” (Notee “SERIAL2” should be
“SERIAL1” if using Telem1 port, SERIAL4 if using Serial4/5, etc)
If you are unable to connect you may wish to set the following parameters although
normally this should not be required:
• SERIAL2_BAUD to 115 (means use serial baudrate of 115200)
• BRD_SER2_RTSCTS to 0 to disable flow control on Telem2 (use
BRD_SER1_RSCTS if connecting to Serial1, Serial4/5 never uses flow control)
The gimbal’s maximum lean angles can be set using these parameters:
• MNT_ANGMIN_ROL, MNT_ANGMAX_ROL to -3000 and 3000 to limit the roll angle
to 30 degrees in each direction
• MNT_ANGMIN_TIL, MNT_ANGMAX_TIL to -9000 and 0 to limit the gimbal to point
between straight down (-90 degrees) and straight forward (0 degrees)
To control the gimbal’s lean angles from a transmitter set:
• MNT_RC_IN_TILT to 6 to control the gimbal’s tilt (aka pitch angle) with the
transmitter’s Ch6 tuning knob
For a 3-axis gimbal with 360 degrees of yaw set:
• MNT_ANGMIN_PAN, MNT_ANGMAX_PAN to -18000 and 18000 to get a full 360
degrees of yaw range
Testing the gimbal
For instructions for testing the gimbal moves correctly please check the similar section
for the Tarot gimbal.