Best Practices - Articulate...
22
Best Practices - Articulate Storyline2 Copyright © 2017 | DiscoverLink, Inc. Page | 1 Contents Folder setup ............................................................................................................................................................................ 2 1. Folders........................................................................................................................................................................ 2 Storyboards and scripts.......................................................................................................................................................... 2 2. Styles should be defined and discussed with Course owners, IDs, & course builders .............................................. 2 Authoring – course standards ................................................................................................................................................ 3 3. Master Slide – Templates........................................................................................................................................... 3 4. Fonts........................................................................................................................................................................... 3 5. Course asset slide....................................................................................................................................................... 4 6. Images ........................................................................................................................................................................ 5 7. Animations and Transitions ....................................................................................................................................... 7 8. Slide Properties and Navigation ................................................................................................................................. 7 9. Naming scenes and assets ......................................................................................................................................... 8 10. Storyline Player .......................................................................................................................................................... 8 Triggers, states, and variables ............................................................................................................................................. 12 12. Triggers make it all happen. ..................................................................................................................................... 12 13. States – Buttons & Images ....................................................................................................................................... 14 14. Variables .................................................................................................................................................................. 14 Timeline ................................................................................................................................................................................ 15 15. Zooming the timeline – you can use the slider or your mouse scroll wheel ........................................................... 15 16. Use cue points for timing rather than seconds in triggers. ..................................................................................... 15 Format and animation painter............................................................................................................................................. 16 17. Copy formats (text, effects and even states) and animations from one object to another with the Format and Animation Painter buttons. ..................................................................................................................................... 16 Work on your local hard drive ............................................................................................................................................. 17 Storyline update status ........................................................................................................................................................ 17 Published project’s location/naming................................................................................................................................... 17 Protecting your work: saving and versions ......................................................................................................................... 18 Protecting your work: back up and auto-recovery ............................................................................................................ 18 Storyline keyboard shortcuts ............................................................................................................................................... 21
Transcript of Best Practices - Articulate...

Best Practices - Articulate Storyline2
Copyright © 2017 | DiscoverLink, Inc. Page | 1
Contents Folder setup ............................................................................................................................................................................ 2
1. Folders ........................................................................................................................................................................ 2
Storyboards and scripts .......................................................................................................................................................... 2
2. Styles should be defined and discussed with Course owners, IDs, & course builders .............................................. 2
Authoring – course standards ................................................................................................................................................ 3
3. Master Slide – Templates........................................................................................................................................... 3
4. Fonts........................................................................................................................................................................... 3
5. Course asset slide ....................................................................................................................................................... 4
6. Images ........................................................................................................................................................................ 5
7. Animations and Transitions ....................................................................................................................................... 7
8. Slide Properties and Navigation ................................................................................................................................. 7
9. Naming scenes and assets ......................................................................................................................................... 8
10. Storyline Player .......................................................................................................................................................... 8
Triggers, states, and variables ............................................................................................................................................. 12
12. Triggers make it all happen. ..................................................................................................................................... 12
13. States – Buttons & Images ....................................................................................................................................... 14
14. Variables .................................................................................................................................................................. 14
Timeline ................................................................................................................................................................................ 15
15. Zooming the timeline – you can use the slider or your mouse scroll wheel ........................................................... 15
16. Use cue points for timing rather than seconds in triggers. ..................................................................................... 15
Format and animation painter ............................................................................................................................................. 16
17. Copy formats (text, effects and even states) and animations from one object to another with the Format and
Animation Painter buttons. ..................................................................................................................................... 16
Work on your local hard drive ............................................................................................................................................. 17
Storyline update status ........................................................................................................................................................ 17
Published project’s location/naming ................................................................................................................................... 17
Protecting your work: saving and versions ......................................................................................................................... 18
Protecting your work: back up and auto-recovery ............................................................................................................ 18
Storyline keyboard shortcuts ............................................................................................................................................... 21

Best Practices - Articulate Storyline2
Copyright © 2017 | DiscoverLink, Inc. Page | 2
Folder setup
1. Folders a. Draft b. Media
i. Photos ii. Audio
iii. Other assets (e.g. Clip Art, PDFs) c. Edits d. Storyline Files e. Published f. Archives
Storyboards and scripts
2. Styles should be defined and discussed with Course owners, IDs, & course builders

Best Practices - Articulate Storyline2
Copyright © 2017 | DiscoverLink, Inc. Page | 3
Authoring – course standards
3. Master Slide – Templates
4. Fonts

Best Practices - Articulate Storyline2
Copyright © 2017 | DiscoverLink, Inc. Page | 4
5. Course asset slide
a. Graphic text b. Buttons

Best Practices - Articulate Storyline2
Copyright © 2017 | DiscoverLink, Inc. Page | 5
6. Images
a. Format picture (CTRL+ENTER) - Styles and effects b. Size & Position (CTRL +SHIFT+ENTER)

Best Practices - Articulate Storyline2
Copyright © 2017 | DiscoverLink, Inc. Page | 6

Best Practices - Articulate Storyline2
Copyright © 2017 | DiscoverLink, Inc. Page | 7
7. Animations and Transitions
8. Slide Properties and Navigation

Best Practices - Articulate Storyline2
Copyright © 2017 | DiscoverLink, Inc. Page | 8
9. Naming scenes and assets
10. Storyline Player

Best Practices - Articulate Storyline2
Copyright © 2017 | DiscoverLink, Inc. Page | 9

Best Practices - Articulate Storyline2
Copyright © 2017 | DiscoverLink, Inc. Page | 10

Best Practices - Articulate Storyline2
Copyright © 2017 | DiscoverLink, Inc. Page | 11
11. Publishing standards

Best Practices - Articulate Storyline2
Copyright © 2017 | DiscoverLink, Inc. Page | 12
Triggers, states, and variables
12. Triggers make it all happen.
The Trigger Wizard
Best Practices - Articulate Storyline2
Copyright © 2017 | DiscoverLink, Inc. Page | 13
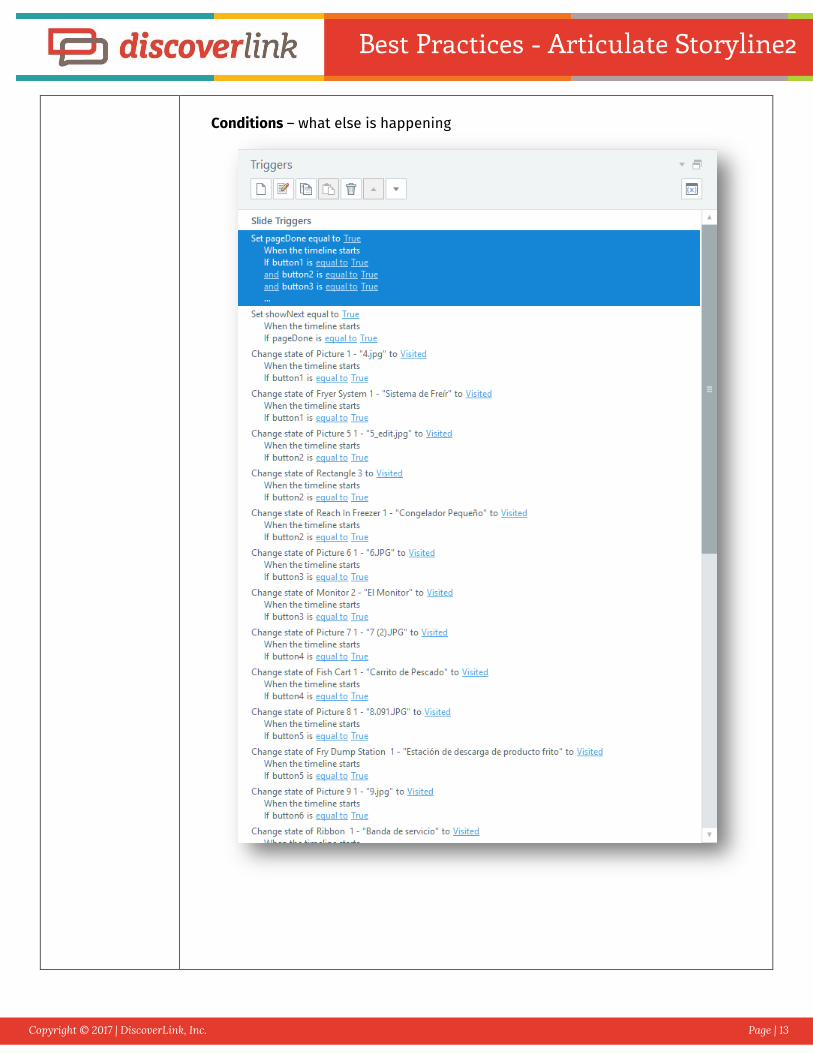
Conditions – what else is happening

Best Practices - Articulate Storyline2
Copyright © 2017 | DiscoverLink, Inc. Page | 14
13. States – Buttons & Images
14. Variables a. Types
i. Text Variables – capture the learner’s name, feedback ii. Number Variables – counting, dates and scores
iii. True/False Variables – toggling the variable b. Must be reset on each scene/slide as needed c. Some must be set as slide triggers and some are assigned to objects

Best Practices - Articulate Storyline2
Copyright © 2017 | DiscoverLink, Inc. Page | 15
Timeline 15. Zooming the timeline – you can use the slider or your mouse scroll wheel
16. Use cue points for timing rather than seconds in triggers.

Best Practices - Articulate Storyline2
Copyright © 2017 | DiscoverLink, Inc. Page | 16
Format and animation painter
17. Copy formats (text, effects and even states) and animations from one object to another with the Format and Animation Painter buttons.
Both the Format Painter and the Animation Painter will work on multiple objects .

Best Practices - Articulate Storyline2
Copyright © 2017 | DiscoverLink, Inc. Page | 17
Work on your local hard drive
Work from and publish to a permanent local drive not to a network or USB drive. Always save and publish to your local hard drive (typically your C: drive). Working on a network drive or an external (USB) drive can cause erratic behavior due to latency, such as file corruption, an inability to save changes, and loss of resources. If you need to place a copy of your project on a network drive or a USB drive for backup or versioning purposes, it's fine to do that after you've closed Storyline. Avoid reopening the project again until you've copied it back to your local hard drive. Similarly, hosting published output on a network drive isn't supported. Instead, place your content in the location for which it was published. For example, if you published for web, upload your content to a web server; if you published for LMS, upload your content to an LMS, etc.
Storyline update status
Have the “Check for Updates” option enabled
Published project’s location/naming
Limit the filename/Title for the course. Be sure the file paths to your projects and published output are well under the 260-character limit imposed by Microsoft Windows. (Publishing adds characters to the file path you selected. If it exceeds 260 characters, your published output will be incomplete.) Avoid using special characters, accents, or symbols in your file paths and file names. Learn more about naming conventions in this Microsoft article (http://msdn.microsoft.com/en-us/library/aa365247%28VS.85%29.aspx). The output folder goes three folders deep so just inside the published folder can be more than 100 characters. Example: “Culturally Competent Customer Service at Food Assistance Programs - Storyline output\story_content\notes\Note6bRIQDxOkGN.6EnMSN9qoX2.swf Be sure to test courses in the environment they will be used. (web server, Locally – CD, LMS – SCORM Cloud.
Use Proper File-Naming Conventions
Use an Underscore or Dash: Instead of using spaces between the words, use a dash or an underscore. For example, safety_training_101.story, or retail-module-3.story. Use CamelCase: CamelCase is a practice often used in the web development world that includes writing words or sentences so each word begins with a capital letter; for example, SafetyTraining101.story or RetailModule3.story.

Best Practices - Articulate Storyline2
Copyright © 2017 | DiscoverLink, Inc. Page | 18
Protecting your work: saving and versions
Saving Save your work at least every 5 to 10 minutes. The fastest and easiest way to save your file is CTRL+S on your keyboard. When you see an asterisk (*) next to your project file’s name, it means your project has changes and needs to be saved:
Always save after you do something complex, confusing, or time-consuming that you don’t want to have to repeat.
Versions Daily: You might consider creating a new version of the *.story file every day and including that day’s date in the title. For example: safety-training-03-22-2016.story or 20170425_FileName.story. This way, if you need to go back to a previous version, you’ll have every day to choose from. Weekly: Versioning every day might be too often for your needs; if that’s the case consider doing at the very least a weekly version of your document. If you choose to store versions less frequently than weekly, you might find you have to re-do a lot of work to get your project file back where you need it to be. Major Changes: It’s definitely a good idea to always create a new version when there’s a major change to the file, including navigation changes or any design changes that are going to apply project-wide: 20170425_FileNameV2.story. If you change your mind, or need to go back for any reason, you’ll be thankful you made the new version. Archiving: How long do you want to hang on to all those versions? It depends, but until the project is delivered is probably a safe bet. After that, you might want to hang on to a couple of versions but are probably safe deleting the rest.
Protecting your work: back up and auto-recovery
Back up options You need to back up your work OFTEN. You should be backing up your work at least once a day. File-Hosting Service: One option is to use a file-hosting service to back up your project files. The options abound: Dropbox, Carbonite, Backblaze, and many more. Some of these services automatically back up all your files constantly, so you don’t even have to think about it. File or Web Server: Another option is to use a file or web server to upload your files and back up your work. External Hard Drive: A third option is to save your files to an external hard drive. If you do this, it’s still a good idea to back up that hard drive to a server or file-hosting service, in case the drive itself should ever become corrupt. IT Department: If you work in an office setting with an IT department there is probably a backup system already in place. If so, work with your IT department, and then consider making your own backups as well, as an extra precaution.
Storyline Auto-Recovery To use the feature, after save your project file. It should be enabled by

Best Practices - Articulate Storyline2
Copyright © 2017 | DiscoverLink, Inc. Page | 19
default; but to make sure, or to adjust the intervals, click on: File (from the Storyline ribbon), and then Storyline Options.
In the Storyline Options window, use the AutoRecovery option.
Why auto-recovery? When Storyline crashes or closes unexpectedly, so, in the background, the application has been saving it for you. Storyline will prompt you, when you reopen the file, with a message to recover the file from the last auto-recovery save that occurred.
Temp Files If there’s a crash and your file is lost or corrupt: there may still be a working

Best Practices - Articulate Storyline2
Copyright © 2017 | DiscoverLink, Inc. Page | 20
version of your project in your temp files. Here's how to check:
1. Open this folder in Windows Explorer: %appdata%\Articulate\Storyline. 2. Scan the contents of this folder for a file that starts with the name of
your project. 3. If you find the file, copy it to your desktop (if you find more than one,
copy the latest version). 4. Change the file extension of the copy on your desktop from *.tmp to
*.story. 5. Double-click the file to open it in Storyline.
Best Practices - Articulate Storyline2
Copyright © 2017 | DiscoverLink, Inc. Page | 21
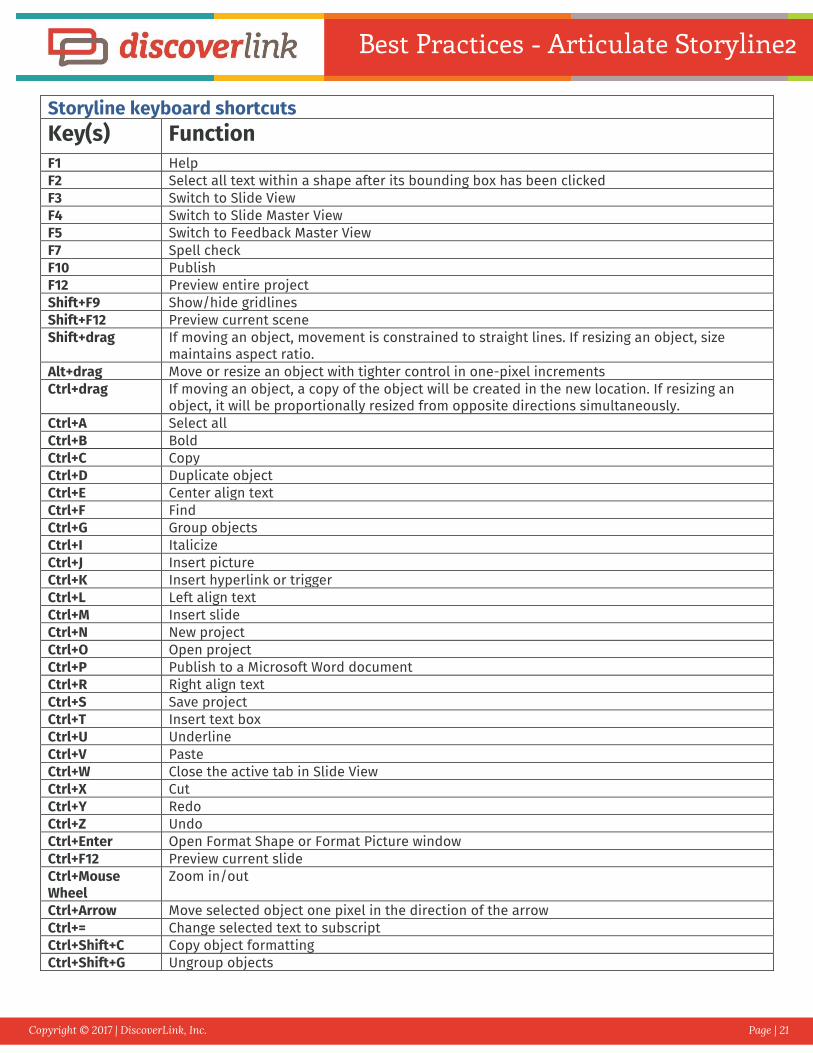
Storyline keyboard shortcuts
Key(s) Function F1 Help F2 Select all text within a shape after its bounding box has been clicked
F3 Switch to Slide View F4 Switch to Slide Master View F5 Switch to Feedback Master View
F7 Spell check F10 Publish F12 Preview entire project
Shift+F9 Show/hide gridlines Shift+F12 Preview current scene Shift+drag If moving an object, movement is constrained to straight lines. If resizing an object, size
maintains aspect ratio.
Alt+drag Move or resize an object with tighter control in one-pixel increments Ctrl+drag If moving an object, a copy of the object will be created in the new location. If resizing an
object, it will be proportionally resized from opposite directions simultaneously. Ctrl+A Select all
Ctrl+B Bold Ctrl+C Copy Ctrl+D Duplicate object
Ctrl+E Center align text Ctrl+F Find Ctrl+G Group objects
Ctrl+I Italicize Ctrl+J Insert picture Ctrl+K Insert hyperlink or trigger
Ctrl+L Left align text Ctrl+M Insert slide Ctrl+N New project
Ctrl+O Open project Ctrl+P Publish to a Microsoft Word document Ctrl+R Right align text
Ctrl+S Save project Ctrl+T Insert text box Ctrl+U Underline
Ctrl+V Paste Ctrl+W Close the active tab in Slide View Ctrl+X Cut
Ctrl+Y Redo Ctrl+Z Undo Ctrl+Enter Open Format Shape or Format Picture window
Ctrl+F12 Preview current slide Ctrl+Mouse Wheel
Zoom in/out
Ctrl+Arrow Move selected object one pixel in the direction of the arrow
Ctrl+= Change selected text to subscript Ctrl+Shift+C Copy object formatting Ctrl+Shift+G Ungroup objects

Best Practices - Articulate Storyline2
Copyright © 2017 | DiscoverLink, Inc. Page | 22
Ctrl+Shift+V Paste object formatting
Ctrl+Shift+Enter Open Size and Position window Ctrl+Shift+Arrow Resize the selected object by one pixel (up/down arrows increase/decrease the object
height; right/left arrows increase/decrease the object width) Ctrl+Shift+= Change selected text to superscript
Ctrl+Shift+> Increase font size Ctrl+Shift+< Decrease font size C Adds a cue point if you press the key while playing the slide from the timeline
Spacebar Pauses/plays the timeline after you click the play button on the timeline Create your own keyboard shortcuts
Add features you use frequently to the Quick Access Toolbar. Just right-click the button for any Storyline feature, then select Add to Quick Access Toolbar. To launch any of the buttons on the Quick Access Toolbar via a keyboard shortcut, press and hold the Alt key on your keyboard and press the number key that matches the button you want to launch. For example, the first button on the Quick Access Toolbar is "1," the second button is "2," etc.