
Articulate Quizmaker – Trainingmalawi.mvm.ed.ac.uk/wp-content/uploads/2011/03/... · Articulate...
26
Articulate Workshop, May 2010 1 Learning Technology Section, University of Edinburgh Articulate Quizmaker – Training Contents Creating a Quiz ............................................................................................. 2 Adding Questions .......................................................................................... 4 Creating a true/false question ................................................................... 4 Creating a multiple choice question ........................................................... 8 Creating a multiple response question ..................................................... 10 Image Hotspot Question ......................................................................... 12 Fill in the Blank Question ........................................................................ 15 Sequence – Drag and Drop Question ....................................................... 18 Creating a matching drag and drop question ............................................ 20 Publishing your quiz .................................................................................... 22 Some Common Questions ....................................................................... 22 Checking Your Quiz ................................................................................ 22 Publishing your quiz ............................................................................... 24
Transcript of Articulate Quizmaker – Trainingmalawi.mvm.ed.ac.uk/wp-content/uploads/2011/03/... · Articulate...
Articulate Workshop, May 2010 1 Learning Technology Section, University of Edinburgh
Articulate Quizmaker – Training
Contents
Creating a Quiz ............................................................................................. 2
Adding Questions .......................................................................................... 4
Creating a true/false question ................................................................... 4
Creating a multiple choice question ........................................................... 8
Creating a multiple response question ..................................................... 10
Image Hotspot Question ......................................................................... 12
Fill in the Blank Question ........................................................................ 15
Sequence – Drag and Drop Question ....................................................... 18
Creating a matching drag and drop question ............................................ 20
Publishing your quiz .................................................................................... 22
Some Common Questions ....................................................................... 22
Checking Your Quiz ................................................................................ 22
Publishing your quiz ............................................................................... 24

Articulate Workshop, May 2010 2 Learning Technology Section, University of Edinburgh
Creating a Quiz What you’ll need:
• Articulate Quizmaker software
• A number of questions to evaluate a topic
Use this tool:
• If you want to create a resource that will provide a self-assessment of student knowledge in a subject
• If you want to create a revision aid for a subject
• To allow students to identify their strengths and weaknesses in a subject
Step 1: Create a new quiz
Open Articulate Quizmaker ‘09 software and select ‘Create a new quiz’.
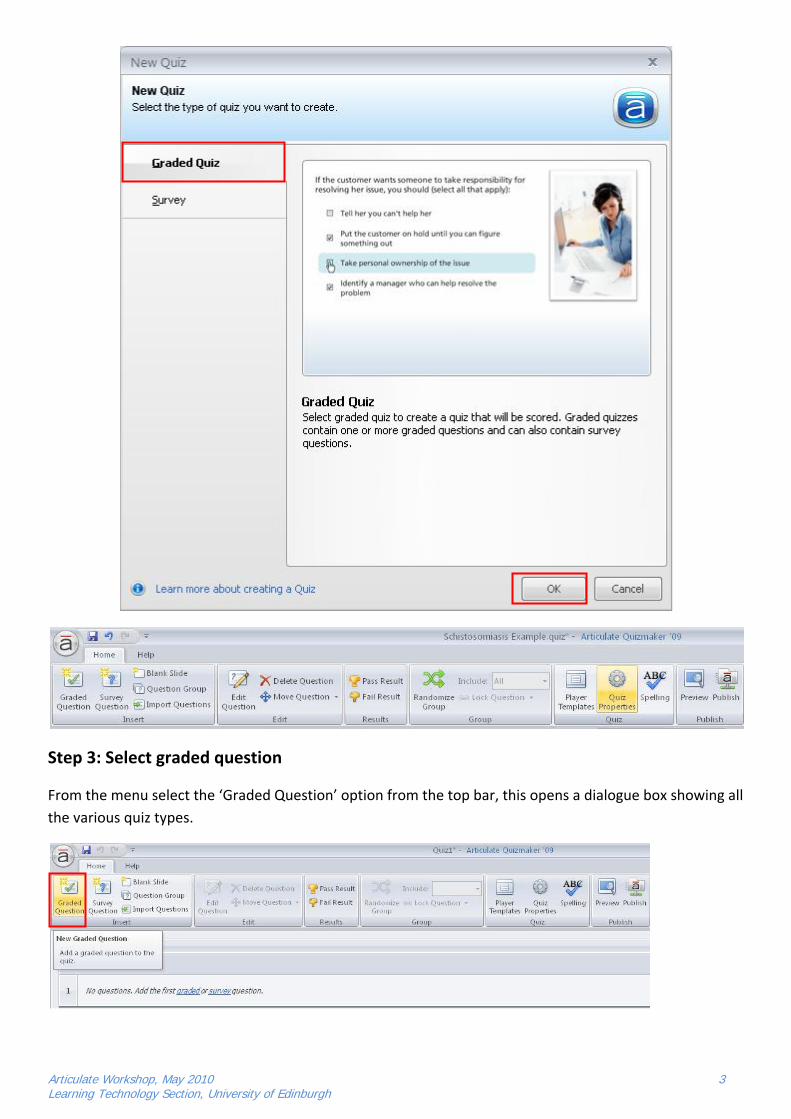
Step 2: Create a new graded quiz
From the list of options provided select the ‘Graded Quiz’ option on the left and then select ‘ok’. A graded quiz means that the student will be given a mark for the quiz, resulting in a pass or fail.
Articulate Workshop, May 2010 3 Learning Technology Section, University of Edinburgh
Step 3: Select graded question
From the menu select the ‘Graded Question’ option from the top bar, this opens a dialogue box showing all the various quiz types.
Articulate Workshop, May 2010 4 Learning Technology Section, University of Edinburgh
Adding Questions
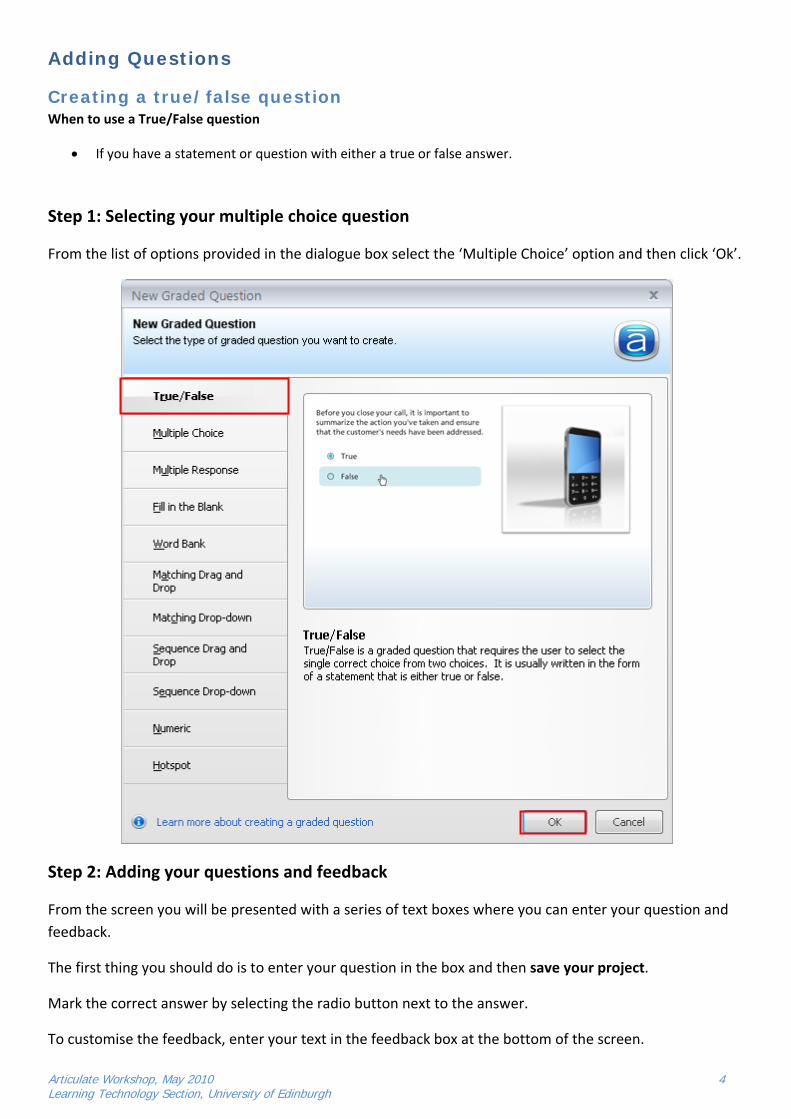
Creating a true/false question When to use a True/False question
• If you have a statement or question with either a true or false answer.
Step 1: Selecting your multiple choice question
From the list of options provided in the dialogue box select the ‘Multiple Choice’ option and then click ‘Ok’.
Step 2: Adding your questions and feedback
From the screen you will be presented with a series of text boxes where you can enter your question and feedback.
The first thing you should do is to enter your question in the box and then save your project.
Mark the correct answer by selecting the radio button next to the answer.
To customise the feedback, enter your text in the feedback box at the bottom of the screen.

Articulate Workshop, May 2010 5 Learning Technology Section, University of Edinburgh
Step 3: Adding media to your question
True/False questions often have lots of empty space available for filling with an appropriate image to help support the question.
If you would like to add a supporting image to your quiz, select the ‘Media’ button from the menu.
Select your image file from the pop-up menu shown below and then select ‘Open’. The image is automatically resized to fit the quiz.

Articulate Workshop, May 2010 6 Learning Technology Section, University of Edinburgh
Step 4: Previewing your question
Once you have added all the content to your question, it is a good idea to preview it before committing to publish. To do this select the ‘Preview’ button from the top menu bar. Previewing your question will allow you to decide if the image adds to the question, or is an unnecessary distraction.
Your preview version will appear in a pop-up window.

Articulate Workshop, May 2010 7 Learning Technology Section, University of Edinburgh
Step 5: Check the finer details
It is always important to double check some of the settings for each of your questions. Below is a quick checklist for a Matching Drag and Drop question:
• Question Format o Can the question be answered by either True or False? o Does the question lead to the answer at all?
• Feedback o Does the feedback support the student? (remember to support the student if they are wrong or
right) o As the chance of answering correctly is 50-50 it is important to reinforce the teaching content o What score would a student receive if they are correct?
• Attempts o How many attempts should a student have?
• Media o Would an image enhance this question? o Is the image in the question a distraction? o There is often lots of space available in a True/False question for an image

Articulate Workshop, May 2010 8 Learning Technology Section, University of Edinburgh
Creating a multiple choice question When to use a Multiple Choice question
• If you have a quiz with only one correct answer.
• Multiple choice is a graded question that allows the student to select one correct choice from a maximum of 10 possible choices. Any of the choices can be correct and the user must select the correct choicefor the question to be graded as correct.
Step 1: Selecting your multiple choice question
From the list of options provided in the dialogue box select the ‘Multiple Choice’ option and then click ‘Ok’.
Step 2: Adding your questions, answers and feedback
From the screen you will be presented with a series of text boxes where you can enter your question, answers and feedback.
The first thing you should do is to enter your question in the box and then save your project.
You can add up to 10 possible answers for the multiple choice quiz. To do this enter your answers in the boxes labelled A – J. Mark the correct answer by selecting the radio button next to the answer.

Articulate Workshop, May 2010 9 Learning Technology Section, University of Edinburgh
To customise the feedback, enter your text in the feedback box at the bottom of the screen.
For a more interactive question it is also possible to add feedback for each question. This is useful to let people know why they are right/wrong depending on their selection. This is useful when it is highly likely a student will select a wrong option.
Step 3: Check the finer details
It is always important to double check some of the settings for each of your questions. Below is a quick checklist for a Matching Drag and Drop question:
• Question Format o Does the question Make sense? o Does the question lead to the answer at all?
• Answers o Is it obvious which is the right answer? o Are there some meaningful distracters? o Should the answers be displayed in a specific order?
• Feedback o Does the feedback support the student? (remember to support the student if they are wrong or
right) o Would the question benefit from having feedback based on the student’s selection? o What score would a student receive if they are correct?
• Attempts o How many attempts should a student have?
• Media o Would an image enhance this question?

Articulate Workshop, May 2010 10 Learning Technology Section, University of Edinburgh
Creating a multiple response question When to use a Multiple Response question
• If you have a quiz with more than one correct answer.
• Multiple response is a graded question that allows the student to select all of the correct choices from a maximum of 10 possible choices. Any of the choices can be correct and the user must select all the correct choices for the question to be graded as correct.
Step 1: Selecting your multiple response question
From the list of options provided in the dialogue box select the ‘Multiple Response’ option and then click ‘Ok’.
Step 2: Adding your questions, answers and feedback
From the screen you will be presented with a series of text boxes where you can enter your question, answers and feedback.
The first thing you should do is to enter your question in the box and then save your project.
You can add up to 10 possible answers for the multiple response quiz. To do this enter your answers in the boxes labelled A – J. Mark the correct answers by checking the checkbox next to the answer.
To customise the feedback, enter your text in the feedback box at the bottom of the screen.

Articulate Workshop, May 2010 11 Learning Technology Section, University of Edinburgh
Step 3: Check the finer details
It is always important to double check some of the settings for each of your questions. Below is a quick checklist for a Matching Drag and Drop question:
• Question Format o Does the question Make sense? o Does the question lead to the answer at all? o Does the question tell the student how many correct answers are expected? (this is important to
make sure a student refines their answer before submitting) • Answers
o Is it obvious which are the right answers? o Are there some meaningful distracters? o Are the answers consistent in format and length? o Should the answers be displayed in a specific order?
• Feedback o Does the feedback support the student? (remember to support the student if they are wrong or
right) o What score would a student receive if they are correct?
• Attempts o How many attempts should a student have?
• Media o Would an image enhance this question?

Articulate Workshop, May 2010 12 Learning Technology Section, University of Edinburgh
Image Hotspot Question When to use an image hotspot question
• If you have been using a labelled image to teach about specific areas of a subject
• If you would like the students to assess their ability to identify an area visually
Step 1: Selecting your image hotspot question
From the list of options provided in the dialogue box select the ‘Hotspot’ option and then click ‘Ok’.
Step 2: Adding your questions, image, answer and feedback
Please Note: The hotspot question can only be used to identify one area of an image at a time. If you require the user to identify multiple areas of an image you will need to create a hotspot question for each area.
Upload Image The basis of this question type is the image. Once you have your image you need to upload it into your question.
First click on the button ‘Choose Image’ this will allow you to find your image and select it to be part of this question. It is only possible to upload one image per question.

Articulate Workshop, May 2010 13 Learning Technology Section, University of Edinburgh
Create answer as a hotspot In this question type the correct answer is an area on the image. You will need to highlight where this area is.
Please note that only one area of the image can be the correct answer. Be careful to check that the correct answer does not appear in multiple parts of the image.
To create the hotspot that forms the answer is very easy. You have 3 options for the type of hotspot available: Oval, Rectangle, or Freehand. You should pic the hotspot shape that will be best suited to your answer. For complex areas you will need to draw the hotspot area by hand.
Question Make sure that you write your question clearly so the student knows what they are supposed to be looking for, and that they are required to click on the image.
Feedback Feedback for the hotspot question can be created in the same way as other question types.

Articulate Workshop, May 2010 14 Learning Technology Section, University of Edinburgh
Step 3: Check the finer details
• The Image o Does the image contain labels that might give away the answer? o Is the picture of high enough quality? o Do you have permission to use this image?
• Question: o Does the question make sense? o Is it clear that the student has to click on a specific area of an image?
A common problem is to have images with ‘blank’ labels, are you asking the student to click on the label, or on the diagram?
o Does the question give away the answer? • The hotspot:
o Is there only one part of the image that shows the correct answer? o Does the hotspot clearly cover the correct answer? o Have you selected the correct hotspot shape? o Have you allowed for a margin of error in where the student clicks?
• Feedback o Does the feedback support the student? (remember to support the student if they are wrong or
right) o What score would a student receive if they are correct?
• Attempts o How many attempts should a student have?
Click on the area of the image that you think is the skull...

Articulate Workshop, May 2010 15 Learning Technology Section, University of Edinburgh
Fill in the Blank Question When to use an image hotspot question
• To test ‘recall’ knowledge without giving the options for the answer
• Can be used to test knowledge on a specific term
Step 1: Selecting your Fill in the Blank question
From the list of options provided in the dialogue box select the ‘Fill in the Blank’ option and then click ‘Ok’.
Step 2: Adding your questions, answers and feedback
Question
As the question will not show any multiple choice options, or any clues to the answer the question has to be written very clearly to state what information is being looked for.
The question should ask for a single word answer, or a few words. The student will only be marked as correct if their response matches one of the answers that you have listed as acceptable.
Write the question in the question box. The answer will then be entered in a box below the question.

Articulate Workshop, May 2010 16 Learning Technology Section, University of Edinburgh
Acceptable Answers You may have one ideal answer that the student should enter as correct, however depending on the question the student might be able to enter a number of variations of the answer that would be technically correct.
For this reason you should write a list of potential answers that you would consider correct. This is more relevant when more than one word is required in the answer.
Think about:
• The different order the words could appear in • Alternative spellings that would be correct • Alternative terms and synonyms for the correct answer
Feedback Feedback for the hotspot question can be created in the same way as other question types.
It is a good idea to provide a ‘Golden Answer’ in the feedback as you would want the student to know exactly what was expected from the question.

Articulate Workshop, May 2010 17 Learning Technology Section, University of Edinburgh
Step 3: Check the finer details
• Question o Is it clear what the student is expected to answer? o Does the question give clues to the answer?
• Answers o Have you entered your ‘Golden Answer’ o Have you provided enough additional acceptable answers o Make sure there are no extra characters such as spaces and full stops in the answers
• Feedback o Does the feedback support the student? (remember to support the student if they are wrong or
right) o Does the feedback show the ‘Golden Answer’ and supply additional supporting information? o What score would a student receive if they are correct?
• Attempts o How many attempts should a student have?

Articulate Workshop, May 2010 18 Learning Technology Section, University of Edinburgh
Sequence – Drag and Drop Question When to use a Sequence “drag and drop” question:
• If you have a series of statements or processes that must be completed in a fixed order
• Sequencing drag and drop is a graded question that requires the user to drag and drop the items into a sequence. Up to 10 items can be selected.
Step 1: Select Question Type
From the list of options provided in the dialogue box select the ‘Sequence Drag and Drop’ option and then click ‘Ok’.
Step 2: Adding your question, answers and feedback
From the screen you will be presented with a series of text boxes where you can enter your question, answers and feedback.
The first thing you should do is to enter your question in the box and then save your project.
You can add up to 10 statements for the sequencing drag and drop quiz. Enter your answers in the correct order in the boxes labelled A – J.

Articulate Workshop, May 2010 19 Learning Technology Section, University of Edinburgh
To customise the feedback, enter your text in the feedback box at the bottom of the screen.
Step 3: Check the finer details
It is always important to double check some of the settings for each of your questions. Below is a quick checklist for a Sequence Drag and Drop question:
• Question Format o Does the question make sense? o Does the question lead the student?
• Answers o Do the answers have any spelling mistakes? o Are there any clues in the answers? (capital letters and punctuation may give a clue to the order)
• Feedback o Does the feedback support the student? (remember to support the student if they are wrong or
right) o What score would a student receive if they are correct?
• Attempts o How many attempts should a student have?
• Media o Would an image enhance this question? o It is very difficult to add images to the Sequence type questions
Articulate Workshop, May 2010 20 Learning Technology Section, University of Edinburgh
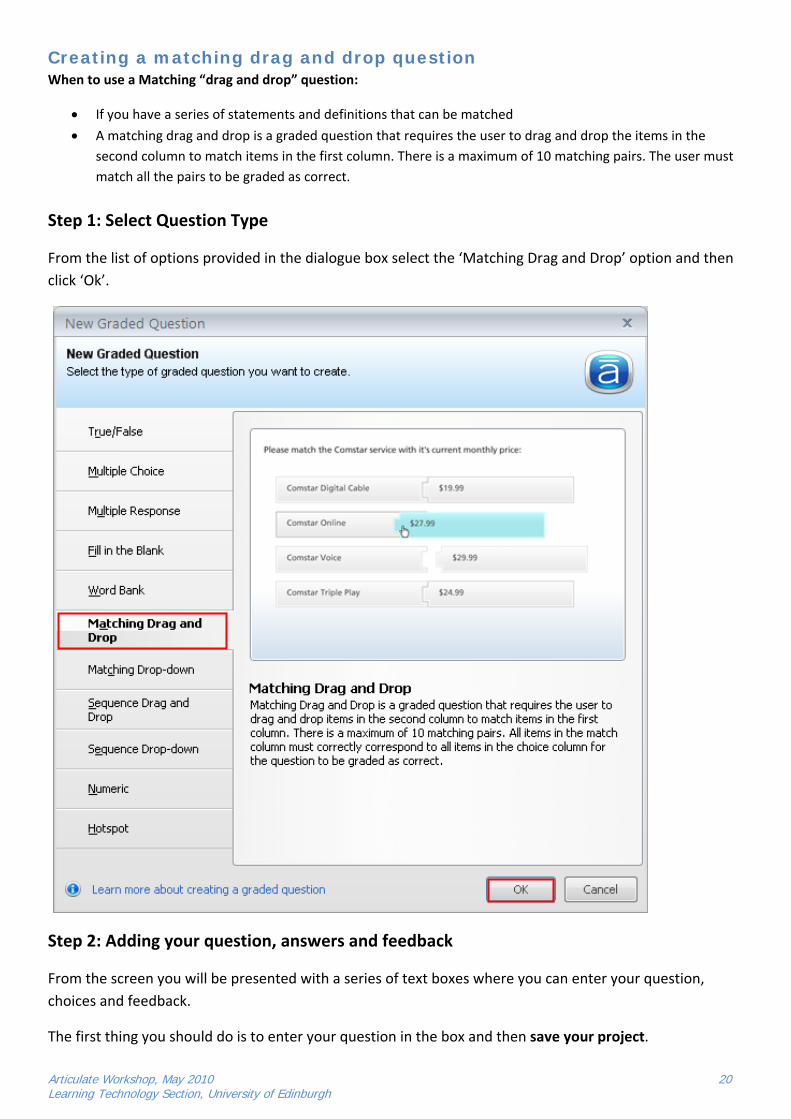
Creating a matching drag and drop question When to use a Matching “drag and drop” question:
• If you have a series of statements and definitions that can be matched
• A matching drag and drop is a graded question that requires the user to drag and drop the items in the second column to match items in the first column. There is a maximum of 10 matching pairs. The user must match all the pairs to be graded as correct.
Step 1: Select Question Type
From the list of options provided in the dialogue box select the ‘Matching Drag and Drop’ option and then click ‘Ok’.
Step 2: Adding your question, answers and feedback
From the screen you will be presented with a series of text boxes where you can enter your question, choices and feedback.
The first thing you should do is to enter your question in the box and then save your project.

Articulate Workshop, May 2010 21 Learning Technology Section, University of Edinburgh
You can add up to 10 pairs for the matching drag and drop quiz. Enter your choices and matching descriptions in the boxes labelled A – J.
To customise the feedback, enter your text in the feedback box at the bottom of the screen.
Step 3: Check the finer details
It is always important to double check some of the settings for each of your questions. Below is a quick checklist for a Matching Drag and Drop question:
• Question Format o Does the question make sense for a matching question?
• Answers o Do the answers have any spelling mistakes? o Are the choices and matches easy to read? o Is it clear what values are “choices” and what values are “matches”?
• Feedback o Does the feedback support the student? (remember to support the student if they are wrong or
right) o What score would a student receive if they are correct?
• Attempts o How many attempts should a student have?
• Media o Would an image enhance this question? o It is very difficult to add an image to a Matching type question
Articulate Workshop, May 2010 22 Learning Technology Section, University of Edinburgh
Publishing your quiz
When you have finished adding questions to your quiz, you will then want to make it available to your students.
Some Common Questions
Q. Can I still edit my quiz?
A. Yes. You can only edit the quiz using Articulate. When you publish the file it will create a new set of files that are used to deliver the quiz. Everytime you make an edit you will need to re-publish your quiz.
Q. Do my students need Articulate installed on their computer?
A. No. To view your quiz your students will need the link for where to find the quiz, and Adobe Flash installed on their computer. Flash is installed on 95% of computers world-wide.
Q. Where can students access my quiz?
A. The best place for your students to access your quiz is to link it to the Curriculum Management System. Currently the best way to do this is by contacting your ICT support and they will help you to upload the resource.
Checking Your Quiz
Step 1: Check your quiz settings
Question Order
Before you publish your quiz make sure your questions are in the right order. In the main window that contains all of your questions you can move your questions up and down by selecting the questions and clicking and dragging the question to the new position.
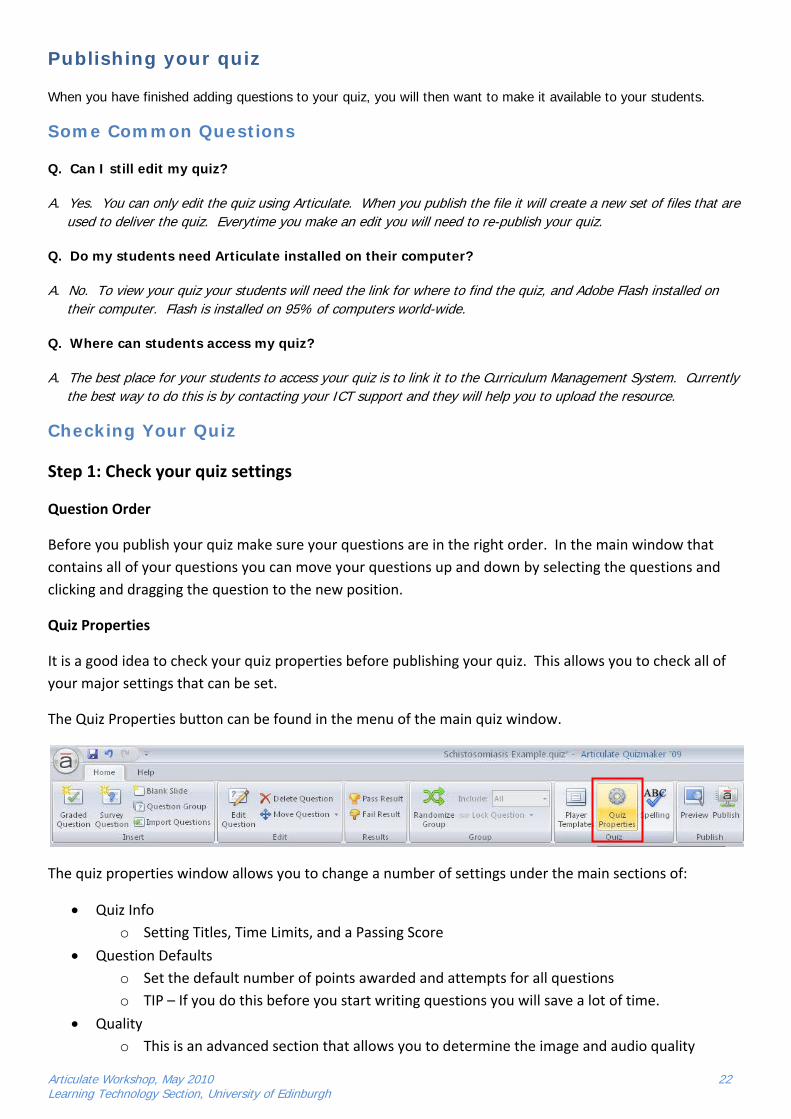
Quiz Properties
It is a good idea to check your quiz properties before publishing your quiz. This allows you to check all of your major settings that can be set.
The Quiz Properties button can be found in the menu of the main quiz window.
The quiz properties window allows you to change a number of settings under the main sections of:
• Quiz Info o Setting Titles, Time Limits, and a Passing Score
• Question Defaults o Set the default number of points awarded and attempts for all questions o TIP – If you do this before you start writing questions you will save a lot of time.
• Quality o This is an advanced section that allows you to determine the image and audio quality

Articulate Workshop, May 2010 23 Learning Technology Section, University of Edinburgh
Step 2: Previewing your quiz
Once you have added all the content to your quiz, it is a good idea to preview it before committing to publish. To do this select the ‘Preview’ button from the top menu bar.
Your preview version will appear in a pop-up window. You should use the test as if you are a student.
• Do all of the questions make sense?
• Do all of the questions have appropriate feedback to support the question?
• Is the quiz easy to use?
• Do any questions need images?
Step 3: Make your changes
If you have noticed anything that you would like to change, make your edits to the quiz. Be sure to preview the whole quiz again to see if there is anything else you might want to alter before publishing.
Articulate Workshop, May 2010 24 Learning Technology Section, University of Edinburgh
Publishing your quiz
Step 1: Publishing your quiz
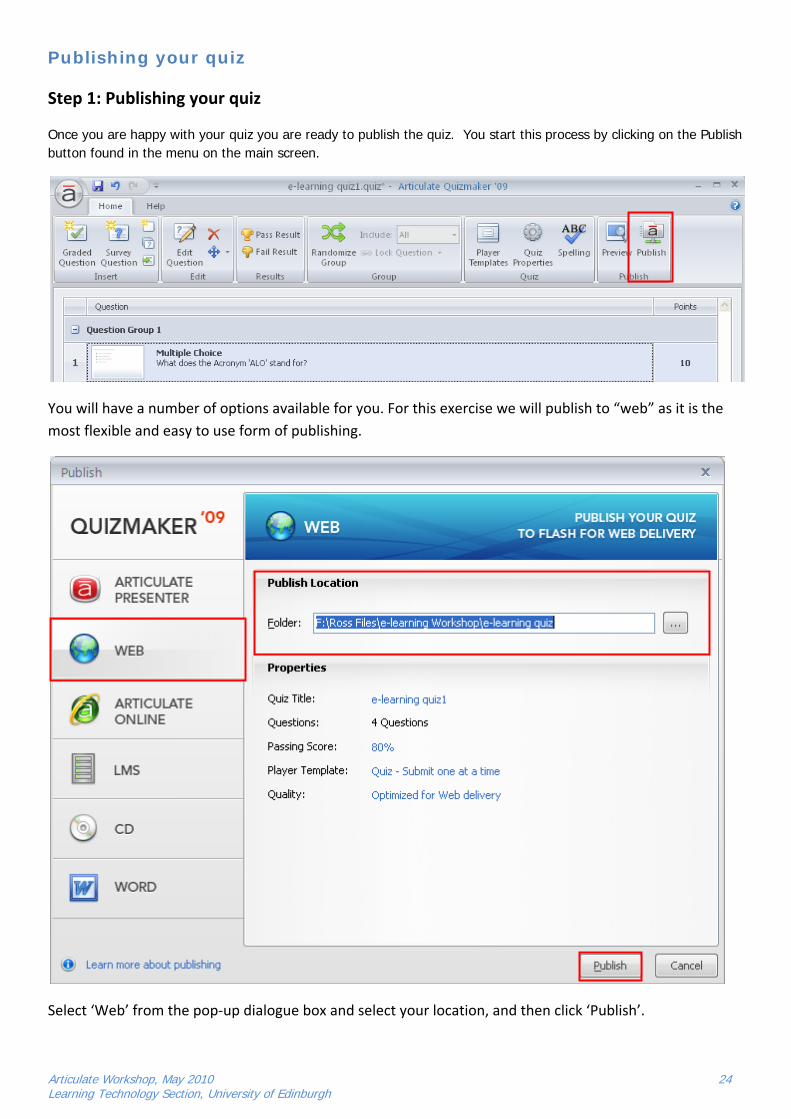
Once you are happy with your quiz you are ready to publish the quiz. You start this process by clicking on the Publish button found in the menu on the main screen.
You will have a number of options available for you. For this exercise we will publish to “web” as it is the most flexible and easy to use form of publishing.
Select ‘Web’ from the pop-up dialogue box and select your location, and then click ‘Publish’.

Articulate Workshop, May 2010 25 Learning Technology Section, University of Edinburgh
Below explains the different publishing formats and their uses.
• Articulate Presenter – publish directly into an e-learning package created in Presenter
• Web – Creates a set of files that can be viewed from a website, or from your computer. The most easy to use form of publishing for simple re-use of the resource
• Articulate Online – not applicable
• LMS – This feature creates many other files and is to only be used to upload files into a compatible Learning Management System
• CD – Similar to web, but creates a “.exe” file that allows the e-learning tool to work without the user requiring to use an internet browser on their Windows computer
• Word – This creates a word document as a supporting file for the e-learning resource
Step 2: Viewing your quiz
After you select publish you will be able to view your quiz. All of the required files will now be available in the location that you published the resource to.
To view the quiz, simply click the “View Quiz” button. Alternatively you can manage your files using the additional options below.
Step 3: Completion
Well done, you have completed your quiz!
You will now need to get your students to view the quiz. There are many ways of doing this, but the best way is to create a link to your resource from your content in the CMS.
If you are unsure how to do this you should contact your ICT team who will be happy to assist you.

Articulate Workshop, May 2010 26 Learning Technology Section, University of Edinburgh
Your finished quiz can now be used for a number of teaching reasons:
• Revision tool • Self-assessment to follow-up from face-to-face teaching • A summary assessment that covers topics featured in an e-learning package