BCST-20 Barcode Scanner · matter into the scanner causing a short circuit or circuit ... 200...
52
www.inateck.com Instruction Manual BCST-20 Barcode Scanner
Transcript of BCST-20 Barcode Scanner · matter into the scanner causing a short circuit or circuit ... 200...

w w w . i n a t e c k . c o m
Instruction Manual
BCST-20Barcode Scanner

IMPORTANT NOTICE
Safety Precaution* DO NOT disassemble the scanner, or place foreign matter into the scanner causing a short circuit or circuit damage.* DO NOT expose the scanner or battery to any flammable sources.
Maintenances Precaution* Use a clean cloth to wipe dust off the body of the scanner.* If you find the scanner abnormal, write down the specific scenario and consult the maintenance person.
2

Contents
IMPORTANT NOTICE........................................................................2 Safety Precaution........................................................................2 Maintenances Precaution............................................................2Contents.............................................................................................3Overview of BCST-20 Barcode Scanner............................................5 Features of the Scanner..............................................................5 Appearance.................................................................................5 Introduction of Key Function........................................................6 Specifications...............................................................................6 Correct Aiming.............................................................................7 Incorrect Aiming...........................................................................7QUICK START....................................................................................7 Enter the Setting Mode................................................................9 Exit the Setting Mode with Save..................................................9 Exit the Setting Mode without Save.............................................9 Restore Factory Defaults...........................................................10 Check Software Version............................................................10 Save Custom Settings...............................................................11Chapter 1 Features and Basic Setups.............................................12 1.1 Battery..................................................................................13 1.1.1 Mounting the battery(charging)...................................13 1.1.2 How to operate BCST-20 Barcode Scanner...............13 1.1.3 Auto Power Off............................................................13 1.2 Transmit Buffer.....................................................................14 1.2.1 Inventory Mode...........................................................16 1.3 LED Indicator.......................................................................17 1.4 Beeper.................................................................................17 1.4.1 Beeper Volume...........................................................18 1.5 Scan Modes.........................................................................19 1.5.1 Manual Mode..............................................................19 1.5.2 Continuous Mode........................................................20 1.5.3 Auto Power Off Mode..................................................21 1.5.4 Auto-induction Mode...................................................23 1.6 Symbologies Supported.......................................................24 1.7 USB Wired Data Transmission............................................24 1.8 Digit capacity Setting...........................................................25
3

Chapter 2 How to Connect with USB receiver.................................26Chapter 3 Symbology Settings........................................................27 3.1 Codabar...............................................................................28 3.1.1 Start/Stop Transmission..............................................29 3.2 Code 25 : Industrial 25.........................................................30 3.3 Code 25 : Interleaved 25......................................................31 3.4 Code 25 : Matrix 25..............................................................32 3.5 Code 25 : Standard 25.........................................................33 3.6 Code 39................................................................................34 3.6.1 Start/Stop Transmission..............................................35 3.6.2 Checksum Verification.................................................36 3.6.3 Standard/Full ASCII Code 39......................................37 3.7 Code 93................................................................................38 3.8 Code 128..............................................................................39 3.9 EAN-8...................................................................................40 3.9.1 Convert to EAN-13......................................................40 3.9.2 Checksum Transmission.............................................41 3.10 EAN-13...............................................................................42 3.10.1 Convert to ISBN........................................................42 3.10.2 Checksum Transmission...........................................43 3.11 UPC-A.................................................................................44 3.11.1 Checksum Transmission...........................................44
3.12 UPC-E.................................................................................45 3.12.1 Checksum Transmission...........................................45
3.13 MSI......................................................................................46 3.14 Code 11...............................................................................47Chapter 4 Defining Output Format...................................................48 4.1 Code ID.................................................................................48 4.2 Suffix Code of Barcode Settings...........................................49
Appendix I........................................................................................50
4

Overview of BCST-20 Barcode Scanner
Features of the Scanner* Small size, portable.* Supports three scan modes, including Continuous Mode, Manual Mode, Auto-off Mode.* Supports most popular barcode symbologies.* User feedback via LED indicator and beeper* The voice volume of scan barcode successfully could change via setting barcode.* Provides 256 KB memory for reserve buffer while Bluetooth connection interruption, which can store up to 2600 scan barcodes.* Programmable parameters include data output format, editing format, symbologies, etc.
★ Abundant decoding symbologies★ Whole body shockproof and drop resistant design ★ Proprietary intellectual property rights★ Comfortable operating feel★ Button life up to 3 million times★ 1500mAh large capacity lithium battery★ Long working hours
Appearance
Power
USB port
Bluetooth Wireless mode USB Wired mode
Scan Window
5
Introduction of Key Function* Long press Scan button 3 seconds will turn on the BCST-20 scanner. * Long press Scan button 3 seconds will turn off the BCST-20 scanner. * Flip the Scan button can read the barcodes.
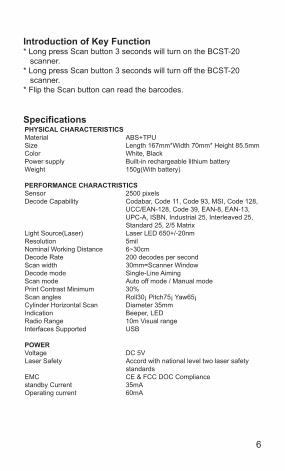
SpecificationsPHYSICAL CHARACTERISTICSMaterialSizeColorPower supplyWeight
PERFORMANCE CHARACTRISTICSSensorDecode Capability
Light Source(Laser)ResolutionNominal Working Distance Decode RateScan widthDecode modeScan modePrint Contrast Minimum Scan anglesCylinder Horizontal Scan IndicationRadio RangeInterfaces Supported
POWERVoltageLaser Safety
EMCstandby CurrentOperating current
ABS+TPULength 167mm*Width 70mm* Height 85.5mmWhite, BlackBuilt-in rechargeable lithium battery150g(With battery)
2500 pixelsCodabar, Code 11, Code 93, MSI, Code 128, UCC/EAN-128, Code 39, EAN-8, EAN-13, UPC-A, ISBN, Industrial 25, Interleaved 25, Standard 25, 2/5 MatrixLaser LED 650+/-20nm5mil6~30cm 200 decodes per second30mm=Scanner WindowSingle-Line AimingAuto off mode / Manual mode30%Roll30¡ Pitch75¡ Yaw65¡Diameter 35mmBeeper, LED10m Visual rangeUSB
DC 5VAccord with national level two laser safety standardsCE & FCC DOC Compliance35mA60mA
6

USER ENVIRONMENT Operating Temp.Storage Temp.Operating Humidity Storage HumidityDrop Specifications Accessories
0 to 50. ¡C / 32 to 122¡F0 to 50. ¡C / 32 to 122¡F20-85% ( non-condensing )20-85% ( non-condensing )Free fall of 1.5m air dropUSB receiver, USB data cable, Manual
Correct Aiming
Incorrect Aiming
QUICK STARTThe setting of the BCST-20 Barcode Scanner can be changed by reading the setup barcodes contained in this manual. This section describes the procedure of setting the BCST-20 Barcode Scanner by reading the setup barcodes and provides some example for demonstration.
Step 1: Turn on BCST-20 Barcode Scanner. It will response with a long beep(high tone), it's LED shows red and with Intmt twinkle. Note: How the BCST-20 Barcode Scanner establishes a connection with computer or other compatible device, please refer to Chapter 2.
Step 2: Enter the Setting Mode. The BCST-20 Barcode Scanner will response three beeps (tone descending from high to low), and its LED indicator will flash purple.
7

Step 3: Read a Setup barcode. The BCST-20 Barcode Scanner will response three beeps (tone ascending from low to high), and its LED indicator will flash purple. For Example:
Step 4: Exit the Setting Mode. The BCST-20 Barcode Scanner will response three beeps (tone descending from high to low), and its LED indicator will not flash purple and power off. Note: When any setup error occurs, the BCST-20 Barcode Scanner will respond with a long beep (low tone), and its LED indicator will flash purple.
Steps of Setup
Enter Setup
Details (eg: Enable/Disable a Barcode)
Exit Setup
Enter Setup
Exit with Save
Enable Codabar
8

Enter the Setting ModeFor the scanner to enter the setting mode, you must have it read the "Enter Setup" barcode, which will be located at the bottom of almost every page of this manual.The BCST-20 Barcode Scanner will respond with three beeps (tone descending from high to low), and its LED indicator becomes purple and go off quickly after reading the barcode.
For setting scanner parameters, see "Read a Setup Barcode" below.
Exit the Setting Mode with SaveFor the scanner to exit the setting mode, you must have it read the "Exit with Save" barcode, which will be located at the bottom of almost every page of this manual.Just like reading the "Enter Setup" barcode, the scanner will respond with three beeps (tone ascending from low to high) after reading the barcode.
Exit the Setting Mode without SaveIf you want to exit the setting mode without saving any changes, you must have the scanner read the "Exit without Save" barcode.Just like reading the "Enter Setup" barcode, the scanner will respond with three beeps (tone ascending from low to high) after reading the barcode.
Enter Setup
Exit with Save
Exit without Save
9

Restore Factory Defaults"Restore Factory Defaults" is a special barcode. The BCST-20 Barcode Scanner will respond with a short beep (high tone) after reading this barcode. At this time, the scanner system could restore factory defaults, and no need to read "Exit with Save" barcode again.
Note: Most of setting mode have restore factory defaults selection. The factory default value for each setting is indicated by an asterisk "*".You could use this barcode at the following status:1. The scanner doesn’t work. For example, it can not read barcodes.2. You forget the settings what you did to the scanner before, and you don't want to be affected by the settings when you use the scanner.3. After using a function which is not to be used usually in the scanner.
Check Software VersionIf you want to know the software version of BCST-20, should read the ‘Enter Setup’ and ‘Output Software Version’ barcode:
Checking the software version is done at the enter setup mode, so after output the software version, need to read ‘Exit without Save’ barcode.
Restore Factory
Enter Setup
Output Software Version
Exit without Save
10

Save Custom Settings1. You may change factory defaults, and customize some functions suitable for your own applications when you use BCST-20, you must read the ‘Enter Setup’ Function barcode you want to customize ‘Save Custom Settings’ ‘Exit with Save’ barcodes.
2. If you want to restore to custom settings after resetting the barcode scanner, just need to read ‘Enter Setup’ ‘Restore Custom Settings’ ‘Exit with Save’ barcodes as above.
Save Custom Settings
Restore Customs Settings
Enter Setup
Exit with Save
11

Chapter 1 Features and Basic SetupsThis chapter will introduce the features and usage of the barcode scanner.
Contents
1.1 Battery........................................................................................13 1.1.1 Mounting the battery(charging).........................................13
1.1.2 How to operate BCST-20 Barcode Scanner.....................13 1.1.3 Auto Power Off..................................................................131.2 Transmit Buffer...........................................................................14 1.2.1 Inventory Mode.................................................................161.3 LED Indicator.............................................................................171.4 Beeper.......................................................................................17 1.4.1 Beeper Volume.................................................................181.5 Scan Modes...............................................................................19 1.5.1 Manual Mode....................................................................19 1.5.2 Continuous Mode..............................................................20 1.5.3 Auto Power Off Mode........................................................21 1.5.4 Auto-induction Mode.........................................................231.6 Symbologies Supported.............................................................241.7 USB Wired Data Transmission..................................................241.8 Digit capacity Setting.................................................................25
12

1.1 BatteryThe scanner is powered by 1500mAh chargeable Lithium batteries. The batteries can support the scanner work continuously for 60 hours, or read 56000 barcodes (read an EAN-13 barcode per 5s).
1.1.1 Mounting the battery (charging)1. Hold the scanner face down in one hand. 2. Insert USB cable for charging.
1.1.2 How to operate BCST-20 Barcode ScannerTurn on the scannerPress the Power key for about 2 seconds. The scanner will respond with a long beep (high tone), and its LED indicator will flash.
Turn off the scannerPress the Power key for about 3 seconds. The scanner will respond with two short beeps (high tone) and the LED indicator will be turned off.
1.1.3 Auto Power OffIn order to conserve battery power, the user can specify the time interval for the scanner to automatically turn off. By default, it is set to be 10 minutes.
Enter Auto Power Off
5min
(*)10min
20min 30min
13

Exit Auto Power Off
eg.: Set 20 minutes for the scanner to be automatically turn off.1. Read the "Enter Setup" barcode;2. Read the "Enter Auto Power Off" barcode;3. Read the "20min" barcode;4. Read the "Exit with Save" barcode.
Note: If you want to keep the scanner power on all the time, read "Exit Auto Power Off" in stead of step 3 and 4.
1.2 Transmit BufferDuring the Bluetooth connection, the BCST-20 Scanner uses a 256KB memory as a data buffer, and sends the collected data to the host computer one by one via the Bluetooth. Upon reading a barcode successfully, the scanner responds with one short beep and its LED indicator becomes green and goes off quickly. However, the host computer may not receive the data immediately if getting out of range. With the 256KB transmit buffer, the scanner can ignore the transmis-sion status and keep on reading barcodes until the buffer is full. When the buffer is full, the scanner will respond with a long beep (low tone), this reminds the user that the space of buffer is not enough and can not read barcode any more. Once the Buffer is
Enter Setup
Exit with Save
Exit without Save
14

full, the user should return to the range of BT connection quickly, the data in the buffer can be sent back to the host computer and release the space of buffer.Note: The 256KB transmit buffer on the scanner can hold as many as 2600 barcodes bases on Code128. You can choose to clear the data in the buffer every time when you turn on the scanner.
Note: You can clear the data in the buffer via enable barcode, you can also clear the data in the buffer via press the Power key long time.After the Bluetooth connect successfully, the barcodes in the buffer will upload to appointed position automatically. You also can setup upload the barcodes in the buffer or not via reading the following barcodes. By default, it is enabled.If you don‘t want to upload the barcodes automatically, you can setup as disabled, when the Bluetooth is connected, the barcodes won’t upload. You can double click Power key to start uploading the barcodes.
Enable Clear Data in Buffer When Turn On the Scanner
(*) Disable Clear Data in Buffer When
Turn On the Scanner
(*) Enable Auto Uploading Disable Auto Uploading
Enter Setup
Exit with Save
Exit without Save
15

1.2.1 Inventory ModeIf you want to keep the barcodes in the buffer of BCST-20 for multiple uploading, you can choose inventory mode. In inventory mode, BCST-20 will count the number of the barcodes automatically, and control the time, position etc. for uploading. Also, you can clear the barcodes in the buffer after uploading. Following is the setup method:1. Read ‘Enter Inventory Mode’ barcode to enter into the inventory mode
2. If you want to recover to normal mode, read the ‘Enter Normal Mode’ barcode
3. Read the ‘Clear the barcodes in the buffer’ barcode to clear the barcodes (only suitable for inventory mode)
4. Read ‘Data Uploading’ barcode to upload the barcodes in the buffer (only suitable for inventory mode)
5. Read ‘Upload Counting’ barcode to count the number of the barcodes (only suitable for inventory mode)
Note: Inventory function can be used under any scan mode mentioned in 1.5.
Enter Inventory Mode
Enter Normal Mode
Clear the barcodes in the buffer
Data Uploading
Upload Counting
16

1.3 LED IndicatorThe LED indicators on BCST-20 can help the user know about the current operation status.
COLOR OF LED INDICATOR
Green LED on and off quickly
Purple, Flashing(On/Off ratio 1:1)
Blue, Flashing (On/Off ratio 1:1)
Blue, Flashing (On/Off ratio 20ms:3s)
Red, Flashing (On/Off ratio 1:1)
1.4 BeeperThe beeper built in BCST-20 can help the user know about the current operation status.
BEEPING
One long beep, high tone
One short beep, high tone
One long beep, low tone
Two short beeps, high tone
MEANING
Good Read, with one short beep (high tone)
Indicates the BCST-20 Scanner in Setting mode
Indicates the scanner is waiting for connection, the BCST-20 stores the address, which connects with the last time.
Indicates the BCST-20 Scanner establish connection successfully, with two short beeps (low-high tone).Indicates the BCST-20 Scanner reconnect successfully, with two short beeps (low-high tone)
Indicates the BCST-20 Scanner has no address of BT which connects with before.
MEANING
Power on. If the scanner has no connection address which could connect with, flashing red. If the scanner has connection address which could connect with, flashing blue.
Read barcode, with green LED on and off quickly
Configuration error, with purple flashing;Or transmit buffer full, with green LED on and off quickly
Power off.
17
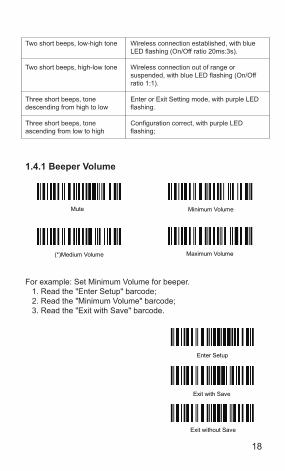
Two short beeps, low-high tone
Two short beeps, high-low tone
Three short beeps, tone descending from high to low
Three short beeps, tone ascending from low to high
Wireless connection established, with blue LED flashing (On/Off ratio 20ms:3s).
Wireless connection out of range or suspended, with blue LED flashing (On/Off ratio 1:1).
Enter or Exit Setting mode, with purple LED flashing.
Configuration correct, with purple LED flashing;
1.4.1 Beeper Volume
For example: Set Minimum Volume for beeper. 1. Read the "Enter Setup" barcode; 2. Read the "Minimum Volume" barcode; 3. Read the "Exit with Save" barcode.
Mute Minimum Volume
(*)Medium Volume Maximum Volume
Enter Setup
Exit with Save
Exit without Save
18

1.5 Scan ModesFour kinds of scan modes are supported by the BCST-20 Barcode Scanner:
1.5.1 Manual ModeBy default, the scan mode is set to Manual Mode. If the user keeps press the Scan Key, the BCST-20 Scanner will emit a red light line. This indicates the scanner could scan, the scanning will not stop until the scanner under the following situation.
* Read a barcode successfully; * Release the Scan Key.
Manual Mode
Enter Setup
Exit with Save
Exit without Save
19
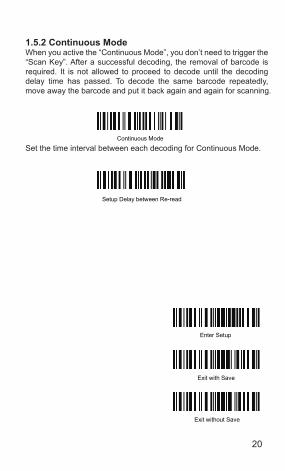
1.5.2 Continuous ModeWhen you active the “Continuous Mode”, you don’t need to trigger the “Scan Key”. After a successful decoding, the removal of barcode is required. It is not allowed to proceed to decode until the decoding delay time has passed. To decode the same barcode repeatedly, move away the barcode and put it back again and again for scanning.
Set the time interval between each decoding for Continuous Mode.Continuous Mode
Setup Delay between Re-read
Enter Setup
Exit with Save
Exit without Save
20

21
Delay Between Re-ReadThe delay time between re-read of above scan modes could be set by the following barcodes.
For Example: 1. Read the "Enter Setup" barcode; 2. Read the "Auto Power off Mode" barcode; 3. Read the "1s" of the time interval between each scanning barcode; 4. Read the "Exit with Save" barcode. 5. Then enter the Auto Power Off Mode.
400ms 800ms
1s (*)2s
3s 5s
10s 15s
Enter Setup
Exit with Save
Exit without Save

1.5.3 Auto Power Off Mode
Enter Setup
Exit with Save
Exit without Save
(*)Auto Power Off Mode
Setup Auto Power Off Time
22

1.5.4 Auto-induction ModeUnder the Auto-induction Mode. the users just need to move the barcodes to be scanned in front of the light band of BCST-20, no need to press the Scan Key, there will show a red light line. This indicates the scanner is ready to scan. The scanning will not stop until the scanner is under the following situation.
* Read a barcode successfully;* The pre-set timeout expires (the default time is 2s).
You also can setup the best auto-induction distance according to actual demand, read the following barcode for setup.
For Example: 1. Read the "Enter Setup" barcode; 2. Read the "Auto-induction Mode" barcode; 3. Read the "Setup Auto-induction Distance"; 4. Read the numeric barcode in Appendix I; (0 means farthest, 9 means nearest) 5. Read the "Exit with Save" barcode. 6. Then enter the Auto-induction Mode.
induction Mode
Setup Auto-induction Distance
Enter Setup
Exit with Save
Exit without Save
23

1.6 Symbologies SupportedMost of the popular barcode symbologies are supported by the BCST-20 Scanner, as listed below. Refer to Chapter 4 for details of each symbology.
1.7 USB Wired Data TransmissionBCST-20 Barcode Scanner support USB Data live transmission. The user just needs to connect one end of the USB cable to a device with USB port, and the other end to BCST-20, open a textbox, it will enter data transmission. USB wired transmission is the prior transmission mode.
Symbologies Supported: Enable/Disable Pre-Set Codabar Disable Code 11 Disable Code 93 Disable MSI Disable Code 128 Enable UCC/EAN-128 Enable Code 39 Enable
EAN-8 Enable EAN-13 Enable UPC-A Enable UPC-E Enable
EAN/UPC
ISBN Disable Industrial 25 Disable Interleaved 25 Disable Standard 25 Disable
Code 2 of 5
2/5 Matrix Disable
24
25
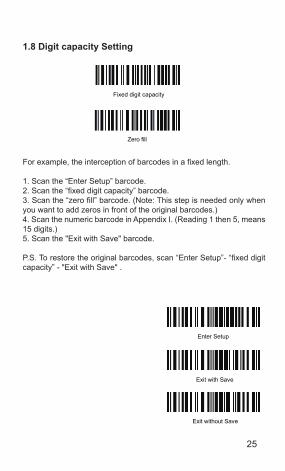
1.8 Digit capacity Setting
For example, the interception of barcodes in a fixed length.
1. Scan the “Enter Setup” barcode.2. Scan the “fixed digit capacity” barcode.3. Scan the “zero fill” barcode. (Note: This step is needed only when you want to add zeros in front of the original barcodes.)4. Scan the numeric barcode in Appendix I. (Reading 1 then 5, means 15 digits.)5. Scan the "Exit with Save" barcode.
P.S. To restore the original barcodes, scan “Enter Setup”- “fixed digit capacity” - "Exit with Save" .
Enter Setup
Exit with Save
Exit without Save
Fixed digit capacity
Zero fill
26
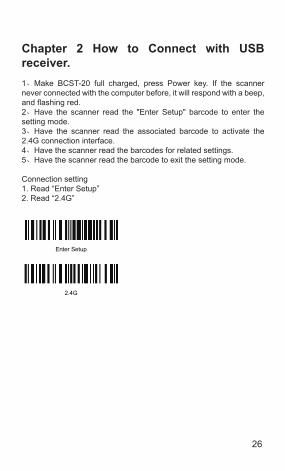
Chapter 2 How to Connect with USB receiver.1、Make BCST-20 full charged, press Power key. If the scanner never connected with the computer before, it will respond with a beep, and flashing red.2、Have the scanner read the "Enter Setup" barcode to enter the setting mode.3、Have the scanner read the associated barcode to activate the 2.4G connection interface.4、Have the scanner read the barcodes for related settings.5、Have the scanner read the barcode to exit the setting mode.
Connection setting1. Read “Enter Setup”2. Read “2.4G”
2.4G
Enter Setup

Chapter 3 Symbology SettingsIn this chapter, a brief on the symbology setting is provided for your reference
Contents
3.1 Codabar.....................................................................................28 3.1.1 Start/Stop Transmission....................................................293.2 Code 25 : Industrial 25...............................................................303.3 Code 25 : Interleaved 25............................................................313.4 Code 25 : Matrix 25....................................................................323.5 Code 25 : Standard 25...............................................................333.6 Code 39.....................................................................................34
3.6.1 Start/Stop Transmission....................................................353.6.2 Checksum Verification.......................................................363.6.3 Standard/Full ASCII Code 39............................................37
3.7 Code 93.....................................................................................383.8 Code 128...................................................................................393.9 EAN-8........................................................................................40
3.9.1 Convert to EAN-13............................................................403.9.2 Checksum Transmission...................................................41
3.10 EAN-13....................................................................................42 3.10.1 Convert to ISBN..............................................................423.10.2 Checksum Transmission.................................................43
3.11 UPC-A......................................................................................44 3.11.1 Checksum Transmission.................................................44
3.12 UPC-E......................................................................................45 3.12.1 Checksum Transmission.................................................45
3.13 MSI...........................................................................................46 3.14 Code 11....................................................................................47
27

28
3.1 CodabarDecide whether or not to enable Codabar. The BCST-20 Scanner defaults disable Codabar contents.
Note: Read the "Disable Codabar" barcode will make the scanner not able to read the Codabar barcode. Thus, if the scanner cannot read the Codabar barcode, please try to read "Enable Codabar" to reset.
For example: Enable Codabar.1. Read the "Enter Setup" barcode;2. Read the "Enable Codabar" barcode;3. Read the "Exit with Save" barcode.
Enter Setup
Exit with Save
Exit without Save
(*) Disable Codabar
Enable Codabar

29
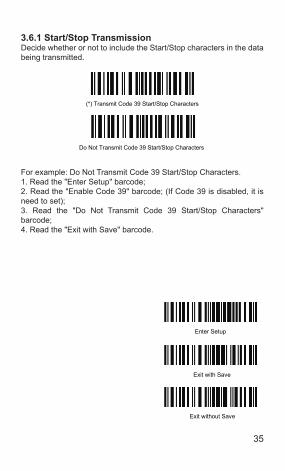
3.1.1 Start/Stop TransmissionDecide whether or not to include the Start/Stop characters in the data being transmitted.
For example: Do Not Transmit Code 25 Start/Stop Characters.1. Read the "Enter Setup" barcode;2. Read the "Enable Code 25" barcode; (If Code 25 is disabled, it is need to set);3. Read the "Do Not Transmit Code 25 Start/Stop Characters" barcode;4. Read the "Exit with Save" barcode.
Enter Setup
Exit with Save
Exit without Save
Do Not Transmit Code 25 Start/Stop Characters
(*) Transmit Code 25 Start/Stop Characters

30
3.2 Code 25 : Industrial 25Decide whether or not to enable Industrial 25. The BCST-20 Scanner defaults disable Industrial 25.
Note: Read the "Disable Interleaved 25" barcode will make the scanner not able to read the Interleaved 25 barcode. Thus, if the scanner cannot read the Interleaved 25 barcode, please try to read "Enable Interleaved 25" to reset.
For example: Enable Interleaved 25.1. Read the "Enter Setup" barcode;2. Read the "Enable Interleaved 25" barcode;3. Read the "Exit with Save" barcode.
Enter Setup
Exit with Save
Exit without Save
(*) Disable Industrial 25
Enable Industrial 25

31
3.3 Code 25 : Interleaved 25Decide whether or not to enable Interleaved 25. The BCST-20 Scanner defaults disable.
Note: Read the "Disable Interleaved 25" barcode will make the scanner not able to read the Interleaved 25 barcode. Thus, if the scanner cannot read the Interleaved 25 barcode, please try to read "Enable Interleaved 25" to reset.
For example: Enable Interleaved 25.1. Read the "Enter Setup" barcode;2. Read the "Enable Interleaved 25" barcode;3. Read the "Exit with Save" barcode.
Enter Setup
Exit with Save
Exit without Save
(*) Disable Interleaved 25
Enable Interleaved 25
32
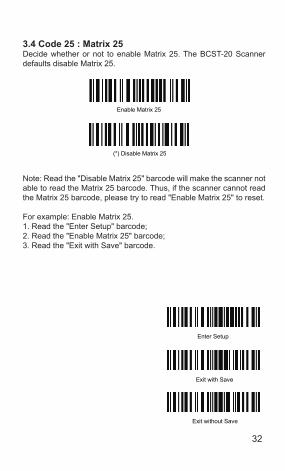
3.4 Code 25 : Matrix 25Decide whether or not to enable Matrix 25. The BCST-20 Scanner defaults disable Matrix 25.
Note: Read the "Disable Matrix 25" barcode will make the scanner not able to read the Matrix 25 barcode. Thus, if the scanner cannot read the Matrix 25 barcode, please try to read "Enable Matrix 25" to reset.
For example: Enable Matrix 25.1. Read the "Enter Setup" barcode;2. Read the "Enable Matrix 25" barcode;3. Read the "Exit with Save" barcode.
Enter Setup
Exit with Save
Exit without Save
(*) Disable Matrix 25
Enable Matrix 25
33
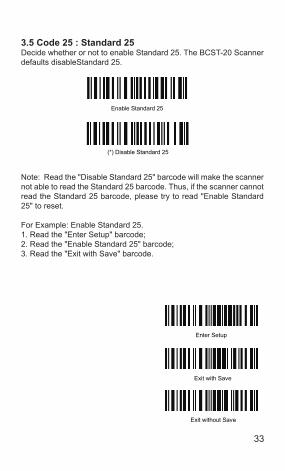
3.5 Code 25 : Standard 25Decide whether or not to enable Standard 25. The BCST-20 Scanner defaults disableStandard 25.
Note: Read the "Disable Standard 25" barcode will make the scanner not able to read the Standard 25 barcode. Thus, if the scanner cannot read the Standard 25 barcode, please try to read "Enable Standard 25" to reset.
For Example: Enable Standard 25.1. Read the "Enter Setup" barcode;2. Read the "Enable Standard 25" barcode;3. Read the "Exit with Save" barcode.
Enter Setup
Exit with Save
Exit without Save
(*) Disable Standard 25
Enable Standard 25

34
3.6 Code 39Decide whether or not to enable Code 39, the BCST-20 Scanner defaults disable Code 39.
Note: Read the "Disable Codabar" barcode will make the scanner not able to read the Codabar barcode. Thus, if the scanner cannot read the Codabar barcode, please try to read "Enable Codabar" to reset.
For example: Disable Codabar.1. Read the "Enter Setup" barcode;2. Read the "Disable Codabar" barcode;3. Read the "Exit with Save" barcode.
Enter Setup
Exit with Save
Exit without Save
Disable Code 39
(*) Enable Code 39
35
3.6.1 Start/Stop TransmissionDecide whether or not to include the Start/Stop characters in the data being transmitted.
For example: Do Not Transmit Code 39 Start/Stop Characters.1. Read the "Enter Setup" barcode;2. Read the "Enable Code 39" barcode; (If Code 39 is disabled, it is need to set);3. Read the "Do Not Transmit Code 39 Start/Stop Characters" barcode;4. Read the "Exit with Save" barcode.
Do Not Transmit Code 39 Start/Stop Characters
(*) Transmit Code 39 Start/Stop Characters
Enter Setup
Exit with Save
Exit without Save
36
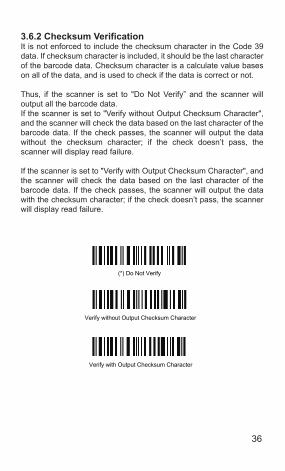
3.6.2 Checksum VerificationIt is not enforced to include the checksum character in the Code 39 data. If checksum character is included, it should be the last character of the barcode data. Checksum character is a calculate value bases on all of the data, and is used to check if the data is correct or not.
Thus, if the scanner is set to "Do Not Verify” and the scanner will output all the barcode data.If the scanner is set to "Verify without Output Checksum Character", and the scanner will check the data based on the last character of the barcode data. If the check passes, the scanner will output the data without the checksum character; if the check doesn’t pass, the scanner will display read failure.
If the scanner is set to "Verify with Output Checksum Character", and the scanner will check the data based on the last character of the barcode data. If the check passes, the scanner will output the data with the checksum character; if the check doesn’t pass, the scanner will display read failure.
(*) Do Not Verify
Verify without Output Checksum Character
Verify with Output Checksum Character

37
3.6.3 Standard/Full ASCII Code 39Decide whether or not to support Code 39 Full ASCII that includes all the alphanumeric and special character. The BCST-20 Scanner defaults full ASCII Code 39. It could disable full ASCII Code 39 via set.
Enter Setup
Exit with Save
Exit without Save
Disable Code 39 Full ASCII
(*) Enable Code 39 Full ASCII

38
3.7 Code 93Decide whether or not to enable Code 93. The BCST-20 Scanner defaults disable Code 93.
Note: Read the "Disable Code 93" barcode will make the scanner not able to read the Code 93 barcode. Thus, if the scanner cannot read the Code 93 barcode, please try to read "Enable Code 93" to reset.
For Example: Enable Code 93.1. Read the "Enter Setup" barcode;2. Read the "Enable Code 93" barcode;3. Read the "Exit with Save" barcode.
Enter Setup
Exit with Save
Exit without Save
(*) Disable Code 93
Enable Code 93

39
3.8 Code 128Decide whether or not to enable Code 128. The BCST-20 Scanner defaults enable Code 128.
Note: Read the "Disable Code 128" barcode will make the scanner not able to read the Code 128 barcode. Thus, if the scanner cannot read the Code 128 barcode, please try to read "Enable Code 128" to reset.
For Example: Disable Code 1281. Read the "Enter Setup" barcode;2. Read the "Disable Code 128" barcode;3. Read the "Exit with Save" barcode.
Enter Setup
Exit with Save
Exit without Save
Disable Code 128
(*) Enable Code 128

40
3.9 EAN-8Decide whether or not to enable EAN-8. The BCST-20 Scanner defaults enable EAN-8.
3.9.1 Convert to EAN-13There are two ways for EAN-8 to change, convert to EAN-13, or add "0" ahead of EAN-8, and the EAN-8 ID doesn’t change.Decide whether or not to convert to EAN-13, if EAN-8 converts to EAN-13, it will be read as same as EAN-13. If add a "0" ahead of EAN-8, and the EAN-8 ID doesn’t change, the output ID is still EAN-8 ID.
Enter Setup
Exit with Save
Exit without Save
Disable EAN-8(*) Enable EAN-8
Convert to EAN-13
(*) Do not Convert
Add "0" ahead and ID is not change

41
3.9.2 Checksum TransmissionDecide whether or not to transmit Checksum.
For example: Do Not Transmit EAN-8 Checksum.1. Read the "Enter Setup" barcode;2. Read the "Enable EAN-8" barcode; (If EAN-8 is disabled, it is need to set);3. Read the "Do Not Transmit EAN-8 Checksum" barcode;4. Read the "Exit with Save" barcode.
Enter Setup
Exit with Save
Exit without Save
Do Not Transmit EAN-8 Checksum
(*) Transmit EAN-8 Checksum

42
3.10 EAN-13Decide whether or not to read EAN-13. The BCST-20 Scanner defaults enable EAN-13.
3.10.1 Convert to ISBNDecide whether or not to convert the EAN-13 to ISBN.
Enter Setup
Exit with Save
Exit without Save
Disable EAN-13(*) Enable EAN-13
Convert EAN-13 to ISBN
(*) Do Not Convert EAN-13 to ISBN

43
3.10.2 Checksum TransmissionDecide whether or not to include the checksum character in the data being transmitted.
For example: Convert EAN-13 to ISBN.1. Read the "Enter Setup" barcode;2. Read the "Convert EAN-13 to ISBN" barcode;3. Read the "Exit with Save" barcode.
Enter Setup
Exit with Save
Exit without Save
Do Not Transmit EAN-13 Checksum
(*) Transmit EAN-13 Checksum
44
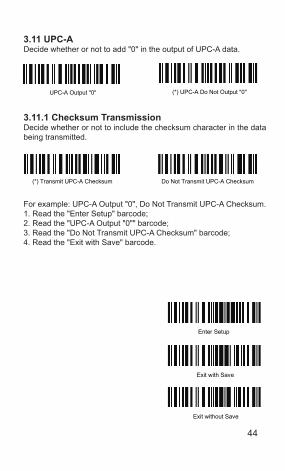
3.11 UPC-ADecide whether or not to add "0" in the output of UPC-A data.
3.11.1 Checksum TransmissionDecide whether or not to include the checksum character in the data being transmitted.
For example: UPC-A Output "0", Do Not Transmit UPC-A Checksum.1. Read the "Enter Setup" barcode;2. Read the "UPC-A Output "0"" barcode;3. Read the "Do Not Transmit UPC-A Checksum" barcode;4. Read the "Exit with Save" barcode.
Enter Setup
Exit with Save
Exit without Save
(*) UPC-A Do Not Output "0"UPC-A Output "0"
(*) Transmit UPC-A Checksum
Do Not Transmit UPC-A Checksum
45
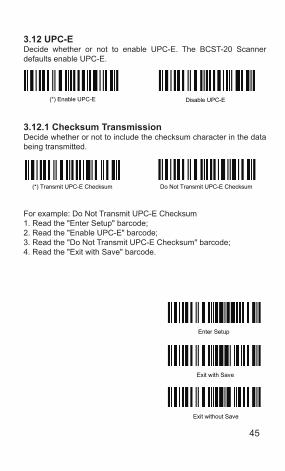
3.12 UPC-EDecide whether or not to enable UPC-E. The BCST-20 Scanner defaults enable UPC-E.
3.12.1 Checksum TransmissionDecide whether or not to include the checksum character in the data being transmitted.
For example: Do Not Transmit UPC-E Checksum1. Read the "Enter Setup" barcode;2. Read the "Enable UPC-E" barcode;3. Read the "Do Not Transmit UPC-E Checksum" barcode;4. Read the "Exit with Save" barcode.
Enter Setup
Exit with Save
Exit without Save
Disable UPC-E(*) Enable UPC-E
(*) Transmit UPC-E Checksum
Do Not Transmit UPC-E Checksum

46
3.13 MSIDecide whether or not to enable MSI. The BCST-20 Scanner defaults disable MSI.
Note: Read the "Disable MSI" barcode will make the scanner not able to read the MSI barcode. Thus, if the scanner cannot read the MSI barcode, please try to read "Enable MSI" to reset.
For example: Enable MSI.1. Read the "Enter Setup" barcode;2. Read the "Enable MSI" barcode;3. Read the "Exit with Save" barcode.
Enter Setup
Exit with Save
Exit without Save
(*) Disable MSI
Enable MSI

47
3.14 Code 11Decide whether or not to enable Code 11. The BCST-20 Scanner defaults disable Code 11.
Note: Read the "Disable Code 11" barcode will make the scanner not able to read the Code 11 barcode. Thus, if the scanner cannot read the Code 11 barcode, please try to read "Enable Code 11" to reset.
For example: Enable Code 11.1. Read the "Enter Setup" barcode;2. Read the "Enable Code 11" barcode;3. Read the "Exit with Save" barcode.
Enter Setup
Exit with Save
Exit without Save
(*) Disable Code11
Enable Code11

48
Chapter 4 Defining Output FormatBefore data transmission to the host or device, you can pre-process the data and decide the format of the data transfer.
4.1 Code ID
Decide whether or not to add Code ID in the barcode data of output.
HEX VALUE6162636465666768696A6D6E6F6B6C
CODE TYPECodabar Code 39UPC-EEAN-13 Interleaved 2 of 5(ITF) Code 2 of 5 (Standard)MSI Code 11Code 93Code 128Matrix 2 of 52/5 IndustrialEAN-8 ISBNUPC-A
CODE IDabcdefghijmnokl
(*) Ignore Output ID
Apply Output ID

49
For example: Apply Output ID1. Read the "Enter Setup" barcode;2. Read the "Output ID" barcode;3. Read the "Exit with Save" barcode;
4.2 Suffix Code of Barcode SettingsDecide whether or not to apply Enter for suffix of barcode data.
Decide whether or not to apply Alt to suffix of barcode data.
For example: Do not Apply Enter for suffix.1. Read the "Enter Setup" barcode;2. Read the "Do not Apply Enter for suffix" barcode;3. Read the "Exit with Save" barcode.
Enter Setup
Exit with Save
Exit without Save
(*) Apply Enter for suffix Do not Apply Enter for suffix
(*) Apply Alt for suffix Do not Apply Alt for suffix

50
Appendix IThe setting barcodes of parameters' value.
0 1
2 3
4 5
6 7
8 9
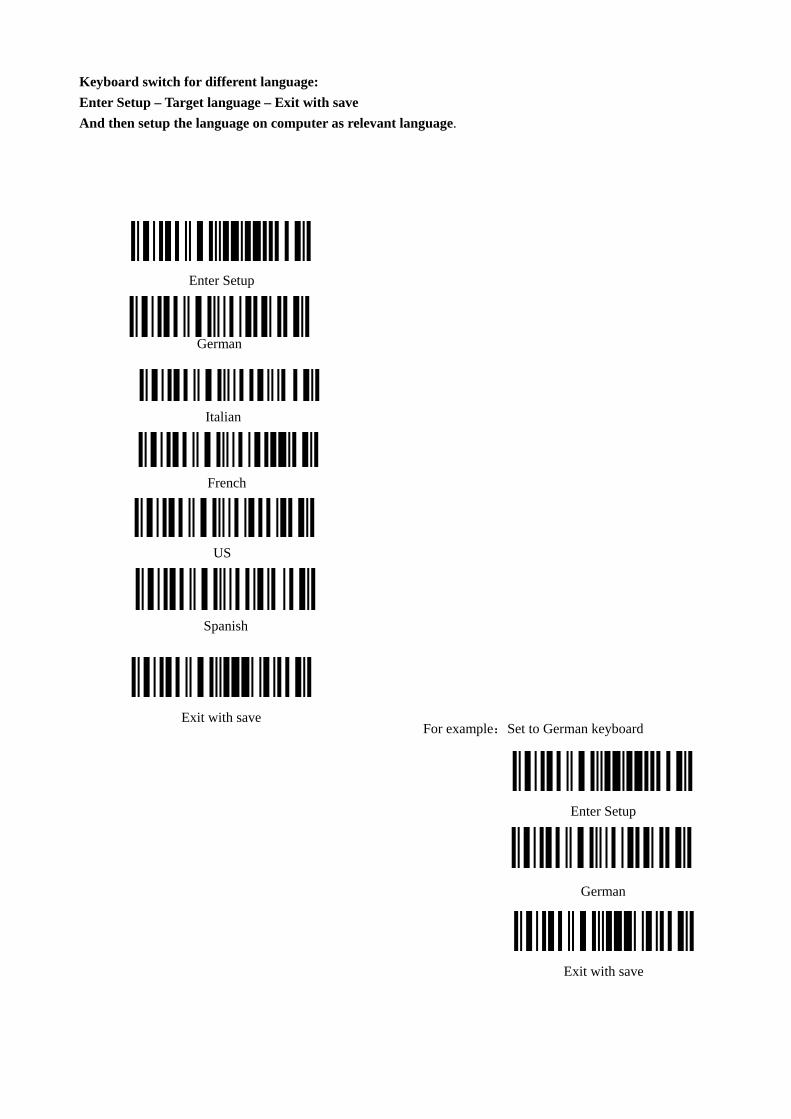
Keyboard switch for different language: Enter Setup – Target language – Exit with save And then setup the language on computer as relevant language.
Enter Setup
German
Italian
French
US
Spanish
Exit with save For example:Set to German keyboard
Enter Setup
German
Exit with save

Website: Http://www.inateck.comEmail: [email protected]
(Service time: Mon - Fri 9:00AM - 5:00PM CET)Tel: 0341-5199 8407