Battles of the Bulge: Celles - Revolution Games1.0 Introduction Celles is a simulation of the...
12
1.0 Introduction Celles is a simulation of the fighting near the Meuse River 23 December through 27 December 1944, at the German high-water mark during the Battle of the Bulge. The German breakthrough was finally eliminated by the combined actions of American and British troops led by a devastating counterattack by the US 2 nd Armor Division. Battles of the Bulge: Celles Table of Contents 1.0 Introduction ..................................................................... 1 2.0 Components .................................................................... 1 2.1 Game Scale .................................................................. 1 2.2 Playing Pieces .............................................................. 1 2.2.1 Action Chits........................................................... 1 2.2.2 Tactical Chits ......................................................... 1 2.2.3 Combat Units ........................................................ 1 3.0 Sequence of Play ............................................................. 2 4.0 Action Chits and Tactical Chits......................................... 2 5.0 Supply .............................................................................. 2 6.0 Initiative ........................................................................... 3 7.0 Action Phase .................................................................... 3 8.0 Movement ....................................................................... 3 8.1 Meuse Bridges ............................................................. 4 8.2 Motorized Units ........................................................... 4 8.3 Trucks........................................................................... 4 8.4 Rear Areas.................................................................... 4 8.5 Strategic Movement .................................................... 4 9.0 Zones of Control (ZOC) .................................................... 4 9.1 Infiltration .................................................................... 4 10.0 Stacking.......................................................................... 5 11.0 Combat .......................................................................... 5 11.1 Retreat ....................................................................... 7 11.2 Advance after Combat ............................................... 8 12.0 Disruption ...................................................................... 8 13.0 Tactical Chits .................................................................. 8 13.1 Combat ...................................................................... 8 13.2 Extra Move................................................................. 8 13.3 Replacement .............................................................. 8 13.4 Allied Air .................................................................... 9 13.5 Playing Multiple Tactical Chits ................................... 9 14.0 Reinforcements ............................................................. 9 15.0 Führer Begleit Withdrawal ............................................ 9 16.0 Victory Conditions ......................................................... 9 17.0 Optional Rule ...............................................................10 18.0 Players Notes ...............................................................10 19.0 Designer’s Notes ..........................................................11 20.0 Game Setup ................................................................. 12 21.0 First Turn Rules ............................................................12 22.0 Reinforcement and Withdrawal Schedule ..................12 2.0 Components 1 22”x17” Map 88 Die-Cut Counters 1 Player Chart (Combat, Movement, etc.) 1 Rules Booklet This game uses a ten-sided die, numbered 0-9, which is not included with the game. 2.1 Game Scale Each hex on the game map is approximately 1 mile across. Each unit is a fighting formation made up of a collection of battalions, companies and batteries totaling in size between 1 - 3 battalion equivalents. Each game turn is 12 hours. 2.2 Playing Pieces 2.2.1 Action Chits German Action Chit Allied Action Chit 2.2.2 Tactical Chits German Tactical chits Allied Tactical Chits 2.2.3 Combat Units The counters in the game represent the units from the historical formations which fought in the battle. US units are olive green, German units are gray, British units are brown. Units have a used side on the rear of the counter that represents a unit’s reduced capabilities after movement. 2012 Revolution Games Battles of the Bulge: Celles 1
Transcript of Battles of the Bulge: Celles - Revolution Games1.0 Introduction Celles is a simulation of the...

1.0 Introduction
Celles is a simulation of the fighting near the Meuse River
23 December through 27 December 1944, at the German
high-water mark during the Battle of the Bulge. The German
breakthrough was finally eliminated by the combined
actions of American and British troops led by a devastating
counterattack by the US 2nd Armor Division.
Battles of the Bulge: Celles Table of Contents 1.0 Introduction .....................................................................1 2.0 Components ....................................................................1
2.1 Game Scale ..................................................................1
2.2 Playing Pieces ..............................................................1
2.2.1 Action Chits...........................................................1
2.2.2 Tactical Chits .........................................................1
2.2.3 Combat Units ........................................................1
3.0 Sequence of Play .............................................................2 4.0 Action Chits and Tactical Chits.........................................2 5.0 Supply ..............................................................................2 6.0 Initiative ...........................................................................3 7.0 Action Phase ....................................................................3 8.0 Movement .......................................................................3
8.1 Meuse Bridges .............................................................4
8.2 Motorized Units ...........................................................4
8.3 Trucks...........................................................................4
8.4 Rear Areas....................................................................4
8.5 Strategic Movement ....................................................4
9.0 Zones of Control (ZOC) ....................................................4 9.1 Infiltration ....................................................................4
10.0 Stacking..........................................................................5 11.0 Combat ..........................................................................5
11.1 Retreat .......................................................................7
11.2 Advance after Combat ...............................................8
12.0 Disruption ......................................................................8 13.0 Tactical Chits ..................................................................8
13.1 Combat ......................................................................8
13.2 Extra Move.................................................................8
13.3 Replacement..............................................................8
13.4 Allied Air ....................................................................9
13.5 Playing Multiple Tactical Chits ...................................9
14.0 Reinforcements .............................................................9 15.0 Führer Begleit Withdrawal ............................................9 16.0 Victory Conditions .........................................................9 17.0 Optional Rule ...............................................................10 18.0 Players Notes ...............................................................10 19.0 Designer’s Notes ..........................................................11 20.0 Game Setup .................................................................12 21.0 First Turn Rules ............................................................12 22.0 Reinforcement and Withdrawal Schedule ..................12
2.0 Components
1 22”x17” Map
88 Die-Cut Counters
1 Player Chart (Combat, Movement, etc.)
1 Rules Booklet
This game uses a ten-sided die, numbered 0-9, which is not
included with the game.
2.1 Game Scale
Each hex on the game map is approximately 1 mile across.
Each unit is a fighting formation made up of a collection of
battalions, companies and batteries totaling in size between
1 - 3 battalion equivalents. Each game turn is 12 hours.
2.2 Playing Pieces
2.2.1 Action Chits
German Action Chit
Allied Action Chit
2.2.2 Tactical Chits
German Tactical chits
Allied Tactical Chits
2.2.3 Combat Units
The counters in the game represent the units from the
historical formations which fought in the battle. US units are
olive green, German units are gray, British units are brown.
Units have a used side on the rear of the counter that
represents a unit’s reduced capabilities after movement.
2012 Revolution Games Battles of the Bulge: Celles 1

Each turn the German and Allied players place the Action
Chits and Tactical Chits that are available to them for that
turn together in a cup. The players will draw chits from
these cups during the Action Phase. Each player has his own
cup containing only his chits. The mix of Action Chits
changes from day to day (see the Action Chits Per Day Table
on the Celles Player Chart). All Tactical Chits are placed in
the cup every turn.
Full Strength Reduced Strength
(Red dot signifies reduced) Unused
Side
Used
Side Used side is identified
by the white numbers
Each turn each player will have a different number of
Actions available to be performed. This is printed on the
Turn Record Track (the number in green refers to the Allies
and the number in gray to the Germans). A marker labeled
Actions Available is provided for each player, and this
marker is placed in the corresponding box on the Actions
Track (on map next to Turn Record) to remind the player of
the number of Action Chits he may play this turn. A player
may have more Action Chits than available actions for the
turn, which means that not all units will move that turn.
Unit Affiliation Number of Steps
Attack Strength Movement Allowance
Defense Strength
Unit Symbols
Armor
Recon
Infantry
SP/AT
3.0 Sequence of Play 5.0 Supply
Each game turn consists of several phases that must be
followed in the following sequence. During the supply phase both players check the supply
status of all of their units. A unit traces a supply path from
the unit to a supply source. This path may be of any length
but may not pass through a hex containing an enemy unit or
an enemy zone of control (see 9.0) unless the hex is
occupied by a friendly unit. This includes the hex that is the
friendly supply source. A supply path may not be traced
through a hex that is in the enemy Rear Area (see 8.4). A
supply path may not be traced across the Meuse River
except at bridges. A unit that cannot trace a supply path
back to a supply source is marked as Out of Supply. If the
unit is already marked as Out of Supply, the unit is now
marked as Isolated. A unit that was Isolated or Out of
Supply that can trace a supply path during the Supply Phase
has its marker removed; it is now in supply. Supply status is
only checked and adjusted during the Supply Phase.
1. Chit Phase-Both players adjust the Action Chits and
Tactical Chits in their cup and reset the Actions
Available Markers.
Supply Phase-Both players check the supply status of
all of their units and mark units appropriately.
Initiative Phase-The players determine who will be the
first player to perform an action.
First Player’s Action Phase-The first player pulls chits
and activates units for movement and combat.
Second Player’s Action Phase-The second player pulls
chits and activates units for movement and combat.
The first player performs another Action Phase,
followed by the Second player, etc., until both players
have expended all of their actions.
Recovery Phase-All “Disrupted” markers are removed
from units. All units are flipped to their unused sides.
Victory Point Phase-The German Player collects victory
points for units in supply adjacent to the Meuse River.
The turn marker is moved to the next turn.
2.
3.
4.
5.
6.
7. German supply sources are any map edge hex in their Rear
Area. American supply sources are any north map edge hex
and east map edge hexes 3300 to 3306, inclusive. British
supply sources are any west map edge hex. American and
British units may only use their own supply sources.
8.
4.0 Action Chits and Tactical Chits Out of Supply units’ movement allowances are reduced by
1/3. Out of Supply units attack with a -2 modifier applied to
the die roll. Defending units are not affected by being Out
of Supply.
Action Chits represent the orders from above, formation
leadership, and supplies needed for a formation to move
and fight. Tactical Chits represent airpower, corps and army
artillery, extra fuel supplies, and replacements.
2 Battles of the Bulge: Celles ©2012 Revolution Games

Isolated units’ movement allowances are reduced by 2/3.
Isolated units may not attack. Isolated units that are
attacked have a +2 modifier applied to the attacker’s die
roll.
combat. All units of the division are, however, flipped to
their unused side, (front), when the activation chit is played.
Exception: British units may not be activated until
December 25.
6.0 Initiative 8.0 Movement
During the Initiative Phase both players roll a die and apply
the following modifiers: +1 to the Allied die roll on a Day
Turn; +1 to the German die roll on a Night Turn. The player
with the higher modified die roll holds the initiative for this
turn. Re-roll any ties. The player who wins the initiative
decides who will be the first player to perform an Action
Phase.
During the Action Phase the player may move and fight with
his activated units. Each unit has a movement allowance
printed on the counter that is the maximum number of
movement points the unit may expend for movement and
combat. Movement allowances may be reduced by Supply
(5.0) or Disruption (12.0). Movement allowances may be
increased by Strategic Movement (8.5). Activated units are
moved individually, with the currently selected activated
unit called the active unit. Once the active unit’s movement
has been completed the unit is flipped over to its used side,
and the next active unit is selected for movement.
(Activated units that do not expend any movement points
for movement or combat remain on their unused sides.)
7.0 Action Phase
The player who is performing the first Action draws a chit
from his cup. If he draws a Tactical Chit, it is placed in the
box on the map for available Tactical Chits. The player then
draws another chit, and continues to draw chits until an
Action Chit is drawn. A player may collect multiple Tactical
Chits before drawing an Action Chit. When he draws an
Action Chit, the marker is placed on his Action Track on the
map, and then all units of the formation named on the chit
are activated for movement and combat, or the player may,
instead, choose to activate one unit of any other formation.
In the latter case, the Action Chit is placed on the Action
Track on its back side to show that some unit other than the
named formation was activated.
Active units move from hex to hex, expending movement
points for the terrain in each hex entered, for hexside
features between hexes, for Combat and for Zones of
Control. See the Movement Point Cost Chart. Units are split
into 2 types for movement, motorized and infantry. All unit
types except infantry are motorized (including truck-
mounted infantry) and use the column labeled Mot on the
Movement Points Costs chart. A unit may not move if it
does not have the movement points to enter an adjacent
hex. (Players should note that the 1 unit of the US 3rd Armor
Division has no movement allowance and may never move.)
When a formation is activated all of its units are flipped to
their unused sides if not already on their unused sides. The
same is true if only an individual unit is activated; it is
flipped to its unused side. The terrain on the map is labeled around the edge of the
hex grid. The words are color coded to match the terrain
they are labeling. The player now stops drawing chits and moves and fights
with his activated units. After the current player completes
all of his moves and combats with his activated units, the
Second Player repeats the above procedure. This continues
until both players have expended all of their available
Actions for the turn. Since both players can have different
numbers of actions available for the turn, it is quite possible
for one player to run out of actions before his opponent,
allowing the player with more actions to perform multiple
actions in a row.
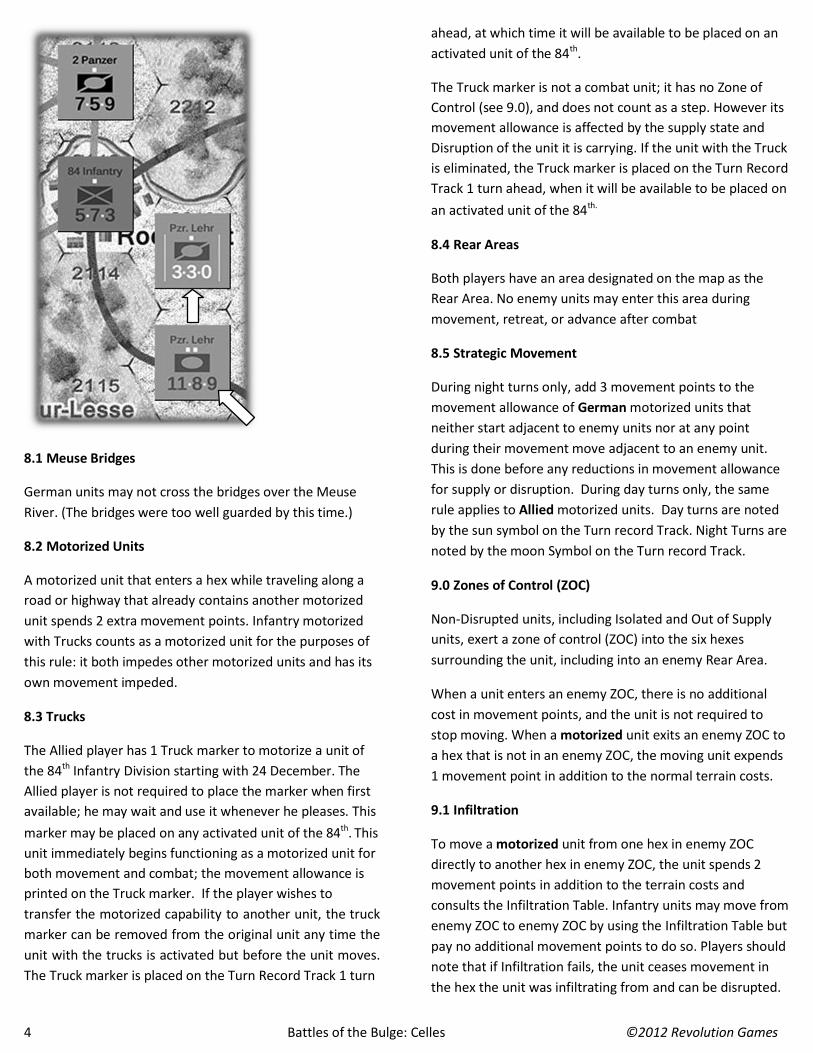
Example : The recon unit of Lehr Division starts the move in
the road hex just behind the armor unit of Lehr. It enters the
armor unit’s hex for 2.5 movement points. (The highway
costs .5 and entering a hex with another motorized units
costs 2 more; See 8.2.) The unit then continues to move to
hex 2213, expending 3 more movement points for the rough
hex. The recon unit still has 4.5 movement points left but,
the German player does not feel that a Light attack on a
town, with -4 total modifiers on the attacker’s die roll, is a
good idea, so the recon unit then flips to its used side as its
movement is completed.
Exception: When the US player draws the 84th Infantry
Action Chit and activates that division, a maximum of 3
units from that division may be activated for movement or
2012 Revolution Games Battles of the Bulge: Celles 3
ahead, at which time it will be available to be placed on an
activated unit of the 84th.
The Truck marker is not a combat unit; it has no Zone of
Control (see 9.0), and does not count as a step. However its
movement allowance is affected by the supply state and
Disruption of the unit it is carrying. If the unit with the Truck
is eliminated, the Truck marker is placed on the Turn Record
Track 1 turn ahead, when it will be available to be placed on
an activated unit of the 84th.
8.4 Rear Areas
Both players have an area designated on the map as the
Rear Area. No enemy units may enter this area during
movement, retreat, or advance after combat
8.5 Strategic Movement
During night turns only, add 3 movement points to the
movement allowance of German motorized units that
neither start adjacent to enemy units nor at any point
during their movement move adjacent to an enemy unit.
This is done before any reductions in movement allowance
for supply or disruption. During day turns only, the same
rule applies to Allied motorized units. Day turns are noted
by the sun symbol on the Turn record Track. Night Turns are
noted by the moon Symbol on the Turn record Track.
8.1 Meuse Bridges
German units may not cross the bridges over the Meuse
River. (The bridges were too well guarded by this time.)
8.2 Motorized Units
A motorized unit that enters a hex while traveling along a
road or highway that already contains another motorized
unit spends 2 extra movement points. Infantry motorized
with Trucks counts as a motorized unit for the purposes of
this rule: it both impedes other motorized units and has its
own movement impeded.
9.0 Zones of Control (ZOC)
Non-Disrupted units, including Isolated and Out of Supply
units, exert a zone of control (ZOC) into the six hexes
surrounding the unit, including into an enemy Rear Area.
When a unit enters an enemy ZOC, there is no additional
cost in movement points, and the unit is not required to
stop moving. When a motorized unit exits an enemy ZOC to
a hex that is not in an enemy ZOC, the moving unit expends
1 movement point in addition to the normal terrain costs.
8.3 Trucks
The Allied player has 1 Truck marker to motorize a unit of
the 84th Infantry Division starting with 24 December. The
Allied player is not required to place the marker when first
available; he may wait and use it whenever he pleases. This
marker may be placed on any activated unit of the 84th. This
unit immediately begins functioning as a motorized unit for
both movement and combat; the movement allowance is
printed on the Truck marker. If the player wishes to
transfer the motorized capability to another unit, the truck
marker can be removed from the original unit any time the
unit with the trucks is activated but before the unit moves.
The Truck marker is placed on the Turn Record Track 1 turn
9.1 Infiltration
To move a motorized unit from one hex in enemy ZOC
directly to another hex in enemy ZOC, the unit spends 2
movement points in addition to the terrain costs and
consults the Infiltration Table. Infantry units may move from
enemy ZOC to enemy ZOC by using the Infiltration Table but
pay no additional movement points to do so. Players should
note that if Infiltration fails, the unit ceases movement in
the hex the unit was infiltrating from and can be disrupted.
4 Battles of the Bulge: Celles ©2012 Revolution Games

Example: The German armor unit in 3309 spends 3
movement points moving into the hex with the recon unit,
and then declares that is attempting to move one hex
further to 3307. This would be a move from one hex in an
enemy ZOC to another hex in an enemy ZOC, and is thus
considered infiltration. The German armor unit expends 1
movement point for the terrain in the hex it is trying to enter
(a road hex) and 2 movement points for infiltration. A die is
then rolled and the German player receives a +1 modifier for
a German unit infiltrating, and a +2 for being a night turn.
On a roll of 5 the infiltration succeeds and the German
armor unit enters the hex. The German armor unit has
expended 6 movement points, and it could now continue
moving or launch a Light attack for 3 movement points on
the adjacent American unit. The German armor unit decides
to end its move and is flipped to its used side. (Players
should note that if the infiltration had failed the German
armor unit would have stopped moving in the hex with the
recon unit and would have been over stacked. see 10.0)
his choice as necessary to bring the hex back into stacking
limit compliance.
11.0 Combat
Combat is both performed as part of movement and costs
movement points and may be initiated at any point during
the active unit’s movement. A unit may continue to move
and initiate attacks as long as the unit has not been forced
to Retreat and has available movement points. Combat has
three levels of intensity: Light, Medium and Heavy attacks.
Each type of attack also has a combat modifier associated
with it. The cost in movement points and the combat
modifier for each type of attack are listed on the Celles
Player Chart.
When an active unit wishes to attack, it expends the
required number of movement points and attacks all
adjacent enemy units. If an attacking unit, for example, is
adjacent to 4 enemy units, then it must attack all 4 enemy
units. (Exception: No attacks are permitted across the
Meuse River, even at bridges.) All friendly units adjacent to
an enemy unit that is being attacked may also be included
in the attack, whether activated or not. The attacking player
decides on a unit by unit basis which of these additional
friendly units will be included in the attack. These additional
attacking units adjacent to the defending units may only
attack the original defending units. The only units the
defender includes in the combat are the units adjacent to
the unit initiating the attack, the active unit. An enemy unit
in its Rear Area may be attacked, but no advance after
combat is allowed into an enemy Rear Area.
The attacking player now adds up all of the attacking units’
attack strengths and compares that number to the
combined strength of all of the defending units. This will
yield a numerical odds ratio (attacker to defender). Round
off the odds ratio downward to conform to one of the odds
ratios found on the Combat Results Table (CRT). The
attacking player now rolls a die and applies all die roll
modifiers for this combat to yield a final modified result on
the CRT. A modifier is applied if any of the units on that side
that are involved in that combat qualify for the modifier.
For example, if 1 defending unit is Disrupted, apply the
Disrupted modifier. Multiple modifiers of the same type are
ignored. (Having 2 Disrupted units and 2 units in the woods
has no more effect than 1 Disrupted unit and 1 unit in the
woods.) Modifiers are cumulative except for the terrain of
the defender’s hexes. If the attacker is attacking multiple
hexes, the terrain most beneficial to the defender is used.
10.0 Stacking
A maximum of 2 steps may stack in a hex. The number of
steps possessed by a unit is at the top of the counter under
the unit affiliation and is represented by small squares; one
square equals one step. Many units start the game with 2
steps, and thus may not stack with another unit when at full
strength. Stacking limits apply at the end of an active units’
movement, retreat, replacement, moment of combat, and
advance after combat. If a hex is over stacked at one of
these times the owning player eliminates as many steps of
2012 Revolution Games Battles of the Bulge: Celles 5

River modifiers are applied in addition to the terrain of the
hex; a maximum of one river modifier may be applied to
each combat. If any attacking units are attacking across a
river, the river modifier is applied.
river, and he does not want the negative modifier affecting
the combat. The modifiers to the attacker’s die roll for the
combat are -2 for a defender in a town and +1 for Germans
attacking during a night turn. A die roll of 9 yields a result of
RD. The defending unit is first disrupted and then must
retreat 2 hexes. Since the unit is surrounded by enemy units
and enemy ZOC and a disrupted unit may not retreat into an
enemy ZOC, the unit is eliminated. Any German unit that
participated in the attack may now advance into the
defender’s hex. The recon unit of Lehr advances so it will be
on the highway for its next move. The armor unit of Lehr still
has 2.5 movement points, and could continue moving, but
decides to finish its move in its current hex and flip to its
used side.
The results on the CRT are read as follows: the left side of
the slash applies to the attacker and the right side to the
defender. The defender applies all results first.
A numerical result is the number of steps that must be lost.
The first step loss for the attacker must come from the
active unit which initiated the attack. If a 2-step unit loses 1
step, the unit is removed from the map and placed in the
destroyed unit area, and a reduced-strength unit of the
same type and formation is put in its place. If a 2-step unit
loses 2 steps, the unit is removed from the map and placed
in the destroyed unit area, and a reduced strength unit of
the same type and formation is also placed in the destroyed
unit area. If a 1 step unit loses 1 step, it is placed in the
destroyed unit area. (This area is on the player’s map edge.)
A “—“result indicates that the combat had no effect
An “R” result indicates that all of the units involved must
Retreat 2 hexes. See Retreat (11.1)
A “D” result indicates that two of the units involved in the
attack are Disrupted. If only one unit participated in the
combat for that side, the second Disruption result is
ignored. The first Disrupted unit for the attacker must be
the active unit which initiated the attack; otherwise it is up
to the owning players, both attacker and defender, to
choose which units to Disrupt from his non Disrupted units.
If all units have been Disrupted there is no further effect.
The results on the CRT are cumulative. In a single combat, a
side could lose steps, be Disrupted, and forced to Retreat;
and the results are applied in that order. (Disrupted
retreating units are vulnerable to enemy ZOC; see 11.1)
Example: The German armor unit in 3208 declares a heavy
attack using all 9 of its movement points. Since it is adjacent
to two American defending units, it must attack both of
them. All other German units that are adjacent to any of the
defenders may now be included in the attack. The German
player chooses to include all three armor units for an attack
factor of 28 to a defense of 14 for the two American units.
The German recon unit is a spectator and will not be
affected by the combat results. The attacker receives a
modifier based on the best terrain any of the defending
units occupy; since woods and village are both -1, a -1
modifier for terrain is applied to the attacker’s die roll. The
attacker receives a +1 modifier for the heavy attack. The
attacker’s modified die roll is a 3; this is a “no effect” result.
Example: The armor unit of Lehr Division moves from 2214
to 2114 and then attacks the American infantry unit in
Rochefort. The armor unit spends .5 movement point for the
highway and 6 movement points for a medium attack. (It
could have launched a heavy attack if it had started
adjacent to the defender and had 9 movement points
available.) All German units adjacent to the defender may
be included in the attack. The German player chooses to
include the recon unit of Lehr to increase the odds to 2-1.
The German player does not include the unit of the 2nd
Panzer because it is separated from the defender by a minor
6 Battles of the Bulge: Celles ©2012 Revolution Games

The German armor unit that initiated the attack is flipped to
its used side, as it has spent all of its movement points. The
other adjacent German units on their unused sides could be
activated later in the same action phase to attack the same
enemy units—such wave attacks are intrinsic to the game
system.
the unit then enters another enemy ZOC, the unit
would take a step loss. Exception: If 2 one-step units
are stacked together and they are both Disrupted
and the stack retreats into an enemy ZOC, only 1
unit is eliminated.
4. American units Retreat North, Northwest or
Northeast. British units Retreat Northwest or
Southwest. German units Retreat South or
Southeast. There is no penalty for retreating in the
wrong direction if no hex is available in the proper
direction due to enemy units, enemy ZOC, enemy
Rear Areas or impassable terrain.
5. A unit must avoid finishing its Retreat in a hex that
is over stacked if possible. A unit that has no choice
because of higher priorities but to end its retreat
over stacked may continue to retreat additional
hexes until it reaches a hex in which it can stack
legally, if such a hex is available.
Example: The American units have just inflicted a retreat
result on the German unit in 1604. The first retreat priority is
to not retreat through terrain prohibited to movement.
There is no such terrain in this example. The second priority
in a retreat is to avoid entering hexes with enemy units. This
means the German unit may not retreat through the 2 hexes
with units of the US 2ndArmor. The third priority is to avoid
enemy ZOC, so the German unit must retreat to 1504 or
1505, since these hexes meets the first 3 priorities, and there
is no hex available that conforms to the fourth priority. They
retreat to 1504. The next hex of the retreat from 1504 must
11.1 Retreat
When a unit is required to Retreat due to a combat result, it
must finish its retreat 2 hexes from its original location. The
unit chooses its retreat path according to the guidelines
listed below in order of priority. In other words, a unit may
violate a higher-numbered priority in order to avoid
violating a lower-numbered priority. If multiple units must
Retreat, the owning player decides the order in which the
units retreat.
1. A unit may not Retreat into or through a hex it
could not enter by normal movement. If forced to
do so, the unit is eliminated. The US 3rd Armor unit
is eliminated if forced to retreat.
A unit may not Retreat into or through a hex with
an enemy unit. If forced to do so, the unit is
eliminated.
A unit must avoid retreating into or through enemy
ZOC, if possible. Friendly units negate enemy ZOC
for the purposes of Retreat. If a unit must retreat
through an enemy ZOC, the unit is Disrupted. If the
unit is already Disrupted, the unit takes a step loss.
This is done on a hex by hex basis, so the first hex
with an enemy ZOC would Disrupt the unit, and if
2.
3.
2012 Revolution Games Battles of the Bulge: Celles 7
ZOC
S
SE
ZOC

be to 1505, as this hex meets the first 3 priorities as well as
the fourth priority, which calls for German units to retreat to
the South or Southeast. At this point, the unit must retreat
another hex, as it is not 2 hexes from the original combat
hex. The unit would retreat to 1506 as the only hex meeting
the first 4 priorities.
13.0 Tactical Chits
There are 4 types of Tactical Chits in the game. The Tactical
Chits are placed in the same pool as the Action Chits and are
randomly selected during the action phase. When pulled,
Tactical Chits are placed in the Tactical Available Box on the
map for use in this Action Phase or a later one during this
turn. When and how each type of Tactical Chit is played is
explained in the rules for each type of Tactical Chit. Chits in
the Tactical Available Box are used once and then placed in
the Played Tactical Box. In the Chit Phase, all Tactical Chits
in the Tactical Available box and the Played Tactical Box are
placed back in the pool of available chits (your cup).
11.2 Advance after Combat
If any of the defending units’ hexes are vacated as a result
of combat, any of the attacking units—not just the active
unit—may occupy the defenders’ vacated hexes up to the
stacking limit. Exception: Advancing units may not enter a
hex in the enemy’s Rear Area. ZOC have no effect on
Advance after Combat. Advance after Combat does not cost
movement points, and the active unit that initiated the
combat may continue to move if it has movement points,
regardless of whether it advanced after combat or not.
Advance after combat does not cost any movement points
and does not cause a unit to flip to its used side.
13.1 Combat
This Tactical Chit allows the player holding it to add 1 to the
die roll of any of his attacks or subtract 1 from the die roll of
any of his opponent’s attacks. This chit is played after the
odds and modifiers are figured for an attack but before the
attack die roll. The attacker announces first if he is using this
Tactical Chit if both players have it available. 12.0 Disruption
Units become Disrupted as a result of Infiltration attempts,
combat, Retreat through enemy ZOC and air attacks.
Disrupted units’ movement allowances are reduced by 1/3.
This modifier is cumulative with the modifiers for being Out
of Supply or Isolated. For example, a unit which is both Out
of Supply and Disrupted has its movement allowance
reduced by 2/3.
13.2 Extra Move This Tactical Chit allows a player to activate one additional
unit of any formation. The Extra Move Chit must be played
right after a Friendly Action Chit has been used to activate
a formation or individual unit but before any units move
or attack. The unit activated by the extra move is now part
of the group of activated units and the player may move
these activated units in any sequence he desires. Exception: British units may not be activated until 25
December. A unit that is Isolated and Disrupted has no movement
allowance at all. 13.3 Replacement
If one or more of the defending units in a combat are
disrupted, a +2 modifier is applied to the combat die roll. Replacements represent the repair of vehicles and the
reorganization of shattered combat units. The Replacement
Tactical Chit may only be played by the Germans during
Night turns and by the Allies during Day turns. If pulled
during a turn in which it may not be played the chit is put
aside and is placed back in the cup at the end of the turn.
If one or more of the attacking units in a combat are
disrupted, a -2 modifier is applied to the combat die roll.
If both the attacker and defender have disrupted units
involved in the same combat these modifiers will cancel
each other out. The Replacement Chit must be played right after a friendly
Action Chit is pulled but before the player decides which
units to activate. The unit being replaced can be from any
formation; it is not limited to the formation of the Action
Chit pulled.
Disrupted units have no ZOC.
Disrupted units ignore additional Disrupted results.
Disrupted units have their disruption removed in the
Recovery Phase. (See 3.0 Sequence of Play.) This chit allows the player to replace 1-step loss by
removing a 1-step unit and replacing it with a 2-step unit of
the same type.
8 Battles of the Bulge: Celles ©2012 Revolution Games

Alternatively, the player may rebuild an eliminated 1-step
unit, including reduced strength units, from among the units
in the destroyed area. Rebuilt German units are placed in
the hexes where the formation enters the game. Example: A
unit of the 2nd Panzer Division would rebuild a unit in 3316.
American units are placed in Marche, Hotton, Ciney or
Hamois. British units are placed in Dinant or Givet (in either
hex of these two cities). Units are placed on the map on
their unused sides.
14.0 Reinforcements
Reinforcements become available according to the
Reinforcement and Withdrawal Schedule. (See 21.0) A
reinforcing unit must be placed in its arrival hex when the
unit or its formation is activated. Some reinforcing units
have multiple arrival hexes and they may be placed in any of
them. A player could use an Extra Move Tactical Chit or
another formation’s action chit to activate an individual
reinforcing unit. An arriving reinforcement may not be
placed in a hex occupied by an enemy unit; it may be placed
in an enemy ZOC.
When rebuilding a unit from 1 step to 2, or rebuilding a 1-
step unit and placing it on the map, the following conditions
apply: the hex must be in supply and not in an enemy ZOC;
stacking limits apply after replacements have been placed. The unit spends no movement points to be placed in the
reinforcement hex. Multiple units may be placed in the
same reinforcement hex during an Action Phase, creating a
temporary over stacked hex, which must be corrected by
the end of the Action Phase. If a reinforcing unit does not
enter on the turn it is scheduled to arrive because the unit
or formation was never activated, the unit(s) are available
as reinforcements during all following turns.
A rebuilt unit may be activated normally in the Action Phase
in which it is rebuilt.
13.4 Allied Air
The Allied Air Tactical Chit must be played right after a
friendly Action Chit is pulled but before the player decides
which units to activate. The Chit may not be played during
a Night Turn. If pulled during a Night turn put chit aside and
put chit back in the cup at the end of the turn.
15.0 Führer Begleit Withdrawal
During the Night Turn of 26 December, or any turn
thereafter, the German Führer Begleit Brigade (FBB) is
withdrawn from the battle area when its Action Chit is
pulled. Place the marker on the German Action Track—this
counts as the German player’s action. The FBB is also
withdrawn if any individual unit of the FBB is activated. (The
German player might choose to activate a unit of the FBB to
force them to withdraw, thus clearing space on the map for
other German units to operate.) Simply pick up the units
and remove them from the map. Step losses suffered by the
withdrawn units do count for victory point calculations. The
German FBB Action Chit remains in the pool for future
turns. If it is pulled after the FBB has withdrawn, the
German player may only use it to activate 1 unit of some
other formation.
When played, the German actions available are reduced by
1 for the turn. Move the Actions Available marker down 1
box on the German Action Track. If the Germans have
already expended all of their actions for the turn, this effect
is ignored.
In addition, the Allied player may immediately attack any
German unit with an Air Attack. Roll one die: on a 5-9 the
unit loses a step; on a roll of 1-4 the unit is Disrupted; a die
roll of 0 has no effect. Subtract 2 from the die roll if the
German unit is in a woods or town hex. German units in
their rear area may be attacked by Air Attacks.
13.5 Playing Multiple Tactical Chits
The Extra Move, Replacement, and Allied Air Tactical Chits
may all only be played after a friendly Action Chit, but any
number of them may be played after the same Action Chit
in whatever order the player desires. Example: The Allied
player has pulled the Action Chit for the 2nd Armor Division,
and decides to first hit the Germans with an Allied Air Chit,
followed by a Replacement Chit to rebuild a British unit,
followed by using an Extra Move Chit to activate the newly
rebuilt British unit.
The German player may play Tactical Chits when
withdrawing the FBB. Example: The German player draws
the FBB Action Chit and withdraws the FBB, and then
decides to rebuild a unit of the 116th Panzer, and spend an
Extra Move Tactical Chit to activate the newly rebuilt unit to
fill the hole left by withdrawal of the FBB.
16.0 Victory Conditions
During the Victory Point Phase of each turn the German
player gets 1 victory point for each German unit that is
2012 Revolution Games Battles of the Bulge: Celles 9

adjacent to the Meuse River and is not marked as out of
supply or isolated. The German player marks this on the
Victory Point Track. If the German player reaches the end of
the track, flip the marker over to its +10 side and place the
marker in the zero box. If the German player reaches the
end of the track a second time, equaling 20 victory points,
the Germans are assumed to have crossed the Meuse River
and the game is over, ending in a decisive German Victory.
18.0 Players Notes
Allied Player-The Allied player needs to be patient and
cautious at the start of the game. There are only 5 Allied
activations, compared to 9 for the Germans, during the first
3 turns, leaving the Allied player with a very limited ability
to move and fight. Try to restrict the movement of German
units by blocking critical crossroads, but do so at a distance
to prevent the Germans from launching devastating attacks
or surrounding your units. In the early going, the Allied
player should only attack if the German player leaves units
unsupported and cheap kills can be had. Try to limit the
number of supplied German units earning victory points
along the Meuse, but not at the cost of losing a good unit.
If the game does not end with the Germans crossing the
Meuse, then add up all of the victory points gained on the
Victory Point Track along with the following:
At the end of the game both players, German and Allied,
receive 2 victory points per town for having a friendly unit in
Marche, Hotton or Rochefort. Starting with the day turn of the 25 December, the situation
is more favorable for the Allies: the Allies now have 5
activations and the Germans have only 3, and Allied
airpower can reduce this further. The Allies also now
receive a +1 to the attack die roll during day turns, which
The German player receives 1 victory point per town for
having a unit in Ciney, Beauraing, Givet or Dinant.
At the end of the game a player receives 1 victory point for
each enemy step eliminated. Steps that have been replaced
do not count as eliminated for victory points. The easiest
way to count step losses is to remove all reduced-strength
units from the destroyed unit area; do not count these.
Then add up the steps of all remaining units in the
destroyed unit area. Then add up all reduced strength units
on the map and subtract this number from the total of
eliminated steps in the destroyed box. This will yield the
total of destroyed steps.
nd can be a decisive advantage. The 2 Armor will be activated
twice this turn, as well as on the day turn of the 26
December, so it can do a lot of moving and attacking. Using th extra moves and the activation chits for the 4 Recon or the
nd 84th Infantry to activate units of the 2 Armor additional
times during the remaining day turns of the game helps nd keep the killing machine of the 2 Armor rolling. Because
the Germans will probably earn some victory points for
getting to the Meuse or taking towns, the Allied player must
offset that deficit by inflicting more losses then he takes.
The player with the most victory points wins. If both players
have the same number of victory points the game is a tie. German Player-The German player has several possible
strategies. He can attack the 84th Infantry Division, hoping to
cause heavy casualties and take Rochefort, Hotton and
Marche, and then hold on against the Allied counter-attack.
Alternatively, he can move several divisions towards the
Meuse, attempting to advance some units adjacent to the
river and keep them in supply. He can mix these strategies
by moving on the Meuse early and attacking the 84th later in
the game with German reinforcements. The key is to
decide upon a plan and make rapid progress during the first
3 turns when the Germans get 9 activations to the Allies 5.
Also 2 of the first 3 turns are night turns, giving the
Germans a combat bonus as well as the ability to use
strategic movement.
17.0 Optional Rule
The number of actions each player receives each turn is
based on the historical levels of movement and combat. If
some of the underlying issues of supply, airpower and
command had been different, the army’s action limits
would have changed.
Each turn, beginning with 24 December, roll one die. On a
roll of 0-1 the Germans receive 1 more action. On a roll of 2-
3 the Germans receive 1 less action. On a roll of 4-5 there is
no change to historical action limits. On a roll of 6-7 the
Allies receive 1 more action. On a roll of 8-9 the Allies
receive 1 less action. The maximum number of actions a
player may have in a turn is 5. Starting with the day turn of the 25 December, the Germans
must be much more cautious, especially during day turns, as
the Allies now receive more actions and possess greater
combat power. Attacking, and often times moving, during
10 Battles of the Bulge: Celles ©2012 Revolution Games

day turns is risky—the Allies receive so many more
activations that flipping a German unit to its weaker side is
usually a bad idea. The German still has the advantage at
night, so use those turns to counterattack or move to stop
Allied advances. Destroying units of the 2nd Armor is an
effective way to reduce the American firepower, but it must
be done at something close to 1-1 ratio of step losses or you
are just speeding up the German demise. If you take victory
point towns, you must garrison them late in the game with
2 steps, or the Allies will eliminate your garrison with an air
strike and deny you the victory points.
Actions Available—The number of Actions available each
turn represents the impact of supply, leadership and
doctrine for each side. For example, German fuel shortages
are factored into the number of actions available to the
German player, and thus each turn a number of German
divisions will not be able to move—without having to
include a rule requiring the German player to roll a die to
see which units run out of fuel. During the Battle of the
Bulge, German units were more likely to move at night, and
Allied units were more likely to be active during the day;
once again, this is handled in the game through the
available actions instead of a series of rules and exceptions.
The limited number of actions available to the Allied player
early in the game represents the heated command
19.0 Designer’s Notes
Celles was designed to be a fast-playing simulation of the
fighting near the Meuse during the Battle of the Bulge. I
have attempted to show all of the major factors of the
battle in a clean format, with as few special rules or
exceptions as possible. The emphasis is on the game play
and not the rules.
nd arguments over the proper use of the US 2 Armor Division.
Action Chits—The Action Chit system is designed to show
the random and chaotic nature of the fighting, without
making luck into the predominant factor. Thus each player
has his own pool of chits, and players alternate instead of all
the chits being in one pool, which can lead to one player
moving over and over while the second player is forced to
remain passive and absorbs attacks. A key design decision
was to allow players to use a formation chit to activate a
single unit anywhere on the map, if they so choose, instead
of activating the units of the formation named on the chit.
This minimizes luck and gives the player at least some ability
to respond to a crisis in one section of the line. Finally,
allowing some units the chance to be activated more than
once a turn allows for those moments in a campaign when a
unit covers great distances, or does a great deal of fighting,
without having to invent a lot of special rules about why the
unit was more effective than on a “normal” day.
Unit Scale—The armored units in the game represent the
approximate number of tactical fighting groups formed
from each division and not the units’ organization on paper.
For example, the US 2nd Armor was divided into a recon
battalion and three combat commands—A, B, and R.
Combat commands A and B were then subdivided into two
task forces each. Combat Command R was smaller and
fought as a single unit. In game turns, then, this division is
represented by 5 large armor units and a recon unit. Each
unit of the US 84th Infantry, on the other hand, represents
one battalion. German organization at this point of the
battle was a muddle, due to heavy losses, parts of units
being left behind for one task or another, or units stuck in
traffic jams. All German units were essentially ad-hoc mixes
of troops formed around regimental or battalion HQ.
Unit Symbols—Units in the game are a mix of tanks,
armored cars, infantry, artillery, engineers, etc. By late 1944
everyone understood combined arms. The symbol merely
reflects the predominant type of equipment of the unit.
Movement and Combat—A number of game elements—
making combat a part of movement, flipping units over to a
weaker side after movement, and allowing non-moving
units to join combats—have been borrowed from “Korea,”
by Victory Games; one of my favorite games of all time.
This system allows a very mobile battle without a lot of
special rules for reserves, exploitation, or wave attacks.
2012 Revolution Games Battles of the Bulge: Celles 11
Credits Designer: Roger Miller
Developer: Richard Handewith
Graphics: Mark Mahaffey
Rules Editing: Gary Miller Playtesting: Metropolitan Wargamers of NYC (Joe Perez,
Mike Willner, Tom Zombeck), David Cohen, Gary Miller,
David Field, Michael Fostar, John Welsh, Mark Buxton,
Dave Alston.

20.0 Game Setup 24 December – Day
British: 29th Brigade
24 December – Night
and/or 1500 and/or 1900
x3
25 December – Day
21.0 First Turn Rules
The German player has the initiative on Turn 1 and must
take the first Action Phase.
The units of the US 2nd Armor available as reinforcements
on turn 1 have only 6 movement points. If they enter on
later turns they get their full movement allowance. 25 December – Night
22.0 Reinforcement and Withdrawal Schedule
23 December - Night
26 December – Day
26 December - Night
German FBB withdrawal possible. (See 15.0)
12 Battles of the Bulge: Celles ©2012 Revolution Games
German Panzer Lehr
2216
German 9th Panzer
3316
German 2nd Panzer
3316
German FBB
May be placed in 3309
and/or 3310 and/or 3311
US 2nd Armor
May be place in 1300 and/or 1500
and/or 1900
German 9th Panzer
3316
US 2nd Armor
1300 or 1500 or 1900
German 9th Panzer
3316
US 84th Infantry
0815 or 0213 or 0113
German 116th Panzer
3309 or 3310 or
3311
German 116th Panzer
3211 3011
German 2nd Panzer
2611 2712
German Panzer Lehr
2216
US 2nd Armor
May be place in 1300
US 84th Infantry
Within 2 hexes
2113(Rochefort) of 2808(Marche)
x4
Within 1 hex of 3306(Hotton), 2808(Marche)
or the highway between them.
US 4th Cavalry
Within 2 hexes of 2305
US 3rd Armor
3306(Hotton)
US 84th Infantry
(See 8.3)
0704(Dinant) 0213(Givet)
German 116th Panzer
3309 or 3310 or 3311
German Panzer Lehr
2216