Basics of Solaris Installation
76
D Manually Installing and Configuring the Solaris OS This topic describes how to install the OS and OS patches through a common CD, and how to perform configuration after installation, and how to check the configurations. D.1 Installing the Solaris 10 OS This topic describes how to install the Solaris 10 OS. D.2 Preconfiguration for Installation The preconfiguration tasks for installation include the installation of the HWICMR software package, the installation of Solaris 10 patches, and relevant configurations. D.3 Checking Whether the OS Is Corretly Installed and Configured This topic describes how to check the patch version, time zone setting, time setting, disk partition, login right of the root user, and right to enabling FTP services. OptiX iManager T2000 Software Installation Guide (Solaris) - Centralized System D Manually Installing and Configuring the Solaris OS Issue 03 (2010-06-10) Huawei Proprietary and Confidential Copyright © Huawei Technologies Co., Ltd. D-1
description
Solaris Installation and commands
Transcript of Basics of Solaris Installation

D Manually Installing and Configuring theSolaris OS
This topic describes how to install the OS and OS patches through a common CD, and how toperform configuration after installation, and how to check the configurations.
D.1 Installing the Solaris 10 OSThis topic describes how to install the Solaris 10 OS.
D.2 Preconfiguration for InstallationThe preconfiguration tasks for installation include the installation of the HWICMR softwarepackage, the installation of Solaris 10 patches, and relevant configurations.
D.3 Checking Whether the OS Is Corretly Installed and ConfiguredThis topic describes how to check the patch version, time zone setting, time setting, disk partition,login right of the root user, and right to enabling FTP services.
OptiX iManager T2000Software Installation Guide (Solaris) - Centralized System D Manually Installing and Configuring the Solaris OS
Issue 03 (2010-06-10) Huawei Proprietary and ConfidentialCopyright © Huawei Technologies Co., Ltd.
D-1

D.1 Installing the Solaris 10 OSThis topic describes how to install the Solaris 10 OS.
D.1.1 Installing the OS Through the GUIThis topic describes how to install the Solaris 10 OS through the GUI.
D.1.2 Installing the OS Through the Command LineThis topic describes how to install the Solaris 10 OS through the command line.
D.1.1 Installing the OS Through the GUIThis topic describes how to install the Solaris 10 OS through the GUI.
Prerequisitel Prepare the Solaris 10 OS disk, that is, Solaris 10 Operating System (10/08).
l Collect the following information required for installing the Solaris OS:
– Host name
– Active network interface
– Host IP address
– Host subnet mask
– Gateway address
l The server is connected to the KVMS or monitor.
Contextl If the server is not installed with the Solaris OS, the system directly accesses the ok prompt.
l If the server has been installed with the Solaris OS, the system accesses the ok promptwhen you enter init 0 as the root user.
Procedure
Step 1 Power on the Sun server and insert the Solaris 10 OS installation disk.
Step 2 Press STOP+A. When an ok prompt appears, enter the following command:ok boot cdrom
Press Enter. The system restarts. After five minutes, the system prompts you to select thelanguage of the installation program.
Step 3 Move the pointer to the text box. Enter 0 to select English. Then,press Enter.
Step 4 In the Welcome dialog box, click Next.
Step 5 In the Network Connectivity dialog box, select Networked, and then click Next.
Step 6 Optional: In the Configure Multiple Network Interfaces dialog box, select a primary networkinterface such as e1000g0, and then click Next.
D Manually Installing and Configuring the Solaris OSOptiX iManager T2000
Software Installation Guide (Solaris) - Centralized System
D-2 Huawei Proprietary and ConfidentialCopyright © Huawei Technologies Co., Ltd.
Issue 03 (2010-06-10)

NOTE
l If the server contains only one network interface, the Configure Multiple Network Interfaces dialogbox is not displayed.
l If the server contains multiple network interfaces, the Configure Multiple Network Interfaces dialogbox is displayed. In this case, it is recommended that you select the first network interface.
l The network interface name is related to the network adapter type. The common types of networkinterfaces are e1000g, bge, and ce.
Step 7 In the DHCP for e1000g0 dialog box, select No, and then click Next.
Step 8 In the Host Name for e1000g0 dialog box, enter the planned host name, and then click Next.
Step 9 In the IP Address for e1000g0 dialog box, enter the planned IP address, and then click Next.
Step 10 In the Netmask for e1000g0 dialog box, enter the planned subnet mask, and then click Next.
Step 11 In the IPv6 for e1000g0 dialog box, select No, and then click Next.
Step 12 In the Set the Default Route for e1000g0 dialog box, select None, and then click Next.
CAUTIONAccording to NMS security policies, using the default route is not allowed.
Step 13 In the Kerberos dialog box, select No for the Kerberos security, and then click Next.
Step 14 In the Name Service dialog box, select None for the name service, and then click Next.
Step 15 In theNFSv4 Domain Namedialog box, select Use the NFSv4 domain derived by thesystem, and then clickNext.
Step 16 In the Time Zone dialog box, select Geographic Continent/Country/Region, and then clickNext.
Step 17 In the Country or Region dialog box, select the corresponding country and region. For example,select Asia and China. Then, click Next.
Step 18 In the Date and Time dialog box, set the time, and then click Next.
CAUTIONIn the OS, the system time must be set correctly according to the specified format. The stablesystem time is of vital importance for the system. Thus, modifying the system time during theserver running is prohibited.
Step 19 In the Root Password dialog box, enter the password of the root user twice, and then clickNext.
NOTE
You must remember the password of the root user.
Step 20 In the Enabling Remote Services dialog box, select Yes, and then click Next.
OptiX iManager T2000Software Installation Guide (Solaris) - Centralized System D Manually Installing and Configuring the Solaris OS
Issue 03 (2010-06-10) Huawei Proprietary and ConfidentialCopyright © Huawei Technologies Co., Ltd.
D-3

Step 21 In the Confirm Information dialog box, confirm the configurations, and then click Confirm.Otherwise, click Back to correct the configurations.
Step 22 In the Welcome dialog box, click Next.
Step 23 In the Installer Options dialog box, select Yes for Reboot automatically after softwareinstallation and Eject CD/DVD automatically after software installation. Click Next.
Step 24 In the Specify Media dialog box, select CD/DVD, and then click Next.
Step 25 In the License dialog box, select Accept, and then click Next.
NOTE
If the Select Upgrade or Initial Install dialog box is displayed during installation, it indicates that thesystem can be upgraded. You can select Initial Install if the original system configuration is not required.
Step 26 In the Select Type of Install dialog box, select Custom Install, and then click Next.
Step 27 In the Select Software Localizations dialog box, select English (United States) (en_US) andEnglish (United States, UTF-8) (en_US.UTF-8) for North America, and then click Next.
Step 28 In the Select System Locale dialog box, select English(en_US)(United.States), and then clickNext.
Step 29 In the Additional Products dialog box, select None, and then click Next.
Step 30 In the Select Solaris Software Group dialog box, select Default Packages for Entire GroupPlus OEM, and then click Next.
Step 31 In the Disk Selection dialog box, select the disks on which you want to lay out the file systems,and then click Next.
CAUTIONSelect the disks to be partitioned according to your disk planning. For example, if you want topartition the c1t0d0 and c1t1d0 disks, you must select both the two disks at this step. Otherwise,the unselected disks are not partitioned. Note that this step cannot be rolled back. Therefore, thedisks to be partitioned must be selected correctly. For details about disk partition, see 2.4.1 DiskPartition Planning.
Step 32 In the Preserve Data dialog box, select No, and then click Next.
Step 33 In the Lay Out File Systems dialog box, click Modify to partition the disk.
NOTE
l The sector names shown as 0, 1, 3, 4, 5, 6, and 7 respectively see c1t0d0s0, c1t0d0s1, c1t0d0s3,c1t0d0s4, c1t0d0s5, c1t0d0s6, and c1t0d0s7. The size of the overlap partition corresponding to thec1t0d0s2 disk is that of the entire disk. Thus, you do not need to set the size.
l The disk names vary according to the device model.
Step 34 Click OK. In the Lay Out File Systems dialog box, click Next.
Step 35 In the Ready to Install dialog box, click Install Now.
A dialog box is displayed, prompting the installation progress. The duration of the installationprocess varies according to the server configuration, usually 60 minutes.
D Manually Installing and Configuring the Solaris OSOptiX iManager T2000
Software Installation Guide (Solaris) - Centralized System
D-4 Huawei Proprietary and ConfidentialCopyright © Huawei Technologies Co., Ltd.
Issue 03 (2010-06-10)

NOTE
l The Pause dialog box is displayed for three times during installation. Each time when the Pause dialogbox is displayed, click Continue. If no operation is performed, the system automatically restarts. Theinstallation can also be performed.
l After the installation is complete, the disk is automatically ejected. Remove the disk.
Step 36 In the Reboot dialog box, click Reboot to restart the system.
Step 37 After system restart, log in to the Solaris OS as the root user.
NOTEBy default, the login password is root.
----End
Postrequisite
Enable the root user to remotely log in to the system and use the FTP tool after the Solaris OSis installed.
1. Enable remote login for the root user.
(1) Run the vi command to modify the /etc/default/login file.# vi /etc/default/login
(2) Add # before CONSOLE=/dev/console to comment out this line. The followinginformation is displayed:……# If CONSOLE is set, root can only login on that device.# Comment this line out to allow remote login by root.## CONSOLE=/dev/console...
(3) Press ESC. Press Shift+;. Enter wq!. Then, press Enter to forcibly save the file andexit.
2. Enable the root user to use the FTP tool.
(1) Run the vi command to modify the /etc/ftpd/ftpusers file.(2) Add # before CONSOLE=/dev/console to comment out this line. The following
information is displayed:# ident "@(#)ftpusers 1.5 04/02/20 SMI"## List of users denied access to the FTP server, see ftpusers(4)##root daemon bin sys...
(3) Press ESC. Press Shift+;. Enter wq!. Then, press Enter to forcibly save the file andexit.
3. Run the following commands to restart the server:# sync;sync;sync;sync;sync;sync# shutdown -y -g0 -i6
D.1.2 Installing the OS Through the Command LineThis topic describes how to install the Solaris 10 OS through the command line.
OptiX iManager T2000Software Installation Guide (Solaris) - Centralized System D Manually Installing and Configuring the Solaris OS
Issue 03 (2010-06-10) Huawei Proprietary and ConfidentialCopyright © Huawei Technologies Co., Ltd.
D-5
Prerequisitel Prepare the Solaris 10 OS disk, that is, Solaris 10 Operating System (10/08).
l Collect the following information required for installing the Solaris OS:– Host name
– Active network interface
– Host IP address
– Host subnet mask
– Gateway address
Procedure
Step 1 Optional: If the T5220 server is used, you can log in to the system controller through SSH.Perform the following substeps until the ok prompt is displayed.
NOTEIn the case of the T5220 server, the login through Telnet is not supported. Please log in the system controllerthrough the following methods:
l You need to install the tools (such as the putty), which supports the login through SSH on the Windowsterminal.
l You need to log in to the system controller through other SUN server, enter ssh SC_IP_Address. If thefollowing message is displayed:The authenticity of host '10.71.35.12 (10.71.35.12)' can't be established.RSA key fingerprint is 0b:23:07:0c:27:72:44:3f:d1:aa:12:99:ed:dd:c0:5a.Are you sure you want to continue connecting (yes/no)? Enter yes.
1. In the command line window displayed, enter the username and password to the systemcontroller. The default username is root, and the initial password is changeme.
2. Enter set /HOST/bootmode state=reset_nvram script="setenv auto-boot? false".
NOTEA space exists between "?" and "false".
The terminal displays:
Set 'state' to 'reset_nvram'Set 'script' to 'setenv auto-boot? false'
3. Enter start /SYS.
The terminal displays:
Are you sure you want to start /SYS (y/n)?4. Enter y to start the T5220.
D Manually Installing and Configuring the Solaris OSOptiX iManager T2000
Software Installation Guide (Solaris) - Centralized System
D-6 Huawei Proprietary and ConfidentialCopyright © Huawei Technologies Co., Ltd.
Issue 03 (2010-06-10)
NOTEIf the terminal displays:start: Target already startedIt indicates that the system is started. Perform the following operations:
a. Enter stop /SYS.
The terminal displays:Are you sure you want to stop /SYS (y/n)?
b. Enter y.
The terminal displays:Stopping /SYS
c. Enter show /HOST status repeatedly to check the system status.
Until the terminal displays:status = Powered offProceed with the subsequent operation.
d. Enter start /SYS.
The terminal displays:Are you sure you want to start /SYS (y/n)?
e. Enter y to start the T5220.
5. Enter start /SP/console -f.
The terminal displays:
Are you sure you want to start /SP/console (y/n)?
6. Enter y and then press Enter.
NOTEIf display the prompt, enter y and then press Enter.
The terminal displays:
Serial console started. To stop, type #....Setting NVRAM parameters to default values.
SUNSP0021283F9FE9
SPARC Enterprise T5220, No KeyboardCopyright 2008 Sun Microsystems, Inc. All rights reserved.OpenBoot 4.29.1, 16256 MB memory available, Serial #88055776.Ethernet address 0:21:28:3f:9f:e0, Host ID: 853f9fe0.
auto-boot? = false{0} ok
Step 2 Optional: If the M4000 server is used, you can log in to the system controller through Telnet.Perform the following substeps until the ok prompt is displayed.
1. On the console, run the following command:telnet SC_IP_Address
The terminal displays:
Login:
2. Enter the user name eis-installer.
The terminal displays:
OptiX iManager T2000Software Installation Guide (Solaris) - Centralized System D Manually Installing and Configuring the Solaris OS
Issue 03 (2010-06-10) Huawei Proprietary and ConfidentialCopyright © Huawei Technologies Co., Ltd.
D-7
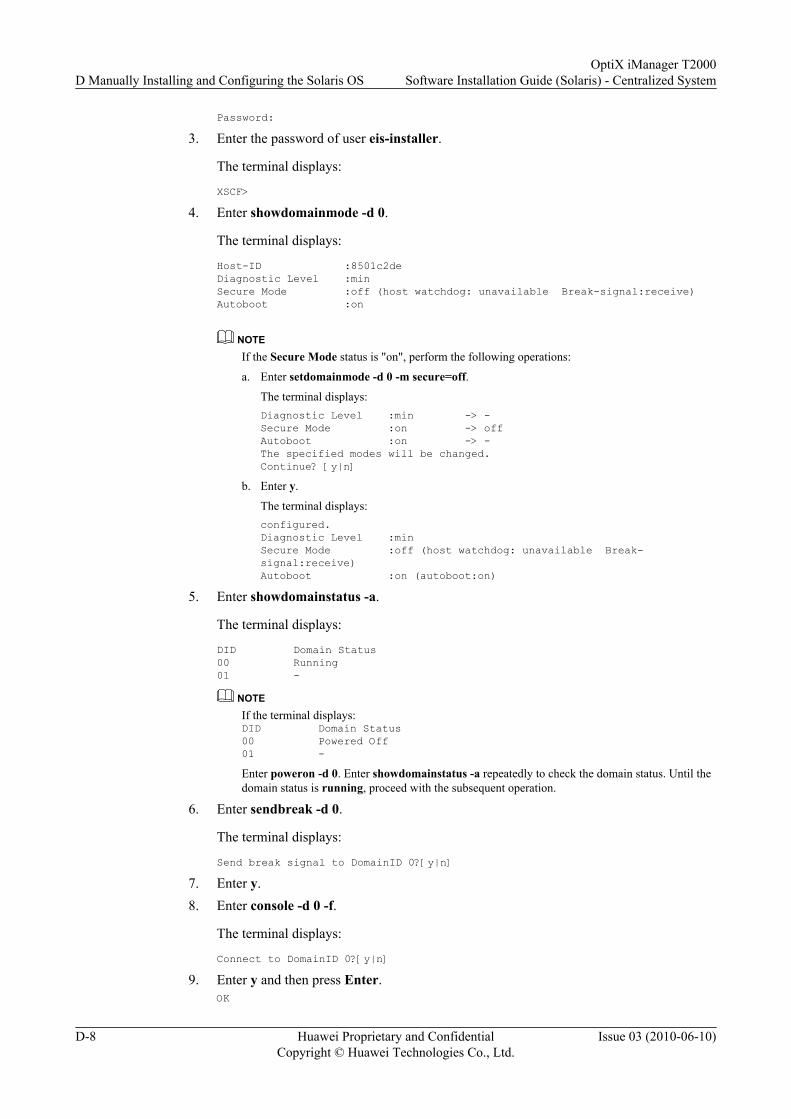
Password:
3. Enter the password of user eis-installer.
The terminal displays:
XSCF>
4. Enter showdomainmode -d 0.
The terminal displays:
Host-ID :8501c2deDiagnostic Level :minSecure Mode :off (host watchdog: unavailable Break-signal:receive) Autoboot :on
NOTEIf the Secure Mode status is "on", perform the following operations:
a. Enter setdomainmode -d 0 -m secure=off.The terminal displays:Diagnostic Level :min -> -Secure Mode :on -> off Autoboot :on -> -The specified modes will be changed.Continue? [y|n]
b. Enter y.
The terminal displays:configured.Diagnostic Level :minSecure Mode :off (host watchdog: unavailable Break-signal:receive)Autoboot :on (autoboot:on)
5. Enter showdomainstatus -a.
The terminal displays:
DID Domain Status00 Running01 -
NOTEIf the terminal displays:DID Domain Status00 Powered Off01 -Enter poweron -d 0. Enter showdomainstatus -a repeatedly to check the domain status. Until thedomain status is running, proceed with the subsequent operation.
6. Enter sendbreak -d 0.
The terminal displays:
Send break signal to DomainID 0?[y|n]
7. Enter y.8. Enter console -d 0 -f.
The terminal displays:
Connect to DomainID 0?[y|n]
9. Enter y and then press Enter.OK
D Manually Installing and Configuring the Solaris OSOptiX iManager T2000
Software Installation Guide (Solaris) - Centralized System
D-8 Huawei Proprietary and ConfidentialCopyright © Huawei Technologies Co., Ltd.
Issue 03 (2010-06-10)

Step 3 Optional: If a server except the T5220 and M4000 servers is used, do as follows to display theok prompt:
l In the case of the Netra 240 server, see 6.1.18 How to Display the ok Prompt of Netra 240on the Console.
l In the case of the V890 server, see 6.1.19 How to Display the ok Prompt of V890 on theConsole.
Step 4 Insert the Solaris 10 installation disk into the DVD-ROM drive.
Step 5 Run the following command to boot the system to prepare for installation:ok boot cdrom
Press Enter. The system restarts. After five minutes, the system prompts you to select thelanguage of the installation program.
Step 6 In the Select a Language dialog box, the system prompts "Please make a choice (0-9), or pressh or ? for help:." Enter 0, select English, and then press Enter.
NOTE
The language selected in this step only applies to the language environment of the installation process. Itis irrelevant to the languages supported by the Solaris OS after installation.
Step 7 In the What type of terminal are you using? dialog box, the system prompts "Type the numberof your choice and press Return:." Enter 3. Set the type of the terminal used during OS installationto DEC VT100. Then, press Enter.
Step 8 In the The Solaris Installation Program dialog box, press F2.
NOTE
l If F2 does not function, press Esc+2 instead.
l If ↑ or ↓ does not function, use Ctrl+B or Ctrl+N instead.
Step 9 In the Identify This System dialog box, press F2.
Step 10 In the Network Connectivity dialog box, click Yes to connect the network. Then, press F2.
NOTE
You can use ↑ and ↓ to move the cursor to the required bracket. Then, press Enter. If X is displayed inthe bracket, it indicates that the selection is complete.
Step 11 Optional: In the Configure Multiple Network Interfaces dialog box, select an active networkinterface, such as e1000g0. Then, press F2.
NOTE
l If the server contains only one network interface, skip this step.
l If the server contains multiple network interfaces, the Configure Multiple Network Interfaces dialogbox is displayed. In this case, it is recommended that you select the first network interface as the activenetwork interface for connecting the public network.
l The network interface name is related to the network adapter type. The common types of networkinterfaces are e1000g, bge, and ce.
Step 12 In the DHCP for e1000g0 dialog box, select No to disable DHCP. Then, press F2.
Step 13 In the Host Name for e1000g0 dialog box, enter the planned host name. Then, press F2.
Step 14 In the IP Address for e1000g0 dialog box, enter the planned server IP address. Then, pressF2.
OptiX iManager T2000Software Installation Guide (Solaris) - Centralized System D Manually Installing and Configuring the Solaris OS
Issue 03 (2010-06-10) Huawei Proprietary and ConfidentialCopyright © Huawei Technologies Co., Ltd.
D-9

Step 15 In the Subnet for e1000g0 dialog box, select Yes. Then, press F2.
Step 16 In the Netmask for e1000g0 dialog box, enter the planned subnet mask. Then, press F2.
Step 17 In the IPv6 for e1000g0 dialog box, select No to disable IPv6. Then, press F2.
Step 18 In the Set the Default Route for e1000g0 dialog box, select None. Then, press F2.
CAUTIONAccording to NMS security policies, using the default route is not allowed.
Step 19 In the Confirm Information for e1000g0 dialog box, confirm configurations. Then, press F2.
NOTE
If any information is incorrect, you can press F4 to return to the Network Connectivity dialog box, andthen modify the settings of network connection.
Step 20 In the Configure Security Policy dialog box, select No to skip the configuration of Kerberossecurity. Then, press F2.
Step 21 In the Confirm Information dialog box, confirm security configurations. Then, press F2.
NOTE
If any information is incorrect, you can press F4 to return to the Configure Security Policy dialog box,and then modify the settings of security policies.
Step 22 In the Name Service dialog box, select None to skip the configruation of the name server. Then,press F2.
Step 23 In the Confirm Information dialog box, confirm the name server configurations. Then, pressF2.
NOTE
If any information is incorrect, you can press F4 to return to the Name Service dialog box, and then modifythe settings of the name server.
Step 24 In the NFSv4 Domain Name dialog box, select Use the NFSv4 domain derived by thesystem. Then, press F2.
Step 25 In the Confirm Information for NFSv4 Domain dialog box, ensure that NFSv4 DomainName: Value to be derived dynamically is displayed. Then, press F2.
Step 26 In the Time Zone dialog box, select the corresponding geographical area, such as Asia,according to your location. Then, press F2.
CAUTIONDo not select other - offset from GMT or other - specify time zone file. Otherwise, the systemtime error may occur.
Step 27 In the Country or Region dialog box, select the corresponding country or region, such asChina, according to your location. Then, press F2.
D Manually Installing and Configuring the Solaris OSOptiX iManager T2000
Software Installation Guide (Solaris) - Centralized System
D-10 Huawei Proprietary and ConfidentialCopyright © Huawei Technologies Co., Ltd.
Issue 03 (2010-06-10)
Step 28 In the Date and Time dialog box, set the precise system time. Then, press F2.
CAUTIONIn the OS, the system time must be set correctly according to the specified format. The stablesystem time is of vital importance for the system. Thus, modifying the system time during theserver running is prohibited.
Step 29 In the Confirm Information dialog box, confirm the preceding configurations. Then, pressF2.
Step 30 In the Root Password dialog box, enter the password the root user twice to set the passwordbased on the plan. Then, press F2.
NOTE
You must remember the password of the root user.
Step 31 In the Identify This System dialog box, confirm the configurations. Then, press F2.
Step 32 In the Enabling remote services dialog box, select Yes. Then, press F2.
Step 33 In the Solaris Interactive Installation dialog box, press F2 to select the Standard installation.
Step 34 In the Eject a DVD/DVD Automatically? dialog box, select Automatically eject DVD/DVD to set the automatic installation through the drive. Then, press F2.
Step 35 In the Reboot After Installation? dialog box, select Auto Reboot to set the restart mode toautomatic restart. Then, press F2.
Step 36 In the Solaris Interactive Installation dialog box, press F4 to start initial installation.
Step 37 In the License dialog box, press F2 to accept the license agreement.
Step 38 In the Select Geographic Regions dialog box, press Enter to expand the Asia list. SelectSimplified Chinese EUC, Simplified Chinese GB18030, Simplified Chinese GBK, andSimplified Chinese UTF-8. Expand the North America list. Select U.S.A.(UTF-8) and U.S.A.(en_US.ISO8859-1). Then, press F2.
NOTE
The selections in this step determine the languages supported by the Solaris OS to be installed. Use ↑ and↓ to move the cursor to the selected list. Then, press Enter. The subitems are displayed. Use ↑ and ↓,or ← and → to move the cursor to the required bracket. Press Enter. If X is displayed in the bracket, itindicates that the language is selected.
Step 39 In the Select System Locale dialog box, select English(en_US)(United. States). Then, pressF2.
Step 40 In the Additional Products dialog box, select None. Then, press F2.
Step 41 In the Choose Filesystem Type dialog box, select UFS. Then, press F2.
Step 42 In the Select Software dialog box, select Entire Distribution plus OEM support. Then, pressF2.
Step 43 In the Select Disks dialog box, select the disks to be partitioned.
OptiX iManager T2000Software Installation Guide (Solaris) - Centralized System D Manually Installing and Configuring the Solaris OS
Issue 03 (2010-06-10) Huawei Proprietary and ConfidentialCopyright © Huawei Technologies Co., Ltd.
D-11

CAUTIONSelect the disks to be partitioned according to your disk planning. For example, if you want topartition the c1t0d0 and c1t1d0 disks, you must select both the two disks at this step. Otherwise,the unselected disks are not partitioned. Note that this step cannot be rolled back. Therefore, thedisks to be partitioned must be selected correctly. For details about disk partition, see 2.4.1 DiskPartition Planning.
Press F2.
Step 44 In the Preserve Data? dialog box, press F2. The data on the disk is not preserved.
Step 45 In the Automatically Layout File Systems? dialog box, press F4 to manually partition disksand plan the file system.
Step 46 In the File System and Disk Layout dialog box, press F4 to manually define disk partitions.NOTE
l The sector names shown as 0, 1, 3, 4, 5, 6, and 7 respectively see c1t0d0s0, c1t0d0s1, c1t0d0s3,c1t0d0s4, c1t0d0s5, c1t0d0s6, and c1t0d0s7. The size of the overlap partition corresponding to thec1t0d0s2 disk is that of the entire disk. Thus, you do not need to set the size.
l The disk names vary according to the device model.
Step 47 In the Select Disk to Customize dialog box, select the required disk and partition it.1. Select the first disk. Move the cursor to the line of the c1t0d0 disk. Then, press F4. The
Customize Disk: c1t0d0 dialog boxt is displayed.2. Define the partition, and then press F2. The Select Disk to Customize dialog box is
displayed.3. Select other disks. For details, see the preceding steps for disk partitioning.
Step 48 In the File System and Disk Layout dialog box, confirm the disk partition planning. Then, pressF2.
Step 49 In the Mount Remote File Systems? dialog box, press F2 without installing the distributed filesystem.
Step 50 In the Profile dialog box, confirm the preceding configurations. Then, press F2.NOTE
If the Solaris OS has been installed on the server and the currently planned boot partition is not on the diskof the original boot partition, a warning is displayed, prompting that the default boot device changes. PressF2 to ignore the warning.
Step 51 In the Warning dialog box, press F2 to start installation. The duration of the installation processvaries with the server configuration, usually 60 minutes.
NOTE
During system installation, a progress bar is displayed, which indicates the installation progress.
When the following information is displayed, enter c to continue the installation:
Pausing for 30 seconds at the "Summary" screen. The wizard will continue to the next step unless you select "Pause". Enter 'p' to pause. Enter 'c' to continue.
If no operation is performed, the OS automatically continues the installation in 30 seconds.
When the following information is displayed, enter c:
D Manually Installing and Configuring the Solaris OSOptiX iManager T2000
Software Installation Guide (Solaris) - Centralized System
D-12 Huawei Proprietary and ConfidentialCopyright © Huawei Technologies Co., Ltd.
Issue 03 (2010-06-10)
Pausing for 90 seconds at the "Reboot" screen. The wizard will continue to the next step unless you select "Pause". Enter 'p' to pause. Enter 'c' to continue.
The system restarts automatically.
If no operation is performed, the OS automatically restarts in 90 seconds.
CAUTIONAfter the installation, the disk is automatically ejected. Take out the disk.
Step 52 In the Configure Keyboard Layout dialog box that is displayed after system restart, select US-English. Then, press F2 to complete all configurations and access the Solaris OS.The Solaris 10 OS is installed.
NOTEBy default, the login password is root.
----End
PostrequisiteEnable the root user to remotely log in to the system and use the FTP tool after the Solaris OSis installed.
1. Enable remote login for the root user.
(1) Run the vi command to modify the /etc/default/login file.# vi /etc/default/login
(2) Add # before CONSOLE=/dev/console to comment out this line. The followinginformation is displayed:……# If CONSOLE is set, root can only login on that device.# Comment this line out to allow remote login by root.## CONSOLE=/dev/console...
(3) Press ESC. Press Shift+;. Enter wq!. Then, press Enter to forcibly save the file andexit.
2. Enable the root user to use the FTP tool.
(1) Run the vi command to modify the /etc/ftpd/ftpusers file.(2) Add # before CONSOLE=/dev/console to comment out this line. The following
information is displayed:# ident "@(#)ftpusers 1.5 04/02/20 SMI"## List of users denied access to the FTP server, see ftpusers(4)##root daemon bin sys...
(3) Press ESC. Press Shift+;. Enter wq!. Then, press Enter to forcibly save the file andexit.
3. Run the following commands to restart the server:
OptiX iManager T2000Software Installation Guide (Solaris) - Centralized System D Manually Installing and Configuring the Solaris OS
Issue 03 (2010-06-10) Huawei Proprietary and ConfidentialCopyright © Huawei Technologies Co., Ltd.
D-13

# sync;sync;sync;sync;sync;sync# shutdown -y -g0 -i6
D.2 Preconfiguration for InstallationThe preconfiguration tasks for installation include the installation of the HWICMR softwarepackage, the installation of Solaris 10 patches, and relevant configurations.
PrerequisiteThe system enables the root user to perform remote login and use the FTP tool.
Procedure
Step 1 Insert the T2000 for Solaris installation DVD-ROM #1 (System patches DVD-ROM) or preparethe installation package (T2000version_en_solaris_SPARC_dvd1.tar) .
NOTE
If the installation software package needs to be transferred by FTP, transfer the software package to the /export directory in the bin mode. For details on how to transfer files by FTP, see 6.1.8 How to UploadFiles by Using the FTP.
Step 2 Run the following command in the terminal window to switch to the installation directory:# cd /cdrom/cdrom0
NOTE
In the case of the installation from the hard disk, run the following commands to clear the installationdirectory and decompress the software installation package to the directory, and then to switch to thecorresponding directory:# rm -rf /export/disk1# cd /export# tar xvf T2000version_en_solaris_SPARC_dvd1.tar# cd disk1
Step 3 Run the following command to check whether the environment variable is correctly set:# echo $LANG
The terminal displays:
C
NOTEIf the screen output is as above, it indicates that the environment variable is correct. Otherwise, run thefollowing command to set the environment variable:# LANG=C; export LANG
Step 4 Run the following command to configure the operating system:# ./pre_install.sh
The terminal displays:
Installing the HWICMR software.........The HWICMR software has been installed successfully.Installing the agent for HWICMR software.........The HWICMR agent has been installed successfully.Installing the HWICMR configuration file...Generating public/private rsa key pair.Enter file in which to save the key (//.ssh/id_rsa): Created directory '//.ssh'.Enter passphrase (empty for no passphrase):
D Manually Installing and Configuring the Solaris OSOptiX iManager T2000
Software Installation Guide (Solaris) - Centralized System
D-14 Huawei Proprietary and ConfidentialCopyright © Huawei Technologies Co., Ltd.
Issue 03 (2010-06-10)

CAUTIONThe SSH password must be null.
Step 5 Press Enter to proceed.
The terminal displays:
Enter same passphrase again:
Step 6 Press Enter to proceed.
The terminal displays:
NOTEThe value of the key fingerprint is displayed according to the actual situation.
Your identification has been saved in //.ssh/id_rsa.Your public key has been saved in //.ssh/id_rsa.pub.The key fingerprint is:9e:56:22:85:21:92:14:56:6a:a5:8c:48:db:a0:fd:9e root@MasterserverInsert authorized_keys...Pseudo-terminal will not be allocated because stdin is not a terminal.The authenticity of host 'localhost (127.0.0.1)' can't be established.RSA key fingerprint is ae:be:89:98:75:ca:24:78:65:d1:de:d9:6a:79:4a:c5.Are you sure you want to continue connecting (yes/no)?
Step 7 Enter yes and press Enter to proceed.Warning: Permanently added 'localhost' (RSA) to the list of known hosts.Sun Microsystems Inc. SunOS 5.10 Generic January 2005Sourcing //.profile-EIS.....Pseudo-terminal will not be allocated because stdin is not a terminal.The authenticity of host '127.0.0.1 (127.0.0.1)' can't be established.RSA key fingerprint is ae:be:89:98:75:ca:24:78:65:d1:de:d9:6a:79:4a:c5.Are you sure you want to continue connecting (yes/no)?
Step 8 Enter yes and press Enter to proceed.Warning: Permanently added '127.0.0.1' (RSA) to the list of known hosts.Sun Microsystems Inc. SunOS 5.10 Generic January 2005Sourcing //.profile-EIS.....Pseudo-terminal will not be allocated because stdin is not a terminal.The authenticity of host '129.9.1.1 (129.9.1.1)' can't be established.RSA key fingerprint is ae:be:89:98:75:ca:24:78:65:d1:de:d9:6a:79:4a:c5.Are you sure you want to continue connecting (yes/no)?
NOTEThe system output considers the host IP address of 129.9.1.1 as an example. This IP address varies with theactual IP address.
Step 9 Enter yes and press Enter to proceed.Warning: Permanently added '129.9.1.1' (RSA) to the list of known hosts.Sun Microsystems Inc. SunOS 5.10 Generic January 2005Sourcing //.profile-EIS.....The HWICMR configuration file has been installed successfully.......Installing the Solaris 10 recommended patches.........The Solaris 10 recommended patches has been installed.......The configuration of system has been modified, so the system must be reboot.Please press ENTER to reboot the system.
OptiX iManager T2000Software Installation Guide (Solaris) - Centralized System D Manually Installing and Configuring the Solaris OS
Issue 03 (2010-06-10) Huawei Proprietary and ConfidentialCopyright © Huawei Technologies Co., Ltd.
D-15

NOTE
l The time for installing the patch depends on the hardware configuration of the server. It takesapproximately 90 to 120 minutes to complete the installation. Therefore, wait patiently.
l If the on-screen output shows that some patches are unsuccessfully installed, ignore this because thisis normal.
Step 10 Press Enter to restart the system.
Step 11 Log in to the system as user root.
Step 12 Optional: If version of the installed operating system is earlier than DVD for Solaris 10 Software(10/08 SPARC Platform Edition) (DVD for Solaris 10 Software (10/08 SPARC PlatformEdition) is excluded), run the following commands to run the patch installation program again:# rm /var/ICMR/HUAWEI_PATCHES_9-0-0_INSTALLED_FLAG# cd /cdrom/cdrom0# ./install_patches.sh
NOTE
l Run the following commands to view the version of the operating system:# more /etc/release
l In the case of the installation from the hard disk, run the following commands to decompress thesoftware installation package and enter the corresponding directory:# cd /export# tar xvf T2000version_en_solaris_SPARC_dvd1.tar# cd disk1# ./install_patches.sh
----End
D.3 Checking Whether the OS Is Corretly Installed andConfigured
This topic describes how to check the patch version, time zone setting, time setting, disk partition,login right of the root user, and right to enabling FTP services.
Procedure
Step 1 Log in the OS as user root.
Step 2 Run the uname -rv command to view the patch version of the OS.# uname -rv
Information similar to 5.10 Generic_138888-07 is displayed. Here, 5.10 Generic_138888-07indicates the patch version of the Solaris 10(10/08) OS.
If the patch version is 5.10 Generic_138888-07, it indicates that the patch is successfullyinstalled.
Step 3 Run the echo $TZ command to check the current time zone of the OS.# echo $TZ
Take China as an example. The following information is displayed:
PRC
Step 4 Run the date command to check the current time of the OS.# date
D Manually Installing and Configuring the Solaris OSOptiX iManager T2000
Software Installation Guide (Solaris) - Centralized System
D-16 Huawei Proprietary and ConfidentialCopyright © Huawei Technologies Co., Ltd.
Issue 03 (2010-06-10)

The terminal displays:
Wed Sep 26 15:30:00 CST
Step 5 Run the format command to check the disk partitioning of the system.1. # format
The partitioned disks and the corresponding serial numbers are displayed.2. Enter the number of the disk to be checked, such as 0. Then, press Enter to display the
formatting menu.3. Enter the partition command, and then press Enter. The partition menu is displayed.4. Enter the print command, and then press Enter. The disk partitioning is displayed.
According to the displayed disk partitioning information, check whether the current diskpartitioning of the system is consistent with the disk partition planning.
5. Enter quit, and then press Enter to exit from the partition menu.6. Enter quit, and then press Enter to exit from the formattin menu.
Step 6 Run the cat command. Ensure that the system allows the remote login of the root user.# cat /etc/default/login
The # to the left of CONSOLE=/dev/console indicates that the root user can remotely log into the system.
Step 7 Run the cat command. Ensure that the system allows the root user to use the FTP tool.# cat /etc/ftpd/ftpusers
The # symbol to the left of root indicates that the system allows the root user to use the FTPtool.
----End
OptiX iManager T2000Software Installation Guide (Solaris) - Centralized System D Manually Installing and Configuring the Solaris OS
Issue 03 (2010-06-10) Huawei Proprietary and ConfidentialCopyright © Huawei Technologies Co., Ltd.
D-17

H Solaris Common Commands
This describes the utility commands provided by the Solaris system, including the commandsfor operating directories, the commands for operating folders, the commands for viewing files,the commands for managing Solaris users, the commands for managing the system resource,and the commands for network communication.
NOTE
l Solaris is case sensitive. For example, the File1 and file1 files are allowed in the same directory. Thecommon Solaris commands should be of the correct cases. In this chapter, all the mentioned commandsare of the lower case, unless otherwise specified.
l "#", "%", and "$" before Solaris commands are prompts of terminal windows. These prompts arespecific to the user terminal windows. The prompt is "#", for user root, and "%", for user t2000, and"$" for user sybase. Make sure that the common Solaris commands you are using correspond to theusers correctly. In this chapter, all the mentioned commands can be run by all users, unless otherwisespecified.
Table H-1 Commands for Operating Solaris Folders
Command Function
pwd Displays the current working directory.
cd Switches to another directory.
mkdir Creates a directory.
rmdir Deletes a directory.
ls Lists the directory contents or the file information.
Table H-2 Commands for Operating Solaris Files
Command Function
cp Copies a file.
mv Moves a file.
rm Deletes a file.
OptiX iManager T2000Software Installation Guide (Solaris) - Centralized System H Solaris Common Commands
Issue 03 (2010-06-10) Huawei Proprietary and ConfidentialCopyright © Huawei Technologies Co., Ltd.
H-1

Command Function
chmod Modifies the authority of a file.
chown Modifies the owner of a file.
chgrp Modifies the group of a file.
find Searches for files.
tar backup a file.
compress/pack/gzip/ Compresses a file.
uncompress/unpack/gunzip/ Uncompresses a file.
pkgadd Sends file package to system.
pkgrm Removes file package from system.
Table H-3 Commands for Viewing Solaris Text Files
Command Function
echo Sends a character string to the screen.
cat Displays the content of the file.
more Displays a file, one screen at a time.
head Displays the beginning of the file.
tail Displays the end of the file.
clear Clears the screen.
grep Searches for special character strings.
vi creates and modifies text files.
Table H-4 Commands for Managing Solaris Users
Command Function
useradd Adds a user.
userdel Deletes a user.
usermod Modifies the user login information.
passwd Modifies user password.
groupadd Adds a user group.
groupdel Deletes a user group.
H Solaris Common CommandsOptiX iManager T2000
Software Installation Guide (Solaris) - Centralized System
H-2 Huawei Proprietary and ConfidentialCopyright © Huawei Technologies Co., Ltd.
Issue 03 (2010-06-10)
Command Function
groupmod Modifies the user group information.
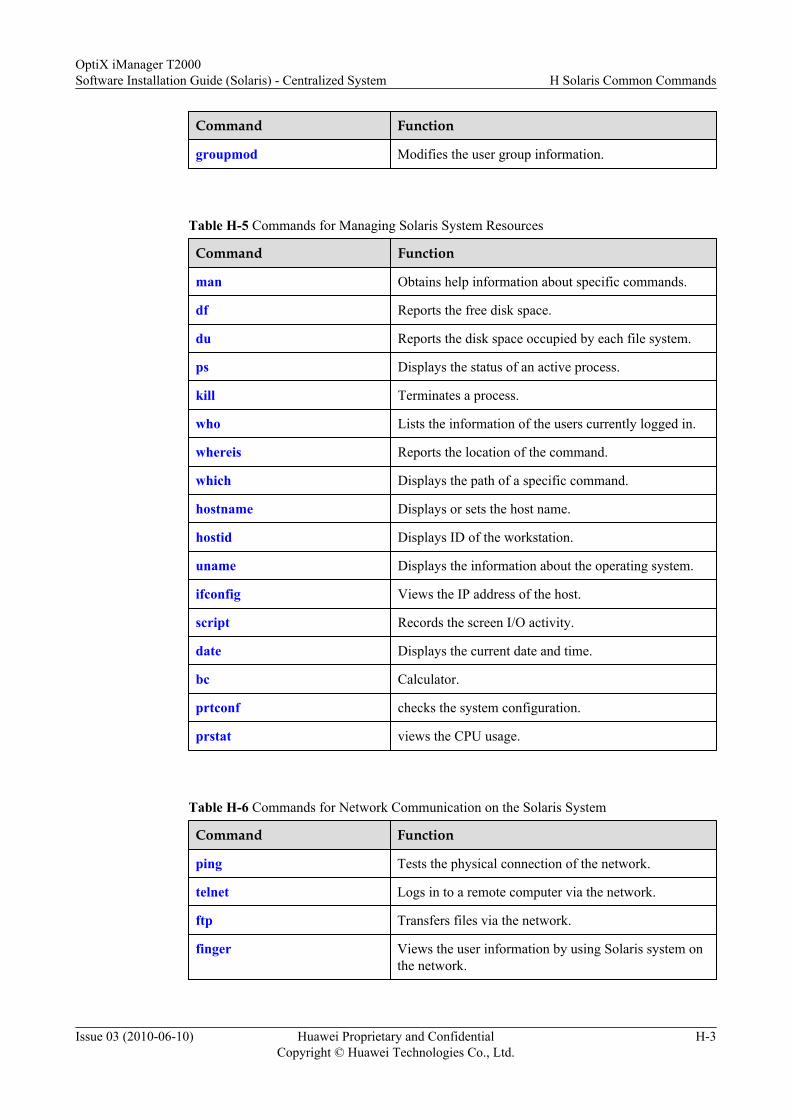
Table H-5 Commands for Managing Solaris System Resources
Command Function
man Obtains help information about specific commands.
df Reports the free disk space.
du Reports the disk space occupied by each file system.
ps Displays the status of an active process.
kill Terminates a process.
who Lists the information of the users currently logged in.
whereis Reports the location of the command.
which Displays the path of a specific command.
hostname Displays or sets the host name.
hostid Displays ID of the workstation.
uname Displays the information about the operating system.
ifconfig Views the IP address of the host.
script Records the screen I/O activity.
date Displays the current date and time.
bc Calculator.
prtconf checks the system configuration.
prstat views the CPU usage.
Table H-6 Commands for Network Communication on the Solaris System
Command Function
ping Tests the physical connection of the network.
telnet Logs in to a remote computer via the network.
ftp Transfers files via the network.
finger Views the user information by using Solaris system onthe network.
OptiX iManager T2000Software Installation Guide (Solaris) - Centralized System H Solaris Common Commands
Issue 03 (2010-06-10) Huawei Proprietary and ConfidentialCopyright © Huawei Technologies Co., Ltd.
H-3
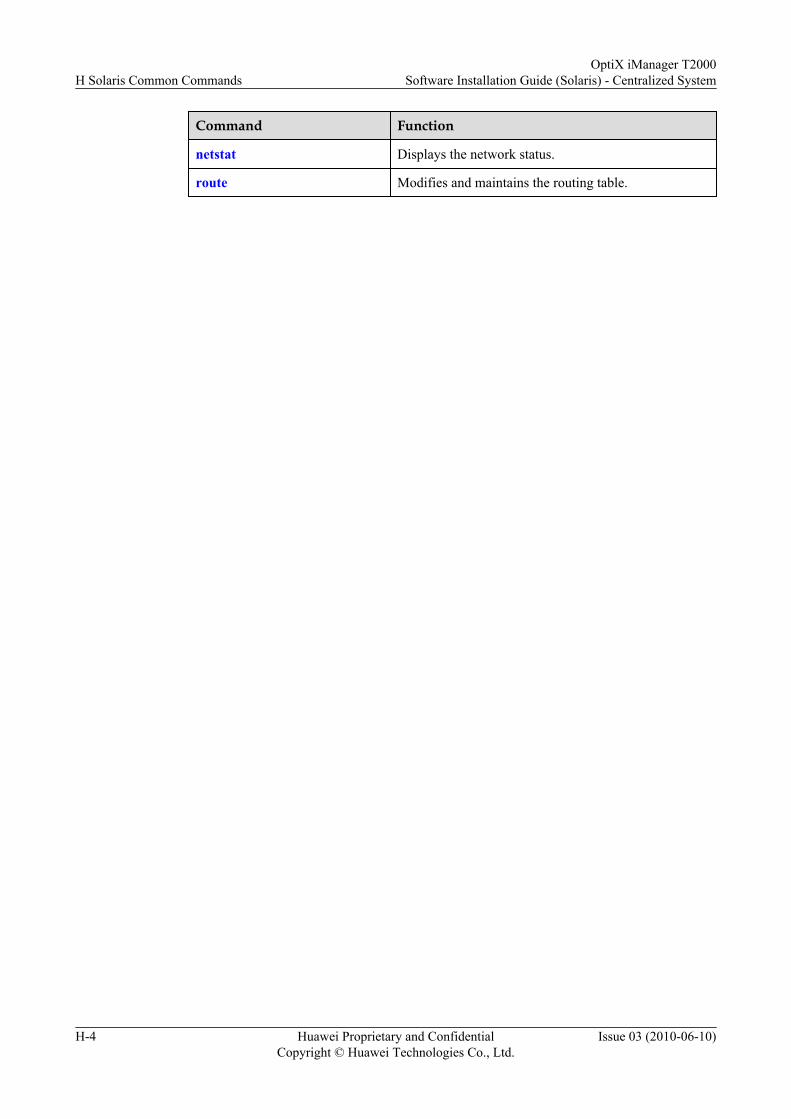
Command Function
netstat Displays the network status.
route Modifies and maintains the routing table.
H Solaris Common CommandsOptiX iManager T2000
Software Installation Guide (Solaris) - Centralized System
H-4 Huawei Proprietary and ConfidentialCopyright © Huawei Technologies Co., Ltd.
Issue 03 (2010-06-10)

H.1 Commands for Operating Solaris FoldersThis describes the commands for operating Solaris folders. This also gives function descriptionsand examples.
H.1.1 pwd CommandThis topic describes the pwd command used for viewing the current working folder.
H.1.2 cd CommandThis topic describes the cd command used for switching the current folder to another folder.
H.1.3 mkdir CommandThis topic describes the mkdir command used for creating a folder.
H.1.4 rmdir CommandThis topic describes the rmdir command used for deleting an empty folder that is no longeruseful.
H.1.5 ls CommandThis topic describes the ls command used for listing the files and subfolders in a specific folder.
H.1.1 pwd CommandThis topic describes the pwd command used for viewing the current working folder.
FunctionView the current working folder.
Example# pwd
/export/home
H.1.2 cd CommandThis topic describes the cd command used for switching the current folder to another folder.
FunctionThe cd command is used to switch the current folder to another folder. This command appliesto both absolute and relative paths.
Examplel To switch to the home folder, run the following command:
# cd
l To switch to the system root directory, run the following command:
# cd /
OptiX iManager T2000Software Installation Guide (Solaris) - Centralized System H Solaris Common Commands
Issue 03 (2010-06-10) Huawei Proprietary and ConfidentialCopyright © Huawei Technologies Co., Ltd.
H-5

l To switch back one folder, run the following command:
# cd ..
l To switch back two folders, run the following command:
# cd ../..
l To switch to the /export/home folder by the absolute path, run the following command:
# cd /export/home
NOTE
If you run the cd command that is not followed by any parameter, the system is switched back to the homefolder.
H.1.3 mkdir CommandThis topic describes the mkdir command used for creating a folder.
FunctionThe mkdir command is used to create a folder. When the path to the created folder is determined,absolute and relative paths can be used.
ExampleTo create a subfolder data in /home1/omc, run the following command:
# mkdir /home1/omc/data
If the current folder is /home1/omc, run the following command:
# mkdir data
H.1.4 rmdir CommandThis topic describes the rmdir command used for deleting an empty folder that is no longeruseful.
FunctionThe rmdir command is used to delete an empty folder.
CAUTIONl If the folder to be deleted is not empty, you must delete the files in the folder before running
the rmdir command.Refer ro rm command.l To delete the current folder, you must switch to the upper-level folder.
ExampleTo delete the data subfolder in the /home1/omc folder, run the following command:
H Solaris Common CommandsOptiX iManager T2000
Software Installation Guide (Solaris) - Centralized System
H-6 Huawei Proprietary and ConfidentialCopyright © Huawei Technologies Co., Ltd.
Issue 03 (2010-06-10)

# rmdir /home1/omc/data
If the current folder is /home1/omc, run the following command:
# rmdir data
H.1.5 ls CommandThis topic describes the ls command used for listing the files and subfolders in a specific folder.
FunctionThe ls command is used to list the files and subfolders in a folder. Run the ls command withoutany parameter to list the content of the current folder. Run the ls command with parameters tolist the information about the size, type, and privileges of the file, and the date when the file wascreated and modified.
Command Formatls Option Directory or File
Option DescriptionSeveral individual options and a combination of options can be used for the ls command. Placethe prefix "-" before the options. Table H-7 lists some common options.
Table H-7 Option description of the ls command
Option Description
-a Lists all files including the hidden files, that is, the files starting with adot ., for example, the .login file.
-F Specifies the type of a file by suffix signs.The meaning of the suffixes are as follows:l /: for folder files
l =: for pipe files
l @: for sign-linking files
l *: for executable files
-l Lists the detailed information about a file, such as the file type, privileges,number of links, owner, file group, file size, file name, and the date of the lastmodification.
If the file is a sign-linking file, then the -> sign is added at the end of the file name for pointingto the linked file.
ExampleTo view the long-form content of the files in the current folder, run the following command:
OptiX iManager T2000Software Installation Guide (Solaris) - Centralized System H Solaris Common Commands
Issue 03 (2010-06-10) Huawei Proprietary and ConfidentialCopyright © Huawei Technologies Co., Ltd.
H-7

# ls -l |more
total 11094632drwxr-xr-x 2 sybase staff 1024 Sep 5 2001 bindrwxr-xr-x 14 sybase staff 512 Sep 5 2001 charsetsdrwxr-xr-x 3 sybase staff 512 Sep 5 2001 collatedrwxr-xr-x 2 sybase staff 512 Sep 5 2001 config-rw-r--r-- 1 sybase staff 2048000000 Mar 6 09:50 data_dev.datdrwxr-xr-x 2 sybase staff 512 Sep 5 2001 devlibdrwxr-xr-x 7 sybase staff 512 Sep 5 2001 diagdrwxr-xr-x 2 sybase staff 512 Sep 5 2001 hs_datadrwxr-xr-x 2 sybase staff 512 Sep 5 2001 includedrwxr-xr-x 7 sybase staff 512 Sep 5 2001 initdrwxr-xr-x 3 sybase staff 512 Sep 5 2001 install-rw-r--r-- 1 sybase staff 268 Sep 5 2001 interf.old-rw-r--r-- 1 sybase staff 402 Oct 29 15:25 interfacesdrwxr-xr-x 2 sybase staff 1024 Sep 5 2001 libdrwxr-xr-x 2 sybase staff 512 Sep 5 2001 licensedrwxr-xr-x 6 sybase staff 512 Sep 5 2001 locales-rw-r--r-- 1 sybase staff 2048000000 Mar 6 10:51 log_dev.dat-rw-r--r-- 1 sybase staff 2048000000 Mar 6 10:36 log_dev1.datdrwxr-xr-x 5 sybase staff 512 Sep 5 2001 pad-rw-r--r-- 1 sybase staff 5242880 Feb 19 10:10 phase2.datdrwxr-xr-x 8 sybase staff 512 Sep 5 2001 sample--More--
After you run the ls -l command, the result may be displayed in several screens. To view the filecontents, one screen at a time, run one of the following commands:
l # ls -la | morel $ ls -la>ccc
Save the command output to the ccc file, and then run the following command to view theoutput on screen at a time:# more ccc
After you run the ls -l command, seven columns of information are displayed, which aredescribed as follows:
l The first column consists of 10 characters. The first character indicates the file type. Forexample, the character - refers to a common file and the character d refers to a folder. Thefollowing nine characters are three triplets indicating the access privileges of the file owner.The first triplet pertains to the owner, the middle triplet pertains to members of the usergroup, and the right-most one pertains to other users in the system. For example, thecharacters r, w, and x indicate that the user has the privileges to read, write, and execute afile, whereas the character - indicates that the user does not have any relevant privilegesfor the file.
l The second column indicates the number of links of the file.l The third and fourth columns display information such as the owner of the file, and the user
group to which the file belongs.l The fifth column shows the size of the file in bytes.l The sixth column shows the time and date when the file is last modified.l The seventh column shows the file name.
H.2 Commands for Operating Solaris FilesThis describes the usage of the operation commands commonly used for files in the Solarisoperating system, including function description and application examples.
H Solaris Common CommandsOptiX iManager T2000
Software Installation Guide (Solaris) - Centralized System
H-8 Huawei Proprietary and ConfidentialCopyright © Huawei Technologies Co., Ltd.
Issue 03 (2010-06-10)

H.2.1 cp CommandThis topic describes the cp command used for copy the contents of a file to another file.
H.2.2 mv CommandThis topic describes the mv command used for moving and renaming a file.
H.2.3 rm CommandThis topic describes the rm command used for deleting a specific file.
H.2.4 chmod CommandThis topic describes the chmod command used for changing the access rights of a directory ora file.
H.2.5 chown CommandThis topic describes the chown command used for changing the owner of a file.
H.2.6 chgrp CommandThis topic describes the chgrp command used for moveing all files from the user group to whichyou belong to another user group.
H.2.7 find CommandThis topic describes the find command used for searching for a file that meets the presetconditions in the specified folders and subfolders.
H.2.8 tar CommandThis topic describes the tar command used for combining several files into one archive and saveit to a tape or disk.
H.2.9 compress CommandThis topic describes the compress command used for compressing files.
H.2.10 uncompress CommandThis topic describes the uncompress command used for decompressing files.
H.2.11 pack CommandThis topic describes the pack command used for compressing files and saving memory space.
H.2.12 unpack CommandThis topic describes the unpack command used for extracting files.
H.2.13 gzip CommandThis topic describes the gzip command used for compressing files.
H.2.14 gunzip CommandThis topic describes the gunzip command used for decompressing files.
H.2.15 pkgadd CommandThis topic describes the pkgadd command used for sending a file package to the system forexecution.
H.2.16 pkgrm CommandThis topic describes the pkgrm command used for removing a package from the system.
H.2.1 cp CommandThis topic describes the cp command used for copy the contents of a file to another file.
OptiX iManager T2000Software Installation Guide (Solaris) - Centralized System H Solaris Common Commands
Issue 03 (2010-06-10) Huawei Proprietary and ConfidentialCopyright © Huawei Technologies Co., Ltd.
H-9

Function
The cp command is used to copy the contents of a file to another file.
Command Format
cp option source file object file
Option Description
The option -r indicates recursively copying a folder. That is, when copying a folder, copy thefiles and subfolders included in the folder, and files and subfolders in the subfolders until thelast level of the folder.
Example
To copy the old_filename file in the current folder to the file new_filename, run the followingcommand:
# cp old_filename new_filename
H.2.2 mv CommandThis topic describes the mv command used for moving and renaming a file.
Function
The mv command is used to move and rename a file.
CAUTIONl After you run the mv command, only the target file instead of the source file exists.
l After you run the cp command, the source file still exists and the target file is generated.
Command Format
mv source file object file
Example
To move the old_filename file in the root directory to the /home1/omc folder, and rename thesource file to new_filename, run the following command:
# mv old_filename /home1/omc/new_filename
H.2.3 rm CommandThis topic describes the rm command used for deleting a specific file.
H Solaris Common CommandsOptiX iManager T2000
Software Installation Guide (Solaris) - Centralized System
H-10 Huawei Proprietary and ConfidentialCopyright © Huawei Technologies Co., Ltd.
Issue 03 (2010-06-10)

Function
The rm command is used to delete a file.
CAUTIONl In the Solaris system, a file, once deleted, cannot be restored. Therefore, use the -i option
to avoid the deletion of a file by mistake.
l To delete a folder, run either of the following commands: rmdir or rm -r. The differencebetween the two commands is: rmdir deletes only empty folders but rm -r deletes anyfolder.
Command Format
rm Option file
Option Descriptionl -i: refers to interactive operations. Your confirmation is required before a command is run.
l -r: recursively deletes a folder. That is, when deleting a folder, delete the files and subfoldersincluded in the folder, and files and subfolders in the subfolders until the root folder.
Example
To delete the old_filename file in the current folder, run the following command:
# rm -i old_filename
H.2.4 chmod CommandThis topic describes the chmod command used for changing the access rights of a directory ora file.
Function
The chmod command is used to change the access rights of a directory or a file.
Format
chmod option directory or file
Based on different notation methods of the option in the command, two modes are available:
l Symbol mode
chmod objectoperatorrights file
l Digit mode
chmod lmn file
OptiX iManager T2000Software Installation Guide (Solaris) - Centralized System H Solaris Common Commands
Issue 03 (2010-06-10) Huawei Proprietary and ConfidentialCopyright © Huawei Technologies Co., Ltd.
H-11

Option Descriptionl Symbol mode
Table H-8 lists common options in symbol mode of the chmod command.
Table H-8 Common options in symbol mode of the chmod command
Option Option Detail Description
Object u Owner of a file
g Users sharing the same groupwith the file owner
o Other users except the file ownerand the users sharing the samegroup with the file owner
a All users
Operator + Add a right
- Cancel a right
= Set a right
l Digit mode
The option lmn represents the following digits:– l: the rights of the owner
– m: the rights of the users sharing the same group with the owner
– n: the rights of other users in the system
The value of each digit is equal to the sum of the values of r (read right), w (write right),x (execute right), or - (no right) in each group. In each group, r = 4, w = 2, x = 1, and - =0. In the following example -rwxr-xr-x 1 t2000 nms 1086964 2008 Aug 14mdp, the access rights of the file mdp is represented by the symbols rwxr-xr--. Thenine symbols are divided into three groups, with three symbols as a group. The three groupsrepresent the rights of the file owner, the rights of the users sharing the same group withthe file owner, and the rights of other users in the system. The three groups can berepresented in digits 755, which is calculated according to the formulas: 7 = 4 + 2 + 1, 5 =4 + 0 + 1, and 5 = 4 + 0 + 1.
Parameter DescriptionFile: indicates the name of the file whose rights are changed.
Examplel Symbol mode
Authorize the file1 owner with the read, write, and execute rights. Authorize the userssharing the same group with the file owner with the read and execute rights. Authorizeother users with the read and execute rights. Run the following command:# chmod u=rwx,go=rx file1
H Solaris Common CommandsOptiX iManager T2000
Software Installation Guide (Solaris) - Centralized System
H-12 Huawei Proprietary and ConfidentialCopyright © Huawei Technologies Co., Ltd.
Issue 03 (2010-06-10)

To authorize all the users with the read and write rights, run the following command:
# chmod a=rw file2
l Digit mode
Authorize the file1 owner with the read, write, and execute rights. Authorize the userssharing the same group with the file owner with the read and execute rights. Authorizeother users with the read and execute rights. Run the following command:
# chmod 755 file1
To authorize all the users with the read and write rights, run the following command:
# chmod 666 file2
NOTE
l To configure the rights of a file for users in a group and other users in the system in symbol mode,you must authorize these users with the execute right of the directory where a file exists. Run thefollowing command for the directory that requires you to set rights:
# chmod u=rw,+x .
You can also run the following command:
# chmodu=rwx,go=x .
In this command, the symbol "." indicates the current directory.
l In digit mode, r = 4, w = 2, x = 1, and - = 0. These mappings are set according to the binary mode.For the three symbols in a group, which represent the read right, the write right, and the execute right,assign the binary value 1 if a symbol has the corresponding right and assign the binary value 0 if asymbol does not have the corresponding rights. Take the previous file sdh as an example. The filerights are represented by the symbols rwxr-xr--. After converting the symbols into a binary value,you can obtain "111101100". The binary value is divided into three 3-digit groups, with each grouprepresenting a file right. After converting the binary value of each group into a decimal value, youcan obtain three values: 7, 5, and 4.
H.2.5 chown CommandThis topic describes the chown command used for changing the owner of a file.
Function
The chown command is used to modify the owner of a file. In Solaris system, this commandcan be run only by the super user.
Command Format
chown Option owner file
Option Descriptionl -f: runs the command forcibly without displaying errors
l -R: recursive folder
Parameter Descriptionl Owner: the modified owner
l File: the file of the owner to be modified
OptiX iManager T2000Software Installation Guide (Solaris) - Centralized System H Solaris Common Commands
Issue 03 (2010-06-10) Huawei Proprietary and ConfidentialCopyright © Huawei Technologies Co., Ltd.
H-13

Examplel Assume that there is a user new_owner and a file in the system. Run the following command
to change the owner of the file to new_owner:# chown new_owner file
l Assume that there is a user test in the system. Change the owner of all files in the /export/home folder and and the subfolders to test:# chown -R test /export/home
H.2.6 chgrp CommandThis topic describes the chgrp command used for moveing all files from the user group to whichyou belong to another user group.
FunctionThe chgrp command is used to move all files from the user group to which you belong, to anotheruser group. That is, you belong to at least two user groups at the same time.
Command Formatchgrp Option group file
Option Descriptionl -f: runs the command forcibly without displaying errors
l -R: recursive folder
Parameter Descriptionl Group: the modified user group
l File: the file the user group of which is to be modified
ExampleTo change the user group file to new_group, run the following command:
# chgrp new_group file
CAUTIONThe new user group to which a file is moved should be created. Run the groups command tolist the groups to which you belong. For details on how to create a user group, see H.4Commands for Managing Solaris Users.After the owner or group of a folder is changed, the folder does not belong to that user or usergroup any more. The attributes of the subfolders and files in the folder, however, are retained.Run the chown command to modify the owner and the user group of a file at the same time:# chown omc:staff file1For example, run the command to modify the owner of file1 to omc and the group to staff.
H Solaris Common CommandsOptiX iManager T2000
Software Installation Guide (Solaris) - Centralized System
H-14 Huawei Proprietary and ConfidentialCopyright © Huawei Technologies Co., Ltd.
Issue 03 (2010-06-10)

H.2.7 find CommandThis topic describes the find command used for searching for a file that meets the presetconditions in the specified folders and subfolders.
Function
The find command is used to search for a file that meets the preset conditions in the specifiedfolders and subfolders. By using this command, you can find the file even if you forget the correctpath of the file.
Command Format
find folder condition
Parameter Descriptionl Folder: indicates the folder to be searched. You can enter multiple folder names. Separate
the folder names by using spaces.l Condition: indicates the conditions for file search, such as the file name, owner, and time
of the last modification.
Table H-9 describes the conditions for file search.
Table H-9 Conditions for file search
Condition Description
-name name The name of the file or folder to be searched.Wildcards, such as -name "*.c", can be used.
-print Prints the path that meets the conditions.
-size n Searches for the files that use n blocks.
-type x Searches for files by file type. The file type x includes:l d: directory
l f: file
l b: block
l c: character
l p: pipe
-user user Searches all files of user. The value of user can be auser name or UID.
-group group Searches all files of the user group. The value of groupcan be a user group name or GID.
-links n Searches all files with the number of links as n.
-atime n Searches the files accessed before n days.
-mtime n Searches the files modified before n days.
OptiX iManager T2000Software Installation Guide (Solaris) - Centralized System H Solaris Common Commands
Issue 03 (2010-06-10) Huawei Proprietary and ConfidentialCopyright © Huawei Technologies Co., Ltd.
H-15

Condition Description
-exec command {}\; Uses the found file as the object of the command to berun. Put the parameters to be used in the commandexecution between { and }.
Table H-10 describes the logical operators of conditions.
Table H-10 Logical operators of conditions
LogicalOperator
Meaning
Example Description
! non ! -name "*.c" All the files except those withthe extension name as .c
-o or -size +10 -o -links 3 All the files with more than 10blocks or with 3 links
and -size +10 -links 3 All the files with more than 10blocks and with 3 links
In the preceding table, +10 stands for more than 10 blocks and -10 for fewer than 10 blocks.
ExampleTo search for files in the /tmp folder with the file name starting with c, and then print the paths,run the following command:
# find /tmp -name "c*" -print
/tmp/ctisql_0WBJgt/tmp/ctisql_0dznJ_/tmp/ctisql_0CpW34/tmp/ctisql_0FO4vs
To search the file test in the current folder and then print the paths, run the following command:
# find . -name test -print
./Report/reloc/resin1.2.0/conf/test
./Report/reloc/resin1.2.0/doc/examples/login/WEB-INF/classes/test
./Report/reloc/resin1.2.0/doc/examples/tags/WEB-INF/classes/test
H Solaris Common CommandsOptiX iManager T2000
Software Installation Guide (Solaris) - Centralized System
H-16 Huawei Proprietary and ConfidentialCopyright © Huawei Technologies Co., Ltd.
Issue 03 (2010-06-10)

NOTE
l The search may take several minutes. To save time, you can run this command in the background.That is, the output for the command is exported to a file for later query. End the command line with& so that the system runs the command in the background. For example,
# find / -name "abc*" -print > abc.file &
l After the search is complete, run the following command to view the result of the search:
# cat abc.file
l Different users may have different privileges for the same file. Therefore, ordinary users may findonly some files of the system. To list all the files that meet the set conditions, log in as a super userand search from the root directory.
H.2.8 tar CommandThis topic describes the tar command used for combining several files into one archive and saveit to a tape or disk.
Function
The tar command is used to combine several files into one archive and save it to a tape or disk.When one of the files is required, obtain the file directly from an archive.
Command Format
tar function options modification options file
Option Description
l function options: sets the actions, such as read and write, of the tar command
l modification options: modifies the actions of the tar command
Table H-11 describes the options of the tar command.
Table H-11 Option description for the tar command
Option SpecifiedOption
Description
Function options r Adds the specified file to an archive.
x Reads a file in an archive. If the file name is afolder, this option reads the subfolders includedin the folder. This option is often used.
c Creates an archive. This option is often used.
g Creates a file at the beginning of an archive ratherthan add the file in the last file.
Modificationoptions
v Activates the display mode. The names of all theprocessed files are displayed. This option is oftenused.
OptiX iManager T2000Software Installation Guide (Solaris) - Centralized System H Solaris Common Commands
Issue 03 (2010-06-10) Huawei Proprietary and ConfidentialCopyright © Huawei Technologies Co., Ltd.
H-17

Option SpecifiedOption
Description
w Activates the confirmation mode. Yourconfirmation is required before each file isprocessed.
f Indicates that an archive is a file. If this parameteris skipped, the preset tape or disk is used as theobject. This option is often used.
Examplel Run the tar command to back up files.
To back up all the files and subfolders in the /export/home folder in the current folder tothe default device and view the file information during the backup, run the followingcommand:# tar cv /export/home
In current folder, back up all the files and subfolders in the /export/home folder to thedatabak.tar file, and to view the file information during the backup, run the followingcommand:# tar cvf databak.tar /export/home
l Use tar to restore files.To restore the files in the default device to a hard disk, and to view the file informationduring the restoration, run the following command:# tar xv
In current folder, restore the databak.tar file to the /export/home folder, and to view thefile information during the restoration, run the following command:# tar xvf databak.tar
CAUTIONl Do not enter "-" on the left of the function and modification options in the tar command.
l Run the following tar command to pack several files into a package:# tar cvf filebak.tar file1 file2 file3
l Run the previous command to pack file1, file2, and file3 into a package namedfilebak.tar.
l The names of the disk and tape devices used in file backup and restoration in the tarcommand may vary according to the Solaris system. Check carefully before running thecommand.
H.2.9 compress CommandThis topic describes the compress command used for compressing files.
H Solaris Common CommandsOptiX iManager T2000
Software Installation Guide (Solaris) - Centralized System
H-18 Huawei Proprietary and ConfidentialCopyright © Huawei Technologies Co., Ltd.
Issue 03 (2010-06-10)

Function
The compress command is used to compress files and save the memory space. The name of thecompressed files ends with .Z. The command for decompressing such files is uncompress.
Command Format
compress file
Example
To compress a file, run the following command:
# compress file
CAUTIONThe difference between the tar command and the file compressing commands is as follows:The tar command packs or combines files and packs many folders or files into a package. Tocompress the combined files *.tar, use the compress or pack command.
H.2.10 uncompress CommandThis topic describes the uncompress command used for decompressing files.
Function
The uncompress command is used to decompress the compressed files. The command forcompressing files is compress.
Command Format
uncompress compressed file ending with ".Z"
Example
To decompress the file.Z file, run the following command:
# uncompress file.Z
H.2.11 pack CommandThis topic describes the pack command used for compressing files and saving memory space.
Function
Run the pack command to compress files. The name of the compressed files ends with .z. Thespace achieved through compression depends on file types. To extract files, use the unpackcommand.
OptiX iManager T2000Software Installation Guide (Solaris) - Centralized System H Solaris Common Commands
Issue 03 (2010-06-10) Huawei Proprietary and ConfidentialCopyright © Huawei Technologies Co., Ltd.
H-19

Command Formatpack file
ExampleTo pack a file, run the following command:
# pack file
CAUTIONl Do not run the pack command to compress files of small sizes. To compress such files, use
the pack command with the option -f for forced compression.# pack -f filename
l The difference between the tar command and the file compression commands is as follows:The tar command packs or combines files and packs many folders or files into a package.To compress the combined files *.tar, use the compress or pack command.
H.2.12 unpack CommandThis topic describes the unpack command used for extracting files.
FunctionThe unpack command is used to extract the packed files. To pack files, use the pack command.
Command Formatunpack compressed file ending with ".z"
ExampleTo extract the file.z file, run the following command:
# unpack file.z
H.2.13 gzip CommandThis topic describes the gzip command used for compressing files.
FunctionThe gzip command is used to compress files and save the memory space. The name of thecompressed files ends with .gz. The command for decompressing such files is gunzip.
Command Formatgzip file
H Solaris Common CommandsOptiX iManager T2000
Software Installation Guide (Solaris) - Centralized System
H-20 Huawei Proprietary and ConfidentialCopyright © Huawei Technologies Co., Ltd.
Issue 03 (2010-06-10)

Example
To compress a file, run the following command:
# gzip file
H.2.14 gunzip CommandThis topic describes the gunzip command used for decompressing files.
Function
The gunzip command is used to decompress the compressed files. The command forcompressing files is gzip.
Command Format
gunzip compressed file ending with ".gz"
Example
To decompress the file.gz file, run the following command:
# gunzip file.gz
H.2.15 pkgadd CommandThis topic describes the pkgadd command used for sending a file package to the system forexecution.
Function
The pkgadd command is used to send a file package to the system for execution. To remove apackage from the system, run the pkgrm command.
Command Format
pkgadd option file package name
Option Description
-d device: to install or copy a package from the device. The device can be an absolute path, theidentifier of a tape, or a disk such as /var/tmp or /floppy/floppy_name, or a device name suchas /floppy/floppy0.
Example
To send a file package in the current folder to the file1 file, run the following command:
# pkgadd -d . file1
The dot in the command indicates that the folder is the current folder.
OptiX iManager T2000Software Installation Guide (Solaris) - Centralized System H Solaris Common Commands
Issue 03 (2010-06-10) Huawei Proprietary and ConfidentialCopyright © Huawei Technologies Co., Ltd.
H-21

H.2.16 pkgrm CommandThis topic describes the pkgrm command used for removing a package from the system.
FunctionThe pkgrm command is used to remove a package from the system. To pack and send a packageto the system, use the pkgadd command.
Command Formatpkgrm option file package name
ExampleTo remove the file1 file, run the following command:
# pkgrm file1
H.3 Commands for Viewing Solaris Text FilesThis section describes the commands used for viewing Solaris text files, their functions, alongwith examples.
H.3.1 echo CommandThis topic describes the echo command used for sending a character string to a standard outputdevice such as the monitor screen.
H.3.2 cat CommandThis topic describes the cat command used for viewing the contents of a text file.
H.3.3 more CommandThis topic describes the more command used for displaying the content of a large file in differentpages.
H.3.4 head CommandThis topic describes the function, format, and example of the head command.
H.3.5 tail CommandThis topic describes the tail command used for viewing the last few lines of a text.
H.3.6 clear CommandThis topic describes the clear command used for clearing the contents on the screen.
H.3.7 grep CommandThis topic describes the grep command used for searching for a character string in a text file.
H.3.8 vi CommandThis topic describes the vi command used for creating and modifying text files.
H.3.1 echo CommandThis topic describes the echo command used for sending a character string to a standard outputdevice such as the monitor screen.
H Solaris Common CommandsOptiX iManager T2000
Software Installation Guide (Solaris) - Centralized System
H-22 Huawei Proprietary and ConfidentialCopyright © Huawei Technologies Co., Ltd.
Issue 03 (2010-06-10)

FunctionThe echo command is used to send a character string to a standard output device such as themonitor screen. Normally,check the environment variable by the command.
Command Formatecho character string option
Option DescriptionTable H-12 lists five options that are frequently used.
Table H-12 Option description of the echo command
Option Description
\c The RETURN character is not displayed.
\0n n is an 8-digit ASCII character code.
\t The TAB character is displayed.
\n The RETURN character is displayed.
\v The vertical TAB character is displayed.
Example# echo $TZ
PRCPRC displayed on the screen is the meaning of the character string "$TZ".
NOTE
The options \c, \0n, \t, \n, and \v are displayed in the character string enclosed in quotation marks. Thequotation marks can quote either one option or multiple options.
Normally,check the environment variable by running the command:
%echo $IMAP
/T2000/server/conf
NOTE
On Solaris, You can check the IMAP environment variable only when you log in as user t2000.
H.3.2 cat CommandThis topic describes the cat command used for viewing the contents of a text file.
FunctionThe cat command is used to view the contents of a text file.
OptiX iManager T2000Software Installation Guide (Solaris) - Centralized System H Solaris Common Commands
Issue 03 (2010-06-10) Huawei Proprietary and ConfidentialCopyright © Huawei Technologies Co., Ltd.
H-23
Command Format
cat option file
Option Descriptionl -n: number of each line of the displayed text
l -v: to view nonprinting characters rather than TAB and RETURN
Example
To view the contents of the cat_Table.txt file, run the following command:
# cat cat_Table.txt
Name Owner Object_type ------------------------------ ------------------------------ ---------------------- tbl128Addr cat user table tbl128IP cat user table tbl128Name cat user table tblAdapterIP cat user table tblAdjCell cat user table... ... ...
NOTE
To view several files at the same time, run the following command:
# cat file1 file2 file3
H.3.3 more CommandThis topic describes the more command used for displaying the content of a large file in differentpages.
Function
You can use this command to view a file on screen at a time. You can also use this command tobrowse the previous screens and to search for character strings.
Command Format
more option file
Option Description
Remember to insert the prefix - before the options when multiple options and combination ofoptions are used. Table H-13 lists four options that are frequently used.
H Solaris Common CommandsOptiX iManager T2000
Software Installation Guide (Solaris) - Centralized System
H-24 Huawei Proprietary and ConfidentialCopyright © Huawei Technologies Co., Ltd.
Issue 03 (2010-06-10)
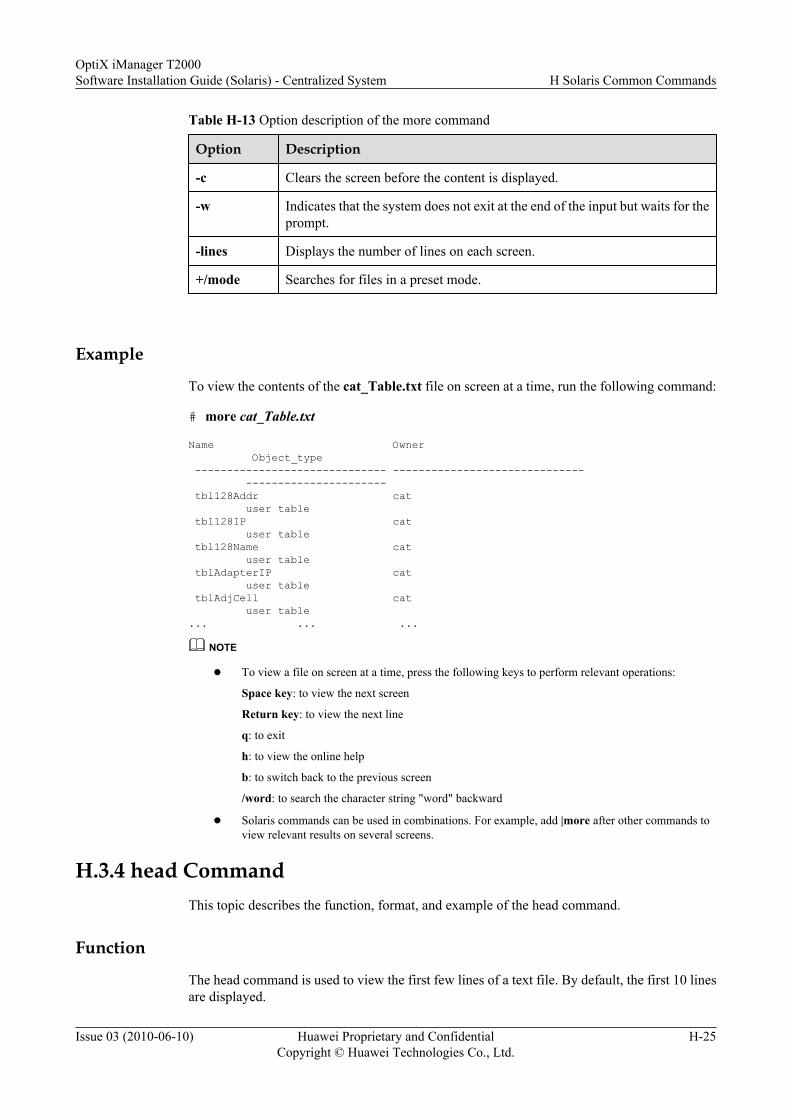
Table H-13 Option description of the more command
Option Description
-c Clears the screen before the content is displayed.
-w Indicates that the system does not exit at the end of the input but waits for theprompt.
-lines Displays the number of lines on each screen.
+/mode Searches for files in a preset mode.
Example
To view the contents of the cat_Table.txt file on screen at a time, run the following command:
# more cat_Table.txt
Name Owner Object_type ------------------------------ ------------------------------ ---------------------- tbl128Addr cat user table tbl128IP cat user table tbl128Name cat user table tblAdapterIP cat user table tblAdjCell cat user table... ... ...
NOTE
l To view a file on screen at a time, press the following keys to perform relevant operations:
Space key: to view the next screen
Return key: to view the next line
q: to exit
h: to view the online help
b: to switch back to the previous screen
/word: to search the character string "word" backward
l Solaris commands can be used in combinations. For example, add |more after other commands toview relevant results on several screens.
H.3.4 head CommandThis topic describes the function, format, and example of the head command.
Function
The head command is used to view the first few lines of a text file. By default, the first 10 linesare displayed.
OptiX iManager T2000Software Installation Guide (Solaris) - Centralized System H Solaris Common Commands
Issue 03 (2010-06-10) Huawei Proprietary and ConfidentialCopyright © Huawei Technologies Co., Ltd.
H-25

Command Formathead value file
ExampleTo view the first three lines of the Table.txt file, run the following command:
# head -3 Table.txt
Name Owner Object_type ------------------------------ ------------------------------
H.3.5 tail CommandThis topic describes the tail command used for viewing the last few lines of a text.
FunctionThe tail command is used to view the last few lines of a text. By default, the last 10 lines aredisplayed.
Command Formattail value file
ExampleTo view the last ten lines of the cat_Table.txt file, run the following command:
# tail cat_Table.txt
Name Owner Object_type ------------------------------ ------------------------------ ---------------------- tbl128Addr cat user table tbl128IP cat user table tbl128Name cat user table tblAdapterIP cat user table tblAdjCell cat user table... ... ...
NOTE
A special function of the tail command is to view the latest changes of a log file, because all the latestchanges are added at the end of the log file. The command format is as follows:
# tail -f commdrv.log
The option -f refers to the function of monitoring a file.
H.3.6 clear CommandThis topic describes the clear command used for clearing the contents on the screen.
H Solaris Common CommandsOptiX iManager T2000
Software Installation Guide (Solaris) - Centralized System
H-26 Huawei Proprietary and ConfidentialCopyright © Huawei Technologies Co., Ltd.
Issue 03 (2010-06-10)
FunctionThe clear command is used to clear the contents on the screen.
ExampleTo clear the screen, run the following command:
# clear
H.3.7 grep CommandThis topic describes the grep command used for searching for a character string in a text file.
FunctionThe grep command is used to search for a character string in a text file and to print all the linesthat contain the character string.
Command Formatgrep character string file
ExampleTo search the character string operation in the ifconfig.txt file, run the following command:
# grep operation ifconfig.txt
used to control operation of dhcpagent(1M), the DHCP client operation, be used to modify the address or characteristics dhcpagent wakes up to conduct another DHCP operation on the given, and the operation is one that requested operation will continue.
To search the character string "The following options are supported" in the ifconfig.txt file, runthe following the command:
# grep "The following options are supported" ifconfig.txt
The following options are supported:
NOTE
The character string "The following options are supported" includes spaces. Remember to enclose thecharacter string within quotation marks in the command line.
H.3.8 vi CommandThis topic describes the vi command used for creating and modifying text files.
FunctionAs a powerful text editing tool, the vi editor is used to create and modify text files.
The vi editor works in two modes:l Text input mode: to enter the text
OptiX iManager T2000Software Installation Guide (Solaris) - Centralized System H Solaris Common Commands
Issue 03 (2010-06-10) Huawei Proprietary and ConfidentialCopyright © Huawei Technologies Co., Ltd.
H-27
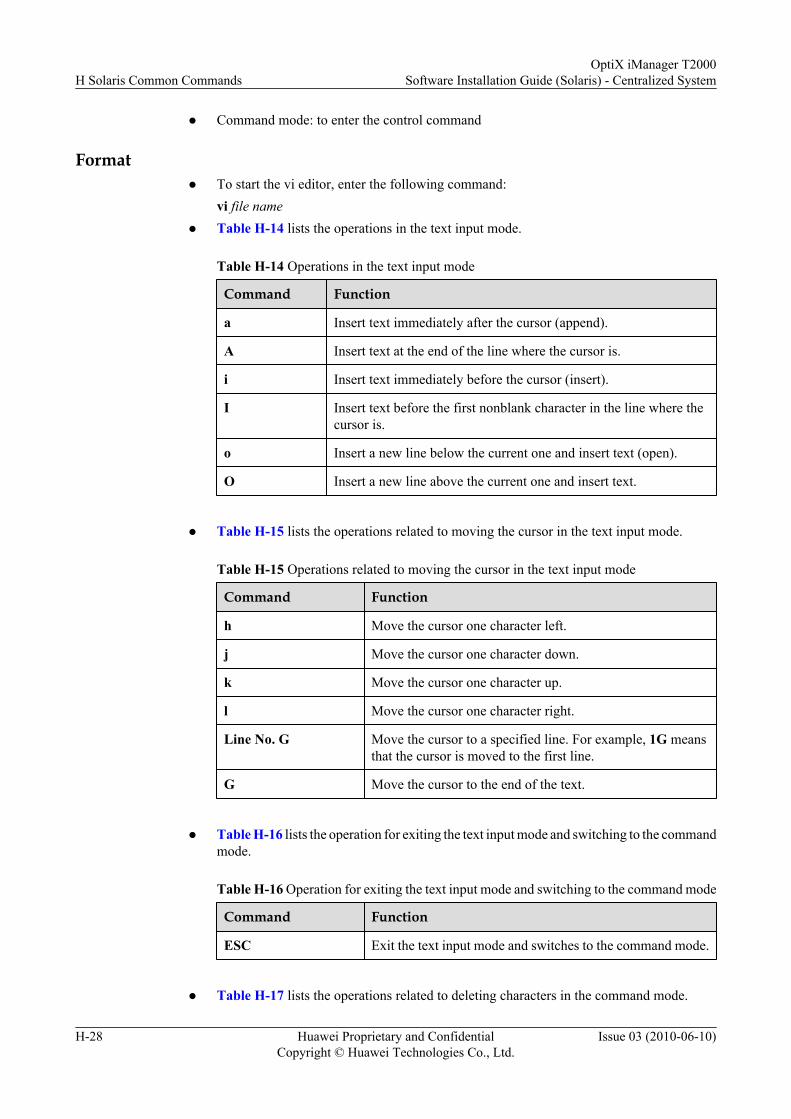
l Command mode: to enter the control command
Formatl To start the vi editor, enter the following command:
vi file namel Table H-14 lists the operations in the text input mode.
Table H-14 Operations in the text input mode
Command Function
a Insert text immediately after the cursor (append).
A Insert text at the end of the line where the cursor is.
i Insert text immediately before the cursor (insert).
I Insert text before the first nonblank character in the line where thecursor is.
o Insert a new line below the current one and insert text (open).
O Insert a new line above the current one and insert text.
l Table H-15 lists the operations related to moving the cursor in the text input mode.
Table H-15 Operations related to moving the cursor in the text input mode
Command Function
h Move the cursor one character left.
j Move the cursor one character down.
k Move the cursor one character up.
l Move the cursor one character right.
Line No. G Move the cursor to a specified line. For example, 1G meansthat the cursor is moved to the first line.
G Move the cursor to the end of the text.
l Table H-16 lists the operation for exiting the text input mode and switching to the command
mode.
Table H-16 Operation for exiting the text input mode and switching to the command mode
Command Function
ESC Exit the text input mode and switches to the command mode.
l Table H-17 lists the operations related to deleting characters in the command mode.
H Solaris Common CommandsOptiX iManager T2000
Software Installation Guide (Solaris) - Centralized System
H-28 Huawei Proprietary and ConfidentialCopyright © Huawei Technologies Co., Ltd.
Issue 03 (2010-06-10)
Table H-17 Operations related to deleting characters in the command mode
Command Function
x Delete a character.
dd Delete a line.
l Exit the vi editor.
All the commands that exit vi editor must be run in the command mode. Therefore pressESC before running the commands. Table H-18 describes the commands for exiting thevi editor.
Table H-18 Commands for exiting the vi editor
Command Function
:wq Save a file and exit the vi editor.
:q Exit from the vi editor without saving the file.
:q! Exit from the vi editor and discard all the changes.
:w Save a file other than exit the vi editor.
H.4 Commands for Managing Solaris UsersThis describes the user management commands that are frequently used in the Solaris system.This also describes the functions of these commands and gives some examples. Only user rootand the authorized users can add, modify, or delete users and user groups.
H.4.1 useradd CommandThe useradd command is used to add a user in the UNIX system.
H.4.2 userdel CommandThis topic describes the userdel command used for deleting a specific user of the UNIX operatingsystem.
H.4.3 usermod CommandThis topic describes the usermod command used for modifying the user login information.
H.4.4 passwd CommandThis topic describes the passwd command used for setting or changing a password for a user.
H.4.5 groupadd CommandThis topic describes the groupadd command used for adding a user group in the UNIX system.
H.4.6 groupdel CommandThis topic describes the groupdel command used for deleting a user group in the UNIX system.
H.4.7 groupmod CommandThis topic describes the groupmod command used for modifying the information about a usergroup..
OptiX iManager T2000Software Installation Guide (Solaris) - Centralized System H Solaris Common Commands
Issue 03 (2010-06-10) Huawei Proprietary and ConfidentialCopyright © Huawei Technologies Co., Ltd.
H-29

H.4.1 useradd CommandThe useradd command is used to add a user in the UNIX system.
FunctionThe useradd command is performed to add a user in the UNIX system.
Command Formatuseradd option new user name
Option DescriptionYou can combine options of the useradd command. Add the prefix - before these options. TableH-19 lists the common options.
Table H-19 Option description of the useradd command
Option Remark
-c comment Indicate the comment.
-d directory Indicate the home folder.
-m Indicate the automatic creation of a homefolder if the home folder does not exist.
-g group Indicate the user group that the user belongsto.
-s shell Indicate the shell that the user uses.
ExampleCreate a user named omc1 in the UNIX system. The user omc1 belongs to the staff user groupand the home folder is /home1/omc that is created automatically. In addition, the comment isTest User and B shell is applied. To create a user named omc1 in the UNIX system, run thefollowing commands:
# useradd -c "Test User" -d /home1/omc -m -g staff -s /usr/bin/sh omc1
CAUTIONAfter a user is added, set the password for the added user. For details of setting the password,refer to H.4.4 passwd Command. After the password is set, the user can log in as a new user.
H.4.2 userdel CommandThis topic describes the userdel command used for deleting a specific user of the UNIX operatingsystem.
H Solaris Common CommandsOptiX iManager T2000
Software Installation Guide (Solaris) - Centralized System
H-30 Huawei Proprietary and ConfidentialCopyright © Huawei Technologies Co., Ltd.
Issue 03 (2010-06-10)
FunctionThe userdel command is used to delete a user. Some UNIX systems do not allow deleting userscompletely. Run the userdel command to revoke the privileges granted to the user.
Command Formatuserdel user name
ExampleAssume that there is user omc1 in the system. To delete user omc1, run the following command:
# userdel omc1
CAUTIONWhen a user has logged in, do not run the userdel command to delete the user. If you run theuserdel command, the following error message is displayed:UX: userdel: ERROR: omc1 is in use. Cannot remove it.
H.4.3 usermod CommandThis topic describes the usermod command used for modifying the user login information.
FunctionThe usermod command is used to modify the user login information.
Command Formatusermod option user name
Option DescriptionThe combined option of the usermod command can be used. Add the prefix - before the options.Table H-20 lists the common options.
Table H-20 Option description of the usermod command
Option Description
-c comment Modified comment
-d directory Modified home folder
-m Create a home folder automatically if thehome folder does not exist
-g group Modified user group
OptiX iManager T2000Software Installation Guide (Solaris) - Centralized System H Solaris Common Commands
Issue 03 (2010-06-10) Huawei Proprietary and ConfidentialCopyright © Huawei Technologies Co., Ltd.
H-31
Option Description
-s shell Used shell
-l new_logname Modified user name
ExampleTo modify the login information about omc1, you need modify the user name to test, user groupto new_group, home folder to /home1, and comment to Tester. Run the following command:
# usermod -c "Test User" -d /home1 -g new_group -l test omc1
CAUTIONWith the different operation system, do not run the usermod command to modify a user whenthe user has logged in, or you must reboot operation system for some settings when perform thecommand.
H.4.4 passwd CommandThis topic describes the passwd command used for setting or changing a password for a user.
FunctionThe passwd command is used to set a password for an added user or to change the user password.
Command Formatpasswd user name
ExampleAssume that the user omc1 is added. To set the password of omc1, run the following command:
# passwd omc1
New Password:Re-enter new Password:passwd: password successfully changed for omc1
NOTE
The input password is not displayed.
H.4.5 groupadd CommandThis topic describes the groupadd command used for adding a user group in the UNIX system.
FunctionThe groupadd command is used to add a user group in the UNIX system.
H Solaris Common CommandsOptiX iManager T2000
Software Installation Guide (Solaris) - Centralized System
H-32 Huawei Proprietary and ConfidentialCopyright © Huawei Technologies Co., Ltd.
Issue 03 (2010-06-10)

Command Format
groupadd user group name
Example
To add the user group staff1 in the UNIX system, run the following command:
# groupadd staff1
H.4.6 groupdel CommandThis topic describes the groupdel command used for deleting a user group in the UNIX system.
Function
The groupdel command is used to delete a user group in the UNIX system.
Command Format
groupdel user group name
Example
To delete the user group staff1, run the following command:
# groupdel staff1
H.4.7 groupmod CommandThis topic describes the groupmod command used for modifying the information about a usergroup..
Function
The groupmod command is used to modify the information about a user group.
Command Format
groupmod <user group name>
Parameter Description
-n name: the name of the modified user group
Example
To modify the name of the user group staff1 to staff2, run the following command:
# groupmod -n staff2 staff1
OptiX iManager T2000Software Installation Guide (Solaris) - Centralized System H Solaris Common Commands
Issue 03 (2010-06-10) Huawei Proprietary and ConfidentialCopyright © Huawei Technologies Co., Ltd.
H-33

H.5 Commands for Managing Solaris System ResourcesThis describes the commands for managing Solaris system resources. This also describes thefunctions of these commands and gives some examples.
H.5.1 man CommandThis topic describes the man command used for viewing the online help about a command.
H.5.2 df CommandThis topic describes the df command used for viewing the free disk space.
H.5.3 du CommandThis topic describes the du command used for viewing the disk space used by a specific folderor file.
H.5.4 ps CommandThis topic describes the ps command used for viewing the status of the processes currentlyrunning in the system.
H.5.5 kill CommandThis topic describes the kill command used for terminating one or more processes.
H.5.6 who CommandThis topic describes the who command used for reporting the login information about all theusers in the current system.
H.5.7 whereis CommandThis topic describes the whereis command used for viewing the location of a source file, binaryfile, and online help of a command.
H.5.8 which CommandThis topic describes the which command used for viewing the location where a command is run.
H.5.9 hostname CommandThis topic describes the hostname command used for viewing or setting the host name.
H.5.10 hostid CommandYou can to view the ID of the workstation by using the hostid command because eachworkstation has an unique ID.
H.5.11 uname CommandThis topic describes the uname command used for viewing the information about the operatingsystem.
H.5.12 ifconfig CommandThis topic describes the ifconfig command used for viewing the IP address and MAC addressof the host.
H.5.13 script CommandThis topic describes the script command used for recording in a script file all the screen inputand output that occur from the time when the script command is run to the time when the exitcommand is entered.
H.5.14 date CommandThis topic describes the date command used for viewing the current date and time of the system.
H.5.15 bc Command
H Solaris Common CommandsOptiX iManager T2000
Software Installation Guide (Solaris) - Centralized System
H-34 Huawei Proprietary and ConfidentialCopyright © Huawei Technologies Co., Ltd.
Issue 03 (2010-06-10)

This topic describes the bc command used for simple calculation.
H.5.16 prtconf CommandThis topic describes the prtconf command used for checking the system configuration.
H.5.17 prstat CommandThis topic describes the prstat command used for viewing the CPU usage.
H.5.1 man CommandThis topic describes the man command used for viewing the online help about a command.
Function
The man command is used to view the online help about a command.
Command Format
man option command
Example
To view the online help about the pwd command, run the following command:
# man pwd
Reformatting page. Wait... done
User Commands pwd(1)
NAME pwd - return working directory name
SYNOPSIS /usr/bin/pwd
DESCRIPTION pwd writes an absolute path name of the current working directory to standard output.
Both the Bourne shell, sh(1), and the Korn shell, ksh(1), also have a built-in pwd command.
ENVIRONMENT See environ(5) for descriptions of the following environment variables that affect the execution of pwd: LC_MESSAGES and NLSPATH.
EXIT STATUS--More--(30%)
NOTE
Not all parameters in the man command are command names. For example, the man ascii commanddisplays all the ASCII characters and their expressions. The man shell_builtins command displays thebuilt-in command list and the shell using the commands.
H.5.2 df CommandThis topic describes the df command used for viewing the free disk space.
OptiX iManager T2000Software Installation Guide (Solaris) - Centralized System H Solaris Common Commands
Issue 03 (2010-06-10) Huawei Proprietary and ConfidentialCopyright © Huawei Technologies Co., Ltd.
H-35

Function
The df command is used to view the free disk space. The system administrator runs this commandfrequently to check the usage of the disk space.
Command Format
df option file system
Option Descriptionl -l : the local file system
l -k: to view the free disk space (unit: KB)
Example
To check the free disk space, run the following command:
# df -k
Filesystem kbytes used avail capacity Mounted on/dev/dsk/c0t0d0s0 2053605 997684 994313 51% //proc 0 0 0 0% /procfd 0 0 0 0% /dev/fd/dev/dsk/c0t1d0s7 35009161 2562019 32097051 8% /export/homeswap 3431792 6664 3425128 1% /tmp
The command result contains the following information:
l File system name
l File size (unit: KB)
l Used space
l Free space
l Capacity percentage of the filled file system and the mounting point
When you run the df command without any parameters, the free disk space in each mounteddevice is displayed.
When the free disk space is reduced to the bottom line, the system administrator must takeimmediate measures to locate the faulty file system.
H.5.3 du CommandThis topic describes the du command used for viewing the disk space used by a specific folderor file.
Function
The du command is used to view the disk space used by a specific folder or file.
Command Format
du option folder or file
H Solaris Common CommandsOptiX iManager T2000
Software Installation Guide (Solaris) - Centralized System
H-36 Huawei Proprietary and ConfidentialCopyright © Huawei Technologies Co., Ltd.
Issue 03 (2010-06-10)

Option Descriptionl -a : to view the disk space used by each file
l -s: to view the used total disk space
l -k: to view the result (unit: KB)
Examplel To view the disk space used by the files in the /etc folder, run the following command:
# du -k /etc |more4 /etc/X11/fs4 /etc/X11/twm84 /etc/X11/xdm/pixmaps157 /etc/X11/xdm721 /etc/X11/xkb/rules52 /etc/X11/xkb/types16 /etc/X11/xkb/semantics8 /etc/X11/xkb/geometry/ibm_vndr44 /etc/X11/xkb/geometry/digital_vndr44 /etc/X11/xkb/geometry/sgi_vndr285 /etc/X11/xkb/geometry81 /etc/X11/xkb/compat28 /etc/X11/xkb/symbols/sun_vndr16 /etc/X11/xkb/symbols/fujitsu_vndr84 /etc/X11/xkb/symbols/macintosh_vndr8 /etc/X11/xkb/symbols/nec_vndr32 /etc/X11/xkb/symbols/digital_vndr4 /etc/X11/xkb/symbols/sony_vndr12 /etc/X11/xkb/symbols/xfree68_vndr4 /etc/X11/xkb/symbols/hp_vndr4 /etc/X11/xkb/symbols/sgi_vndr850 /etc/X11/xkb/symbols40 /etc/X11/xkb/keymap/sun_vndr8 /etc/X11/xkb/keymap/digital_vndr93 /etc/X11/xkb/keymap/sgi_vndr181 /etc/X11/xkb/keymap16 /etc/X11/xkb/keycodes/digital_vndr12 /etc/X11/xkb/keycodes/sgi_vndr108 /etc/X11/xkb/keycodes2345 /etc/X11/xkb4 /etc/X11/xsm4 /etc/X11/lbxproxy16 /etc/X11/fvwm24 /etc/X11/xserver/C/print/ddx-config/raster4 /etc/X11/xserver/C/print/ddx-config12 /etc/X11/xserver/C/print/attributes245 /etc/X11/xserver/C/print/models/PSdefault/fonts--More-
l To view the disk space used by all file systems in the current folder and send the results tothe sort command for sorting, run the following command:# du -s * |sort -rn |more28672 opt3757 X112522 cups1282 bootsplash822 xscreensaver808 sysconfig661 services661 init.d473 postfix428 apparmor416 mono389 joe
OptiX iManager T2000Software Installation Guide (Solaris) - Centralized System H Solaris Common Commands
Issue 03 (2010-06-10) Huawei Proprietary and ConfidentialCopyright © Huawei Technologies Co., Ltd.
H-37
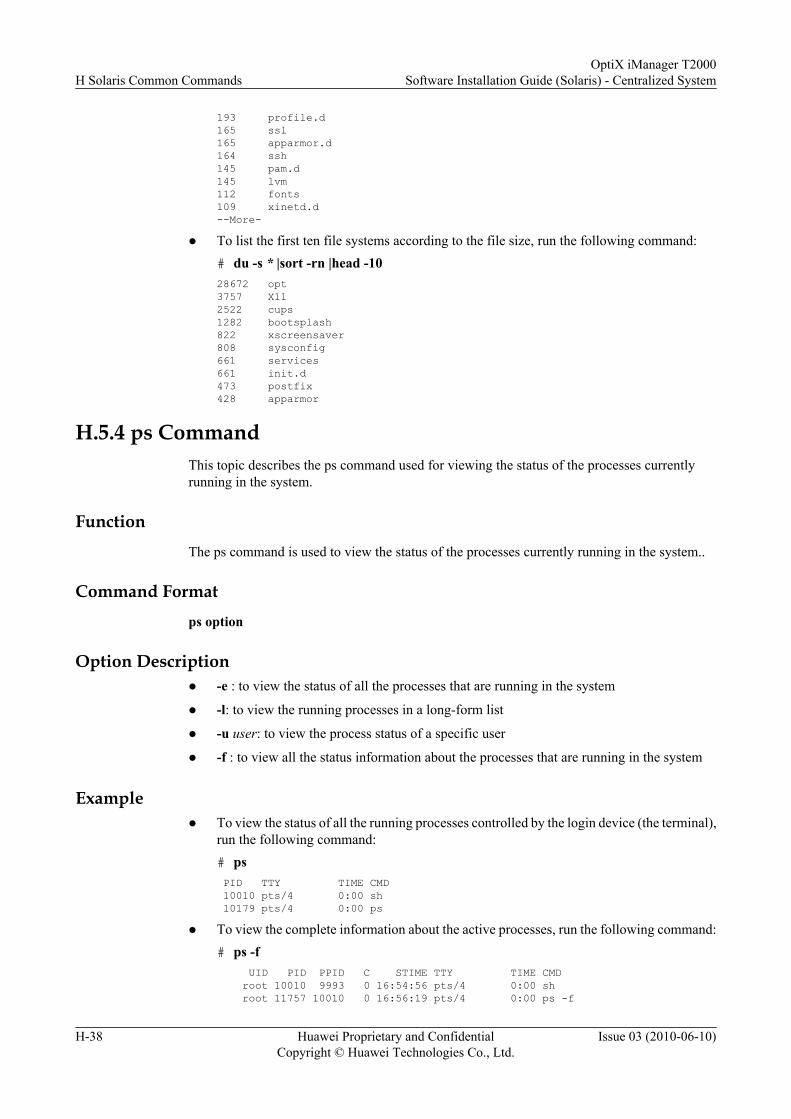
193 profile.d165 ssl165 apparmor.d164 ssh145 pam.d145 lvm112 fonts109 xinetd.d--More-
l To list the first ten file systems according to the file size, run the following command:# du -s * |sort -rn |head -1028672 opt3757 X112522 cups1282 bootsplash822 xscreensaver808 sysconfig661 services661 init.d473 postfix428 apparmor
H.5.4 ps CommandThis topic describes the ps command used for viewing the status of the processes currentlyrunning in the system.
FunctionThe ps command is used to view the status of the processes currently running in the system..
Command Formatps option
Option Descriptionl -e : to view the status of all the processes that are running in the system
l -l: to view the running processes in a long-form list
l -u user: to view the process status of a specific user
l -f : to view all the status information about the processes that are running in the system
Examplel To view the status of all the running processes controlled by the login device (the terminal),
run the following command:# ps PID TTY TIME CMD 10010 pts/4 0:00 sh 10179 pts/4 0:00 ps
l To view the complete information about the active processes, run the following command:# ps -f UID PID PPID C STIME TTY TIME CMD root 10010 9993 0 16:54:56 pts/4 0:00 sh root 11757 10010 0 16:56:19 pts/4 0:00 ps -f
H Solaris Common CommandsOptiX iManager T2000
Software Installation Guide (Solaris) - Centralized System
H-38 Huawei Proprietary and ConfidentialCopyright © Huawei Technologies Co., Ltd.
Issue 03 (2010-06-10)

l To view the IMAP processes, run the following command:
# ps -ef | grep imap root 22344 1 0 17:49:43 ? 0:03 imapsvcd -name devdoc_agent -sysagent DEFAULTSYSAGENT -port 31105 -agentid 0 root 22374 1 0 17:49:48 ? 0:02 imapsvcd -name am_agent -sysagent DEFAULTSYSAGENT -port 31131 -agentid 0 root 22346 1 0 17:49:43 ? 0:01 imapsvcd -name em_agent -sysagent DEFAULTSYSAGENT -port 31002 -agentid 0 root 22342 1 0 17:49:43 ? 0:11 imapsvcd -name cmdc_agent -sysagent DEFAULTSYSAGENT -port 31103 -agentid 0 root 22355 1 0 17:49:45 ? 0:11 imapsvcd -name ifms_agent -sysagent DEFAULTSYSAGENT -port 31011 -agentid 119 root 22338 1 0 17:49:42 ? 0:02 imapsvcd -name 3gpp_agent -sy......
NOTE
l After you run the ps command without any parameters, the screen displays information about allrunning processes that are controlled by the login device (terminal).
l After you specify the -f parameter, more information is displayed. The information includes the username (UID), process ID (PID), parent process ID (PPID), technical number that indicates therunning time of the process (C), process start time (STIME), name of the terminal that activates theprocess (TTY), and the process name (CMD). If TTY displays ?, infer that this process is not associatedwith the terminal.
l To view all the processes related to specific characters, for example, the process related to the IMAP,run the grep command with the ps command.
H.5.5 kill CommandThis topic describes the kill command used for terminating one or more processes.
Function
Thekill command is used to send signals to the specified process. Usually, termination signalsare sent to a process or multiple processes. That is, stop the running of a process or multipleprocesses.
Command Format
kill option process No.
Option Descriptionl -l : lists the names of all the signals
l -s signal: sends a signal named signal to the processes
Parameter Description
Process No.: the ID of the process to be terminated, that is, the process ID
OptiX iManager T2000Software Installation Guide (Solaris) - Centralized System H Solaris Common Commands
Issue 03 (2010-06-10) Huawei Proprietary and ConfidentialCopyright © Huawei Technologies Co., Ltd.
H-39
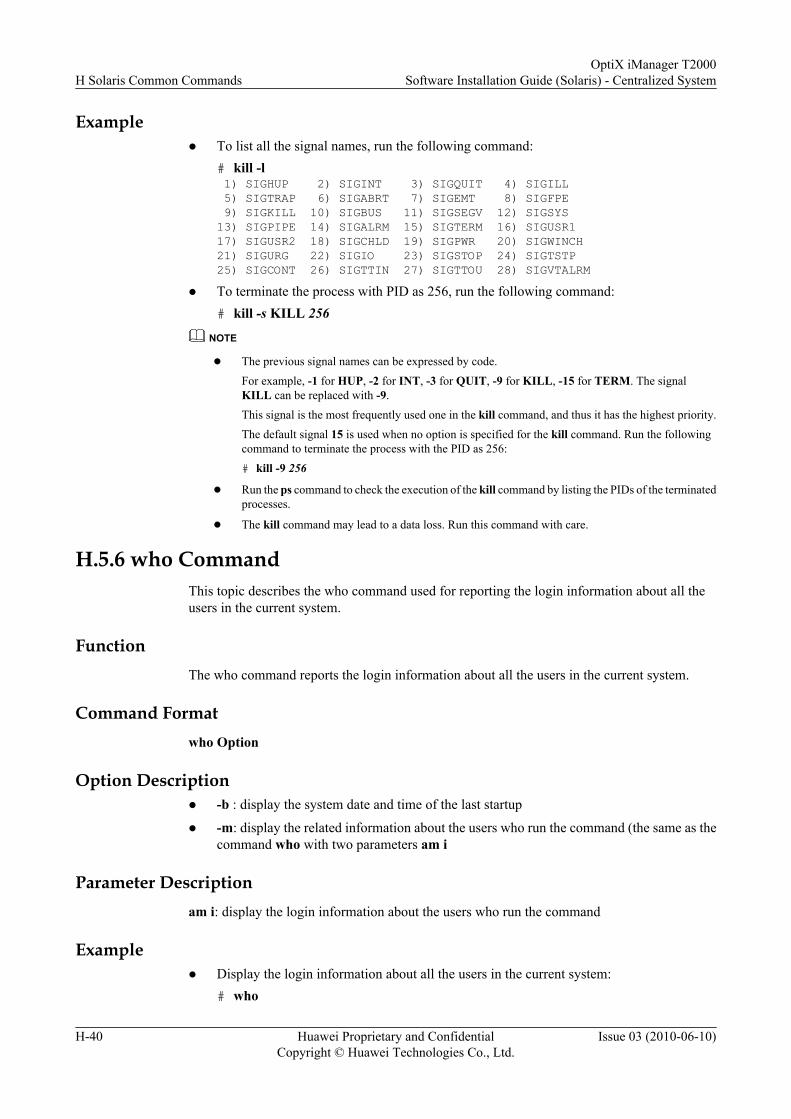
Examplel To list all the signal names, run the following command:
# kill -l 1) SIGHUP 2) SIGINT 3) SIGQUIT 4) SIGILL 5) SIGTRAP 6) SIGABRT 7) SIGEMT 8) SIGFPE 9) SIGKILL 10) SIGBUS 11) SIGSEGV 12) SIGSYS13) SIGPIPE 14) SIGALRM 15) SIGTERM 16) SIGUSR117) SIGUSR2 18) SIGCHLD 19) SIGPWR 20) SIGWINCH21) SIGURG 22) SIGIO 23) SIGSTOP 24) SIGTSTP25) SIGCONT 26) SIGTTIN 27) SIGTTOU 28) SIGVTALRM
l To terminate the process with PID as 256, run the following command:# kill -s KILL 256
NOTE
l The previous signal names can be expressed by code.For example, -1 for HUP, -2 for INT, -3 for QUIT, -9 for KILL, -15 for TERM. The signalKILL can be replaced with -9.This signal is the most frequently used one in the kill command, and thus it has the highest priority.The default signal 15 is used when no option is specified for the kill command. Run the followingcommand to terminate the process with the PID as 256:# kill -9 256
l Run the ps command to check the execution of the kill command by listing the PIDs of the terminatedprocesses.
l The kill command may lead to a data loss. Run this command with care.
H.5.6 who CommandThis topic describes the who command used for reporting the login information about all theusers in the current system.
FunctionThe who command reports the login information about all the users in the current system.
Command Formatwho Option
Option Descriptionl -b : display the system date and time of the last startup
l -m: display the related information about the users who run the command (the same as thecommand who with two parameters am i
Parameter Descriptionam i: display the login information about the users who run the command
Examplel Display the login information about all the users in the current system:
# who
H Solaris Common CommandsOptiX iManager T2000
Software Installation Guide (Solaris) - Centralized System
H-40 Huawei Proprietary and ConfidentialCopyright © Huawei Technologies Co., Ltd.
Issue 03 (2010-06-10)

root pts/3 Feb 4 10:08 (10.129.16.60)sybase pts/5 Feb 4 08:45 (10.129.28.44)root pts/6 Feb 4 11:25 (10.129.16.60)
l Display the login information about the users who run the command:# who am isybase pts/5 Feb 4 08:45 (10.129.28.44)
or:# who -msybase pts/5 Feb 4 08:45 (10.129.28.44)
H.5.7 whereis CommandThis topic describes the whereis command used for viewing the location of a source file, binaryfile, and online help of a command.
Function
The whereis command is used to view the location of a source file, binary file, and online helpof a command.
Command Format
whereis option command
Option Descriptionl -b : to view the location of the binary file
l -m: to view the location of the help manual
l -s: to view the location of the source file
Parameter Description
command: the command for which the location is to be displayed
Examplel To view the exact location of files of various versions for the ls command, run the following
command:# whereis lsls: /usr/bin/ls /usr/ucb/ls /usr/man/man1/ls.1 /usr/man/man1b/ls.1b
l To view the exact location of the binary file for the ls command, run the followingcommand:# whereis -b lsls: /usr/bin/ls /usr/ucb/ls
l To view the exact location of the help manual for the ls command, run the followingcommand:# whereis -m lsls: /usr/man/man1/ls.1 /usr/man/man1b/ls.1b
OptiX iManager T2000Software Installation Guide (Solaris) - Centralized System H Solaris Common Commands
Issue 03 (2010-06-10) Huawei Proprietary and ConfidentialCopyright © Huawei Technologies Co., Ltd.
H-41

H.5.8 which CommandThis topic describes the which command used for viewing the location where a command is run.
Function
The which command is used to view the location where a command is run. The result may bean absolute path or alias of the command found in the user environment variant PATH.
Command Format
which command
Example
To view the position where the commands pwd, who, and which are run, run the followingcommand:
# which pwd who which
/usr/bin/pwd/usr/bin/who/usr/bin/which
NOTE
If the command to be located does not exist in the file, the following error messages are displayed afteryou run the which command:
# which qqqqno qqqq in /usr/bin /usr/ucb /etc
H.5.9 hostname CommandThis topic describes the hostname command used for viewing or setting the host name.
Function
The hostname command is used to view or set the host name.
Command Format
hostname host name
Example
To view the host name, run the following command:
# hostname
NOTE
If you run the hostname command without parameters, the host name of the equipment is displayed. Ifyou run the hostname command with parameters, the host name is set. Only the super user can run thehostname command.
H Solaris Common CommandsOptiX iManager T2000
Software Installation Guide (Solaris) - Centralized System
H-42 Huawei Proprietary and ConfidentialCopyright © Huawei Technologies Co., Ltd.
Issue 03 (2010-06-10)

H.5.10 hostid CommandYou can to view the ID of the workstation by using the hostid command because eachworkstation has an unique ID.
FunctionThe hostid command is used to display the ID of the host.
Formathostid
ExampleTo display the ID of the workstation, run the following command:
# hostid
NOTE
The characters displayed on the screen are the ID of the workstation.
H.5.11 uname CommandThis topic describes the uname command used for viewing the information about the operatingsystem.
FunctionThe uname command is used to view the information about the operating system. If you run thiscommand without parameters, only the name of the operating system is displayed. If you runthis command with parameters, more details about the operating system are displayed.
Formatuname option
Option DescriptionThe options of the uname command can be combined. Add the prefix - before the options. TableH-21 lists some frequently used options.
Table H-21 Description of the uname options
Option Description
-a Views all the information.
-i Views hardware information.
-m Views the name of the equipment hardware.It is recommended that -p be used instead of-m.
OptiX iManager T2000Software Installation Guide (Solaris) - Centralized System H Solaris Common Commands
Issue 03 (2010-06-10) Huawei Proprietary and ConfidentialCopyright © Huawei Technologies Co., Ltd.
H-43

Option Description
-n Views the name of the network equipment.
-p Views the ISA of the host or the type of theprocessor.
-r Views the serial number of the operatingsystem of the host.
-s Views the name of the operating system of thehost (it is the default option).
-v Views the version of the operating system ofthe host.
-S system_name Sets the host name of the machine.system_name stands for the host name set bythe user.
ExampleTo view the name, version, and serial number of the operating system on the host, run thefollowing command:
# uname -svr
H.5.12 ifconfig CommandThis topic describes the ifconfig command used for viewing the IP address and MAC addressof the host.
FunctionThe ifconfig command is used to view the IP address and MAC address of the host.
Command Formatifconfig option
Option Description-a: to view all the address information
ExampleTo view all the address of the host, run the following command:
# ifconfig -a
lo0: flags=849<UP,LOOPBACK,RUNNING,MULTICAST> mtu 8232inet 127.0.0.1 netmask ff000000hme0: flags=863<UP,BROADCAST,NOTRAILERS,RUNNING,MULTICAST>mtu 1500 inet 129.9.169.143 netmask ffff0000 broadcast 129.9.255.255hme0:1:flags=863<UP,BROADCAST,NOTRAILERS,RUNNING,MULTICAST> mtu 1500 inet
H Solaris Common CommandsOptiX iManager T2000
Software Installation Guide (Solaris) - Centralized System
H-44 Huawei Proprietary and ConfidentialCopyright © Huawei Technologies Co., Ltd.
Issue 03 (2010-06-10)

129.6.253.136 netmask ffff0000 broadcast 129.6.255.255ether 0:3:ba:f2:ee:74
NOTE
l In the previous output, the IP address of the displayed host is 129.9.169.143, and the logical IP addressis 129.6.253.136. In the UNIX system, a network adapter can bind several logical IP addresses, whichrealizes communications between different network segments.
l In the previous output, the MAC address of the displayed host is 0:3:ba:f2:ee:74.
H.5.13 script CommandThis topic describes the script command used for recording in a script file all the screen inputand output that occur from the time when the script command is run to the time when the exitcommand is entered.
Function
CAUTIONClose the script file before running the exit command to terminate the recording of the screenI/O. If you do not close the script file, the script file builds up and hinders the normal operationof the system.
Record in a script file all the screen input and output that occur from the time when the scriptcommand is run to the time when the exit command is entered. The script command is helpfulfor programming and debugging.
Formatscript option file
Option Description-a: appends the screen I/O content to a file. If you do not set this parameter, the screen I/Ooverwrites the content of the file.
Parameter Descriptionfile: the file used to save the screen I/O content. If you do not specify the file name, the screenI/O content is saved to the typescript file.
ExampleTo save the screen I/O content in the default destination file typescript, run the followingcommands:
# script
Script started, file is typescript
# ps
PID TTY TIME CMD 775 pts/8 0:00 ksh
OptiX iManager T2000Software Installation Guide (Solaris) - Centralized System H Solaris Common Commands
Issue 03 (2010-06-10) Huawei Proprietary and ConfidentialCopyright © Huawei Technologies Co., Ltd.
H-45
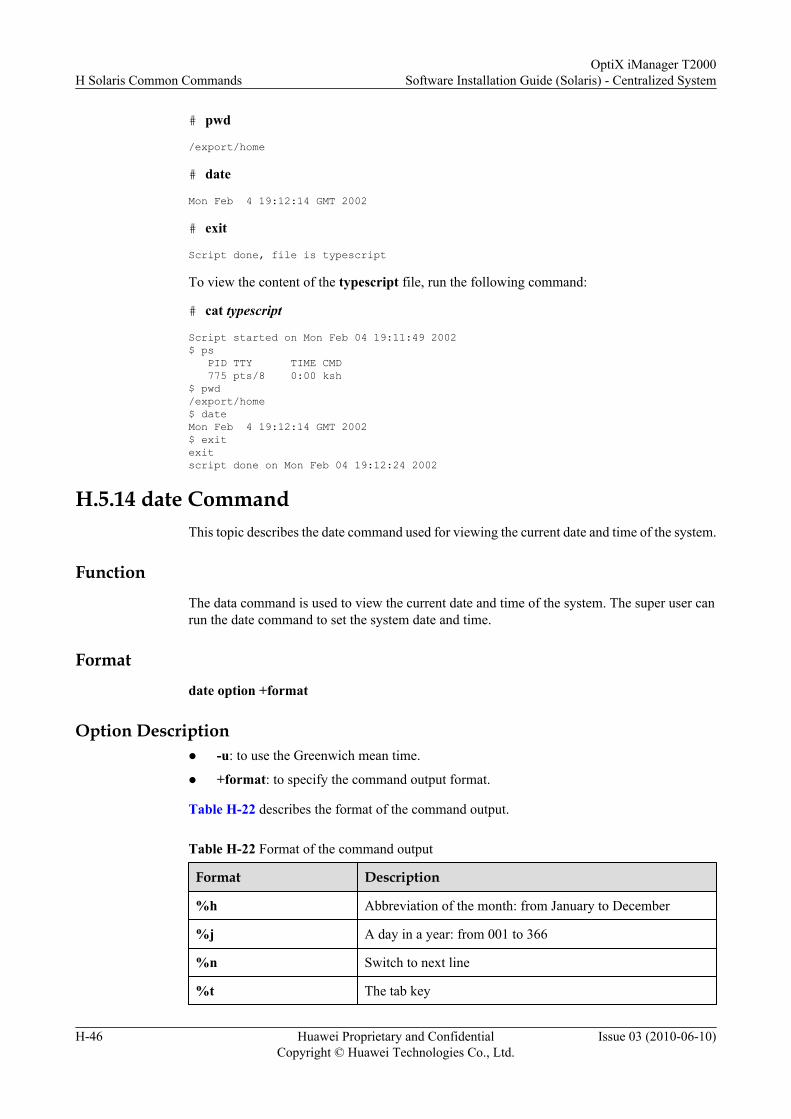
# pwd
/export/home
# date
Mon Feb 4 19:12:14 GMT 2002
# exit
Script done, file is typescript
To view the content of the typescript file, run the following command:
# cat typescript
Script started on Mon Feb 04 19:11:49 2002$ ps PID TTY TIME CMD 775 pts/8 0:00 ksh$ pwd/export/home$ dateMon Feb 4 19:12:14 GMT 2002$ exitexitscript done on Mon Feb 04 19:12:24 2002
H.5.14 date CommandThis topic describes the date command used for viewing the current date and time of the system.
Function
The data command is used to view the current date and time of the system. The super user canrun the date command to set the system date and time.
Format
date option +format
Option Descriptionl -u: to use the Greenwich mean time.
l +format: to specify the command output format.
Table H-22 describes the format of the command output.
Table H-22 Format of the command output
Format Description
%h Abbreviation of the month: from January to December
%j A day in a year: from 001 to 366
%n Switch to next line
%t The tab key
H Solaris Common CommandsOptiX iManager T2000
Software Installation Guide (Solaris) - Centralized System
H-46 Huawei Proprietary and ConfidentialCopyright © Huawei Technologies Co., Ltd.
Issue 03 (2010-06-10)
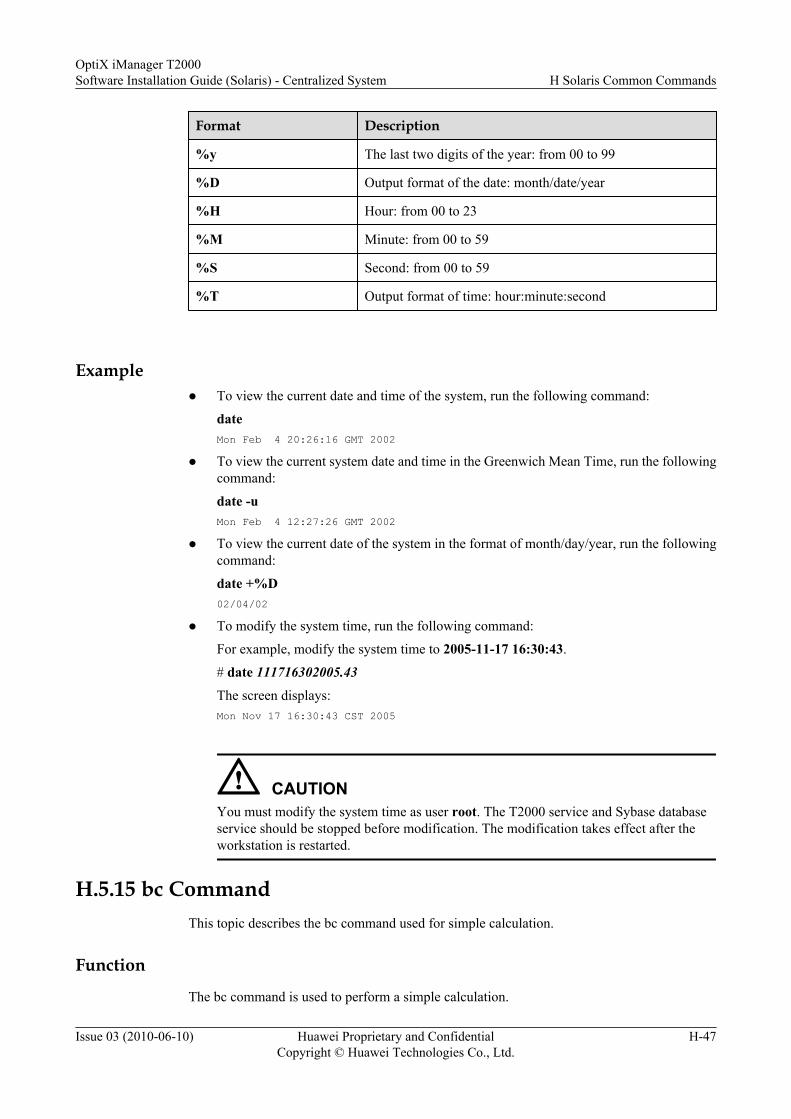
Format Description
%y The last two digits of the year: from 00 to 99
%D Output format of the date: month/date/year
%H Hour: from 00 to 23
%M Minute: from 00 to 59
%S Second: from 00 to 59
%T Output format of time: hour:minute:second
Examplel To view the current date and time of the system, run the following command:
dateMon Feb 4 20:26:16 GMT 2002
l To view the current system date and time in the Greenwich Mean Time, run the followingcommand:
date -uMon Feb 4 12:27:26 GMT 2002
l To view the current date of the system in the format of month/day/year, run the followingcommand:
date +%D02/04/02
l To modify the system time, run the following command:
For example, modify the system time to 2005-11-17 16:30:43.
# date 111716302005.43The screen displays:Mon Nov 17 16:30:43 CST 2005
CAUTIONYou must modify the system time as user root. The T2000 service and Sybase databaseservice should be stopped before modification. The modification takes effect after theworkstation is restarted.
H.5.15 bc CommandThis topic describes the bc command used for simple calculation.
Function
The bc command is used to perform a simple calculation.
OptiX iManager T2000Software Installation Guide (Solaris) - Centralized System H Solaris Common Commands
Issue 03 (2010-06-10) Huawei Proprietary and ConfidentialCopyright © Huawei Technologies Co., Ltd.
H-47

ExampleTo multiply 4 by 5, run the following command:
# bc
4*5
20
NOTE
To get the result, run the bc command, and then press Enter. Type the formula 4*5, and then pressEnter. The result is displayed on the screen. Press Ctrl+D to exit from the bc program.
H.5.16 prtconf CommandThis topic describes the prtconf command used for checking the system configuration.
FunctionThe prtconf command is used to check the system configuration.
Formatprtconf option device path
Instancel Check all the configuration information about the system.
# prtconfSystem Configuration: Sun Microsystems sun4uMemory size: 4096 MegabytesSystem Peripherals (Software Nodes):
SUNW,Netra-240 scsi_vhci, instance #0 packages (driver not attached) SUNW,builtin-drivers (driver not attached) deblocker (driver not attached) disk-label (driver not attached) terminal-emulator (driver not attached) dropins (driver not attached) kbd-translator (driver not attached) obp-tftp (driver not attached) SUNW,i2c-ram-device (driver not attached) SUNW,fru-device (driver not attached) SUNW,asr (driver not attached) ufs-file-system (driver not attached) chosen (driver not attached) openprom (driver not attached) client-services (driver not attached) options, instance #0 aliases (driver not attached) memory (driver not attached) virtual-memory (driver not attached) SUNW,UltraSPARC-IIIi, instance #0 (driver not attached) memory-controller, instance #0 SUNW,UltraSPARC-IIIi, instance #1 (driver not attached) memory-controller, instance #1 pci, instance #0 network, instance #0 network, instance #1
H Solaris Common CommandsOptiX iManager T2000
Software Installation Guide (Solaris) - Centralized System
H-48 Huawei Proprietary and ConfidentialCopyright © Huawei Technologies Co., Ltd.
Issue 03 (2010-06-10)
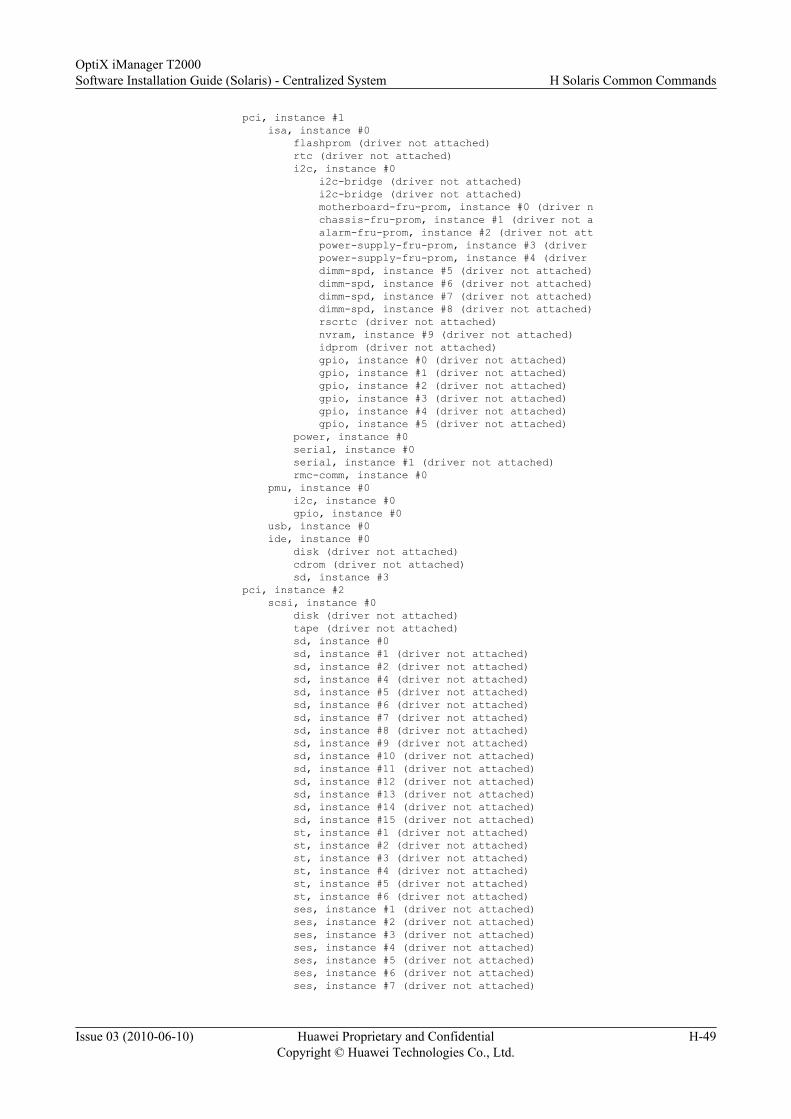
pci, instance #1 isa, instance #0 flashprom (driver not attached) rtc (driver not attached) i2c, instance #0 i2c-bridge (driver not attached) i2c-bridge (driver not attached) motherboard-fru-prom, instance #0 (driver n chassis-fru-prom, instance #1 (driver not a alarm-fru-prom, instance #2 (driver not att power-supply-fru-prom, instance #3 (driver power-supply-fru-prom, instance #4 (driver dimm-spd, instance #5 (driver not attached) dimm-spd, instance #6 (driver not attached) dimm-spd, instance #7 (driver not attached) dimm-spd, instance #8 (driver not attached) rscrtc (driver not attached) nvram, instance #9 (driver not attached) idprom (driver not attached) gpio, instance #0 (driver not attached) gpio, instance #1 (driver not attached) gpio, instance #2 (driver not attached) gpio, instance #3 (driver not attached) gpio, instance #4 (driver not attached) gpio, instance #5 (driver not attached) power, instance #0 serial, instance #0 serial, instance #1 (driver not attached) rmc-comm, instance #0 pmu, instance #0 i2c, instance #0 gpio, instance #0 usb, instance #0 ide, instance #0 disk (driver not attached) cdrom (driver not attached) sd, instance #3 pci, instance #2 scsi, instance #0 disk (driver not attached) tape (driver not attached) sd, instance #0 sd, instance #1 (driver not attached) sd, instance #2 (driver not attached) sd, instance #4 (driver not attached) sd, instance #5 (driver not attached) sd, instance #6 (driver not attached) sd, instance #7 (driver not attached) sd, instance #8 (driver not attached) sd, instance #9 (driver not attached) sd, instance #10 (driver not attached) sd, instance #11 (driver not attached) sd, instance #12 (driver not attached) sd, instance #13 (driver not attached) sd, instance #14 (driver not attached) sd, instance #15 (driver not attached) st, instance #1 (driver not attached) st, instance #2 (driver not attached) st, instance #3 (driver not attached) st, instance #4 (driver not attached) st, instance #5 (driver not attached) st, instance #6 (driver not attached) ses, instance #1 (driver not attached) ses, instance #2 (driver not attached) ses, instance #3 (driver not attached) ses, instance #4 (driver not attached) ses, instance #5 (driver not attached) ses, instance #6 (driver not attached) ses, instance #7 (driver not attached)
OptiX iManager T2000Software Installation Guide (Solaris) - Centralized System H Solaris Common Commands
Issue 03 (2010-06-10) Huawei Proprietary and ConfidentialCopyright © Huawei Technologies Co., Ltd.
H-49
ses, instance #8 (driver not attached) ses, instance #9 (driver not attached) ses, instance #10 (driver not attached) ses, instance #11 (driver not attached) ses, instance #12 (driver not attached) ses, instance #13 (driver not attached) ses, instance #14 (driver not attached) ses, instance #15 (driver not attached) scsi, instance #1 disk (driver not attached) tape (driver not attached) sd, instance #16 (driver not attached) sd, instance #17 (driver not attached) sd, instance #18 (driver not attached) sd, instance #19 (driver not attached) sd, instance #20 (driver not attached) sd, instance #21 (driver not attached) sd, instance #22 (driver not attached) sd, instance #23 (driver not attached) sd, instance #24 (driver not attached) sd, instance #25 (driver not attached) sd, instance #26 (driver not attached) sd, instance #27 (driver not attached) sd, instance #28 (driver not attached) sd, instance #29 (driver not attached) sd, instance #30 (driver not attached) st, instance #8 (driver not attached) st, instance #9 (driver not attached) st, instance #10 (driver not attached) st, instance #11 (driver not attached) st, instance #12 (driver not attached) st, instance #13 (driver not attached) ses, instance #16 (driver not attached) ses, instance #17 (driver not attached) ses, instance #18 (driver not attached) ses, instance #19 (driver not attached) ses, instance #20 (driver not attached) ses, instance #21 (driver not attached) ses, instance #22 (driver not attached) ses, instance #23 (driver not attached) ses, instance #24 (driver not attached) ses, instance #25 (driver not attached) ses, instance #26 (driver not attached) ses, instance #27 (driver not attached) ses, instance #28 (driver not attached) ses, instance #29 (driver not attached) ses, instance #30 (driver not attached) ses, instance #31 (driver not attached) pci, instance #3 network, instance #2 network, instance #3 iscsi, instance #0 pseudo, instance #0
H.5.17 prstat CommandThis topic describes the prstat command used for viewing the CPU usage.
FunctionThe CPU usage may be high when a large number of NE alarms are reported in a short periodor when the performance data is high. This command is used to find out the cause of these alarms.
Permitted UsersUsers root, omcuser, and dbuser are authorized to run the prstat command.
H Solaris Common CommandsOptiX iManager T2000
Software Installation Guide (Solaris) - Centralized System
H-50 Huawei Proprietary and ConfidentialCopyright © Huawei Technologies Co., Ltd.
Issue 03 (2010-06-10)
Example# prstat
The command result contains the CPU usage of each process.
H.6 Commands for Network Communication on theSolaris System
This section describes the commands for network communication on the Solaris system. It alsodescribes the functions of these commands and gives some examples.
H.6.1 ping CommandThis topic describes the ping command used for checking the connection of networks.
H.6.2 telnet CommandThis topic describes the telnet command used for logging in to the remote UNIX host from thelocal computer.
H.6.3 ftp CommandThis topic describes the ftp command used for transfering files between the local computer andthe remote host.
H.6.4 finger CommandThis topic describes the finger command used for viewing the information about the online userswho are using the UNIX system.
H.6.5 netstat CommandThis topic describes the netstat command used for displaying the current network status.
H.6.6 route CommandThis topic describes the route command used for changing the maintenance routing table.
H.6.1 ping CommandThis topic describes the ping command used for checking the connection of networks.
FunctionThe ping command is used to check the physical connection of the network when thecommunication between a user computer and the hosts in the network is interrupted.
Formatping IP address of a host
ExampleCheck the physical connection between the current host and the host whose IP address is129.9.0.1.
# ping 129.9.0.1
129.9.0.1 is alive
OptiX iManager T2000Software Installation Guide (Solaris) - Centralized System H Solaris Common Commands
Issue 03 (2010-06-10) Huawei Proprietary and ConfidentialCopyright © Huawei Technologies Co., Ltd.
H-51
The Internet Control Message Protocol (ICMP) is used through the ping command to check thenetwork connection. An ICMP echo request message is sent to a specific host to request an ICMPecho response message. If the response message is not received within a specified time, theHost unreachable message is displayed on the screen.
The Host unreachable message is displayed in the following cases:
l The specified host is invalid.
l The network cables are not correctly connected.
l The two communicating hosts do not support the same communication protocol.
To analyze the causes, run the ping command to connect to other hosts in the same networksegment. If the ping command is successful, you can infer that the connection is functional. Inthis case, check the physical connection and the operational status of the specified host. If theping command fails, check whether the physical network connection of the current host is secureor whether the TCP/IP protocol is set correctly only for Windows 95 users.
H.6.2 telnet CommandThis topic describes the telnet command used for logging in to the remote UNIX host from thelocal computer.
FunctionNOTE
Before running the telnet command, ensure that a local computer is connected to the remote UNIX hostaccording to the TCP/IP protocol.
Telnet is the software used to log in to remote UNIX hosts through network connection. Telnettakes the local computer as a simulated terminal of the remote UNIX host and enables you tolog in to the remote server from the local computer. After you log in to the remote UNIX hostsuccessfully through telnet, you become a remote simulated terminal user and you can use thelocal computer as a real UNIX terminal. In this case, the resources and functions available andthe operating mode depend on the settings of the remote host and the access privileges of thelogin account.
Command Formattelnet IP address or domain name
Parameter Descriptionl IP address: the IP address of a remote UNIX host
l Domain: the domain name of a remote UNIX host
ExampleRun the telnet command on a local computer and log in to a remote UNIX host. Assume thatthe IP address of the UNIX host is 129.9.169.143.
On the local computer, choose Start > Run. Enter telnet 129.9.169.143 and click OK. TheTelnet dialog box appears and prompts you to enter the UNIX user name and password.
login: root
H Solaris Common CommandsOptiX iManager T2000
Software Installation Guide (Solaris) - Centralized System
H-52 Huawei Proprietary and ConfidentialCopyright © Huawei Technologies Co., Ltd.
Issue 03 (2010-06-10)

Password:root password
NOTE
Enter the password on the right of Password. The entered password is not displayed.
The subsequent steps are the same as those when you operate on the UNIX host.
H.6.3 ftp CommandThis topic describes the ftp command used for transfering files between the local computer andthe remote host.
FunctionThe ftp command is used to transfer files between the local computer and the remote host. Youcan transfer one or multiple files at a time between the remote UNIX system and the localcomputer.
Formatftp IP address or domain
Parameter Descriptionl IP address: the IP address of the remote UNIX host
l Domain name: the domain name of the remote UNIX host
ExampleRun the ftp command on the local computer. Assume that the IP address of the remote UNIXhost is 129.9.169.143.
Choose Start > Run on the local computer. In the displayed dialog box, enter ftp129.9.169.143 and click OK. When the ftp window is displayed, enter the UNIX user name andpassword.
User (129.9.169.143: (none) : ) ftpuser
Password:password of ftpuser230 Login successful.ftp>
NOTE
Enter the password after Password: . The password is not displayed.
Enter the ftp command behind the prompt ftp>. Table H-23 describes the ftp commands thatare commonly used.
Table H-23 Common ftp commands
ftp Command Description
!command Use a local command and return to ftpimmediately.
OptiX iManager T2000Software Installation Guide (Solaris) - Centralized System H Solaris Common Commands
Issue 03 (2010-06-10) Huawei Proprietary and ConfidentialCopyright © Huawei Technologies Co., Ltd.
H-53

ftp Command Description
?|help command View the command help.
ascii Transfer files in ASCII format (default).
binary Transfer files in binary format.
cd folder Modify the remote folder.
close Break the remote connection.
dir remote-directory local-file View the remote directory. If there is a localfile, save the result to the local file.
get file1 file2 Copy the remote file1 to the local file2.
lcd folder Modify the local folder.
ls r-folder l-file Same as dir, but the display format isdifferent.
mget several files Copy several remote files to the localcomputer.
mput several files Copy several local files to the remotecomputer.
open IP address or domain Reestablish a connection.
put file1 file2 Copy the local file1 to the remote file2.
pwd List the folders of the current remote host.
quit|bye Exit from the ftp.
status View the current ftp status.
l Copy all the files in the path C:\mydoc on the local computer to the /usr/local/tmp folderon the remote host.ftp> binaryftp> lcd c:\mydocftp> cd /usr/local/tmpftp> mput *.*
l Copy the .login file in the /usr/home/rms folder on the remote host to the path C:\mydoc folder on the local computer.ftp> asciiftp> lcd c:\temp\fromftp> cd /usr/home/rmsftp> get .login
l Copy all files in the /usr/home/rms folder on the remote computer to the path C:\temp\from on the local computer in binary format.
H Solaris Common CommandsOptiX iManager T2000
Software Installation Guide (Solaris) - Centralized System
H-54 Huawei Proprietary and ConfidentialCopyright © Huawei Technologies Co., Ltd.
Issue 03 (2010-06-10)
ftp> binary
ftp> lcd c:\temp\from
ftp> cd /usr/home/rms
ftp> mget *
l To exit ftp.ftp> quit
H.6.4 finger CommandThis topic describes the finger command used for viewing the information about the online userswho are using the UNIX system.
Function
The finger command is used to view the information about online users of the UNIX system.
Command Format
finger user name@host domain|IP address
Parameter Descriptionl user name: the user that has currently logged in to the local system.
l host domain: the UNIX host domain.
l IP address: the IP address of the UNIX host.
Example
Table H-24 lists some common examples of the finger command.
Table H-24 Examples of the finger command
Example Description
# finger View the information about all local users.
# finger root View the information about user root.
# finger @omcsyb2 View the information about all users in thehost omcsyb2.
# finger @omcsyb2.huawei.com.cn View the information about all users in thehost omcsyb2.huawei.com.cn.
# finger abc@omcsyb2 View the information about user abc in thehost omcsyb2.
# finger [email protected] View the information about user abc in thehost 10.10.10.1.
OptiX iManager T2000Software Installation Guide (Solaris) - Centralized System H Solaris Common Commands
Issue 03 (2010-06-10) Huawei Proprietary and ConfidentialCopyright © Huawei Technologies Co., Ltd.
H-55

H.6.5 netstat CommandThis topic describes the netstat command used for displaying the current network status.
Function
The netstat command is used to display the current network status. The netstat command ispowerful but complex in format. This describes common applications of the netstat command.
Command Format
netstat options
Option Descriptionl For viewing all the sockets and routing tables (netstat -anv)
– -a: views all socket information.
– -n: views the information by number. If you do not specify this parameter, theinformation is displayed by logical name.
– -v: views the information about sockets and routing tables of the additional information.
l For viewing the IP address of the network adapter (netstat -i -I interface intervalinterval)– -i: views the information about the network interface.
– -I interface: specifies an interface, for example, hme0:1
– interval: indicates a time interval.
l For viewing the routing table status (netstat -r -anv)– -r: views the information about the routing table.
– -anv: refers to For viewing all the sockets and routing tables.
l For viewing the broadcast information (netstat -M -ns)– -M: views broadcast routing tables.
– -s: summarizes the status of each protocol.
l For viewing the DHCP status (netstat -D -I interface)-D: views the DHCP information.
Example
Use the command netstat -rn to view the information about the routing tables:
root@ts-007 # netstat -rn
Routing Table:Destination Gateway Flags Ref Use Interface10.105.28.0 10.105.28.202 U 4 2 hme010.0.0.0 10.105.31.254 UG 0 0 224.0.0.0 10.105.28.202 U 4 0 hme0127.0.0.1 127.0.0.1 UH 0 896 lo0
A router can be in any of the following five different flags: U, G, H, D, and M, as described inTable H-25.
H Solaris Common CommandsOptiX iManager T2000
Software Installation Guide (Solaris) - Centralized System
H-56 Huawei Proprietary and ConfidentialCopyright © Huawei Technologies Co., Ltd.
Issue 03 (2010-06-10)

Table H-25 Description of routing flags
Flag Description
U U indicates that a route is currently available.
G G indicates that a route is destined for a gateway such as a router.If this flag is not set, you can infer that the destination is connected directly.Flag G distinguishes between direct and indirect routes. Flag G is unnecessaryfor direct routes. The difference is that the packet sent through a direct routecarries both the destination IP address and the link-layer address. In the packetsent through an indirect route, however, the IP address points to the destinationand the link layer address points to the gateway (for example, the next router).
H H indicates a route destined for a host. That is, the destination address is acomplete host address.If this flag is not set, you can infer that the route leads to a network and thatthe destination address is a network address: either a network number or anetwork. The part in the address for the host is 0. When you search the routingtable for an IP address, the host address must exactly match the destinationaddress. The network address, however, is required to match only the networknumber and subnet number of the destination address.
D D indicates that a route is created by a redirected packet.
M M indicates that a route is modified by a redirected packet.
The Ref (Reference count) column lists the number of routing progresses. The protocol forconnection, such as TCP, requires a fixed route when a connection is established. If the telnetconnection is established between the host svr4 and the host slip, the Ref is 1. If another telnetconnection is established, its value is changed to 2.
The next column (Use) displays the number of packets sent through a specified route. After yourun the ping command as the unique user of this route, the program sends five groups and thenumber of packets is displayed as 5. The last column (Interface) indicates the name of thelocal interface.
The second row of the output is a loop-back interface. The interface name is permanent set tolo0. Flag G is not set because the route is not destined for a gateway. Flag H indicates that thedestination address, 127.0.0.1, is a host address and not a network address. Because flag G isnot set, the route here is a direct route and the gateway column shows the outgoing IP address.
Each host has one or multiple default routes. That is, if a particular route is not found in the table,the packet is sent to the router. In addition, the current host can access other systems throughthe Sun router (and the slip link) on the internet, based on the settings of the routing table. Theflag UG refers to the gateway.
H.6.6 route CommandThis topic describes the route command used for changing the maintenance routing table.
OptiX iManager T2000Software Installation Guide (Solaris) - Centralized System H Solaris Common Commands
Issue 03 (2010-06-10) Huawei Proprietary and ConfidentialCopyright © Huawei Technologies Co., Ltd.
H-57

FunctionThe routing table relays IP address between network segments. The route command is used tomodify and maintain the routing table.
Formatroute -fnvq command modifiers args
route -fnvq add | change | delete | get host/net destination gateway args
route -n monitor
route -n flush
NOTE
The meaning of "|" is the same as that of the word "or".
Parameter DescriptionOptions of the route command can be combined. Table H-26 lists some common options.
Table H-26 Description of the route commands
Option Description
-f Refresh routing tables for all gateways.
-n View the information in characters instead of symbols.
-v View the additional information.
-q Suspend all outputs.
-commond Refer to the add, chang, flush (clear the gateways in therouting table), get or monitor.
-destination Destination network segment. For example, 10.0.0.0 standsfor section 10, and 10.11.0.0 stands for section 10.11.
-gateway Indicate the IP address of the gateway.
net Indicate the network segment. For example, 10.11.12.0stands for section 10.11.12.
host Indicate the IP address of the host.
Examplel Obtain the routing information about network segment 10.
root@ts-007 # route -n get 10.0.0.0 route to: 10.0.0.0destination: 10.0.0.0 mask: 255.0.0.0 gateway: 10.105.31.254 interface: hme0
H Solaris Common CommandsOptiX iManager T2000
Software Installation Guide (Solaris) - Centralized System
H-58 Huawei Proprietary and ConfidentialCopyright © Huawei Technologies Co., Ltd.
Issue 03 (2010-06-10)
flags: <UP,GATEWAY,DONE,STATIC> recvpipe sendpipe ssthresh rtt,msec rttvar hopcount mtu expire 0 0 0 0 0 0 1500 0
l Clear the gateways in the routing table.
root@ts-007 # route -n flush10 10.105.31.254 done
root@ts-007 # netstat -rnRouting Table: Destination Gateway Flags Ref Use Interface-------------------- -------------------- ----- ----- ------ ---------10.105.28.0 10.105.28.202 U 4 6 hme0224.0.0.0 10.105.28.202 U 4 0 hme0127.0.0.1 127.0.0.1 UH 0 1500 lo0
root@ts-007 # telnet 10.129.3.4Trying 10.129.3.4...telnet: Unable to connect to remote host: Network is unreachable
After the gateways in the routing table are cleared, the network segments beyond10.105.28.202/34 are no longer accessible.
l Add a routing record.
root@ts-007 # route add 129.9.0.0 10.105.28.202add net 129.9.0.0: gateway 10.105.28.202
root@ts-007 # netstat -rnRouting Table: Destination Gateway Flags Ref Use Interface-------------------- -------------------- ----- ----- ------ ---------10.105.28.0 10.105.28.202 U 4 2 hme0129.9.0.0 10.105.28.202 UG 0 0 10.0.0.0 10.105.31.254 UG 0 0 224.0.0.0 10.105.28.202 U 4 0 hme0127.0.0.1 127.0.0.1 UH 0 313 lo0
129.9.0.0 10.105.28.202 UG 0 0 is the newly-added routing record.
NOTE
Those routes added in this way will disappear when the operating system reboots. To prevent thiscase from happening, create the startup file S98router in the /etc/rc3.d directory and write thecommand mentioned above into the boot script.
l Modify the routing table.
root@ts-007 # route change 129.9.0.0 1.2.3.4change net 129.9.0.0: gateway 1.2.3.4
root@ts-007 # netstat -rnRouting Table: Destination Gateway Flags Ref Use Interface-------------------- -------------------- ----- ----- ------ ---------10.105.28.0 10.105.28.202 U 4 2 hme0129.9.0.0 1.2.3.4 UG 0 0 10.0.0.0 10.105.31.254 UG 0 0 224.0.0.0 10.105.28.202 U 4 0 hme0127.0.0.1 127.0.0.1 UH 0 445 lo0
NOTE
129.9.0.0 1.2.3.4 UG 0 0 is the routing record of the modified gateway.
OptiX iManager T2000Software Installation Guide (Solaris) - Centralized System H Solaris Common Commands
Issue 03 (2010-06-10) Huawei Proprietary and ConfidentialCopyright © Huawei Technologies Co., Ltd.
H-59