BarnCraft – Rolling Barn Doors - GlassCraft Door Companyproceed to assemble the barn door....
7
® BarnCraſt Collection™ The Premium Rolling Barn Doors BarnCraſt ™ – Rolling Barn Doors Assembly Instructions
Transcript of BarnCraft – Rolling Barn Doors - GlassCraft Door Companyproceed to assemble the barn door....
Looks so good, you’ll think it’s wood.®® BarnCraft Collection™The
Premium Rolling Barn Doors
BarnCraft™ – Rolling Barn Doors
Assembly Instructions

Plank Z Mid Rail Plank Double X Double Z One Panel Two Panel Double Z Two Panel X Two Panel
GlassCraft Rolling Barn Door Con�gurations
8’0”
6’8”
DIMENSIONS
Plank Z Mid Rail Plank Double X Double Z One Panel Two Panel Double Z Two Panel X Two Panel
GlassCraft Rolling Barn Door Con�gurations
8’0”
6’8” Assembly Instructions – BarnCraft Barn Doors 2
8"
8" 4"
4"
6"
6"
4"
4"
4"
BarnCraft 8'0" Barn Door
Shown here with Z Barn Door
A – Tongue-and-groove Plank ....... 6” widthB – Cross Rail .................................... 8” height (Plank style doors) or 4” height (Panel style doors)C – Vertical Brace ............................ 4” width (Panel style doors only)D – Horizontal Brace ........................ 4” height (Panel style doors only)E – Diagonal Brace ........................ 4” width
Shown here with X Two Panel Barn Door
BarnCraft 6'8” Barn Door
4"
A
A
D
B
B
E
E
E
E
BB
C C

Assembly Instructions – BarnCraft Barn Doors 3
TOOLS & PARTS
IMPORTANT:
When you open your barn door box, please note the box is heavy and requires 2 people to move or lift it. Caution, parts may shift in transit, please open the box carefully.
Please read and understand all warnings, safety precautions and instructions before you proceed to assemble the barn door. Exercise safety and caution at all times.
Remove everything from the box and lay flat on the floor with stickers showing.
Assembly Instructions and parts shown here refer to an 8'0" tall Z Barn Door, but may also apply to all other Barn Door designs.
You will need:
• Hammer
• Safety Glasses
• Tape Measure
• 4 mm Allen Wrench (provided)
We do NOT recommend using glue to assemble your door.
Please read and understand all manufacturers user guides for all tools used in this project.
Kit Includes:
• Instructions / safety cautions
• Tongue-and-groove planks
• Cross rails
• 2 Clamps
• 2 Wedges
• Bolts & Allen Wrench
• Brace(s)
NOTE: Number of planks will vary depending on the door size, and the number of braces varies by door design.

Assembly Instructions – BarnCraft Barn Doors 4
ASSEMBLY PROCEDURE
STEP 2:
Take planks and line them up according to their corre-sponding number. This will let you know you are lining up the planks in the right order.
STEP 1:
Clear your assembly work space and take your 2 clamps and lay them down on the floor approximately 6 feet apart.
STEP 3:
Once the planks are lined up, you will then place the planks onto the clamps, fitting tongue to groove, until they are all leveled at the top and bottom of the door.
(cont.)
Assembly Instructions – BarnCraft Barn Doors 5
ASSEMBLY PROCEDURE
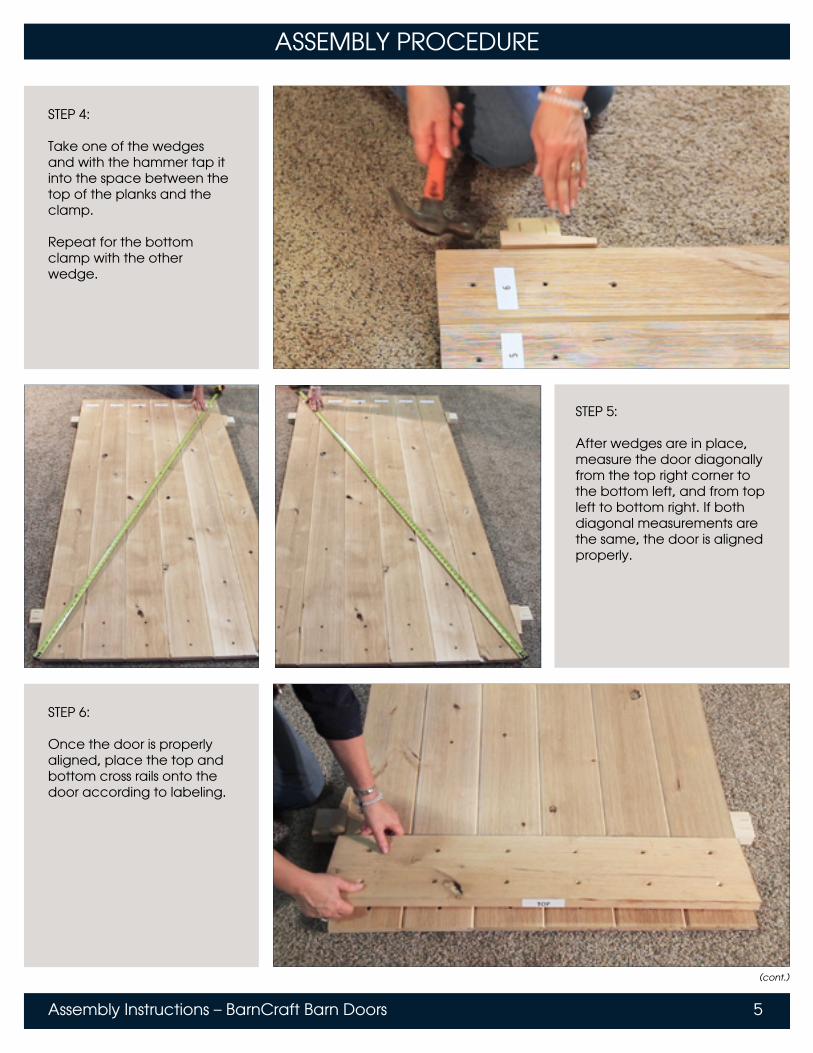
STEP 5:
After wedges are in place, measure the door diagonally from the top right corner to the bottom left, and from top left to bottom right. If both diagonal measurements are the same, the door is aligned properly.
STEP 4:
Take one of the wedges and with the hammer tap it into the space between the top of the planks and the clamp.
Repeat for the bottom clamp with the other wedge.
STEP 6:
Once the door is properly aligned, place the top and bottom cross rails onto the door according to labeling.
(cont.)

Assembly Instructions – BarnCraft Barn Doors 6
ASSEMBLY PROCEDURE
STEP 8:
Each plank, cross rail and brace has pre-drilled holes.
Take the bolts provided and loosely place them into each hole on the cross rails and brace, aligning them with the holes in the planks below.
STEP 7:
Line up and place all brace(s) or rails onto the door according to labeling.
STEP 9:
When everything is aligned and all bolts are in place, screw in the bolts using the 4 millimeter Allen Wrench.
After all of the bolts are screwed in, double check everything. Measure each door diagonally from corner to corner once more. Make sure all bolts are securely tightened.
(cont.)

Assembly Instructions – BarnCraft Barn Doors 7
ASSEMBLY PROCEDURE
STEP 11:
Now your GlassCraft Barn Door is fully assembled.
You are free to paint or stain your door. Please remember to follow all manufacturers paint and staining instructions.
STEP 10:
Take your hammer and lightly tap out the wedges and remove the clamps. When the door is complete you can then discard the clamps and wedges.
For more information about the BarnCraft Rolling Door Collection, please visit: www.glasscraft.com
Plank Z Mid Rail Plank Double X Double Z One Panel Two Panel Double Z Two Panel X Two Panel
GlassCraft Rolling Barn Door Con�gurations
8’0”
6’8”
Plank Z Mid Rail Plank Double X Double Z One Panel Two Panel Double Z Two Panel X Two Panel
GlassCraft Rolling Barn Door Con�gurations
8’0”
6’8”
Plank Z Mid Rail Plank Double X Double Z One Panel Two Panel Double Z X Two Panel Two Panel