Banca Para Jardin
16
Garden Bench It dawned on me the other day that every single project I’ve made resides in my house. Since I spend a lot of time in my back yard garden, I decided it was high time I made something to enjoy in my outdoor living space as well. This backless bench is the perfect project. The bench is now the centerpiece of my yard. Stout mortise-and-tenon joinery and naturally rot-resistant mahogany ensure that it will retain its exalted position for years to come. Traditional joinery holds the framework together; the seat slats are secured with a newer joinery technique, the Miller Dowel system (see “Miller Dowel Joinery System,” below). The bench seemed to be the perfect project on which to try these high-tech dowels. I really liked how quick and easy they were to use compared with the traditional screw-and-plug approach. Assembly Steps 1. Mill all pieces to their final dimensions, except for the spreaders (D) and brace (F). 2. Make a template (Fig. B, page 66) to route the mortises. 3. It’s easy to end up with misplaced mortises. To avoid mistakes, label each leg as front or back, left or right (Fig. A, page 66). Use the template to lay out the mortises. 4. Drill out the mortises on the drill press. 5. Rout the mortises in the bench legs (Photo 1).
-
Upload
joseorrego -
Category
Documents
-
view
218 -
download
0
Transcript of Banca Para Jardin

8/3/2019 Banca Para Jardin
http://slidepdf.com/reader/full/banca-para-jardin 1/16
Garden Bench
It dawned on me the other day that every single project I’ve made resides in my house. Since I spend a lot of
time in my back yard garden, I decided it was high time I made something to enjoy in my outdoor living
space as well. This backless bench is the perfect project. The bench is now the centerpiece of my yard. Stoutmortise-and-tenon joinery and naturally rot-resistant mahogany ensure that it will retain its exalted position
for years to come.
Traditional joinery holds the framework together; the seat slats are secured with a newer joinery technique,the Miller Dowel system (see “Miller Dowel Joinery System,” below). The bench seemed to be the perfect
project on which to try these high-tech dowels. I really liked how quick and easy they were to use compared
with the traditional screw-and-plug approach.
Assembly Steps
1. Mill all pieces to their final dimensions, except for the spreaders (D) and brace (F).
2. Make a template (Fig. B, page 66) to route the mortises.
3. It’s easy to end up with misplaced mortises. To avoid mistakes, label each leg as front or back, left or
right (Fig. A, page 66). Use the
template to lay out the mortises.
4. Drill out the mortises on the drill press.
5. Rout the mortises in the bench legs (Photo 1).

8/3/2019 Banca Para Jardin
http://slidepdf.com/reader/full/banca-para-jardin 2/16
Photo 1: Mortise-and-tenon joinery makes this bench strong and durable. Rout the mortises in the
legs using a template and a top-bearing pattern bit. The bulk of the material has already been
removed on the drill press.
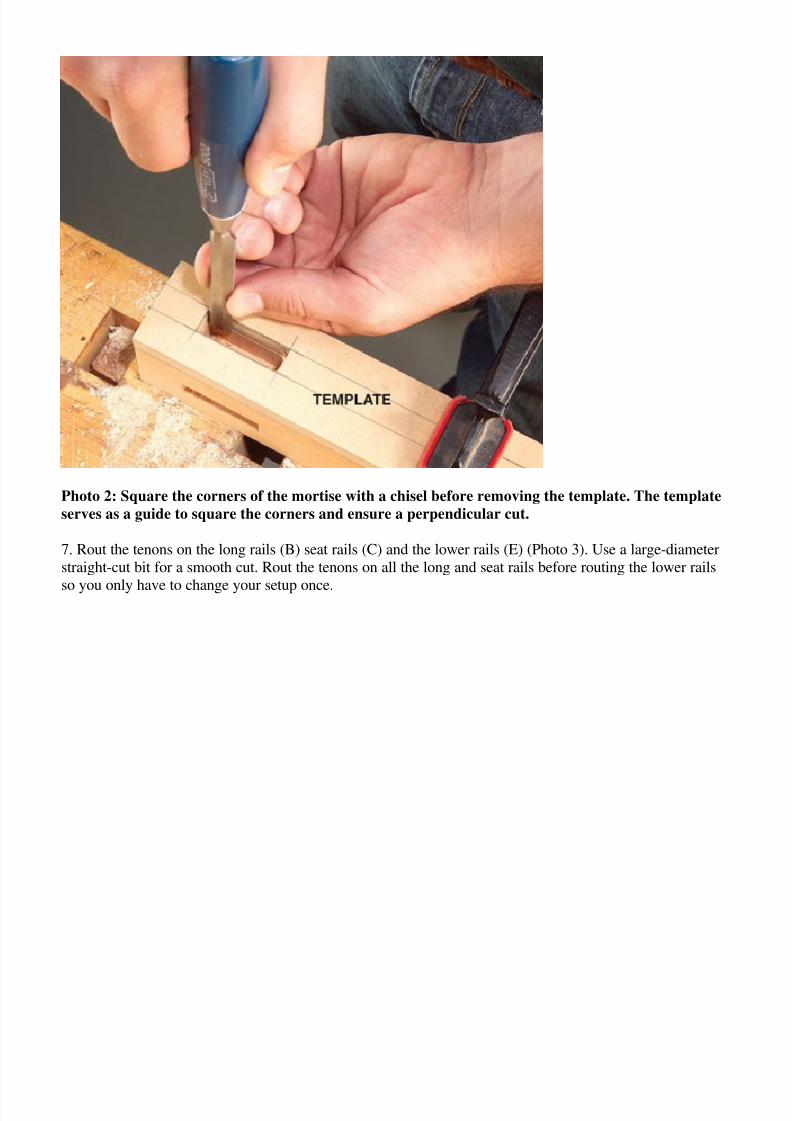
6. Use a chisel to square the mortise’s corners (Photo 2). Do this right after you rout each mortise to avoid
having to reposition the template.
8/3/2019 Banca Para Jardin
http://slidepdf.com/reader/full/banca-para-jardin 3/16
Photo 2: Square the corners of the mortise with a chisel before removing the template. The template
serves as a guide to square the corners and ensure a perpendicular cut.
7. Rout the tenons on the long rails (B) seat rails (C) and the lower rails (E) (Photo 3). Use a large-diameter
straight-cut bit for a smooth cut. Rout the tenons on all the long and seat rails before routing the lower rails
so you only have to change your setup once.

8/3/2019 Banca Para Jardin
http://slidepdf.com/reader/full/banca-para-jardin 4/16
Photo 3: Cut the tenons on the rails with a 3/4-in.-dia. straight bit. A plywood sled with an attached
hardwood fence ensures the shoulders of the tenon are cut square and keeps your hands away from
the spinning bit.
8. Use the dovetail jig (Fig. C, below) to rout the stopped-dovetail grooves in the long rails (Photo 4). Match
the centerline of the socket with the centerline on the jig. Clamp everything firmly to the workbench.

8/3/2019 Banca Para Jardin
http://slidepdf.com/reader/full/banca-para-jardin 5/16
Photo 4: Rout the stopped-dovetail sockets for the seat supports using a simple shop-made jig. Clamp
the jig to the stock and the workbench. Add a stop-block to the jig to cut the shorter sockets for the
brace in the lower rails.
9. Insert the stop block in the jig and rout the dovetail sockets in the lower rails.
10. Rough-cut the seat template pattern (Fig. D, page 68) on the bandsaw and sand smooth.
11. Rough cut the curves in the seat rails on the bandsaw. Finish the profile with the seat template and a
pattern-
cutting bit (Photo 5). Center the template on the rail with the back edges flush.

8/3/2019 Banca Para Jardin
http://slidepdf.com/reader/full/banca-para-jardin 6/16
Photo 5: Rout the curve in the seat rails and spreaders using a template. Center the template on the
rail and secure it with double-sided tape. Climb-cut the last portion of the curve first to prevent
tearout.
12. Sand all the parts to 180 grit.
13. Glue the bench frame in stages, using a waerproof glue, such as Titebond II or III. Assemble the legs,
seat rails and lower rails first to create an end assembly. Then join the end assemblies with the long rails(Photo 6).

8/3/2019 Banca Para Jardin
http://slidepdf.com/reader/full/banca-para-jardin 7/16
Photo 6: Glue the long rails to the assembled end frames. Keep the dovetail groove opening faceup
(that is, down on the bench) on the long rails. The grooves on the lower rails face the opposite
direction to hide the dovetail joint.
14. Determine the exact length of the seat spreader (D) by measuring the distance between the long rails
where they join the legs and adding the length of each dovetail. Cut the spreaders to length. Measuring nearthe legs rather than in the dovetail grooves eliminates measuring any slight bow in the long rails.
15. Measure and cut the brace (F) to length.
16. Route the tails of the dovetails on the seat spreaders and on the brace (Photo 7). Run a few test cuts on
scrap lumber to get the perfect fit.

8/3/2019 Banca Para Jardin
http://slidepdf.com/reader/full/banca-para-jardin 8/16
Photo 7: Rout the tails on the ends of the brace and the seat spreaders. Stabilize the stock using a
push block with a slide attached. Fasten the slide so it runs along the top of the fence. Clamp the stock
to the slide so it butts against the push block.
17. Use a handsaw to notch each tail so they are about 1/8 in. shorter than the sockets.
18. Rout the curves in the spreaders, as done on the seat rails in Step 11. Make sure to use the centerline for
reference. Unlike the rails, the spreaders will have short flats on each end of the curve (Fig. A, below).
19. Sand the seat spreaders and the brace.
20. Glue in the spreaders (Photo 8). Then, flip the bench and add the brace.

8/3/2019 Banca Para Jardin
http://slidepdf.com/reader/full/banca-para-jardin 9/16
Photo 8: Glue the spreaders and the brace to the bench frame. Slide the dovetails together by hand as
far as possible. Use a rubber mallet to tap the joint home. Alternate tapping each end to prevent
binding.
21. Shape the seat slats on the router table with a 1/4-in. round-over bit.
22. Lay out all dowel locations on the seat slats (Fig. A).
23. Attach the seat slats to the bench (Photo 9). First clamp an outside slat so it overhangs the leg by 1/8 in.
Run the drill at the maximum rpm level with a slow feed rate to prevent tearout around the hole.

8/3/2019 Banca Para Jardin
http://slidepdf.com/reader/full/banca-para-jardin 10/16
Photo 9: Install the slats to the bench frame using Miller Dowels. When the first board has been
doweled, use a 1/4-in. spacer to set the gap between the slats. Clamp the end of each slat as you drill
and dowel, working your way across the bench.
24. Use a framing square to keep the slats’ ends aligned.
25. Trim the dowel heads with a flush-cut saw.
26. Sand the slats to 180 grit.
27. Finish the bench with an outdoor finish to preserve its color and appearance or skip the finish and let it
age naturally to a silver-gray color.
Miller Dowel Joinery System

8/3/2019 Banca Para Jardin
http://slidepdf.com/reader/full/banca-para-jardin 11/16
The Miller Dowel system combines the strength of wood joinery with the ease of a screw. Drill the hole,
add the glue, tap the peg and you’re finished. The secret to the dowel’s success lies in its stepped design.The shoulder on the head of the dowel seats before the other shoulders do, driving the parts together much
like a nail does. Horizontal ribs on the dowel absorb moisture from the glue, causing the dowel to swell in
the hole and lock in place. The head of the dowel serves as a plug in the hole, but unlike traditional plugs,

8/3/2019 Banca Para Jardin
http://slidepdf.com/reader/full/banca-para-jardin 12/16
the Miller Dowel leaves dark-looking end grain exposed for a decorative look after the plug is sanded and
finished.
Miller Dowels are available in three sizes and a wide variety of species. A companion stepped drill bit is
specifically designed for each size of dowel. (see Sources, below).

8/3/2019 Banca Para Jardin
http://slidepdf.com/reader/full/banca-para-jardin 13/16

8/3/2019 Banca Para Jardin
http://slidepdf.com/reader/full/banca-para-jardin 14/16

8/3/2019 Banca Para Jardin
http://slidepdf.com/reader/full/banca-para-jardin 15/16

8/3/2019 Banca Para Jardin
http://slidepdf.com/reader/full/banca-para-jardin 16/16