Balloon Sculpture From Scratch 5 - Tux the Penguin · Balloon Sculpture From Scratch 5 - Tux the...
4
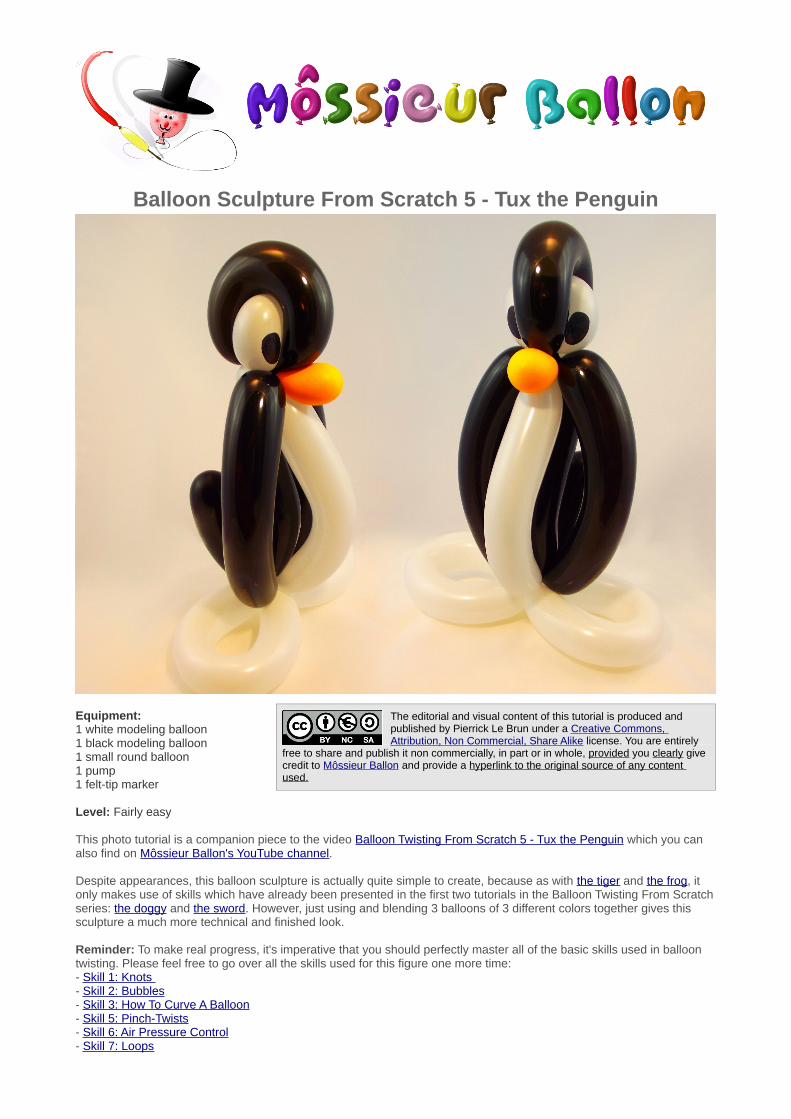
Balloon Sculpture From Scratch 5 - Tux the Penguin Equipment: 1 white modeling balloon 1 black modeling balloon 1 small round balloon 1 pump 1 felt-tip marker Level: Fairly easy This photo tutorial is a companion piece to the video Balloon Twisting From Scratch 5 - Tux the Penguin which you can also find on Môssieur Ballon's YouTube channel . Despite appearances, this balloon sculpture is actually quite simple to create, because as with the tiger and the frog , it only makes use of skills which have already been presented in the first two tutorials in the Balloon Twisting From Scratch series: the doggy and the sword . However, just using and blending 3 balloons of 3 different colors together gives this sculpture a much more technical and finished look. Reminder: To make real progress, it's imperative that you should perfectly master all of the basic skills used in balloon twisting. Please feel free to go over all the skills used for this figure one more time: - Skill 1: Knots - Skill 2: Bubbles - Skill 3: How To Curve A Balloon - Skill 5: Pinch-Twists - Skill 6: Air Pressure Control - Skill 7: Loops The editorial and visual content of this tutorial is produced and published by Pierrick Le Brun under a Creative Commons, Attribution, Non Commercial, Share Alike license. You are entirely free to share and publish it non commercially, in part or in whole, provided you clearly give credit to Môssieur Ballon and provide a hyperlink to the original source of any content used.
Transcript of Balloon Sculpture From Scratch 5 - Tux the Penguin · Balloon Sculpture From Scratch 5 - Tux the...
Balloon Sculpture From Scratch 5 - Tux the Penguin
Equipment: 1 white modeling balloon1 black modeling balloon1 small round balloon1 pump1 felt-tip marker
Level: Fairly easy
This photo tutorial is a companion piece to the video Balloon Twisting From Scratch 5 - Tux the Penguin which you can also find on Môssieur Ballon's YouTube channel.
Despite appearances, this balloon sculpture is actually quite simple to create, because as with the tiger and the frog, it only makes use of skills which have already been presented in the first two tutorials in the Balloon Twisting From Scratchseries: the doggy and the sword. However, just using and blending 3 balloons of 3 different colors together gives this sculpture a much more technical and finished look.
Reminder: To make real progress, it's imperative that you should perfectly master all of the basic skills used in balloon twisting. Please feel free to go over all the skills used for this figure one more time:- Skill 1: Knots - Skill 2: Bubbles- Skill 3: How To Curve A Balloon- Skill 5: Pinch-Twists- Skill 6: Air Pressure Control- Skill 7: Loops
The editorial and visual content of this tutorial is produced and published by Pierrick Le Brun under a Creative Commons, Attribution, Non Commercial, Share Alike license. You are entirely
free to share and publish it non commercially, in part or in whole, provided you clearly give credit to Môssieur Ballon and provide a hyperlink to the original source of any content used.

1- Inflate a white balloon leaving a margin at the end of slightly more than the width of a hand. Then tie theknot.
2- Do likewise with a black balloon and tie the knotted end of each balloon together.
3- With the white balloon, make a first oval bubble about three fingers wide.
4- Make a second, identical bubble, following the first.
5- Twist the bubbles several times around their base to keep them in place. We already have our penguin's eyes!
6- Roll the black balloon along the groove located between the two white bubbles. In this way, shape a wide black loop and bring its base to the base of the two white bubbles.
7- Twist the two white bubbles and the black loop several times around their base to keep them in place. We've just made the head of our penguin.
8- Push the air to the end of the remaining portion of black balloon (don't bother with the remaining portion of white balloon for the moment), you should get a shape similar to this one.
9- Make a zigzag with the rest of the black balloon so that the last segment is slightly longer than the first two. Make a mental note of the position of each of the two bends thus formed.
10- Make a first long bubble at the first bend formed by the zigzag.
11- Then make a second long bubble, identical to the first, normally it should fall more or less at the second bend formed by the zigzag.
12- Twist the two large black bubblesaround their base several times to block them at the base of Tux's head.

13- You should now have a shape resembling this one, with at the center, under the head, the two wings we've just created (the two long black bubbles).
14- With what's left of the black balloon, make a bubble that's shorterthan the previous two. Doing so you will also get one final bubble that should be wedged between the two wings.
15- Then roll this last bubble several times between the wings to keep everything firmly in place. You can now make out Tux's head, wings, back and tail.
16- Go back to the white balloon andform a small, round bubble at the base of Tux's head.
17- Make this bubble into a pinch-twist which will enable us to keep Tux's head firmly in place on top of its back and shoulders (or rather its back and wings).
18- Notice that the rest of the white balloon is naturally located under the pinch-twist.
19- You will have to feed it through tothe other side, so that we can use it to make Tux's belly.
20- Push the air in the white balloon a bit towards the end, and shape a large bubble for the belly which should look a little rounded.
21- Then finish pushing the air all theway to the end of the white balloon so that there is no remaining length of empty balloon.
22- Make a small bubble at the tip of the white balloon.
23- Then wedge the small white bubble into the joint common to the base of the wings, the base of the back, and the tail. It doesn't matter which side the bubble is sticking out from for now. What matters is the large loop.
24- We are now going to learn how to divide one big loop into two smaller loops. To do this, twist the large white loop into two equal parts and take note of the central mark.
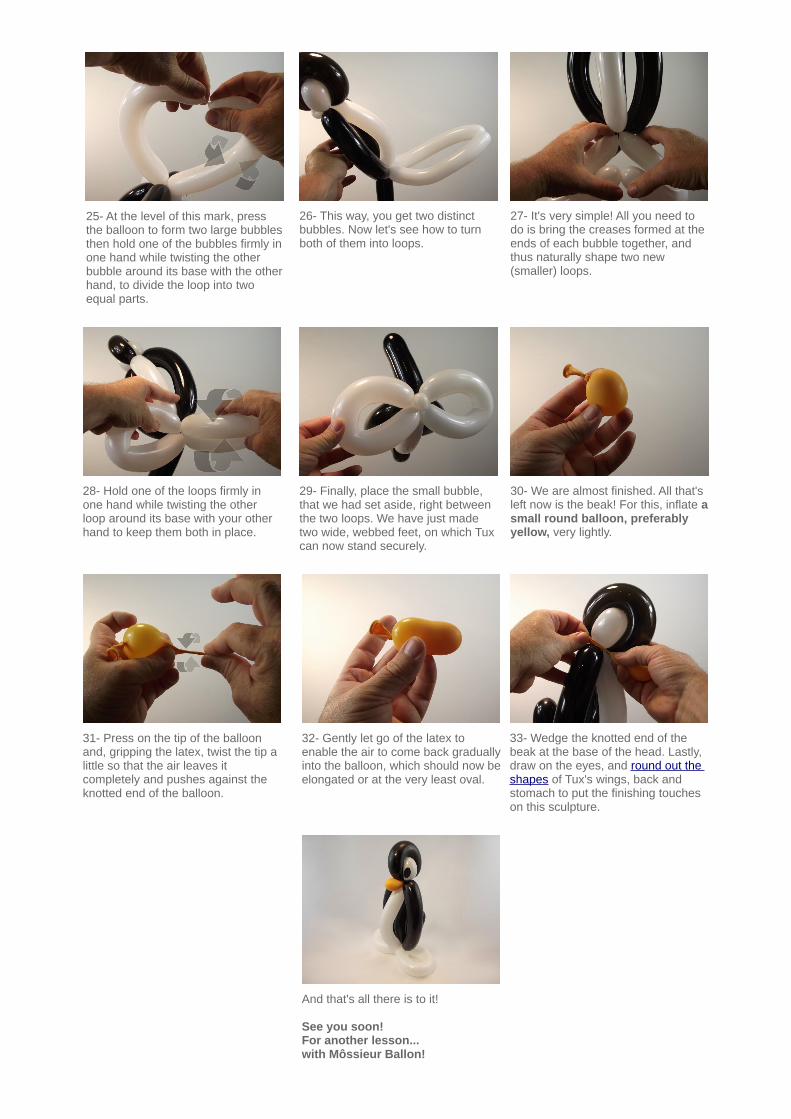
25- At the level of this mark, press the balloon to form two large bubblesthen hold one of the bubbles firmly inone hand while twisting the other bubble around its base with the otherhand, to divide the loop into two equal parts.
26- This way, you get two distinct bubbles. Now let's see how to turn both of them into loops.
27- It's very simple! All you need to do is bring the creases formed at the ends of each bubble together, and thus naturally shape two new (smaller) loops.
28- Hold one of the loops firmly in one hand while twisting the other loop around its base with your other hand to keep them both in place.
29- Finally, place the small bubble, that we had set aside, right between the two loops. We have just made two wide, webbed feet, on which Tux can now stand securely.
30- We are almost finished. All that's left now is the beak! For this, inflate asmall round balloon, preferably yellow, very lightly.
31- Press on the tip of the balloon and, gripping the latex, twist the tip a little so that the air leaves it completely and pushes against the knotted end of the balloon.
32- Gently let go of the latex to enable the air to come back graduallyinto the balloon, which should now beelongated or at the very least oval.
And that's all there is to it!
See you soon!For another lesson...with Môssieur Ballon!
33- Wedge the knotted end of the beak at the base of the head. Lastly, draw on the eyes, and round out the shapes of Tux's wings, back and stomach to put the finishing touches on this sculpture.