Badminton Footwork Bible
21
Badminton footwork Footwork is about movement skills. While it’s obvious that racket skills are important in badminton, many players underestimate the importance of good movement skills. The importance of f ootwork Badminton is a fast game; you have little time to respond after each shot. A second’s delay often turns a winning situation into a losing one. Reaching the shuttle early Good footwork will help you to reach the shuttlecock early. This is desirable in all situations. You should play your shots from the highest point you can. Don’t allow the shuttlecock to drop! Playing the shuttlecock from the highest point gives you options to hit downwards. You don’t necessarily have to use those options every time, but the mere threat of downwards shots gives your opponents a lot more to worry about. At the front of the court, taking the shuttlecock early has an especially dramatic effect. If you reach it early, you can often play a net kill and end the rally at once; but if you delay even a second, then you will lose the option to play a net kill, as the shuttlecock drops below net height. You can still play a net shot, but that’s not as good as a kill. At the back of the court, you want to hit the shuttlecock overhead at full relaxed reach. Reach upwards! Allowing the shuttleco ck to drop here is fatal! You will be forced to play a weak shot; when the shuttlecock is below net height, most players struggle to play a good-length clear, and obviously a smash is impossible. It’s also much better to get behind the shuttle cock at the back of the court. This gives you a more threatening smash, and makes all your overhead shots easier. If you are slow to move backwards, then you may be forced to hit the shuttlecock from behind your body. It’s still poss ible to play smashes , clears , and drops; but it’s much more diffic ult, and your smashes will be less powerful. Hitting from a balanced position Good footwork helps you remain balanced while you hit the shuttlecock. Staying balanced affords you the best control of your shot, because you do not need to correct for body movement. If you are unbalanced, then it’s much harder to control your hitting action. You have to compensate for your body moti on; the gr eater your body motion, the harder it is to compensate. Think about it like this: if you were playing golf, would you rather play in a hurricane or on a calm day? It’s possible to correct for wind, but strong winds make it much harder to control
-
Upload
pankaj-singh -
Category
Documents
-
view
238 -
download
0
Transcript of Badminton Footwork Bible

8/3/2019 Badminton Footwork Bible
http://slidepdf.com/reader/full/badminton-footwork-bible 1/21
Badminton footwork
Footwork is about movement skills. While it’s obvious that racket skills are important in
badminton, many players underestimate the importance of good movement skills.
The importance of footwork
Badminton is a fast game; you have little time to respond after each shot. A second’s delay
often turns a winning situation into a losing one.
Reaching the shuttle early
Good footwork will help you to reach the shuttlecock early. This is desirable in all situations.
You should play your shots from the highest point you can. Don’t allow the shuttlecock todrop! Playing the shuttlecock from the highest point gives you options to hit downwards.
You don’t necessarily have to use those options every time, but the mere threat of downwards
shots gives your opponents a lot more to worry about.
At the front of the court, taking the shuttlecock early has an especially dramatic effect. If you
reach it early, you can often play a net kill and end the rally at once; but if you delay even a
second, then you will lose the option to play a net kill, as the shuttlecock drops below net
height. You can still play a net shot, but that’s not as good as a kill.
At the back of the court, you want to hit the shuttlecock overhead at full relaxed reach. Reach
upwards! Allowing the shuttlecock to drop here is fatal! You will be forced to play a weak shot; when the shuttlecock is below net height, most players struggle to play a good-length
clear, and obviously a smash is impossible.
It’s also much better to get behind the shuttlecock at the back of the court. This gives you a
more threatening smash, and makes all your overhead shots easier. If you are slow to move
backwards, then you may be forced to hit the shuttlecock from behind your body. It’s still
possible to play smashes, clears, and drops; but it’s much more difficult, and your smashes
will be less powerful.
Hitting from a balanced position
Good footwork helps you remain balanced while you hit the shuttlecock. Staying balanced
affords you the best control of your shot, because you do not need to correct for body
movement.
If you are unbalanced, then it’s much harder to control your hitting action. You have to
compensate for your body motion; the greater your body motion, the harder it is to
compensate.
Think about it like this: if you were playing golf, would you rather play in a hurricane or on a
calm day? It’s possible to correct for wind, but strong winds make it much harder to control

8/3/2019 Badminton Footwork Bible
http://slidepdf.com/reader/full/badminton-footwork-bible 2/21
your shot. Body movement is like wind: it’s a distraction from your precise control of the
shuttlecock.
Quicker recovery for the next shot
It’s not much good retrieving only one shot. You need to get ready for the next one.
Good footwork will help you recover into a position to cover the next shot. If you are slow to
recover, however, then your opponent will inevitably gain an advantage. Even a slight delay
can be exploited, because it can be compounded : if your opponent plays intelligently, you
will find yourself even farther out of position on the next shot.
Prevention of injuries
Poor footwork often leads to injuries. Many of these can be prevented with only a few
minutes’ instruction in safe footwork.
In particular, all players should learn good lunge technique.
Your ready position is the stance and position that you want to reach before your opponent
hits the shuttlecock.
It’s called the ready position because it helps you get ready for the next shot.
Your actual position on court will vary a lot depending on whether you are playing singles or
doubles, and also depending on the circumstances during the rally.
(For the basic positions in doubles, read about doubles positioning.)
Although there are many variations, it’s still good to learn a basic ready position. Once you
understand these basic ideas, you can adapt the ready position for different situations.
Elements of the ready position
Stance
You should be ready with a somewhat wide stance: your feet a little more than shoulder-
width apart. You cannot simply stand there, feet together, as though waiting for a bus!
Your weight should be lowered a little, with your knees slightly bent. Your weight should be
shifted forwards a little, so that you are on the balls of your toes.
This does not mean that you should be perched uncomfortably on your tiptoes, leaning
forwards so much that you almost fall over! Rather, you need to lean forwards just enough to
take the weight off your heels. Failure to do this will leave you flat footed.
Your right foot should be slightly ahead of your left foot—only about half a foot length
ahead. This position is effective for covering all four corners of the court (I’ll explain why
later when we look at singles footwork).

8/3/2019 Badminton Footwork Bible
http://slidepdf.com/reader/full/badminton-footwork-bible 3/21
Racket carriage
Your badminton racket position varies a lot depending on the situation.
It should never be left to dangle near your ankles, however. Bring your racket up! Your
racket should be held out in front of you, and away from your body. Typically you will holdit about waist height; but you’ll hold it higher when attacking and lower when defending.
Your left arm
Don’t forget that you have two arms! Although your left arm does not hit the shuttlecock, it
affects your balance a great deal.
Your left arm should be used to balance your right arm and racket. In the ready position, this
generally means holding it in front of your body and slightly out to the side.
Never leave your left arm dangling at your side!
Badminton footwork patterns use a variety of basic movement elements; this page gives a
brief overview.
The professionals make it look easy. When you watch their footwork, you’ll often get the
feeling that they are gliding effortlessly around the court. They make the court look smaller
than it really is.
What you’re observing here is fluid footwork . Each movement flows seamlessly into the next,
and every movement is made without hesitation. Professional badminton players knowexactly which footwork patterns to use, without having to think: their vast experience allows
them to select the right patterns instinctively.
Learning this quality of footwork takes a long time. Before you can put it all together, you
need to become familiar and comfortable with the basic elements of badminton movement.
Elements of movement

8/3/2019 Badminton Footwork Bible
http://slidepdf.com/reader/full/badminton-footwork-bible 4/21
Steps
Steps are the most natural element of badminton movement. Everyone knows how to put one
foot in front of the other!
But in badminton, you need to be comfortable stepping in all directions: forwards, backwards, sideways, and diagonally. Everyone is comfortable stepping forwards; but ask
people to step backwards quickly and without looking , and you’ll find few people who
succeed on their first attempt.
But this is fundamental to badminton. You must learn to be comfortable taking large, fast
steps backwards.
To distinguish steps from chassés, we often describe steps in badminton as cross-overs. For
example, I might say something like this: Try using a cross-over instead of a chassé.
Chassés
A chassé is an alternative movement to a step. Which is better? Well, they are different
movements, and all good players will use both; to compare their virtues, read about steps vs.
chassés.
To perform a chassé, step out with one foot and then bring the other foot in the same
direction—but do not cross your feet. In a chassé, one foot leads while the other foot
follows. The leading foot is always ahead of the following foot.
Key tip
The word chassé means chase in French.
Imagine that one foot is chasing the other, but never quite catches up.
The leading foot often points in the direction of travel, but not always. For example, a typical
backwards chassé for an overhead forehand keeps the leading foot pointing sideways, not
backwards.
The following foot always points at right-angles to the direction of travel. For example, if you
are chasséing to your right, then your left foot (the following foot) will be pointing roughly
forwards.
When chasséing, keep your movements long and low. A high, bouncy chassé is useless;
remember that your purpose is to cover distance quickly.
Hitches
A hitch is a fast, short movement along the ground that uses mainly the ankles.
You must start with a wide base (legs wide apart). Your feet must be aligned in the directionyou want to travel (imagine drawing a line between the feet).

8/3/2019 Badminton Footwork Bible
http://slidepdf.com/reader/full/badminton-footwork-bible 5/21
To perform a hitch, push off with both ankles, so that you spring lightly along the ground.
You should travel a short distance very quickly, without having moved your legs.
These movements are much neglected in badminton coaching. Indeed, they are ignored to
such an extent that we don’t even have a standard name for them! The term hitch is obscure,
but I can’t find a better alternative.
Hitches are sometimes called shuffles or hops.
Jumps
Jumping is fundamental to badminton movement, especially in the rearcourt.
Jumps can be in any direction. You can push off with one or two feet, and land with one or
two feet (a two-footed landing is greatly preferred when possible, because it’s kinder on your
knees).
When most players think about jumping in badminton, they imagine the jump smash. A jump
smash involves jumping for height, so that you can smash with a steeper angle.
Although a big jump smash is a fearsome shot, it’s also advanced and specialist. There are
many other, more useful jumps in badminton—the subtler jumps that help you cover the
court faster.
In particular, jumping is useful for playing overhead forehands. In most situations, you
should get both feet off the ground at least for a moment, while you are playing an overhead
forehand shot.
Lunges
Lunges are useful in all corners of the court, but especially at the front. Lunges can be in any
direction, but you always lunge in the direction you are moving.
At the net, a lunge allows you to reach forwards to take the shuttlecock early, while also
preparing to recover to a more central position.
Good lunging technique is very important, both for your speed of movement and also to
prevent injuries.
The split drop
The split drop is a technique for making a quick start, when you don’t know in advance
which way you will need to go.
This skill is so important that I’ve devoted a separate page to explaining the split drop (and
I’ll probably write several more pages about it later!).
The split drop is an essential technique for starting quickly in badminton.

8/3/2019 Badminton Footwork Bible
http://slidepdf.com/reader/full/badminton-footwork-bible 6/21
It may sound mysterious and technical; but every professional player does this, every time.
The split drop is also known by the names split step, pre-loading hop, bounce start , and many
other variations. They all refer to the same thing.
The split drop
The importance of a quick start
After your opponent makes a shot, you need to react quickly.
You don’t need to move very far—typically just two large steps—but you don’t have much
time to get there.
Think about how important the start is for 100m sprinters. Unlike marathon runners, sprinters
use special starting blocks to help launch themselves forwards. The shorter the distance, the
more important your starting movement is.
But in badminton, you typically move only about 3–4 metres from your starting position.
Compare that to 100m sprinting, and you can understand how essential a quick start is in
badminton.
Split drop technique
The split drop involves widening your base (the split) and lowering your base (the drop) at
the same time.
Start in the ready position. Now push upwards slightly to get your feet just off the ground. As
your feet are coming off the ground, widen your legs so that you land with your feet farther
apart. As you land, bend your knees so that you land in a slightly lower posture than before
(with the knees bent more).
A casual observer would not even realise that you momentarily took your feet off the floor.
Your feet barely leave the surface before you land again.

8/3/2019 Badminton Footwork Bible
http://slidepdf.com/reader/full/badminton-footwork-bible 7/21
The whole process takes a mere instant, and then you are ready to push off and move to the
shuttlecock.
Timing the split drop
You should start your split drop just as the opponent is hitting the shuttlecock, so that youcomplete it just after you see where the shuttlecock is going.
This timing must be precise. If you split too late, your movement is delayed; but if you split
too early, you lose the bouncing effect.
Practise timing your split drop so that you can move off immediately after seeing where the
shuttlecock is going.
How does the split drop work?
Counter-movements
Widening your base allows you to push off into the ground with one foot, at an angle. For
every movement, you need an initial counter-movement in the opposite direction. So if you
want to move forwards, you have to push off backwards with one foot.
That’s why the ready position has your right foot slightly in front of your left foot. If the feet
were completely side-by-side, it would be difficult to initiate forwards or backwards
movement.
The stretch-shortening cycle
Muscles are able to generate more force if they are lengthened (stretched) and then
immediately shortened (contracted). This is called the stretch-shortening cycle.
More technically, this occurs when an eccentric muscle contraction is followed immediately
by a concentric muscle contraction.
The important thing to understand is that you cannot wait. Your pushing-off movement must
immediately follow your split-drop; otherwise, the benefits are lost.
Even among coaches, there is often confusion about the merits of steps vs. chassés.Sometimes a coach will teach only chassés, believing that they make steps redundant (this is
an error).
The reality is that both steps and chassés are useful, but they have different merits.
Steps: the fastest way to cover distance
Consider (again) a 100m race. If one of the runners decided to use chassé steps instead, how
well do you think he would perform?

8/3/2019 Badminton Footwork Bible
http://slidepdf.com/reader/full/badminton-footwork-bible 8/21
Chassés are much slower at covering long distances, because the length of each stride is
smaller. Because of this, there are many situations in badminton where running steps are by
far the faster method to reach the shuttlecock, and using a chassé instead would just be silly.
You should generally avoid stringing multiple chassés together for covering distance.
Running steps would be faster. Most of the time, it’s inefficient to string two chasséstogether; and you should certainly not string three chassés together!
(This is not the same as following one chassé with another. Multiple consecutive chassés can
often be useful to help you change direction quickly.)
Chassés: dynamic footwork
Chassés, although slower over distance, have some interesting advantages over steps.
Chassés are adaptable for different distances
The effective length of a running step is fixed by your leg length: short steps are a hideously
inefficient method of movement. Chassés, however, remain efficient regardless of whether
you need a full-length chassé or a small adjustment chassé.
It’s important to realise that you do not need to bring your feet fully together for a chassé.
This is optional; sometimes the feet come almost together, and sometimes they stay wide
apart. The more distance you intend to cover with a single chassé, the closer your following
foot must move to the leading foot.
This is what makes chassés so adaptable: you can speed up a short chassé by moving eachfoot only a small amount (so the feet don’t move close together). This doesn’t work with
ordinary running steps.
Because of these differences, chassés are faster than running steps over very short distances.
They also keep you on-balance throughout the whole movement, and minimise body rotation
(which can get in the way of hitting a good shot).
Chassés help you jump
Unlike running steps, chassés keep both feet close to the ground at all times. A good chassé
feels like you are skimming across the floor! Chassés also keep you in a balanced position atall times, whereas a running step depends on using imbalance to create movement.
These differences make chassés more effective than running steps when you want to launch
yourself into a jump at the end. At the end of a chassé movement, you have both feet wide
apart and on the ground, and you are well balanced. This helps you to make a powerful two-
footed take-off.
Running steps, however, generally force you to use a one-footed take-off if you want to move
immediately into a jump. One-footed take-offs are less powerful.
Lunge technique is a boring topic, so most players ignore it.

8/3/2019 Badminton Footwork Bible
http://slidepdf.com/reader/full/badminton-footwork-bible 9/21
Successful athletes, however, pay attention to the boring things as well as the fun things. If
your lunge is slightly wrong, then your knees will suffer.
A good lunge will also help you reach farther and recover more quickly.
Lunge technique
The purpose of a lunge
Lunging provides several benefits:
• A good lunge absorbs lots of force, without hurting your joints.• A lunge provides a balanced position from which to hit your shot.• Lunges maximise your reach, so that you can take the shuttlecock earlier.• After the shot, you can use your lunging leg to push back in the direction
you came from.
Lunge basics
Lunges involve making one final large step, so that you finish your movement with your foot
well away from your body, in a low posture with the lunging knee bent.
In most situations, you should lunge with your right foot leading. This helps you to stay on balance, by keeping your arms balanced above your legs. It also gives you the maximum
reach.
When lunging to your backhand side, however, it is quicker to lunge with your left foot
leading. Nevertheless you will often need to lunge with your right foot, in order to reach
backhand shots that are farther away.
As much as possible, keep your upper body upright throughout the lunge. If you fail to
control your upper body movement, you will bend at the waist too much and will have
difficulty recovering for the next shot. Avoid trying to reach the shuttlecock by bending at the
waist; make a deeper, lower lunge instead.

8/3/2019 Badminton Footwork Bible
http://slidepdf.com/reader/full/badminton-footwork-bible 10/21
Protecting your knees and ankles
If your lunge technique is slightly wrong, you are at risk of damaging your knees or ankles.
There are several important points to follow:
The foot must point in the direction of the lunge
Whatever direction you are lunging in, your leading foot must point that way.
For example: if you are lunging towards the right tramlines, then your leading foot must point
towards the right tramlines when it lands.
It’s common for players to make a sideways lunge with both feet pointing forwards. This is a
dangerous habit and must be corrected at once.
Years ago, I severely sprained my right ankle because of this footwork error; at the time, Iwas unaware of the correct method. I wish I had been taught the correct method; instead, I
learned about this by injuring myself—permanently.
The foot and knee must stay in alignment
When you lunge, a large force travels up your leg. This force is supposed to be absorbed by
your muscles; but if you get the technique wrong, it will go into your joints instead (that’s
bad. Really, really bad).
The knee must be lined up with the foot. Ideally, the knee should stay lined up with your
second toe (the one next to your big toe).
If the foot is turned in or out, then the knee is placed in an unstable position and is susceptible
to damage. This typically leads to patello-femoral pain syndrome (runners’ knee in the US).
To maintain ankle stability, however, some players choose to turn the foot out very slightly.
This is an acceptable compromise, but should be kept to an absolute minimum in order to
safeguard your knees.
The knee must not travel beyond the foot
As you complete a lunge, your forwards movement will cause the knee to move towards the
foot.
This movement must not continue beyond the point where the knee is directly over the foot.
The angle under the knee should be more than 90 degrees throughout the lunge.
Naturally you may ask, What if I need to lunge farther? The solution is simple: get lower
down. The longer your lunge, the lower it must be. This allows you to keep the knee behind
the foot, while still gaining maximum reach.
That’s why these types of lunges are called deep lunges.

8/3/2019 Badminton Footwork Bible
http://slidepdf.com/reader/full/badminton-footwork-bible 11/21
The heel must strike first
Another common error is to contact the floor with your toe first, or all of your foot together.
You must make contact first with your heel, and then roll onto the rest of the foot.
Using this heel-to-toe contact absorbs a surprising amount of force. If you land flat-footedinstead, guess where that extra force is going? That’s right: into your joints!
You can imagine that you are stepping on the brake pedal of a car. The heel-first contact acts
as a braking mechanism.
In order to make this heel-first contact, you must deliberately throw your lower leg out in the
direction of your lunge, so that your toes are pointing somewhat upwards. This requires a
conscious effort at first, but should eventually be drilled into you so that it happens
automatically.
(Making an effort to throw out your lower leg has another benefit: it helps to ensure that your
knee will remain behind your foot.)
The backwards foot
The backwards foot should also be used as a brake (the more force-absorbing components,
the better!). Turn the foot outwards so that the inside side is dragged along the floor, and
allow it to drag forwards towards your front foot.
As well as providing a brake, dragging in the back foot reduces the width of your base. If you
don’t do this on deep lunges, you will finish with your feet too far apart (an excessively wide base), and it will be difficult to push off again for the next shot.
If you do this properly, your left badminton shoe will develop a distinctive wear pattern on
the inside side wall. This will eventually become a hole. This is perfectly normal, and
actually indicates that this element of your footwork is correct.
The scissor jump is often used as the last movement when hitting overhead forehands.
It’s called a scissor jump because the legs swap positions while in the air. This motion bears a
vague resemblence to closing a pair of scissors.
Scissor jumps are also known as scissor kicks.
Scissor jump technique
Start near the back of the court, in a side-on position with your right foot back and your left
foot forward.
Now jump straight off the ground, turning your body as you hit the shuttlecock, so that your
feet swap places when they land: your right foot is now in front, with your left foot behind.
Your left foot should land momentarily before your right foot.

8/3/2019 Badminton Footwork Bible
http://slidepdf.com/reader/full/badminton-footwork-bible 12/21
In a real game, you will often still be moving backwards as you make a scissor jump.
Foot rhythm
You can learn the rhythm of the scissor jump by practising continuous scissor jumps.
Make a scissor jump. Then step your left foot forwards to recover. Then step your right foot
backwards to return to the side-on starting position. Finally, repeat the scissor jump.
The rhythm is like this: left, right—left, right. Let me explain that:
1. You jump. Both feet come off the ground and switch places in the air.2. You land, one foot immediately after the other: left, right.3. You recover forwards with your left foot, and then step back again with
your right foot: left, right.4. You jump again…
Benefits of a scissor jump
Scissor jumps allow you to play more powerful forehands, because you get your feet off the
ground and turn your body and shoulders.
Scissor jumps also help you make a quick recovery forwards, because you can push forwards
with your left foot as soon as it lands.
Scissor jumps are not always appropriate
A scissor jump is only effective when you are able to get behind the shuttlecock (or at least
level with it).
If the shuttlecock is behind you, then you will need to strike it with your badminton racket
behind your body. This is not compatible with a scissor jump; scissor jumps create an impact
point level or in front of the body.
A block jump, however, may be a good choice in this sitution.
The block jump is used to intercept the shuttlecock with a forehand or round-the-head
forehand action.
Comparing block jumps with scissor jumps
With the scissor jump, you lead your jump with the right foot but then swap your feet
positions in mid-air.
With the block jump, your feet don’t swap. You land with the same foot position as you
started.

8/3/2019 Badminton Footwork Bible
http://slidepdf.com/reader/full/badminton-footwork-bible 13/21
Examples of block jumps
The canonical block jump: a forehand jump-out
In this case, you jump backwards to play a forehand overhead with the shuttlecock behind
your body. You start in a side-on position, jump, and remain in the side-on position when youland. The right foot stays behind the left foot during the whole jump.
Jump-out footwork
Sideways block jumps
You can also jump out to the side. In this case, your body is square-on (parallel) to the net.
When jumping to the forehand side, your right foot leads; when jumping to the backhand
side, your left foot leads. Your feet do not cross over; they remain wide apart throughout the
jump.
When you jump out to your right, you can usually land with both feet together (and this is
preferable). When you jump out to your left, however, you are playing a round-the-head
forehand, and will therefore be less balanced; usually, you’ll be forced to make a one-footed
landing with your left foot (but ground your right foot as soon as possible).
Block jumps into the backhand rear corner (round-the-head)
Block jumps are less effective in the backhand rearcourt, because a round-the-head
movement cannot be combined with a contact point that is well behind the body.
Nevertheless, you can use a block jump if you’re able to intercept the shuttlecock while it is
still level with the body (or only very slightly behind). This often requires a near-contortionist
round-the-head movement!
For these round-the-head block jumps into the rearcourt, the left foot is behind the right foot
during the jump (that’s the opposite way around from the forehand corner block jump).

8/3/2019 Badminton Footwork Bible
http://slidepdf.com/reader/full/badminton-footwork-bible 14/21
Even if you are a doubles-only badminton player, you need to learn singles footwork. The
footwork patterns used for singles movement are also essential for doubles movement.
Once you have good singles footwork, you can easily adapt it for doubles too.
This section will teach you how to move from a central singles base to each of the four corners:
• Footwork to the front corners• Footwork to the forehand rear corner• Footwork to the backhand rear corner
Your starting position
When practising these footwork patterns, you should start in a typical singles base position:
in the middle of the court, but one small step closer to the back line than the net.
A challenge!
Practise reaching all four corners with the fewest steps you can.
Many players add unnecessary steps, because they are not confident of their footwork
patterns. This wastes time; it’s better to take fewer, longer steps.
From a typical central singles base, you should be able to reach any corner in only two
movements. For example: a step and a lunge, or a chassé and a jump
The basic footwork pattern is essentially the same for both front corners: split drop, step with
your left foot, and lunge with your right foot.
Pattern summary: split, left, right.
The basic pattern (for both sides)
(1) Split drop
Start with a split drop. As you land, you should shift your weight towards your right foot, so
that your left foot will be free to push off and make the first step.
(2) Step with your left foot
Take step with your left foot towards the front corner. Try to cover as much distance as you
can with this step, rather than just relying on a deep lunge at the end.
(3) Lunge with your right foot
Finish the movement with a lunge into corner. Remember to maintain good
lunging technique.

8/3/2019 Badminton Footwork Bible
http://slidepdf.com/reader/full/badminton-footwork-bible 15/21
On the backhand side, you will need to turn your body as your right foot crosses over for the
lunge.
Variations
Chassé steps
In many situations, a chassé will be more effective than a cross-over step. Chassés are faster
when you have a short distance to cover, such as when you are already in the forecourt (after
you played a net shot, for example).
Chassés are often used for travelling to the forehand front corner. A good example would be
when you play a high serve, and your opponent plays a fast drop shot to your forehand. You
would normally be best using a chassé here.
If you are travelling a longer distance, however, you should use steps instead. For example:
suppose you just played a clear from your backhand corner, and your opponent plays the
same fast drop shot to your forehand. In this situation, because you are travelling from the
rearcourt (a longer distance), you would use running steps.
Similarly, if your opponent plays a slow drop shot, you will normally need running steps and
not chassés (the distance to cover is longer, but you have more time).
Chassés are not effective for reaching drop shots in the backhand corner, because you need to
turn your body for the final lunge. Normally you would use running steps here. Chassés are
often the better option for reaching net shots, however (a shorter distance to cover than drop
shots).
The forehand reversed cross-over
Sometimes, when travelling to the forehand front corner, it’s more effective to cross your left
foot behind your right foot. This is often the case when your movement is more sideways
than normal (as when you have just played a shot on the backhand side of the court).
Crossing the foot behind may feel odd at first, but it’s a useful variation. It can often save you
from being forced into awkward over-rotation of your body in order to perform a normal
cross-over step.
The Danish leap into the backhand net corner
This is an obscure footwork pattern, which I’ve heard originated in Denmark. It is best suited
to tall players. You won’t get many chances to use this.
If you are able to anticipate your opponent’s shot to your backhand front corner, then you can
sometimes position your feet to point towards that corner: the left foot is in front of the right
foot. Note that this is the opposite way around from your normal ready position.
From this position, you can reach the backhand front corner by making one huge leap. You
push off from your right foot with a powerful leap towards the corner, turning your bodywhile in the air, and land with a lunge on your right foot.

8/3/2019 Badminton Footwork Bible
http://slidepdf.com/reader/full/badminton-footwork-bible 16/21
Even when your ready position is biased towards the forehand side (as when your opponent is
in the rearcourt on your forehand side), you can use this leap to reach the backhand front
corner. It’s not easy, but it is possible.
If you succeed in using this footwork pattern, you will take the shuttlecock very early. The
problem with this footwork is that you must be confident that your opponent will hit to the backhand front corner. The Danish leap ready position is terrible for reaching the backhand
rear corner or the forehand front corner.
There are three basic patterns of footwork to the forehand rear corner: the arc step, the jump-
out, and the step-out.
Each is useful in different situations.
The arc step
Use this footwork pattern when you have time to get behind the shuttlecock.
Arc step footwork
The idea of the arc step is to position yourself directly behind the shuttlecock, in a fully side-
on hitting position, so that you can threaten to play a full-power smash. By contrast, the other
two footwork patterns place you diagonally into the corner (the fastest way).
Pattern summary: split, arc step, scissor jump.
1) Split drop
From the ready position, make a split drop. As you land, shift your weight slightly onto your
left foot (because you are about to push off to your right).
If you anticipate your opponent’s shot, then you can complete your split drop with your right
foot behind your left foot, so that your feet are already angled into the corner. This makes the
next movement easier.

8/3/2019 Badminton Footwork Bible
http://slidepdf.com/reader/full/badminton-footwork-bible 17/21
2) Arc step
This involves moving sideways and backwards while turning your body to a side-on,
aggressive hitting position. You do not move directly into the corner (a diagonal movement),
but rather you make a slight arc, in order to achieve the side-on position.
You can think of the arc step as a turning chassé , where the chassé movement is initially to
your right, but then smoothly changes into a backwards movement as you turn your body
part-way through.
Sometimes, however, it’s more of a turning jump than a turning chassé . For example: when
you have not anticipated your opponent’s shot, your split drop will finish in the standard
position of right foot ahead of the left foot. In this case, you may need a jump to begin the arc
step.
3) Scissor jump
Finish with a scissor jump. This jump should take you backwards and somewhat upwards; hit
the shuttlecock while you are in the air.
If you have time to spare, however, get fully to the back (use an extra chassé or step if
necessary) before jumping straight upwards (rather than backwards). This will improve your
recovery for the next shot.
Jump-out
Use this footwork pattern for intercepting the shuttlecock when it is travelling behind you.
For example, you can often use a jump-out to intercept a shallow lift, allowing you to play a
winning half-smash.
Pattern summary: split, chassé, block jump.
Jump-out footwork
8/3/2019 Badminton Footwork Bible
http://slidepdf.com/reader/full/badminton-footwork-bible 18/21
1) Split drop
If possible, finish your split drop with your right foot behind your left foot, so that you are
already in a side-on position and prepared to move back and jump.
This is different from the standard (generic) position, where your right foot is slightly aheadof your left foot, in a stance roughly square-on to the net. If you finish your split drop in this
standard position, it will be much more difficult to perform a jump-out.
2) Chassé (or hitch)
Normally you will need to make a short, fast chassé backwards before you jump. Sometimes
you will need an even shorter, faster movement: use a hitch instead.
Occasionally you will skip this part entirely, and follow your split drop directly with a jump,
in order to make an immediate interception.
3) Block jump
Finish with a block jump, jumping backwards and upwards to intercept the shuttlecock and
hitting while in the air. Remember to land on both feet together.
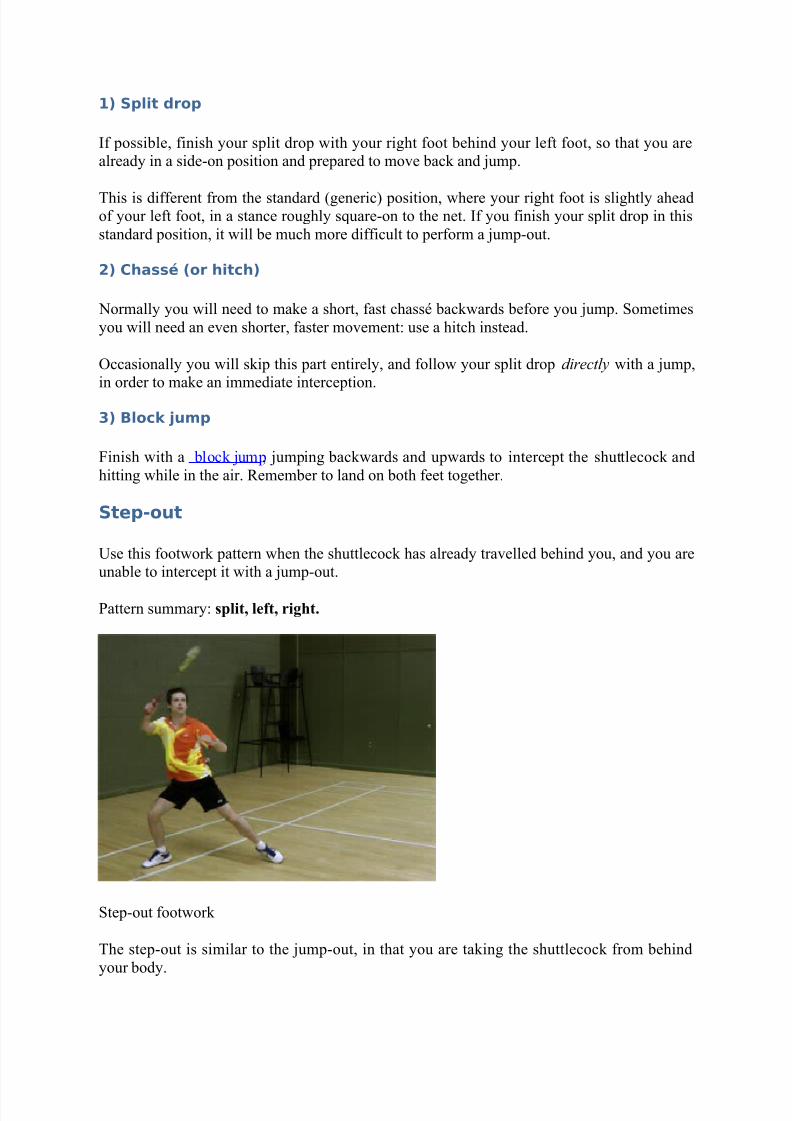
Step-out
Use this footwork pattern when the shuttlecock has already travelled behind you, and you are
unable to intercept it with a jump-out.
Pattern summary: split, left, right.
Step-out footwork
The step-out is similar to the jump-out, in that you are taking the shuttlecock from behind
your body.

8/3/2019 Badminton Footwork Bible
http://slidepdf.com/reader/full/badminton-footwork-bible 19/21
1) Split drop
One advantage of the step-out is that, unlike the jump-out, it is easy to perform regardless of
your foot position after the split drop.
Landing with your right foot behind still makes this movement easier, but it’s nowhere near as dramatic an advantage as for the jump-out.
2) Step with your left foot
Take a step with your left foot towards the corner. Your left foot will normally cross behind your right foot during this step.
3) Step with your right foot
Step with your right foot towards the corner.
When you are taking the shuttlecock very late, this last step can become a lunge. If this
happens, remember that you must point your foot in the direction of the lunge so that the knee
and foot remain in alignment.
The deeper the step-out, the more lunge-like it becomes, and therefore the leg (and foot) must
point more towards the corner.
When you are taking the shuttlecock earlier, however, you should make every effort to push
up off the ground for a higher impact point. This is like a very weak jump-out. In this case,
the right leg (and foot) will land pointing sideways and perhaps slightly forwards.
In the backhand rear corner, you can play either backhands or round-the-head forehands.
These have completely different footwork patterns.
Round-the-head forehands are a much better choice when possible, but you will nevertheless
often be forced to play a backhand.
Backhand footwork
The backhand footwork is simple. It’s much the same as a forehand step-out.
Pattern summary: split, chassé, turn.
1) Split drop
The standard landing position (right foot slightly ahead of left foot) will serve you well here,
and there’s no advantage to be gained by selecting a different foot position.
2) Chassé towards the corner
Your left foot will lead the chassé.

8/3/2019 Badminton Footwork Bible
http://slidepdf.com/reader/full/badminton-footwork-bible 20/21
When you have more distance to cover, you may need an extra chassé or to replace the chassé
with running steps.
3) Turn and step with your right foot
Pivot on your left foot and turn your body, stepping across with your right foot, so that your back turns towards the net.
This final step will often become a lunge. Where possible, step to the side rather than
backwards. Often, however, you will need to turn your back fully to the net and lunge into the
corner.
Round-the-head forehand footwork
This footwork pattern, although challenging to learn, is essential for your attacking play.
Pattern summary: split, swivel, scissor jump.
Round-the-head footwork
1. Introduction 6:35 2. Technique details 13:20
1) Split drop
As with the backhand footwork, the standard foot position is the best one.
2) Swivel step (moving pivot)
This is the key element of round-the-head footwork.
Push off with your right foot, and use this force to pivot around your left foot, angling your
body towards the corner.
It’s essential that this is a moving pivot : while you are turning, you must also move back towards the corner. The more distance you can cover while turning, the better.

8/3/2019 Badminton Footwork Bible
http://slidepdf.com/reader/full/badminton-footwork-bible 21/21
The left foot only remains on the ground for the very start of the pivot—just enough time to
begin the turn. It then comes off the ground, and hovers briefly (this is where you cover
distance) before landing again.
Try to make your left foot cover as much ground as possible while hovering.
You can also think of this swivel step as a turning hop.
3) Scissor jump
Finish with a scissor jump, jumping backwards into the corner.
This combination of movements feel unnatural at first, because you are swivelling one way
before using the scissor jump to rotate your body in the opposite direction. You’ll need good
core stability to make the most of this twisting footwork pattern!