Windows Server 2008 Offline System Recovery Using Windows Server Backup With Avamar

OTTO Basic & OTTO Max v5.5
User’s Guide
Backup/Restore System with Microsoft Windows System Backup
This chapter will describe in details how to use OTTO Max to backup your Microsoft Windows Server system and how you can restore them from backup files. This feature only works on Microsoft Windows Vista Business/Enterprise/Ultimate Edition and Windows Server 2008.
1.1 Requirements
i. The computer is using either Microsoft Windows Vista Business/Enterprise/Ultimate Edition or Windows Server 2008.
ii. OTTO Max must be installed onto the computer.
iii. You must install the Windows Server Backup, Command-line Tools, and Windows PowerShell items that are available in the Add Features Wizard in Server Manager. This installs the following tools:
- Windows Server Backup Microsoft Management Console (MMC) snap-in
- Wbadmin command-line tool
- Windows Server Backup cmdlets (Windows PowerShell commands)
iv. System images generated by Windows Server Backup will be backed up to a temporary directory before they are sent to OTTO OBS. Please make sure you have sufficient space on your computer to store these data when you run the backup job.
1.2 Overview
OTTO Max will back up your system by taking the following steps:
i. Before running any backup activities, OTTO Max will run all Pre-Commands of the backup set.
ii. OTTO Max will issue a system backup command to back up the volume(s) selected in backup source to a set of files and save it in the [WindowsImageBackup] directory under the temporary directory specified in the backup set settings.
iii. After all files have been spooled to the [WindowsImageBackup] directories, OTTO Max will run all Post-Commands of the backup set.
iv. Upload all file copied to the temporary directory to OTTO OBS.
1.3 How to backup system with Microsoft Windows System Backup
Please follow the instructions below to back up your Mircosoft Windwos Server 2008 or Windows Vista Business /Enterprise/Ultimate Edition using OTTO Max.
i. Open OTTO Max

OTTO Basic & OTTO Max v5.5
User’s Guide
Right click OTTO Max icon available in the system tray and choose [Open].
ii. Create a backup set
a. To start setting up backup sets, click the button to open the [Backup Setting]
dialog.
b. On the left panel, press the button to create a new backup set.
c. On the dialog, choose [MS Windows System Backup] as the [Type].

OTTO Basic & OTTO Max v5.5
User’s Guide
d. Enter a name for your backup set.
e. Select the volume(s) you want to backup.
OTTO Basic & OTTO Max v5.5
User’s Guide
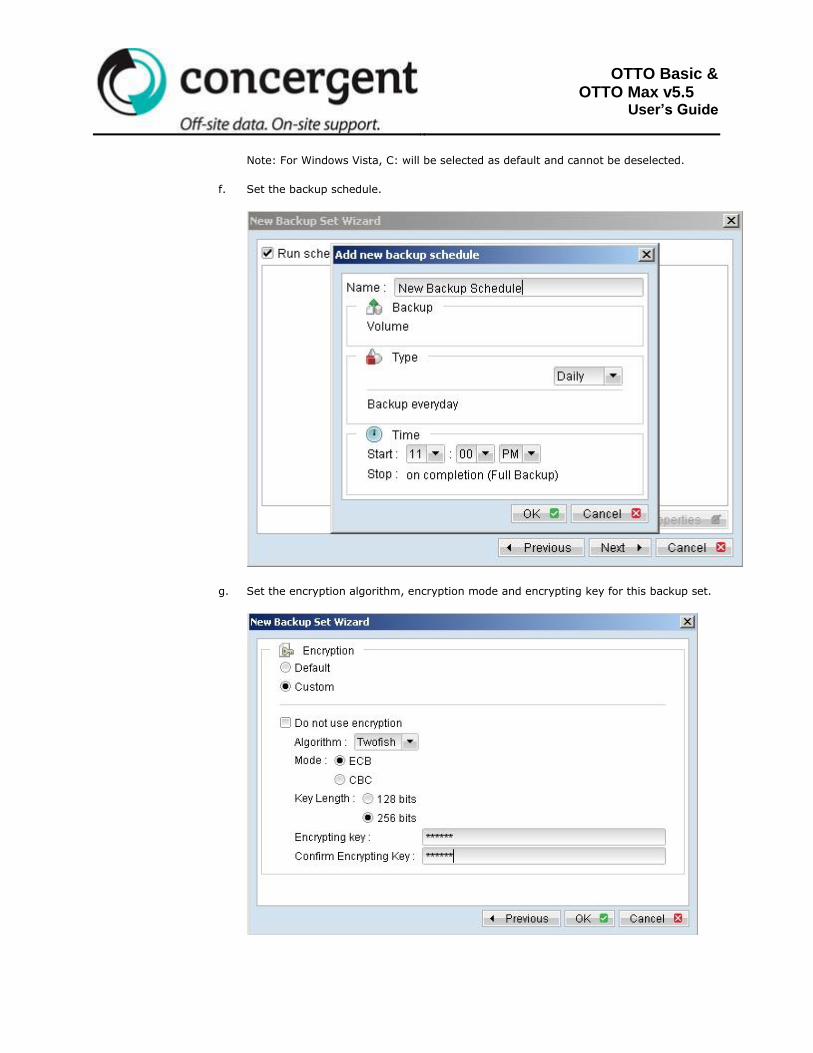
Note: For Windows Vista, C: will be selected as default and cannot be deselected.
f. Set the backup schedule.
g. Set the encryption algorithm, encryption mode and encrypting key for this backup set.

OTTO Basic & OTTO Max v5.5
User’s Guide
iii. Run Backup
a. Press the [Backup] button on the main page of OTTO Max dialog.
b. Select the backup set you want to run and select [Offsite Backup Server] to start backing up your files to OTTO OBS. If applicable, you can change the In-File Delta Type also.
c. Click [OK] to start backing up your files to OTTO OBS.
1.4 How to restore system with Microsoft Windows System Backup
Please follow the instructions below to restore your Microsoft Windows Server 2008 or Windows Vista Business/Enterprise/Ultimate Edtion from OTTO OBS.
i. Download the backup file (Microsoft_Windows_System_Backup) from OTTO OBS
Please refer to the [Quick Start – Backup file] section for information on how to download backup files from OTTO OBS.
ii. For Windows Server 2008, please follow the instructions below to recover volumes with Recovery Wizard:
a. From the [Start] menu, click [Administrative Tools], and then click [Windows Server
Backup].
b. In the [Actions] panel of the snap-in default page, under [Windows Server Backup],

OTTO Basic & OTTO Max v5.5
User’s Guide
click [Recover]. This opens the Recovery Wizard.
c. On the [Getting started] page, specify whether you will recover volumes from backups stored on this computer or another computer, and then click [Next].
d. If you are recovering volumes from backups stored on another computer, do the following, and then click [Next]:
- On the [Specify location type] page, specify thata you want to restore from a local drive.
- On the [Select backup location] page, select the location of the backup from the drop-down list.
e. Click [Next] to continue.
f. For a recovery either from the local computer or another computer, on the [Select backup date] page, select the date from the calendar and the time from the drop-down list of backup you want to restore from.
g. On the [Select recovery type] page, click [Volumes], and then click [Next].
h. On the [Select volumes] page, select the check boxes associated with the volumes in the [Source Volume] column that you want to recover. Then, from the associated drop-down list in the [Destination Volume] column, select the location that you wean to
recover the volume to. Click [Next].
Note: You will receive a message that any data on the desintation volume will be lost when you perform the recovery. Make sure that the destination volume is empty or does nto contain information that you will need later.
i. On the [Confirmation] page, review the details, and then click [Recover] to restore the specified volumes.
j. On the [Recovery progress] page, you can view the status of the recovery operation and whether or not it was successfully completed.
Note: To recover volumes from a backup using Windows Server Backup, you must be a member of the Backup Operators or Administrators grouop, or you must have been delegated the appropriate authority. As a security best practice, consider using [Run as] to perform this procedure.
iii. For Windows Server 2008, please follow the instructions below to recover the operating system or a full server with Instsall Windows Wizard:
a. Insert the Windows Setup disc into the CD or DVD drive and turn on the computer. If needed, press the required key to boot from the disc. The Install Windows Wizard should appear.
b. Specify language settings, and then click [Next].
c. Click [Repair your computer].
d. Setup searched the hard disk drives for an existing Windows installation and then displays the results in [System Recovery Options]. If you are recovering the operating system onto separate hardware, the list should be empty (there should be no operating system on the computer). Click [Next].
e. On the [System Recovery Options] page, click [Windows Complete PC Restore]. This opens the Windows Complete PC Restore Wizard.

OTTO Basic & OTTO Max v5.5
User’s Guide
f. Perform one of the following actions:
- Click [Use the latest available backup (recommended)] and then click [Next].
- Click [Restore a different backup] and then click [Next].
g. If you chose to restore a different backup, please perform one of the following actions on the [Select the location of the backup] page:
- Click the computer that contains the backup that you want to use, and then click [Next]. Then, on the [Select the backup to restore] page, click the backup that you want to use, and then click [Next].
- Click [Advanced] to browse for a backup on the network, and then click [Next].
h. On the [Choose how to restore the backup] page, do the following optional tasks, and then click [Next]:
- Select the [Format and repartition disks] check box to delete existing partitions and reformat the destination disks to be the same as the backup. This enables the [Exclude disks] button. Click this button and then select the check boxes associated with any disks that you want to exclude from being formatted and partitioned. The disk that contains the backup that you are using is automatically excluded.
Note: Unless a disk is excluded, data on it can be lost – regardless of whether it was part of the backup or whether it has volumes that are being restored. In [Exclude disks], if you do not see all the disks that are attached to the computer, you might need to install the associated drivers for the storage device.
- Select the [Only restore system disks] check box to performa an operating system –only recovery.
- Click [Install drivers] to install device drivers for the hardware that you are recovering to,
- Click [Advanbced] to specify whether the computer is restarted and the disks are checked for errors immediate after the recovery.
i. Confirm the details for the restoration, and then click [Finish].
iv. For Windows Server 2008, you can also recover volumes with the following sub command:
Wbadmin start recovery –version: <VersionIdentifier> -itemtypeVolume –items:<VolumesToRecover> -backupTarget: <VolumeHostingBackup> -recoveryTarget:<TargetVolumeForRecovery>
- Version Identifier: Specifies the version identifier of the backup to recover in MM/DD/YYYY-HH:MM format. If you do not know the version identifier, type [wbadmin get versions].
- VolumesToRecover: Specifies a comma-delimited list of volumes.
- VolumesHostingBackup: Specifies the storage location that coantains the backup that you want to recover
- TargetVolumeForReocvery: Specify the volume drive letter of the alternate volume to restore to.
For example,
OTTO Basic & OTTO Max v5.5
User’s Guide
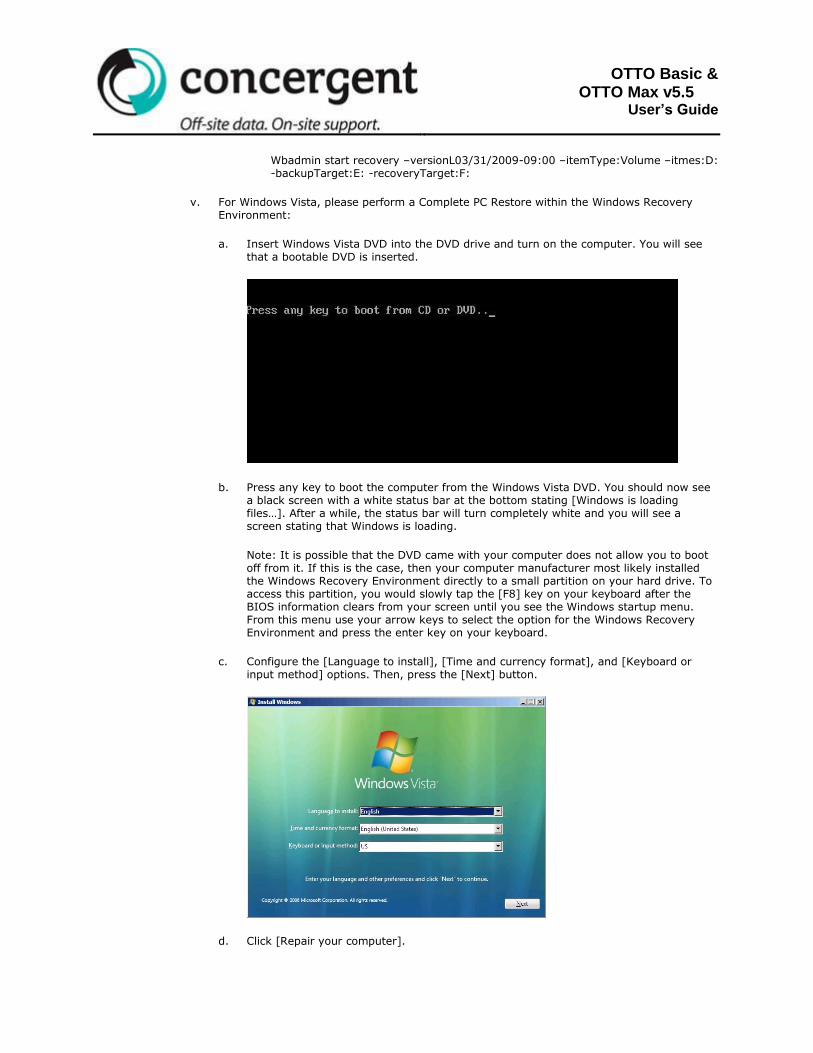
Wbadmin start recovery –versionL03/31/2009-09:00 –itemType:Volume –itmes:D: -backupTarget:E: -recoveryTarget:F:
v. For Windows Vista, please perform a Complete PC Restore within the Windows Recovery Environment:
a. Insert Windows Vista DVD into the DVD drive and turn on the computer. You will see that a bootable DVD is inserted.
b. Press any key to boot the computer from the Windows Vista DVD. You should now see a black screen with a white status bar at the bottom stating [Windows is loading files…]. After a while, the status bar will turn completely white and you will see a screen stating that Windows is loading.
Note: It is possible that the DVD came with your computer does not allow you to boot off from it. If this is the case, then your computer manufacturer most likely installed the Windows Recovery Environment directly to a small partition on your hard drive. To access this partition, you would slowly tap the [F8] key on your keyboard after the BIOS information clears from your screen until you see the Windows startup menu. From this menu use your arrow keys to select the option for the Windows Recovery Environment and press the enter key on your keyboard.
c. Configure the [Language to install], [Time and currency format], and [Keyboard or input method] options. Then, press the [Next] button.
d. Click [Repair your computer].

OTTO Basic & OTTO Max v5.5
User’s Guide
e. The [System Recovery Options] dialog box will be shown. Select the Vista installation you would like to repair.
Note: If there are drivers you need to load in order for Vista to access any of your drives or other components, then you should click on the [Load Drivers] button to load them. When ready, press the [Next] button to continue. If the repair process does not
detect any problems starting Vista, it will display a list of available recovery tools. If it does detect a problem it will attempt to perform a Startup Repair to automatically fix

OTTO Basic & OTTO Max v5.5
User’s Guide
these problems. Click on the [Cancel] button and select the [View advanced options for system recovery and support] option to see the list of recovery tools.
f. Click on the [Windows Complete PC Restore] option.
g. Complete PC Restore will search your hard drives and DVD media for any saved backup image. If none are found, then a message will papear stating that no backups could be found. On the other hand, if a backup was found in one of your drives or the inserted media, you will see a screen with the latest backup selected.

OTTO Basic & OTTO Max v5.5
User’s Guide
h. If the selected backup is the one you wish to restore, press the [Next] button to
continue. If there is a different backup that you would like to use, select the [Restore a different backup] option and press the [Next] button. This will bring up a screen displaying the list of backups you have created in the past.
i. Select the backup that you would like to restore. Then click on the [Next] button. Compelte PC Restore will now examine your selected backup and see if there is more than one time you backed up your computer to this location. If you have backed up multiple times it will display an entry for each of them.
OTTO Basic & OTTO Max v5.5
User’s Guide
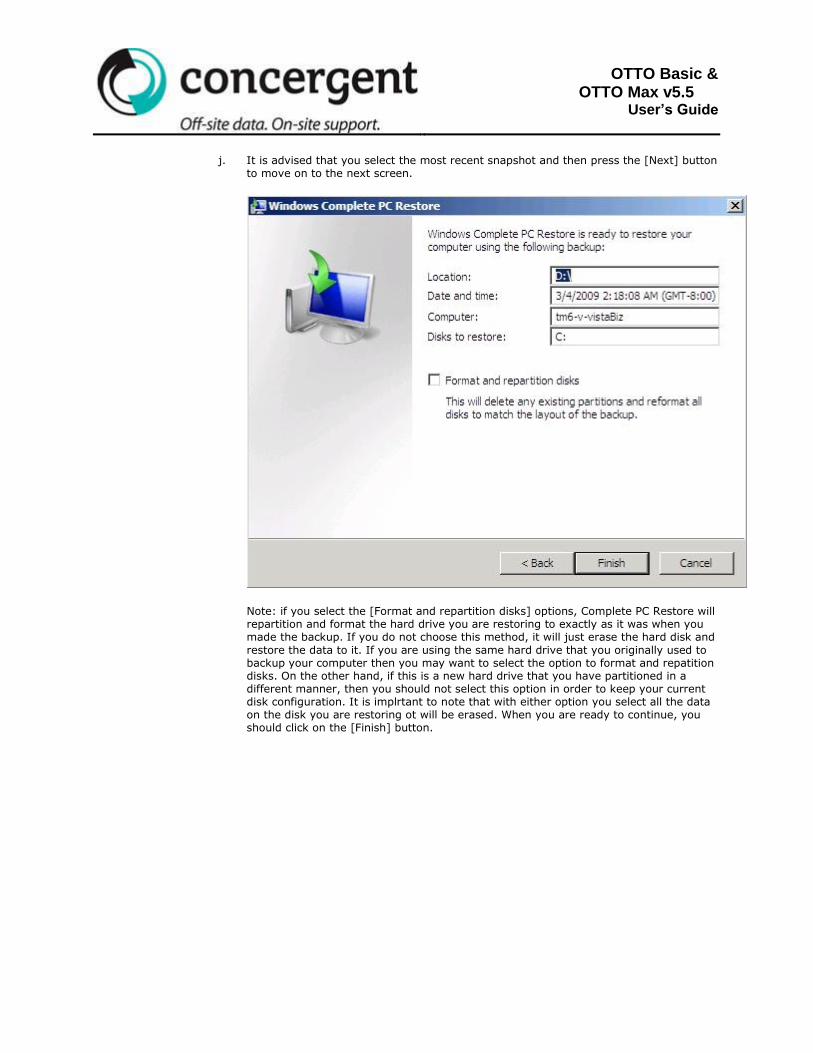
j. It is advised that you select the most recent snapshot and then press the [Next] button
to move on to the next screen.
Note: if you select the [Format and repartition disks] options, Complete PC Restore will repartition and format the hard drive you are restoring to exactly as it was when you made the backup. If you do not choose this method, it will just erase the hard disk and
restore the data to it. If you are using the same hard drive that you originally used to backup your computer then you may want to select the option to format and repatition disks. On the other hand, if this is a new hard drive that you have partitioned in a different manner, then you should not select this option in order to keep your current disk configuration. It is implrtant to note that with either option you select all the data on the disk you are restoring ot will be erased. When you are ready to continue, you should click on the [Finish] button.

OTTO Basic & OTTO Max v5.5
User’s Guide
k. A new window is opened stating that all of your data will be erased. If you want to
continue with the restore then you need to put a checkmark in the checkbox labeled [ I confirm that I want to erase all existing data and restore the backup] and then press the [OK] button. Complete PC Restore will now restore the backup on your computer.
l. When the restore is completed, you will see a message stating that it is complete and it will reboot your computer after a certain amount of time. When your computer reboots, you will now be using the data and configuration from the backup you just restored.
vi. All volume(s) restored successfully.