Ax2009 Enus Devii 01
24
Chapter 1: X++ Overview 1-1 CHAPTER 1: X++ OVERVIEW Objectives The objectives are: • Identify key features of developing with X++ ® • Describe the basic foundation of object-oriented programming • Use the development tools available within Microsoft Dynamics ® AX • Create object and data models from existing application elements using the Reverse Engineering tool • Use best practices to instill good programming habits Introduction X++ is the programming language that is used in the MorphX ® Development environment. When you develop with X++, refer to the “Microsoft Dynamics AX Developer Help”, available from the Help menu for detailed information. The following are notable features of X++: • A primary characteristic of X++ is that it can be programmed without extensive training. The fundamental concepts of X++ can be easily understood. • X++ is an object-oriented language and provides a clean and efficient object-based development platform. • Programmers using X++ can access existing Microsoft Dynamics AX system classes that provide functionality ranging from basic I/O, XML, to modifying controls in the graphical user interface at run time. These system classes can be extended to provide new behavior. • X++ resembles C#. Because MorphX can build complex accounting and business management systems, the X++ language includes several integrated SQL commands to help programmers migrate to X++. Microsoft Official Training Materials for Microsoft Dynamics ® Your use of this content is subject to your current services agreement
-
Upload
zoemy-esquivel -
Category
Documents
-
view
238 -
download
4
Transcript of Ax2009 Enus Devii 01

Chapter 1: X++ Overview
1-1
CHAPTER 1: X++ OVERVIEW Objectives
The objectives are:
• Identify key features of developing with X++® • Describe the basic foundation of object-oriented programming • Use the development tools available within Microsoft Dynamics®
AX • Create object and data models from existing application elements
using the Reverse Engineering tool • Use best practices to instill good programming habits
Introduction X++ is the programming language that is used in the MorphX® Development environment. When you develop with X++, refer to the “Microsoft Dynamics AX Developer Help”, available from the Help menu for detailed information. The following are notable features of X++:
• A primary characteristic of X++ is that it can be programmed without extensive training. The fundamental concepts of X++ can be easily understood.
• X++ is an object-oriented language and provides a clean and efficient object-based development platform.
• Programmers using X++ can access existing Microsoft Dynamics AX system classes that provide functionality ranging from basic I/O, XML, to modifying controls in the graphical user interface at run time. These system classes can be extended to provide new behavior.
• X++ resembles C#. Because MorphX can build complex accounting and business management systems, the X++ language includes several integrated SQL commands to help programmers migrate to X++.
Microsoft Official Training Materials for Microsoft Dynamics ® Your use of this content is subject to your current services agreement

Development II in Microsoft Dynamics® AX 2009
1-2
Characteristics of X++ The following are characteristics of X++:
• Reliable - X++ provides extensive compile-time checking, followed by a second level of run-time checking. Language features guide programmers toward reliable programming habits. The memory management model is simple; objects are created by using a new operator. There are no explicit programmer-defined pointer data types or arithmetic. This model eliminates entire classes of programming errors.
• High Performing - When references no longer exist to an object, the object is deleted and its storage area reclaimed. This strategy guarantees a high probability that memory is available when it is required, leading to better performance.
• Interpreted and Dynamic - Benefit from faster development cycles-prototyping, experimentation, and rapid development, versus the traditional compile, link, and test cycles.
• Interoperable - Components in Microsoft Dynamics AX are seamlessly accessible to any application supporting the Component Object Model (COM) standard and .NET assembles.
The Microsoft Dynamics AX .NET Business Connector does not add functionally to these components, but exposes the components to other applications, allowing programmers to take advantage of existing Microsoft Dynamics AX functionality in their favorite programming language.
X++ also supports components outside Microsoft Dynamics AX that implement the COM standards. Programmers can call methods in third-party COM components and automate Microsoft Office® applications.
Scenario Systems developers in a large development environment have joined a team that is customizing a Microsoft Dynamics AX application. This is the team's first project in X++ so they need to learn what development tools are available to them within Microsoft Dynamics AX.
Development Tools All objects (classes, forms, or tables) are organized in the Application Object Tree (AOT) in Microsoft Dynamics AX. This is a central, organized index to all application objects. These are organized in development projects which consist of various objects.
Microsoft Official Training Materials for Microsoft Dynamics ® Your use of this content is subject to your current services agreement

Chapter 1: X++ Overview
1-3
X++ code is developed as a set of objects from the AOT. These are usually assembled in a project, or container for objects that implement an application in Microsoft Dynamics AX. Projects also help manage development efforts by organizing units of functionality.
As developers create new projects or modify existing projects, they use a series of development tools. These tools include the following:
• Code Editor • X++ Compiler • X++ Debugger
Other tools exist to aid the developer while writing code and for managing modifications they make to objects in the AOT.
These tools are described in the following sections.
Using the Code Editor
Double-clicking many of the objects in the AOT opens them in the code editor. The code editor may also be started by selecting Edit in the right-click context menu.
The code editor window consists of two panes:
• The left pane contains a list of current methods • The right pane displays the X++ code
FIGURE 1.1 CODE EDITOR WINDOW
HINT: When developing in Microsoft Dynamics AX 2009, as the Content Pane cannot be closed, it is often convenient to work in developer mode. This allows it to be minimized, and to keep multiple code or AOT windows open. You can set developer mode by clicking on the view icon next to the breadcrumb bar and selecting Developer mode, or by pressing Ctrl-Shift-D.
Microsoft Official Training Materials for Microsoft Dynamics ® Your use of this content is subject to your current services agreement

Development II in Microsoft Dynamics® AX 2009
1-4
Using the Code Editor – Shortcut keys
There are several toolbar buttons in the heading of the code editor window. Many of these functions can be started using shortcut keys. Moving the pointer over these icons reveals the icon's function and a shortcut key. These buttons are described as follows:
Button Description New (Ctrl+ N) Creates a new job.
Save Saves the changes to the active method.
Go (F5) Executes the class, form, or project.
Toggle Breakpoint (F9) Turns breakpoints on and off.
Enable/Disable Breakpoint (Ctrl + F9)
Enables or disables a breakpoint.
Remove all breakpoints (Ctrl + Shift + F9)
Deletes all breakpoints from the method.
Compile (F7) Checks the code for errors, compiles the code, and saves it.
Lookup properties/methods (Ctrl + Space)
Helps you locate methods or properties.
Lookup label/text (Ctrl + Alt + Space)
Helps you find a label.
Run an Editor Script (Alt + M)
Helps you choose between a selection of scripts.
Help (F1) Accesses X++ code editor window help.
Using the Code Editor – Context menu
Right-clicking a code-bearing category in the AOT opens a context menu and lets you create a new object. A template resides in the code editor for required code input. A default name, such as method1, is provided and can be changed.
Access the context menu anywhere in the code editor by right-clicking. This menu contains a series of list functions. Use list functions to look up tables, classes, types, and other objects from the code editor.
Microsoft Official Training Materials for Microsoft Dynamics ® Your use of this content is subject to your current services agreement

Chapter 1: X++ Overview
1-5
Selecting a list function opens a small window inside the editor window where you can make a type-ahead search in the window.
FIGURE 1.2 LIST BUILT-IN FUNCTIONS TYPE AHEAD WINDOW
Jobs
A job is a piece of code in Microsoft Dynamics AX that is executed sequentially. Jobs are primarily used for testing code during development and running batch processes within Microsoft Dynamics AX that affect large amounts of data.
This course uses jobs as a mechanism to write code and run it directly from the code editor. Most code for applications is written in classes, methods, tables, and forms. However, jobs are useful for testing pieces of code before inserting them into methods or classes.
The following is default code whenever you create a new job in the AOT:
Static void jobname (Args _args)
{
}
The code that determines what the job does is written between the braces “{ }”.
NOTE: Rename a job within the editor instead of right-clicking and selecting Rename.
Create a new job by right-clicking the Job node n the AOT, and selecting New Job. The code editor opens displaying the new job.
Compiler
When code written in X++ is ready to be executed, use the compiler. The compiler is a translation program which converts X++ into a language that can be interpreted. You can import/export a list of errors and copy output messages to the clipboard.
Microsoft Official Training Materials for Microsoft Dynamics ® Your use of this content is subject to your current services agreement

Development II in Microsoft Dynamics® AX 2009
1-6
Code can be compiled by clicking on the icon in the code editor tool bar or by pressing F7. It can also be compiled by right-clicking on the node in the AOT and selecting Compile.
In this course you will also learn about inheritance. Classes that inherit from, or extend, other classes can be compiled by right-clicking on the main class, then selecting Add-Ins > Compile forward. This ensures any changes made to the main class are propagated down to the sub-classes correctly.
The Compiler Output Window
Use this window to view information to help improve and correct errors in the program. The Compiler window contains the following tabs:
• Status - Displays the code being compiled and its status. It is visible when the compilation is occurring. The object currently being compiled is shown and also the total number of errors and warnings found.
• Errors and warnings - Displays objects containing errors. By double-clicking a record within the grid, or clicking the Edit button, the editor window or the property sheet opens, displaying the corresponding method or property. Error information from the AOT compilation is saved for the next multi-compilation. Secondary compilation of individual objects can be performed without corrupting or destroying data from a recent multi-compilation. All records in yellow are new errors or warnings. Records in white are old errors from previous compilations.
• Best Practices - Displays a list of deviations from Microsoft Dynamics AX Developers Best Practices.
• Tasks - Generates a list of To-Do items written in the code's comments. To write a task, use a single line comment, followed by the word ToDo and a description of the task. For example: // ToDo Add validation code
The Debugger
Microsoft Dynamics AX includes a powerful stand-alone tool named the Debugger. Use the Debugger to debug X++ code running on the:
• Microsoft Dynamics AX Client • Microsoft Dynamics AX Object Server • Microsoft Dynamics AX .Net Business Connector
Microsoft Official Training Materials for Microsoft Dynamics ® Your use of this content is subject to your current services agreement

Chapter 1: X++ Overview
1-7
Use the Debugger to:
• Run a program to a certain point and then stop (set a breakpoint). • Step through the program one statement at a time. • Display the call stack with code line numbers. • Watch specific variables and their values. • Search the code for specific words.
Setting a Breakpoint
Start the debugger by setting breakpoints in the code. This is a command to stop program execution and enter the debug mode.
When the logic flow of the code reaches a breakpoint, the debug session initiates and the X++ debugger is automatically started.
To set a breakpoint:
1. Position the pointer within the X++ code in the code editor where you want to insert the breakpoint.
2. Click the breakpoint icon in the title bar or press F9.
The line of code is highlighted dark red to indicate that a breakpoint has been inserted. An invalid breakpoint is indicated with a gray highlight.
Breakpoints can also be set by inserting the keyword Breakpoint into the code. This should be used with caution, as it will mean that all users will enter the debugger when the code reaches this point.
To turn debugging off, you can go to Tools > Options, select the Developer tab. In the Debug field, select None. Note that when you set a breakpoint in code, this field will automatically be set to When Breakpoint.
Debugger Window Panes
The Debugger window can display up to six information windows. The windows display detailed information about the current state of the executing code while you are debugging. The information windows available are as follows:
• Code - Displays the X++ code currently being debugged. The red dot indicates where the breakpoint is inserted. The yellow arrow indicates the line that is being executed. The arrow can be dragged to a different line of code so that code is either re-executed or skipped.
• Variables - Displays the value of the variables. Modified variables appear in different colors to indicate change. It is possible to alter the value of variables in the debugger to observe how the program would run under different conditions.
Microsoft Official Training Materials for Microsoft Dynamics ® Your use of this content is subject to your current services agreement

Development II in Microsoft Dynamics® AX 2009
1-8
• Call Stack - Indicates which method is currently being debugged. Double-clicking on a method further down the stack will take the code window to that method.
• Watch - Contains a user-defined range of variables. The variables can be dragged and dropped from the output window.
• Breakpoints - Consists of a header with two columns and the list of currently defined breakpoints.
• Output - Displays separate views of text written to the window from X++ code and kernel code. These views organize the information sent to the Output window.
HINT: The Microsoft Dynamics AX Debugger Help Guide can be accessed directly by pressing F1 in the debugger. This guide contains a list of shortcut keys that make it easier and faster to use the system's debugger.
Debugger Toolbar
Use the toolbar above the Output window to navigate through the code and perform other actions.
Moving the pointer over these icons reveals the icon's function and a shortcut key.
The more commonly used buttons are described as follows along with the shortcut keys:
Button Description Stop Debugging (Shift + F5)
Enables the Watch window.
Insert/Remove Breakpoint (F9)
Inserts or clears a breakpoint.
Enable/Disable Breakpoint (Ctrl + F9)
Enables or disables a breakpoint.
Remove all breakpoints (Ctrl + Shift + F9)
Clears all breakpoints.
Step Over (F10)
Steps to the next line of code in the current function/method.
Step Into (F11) Steps into the current line if it contains a function or method call.
Step Out (Shift + F11)
Steps out of the current function or method.
Run to Pointer (Ctrl + F8) Continues execution until reaching the location of the pointer in the source window.
Microsoft Official Training Materials for Microsoft Dynamics ® Your use of this content is subject to your current services agreement

Chapter 1: X++ Overview
1-9
Demonstration: Using the debugger
Perform the following steps to use the debugger.
1. Open the AOT. 2. Expand Classes > SalesLineType. 3. Double-click on the method InitFromInventTable. 4. Place the cursor on the first line of code. 5. Press F9 to set a breakpoint. 6. Close the code editor. 7. Open the Main menu > AR > Sales Order Details. 8. Press Ctrl+N to create a new sales order. 9. Select a customer account number. 10. Click OK. 11. Click the lookup button on the Item number field and select an
item. 12. The debugger should start. 13. Look at the windows that are available. 14. In the variables window, find the variable This. 15. Press F10 to step through the code. 16. Note how the field values change and are highlighted in red. 17. Press F5 to run the code and stop debugging.
Compare
Use the compare tool to highlight differences between versions of a single element:
• In two different layers • In an old version of an element • In two different elements • An element that will be imported
The most common use is to review differences between two layers. This is useful when determining what has been changed in a standard element. To compare two layers, right-click on the element and select Compare. Select which two layers to compare and click Compare.
Microsoft Official Training Materials for Microsoft Dynamics ® Your use of this content is subject to your current services agreement

Development II in Microsoft Dynamics® AX 2009
1-10
Any element nodes that contain differences will be listed in the lower left pane, and the differences can be seen in the lower right pane. The differences are color coded to make it clear which version the differences come from.
FIGURE 1.3 COMPARE SYS TO USR
You can also use the compare tool to move code and element properties between layers. When a difference is found, a black arrow is displayed in the left margin of the lower right pane. The icon will either cut the code from the current layer, or paste the code in to the current layer. This feature is very useful when upgrading code.
NOTE: You can view code in a different layer by right-clicking on the element and selecting Layers.
Demonstration: Using the compare tool
Perform the following steps to use the compare tool.
1. Open the AOT. 2. Expand the classes node. 3. Expand the Activities class. 4. Double-click on the classDeclaration method. 5. Add the following line of code:
// Compare tool demonstration 6. Press f8 to compile and save. 7. Right-click on the Activities class. 8. Select Compare.
Microsoft Official Training Materials for Microsoft Dynamics ® Your use of this content is subject to your current services agreement

Chapter 1: X++ Overview
1-11
9. Click the Compare button. 10. Note how the tool displays differences in the color of the version the
code is in. 11. Note the icon to remove the code from the USR layer.
Context menu add-ins tools
Microsoft Dynamics AX has several built-in tools to help developers program in Microsoft Dynamics AX. Some of them can be accessed by right-clicking any node in the AOT, and selecting Add-ins.
The node you click on determines which tools are available. The following list is a brief overview of the more commonly used tools.
Function Description Application Hierarchy Tree
Displays the current object's inheritance hierarchy. Use to learn more about the hierarchical application view.
Check Best Practices Checks whether your X++ code complies with Microsoft Dynamics AX standards.
Code upgrade Helps you compare and merge your X++ source code when you upgrade to a new version of Microsoft Dynamics AX.
Compile forward Compiles the current node and all child nodes.
Cross-reference The following options are available: Used by: shows where the current object is being used. Names: shows a list of application objects with name, type, and number of references. Using: shows what other objects the current object uses. Update: updates cross-reference information about the current object.
Developer Documentation Opens the help topic for the current application object.
Find and replace Enables you to find and replace text in the X++ code on the current object, including its children. HINT: Use Syntactic renaming to specify the name and type of object you want to replace text in. Select Restore first to restore the AOT automatically. This is useful in a multi-user environment where others may have modified objects since you loaded the object.
Microsoft Official Training Materials for Microsoft Dynamics ® Your use of this content is subject to your current services agreement
Development II in Microsoft Dynamics® AX 2009
1-12
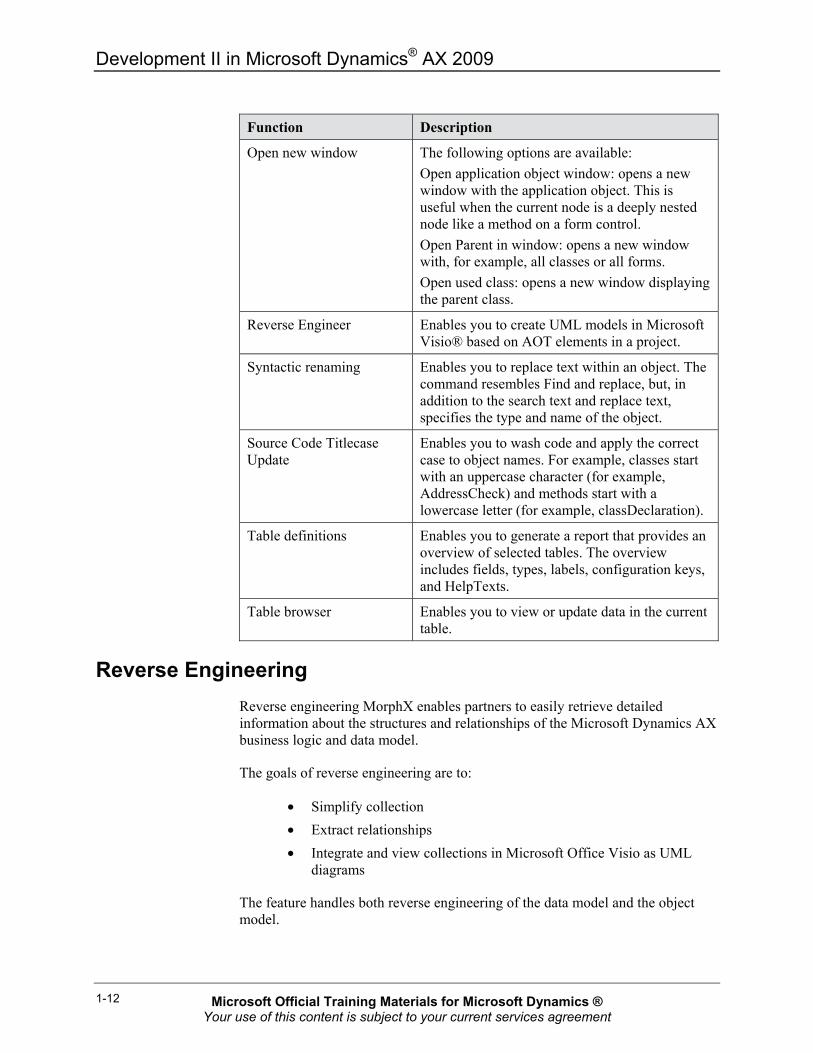
Function Description
Open new window The following options are available: Open application object window: opens a new window with the application object. This is useful when the current node is a deeply nested node like a method on a form control. Open Parent in window: opens a new window with, for example, all classes or all forms. Open used class: opens a new window displaying the parent class.
Reverse Engineer Enables you to create UML models in Microsoft Visio® based on AOT elements in a project.
Syntactic renaming Enables you to replace text within an object. The command resembles Find and replace, but, in addition to the search text and replace text, specifies the type and name of the object.
Source Code Titlecase Update
Enables you to wash code and apply the correct case to object names. For example, classes start with an uppercase character (for example, AddressCheck) and methods start with a lowercase letter (for example, classDeclaration).
Table definitions Enables you to generate a report that provides an overview of selected tables. The overview includes fields, types, labels, configuration keys, and HelpTexts.
Table browser Enables you to view or update data in the current table.
Reverse Engineering Reverse engineering MorphX enables partners to easily retrieve detailed information about the structures and relationships of the Microsoft Dynamics AX business logic and data model.
The goals of reverse engineering are to:
• Simplify collection • Extract relationships • Integrate and view collections in Microsoft Office Visio as UML
diagrams
The feature handles both reverse engineering of the data model and the object model.
Microsoft Official Training Materials for Microsoft Dynamics ® Your use of this content is subject to your current services agreement

Chapter 1: X++ Overview
1-13
The Reverse Engineering tool enables you to visualize data and object models generated from projects in Microsoft Dynamics AX. These models are created as Microsoft Visio documents.
Using reverse engineering
To open the Reverse Engineering tool, right-click a project and select Add- ins > Reverse engineer.
The information Microsoft Dynamics AX provides Visio depends on whether you are creating a data or an object model from a project. The following table illustrates what is provided per model type:
Data Model Object Model Tables Tables
Each table's group property
Table Fields
Table fields Table Methods
Field index information Table Method parameters
All Extended Data Types Classes (extended and referenced)
All Base Enums All Extended Data Types
All X++ Data Types All Base Enums
All X++ Data Types
Procedure: Generating an Object Model
Perform the following steps to generate an object model that is based on objects included in a project.
1. Create a project. 2. Drag AOT objects into the project you want to reverse engineer into
an object model. 3. Right-click the project and select Add- ins > Reverse engineer. 4. Click Object model to create a UML object model. 5. Select a name and path for the file and then click OK. 6. From Microsoft Visio, drag object nodes into the center grid to lay
out the desired model.
Microsoft Official Training Materials for Microsoft Dynamics ® Your use of this content is subject to your current services agreement
Development II in Microsoft Dynamics® AX 2009
1-14
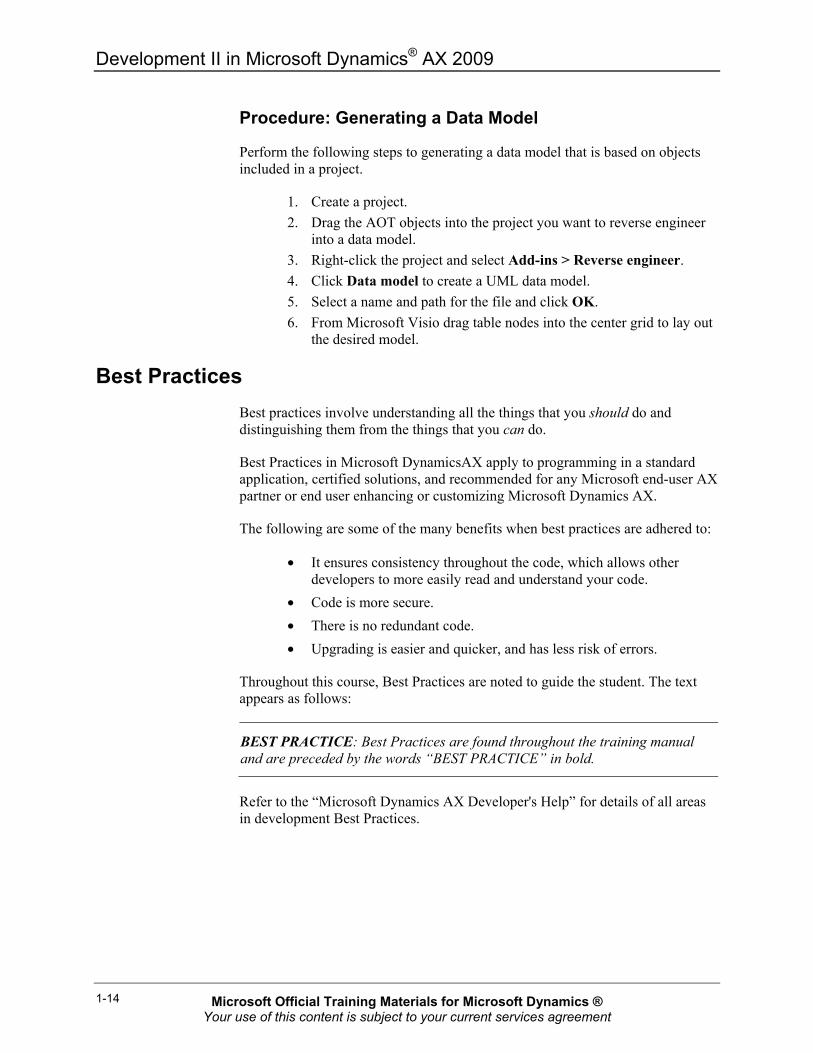
Procedure: Generating a Data Model
Perform the following steps to generating a data model that is based on objects included in a project.
1. Create a project. 2. Drag the AOT objects into the project you want to reverse engineer
into a data model. 3. Right-click the project and select Add-ins > Reverse engineer. 4. Click Data model to create a UML data model. 5. Select a name and path for the file and click OK. 6. From Microsoft Visio drag table nodes into the center grid to lay out
the desired model.
Best Practices Best practices involve understanding all the things that you should do and distinguishing them from the things that you can do.
Best Practices in Microsoft DynamicsAX apply to programming in a standard application, certified solutions, and recommended for any Microsoft end-user AX partner or end user enhancing or customizing Microsoft Dynamics AX.
The following are some of the many benefits when best practices are adhered to:
• It ensures consistency throughout the code, which allows other developers to more easily read and understand your code.
• Code is more secure. • There is no redundant code. • Upgrading is easier and quicker, and has less risk of errors.
Throughout this course, Best Practices are noted to guide the student. The text appears as follows:
BEST PRACTICE: Best Practices are found throughout the training manual and are preceded by the words “BEST PRACTICE” in bold.
Refer to the “Microsoft Dynamics AX Developer's Help” for details of all areas in development Best Practices.
Microsoft Official Training Materials for Microsoft Dynamics ® Your use of this content is subject to your current services agreement

Chapter 1: X++ Overview
1-15
Naming conventions
Naming conventions contribute to consistency and to making the application easier to understand.
Where possible, application object names should be constructed hierarchically from three basic components:
{business area name} + {business area description} + {action performed (for classes) or type of contents (for tables)}
Examples:
• CustInvoicePrintout • PriceDiscAdmCopy • PriceDiscAdmDelete • PriceDiscAdmSearch • PriceDiscAdmName • PriceDiscAdmTrans
Additionally:
• All names must be in U.S. English. • The default rule is to use logical and descriptive names if no other
specialized rules apply. • Identifier names have a limit of 40 characters. • Names in the Application Object Tree (AOT) and in X++ code must
correspond to the names in the U.S. English user interface. • Names must be spelled correctly. • Names must be used consistently. • Each path in the AOT must be unique; nodes must not have identical
names. • All texts that appear in the user interface must be defined by using a
label. • Do not begin a name with “aaa”, or “CopyOf”. Do not begin a name
with “DEL_” unless it is a table, extended data type or enum, and it is needed for data upgrade purposes.
Code placement
Placement of code is dependent on the the code you are writing. The preferred procedure in an object-oriented programming language is to place code in a class which can be reused and called whenever it is needed.
Microsoft Official Training Materials for Microsoft Dynamics ® Your use of this content is subject to your current services agreement

Development II in Microsoft Dynamics® AX 2009
1-16
Placing code in classes enables greater control over where the code is executed. Performance considerations often dictate where code should run, and so having control over this is desirable. Code placed in forms always runs on the client, which may therefore cause a lot of client-server communication.
When a method on a class or table is modified, they are stored individually in the current layer. This means that these elements are easier to upgrade as smaller blocks of code need to be compared when conflicts occur. Forms and reports do not store individual methods in layers; this means conflicts require more work to resolve. Keeping as much code as possible out of forms and reports reduces this work load considerably.
When deciding where to place code, ask the following questions:
• Is the code related to the form's appearance or to the data entered through the form?
• Can I use the code's functionality elsewhere in the application or in a different application?
• Does the code execute on the client or on the server?
BEST PRACTICE: Always place the code nearest to the source so it can be more easily manipulated. For instance code that manipulates a table should be placed in that tables methods. Best practice is to place as little code as possible on forms.
Comments
A best practice for all programming is the use of comments. It is important when developing X++ programs in Microsoft Dynamics AX to use comments and document what the code does and how parameters are used. It is also good to know who made the change and why. When upgrading code, you need to decide whether to merge code and if so, how to merge it; comments are very useful to help determine why the code change was made. Note the following about the use of comments:
• You can insert comments directly into the code lines. • Comments are ignored by the compiler. • Comments turn the code green in the editor.
The following show the types of comments:
• Single line “//” • Block comments “/* */” • To do comments “TODO.” To do comments appear in the compilers
Tasks tab page.
Microsoft Official Training Materials for Microsoft Dynamics ® Your use of this content is subject to your current services agreement

Chapter 1: X++ Overview
1-17
XML comments
// This is a single line comment
/* This is a block comment because
It contains more than one line */
/// <summary>
/// This is an XML comment with tags to distinguish sections.
/// </summary>
XML comments can be used to build XML documents containing developer documentation. To extract an XML file from code, right-click on a development project node, and select Add-ins > Extract XML documentation.
Trustworthy Computing
Microsoft formed Trustworthy Computing in January 2002, when Bill Gates committed the company to fundamentally changing its mission and strategy in the key areas of Security, Privacy, Reliability, and Business Practices.
Security considerations are highlighted through the Code Access Security (CAS) framework. There are a number of API's within Microsoft Dynamics Ax that allow communication with external elements, for example. reading from and writing to text files, accessing other databases, running other software programs and allowing other programs to access Microsoft Dynamics AX.
The CAS places the responsibility for considering these security risks on the developer. Once a developer has considered security when using these API's they can acknowledge this by asserting permission within the code for the API to be used.
Summary This lesson introduced some of the development tools used almost every time that you do modifications to Microsoft Dynamics AX. In the next lesson you will practice using these tools by creating a Calculator Class with four basic methods.
Microsoft Official Training Materials for Microsoft Dynamics ® Your use of this content is subject to your current services agreement

Development II in Microsoft Dynamics® AX 2009
1-18
Test Your Knowledge Test your knowledge with the following questions.
1. What are the three main Object-Oriented Programming components?
2. What are the functions of the six Debugger Window panes?
3. What do you use the code editor for?
Microsoft Official Training Materials for Microsoft Dynamics ® Your use of this content is subject to your current services agreement

Chapter 1: X++ Overview
1-19
Lab 1.1 - Print to the Screen Scenario
The client wants you to demonstrate how to print a message to the screen. Create a job that prints a message to the screen.
Challenge Yourself!
Create a job that prints the message “Microsoft Dynamics AX is cool”.
Step by Step
1. Open the AOT 2. Right-click on the Jobs node and select New Job 3. Rename the job. 4. Add the following code.
print "Microsoft Dynamics Ax is cool";
pause;
5. Compile (press F7 or click on the Compile icon on the toolbar). 6. Run the job (press F5 or click on the Go icon on the toolbar).
Microsoft Official Training Materials for Microsoft Dynamics ® Your use of this content is subject to your current services agreement

Development II in Microsoft Dynamics® AX 2009
1-20
Lab 1.2 - Debug the Job Scenario
The client wants you to verify the code executes without errors. Debug the job you created in the previous lab.
Challenge Yourself!
Set a breakpoint in the code in the job from the previous lab. Run the code and step through it.
Step by Step
1. Set a breakpoint in your job on this line of code: static void <your jobname>(Args _args)
2. Save the code by using a shortcut key. 3. Run the code.
NOTE: You should enter the Microsoft Dynamics AX Debugger at this point. If not, ask your instructor.
4. Step through the code using either the icon on the toolbar or F11.
Microsoft Official Training Materials for Microsoft Dynamics ® Your use of this content is subject to your current services agreement
Chapter 1: X++ Overview
1-21
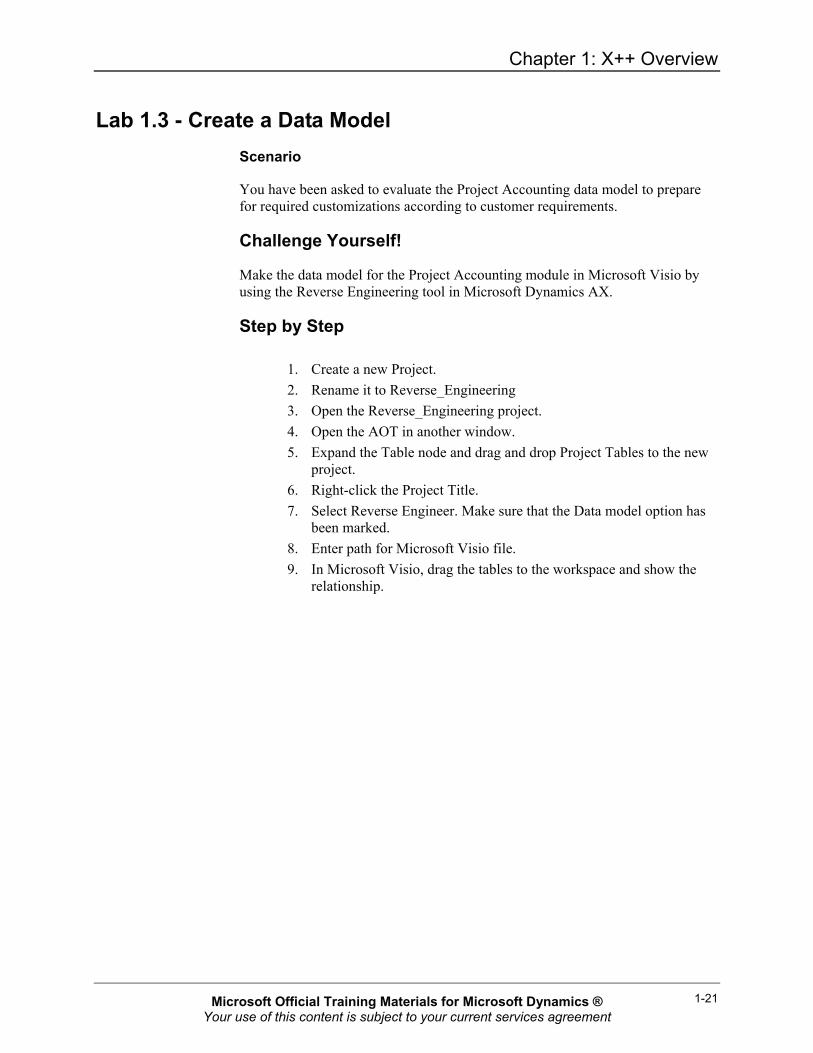
Lab 1.3 - Create a Data Model Scenario
You have been asked to evaluate the Project Accounting data model to prepare for required customizations according to customer requirements.
Challenge Yourself!
Make the data model for the Project Accounting module in Microsoft Visio by using the Reverse Engineering tool in Microsoft Dynamics AX.
Step by Step
1. Create a new Project. 2. Rename it to Reverse_Engineering 3. Open the Reverse_Engineering project. 4. Open the AOT in another window. 5. Expand the Table node and drag and drop Project Tables to the new
project. 6. Right-click the Project Title. 7. Select Reverse Engineer. Make sure that the Data model option has
been marked. 8. Enter path for Microsoft Visio file. 9. In Microsoft Visio, drag the tables to the workspace and show the
relationship.
Microsoft Official Training Materials for Microsoft Dynamics ® Your use of this content is subject to your current services agreement

Development II in Microsoft Dynamics® AX 2009
1-22
Lab 1.4 - Create an XML developer document Scenario
You have been asked to create developer documentation for the Credit Limit modifications made in the standard Microsoft Dynamics AX application.
Challenge Yourself!
Create an XML file using the XML documentation generation for the Credit Limit development project.
Step by Step
1. Open the development project tree. 2. Find the Credit Limit project. 3. Right-click on the project, and select Add-ins > Extract XML
documentation. 4. Enter a file name. 5. Click OK. 6. Review the file that was created.
Microsoft Official Training Materials for Microsoft Dynamics ® Your use of this content is subject to your current services agreement

Chapter 1: X++ Overview
1-23
Quick Interaction: Lessons Learned Take a moment and write down three key points you have learned from this chapter:
1.
2.
3.
Microsoft Official Training Materials for Microsoft Dynamics ® Your use of this content is subject to your current services agreement

Development II in Microsoft Dynamics® AX 2009
1-24
Microsoft Official Training Materials for Microsoft Dynamics ® Your use of this content is subject to your current services agreement