Avaya Predictive Dialing SystemAvaya Predictive Dialing System User’s Guide Volume 1 585-315-703...
382
Transcript of Avaya Predictive Dialing SystemAvaya Predictive Dialing System User’s Guide Volume 1 585-315-703...


Avaya Predictive Dialing SystemUser’s Guide Volume 1
585-315-703August 2002

Copyright 2002 Avaya Inc. All Rights Reserved.
This material is protected by the copyright laws of the United States and other countries. It may not be reproduced, distributed, or altered in any fashion by any entity (either internal or external to Avaya Inc.),
Notice
Every effort was made to ensure that the information in this book was complete and accurate at the time of printing. However, information is subject to change.
Mandatory Customer Information
WarrantyAvaya Inc. provides a limited warranty on this product. Refer to the "Limited Use Software License Agreement" or other applicable documentation provided with your package to establish the terms of the limited warranty.
Preventing Toll FraudToll Fraud is the unauthorized use of your telecommunications system by an unauthorized party (for example, a person who is not a corporate employee, agent, subcontractor, or working on your company’s behalf). Be aware that there is a risk of toll fraud associated with your system and that, if toll fraud occurs, it can result in substantial additional charges for your telecommunications services.
Avaya Fraud InterventionIf you suspect that you are being victimized by toll fraud and you need technical assistance or support, call the Technical Service Center’s Toll Fraud Intervention Hotline at 1-800-643-2353.
Providing Telecommunications SecurityTelecommunications security of voice, data, and/or video communications is the prevention of any type of intrusion to, that is, either unauthorized or malicious access to or use of, your company’s telecommunications equipment by some party.
Your company’s “telecommunications equipment” includes both this Avaya product and any other voice/data/video equipment that could be accessed via this Avaya product (that is, “networked equipment”). An “outside party” is anyone who is not a corporate employee, agent, subcontractor, or working on your company’s behalf. Whereas, a “malicious party” is Anyone, including someone who may be otherwise authorized, who accesses your telecommunications equipment with either malicious or mischievous intent.Such intrusions may be either to/through synchronous (time multiplexed and/or circuit-based) or asynchronous (character-, message-, or packet-based) equipment or interfaces for reasons of:• Utilization (of capabilities special to the accessed equipment)• Theft (such as, of intellectual property, financial assets, or toll-facility access)• Eavesdropping (privacy invasions to humans)• Mischief (troubling, but apparently innocuous, tampering)• Harm (such as harmful tampering, data loss or alteration, regardless of motive or intent)Be aware that there may be a risk of unauthorized or malicious intrusions associated with your system and/or its networked equipment. Also realize that, if such an intrusion should occur, it could result in a variety of losses to your company, including but not limited to, human/data privacy, intellectual property, material assets, financial resources, labor costs, and/or legal costs.
Your Responsibility for Your Company’s Telecommunications SecurityThe final responsibility for securing both this system and its networked equipment rests with you - an Avaya customer’s system administrator, your telecommunications peers, and your managers. Base the fulfillment of your responsibility on acquired knowledge and resources from a variety of sources including but not limited to:
• Installation documents• System administration documents• Security documents• Hardware-/software-based security tools• Shared information between you and your peers• Telecommunications security experts
To prevent intrusions to your telecommunications equipment, you and your peers should carefully program and configure your:
• Avaya provided telecommunications system and their interfaces• Avaya provided software applications, as well as their underlying hardware/software platforms and interfaces• Any other equipment networked to your Avaya products
...........................................................................................................................................................................................................................................................

Federal Communications Commission StatementPart 15: Class A Statement. This equipment has been tested and found to comply with the limits for a Class A digital device, pursuant to Part 15 of the FCC Rules. These limits are designed to provide reasonable protection against harmful interference when the equipment is operated in a commercial environment. This equipment generates, uses, and can radiate radio-frequency energy and, if not installed and used in accordance with the instructions, may cause harmful interference to radio communications. Operation of this equipment in a residential area is likely to cause harmful interference, in which case the user will be required to correct the interference at his own expense.Part 68: Network Registration Number. This equipment is registered with the FCC in accordance with Part 68 of the FCC Rules. It is identified by FCC registration number AV1USA-28011-MA-T. Refer to “Federal Communications Commission Statement” in “About This Book” for more information regarding Part 68.
Canadian Department of Communications (DOC) Interference InformationThis digital apparatus does not exceed the Class A limits for radio noise emissions set out in the radio interference regulations of the Canadian Department of Communications.
Le Présent Appareil Nomérique n’émet pas de bruits radioélectriques dépassant les limites applicables aux appareils numériques de la class A préscrites dans le reglement sur le brouillage radioélectrique édicté par le ministére des Communications du Canada.
TrademarksAvaya Predictive Dialing System and Avaya PDS Internet Monitor is a trademark of Avaya Inc.
Microsoft Internet Explorer and Windows 2000 is a trademark of Microsoft Corporation.
Crystal Reports is a trademark of Crystal Decisions and/or Seagate Technology Inc.
Oracle is a trademark of Oracle Corp.
All trademarks identified by the ® or TM are registered trademarks or trademarks, respectively, of Avaya Inc. All other trademarks are the property of their respective owners. Ordering InformationCall: Avaya Publications Center
Voice 1-800-457-1235 International Voice 410-568-3680
Fax 1-800-457-1764 International Fax 410-891-0207
Write: Avaya Publications Center
2855 North Franklin Road
Indianapolis, IN 46219
If applicable, refer to the section in "About this Book" entitled "Related Documents."
For information about Avaya products and services, go to www.avaya.com.
For support on Avaya products, go to support.avaya.com.
For online updates to this documentation and product documentation for all Avaya products, go to support.avaya.com and click on Product Documentation.
For information about Avaya product training, go to www.learning-avaya.com.
European Union Declaration of Conformity
The “CE” mark affixed to the DEFINITY ONE equipment described in this book indicates that the equipment conforms to the following European Union (EU) Directives:
• Electromagnetic Compatibility (89/336/EEC)Low Voltage (73/23/EEC)
• Telecommunications Terminal Equipment (TTE) i-CTR3 BRI and i-CTR4 PRIFor more information on standards compliance, contact your local distributor.
............................................................................................................................................................................................................................................................

...........................................................................................................................................................................................................................................................

Contents
............................................................................................................................................................................................................................................................
............................................................................................................................................................................................................................................................
1 Avaya Predictive Dialing System
Avaya PDS overview 2
System components 3
Campaign Director 11
Editor 14
Monitor 15
Analyst 16
............................................................................................................................................................................................................................................................
2 Campaign Life Cycle
Campaign Life Cycle 18
............................................................................................................................................................................................................................................................
3 Multi-dialer
Shared features 22
Primary and secondary dialers 24
Pod impacts 25
............................................................................................................................................................................................................................................................
4 Agent types
Agent types 28
Agent logons 29
............................................................................................................................................................................................................................................................
5 Calling list
Calling list features 32
Download calling lists 33
C O N T E N T Sv

............................................................................................................................................................................................................................................................
6 Completion codes
Completion codes 36
Completion code table 37
............................................................................................................................................................................................................................................................
7 Log in to Avaya PDS Campaign Director
Log in to Campaign Director 44
............................................................................................................................................................................................................................................................
8 Editor settings
Enable or disable multi-dialer commands 46
Save options 47
Set refresh options 48
............................................................................................................................................................................................................................................................
9 Phone strategy
Phone strategy overview 51
Phone strategy preparation 52
Phone strategy settings 53
Create a phone strategy 56
Copy a phone strategy 58
View phone strategy settings 59
Edit a phone strategy 60
Delete a phone strategy 61
List all phone strategies on a selected dialer 62
Append a phone strategy row 63
Insert a row in a phone strategy 64
Delete a row in a phone strategy 65
Move a row up in a phone strategy 66
Move a row down in a phone strategy 67
Select all rows in a phone strategy 68
Unselect all rows in a phone strategy 69
............................................................................................................................................................................................................................................................
10 Record selection
Record selection 73
C O N T E N T Sv i
............................................................................................................................................................................................................................................................

Record selection organization 75
Record selection wildcard characters 77
Understand the Selection Reports pane 79
Open and view a record selection 80
Complete the Miscellaneous pane 81
Complete the Records pane 82
Complete the Time Zone pane 83
Complete the Calling Results pane 84
Complete the Recalls pane (optional) 85
Complete the Sort pane (optional) 86
Create a record selection 87
Save a record selection 88
Edit a record selection 89
Delete a record selection 90
Verify a record selection 91
Run a record selection 92
Copy a record selection 93
List all record selections on a selected dialer 94
View selection reports 95
View record selection settings 96
Append record selection rows 97
Insert a row in a record selection 98
Delete a row in a record selection 99
Move a row up in a record selection 100
Move a row down in a record selection 101
Select all rows in a record selection 102
Unselect all rows in a record selection 103
............................................................................................................................................................................................................................................................
11 Jobs
Job types 107
Outbound job 108
Job settings 109
Create a job 117
View job settings 118
Save a job 119
C O N T E N T Sv i i
............................................................................................................................................................................................................................................................

Save a job as another name or on a different dialer 120
Start a job on one or more dialers 121
Start multiple jobs on currently selected dialer 122
Copy a job 123
Edit a job 124
Verify a job on one or more dialers 125
Verify multiple jobs on the currently selected dialer 126
Delete a job on one or more dialers 127
Delete multiple jobs on the currently selected dialer 128
List all jobs on a selected dialer 129
............................................................................................................................................................................................................................................................
12 Monitor default settings
Set the default hierarchy 132
Set time range 133
Set job changes 134
Set agent states to display 135
Set view set 136
Set refresh rate 137
Set save on exit settings 138
............................................................................................................................................................................................................................................................
13 Monitor navigation and personalization
User interface 140
Navigate among the Tool menu applications 141
Use large icons or small icons in the button bar 142
Open a standard view 143
Open a view or view set from another location 144
Create a custom view 145
Save current view 146
Save as view set 147
Save view set with a new name 148
Delete a view set 149
Add a view to the Custom button group 150
Refresh a view 151
C O N T E N T Sv i i i
............................................................................................................................................................................................................................................................
............................................................................................................................................................................................................................................................
14 Monitor views
Views 155
Dialer Status view 158
Dialer Agents view 160
Dialer Lines view 162
Dialer History view 163
Job Status view 165
Job Agents view 167
Job Detail view 169
Job Call Handling view 172
Job Completion Codes view 173
Job Wait Queues view 175
Job History view 178
Job Performance view 180
Supervisor Agents view 181
Find Agent view 183
Agent Detail view 184
Agent Completion Codes view 187
Agent History view 189
............................................................................................................................................................................................................................................................
15 View control functions
View control toolbar 192
Filter data in a view 194
Select a performance code 195
Scope selectors examples 196
Set scope selectors 197
Select a time range 199
Select a hierarchy 200
Hide or show columns 201
Select Table View or Graphical View 202
Save a view as HTML 203
............................................................................................................................................................................................................................................................
16 Job control functions
Stop a job 207
C O N T E N T Si x
............................................................................................................................................................................................................................................................

Link to job 208
Minimum hit rate 209
Expert calling ratio 210
Inbound settings 211
Reassign lines 212
Managed Dialing 213
Time zones 214
Unit Work Lists 215
Detection modes 216
Alternate initial 217
Recalls 218
............................................................................................................................................................................................................................................................
17 Quotas
Job end and quotas 220
Create or modify a quota 221
............................................................................................................................................................................................................................................................
18 Alerts
Alerts 224
Alert Settings 227
Create an alert 229
Edit an alert 230
Remove an alert 231
View a log 232
Enable and disable alerts 233
Check the status of each alert 234
............................................................................................................................................................................................................................................................
19 Agent control functions
Agent control functions 236
Find an agent 237
Transfer an agent to another job 238
Send message to an agent 239
Monitor agent line 240
Remove an agent from a job 241
Show an agent view 242
C O N T E N T Sx
............................................................................................................................................................................................................................................................

............................................................................................................................................................................................................................................................
20 Analyst
Reports 244
Report categories 247
Preview a report 250
Export a report 251
Create a new report configuration 252
Schedule a report 258
Change a report 259
Print a report 260
Delete a report configuration 261
............................................................................................................................................................................................................................................................
21 Hierarchy Manager
Hierarchies 267
Start Hierarchy Manager 269
Create a hierarchy 270
Open a hierarchy 272
Add a level to a hierarchy 273
Add a data item to a hierarchy 274
Move a level or item within a hierarchy 275
Rename a hierarchy level 276
Remove a level from a hierarchy 277
Remove a data item from a hierarchy 278
Rename a hierarchy 279
Delete a hierarchy 280
............................................................................................................................................................................................................................................................
22 Completion Code Manager
Completion code categories 282
Start Completion Code Manager 285
Set a completion code as RPC 286
Set a completion code as a Closure 287
Set a completion code as an Abandon 288
Remove a completion code 289
Change a completion code description 290
View Completion Code Manager for another dialer 291
C O N T E N T Sx i
............................................................................................................................................................................................................................................................
............................................................................................................................................................................................................................................................
23 PC Analysis Telnet
PC Analysis Telnet 294
Toolbar icons 295
Start PC Analysis Telnet 297
Transfer PC Analysis extract output files 298
............................................................................................................................................................................................................................................................
24 System Telnet
System Telnet 300
Toolbar icons 301
Start System Telnet 302
............................................................................................................................................................................................................................................................
25 Agent Blending
Agent Blending 305
Supported ACDs 307
Switch terminology 308
Domains 313
Domain Groups 315
Start the Agent Blending tool 320
Create a domain group 321
Create a domain 322
Edit domain group settings 323
Edit domain settings 324
Delete a domain group 325
Delete a domain 326
Move a domain to a different group 327
Stop the blend engine 328
Start the blend engine 329
Reset the blend engine 330
Resynch the blend engine 331
View ACD statistics 332
View alerts 333
View transactions 334
C O N T E N T Sx i i
............................................................................................................................................................................................................................................................

............................................................................................................................................................................................................................................................
A Pattern Matching 335
Default pattern syntax 336
Supported syntax 338............................................................................................................................................................................................................................................................
B Configurator 347
Shared features 348
Pod impacts 350
Primary and secondary dialers 352
Configurator 353
Validation 355
C O N T E N T Sx i i i
............................................................................................................................................................................................................................................................

C O N T E N T Sx i v
............................................................................................................................................................................................................................................................

About this information product
............................................................................................................................................................................................................................................................
Purpose The purpose of this manual is to provide detailed information about the operation of the AvayaTM Predictive Dialing System (PDS).
Reason for reissue The following list describes changes to the Avaya PDS User’s Guide since the last release.• This guide has been branded to match our product name changes.• Report topics have been added to the Analyst chapter.• There is an appendix which contains new pattern matching rules
and syntax.• There is an appendix which contains information on the Middle
tier Configurator.• This guide has been formatted for easier use. • This guide contains two volumes - one for the graphical, Avaya
PDS Campaign Director (Campaign Director) interface, and the other for the Character-Based User Interface, which uses menus to navigate through the system (these two interfaces cannot be used simultaneously).
• This guide is arranged by task rather than by application. This allows the information to flow according to user task rather than individual tasks performed within certain applications.
Intended-Audience The audience for this manual includes any user of the Avaya PDS. This includes, but is not limited to, system supervisors, integration consultants, application consultants, and customer support engineers.
1

............................................................................................................................................................................................................................................................
2

Part I: Avaya Predictive Dialing System introduction
............................................................................................................................................................................................................................................................

............................................................................................................................................................................................................................................................

1 Avaya Predictive Dialing System
............................................................................................................................................................................................................................................................
............................................................................................................................................................................................................................................................Overview
Purpose The AvayaTM Predictive Dialing System (PDS) consists of software, hardware, and networked components. The system is comprised of the system cabinet, supervisor workstation, agent workstations, printer, and modem. As a system supervisor, you use the supervisor workstation and the Avaya PDS Campaign Director (Campaign Director) applications to set up, monitor, modify, and report on your calling activities.This guide focuses on how you can use the Campaign Director applications -- Avaya PDS Monitor (Monitor), Avaya PDS Editor (Editor), Avaya PDS Analyst (Analyst) -- to make your call center more effective.
Contents This section contains the following topics:• Avaya PDS overview• System components• Campaign Director• Editor• Monitor• Analyst
1 - 1

Avaya Predictive Dialing System
...........................................................................................................................................................................................................................................................
............................................................................................................................................................................................................................................................Avaya PDS overview
Overview The Avaya PDS works with your call center’s equipment and operations to perform call center tasks. The following list describes the main functions of the Avaya PDS:• Receives customer records from the call center’s host computer• Selects and sorts customer records based on your call center’s
business goals• Allows agents to update customer information on an agent screen
or on the host, depending on your configuration• Passes only specific call types to agents• Adjusts the calling pace to meet the call center’s requirements• Monitors ACD inbound traffic and predicts when to acquire and
release ACD agents for outbound calling (Avaya PDS with Agent Blending)
• Supports outbound, inbound, and blend jobs• Generates a variety of reports, including job, agent, and system
reports for three time variables• Uploads record information to the host (optional)
1 - 2
Avaya Predictive Dialing System
............................................................................................................................................................................................................................................................
............................................................................................................................................................................................................................................................System components
Overview Depending on the configuration and Avaya PDS purchased, the hardware features may be different. The purpose of this section is to provide a general understanding of the names and functions of the various Avaya PDS components.
Hardware components The basic Avaya PDS includes the following hardware components:• System cabinet• Digital switch• Digital switch subrack• Digital switch buses• ENBC I/O Transition Module• Avaya PDS CPU• Maintenance modem• Administrator console• Agent workstation (customer provided)• Supervisor workstation (customer provided)• Printers
System cabinet The system cabinet contains the Avaya PDS software and hardware that allows the system to call customers and connect agents to those customers. The system cabinet components also store system, job, and agent statistics. Components inside the system cabinet include:• Digital switch to provide telephone switching services• Avaya PDS CPU to run the system software• DDS drive for backing up and restoring the Avaya PDS database
and files• Modem and access server for remote technical support of the
system (systems installed in the United States and Canada include a maintenance modem and modem cable. All other installations outside the United States and Canada include only a modem cable. You, your VAR, or your partner provides the modem.)
• Uninterruptible Power Supply (UPS) to control power to the cabinet components
1 - 3

Avaya Predictive Dialing System
...........................................................................................................................................................................................................................................................
Components that connect to the system cabinet include:• Administrator console for access to the Avaya PDS CPU• Public Switched Telephone Network (PSTN) for placing and
receiving calls• Local Area Network (LAN) for connecting to agent and
supervisor workstations• Agent and supervisor headsets or telephonesCabinet specifications for Avaya PDSs may be different. The following illustration shows a typical system cabinet layout in the Avaya PDS environment.
Digital switch The digital switch places calls, performs call progress analysis, answers calls, connects calls to agents or hold queues, plays messages, and communicates with the system controller (Avaya PDS CPU). The digital switch is comprised of two subsystems: the digital switch
1 - 4

Avaya Predictive Dialing System
............................................................................................................................................................................................................................................................
subrack and the ENBC/IO Transition Module. The digital switch uses an Ethernet connection to communicate with the system controller.
Digital switch subrack The digital switch subrack, also called the digital switch card file, contains cards that provide the following functions:• Provides a central processor for the digital switch• Monitors alarm conditions and provides controls for resetting the
digital switch• Provides interfaces for voice cables and various types of telephone
trunks• Places, receives, and processes telephone calls• Plays digitized voice messages• Switches calls to workstation headsetsAll systems have one ENBC and one EDTG card. The number of LPVC2s depends on your system. The other cards vary from site to site, depending on the number and type of trunks connected to the system.The following table provides an overview of the functions of the most common cards.
Card type General function Description
ENBC (Enhanced Network Bus Controller)
Control circuit card This card controls the operation of the digital switch under the direction of the Avaya PDS CPU.
EDTG (Enhanced Digital Tone Generator)
Service circuit card Generates DTMF (Dual Tone Multi-frequency) or MF (Multi-frequency) tones for placing calls and testing audio paths.
LPVC2Large Port Voice Card
Service circuit card Plays and records digitized voice messages and ziptones.
1 - 5

Avaya Predictive Dialing System
...........................................................................................................................................................................................................................................................
DDCDigital Dialer Card
Service circuit card Generates additional DTMF tone channels and provides additional ports/capacity.
ECPAEnhanced Call Progress Analyzer
Service circuit card Detects and analyzes call progress tones, voices, and automated voice and message systems.
EDRCEnhanced DTMF Receiver Card
Service circuit card Detects and reports DTMF digits on inbound calls which provide ANI/DNIS.
ECCEnhanced Conference Card
Service circuit card Provides transfer and conference capabilities.
UTC-2Universal Trunk Card
Port interface card Provides an interface to analog ground start or analog loop start telephone trunks.
QT1Quad T1 card
Port interface card Provides interfaces to four digital T1 telephone trunks (non-ISDN).
QE1Quad E1 card
Port interface card Provides interfaces to four digital E1 telephone trunks (non-ISDN).
T1-PRI/NT1 Primary Rate Interface card
Port interface card Provides interfaces to one T1-based Primary Rate Interface (ISDN) telephone trunk.
E1-PRIE1 Primary Rate Interface card
Port interface card Provides interfaces to one E1-based Primary Rate Interface (ISDN) telephone trunk.
Card type General function Description
1 - 6

Avaya Predictive Dialing System
............................................................................................................................................................................................................................................................
Digital switch buses The digital switch buses are integrated in the digital switch subrack and controller. The buses control signals and other information within the digital switch.
QT1-PRIQuad T1 Primary Rate Interface card
Port interface card Provides interfaces to four T1-based Primary Rate Interface (ISDN) telephone trunks.
QE1-PRIQuad E1 Primary Rate Interface card
Port interface card Provides interfaces to four E1-based Primary Rate Interface (ISDN) telephone trunks.
OLIC2Operator Line Interface Card
Port interface card Provides an interface to analog voice cables for 24 direct-connect headsets.
Card type General function Description
Digital switch bus name
Description
Ethernet Carries communication network traffic between the Avaya PDS CPU and the digital switch.
SCSI Connects the ENB I/O Transition Module to the digital switch subrack. When the call center starts a calling job, the ENBC uses the SCSI bus to download digitized voice messages to the LPVC.
Communication Carries control signals and data between the ENBC and the cards in the digital switch subrack. When the digital switch is reset, the ENBC uses the communication bus to download application software to cards in the digital switch subrack.
PCM Carries telephone audio information within the digital switch. The digital switch uses the PCM bus to link the ports on the port interface cards and service circuit cards in the digital switch subrack.
1 - 7

Avaya Predictive Dialing System
...........................................................................................................................................................................................................................................................
ENBC I/O TransitionModule
The ENBC (Enhance Network Bus Controller) I/O Transition Module provides the following connections to the digital switch: • Ethernet• serial RS-232 communication• SCSI• external clock for testingThe ENBC I/O Transition Module has the following components:• hard disk drive• diskette drive• serial RS-232 ports• Ethernet connections• SCSI connection• ENBC connectionThe hard drive contains the operating system, application software, and configuration information used by the digital switch.
Avaya PDS CPU The Avaya PDS CPU is a Hewlett-Packard computer running the HP-UX operating system. It controls all Avaya PDS operations and provides the interface that supervisors and agents use on their workstations. It contains the Avaya PDS software that calls customers, connects agents and customers, and stores system, job, and agent statistics.The Avaya PDS CPU contains a DDS tape drive that provides data storage and is used for backing up system software.
AC powerA UPS controls power to the assemblies in the system cabinet.
FanThe system cabinet has one fan assembly -- the digital switch subrack fan.
Maintenance modem The Avaya PDS uses a high-speed modem to enable remote access to the system for diagnostic and maintenance purposes. The modem connects an analog telephone line to the access server to provide access to the major subsystems.Systems installed in the United States and Canada include a maintenance modem and modem cable.
1 - 8

Avaya Predictive Dialing System
............................................................................................................................................................................................................................................................
All other installations outside the United States and Canada include only a modem cable. You, your VAR, or your partner provides the modem.
Administrator console The administrator console provides access to the Avaya PDS CPU and digital switch. It connects directly to the access server inside the system cabinet. This console consists of a monitor and keyboard. The system administrator uses it to perform basic system operations, such as backing up system files, shutting down the system, and setting the system’s time and date. Do not use the administrator console to run jobs, select records, or similar tasks. Systems installed in the United States and United Kingdom include the administrator console. For installations outside the United States and United Kingdom, you, your VAR, or your partner provides the console or purchases one through Avaya.
Agent workstation(customer provided)
Each agent workstation consists of a computer and voice connection. During calling jobs, agents use the workstation to talk to customers and update customer records.An agent workstation can be a personal computer (PC) or a dumb terminal. See the Avaya PDS Installation Planner for specific requirements.
Personal computersPCs can be network-connected or serial-connected (direct-connected). The Avaya PDS provides the best service using network connected PCs. Network connected PCs use a Windows or Windows NT operating system. The Avaya PDS supports connections to either an Ethernet or Token Ring type of network. The Avaya PDS uses TCP/IP to move data between itself and the agent workstations. These systems can use graphical user interfaces designed by an application developer using the Avaya PDS Agent API.Serial-connected computers require a terminal emulation package and terminal servers for connection to the Avaya PDS CPU.
Dumb terminalsDumb terminals are usually serial-connected to the Avaya PDS through terminal servers. Dumb terminals use the character-based menu system.
Supervisor workstation(customer provided)
Supervisor workstations are usually network-attached PCs. They may also be serial-attached dumb terminals or serial-attached PCs.
1 - 9

Avaya Predictive Dialing System
...........................................................................................................................................................................................................................................................
Supervisor workstations require a headset or telephone. System supervisors use these workstations to set up and manage system settings, set up jobs, and monitor calling activity. See the Avaya PDS Installation Planner for specific requirements.
ComparisonThe supervisor workstation is identical to the agent workstation except it is usually a PC running Campaign Director. If it is a dumb terminal, the workstation uses a character-based menu system.
Printers The printer is used to print status messages, error messages, diagnostic information, and reports on call center operations. You are responsible for the purchase, installation, and maintenance of the printer.The printer is connected to your call center’s LAN, which makes it available to other application software. The printer connects to the Avaya PDS CPU by an Ethernet LAN connection.
1 - 1 0

Avaya Predictive Dialing System
............................................................................................................................................................................................................................................................
............................................................................................................................................................................................................................................................Campaign Director
Overview Campaign Director is a suite of call management applications that serve as the interface between a call center supervisor and the Avaya PDS. Campaign Director applications allow you to easily and dynamically design, control, monitor, and analyze call center activity. The Avaya PDS increases your call center’s productivity and helps you achieve your campaign goals.The Avaya PDS consists of software and networked components, including the Avaya PDS cabinet, supervisor workstations, agent workstations, printers, and modems. The Campaign Director software provides a graphical user interface to the Avaya PDS which runs on your supervisor workstation.
New features of CampaignDirector
The newest release of Campaign Director encompasses all existing functionality of earlier versions. The following list describes the new features of Campaign Director.
Integration of monitoring and control functions The functionality of previous versions of Campaign Monitor and Campaign Manager are combined into Monitor to provide a single interface to all job and agent monitor and control functions.
Enterprise-wide monitoring Monitor allows you to view multiple dialers across the enterprise. Monitor provides the ability to focus on a single agent on a single dialer as well as provide an enterprise-view of a call center.
Customizable views In order to satisfy the needs of a wider, more diverse audience, Monitor provides tools for customizing views of enterprise data and saving view configurations.
Improved speed and performance Files are retrieved from and stored directly to the PDS by means of the Command and Control
1 - 1 1

Avaya Predictive Dialing System
...........................................................................................................................................................................................................................................................
interface, therefore, eliminating the need to synchronize with each Avaya PDS.
Improved User Interface (UI) The current tabular layout of Editor is replaced with a single form to maintain the same look and feel as Monitor. This new design is similar to MicrosoftTM Outlook.
Improved usability The job and record selection editor screens display additional information which lets you view the current status of the jobs or record selections on a specified system.
Ease of use Editor automatically executes the record selection (if needed) and then verifies the job. If the job verification passes, you will be offered a choice of starting the job or cancelling the operation. You still have the capability to run record selections as a separate action.
Global Campaign Directorfeatures
With Campaign Director’s new user interface, there are several features that have been added in order to increase the ability to customize settings. The table below identifies some of the new features that are used throughout the Campaign Director applications and tools.
New feature Description
Button bar Allows you to use shortcuts and navigate more easily.
Sort columns Allows you to sort data in ascending and descending order by clicking a column’s heading.
Resize columns Allows you to make a column wider or narrower by clicking the area between column headings and then dragging to the left or right.
Refresh Allows you to refresh the data in the active window.
Tools Allows you to launch various tools: Hierarchy Manager, Completion Code Manager, Agent Blending, PC Analysis telnet, and System telnet.
1 - 1 2

Avaya Predictive Dialing System
............................................................................................................................................................................................................................................................
Multiple dialer controls Allows you to save and retrieve record selections, phone strategies, and jobs from multiple dialers if this feature is enabled. Also allows you to run reports across dialers.
Define main dialer Allows you to define the main dialer within a pod (up to four dialers).
New feature Description
1 - 1 3

Avaya Predictive Dialing System
...........................................................................................................................................................................................................................................................
............................................................................................................................................................................................................................................................Editor
Overview Editor is used for a variety of tasks. Following is a sample list of tasks performed using Editor:• Create and modify a phone strategy, record selection, or job• Open a phone strategy, record selection, or job on local dialer or
another dialer (if multi-dialer option is enabled)• Save a phone strategy, record selection, or job to another dialer• Display a record selection report
Editor application Editor allows you to see large amounts of information in a single window.• When the Job Files button is selected, (left-hand side of your
screen), you see a list of existing jobs. If you select one of the jobs in the list, you see a tree structure on the right-hand side of the window. The tree structure displays all of your settings for that particular job. To modify the job settings, double-click the fields in the tree structure.
• When the Strategy Files button is selected, you see a list of existing phone strategies. If you select a phone strategy in the list, you see a wizard on the right-hand side of the window. The wizard screens contain all of your settings for the selected phone strategy. To modify phone strategy settings, use the Next and Back buttons located at the bottom of each wizard screen to navigate. On the wizard screens, append rows and double-click fields to modify phone strategy settings.
• When the Selection Files button is selected, you see a list of existing record selections. If you select a record selection, you see a wizard on the right-hand side of the widow. The wizard screens contain all of your settings for the selected record selection. To modify record selection settings, use the Next and Back buttons located at the bottom of each wizard screen to navigate. On the wizard screens, append rows and double-click fields to modify record selection settings.
1 - 1 4

Avaya Predictive Dialing System
............................................................................................................................................................................................................................................................
............................................................................................................................................................................................................................................................Monitor
Overview Monitor is used for a variety of tasks. In this version, the previous Campaign Manager functions are incorporated into Monitor.Following is a sample list of tasks performed using Monitor:• Monitor agents on one or multiple dialers (if multi-dialer option is
enabled)• Customize your view settings• View detailed agent, supervisor, job, or dialer information and
save customized views to use at a later time• Sort data based on information that is relevant to your call center
User InterfaceSee the “Monitor personalization and navigation” section for information on Monitor.
1 - 1 5

Avaya Predictive Dialing System
...........................................................................................................................................................................................................................................................
............................................................................................................................................................................................................................................................Analyst
Overview Analyst is a reporting tool for the Avaya PDS. Analyst can filter data according to agent, supervisor, job, or dialer, depending on your call center goals. See “Analyst” for more information.
1 - 1 6
2 Campaign Life Cycle
............................................................................................................................................................................................................................................................
............................................................................................................................................................................................................................................................Overview
Purpose The AvayaTM Predictive Dialing System (PDS) uses campaigns to target specific customers. The Campaign Life Cycle describes the day to day tasks that you perform in a typical call center. Following the Campaign Life Cycle description are introductions to each application within Avaya PDS Campaign Director (Campaign Director). This helps you understand how the Campaign Life Cycle activities are relative to Avaya PDS Editor (Editor), Avaya PDS Monitor (Monitor), and Avaya PDS Analyst (Analyst).
Contents This section contains the following topic:• Campaign Life Cycle
2 - 1 7

Campaign Life Cycle
...........................................................................................................................................................................................................................................................
............................................................................................................................................................................................................................................................Campaign Life Cycle
Overview The term campaign is used to group together calling lists, phone strategies, record selections, and jobs that share an objective. A campaign can contain several jobs, each with its own phone strategy and record selection, which target a specific group of customers. Whether your campaigns last a day or a month, there are events that occur during every Campaign Life Cycle.
2 - 1 8

Campaign Life Cycle
............................................................................................................................................................................................................................................................
Campaign Life Cycleactivities
The Campaign Life Cycle diagram creates a circular view of the activities involved during a campaign. The following table outlines those activities.
Activity Consists of:
Preparation • verify download• set user accounts• system configuration and set-up
Planning Set campaign objectives• job objectives• record selections• phone strategies• other optional features
Implementation Implementation plan• create phone strategies• create and verify record selections• create jobs
Operation Manage operation• start jobs• log in to jobs• monitor and modify jobs• shutdown jobs
Evaluation Evaluation and completion• define and run reports• analyze output• upload results• backup results
Sustaining • maintain user accounts• system administration
2 - 1 9

Campaign Life Cycle
...........................................................................................................................................................................................................................................................
2 - 2 0

3 Multi-dialer
............................................................................................................................................................................................................................................................
............................................................................................................................................................................................................................................................Overview
Purpose The AvayaTM Predictive Dialing System (PDS) has the capability to be configured into a pod. A pod is a group of up to four dialers connected by a middle-tier structure.
Contents This section contains the following topics:• Shared features • Primary and secondary dialers• Pod impacts
3 - 2 1

Multi-dialer
...........................................................................................................................................................................................................................................................
............................................................................................................................................................................................................................................................Shared features
Overview A pod of Avaya PDS dialers contains up to four dialers connected through a middle-tier server. Following is a list of features that are shared among dialers in a pod:• calling lists• jobs• phone strategies• record selections• loginsA multi-dialer office environment greatly increases your company's outreach capacity. The functionality allows you to manage up to four dialers in a distributed architecture using a single, unified administration and supervisor interface for faster implementation of large-scale outreach programs. To support multi-dialer, Campaign Director 4.0 makes it easy for you to manage operations and monitor traffic and workload across the multi-dialer network.
Shared calling list The Avaya PDS allows you to run a job using a calling list from a different dialer. Any Avaya PDS within a pod can be used to dial another dialer’s (within that same pod) calling list. This allows multiple dialers to call on the same calling list at the same time which provides scalability on a single campaign above the physical agent limitation of one Avaya PDS.The primary advantage of a shared calling list is speed. Imagine a job with 1 million records finishing in 5 hours! The shared list feature allows the agent capacity of multiple Avaya PDSs to be used for a single job. For example, a supervisor creates and starts a job on each of the dialers in a pod with a single command. Once agents are logged onto each system, the supervisor monitor all activity from a single, real-time view.
Pod monitoring The pod feature combines monitoring, control, and administration of all four dialers in a pod from a single Campaign Director workstation.
3 - 2 2

Multi-dialer
............................................................................................................................................................................................................................................................
Multi-dialer agent login managementYou can create and manage logins and passwords for multiple dialers from a single system. For example, a login and password created on one dialer may be used on any dialer in the pod.
Multi-dialer monitoringMonitor will support multiple dialers across the pod. For example, real-time job data from multiple dialers can be aggregated into a single view of the overall pod.
Multi-dialer controlEditor provides control functions throughout all dialers within a pod. This allows one supervisor to stop and start jobs, adjust Expert Calling Ratio, assign line pools, and other job control functions from a single Campaign Director workstation.
Multi-dialer administrationCampaign Director applications and tools provide administration across all dialers in a pod. For example, copying, deleting, and modifying phone strategies, record selections, or jobs, regardless of the dialer they reside on.
3 - 2 3

Multi-dialer
...........................................................................................................................................................................................................................................................
............................................................................................................................................................................................................................................................Primary and secondary dialers
Overview Within a pod, there are dialers that are configured as the “primary” dialer and the “secondary” dialer.
Primary dialer A pod’s primary dialer is an Avaya PDS dialer that runs the mid-tier software essentially controlling and coordinating data management. Every Avaya PDS pod must have a primary dialer. Other dialers feed data to the primary dialer’s mid-tier that processes the data and makes it available for monitoring and reporting. In this way, the system supervisor can view status or create reports that include the operation of all the dialers in the pod.
Secondary dialer The secondary dialer is a dialer that is configured to take over primary dialer functions in the event of a failure of the primary dialer.
3 - 2 4

Multi-dialer
............................................................................................................................................................................................................................................................
............................................................................................................................................................................................................................................................Pod impacts
Overview If you work with a pod (two to four dialers), there are special considerations to think about as you create ways to manage, control, and administer settings across multiple dialers.
Multi-dialer Monitor always shows data for all dialers in a pod. However, the controls for multi-dialer are turned off by default. You can turn on the multi-dialer control from Settings > Options. Choose which dialers in a pod to view. See “View control functions” for more information.Once the multi-dialer control is turned on, each job control dialog box (for example, Job Linking or Change Time Zones) shows a check mark. If you want to control a single dialer, clear the check box.
Completion codes Dialer completion codes and their corresponding code number and code description are contained within a system file called compcode.cfg. Each dialer has one compcode.cfg file. Completion codes are used in a variety of ways. Initially, they are used by the agent to end a call with a customer. This marks the call outcome on the customer record. Completion codes are also used as part of reporting. They are essential to accurate reporting and can be used to determine the success of a campaign. If there are four dialers in a pod, that also means there are four compcode.cfg files. It is important to keep these four completion code files in sync for a variety of reasons:• Agents use the same codes for the same call outcome• Reporting from completion codes is accurate• Eliminates the need for troubleshooting for reasons of inaccurate
completion codes. Keeps all dialer completion codes in sync• To aggregate data across dialer effectively, completion code
descriptions and completion code assignments (RPC, Abandon, Closure) must remain consistent across all dialers in a pod
Jobs Jobs should be named carefully. Use the following guidelines when creating or modifying jobs:• Do not create multiple jobs on multiple dialers with the same
name if they have very different job parameters. This limits your ability to aggregate “like” data across multiple Avaya PDSs.
3 - 2 5

Multi-dialer
...........................................................................................................................................................................................................................................................
• If you want to control like jobs in a single step (jobs with similar or like parameters), then name the jobs the same on different dialers. For example, if you want to change the quota on job1 on all dialers, you can do so in one step.
3 - 2 6

4 Agent types
............................................................................................................................................................................................................................................................
............................................................................................................................................................................................................................................................Overview
Purpose The AvayaTM Predictive Dialing System (PDS) places calls and uses agents to talk to customers. The Avaya PDS supports several agent types. The agent type is a logon parameter that tells the Avaya PDS what types of calls a specific agent is allowed to take.
Contents This section contains the following topics:• Agent types• Agent logons
4 - 2 7
Agent types
...........................................................................................................................................................................................................................................................
............................................................................................................................................................................................................................................................Agent types
Agent types Agents can log on to the Avaya PDS using several agent types, which are determined by your Avaya PDS configuration.
Outbound agents Outbound agents handle outbound calls only. Outbound agents can join the following jobs types:• Unit work list • Managed Dialing• Sales Verification• Infinite
Managed agent Managed agents only handle outbound calls during an outbound job set up as a Managed Dialing job.
Inbound agent Inbound agents handle only inbound calls. They can join inbound or blend jobs. The Avaya PDS receives calls directly from customers or through an ACD.
Blend agent Blend agents handle both outbound and inbound calls. They join blend jobs and can handle customer records on outbound and inbound calling screens.
Person to Person agent Person to Person agents handle outbound calls when outbound agents are not available.
ACD agent ACD agents handle outbound calls on the Avaya PDS. They may also handle inbound calls on the ACD or may only take outbound calls depending on which domain group they logged into on the ACD.
4 - 2 8

Agent types
............................................................................................................................................................................................................................................................
............................................................................................................................................................................................................................................................Agent logons
Basic logon The following table describes the agent logons used, regardless of the blending configuration on your system.
Agent Blending logon If your system is configured with Agent Blending, the following table describes the agent logons used.
Intelligent Call Blendinglogon
If your system is configured with Intelligent Call Blending, the following table describes the agent logons used.
Agent type Logon Joins job Handles calls
Managed M outbound outbound calls on Avaya PDS
Outbound O outbound or blend
outbound calls on Avaya PDS
Person to Person
PTP outbound outbound calls on Avaya PDS
Agent type Logon Joins job Handles calls
ACD ACD outbound outbound calls on Avaya PDS and inbound calls on ACD
Agent type Logon Joins job Handles calls
Inbound I inbound or blend
inbound calls on Avaya PDS
Blend B blend inbound and outbound calls on Avaya PDS
4 - 2 9

Agent types
...........................................................................................................................................................................................................................................................
4 - 3 0
5 Calling list
............................................................................................................................................................................................................................................................
............................................................................................................................................................................................................................................................Overview
Purpose The AvayaTM Predictive Dialing System (PDS) uses calling lists -- a group of customer records -- to place calls to customers.
Contents This section contains the following topics:• Calling list features• Download calling lists
5 - 3 1
Calling list
...........................................................................................................................................................................................................................................................
............................................................................................................................................................................................................................................................Calling list features
Overview A calling list is a file on the Avaya PDS containing customer records. The host system creates files of customer records for the Avaya PDS. After the customer records are downloaded from the host, the Avaya PDS adds several fields to each record to help track calling results. After the system adds the fields, it may check for and reject duplicate records and uncallable phone numbers. This process depends upon your system configuration. The Avaya PDS refers to the set of modified records as the calling list. During calling list preprocessing, the Avaya PDS performs the following actions:• Checks for and flags duplicate records and invalid telephone
numbers• Identifies and marks records that have been on the system more
than a specified number of days• Recalls the name of the last agent to speak to the customer• Stores the result of the last call attempt as recorded by the agent• Verifies the following statistics:
– The name of the last agent to speak with the customer– The date and time of the last call attempt– The result of the last call attempt as recorded by the agent on
the system– The number of days the record has been on the system– The record status
5 - 3 2

Calling list
............................................................................................................................................................................................................................................................
............................................................................................................................................................................................................................................................Download calling lists
Download calling lists Before you begin calling activities, you need to provide the Avaya PDS with a calling list. The system uses two types of calling lists, one for outbound calling and one for inbound calling (Intelligent Call Blending systems only).In most call centers, the Avaya PDS automatically downloads data files from the host computer for the outbound calling list. The host data files contain the records and fields you defined as necessary to your outbound call activity.
Schedules At scheduled times, the Avaya PDS converts the customer records in a specific calling list to your host computer’s format and creates an upload file. When the host receives this file, it runs a script (written by your host application contact) that updates your customer database.
Environment The calling list environment is responsible for these activities:• Creating the files required to convert host computer data to the
Avaya PDS calling list format• Preparing the calling list for calling• Preparing the calling list for extracting data to send back to the
host after calls have been made
5 - 3 3

Calling list
...........................................................................................................................................................................................................................................................
5 - 3 4

6 Completion codes
............................................................................................................................................................................................................................................................
............................................................................................................................................................................................................................................................Overview
Purpose The AvayaTM Predictive Dialing System (PDS) uses completion codes to identify the result of a call.
Contents This section contains the following topics:• Completion codes• Completion code table
6 - 3 5

Completion codes
...........................................................................................................................................................................................................................................................
............................................................................................................................................................................................................................................................Completion codes
Completion codes A completion code identifies a call result. When a customer answers a phone call, the Avaya PDS transfers the call to an agent. At the end of the call, the agent records the outcome by pressing an function key or by clicking a button that is associated with a completion code.The Avaya PDS uses completion codes to select records for calling and reports. A completion code consists of a code number, call result, and description. The call result is a short name that makes the code easier for agents to identify. The description provides call center supervisors with a more detailed description. Each Avaya PDS has one set of completion codes.The completion code can be an agent-generated code you specified or a standard system completion code. If the system does not pass the call to an agent, the Avaya PDS generates the completion code.The following list are examples of completion codes that agents would use after a call attempt:• Recall (try back later when the desired party is available)• Promise to pay• Answering machine/left message• Talked to customerThe following list are examples of when the Avaya PDS would not pass a call to an agent:• A busy signal• A SIT (Standard Information Tone), which could represent a
disconnected number or circuits that are too busy to handle the call
• No answerA system completion code typically identifies an unsuccessful call attempt. The only successful call attempts the Avaya PDS identifies are Virtual Agent 91 and 92. You can change the number of times the system attempts to call the customer. When the Avaya PDS processes a host download file, it leaves a null entry in the completion code field for each record. When the system unsuccessfully calls a phone number, it releases the record and completes the field with the appropriate system completion code.
6 - 3 6
Completion codes
............................................................................................................................................................................................................................................................
............................................................................................................................................................................................................................................................Completion code table
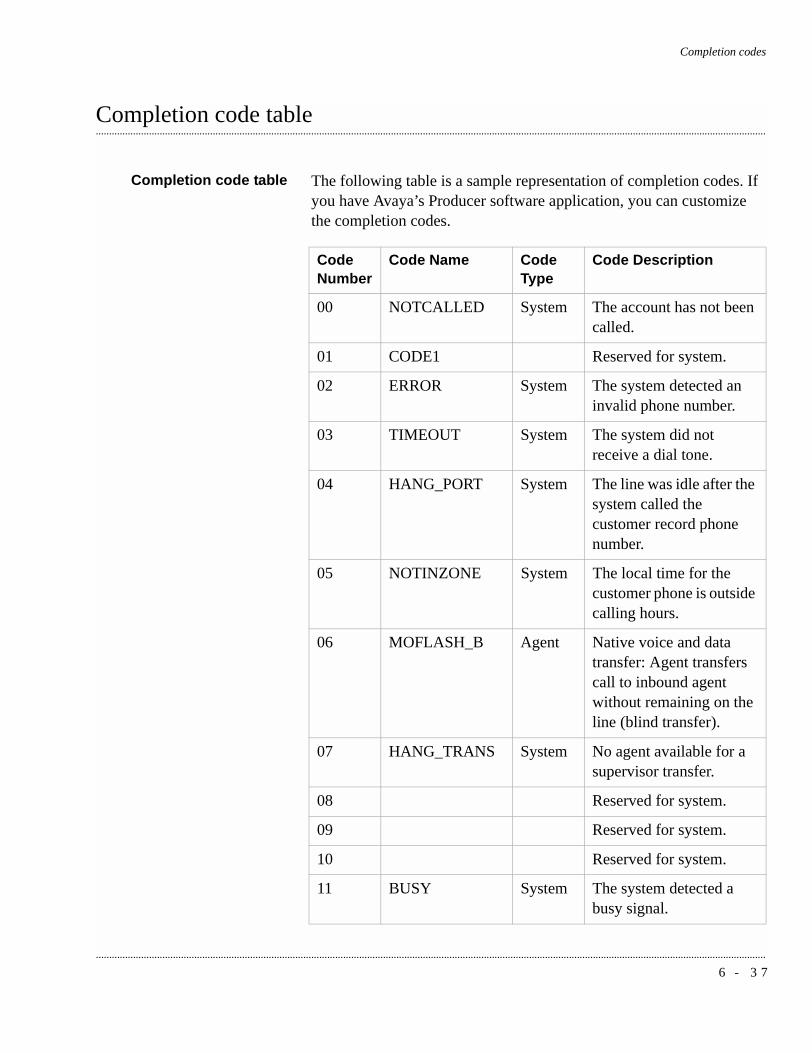
Completion code table The following table is a sample representation of completion codes. If you have Avaya’s Producer software application, you can customize the completion codes.
Code Number
Code Name Code Type
Code Description
00 NOTCALLED System The account has not been called.
01 CODE1 Reserved for system.
02 ERROR System The system detected an invalid phone number.
03 TIMEOUT System The system did not receive a dial tone.
04 HANG_PORT System The line was idle after the system called the customer record phone number.
05 NOTINZONE System The local time for the customer phone is outside calling hours.
06 MOFLASH_B Agent Native voice and data transfer: Agent transfers call to inbound agent without remaining on the line (blind transfer).
07 HANG_TRANS System No agent available for a supervisor transfer.
08 Reserved for system.
09 Reserved for system.
10 Reserved for system.
11 BUSY System The system detected a busy signal.
6 - 3 7

Completion codes
...........................................................................................................................................................................................................................................................
12 CONTTONE System The system detected a continuous tone, such as a facsimile or modem.
13 AUTOVOICE System The system detected an answering machine.
14 VOICE System Interim code when a person is on the line.
15 NOANSWER System The call placed was not answered.
16 RINGING Agent Can be user-defined but is typically defined as a phone call that was still ringing but was passed to an agent.
17 CUSTHU Agent Can be user-defined but is typically defined as the customer hung up while the call was in the wait queue, but the call was passed to an agent.
18 TRANSFER Agent Can be user-defined but is typically defined as a transfer release.
19 RECALL Agent Can be user-defined but is typically defined as a recall release.
20 - 34 Agent Customer-assigned codes used by agents.
35 CANCEL System Can be user-defined but is typically defined as the agent cancelled the managed call.
Code Number
Code Name Code Type
Code Description
6 - 3 8

Completion codes
............................................................................................................................................................................................................................................................
36 INTERCEPT System Special Information Tone (SIT) indicating an operator intercept.
37 NOCIRCUIT System Special Information Tone (SIT) indicating that circuits were unavailable.
38 DISCONN System Special Information Tone (SIT) indicating that the call was a disconnected number.
39 VACANT System Special Information Tone (SIT) indicating that the call could not be completed as dialed.
40 REORDER System The call resulted in a fast busy tone.
41 R_RINGING System Reserved for system.
42 LINEFAIL System A failure on the phone line occurred.
43 OP_RECALL System Operator set recall.
44 DTMF_V System DTMF tone detected.
45 HU_INB System The customer hung up while in the inbound wait queue.
46 HU_OUT System The customer hung up while in the outbound wait queue.
47 HANG_INB System An agent was not available for the inbound call.
48 HANG_OUT System An agent was not available for the outbound call.
Code Number
Code Name Code Type
Code Description
6 - 3 9

Completion codes
...........................................................................................................................................................................................................................................................
49 OPDIED System The agent session ended abnormally.
50 R_HSONHOOK System Agent headset disconnected from the Avaya PDS.
51 - 90 Agent Customer-assigned codes used by agents.
91 VIRTVOICE System Virtual Agent: Virtual message to VOICE.
92 VIRTAUTOV System Virtual Agent: Virtual message to AUTOVOICE.
93 SOLD Agent Sales Verification: Sold campaign.
94 VERIFIED Agent Sales Verification: Sale verified.
95 UNVERIFIED Agent Sales Verification: Sale not verified.
96 - 97 Reserved for system.
98 AORECALL Agent Owned Recall.
99 Reserved for system.
Code Number
Code Name Code Type
Code Description
6 - 4 0

Part II: Use the Avaya PDS
............................................................................................................................................................................................................................................................

............................................................................................................................................................................................................................................................

7 Log in to Avaya PDS Campaign Director
............................................................................................................................................................................................................................................................
............................................................................................................................................................................................................................................................Overview
Purpose The AvayaTM Predictive Dialing System (PDS) uses the Avaya PDS Campaign Director (Campaign Director) application to interface with the hardware and software that is included with the system. Campaign Director contains three modules: Avaya PDS Editor (Editor), Avaya PDS Monitor (Monitor), and Avaya PDS Analyst (Analyst).
Contents This section contains the following topic:• Log in to Campaign Director
7 - 4 3
Log in to Avaya PDS Campaign Director
...........................................................................................................................................................................................................................................................
............................................................................................................................................................................................................................................................Log in to Campaign Director
Log in to CampaignDirector
The Avaya PDS allows you to access any Campaign Director application (Monitor, Editor, or Analyst) by using one password. After you are logged on to one application, you can access the others without entering another user name and password. Use the following procedure to log in to any Campaign Director application.
...........................................................................................................................................................................
1 Select Start > Programs > Avaya > Monitor, Editor, or Analyst.
...........................................................................................................................................................................
2 Type your log in name (must be at least 3 characters) and password, and then click OK.
NoteIf you exit all applications, you will need to log in again.
7 - 4 4

8 Editor settings
............................................................................................................................................................................................................................................................
............................................................................................................................................................................................................................................................Overview
Purpose The AvayaTM Predictive Dialing System (PDS) gives you the ability to enable or disable multi-dialer commands and set your save and refresh options in Editor.
Contents This section contains the following topics:• Enable or disable multi-dialer commands• Save options• Set refresh options
8 - 4 5

Editor settings
...........................................................................................................................................................................................................................................................
............................................................................................................................................................................................................................................................Enable or disable multi-dialer commands
Enable or disable multi-dialer commands
Use the following procedure to enable or disable multi-dialer commands.
...........................................................................................................................................................................
1 In Editor, select Settings > Options.
...........................................................................................................................................................................
2 In the Options dialog box, click the Multi-dialer tab.
...........................................................................................................................................................................
3 Select Enable to enable multi-dialer commands. (Select Disable to disable multi-dialer commands.)
...........................................................................................................................................................................
4 Select the dialer you want to use.
...........................................................................................................................................................................
5 Click Apply to save your changes, or click OK to save your changes and close the dialog box.
8 - 4 6
Editor settings
............................................................................................................................................................................................................................................................
............................................................................................................................................................................................................................................................Save options
Save options Use the following procedure to set Save options.
...........................................................................................................................................................................
1 In Editor, select Settings > Options.
...........................................................................................................................................................................
2 In the Options dialog box, click the Save tab.
...........................................................................................................................................................................
3 Select Prompt before overwrite to receive a prompt before saving. (Select Overwrite without asking to save without receiving a prompt.)
...........................................................................................................................................................................
4 Click Apply to save your changes, or click OK to save your changes and close the dialog box.
8 - 4 7

Editor settings
...........................................................................................................................................................................................................................................................
............................................................................................................................................................................................................................................................Set refresh options
Set refresh options Use the following procedure to set refresh options.
...........................................................................................................................................................................
1 In Editor, select Settings > Options.
...........................................................................................................................................................................
2 In the Options dialog box, click the Refresh tab.
...........................................................................................................................................................................
3 Select the interval at which you want Editor to refresh.
...........................................................................................................................................................................
4 Click Apply to save your changes, or click OK to save your changes and close the dialog box.
8 - 4 8

9 Phone strategy
............................................................................................................................................................................................................................................................
............................................................................................................................................................................................................................................................Overview
Purpose The AvayaTM Predictive Dialing System (PDS) uses phone strategies to call customers more effectively.
Contents This section contains the following topics:• Phone strategy overview• Phone strategy preparation• Phone strategy settings• Create a phone strategy• Copy a phone strategy• View phone strategy settings• Edit a phone strategy• Delete a phone strategy• List all phone strategies on a selected dialer• Append a phone strategy row• Insert a row in a phone strategy• Delete a row in a phone strategy• Move a row up in a phone strategy• Move a row down in a phone strategy• Select all rows in a phone strategy
9 - 4 9

Phone strategy
...........................................................................................................................................................................................................................................................
• Unselect all rows in a phone strategy
9 - 5 0

Phone strategy
............................................................................................................................................................................................................................................................
............................................................................................................................................................................................................................................................Phone strategy overview
Overview A phone strategy is a set of instructions that tells the Avaya PDS to call customers during a campaign. A phone strategy tells the Avaya PDS when and how to call customers, which customer phone number to call, and the frequency of calls.You define the following parameters for each phone strategy:• Which phone number to call first• The number of rings to allow before disconnecting• The time to wait before retrying a phone number that was busy,
unanswered, or disconnected• The phone number to call if the first phone number is unanswered• The number of times to retry a busy phone number• The number of times to call a phone number before switching to
an alternate phone number• The types of calls to be passed to an agent when the Avaya PDS
detects an answer
Phone strategy parameters Phone strategy parameters are grouped into four areas: Initial Phone, Alternate Initial Phone, Detection Mode, and Retries. The following table describes each group of parameters.
Initial Phone The first phone number the system will call.
Alternate Initial Phone The phone number that becomes the initial phone at a specified time of day.
Call Detection Mode The system detects how the phone number is answered (such as live voice, answering machine, and operator). This determines which calls are passed to agents.
Retries This parameter tells the system to retry a phone number depending on the previous outcome.
9 - 5 1
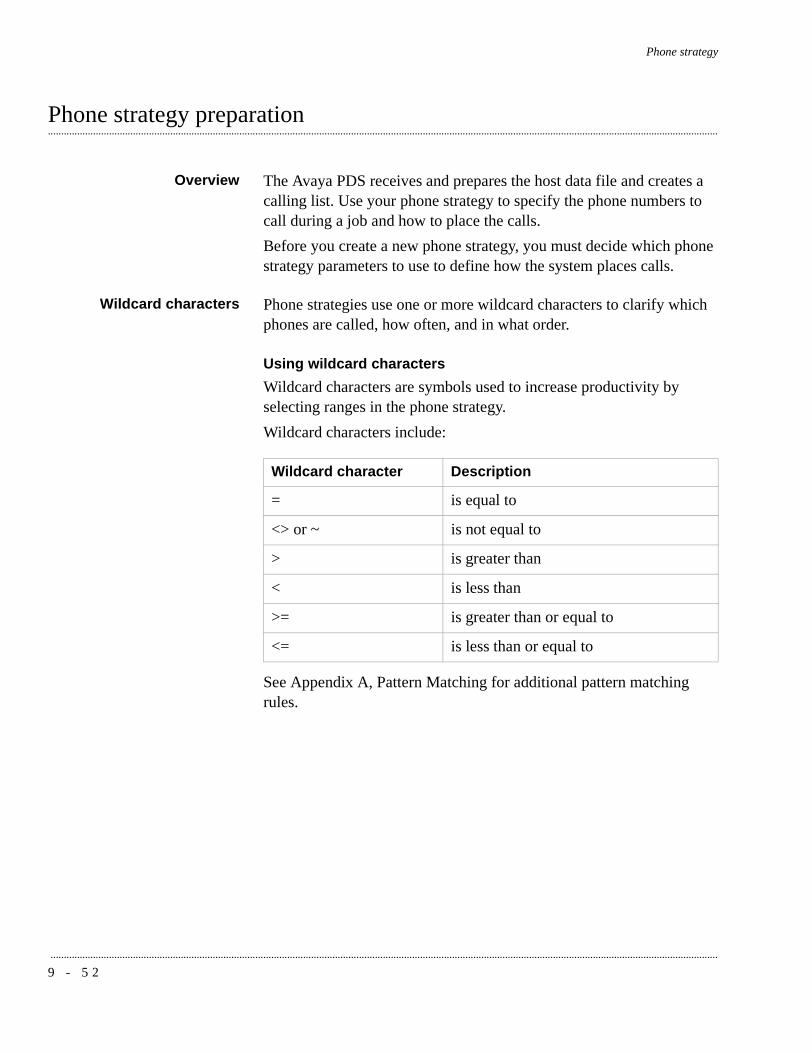
Phone strategy
...........................................................................................................................................................................................................................................................
............................................................................................................................................................................................................................................................Phone strategy preparation
Overview The Avaya PDS receives and prepares the host data file and creates a calling list. Use your phone strategy to specify the phone numbers to call during a job and how to place the calls. Before you create a new phone strategy, you must decide which phone strategy parameters to use to define how the system places calls.
Wildcard characters Phone strategies use one or more wildcard characters to clarify which phones are called, how often, and in what order.
Using wildcard charactersWildcard characters are symbols used to increase productivity by selecting ranges in the phone strategy. Wildcard characters include:
See Appendix A, Pattern Matching for additional pattern matching rules.
Wildcard character Description
= is equal to
<> or ~ is not equal to
> is greater than
< is less than
>= is greater than or equal to
<= is less than or equal to
9 - 5 2
Phone strategy
............................................................................................................................................................................................................................................................
............................................................................................................................................................................................................................................................Phone strategy settings
Initial phone The initial phone is the first phone number the Avaya PDS calls for each record. In the calling list, phone numbers are stored in phone fields. These fields are labeled PHONE1, PHONE2, and so on. If a record does not match the criteria you set, the system will not call the record.The Avaya PDS classifies phone numbers by phone type and assigns a number to each type. For example, the home phone might be phone number 1 and the business phone number 2. The Avaya PDS phone type numbers are set during your system configuration. For example, if your initial phone pane’s fields were as follows: Phone=1, Field Name=PHONESTAT, and Value=~B?then the Avaya PDS would dial the number in the PHONE1 field for all records whose PHONESTAT field does not contain a “B”, or bad number.
Alternate initial phone The alternate initial phone setting is used to set up one or more phones that the Avaya PDS will use as alternate initial phones based on the time of day. At a particular time of day, the alternate initial phone replaces the initial phone as the first phone number to call. The system can switch to calling the alternate initial phone number at the time you specify in the alternate initial phone settings.Alternate initial time settings are also defined in this parameter, which changes the time the system starts calling the alternate initial phone. The system starts calling based on the local time in the selected time zone.
ExampleYou can tell the Avaya PDS to switch from calling business phones during the day (initial phone) to calling home phones (alternate initial phone) during the evening starting at 6 PM.
Detection mode The detection mode is used to determine the types of calls the Avaya PDS passes to agents. Detection modes correspond to responses that the system detects when it dials a number. Typical detection modes include voice, autovoice, and operator intercept. The system passes calls to agents based on the selected modes.
9 - 5 3

Phone strategy
...........................................................................................................................................................................................................................................................
The type of connect criteria determines what type of connects the Avaya PDS will pass to an agent. Define the following parameters for detection mode settings:• The ring count is the number of rings to allow before the system
records a NOANSWER completion code.• The detection mode tells the system which calls to pass to agents.When the Avaya PDS places a call, the system detects what type of answer occurs for each call. The following table describes the Detection Mode tab options:
TipIncrease your hit rate by deciding which detection modes to use. With each additional criteria you select, more calls can be handled by your agents instead of by the system.
Retries The retries setting is used to determine how long the Avaya PDS waits before retrying a number, how many times it retries the same phone number, and which phone it calls next. The Avaya PDS determines the settings by the result of the initial call. For example, you can tell the system to retry the call in 15 minutes when the initial call result is busy and to stop calling that record if there is no answer after three retries.
Option Description
Voice A person’s voice was detected
Autovoice An answering machine was detected
Intercept Operator intercepted the call
No circuit No circuit available
Disconnect Disconnected number
Vacant Vacant number
Reorder Reorder
9 - 5 4
Phone strategy
............................................................................................................................................................................................................................................................
NoteIt is important to understand the difference between a system retry and a customer recall. • Retries are computer generated retries. If the Avaya PDS detects a
busy signal on the first call attempt, it will retry based on the retry parameters set in the phone strategy.
• Recalls are set by agents. An agent can set either an Agent Owned Recall (the system routes the recall to the agent who set it) or a general recall (any available agent talks to the customer when the system recalls the account).
9 - 5 5

Phone strategy
...........................................................................................................................................................................................................................................................
............................................................................................................................................................................................................................................................Create a phone strategy
Create a phone strategy Use the following procedure to create a phone strategy:
...........................................................................................................................................................................
1 Start Editor.
...........................................................................................................................................................................
2 Click the name of the dialer where you want your phone strategy to reside. (You can save it to other dialers or delete it from this dialer later.)
...........................................................................................................................................................................
3 Click Strategy Files on the button bar.
...........................................................................................................................................................................
4 Select File > New.
...........................................................................................................................................................................
5 On the right side of the window, click the List field, select a calling list, and then click Next.
...........................................................................................................................................................................
6 In the Initial Phone pane, click the Phone field and select a phone. In the remaining fields, specify your restrictions. For example, to exclude bad numbers, select PHONESTAT in the Field list and type ~B? (not equal to bad numbers) in the Value field. To call all records, type an asterisk (*) in the Value field. (The remaining fields--Logic, Field, and Value--are optional. For documentation on wild card characters, see “Phone Strategy Preparation” in the Avaya PDS User Guide Volume I.) Click Next.
...........................................................................................................................................................................
7 (Optional) In the Alternate Initial pane, specify alternate initial phone settings. Right-click and select Append Row. Click the Time field to specify the time that you want to switch from the initial phone to the alternate initial phone. The Avaya PDS bases the decision to switch phone numbers on the time in the time zone (not the system time). Select a time zone(s) as appropriate. Right-click and select Select All to select all time zones. Right-click and select Unselect All to clear all options. Click Next.
9 - 5 6

Phone strategy
............................................................................................................................................................................................................................................................
...........................................................................................................................................................................
8 In the Detection Mode pane, click the Number of Rings field and then use the list to select a number. Use the check boxes to specify which types of calls to pass to agents, and then click Next.
...........................................................................................................................................................................
9 In the Retries pane, select the call results that the Avaya PDS will retry. For example, if the Avaya PDS detects a busy signal on the first call attempt, it will retry based on your “Busy signal” values on this pane. For each result you select, enter a value in the Retry Interval (minutes), Attempts, and Next Phone columns.
...........................................................................................................................................................................
10 Select File > Save. The strategy is automatically saved to the dialer that you had selected in the button bar. If multi-dialer is enabled, select additional dialers where the strategy should be saved. Type a file name for your strategy, and then click OK. (If the check boxes are unavailable, enable them in the Settings > Options dialog box.)
9 - 5 7

Phone strategy
...........................................................................................................................................................................................................................................................
............................................................................................................................................................................................................................................................Copy a phone strategy
Copy a phone strategy Use the following procedure to copy a phone strategy.
...........................................................................................................................................................................
1 Double-click the phone strategy you want to copy.
...........................................................................................................................................................................
2 Select File > Save As.
...........................................................................................................................................................................
3 Avaya PDS automatically copies the file to the selected dialer. If multi-dialer is enabled (a grayed-out check box indicates that multi-dialer is unavailable; enable and disable multi-dialer using the Settings > Options dialog box), you can copy the strategy to additional dialers. Select dialers as needed, type a file name for the phone strategy, and then click OK.
9 - 5 8
Phone strategy
............................................................................................................................................................................................................................................................
............................................................................................................................................................................................................................................................View phone strategy settings
View phone strategysettings
Use the following procedure to view phone strategy settings.
...........................................................................................................................................................................
1 Double-click the phone strategy you want to open.The phone strategy settings appear in the right-hand pane.
...........................................................................................................................................................................
2 To navigate through the phone strategy settings, click Next or Back.
9 - 5 9

Phone strategy
...........................................................................................................................................................................................................................................................
............................................................................................................................................................................................................................................................Edit a phone strategy
Overview Change phone strategy settings when doing so will help your system call more efficiently. Changes take affect the next time a job that uses the strategy is started.If you select a different calling list for a phone strategy, you might need to redefine certain phone strategy settings:• If the newly selected calling list contains the same number of
phone fields with the same field names as the original list, the system retains all the phone strategy settings.
• If the newly selected calling list has a different number of phones or the phone field names are different, the system retains the initial phone and alternate initial phone settings, but does not retain the original detection modes and retries settings.
Edit a phone strategy Use the following procedure to edit a phone strategy.
...........................................................................................................................................................................
1 Double-click the phone strategy you want to edit.
...........................................................................................................................................................................
2 Make the necessary edits in the right-hand pane. (Refer to the documentation in the “Create a phone strategy” procedure for detailed information.)
...........................................................................................................................................................................
3 Select File > Save, and then click OK.
9 - 6 0
Phone strategy
............................................................................................................................................................................................................................................................
............................................................................................................................................................................................................................................................Delete a phone strategy
Delete a phone strategy Use the following procedure to delete a phone strategy.
...........................................................................................................................................................................
1 Double-click the phone strategy you want to delete.
...........................................................................................................................................................................
2 Select File > Delete.
...........................................................................................................................................................................
3 When asked if you really want to do this, click Yes if you do.
...........................................................................................................................................................................
4 If the multi-dialer option is enabled, the Multiple dialer command dialog box appears. Click to clear the check boxes of the dialers from which you do not want to delete the strategy. Click OK. (If the check boxes are grayed out, select Settings > Options to enable the multi-dialer settings.)
9 - 6 1

Phone strategy
...........................................................................................................................................................................................................................................................
............................................................................................................................................................................................................................................................List all phone strategies on a selected dialer
List all phone strategies ona selected dialer
Use the following procedure to view a list of all phone strategies on a selected dialer.
...........................................................................................................................................................................
1 On the button bar, select the dialer for which you want to list the phone strategies.
...........................................................................................................................................................................
2 Click Strategy Files.
9 - 6 2

Phone strategy
............................................................................................................................................................................................................................................................
............................................................................................................................................................................................................................................................Append a phone strategy row
Append a phone strategyrow
Appending a row adds a row beneath the bottom row. Use the following procedure to append a row to your phone strategy.
...........................................................................................................................................................................
1 On the Editor button bar, click Strategy Files.
...........................................................................................................................................................................
2 Double-click the phone strategy you want to edit.
...........................................................................................................................................................................
3 In the right hand pane, click Back or Next to select the pane you want to edit.
...........................................................................................................................................................................
4 Select Edit > Append Row.
9 - 6 3

Phone strategy
...........................................................................................................................................................................................................................................................
............................................................................................................................................................................................................................................................Insert a row in a phone strategy
Insert a row in a phonestrategy
Inserting a row adds a row directly above the row you select. Use the following procedure to insert a row in your phone strategy.
...........................................................................................................................................................................
1 On the Editor button bar, click Strategy Files.
...........................................................................................................................................................................
2 Double-click the phone strategy you want to edit.
...........................................................................................................................................................................
3 In the right-hand pane, click Back or Next to select the pane you want to edit.
...........................................................................................................................................................................
4 Select the row that the new row will appear above.
...........................................................................................................................................................................
5 Select Edit > Insert Row.
9 - 6 4

Phone strategy
............................................................................................................................................................................................................................................................
............................................................................................................................................................................................................................................................Delete a row in a phone strategy
Delete a row in a phonestrategy
Use the following procedure to delete a row from your phone strategy.
...........................................................................................................................................................................
1 On the Editor button bar, click Strategy Files.
...........................................................................................................................................................................
2 Double-click the phone strategy you want to edit.
...........................................................................................................................................................................
3 In the right hand pane, click Back or Next to select the pane you want to edit.
...........................................................................................................................................................................
4 Select the row you want to delete.
...........................................................................................................................................................................
5 Select Edit > Delete Row.
9 - 6 5
Phone strategy
...........................................................................................................................................................................................................................................................
............................................................................................................................................................................................................................................................Move a row up in a phone strategy
Move a row up in a phonestrategy
Use the following procedure to move a row up in your phone strategy.
...........................................................................................................................................................................
1 On the Editor button bar, click Strategy Files.
...........................................................................................................................................................................
2 Double-click the phone strategy you want to edit.
...........................................................................................................................................................................
3 In the right hand pane, click Back or Next to select the pane you want to edit.
...........................................................................................................................................................................
4 Select the row to move.
...........................................................................................................................................................................
5 Select Edit > Move Up.
9 - 6 6

Phone strategy
............................................................................................................................................................................................................................................................
............................................................................................................................................................................................................................................................Move a row down in a phone strategy
Move a row down in aphone strategy
Use the following procedure to move a row down in your phone strategy.
...........................................................................................................................................................................
1 On the Editor button bar, click Strategy Files.
...........................................................................................................................................................................
2 Double-click the phone strategy you want to edit.
...........................................................................................................................................................................
3 In the right hand pane, click Back or Next to select the pane you want to edit.
...........................................................................................................................................................................
4 Select the row you want to move down.
...........................................................................................................................................................................
5 Select Edit > Move Down.
9 - 6 7
Phone strategy
...........................................................................................................................................................................................................................................................
............................................................................................................................................................................................................................................................Select all rows in a phone strategy
Select all rows in a phonestrategy
Use the following procedure to select all rows in your phone strategy.
...........................................................................................................................................................................
1 On the Editor button bar, click Strategy Files.
...........................................................................................................................................................................
2 Double-click the phone strategy you want to edit.
...........................................................................................................................................................................
3 In the right hand pane, click Back or Next to select the pane you want to edit.
...........................................................................................................................................................................
4 Select Edit > Select All.
9 - 6 8

Phone strategy
............................................................................................................................................................................................................................................................
............................................................................................................................................................................................................................................................Unselect all rows in a phone strategy
Unselect all rows in aphone strategy
Use the following procedure to unselect all rows in a phone strategy.
...........................................................................................................................................................................
1 On the Editor button bar, click Strategy Files.
...........................................................................................................................................................................
2 Double-click the phone strategy you want to edit.
...........................................................................................................................................................................
3 In the right hand pane, click Back or Next to select the pane you want to edit.
...........................................................................................................................................................................
4 Select Edit > Unselect All.
9 - 6 9

Phone strategy
...........................................................................................................................................................................................................................................................
9 - 7 0
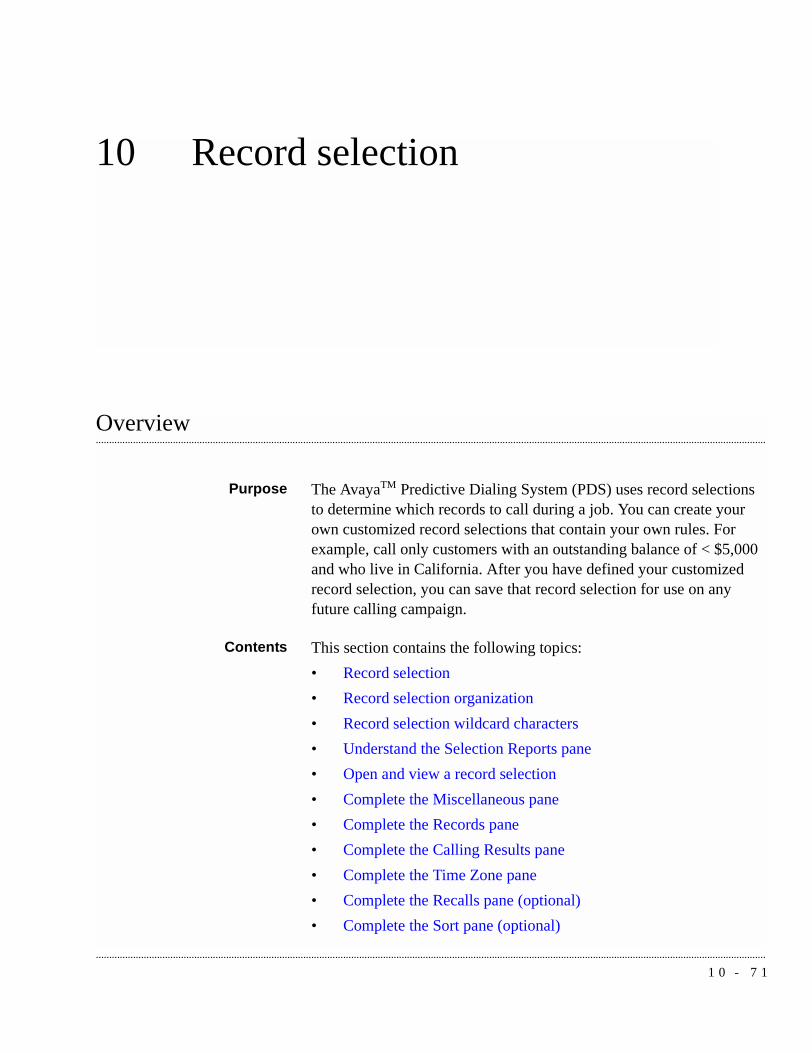
10 Record selection
............................................................................................................................................................................................................................................................
............................................................................................................................................................................................................................................................Overview
Purpose The AvayaTM Predictive Dialing System (PDS) uses record selections to determine which records to call during a job. You can create your own customized record selections that contain your own rules. For example, call only customers with an outstanding balance of < $5,000 and who live in California. After you have defined your customized record selection, you can save that record selection for use on any future calling campaign.
Contents This section contains the following topics:• Record selection• Record selection organization• Record selection wildcard characters• Understand the Selection Reports pane• Open and view a record selection• Complete the Miscellaneous pane• Complete the Records pane• Complete the Calling Results pane• Complete the Time Zone pane• Complete the Recalls pane (optional)• Complete the Sort pane (optional)
1 0 - 7 1

Record selection
...........................................................................................................................................................................................................................................................
• Create a record selection• Save a record selection• Edit a record selection• Delete a record selection• Verify a record selection• Run a record selection• Copy a record selection• List all record selections on a selected dialer• View selection reports• View record selection settings• Append record selection rows• Insert a row in a record selection• Delete a row in a record selection• Move a row up in a record selection• Move a row down in a record selection• Select all rows in a record selection• Unselect all rows in a record selection
1 0 - 7 2

Record selection
............................................................................................................................................................................................................................................................
............................................................................................................................................................................................................................................................Record selection
Overview A record selection contains the set of instructions that tells the Avaya PDS which customer records to select from a calling list. Record selections allow supervisors to define the criteria for selecting records and target specific customers to be called during a job. A record selection consists of selection criteria and a phone strategy. Each job uses the results of a record selection and a phone strategy to call customers. When starting a record selection, the Avaya PDS chooses records based on the following criteria:• calling list fields• time zones• previous calling results• agent set recalls• phone strategy settingsYou can verify a record selection before you start a job to determine how many records are chosen.
Target Time ZonesYou can use your record selection to target time zones such as Eastern, Central, or Pacific. This allows only records from specific time zones to be targeted. If not specified, the Avaya PDS defaults to a “follow the sun” method, meaning it calls records from east to west.
Target completion codesYou can use your record selection to target completion codes such as BUSY or NOANSWER. Use this to also select SIT tone completion codes to run a job to look for disconnected or redirected numbers, or numbers that are no longer in service.
Target goalsYou can use your record selection to target goals, such as accounts more than 30 days overdue, accounts with a balance over $2,000, or records in a particular state.
1 0 - 7 3

Record selection
...........................................................................................................................................................................................................................................................
Record selection use Create a record selection when an existing record selection does not meet your current needs. Edit a record selection when you want to modify an existing record selection.To view a record selection, open Editor and click Selection Files in the button bar. Then, double-click a record selection title. Record selection settings populate the right-hand pane, which serves as a wizard. Back and Next buttons located at the bottom of the screen allow you to switch among the various wizard screens.The wizard screens guide you through the record selection editing process. If you are ever unsure what to enter in a field, you should double-click or single-click the field to see if there is a list of values to choose from or a blinking cursor that indicates you can type your own value in the field.The difference between Selection Files and Selection Reports in the button bar is that Selection Files causes all of the record selections that you have created to appear and Selection Reports causes reports for all of the record selections that have already run to appear. Selection Reports provides detailed information about the results of the record selection, while Selection Files serves as an editor (and not a reporting mechanism).
1 0 - 7 4
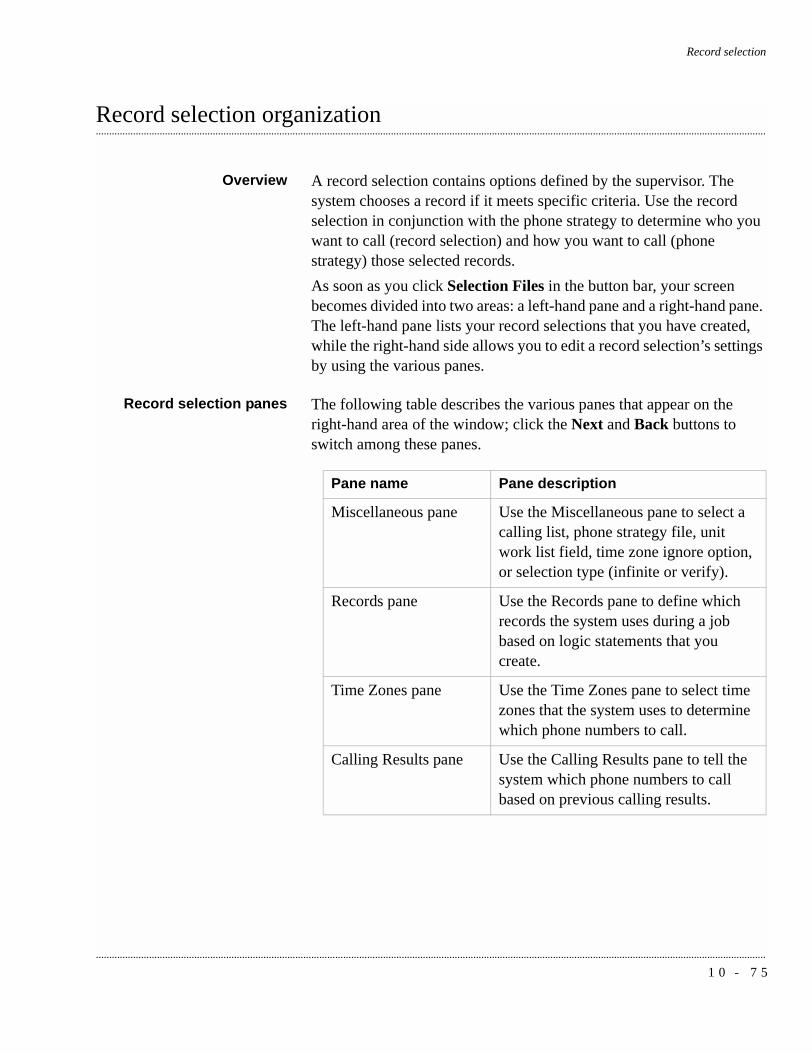
Record selection
............................................................................................................................................................................................................................................................
............................................................................................................................................................................................................................................................Record selection organization
Overview A record selection contains options defined by the supervisor. The system chooses a record if it meets specific criteria. Use the record selection in conjunction with the phone strategy to determine who you want to call (record selection) and how you want to call (phone strategy) those selected records.As soon as you click Selection Files in the button bar, your screen becomes divided into two areas: a left-hand pane and a right-hand pane. The left-hand pane lists your record selections that you have created, while the right-hand side allows you to edit a record selection’s settings by using the various panes.
Record selection panes The following table describes the various panes that appear on the right-hand area of the window; click the Next and Back buttons to switch among these panes.
Pane name Pane description
Miscellaneous pane Use the Miscellaneous pane to select a calling list, phone strategy file, unit work list field, time zone ignore option, or selection type (infinite or verify).
Records pane Use the Records pane to define which records the system uses during a job based on logic statements that you create.
Time Zones pane Use the Time Zones pane to select time zones that the system uses to determine which phone numbers to call.
Calling Results pane Use the Calling Results pane to tell the system which phone numbers to call based on previous calling results.
1 0 - 7 5

Record selection
...........................................................................................................................................................................................................................................................
Recalls pane Use the Recalls pane to determine which agent-set recalls to include in the record selection.
Sort pane Use the Sort pane to determine the record order that the system uses to call customers.
Pane name Pane description
1 0 - 7 6

Record selection
............................................................................................................................................................................................................................................................
............................................................................................................................................................................................................................................................Record selection wildcard characters
Wildcard characters Like phone strategies, record selections use wildcard characters to specify criteria for a field. Use wildcard character expressions to define the subset of records you want to call. A wildcard character expression is a combination of wildcard characters (such as < or >) and values.
Use wildcard characters Use wildcard characters in the Records and Recalls panes. Each wildcard character expression specifies a field name (from the records in your calling list), a wildcard character, and a value.Values can be numbers, letters, dates, and times. For example, account balances consist of numbers, while customer names consist of letters. Wildcard characters include the following:
See Appendix A, Pattern Matching for additional pattern matching rules.
Wildcard characters Description
> greater than
< less than
= equal to
~ not equal to
>= greater than or equal to
<= less than or equal to
- use between a range of values
, use between multiple values
* wildcard character
! list wildcard character
? single character wildcard character
1 0 - 7 7

Record selection
...........................................................................................................................................................................................................................................................
Example record selection statements include the following:
Consider the following tips when you create your record selection statement:• You can connect two or more statements using the operators AND
and OR.Use AND to narrow the selection to the customer records that meet the criteria in both statements.Use OR to broaden the selection to select the customer records that meet the conditions in either statement.
• Click Append to add a line to the bottom of the selection area.• Click Insert to insert a line below the cursor.• Click Delete to delete the selected line.
Field Value What is selected?
ACCT_BALANCE >=500 Customer records with account balances greater than or equal to $500.
CITY =Chicago Customer records with Chicago addresses.
1 0 - 7 8
Record selection
............................................................................................................................................................................................................................................................
............................................................................................................................................................................................................................................................Understand the Selection Reports pane
Overview When you click Selection Reports in the button bar, the Selection Reports pane appears and shows a list of record selections that have previously been run. The Selection Reports pane is an area that contains summary information, so you do not modify its contents. Modify record selections in the pane that appears when you click Selection Files in the button bar.To view a selection report, double-click a selection. You can then right-click and select Select All so that you can copy and paste the report into a different application.
Understand the SelectionReports pane
The Selection Reports pane contains the following headings: Selection, List, Status, Records, Records Remaining, Recalls, and Select Ran at.The following table describes these headings:
Heading Description
Selection Record selection file name
List Calling list associated with this record selection
Status Record selection status is In Use if being used for a currently running job or Available if not.
Records Number of customer records associated with this record selection file
Records Remaining Number of records that still need to be called (this number changes if the job is running)
Recalls Number of recalls (callbacks) that this record selection file has flagged
Selection Ran at Time and date stamp
1 0 - 7 9

Record selection
...........................................................................................................................................................................................................................................................
............................................................................................................................................................................................................................................................Open and view a record selection
Open and view a recordselection
Use the following procedure to open and view a record selection.
...........................................................................................................................................................................
1 Select Start > Programs > Avaya > Campaign Director > Editor.
...........................................................................................................................................................................
2 On the button bar, click Selection Files. The list of selections for the selected dialer appear. To see record selections that have been defined for a different dialer, click the name of the dialer on the button bar, and then click Selection Files for that dialer.
...........................................................................................................................................................................
3 Double-click a record selection title to display the selection settings in the right-most pane.
...........................................................................................................................................................................
4 Use the Next and Back buttons to move through the wizard screens.
1 0 - 8 0

Record selection
............................................................................................................................................................................................................................................................
............................................................................................................................................................................................................................................................Complete the Miscellaneous pane
Complete theMiscellaneous pane
Use the following procedure to modify the fields on the Miscellaneous pane.
...........................................................................................................................................................................
1 Click the List field to use the drop-down list. Select a calling list.
...........................................................................................................................................................................
2 Click the Strategy File field to use the drop-down list. Select a phone strategy file that you have already created (it is beneficial to create a phone strategy, record selection and then job, in that order).
...........................................................................................................................................................................
3 Click the Unit Field field and select a unit work list.
...........................................................................................................................................................................
4 Click the Ignore Time Zone field and select Yes or No.
...........................................................................................................................................................................
5 Click the Selection Type field and select Infinite, Verify, or blank (blank is usually the first list item and is an empty, blank option; in this case it indicates that you want neither Infinite nor Verify). Select Infinite if your job is an infinite job; select Verify if your job is a verify job.
1 0 - 8 1

Record selection
...........................................................................................................................................................................................................................................................
............................................................................................................................................................................................................................................................Complete the Records pane
Complete the Recordspane
Use the Records pane to define your record selection statement.
...........................................................................................................................................................................
1 Select Next or Back to navigate to the Records pane.
...........................................................................................................................................................................
2 Click the Field field to use the drop-down list. Select a field (for example, BAL).
...........................................................................................................................................................................
3 Double-click the Value field to type a value (for example, >3000).
...........................................................................................................................................................................
4 (Optional) If you use the Logic field, you begin to create a multi-line logic statement. Click the Logic field to use the drop-down list to select AND or OR.
...........................................................................................................................................................................
5 Double-click the Group field to type a letter or number. For example, if you type a “1” in the Group column for the first row and a “1” in the Group column for the second row, then you have just grouped the first two rows into a group called “1.” When you group rows, the Logic column becomes a critical linking component because its logic operator determines how the linked elements resolve as one statement.
...........................................................................................................................................................................
6 To add a row, select Edit > Append Row.
...........................................................................................................................................................................
7 Repeat steps 2 through 6 for each selection criteria.
1 0 - 8 2
Record selection
............................................................................................................................................................................................................................................................
............................................................................................................................................................................................................................................................Complete the Time Zone pane
Complete the Time Zonepane
Use the following procedure to select which time zones the Avaya PDS will call.
...........................................................................................................................................................................
1 Select the time zones you want to call. To select all time zones, right-click and select Select All.
...........................................................................................................................................................................
2 Clear the each time zone you do not want to include. To clear all time zones, right-click and select Unselect All.
1 0 - 8 3

Record selection
...........................................................................................................................................................................................................................................................
............................................................................................................................................................................................................................................................Complete the Calling Results pane
Complete the CallingResults pane
Use the following procedure to complete the calling results pane.
...........................................................................................................................................................................
1 Select each completion code you want the system to call. You can right-click and select Select All.
...........................................................................................................................................................................
2 Clear each completion code you do not want to call. Right-click and select Unselect All to clear all of the completion codes.
NoteNew records that have not been called yet are assigned a “Record not yet called” code. You will almost always select the “Record not yet called” box because you have never attempted to call that customer before.
1 0 - 8 4
Record selection
............................................................................................................................................................................................................................................................
............................................................................................................................................................................................................................................................Complete the Recalls pane (optional)
Complete the Recalls pane The Recalls wizard pane is blank by default because it is optional. It is common not to define recall settings to tell the Avaya PDS to dial all scheduled agent-set recalls. To make only the recalls scheduled during the current job, enter criteria to match the Records pane. To prevent any agent-set recalls, enter values that cannot be met so that no records can qualify for recall. For example, select the STATE field and enter ZZ (no records will have a STATE value of ZZ, so no records can be selected for recall).
...........................................................................................................................................................................
1 If the Recalls pane has no visible rows, right-click and select Append Row.
...........................................................................................................................................................................
2 Click the Field field to select a field (for example, BAL).
...........................................................................................................................................................................
3 Double-click the Value field to type a value (for example, >3000).
...........................................................................................................................................................................
4 (Optional) If you use the Logic field, you begin to create a multi-line logic statement. Click the Logic field to use the drop-down list to select AND or OR.
...........................................................................................................................................................................
5 Double-click the Group field to type a letter or number. For example, if you type a “1” in the Group column for the first row and a “1” in the Group column for the second row, then you have just grouped the first two rows into a group called “1.” When you group rows, the Logic column becomes a critical linking component because its logic operator determines how the linked elements resolve as one statement.
1 0 - 8 5

Record selection
...........................................................................................................................................................................................................................................................
............................................................................................................................................................................................................................................................Complete the Sort pane (optional)
Complete the Sort pane This screen is blank by default because it is optional. Use the following procedure to tell the Avaya PDS how to sort the selected records.
...........................................................................................................................................................................
1 If the Sort pane has no visible rows, right-click and select Append Row.
...........................................................................................................................................................................
2 Click the Order field to use the drop-down list and select Ascending or Descending.
...........................................................................................................................................................................
3 Click the Sorts Records By field to enter a value.
...........................................................................................................................................................................
4 To change the priority, select the row and then select Move Up or Move Down.
NoteIf you set more than nine sorts, the Avaya PDS performance will be reduced.
1 0 - 8 6

Record selection
............................................................................................................................................................................................................................................................
............................................................................................................................................................................................................................................................Create a record selection
Create a record selection Use the following procedure to create a record selection.
...........................................................................................................................................................................
1 Select the name of the dialer where you want your record selection to reside. (You can save it to additional dialers or delete it from this dialer later.)
...........................................................................................................................................................................
2 On the button bar, click Selection Files.
...........................................................................................................................................................................
3 Select File > New. The right-hand pane populates.
...........................................................................................................................................................................
4 In the right-hand pane, click the List field and select a calling list.
...........................................................................................................................................................................
5 Click Next and Back to complete the other panes. (Descriptions of each pane appear in this documentation prior to this section.)
...........................................................................................................................................................................
6 When finished, select File > Save. The record selection is automatically saved to the dialer you selected.
...........................................................................................................................................................................
7 Type a file name, and then click OK.(If the additional dialers were unavailable, select Settings > Options to change your multi-dialer settings.)
1 0 - 8 7
Record selection
...........................................................................................................................................................................................................................................................
............................................................................................................................................................................................................................................................Save a record selection
Save a record selection Use the following procedure to save a record selection.
...........................................................................................................................................................................
1 When you finish defining settings for a record selection, select File > Save.
...........................................................................................................................................................................
2 Your record selection will automatically be saved to the selected dialer. Select additional dialers on which to save your record selection. (If the check boxes are unavailable, select Settings > Options to change your multi-dialer settings.)
...........................................................................................................................................................................
3 Type a file name for your record selection, and then click OK.
1 0 - 8 8

Record selection
............................................................................................................................................................................................................................................................
............................................................................................................................................................................................................................................................Edit a record selection
Edit a record selection Use the following procedure to edit a record selection.
...........................................................................................................................................................................
1 Double-click on the record selection you want to edit.
...........................................................................................................................................................................
2 Make the necessary edits in the right-hand pane.
...........................................................................................................................................................................
3 Select File > Save to save the changes.
1 0 - 8 9

Record selection
...........................................................................................................................................................................................................................................................
............................................................................................................................................................................................................................................................Delete a record selection
Delete a record selection Use the following procedure to delete a record selection.
...........................................................................................................................................................................
1 Select the record selection you want to delete.
...........................................................................................................................................................................
2 Select File > Delete.
...........................................................................................................................................................................
3 When asked if you are sure, click Yes if you are sure.
1 0 - 9 0
Record selection
............................................................................................................................................................................................................................................................
............................................................................................................................................................................................................................................................Verify a record selection
Verify a record selection Use the following procedure to verify that the settings for a particular record selection are complete and that the record selection will run when started. The Avaya PDS displays a message if an error occurs. You should review your wizard screens before verifying a record selection. You cannot verify a record selection until you have saved your work.
...........................................................................................................................................................................
1 Select the record selection you want to verify.
...........................................................................................................................................................................
2 Select File > Verify, and then click OK.
1 0 - 9 1

Record selection
...........................................................................................................................................................................................................................................................
............................................................................................................................................................................................................................................................Run a record selection
Run a record selection Use the following procedure to run a record selection.
...........................................................................................................................................................................
1 Click the record selection you want to run.
...........................................................................................................................................................................
2 Select File > Run, and then click OK.
NoteYou do not need to run a record selection before you start a job. You can, however, run a record selection to check to determine how many records are selected. When you start a job, the system first verifies the record selection, and then starts the job.
1 0 - 9 2

Record selection
............................................................................................................................................................................................................................................................
............................................................................................................................................................................................................................................................Copy a record selection
Copy a record selection Use the following procedure to copy a record selection.
...........................................................................................................................................................................
1 Select the record selection you want to copy.
...........................................................................................................................................................................
2 Select File > Save As.
...........................................................................................................................................................................
3 Type a name for the copied record selection, and then click OK.
1 0 - 9 3

Record selection
...........................................................................................................................................................................................................................................................
............................................................................................................................................................................................................................................................List all record selections on a selected dialer
List all record selectionson a selected dialer
Use the following procedure to view a list of all record selections on a selected dialer.
...........................................................................................................................................................................
1 Select the name of the dialer whose record selections you want to list.
...........................................................................................................................................................................
2 Click Selection Files.The record selections for the selected dialer appear.
1 0 - 9 4

Record selection
............................................................................................................................................................................................................................................................
............................................................................................................................................................................................................................................................View selection reports
View selection reports In the button bar, you see both Selection Files and Selection Reports. The difference between these two is that Selection Files displays all of the record selections that you have created and Selection Reports displays all of the record selections that you have run. Selection Reports provides detailed information about the results of the record selection, while Selection Files serves as an editor and not a reporting mechanism. Use the following procedure to view selection reports.
...........................................................................................................................................................................
1 In the button bar, select the dialer whose record selection reports you want to view.
...........................................................................................................................................................................
2 Click Selection Reports.
...........................................................................................................................................................................
3 Double-click the name of a selection report. The right-hand pane populates with your selection report.
...........................................................................................................................................................................
4 If you want to copy and paste the report to a different application, right-click and select Select All. Then, right-click and select Copy.
1 0 - 9 5

Record selection
...........................................................................................................................................................................................................................................................
............................................................................................................................................................................................................................................................View record selection settings
View record selectionsettings
Use the following procedure to view record selection settings.
...........................................................................................................................................................................
1 Double-click the record selection you want to open.The record selection settings will appear in the right hand pane.
...........................................................................................................................................................................
2 Click Next or Back to navigate through all of the record selection settings.
1 0 - 9 6
Record selection
............................................................................................................................................................................................................................................................
............................................................................................................................................................................................................................................................Append record selection rows
Append record selectionrows
Appending a row adds a row beneath the bottom row. Use the following procedure to append a row in your record selection.
...........................................................................................................................................................................
1 On the Editor button bar, click Selection Files.
...........................................................................................................................................................................
2 Double-click the record selection you want to edit.
...........................................................................................................................................................................
3 Click Next or Back to navigate to the pane you want to edit.
...........................................................................................................................................................................
4 Select Edit > Append Row.
1 0 - 9 7

Record selection
...........................................................................................................................................................................................................................................................
............................................................................................................................................................................................................................................................Insert a row in a record selection
Insert a row in a recordselection
Inserting a row adds a row directly above the highlighted row. Use the following procedure to insert a row to your record selection.
...........................................................................................................................................................................
1 On the Editor button bar, click Selection Files.
...........................................................................................................................................................................
2 Double-click the record selection you want to edit.
...........................................................................................................................................................................
3 Click Next or Back to navigate to the pane you want to edit.
...........................................................................................................................................................................
4 Select the row that the new row will appear directly above.
...........................................................................................................................................................................
5 Select Edit > Insert Row.
1 0 - 9 8

Record selection
............................................................................................................................................................................................................................................................
............................................................................................................................................................................................................................................................Delete a row in a record selection
Delete a row in a recordselection
Use the following procedure to delete a row from your record selection.
...........................................................................................................................................................................
1 On the Editor button bar, click Selection Files.
...........................................................................................................................................................................
2 Double-click the record selection you want to edit.
...........................................................................................................................................................................
3 Click Next or Back to navigate to the pane you want to edit.
...........................................................................................................................................................................
4 Select the row you want to delete.
...........................................................................................................................................................................
5 Select Edit > Delete Row.
1 0 - 9 9

Record selection
...........................................................................................................................................................................................................................................................
............................................................................................................................................................................................................................................................Move a row up in a record selection
Move a row up in a recordselection
Use the following procedure to move a row up in your record selection.
...........................................................................................................................................................................
1 On the Editor button bar, click Selection Files.
...........................................................................................................................................................................
2 Double-click the record selection you want to edit.
...........................................................................................................................................................................
3 Click Next or Back to navigate to the pane you want to edit.
...........................................................................................................................................................................
4 Select the row you want to move.
...........................................................................................................................................................................
5 Select Edit > Move Up.
1 0 - 1 0 0
Record selection
............................................................................................................................................................................................................................................................
............................................................................................................................................................................................................................................................Move a row down in a record selection
Move a row down in arecord selection
Use the following procedure to move a row down in your record selection.
...........................................................................................................................................................................
1 On the Editor button bar, click Selection Files.
...........................................................................................................................................................................
2 Double-click the record selection you want to edit.
...........................................................................................................................................................................
3 Click Next or Back to navigate to the pane you want to edit.
...........................................................................................................................................................................
4 Select the row you want to move.
...........................................................................................................................................................................
5 Select Edit > Move Down.
1 0 - 1 0 1

Record selection
...........................................................................................................................................................................................................................................................
............................................................................................................................................................................................................................................................Select all rows in a record selection
Select all rows in a recordselection
Use the following procedure to select every row in your record selection.
...........................................................................................................................................................................
1 On the Editor button bar, click Selection Files.
...........................................................................................................................................................................
2 Double-click the record selection you want to edit.
...........................................................................................................................................................................
3 Click Next or Back to navigate to the pane you want to edit.
...........................................................................................................................................................................
4 Select Edit > Select All.
1 0 - 1 0 2
Record selection
............................................................................................................................................................................................................................................................
............................................................................................................................................................................................................................................................Unselect all rows in a record selection
Cancel a row selection in arecord selection
Use the following procedure cancel a row selection in your record selection.
...........................................................................................................................................................................
1 On the Editor button bar, click Selection Files.
...........................................................................................................................................................................
2 Double-click the record selection you want to edit.
...........................................................................................................................................................................
3 Click Next or Back to navigate to the pane you want to edit.
...........................................................................................................................................................................
4 Select Edit > Unselect All.
1 0 - 1 0 3

Record selection
...........................................................................................................................................................................................................................................................
1 0 - 1 0 4

11 Jobs
............................................................................................................................................................................................................................................................
............................................................................................................................................................................................................................................................Overview
Purpose A job contains all the information the AvayaTM Predictive Dialing System (PDS) needs to call customers. A job integrates a calling list, phone strategy, record selection, and other settings to place outbound calls and receive inbound calls.
Contents This section contains the following topics:• Job types• Outbound job• Job settings• Create a job• View job settings• Save a job• Save a job as another name or on a different dialer• Start a job on one or more dialers• Start multiple jobs on currently selected dialer• Copy a job• Edit a job• Verify a job on one or more dialers• Verify multiple jobs on the currently selected dialer
1 1 - 1 0 5

Jobs
...........................................................................................................................................................................................................................................................
• Delete a job on one or more dialers• Delete multiple jobs on the currently selected dialer• List all jobs on a selected dialer
1 1 - 1 0 6

Jobs
............................................................................................................................................................................................................................................................
............................................................................................................................................................................................................................................................Job types
Overview Jobs are part of a campaign. A job, depending on what type of system configuration you have, can make outbound calls, receive inbound calls, verify a sale, or a handle variety of other tasks. If you have an Intelligent Call Blending system, you can use Editor to set up three types of jobs:• Outbound jobs • Inbound jobs• Blend jobs
If you have an Agent Blending system, you can use Editor to set up out-bound jobs.
Outbound jobs During outbound jobs, the Avaya PDS uses a calling list, phone strategy, record selection, and other settings to place outbound calls to customers. There are many settings to configure for an outbound job. These are discussed more in depth in the following section.
Inbound jobs During inbound jobs, the Avaya PDS automatically routes inbound calls to agents. There are no inbound jobs on an Agent Blending system. All inbound calls are handled by inbound ACD agents. Because the Avaya PDS does not control the inbound call activity on the Agent Blending system, the system does not consider it a job.
Blend jobs The term blend job refers to job run on an Intelligent Call Blending system. During an Intelligent Call Blending job, the Avaya PDS moves agents between outbound and inbound calls. Blend agents receive inbound calls during peak inbound activity and outbound calls when inbound activity decreases.An Avaya PDS blend agent handles both inbound and outbound calls with Intelligent Call Blending.
1 1 - 1 0 7

Jobs
...........................................................................................................................................................................................................................................................
............................................................................................................................................................................................................................................................Outbound job
Overview During outbound jobs, the Avaya PDS automatically dials phone numbers and routes calls to agents. The system screens for answering machines, phone operator intercepts, busy signals, Interactive Voice Response systems (IVRs), and no answers.
Special outbound jobsAn outbound job uses settings to target customers for calling. Agent Blending and Intelligent Call Blending systems both use outbound jobs. Depending on your system configuration, there are up to five special jobs. These settings are configured when you create or modify a job.• A Unit Work List job divides customer records into subsets.
Agents work with records only in their assigned work lists. • A Managed Dialing job allows agents to preview or cancel a
customer record before the Avaya PDS calls the customer. As the supervisor, you can adjust the preview time and allow agent to cancel calls depending on how the job settings are configured.
• A Sales Verification job creates a second campaign to verify a sale or commitment that the customer made. Use the Sales Verification Record Selection when starting a Sales Verification job.
• An Infinite job uses a special record selection to receive new records for calling while the job is active. Use the Infinite record selection when starting an Infinite job.The Avaya PDS uses this record selection to add new records (downloaded from your host) to an existing calling list on an active infinite job. An infinite job runs until you stop it manually.
• A Virtual Agent job allows the Avaya PDS to run a job without agents. When the Avaya PDS detects a customer or an answering machine, the system plays a recorded message.
Define Sales Verification, Unit Work List, Virtual, and Managed on the second screen of the Editor Job Wizard when you create a new job. These features are optional and some features are mutually exclusive. For example, if you select Virtual, you cannot select any other choices. If you select Managed, you can only select Sales Verification with it. If you select Unit Work List, you can only select Sales Verification with it.
1 1 - 1 0 8
Jobs
............................................................................................................................................................................................................................................................
............................................................................................................................................................................................................................................................Job settings
Overview There are several settings that you define for each outbound job. The settings on your system may vary depending on your configuration. The settings are grouped in the following way: • Basic• Outbound• Managed• Interactive Voice Response• Unit Work List
Basic job settings Basic settings are for every type of job, regardless of whether it is outbound, inbound, or blend. The following settings are listed in the BASIC tree structure.
Main data processing labelUse the drop-down list to select the correct main data processing label. The main data process label instructs the Avaya PDS to begin job processing and tells the system what to display on the agent screens.
NoteIf you run a virtual or sales verification job, select the appropriate data process label. For example, select virtual for a virtual job, verify for a sales verification job, and generic for an outbound job.
Job descriptionDouble-click in the text box and type a job description. This is a description of the job. For example, type a description that reflects the goal of the job such as 30-day Accounts.
Link to jobYou can tell the Avaya PDS to automatically start a job when this job ends. Use the Link to job setting to select the next job to start.When you link a job, the system transfers each agent to the next job after the agent completes the last call and releases the record. The system displays a message telling the agents that they are changing jobs.
1 1 - 1 0 9

Jobs
...........................................................................................................................................................................................................................................................
The following table describes the types of jobs that can link together:
NoteIf you stop a job that has a job linked to it, the Avaya PDS will automatically start the next job.
Agent keys definition file nameUse the drop-down list to select the agent keys file name to use during a job. An agent keys file is configured with different sets of functions for keys used during differently types of jobs.
Line type(s) for use on jobDouble-click and the line types to use during a job. Use this setting to select or clear the groups of lines the Avaya PDS uses for a job.
Earliest start timeDouble-click to set the time (numbers only) you want the Avaya PDS to begin calling customer records. The Avaya PDS is preset with recommended start and stop times for different time zones. If you enter a time that is earlier than the recommended start time, the system does not begin dialing until the system clock reaches the recommended time.
Latest stop timeDouble-click to set the time (numbers only) you want the Avaya PDS to stop calling customer records.
Job type Can link to
outbound job outbound or blend job (includes Unit Work List jobs)
Managed Dialing job ONLY to managed jobs (includes Unit Work List jobs)
inbound job ONLY to inbound job
blend job blend job (blend job cannot link to outbound job)
virtual job ONLY virtual job
1 1 - 1 1 0

Jobs
............................................................................................................................................................................................................................................................
Run job without agentsSelect this option if you want to run your job without agents. This field does not appear unless you select Virtual in the Editor Job Wizard (when you create a new job).
Transfer on hold message numberDouble-click and type the number of the message that users should hear during the call-transfer process.
Outbound job settings Outbound settings are for outbound jobs. The following settings are listed in the OUTBOUND tree structure.
Do Not Call group nameUse the drop-down list to select the Do Not Call Group file name.
Initial hit rateDouble-click and enter the initial hit rate (number only).Initial hit rate determines the average number of calls per agent the Avaya PDS makes during the first five minutes of the job. The initial hit rate is the number of call completions compared with call attempts. For example, an initial hit rate of 50% means the system must make approximately two dialing attempts for each agent to get one successful connection. When the Avaya PDS gathers statistics from actual call attempts, it readjusts the hit rate automatically to meet the minimum hit rate setting. Set the rate too low (20 to 30) and the Avaya PDS could make more connects than your agents can handle during the initial dialing period. Set the rate too high (over 70) and the system could fail to make enough connections to keep your agents busy.Use the following table to adjust the initial hit rate according to the particular needs of the job:
If you want to make Set rate to Description
Daytime home calls 30 3 calls per agent for 1 connection
Evening home calls 50 2 calls per agent for 1 connection
1 1 - 1 1 1

Jobs
...........................................................................................................................................................................................................................................................
Expert Calling ratioDouble-click for text boxes to enter in Expert Calling ratio settings.Following are the three choices for setting Expert Calling ratio:
Remember, when you use Calls in Wait Queue, customer wait times are affected. When you use Agent Work Time or Agent Update Time, the average agent idle time can be short, but there may be a large percentage of customers in the wait queue at any given time.
End jobs when no more calls remainSelect this option if you want the Avaya PDS to end jobs when each customer has been called at least once. Clear this option if you want the Avaya PDS to end jobs after all calls are completed, including recalls.
Weekend home calls 50 2 calls per agent for 1 connection
Daytime office calls 70 1 call per agent for 1 connection
Setting Description & recommended setting
Calls in the wait queue
The Avaya PDS achieves a balance between agents waiting for a call and customers placed in the wait queue.Enter a percent value between 1 and 100. The recommended setting is between 4 and 31.
Agent Work Time
The Avaya PDS monitors the time agents take to complete calls and update records and adjusts the calling pace accordingly.Enter a percent value between 1 and 100. The recommended setting is between 29 and 71.
Agent Update Time
The Avaya PDS monitors the time agents take to update records and adjusts the calling pace accordingly.Enter a percent value between 1 and 100. The recommended setting is between 32 and 78.
If you want to make Set rate to Description
1 1 - 1 1 2

Jobs
............................................................................................................................................................................................................................................................
Outbound calling listSelect a list name from the drop-down list. The outbound calling list is the list you will use for the job. The calling list name contains the host dialer name (where the list is stored) and the calling list name. The calling list description (if any) is listed in the right-hand column drop-down list.
Minimum hit rateDouble-click to set the minimum hit rate (number only). The minimum hit rate determines the maximum number of calls the Avaya PDS will make in order to make an agent connection. Use minimum hit rate to limit the number of lines a job can use, even if the hit rate falls below this rate. For example, a minimum hit rate of 30% means the system will make no more than three dialing attempts for each agent. This prevents the Avaya PDS from allocating more pooled lines to a poorly performing job at the expense of a more successful job. Enter a value between 1 and 100 in increments of 10. A typical setting is 30.
Order calls by time zoneSelect this option if you want the Avaya PDS to order calls by times zones. This means the Avaya PDS calls “following the sun,” or east to west. With either choice, time zone laws are still applied.
Quota setting (completion code, quota)Double-click to use a drop-down list and a box. Use the drop-down list to select a completion code. Use the text box to enter a quota (for example, a quota number of 500 would mean that a job automatically stops if the number of completion codes reaches 500).
Save quota setting when the job endsSelect this option to save the quota setting when the jobs ends.
Quota settings file nameDouble-click to type a file name in the field.
1 1 - 1 1 3

Jobs
...........................................................................................................................................................................................................................................................
Recall reschedule interval (mins)If Agent Owned Recall is configured on your system, this field will be visible. Double-click to enter the minimum amount of time that must pass before the system tries to pass the agent a recall.
Recall notification time (min)If Agent Owned Recall is configured on your system, this field will be visible. Double-click to enter the amount of time that the system will look for the agent (to pass the recall to the agent who set it up).
Number of recall attemptsIf Agent Owned Recall is configured on your system, this field will be visible. Double-click to enter the number of times to look for the agent that set up the recall.
Script label for callSelect the script label from the drop-down list. The script label is the name of the script being used for the job. This determines the messages the customer hears when placed in the wait queue.If a customer is placed in a wait queue, the customer hears a message. The wait queue messages are created for different jobs. The message or string of messages a customer hears is the message script.
Outbound screen(s)Select the outbound screen name from the drop-down list. This determines the outbound screen that agents see on their workstations during an outbound job.
Record selection file nameSelect the record selection name from the drop-down list. The Selection parameter identifies which record selection is used for the outbound job. The record selection contains the phone strategy used for the job.
Transfer to inbound job nameSelect the transfer to inbound job name from the drop-down list of inbound or blend job names that agents can transfer calls to.
Total wait delay (sec.)Double-click the total wait delay field and enter in the number of seconds (from 0 to 999) that the customer can wait in the Avaya PDS wait queue before the system ends the call.
1 1 - 1 1 4

Jobs
............................................................................................................................................................................................................................................................
Managed job settings Managed settings are settings for Managed Dialing jobs. The following settings are listed in the MANAGED tree structure.The following settings become active only if the MANAGED check box is selected.
Allow dialing from deleted recordSelect this option to allow an agent to dial a deleted record. Clear the check box to prevent agents from dialing a deleted record. This setting can only be used if the MANAGED check box is selected.
Allow agents to cancel callSelect this option to allow an agent to cancel a Managed Dialing call. Clear this option to prevent agents from cancelling a Managed Dialing call. This setting can only be used if the MANAGED check box is selected.
Display empty record at previewSelect this option to allow an agent to display an empty record at preview. Clear this option to prevent agents from displaying empty record at preview. This setting can only be used if the MANAGED check box is selected.
Time limit (sec.) for previewDouble-click the time limit field and enter in a value (in seconds) between 1 and 999. This parameter sets the time that an agent can preview a record before the Avaya PDS dials the number. Use 0 (zero) to set an unlimited amount of preview time.This setting can only be used if the MANAGED check box is selected.
Allow record search type at previewSelect one of the following three options from the drop-down list:• NONE - No search is allowed. The only way for the agent to make
a call is by manually entering a phone number.• HASH - The search is done through the PDS QuickSearch
method. The calling list is searched until the matching record is found.
1 1 - 1 1 5

Jobs
...........................................................................................................................................................................................................................................................
• LIS - The search is accomplished through the List Indexed Sequential method. The LIS method processes the calling list into a table that is indexed on a key field from the calling list. That key field is specified during configuration.
This setting can only be used if the MANAGED check box is selected.
Interactive Voice Responsejob settings
The INTERACTIVE VOICE RESPONSE tree structure becomes active when its check box is selected.
IVR identifierDouble-click the field to enter the IVR identifier.
Script to run on the IVRDouble-click the field to enter the script to be used for the IVR.
Unit Work List job settings The UNIT WORK LIST tree structure becomes active when its check box is selected.
Record selection with unitsSelect a unit work list record selection from the drop-down list to use with this job.
1 1 - 1 1 6

Jobs
............................................................................................................................................................................................................................................................
............................................................................................................................................................................................................................................................Create a job
Overview You are not required to run a record selection before starting a job. Editor will automatically execute the record selection if needed, and then verify the job. If the job verification passes, you are offered a choice of starting the job or cancelling the action.
Create a job Use the following procedure to create a job.
...........................................................................................................................................................................
1 In the Editor button bar, select a dialer, and then click Job Files.
...........................................................................................................................................................................
2 Select File > New.
...........................................................................................................................................................................
3 Click Next when the Editor Job Wizard appears.
...........................................................................................................................................................................
4 Select the type of job to create, the appropriate outbound or inbound calling list, and the check box next to the options you want to use: Sales Verification, Unit Work List, Virtual, or Managed, and then click Next.
...........................................................................................................................................................................
5 Type a job description, and then click Finish.The default tree structure for your job type (inbound, outbound, blend, etc.) appears in the right-hand pane. Use the Setting column to edit values.
1 1 - 1 1 7

Jobs
...........................................................................................................................................................................................................................................................
............................................................................................................................................................................................................................................................View job settings
View job settings Use the following procedure to view job settings.
...........................................................................................................................................................................
1 Double-click the job you want to view.The job settings appear in the right-hand pane.
1 1 - 1 1 8

Jobs
............................................................................................................................................................................................................................................................
............................................................................................................................................................................................................................................................Save a job
Save a job Use the following procedure to save a job.
...........................................................................................................................................................................
1 Select File > Save to save the job. (If needed, provide a file name.)
...........................................................................................................................................................................
2 Click OK.
1 1 - 1 1 9

Jobs
...........................................................................................................................................................................................................................................................
............................................................................................................................................................................................................................................................Save a job as another name or on a different dialer
Save a job as another nameor on a different dialer
Use the following procedure to save a job as another name or on a different dialer.
...........................................................................................................................................................................
1 Double-click the job you want to save.
...........................................................................................................................................................................
2 Select File > Save As.If the multi-dialer option is enabled, select additional dialers to which you want to save the job. (If the dialer check boxes are unavailable and you want to enable them, select Settings > Options.)
...........................................................................................................................................................................
3 Type a file name for your job, and then click OK.The job is saved to the dialer you selected in the button bar and it to any additional dialers you selected.
1 1 - 1 2 0

Jobs
............................................................................................................................................................................................................................................................
............................................................................................................................................................................................................................................................Start a job on one or more dialers
Start a job on one or moredialers
Use the following procedure to start a job on one or more dialers.
...........................................................................................................................................................................
1 Double-click the job you want to start.
...........................................................................................................................................................................
2 Select File > Run.If the multi-dialer option is enabled, you are asked if you want to run the job on additional dialers. Select additional dialers on which you want to start the job.
...........................................................................................................................................................................
3 Click OK.
1 1 - 1 2 1

Jobs
...........................................................................................................................................................................................................................................................
............................................................................................................................................................................................................................................................Start multiple jobs on currently selected dialer
Start multiple jobs oncurrently selected dialer
Use the following procedure to start multiple jobs on the currently selected dialer.
...........................................................................................................................................................................
1 Control-click the jobs you want to start.
...........................................................................................................................................................................
2 Select File > Run, and then click OK.
1 1 - 1 2 2

Jobs
............................................................................................................................................................................................................................................................
............................................................................................................................................................................................................................................................Copy a job
Copy a job Use the following procedure to copy a job.
...........................................................................................................................................................................
1 Double-click the job you want to copy.
...........................................................................................................................................................................
2 Select File > Save As.If the multi-dialer option is enabled, select the dialer where you want to copy a job.
...........................................................................................................................................................................
3 Type a file name for the job, and then click OK.
1 1 - 1 2 3

Jobs
...........................................................................................................................................................................................................................................................
............................................................................................................................................................................................................................................................Edit a job
Edit a job Use the following procedure to edit a job.
...........................................................................................................................................................................
1 Select File > Open.
...........................................................................................................................................................................
2 Double-click the job you want to edit, and then make the necessary edits in the right-hand pane.
...........................................................................................................................................................................
3 Select File > Save to save the job.If the multi-dialer option in enabled, select the additional dialers to save the job to.
...........................................................................................................................................................................
4 Type a file name for the job, and then click OK.
1 1 - 1 2 4
Jobs
............................................................................................................................................................................................................................................................
............................................................................................................................................................................................................................................................Verify a job on one or more dialers
Verify a job on one or moredialers
Use the following procedure to verify a job on one or more dialers.
...........................................................................................................................................................................
1 Select the job you want to verify.
...........................................................................................................................................................................
2 Select File > Verify.If the multi-dialer option is enabled, you are prompted to select whether or not to verify the job on additional dialers. Specify your preferences, and then click OK.
...........................................................................................................................................................................
3 In the This File is OK dialog box, click OK.
1 1 - 1 2 5

Jobs
...........................................................................................................................................................................................................................................................
............................................................................................................................................................................................................................................................Verify multiple jobs on the currently selected dialer
Verify multiple jobs on thecurrently selected dialer
Use the following procedure to verify multiple jobs on the currently selected dialer.
...........................................................................................................................................................................
1 Control-click to select all the jobs you want to verify.
...........................................................................................................................................................................
2 Select File > Verify.
...........................................................................................................................................................................
3 Click OK in The File is OK dialog box.
1 1 - 1 2 6

Jobs
............................................................................................................................................................................................................................................................
............................................................................................................................................................................................................................................................Delete a job on one or more dialers
Delete a job on one or moredialers
Use the following procedure to delete a job on one or more dialers.
...........................................................................................................................................................................
1 Select the job you want to delete.
...........................................................................................................................................................................
2 Select File > Delete.If the multi-dialer option is enabled, you are prompted to specify whether or not to delete the job from additional dialers. Make your selections, and then click OK.
...........................................................................................................................................................................
3 When prompted, click Yes to delete the job.
1 1 - 1 2 7

Jobs
...........................................................................................................................................................................................................................................................
............................................................................................................................................................................................................................................................Delete multiple jobs on the currently selected dialer
Delete multiple jobs on thecurrently selected dialer
Use the following procedure to delete multiple jobs on the currently selected dialer.
...........................................................................................................................................................................
1 Control-click to select the jobs you want to delete.
...........................................................................................................................................................................
2 Select File > Delete.If the multi-dialer option is enabled, you are prompted to specify whether or not to delete the job from additional dialers. Make your selections, and then click OK.
...........................................................................................................................................................................
3 When prompted, click Yes to delete the jobs.
1 1 - 1 2 8

Jobs
............................................................................................................................................................................................................................................................
............................................................................................................................................................................................................................................................List all jobs on a selected dialer
List all jobs on a selecteddialer
Use the following procedure to list all jobs on a selected dialer.
...........................................................................................................................................................................
1 Select the dialer name on the button bar.
...........................................................................................................................................................................
2 Click Job Files. A list of jobs on the selected dialer appears.
1 1 - 1 2 9

Jobs
...........................................................................................................................................................................................................................................................
1 1 - 1 3 0

12 Monitor default settings
............................................................................................................................................................................................................................................................
............................................................................................................................................................................................................................................................Overview
Purpose Monitor gives you the ability to define how data is arranged, specify the time range, change a job on the fly, customize a view according to completion code, customize a view according to an agent’s state, and determine the refresh rate and the preferred saving method.The topics in this chapter discuss settings that are the Monitor’s default settings. You can modify these settings during a job from the Monitor toolbar, but unless you save these changes to a custom view and then select that custom view from the button bar the next time you open Monitor, your modified settings are lost. When you start Monitor, it applies the default settings.
Contents This section contains the following topics:• Set the default hierarchy• Set time range• Set job changes• Set agent states to display• Set view set • Set refresh rate• Set save on exit settings
1 2 - 1 3 1

Monitor default settings
...........................................................................................................................................................................................................................................................
............................................................................................................................................................................................................................................................Set the default hierarchy
Set the default hierarchy The default hierarchy is set in the Options dialog box. The Scope tab affects the options you see in a view’s toolbar. For example, on the Scope tab, you select a hierarchy from the agent/supervisor list, then, when a view is opened and you select agent/supervisor hierarchy from the list that appears when you click the Hierarchy Manager toolbar icon, the hierarchy defined in the Scope tab is used. Note that for some of the choices on this tab, you will need to have previously created hierarchies using the Hierarchy Manager tool.
...........................................................................................................................................................................
1 In Monitor, select Settings > Options.
...........................................................................................................................................................................
2 In the Options dialog box, select the Scope tab.
...........................................................................................................................................................................
3 Under How should data be arranged, use the Agent/supervisor list to select a hierarchy. Use the Custom list to select a hierarchy.
...........................................................................................................................................................................
4 Click OK or Apply.
1 2 - 1 3 2

Monitor default settings
............................................................................................................................................................................................................................................................
............................................................................................................................................................................................................................................................Set time range
Set the time range The time range is set in the Options dialog box. The preferences that you specify in the Options dialog box’s Scope tab dynamically affect the Time Scope button on all of your views’ toolbars.
...........................................................................................................................................................................
1 In Monitor, select Settings > Options.
...........................................................................................................................................................................
2 In the Options dialog box, select the Scope tab.
...........................................................................................................................................................................
3 Under What time range should views support, select Show data for both active and recent jobs if you want to see data for both currently running jobs and jobs that have run today but have since shutdown.
1 2 - 1 3 3

Monitor default settings
...........................................................................................................................................................................................................................................................
............................................................................................................................................................................................................................................................Set job changes
Set job changes Use the Multi-Dialer Control tab to choose which of the available dialers you want included in your views. Use the following procedure to set job changes.
...........................................................................................................................................................................
1 In Monitor, select Settings > Options.
...........................................................................................................................................................................
2 In the Options dialog box, select the Multi-Dialer Control tab.
...........................................................................................................................................................................
3 To apply job changes to all dialers, select Apply job changes to all selected dialers, or to apply job changes to specific dialers, select the name of the dialer to which you want to apply job changes, and then click OK.
1 2 - 1 3 4

Monitor default settings
............................................................................................................................................................................................................................................................
............................................................................................................................................................................................................................................................Set agent states to display
Set agent states to display Use the Agent States tab to choose which agent states to display. For example, the “state” of an agent might include any of the following: talking, updating a record, idle, off a job, or offline.
...........................................................................................................................................................................
1 In Monitor, select Settings > Options.
...........................................................................................................................................................................
2 In the Options dialog box, select the Agent States tab.
...........................................................................................................................................................................
3 Select which states to display, and then click OK.
1 2 - 1 3 5
Monitor default settings
...........................................................................................................................................................................................................................................................
............................................................................................................................................................................................................................................................Set view set
Set view set Use the Appearance tab to set the view set.
...........................................................................................................................................................................
1 In Monitor, select Settings > Options.
...........................................................................................................................................................................
2 In the Options dialog box, select the Appearance tab.
...........................................................................................................................................................................
3 Type the view set to use, or select Browse to locate your view set, and then click OK.
1 2 - 1 3 6

Monitor default settings
............................................................................................................................................................................................................................................................
............................................................................................................................................................................................................................................................Set refresh rate
Set refresh rate Use the Appearance tab to set a refresh rate.
...........................................................................................................................................................................
1 In Monitor, select Settings > Options.
...........................................................................................................................................................................
2 In the Options dialog box, select the Appearance tab.
...........................................................................................................................................................................
3 Click the up or down arrow to set the refresh interval (in seconds) for your views, and then click OK.
1 2 - 1 3 7

Monitor default settings
...........................................................................................................................................................................................................................................................
............................................................................................................................................................................................................................................................Set save on exit settings
Set save on exit settings Use the Feedback tab to choose how changes to views and view sets are saved when the application closes.
...........................................................................................................................................................................
1 In Monitor, select Settings > Options.
...........................................................................................................................................................................
2 In the Options dialog box, select the Feedback tab.
...........................................................................................................................................................................
3 Below each choice, select when to save changes, and then click OK.
1 2 - 1 3 8
13 Monitor navigation and personalization
............................................................................................................................................................................................................................................................
............................................................................................................................................................................................................................................................Overview
Purpose The AvayaTM Predictive Dialing System (PDS) allows you to customize the display of Monitor windows and navigate among the various tool applications within Monitor.
Contents This section contains the following topics:• User interface• Navigate among the Tool menu applications• Use large icons or small icons in the button bar• Open a standard view• Open a view or view set from another location• Create a custom view• Save current view• Save as view set• Save view set with a new name• Delete a view set• Add a view to the Custom button group• Refresh a view
1 3 - 1 3 9

Monitor navigation and personalization
...........................................................................................................................................................................................................................................................
............................................................................................................................................................................................................................................................User interface
Overview Monitor has a button bar on the left-hand side of the screen and an open space where your various windows (or views) appear. A view is a window that displays when you click a button in the button bar. In each view, you can filter information and customize your monitoring.
Monitor screen layout andusage
Monitor is highly customizable. The following is a sample list of Monitor’s customizable features. In addition to these features, you should experiment with the toolbar options in each view to customize individual views. After you have a view set up the way you want it, you can save it as a custom view so that it is available for you to select from the Custom button group on the button bar. For more information on customizing individual views using the toolbar, see “View Control Functions.”
Button barThe button bar works like an accordion: it expands and contracts. In other words, when you click a button group, the group expands to display its buttons.To learn more about the various Monitor views and how to customize each view, see the “Views” section.
SortYou can sort the contents of a view by clicking a column heading. When you click a heading, you see a small arrow appear alongside the heading; if the small arrow is pointing up, you are sorting the data in ascending order. If the small arrow is pointing down, then you are sorting in descending order.
Resize columnsYou can resize any column in a view by hovering your cursor between the heading titles until a double-arrow appears. Hold down the left mouse button while you drag your cursor to resize the columns.
1 3 - 1 4 0

Monitor navigation and personalization
............................................................................................................................................................................................................................................................
............................................................................................................................................................................................................................................................Navigate among the Tool menu applications
Navigate among the Toolmenu applications
Monitor comes with tool applications that you access from the Tools menu. Use the following procedure to start Tool menu applications.
...........................................................................................................................................................................
1 Select Start > Programs > Avaya > Campaign Director > Monitor.
...........................................................................................................................................................................
2 To start a tool, select it from the Tools menu.While you use the tool, Monitor remains open in the background so that you can navigate back to it when you are finished using the tool.
1 3 - 1 4 1

Monitor navigation and personalization
...........................................................................................................................................................................................................................................................
............................................................................................................................................................................................................................................................Use large icons or small icons in the button bar
Use large icons or smallicons in the button bar
You can view large or small buttons on the button bar. Use the following procedure to switch between large and small icons in the button bar.
...........................................................................................................................................................................
1 On the button bar, click to expand the button group whose icon size you want to change.
...........................................................................................................................................................................
2 Right-click, and then select either Large Icons or Small Icons.A check mark next to the menu command indicates which view you are currently using.
1 3 - 1 4 2
Monitor navigation and personalization
............................................................................................................................................................................................................................................................
............................................................................................................................................................................................................................................................Open a standard view
Open a standard view Use the following procedure to open a standard view in Monitor.
...........................................................................................................................................................................
1 On the Monitor button bar, click View Set, Dialer, Job, Supervisor, Agent, or Custom.
...........................................................................................................................................................................
2 Select the view you want to open.The view opens as a new window in the right-hand pane.
1 3 - 1 4 3

Monitor navigation and personalization
...........................................................................................................................................................................................................................................................
............................................................................................................................................................................................................................................................Open a view or view set from another location
Open a view or view setfrom another location
Use the following procedure to open a view or view set from another location.
...........................................................................................................................................................................
1 In Monitor, select File > Open.
...........................................................................................................................................................................
2 Locate and select the view or view set you want to open, or type the file name in the File name field, and then click OK.The view or view set opens as a new window in the right-hand pane.
1 3 - 1 4 4

Monitor navigation and personalization
............................................................................................................................................................................................................................................................
............................................................................................................................................................................................................................................................Create a custom view
Create a custom view Use the following procedure to create a custom view.
...........................................................................................................................................................................
1 In Monitor, select File > New.The Monitor View Wizard opens.
...........................................................................................................................................................................
2 Follow the steps in the View Wizard to create your custom view.
1 3 - 1 4 5
Monitor navigation and personalization
...........................................................................................................................................................................................................................................................
............................................................................................................................................................................................................................................................Save current view
Save current view Use the following procedure to save a current view.
...........................................................................................................................................................................
1 On the Monitor button bar, click View Set, Dialer, Job, Supervisor, Agent, or Custom.
...........................................................................................................................................................................
2 Select the button for the view you want to open.
...........................................................................................................................................................................
3 Alter the view using the view’s toolbar.
...........................................................................................................................................................................
4 When you have the view set up the way you want, select File > Save.The next time you select the view, your saved preferences appear.
1 3 - 1 4 6
Monitor navigation and personalization
............................................................................................................................................................................................................................................................
............................................................................................................................................................................................................................................................Save as view set
Save as view set Use the following procedure to save a view set.
...........................................................................................................................................................................
1 On the Monitor button bar, click View Set, Dialer, Job, Supervisor, Agent, or Custom.
...........................................................................................................................................................................
2 Select the button for the view you want to open.The view opens as a new window in the right-hand pane
...........................................................................................................................................................................
3 Repeat steps 1 and 2 until you have all necessary views open.
...........................................................................................................................................................................
4 Select File > Save All As.
...........................................................................................................................................................................
5 Type a name for your view set, and then click OK.A button for the view set appears in the View Set group.
1 3 - 1 4 7
Monitor navigation and personalization
...........................................................................................................................................................................................................................................................
............................................................................................................................................................................................................................................................Save view set with a new name
Save view set with a newname
Use the following procedure to save a view set with a new name.
...........................................................................................................................................................................
1 On the Monitor button bar, click View Set, Dialer, Job, Supervisor, Agent, or Custom.
...........................................................................................................................................................................
2 Select the button for the view set you want to open. The view set opens.
...........................................................................................................................................................................
3 Select File > Save All As.
...........................................................................................................................................................................
4 Type the name you want to give your view set, and then click OK.The view set’s new name appears in the View Set button group.
1 3 - 1 4 8

Monitor navigation and personalization
............................................................................................................................................................................................................................................................
............................................................................................................................................................................................................................................................Delete a view set
Delete a view set Use the following procedure to delete a view set.
...........................................................................................................................................................................
1 On the Monitor button bar, click View Set.
...........................................................................................................................................................................
2 Right-click the view set you want to delete, and then select Remove Viewset.
1 3 - 1 4 9

Monitor navigation and personalization
...........................................................................................................................................................................................................................................................
............................................................................................................................................................................................................................................................Add a view to the Custom button group
Add a view to the Custombutton group
To create a button, you must have a view open in the main pane. Use the following procedure to add a view to the Custom button group.
...........................................................................................................................................................................
1 Open a view that you would like to have as a button.
...........................................................................................................................................................................
2 Right-click in the button bar area and select Add View to Custom.
...........................................................................................................................................................................
3 Type a name for the button, and then click OK. The view appears in the Custom button group.
1 3 - 1 5 0

Monitor navigation and personalization
............................................................................................................................................................................................................................................................
............................................................................................................................................................................................................................................................Refresh a view
Refresh a view Use the following procedure to refresh a view.
...........................................................................................................................................................................
1 With a view open, press the F5 key.
1 3 - 1 5 1

Monitor navigation and personalization
...........................................................................................................................................................................................................................................................
1 3 - 1 5 2

14 Monitor views
............................................................................................................................................................................................................................................................
............................................................................................................................................................................................................................................................Overview
Purpose Monitor uses the button bar (left-hand side of the window) as the primary navigation point for opening views. You can open and save favorite views, display views according to completion codes, display views according to agent and supervisor relationships, and configure alerts so that you can receive notifications from the Avaya™ Predictive Dialing System (PDS). Monitor displays views in the main window (right-hand side of your screen).
Contents This section contains the following topics:• Views• Dialer Status view• Dialer Agents view• Dialer Lines view• Dialer History view• Job Status view• Job Agents view• Job Detail view• Job Call Handling view• Job Completion Codes view• Job Wait Queues view
1 4 - 1 5 3

Monitor views
...........................................................................................................................................................................................................................................................
• Job History view• Job Performance view• Supervisor Agents view• Find Agent view• Agent Detail view• Agent Completion Codes view• Agent History view
1 4 - 1 5 4
Monitor views
............................................................................................................................................................................................................................................................
............................................................................................................................................................................................................................................................Views
Overview A view displays information about dialers, jobs, agents, and completion codes. In Monitor, you are able to create your views, save them on exit, and then restore them. This allows you to display views in the same way without having to recreate specific views.The button bar provides a means of organizing the available views, as well as access to those views. The button bar contains six view categories: View Set, Dialer, Job, Supervisor, Agent, and Custom.
View toolbar description There are several view control options.
Table viewDisplays the data without icons (only available if the view has two presentation modes).
Graphic viewDisplays the data with icons (only available if the view has two presentation modes).
Filter dataAllows you to filter the data in the view according to one selected criteria.
Performance code(For the Job Performance View only.) Allows you to select which completion code to use when monitoring job performance.
Hide/show columnsAllows you to select which of the available data fields appear.
Find itemAllows you to search for a text string within a view. For example, search for a specific agent or job.
Hierarchy Manager iconAllows you to choose the types of data that appear in the scope selectors.
1 4 - 1 5 5

Monitor views
...........................................................................................................................................................................................................................................................
You can choose to use no hierarchy, the default supervisor/agent hierarchy (if one has been defined using Settings > Options), or another custom hierarchy (if one has been defined using Settings > Options). You can define the default supervisor/agent hierarchy and the custom hierarchy.
Time SelectorAllows you to choose the time range for the data in the view.
RefreshRefreshes the data in the open views.
View categories The following view categories are available in Monitor:
View setYou can create a view set that you can save and restore as a group. The first time you click View Set, and no view set is active, the Save As dialog box appears so you can name the set and choose its storage location. When the dialog box closes, a button for the new view set appears in the View Sets group on the button bar. If you change a view, you will be asked whether the view should be saved.
Dialer viewsUse the Dialer views to see Dialer Status, Dialer Agents, Dialer Lines, and Dialer History.
Job viewsUse the Job views to see Job Status, Job Agents, Job Detail, Job Call Handling, Job Completion Codes, Job Wait Queues, Job History, and Job Performance.
Hierarchy Scope selector 1 Scope selector 2 Scope selector 3
No hierarchy Dialer (default) Job (default) empty
Default agent/supervisor hierarchy
Dialer (default) Job (default) supervisor (bottom level of the selected hierarchy)
Custom Top level of the selected hierarchy
Middle level of the selected hierarchy
Bottom level of the selected hierarchy
1 4 - 1 5 6

Monitor views
............................................................................................................................................................................................................................................................
Supervisor viewUse the Supervisor view to see the Supervisor Agents data.
Agent viewUse the Agent views to display Agent data.
Custom viewThe custom views section will vary, depending on what you choose to include. Monitor lets you save a customized view to the Custom group.
1 4 - 1 5 7

Monitor views
...........................................................................................................................................................................................................................................................
............................................................................................................................................................................................................................................................Dialer Status view
Dialer Status view The Dialer Status view displays the job, agent, and line resources used on a dialer. The view shows the agents and lines assigned to all dialers in the selected scope, as well as the jobs and the state of completion of each job.The following table describes the Dialer Status views.
Dialer Status Description
DialerID A unique identification number, automatically assigned to a dialer, and is used to identify dialer data in the database.
Dialer The name of a dialer in the current scope.
JobID A unique identification number, automatically assigned to a job (by name), used to identify job data in the database.
Job The name of each job running in the current scope.
Job Instance A unique identification number, automatically assigned to a single instance of a job, used to identify data associated with that job instance in the database. Each time a job runs, the system assigns it a new job instance ID.
Status The current status of the job (status types include stopped, running, error, or shutting down).
Start Time The date and time the job instance started.
Stop Time The time the job instance stopped or blank if the job is still running.
Estimated Job End
The time that Monitor estimates the job will end. For an inbound job, this field is empty.
Inbound Agents
The total number of inbound agents logged in to each job.
Outbound Agents
The total number of outbound agents logged in to each job.
Blend Agents The total number of blend agents logged in to each job.
1 4 - 1 5 8
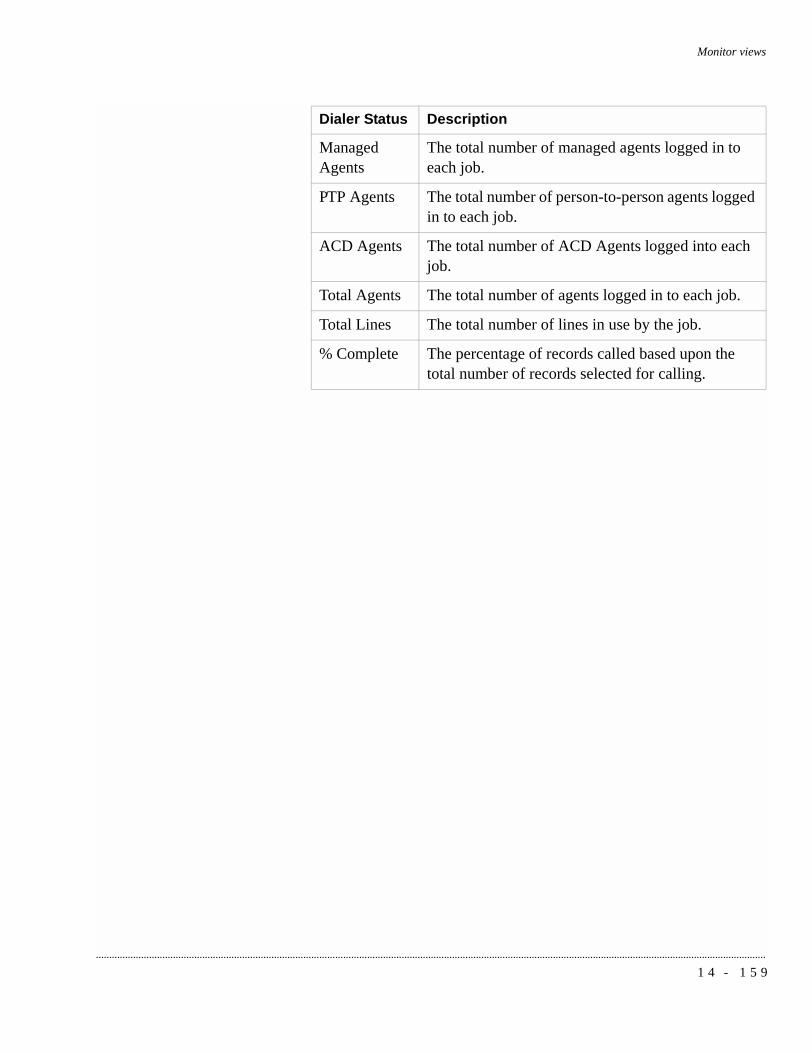
Monitor views
............................................................................................................................................................................................................................................................
Managed Agents
The total number of managed agents logged in to each job.
PTP Agents The total number of person-to-person agents logged in to each job.
ACD Agents The total number of ACD Agents logged into each job.
Total Agents The total number of agents logged in to each job.
Total Lines The total number of lines in use by the job.
% Complete The percentage of records called based upon the total number of records selected for calling.
Dialer Status Description
1 4 - 1 5 9

Monitor views
...........................................................................................................................................................................................................................................................
............................................................................................................................................................................................................................................................Dialer Agents view
Dialer Agents view The Dialer Agents view displays the agents active on one or more dialers.You can choose which agent states to include in the Dialer Agent view by selecting, on the Agent States tab in the Options dialog box, the agent states you want to view. You can further limit the agent states in a single view by using the Filter option.The following table describes the Dialer Agents view.
Dialer Agents
Description
Total The total number of agents within the selected scope.
Talk The total number of agents with status “Talk” in the selected scope.
Update The total number of agents with status “Update” in the selected scope.
Idle The total number of agents with status “Idle” in the selected scope.
ACD The total number of ACD agents in the selected scope.
Acquired The total number of acquired ACD agents in the selected scope.
Offline The total number of offline agents in the selected scope.
Logging Off The total number of agents that have requested log off but are still handling calls.
Dialer The name of the dialer on which the job instance is running.
Job The name of a currently running job. Available data includes the names of all jobs running in the current scope.
1 4 - 1 6 0

Monitor views
............................................................................................................................................................................................................................................................
Job Instance A unique identification number automatically assigned to a single instance of a job, used to identify data associated with that job instance in the database. Each time a job runs, the system assigns a new job instance ID.
Agent ID The identification number of the agent logged in to the selected dialer.
Status The current status of the agent. Status types include Talk, Update, Idle, ACD, Acquired, and Offline.
On Status The duration of the current status of the agent in hh:mm:ss format.
Agent Type The type of calling activity that the agent logged in to handle. Acceptable values include Outbound, Inbound, and Blend.
On Job The elapsed time that the agent has been working on a job.
Headset The headset ID or ACD extension assigned to the agent. The system uses this data to perform audio monitoring of an agent.
Dialer Agents
Description
1 4 - 1 6 1
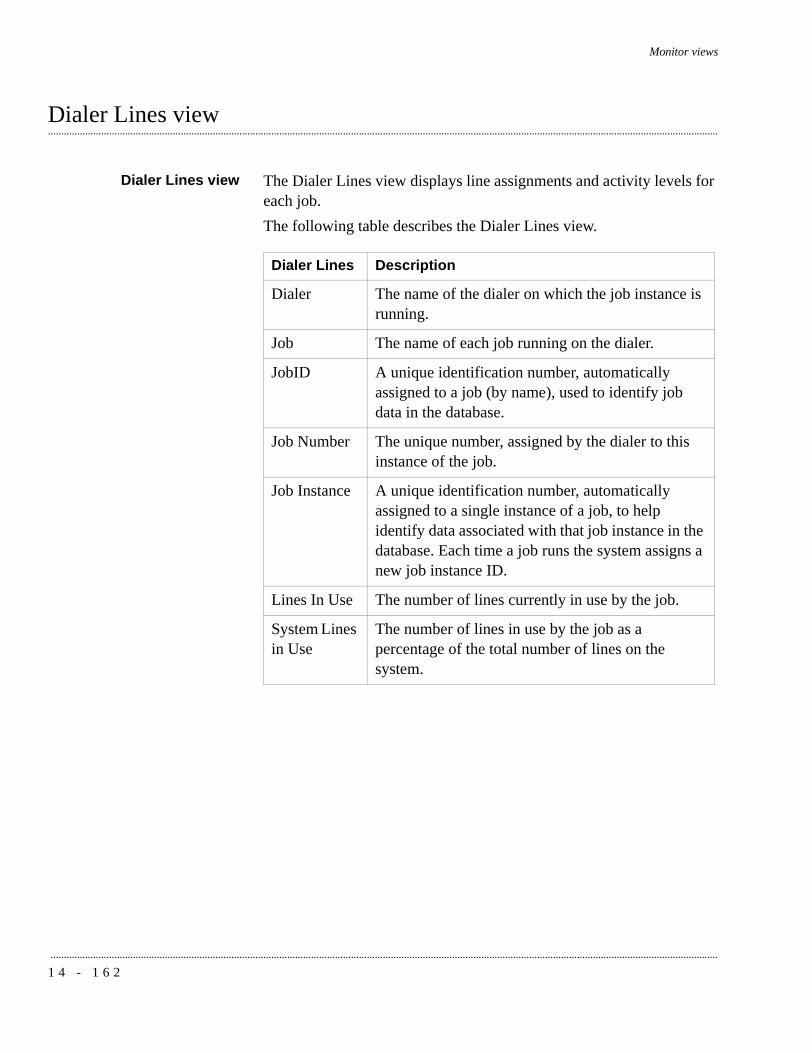
Monitor views
...........................................................................................................................................................................................................................................................
............................................................................................................................................................................................................................................................Dialer Lines view
Dialer Lines view The Dialer Lines view displays line assignments and activity levels for each job.The following table describes the Dialer Lines view.
Dialer Lines Description
Dialer The name of the dialer on which the job instance is running.
Job The name of each job running on the dialer.
JobID A unique identification number, automatically assigned to a job (by name), used to identify job data in the database.
Job Number The unique number, assigned by the dialer to this instance of the job.
Job Instance A unique identification number, automatically assigned to a single instance of a job, to help identify data associated with that job instance in the database. Each time a job runs the system assigns a new job instance ID.
Lines In Use The number of lines currently in use by the job.
System Lines in Use
The number of lines in use by the job as a percentage of the total number of lines on the system.
1 4 - 1 6 2

Monitor views
............................................................................................................................................................................................................................................................
............................................................................................................................................................................................................................................................Dialer History view
Dialer History view The Dialer History view shows dialer activity over time. The view lists all instances of a job that have run on a dialer, regardless of the current status of the job. For example, if Job1 runs from 8:00 until 10:30, then restarts at 11:15, both job instances appear in the view separately. The default value for the time selector is active data + recent data.The following table describes the Dialer History view.
Dialer History Description
Dialer ID A unique identification number, automatically assigned to a dialer, used to identify data related to that dialer in the database.
Dialer The name of the dialer in the current scope.
Job The name of a job that has run during the current time scope.
JobID A unique identification number, automatically assigned to a job (by name), used to identify job data in the database.
Job Instance A unique identification number, automatically assigned to a single instance of a job, used to identify data associated with that job instance in the database. Each time a job runs, the system assigns a new job instance ID.
Job Number The unique number, assigned by the dialer to this instance of the job.
Status The current status of the job (status types include: stopped, running, error, or shutting down).
Start Time The time the job started.
Stop Time The time the job stopped.
Estimated Job End
The time that Monitor estimates the job will end. For an inbound job, this field is empty.
1 4 - 1 6 3

Monitor views
...........................................................................................................................................................................................................................................................
Connects The total number of connects (both inbound and outbound) for each job instance. A subtotal appears for each job and each dialer.
RPCs The total number of calls released as right-party contacts (RPCs) for each job instance. A subtotal appears for each job and each dialer.
Closures The total number of calls released as closures for each job instance. A subtotal appears for each job and each dialer.
Abandons The total number of calls released as abandoned for each job instance. A subtotal appears for each job and each dialer.
Agent Hours The total number of hours agents have logged on to a job instance over the course of the job. A subtotal appears for each job and each dialer.
Total Records The total number of records selected for calling. For inbound jobs, this field is always zero.
Records Called The total number of records called during the course of the job. A subtotal appears for each job and each dialer.
Dialer History Description
1 4 - 1 6 4

Monitor views
............................................................................................................................................................................................................................................................
............................................................................................................................................................................................................................................................Job Status view
Job Status view The Job Status view displays the same data as the Dialer Resource view, but is grouped and totaled by job.The following table displays the Job Status view.
Job Status Description
DialerID A unique identification number, automatically assigned to a dialer, used to identify data related to that dialer in the database.
Dialer The name of a dialer in the current scope.
JobID A unique identification number, automatically assigned to a job (by name), used to identify job data in the database.
Job The job name appears in the window title bar.
Job Instance A unique identification number, automatically assigned to a single instance of a job, used to identify data associated with that job instance in the database. Each time a job runs, the system assigns a new job instance ID.
Status The current status of the job (status types include: stopped, running, error, or shutting down).
Start Time The time the job started running.
Stop Time The time the job stopped running.
Estimated Job End
The time that Monitor estimates the job will end. For an inbound job, this field is empty.
Inbound Agents
The total number of inbound agents logged in to each job.
Outbound Agents
The total number of outbound agents logged in to each job.
Blend Agents The total number of blend agents logged in to each job.
Managed Agents
The total number of managed agents logged in to each job.
1 4 - 1 6 5

Monitor views
...........................................................................................................................................................................................................................................................
PTP Agents The total number of PTP agents logged in to each job.
ACD Agents The total number of ACD agents logged in to each job.
Total Agents The total number of agents within the selected scope.
Total Lines The number of lines currently in use by each job.
% Complete The percentage of records called based upon the total number of records selected for calling.
Job Status Description
1 4 - 1 6 6
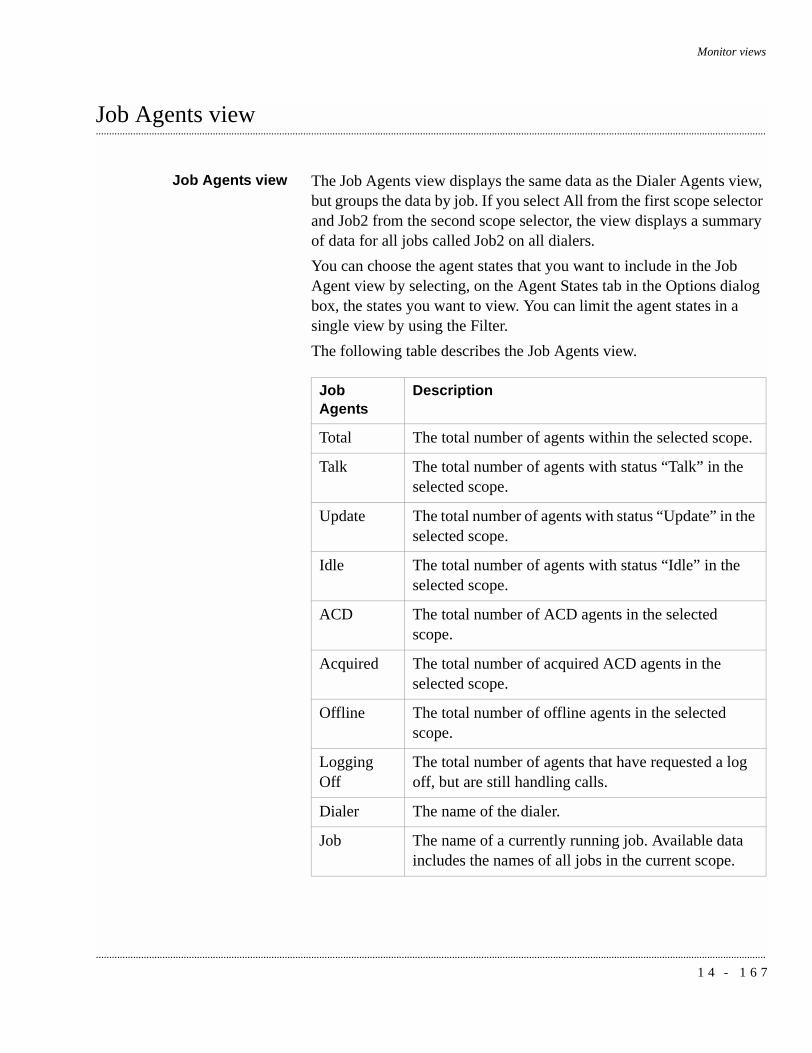
Monitor views
............................................................................................................................................................................................................................................................
............................................................................................................................................................................................................................................................Job Agents view
Job Agents view The Job Agents view displays the same data as the Dialer Agents view, but groups the data by job. If you select All from the first scope selector and Job2 from the second scope selector, the view displays a summary of data for all jobs called Job2 on all dialers.You can choose the agent states that you want to include in the Job Agent view by selecting, on the Agent States tab in the Options dialog box, the states you want to view. You can limit the agent states in a single view by using the Filter.The following table describes the Job Agents view.
Job Agents
Description
Total The total number of agents within the selected scope.
Talk The total number of agents with status “Talk” in the selected scope.
Update The total number of agents with status “Update” in the selected scope.
Idle The total number of agents with status “Idle” in the selected scope.
ACD The total number of ACD agents in the selected scope.
Acquired The total number of acquired ACD agents in the selected scope.
Offline The total number of offline agents in the selected scope.
Logging Off
The total number of agents that have requested a log off, but are still handling calls.
Dialer The name of the dialer.
Job The name of a currently running job. Available data includes the names of all jobs in the current scope.
1 4 - 1 6 7

Monitor views
...........................................................................................................................................................................................................................................................
Job Instance
A unique identification number, automatically assigned to a single instance of a job, used to identify data associated with that job instance in the database. Each time a job run, the system assigns a new job instance ID.
Agent ID The identification number of the agent logged in to the selected dialer.
Agent The name of an agent logged into the selected dialer.
Status The current status of the agent. Status types include Talk, Update, Idle, ACD, Offline, off job, and logging off.
On Status The duration of the current status of the agent in hh:mm:ss format.
Agent Type The type of calling activity that the agent logged in to handle. Acceptable values include Outbound, Inbound, Blend.
On Job The elapsed time that the agent has actually been working on a job.
Headset The headset ID or ACD extension assigned to the agent. The system uses this data to perform audio monitoring of an agent.
Job Agents
Description
1 4 - 1 6 8

Monitor views
............................................................................................................................................................................................................................................................
............................................................................................................................................................................................................................................................Job Detail view
Job Detail view The Job Detail view displays detailed information about the performance of a job, including connect, RPC, and closure rates. It also displays static operational information about the job, as well as the current setting of various runtime parameters. Because the Job Detail view is the lowest-level view of a job, data is not summed over time or dialers. Instead, it is information about a single instance of a job. For historical or summary information about a job, see the Job History view.The following table describes the Job Detail view.
Job Detail Description
Job Name The job name appears in the window title bar.
Job Number The unique number assigned to this instance of the job by the dialer.
Dialer The name of the dialer on which the job instance is running.
Status The current status of the job (status types include: stopped, running, error, or shutting down).
Selection The name of the file that defines which records will be available for calling. If the job is inbound, this field is blank.
Strategy The name of the file that defines which records will be available for calling. If the job is inbound, this field is blank.
Expert Calling Ratio
The Expert Calling Ratio defined for the job. If the job is inbound, this field is blank.
Running Hit Rate
The overall hit rate (percentage of call completions measured against call attempts) for the job calculated from job start to the present.
Current Hit Rate
The hit rate for the job over the last five to ten minutes. The Avaya PDS uses this figure to make adjustments in the Expert Calling Ratio.
1 4 - 1 6 9

Monitor views
...........................................................................................................................................................................................................................................................
Inbound Connects
The total number of inbound calls connected.
Inbound Connects per Hr
The average number of inbound connects per hour. The value is calculated by dividing the total number of inbound connects by the total Online Time (Online Time is the elapsed time since the job instance began).
Outbound Connects
The total number of outbound calls connected.
Outbound Connects per Hr
The average number of outbound connects per hour. The value is calculated by dividing the total number of outbound connects by the total Online Time.
Total Connects
The total number of inbound and outbound connects for the job.
Start Time The time the job started running.
Time Left The estimated time remaining to complete calling for the job. For an inbound job, this field is empty.
Total Records
The total number of records selected for calling. For inbound jobs, this field is always zero.
Total Calls The total number of calls made or handled for the job, including both inbound and outbound calls.
Records Left
The number of eligible records not yet called for the job. For inbound jobs, this field is always zero.
Total RPCs The total number of RPCs currently recorded.
RPCs per Connect
The number of RPCs as a percentage of the total number of connects. This value is calculated by dividing the total RPC connects by total agent connects.
% Complete The percentage complete for the job. This value is calculated by dividing the total records called by total records selected for calling. An outbound job will never appear as 100% complete unless all records are called. Inbound jobs always appear as 100% complete.
Job Detail Description
1 4 - 1 7 0
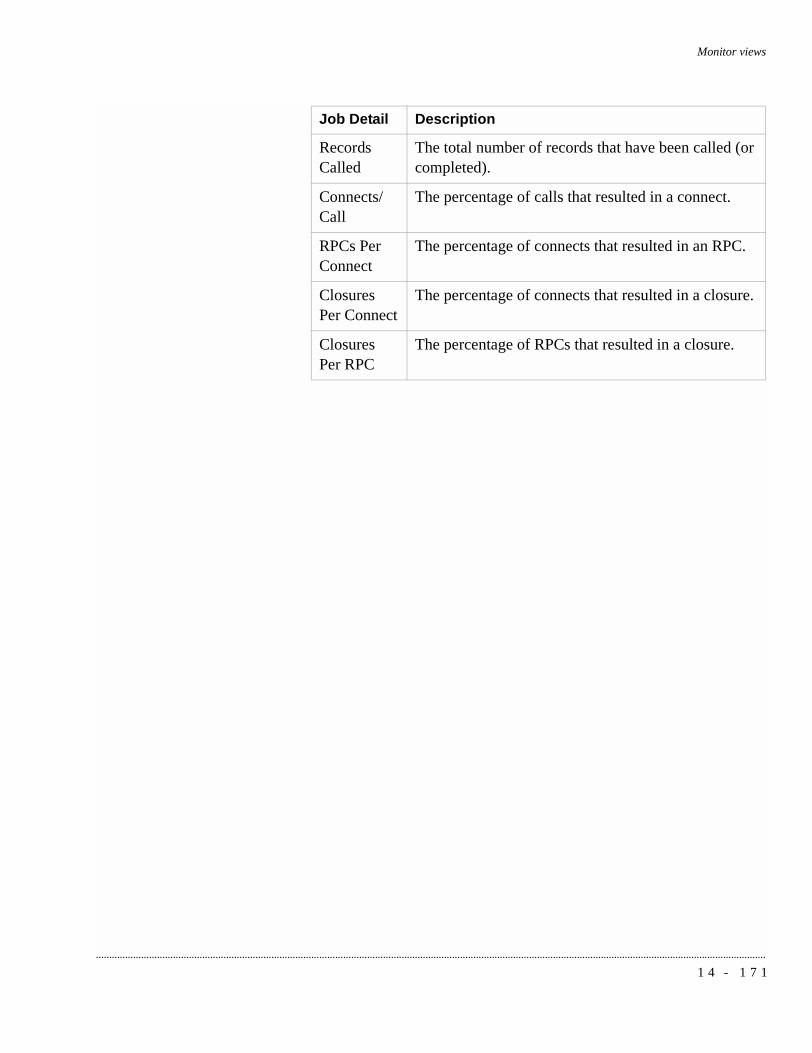
Monitor views
............................................................................................................................................................................................................................................................
Records Called
The total number of records that have been called (or completed).
Connects/Call
The percentage of calls that resulted in a connect.
RPCs Per Connect
The percentage of connects that resulted in an RPC.
Closures Per Connect
The percentage of connects that resulted in a closure.
Closures Per RPC
The percentage of RPCs that resulted in a closure.
Job Detail Description
1 4 - 1 7 1
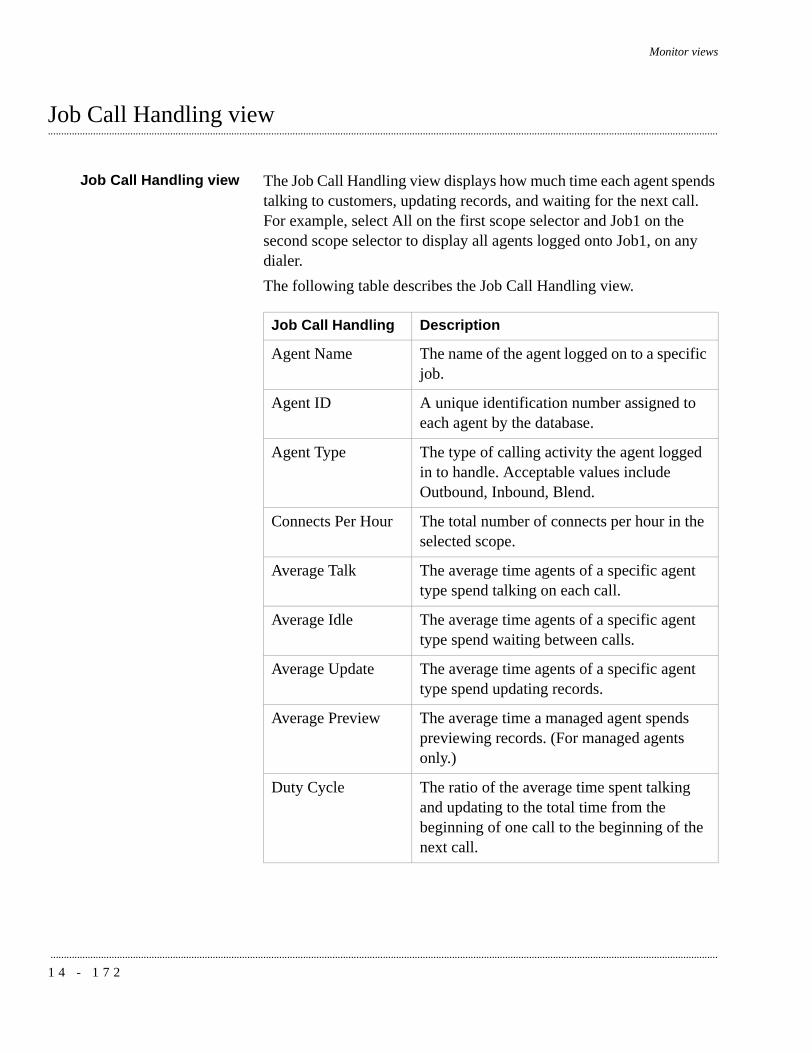
Monitor views
...........................................................................................................................................................................................................................................................
............................................................................................................................................................................................................................................................Job Call Handling view
Job Call Handling view The Job Call Handling view displays how much time each agent spends talking to customers, updating records, and waiting for the next call. For example, select All on the first scope selector and Job1 on the second scope selector to display all agents logged onto Job1, on any dialer.The following table describes the Job Call Handling view.
Job Call Handling Description
Agent Name The name of the agent logged on to a specific job.
Agent ID A unique identification number assigned to each agent by the database.
Agent Type The type of calling activity the agent logged in to handle. Acceptable values include Outbound, Inbound, Blend.
Connects Per Hour The total number of connects per hour in the selected scope.
Average Talk The average time agents of a specific agent type spend talking on each call.
Average Idle The average time agents of a specific agent type spend waiting between calls.
Average Update The average time agents of a specific agent type spend updating records.
Average Preview The average time a managed agent spends previewing records. (For managed agents only.)
Duty Cycle The ratio of the average time spent talking and updating to the total time from the beginning of one call to the beginning of the next call.
1 4 - 1 7 2

Monitor views
............................................................................................................................................................................................................................................................
............................................................................................................................................................................................................................................................Job Completion Codes view
Job Completion Codesview
The Job Completion Codes view displays completion codes used during the job. Additional information includes the total number of calls, connects, and RPCs; the per hour number of calls, connects, and RPCs; and the number of RPCs per connect.The following table describes the Job Completion Codes view.
Job Completion Codes
Description
Closure A check mark indicates that you have defined the code as a closure in the Completion Code Manager.
Code The unique identification number associated with each completion code.
RPC The number of records released with this code as a percentage of the total number of RPCs. (For codes marked as RPC only.)
Abandon A check mark indicates that you have defined the code as an abandon in the Completion Code Manager.
Name The user-defined name or description assigned to each code. This description is defined by the user in the Completion Code Manager.
Total The total calls made by the dialer in the selected scope.
Avg/Hr The average number of calls released with a completion code during an hour.
RPC % For each code designated as an RPC, the percentage of connects recorded for each completion code based on the total number of RPCs for the job.
1 4 - 1 7 3

Monitor views
...........................................................................................................................................................................................................................................................
NoteYou define which codes are abandons using Completion Code Manager. By default, codes 45 and 47 are inbound abandons and 46 and 48 are outbound abandons.Monitor always uses the definitions that were in effect when the job began. If you change any of the completion code descriptions, you will not see the changes until the next time the job runs.
Closure % The percentage of closures recorded for each completion code based on the total number of RPCs for the job.
% of Calls The number of calls recorded for each code as a percentage of the total number of calls for the job.
Job Completion Codes
Description
1 4 - 1 7 4
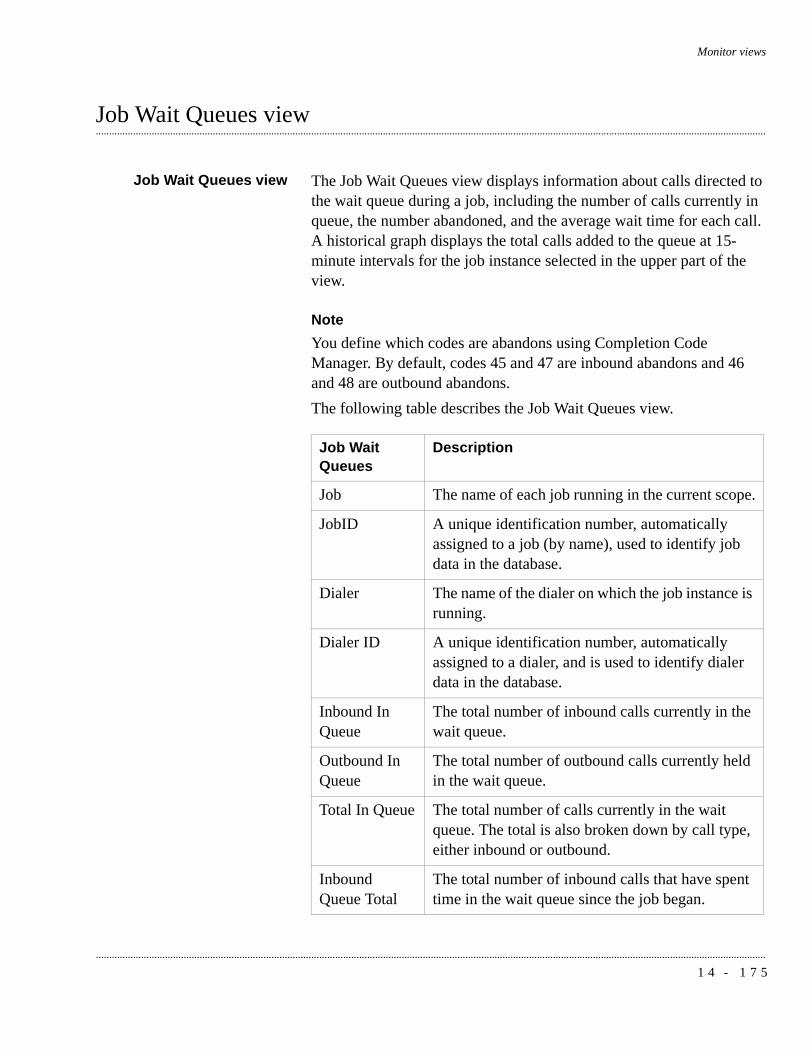
Monitor views
............................................................................................................................................................................................................................................................
............................................................................................................................................................................................................................................................Job Wait Queues view
Job Wait Queues view The Job Wait Queues view displays information about calls directed to the wait queue during a job, including the number of calls currently in queue, the number abandoned, and the average wait time for each call. A historical graph displays the total calls added to the queue at 15-minute intervals for the job instance selected in the upper part of the view.
NoteYou define which codes are abandons using Completion Code Manager. By default, codes 45 and 47 are inbound abandons and 46 and 48 are outbound abandons.The following table describes the Job Wait Queues view.
Job Wait Queues
Description
Job The name of each job running in the current scope.
JobID A unique identification number, automatically assigned to a job (by name), used to identify job data in the database.
Dialer The name of the dialer on which the job instance is running.
Dialer ID A unique identification number, automatically assigned to a dialer, and is used to identify dialer data in the database.
Inbound In Queue
The total number of inbound calls currently in the wait queue.
Outbound In Queue
The total number of outbound calls currently held in the wait queue.
Total In Queue The total number of calls currently in the wait queue. The total is also broken down by call type, either inbound or outbound.
Inbound Queue Total
The total number of inbound calls that have spent time in the wait queue since the job began.
1 4 - 1 7 5

Monitor views
...........................................................................................................................................................................................................................................................
Outbound Queue Total
The total number of outbound calls that have spent time in the wait queue since the job began.
Queue Total The total number of calls, both inbound and outbound, that have spent time in the wait queue.
Avg Inbound Wait Time
The average number of minutes and seconds that an inbound call spends in the wait queue in the mm:ss format.
Avg Outbound Wait Time
The average number of minutes and seconds that an outbound call spends in the wait queue in the mm:ss format.
Avg Wait Time The average time calls (inbound, outbound) spent in the wait queue. The total figure is a weighted average of inbound and outbound wait times.
Inbound Connects
The total number of inbound calls connected to an agent.
Outbound Connects
The total number of outbound calls connected to an agent.
Total Connects The total number of calls, both inbound and outbound, connected to an agent.
Inbound Calls Answered
The total number of inbound calls answered by the dialer. (This number includes all inbound calls connected to an agent plus all inbound calls abandoned in the wait queue.)
Outbound Calls Answered
The total number of outbound calls answered by a customer. (This number includes all outbound calls connected to an agent plus all outbound calls abandoned in the wait queue.)
Outbound Calls Placed
The total number of outbound calls dialed, regardless of the final outcome of the call (i.e., abandoned or connected).
Inbound Abandoned
The total number of inbound calls abandoned by the customer or by the system.
Outbound Abandoned
The total number of outbound calls abandoned by the customer or by the system.
Job Wait Queues
Description
1 4 - 1 7 6

Monitor views
............................................................................................................................................................................................................................................................
Total Abandoned
The total number of calls marked with a completion code that has been defined as an “abandon.”
% Abandoned Per Inbound Connect
The total number of abandoned calls divided by the total number of inbound connects and multiplied by 100.
% Abandoned Per Outbound Connect
The total number of abandoned calls divided by the total number of outbound calls and multiplied by 100.
% Abandoned Per Total Connects
The total number of abandoned calls divided by the total number of connects and multiplied by 100.
% Abandoned Per Inbound Calls Answered
The total number of abandoned calls divided by the sum of the total inbound connects and the total number of inbound calls abandoned.
% Abandoned Per Outbound Calls Answered
The total number of abandoned calls divided by the sum of the total number of outbound connects and the total number of outbound calls abandoned.
% Abandoned Per Total Calls Answered
The total number of abandoned calls divided by the sum of the total number of connects and the total number of system abandons (codes 45-48).
% Abandoned Per Outbound Calls Placed
The total number of abandoned calls divided by the total number of outbound calls placed.
Job Wait Queues
Description
1 4 - 1 7 7

Monitor views
...........................................................................................................................................................................................................................................................
............................................................................................................................................................................................................................................................Job History view
Job History view The Job History view displays the same information as the Dialer History view grouped by job, rather than dialer.The following table displays the Job History view.
Job History Description
Dialer ID A unique identification number, automatically assigned to a dialer, used to identify data related to that dialer in the database.
Dialer The name of the dialer in the current scope.
Job The name of a job that has run during the current time scope.
Job ID A unique identification number, automatically assigned to a job (by name), used to identify job data in the database.
Job Number The unique number assigned to this instance of the job by the dialer.
Job Instance A unique identification number, automatically assigned to a single instance of a job, used to help identify data associated with that job instance in the database. Each time a job runs, the system assigns a new job instance ID.
Status The current status of the job (status types include: stopped, running, error, or shutting down).
Start Time The time the job started.
Stop Time The time the job stopped.
Estimated End Time
The time that Monitor estimates the job will end. For an inbound job, this field is empty.
Connects The total number of connects (both inbound and outbound) for each job instance. A subtotal appears for each job and each dialer.
RPCs The total number of calls released as right-party contacts (RPCs) for each job instance. A subtotal appears for each job and each dialer.
1 4 - 1 7 8

Monitor views
............................................................................................................................................................................................................................................................
Closures The total number of calls released as closures for each job instance. A subtotal appears for each job and each dialer.
Abandons The total number of calls released as abandoned for each job instance. A subtotal appears for each job and each dialer.
Agent Hours The total number of hours agents have logged on to a job instance over the course of the job. A subtotal appears for each job and each dialer.
Total Records The total number of records selected for calling. For inbound jobs, this field is always zero.
Records Called The total number of records called during the course of the job. A subtotal appears for each job and each dialer.
Job History Description
1 4 - 1 7 9
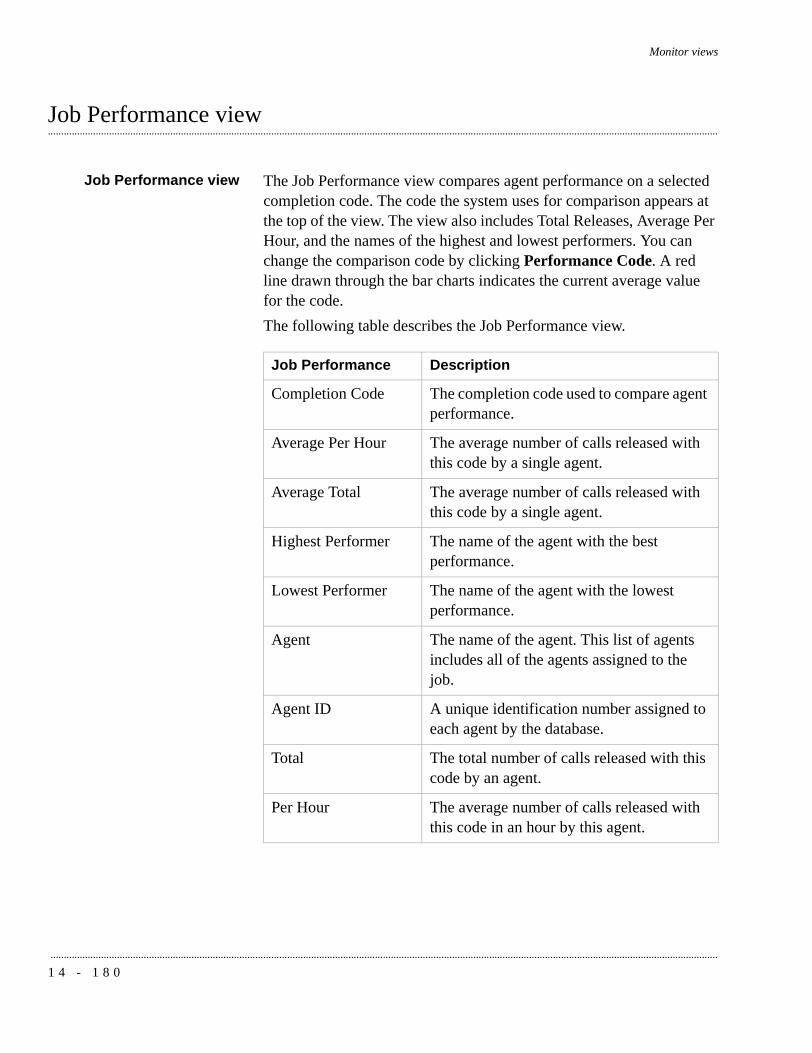
Monitor views
...........................................................................................................................................................................................................................................................
............................................................................................................................................................................................................................................................Job Performance view
Job Performance view The Job Performance view compares agent performance on a selected completion code. The code the system uses for comparison appears at the top of the view. The view also includes Total Releases, Average Per Hour, and the names of the highest and lowest performers. You can change the comparison code by clicking Performance Code. A red line drawn through the bar charts indicates the current average value for the code.The following table describes the Job Performance view.
Job Performance Description
Completion Code The completion code used to compare agent performance.
Average Per Hour The average number of calls released with this code by a single agent.
Average Total The average number of calls released with this code by a single agent.
Highest Performer The name of the agent with the best performance.
Lowest Performer The name of the agent with the lowest performance.
Agent The name of the agent. This list of agents includes all of the agents assigned to the job.
Agent ID A unique identification number assigned to each agent by the database.
Total The total number of calls released with this code by an agent.
Per Hour The average number of calls released with this code in an hour by this agent.
1 4 - 1 8 0

Monitor views
............................................................................................................................................................................................................................................................
............................................................................................................................................................................................................................................................Supervisor Agents view
Supervisor Agents view The Supervisor Agents view displays the same data as the Dialer Agents view, but groups the data by job. This view is only available if you have defined a supervisor-agent hierarchy and selected that hierarchy as the default supervisor-agent hierarchy using Settings > Options.You can choose which agent states should be included in the Supervisor Agent view by selecting, on the Agent States tab in the Options dialog box, the states you want to view. You can further limit the agent states in a single view by using the Filter icon.The following table describes the Supervisor Agents view.
Supervisor Agents
Description
Total The total number of agents within the selected scope.
Talk The total number of agents with status “Talk” in the selected scope.
Update The total number of agents with status “Update” in the selected scope.
Idle The total number of agents with status “Idle” in the selected scope.
ACD The total number of ACD agents in the selected scope.
Acquired The total number of acquired ACD agents in the selected scope.
Offline The total number of offline agents in the selected scope.
Logging Off The total number of agents that have requested log off, but are still handling calls.
Dialer The name of the dialer.
Job The name of a currently running job. Available data includes the names of all jobs running in the current scope.
1 4 - 1 8 1
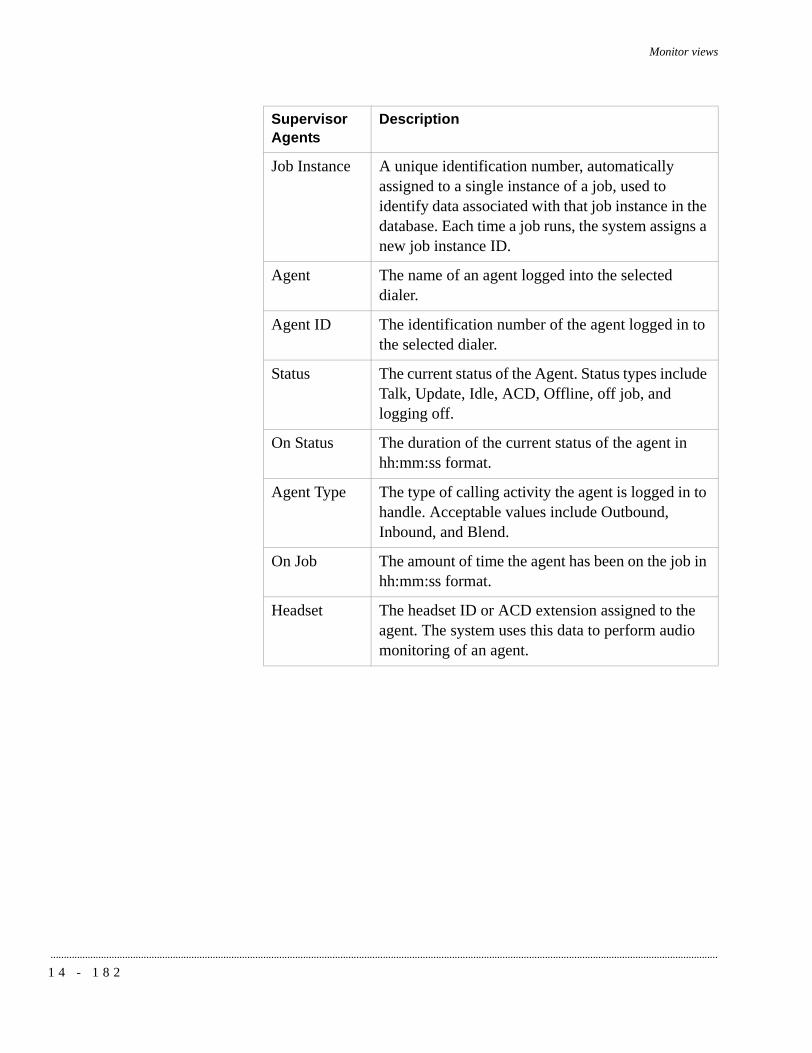
Monitor views
...........................................................................................................................................................................................................................................................
Job Instance A unique identification number, automatically assigned to a single instance of a job, used to identify data associated with that job instance in the database. Each time a job runs, the system assigns a new job instance ID.
Agent The name of an agent logged into the selected dialer.
Agent ID The identification number of the agent logged in to the selected dialer.
Status The current status of the Agent. Status types include Talk, Update, Idle, ACD, Offline, off job, and logging off.
On Status The duration of the current status of the agent in hh:mm:ss format.
Agent Type The type of calling activity the agent is logged in to handle. Acceptable values include Outbound, Inbound, and Blend.
On Job The amount of time the agent has been on the job in hh:mm:ss format.
Headset The headset ID or ACD extension assigned to the agent. The system uses this data to perform audio monitoring of an agent.
Supervisor Agents
Description
1 4 - 1 8 2

Monitor views
............................................................................................................................................................................................................................................................
............................................................................................................................................................................................................................................................Find Agent view
Find Agent view The Find Agent view helps you locate one or more agents by name, dialer, supervisor, or job. The results appear in a grid at the bottom of the dialog box. You can select one or more agents from the result list and perform any of the actions on the Find Agent toolbar.The following table displays the Find Agent view.
Find Agent Description
Agent The name of the agent to search for, or a wildcard character (*).
Status The current status of the agent or activity and the duration of the status. Status types include Talk, Update, Idle, ACD, Offline, logging off, and off job.
Dialer The name of one or more dialers on which to search. Also available as a column.
Job The name of one or more jobs to limit the search.
1 4 - 1 8 3

Monitor views
...........................................................................................................................................................................................................................................................
............................................................................................................................................................................................................................................................Agent Detail view
Agent Detail view The Agent Detail view displays detailed information about the current activity and performance of an agent.The following table describes the Agent Detail view.
Agent Detail Description
Name The name of the agent appears in the title bar.
Dialer The name of the dialer on which the agent is working.
Supervisor The name of one or more supervisors to limit the search. This is only valid if you define an agent/supervisor hierarchy. See note under Supervisor Agents view.
Job The name of the job on which the agent is working.
Status The current status of the agent or activity and the duration of the status. Status types include Talk, Update, Idle, ACD, Offline, off job, and logging off.
Agent Type The type of calling activity the agent is logged in to handle. Acceptable values include Outbound, Inbound, and Blend.
Current Type The type of calling activity in which the agent is currently engaged. This data is significant for agents that log in as blend, but are normally engaged in either Inbound or Outbound activity. Their agent type is Blend, but their current type varies between Outbound and Inbound. Similarly, for agents that have logged in as ACD, both agent type and current type change to Outbound once the agent has been acquired.
Last Released The last time an ACD agent was released to inbound.
Last Acquired The last time an ACD agent was acquired for outbound calling.
1 4 - 1 8 4
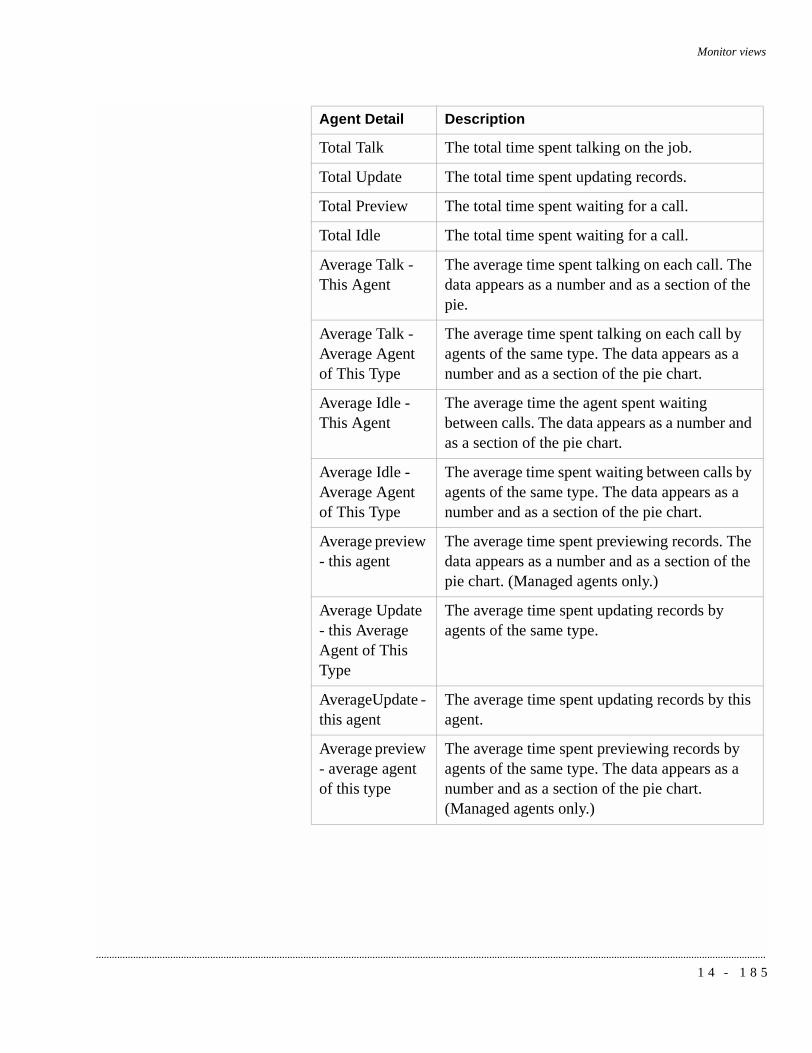
Monitor views
............................................................................................................................................................................................................................................................
Total Talk The total time spent talking on the job.
Total Update The total time spent updating records.
Total Preview The total time spent waiting for a call.
Total Idle The total time spent waiting for a call.
Average Talk - This Agent
The average time spent talking on each call. The data appears as a number and as a section of the pie.
Average Talk - Average Agent of This Type
The average time spent talking on each call by agents of the same type. The data appears as a number and as a section of the pie chart.
Average Idle - This Agent
The average time the agent spent waiting between calls. The data appears as a number and as a section of the pie chart.
Average Idle - Average Agent of This Type
The average time spent waiting between calls by agents of the same type. The data appears as a number and as a section of the pie chart.
Average preview - this agent
The average time spent previewing records. The data appears as a number and as a section of the pie chart. (Managed agents only.)
Average Update - this Average Agent of This Type
The average time spent updating records by agents of the same type.
AverageUpdate - this agent
The average time spent updating records by this agent.
Average preview - average agent of this type
The average time spent previewing records by agents of the same type. The data appears as a number and as a section of the pie chart. (Managed agents only.)
Agent Detail Description
1 4 - 1 8 5
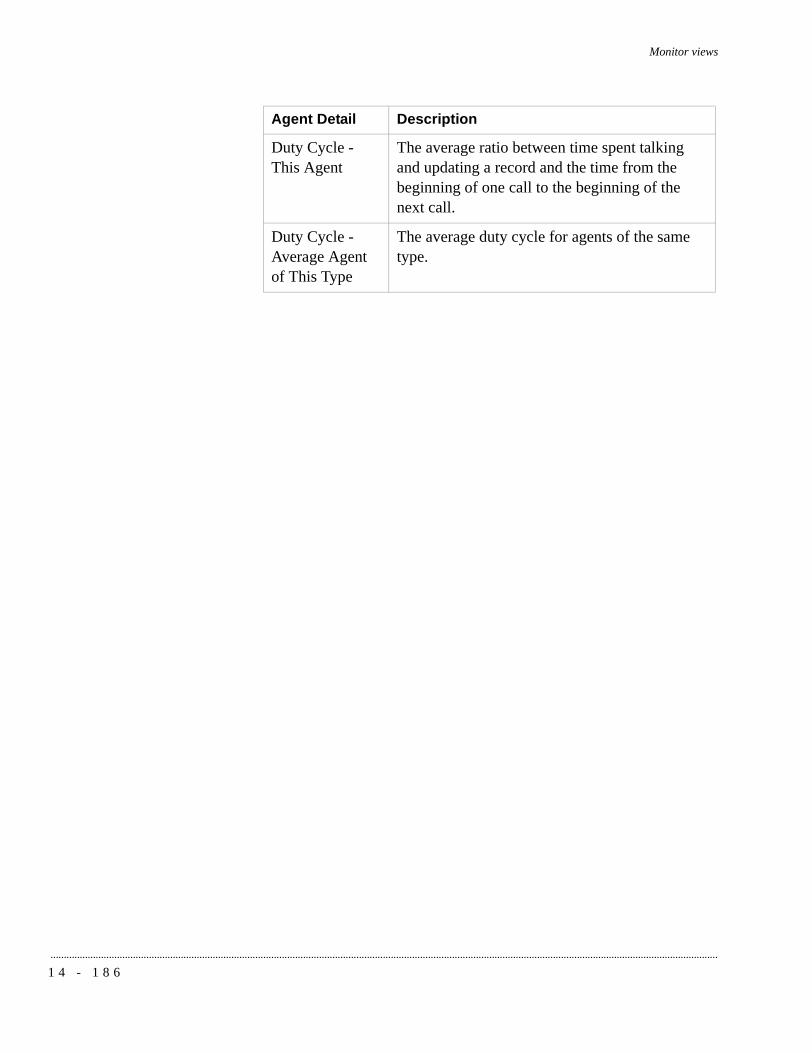
Monitor views
...........................................................................................................................................................................................................................................................
Duty Cycle - This Agent
The average ratio between time spent talking and updating a record and the time from the beginning of one call to the beginning of the next call.
Duty Cycle - Average Agent of This Type
The average duty cycle for agents of the same type.
Agent Detail Description
1 4 - 1 8 6

Monitor views
............................................................................................................................................................................................................................................................
............................................................................................................................................................................................................................................................Agent Completion Codes view
Agent Completion Codesview
The Agent Completion Codes view displays the calling results in terms of completion codes. Additional information includes the total number of calls, connects, and RPCs; the per hour number of calls, connects, and RPCs; and the number of RPCs per connect.The following table displays the Agent Completion Codes view.
Agent Completion Codes
Description
Connects The total number of connects for this agent.
RPCs The total number of RPCs for this agent.
Closures The total number of closures for this agent.
Code The unique identification number associated with each completion code.
RPC A check mark indicates the code is an RPC.
Closure A check mark indicates the code is a closure.
Name The user-defined name or description assigned to each code.
Total The total number of calls released with each completion code.
Avg/Hr The average number of calls released with a completion code during an hour.
Type Avg/Hr The average number of calls released by a specific type of agent with a completion code during an hour.
% of RPCs For each code designated as an RPC, the percentage of connects recorded for each completion code based on the total number of RPCs for the job. See Job Completion Codes view.
1 4 - 1 8 7

Monitor views
...........................................................................................................................................................................................................................................................
% of Closures
For each code designated as a closure, the percentage of connects recorded for each completion code based on the total number of closures for the job. See Job Completion Codes view.
% of Calls The number of calls recorded for each code as a percentage of the total number of calls for the job. See Job Completion Codes view.
Agent Completion Codes
Description
1 4 - 1 8 8

Monitor views
............................................................................................................................................................................................................................................................
............................................................................................................................................................................................................................................................Agent History view
Agent History view The Agent History view displays detailed information about the past activity and performance of an agent.The following table displays the Agent History views.
Agent History Description
Agent The name of the agent logged in to the selected dialer.
Agent ID The identification number of the agent logged in to the selected dialer.
Dialer The name of the dialer in the current scope.
Dialer ID A unique identification number, automatically assigned to a dialer, used to identify data related to that dialer in the database.
Job The name of a job runs during the current time scope.
JobID A unique identification number, automatically assigned to a job (by name), used to identify job data in the database.
First Login The date and time the agent first logged on to a job in yyyy/mm/dd hh:mm:ss format.
Last Logout The date and time the agent last logged off of a job in yyyy/mm/dd hh:mm:ss format.
Agent Hours The total number of hours agents have logged on to a job instance over the course of the job. A subtotal appears for each job and each dialer.
1 4 - 1 8 9

Monitor views
...........................................................................................................................................................................................................................................................
1 4 - 1 9 0

15 View control functions
............................................................................................................................................................................................................................................................
............................................................................................................................................................................................................................................................Overview
Purpose A view is the name given to the customizable window that appears in the main area of Monitor after you click a button on the button bar. This section describes how to use views in Monitor.
Contents This section contains the following topics:• View control toolbar• Filter data in a view• Select a performance code• Set scope selectors• Scope selectors examples• Select a time range• Select a hierarchy• Hide or show columns• Select Table View or Graphical View• Save a view as HTML
1 5 - 1 9 1

View control functions
...........................................................................................................................................................................................................................................................
............................................................................................................................................................................................................................................................View control toolbar
Toolbar buttons within aView
Every view opens with a set of tools that help you manipulate the data in a View. The available options vary depending the view. For example, the time selector option does not appear if time scoping is not allowed for data in a view.
View tool Button Description
Table View If the view has two presentation modes (graphical and table) this button displays the data without icons (not available for all views).
Graphical View
If the view has two presentation modes (graphical and table) this button displays the data by showing icons (not available for all views).
Filter Data Displays a dialog box that allows you to filter the data in the view according to one selected criteria.
Performance Code
Displays a dialog box that allows you to select a completion code to use to measure agent performance.
Hide/Show Columns
Displays a dialog box that allows you to select which of the available data fields will be displayed.
Find Allows you to search for an item in a view.
Level 1 Scope Selector
A drop-down list that allows you to limit the amount of data in the display.
1 5 - 1 9 2
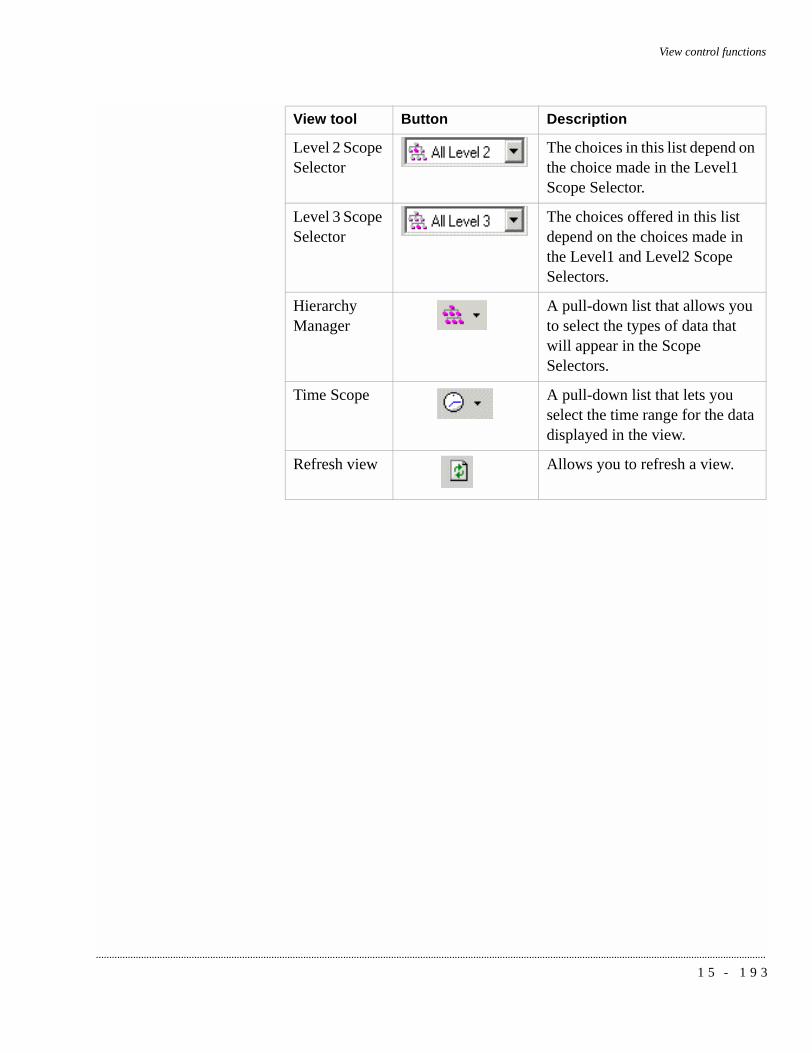
View control functions
............................................................................................................................................................................................................................................................
Level 2 Scope Selector
The choices in this list depend on the choice made in the Level1 Scope Selector.
Level 3 Scope Selector
The choices offered in this list depend on the choices made in the Level1 and Level2 Scope Selectors.
Hierarchy Manager
A pull-down list that allows you to select the types of data that will appear in the Scope Selectors.
Time Scope A pull-down list that lets you select the time range for the data displayed in the view.
Refresh view Allows you to refresh a view.
View tool Button Description
1 5 - 1 9 3

View control functions
...........................................................................................................................................................................................................................................................
............................................................................................................................................................................................................................................................Filter data in a view
Filter data in a view Use the following procedure to filter data in a view.
...........................................................................................................................................................................
1 With a view open, click Filter Data. The Filter Data dialog box appears.
...........................................................................................................................................................................
2 Select a column from the list. The options in this list are the column headings for the selected view.
...........................................................................................................................................................................
3 From the Operator list, select an operator.
...........................................................................................................................................................................
4 In the Value box, type a value, and then click OK.
1 5 - 1 9 4

View control functions
............................................................................................................................................................................................................................................................
............................................................................................................................................................................................................................................................Select a performance code
Select a performance code The performance code option is available only from the Job Performance view. Use the following procedure to select a performance code.
...........................................................................................................................................................................
1 From the Job Performance view, click Performance Code. (You may then be prompted to use the scope selector drop-down lists on the view toolbar to select a single dialer and a single job.) The Performance Completion Code dialog box appears.
...........................................................................................................................................................................
2 Select a code, and then click OK. Monitor uses the selected code to measure agent performance.
NoteThe Performance Completion Code dialog box lists a set of completion codes. For each code, the system displays the RPC, Closure, and Abandon attributes and a description. The RPC, Closure, and Abandon attributes are based on Completion Code Manager settings when the job started. The description, however, reflects the current completion code description from Completion Code Manager.
1 5 - 1 9 5

View control functions
...........................................................................................................................................................................................................................................................
............................................................................................................................................................................................................................................................Scope selectors examples
Overview The three drop-down lists in the view toolbar are called scope selectors. They are used along with the Hierarchy Manager toolbar button. The option you select using the Hierarchy Manager toolbar button dynamically changes the available options in the three scope selectors. From left-to-right, the default scope selectors are dialer and job. The scope selector feature allows you to alternately narrow and broaden the range of data displayed in a view. You can select one or all items from each selector.
NoteA list of supervisors appears in the third scope selector only if you have defined an agent-supervisor hierarchy using the Hierarchy Manager tool (Tools > Hierarchy Manager) and designated that hierarchy as the default hierarchy in Monitor (Settings > Options).
Example OneSet the first selector to All Level 1, the second selector to All Level 2, and the third selector to All Level 3. The view displays data for all dialers, all jobs, and all supervisors. If you change the dialer selector to DialerA, Monitor removes the data for all other dialers from the view.
Example TwoIf the first selector is set to All Level 1 and the second selector is set to 30Day, the view displays data for all jobs named 30Day regardless of the dialer on which the jobs reside.
1 5 - 1 9 6

View control functions
............................................................................................................................................................................................................................................................
............................................................................................................................................................................................................................................................Set scope selectors
Set scope selectors Set the scope using the three drop-down lists available from any view toolbar. The options in the lists are determined by the default hierarchy selections (defined in the Scope tab--Settings > Options) and by using the Hierarchy Manager toolbar icon. From left-to-right, the default scope selectors are dialer and job. The scope selector feature allows you to alternately narrow and broaden the range of data displayed in a view.
...........................................................................................................................................................................
1 With a view open, click the Hierarchy Manager icon and select either No hierarchy, Agent/supervisor hierarchy, or Custom hierarchy. These options coordinate with the Agent/supervisor hierarchy and Custom hierarchy lists on the Scope tab (Settings > Options). Additionally, the option that you select in the Hierarchy Manager list affects the three scope selectors (the three drop-down lists) in your view. For example, if you select MySuperAgentHierarchy in the Scope tab’s Agent/supervisor hierarchy list and then select Agent/supervisor hierarchy from the Hierarchy Manager icon’s list, then your scope selectors will populate with data from MySuperAgentHierarchy (because the hierarchy selected in the Scope tab becomes the default hierarchy that populates your views).
...........................................................................................................................................................................
2 From the first scope selector, select an item. By default, a list of dialer names appear. If you selected Use custom hierarchy, the top-level items of the selected hierarchy appear in this list.The item you select in the first scope selector typically reduces the options available in the second scope selector. You can select All Level 1, which does not narrow your view’s scope.
...........................................................................................................................................................................
3 From the second scope selector, select an item. By default, a list of job names appear. If you selected Use custom hierarchy, the middle-level items of the selected hierarchy appear in this list.The item you select typically narrows the options available in the third scope selector. You can select All Level 2, which does not narrow your view’s scope.
1 5 - 1 9 7

View control functions
...........................................................................................................................................................................................................................................................
...........................................................................................................................................................................
4 From the third scope selector, select an item. By default, the third scope selector contains no options except All Level 3. If you selected either Use default hierarchy or Use custom hierarchy, the bottom-level items of the selected hierarchy appear in this list. The All Level 3 value does not narrow your view’s scope.
1 5 - 1 9 8

View control functions
............................................................................................................................................................................................................................................................
............................................................................................................................................................................................................................................................Select a time range
Select a time scope You can expand the default time view of current data only (for example, running jobs and active agents) to include recently run jobs (for example, since last dialer restart).For example, change the time scope setting to display a view showing right party contacts for all instances of Job1 that have run during a single day.Time selection is limited to views and data fields where summing makes sense. For example, non-numerical data is not summed. Similarly, data whose value is transient (for example, minimum hit rate) is not summed.
Select a time range Set the time range for your view by clicking the Time Scope icon on any view toolbar.
...........................................................................................................................................................................
1 With a view open, click the Time Scope icon.
...........................................................................................................................................................................
2 From the list, select Active Data or Active+Recent Data.Active Data means that your view will only display data for currently running jobs. Active+Recent Data will display data for currently running jobs and jobs that have run during a single day.
1 5 - 1 9 9
View control functions
...........................................................................................................................................................................................................................................................
............................................................................................................................................................................................................................................................Select a hierarchy
Select a hierarchy After you have previously created a hierarchy in Hierarchy Manager and then used the Scope tab (in Monitor, select Settings > Options) to select it, you can apply that hierarchy to any view.
...........................................................................................................................................................................
1 With a view open, click the Hierarchy Manager icon. A list appears.
...........................................................................................................................................................................
2 From the list, select No Hierarchy, Agent/supervisor hierarchy, or Custom hierarchy. The No Hierarchy option sets the scope selectors back to their default settings. The first scope selector lists dialers, the second scope selector lists jobs, and the third scope selector contains no items except All Level 3.Agent/supervisor hierarchy and Custom hierarchy coordinate with the Agent/supervisor hierarchy and Custom hierarchy lists seen on the Scope tab (Settings > Options). Additionally, the option that you select in the Hierarchy Manager list affects the three scope selectors (the three drop-down lists) in your view. For example, if you select MySuperAgentHierarchy in the Scope tab’s Agent/supervisor hierarchy list and then select Agent/supervisor hierarchy from the Hierarchy Manager icon’s list, then your scope selectors will populate with data from MySuperAgentHierarchy (because the hierarchy selected in the Scope tab becomes the default hierarchy that populates your views). The options you select in the scope selectors can then narrow or broaden the scope of the data displayed in your views.
1 5 - 2 0 0

View control functions
............................................................................................................................................................................................................................................................
............................................................................................................................................................................................................................................................Hide or show columns
Hide or show columns Use the following procedure to hide or show columns. This allows you to customize your view to display only the columns you want.
...........................................................................................................................................................................
1 With a view open, click the Hide/Show columns button.
...........................................................................................................................................................................
2 Clear a column’s check box to hide a column in your current view. Select a check box to show a column in your current view.
1 5 - 2 0 1

View control functions
...........................................................................................................................................................................................................................................................
............................................................................................................................................................................................................................................................Select Table View or Graphical View
Select Table View orGraphical View
Use the following procedure to display views in table or graphical form. Table view is the default.
...........................................................................................................................................................................
1 With a view open, click the Graphic View button to switch to a view that uses icons.
...........................................................................................................................................................................
2 With a view open, click the Table View button to switch to a view that does not display icons of the data in your view.
1 5 - 2 0 2

View control functions
............................................................................................................................................................................................................................................................
............................................................................................................................................................................................................................................................Save a view as HTML
Save a view as HTML Use the following procedure to save your view as HTML.
...........................................................................................................................................................................
1 In Monitor, select the view to save as HTML.
...........................................................................................................................................................................
2 Select File > Save as HTML. Monitor opens a new window with the HTML output.By default, the HTML file will be saved toC:\Program Files\Avaya\Campaign Director\Monitor\View Name.html.
1 5 - 2 0 3

View control functions
...........................................................................................................................................................................................................................................................
1 5 - 2 0 4

16 Job control functions
............................................................................................................................................................................................................................................................
............................................................................................................................................................................................................................................................Overview
Purpose The AvayaTM Predictive Dialing System (PDS) allows you to adjust job settings while a job is running. You make these adjustments through the Monitor Tools menu. The new settings expire when the job ends.The job controls are available from any view that displays a list of jobs, such as the Job Status view or the Job Wait Queue view.
Contents This section contains the following topics:• Stop a job• Link to job• Minimum hit rate• Expert calling ratio• Inbound settings• Reassign lines• Managed Dialing• Time zones• Unit Work Lists• Detection modes• Alternate initial
1 6 - 2 0 5

Job control functions
...........................................................................................................................................................................................................................................................
• Recalls
1 6 - 2 0 6

Job control functions
............................................................................................................................................................................................................................................................
............................................................................................................................................................................................................................................................Stop a job
Stop a job Use the following procedure to stop a job.
...........................................................................................................................................................................
1 In Monitor, open a view that lists jobs, and then select the job you want to stop.
...........................................................................................................................................................................
2 Select Tools > Stop Job. The Stop Job dialog box appears.
...........................................................................................................................................................................
3 Select one of the following two options:
...........................................................................................................................................................................
4 Click OK. A dialog box appears asking you Are you sure?
...........................................................................................................................................................................
5 Click Yes to stop the job.
Shutdown gracefully as agents complete calls
Allows you to stop a job after the agents complete their current calls. This option allows the agents to end their current calls and release the records. This is the typical method.
Stop job immediately Allows you to stop a job immediately. The Avaya PDS disconnects all phone conversations and closes the records immediately. As a result, agents cannot finish speaking with a customer or update customer records.
1 6 - 2 0 7

Job control functions
...........................................................................................................................................................................................................................................................
............................................................................................................................................................................................................................................................Link to job
Link to job Use the Link to job option to identify a job to start automatically when the current job completes. When you link a job, the system transfers agents to the next job as the agents complete their last calls and release the records. The system displays a message telling the agents that they are changing jobs. For rules regarding linking jobs, see “Job Settings” located in the Jobs section.
...........................................................................................................................................................................
1 Open a Monitor view that lists jobs.
...........................................................................................................................................................................
2 Select a job, and then select Tools > Link to Job.
...........................................................................................................................................................................
3 Select a job, and then click OK.
1 6 - 2 0 8
Job control functions
............................................................................................................................................................................................................................................................
............................................................................................................................................................................................................................................................Minimum hit rate
Minimum hit rate The minimum hit rate determines the maximum number of calls the Avaya PDS will make as it attempts to make an agent connection. For example, a minimum hit rate of 30% means the system will make no more than three dialing attempts for each agent. This prevents the Avaya PDS from allocating more pooled lines to a poorly performing job at the expense of a more successful job.
...........................................................................................................................................................................
1 Open a Monitor view that lists jobs.
...........................................................................................................................................................................
2 Select a job, and then select Tools > Minimum Hit Rate.
...........................................................................................................................................................................
3 Use the slider or type a value from 1 to 100 in increments of 10, and then click OK.
1 6 - 2 0 9
Job control functions
...........................................................................................................................................................................................................................................................
............................................................................................................................................................................................................................................................Expert calling ratio
Expert calling ratio Expert calling ratio changes the way the Avaya PDS predicts when to make the next call. You can select any of the following three ratios: Callers in the wait queue, Agent Work Time, or Agent Update time. If you are currently experiencing a high abandonment rate, you may want to lower the percentage; if your agents are experiencing large amounts of idle time you may want to increase the percentage. This rule is true using any of the three ratios.
...........................................................................................................................................................................
1 Open a Monitor view that lists jobs.
...........................................................................................................................................................................
2 Select a job, and then select Tools > Expert Calling Ratio.
...........................................................................................................................................................................
3 Click the Expert Calling Mode field and select either Callers in the wait queue, Agent update time, or Agent work time.
...........................................................................................................................................................................
4 Double-click the Value field and enter a value from 0 to 100 in increments of 10, and then click OK.Wait at least 15 minutes before changing your expert calling ratio again because your change will not be noticeable to you for at least that long.
1 6 - 2 1 0

Job control functions
............................................................................................................................................................................................................................................................
............................................................................................................................................................................................................................................................Inbound settings
Inbound settings Use this menu command to adjust your inbound settings.
...........................................................................................................................................................................
1 Open a Monitor view that lists jobs.
...........................................................................................................................................................................
2 Select an inbound or blend job, and then select Tools > Inbound Settings.
...........................................................................................................................................................................
3 Double-click the Value field to enter settings, and then click OK.
1 6 - 2 1 1

Job control functions
...........................................................................................................................................................................................................................................................
............................................................................................................................................................................................................................................................Reassign lines
Reassign lines When you reassign lines, you alleviate congestion on certain Avaya PDS lines so that your jobs run more quickly.
...........................................................................................................................................................................
1 Open a Monitor view that lists jobs.
...........................................................................................................................................................................
2 Select a job, and then select Tools > Reassign Lines.
...........................................................................................................................................................................
3 A check indicates that the line group is activate (in use). Click to select or clear line groups as needed, and then click OK.Use the Activate All button to select all of the line groups. Use the Deactivate All button to clear all of the line groups.
1 6 - 2 1 2
Job control functions
............................................................................................................................................................................................................................................................
............................................................................................................................................................................................................................................................Managed Dialing
Managed Dialing Managed jobs allow agents to preview a customer’s record prior to beginning their conversation with the customer. For more information on Managed Dialing settings, see “Job Settings” in the Job section.
...........................................................................................................................................................................
1 Open a Monitor view that lists jobs.
...........................................................................................................................................................................
2 Select a Managed Dialing job, and then select Tools > Managed Dialing.
...........................................................................................................................................................................
3 Modify agents’ preview time setting by typing a different value in the Time Limit box.
...........................................................................................................................................................................
4 Select Allow agent to cancel calls to immediately allow agents to cancel calls, and then click OK.
1 6 - 2 1 3

Job control functions
...........................................................................................................................................................................................................................................................
............................................................................................................................................................................................................................................................Time zones
Time zones Select the check box if you want the Avaya PDS to sort calls by times zones.
...........................................................................................................................................................................
1 Open a Monitor view that lists jobs.
...........................................................................................................................................................................
2 Select a job, and then select Tools > Time Zones.
...........................................................................................................................................................................
3 Clear time zones you do not want to call, and then click OK.Click Activate All to select all time zones. Click Deactivate All to clear all time zones.
1 6 - 2 1 4
Job control functions
............................................................................................................................................................................................................................................................
............................................................................................................................................................................................................................................................Unit Work Lists
Unit Work Lists A unit work list creates a sub-list in a job so that certain agents can be assigned to a unit work list and, therefore, receive only certain calls. For example, you can set up a unit work list in a job so that Spanish-speaking customers are routed only to Spanish-speaking agents.
...........................................................................................................................................................................
1 Open a Monitor view that lists jobs.
...........................................................................................................................................................................
2 Select a job, and then select Tools > Unit Work Lists.
...........................................................................................................................................................................
3 Clear or select a unit work list for the currently running job, and then Click OK.Click Activate All to select all unit IDs. Click Deactivate All to clear all unit IDs.
1 6 - 2 1 5

Job control functions
...........................................................................................................................................................................................................................................................
............................................................................................................................................................................................................................................................Detection modes
Detection modes Use the Detection Mode option to determine the types of calls the Avaya PDS passes to agents. For more information on detection modes, see “Call detection mode settings” in the Phone Strategies section.
...........................................................................................................................................................................
1 Open a Monitor view that lists jobs.
...........................................................................................................................................................................
2 Select a job, and then select Tools > Detection Modes.
...........................................................................................................................................................................
3 Click the Phone field to select a phone.
...........................................................................................................................................................................
4 Double-click the Rings field to type a different number of rings.
...........................................................................................................................................................................
5 To add a phone, click Add Phone, and then repeat steps 3 and 4 to edit the fields.
...........................................................................................................................................................................
6 To remove a phone, select the phone you want to delete, click Remove Phone, and then click OK.
1 6 - 2 1 6
Job control functions
............................................................................................................................................................................................................................................................
............................................................................................................................................................................................................................................................Alternate initial
Alternate initial The alternate initial phone replaces the initial phone as the first phone number to call at a particular time of day. The system begins to call the alternate initial phone number at the time you specify in the alternate initial phone settings. For more information, see “Alternate Initial Phone Settings” in the Phone Strategies section.
...........................................................................................................................................................................
1 Open a Monitor view that lists jobs.
...........................................................................................................................................................................
2 Select a job, and then select Tools > Alternate Initial.
...........................................................................................................................................................................
3 Click the Phone field to select a phone.
...........................................................................................................................................................................
4 Double-click the Local Time to edit the time. To toggle between AM and PM, select it, and then use your up and down arrows.
...........................................................................................................................................................................
5 Click the Time Zones field, and then click the button to display the list of time zones. Select the time zones you want to call.
...........................................................................................................................................................................
6 Click Add Phone to append a row, and then configure the new alternate initial phone’s settings.To remove a phone, select the phone you want to remove, and then click Remove Phone.
...........................................................................................................................................................................
7 Click OK.
1 6 - 2 1 7
Job control functions
...........................................................................................................................................................................................................................................................
............................................................................................................................................................................................................................................................Recalls
Recalls Use the recalls setting to determine how long the Avaya PDS waits before recalling a number, how many times it recalls the same phone number, and which phone it calls next.
...........................................................................................................................................................................
1 Open a Monitor view that lists jobs.
...........................................................................................................................................................................
2 Select a job, and then select Tools > Recalls.
...........................................................................................................................................................................
3 Double-click the various fields on the Recalls dialog box to edit the recalls currently configured. The Result column indicates the calling result of the call. The Retry Interval values are displayed in minutes.
...........................................................................................................................................................................
4 Click Add Recall to insert a row where you can edit a new recall.To delete a recall, select the row, and then click Remove Recall.
...........................................................................................................................................................................
5 Click OK
1 6 - 2 1 8
17 Quotas
............................................................................................................................................................................................................................................................
............................................................................................................................................................................................................................................................Overview
Purpose The AvayaTM Predictive Dialing System (PDS) uses quotas as a means to complete a certain number of calls based on a selected outcome. A quota is a maximum number of releases for a particular completion code. When the quota for a unit is reached, no more calls are placed. In Editor, you set and modify a quota that is applied when the job starts. In Monitor, you set and modify a quota that affects a currently running job. This section discusses quotas as they apply to Monitor only. See “Jobs” for more information on setting quota information in Editor.
Contents This section contains the following topics:• Job end and quotas• Create or modify a quota
1 7 - 2 1 9

Quotas
...........................................................................................................................................................................................................................................................
............................................................................................................................................................................................................................................................Job end and quotas
Job end and quotas A quick review of ending a job will help you understand why you might want to specify a quota. Here are the ways in which a job can end:• The job reaches the Latest Time to Stop setting.• The job is manually stopped.• The job stops only after the Avaya PDS calls all initial phones at
least once.• The job stops only after the Avaya PDS calls all recalls at least
once.• The job stops when the Avaya PDS calls all scheduled recalls, but
it stops calling when it has called all initial phones at least once.• The job stops when the agents meet the quota set for the job.The topics that follow are concerned with the last item in the previous list. Some supervisors use the Quota feature as a way to quickly stop a job. For example, specify a quota that your agents will quickly meet for a job.
NoteQuotas are not used for inbound-only jobs.
1 7 - 2 2 0

Quotas
............................................................................................................................................................................................................................................................
............................................................................................................................................................................................................................................................Create or modify a quota
Create or modify a quota Use the following procedure in Monitor to change the quota value during calling activities.
...........................................................................................................................................................................
1 Start Monitor.
...........................................................................................................................................................................
2 Select a job, and then select Tools > Quotas.The Quota dialog box appears.
...........................................................................................................................................................................
3 Double-click the Unit ID field and type a Unit ID.
...........................................................................................................................................................................
4 Click the Completion Code field to select a completion code.
...........................................................................................................................................................................
5 Double-click the Quota field and type a number (the number must be greater than 0).
1 7 - 2 2 1

Quotas
...........................................................................................................................................................................................................................................................
1 7 - 2 2 2

18 Alerts
............................................................................................................................................................................................................................................................
............................................................................................................................................................................................................................................................Overview
Purpose The AvayaTM Predictive Dialing System (PDS) uses alerts to signal to supervisors of the end of a job, a goal being met, and other campaign events.
Contents This section contains the following topics:• Alerts• Alert Settings• Create an alert• Edit an alert• Remove an alert• View a log• Enable and disable alerts• Check the status of each alert
1 8 - 2 2 3

Alerts
...........................................................................................................................................................................................................................................................
............................................................................................................................................................................................................................................................Alerts
Overview You can define up to 10 alerts that provide audio cues, visual cues, log files, e-mails, or pager signals when job/agent performance, system or job status, or line usage varies beyond predetermined levels. This capability allows you to identify and correct potential problems before they escalate.For example, you might want to know when an agent takes more than five minutes on a call or when the hit rate on a job is less than 30%. Alerts can also be set to tell you when the system needs attention, for example, a job is approaching completion.To access alerts, start Monitor and select Settings > Alerts.
NoteIf you set an alert, you can close Monitor. When you restart Monitor, your alert will be saved. However, if Monitor is closed when you should receive your notification, you will not receive notification. In other words, Monitor must be active in order for you to receive a notification. After you receive an alert notification, the alert is not automatically enabled again. Open the Alert Viewer and select Enabled to reactivate an alert.
Alert examples The Avaya PDS can alert you for many reasons. The following is a sample list.• Average Idle Time - the average time that all agents or a specific
agent are idle (not talking or updating).• Average Talk Time - the average time that all agents or a specific
agent spend talking.• Average Update Time - the average update time that all agents or
a specific agent spend updating a customer record.• Current Talk Time - the talk time for all agents or a specific
agent, as shown talking in real-time (rather than an average over multiple calls).
• Current Update Time - the update time for all agents or a specific agent, as shown updating in real-time (rather than an average over multiple calls).
• Total Idle Time - the total idle time for all agents or a specific agent, as idle time added over the course of a single job.
1 8 - 2 2 4
Alerts
............................................................................................................................................................................................................................................................
• Total Talk Time - the total talk time for all agents or a specific agent, as talk time added over the course of a single job.
• Total Update Time - the total update time for all agents or a specific agent, as update time added over the course of a single job.
• Line Utilization - the percentage of lines in use; for example, you might want to know when 95% of your lines are utilized so that you can free up some lines (otherwise, when 100% of the lines are utilized, customers will automatically be placed in a wait queue when they call in).
• Current Hit Rate - a hit rate is the ratio or percentage of call connects to call attempts (a 25% hit rate means that out of 100 attempts, 25 connects were made or it takes 4 calls to connect to one customer); a minimum hit rate keeps a job with a low hit rate from using all the lines when it shares a line pool with other jobs.
• Time on Dialer - this feature is like an alarm clock: when the dialer hits a certain time of the day/night, you are alerted.
• Agent Completion Code Total - the accumulated total of completion codes that agents have entered.
• Agent Completion Code Average - the average number of completion codes that agents have entered.
• Job Completion Code Average - the completion code average per hour; this is useful if, for example, you would like an overall sense of job performance.
• Job Completion Code Total - the total of all job completion codes, as accumulated over the entire life of a job; this is helpful if you want to shut down a job or reassign agents to another job when the goal for a job has been met.
• Agents Assigned - the number of agents currently on a job.• Job End - the job has ended.• Records Left - the number of records still left in the job that need
to be called.• Records Left as Percent of Total - the percent of records in the
entire job still left to be called.• Time Remaining - the estimated time left on a job.
NoteThere is also one alert that you may receive that you do not configure yourself. The Avaya PDS automatically alerts you if new data has not
1 8 - 2 2 5

Alerts
...........................................................................................................................................................................................................................................................
appeared in the database for more than 12 minutes (12 is the current setting). This alert lets you know if the data you are viewing in Monitor is not being updated.
1 8 - 2 2 6

Alerts
............................................................................................................................................................................................................................................................
............................................................................................................................................................................................................................................................Alert Settings
Alert settings The following table shows possible combinations of alert settings:
Condition Dialer Job Agent Relation Value Modifier
Agent Comp Code Totals
Yes Yes Yes >,< Total
Agent Comp code Avg
Yes Yes Yes >,< Average Per Hour
Agents Assigned Yes Yes No >,<
Average Idle Time Yes Yes Yes >,< 0-1440 minutes
Average Talk Time Yes Yes Yes >,< 0-1440 minutes
Average Update Time
Yes Yes Yes >,< 0-1440 minutes
Current Hit Rate Yes Yes No >,< 1-100 %
Current Talk Time Yes Yes Yes >,< 0-1440
Current Update Time
Yes Yes Yes >,< 0-1440
Job Comp Code Avg Yes Yes No >,<
Job Comp Code Total
Yes Yes No >,<
Job End Yes Yes No
Line Utilization Yes Yes No >,< 1-100 %
Records Left Yes Yes No >,<
Records Left Percent
Yes Yes No >,< 1-100 %
Time on Dialer Yes No No >,< 1:00-12:59
AMPM
1 8 - 2 2 7

Alerts
...........................................................................................................................................................................................................................................................
The dialer, job, and agent columns indicate whether a data item is relevant to a particular alert condition. For example, you can set a Job End alert for any job on any dialer, and you can set a Total Talk Time alert on any agent on any job on any dialer.
Time Remaining Yes Yes No >,< 0-1440 minutes
Total Idle Time Yes Yes Yes >,< 0-1440 minutes
Total Talk Time Yes Yes Yes >,< 0-1440 minutes
Total Update Time Yes Yes Yes >,< 0-1440 minutes
Condition Dialer Job Agent Relation Value Modifier
1 8 - 2 2 8
Alerts
............................................................................................................................................................................................................................................................
............................................................................................................................................................................................................................................................Create an alert
Overview You create alerts in Alerts Viewer, which is a available in Monitor.
Create an alert Use the following procedure to create an alert.
...........................................................................................................................................................................
1 Select Start > Programs > Avaya > Campaign Director > Monitor.
...........................................................................................................................................................................
2 Select Settings > Alerts.(If an e-mail configuration wizard appears, either complete it or cancel out of it.)
...........................................................................................................................................................................
3 In the Alerts Viewer dialog box, click Add.The Alert Editor dialog box appears.
...........................................................................................................................................................................
4 On the Alert Definition tab, select the condition you want to monitor and complete the conditional statement.
...........................................................................................................................................................................
5 On the Scope tab, narrow your alert condition.You can skip this tab if you do not want to narrow your alert criteria.
...........................................................................................................................................................................
6 On the Notifications tab, specify how Avaya PDS notifies you: a pop-up alert on your screen, an audible sound, a log file, or an e-mail.If you select Send to log, then you can view a log file that will contain all alert conditions that have been met. This log file is accessible using the View Log button on the Alert Viewer.If Send e-mail is unavailable, configure your default e-mail client on your PC. If Send e-mail is available and you want to receive an e-mail alert notification, type your e-mail address in the To... box.
...........................................................................................................................................................................
7 Click OK.The alert name and summary information appear in the Alerts Viewer dialog box.
1 8 - 2 2 9

Alerts
...........................................................................................................................................................................................................................................................
............................................................................................................................................................................................................................................................Edit an alert
Edit an alert Use the following procedure to edit an alert.
...........................................................................................................................................................................
1 In Monitor, select Settings > Alerts.The Alert Viewer dialog box appears.
...........................................................................................................................................................................
2 Select the alert you want to edit, and then click Edit.The Alert Editor dialog box appears.
...........................................................................................................................................................................
3 Use the Alert Definition, Scope, and Notifications tabs to modify the alert.
...........................................................................................................................................................................
4 Click OK.
1 8 - 2 3 0

Alerts
............................................................................................................................................................................................................................................................
............................................................................................................................................................................................................................................................Remove an alert
Remove an alert Use the following procedure to remove an alert.
...........................................................................................................................................................................
1 In Monitor, select Settings > Alerts.The Alert Viewer dialog box appears.
...........................................................................................................................................................................
2 Select the alert you want to delete, and then click Remove.
...........................................................................................................................................................................
3 Click OK.
1 8 - 2 3 1

Alerts
...........................................................................................................................................................................................................................................................
............................................................................................................................................................................................................................................................View a log
View a log If you have selected the Send to Log option for an alert (which you set on the Notifications tab on the Alert Editor), you can use the View Log button in the Alert Viewer dialog box to display a log of all alert conditions that have been met.
...........................................................................................................................................................................
1 In Monitor, select Settings > Alerts.
...........................................................................................................................................................................
2 On the Alert Viewer dialog box, click View Log.A log file (text file) appears in a separate window.
1 8 - 2 3 2

Alerts
............................................................................................................................................................................................................................................................
............................................................................................................................................................................................................................................................Enable and disable alerts
Overview In Alert Viewer, you have the option to disable alerts, which tells the Avaya PDS not to notify you about an alert. For example, if you usually monitor agent Doe everyday because he is a new hire, but agent Doe calls in sick for a day, clear the check box next to the agent Doe alert to disable the alert. When agent Doe returns to work, select the agent Doe alert to reactivate it.The Enabled check box tells you whether or not the Avaya PDS is actively checking the alert’s condition. A check mark indicates that the Avaya PDS is monitoring the condition. Job Ended, Current Talk Time, and Current Update Time automatically reactivate after their condition is met, but all other alerts require that you re-enable them in Alerts Viewer.
Enable and disable alerts Use the following procedure to enable and disable alerts.
...........................................................................................................................................................................
1 In Monitor, select Settings > Alerts.
...........................................................................................................................................................................
2 Select the Enabled field to activate monitoring of the alert condition.Clear Enabled to deactivate the alert.
1 8 - 2 3 3

Alerts
...........................................................................................................................................................................................................................................................
............................................................................................................................................................................................................................................................Check the status of each alert
Overview In Alert Viewer, you can check the status of your alerts. If an alert condition has not been met, its status is On. If an alert condition has been met, its status is Off.
Check the status of eachalert
Use the following procedure to check the status of each alert.
...........................................................................................................................................................................
1 In Monitor, select Settings > Alerts.
...........................................................................................................................................................................
2 Notice whether the Status column has an On or Off status.
1 8 - 2 3 4

19 Agent control functions
............................................................................................................................................................................................................................................................
............................................................................................................................................................................................................................................................Overview
Purpose During calling activities, Monitor provides a means to find a particular agent, and then take an action for that agent.
Contents This section contains the following topics:• Agent control functions• Find an agent• Transfer an agent to another job• Send message to an agent• Monitor agent line• Remove an agent from a job
1 9 - 2 3 5

Agent control functions
...........................................................................................................................................................................................................................................................
............................................................................................................................................................................................................................................................Agent control functions
Overview Monitor allows you to search for one or more agents in order to complete various tasks. After an agent is found, you can initiate the following actions:• Transfer one or more agents to another job• Send a message to one or more agents• Monitor an agent line• Remove an agent from a jobBefore performing any of these tasks, you must first find an agent.
Hierarchies You can find agents in several ways. If you know the exact agent login, you can search for a single agent. Use the following hierarchy groups to search for a single agent or a group of agents.
Job Search all agents in a job.
Supervisor Search all agents reporting to a supervisor.
Dialer Search all agents on a dialer.
NoteAn agent must be set up within the supervisor hierarchy in order for the agent to be found using this function. Set up hierarchies using Hierarchy Manager.
Using wildcard characters In addition to finding a single agent, you can use wildcard characters to search for multiple agents.
Wildcard character
Description
* Search for all agents. Use also for multiple agents with identical characters. For example, *smith will find all agents with anything containing the letters smith.
? Search for a single character within an agent login.
, Search for multiple agents by their exact login names, separated by commas.
1 9 - 2 3 6

Agent control functions
............................................................................................................................................................................................................................................................
............................................................................................................................................................................................................................................................Find an agent
Find an agent Use the following procedure to find an agent.
...........................................................................................................................................................................
1 On the Monitor button bar, click Agent, and then click Find Agent.The Find Agent dialog box appears.
...........................................................................................................................................................................
2 Type the name of an agent or use wildcard characters to select multiple agents.
...........................................................................................................................................................................
3 Use scope selectors to filter information.
...........................................................................................................................................................................
4 Click Find.Agent names appear in the lower section of the Find Agent dialog box.
1 9 - 2 3 7

Agent control functions
...........................................................................................................................................................................................................................................................
............................................................................................................................................................................................................................................................Transfer an agent to another job
Transfer an agent toanother job
Use the following procedure to transfer an agent to another job.
...........................................................................................................................................................................
1 Find the agent or agents that you want to transfer to another job.
...........................................................................................................................................................................
2 Select one or more agents in the Find Agent dialog box.
...........................................................................................................................................................................
3 Click Transfer Agent.A list of currently running jobs appears.
...........................................................................................................................................................................
4 Select the job to transfer the agent to, and then click OK.
NoteYou may not see the agent transfer immediately. Factors such as agent talk time and update time may affect how quickly the agent transfers.
1 9 - 2 3 8

Agent control functions
............................................................................................................................................................................................................................................................
............................................................................................................................................................................................................................................................Send message to an agent
Send message to an agent Use the following procedure to send a message to an agent.
...........................................................................................................................................................................
1 Find the agent or agents to whom you want send a message.
...........................................................................................................................................................................
2 Select one or more agents in the Find Agent dialog box.
...........................................................................................................................................................................
3 Click Send Message.The Send Message dialog box appears.
...........................................................................................................................................................................
4 Type the message to send to an agent, and then click OK.
1 9 - 2 3 9
Agent control functions
...........................................................................................................................................................................................................................................................
............................................................................................................................................................................................................................................................Monitor agent line
Monitor agent line Use the following procedure to monitor an agent line.
...........................................................................................................................................................................
1 Find the agent that you want to monitor.
...........................................................................................................................................................................
2 Select the agent in the Find Agent dialog box.
...........................................................................................................................................................................
3 Click Monitor Agent.A dialog box appears.
...........................................................................................................................................................................
4 Enter headset ID number, and then click OK.
1 9 - 2 4 0

Agent control functions
............................................................................................................................................................................................................................................................
............................................................................................................................................................................................................................................................Remove an agent from a job
Remove an agent from ajob
Use the following procedure to immediately disconnect an agent from a call. Use this option only for emergencies when the agent cannot use a normal disconnect method. Remove Agent immediately removes the agent from the job and logs the agent out of the Avaya PDS.
...........................................................................................................................................................................
1 Find the agent or agents that you want to remove from a job.
...........................................................................................................................................................................
2 Select one or more agents in the Find Agent dialog box.
...........................................................................................................................................................................
3 Click Remove Agent.The system prompts you, “Are you sure you want to remove this agent from the current job?”
...........................................................................................................................................................................
4 Click Yes to remove the agent, or click No to close the message box without removing the agent.
1 9 - 2 4 1

Agent control functions
...........................................................................................................................................................................................................................................................
............................................................................................................................................................................................................................................................Show an agent view
Show an agent view From the Find Agent dialog box, display an agent view for a selected agent. Choose from the Agent Detail, Agent Completion Codes, and Agent History views.
...........................................................................................................................................................................
1 Find the agent for whom you want see a view.
...........................................................................................................................................................................
2 Select the agent in the Find Agent dialog box.
...........................................................................................................................................................................
3 Click the Show an agent view arrow.A list of available views appears.
...........................................................................................................................................................................
4 Select Agent Detail, Agent Completion Codes, or Agent History, and then click OK.The selected view for the selected agent appears.
1 9 - 2 4 2
20 Analyst
............................................................................................................................................................................................................................................................
............................................................................................................................................................................................................................................................Overview
Purpose AvayaTM Predictive Dialing System (PDS) Analyst (Analyst) generates call management reports with job, agent, and system details based on Avaya PDS activity.
Contents This section contains the following topics:• Reports• Report categories• Preview a report• Export a report• Create a new report configuration• Schedule a report• Change a report• Print a report• Delete a report configuration
2 0 - 2 4 3
Analyst
...........................................................................................................................................................................................................................................................
............................................................................................................................................................................................................................................................Reports
Overview Reports provide statistical information that you can use to evaluate your calling campaigns. For example, reports can show you how agents spend their time, which completion codes are most frequently used, the amount of time a particular job ran, and the hierarchy of managers and agents.In Analyst, reports are grouped into seven categories: Agent, Job, Time of Day, Administrative, Agent Monthly, Job Monthly, and Time of Day Monthly. For each category, Analyst provides several reports. For example, the Agent category include reports about agent activity, performance summary, and completion code summary. For each report, Analyst provides several variations or configurations. The different configurations sort, group, and filter data differently.
2 0 - 2 4 4
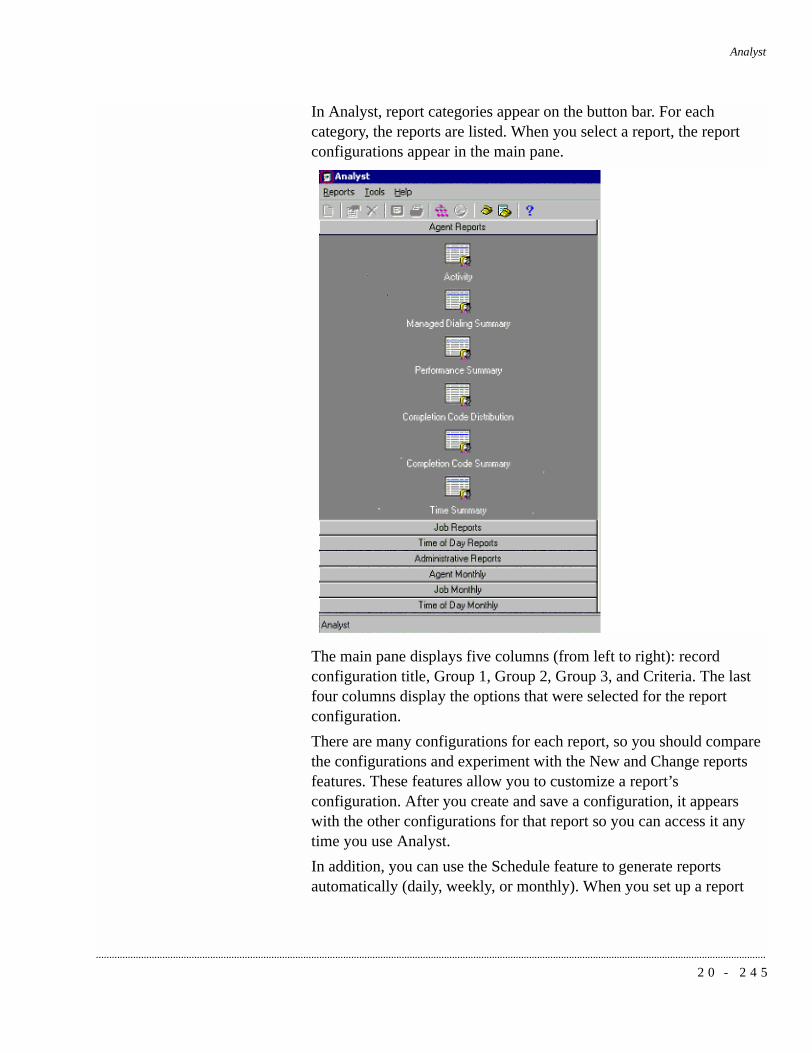
Analyst
............................................................................................................................................................................................................................................................
In Analyst, report categories appear on the button bar. For each category, the reports are listed. When you select a report, the report configurations appear in the main pane.
The main pane displays five columns (from left to right): record configuration title, Group 1, Group 2, Group 3, and Criteria. The last four columns display the options that were selected for the report configuration.There are many configurations for each report, so you should compare the configurations and experiment with the New and Change reports features. These features allow you to customize a report’s configuration. After you create and save a configuration, it appears with the other configurations for that report so you can access it any time you use Analyst.In addition, you can use the Schedule feature to generate reports automatically (daily, weekly, or monthly). When you set up a report
2 0 - 2 4 5

Analyst
...........................................................................................................................................................................................................................................................
schedule, you specify the exact time that Avaya PDS sends the report to your printer.
2 0 - 2 4 6

Analyst
............................................................................................................................................................................................................................................................
............................................................................................................................................................................................................................................................Report categories
Report categories Analyst reports fall under the following categories: Agent, Job, Time of Day, and Administrative.
Agent reports Agent reports present statistics on both an agent’s work time (such as total work, update, and idle time) and performance (such as total connects and connects per hour).
Job reports Job reports present job statistics by job type: inbound, outbound, or blend. These reports include statistics about how the system ran a job, system information on calling activity, and statistics about combined agent activity during a job.Several job report configurations also group statistics by system to accommodate a multi-dialer environment.
Time of Day reports Time of day reports present job information grouped by time segments. Time of Day reports let you evaluate job performance at intervals of 60, 30, 20, 15, 10, or 5 minutes. The interval is set when your system is installed.The data in any reported interval includes only calls that ended during that interval. For example, if an agent started talking to a customer at 12:29 and ended the call with a Promise to Pay at 12:32, the total talk time, update time, idle time, the PTP completion code count and all other data associated with that transaction would be added to the 12:30-1:00 interval.Several Time of Day report configurations also group statistics by system to accommodate a multi-dialer environment.
Administrative reports Administrative reports present information about the hierarchies created using Hierarchy Manager.
Agent Monthly Agent Monthly reports present monthly statistics on both an agent’s work time (such as total work, update, and idle time) and performance (such as total connects and connects per hour).
Job Monthly Job Monthly reports present monthly job statistics by job type: inbound, outbound, or blend. These reports include statistics about how the system ran a job, system information on calling activity, and statistics about combined agent activity during a job.
2 0 - 2 4 7
Analyst
...........................................................................................................................................................................................................................................................
Several job report configurations also group statistics by system to accommodate a multi-dialer environment.
Time of Day Monthly Time of Day Monthly reports present monthly job information grouped by time segments. Time of Day Monthly reports let you evaluate job performance at intervals of 60, 30, 20, 15, 10, or 5 minutes. The interval is set when your system is installed.
NoteMonthly Agent, Job, and Time of Day reports roll-up all agent, job, and time of day data respectively. For these reports only, all data is combined--regardless of type. For example, if you are viewing an Agent Monthly report, all Job types are combined together. As such, it is important to consider the different types of Jobs that have been run during the roll-up period. For example, if Outbound and Managed jobs have been completed, it is important to consider that Connects in an Outbound job are "live" calls passed to agents, whereas, in a Managed job, Connects are the total number of records previewed by the agent.
Managed Dialing reports Agent, Job, and Time of Day report groups include reports designed for Managed Dialing jobs. Analyst handles connect and online time statistics for Managed Dialing jobs differently than it does for regular (outbound, inbound, and blend) jobs.The following table summarizes the differences between regular and Managed Dialing reports with regard to the connect and online time statistics.
By default, reports for regular jobs do not contain statistics for Managed Dialing jobs. Regular job reports contain criteria to include statistics where job type is outbound (OUT), inbound (INB), or blend (BLND). If you want a report to include both Managed Dialing and regular job statistics, use the Analyst report wizard to remove the
Statistic Regular job Managed Dialing job
Connect An agent is connected to a call placed by the Avaya PDS.
An agent previewed a record and did not cancel the call.
Online time Amount of time an agent waited for connects, talked to customers, and updated records.
Regular job online time plus the time an agent previewed records.
2 0 - 2 4 8

Analyst
............................................................................................................................................................................................................................................................
criteria. On page 4 of the wizard, remove the Job Type condition and its associated values.
NoteIf you generate a report that combines statistics from both regular and Managed Dialing jobs, the numbers for online time and connects statistics might be skewed because of the differences in how those statistics are calculated.
Agent Completion CodeSummary reports
The Completion Code Summary report in the Agent report group contains statistics about completion codes the agents used during jobs. The report displays up to 14 completion codes. You can control which codes appear on the report.Analyst selects the first 14 completion codes for which the first character of the description is an asterisk (*). (Analyst selects codes in numerical order.) Use Completion Code Manager to add an asterisk to the descriptions of the completion codes that you want the Agent Completion Code Summary report to include. If you add an asterisk to more than 14 completion code descriptions, Analyst selects the first 14 codes and disregards the rest.In the report, the description appears in a narrow, three-line column (the asterisk does not appear in the report). Consider modifying long descriptions so that they are more readable when you view the report. For example, possible abbreviations for a Promise to Pay description include Prom to Pay or PTP.
NoteIf you are operating in a multi-dialer environment, Analyst can use the Completion Code Manager settings from any dialer.
2 0 - 2 4 9

Analyst
...........................................................................................................................................................................................................................................................
............................................................................................................................................................................................................................................................Preview a report
Preview a report When you preview a report, Analyst launches a report viewer that lets you view, print, and export a report.
...........................................................................................................................................................................
1 Select Start > Programs > Avaya > Campaign Director > Analyst.
...........................................................................................................................................................................
2 Select a report category on the button bar.
...........................................................................................................................................................................
3 Select a report in the button bar.
...........................................................................................................................................................................
4 Select a report configuration.
...........................................................................................................................................................................
5 Select Reports > Preview.Analyst displays the report in a new window.
2 0 - 2 5 0

Analyst
............................................................................................................................................................................................................................................................
............................................................................................................................................................................................................................................................Export a report
Export a report Export a report to use or view the data in a different application.
...........................................................................................................................................................................
1 Select a report category on the button bar.
...........................................................................................................................................................................
2 Select a report in the button bar.
...........................................................................................................................................................................
3 Select a report configuration in the main pane.
...........................................................................................................................................................................
4 Select Reports > Preview.Analyst displays the report.
...........................................................................................................................................................................
5 Click Export.
...........................................................................................................................................................................
6 From the Format list, select a format.
...........................................................................................................................................................................
7 Click OK.
2 0 - 2 5 1
Analyst
...........................................................................................................................................................................................................................................................
............................................................................................................................................................................................................................................................Create a new report configuration
Overview Create a new report configuration to define your preferred grouping (affects the indentation of your information and the hierarchical layout), timeframe (tells Analyst the time frame you want the report to cover), filtering (set the conditions that tell Analyst to include only specific information in your report), and title (specifies a title for your report configuration).The New menu item is unavailable until you select a report in the button bar. When you finish creating the configuration, it appears with the title you specify as the last item in the list of report configurations.
Create a new report When you select New, the Analyst Report Wizard appears and guides you through the configuration process.
...........................................................................................................................................................................
1 Select a report category on the button bar.
...........................................................................................................................................................................
2 Select Reports > New.The Analyst Report Wizard appears.
...........................................................................................................................................................................
3 Read the Welcome screen, and then click Next.
...........................................................................................................................................................................
4 In the Data Grouping wizard page, use the drop-down lists to group your information, and then click Next.
2 0 - 2 5 2

Analyst
............................................................................................................................................................................................................................................................
For example, if you choose the following options:
The report would look like the following sample report (notice how month, week, and date are indented based on your data grouping selections):
If you select a hierarchy branch as a group criteria, you must select the hierarchy name as a selection criteria (page 4 of the Analyst Report Wizard).
2 0 - 2 5 3

Analyst
...........................................................................................................................................................................................................................................................
...........................................................................................................................................................................
5 In the Date Criteria wizard page, set the date conditions for the report selection formula, and then click Next. For example, if you select the following options:
The report will look like the following sample report (notice that the date at the top of the page contains a single date: yesterday’s date):
...........................................................................................................................................................................
6 In the Additional Report Criteria wizard page, filter your data. If you leave these settings blank (which is common), then you would not narrow the data selected by the report. Select your conditions, and then
2 0 - 2 5 4

Analyst
............................................................................................................................................................................................................................................................
click Next. Consider the following example, filters data based on Job Name:
The report would include only data for the job named mytest.If you selected a hierarchy branch as a group criteria (on page 2 of the wizard), you must select the hierarchy as a selection condition.
2 0 - 2 5 5

Analyst
...........................................................................................................................................................................................................................................................
...........................................................................................................................................................................
7 In the Report Title wizard page, type a name your report configuration. For example, if you typed the following title in the title field:
The report will look like the following sample report (notice the title just below the Analyst heading):
...........................................................................................................................................................................
8 Click Preview to generate and view the report or click Finish to end the wizard (you can make changes to it later by using the Change
2 0 - 2 5 6

Analyst
............................................................................................................................................................................................................................................................
command). After you click Finish, your report configuration appears as the last item in the list of report configurations.
NoteYou can only have one wizard running at a time.
2 0 - 2 5 7

Analyst
...........................................................................................................................................................................................................................................................
............................................................................................................................................................................................................................................................Schedule a report
Schedule a report Use the following procedure to schedule a time to print reports automatically. After you have scheduled a report, you can look in the Control Panel to view your scheduled reports: Start > Settings > Control Panel...“Scheduled Tasks” option.
...........................................................................................................................................................................
1 In Analyst, select a report configuration to schedule.
...........................................................................................................................................................................
2 Select Tools > Scheduler.
...........................................................................................................................................................................
3 In the Schedule dialog box, select the frequency option that corresponds with how often you want to print the report (Once, Daily, Weekly, Monthly).If you select Weekly or Monthly, the report will print on Monday only. If you want to choose a different week day, use MS Scheduler to change the day. The settings that you specify in MS Scheduler override the Analyst schedule.
...........................................................................................................................................................................
4 Select a start time and date.
...........................................................................................................................................................................
5 Type the number of copies you want the Avaya PDS to print, and then click OK.
2 0 - 2 5 8

Analyst
............................................................................................................................................................................................................................................................
............................................................................................................................................................................................................................................................Change a report
Change a report If there is an existing report configuration that you need to modify, use the Change command to alter it.
...........................................................................................................................................................................
1 Select a report configuration.
...........................................................................................................................................................................
2 Select Reports > Change.The Analyst Report Wizard appears.
...........................................................................................................................................................................
3 Read the Welcome page, and then click Next.
...........................................................................................................................................................................
4 Follow the on-screen instructions to change the report criteria.
2 0 - 2 5 9

Analyst
...........................................................................................................................................................................................................................................................
............................................................................................................................................................................................................................................................Print a report
Print a report Use the following procedure to print a Analyst report.
...........................................................................................................................................................................
1 Select a report configuration.
...........................................................................................................................................................................
2 Select Reports > Print.
...........................................................................................................................................................................
3 Type the number of copies you want to print, and then click OK.
2 0 - 2 6 0

Analyst
............................................................................................................................................................................................................................................................
............................................................................................................................................................................................................................................................Delete a report configuration
Delete a reportconfiguration
Use the following procedure to delete a Analyst report configuration.
...........................................................................................................................................................................
1 Select a report configuration.
...........................................................................................................................................................................
2 Select Reports > Delete.
...........................................................................................................................................................................
3 Click Yes to delete the report configuration, or click No to close the message box without deleting the report configuration.
2 0 - 2 6 1

Analyst
...........................................................................................................................................................................................................................................................
2 0 - 2 6 2

Part III: Tools
............................................................................................................................................................................................................................................................

............................................................................................................................................................................................................................................................

21 Hierarchy Manager
............................................................................................................................................................................................................................................................
............................................................................................................................................................................................................................................................Overview
Purpose Hierarchy Manager is a tool to help you group and organize data. Hierarchy Manager lets you create agent, job, or dialer hierarchies that reflect the way your company or business is organized. For example, you can create relationships between the Avaya™ Predictive Dialing System (PDS) agents and the management structure of a company. You can use hierarchies in Avaya PDS Monitor (Monitor) to adjust the scope of data to view and in Analyst to group data in reports.
Contents This section contains the following topics:• Hierarchies• Start Hierarchy Manager• Create a hierarchy• Open a hierarchy• Add a level to a hierarchy• Add a data item to a hierarchy• Move a level or item within a hierarchy• Rename a hierarchy level• Remove a level from a hierarchy• Remove a data item from a hierarchy
2 1 - 2 6 5

Hierarchy Manager
...........................................................................................................................................................................................................................................................
• Rename a hierarchy• Delete a hierarchy
2 1 - 2 6 6
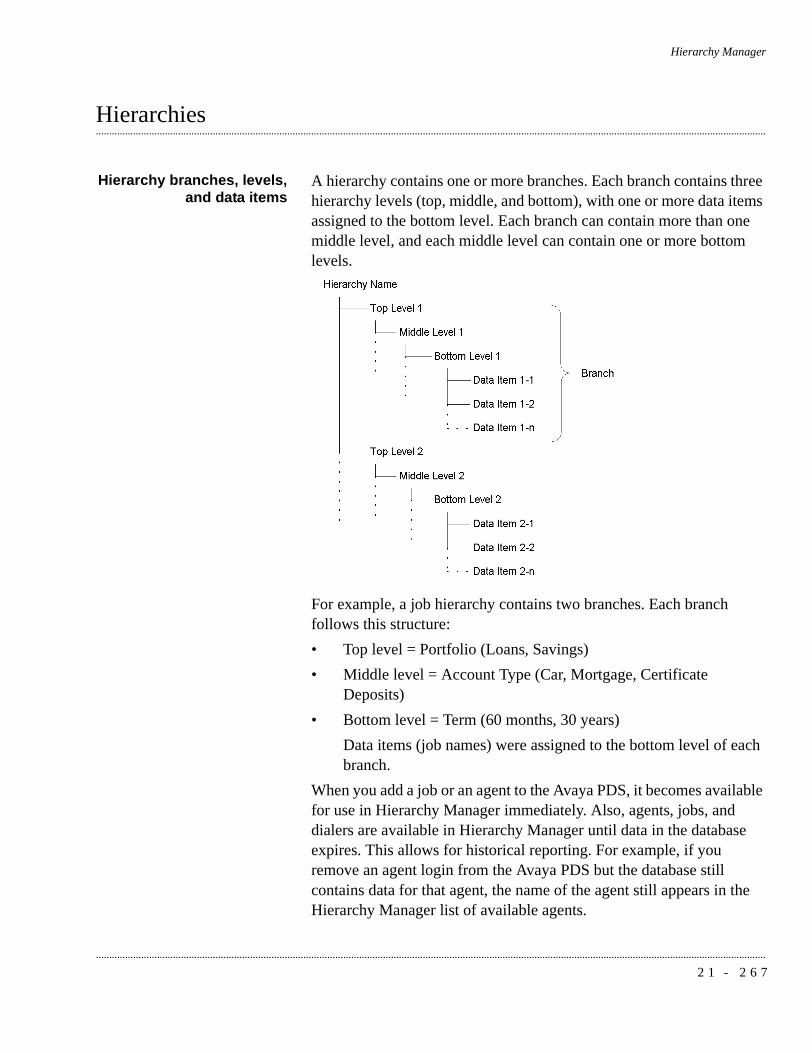
Hierarchy Manager
............................................................................................................................................................................................................................................................
............................................................................................................................................................................................................................................................Hierarchies
Hierarchy branches, levels,and data items
A hierarchy contains one or more branches. Each branch contains three hierarchy levels (top, middle, and bottom), with one or more data items assigned to the bottom level. Each branch can contain more than one middle level, and each middle level can contain one or more bottom levels.
For example, a job hierarchy contains two branches. Each branch follows this structure:• Top level = Portfolio (Loans, Savings)• Middle level = Account Type (Car, Mortgage, Certificate
Deposits)• Bottom level = Term (60 months, 30 years)
Data items (job names) were assigned to the bottom level of each branch.
When you add a job or an agent to the Avaya PDS, it becomes available for use in Hierarchy Manager immediately. Also, agents, jobs, and dialers are available in Hierarchy Manager until data in the database expires. This allows for historical reporting. For example, if you remove an agent login from the Avaya PDS but the database still contains data for that agent, the name of the agent still appears in the Hierarchy Manager list of available agents.
2 1 - 2 6 7
Hierarchy Manager
...........................................................................................................................................................................................................................................................
Hierarchy Manager supports three hierarchy types: agent, job, and dialer.
Agent hierarchies An agent hierarchy creates statistical relationships for individual agent activity and performance data that the Avaya PDS collects during calling activities. Activity and performance data examples include Talk Time, Idle Time, and Connects per Hour.For example, an agent hierarchy can represent the management structure of a company. Top, middle, and bottom levels represent directors, managers, and supervisors, respectively. Agents are assigned to each supervisor. Monitor can use this hierarchy to group agent activity and performance data by supervisor.Agent hierarchies are most effectively applied when monitoring agent views in Monitor and when grouping data in Analyst agent reports.
Job hierarchies A job hierarchy creates statistical relationships for individual job activity data that the Avaya PDS collects during calling activities. Examples of job activity data include Calls Placed, Connects per Hour, and Time in Wait Queue.In a multi-dialer environment, job hierarchies apply to all jobs across all dialers unless you make all jobs unique across all dialers or create a dialer-job relationship outside of Hierarchy Manager. For example, when you create a job, include a reference to the dialer in the job name such as job1_dialer1.Job hierarchies are most effectively applied when monitoring job views in Monitor and when grouping data in Analyst job reports.
Dialer hierarchies A dialer hierarchy creates relationships for individual dialer activity data that the Avaya PDS collects during calling activities. Dialer activity includes all available job and agent activity and performance data.For example, in a four-dialer pod environment, the collections department uses dialer1 and dialer2 and the marketing department uses dialer3 and dialer4. A hierarchy branch could contain a level for department with individual dialers assigned to the level. Dialer hierarchies let you meaningfully group data by department and dialer.
2 1 - 2 6 8
Hierarchy Manager
............................................................................................................................................................................................................................................................
............................................................................................................................................................................................................................................................Start Hierarchy Manager
Start Hierarchy Manager Hierarchy Manager can be accessed from the Tools menu in either Monitor or Analyst. Use the following procedure to access the Hierarchy Manager.
...........................................................................................................................................................................
1 Select Start > Programs > Avaya > Campaign Director > Monitor or Analyst.
...........................................................................................................................................................................
2 Select Tools > Hierarchy Manager. The Hierarchy Manager window appears.
2 1 - 2 6 9

Hierarchy Manager
...........................................................................................................................................................................................................................................................
............................................................................................................................................................................................................................................................Create a hierarchy
Overview Create an agent, job, or dialer hierarchy based on the hierarchy type you select. When you create a new hierarchy, you add top, middle, and bottom hierarchy levels and assign data items. If you name two like levels the same under one parent level, Hierarchy Manager combines them. For example, if a hierarchy middle level contains two bottom levels named Supervisor, Hierarchy Manager combines all data items assigned to both Supervisor levels and removes the duplicate level.
Create a hierarchy Use the following procedure to create a hierarchy.
...........................................................................................................................................................................
1 On the button bar, click Agent Hierarchies, Job Hierarchies, or Dialer Hierarchies depending on the type of hierarchy you want to create.
...........................................................................................................................................................................
2 Select Hierarchy > New. Hierarchy Manager displays a new hierarchy including a default structure.The Available list contains agent, job, or dialer names depending on which hierarchy type you selected.
...........................................................................................................................................................................
3 Add hierarchy levels.To add a hierarchy level, right-click the level above where you want to add a level, and then select Add Level. Hierarchy Manager inserts a level named New Level.
...........................................................................................................................................................................
4 Rename the new level.Right-click New Level, select Rename, type a new name (up to 20 characters), and then press Enter.
...........................................................................................................................................................................
5 Repeat steps 3 and 4 for each level you want to add to the hierarchy.
...........................................................................................................................................................................
6 Add data items.Drag and drop an item from the Available list onto the bottom level of the branch to which you want to add it.
2 1 - 2 7 0

Hierarchy Manager
............................................................................................................................................................................................................................................................
After an item is added to the hierarchy, Hierarchy Manager moves the data item from the Available list to the Allocated list.
...........................................................................................................................................................................
7 Select Hierarchy > Save to save the hierarchy settings.Hierarchy Manager does not save branches that do not contain data items. Empty branches will no longer appear in the hierarchy after you close and restart Hierarchy Manager.
...........................................................................................................................................................................
8 In the Hierarchy Properties dialog box, type a name (up to 64 characters) for the hierarchy, and then click OK.Hierarchy Manager saves the hierarchy settings.
2 1 - 2 7 1
Hierarchy Manager
...........................................................................................................................................................................................................................................................
............................................................................................................................................................................................................................................................Open a hierarchy
Open a hierarchy Use the following procedure to open a hierarchy that you want to view or change.
...........................................................................................................................................................................
1 On the button bar, click Agent Hierarchies, Job Hierarchies, or Dialer Hierarchies depending on the type of hierarchy you want to open.A list of hierarchies appears in the button bar for the selected hierarchy type.
...........................................................................................................................................................................
2 Select a hierarchy.The selected hierarchy appears.
2 1 - 2 7 2
Hierarchy Manager
............................................................................................................................................................................................................................................................
............................................................................................................................................................................................................................................................Add a level to a hierarchy
Hierarchy levels To build your organizational structure in Hierarchy Manager, you add levels to a hierarchy. Each branch in a hierarchy contains three levels: top, middle, and bottom. When you add a level, Hierarchy Manager adds a level that is subordinate to the selected level. For example, if you add a level to a top level item, Hierarchy Manager adds a middle level item. To add a top level item, add a level to the hierarchy name.A hierarchy can contain one or more top levels. Each hierarchy branch (top level) can contain one or more middle levels. Each middle level can contain one or more bottom levels. Bottom levels can contain only data items. No other level can contain data items.If you name two like levels the same under one parent level, Hierarchy Manager combines them. For example, if a middle level contains two bottom levels named Supervisor, Hierarchy Manager combines all data items assigned to both Supervisor levels into one level and removes the duplicate level.Hierarchy Manager does not save branches that do not contain data items. Be sure that all branches contain data items before you save the hierarchy.
Add a level to a hierarchy Use the following procedure to add a level to a hierarchy.
...........................................................................................................................................................................
1 Open the hierarchy that you want to change.
...........................................................................................................................................................................
2 Right-click the level above where you want to add a level, and then select Add Level.Hierarchy Manager inserts a level named New Level.
...........................................................................................................................................................................
3 Right-click New Level, and then select Rename.
...........................................................................................................................................................................
4 Type a new name for the level (up to 20 characters), and then press Enter.
2 1 - 2 7 3

Hierarchy Manager
...........................................................................................................................................................................................................................................................
............................................................................................................................................................................................................................................................Add a data item to a hierarchy
Add a data item to ahierarchy
Use the following procedure to add data items to a hierarchy. Hierarchy Manager lets you add data items to only the bottom-most levels of the hierarchy.
...........................................................................................................................................................................
1 Open the hierarchy to which you want to add data items.
...........................................................................................................................................................................
2 Select one or more items in the Available list, and then drag the items to the appropriate level.After an item is added to the hierarchy, Hierarchy Manager moves the data item from the Available list to the Allocated list.
TipTo select two or more adjacent items in the Available list, click the first item, and then hold down Shift and click the last item.To select two or more nonadjacent items, click the first item, and then hold down Ctrl and click additional items.
2 1 - 2 7 4

Hierarchy Manager
............................................................................................................................................................................................................................................................
............................................................................................................................................................................................................................................................Move a level or item within a hierarchy
Overview As your organization changes, you might need to rearrange elements in a hierarchy to reflect the changes. You can move data items from one bottom level to another. For example, in an agent hierarchy you can move an agent from one supervisor to another. You can also move a level within a hierarchy. Items and levels that you move must maintain their same level in the hierarchy. For example, a bottom level cannot be moved to a middle level position.
Move a level or item withina hierarchy
Use the following procedure to move a level or a data item within a hierarchy.
...........................................................................................................................................................................
1 Open the hierarchy that you want to change.
...........................................................................................................................................................................
2 Select the level or data item that you want to move, and then drag it to the hierarchy level above where you want the level or item to be listed.
...........................................................................................................................................................................
3 Repeat step 2 for each level or item that you want to move.
2 1 - 2 7 5

Hierarchy Manager
...........................................................................................................................................................................................................................................................
............................................................................................................................................................................................................................................................Rename a hierarchy level
Overview Hierarchy Manager lets you rename levels in a hierarchy to reflect organizational changes. If you name two like levels the same under one parent level, Hierarchy Manager combines them. For example, if a hierarchy middle level contains two bottom levels named Supervisor, Hierarchy Manager combines all data items assigned to both Supervisor levels into one level and removes the duplicate level.
Rename a hierarchy level Use the following procedure to rename a hierarchy level.
...........................................................................................................................................................................
1 Open the hierarchy in which you want to rename a level.
...........................................................................................................................................................................
2 Right-click the hierarchy level name that you want to change, and then select Rename.
...........................................................................................................................................................................
3 Type a new name for the level (up to 20 characters), and then press Enter.
2 1 - 2 7 6

Hierarchy Manager
............................................................................................................................................................................................................................................................
............................................................................................................................................................................................................................................................Remove a level from a hierarchy
Overview As your organization changes, you can use Hierarchy Manager to reflect those changes in your hierarchies. You can remove a level from your hierarchy to better represent your organization. To remove a top or middle hierarchy level that contains a bottom level with data items, you must first delete the bottom level (and data items).
Remove a level from ahierarchy
Use the following procedure to remove a level from a hierarchy.
...........................................................................................................................................................................
1 Open the hierarchy from which you want to remove a level.
...........................................................................................................................................................................
2 Right-click the level that you want to remove, and then select Delete.If the level you select to remove contains data items, Hierarchy Manager asks you if you want to delete the selected level and all the agents associated with that level.
...........................................................................................................................................................................
3 Click Yes to delete the level.Hierarchy Manager removes the level and moves the data items from the Allocated list to the Available list.
2 1 - 2 7 7

Hierarchy Manager
...........................................................................................................................................................................................................................................................
............................................................................................................................................................................................................................................................Remove a data item from a hierarchy
Remove a data item from ahierarchy
Remove a data item from a hierarchy when the item no longer meets your organizational needs. You can remove individual data items as described in the following procedure. You can also remove all the data items assigned to a bottom level by removing the bottom level.
...........................................................................................................................................................................
1 Open the hierarchy from which you want to remove one or more data items.
...........................................................................................................................................................................
2 Right-click a data item that you want to remove, and then select Delete.Hierarchy Manager removes the data item from the hierarchy, and moves the data item from the Allocated list to the Available list.
...........................................................................................................................................................................
3 Repeat step 2 for each data item you want to remove.
2 1 - 2 7 8
Hierarchy Manager
............................................................................................................................................................................................................................................................
............................................................................................................................................................................................................................................................Rename a hierarchy
Rename a hierarchy Use the following procedure to rename a hierarchy.
...........................................................................................................................................................................
1 Open the hierarchy that you want to change.
...........................................................................................................................................................................
2 Select Hierarchy > Save As.
...........................................................................................................................................................................
3 In the Hierarchy Properties dialog box, type a unique name for the hierarchy.A hierarchy name can contain up to 64 characters and can include the following special characters: parentheses ( ), comma (,), hyphen (-), dollar sign ($), and the pound sign (#).
...........................................................................................................................................................................
4 Click OK.Hierarchy Manager saves the hierarchy settings with the new name.
2 1 - 2 7 9
Hierarchy Manager
...........................................................................................................................................................................................................................................................
............................................................................................................................................................................................................................................................Delete a hierarchy
Delete a hierarchy As your organization changes, you might decide to no longer use a particular hierarchy. You can delete a hierarchy from Hierarchy Manager.
...........................................................................................................................................................................
1 Open the hierarchy that you want to change.
...........................................................................................................................................................................
2 Select Hierarchy > Delete.Hierarchy Manager asks you to confirm the delete action.
...........................................................................................................................................................................
3 Click Yes to delete the hierarchy.Hierarchy Manager removes the selected hierarchy.
2 1 - 2 8 0
22 Completion Code Manager
............................................................................................................................................................................................................................................................
............................................................................................................................................................................................................................................................Overview
Purpose The AvayaTM Predictive Dialing System (PDS) uses Completion Code Manager to categorize completion codes as Right Party Contacts (RPCs), Abandons, and Closures.
Contents This section contains the following topics:• Completion code categories• Start Completion Code Manager• Set a completion code as RPC• Set a completion code as a Closure• Set a completion code as an Abandon• Remove a completion code• Change a completion code description• View Completion Code Manager for another dialer
2 2 - 2 8 1

Completion Code Manager
...........................................................................................................................................................................................................................................................
............................................................................................................................................................................................................................................................Completion code categories
Overview During an Avaya PDS job, agents use a completion code to indicate the outcome of a call, such as Promise to Pay or Left Message. You can categorize completion codes for monitoring and reporting purposes with Completion Code Manager.
Completion codecategories
There are three completion code categories: RPC (Right Party Contact), Closure, and Abandon.
RPC indicates the agent called and talked to the correct party. This designation may overlap with the Closure designation.
Closure indicates that the agent called and talked to a party. Closure can represent a variety of outcomes, including the following examples:• Balance paid in full• Bankruptcy• Deceased• Sale verified and completedThis designation may overlap with the RPC designation.
Abandon indicates that a call has been abandoned and the Avaya PDS has disconnected the call. An abandon can be caused by one of several events:• An inbound caller hung up in the inbound wait queue• A customer hung up while in the outbound wait queue• The time limit for a call being held in a queue was met
2 2 - 2 8 2

Completion Code Manager
............................................................................................................................................................................................................................................................
Completion codeassignments
You can assign a completion code to more than one category. For example, you can classify a verified sale as an RPC and a Closure. The following illustration shows sample completion code assignments.
Multi-dialer environment Completion Code Manager lets you change the completion code description and code designation for your completion codes. However, if the multi-dialer feature is enabled on your system, you must take one of the following two actions:• Make the identical changes on each dialer’s set of completion
codes• Copy the completion code file to each dialer
Completion codedesignation changes
When an Avaya PDS job starts, it applies the current Completion Code Manager settings. If you make changes to code designations (RPC, Closure, or Abandon) while a job is running, you need to restart the job to apply your new code designation changes.
Completion codedescriptions
If you change one or more completion code descriptions in Completion Code Manager, Monitor automatically updates to use the new descriptions. You do not need to restart a job for the Avaya PDS to recognize new descriptions.If you use the Analyst Agent Completion Code Summary report, you need to designate which codes you want to appear on the report. Insert an asterisk (*) as the first character of the description for each
2 2 - 2 8 3

Completion Code Manager
...........................................................................................................................................................................................................................................................
completion code you want to include in the report. You can define up to 14 codes. If you define more than 14 codes, Analyst uses the first 14 codes (in numerical order) and disregards the remaining designated codes.
2 2 - 2 8 4
Completion Code Manager
............................................................................................................................................................................................................................................................
............................................................................................................................................................................................................................................................Start Completion Code Manager
Start Completion CodeManager
You can start Completion Code Manager from Editor, Monitor, or Analyst. Use the following procedure to start Completion Code Manager.
...........................................................................................................................................................................
1 Select Start > Programs > Avaya > Campaign Director > Editor, Monitor or Analyst.
...........................................................................................................................................................................
2 Select Tools > Completion Code Manager. The Completion Code Manager window appears.
2 2 - 2 8 5
Completion Code Manager
...........................................................................................................................................................................................................................................................
............................................................................................................................................................................................................................................................Set a completion code as RPC
Set a completion code asRPC
Use the following procedure to set a completion code as an RPC.
...........................................................................................................................................................................
1 From the list of completion codes in the right-hand pane, select a completion code.
...........................................................................................................................................................................
2 Drag the completion code to the left-hand pane and drop it under the row labeled RPCs.
2 2 - 2 8 6

Completion Code Manager
............................................................................................................................................................................................................................................................
............................................................................................................................................................................................................................................................Set a completion code as a Closure
Set a completion code as aClosure
Use the following procedure to set a completion code as a Closure.
...........................................................................................................................................................................
1 From the list of completion codes in the right-hand pane, select a completion code.
...........................................................................................................................................................................
2 Drag the completion code to the left-hand pane and drop it under the row labeled Closures.
2 2 - 2 8 7

Completion Code Manager
...........................................................................................................................................................................................................................................................
............................................................................................................................................................................................................................................................Set a completion code as an Abandon
Set a completion code asan Abandon
Use the following procedure to set a completion code as an Abandon.
...........................................................................................................................................................................
1 From the list of completion codes in the right-hand pane, select a completion code.
...........................................................................................................................................................................
2 Drag the completion code to the left-hand pane and drop it under the row labeled Abandons.
2 2 - 2 8 8

Completion Code Manager
............................................................................................................................................................................................................................................................
............................................................................................................................................................................................................................................................Remove a completion code
Remove a completion code Use the following procedure to remove a completion code from an RPC, Closure, or Abandon category.
...........................................................................................................................................................................
1 From the list of completion codes in the left-hand pane, right-click the completion code you want to remove.
...........................................................................................................................................................................
2 Click Delete.
NoteWhen you delete the completion code from the list of categorized completion codes, the code still appears it in the right-hand pane and is available to be selected again.
2 2 - 2 8 9

Completion Code Manager
...........................................................................................................................................................................................................................................................
............................................................................................................................................................................................................................................................Change a completion code description
Change a completion codedescription
Use the following procedure to change a completion code description.
...........................................................................................................................................................................
1 From the list of completion codes in the left-hand pane of the window, double-click the Description column of the completion code you want to change.
...........................................................................................................................................................................
2 Type the new description, and then press Enter.Completion Code Manager displays the new description.
2 2 - 2 9 0
Completion Code Manager
............................................................................................................................................................................................................................................................
............................................................................................................................................................................................................................................................View Completion Code Manager for another dialer
View Completion CodeManager for another dialer
Use the following procedure to view Completion Code Manager for another dialer.
...........................................................................................................................................................................
1 Start Editor, Monitor, or Analyst.
...........................................................................................................................................................................
2 (Editor only) On the button bar, select the dialer you want to view.
...........................................................................................................................................................................
3 Select Tools > Call Completion Codes.In Editor, the Completion Code Manager window for the selected dialer appears.
...........................................................................................................................................................................
4 (Monitor and Analyst) Select a dialer from the Dialer dialog box, and then click OK.The Completion Code Manager window for the selected dialer appears.
2 2 - 2 9 1

Completion Code Manager
...........................................................................................................................................................................................................................................................
2 2 - 2 9 2

23 PC Analysis Telnet
............................................................................................................................................................................................................................................................
............................................................................................................................................................................................................................................................Overview
Purpose The PC Analysis Telnet tool provides access to the character-based PC Analysis menus. PC Analysis is a reporting and troubleshooting tool included with the AvayaTM Predictive Dialing System (PDS). The PC Analysis Telnet tool also lets you transfer extract output files to a network location.
Contents This section contains the following topics:• PC Analysis Telnet• Toolbar icons• Start PC Analysis Telnet• Transfer PC Analysis extract output files
2 3 - 2 9 3
PC Analysis Telnet
...........................................................................................................................................................................................................................................................
............................................................................................................................................................................................................................................................PC Analysis Telnet
Overview The PC Analysis Telnet tool included in Analyst provides access to the character-based PC Analysis menus, which you can use to define extract files and generate extract output files. You can also use PC Analysis Telnet to move PC Analysis extract output files from the Avaya PDS to a network location.After you transfer the extract output files, you can use spreadsheet, word processing, and reporting packages available to you to create reports, charts, and spreadsheets.PC Analysis Telnet is available from the Analyst Tools menu only. If access to Campaign Director is not available, you will need to use a third-party telnet tool to access Avaya PDS menu system and PC Analysis.
2 3 - 2 9 4
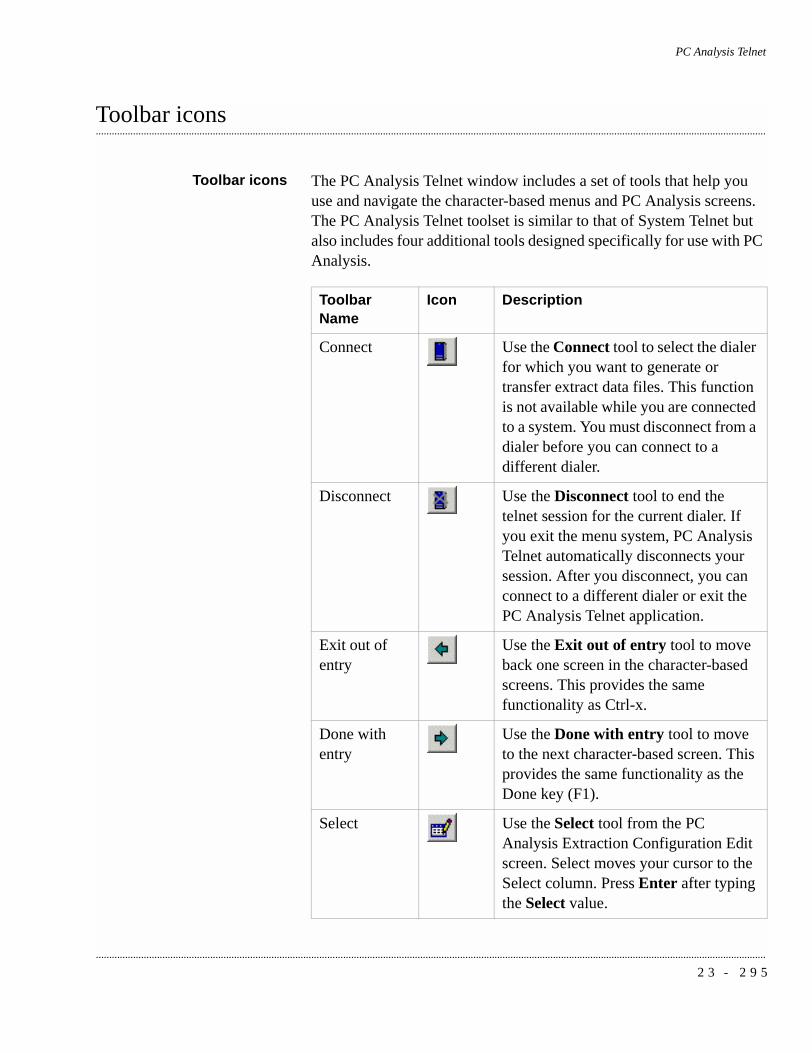
PC Analysis Telnet
............................................................................................................................................................................................................................................................
............................................................................................................................................................................................................................................................Toolbar icons
Toolbar icons The PC Analysis Telnet window includes a set of tools that help you use and navigate the character-based menus and PC Analysis screens. The PC Analysis Telnet toolset is similar to that of System Telnet but also includes four additional tools designed specifically for use with PC Analysis.
Toolbar Name
Icon Description
Connect Use the Connect tool to select the dialer for which you want to generate or transfer extract data files. This function is not available while you are connected to a system. You must disconnect from a dialer before you can connect to a different dialer.
Disconnect Use the Disconnect tool to end the telnet session for the current dialer. If you exit the menu system, PC Analysis Telnet automatically disconnects your session. After you disconnect, you can connect to a different dialer or exit the PC Analysis Telnet application.
Exit out of entry
Use the Exit out of entry tool to move back one screen in the character-based screens. This provides the same functionality as Ctrl-x.
Done with entry
Use the Done with entry tool to move to the next character-based screen. This provides the same functionality as the Done key (F1).
Select Use the Select tool from the PC Analysis Extraction Configuration Edit screen. Select moves your cursor to the Select column. Press Enter after typing the Select value.
2 3 - 2 9 5
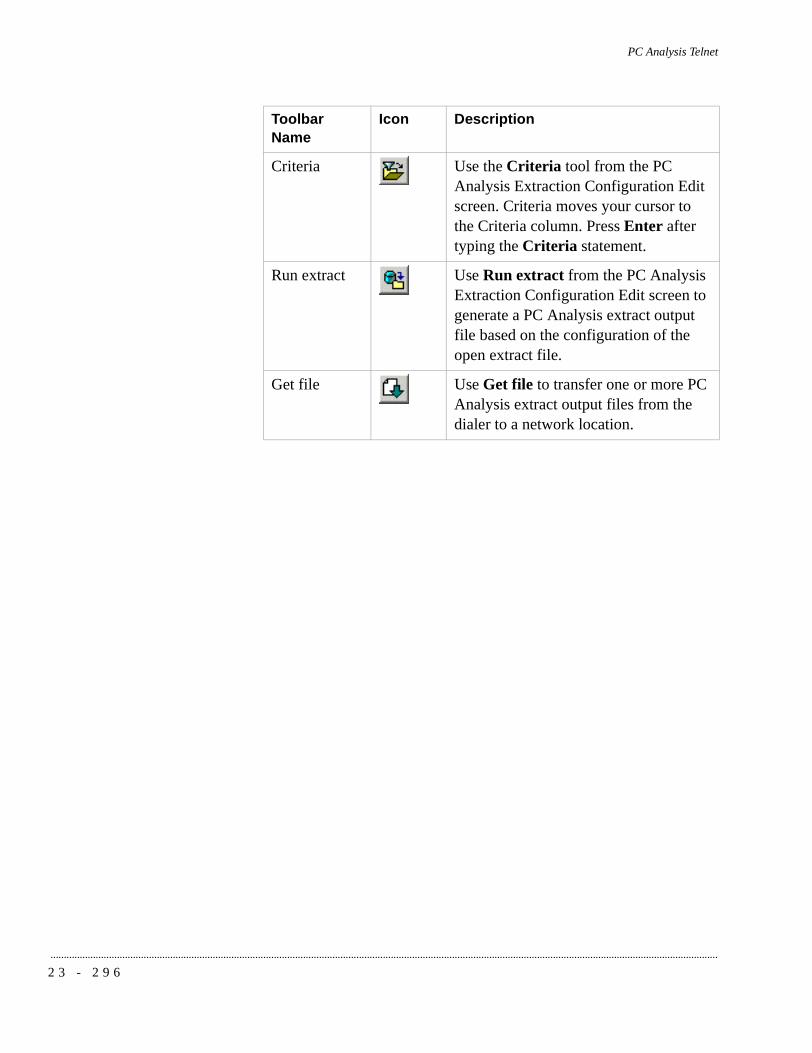
PC Analysis Telnet
...........................................................................................................................................................................................................................................................
Criteria Use the Criteria tool from the PC Analysis Extraction Configuration Edit screen. Criteria moves your cursor to the Criteria column. Press Enter after typing the Criteria statement.
Run extract Use Run extract from the PC Analysis Extraction Configuration Edit screen to generate a PC Analysis extract output file based on the configuration of the open extract file.
Get file Use Get file to transfer one or more PC Analysis extract output files from the dialer to a network location.
Toolbar Name
Icon Description
2 3 - 2 9 6

PC Analysis Telnet
............................................................................................................................................................................................................................................................
............................................................................................................................................................................................................................................................Start PC Analysis Telnet
Start PC Analysis Telnet The PC Analysis Telnet tool provides access to the PC Analysis character-based menus. Use the following procedure to start PC Analysis Telnet.
...........................................................................................................................................................................
1 Select Start > Programs > Avaya > Campaign Director > Analyst.
...........................................................................................................................................................................
2 Select Tools > PC Analysis Telnet.The PC Analysis Telnet window appears.
...........................................................................................................................................................................
3 Select File > Connect.The Connect to PDS dialog box appears.
...........................................................................................................................................................................
4 From the Name list, select the name of the dialer to which you want to connect, and then click OK.The dialer login: prompt appears in the Telnet window.
...........................................................................................................................................................................
5 Use your system or PC Analysis login to access the PC Analysis menus.
2 3 - 2 9 7

PC Analysis Telnet
...........................................................................................................................................................................................................................................................
............................................................................................................................................................................................................................................................Transfer PC Analysis extract output files
Transfer PC Analysisextract output files
Use the following procedure to transfer generated PC Analysis extract output files from an Avaya PDS to a network location or to a personal computer.
...........................................................................................................................................................................
1 Start PC Analysis Telnet.
...........................................................................................................................................................................
2 Connect to an Avaya PDS dialer.
...........................................................................................................................................................................
3 Select Tools > Get File(s)....The FTP Client dialog box appears. The name of the system to which you are connected appears in the dialog box title.
...........................................................................................................................................................................
4 Select one or more extract output files to transfer, and then click Get file.The Save As dialog box appears.
...........................................................................................................................................................................
5 Browse to the location where you want to transfer the selected extract output file, and then click Save.The system saves the file to the selected location.If you selected more than one extract output file to transfer, the Save As dialog box appears for the next file.
...........................................................................................................................................................................
6 Repeat step 5 for each extract output file you selected to transfer.After you click save for the last output file, the FTP Client dialog box appears.
...........................................................................................................................................................................
7 Click Cancel to close the FTP Client dialog box.
2 3 - 2 9 8
24 System Telnet
............................................................................................................................................................................................................................................................
............................................................................................................................................................................................................................................................Overview
Purpose The System Telnet tool provides access to the AvayaTM Predictive Dialing System (PDS) character-based user interface.
Contents This section contains the following topics:• System Telnet• Toolbar icons• Start System Telnet
2 4 - 2 9 9
System Telnet
...........................................................................................................................................................................................................................................................
............................................................................................................................................................................................................................................................System Telnet
Overview Use the System Telnet tool to access the system and administrative menus. The telnet session lets you access Avaya PDS features available through character-based menu systems. For example, you can manage user accounts, check calling list status, or manage agent job lists. You can also access some Monitor and Editor features through character-based menus.System Telnet is available from the Tools menu in Editor, Monitor, and Analyst. If access to Campaign Director is not available, you will need to use a third-party telnet tool to access Avaya PDS menu system and PC Analysis.
TIPTo access PC Analysis menus, use the PC Analysis Telnet tool in Analyst. PC Analysis Telnet includes special tools designed to help you navigate the PC Analysis extract screens.
2 4 - 3 0 0
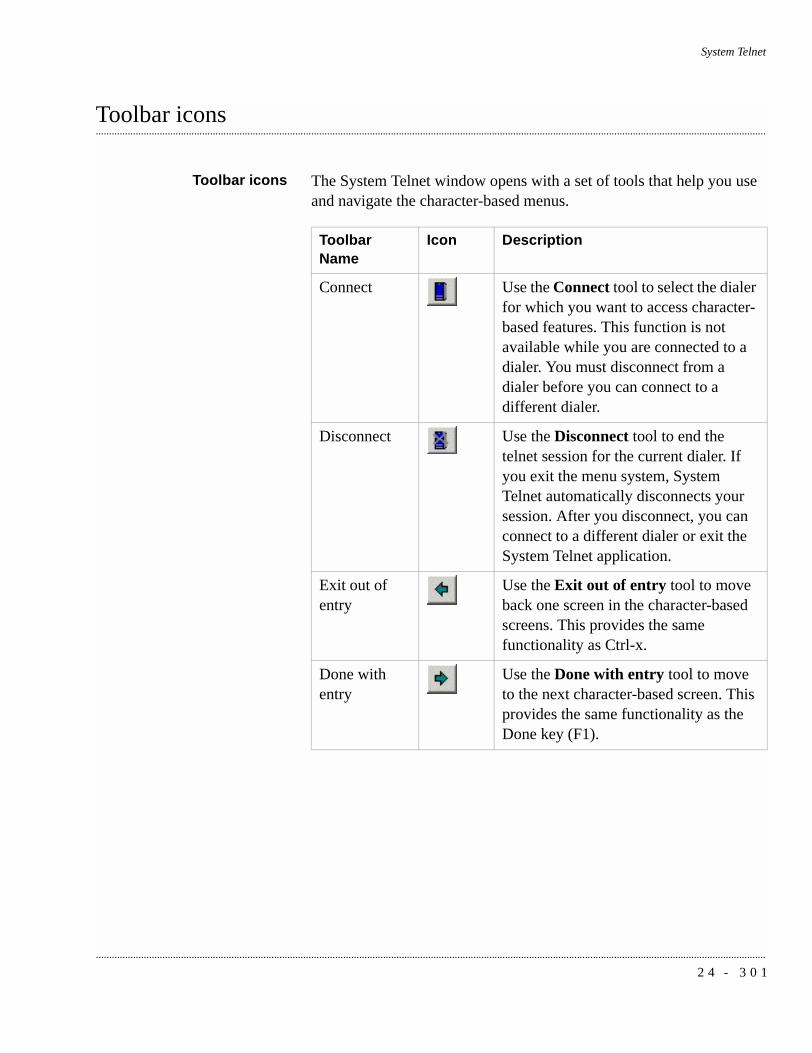
System Telnet
............................................................................................................................................................................................................................................................
............................................................................................................................................................................................................................................................Toolbar icons
Toolbar icons The System Telnet window opens with a set of tools that help you use and navigate the character-based menus.
Toolbar Name
Icon Description
Connect Use the Connect tool to select the dialer for which you want to access character-based features. This function is not available while you are connected to a dialer. You must disconnect from a dialer before you can connect to a different dialer.
Disconnect Use the Disconnect tool to end the telnet session for the current dialer. If you exit the menu system, System Telnet automatically disconnects your session. After you disconnect, you can connect to a different dialer or exit the System Telnet application.
Exit out of entry
Use the Exit out of entry tool to move back one screen in the character-based screens. This provides the same functionality as Ctrl-x.
Done with entry
Use the Done with entry tool to move to the next character-based screen. This provides the same functionality as the Done key (F1).
2 4 - 3 0 1

System Telnet
...........................................................................................................................................................................................................................................................
............................................................................................................................................................................................................................................................Start System Telnet
Start System Telnet Use the following procedure to start System Telnet to access the Avaya PDS character-based menus.
...........................................................................................................................................................................
1 Select Start > Programs > Avaya > Campaign Director > Editor, Monitor, or Analyst.
...........................................................................................................................................................................
2 Select Tools > System Telnet. A System Telnet window appears.
...........................................................................................................................................................................
3 Select File > Connect. The Connect to PDS dialog box appears.
...........................................................................................................................................................................
4 From the Name list, select the name of the dialer to which you want to connect, then click OK.The dialer login: prompt appears in the Telnet window.
...........................................................................................................................................................................
5 Type your system login and password to access the system menus or the administrator login and password to access the administrative menus.The character-based menu system associated with your user name appears in the Telnet window.
2 4 - 3 0 2

25 Agent Blending
............................................................................................................................................................................................................................................................
............................................................................................................................................................................................................................................................Overview
Purpose The Agent Blending tool allows you to manage domains (ACD call queues) and domain groups (every domain is a member of a domain group). Start the Agent Blending tool from the Monitor or Editor Tools menu.
Contents This section contains the following topics:• Agent Blending• Supported ACDs• Switch terminology• Domains• Domain Groups• Start the Agent Blending tool• Create a domain group• Create a domain• Edit domain group settings• Edit domain settings• Delete a domain group• Delete a domain• Move a domain to a different group
2 5 - 3 0 3

Agent Blending
...........................................................................................................................................................................................................................................................
• Stop the blend engine• Start the blend engine• Reset the blend engine• Resynch the blend engine• View ACD statistics• View alerts• View transactions
2 5 - 3 0 4

Agent Blending
............................................................................................................................................................................................................................................................
............................................................................................................................................................................................................................................................Agent Blending
Overview Agent Blending integrates outbound calling activities on your Avaya PDS with inbound calling activities on your ACD. In an Agent Blending system, ACD agents log on to the Avaya PDS and the ACD. Agent Blending monitors the activity on the ACD and uses this information to determine when to acquire agents for outbound calling and when to release ACD agents to handle inbound calls.The Avaya PDS uses a pool of ACD (blend) agents for outbound calling. The system acquires the pooled agents for outbound calling when the inbound calling activity decreases. It releases these agents to inbound calling when the inbound calling activity increases. This movement keeps the ACD blend agents busy while keeping the ACD service level within your prescribed limits.
Predictive Agent Blending If your first priority is servicing your inbound customers and your inbound volume is fairly high, you will benefit from using Predictive Agent Blending. Predictive Agent Blending focuses on the inbound mission and only acquires agents for outbound when the Service Level or Average Speed to Answer parameters are above the desired value. These agents take inbound calls until the Avaya PDS predicts that there will be too many agents on inbound (the Avaya PDS bases the prediction on the service level requirements you set). The Avaya PDS then acquires agents from the ACD to handle outbound calls until the inbound volume increases.Call centers with moderate to heavy inbound traffic and more than 25 agents in an inbound pool benefit from using Predictive Agent Blending.Predictive Agent Blending uses events from the ACD to forecast call volume and determine when to move ACD agents between inbound and outbound calling.There are two control method option within Predictive Agent Blending: Average Speed to Answer and Service Level. To configure Predictive Agent Blending, set up an Average Speed to Answer or a Service Level domain group that contains one or more acquire domains and at least one inbound domain. Each type requires different settings.
Average Speed to Answer (ASA)This domain group type uses the target ASA field (MAAS) for calculating when to acquire and release agents. Agents are acquired for
2 5 - 3 0 5

Agent Blending
...........................................................................................................................................................................................................................................................
outbound calls when the average speed to answer for all inbound domains in the group is less than or equal to the targeted value. Agents are released when the value rises above the target.
Service Level (SL)This domain group type uses the Service Criterion (SC, seconds), Desired Service Level (DSL, %), and Abatement Service Level (ASL, %) fields for calculating when to acquire and release agents. Agents are acquired for outbound calls when the percentage of inbound calls answered within the Service Criterion is greater than or equal to the Desired Service Level percentage. Acquisitions will stop when the actual service level reaches the Abatement Service Level value. Agents will be released back to inbound when the service level falls below the desired value. The actual service level is calculated using all inbound domains in the group.
Proactive Agent Blending If your focus is on outbound calling, but you need to service a low volume of inbound customers, you will benefit from using Proactive Agent Blending. Proactive Agent Blending focuses on outbound calls and releases agents to inbound only when an inbound calls enters a monitored queue on the ACD. When an ACD agent logs on, the Avaya PDS immediately acquires the agent for outbound calling. When an inbound call comes into the ACD queue, the Avaya PDS releases the agent to handle the call. The number of queued calls before agents release to inbound can be configured for each OB_ONLY domain group. If inbound calls continue to come in, the Avaya PDS continues to release agents. As soon as the queue is empty, the Avaya PDS acquires the agent for outbound calls.
2 5 - 3 0 6
Agent Blending
............................................................................................................................................................................................................................................................
............................................................................................................................................................................................................................................................Supported ACDs
Supported ACDs The system supports Agent Blending on the following ACDs:• Aspect CallCenter• DEFINITY G3 • PINNACLE 5ESS• Northern Telecom Meridian 1• Rockwell Spectrum• Siemens ROLM 9751, Release 9005The AvayaTM Predictive Dialing System (PDS) Installation Planner contains a full description of the requirements for each supported switch. Each switch has unique settings and terminology.Regardless of the special terminology used by ACD vendors, you configure your ACD to work with the Avaya PDS. The Avaya PDS uses domains and domain groups to control Agent Blending.
2 5 - 3 0 7

Agent Blending
...........................................................................................................................................................................................................................................................
............................................................................................................................................................................................................................................................Switch terminology
Aspect Agent group A set of agents handling similar types of calls. Agents log into an agent group when they log onto the Aspect CallCenter. Agent groups may be part of an agent super group. Agent groups correspond to Agent Blending domains. Agent Blending monitors events for domains configured on the system as inbound or acquire.
Call Control Tables (CCTs) Part of the Aspect CallCenter database. CCTs control call routing, queuing, and messaging for agent groups and agent super groups. You can view, set up, edit, or delete CCTs from Aspect CallCenter management workstation. There can be multiple CCTs for each agent group and agent super group.
Data System Interlink Table Part of the Aspect CallCenter database. It controls communication between the Aspect CallCenter and the system. You can view the Data System Interlink Table and set application parameters using the Aspect CallCenter management workstation. However, only an Aspect representative can set system-level parameters.
DEFINITY G3 Expert Agent Selection (EAS) An optional Definity G3 feature. It allows skill types to be assigned to a call type or Vector Directory Number (VDN).
Hunt group An agent queue on an ACD configured without EAS. The ACD hunts for the next available agent in each hunt group. It uses the hunt method defined on the ACD.
Skill Skill types provide a method for call center managers to match the needs of a caller to the talents of the agents. A skill designates a work category such as sales or collections. It enables the ACD to route
2 5 - 3 0 8
Agent Blending
............................................................................................................................................................................................................................................................
types of calls to queues. Administrators can assign up to four skills or sets of skills to each agent login ID.
Skill hunt group Replaces ACD splits when the ACD is configured with EAS. The ACD can be queued to up to three different skill hunt groups at one time.
Split An ACD split is a hunt group that is designed for a high volume of similar calls. Members of a split are called agents. At any one time, an agent can be logged into a maximum of three splits.
Vector Vector settings determine how the switch handles incoming calls based on the number dialed. When the DEFINITY G3 is configured with EAS, the vector directs the incoming call to a split, a hunt group, or a skill hunt group.
Vector Directory Number The extension number that accesses a vector. Agent Blending uses the Vector Directory Number for the domain address and domain extension.
Spectrum Agent Group A collection of one or more agents, based on equivalent skills or a specific call center need. In Spectrum, agents may have a primary and a secondary group assignment; however, the system requires that agents belong to only one group. In addition to the agent’s skill level, you must assign agents to groups as inbound or acquire. Inbound agents take only inbound calls. Acquire agents take inbound and outbound calls, or they can be outbound-only.
Application The system treats applications as domains. In Spectrum, incoming calls are routed to applications. An application is a type or category of call you want handled in a similar way. Applications may include:• Company functions (for example, Customer Service, Accounts• Payable)• Special skill groups (for example, bilingual or technical
troubleshooters)• Types of products (for example, Savings, Checking Accounts,
Mortgages)For each application, the Spectrum tracks performance data such as average speed to answer, number of calls offered, and average handling time.
2 5 - 3 0 9

Agent Blending
...........................................................................................................................................................................................................................................................
You associate each application with an Application Telescript. The telescript contains a set of instructions for handling calls. For Agent Blending, it queues agent groups, places calls in wait queues, and allows the system to track the call while it is on the Spectrum.
Application Directory Number (DN) You assign an Application Directory Number in Applications Parameters when you create the Spectrum application. When dialed, this number calls the application. The Application Directory Number is used as the domain extension in Agent Blending.
Application Number (also called the Application ID) You assign an Application Number in Applications Parameters when you create the Spectrum application. The Application Number is used as the domain address in Agent Blending.
Class of Service A collection of attributes associated with agents and devices within the Spectrum. One of the class of service attributes is the Host Transaction feature. Host Transaction controls whether or not the Spectrum generates call progress messages on the Transaction Link for the associated agent or device. Agent Blending requires that you enable the Host Transaction feature.
Host The host for the Spectrum is the Predictive Dialing System.
Provisioning A set of actions that add, alter, or delete system parameters. In the system documentation, “configuring” has the same meaning as “provisioning” in Spectrum documentation.
Telescript A user-programmable sequence of steps associated with various call routing points within the Spectrum. During inbound call routing, error processing, and call queuing, the Spectrum invokes Routing, Intercept, and Application Telescripts. Feature Telescripts operate as subroutines for the other telescript types.Configuring an Application Telescript to route to the desired agent groups is key to making Agent Blending work with Spectrum.
Transaction Link Spectrum’s name for its Computer Telephony Interface (CTI) link. Transaction Link is a communications channel between the Spectrum and the system. It is operated over an X.25 or TCP/IP transport facility.
Trunk Group A collection of trunk ports that have common processing characteristics, such as ANI and DNIS. One of the characteristics is the Host Transaction Link feature. It controls whether
2 5 - 3 1 0

Agent Blending
............................................................................................................................................................................................................................................................
Spectrum generates call progress messages for calls associated with the trunk group members.You must enable this feature to allow the system to monitor calls on Spectrum.
Meridian ACD-DN (directory number) The ACD address for a call queue. It is the Agent Blending domain address.
ACD Agent Position ID The number that identifies an agent’s telephone extension. Agent Blending agents log onto the system as ACD agents using their ACD Agent Position ID as the ACD extension. During calling operations, managers can assign agents to Agent Blending domains by assigning agent positions to call queues, or agents can log into call queues that are Agent Blending domains.
Multiple queue assignment A Meridian option that allows agents to log into multiple call queues.The domains and domain groups you define and how your agents log into call queues depends on whether your Meridian uses multiple queue assignment.
PINNACLE Call queue A destination for call routing, defined by an ACD address. A call queue can be an Agent Blending domain.
Queue ID The ACD address associated with a call queue. Queue IDs are Agent Blending domain addresses.
Queue pilot number The ACD extension associated with an ACD address. Queue pilot numbers are Agent Blending domain extensions.
Serving Team A group of agent identifiers for agents who will work on the same task. PINNACLE can route calls to the serving team for a call queue. Agent Blending inbound agents belong to an inbound serving team. Agent Blending outbound and blend agents belong to an acquire serving team.
ROLM 9005 ACD group or agent group A group of agent extensions that receives calls from the same pilot number. Each ACD group has its own telephones and members.
Call-progress event Any change in a call’s state in ROLM 9005. CallBridge passes call-progress event messages from ROLM 9005 to
2 5 - 3 1 1

Agent Blending
...........................................................................................................................................................................................................................................................
CallPath. Call-progress event messages provide the information Agent Blending needs to acquire and release agents.
Class of service A code indicating the features, extensions, and trunk access available to an ACD address. Agent Blending uses agent groups with the CallPath class of service.
Directory Number (DN) An ACD address or extension associated with an ACD-defined group (such as an agent group or a hunt group) or with a device such as a telephone or a Voice Response Unit (VRU) port.
Dummy hunt group A hunt group with no members defined on ROLM 9005. It unconditionally forwards calls to an agent group. Agent Blending requires dummy hunt groups to collect call-progress event messages. It uses the dummy hunt group’s pilot number as the auxiliary domain’s extension number.
Pilot number A directory number associated with a group of extension numbers that comprise one ACD group. Agent Blending uses pilot numbers as the domain address. It uses the dummy hunt group’s pilot number as the domain extension.
2 5 - 3 1 2
Agent Blending
............................................................................................................................................................................................................................................................
............................................................................................................................................................................................................................................................Domains
Overview No matter which type of switch your system uses, the Avaya PDS requires domains and domain groups. Domains are the ACD call queues which are defined on the ACD and on the Avaya PDS.Each domain is a member of a domain group. Agent Blending collects calling events for each domain and totals them by domain group for statistic calculation. It uses these statistics to determine when to move ACD agents between inbound and outbound calling. It does not total statistics across domain groups and it does not monitor activity in call queues that are not part of a domain group.After your system is installed, assign your agents to domains. Usually you assign agents to domains based on a skill set. For example, you might divide agents into three sets:• agents who handle only credit card customers• agents who handle consumer loan customers• agents with skills to handle both credit card customers and
consumer loan customers
Configure domains The types of domains you configure depend upon the ACD. The two main domain types are inbound and acquire. All Agent Blending systems must have an acquire domain.Agent Blending uses inbound domains to determine agent availability by monitoring and analyzing the traffic. It uses acquire domains to acquire agents for outbound calling.In addition to inbound and acquire domains, the Avaya PDS recognizes two additional domains. Some ACDs use auxiliary domains to monitor all calling activity in a domain group. Meridian switches without multiple queues assignment (MQA) use transient domains to
2 5 - 3 1 3
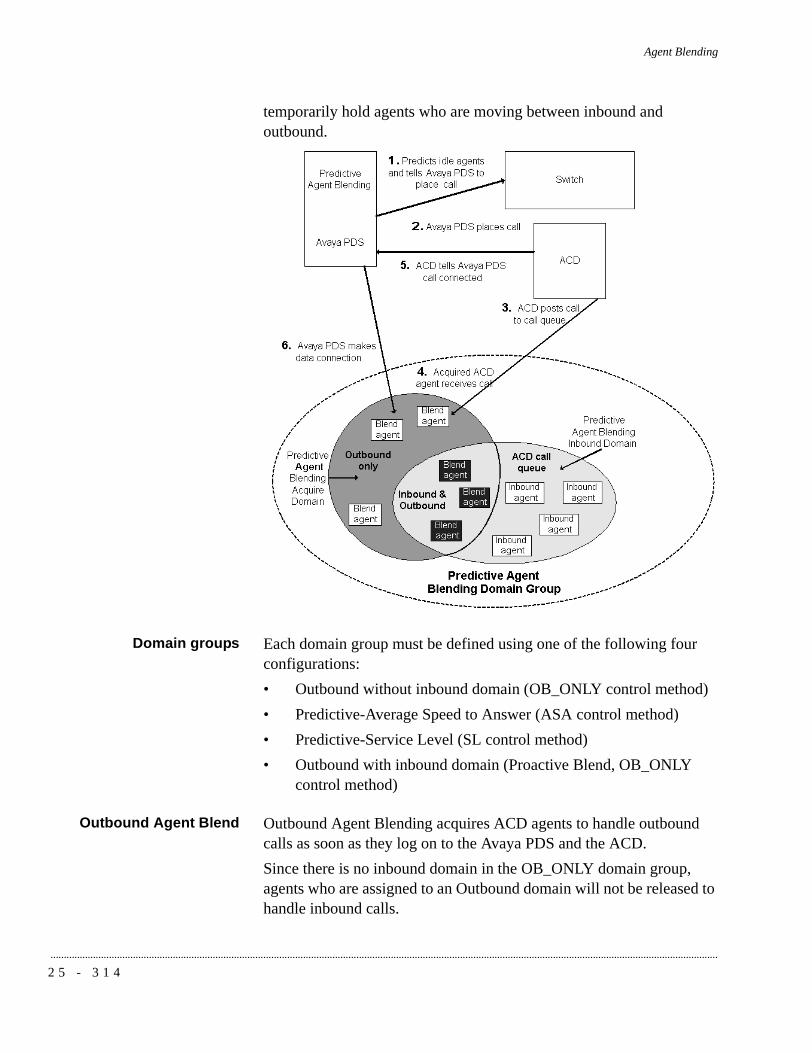
Agent Blending
...........................................................................................................................................................................................................................................................
temporarily hold agents who are moving between inbound and outbound.
Domain groups Each domain group must be defined using one of the following four configurations:• Outbound without inbound domain (OB_ONLY control method)• Predictive-Average Speed to Answer (ASA control method)• Predictive-Service Level (SL control method)• Outbound with inbound domain (Proactive Blend, OB_ONLY
control method)
Outbound Agent Blend Outbound Agent Blending acquires ACD agents to handle outbound calls as soon as they log on to the Avaya PDS and the ACD.Since there is no inbound domain in the OB_ONLY domain group, agents who are assigned to an Outbound domain will not be released to handle inbound calls.
2 5 - 3 1 4

Agent Blending
............................................................................................................................................................................................................................................................
............................................................................................................................................................................................................................................................Domain Groups
Domain Groups During site preparation, you identify which domains you want grouped. A domain group contains one or more domains. A domain can belong to only one domain group. There are three domain group Control Methods: Outbound Only, Average Speed to Answer, and Service Level. The Agent Blending Administrator window changes dynamically depending on which one of the three Control Methods you choose.
Outbound Only The Avaya PDS acquires outbound-only agents to handle outbound calls as soon as they log onto the system and the ACD. Outbound Agent Blending allows you to take advantage of the least-cost routing available on your ACD and to use the detailed reports available on the ACD.To configure an Outbound Agent Blending job, set up an outbound domain that contains at least one acquire domain (no inbound domain). Select Outbound as the domain group type. Assign at least one acquire domain to the group (no inbound domain).If you select Outbound Only, you are required to enter a Minimum Queued for Release value. Type a value between 0 and 999. The default value is 0.
2 5 - 3 1 5

Agent Blending
...........................................................................................................................................................................................................................................................
Average Speed to Answer If you select Average Speed to Answer, your dialog box changes dynamically, and you need to set values for the required fields. The Average Speed to Answer fields are described in the following table.
Parameter Definition
Time Interval (required)
The interval that the system uses to calculate the Average Speed to Answer. It influences how responsive the system is to fluctuations in answer delays. It is an interval that begins each time you start the system or restart Agent Blending. Select a value greater than 0.25, in increments of .25. The interval is in hours, so .25 is 1/4 of an hour or 15 minutes. The default is .50 (30 minutes). The setting represents an average calculated over the Average Speed to Answer interval.
Average Speed to Answer (required)
The average time within which agents should answer calls. Type a value between 1 and 999. The default value is 60.
Agent Utilization Threshold (required)
The percentage of agents available to take calls. This setting determines how quickly the system moves agents between inbound and outbound calls. The goal is to prevent agents from being acquired or released too frequently.Agents are available if they are not taking calls or updating records.Agent Blending tracks calling statistics and uses this information to predict future availability. To calculate the threshold, the system divides the projected inbound call volume by the projected number of available agents. Type a value between 1 and 999. The default value is 200.
2 5 - 3 1 6

Agent Blending
............................................................................................................................................................................................................................................................
Minimum Agents on Outbound (required)
The minimum number of ACD blend agents, in this domain, dedicated to handling outbound calls. This setting overrides Desired level. For example, no matter how low the Average Speed to Answer, there will always be this number of agents unavailable to handle inbound calls. Use this option when it is more important to meet outbound goals than to service inbound calls. Type a value between 0 and 999. The default value is 0.
Initial Traffic Rate (optional)
The estimated number of calls each second. The system uses this rate for the first 30 calls. It ensures that there are enough agents to handle the first 30 calls. Type a value between 0 and 999.
Talk Time (optional)
The estimated minimum seconds agents spend connected on each inbound call. The system adds Talk time and After Call Work Time to determine agent availability. Agent availability is sometimes called service capacity. Type a value between 1 and 999.
After Call Work Time (optional)
The estimated minimum seconds agents spend, after a call, updating records and processing information. Type a value between 1 and 999.
Parameter Definition
2 5 - 3 1 7
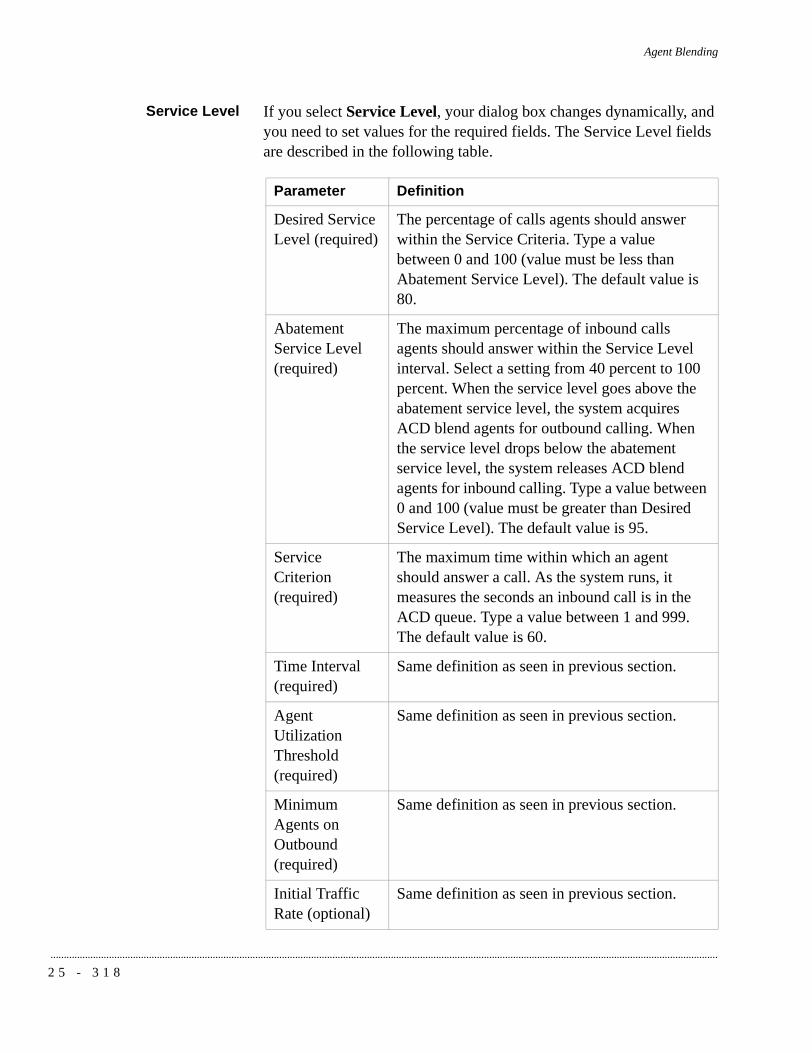
Agent Blending
...........................................................................................................................................................................................................................................................
Service Level If you select Service Level, your dialog box changes dynamically, and you need to set values for the required fields. The Service Level fields are described in the following table.
Parameter Definition
Desired Service Level (required)
The percentage of calls agents should answer within the Service Criteria. Type a value between 0 and 100 (value must be less than Abatement Service Level). The default value is 80.
Abatement Service Level (required)
The maximum percentage of inbound calls agents should answer within the Service Level interval. Select a setting from 40 percent to 100 percent. When the service level goes above the abatement service level, the system acquires ACD blend agents for outbound calling. When the service level drops below the abatement service level, the system releases ACD blend agents for inbound calling. Type a value between 0 and 100 (value must be greater than Desired Service Level). The default value is 95.
Service Criterion (required)
The maximum time within which an agent should answer a call. As the system runs, it measures the seconds an inbound call is in the ACD queue. Type a value between 1 and 999. The default value is 60.
Time Interval (required)
Same definition as seen in previous section.
Agent Utilization Threshold (required)
Same definition as seen in previous section.
Minimum Agents on Outbound (required)
Same definition as seen in previous section.
Initial Traffic Rate (optional)
Same definition as seen in previous section.
2 5 - 3 1 8

Agent Blending
............................................................................................................................................................................................................................................................
Talk Time (optional)
Same definition as seen in previous section.
After Call Work Time (optional)
Same definition as seen in previous section.
Parameter Definition
2 5 - 3 1 9

Agent Blending
...........................................................................................................................................................................................................................................................
............................................................................................................................................................................................................................................................Start the Agent Blending tool
Start the Agent Blendingtool
Start the Agent Blending tool from either Monitor or Editor.
...........................................................................................................................................................................
1 Select Start > Programs > Avaya > Campaign Director > Monitor or Editor.
...........................................................................................................................................................................
2 Select Tools > Agent Blending.The Agent Blending Administrator window appears.
2 5 - 3 2 0
Agent Blending
............................................................................................................................................................................................................................................................
............................................................................................................................................................................................................................................................Create a domain group
Create a domain group You can edit domain group settings while your blend engine is running.
...........................................................................................................................................................................
1 In the Agent Blending Administrator window, select File > Create Domain Group.
...........................................................................................................................................................................
2 In the New Domain Group box, type a descriptive name for the domain group, such as MIDWEST, and then click OK.The name must be 10 or fewer characters. You have now created the domain group name and must now complete the domain group settings.
...........................................................................................................................................................................
3 Set values for the domain group fields: Control Method (Outbound Only, Service Level, or Average Speed to Answer) and the options that change dynamically based on your Control Method selection. For help with filling in your fields, see the earlier topics that discuss Outbound Only, Service Level, and Average Speed to Answer.
2 5 - 3 2 1
Agent Blending
...........................................................................................................................................................................................................................................................
............................................................................................................................................................................................................................................................Create a domain
Create a domain You must stop your blend engine in order to create a domain. The Create Domain option is not available until you select the name of a domain group. The domain will be added to the domain group that you select.
...........................................................................................................................................................................
1 In the Agent Blending Administrator window, click the domain group to which you want the new domain to belong, and then, select File > Create Domain.
...........................................................................................................................................................................
2 In the New Domain dialog box, type the address of the domain.Typical values for this box are 5-digit addresses, such as 20601, and must match your PBX ID exactly to communicate with the PBX.
...........................................................................................................................................................................
3 Click OK.You have created the domains name and must now define in the domain settings.
...........................................................................................................................................................................
4 Define the domain settings: Domain Type (Inbound, Transient Acquire, Team Acquire, and Overflow), Phone Number, Gateway ID, Application ID, and PBX ID.For help with filling in your fields, see the earlier topics that discuss Domain Type, Phone Number, Gateway ID, Application ID, and PBX ID.
2 5 - 3 2 2

Agent Blending
............................................................................................................................................................................................................................................................
............................................................................................................................................................................................................................................................Edit domain group settings
Edit domain group settings You must stop your blend engine in order to edit domain group settings.
...........................................................................................................................................................................
1 In the Agent Blending Administrator window, select the domain group you want to edit.
...........................................................................................................................................................................
2 Double-click the Control Method field to select Outbound Only, Service Level, or Average Speed to Answer.For descriptions of these options, see their sections shown earlier.
...........................................................................................................................................................................
3 The domain group fields change dynamically depending on which Control Method option you select. See the Domain Groups section shown earlier for descriptions of the domain group fields. To determine whether the field has a drop-down list or an editable value for you to use, double-click the field. Save your work.
2 5 - 3 2 3

Agent Blending
...........................................................................................................................................................................................................................................................
............................................................................................................................................................................................................................................................Edit domain settings
Edit domain settings You must stop your blend engine in order to edit domain settings.
...........................................................................................................................................................................
1 In the Agent Blending Administrator window, select the domain you want to edit.
...........................................................................................................................................................................
2 Double-click the Domain Type field select Inbound, Transient Acquire, Team Acquire, or Overflow.For descriptions of these options, see the Domain section shown earlier.
...........................................................................................................................................................................
3 Type values for the Phone Number, Gateway ID, Application ID, and PBX ID fields.For descriptions of these fields, see the Domains section shown earlier.
2 5 - 3 2 4

Agent Blending
............................................................................................................................................................................................................................................................
............................................................................................................................................................................................................................................................Delete a domain group
Delete a domain group You must stop your blend engine in order to delete a domain group.
...........................................................................................................................................................................
1 In the Agent Blending Administrator window, select the domain group you want to delete.
...........................................................................................................................................................................
2 Select File > Delete Domain Group, and then save your work.
2 5 - 3 2 5
Agent Blending
...........................................................................................................................................................................................................................................................
............................................................................................................................................................................................................................................................Delete a domain
Delete a domain You must stop your blend engine in order to delete a domain.
...........................................................................................................................................................................
1 In the Agent Blending Administrator window, select the domain you want to delete.
...........................................................................................................................................................................
2 Select File > Delete Domain, and then save your work.
2 5 - 3 2 6

Agent Blending
............................................................................................................................................................................................................................................................
............................................................................................................................................................................................................................................................Move a domain to a different group
Move a domain to adifferent group
You must stop your blend engine in order to move a domain to a different domain group. Moving a domain is possible by deleting the domain and then adding it to a different domain (remember to write down its existing settings so that you can recreate them when you add the domain to the new domain group).
...........................................................................................................................................................................
1 In the Agent Blending Administrator window, select the domain you want to move (write down its settings first, if necessary), and then, select File > Delete Domain.
...........................................................................................................................................................................
2 Select the domain group to which you want to add the new domain, and then select File > Create Domain.
...........................................................................................................................................................................
3 In the New Domain dialog box, type the domain address, such as 20601, and then click OK.
...........................................................................................................................................................................
4 Complete the domain settings.
2 5 - 3 2 7

Agent Blending
...........................................................................................................................................................................................................................................................
............................................................................................................................................................................................................................................................Stop the blend engine
Stop the blend engine The Stop button shuts down all but two of the Blend processes on a dialer; cbamain and cbauser remain up. This state is also called configure-only mode. It is required for editing or deleting domains. You stop the blend engine by clicking Stop in the Agent Blending Administrator dialog box. (You must have a dialer selected in the tree view for the Stop button to be visible. The dialers are located at the top-most level in the tree view.)
...........................................................................................................................................................................
1 Open Monitor or Editor and select Tools > Agent Blending.The Agent Blending Administrator window appears.
...........................................................................................................................................................................
2 In the tree view, select a dialer.
...........................................................................................................................................................................
3 Select Blend Engine > Stop.
2 5 - 3 2 8

Agent Blending
............................................................................................................................................................................................................................................................
............................................................................................................................................................................................................................................................Start the blend engine
Start the blend engine The Start button starts the Blend processes that were killed with the Stop command on a dialer. You start the blend engine by clicking Start in the Agent Blending Administrator dialog box. (You must have a dialer selected in the tree view for the Start button to be visible. The dialers are located at the top-most level in the tree view.)
...........................................................................................................................................................................
1 Open Monitor or Editor and select Tools > Agent Blending.The Agent Blending Administrator window appears.
...........................................................................................................................................................................
2 In the tree view, select a dialer.
...........................................................................................................................................................................
3 Select Blend Engine > Start.
2 5 - 3 2 9

Agent Blending
...........................................................................................................................................................................................................................................................
............................................................................................................................................................................................................................................................Reset the blend engine
Reset the blend engine The Reset button stops and restarts the Blend processes on a dialer. If Blend is not running, the Reset button starts the processes on a dialer.
...........................................................................................................................................................................
1 Open Monitor or Editor and select Tools > Agent Blending. The Agent Blending Administrator window appears.
...........................................................................................................................................................................
2 In the tree view, select a dialer.
...........................................................................................................................................................................
3 Select Blend Engine > Reset.
2 5 - 3 3 0
Agent Blending
............................................................................................................................................................................................................................................................
............................................................................................................................................................................................................................................................Resynch the blend engine
Resynch the blend engine The Resynch button updates the Avaya PDS with the current ACD agent queue assignments. Use Resynch after a supervisor uses the ACD to reassign agents to different inbound queues.
...........................................................................................................................................................................
1 Open Monitor or Editor and select Tools > Agent Blending. The Agent Blending Administrator window appears.
...........................................................................................................................................................................
2 In the tree view, select a dialer.
...........................................................................................................................................................................
3 Select Blend Engine > Resynch.
2 5 - 3 3 1

Agent Blending
...........................................................................................................................................................................................................................................................
............................................................................................................................................................................................................................................................View ACD statistics
View ACD statistics Use the following procedure to view ACD statistics.
...........................................................................................................................................................................
1 In the Agent Blending Administrator window, select Statistics under the domain group for which you want to view statistics.
2 5 - 3 3 2
Agent Blending
............................................................................................................................................................................................................................................................
............................................................................................................................................................................................................................................................View alerts
View alerts You are able to view alerts by clicking Alerts in the tree view.
...........................................................................................................................................................................
1 In the Agent Blending Administrator window, select Alerts under the domain group for which you want to view alerts.
2 5 - 3 3 3

Agent Blending
...........................................................................................................................................................................................................................................................
............................................................................................................................................................................................................................................................View transactions
View transactions Use the following procedure to view transactions.
...........................................................................................................................................................................
1 In the Agent Blending Administrator window, select Transactions under the domain group for which you want to view transactions.
2 5 - 3 3 4
Appendix A: Pattern Matching
............................................................................................................................................................................................................................................................
............................................................................................................................................................................................................................................................Overview
Purpose Pattern matching syntax is used throughout the dialer. A basic understanding of pattern matching syntax is required to do even simple tasks, such as preparing a call selection for an outbound dialing job. The Avaya PDS v12.0 supports a broad variety of pattern matching syntaxes, including integer, floating point, date, time, string, shell-style, and extended regular expression-style patterns. This appendix details how to construct patterns using the various pattern matching syntaxes, and provides many examples of commonly used constructs.
A - 3 3 5

...........................................................................................................................................................................................................................................................
............................................................................................................................................................................................................................................................Default pattern syntax
Default pattern syntax Field types are supported in dialer calling lists. The following table shows which pattern syntax is expected for each field type by default.
If the pattern fails to compile with the default syntax, other syntax types are tried in turn, until one succeeds or fails.If all compile attempts fail, only the error message for the first failure is reported.You can explicitly designate a pattern syntax by beginning your pattern with the field type symbol of the comparison followed by a ‘@’ character.
Field type symbol
Field type description Default pattern syntax
$ Currency Amount F.P. Numerical comparison syntax
N Number Numerical comparison syntax
D Date Date conversion + Time conversion
T Time Time conversion + Numerical comparison syntax,
C Character String comparison syntax, then Shell-style pattern syntax
@ Type Data description Syntax
$@ Currency amount F.P. numerical comparison syntax
F@ Floating point F.P. numerical comparison syntax
N@ Integer Numerical comparison syntax
A - 3 3 6
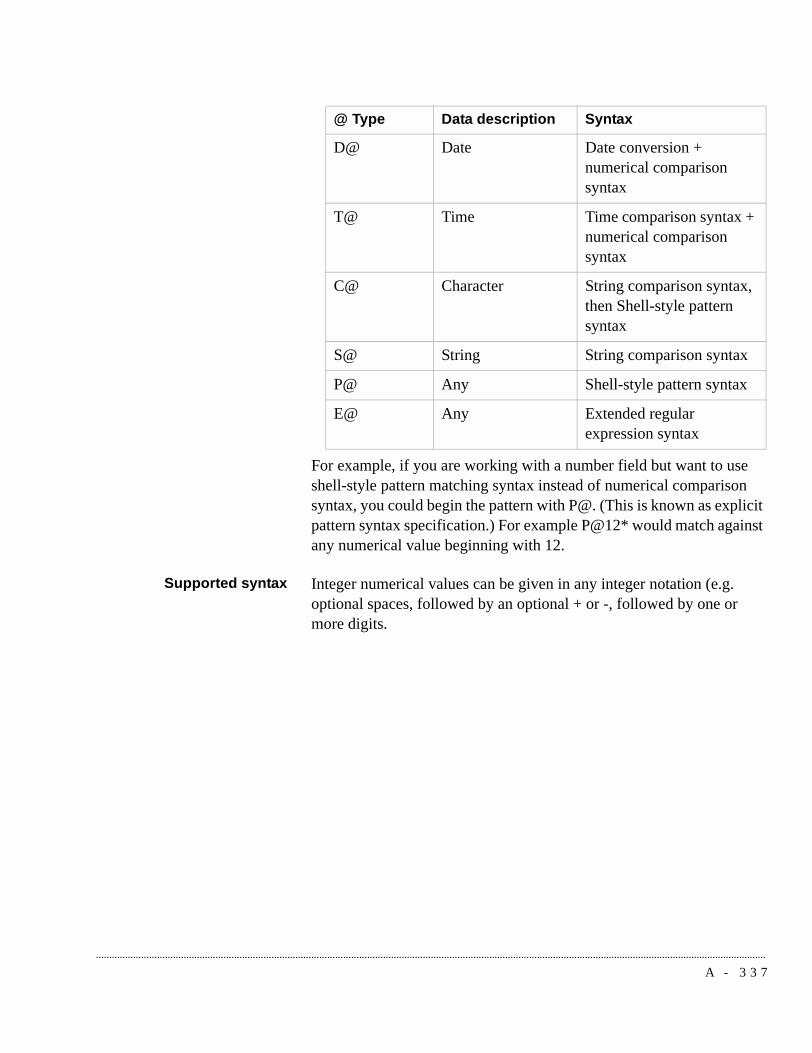
............................................................................................................................................................................................................................................................
For example, if you are working with a number field but want to use shell-style pattern matching syntax instead of numerical comparison syntax, you could begin the pattern with P@. (This is known as explicit pattern syntax specification.) For example P@12* would match against any numerical value beginning with 12.
Supported syntax Integer numerical values can be given in any integer notation (e.g. optional spaces, followed by an optional + or -, followed by one or more digits.
D@ Date Date conversion + numerical comparison syntax
T@ Time Time comparison syntax + numerical comparison syntax
C@ Character String comparison syntax, then Shell-style pattern syntax
S@ String String comparison syntax
P@ Any Shell-style pattern syntax
E@ Any Extended regular expression syntax
@ Type Data description Syntax
A - 3 3 7

...........................................................................................................................................................................................................................................................
............................................................................................................................................................................................................................................................Supported syntax
List separators The following syntaxes are supported:
To use any of these symbols explicitly in a pattern (and not as list separators) you must precede them with a backslash (e.g. \!).
Numerical comparisons(type N, $, F)
A numerical comparison pattern must contain at least one numerical value and one legal numerical comparison operator. It may contain one or more list separators (, ! &)
Floating point numerical values can be given in any legal floating point notation (e.g. optional spaces, followed by an optional + or -, followed by one or more digits, an optional decimal point, and one or more optional digits).
! List separator ('or' operator)
, List separator ('or' operator)
& List separator ('and' operator)
> Match if greater than
>= Match if greater than or equal to
< Match if less than
<= Match if less than or equal to
= Match if equal to
== Match if equal to
<> Match if not equal to
- Match if within inclusive range
Example Numerical Comparisons
> 123 Match if greater than 123
>=123.45 Match if greater than or equal to 123.45
<-123. Match if less than -123
<=+12.34 Match if less than or equal to 12.34
A - 3 3 8

............................................................................................................................................................................................................................................................
Date Comparisons (Type D) Date comparisons are handled by first converting each date in the pattern to an 8 digit integer with the digit order CCYYMMDD, then compiling the resulting pattern using integer numerical comparison syntax. The same conversion is done to the target date during the comparison operation.To use this comparison syntax, the dates must follow the format in the DATEFORM parameter of master.cfg. Otherwise, dates could be compared as simple strings using a shell-, ERE-, or string-style pattern notation.A relative date feature is supported for date comparisons. Instead of an explicit date, you can use any of the notations "$TODAY", "$TODAY + n", or $TODAY - n", where n is an integer. These will be converted into today's date +/- n days.
= 123.0 Match if equal to 123
==123 Match if equal to 123
123-456.78 Match if in range of 123 to 456.78
-200--100 Match if in range of -200 to -100
=123,456 Match if 123 or 456
=123!>456 Match if 123 or greater than 456
>123&<>456 Match if greater than 123 and not 456
Example Numerical Comparisons
Example Date Comparisons
2001/12/31 Match if date is 2001/12/31
=2001/12/31 Match if date is 2001/12/31
>2001/12/31 Match if date is greater than 2001/12/31
>=2002/01/01 Match if date is greater than or equal to 2002/01/01
<$TODAY Match if date is less than today
<$TODAY-30 Match if date is less than 30 days ago
A - 3 3 9
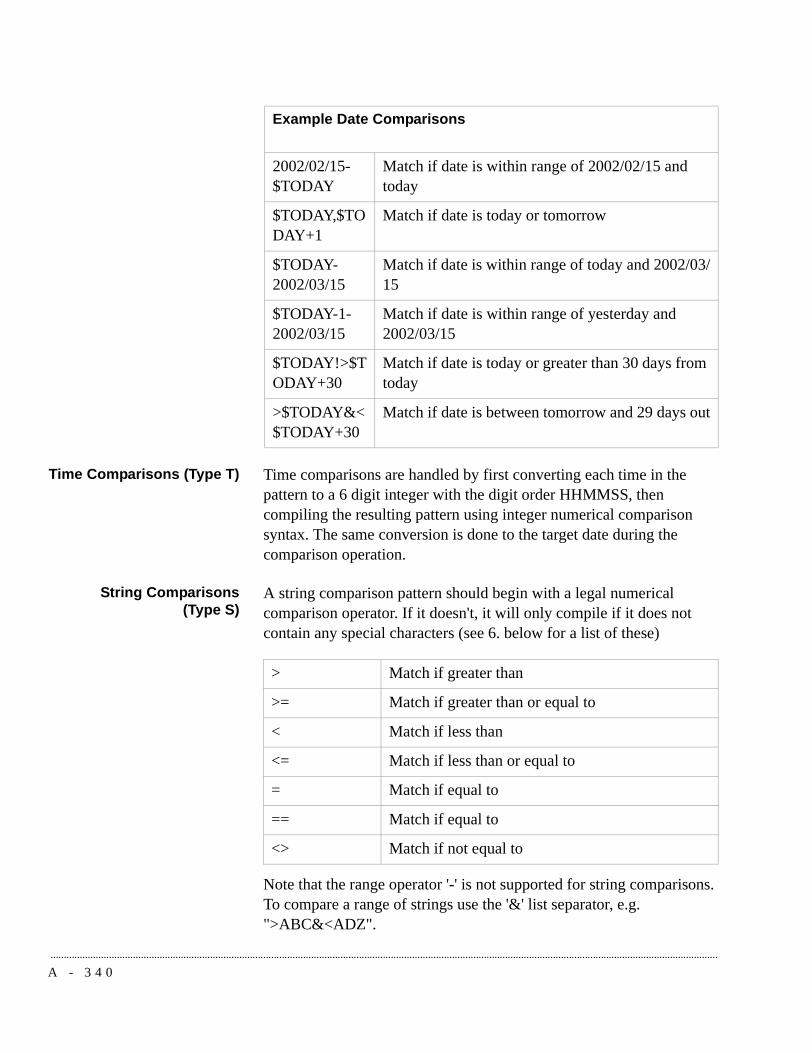
...........................................................................................................................................................................................................................................................
Time Comparisons (Type T) Time comparisons are handled by first converting each time in the pattern to a 6 digit integer with the digit order HHMMSS, then compiling the resulting pattern using integer numerical comparison syntax. The same conversion is done to the target date during the comparison operation.
String Comparisons(Type S)
A string comparison pattern should begin with a legal numerical comparison operator. If it doesn't, it will only compile if it does not contain any special characters (see 6. below for a list of these)
Note that the range operator '-' is not supported for string comparisons. To compare a range of strings use the '&' list separator, e.g. ">ABC&<ADZ".
2002/02/15-$TODAY
Match if date is within range of 2002/02/15 and today
$TODAY,$TODAY+1
Match if date is today or tomorrow
$TODAY-2002/03/15
Match if date is within range of today and 2002/03/15
$TODAY-1-2002/03/15
Match if date is within range of yesterday and 2002/03/15
$TODAY!>$TODAY+30
Match if date is today or greater than 30 days from today
>$TODAY&<$TODAY+30
Match if date is between tomorrow and 29 days out
Example Date Comparisons
> Match if greater than
>= Match if greater than or equal to
< Match if less than
<= Match if less than or equal to
= Match if equal to
== Match if equal to
<> Match if not equal to
A - 3 4 0
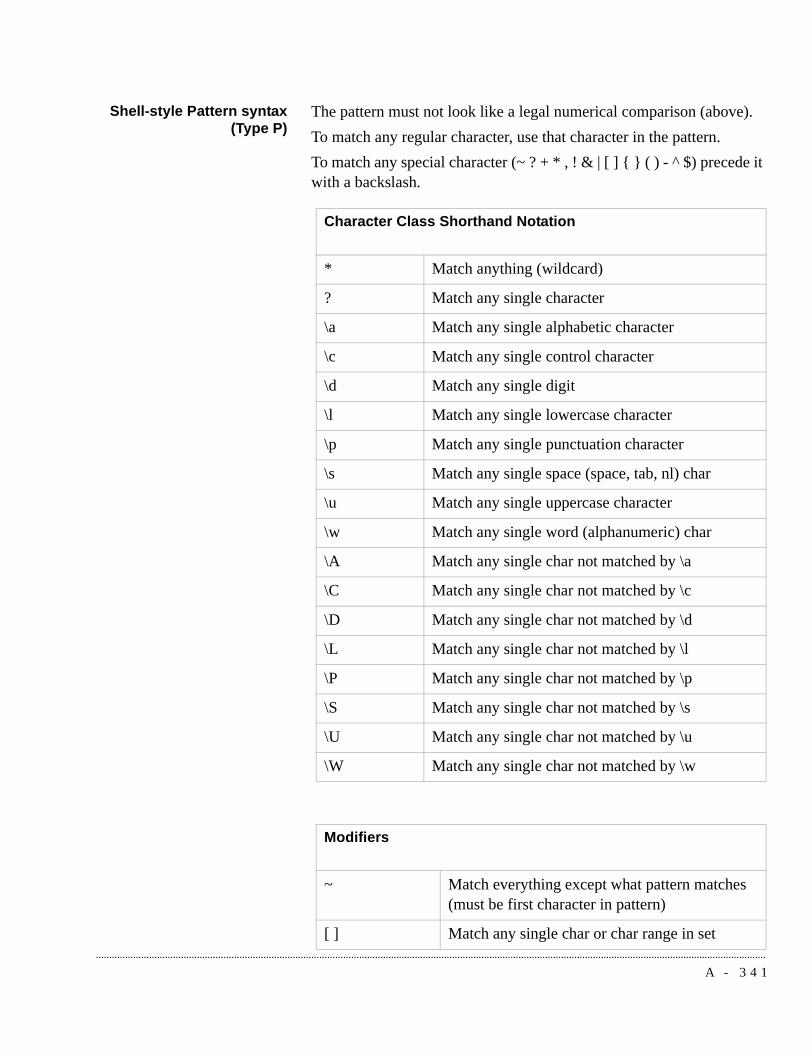
............................................................................................................................................................................................................................................................
Shell-style Pattern syntax(Type P)
The pattern must not look like a legal numerical comparison (above).To match any regular character, use that character in the pattern.To match any special character (~ ? + * , ! & | [ ] { } ( ) - ^ $) precede it with a backslash.
Character Class Shorthand Notation
* Match anything (wildcard)
? Match any single character
\a Match any single alphabetic character
\c Match any single control character
\d Match any single digit
\l Match any single lowercase character
\p Match any single punctuation character
\s Match any single space (space, tab, nl) char
\u Match any single uppercase character
\w Match any single word (alphanumeric) char
\A Match any single char not matched by \a
\C Match any single char not matched by \c
\D Match any single char not matched by \d
\L Match any single char not matched by \l
\P Match any single char not matched by \p
\S Match any single char not matched by \s
\U Match any single char not matched by \u
\W Match any single char not matched by \w
Modifiers
~ Match everything except what pattern matches (must be first character in pattern)
[ ] Match any single char or char range in set
A - 3 4 1

...........................................................................................................................................................................................................................................................
Patterns without wildcards are considered complete, and will not match on substrings. The following are example patterns.
[^ ] Match any single char or char range not in set
- Character range (sets only)
{ } Subset (subsets can be nested)
| List separator ('or' operator)
Modifiers
Match if string is empty
~?* Match if string is empty
ABC Match if string is ABC
~DEF Match if string is not DEF
FOO* Match if string starts with FOO
*BAR Match if string ends with BAR
SPL?T Match if string is SPL?T where ? can be any character
[AD-F] Match if string is the single character A or D - F
A[^AD-F]* Match if string starts with an A, whose second character is not the character A or D - F, and ends with anything
ABC|DEF Match if string is ABC or DEF
BAZ!FUB* Match if string is BAZ or starts with FUB
~{205,425} Match if string is not 206 or 425
{DOG|CAT} Match if string is DOG or CAT (subset is unnecessary here)
CA{NA,LI,RG}* Match if string begins with CA; has NA, LI, or RG as its 3rd and 4th characters; and ends in anything. (Would match CANADA, CALIFORNIA, CARGO...)
\d\d\d\-\d\d\-\d\d\d\d Match if string looks like a SSN
A - 3 4 2

............................................................................................................................................................................................................................................................
Extended RegularExpression syntax (Type E)
Must begin with the symbol 'E@' (which is stripped off prior to compiling the pattern with regcomp ()).See man 5 regexp, section entitled "Extended Regular Expressions" for the full details on ERE syntax.In addition to the standard ERE syntax described by the above mentioned man page, the following extensions are supported:• Negation ('~')• Character class shorthand notation (\a, \c, \d, etc...)The pattern must not look like a legal numerical comparison (above).To match any regular character, use that character in the pattern.To match any special character (~ ? + * , ! & | [ ] { } ( ) - ^ $) precede it with a backslash.
Character Class Shorthand Notation
. Match any single character
\a Match any single alphabetic character
\c Match any single control character
\d Match any single digit
\l Match any single lowercase character
\p Match any single punctuation character
\s Match any single space (space, tab, nl) char
\u Match any single uppercase character
\w Match any single word (alphanumeric) char
\A Match any single char not matched by \a
\C Match any single char not matched by \c
\D Match any single char not matched by \d
\L Match any single char not matched by \l
\P Match any single char not matched by \p
\S Match any single char not matched by \s
\U Match any single char not matched by \u
A - 3 4 3

...........................................................................................................................................................................................................................................................
Patterns without anchors are considered incomplete (fragments), and will match on substrings (e.g. 'E@RES' will match on 'FRESNO')
\W Match any single char not matched by \w
\n Where n is a number, match previously matched subset number n
Modifiers
~ Match everything except what pattern matches (must be first character in pattern after '@')
^ Anchor pattern to beginning (i.e. pattern must match from the beginning of the string)
$ Anchor pattern to end (i.e. pattern must match from the end of the string)
* Match preceding character 0 or more times
+ Match preceding character 1 or more times
? Match preceding character 0 or 1 time
{ } Match preceding character n or n,m times where n is a number and n,m is a number range.
[ ] Match any single char or char range in set
[^ ] Match any single char or char range not in set
- Character range (sets only)
( ) Subset (subsets can be nested). Subsets are numbered by the order of occurrence of the '(' character
| List separator ('or' operator)
Character Class Shorthand Notation
A - 3 4 4
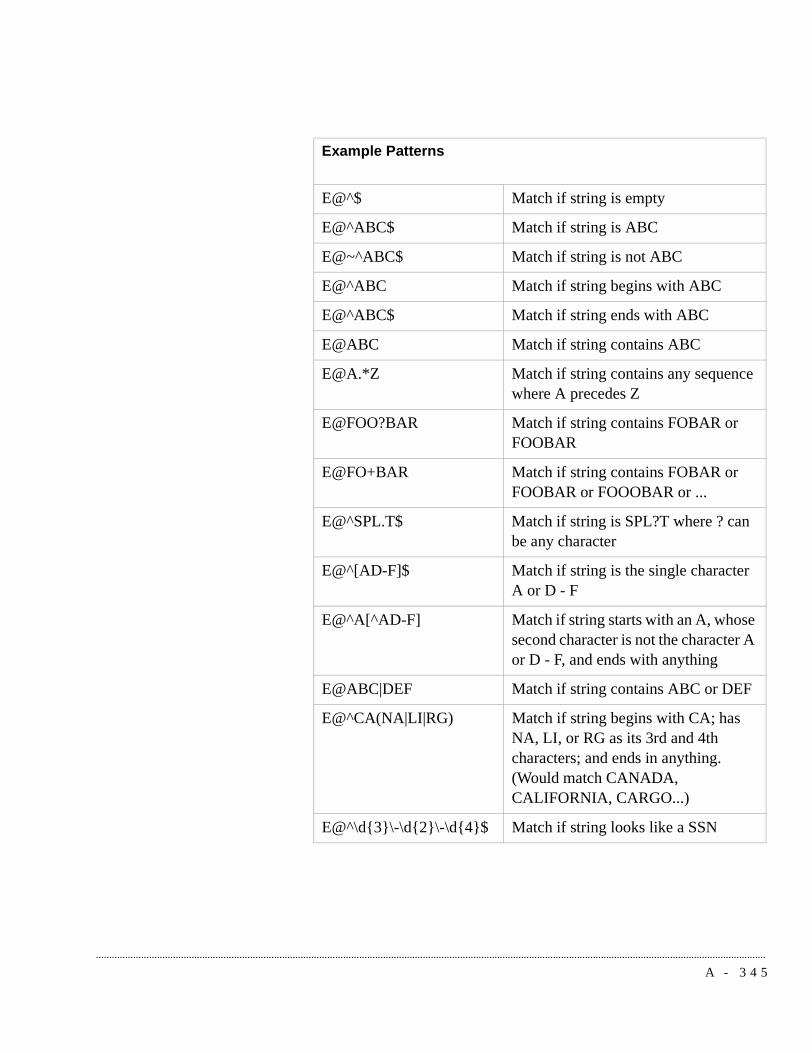
............................................................................................................................................................................................................................................................
Example Patterns
E@^$ Match if string is empty
E@^ABC$ Match if string is ABC
E@~^ABC$ Match if string is not ABC
E@^ABC Match if string begins with ABC
E@^ABC$ Match if string ends with ABC
E@ABC Match if string contains ABC
E@A.*Z Match if string contains any sequence where A precedes Z
E@FOO?BAR Match if string contains FOBAR or FOOBAR
E@FO+BAR Match if string contains FOBAR or FOOBAR or FOOOBAR or ...
E@^SPL.T$ Match if string is SPL?T where ? can be any character
E@^[AD-F]$ Match if string is the single character A or D - F
E@^A[^AD-F] Match if string starts with an A, whose second character is not the character A or D - F, and ends with anything
E@ABC|DEF Match if string contains ABC or DEF
E@^CA(NA|LI|RG) Match if string begins with CA; has NA, LI, or RG as its 3rd and 4th characters; and ends in anything. (Would match CANADA, CALIFORNIA, CARGO...)
E@^\d{3}\-\d{2}\-\d{4}$ Match if string looks like a SSN
A - 3 4 5

...........................................................................................................................................................................................................................................................
A - 3 4 6
Appendix B: Configurator
............................................................................................................................................................................................................................................................
.............................................................................................................................................................................................................................................................Overview
Purpose The AvayaTM Predictive Dialing System (PDS) has the capability to beconfigured into a pod. A pod is a group of up to four dialers connectedby a middle-tier structure.
Contents This section contains the following topics:
• Shared features
• Pod impacts
• Primary and secondary dialers
• Configurator
• Validation
B - 3 4 7

...........................................................................................................................................................................................................................................................
.............................................................................................................................................................................................................................................................Shared features
Overview A pod of Avaya PDS dialers contains up to four dialers connectedthrough a middle-tier server. Following is a list of features that areshared among dialers in a pod:
• calling lists
• jobs
• phone strategies
• record selections
• logins
A multi-dialer office environment greatly increases your company'soutreach capacity. The functionality allows you to manage up to fourdialers in a distributed architecture using a single, unifiedadministration and supervisor interface for faster implementation oflarge-scale outreach programs.
To support multi-dialer, Campaign Director 4.0 makes it easy for you tomanage operations and monitor traffic and workload across the multi-dialer network.
Shared calling list The Avaya PDS allows you to run a job using a calling list from adifferent dialer. Any Avaya PDS within a pod can be used to dialanother dialer’s (within that same pod) calling list. This allows multipledialers to call on the same calling list at the same time which providesscalability on a single campaign above the physical agent limitation ofone Avaya PDS.
The primary advantage of a shared calling list is speed. Imagine a jobwith 1 million records finishing in 5 hours!
The shared list feature allows the agent capacity of multiple AvayaPDSs to be used for a single job. For example, a supervisor creates andstarts a job on each of the dialers in a pod with a single command. Onceagents are logged onto each system, the supervisor monitor all activityfrom a single, real-time view.
Pod monitoring The pod feature combines monitoring, control, and administration ofall four dialers in a pod from a single Campaign Director workstation.
B - 3 4 8

............................................................................................................................................................................................................................................................
Multi-dialer agent login management
You can create and manage logins and passwords for multiple dialersfrom a single system. For example, a login and password created onone dialer may be used on any dialer in the pod.
Multi-dialer monitoring
Monitor will support multiple dialers across the pod. For example, real-time job data from multiple dialers can be aggregated into a single viewof the overall pod.
Multi-dialer control
Editor provides control functions throughout all dialers within a pod.This allows one supervisor to stop and start jobs, adjust Expert CallingRatio, assign line pools, and other job control functions from a singleCampaign Director workstation.
Multi-dialer administration
Campaign Director applications and tools provide administrationacross all dialers in a pod. For example, copying, deleting, andmodifying phone strategies, record selections, or jobs, regardless of thedialer they reside on.
B - 3 4 9

...........................................................................................................................................................................................................................................................
.............................................................................................................................................................................................................................................................Pod impacts
Overview If you work with a pod (two to four dialers), there are specialconsiderations to think about as you create ways to manage, control,and administer settings across multiple dialers.
Multi-dialer Monitor always shows data for all dialers in a pod. However, thecontrols for multi-dialer are turned off by default. You can turn on themulti-dialer control from Settings > Options. Choose which dialers in apod to view. See “View control functions” for more information.
Once the multi-dialer control is turned on, each job control dialog box(for example, Job Linking or Change Time Zones) shows a check mark.If you want to control a single dialer, clear the check box.
Completion codes Dialer completion codes and their corresponding code number andcode description are contained within a system file calledcompcode.cfg. Each dialer has one compcode.cfg file.
Completion codes are used in a variety of ways. Initially, they are usedby the agent to end a call with a customer. This marks the call outcomeon the customer record. Completion codes are also used as part ofreporting. They are essential to accurate reporting and can be used todetermine the success of a campaign.
If there are four dialers in a pod, that also means there are fourcompcode.cfg files. It is important to keep these four completion codefiles in sync for a variety of reasons:
• Agents use the same codes for the same call outcome
• Reporting from completion codes is accurate
• Eliminates the need for troubleshooting for reasons of inaccuratecompletion codes. Keeps all dialer completion codes in sync
• To aggregate data across dialer effectively, completion codedescriptions and completion code assignments (RPC, Abandon,Closure) must remain consistent across all dialers in a pod
Jobs Jobs should be named carefully. Use the following guidelines whencreating or modifying jobs:
• Do not create multiple jobs on multiple dialers with the samename if they have very different job parameters. This limits yourability to aggregate “like” data across multiple Avaya PDSs.
B - 3 5 0

............................................................................................................................................................................................................................................................
• If you want to control like jobs in a single step (jobs with similaror like parameters), then name the jobs the same on differentdialers. For example, if you want to change the quota on job1 onall dialers, you can do so in one step.
B - 3 5 1

...........................................................................................................................................................................................................................................................
.............................................................................................................................................................................................................................................................Primary and secondary dialers
Overview Within a pod, there are dialers that are configured as the “primary”dialer and the “secondary” dialer.
Primary dialer A pod’s primary dialer is an Avaya PDS dialer that runs the mid-tiersoftware essentially controlling and coordinating data management.Every Avaya PDS pod must have a primary dialer. Other dialers feeddata to the primary dialer’s mid-tier that processes the data and makes itavailable for monitoring and reporting. In this way, the systemsupervisor can view status or create reports that include the operationof all the dialers in the pod.
Secondary dialer The secondary dialer is a dialer that is configured to take over primarydialer functions in the event of a failure of the primary dialer.
B - 3 5 2

............................................................................................................................................................................................................................................................
.............................................................................................................................................................................................................................................................Configurator
Overview The Configurator tool provides configuration and troubleshootingutility that exists on the supervisor workstation.
The Configurator is installed during the installation of the AvayaTM
Predictive Dialing System (PDS) Middle Tier Windows Components1.0 and launches at the end of the installation.
Installing the Configuration is a required step prior to the installation ofCampaign Director 4.0. The Configurator can be used fortroubleshooting at any time. After installation, you can find theConfigurator by selecting Start > Program Files > Avaya >PDSMiddleTier.
To complete the configuration, the following items must be entered andsaved in to the Configurator:
• dialer name
• IP address of the primary dialer in the pod and the IP address ifthere is a secondary dialer.
The following shows the screen after the dialer settings are saved:
B - 3 5 3
...........................................................................................................................................................................................................................................................
.............................................................................................................................................................................................................................................................Validation
Overview The Configurator validates information in three areas. The validationsat these areas allow you to isolate any problem in different layers andtiers of the Avaya PDS.
Database validation As the Configurator saves the different settings, it starts to validate thesuccess or failure at each step. This appears on the right half of thescreen.
The Database Validation (Alt-D) shows the following:
A successful validationshows:
A validation failure. This canoccur for several reasons:
the installation and configurationof the Oracle Client is completedsuccessfully on the supervisorworkstation
the Avaya PDS Database Serveris not ready for use (as a result ofthis: Monitor, Analyst, HierarchyManager, and Alerts Viewer maynot be able to return any real-time or historical data).
the Avaya PDS Database isready and available for real-timeand historical monitoring.
TCP/IP or Networking problemsare prohibiting the successfulconnection to the Avaya PDSDatabase Server.
the installation or configurationof the Oracle Client wasunsuccessful.
B - 3 5 4

............................................................................................................................................................................................................................................................
Database failure examples
A failure can be demonstrated for the Database validation by a stop_dboperation on the primary dialer.
Additionally, you can start Monitor or Analyst and demonstrate morecascading failures as a result of the inability of Data Services(avmtdsci.dll) to connect successfully to the Avaya PDS database onthe primary dialer.
Registered ServicesValidation
The Registered Services Validation (Alt-R) shows successfulvalidations and failure validations.
A successful validationshows:
A validation failure occurs forseveral reasons, including thefollowing:
successful installation andconfiguration of the Win32CORBA Services that isinstalled by the Avaya PDSMiddle Tier WindowsComponents on the supervisorworkstation.
unavailability of CORBAservers and services on the HP-UX dialers in the pod. As a resultof this, all of the CampaignDirector applications could behampered
availability of CORBA serversand services on all the HP-UXPDS dialer in the pod.
TCP/IP Networking propertieson the supervisor workstationmight not be correct and mayneed to be tweaked
unsuccessful installation orconfiguration of the Win32CORBA Services that areinstalled by the Avaya PDSMiddle Tier WindowsComponents on the supervisorworkstation
B - 3 5 5

...........................................................................................................................................................................................................................................................
Here are the results of a successful Registered Services Validation:
Validation failure examples
A failure can be demonstrated for the Registered Services validation bya stop_mts operation on the primary dialer.
Additionally, you can start Editor or Monitor and demonstrate morecascading failures as a result of the inability of the CCBridge(ccbridge.dll) to connect successfully to the CCS Service on theprimary tier.
B - 3 5 6
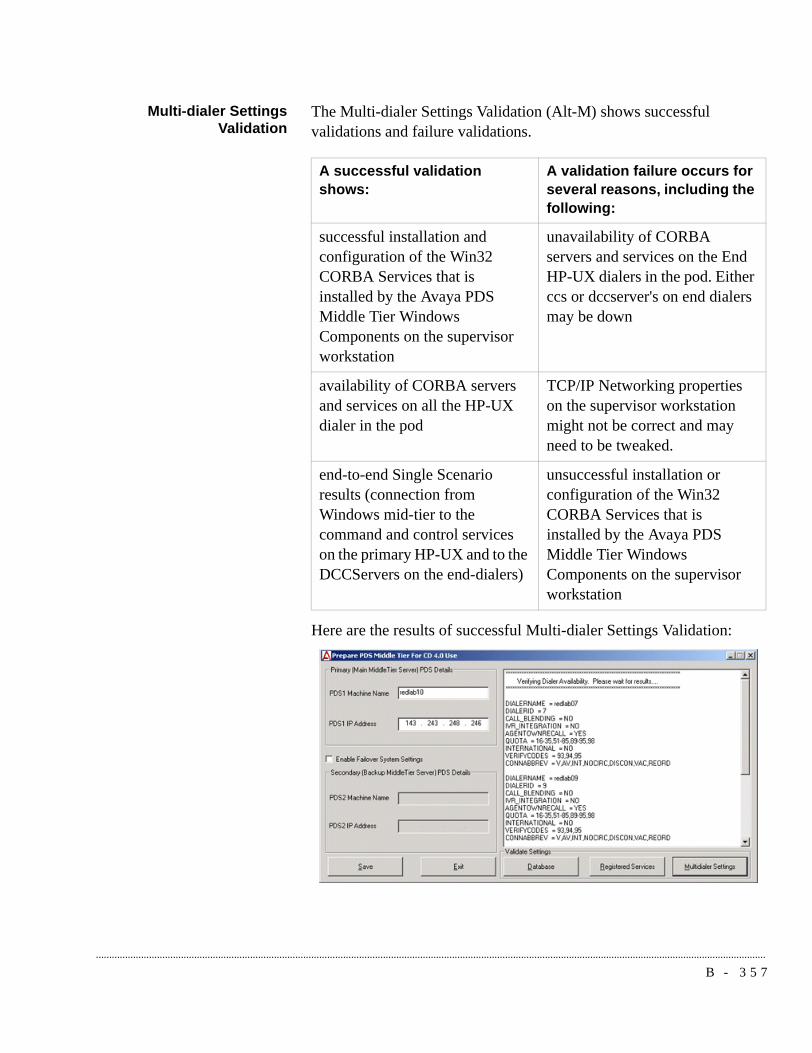
............................................................................................................................................................................................................................................................
Multi-dialer SettingsValidation
The Multi-dialer Settings Validation (Alt-M) shows successfulvalidations and failure validations.
Here are the results of successful Multi-dialer Settings Validation:
A successful validationshows:
A validation failure occurs forseveral reasons, including thefollowing:
successful installation andconfiguration of the Win32CORBA Services that isinstalled by the Avaya PDSMiddle Tier WindowsComponents on the supervisorworkstation
unavailability of CORBAservers and services on the EndHP-UX dialers in the pod. Eitherccs or dccserver's on end dialersmay be down
availability of CORBA serversand services on all the HP-UXdialer in the pod
TCP/IP Networking propertieson the supervisor workstationmight not be correct and mayneed to be tweaked.
end-to-end Single Scenarioresults (connection fromWindows mid-tier to thecommand and control serviceson the primary HP-UX and to theDCCServers on the end-dialers)
unsuccessful installation orconfiguration of the Win32CORBA Services that isinstalled by the Avaya PDSMiddle Tier WindowsComponents on the supervisorworkstation
B - 3 5 7

...........................................................................................................................................................................................................................................................
Note
You can see an example of a failure for the Registered Servicesvalidation by doing a stop_pds operation on one of the secondarydialers. When the multi-dialer settings button is selected, you will notsee results from that dialer. This is an indication that the dccserver onthe dialer is down. This behavior will impact Editor, which will nowshow that the particular dialer is not available. It also has impact onMonitor and System Telnet.
You can also see a failure demonstration by doing a stop_mts on theprimary dialer. Now when the multi-dialer button is selected, there willbe another exception and no results from any of the other dialers will beavailable, even though they may be running all the PDS servicessuccessfully. You will see different impacts on Editor, Monitor, andSystem Telnet.
B - 3 5 8
.............................................................................
.............................................................................
A ACD agent, 28
administrator console, 9agent
find, 237
remove from job, 241
transfer, 238
agent blending, 29
Agent Blending tool, 303, 320
Agent Completion Codes view, 187
Agent control functions, 236
Agent Detail view, 184
Agent History view, 189
agent line
monitor, 240
agent logons, 29
agent states, 135
agent workstation, 9agents
types of, 28
alerts, 224
Alternate Initial pane, 56
alternate initial phone, 53, 217
Analyst
overview, 16, 243
append, 63
audience
intended for this guide, 1Avaya PDS
CPU, 8overview, 2
B blend agent, 28
blend jobs, 107
blending, 320
...................................................................................
.............................................................................
.............................................................................
button bar, 140
button group
Custom, 150
buttons
large or small, 142
C cabinet
system, 3call detection mode, 53
calling list
overview, 32
shared, 22, 348
Calling Results pane, 84
calling results pane, 84
calls in the wait queue, 112
Campaign Director
overview, 11
campaign life cycle, 18
cards
EDTG, 5ENBC, 5trunk, 5
characters
wildcard, 77
Completion Code Manager, 281, 285
completion codes, 36
pods, 25, 350
components, 3Custom button group, 150
custom view, 145
customizable
Monitor, 140
D daytime home calls, 111
Detection Mode, 216
Detection Mode pane, 57
........................................................................................
.............................................................................
.............................................................................
.............................................................................
dialer, 62, 94
multi-dialer commands, 46
primary, 24, 352
secondary, 24, 352
Dialer Agents view, 160
Dialer History view, 163
Dialer Lines view, 162
Dialer Status view, 158
dialers
in your views, 134
digital switch, 4Do Not Call group name, 111
download calling lists, 33
E Editor
overview, 14
ENBC, 8end jobs, 112
environment, 33
Expert calling ratio, 210
expert calling ratio, 112
F favorite views, 153
field
Group, 82
Logic, 82
Value, 82
Filter Data, 192
Filter data, 194
filter data, 155
Find, 192
Find Agent view, 183
find an agent, 237
Find item, 155
G global features, 12
I N D E XI N - 3 6 1
................................................................................

.............................................................................
.............................................................................
.............................................................................
Graphic view, 155
Graphical View, 192
Group field, 82
H hardware, 3Hide or show columns, 201
Hide/Show Columns, 192
hide/show columns, 155
hierarchies, 267
hierarchy, 132, 200
Hierarchy Manager, 193, 269
overview, 265
Hierarchy Manager icon, 155
hit rate, 111
HTML, 203
I icons
views toolbar, 155
inbound agent, 28
inbound jobs, 107
inbound settings, 211
infinite, 81
initial hit rate, 111
initial phone, 53
Initial Phone pane, 56
intelligent call blending, 29
Interactive Voice Response job settings, 116
J job
adjust while running, 205
link a job, 208
stop a job, 207
Job Agents view, 167
Job Call Handling view, 172
Job Completion Codes view,
I N D E XI N - 3 6 2
...................................................................................
.............................................................................
.............................................................................
173
Job Detail view, 169
Job History view, 178
Job Performance view, 180
job settings, 109
Job Status view, 165
Job Wait Queues view, 175
jobs
overview, 107
L Level 1 Scope Selector, 192
life cycle
campaign, 18
lines
reassign, 212
Link to job, 208
list
shared calling, 22, 348
Log, 232
Logic field, 82
login
to campaign director, 44
logons
agent, 29
M managed agent, 28
managed job settings, 115
Managed jobs, 213
messages
send to an agent, 239
middle-tier server, 22, 348
Minimum, 113
minimum hit rate, 113, 209
Miscellaneous pane, 81
miscellaneous pane, 81
modem
maintenance, 8
........................................................................................
.............................................................................
.............................................................................
.............................................................................
Monitor
adjust job while running, 205
overview, 15, 131
user interface, 140
monitor an agent line, 240
monitoring
multi-dialers, 23, 349
multi-dialer
administration, 23, 349
agent login management, 23, 349
control, 23, 349
impacts, 25, 350
monitoring, 23, 349
multi-dialer commands, 46
multi-dialer control, 134
N navigate, 141
O outbound calling list, 113
outbound jobs, 107, 108
P PC analysis telnet, 297
PC Analysis Telnet tool, 293
Performance Code, 192
performance code, 155, 195
person-to-person agent, 28
phone strategy
create, 56
overview, 51
pod
administration, 23, 349
agent login management, 23, 349
completion codes, 25, 350
control, 23, 349
..............................................................................
.............................................................................
.............................................................................
definition of, 21, 347
monitoring, 22, 23, 348, 349
overview of, 22, 348
pod impacts, 25, 350
pods
shared features, 22
primary dialer, 24, 352
printers, 10
Q quotas, 113, 220
R reason for reissue, 1reassign lines, 212
recall notification time (min), 114
recall reschedule interval (mins), 114
recalls, 85, 218
Recalls pane, 85
record selection, 73
create, 87
run, 92
record selections
list all on dialer, 94
Records pane, 82
records pane
record selection, 82
Refresh, 156
refresh, 48
refresh a view, 151
refresh rate, 137
Refresh view, 193
remove agent, 241
report categories, 247
reports, 244
resize columns, 140
retries, 54
...................................................................................
.............................................................................
Retries pane, 57
S save, 47
schedules, 33
Scope Selector, 192
scope selectors, 197
Scope selectors examples, 196
script label for call, 114
secondary dialer, 24, 352
Selection Files button, 80
selection reports
overview of pane, 79
selection reports button, 79, 95
selections
overview, 73
settings
job, 109
shared calling list, 22, 348
Shared features, 22, 348
shared features, 22
sort, 86, 140
Sort pane, 86
special characters, 77
strategies
create, 56
overview, 51
subrack, 5Supervisor Agents view, 181
supervisor workstation, 9switch
digital, 4system cabinet, 3system components, 3system telnet, 302
System Telnet tool, 299
........................................................................................
.............................................................................
.............................................................................
.............................................................................
T Table View, 192
Table view, 155
Table View or Graphical View, 202
telephone lines
reassign, 212
telnet
PC Analysis, 297
system, 302
time range, 133, 199
Time Scope, 193
Time selector, 156
time zone, 113
Time Zone pane, 83
time zone pane, 83
times zones, 214
toolbar
within a view, 155
Toolbar buttons within a View, 192
Tools
Agent Blending, 303
Completion Code Manager, 281
Hierarchy Manager, 265
PC Analysis Telnet, 293
System Telnet, 299
transfer an agent, 238
transfer to inbound job name, 114
U unit work list, 215
user interface
Monitor, 140
V Value field, 82
verify, 81
I N D E XI N - 3 6 3
................................................................................

.............................................................................
view, 143
custom, 145
definition of, 140, 155
overview, 155
view categories, 156
view set, 136
views
custom, 153
in Monitor, 140
Views toolbar icons, 155
W wait delay (sec.), 114
wildcard, 236
wildcard characters, 77
workstation, 9
I N D E XI N - 3 6 4
...................................................................................
........................................................................................ ..............................................................................