AutoDownload: SQL Server and Network Trouble Shooting · 2.2 Firewalls and Antivirus Software...
17
Information Sheet AutoDownload: SQL Server & Network Troubleshooting Information Sheet Version 4 AutoDownloadSQLServerAndNetworkingTroubleshootingv4.docx Page 1 of 17 AutoDownload: SQL Server and Network Trouble Shooting AutoDownload uses Microsoft’s SQL Server database software. Since 2005 when AutoDownload was first released Microsoft have also released new versions of both its operating system and SQL Server software. The current version of AutoDownload runs on the following operating systems: Windows XP – No longer supported by Microsoft Windows Vista Windows 7 Windows 8 and 8.1 Windows 10 A number of users have been able to get AutoDownload working on a Mac using a Windows emulator but we have very little experience of Apples! The following versions of SQL server are supported: SQL Server Express 2005 SQL Server Express 2008 SQL Server Express 2008 R2 SQL Server Express 2012 SQL Server Express 2014 Full SQL Server The more recent versions are available as either 32 bit or 64 bit. 1 Installing SQL Server This is covered in detail in the AutoDownload Installation Instructions. There are two key points when installing SQL server; firstly that you install the correct version for your computer and secondly that SQL Server is installed from within AutoDownload. If you fail to do this you have very little chance of getting it to work. Installing SQL Server through AutoDownload enables these three key actions to be made: TCP/IP enabled Mixed Authentication to be enabled. This allow the logging on to SQL Server to be via Windows Authentication (Windows user/Password) and SQL Server Authentication (ability to use a SQL login e.g. “sa” for system administrator). AutoDownload requires SQL Server Authentication. The naming of the SQL Server Instance which must be “MSSQLSERVER” for AutoDownload to work. If you install SQL Server outside of AutoDownload these three setting will not be made and SQL Server will not work for AutoDownload. You will need to uninstall SQL Server and start again!
Transcript of AutoDownload: SQL Server and Network Trouble Shooting · 2.2 Firewalls and Antivirus Software...
Information Sheet
AutoDownload: SQL Server & Network Troubleshooting Information Sheet Version 4 AutoDownloadSQLServerAndNetworkingTroubleshootingv4.docx Page 1 of 17
AutoDownload: SQL Server and Network Trouble Shooting
AutoDownload uses Microsoft’s SQL Server database software. Since 2005 when AutoDownload was first released Microsoft have also released new versions of both its operating system and SQL Server software. The current version of AutoDownload runs on the following operating systems:
Windows XP – No longer supported by Microsoft
Windows Vista
Windows 7
Windows 8 and 8.1
Windows 10
A number of users have been able to get AutoDownload working on a Mac using a Windows emulator but we have very little experience of Apples!
The following versions of SQL server are supported:
SQL Server Express 2005
SQL Server Express 2008
SQL Server Express 2008 R2
SQL Server Express 2012
SQL Server Express 2014
Full SQL Server The more recent versions are available as either 32 bit or 64 bit.
1 Installing SQL Server This is covered in detail in the AutoDownload Installation Instructions. There are two key points when installing SQL server; firstly that you install the correct version for your computer and secondly that SQL Server is installed from within AutoDownload. If you fail to do this you have very little chance of getting it to work. Installing SQL Server through AutoDownload enables these three key actions to be made:
TCP/IP enabled
Mixed Authentication to be enabled. This allow the logging on to SQL Server to be via Windows Authentication (Windows user/Password) and SQL Server Authentication (ability to use a SQL login e.g. “sa” for system administrator). AutoDownload requires SQL Server Authentication.
The naming of the SQL Server Instance which must be “MSSQLSERVER” for AutoDownload to work.
If you install SQL Server outside of AutoDownload these three setting will not be made and SQL Server will not work for AutoDownload. You will need to uninstall SQL Server and start again!

Information Sheet
AutoDownload: SQL Server & Network Troubleshooting Information Sheet Version 4 AutoDownloadSQLServerAndNetworkingTroubleshootingv4.docx Page 2 of 17
1.1 Installation Problems
The following is a list of common problems, and solutions we have been made aware of as part of providing support for AutoDownload.
The installation may fail if you have not installed the latest Windows Updates on your computer. The SQL Server installation process does a number of checks and if you have missing or out of date Windows files the installation may well fail. For Example:
o On a Windows 7 laptop installing SQL Server 2012 Express the installation failed with an Exit code of “-2067922335”, this was fixed by performing a Windows Update and then running the install again.
o On a Windows 7 laptop installing SQL Server 2012 Express the installation failed with an Exit code of “-2068578304”, this was caused by the password not being strong enough.
In rare situations, you may already have programs on the computer that use components of SQL Server. This may result in the failure of the installation. If for example "Microsoft SQL Server Native Client" is already installed on your computer the installation will fail. - Uninstall the SQL Server components before installing SQL Server Express and they will be reinstalled as part of this process.
Once you have downloaded the SQL Server setup file you should disconnect from your Wi-Fi / the internet. If you do not disconnect the SQL Server installation process checks for software updates and this causes the installation to fail.
Windows 8 and Windows 8.1 – SQL Server will not install correctly if the Computer Name and the Windows User Name are the same (no, we don’t know why either)! You must either change the Computer’s Name or use a different Windows User before installing the software. If you change the computer’s name then we suggest that you then reboot.
SQL Server password. In the early versions of Windows/SQL Server the password could be very weak. Microsoft now requires stronger passwords to improve security. How strong the password needs to be is based on your Windows Locale. We recommend a minimum password length of 7 characters. If you use fewer than that the install may fail depending on your Windows security configuration. You may also want to think of using a mix of upper and lower case alphanumeric, numbers and special characters e.g. %,!. The following is a link to a Microsoft webpage on the subject https://technet.microsoft.com/en-us/library/hh994562(v=ws.11).aspx Don’t lose the password as you will need it when setting up new database settings. If you club/organisation has multiple computers with SQL Server only for AutoDownload installed we recommend that the same password is used on all computers to keep it as simple as Microsoft allows you!
Do not install SQL Server on a Windows XP computer that is on Service Pack 2. You MUST upgrade to Windows XP Service Pack 3 first.
Make sure you have permission to install the software. Microsoft will require that your Windows User has administrator rights.
In order to save disk space some computers are setup with “Compress Contents” enabled. If the SQL Server Program and data folders have compression enabled then SQL Server will not work.

Information Sheet
AutoDownload: SQL Server & Network Troubleshooting Information Sheet Version 4 AutoDownloadSQLServerAndNetworkingTroubleshootingv4.docx Page 3 of 17
If the installation fails you will normally get an installation exit code. When we are told about these we find that they are not very helpful, normally a Google search for them will return no help. However the SQL server set-up progress should create a log file which should provide better clues on what the problem is. As long as the installer is run through AutoDownload it should be at C:\Users\[username]\AppData\Local\Temp\SqlSetup*.log. Additionally the following file “SystemConfigurationCheck_Report” may provide some clues.
SQL Server exit error code 5. This relates to the security access needed to install SQL Server. Administrator access is required. Even if the user you have logged in with has administrator rights you still need to run AutoDownload as an administrator and then install SQL Server from within AutoDownload.
2 SQL Server “Not Working” Once SQL Server has been installed the next step is to create a connection by adding a database setting. This is covered in the installation instructions. If you get the following then something is wrong!
Means: Can’t find Server (Computer name or IP address from the database settings).
Or
Means: Connected to Server but not getting anything from the port. This will be because either SQL Server is not running or the firewall is blocking the port or the port number is wrong!
Or
Means: Either: You have entered the wrong password Or: You have the Incorrect Authentication mode

Information Sheet
AutoDownload: SQL Server & Network Troubleshooting Information Sheet Version 4 AutoDownloadSQLServerAndNetworkingTroubleshootingv4.docx Page 4 of 17
There are a number of possible reasons why you get these errors. The following are checks you can do to find and correct the problem.
2.1 Is SQL Server running?
SQL Server runs as a service on the computer. To check that it is running go to Control Panel >> Administrative Tools >> Services
The service should be “Started”. The start up type of “Automatic” means that when the computer is turned on SQL Server should be started as part of the boot up process. However if the computer is required to do a lot of processing on start up or the computer is not very powerful then starting of SQL Server can timeout and thus fail. We have found that for Windows 8 and later it is better to change the services “Startup Type” to “Automatic (Delayed Start)”. If SQL Server is not in the list then it’s not installed!
2.2 Firewalls and Antivirus Software
Firewall settings and antivirus software can stop AutoDownload communicating with SQL Server. The best way to test this is to turn them off and see if that fixes the problem. It is strongly recommended that you disconnect from the internet/Wi-Fi before turning off firewalls or disabling antivirus software! If this fixed the problem then a solution needs to be found to re-enable the firewall/antivirus but still allow AutoDownload to communicate with SQL Server. Additional notes about firewalls can be found below in section 3.5.

Information Sheet
AutoDownload: SQL Server & Network Troubleshooting Information Sheet Version 4 AutoDownloadSQLServerAndNetworkingTroubleshootingv4.docx Page 5 of 17
2.3 TCP/IP Enabled?
TCP/IP needs to be enabled. This should have happened as part of the installation process! But...to check Open application ‘SQL Server Configuration Manager’. Check in ‘SQL Server 20xx Network Configuration > Protocols for MSSQLSERVER > TCP/IP. The status should be “Enabled”.
SQL Server Configuration Manager can also be used to check if SQL Server is running...

Information Sheet
AutoDownload: SQL Server & Network Troubleshooting Information Sheet Version 4 AutoDownloadSQLServerAndNetworkingTroubleshootingv4.docx Page 6 of 17
2.4 Incorrect Authentication mode?
Again this should have been setup correctly as part of the installation process, but...to check... You will need to install “SQL Server Management Studio Express”. This is a free application from Microsoft, make sure you download and install the correct version for your version of SQL Server. Start SQL Server Management Studio Express, Right click on machine name and select properties then select security. The authentication mode should be set to ‘SQL server and Windows Authentication mode. If not select it. You will then be prompted to add a password for user ‘sa’.

Information Sheet
AutoDownload: SQL Server & Network Troubleshooting Information Sheet Version 4 AutoDownloadSQLServerAndNetworkingTroubleshootingv4.docx Page 7 of 17
3 Network Troubleshooting
3.1 Background
For small events you may well only need one computer running AutoDownload. For bigger events to allow more users, split tasks or just to have more screens you will need to network multiple computers together with them all accessing a common SQL Server database. Within AutoDownload on each computer, a database setting needs to be set-up to point to the database on the main computer, see section 3.6 below. However you need to get the computers talking to each other first! SQL Server is a database engine rather than one that works via file sharing, that is the server program running on the host computer is the only program that accesses the physical database files, and client programs (such as AutoDownload) talk only to the server program. The communication between client and server, even on the same computer, works via TCP/IP networking, which has numeric port numbers to specify the "channel" communications is on, default for SQL Server is 1433. So file transfer may be of use to you but it doesn't have any bearing on AutoDownload being able to talk to the server. However if you have file sharing working between the two computers you have some networking working, so can skip the first few steps.
3.2 Physical Connection
The first thing required for any networking is a physical connection. Generally this would be by Ethernet cable, but could be by Wi-Fi. We would always recommend using cables for events, Wi-Fi is so dependent on its locality for interference, other devices on the same channel etc so it works great in the office, then you take it out into the field and it doesn't work, or it works intermittently or slowly. Often lots of bodies in the way stops it working, which means it works great until download is busy when it stops. If you are using cable then most Ethernet sockets will have a light on to indicate a physical connection is working. If you are linking just two computers together with a single cable then traditionally you would have to use a special cable called a crossover cable, but most modern laptops from the last five or so years will work with either a crossover or a normal Ethernet cable. Whether cable or Wi-Fi, you can check you have a connection. Open Network and Sharing Center >> Change adapter settings (Control Panel\Network and Internet\Network Connections) Or right click on the network icon at the bottom right of the screen and select “Open Network and Sharing Center” and then select “Change adapter settings” from the menu.

Information Sheet
AutoDownload: SQL Server & Network Troubleshooting Information Sheet Version 4 AutoDownloadSQLServerAndNetworkingTroubleshootingv4.docx Page 8 of 17
You will have a list of network adapters, and you can see the status of each.
Screen shot from Windows 8.1 showing that both Wi-Fi and Cable (Ethernet) network connections are enabled.
3.3 TCP/IP Addressing
The TCP/IP networking system has an address for each computer on the network. This address has two parts to it, the actual address and a thing called a subnet mask. The subnet mask tells the computer which other addresses should be on the same local network as it. So for the two or more computers to talk to each other they must have addresses which are different to each other but on the same subnet. On the internet, where TCP/IP was designed for, addresses are assigned by a global authority (Internet Assigned Numbers Authority - IANA), but it would be too much to expect each home or corporate network to apply for each addresses they needed, and also there would not actually be enough addresses available for all the computers that needed them (for TCP/IP v4 at least, ignoring v6 for now...). So this authority has set aside three ranges of addresses that are for internal use. The addresses you use will generally be in this range, although there is one exception we will talk about below. To find out what address a computer is using, open up a Command Prompt. You will find a shortcut to this on the start menu under accessories, or you can run “cmd”. When faced with the prompt type “ipconfig” (without the quotes) and press enter. You will get a myriad of information which at first will seem unintelligible. There will probably be more than one network adapter listed, so find the correct one first. Then you are looking for the IPv4 address and its Subnet Mask. These will be both of the form a.b.c.d where a-d are numbers between 0 and 255.

Information Sheet
AutoDownload: SQL Server & Network Troubleshooting Information Sheet Version 4 AutoDownloadSQLServerAndNetworkingTroubleshootingv4.docx Page 9 of 17
In the above screen shot for the Ethernet connection the IP address is 192.168.1.59 and the Subnet Mask 255.255.255.0. In technical terms, if the address and subnet mask are combined in a binary AND operation, and compared to the same operation on another computer, they will talk to each other locally if the answers are the same. This is very technical, but generally speaking subnet masks are kept simple and only consist of several segments of 255 followed by several of 0 for example 255.255.255.0. This example would mean that as long as the two addresses had the same first 3 segments they would talk. Similarly 255.255.0.0 would mean as long as the first 2 segments were the same they would talk. So you are probably thinking now why not make it 0.0.0.0 and then all computers talk right? On a isolated network never connected to the outside world, yes. But remember this is defining which addresses are local, and as soon as you connect your computer to another network it will never look outside the local network for any other computer. There is also convention as to which ranges of addresses are designed for use with which subnets. The three ranges reserved for private use mentioned above are for three different subnets. So they are: 10.*.*.* with 255.0.0.0 176.16.*.* with 255.255.0.0 192.168.*.* with 255.255.255.0 The last one appears unusual, as the subnet doesn’t match the same as the range allocated. If you’ve got the hang of it by now you will see there are actually 256 ranges

Information Sheet
AutoDownload: SQL Server & Network Troubleshooting Information Sheet Version 4 AutoDownloadSQLServerAndNetworkingTroubleshootingv4.docx Page 10 of 17
available here, not one. Generally speaking most private networks will use an address in this last range. I would imagine that most of you reading this who have two computers plugged together with a network cable will actually have an address starting 169. As mentioned above, this is the exception to those private ranges. Microsoft use this range when a network adapter is set-up to receive an address automatically, but cannot. This is actually really useful because plug in two computers together and leave for a while, say a minute (long enough for them to give up trying to receive an automatic address), and they will be able to talk to each other. Note this is not available on Windows 2000. If you plug your computer in to another network, or you are using Wi-Fi to link the two computers and you connect this to another network then this is probably the easiest way to do it as you don’t have to change settings between networks. We recommend that you allocate an IP address to each computer you intend to use on your “AutoDownload Network” and that once set-up you put a sticker on each computer saying what its IP address is! To allocate an IP address go to Network Connects (as above) and right click on the appropriate adapter and get the Properties...
then Properties for TCP/IP (v4)...
Information Sheet
AutoDownload: SQL Server & Network Troubleshooting Information Sheet Version 4 AutoDownloadSQLServerAndNetworkingTroubleshootingv4.docx Page 11 of 17
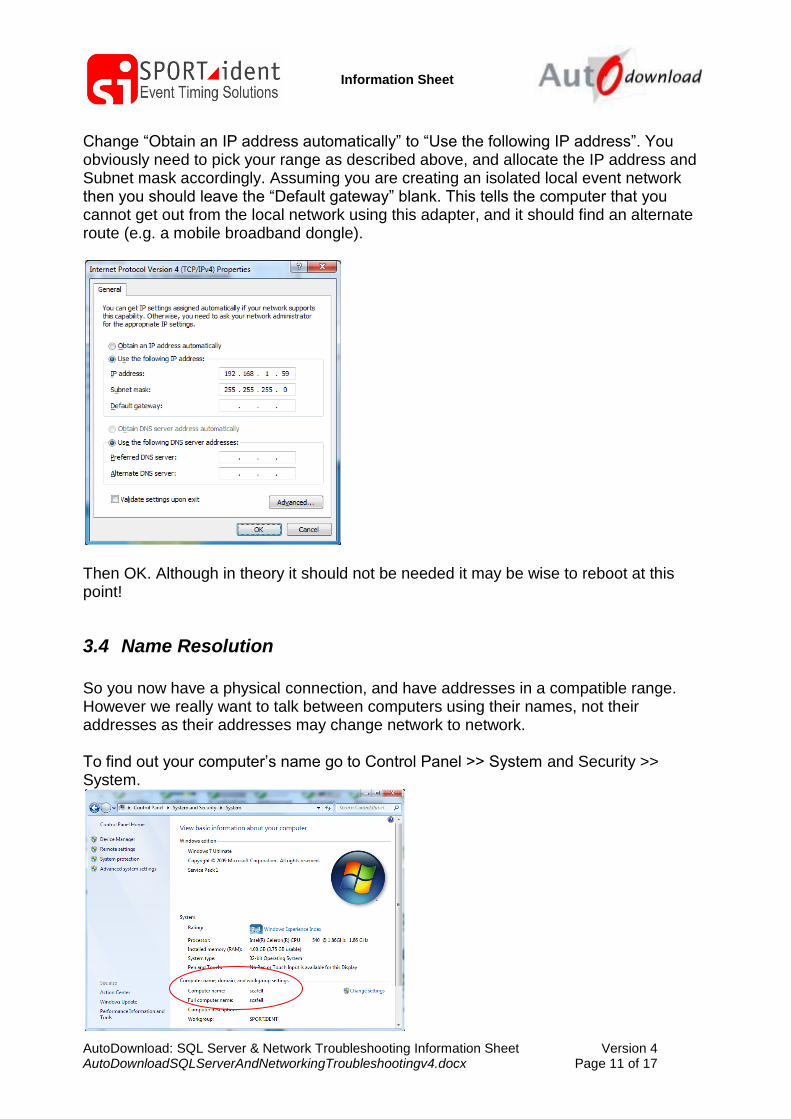
Change “Obtain an IP address automatically” to “Use the following IP address”. You obviously need to pick your range as described above, and allocate the IP address and Subnet mask accordingly. Assuming you are creating an isolated local event network then you should leave the “Default gateway” blank. This tells the computer that you cannot get out from the local network using this adapter, and it should find an alternate route (e.g. a mobile broadband dongle).
Then OK. Although in theory it should not be needed it may be wise to reboot at this point!
3.4 Name Resolution
So you now have a physical connection, and have addresses in a compatible range. However we really want to talk between computers using their names, not their addresses as their addresses may change network to network. To find out your computer’s name go to Control Panel >> System and Security >> System.

Information Sheet
AutoDownload: SQL Server & Network Troubleshooting Information Sheet Version 4 AutoDownloadSQLServerAndNetworkingTroubleshootingv4.docx Page 12 of 17
Windows uses two methods to resolve names to addresses: The first is DNS (Domain Name System) which is an internet technology whereby servers act as lookup stations for names. If you decided to allocate yourself an IP address you would’ve seen an option for allocating DNS servers. When an IP address is handed out automatically (e.g. by your home broadband router), generally the DNS server or servers to use are allocated with it. For a local event network you could set-up a DNS server on it but this is quite advanced. The other way Windows finds names is by broadcast on the local network. If you have a Windows 2000 or XP computer, you will probably find this just works. However all the nasty people out there on the internet have spoiled this for the rest of us, and broadcast of names is now generally turned off. Windows Vista and later have the ability to identify a network as Public or Private, with Private sub-divided into Home or Work. You may have seen a popup window shortly after plugging into a new network offering this choice. Essentially broadcast of names and receipt of those broadcasts only happens if the network is Private. The big problem here though is that Microsoft haven’t thought of us running small isolated networks, they are thinking of an ever connected world. If you just have a single cable linking two computers together, you cannot change this from the default of Public hence by default hence no broadcast. You have three choices:
1) Don’t use names, use IP addresses
2) Disable the firewalls, if you are on an isolated network you don’t need it anyway.
Think though if you are going to plug a mobile broadband dongle in though.
3) Enable name broadcast for Public networks
If you go with option 3, go to the “Network and Sharing Center” again and then “Change advanced sharing settings”.
And then turn on “Network Discovery”. You may want to turn this back off when not on events.

Information Sheet
AutoDownload: SQL Server & Network Troubleshooting Information Sheet Version 4 AutoDownloadSQLServerAndNetworkingTroubleshootingv4.docx Page 13 of 17
So we should check we can resolve names. The easiest way to do this is to perform a Ping test. Open up a command prompt (as explained above) and type in “ping <destination name>” (replacing <destination name> as appropriate e.g. “ping my-other-computer”. You will get one of three results:
The first is it will report it cannot find the host - this means the name resolution is not working.
The second is that it will report Request timed out four times, this means the name resolution is working but the remote computer is not replying; this is not unusual as the firewall on that computer may not allow the response.
The third result is that you get four successful replies – this is obviously good.
Note you can also do a Ping test using IP addresses to check if the computer can “see” each other.

Information Sheet
AutoDownload: SQL Server & Network Troubleshooting Information Sheet Version 4 AutoDownloadSQLServerAndNetworkingTroubleshootingv4.docx Page 14 of 17
3.5 Firewall and Anti-Virus software
As mentioned right at the top of the networking section, TCP/IP uses port numbers as “channels” for information. SQL Server by default uses 1433 on TCP. You can check the port number using “SQL Server Configuration Manager” and double clicking on the TCP/IP Protocols.
If you have a firewall enabled on your server computer it needs to allow traffic on this port from the client computers. There are several strategies you might want to use here:
Turn off firewall for the duration of the event, beware use of mobile broadband
dongles though.
Allow this port through the firewall as an “Exception”. Consider turning off all
exceptions when on an unsecure connection e.g. coffee shop Wi-Fi.
If you have allocated your own IP addresses then you may want to only make the exception allowed for the correct addresses (this is not available under certain versions of Windows). Windows comes with its own firewall but some Anti-Virus/Internet Security software products also have their own Firewall Software. For any computer that has SQL Server installed and an AutoDownload database we recommend the second of the two strategies above and that an inbound rule (exception) is created to enable port 1433 and thus allow other computers to access the database. This needs to be done either in the Windows Firewall or the third party one if it exists.

Information Sheet
AutoDownload: SQL Server & Network Troubleshooting Information Sheet Version 4 AutoDownloadSQLServerAndNetworkingTroubleshootingv4.docx Page 15 of 17
3.5.1 Enabling Port 1433 in Windows Firewall
The following is using Windows 7, the screens/process is the same for Windows 8. In “Windows Search” look for and then open “Windows Firewall”
Then “Advanced Settings” and Inbound Rules and New Rule
Select “Port” and then “Next”

Information Sheet
AutoDownload: SQL Server & Network Troubleshooting Information Sheet Version 4 AutoDownloadSQLServerAndNetworkingTroubleshootingv4.docx Page 16 of 17
Specify port 1433 and Next
“Allow the connection” and Next
Next
Information Sheet
AutoDownload: SQL Server & Network Troubleshooting Information Sheet Version 4 AutoDownloadSQLServerAndNetworkingTroubleshootingv4.docx Page 17 of 17
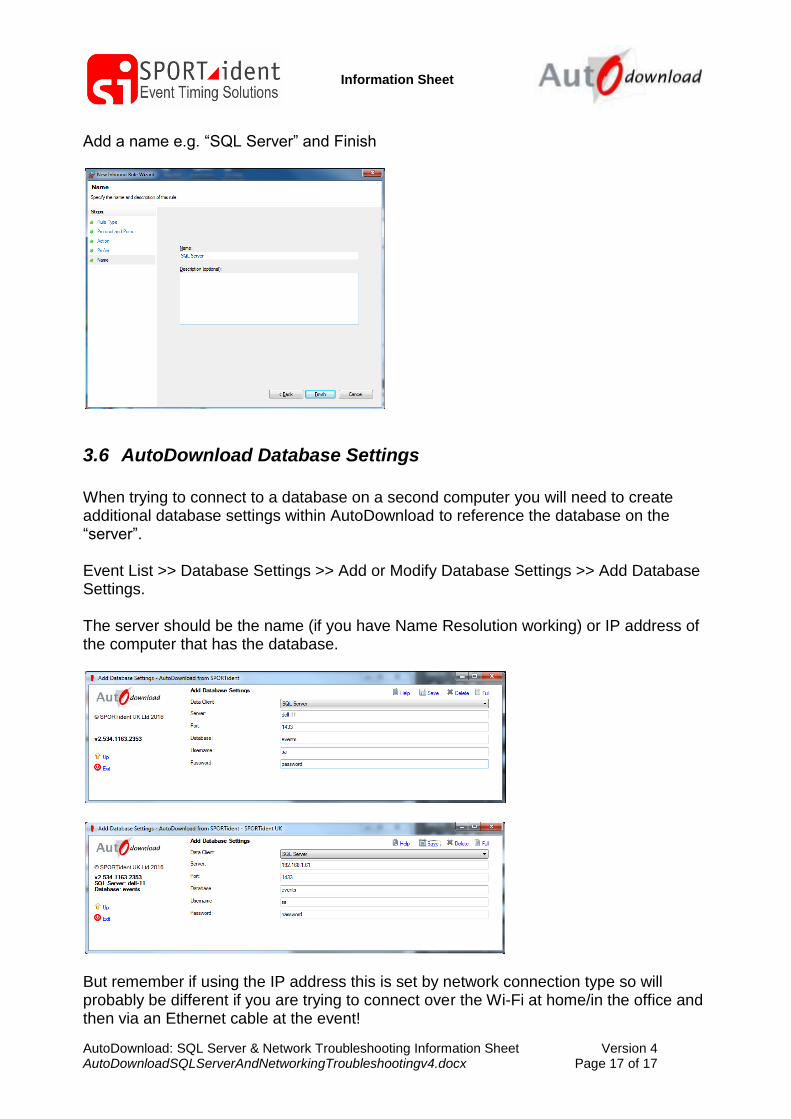
Add a name e.g. “SQL Server” and Finish
3.6 AutoDownload Database Settings
When trying to connect to a database on a second computer you will need to create additional database settings within AutoDownload to reference the database on the “server”. Event List >> Database Settings >> Add or Modify Database Settings >> Add Database Settings. The server should be the name (if you have Name Resolution working) or IP address of the computer that has the database.
But remember if using the IP address this is set by network connection type so will probably be different if you are trying to connect over the Wi-Fi at home/in the office and then via an Ethernet cable at the event!