Autodesk Fabrication 2013
36
Buildi ng Da ta M EP C ontent Ma nag er 2013 and Autodesk Fabri c ati on Ins talla ti on Manual C op yr ight ©201 2 Tec hnica l S ales Inter nationa l, Inc. All ri ghts res erved worldwide . Rev A3 Page 1 Aut odes k F abr ic at ion 20 13 & B uilding Dat a ME P C ont ent Manager 20 13 Ver 3.0 .1.5 Installation Manual B y Tableof Contents 1 Introduction and Instructions ................................................................................................................... 2 2 Download and Install Autodesk Fabrication Software.... ................................................................. ....... 4 2.1 Download and Install MEP Content Manager 2013 From Fabrication 2013 .......................................... 12 2.2 Upgrading Your 2012 MAP Database ........................................................................................................ 20 2.2.1 Repairing Item Paths................................................................................................................................... 23 2.2.2 - Service Button Items Still Missing? Try This! .......... ......................................................................... 25 2.3 Downloading a New Building Data Content Pack ..................................................................................... 27 3 Download and Install MEP Content Manager 2013 From Website ......... ............................................ 30 4 Get Serial Number for Fabrication 2013. ............................................................................................... 32
-
Upload
raul-sigfrid -
Category
Documents
-
view
219 -
download
0
Transcript of Autodesk Fabrication 2013

7/27/2019 Autodesk Fabrication 2013
http://slidepdf.com/reader/full/autodesk-fabrication-2013 1/36
Building Data MEP Content Manager 2013 and Autodesk Fabrication Installation Manual
Copyright ©2012 Technica l Sales Internationa l, Inc. All rights reserved worldwide. Rev A3 Page 1
Autodesk Fabrication 2013
&Building Data MEP Content Manager 2013 Ver 3.0.1.5
Installation Manual
By
Tableof Contents
1 Introduction and Instructions ................................................................................................................... 2 2 Download and Install Autodesk Fabrication Software............................................................................ 4
2.1 Download and Install MEP Content Manager 2013 From Fabrication 2013 .......................................... 12 2.2 Upgrading Your 2012 MAP Database ........................................................................................................ 20 2.2.1 Repairing Item Paths................................................................................................................................... 23 2.2.2 - Service Button Items Still Missing? Try This! ................................................................................... 25 2.3 Downloading a New Building Data Content Pack ..................................................................................... 27
3 Download and Install MEP Content Manager 2013 From Website ..................................................... 30 4 Get Serial Number for Fabrication 2013. ............................................................................................... 32

7/27/2019 Autodesk Fabrication 2013
http://slidepdf.com/reader/full/autodesk-fabrication-2013 2/36
Building Data MEP Content Manager 2013 and Autodesk Fabrication Installation Manual
Copyright ©2012 Technica l Sales Internationa l, Inc. All rights reserved worldwide. Rev A3 Page 2
1 Introduction and Instructions
This instruction document will help assist you with the installation of Autodesk Fabrication 2013, Building Data
MEP Content Manager 2013, and getting your serial numbers for Fabrication 2013.
If you currently have a TSI Building data Icon running on your task bar (see screen shot below, it must first be
uninstalled before continuing with the installation instructions.
1. Close the BDInformationService by right-clicking on the icon in the task bar and select EXIT from the
context menu.
2. Remove the BDInformationManager shortcut from the Startup menu:
a. Go to START – ALL PROGRAMS – STARTUP
b. Right-click the program’s icon
c. Select “Delete” from the context menu.
3. Start Windows Explorer.and navigate to C:\Program Files\BuildingData\Support. Delete the following
files from this directory:
a. BDInformationManager.exe
b. BDNotify.exe
c. BDSvc.exe
d. BDWSvc.exe
Please start from the top of Page_3 to ensure the correct installation.
If you have any questions or issues please contact support at www.MAP-CC.com.
7/27/2019 Autodesk Fabrication 2013
http://slidepdf.com/reader/full/autodesk-fabrication-2013 3/36
Building Data MEP Content Manager 2013 and Autodesk Fabrication Installation Manual
Copyright ©2012 Technica l Sales Internationa l, Inc. All rights reserved worldwide. Rev A3 Page 3
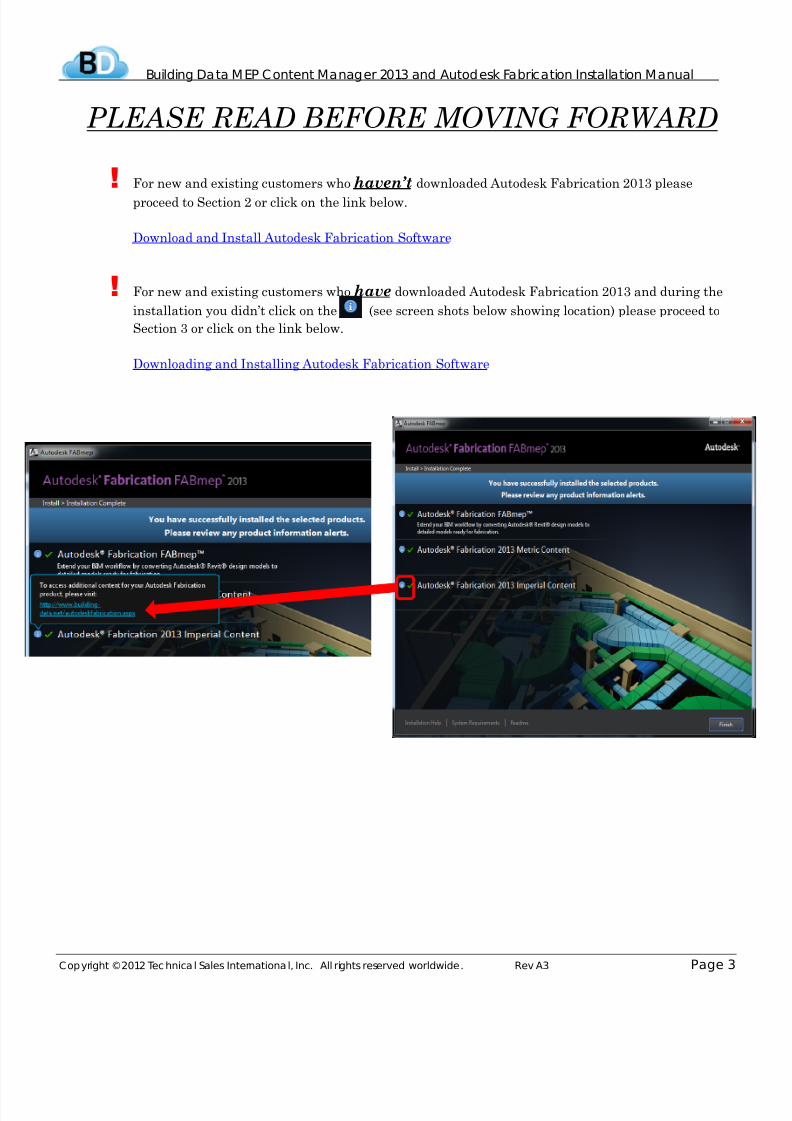
PLEASE READ BEFORE MOVING FORWARD
! For new and existing customers who haven’t downloaded Autodesk Fabrication 2013 please
proceed to Section 2 or click on the link below.
Download and Install Autodesk Fabrication Software
! For new and existing customers who have downloaded Autodesk Fabrication 2013 and during the
installation you didn’t click on the (see screen shots below showing location) please proceed to
Section 3 or click on the link below.
Downloading and Installing Autodesk Fabrication Software

7/27/2019 Autodesk Fabrication 2013
http://slidepdf.com/reader/full/autodesk-fabrication-2013 4/36
Building Data MEP Content Manager 2013 and Autodesk Fabrication Installation Manual
Copyright ©2012 Technica l Sales Internationa l, Inc. All rights reserved worldwide. Rev A3 Page 4
2 Download and Install Autodesk Fabrication Software
To begin, you will need to access the Building-Data.net site to download and install the Autodesk
Fabrication software to your local computer. To do so:
1. Open an internet browser. Internet Explorer 9 is strongly suggested.
2. In the address bar, input http://www.building-data.net/GoFabrication2013.aspxas the web address and
press [ENTER] or click link above.
3. Scroll down to where it reads “Step 2: Download the new Autodesk Fabrication software”. Underneath that
header, you will see pictures of the multiple Autodesk Fabrication software packages listed. (Hovering
your mouse pointer over the pictures will pop up the name of the software.) Click on the software you wish
to download. (In this example, we will download Autodesk Fabrication FABmep.)
4. Once you left-click your mouse button on the software package you wish to download, a yellow pop-up will
appear at the bottom of your browser asking “Do you want to run or save Autodesk_Fabrication_
FABmep201….exe (489 MB) from building-data.net?” (where “FABmep20….exe (489 MB)” will be
different depending on what package you selected). Click the RUN button.
7/27/2019 Autodesk Fabrication 2013
http://slidepdf.com/reader/full/autodesk-fabrication-2013 5/36
Building Data MEP Content Manager 2013 and Autodesk Fabrication Installation Manual
Copyright ©2012 Technica l Sales Internationa l, Inc. All rights reserved worldwide. Rev A3 Page 5
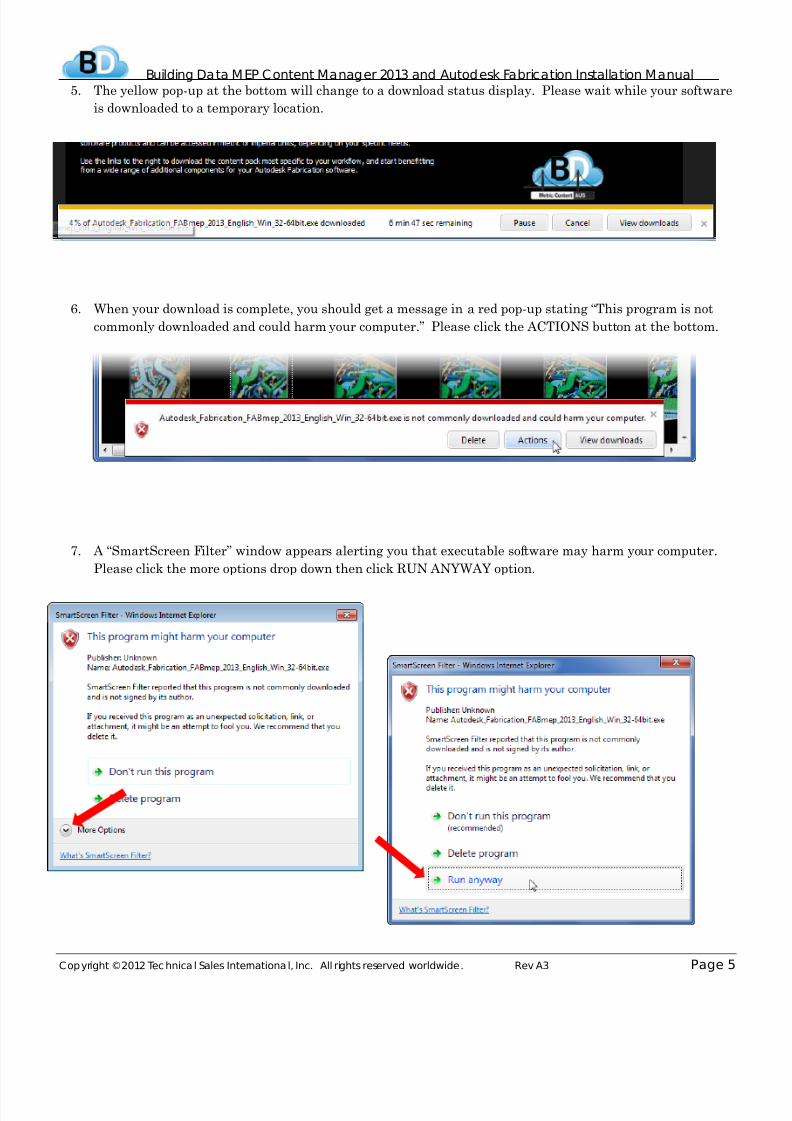
5. The yellow pop-up at the bottom will change to a download status display. Please wait while your software
is downloaded to a temporary location.
6. When your download is complete, you should get a message in a red pop-up stating “This program is not
commonly downloaded and could harm your computer.” Please click the ACTIONS button at the bottom.
7. A “SmartScreen Filter” window appears alerting you that executable software may harm your computer.
Please click the more options drop down then click RUN ANYWAY option.

7/27/2019 Autodesk Fabrication 2013
http://slidepdf.com/reader/full/autodesk-fabrication-2013 6/36
Building Data MEP Content Manager 2013 and Autodesk Fabrication Installation Manual
Copyright ©2012 Technica l Sales Internationa l, Inc. All rights reserved worldwide. Rev A3 Page 6
8. The “WinRAR self-extracting archive”
window will appear. Please accept thedefault destination folder (which depends on
the software you are installing, but will
always be located under the C:\Autodesk
folder) and click the INSTALL button. This
process unpacks the installation files to the
destination folder so the installation may
continue.
9. After unpacking the installation
files, a window titled “Autodesk
FABmep” appears (where “FABmep” will
be different depending on what software
you are installing). Please click the large
INSTALL – INSTALL ON THIS
COMPUTER button on the bottom right.

7/27/2019 Autodesk Fabrication 2013
http://slidepdf.com/reader/full/autodesk-fabrication-2013 7/36
Building Data MEP Content Manager 2013 and Autodesk Fabrication Installation Manual
Copyright ©2012 Technica l Sales Internationa l, Inc. All rights reserved worldwide. Rev A3 Page 7
10. Autodesk requires .Net Framework 4. If your PC has it installed you can skip to the next step
(Step_15). If you see the following screen shot below you will need to install .Net Framework 4.
Click update to continue with installing .Net Framework 4.
11. If you agree to the license terms from
Microsoft click “I have read and accept
the license terms.” Then click Install.

7/27/2019 Autodesk Fabrication 2013
http://slidepdf.com/reader/full/autodesk-fabrication-2013 8/36
Building Data MEP Content Manager 2013 and Autodesk Fabrication Installation Manual
Copyright ©2012 Technica l Sales Internationa l, Inc. All rights reserved worldwide. Rev A3 Page 8
12. Once the install is finished, click finish.
13. The machine must restart after the
install.
14. After the restart, Fabrication 2013 download needs
to be repeated. To do this Step_3 through 8 need to be
repeated. After step 8 you will see the this screen shot.
Click “yes to all”

7/27/2019 Autodesk Fabrication 2013
http://slidepdf.com/reader/full/autodesk-fabrication-2013 9/36
Building Data MEP Content Manager 2013 and Autodesk Fabrication Installation Manual
Copyright ©2012 Technica l Sales Internationa l, Inc. All rights reserved worldwide. Rev A3 Page 9
15. The “License Agreement” appears. Please read the licensing information. If you agree with the license
agreement pick I ACCEPT radio button at the bottom right ( A ). Then, click the NEXT button (B).
16. In the “Product Information” window, please pick the “Stand-Alone” radio button under the License Type
header ( A ). Next, pick the “I want to try this product for 30 days” radio button under the Product
Information header (B). Click the next button to continue.(C).

7/27/2019 Autodesk Fabrication 2013
http://slidepdf.com/reader/full/autodesk-fabrication-2013 10/36
Building Data MEP Content Manager 2013 and Autodesk Fabrication Installation Manual
Copyright ©2012 Technica l Sales Internationa l, Inc. All rights reserved worldwide. Rev A3 Page 10
17. The “Configure Installation” window appears. If you are so inclined, you can opt out of one of the content
packs provided by unchecking one of the checkboxes on the left, but it is better to leave them both selected.
To accept the default installation location and options, click the INSTALL button at the bottom.
18. The installation may take a while, so please be patient.

7/27/2019 Autodesk Fabrication 2013
http://slidepdf.com/reader/full/autodesk-fabrication-2013 11/36
Building Data MEP Content Manager 2013 and Autodesk Fabrication Installation Manual
Copyright ©2012 Technica l Sales Internationa l, Inc. All rights reserved worldwide. Rev A3 Page 11
19. When the install is done, the “Installation Complete” window appears. Please hover over the as this
will bring up a new Autodesk pop up window (see screen shots below).
20. Click the link http://www.building-data.net/autodeskfabrication.aspx to redirect to our BD Content Site.

7/27/2019 Autodesk Fabrication 2013
http://slidepdf.com/reader/full/autodesk-fabrication-2013 12/36
Building Data MEP Content Manager 2013 and Autodesk Fabrication Installation Manual
Copyright ©2012 Technica l Sales Internationa l, Inc. All rights reserved worldwide. Rev A3 Page 12
2.1 Download and Install MEP Content Manager 2013 From Fabrication 2013
1. To the right, you will see two Building Data cloud icons. Clicking one of these clouds will download
the content type appropriate for a particular location. (From top to bottom; Imperial Content – US
(for the United States), Metric Content – AUS (for Australia). For this example, we will use
“Imperial Content – US.”) Click the Building Data cloud icon of your choice. This will download the
MEP Content Manager and content type of your choice.
[NOTE: You will only need to do this download one time. If you install the US Imperial Content and wish
to download Metric Content later, this will be done with the MEP Content Manager. There is no need to
download it again.
ALSO NOTE: This is not an update. Do not use this install on an existing Building Data Content Manager
2013 installation.]
2. Upon clicking a Building Data icon, the yellow pop-up will appear again at the bottom asking “Do you want
to run or save BD_ImperialUS.exe (45.3 MB) from building-data.net?” (where “ImperialUS.exe (45.3 MB)”
will be different depending on what package you selected.”). Click the RUN button.
3. The yellow pop-up at the bottom will change to a download status display. Please wait while your software
is downloaded.

7/27/2019 Autodesk Fabrication 2013
http://slidepdf.com/reader/full/autodesk-fabrication-2013 13/36
Building Data MEP Content Manager 2013 and Autodesk Fabrication Installation Manual
Copyright ©2012 Technica l Sales Internationa l, Inc. All rights reserved worldwide. Rev A3 Page 13
4. When your download is complete, you should get a message in the yellow pop-up stating
“BD_ImperialUS.exe is not commonly downloaded and could harm your computer.” Click the ACTIONS
button on the bottom.
5. A “SmartScreen Filter” window appears alerting you that executable software may harm your computer.
Please click the more options drop down then click RUN ANYWAY option.
.
.

7/27/2019 Autodesk Fabrication 2013
http://slidepdf.com/reader/full/autodesk-fabrication-2013 14/36
Building Data MEP Content Manager 2013 and Autodesk Fabrication Installation Manual
Copyright ©2012 Technica l Sales Internationa l, Inc. All rights reserved worldwide. Rev A3 Page 14
6. Should any prerequisites need to be
installed, a window will appear alerting you
to them. Click the INSTALL button to go
ahead with these installations.
7. The welcome screen appears. Click NEXT.
8. The “Select Installation Folder” window
appears. The default folder should not be
changed, and the “Just Me” radio button at
the bottom should be selected ( A ). Click
NEXT (B).
9. The “Confirm Installation” window
appears. Click NEXT.

7/27/2019 Autodesk Fabrication 2013
http://slidepdf.com/reader/full/autodesk-fabrication-2013 15/36
Building Data MEP Content Manager 2013 and Autodesk Fabrication Installation Manual
Copyright ©2012 Technica l Sales Internationa l, Inc. All rights reserved worldwide. Rev A3 Page 15
10. When the installation is complete, the
“Installation Complete” window appears.
Click CLOSE.
11. If it was included in the “Prerequisites” window
in Step 6, the system will now install the Building Data
License. When the “Welcome” screen for BDLicense3015
appears, click NEXT.
12. The “Ready to Install the Program” window
appears. Click INSTALL.
13. When the install is complete, the
installer will let you know with an “InstallShield Wizard
Complete” window. Click FINISH when this appears.

7/27/2019 Autodesk Fabrication 2013
http://slidepdf.com/reader/full/autodesk-fabrication-2013 16/36

7/27/2019 Autodesk Fabrication 2013
http://slidepdf.com/reader/full/autodesk-fabrication-2013 17/36
Building Data MEP Content Manager 2013 and Autodesk Fabrication Installation Manual
Copyright ©2012 Technica l Sales Internationa l, Inc. All rights reserved worldwide. Rev A3 Page 17
19. Upon rebooting and logging in, Building Data should automatically continue the installation process. The
first window to appear will be the “Thank You” window, asking you to either Try the software for 30 days or
Activate it.
a. If you do not have your registration information, please click the TRY button on the bottom left and
skip to Step 24 on Page19 .
b. If you did receive your Registration Key from TSI Support, please click the ACTIVATE button on theright and continue with Step 20 on the next page.
7/27/2019 Autodesk Fabrication 2013
http://slidepdf.com/reader/full/autodesk-fabrication-2013 18/36
Building Data MEP Content Manager 2013 and Autodesk Fabrication Installation Manual
Copyright ©2012 Technica l Sales Internationa l, Inc. All rights reserved worldwide. Rev A3 Page 18
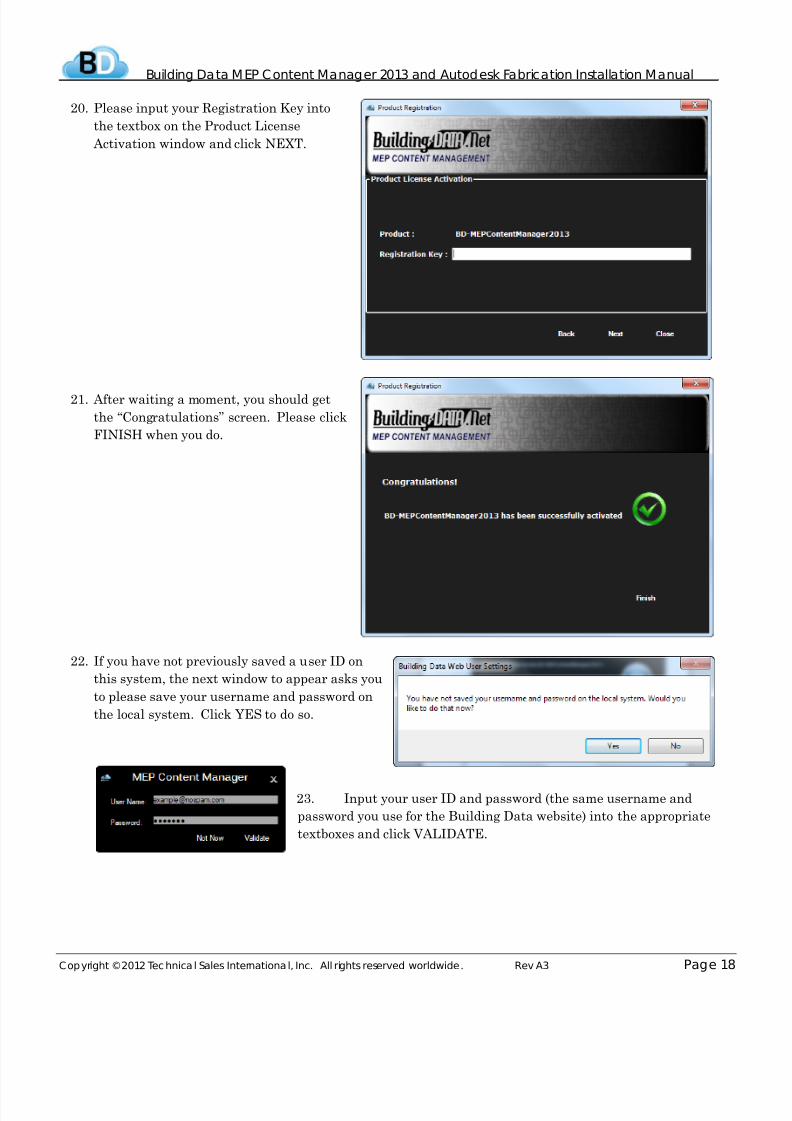
20. Please input your Registration Key into
the textbox on the Product License
Activation window and click NEXT.
21. After waiting a moment, you should get
the “Congratulations” screen. Please click
FINISH when you do.
22. If you have not previously saved a user ID on
this system, the next window to appear asks you
to please save your username and password on
the local system. Click YES to do so.
23. Input your user ID and password (the same username and
password you use for the Building Data website) into the appropriate
textboxes and click VALIDATE.
7/27/2019 Autodesk Fabrication 2013
http://slidepdf.com/reader/full/autodesk-fabrication-2013 19/36
Building Data MEP Content Manager 2013 and Autodesk Fabrication Installation Manual
Copyright ©2012 Technica l Sales Internationa l, Inc. All rights reserved worldwide. Rev A3 Page 19
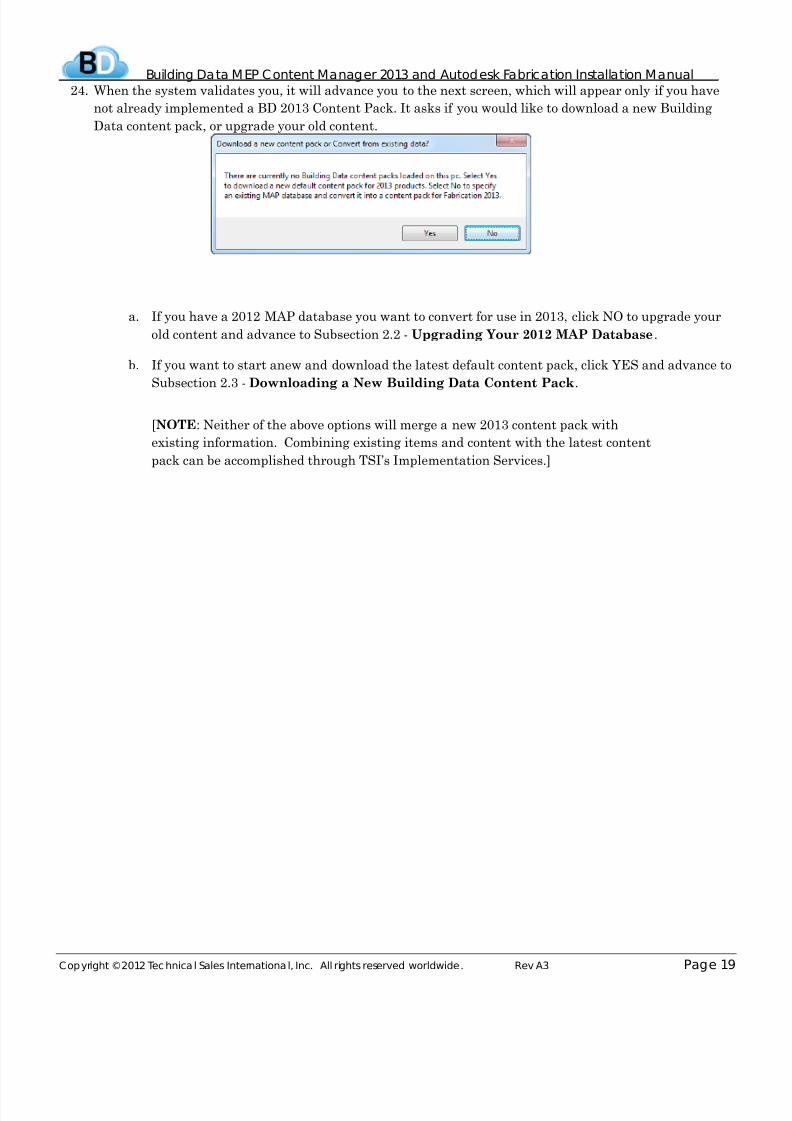
24. When the system validates you, it will advance you to the next screen, which will appear only if you have
not already implemented a BD 2013 Content Pack. It asks if you would like to download a new Building
Data content pack, or upgrade your old content.
a. If you have a 2012 MAP database you want to convert for use in 2013, click NO to upgrade your
old content and advance to Subsection 2.2 - Upgrading Your 2012 MAP Database.
b. If you want to start anew and download the latest default content pack, click YES and advance to
Subsection 2.3 - Downloading a New Building Data Content Pack.
[NOTE: Neither of the above options will merge a new 2013 content pack with
existing information. Combining existing items and content with the latest content
pack can be accomplished through TSI’s Implementation Services.]
7/27/2019 Autodesk Fabrication 2013
http://slidepdf.com/reader/full/autodesk-fabrication-2013 20/36
Building Data MEP Content Manager 2013 and Autodesk Fabrication Installation Manual
Copyright ©2012 Technica l Sales Internationa l, Inc. All rights reserved worldwide. Rev A3 Page 20
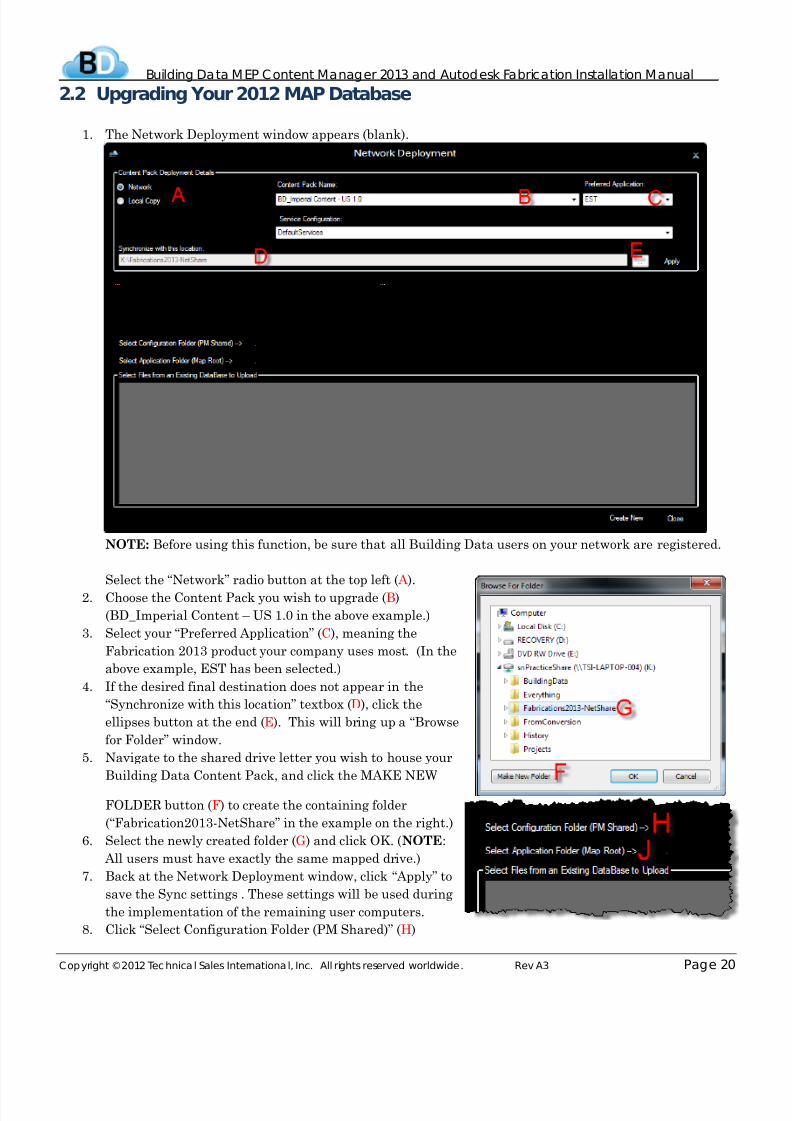
2.2 Upgrading Your 2012 MAP Database
1. The Network Deployment window appears (blank).
NOTE: Before using this function, be sure that all Building Data users on your network are registered.
Select the “Network” radio button at the top left ( A ).
2. Choose the Content Pack you wish to upgrade (B)
(BD_Imperial Content – US 1.0 in the above example.)
3. Select your “Preferred Application” (C), meaning the
Fabrication 2013 product your company uses most. (In the
above example, EST has been selected.)
4. If the desired final destination does not appear in the
“Synchronize with this location” textbox (D), click the
ellipses button at the end (E). This will bring up a “Browse
for Folder” window.
5. Navigate to the shared drive letter you wish to house your
Building Data Content Pack, and click the MAKE NEW
FOLDER button (F) to create the containing folder
(“Fabrication2013-NetShare” in the example on the right.)
6. Select the newly created folder (G) and click OK. (NOTE:
All users must have exactly the same mapped drive.)
7. Back at the Network Deployment window, click “Apply” to
save the Sync settings . These settings will be used during
the implementation of the remaining user computers.
8. Click “Select Configuration Folder (PM Shared)” (H)

7/27/2019 Autodesk Fabrication 2013
http://slidepdf.com/reader/full/autodesk-fabrication-2013 21/36
Building Data MEP Content Manager 2013 and Autodesk Fabrication Installation Manual
Copyright ©2012 Technica l Sales Internationa l, Inc. All rights reserved worldwide. Rev A3 Page 21
9. This opens another Browse for Folder window. Navigate to
the location of your existing PM Shared folder and select it
(I). (If you were running a networked installation, you
would find the PM Shared directory on a shared drive, and
not necessarily under the MAP-Software-US2012 directory.)10. Click OK.
11. Back at the Network Deployment window, click “Select
Application Folder (Map Root)” (J)
12. This opens another Browse for Folder window. Navigate to
the location of your MAP-Software-US2012 directory and
select it. (K )
[NOTE: Your live and active 2012 CAD, CAM, EST, and
FAB directories must be located in the same folder as your
live and active 2012 PM Shared directory. If they are not
(as may be the case with a networked deployment of thesoftware), please copy those program directories (CAD,
CAM, EST, and FAB) into the same folder structure so they
are at the same level as the PM Shared directory (as shown
in the Browse for Folder window above right.)
Furthermore, please check the PM Shared and the other
directories for possible backup copies or accidental copies of
the PM Shared directory. Only one instance of the PM
Shared directory must be present in this folder structure for
this process to complete successfully. Delete or move out any
superfluous copies of PM Shared from this folder structure.]
13. Click OK.
14. Back at the Network Deployment Window, click on the LIST FILES button on the right (L).
15. While the list is populating, a message will appear under the “Synchronize with this location” dropdown
that reads “Please wait while the files list is generated.” When complete, that message changes to “###
configuration files to copy” (where ### is a number) and the gray box at the bottom will populate.16. Click the CREATE NEW button (M) at the bottom to begin the conversion process.
7/27/2019 Autodesk Fabrication 2013
http://slidepdf.com/reader/full/autodesk-fabrication-2013 22/36
Building Data MEP Content Manager 2013 and Autodesk Fabrication Installation Manual
Copyright ©2012 Technica l Sales Internationa l, Inc. All rights reserved worldwide. Rev A3 Page 22
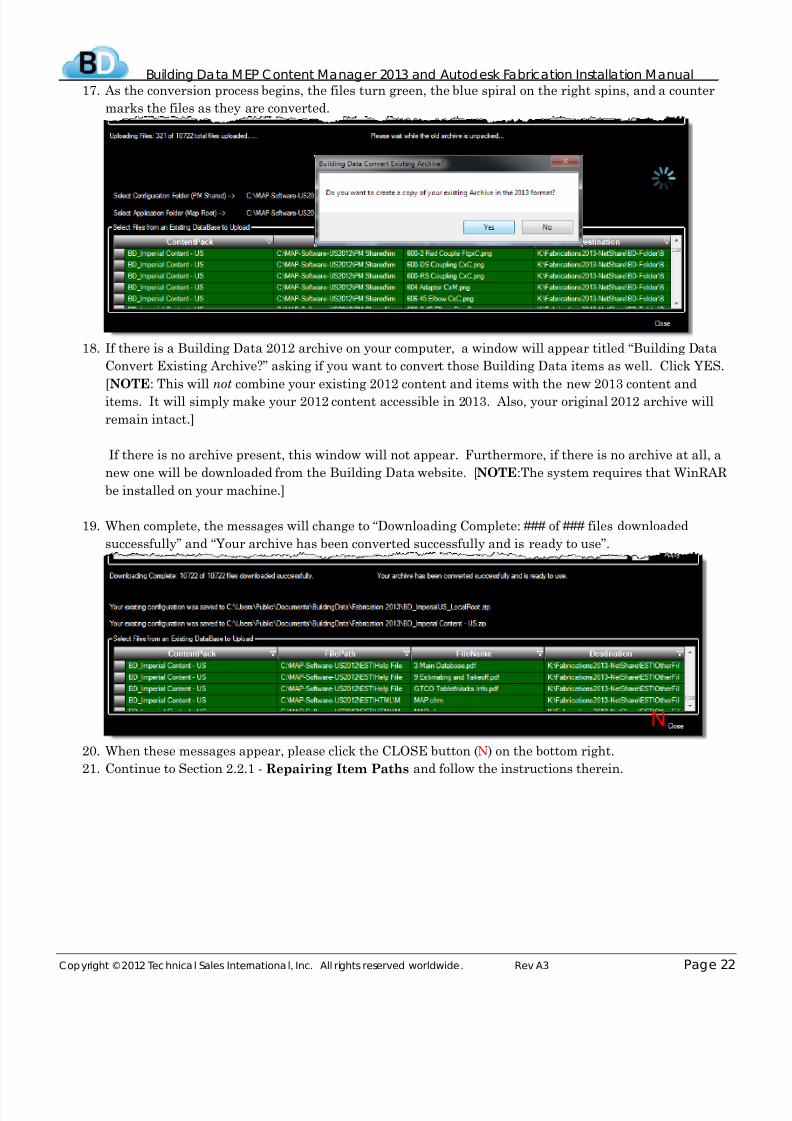
17. As the conversion process begins, the files turn green, the blue spiral on the right spins, and a counter
marks the files as they are converted.
18. If there is a Building Data 2012 archive on your computer, a window will appear titled “Building Data
Convert Existing Archive?” asking if you want to convert those Building Data items as well. Click YES.
[NOTE: This will not combine your existing 2012 content and items with the new 2013 content and
items. It will simply make your 2012 content accessible in 2013. Also, your original 2012 archive will
remain intact.]
If there is no archive present, this window will not appear. Furthermore, if there is no archive at all, a
new one will be downloaded from the Building Data website. [NOTE:The system requires that WinRAR
be installed on your machine.]
19. When complete, the messages will change to “Downloading Complete: ### of ### files downloaded
successfully” and “Your archive has been converted successfully and is ready to use”.
20. When these messages appear, please click the CLOSE button (N) on the bottom right.
21. Continue to Section 2.2.1 - Repairing Item Paths and follow the instructions therein.

7/27/2019 Autodesk Fabrication 2013
http://slidepdf.com/reader/full/autodesk-fabrication-2013 23/36
Building Data MEP Content Manager 2013 and Autodesk Fabrication Installation Manual
Copyright ©2012 Technica l Sales Internationa l, Inc. All rights reserved worldwide. Rev A3 Page 23
2.2.1 Repairing Item Paths1. [NOTE: Only if you upgraded your 2012 MAP Database will you need to
follow the instructions in this section.] On the Primary User’s computer,
open the Autodesk Fabrication 2013 product of your choice. (The below
example uses ESTmep).
2. When asked, choose the BD Content Pack you chose in Step 2 of Section 2.2 (BD_Imperial Content – US
1.0 in this example) and click OK.
3. Log in as user “Full”.
4. When the Browse for Jobs folder appears, click CANCEL.
5. Once the software has started and a blank job opens, select an
active service in the Service Toolbar. ( A )
6. See if there are any missing items (indicated by a button that
has a green cross in a blue circle. ) If so, continue on to Step
7. If not, check other Services. If no Service exhibits missing
items, you have completed your upgrade and need not continue.
7. Right-click in the blank part of the Service Template (B) (in
the section where there are no buttons) and pick “Path Repair
Tool” (C) from the context menu that appears.

7/27/2019 Autodesk Fabrication 2013
http://slidepdf.com/reader/full/autodesk-fabrication-2013 24/36
Building Data MEP Content Manager 2013 and Autodesk Fabrication Installation Manual
Copyright ©2012 Technica l Sales Internationa l, Inc. All rights reserved worldwide. Rev A3 Page 24
8. A new window appears, titled “Path Repair Tool – Select Mapping File”. Navigate to the directory
C:\Users\Public\Documents\BuildingData\Fabrication 2013\BD_Imperial Content - US (where
“BD_Imperial Content - US” is the content pack you chose in Step 2 of Section 2.2). There are three files
to choose from;
a. RepairBDServicePaths.csv –
used if the archive was converted
from an old versionb. RepairServicePathsLocal.csv–
used if you are only working locally
c. RepairServicePathsNetwork.csv–
used if you are going to be working
on a shared, network database
[NOTE: If no .csv files appear here,
close the Fabrication software and
proceed to Section 2.2.2 - -
Service Button Items Still
Missing? Try This! on Page 25
and complete those instructions
before retrying this Section.]
Select the file you wish to use and click the OPEN button.
9. When the paths are reset, you will get a window titled
“Repair Paths” asking if you want to save changes to
disk. Click YES.
10. Open the Service section of the Database.
11. When the Setup Services window opens,
simply click the APPLY button (D), then the
OK button (E). This sets the repaired paths
for all network users, and does not need to
be repeated by anyone.

7/27/2019 Autodesk Fabrication 2013
http://slidepdf.com/reader/full/autodesk-fabrication-2013 25/36
Building Data MEP Content Manager 2013 and Autodesk Fabrication Installation Manual
Copyright ©2012 Technica l Sales Internationa l, Inc. All rights reserved worldwide. Rev A3 Page 25
2.2.2 - Service Button Items Still Missing? Try This!
If you followed all the steps in Section 2.2.1 and you are still missing Items in your Services (indicated by
green crosses in blue circles ), you will have to complete one or both of the following subsections. The
subsection you will use depends on whether you need to remap Building Data content (Section 2.2.2.1),
unmanaged content such as sheet metal (Section 2.2.2.2). or both.
Building Data Items will only need to be remapped if you upgraded from an MAP install that referenced a
2012 archive. If you are remapping to an archive downloaded from the Building Data site, you will need to
redownload previously requested fittings.
2.2.2.1 Remap Managed Content (Building Data) Item Paths
1. In your taskbar, there is a small cloud shaped icon with the letters BD
. Right-click that icon and select “Change Settings”.
2. When the MEP Content Manager Settings window appears, go to the
Deployment tab and click on the “Remap BD Items to Services” ( A )
3. The “Remap Services (BD-Items)” window
appears. Choose the Content Pack to be
remapped (B).
4. If the “Synchronize with this location” (C) is notprefilled, you can click on the ellipses button (D)
to call up the “Browse for Folder” window to select
the network location.
5. After selecting the network location, click the
APPLY button (E), then the REMAP button (F).
6. When the process completes, the “Remap Services
(BD-Items)” window displays a message reading
“The service remapping file was successfully
created in the network share and locally at
C:\Users\Public\Documents\BuildingData\Fabrication 2013\BD_Imperial Content –
US. You may run the Path Repair Tool in any of
the Fabrication 2013 products to remap services
to the new BD items location.” Click the X at the
top right.
7. Back at the “MEP Content Manager Settings” click APPLY and CLOSE.
8. Go to Section 2.2.1 – Repairing Item Paths and follow those instructions to complete this task.

7/27/2019 Autodesk Fabrication 2013
http://slidepdf.com/reader/full/autodesk-fabrication-2013 26/36
Building Data MEP Content Manager 2013 and Autodesk Fabrication Installation Manual
Copyright ©2012 Technica l Sales Internationa l, Inc. All rights reserved worldwide. Rev A3 Page 26
2.2.2.2 Remap Unmanaged Content (NonBuilding Data) Item Paths
1. In your taskbar, there is a small cloud shaped icon with the letters BD
. Right-click that icon and select “Change Settings”.
2.
When the MEP Content Manager Settings window appears, go to theDeployment tab and click on the “Remap Unmanaged Items to Services”
( A ) button.
3.
The “Remap Services (Un-Managed-Items)” window appears. Choose the
Content Pack (B) to be remapped.
4. If the “Synchronize with this location” (C)
is not prefilled, you can click on the
ellipses button (D) to call up the “Browse
for Folder” window to select the network
location.
5. After selecting the network location, click
the APPLY button (E).
6. To select the path to the original PM
Shared folder (F), click the second ellipses button (G) to call up another
“Browse for Folder” window (H) where it can be selected.
7. Once the “Path to the Old Library Items” has been set, click the
REMAP button (I) at the bottom.
8. When the Items have been successfully remapped, you will get a
message at the bottom of the window telling you so.
9. Close this window by clicking the X at the top right, and then APPLY and CLOSE on the MEP Content
Manager Settings window.
10. Go to Section 2.2.1 – Repairing Item Paths and follow those instructions to complete this task.

7/27/2019 Autodesk Fabrication 2013
http://slidepdf.com/reader/full/autodesk-fabrication-2013 27/36
Building Data MEP Content Manager 2013 and Autodesk Fabrication Installation Manual
Copyright ©2012 Technica l Sales Internationa l, Inc. All rights reserved worldwide. Rev A3 Page 27
2.3 Downloading a New Building Data Content Pack
1. Upon clicking YES on the
“Download a New Content
Pack or Convert from
Existing Data?” window in
Step 24 of Section 2.1 theInstall Content Packs
menu will appear. Under
Choose a Content Pack,
click the drop down and
select the content pack that
you would like to download
(BD_Imperial Content –
US in this example).
2. Click List files and wait for
the list to generate.

7/27/2019 Autodesk Fabrication 2013
http://slidepdf.com/reader/full/autodesk-fabrication-2013 28/36
Building Data MEP Content Manager 2013 and Autodesk Fabrication Installation Manual
Copyright ©2012 Technica l Sales Internationa l, Inc. All rights reserved worldwide. Rev A3 Page 28
3. Once the files have been
downloaded click the INSTALL
CONTENT PACK button at the
bottom right corner of the screen.
4. The files will begin queuing
for download and will change from
gray to green. Please wait while thefiles are queued. You can see the
status of the remaining files in the
top center of the screen. You can
also see which group of items are
queuing for download from the item
list at the top right of the screen.
After an item list has been
completed, a check mark will
appear. +

7/27/2019 Autodesk Fabrication 2013
http://slidepdf.com/reader/full/autodesk-fabrication-2013 29/36
Building Data MEP Content Manager 2013 and Autodesk Fabrication Installation Manual
Copyright ©2012 Technica l Sales Internationa l, Inc. All rights reserved worldwide. Rev A3 Page 29
5. Once all the marks
have been checked
the items will begin
downloading and the
status can be seen by
the progress bar.
Once it’s done, closethe “Install Content
Packs” window by
clicking the top right
corner X.
6. At this point, your installation is complete, and you do not need to continue with the other sections in this
document. However, the other users on your network will not be alerted that a change has occurred.

7/27/2019 Autodesk Fabrication 2013
http://slidepdf.com/reader/full/autodesk-fabrication-2013 30/36
Building Data MEP Content Manager 2013 and Autodesk Fabrication Installation Manual
Copyright ©2012 Technica l Sales Internationa l, Inc. All rights reserved worldwide. Rev A3 Page 30
3 Download and Install MEP Content Manager 2013 From Website
1. Open an internet browser. Internet Explorer 9 is strongly suggested.
2. In the address bar, input http://www.building-data.net/GoFabrication2013.aspxas the web address and
press [ENTER] or click link above.
3. Scroll down just below where you will see the header “Step 3: Get your copy of Building Data 2013.” To the
right, you will see two Building Data cloud icons. Clicking one of these clouds will download the content
type appropriate for a particular location. (From top to bottom; Imperial Content – US (for the United
States), Metric Content – AUS (for Australia). For this example, we will use “Imperial Content – US.”)
Click the Building Data cloud icon of your choice.
Please Note: You will only need to do this download one time. If you install the US Imperial and wish to
download Metric Content later, this will be done with the MEP Content Manager. There is no need todownload it again.

7/27/2019 Autodesk Fabrication 2013
http://slidepdf.com/reader/full/autodesk-fabrication-2013 31/36
Building Data MEP Content Manager 2013 and Autodesk Fabrication Installation Manual
Copyright ©2012 Technica l Sales Internationa l, Inc. All rights reserved worldwide. Rev A3 Page 31
4. Upon clicking a Building Data icon, the yellow pop-up will appear again at the bottom asking “Do you want
to run or save BD_ImperialUS.exe (45.3 MB) from building-data.net?” (where “ImperialUS.exe (45.3 MB)”
will be different depending on what package you selected.”). Click the RUN button.
5. The yellow pop-up at the bottom will change to a download status display. Please wait while your software
is downloaded.
6. When your download is complete, you should get a message in the yellow pop-up stating
“BD_ImperialUS.exe is not commonly downloaded and could harm your computer.” Click the ACTIONS
button on the bottom.
7. A “SmartScreen Filter” window appears alerting you that executable software may harm your computer.
Please click the more options drop down then click RUN ANYWAY option.
8. Continue your installation with Step 6 of the instructions found under Section 2.1 – Download and
Install MEP Content Manager 2013 From Fabrication 2013 on Page 14. Following these instructions
to the end of the section (including any applicable subsections) will complete your installation.

7/27/2019 Autodesk Fabrication 2013
http://slidepdf.com/reader/full/autodesk-fabrication-2013 32/36
Building Data MEP Content Manager 2013 and Autodesk Fabrication Installation Manual
Copyright ©2012 Technica l Sales Internationa l, Inc. All rights reserved worldwide. Rev A3 Page 32
4 Get Serial Number for Fabrication 2013.
1. Open an internet browser. Internet Explorer 9 is strongly suggested.
2. In the address bar, input http://www.building-data.net/GoFabrication2013.aspxas the web address and
press [ENTER] or click link above.
3. Scroll down until Step 4. Click Get Serial Number.

7/27/2019 Autodesk Fabrication 2013
http://slidepdf.com/reader/full/autodesk-fabrication-2013 33/36
Building Data MEP Content Manager 2013 and Autodesk Fabrication Installation Manual
Copyright ©2012 Technica l Sales Internationa l, Inc. All rights reserved worldwide. Rev A3 Page 33
4. You will be taken to the Member Login of Building Data. You will need your Email Address and Password
to continue. Fill in the information needed and click submit.
5. Please read the terms and if you agree with them click accept.

7/27/2019 Autodesk Fabrication 2013
http://slidepdf.com/reader/full/autodesk-fabrication-2013 34/36
Building Data MEP Content Manager 2013 and Autodesk Fabrication Installation Manual
Copyright ©2012 Technica l Sales Internationa l, Inc. All rights reserved worldwide. Rev A3 Page 34
6. Copy to Clipboard will now appear next to Get Serial Number. Click Copy to Clipboard.
7. Depending on your security settings you might get a pop up asking to allow access to copy to your clipboard.Click Allow Access.

7/27/2019 Autodesk Fabrication 2013
http://slidepdf.com/reader/full/autodesk-fabrication-2013 35/36
Building Data MEP Content Manager 2013 and Autodesk Fabrication Installation Manual
Copyright ©2012 Technica l Sales Internationa l, Inc. All rights reserved worldwide. Rev A3 Page 35
8. Open Notepad under START – ALL PROGRAMS - ACCESSORES (or, if you have it, a spreadsheet
application like Microsoft Excel, which is a better option). Once open, right-click and paste. You will now
have your Autodesk Fabrication serial numbers.

7/27/2019 Autodesk Fabrication 2013
http://slidepdf.com/reader/full/autodesk-fabrication-2013 36/36
Building Data MEP Content Manager 2013 and Autodesk Fabrication Installation Manual
All contents copyright © 2012 by Technical Sales International, Inc. All rights reserved worldwide. No part
of this document or the related files may be reproduced or transmitted in any form, by any means (electronic,
photocopying, recording, or otherwise) without the prior written permission of Technical Sales International, Inc.
Limit of Liability and Disclaimer of Warranty: Technical Sales International, Inc. has used its best efforts in
preparing this manual, and the information provided herein is provided "as is” and is subject to
change. Technical Sales International, Inc. makes no representation or warranties with respect to the accuracy
or completeness of the contents of this manual and specifically disclaims any implied warranties of
merchantability or fitness for any particular purpose and shall in no event be liable for any loss of profit or any
other commercial damage, including but not limited to special, incidental, consequential, or other damages.
Trademarks: This manual identifies product names and services known to be trademarks, registered
trademarks, or service marks of their respective holders. They are used throughout this manual in an editorial
fashion only. In addition, terms suspected of being trademarks, registered trademarks, or service marks have
been appropriately capitalized, although Technical Sales International, Inc. cannot attest to the accuracy of thisinformation. Use of a term in this manual should not be regarded as affecting the validity of any trademark,
registered trademark, or service mark.