AutoCAD - Digital Riverdrh2.img.digitalriver.com/DRHM/Storefront/Company/... · Intermediate...
12
AutoCAD ® 2010 Autodesk Official Training Guide Intermediate 001B1-050000-CM20A July 2009 Learning AutoCAD ® 3D Using hands-on exercises, explore the fundamental concepts and workflows for creating 3D models.
Transcript of AutoCAD - Digital Riverdrh2.img.digitalriver.com/DRHM/Storefront/Company/... · Intermediate...

AutoCAD®
2010
Autodesk Official Training Guide
Intermediate
001B1-050000-CM20AJuly 2009
Learning AutoCAD® 3DUsing hands-on exercises, explore the fundamental concepts andworkflows for creating 3D models.

© 2009 Autodesk, Inc. All rights reserved.
Except as otherwise permitted by Autodesk, Inc., this publication, or parts thereof, may not be reproduced inany form, by any method, for any purpose.
Certain materials included in this publication are reprinted with the permission of the copyright holder.
Trademarks
The following are registered trademarks or trademarks of Autodesk, Inc., and/or its subsidiaries and/or affiliates in the USAand other countries: 3DEC (design/logo), 3December, 3December.com, 3ds Max, ADI, Algor, Alias, Alias (swirl design/logo),AliasStudio, Alias|Wavefront (design/logo), ATC, AUGI, AutoCAD, AutoCAD Learning Assistance, AutoCAD LT, AutoCADSimulator, AutoCAD SQL Extension, AutoCAD SQL Interface, Autodesk, Autodesk Envision, Autodesk Intent, AutodeskInventor, Autodesk Map, Autodesk MapGuide, Autodesk Streamline, AutoLISP, AutoSnap, AutoSketch, AutoTrack,Backburner, Backdraft, Built with ObjectARX (logo), Burn, Buzzsaw, CAiCE, Can You Imagine, Character Studio, Cinestream,Civil 3D, Cleaner, Cleaner Central, ClearScale, Colour Warper, Combustion, Communication Specification, Constructware,Content Explorer, Create>what’s>Next> (design/logo), Dancing Baby (image), DesignCenter, Design Doctor, Designer’sToolkit, DesignKids, DesignProf, DesignServer, DesignStudio, Design|Studio (design/logo), Design Web Format, Discreet,DWF, DWG, DWG (logo), DWG Extreme, DWG TrueConvert, DWG TrueView, DXF, Ecotect, Exposure, Extending the DesignTeam, Face Robot, FBX, Fempro, Filmbox, Fire, Flame, Flint, FMDesktop, Freewheel, Frost, GDX Driver, Gmax, GreenBuilding Studio, Heads-up Design, Heidi, HumanIK, IDEA Server, i-drop, ImageModeler, iMOUT, Incinerator, Inferno,Inventor, Inventor LT, Kaydara, Kaydara (design/logo), Kynapse, Kynogon, LandXplorer, Lustre, MatchMover, Maya,Mechanical Desktop, Moldflow, Moonbox, MotionBuilder, Movimento, MPA, MPA (design/logo), Moldflow PlasticsAdvisers, MPI, Moldflow Plastics Insight, MPX, MPX (design/logo), Moldflow Plastics Xpert, Mudbox, Multi-Master Editing,NavisWorks, ObjectARX, ObjectDBX, Open Reality, Opticore, Opticore Opus, Pipeplus, PolarSnap, PortfolioWall, Poweredwith Autodesk Technology, Productstream, ProjectPoint, ProMaterials, RasterDWG, Reactor, RealDWG, Real-time Roto,REALVIZ, Recognize, Render Queue, Retimer, Reveal, Revit, Showcase, ShowMotion, SketchBook, Smoke, Softimage,Softimage|XSI (design/logo), Sparks, SteeringWheels, Stitcher, Stone, StudioTools, Topobase, Toxik, TrustedDWG,ViewCube, Visual, Visual Construction, Visual Drainage, Visual Landscape, Visual Survey, Visual Toolbox, Visual LISP, VoiceReality, Volo, Vtour, Wire, Wiretap, WiretapCentral, XSI, and XSI (design/logo).
All other brand names, product names, or trademarks belong to their respective holders.
Disclaimer
THIS PUBLICATION AND THE INFORMATION CONTAINED HEREIN IS MADE AVAILABLE BY AUTODESK, INC. “AS IS.”AUTODESK, INC. DISCLAIMS ALL WARRANTIES, EITHER EXPRESS OR IMPLIED, INCLUDING BUT NOT LIMITED TO ANY IMPLIEDWARRANTIES OF MERCHANTABILITY OR FITNESS FOR A PARTICULAR PURPOSE REGARDING THESE MATERIALS.
Published by: Autodesk, Inc. 111 Mclnnis Parkway San Rafael, CA 94903, USA

Contents ■ iii
Contents
Introduction ....................................................................................................... ix
Chapter 1: Introduction to 3D Modeling ........................................................... 1Lesson: Introduction to 3D .................................................................................. 2
Types of 3D Models .................................................................................. 3Navigating and Displaying 3D Models ....................................................... 4Changing the Model Display ..................................................................... 6About the ViewCube ................................................................................. 9Using the ViewCube ................................................................................ 11Orbiting Your 3D Model .......................................................................... 15Setting Viewport Display ......................................................................... 17Exercise: Use ViewCube to Navigate a 3D Environment .......................... 21Exercise: Interact with 3D Models .......................................................... 25
Lesson: Creating Solid Primitives ...................................................................... 27About Solid Primitives ............................................................................. 28Creating a Solid Box ................................................................................ 29Creating a Solid Sphere ........................................................................... 31Creating a Solid Cylinder ......................................................................... 32Creating a Solid Cone .............................................................................. 34Creating a Solid Wedge ........................................................................... 36Creating a Solid Torus ............................................................................. 38Creating a Solid Pyramid ......................................................................... 39Exercise: Create Solid Primitives ............................................................. 42
Lesson: Mesh Primitives .................................................................................... 45About Subdivision Meshes ...................................................................... 46Creating Mesh Primitives ........................................................................ 47Creating Mesh Surfaces .......................................................................... 54Exercise: Create Mesh Primitives ............................................................ 57
Lesson: Working in 3D ...................................................................................... 63About the Cartesian Coordinate System ................................................. 64Changing the Coordinate System ............................................................ 66Changing the UCS Icon Display ............................................................... 69Changing the Coordinate System Dynamically ........................................ 72Acquiring Points in 3D Space .................................................................. 74Exercise: Work with the UCS ................................................................... 77Exercise: Use a Dynamic UCS .................................................................. 80

iv ■ Contents
Lesson: Introduction to Free-Form Design .................................................... 82About Free-Form Design ..................................................................... 83Using Free-Form Design ...................................................................... 85Exercise: Use Free-Form Design .......................................................... 88
Chapter 2: Modeling Workflow .................................................................... 93
Lesson: Creating Models from 2D Profiles .................................................... 94About Models from 2D Profiles .......................................................... 95About the Right-Hand Rule of Rotation .............................................. 98About Choosing a Model Creation Method ........................................ 99Creating a Model Using the Extrude Command .................................. 99Creating a Model Using the Loft Command ...................................... 102Creating a Model Using the Planar Surface Command ..................... 105Creating a Model Using the Polysolid Command .............................. 107Creating a Model Using the Revolve Command ................................ 109Creating a Model Using the Sweep Command ................................. 111Creating a Model Using the Presspull Command .............................. 114Creating a Helical Path ...................................................................... 117Exercise: Create Solid Models from 2D Profiles ................................ 119Exercise: Create Sweeps .................................................................... 122
Lesson: Using Booleans on Solid Models .................................................... 124About Composite Solids .................................................................... 125Creating Solids Using Union .............................................................. 128Creating Solids Using Subtract .......................................................... 129Creating Solids Using Intersect ......................................................... 131Checking Interference ....................................................................... 132Exercise: Create Composite Solids - Mechanical ............................... 136Exercise: Create Composite Solids - Architectural ............................. 140
Lesson: Creating Composite Models ........................................................... 144About Composite Models ................................................................. 145Creating Composite Models .............................................................. 148Using Boolean Operations in Composite Models .............................. 151Exercise: Create a Composite Model ................................................ 156Exercise: Use Booleans in an Architectural Model ............................ 159
Lesson: Extracting Geometry from Solid Models ........................................ 162Copying Faces .................................................................................... 163Copying Edges ................................................................................... 164Extracting All Model Edges ............................................................... 165Exploding 3D Models ........................................................................ 166Exercise: Extract Geometry from Solid Models ................................. 167
Lesson: Getting Information from 3D Objects ............................................ 170Checking Solid Model Integrity ......................................................... 171Viewing Mass Properties .................................................................. 172Exercise: Get Information from 3D Objects ...................................... 174

Contents ■ v
Chapter 3: Editing Models ......................................................................... 177Lesson: Adding Detail to Your Solid Models ................................................ 178
Filleting Solid Models ........................................................................ 179Chamfering Solid Models .................................................................. 181Slicing a Solid Model ......................................................................... 184Exercise: Create 3D Fillets and Chamfers .......................................... 187Exercise: Slice a Solid Along a Plane ................................................. 190
Lesson: Editing Solid Models ....................................................................... 192Extruding Faces ................................................................................. 193Moving Faces .................................................................................... 195Offsetting Faces ................................................................................. 196Deleting Faces ................................................................................... 198Rotating Faces ................................................................................... 199Tapering Faces ................................................................................... 201Creating a Shell ................................................................................. 203Imprinting Edges ............................................................................... 204Separating Solids ............................................................................... 205Changing Face Color ......................................................................... 207Changing Edge Color ......................................................................... 208Slicing Solids ...................................................................................... 210Exercise: Edit Solid Models ............................................................... 212Exercise: Edit Solids to Create Complex Shapes ................................ 216
Lesson: Manipulating the Model ................................................................ 218About Solid History and Editing Methods ......................................... 219About Grip Editing Solid Models ....................................................... 221Editing Sub-Objects ........................................................................... 224Manipulating Objects with the 3D Gizmo ......................................... 226Aligning in 3D .................................................................................... 235Exercise: Edit Solids Using Grips and Sub-Object Selection ............... 237Exercise: Manipulate the Models - Mechanical ................................ 239Exercise: Manipulate the Models - Architectural .............................. 242
Lesson: Duplicating the Model .................................................................... 245Mirroring in 3D ................................................................................. 246Arraying in 3D ................................................................................... 248Exercise: Mirror Objects in 3D .......................................................... 252Exercise: Array Objects in 3D ............................................................ 254
Lesson: Converting 2D Objects ................................................................... 256About Converting 2D Objects to Solids or Surfaces .......................... 257Converting to Solids .......................................................................... 258Converting to Surfaces ...................................................................... 260About Thickening Surfaces into Solids .............................................. 261Thickening Surfaces to Solids ............................................................ 262Exercise: Convert Objects ................................................................. 264

vi ■ Contents
Lesson: Basic Mesh Modeling ..................................................................... 267Editing Meshes .................................................................................. 268Smoothing Meshes ........................................................................... 273Creasing Meshes ............................................................................... 277Subobject Edits ................................................................................. 279Exercise: Edit Mesh Surfaces ............................................................. 286
Chapter 4: Sectioning a Model and Creating Drawings .............................. 291
Lesson: Section a Solid Model and Generate 2D Geometry ........................ 292About Flattened Views ...................................................................... 293Displaying 2D Geometry from a Model View .................................... 294Creating Simple Sections ................................................................... 297Creating Section Planes .................................................................... 299Manipulating Section Planes ............................................................. 301Generating 2D/3D Sections ............................................................... 304Exercise: Create Cross Sections and Slice Geometry ......................... 309Exercise: Flatten a View .................................................................... 312Exercise: Define Section Planes ........................................................ 315Exercise: Draw a Section Plane ......................................................... 318
Lesson: Creating Drawings from 3D Models ............................................... 321Types of Views from 3D Models ....................................................... 322Shaded and Hidden Views ................................................................ 325Creating Views from Flatshots and Sectionplanes ............................ 326Exercise: Create Layouts of 3D Models - Mechanical ........................ 328Exercise: Create a Section Plane Layout View ................................... 331Exercise: Create Layouts of 3D Models - Architectural ...................... 334
Chapter 5: Visualization ............................................................................. 339
Lesson: Using Visual Styles ......................................................................... 340About Visual Styles ........................................................................... 341Using the Visual Styles Manager ....................................................... 343Using the Visual Styles Panel ............................................................ 345Exporting Visual Styles ...................................................................... 348Exercise: Use and Create Visual Styles .............................................. 352Exercise: Apply Visual Styles to Layout Views ................................... 356
Lesson: Using Lights .................................................................................... 358About Lighting ................................................................................... 359Adding Lights to a Scene ................................................................... 361Editing Lights in a Scene ................................................................... 364Exercise: Work with Lights in a Scene - Architectural ........................ 373Exercise: Work with Lights in a Scene - Mechanical .......................... 376
Lesson: Using Materials .............................................................................. 380About Materials ................................................................................ 381Working with Predefined Materials .................................................. 383Creating and Editing Materials .......................................................... 386Exercise: Add Materials to Your Scene - Architectural ...................... 395Exercise: Add Materials to Your Scene - Mechanical ......................... 398

Contents ■ vii
Lesson: Using the Sun ................................................................................. 401About the Sun ................................................................................... 402About the Render tab ....................................................................... 403Specifying Your Scene's Geographic Location ................................... 405About the Sun Properties Palette ..................................................... 410Exercise: Use the Sun ........................................................................ 416
Lesson: Rendering ....................................................................................... 419About the Rendering Environment and Render Presets .................... 420Rendering Views, Cropped Regions, and Selected Objects ............... 421About the Render Window and Image Information .......................... 423Render Output Size and Format ....................................................... 426Advanced Rendering ......................................................................... 429Exercise: Render an Architectural Scene ........................................... 432Exercise: Render a Mechanical Scene ............................................... 434
Lesson: Navigating the Model ..................................................................... 437Walking and Flying Through a Model ............................................... 438Recording an Animation .................................................................... 443Using Animation Paths ...................................................................... 445Exercise: Walk Through a Model and Create a Path Animation ......... 448
Lesson: Leveraging Cameras and Views ...................................................... 451About Cameras .................................................................................. 452Creating Cameras and Views ............................................................ 453Activating and Managing Camera Views ........................................... 458Viewing ShowMotion Presentations ................................................. 464Creating Views for Presentation with Show Motion ......................... 466Exercise: Create Camera Views ......................................................... 469Exercise: Use ShowMotion ................................................................ 473
Chapter 6: Downstream Uses for Your Digital Prototype ........................... 477
Lesson: 3D Printing ..................................................................................... 478About 3D Printing ............................................................................. 4793D Printing ........................................................................................ 481Exercise: Create a 3D Print ............................................................... 484
Appendix .................................................................................................... 487

viii ■ Acknowledgements
Acknowledgements
The Autodesk Learning team wishes to thank everyone who participated in thedevelopment of this project, with special acknowledgement to the authoringcontributions and subject matter expertise of Ron Myers and CrWare, LP. CrWare, LP began publishing courseware for Autodesk® Inventor® in 2001. Sincethat time, the company has grown to include full-time curriculum developers,subject matter experts, technical writers, and graphics specialists, each with aunique set of industry experiences and talents that enables CrWare to createcontent that is both accurate and relevant to meeting the learning needs of itsreaders and customers. The company's Founder and General Partner, Ron Myers, has been usingAutodesk® products since 1989. During that time, Ron Myers worked in alldisciplines of drafting and design, until 1996 when he began a career as anApplications Engineer, Instructor, and Author. Ron Myers has been creatingcourseware and other training material for Autodesk since 1996 and has writtenand created training material for AutoCAD®, Autodesk Inventor, AutoCAD®Mechanical, Mechanical Desktop®, and Autodesk® Impression.

ix
Introduction
Welcome to the AutoCAD 2010: Learning AutoCAD 3D training guide for use in Authorized TrainingCenters (ATC®) locations, corporate training settings, and other classroom settings.
Although this guide is designed for instructor-led courses, you can also use it for self-paced learning.The guide encourages self-learning through the use of the AutoCAD® Help system.
This introduction covers the following topics:
■ Course objectives■ Prerequisites■ Using this guide■ CD contents■ Completing the exercises■ Installing the exercise data files from the CD■ Imperial and metric datasets■ Notes, tips, and warnings■ Feedback This guide is complementary to the software documentation. For detailed explanations of features andfunctionality, refer to the Help in the software.
Course Objectives
After completing this guide, you will be able to:
■ Work within the 3D environment and represent a design by creating solid or mesh primitives.Begin working with free-form organic meshes.
■ Create advanced solid, surface or mesh models from 2D profiles. Create composite models usingbooleans, and extract information from those models.
■ Complete a solid model design by adding the necessary features to detail, duplicate, and position3D models. Also to convert 2D objects to 3D objects. Use subdivision mesh editing to manipulateand mold free-form meshes.
■ Document a 3D design by creating 2D drawings for production and visualization.■ Communicate your design ideas using visual styles, lights, model walk-through tools, and
renderings.■ Output your 3D model to a 3D printer.

x ■ Introduction
Prerequisites
This guide is designed for the AutoCAD user who possesses an introductory-level knowledge ofAutoCAD or has been using AutoCAD for some time and understands the basics of working withAutoCAD. Terminology and instructions assume this level of experience when concepts, procedures,and exercises are discussed.
It is recommended that you have a working knowledge of:
■ Microsoft Windows® or Microsoft® Windows® Vista.■ The current or a previous release of AutoCAD.■ How to create and edit basic AutoCAD objects.■ How to create and work with layouts.
Using This Courseware
The lessons are independent of each other. However, it is recommended that you completethese lessons in the order that they are presented unless you are familiar with the concepts andfunctionality described in those lessons.
Each chapter contains:
■ Lessons Usually two or more lessons in each chapter.■ Exercises Practical, real-world examples for you to practice using the functionality you have just learned.
Each exercise contains step-by-step procedures and graphics to help you complete the exercisesuccessfully.
CD Contents
The CD attached to the back cover of this book contains all the data and drawings you need tocomplete the exercises in this guide.
Completing the Exercises
You can complete the exercises by using the book or working on screen.
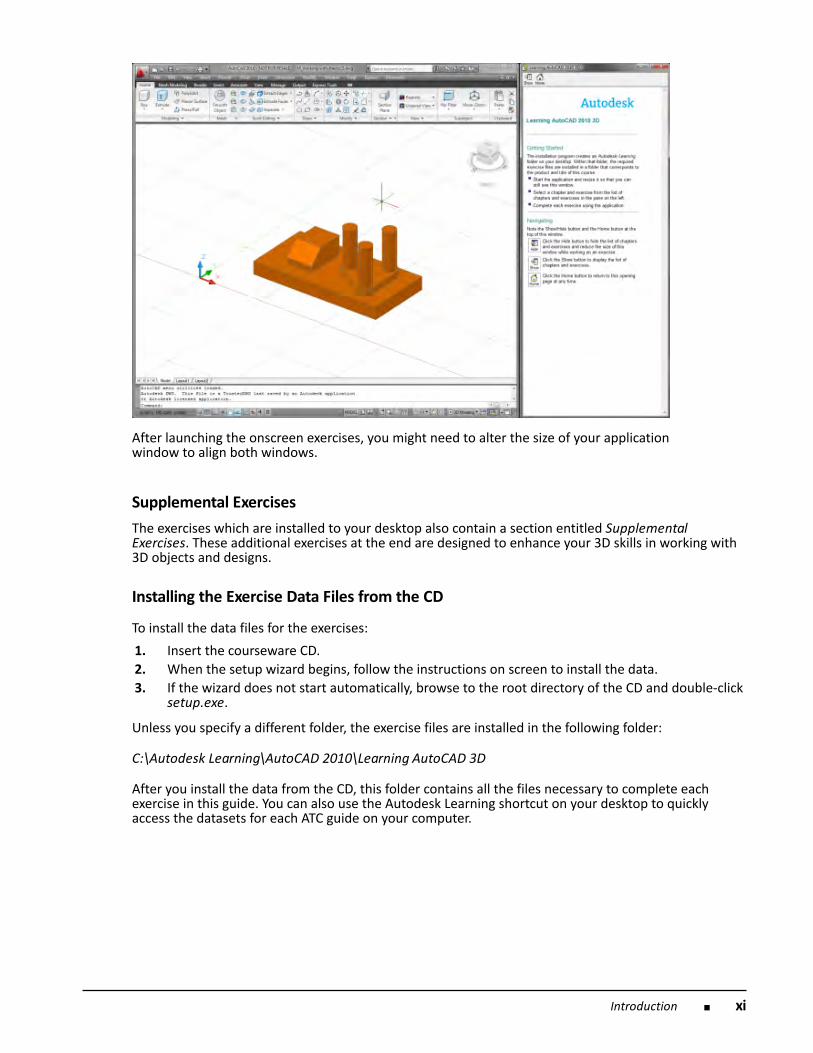
■ Use the book Follow the step-by-step exercises in the book.■ On screen Click the Learning AutoCAD 3D icon installed on your desktop from the CD, and follow the step-by-
step exercises on screen. The onscreen exercises are the same as those in the book. The onscreenversion has the advantage that you can concentrate on the screen without having to glance downat your book. The onscreen content also has several supplemental exercises available for use thatare not included in the book.
Introduction ■ xi
After launching the onscreen exercises, you might need to alter the size of your application window to align both windows.
Supplemental Exercises
The exercises which are installed to your desktop also contain a section entitled SupplementalExercises. These additional exercises at the end are designed to enhance your 3D skills in working with3D objects and designs.
Installing the Exercise Data Files from the CD
To install the data files for the exercises:
1. Insert the courseware CD. 2. When the setup wizard begins, follow the instructions on screen to install the data. 3. If the wizard does not start automatically, browse to the root directory of the CD and double-click
setup.exe.
Unless you specify a different folder, the exercise files are installed in the following folder:
C:\Autodesk Learning\AutoCAD 2010\Learning AutoCAD 3D
After you install the data from the CD, this folder contains all the files necessary to complete eachexercise in this guide. You can also use the Autodesk Learning shortcut on your desktop to quicklyaccess the datasets for each ATC guide on your computer.

xii ■ Introduction
Imperial and Metric Datasets
In exercises that specify units of measurement, alternative files are provided as shown in the followingexample:■ Open i_stair_settings.dwg (imperial) or m_stair_settings.dwg (metric).
In the exercise steps, the imperial value is followed by the metric value in parentheses as shown in thefollowing example:■ For Length, enter 13'2" (4038 mm).
For exercises with no specific units of measurement, files are provided as shown in the followingexample:■ Open c_stair_settings.dwg (common).
In the exercise steps, the unitless value is specified as shown in the following example:■ For Length, enter 400.
Some exercise may be provided with only a metric or imperial version. In those instances, you will beasked to enter the appropriate value, as described previously.
Notes, Tips, and Warnings
Throughout this guide, notes, tips, and warnings are called out for special attention.
Notes contain guidelines, constraints, and other explanatory information.
Tips provide information to enhance your productivity.
Warnings provide information about actions that might result in the loss of data, systemfailures, or other serious consequences.
Feedback
We always welcome feedback on Autodesk Official Training Guides. After completing this course, ifyou have suggestions for improvements or if you want to report an error in the book or on the CD,please send your comments to [email protected].