Attaching Tabletops - TIMBERtech - home -...
6
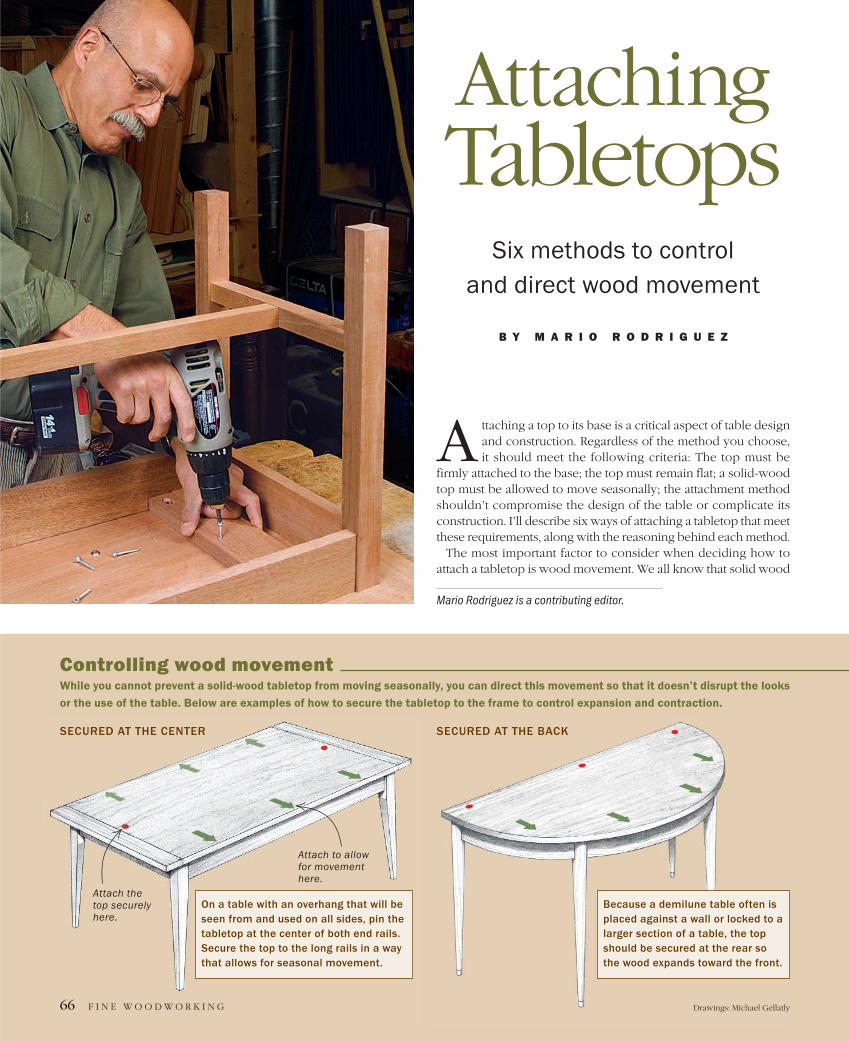
ttaching a top to its base is a critical aspect of table design and construction. Regardless of the method you choose, it should meet the following criteria: The top must be firmly attached to the base; the top must remain flat; a solid-wood top must be allowed to move seasonally; the attachment method shouldn’t compromise the design of the table or complicate its construction. I’ll describe six ways of attaching a tabletop that meet these requirements, along with the reasoning behind each method. The most important factor to consider when deciding how to attach a tabletop is wood movement. We all know that solid wood Six methods to control and direct wood movement BY MARIO RODRIGUEZ A Attaching Tabletops 66 FINE WOODWORKING Drawings: Michael Gellatly Because a demilune table often is placed against a wall or locked to a larger section of a table, the top should be secured at the rear so the wood expands toward the front. SECURED AT THE CENTER On a table with an overhang that will be seen from and used on all sides, pin the tabletop at the center of both end rails. Secure the top to the long rails in a way that allows for seasonal movement. Attach the top securely here. Attach to allow for movement here. SECURED AT THE BACK Controlling wood movement While you cannot prevent a solid-wood tabletop from moving seasonally, you can direct this movement so that it doesn’t disrupt the looks or the use of the table. Below are examples of how to secure the tabletop to the frame to control expansion and contraction. Mario Rodriguez is a contributing editor.
Transcript of Attaching Tabletops - TIMBERtech - home -...
ttaching a top to its base is a critical aspect of table designand construction. Regardless of the method you choose,it should meet the following criteria: The top must be
firmly attached to the base; the top must remain flat; a solid-woodtop must be allowed to move seasonally; the attachment methodshouldn’t compromise the design of the table or complicate itsconstruction. I’ll describe six ways of attaching a tabletop that meetthese requirements, along with the reasoning behind each method.
The most important factor to consider when deciding how to attach a tabletop is wood movement. We all know that solid wood
Six methods to control and direct wood movement
B Y M A R I O R O D R I G U E Z
A
AttachingTabletops
66 F I N E W O O D W O R K I N G Drawings: Michael Gellatly
Because a demilune table often isplaced against a wall or locked to alarger section of a table, the topshould be secured at the rear sothe wood expands toward the front.
SECURED AT THE CENTER
On a table with an overhang that will beseen from and used on all sides, pin thetabletop at the center of both end rails.Secure the top to the long rails in a waythat allows for seasonal movement.
Attach thetop securelyhere.
Attach to allowfor movementhere.
SECURED AT THE BACK
Controlling wood movementWhile you cannot prevent a solid-wood tabletop from moving seasonally, you can direct this movement so that it doesn’t disrupt the looks
or the use of the table. Below are examples of how to secure the tabletop to the frame to control expansion and contraction.
Mario Rodriguez is a contributing editor.

moves seasonally across the grain. It’s a fact; you can’t do anythingto stop it. In the summer, a board will expand across its widthbecause of an increase in humidity. During cold months, the sameboard will shrink and become narrower. If no allowance is madeto control or direct this seasonal movement, a tabletop mightbuckle, or worse, crack and split.
When calculating how much a board will move, I usually allowfrom 1⁄8 in. to 3⁄16 in. for every 12 in. of width. Therefore, I wouldanticipate that a 42-in.-wide tabletop might move about 1⁄2 in.overall. This is only a general guide, and certain factors must betaken into account. For instance, in parts of the country with lowhumidity, wood movement might be minimal.
Another factor is the type of wood you’re using: Cherry movesless than white oak but more than mahogany, while flatsawnwood moves more than quartersawn. For more on this subject,read Understanding Wood by R. Bruce Hoadley (The TauntonPress, 2000).
Once you accept that the tabletop will move, you can control ordirect this movement so that it doesn’t disrupt how the table worksor looks (see the drawings below). For a freestanding table with auniform overhang, I anchor the top to the base at the center of theend rails. That way, any cross-grain movement will occur evenlyalong each long-grain side. On a demilune (half-round) table, I pinthe back edge of the top, which typically is placed against a wall.Conversely, on a writing table I might fix the top along the front ofthe table so that movement occurs toward the rear.
For this article, I have illustrated six methods of securing a table-top (right and pp. 68-71). The methods are listed by ease of instal-lation, starting with the simplest. The hardware for two of themethods can be purchased relatively cheaply from hardware cat-alogs, while the rest can be made from shop scrap. This is a low-budget process.
P O C K E T H O L E S
This method is probably
the oldest way of attach-
ing a tabletop. It involves
drilling into the rail a 1⁄2-in.
flat-bottomed pocket hole at
a 10° angle. Then a smaller
pilot hole (to accommodate
the shank of a #8 wood
screw) is drilled into the center of the pocket hole.
Common on antique furniture, pocket holes make no
allowance for wood movement, which may explain the num-
ber of cracked and split tabletops. On small solid-wood tops
(up to 9 in.) or veneered plywood tops, pocket holes can be
the only attachment method. On larger pieces, they should
be limited to areas needing movement restricted.
Pocket-hole jig. Construct a small jig to hold the rail at approxi-mately 10° while drilling pocket holes with a Forstner bit.
A hole in thepocket. Drill asmaller-diameterpilot hole for thescrew that will bedriven into thetabletop.
SECURED AT THE FRONT
If one side of a table is going tobe used more than the others,secure that edge to the rail andconfine seasonal movement tothe opposite edge.
M A Y / J U N E 2 0 0 3 67
68 F I N E W O O D W O R K I N G Photos, except where noted: Mark Schofield; this page (top left, middle left): Kelly J. Dunton
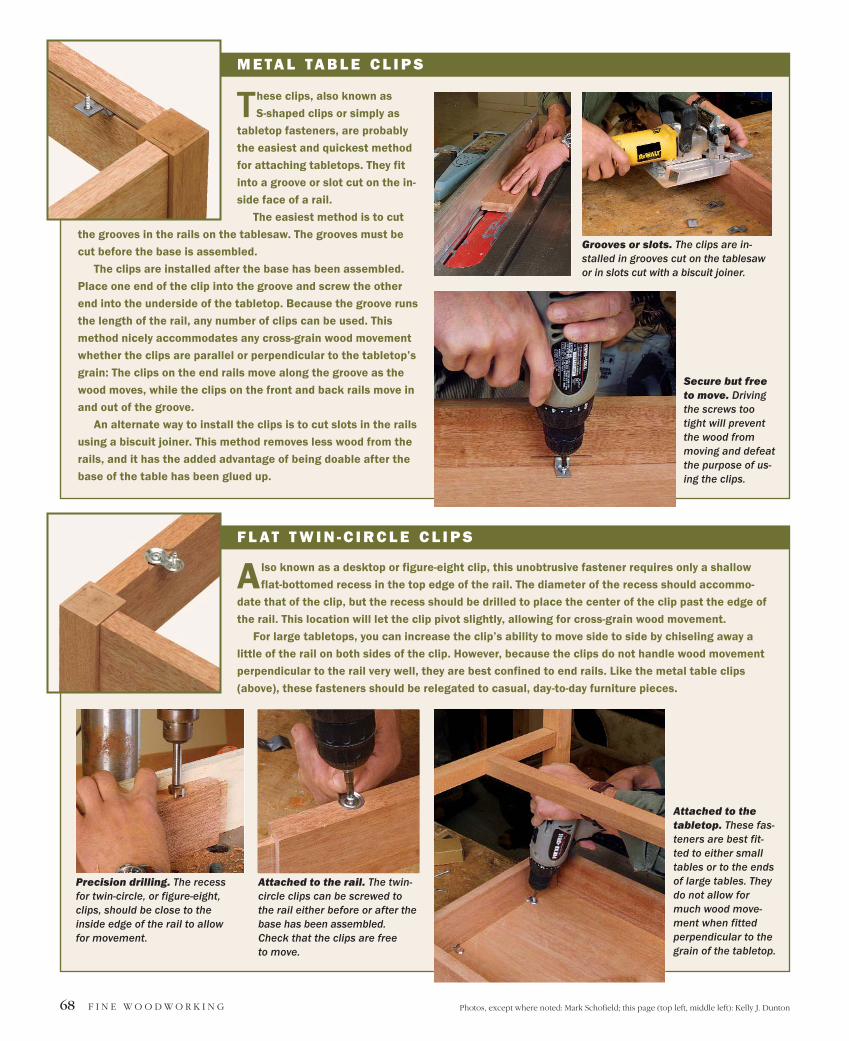
M E TA L TA B L E C L I P S
F L AT T W I N - C I R C L E C L I P S
These clips, also known as
S-shaped clips or simply as
tabletop fasteners, are probably
the easiest and quickest method
for attaching tabletops. They fit
into a groove or slot cut on the in-
side face of a rail.
The easiest method is to cut
the grooves in the rails on the tablesaw. The grooves must be
cut before the base is assembled.
The clips are installed after the base has been assembled.
Place one end of the clip into the groove and screw the other
end into the underside of the tabletop. Because the groove runs
the length of the rail, any number of clips can be used. This
method nicely accommodates any cross-grain wood movement
whether the clips are parallel or perpendicular to the tabletop’s
grain: The clips on the end rails move along the groove as the
wood moves, while the clips on the front and back rails move in
and out of the groove.
An alternate way to install the clips is to cut slots in the rails
using a biscuit joiner. This method removes less wood from the
rails, and it has the added advantage of being doable after the
base of the table has been glued up.
Also known as a desktop or figure-eight clip, this unobtrusive fastener requires only a shallow
flat-bottomed recess in the top edge of the rail. The diameter of the recess should accommo-
date that of the clip, but the recess should be drilled to place the center of the clip past the edge of
the rail. This location will let the clip pivot slightly, allowing for cross-grain wood movement.
For large tabletops, you can increase the clip’s ability to move side to side by chiseling away a
little of the rail on both sides of the clip. However, because the clips do not handle wood movement
perpendicular to the rail very well, they are best confined to end rails. Like the metal table clips
(above), these fasteners should be relegated to casual, day-to-day furniture pieces.
Grooves or slots. The clips are in-stalled in grooves cut on the tablesawor in slots cut with a biscuit joiner.
Secure but freeto move. Drivingthe screws tootight will preventthe wood frommoving and defeatthe purpose of us-ing the clips.
Precision drilling. The recessfor twin-circle, or figure-eight,clips, should be close to the inside edge of the rail to allow for movement.
Attached to thetabletop. These fas-teners are best fit-ted to either smalltables or to the endsof large tables. Theydo not allow formuch wood move-ment when fittedperpendicular to thegrain of the tabletop.
Attached to the rail. The twin-circle clips can be screwed tothe rail either before or after thebase has been assembled.Check that the clips are free to move.
M A Y / J U N E 2 0 0 3 69Photo, this page (top left): Kelly J. Dunton
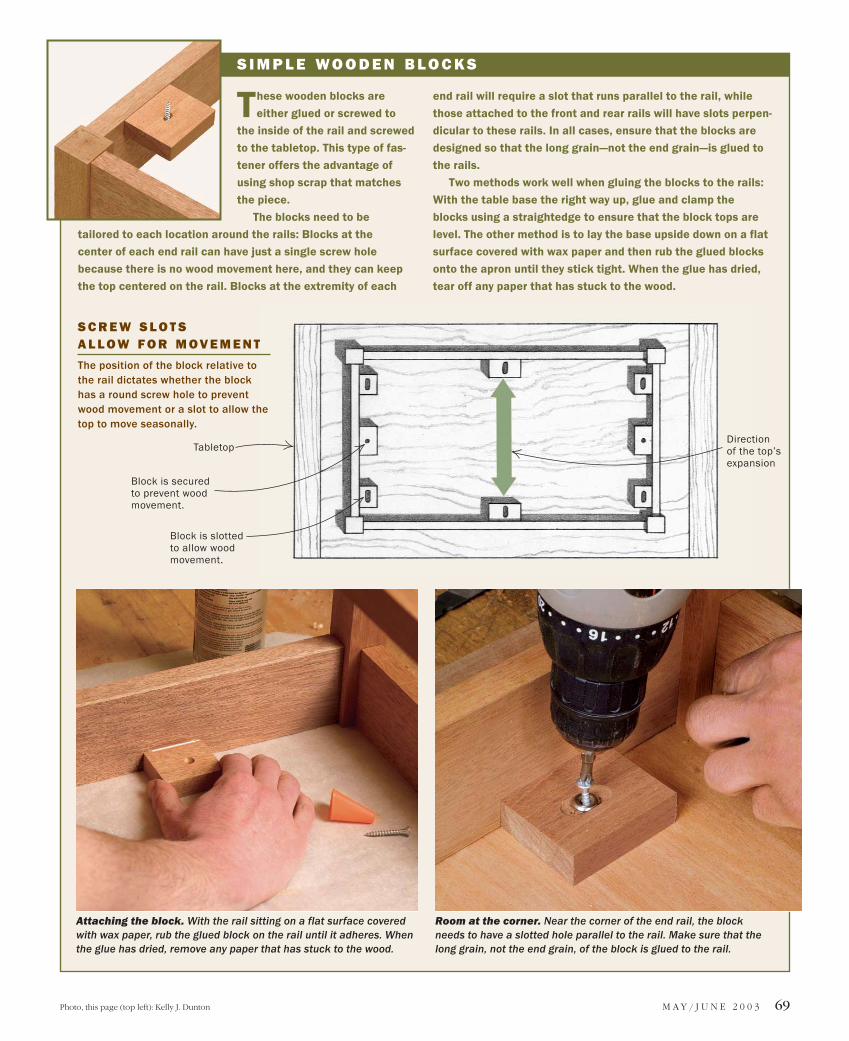
S I M P L E W O O D E N B L O C K S
These wooden blocks are
either glued or screwed to
the inside of the rail and screwed
to the tabletop. This type of fas-
tener offers the advantage of
using shop scrap that matches
the piece.
The blocks need to be
tailored to each location around the rails: Blocks at the
center of each end rail can have just a single screw hole
because there is no wood movement here, and they can keep
the top centered on the rail. Blocks at the extremity of each
end rail will require a slot that runs parallel to the rail, while
those attached to the front and rear rails will have slots perpen-
dicular to these rails. In all cases, ensure that the blocks are
designed so that the long grain—not the end grain—is glued to
the rails.
Two methods work well when gluing the blocks to the rails:
With the table base the right way up, glue and clamp the
blocks using a straightedge to ensure that the block tops are
level. The other method is to lay the base upside down on a flat
surface covered with wax paper and then rub the glued blocks
onto the apron until they stick tight. When the glue has dried,
tear off any paper that has stuck to the wood.
Attaching the block. With the rail sitting on a flat surface coveredwith wax paper, rub the glued block on the rail until it adheres. Whenthe glue has dried, remove any paper that has stuck to the wood.
Room at the corner. Near the corner of the end rail, the blockneeds to have a slotted hole parallel to the rail. Make sure that thelong grain, not the end grain, of the block is glued to the rail.
S C R E W S L O T S A L L O W F O R M O V E M E N T
The position of the block relative tothe rail dictates whether the blockhas a round screw hole to preventwood movement or a slot to allow thetop to move seasonally.
Tabletop
Block is slottedto allow woodmovement.
Block is secured to prevent woodmovement.
Direction of the top’sexpansion
70 F I N E W O O D W O R K I N G Photo, this page (top left): Kelly J. Dunton
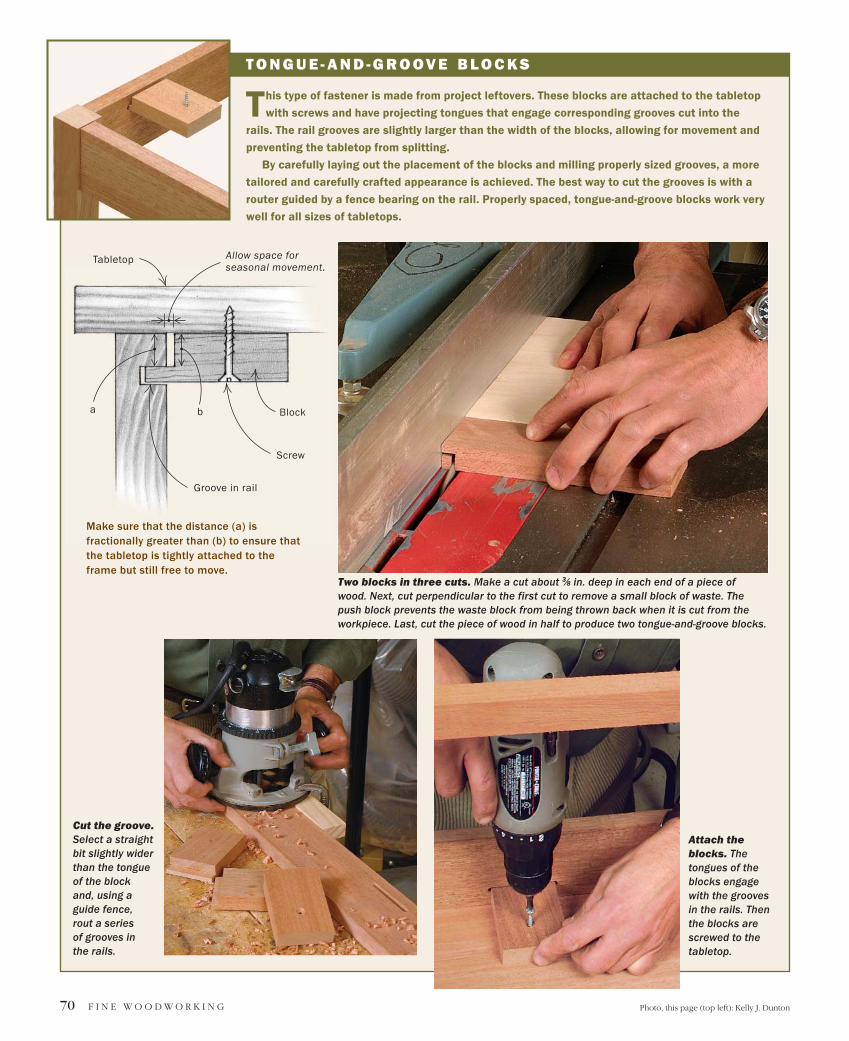
T O N G U E - A N D - G R O O V E B L O C K S
This type of fastener is made from project leftovers. These blocks are attached to the tabletop
with screws and have projecting tongues that engage corresponding grooves cut into the
rails. The rail grooves are slightly larger than the width of the blocks, allowing for movement and
preventing the tabletop from splitting.
By carefully laying out the placement of the blocks and milling properly sized grooves, a more
tailored and carefully crafted appearance is achieved. The best way to cut the grooves is with a
router guided by a fence bearing on the rail. Properly spaced, tongue-and-groove blocks work very
well for all sizes of tabletops.
Cut the groove.Select a straightbit slightly widerthan the tongueof the blockand, using aguide fence,rout a series of grooves in the rails.
Attach theblocks. Thetongues of theblocks engagewith the grooves in the rails. Thenthe blocks arescrewed to thetabletop.
Two blocks in three cuts. Make a cut about 3⁄8 in. deep in each end of a piece ofwood. Next, cut perpendicular to the first cut to remove a small block of waste. Thepush block prevents the waste block from being thrown back when it is cut from theworkpiece. Last, cut the piece of wood in half to produce two tongue-and-groove blocks.
Tabletop
Screw
Block
Allow space forseasonal movement.
Groove in rail
a b
Make sure that the distance (a) isfractionally greater than (b) to ensure thatthe tabletop is tightly attached to theframe but still free to move.
M A Y / J U N E 2 0 0 3 71Photo, this page (top left): Kelly J. Dunton
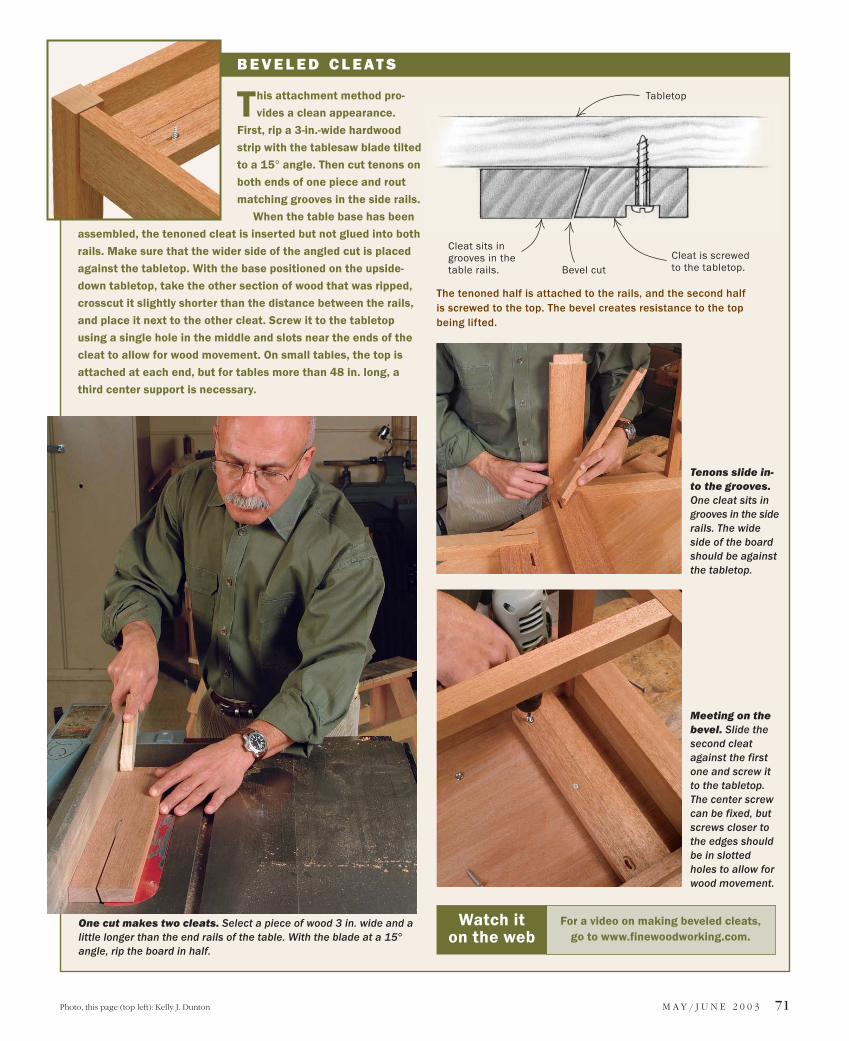
This attachment method pro-
vides a clean appearance.
First, rip a 3-in.-wide hardwood
strip with the tablesaw blade tilted
to a 15° angle. Then cut tenons on
both ends of one piece and rout
matching grooves in the side rails.
When the table base has been
assembled, the tenoned cleat is inserted but not glued into both
rails. Make sure that the wider side of the angled cut is placed
against the tabletop. With the base positioned on the upside-
down tabletop, take the other section of wood that was ripped,
crosscut it slightly shorter than the distance between the rails,
and place it next to the other cleat. Screw it to the tabletop
using a single hole in the middle and slots near the ends of the
cleat to allow for wood movement. On small tables, the top is
attached at each end, but for tables more than 48 in. long, a
third center support is necessary.
B E V E L E D C L E AT S
One cut makes two cleats. Select a piece of wood 3 in. wide and alittle longer than the end rails of the table. With the blade at a 15°angle, rip the board in half.
Meeting on thebevel. Slide thesecond cleatagainst the firstone and screw itto the tabletop.The center screwcan be fixed, butscrews closer tothe edges shouldbe in slottedholes to allow forwood movement.
Tenons slide in-to the grooves.One cleat sits ingrooves in the siderails. The wideside of the boardshould be againstthe tabletop.
The tenoned half is attached to the rails, and the second half is screwed to the top. The bevel creates resistance to the topbeing lifted.
Tabletop
Cleat is screwedto the tabletop.
Cleat sits ingrooves in thetable rails. Bevel cut
For a video on making beveled cleats, go to www.finewoodworking.com.
Watch it on the web