Assembly InstructIons - Thrive Life 3 of 8 Assembly Instructions food rotation system crossbArs cAn...
9
ASSEMBLY INSTRUCTIONS Food Rotation System ™ Shelf Reliance ® LLC | 691 South Auto Mall Drive American Fork, UT 84003 | 801-756-9902 | [email protected] If you have damaged or missing parts, please contact us by phone or email. CONTACT US FIRST! Note: The picture used in the assembly instructions is a general picture of a Food Rotation System. Although your system may vary in size and dimension, these instructions are suited for all Food Rotation Systems. Copyright © Shelf Reliance, 2012. All Rights Reserved.
Transcript of Assembly InstructIons - Thrive Life 3 of 8 Assembly Instructions food rotation system crossbArs cAn...

Assembly InstructIonsFood Rotation System™
shelf reliance® llc | 691 South Auto Mall Drive
American Fork, UT 84003 | 801-756-9902 | [email protected]
If you have damaged or missing parts, please contact us by phone or email.
contAct us fIrst!
note: The picture used in the assembly instructions is a general picture of a Food Rotation System. Although your system may vary in size and dimension, these instructions are suited for all Food Rotation Systems.
Copyright © Shelf Reliance, 2012. All Rights Reserved.

Page 1 of 8
Assembly InstructionsFood Rotation System™
tools needed
PArts
note: use a hard rubber or plastic mallet to pound metal pieces together (a hammer may leave dents and chips in the paint).
- or -
tIPs
1. storage area. To optimize food shelf life, set up your Food Rotation System in a cool area that experiences few temperature fluctuations and remains in the range of 40–70°⁰F.
2. Assembly. Assemble the unit on a sturdy, level surface (not carpet). Safe assembly requires at least two people.
3. connecting metal pieces. Pound crossbars and beams into angle posts with a mallet until the rivets have firmly set into the bottom of the notches. This is extremely important to ensure maximum stability of the frame and proper fit of Can Tracks. If needed, apply a simple lubricant to the rivets to help them slide into the notches.
4. notches are the cutout keyhole segments of an angle post.
5. rivets are the ½" protruding round buttons that insert into the notches.
6. lips are the horizontal edges of beams. Except for bottom wide beams, the lip of the beam should be on the bottom facing inward.
caution: Failure to pound all wide beams and crossbars so the rivets are set firmly into the bottom of the notches may cause the unit to tip over and could result in serious injury.
crossbar
strap
Wide beam (long/short)
Angle Post
can track (small /medium/large) magnet Page
See the parts list on page 7 to see how many of each part come with your specific unit.
Page 2 of 8
Assembly InstructionsFood Rotation System™
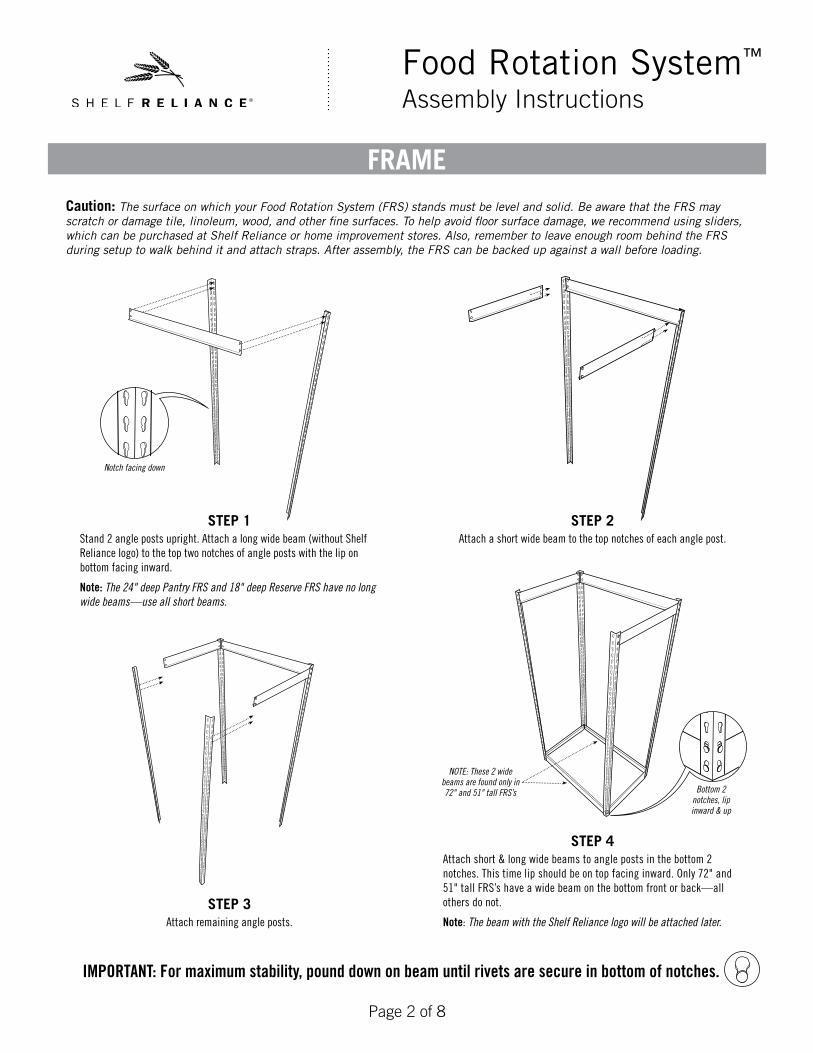
frAmecaution: The surface on which your Food Rotation System (FRS) stands must be level and solid. Be aware that the FRS may scratch or damage tile, linoleum, wood, and other fine surfaces. To help avoid floor surface damage, we recommend using sliders, which can be purchased at Shelf Reliance or home improvement stores. Also, remember to leave enough room behind the FRS during setup to walk behind it and attach straps. After assembly, the FRS can be backed up against a wall before loading.
steP 1Stand 2 angle posts upright. Attach a long wide beam (without Shelf Reliance logo) to the top two notches of angle posts with the lip on bottom facing inward.
Note: The 24" deep Pantry FRS and 18" deep Reserve FRS have no long wide beams—use all short beams.
steP 4Attach short & long wide beams to angle posts in the bottom 2 notches. This time lip should be on top facing inward. Only 72" and 51" tall FRS’s have a wide beam on the bottom front or back—all others do not.
Note: The beam with the Shelf Reliance logo will be attached later.
steP 2Attach a short wide beam to the top notches of each angle post.
steP 3Attach remaining angle posts.
Notch facing down
Bottom 2 notches, lipinward & up
NOTE: These 2 wide beams are found only in 72" and 51" tall FRS’s
IMPORTANT: For maximum stability, pound down on beam until rivets are secure in bottom of notches.
Page 3 of 8
Assembly InstructionsFood Rotation System™
crossbArs
cAn trAcks
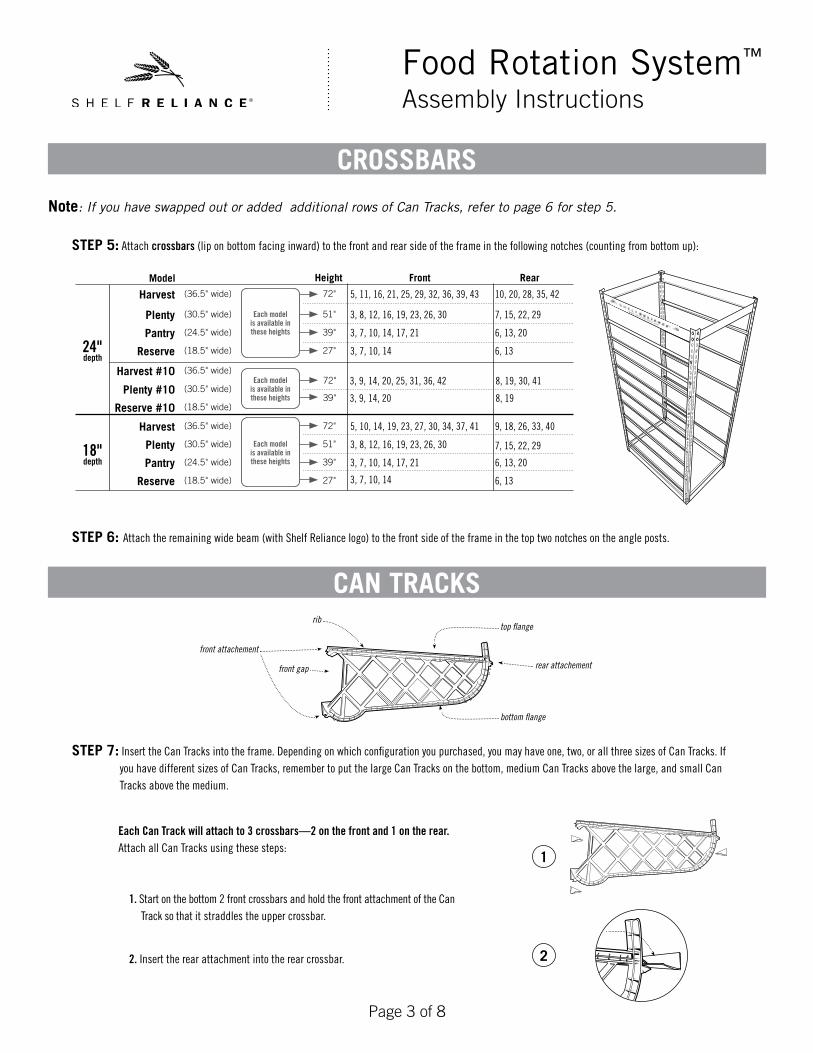
note: If you have swapped out or added additional rows of Can Tracks, refer to page 6 for step 5.
steP 5: Attach crossbars (lip on bottom facing inward) to the front and rear side of the frame in the following notches (counting from bottom up):
steP 6: Attach the remaining wide beam (with Shelf Reliance logo) to the front side of the frame in the top two notches on the angle posts.
steP 7: Insert the Can Tracks into the frame. Depending on which configuration you purchased, you may have one, two, or all three sizes of Can Tracks. If you have different sizes of Can Tracks, remember to put the large Can Tracks on the bottom, medium Can Tracks above the large, and small Can Tracks above the medium.
Each Can Track will attach to 3 crossbars—2 on the front and 1 on the rear. Attach all Can Tracks using these steps:
1. Start on the bottom 2 front crossbars and hold the front attachment of the Can Track so that it straddles the upper crossbar.
2. Insert the rear attachment into the rear crossbar.
Harvest (36.5" wide) 72" 5, 11, 16, 21, 25, 29, 32, 36, 39, 43 10, 20, 28, 35, 42
Plenty (30.5" wide) 51" 3, 8, 12, 16, 19, 23, 26, 30 7, 15, 22, 29
Pantry (24.5" wide) 39" 3, 7, 10, 14, 17, 21 6, 13, 20
reserve (18.5" wide) 27" 3, 7, 10, 14 6, 13
Harvest #10 (36.5" wide)
Plenty #10 (30.5" wide)
reserve #10 (18.5" wide)
Harvest (36.5" wide) 72" 5, 10, 14, 19, 23, 27, 30, 34, 37, 41 9, 18, 26, 33, 40
Plenty (30.5" wide) 51" 3, 8, 12, 16, 19, 23, 26, 30 7, 15, 22, 29
Pantry (24.5" wide) 39" 3, 7, 10, 14, 17, 21 6, 13, 20
reserve (18.5" wide) 27" 3, 7, 10, 14 6, 13
72" 3, 9, 14, 20, 25, 31, 36, 42 8, 19, 30, 41
39" 3, 9, 14, 20 8, 19
24"depth
18"depth
Each model is available in these heights
Each model is available in these heights
Each model is available in these heights
model Height front rear
1
2
front gap
rib
bottom flange
top flange
front attachement
rear attachement

Page 4 of 8
Assembly InstructionsFood Rotation System™
steP 8: Adjust Can Tracks to the desired width using the following steps:
1. Place a can on the bottom flanges of two Can Tracks.
Note: Small, medium, and large Can Tracks each store different sizes of cans. It is important that cans are rotated in the correct Can Tracks to prevent them from binding in the back . The Can Sizing Diagram on page 8 will help you determine the appropriate can size.
2. Adjust the Can Tracks along the crossbars so that the can rests about ⅛" away from the center rib of the Can Track on each side.
3. Secure the width by attaching a strap to the buttons on the bottom of the Can Tracks. Position the strap so that the lip is perpendicular to the Can Tracks, allowing you to push the lip of the strap forward until the strap snaps into place.
Note: There are 2 different sizes of straps. Use the large straps for #10 cans and other large cans.
4. Attach additional straps to the remaining button sets (shown to the right) at the same increment as the first strap.
5. Connect adjacent Can Tracks by alternating straps between the top and bottom sets of buttons, as shown below.
3. Press the front attachment of the Can Track downward into the front crossbars until it snaps into place.
cAn trAcks (contInued)
3
1
2
3
4
5
5
4 32
31
2
1
Large Can Track button sets Small/medium Can Track button sets

Page 5 of 8
Assembly InstructionsFood Rotation System™
troublesHootIngCan rolling Cans should roll smoothly. If they don’t, or if a can falls in between two Can Tracks, check to see that all straps on the track are attached to the buttons at the same increment to create equal spacing in front and back.
Can binding If a can binds in the back, double-check the Can Sizing Diagram to see if the can is in the right size Can Track. Then check the straps to ensure they are attached at the same increment in the front and back. Finally, give the can a gentle push to engage the rolling process.
#10 Cans If a #10 can has a lid, remove it (unless contents are not sealed beneath the lid) before placing it on Can Tracks.
Side Shelves If you have purchased Side Shelves to enhance your Food Rotation System, space them evenly on both sides of the FRS, so as to not overload one side.
Wheels If you have purchased wheels to go with your Food Rotation System, do not store more than 800 lbs. on 4 wheels (200 lbs. each). DO NOT use wheels with any FRS over 42" tall!
Defective parts If there are defective or missing parts when you receive your FRS, call us at 801-756-9902.
Congratulations!You have finished assembling your Food Rotation System and are now ready to conveniently store and rotate your food at your
own pace. We hope that this system will help you both build a supply of food for you and your family and use it every day.
For other Shelf Reliance products that facilitate everyday convenience and long-term peace of mind, visit our website.
www.ShelfReliance.com
shelf reliance®
691 South Auto Mall DriveAmerican Fork, UT 84003
Phone: (801) 756-9902Website: www.ShelfReliance.com
Customer support: [email protected]
Page 6 of 8
Assembly InstructionsFood Rotation System™
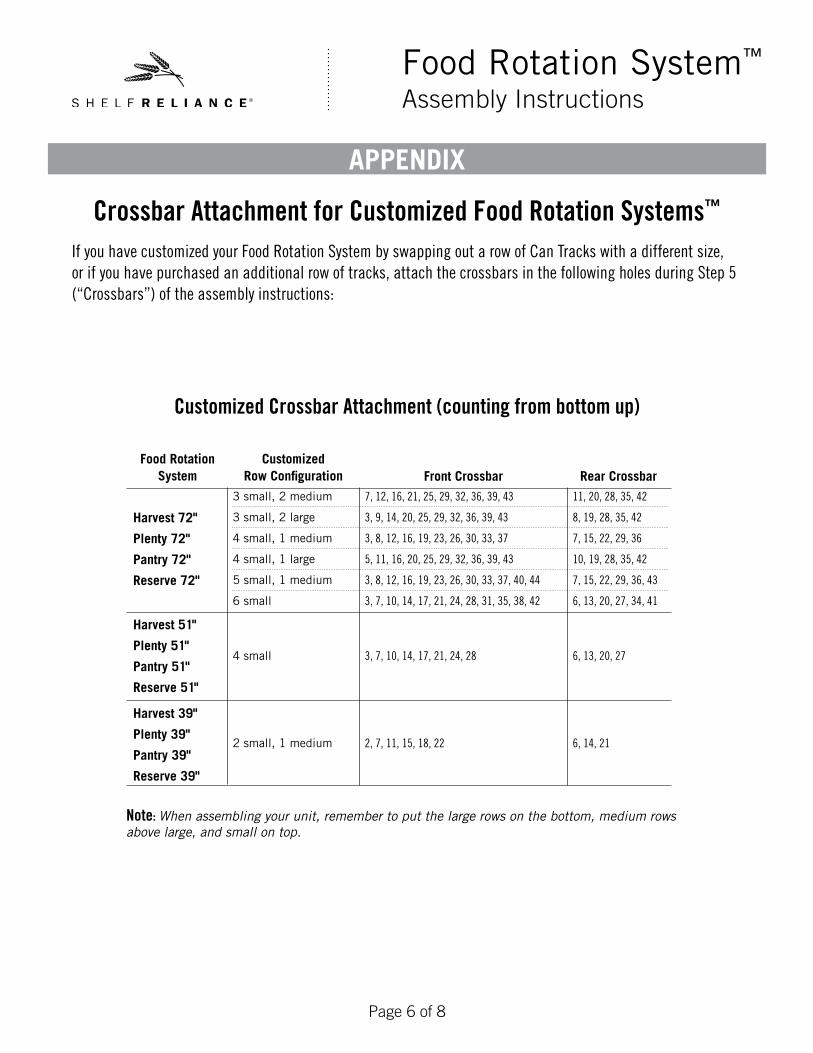
Crossbar Attachment for Customized Food Rotation Systems™
If you have customized your Food Rotation System by swapping out a row of Can Tracks with a different size, or if you have purchased an additional row of tracks, attach the crossbars in the following holes during Step 5 (“Crossbars”) of the assembly instructions:
Customized Crossbar Attachment (counting from bottom up)
food rotation system
customized row configuration front crossbar rear crossbar
3 small, 2 medium 7, 12, 16, 21, 25, 29, 32, 36, 39, 43 11, 20, 28, 35, 42
Harvest 72" 3 small, 2 large 3, 9, 14, 20, 25, 29, 32, 36, 39, 43 8, 19, 28, 35, 42
Plenty 72" 4 small, 1 medium 3, 8, 12, 16, 19, 23, 26, 30, 33, 37 7, 15, 22, 29, 36
Pantry 72" 4 small, 1 large 5, 11, 16, 20, 25, 29, 32, 36, 39, 43 10, 19, 28, 35, 42
reserve 72" 5 small, 1 medium 3, 8, 12, 16, 19, 23, 26, 30, 33, 37, 40, 44 7, 15, 22, 29, 36, 43
6 small 3, 7, 10, 14, 17, 21, 24, 28, 31, 35, 38, 42 6, 13, 20, 27, 34, 41
Harvest 51"
Plenty 51"4 small 3, 7, 10, 14, 17, 21, 24, 28 6, 13, 20, 27
Pantry 51"
reserve 51"
Harvest 39"
Plenty 39"2 small, 1 medium 2, 7, 11, 15, 18, 22 6, 14, 21
Pantry 39"
reserve 39"
APPendIx
Note: When assembling your unit, remember to put the large rows on the bottom, medium rows above large, and small on top.

Page 7 of 8
food
rot
atio
n sy
stem
- P
arts
lis
t
Page 8 of 8
Assembly InstructionsFood Rotation System™
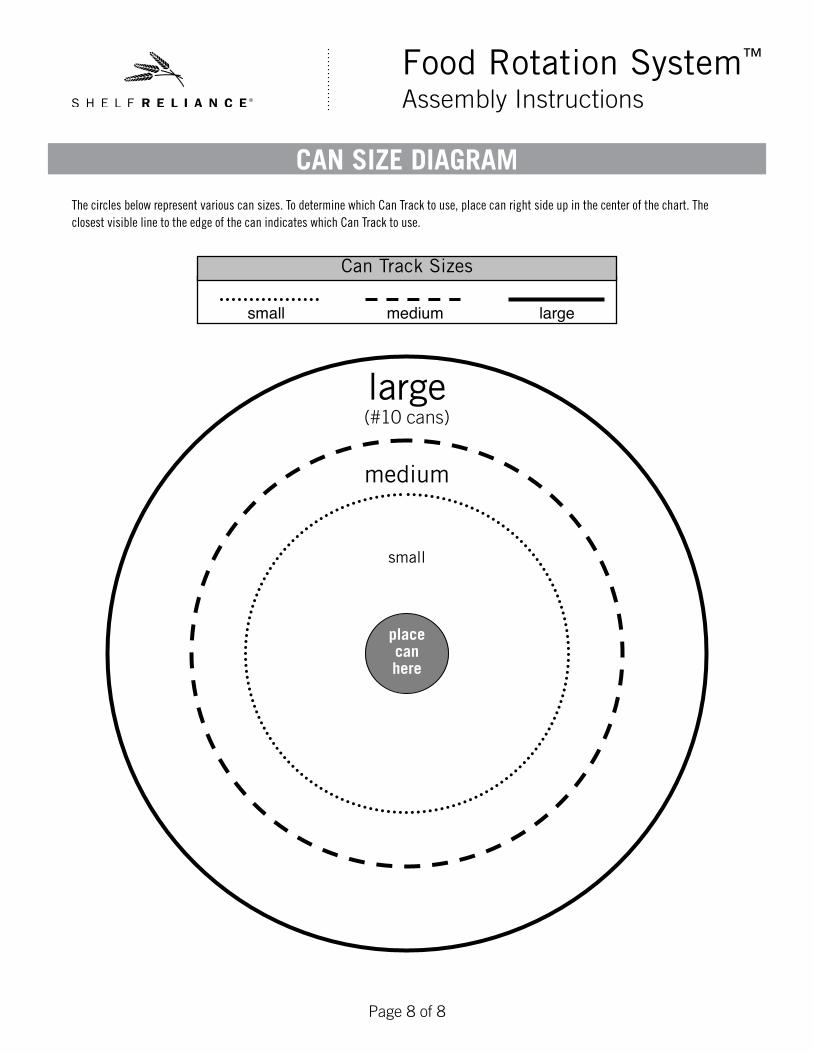
cAn sIze dIAgrAmThe circles below represent various can sizes. To determine which Can Track to use, place can right side up in the center of the chart. The closest visible line to the edge of the can indicates which Can Track to use.
small medium large
can track Sizes
large(#10 cans)
medium
small
placecan here