
Aquis550-1250 Instructions New 001
16
Aquis Complet e step by step instruction book let
-
Upload
thunderhoss -
Category
Documents
-
view
16 -
download
0
description
zerk
Transcript of Aquis550-1250 Instructions New 001

7/15/2019 Aquis550-1250 Instructions New 001
http://slidepdf.com/reader/full/aquis550-1250-instructions-new-001 1/15
Aquis
Complete step by step instruction booklet
7/15/2019 Aquis550-1250 Instructions New 001
http://slidepdf.com/reader/full/aquis550-1250-instructions-new-001 2/15
Important Safeguards
This appliance is not intended for use bychildren or infirm persons without supervi-sion. Young children should be supervisedto ensure that they do not play with the
appliance.
Warning: To guard against injury, basicsafety precautions should be observed,including the following:
1. Read and follow all safety instructions beforeusing this appliance.
2. Danger: To avoid possible electric shocks,special care should be taken since water isemployed in the use of aquarium equipment. For each of the following situations do not attemptrepairs yourself. Return the appliance to anauthorised service facility for service or discard theappliance.
a) If the electrical components of the appliance getwet, unplug the appliance immediately (nonimmersible equipment only).
b) If the filter shows any sign of abnormal water leakage, immediately unplug it from the power
source.
c) Carefully examine the filter after installation. Itshould not be plugged in when there is water onparts which are not intended to be wet.
d) Do not operate any filter if it has a damaged cordor plug, or if it is malfunctioning, or dropped or damaged in any manner.
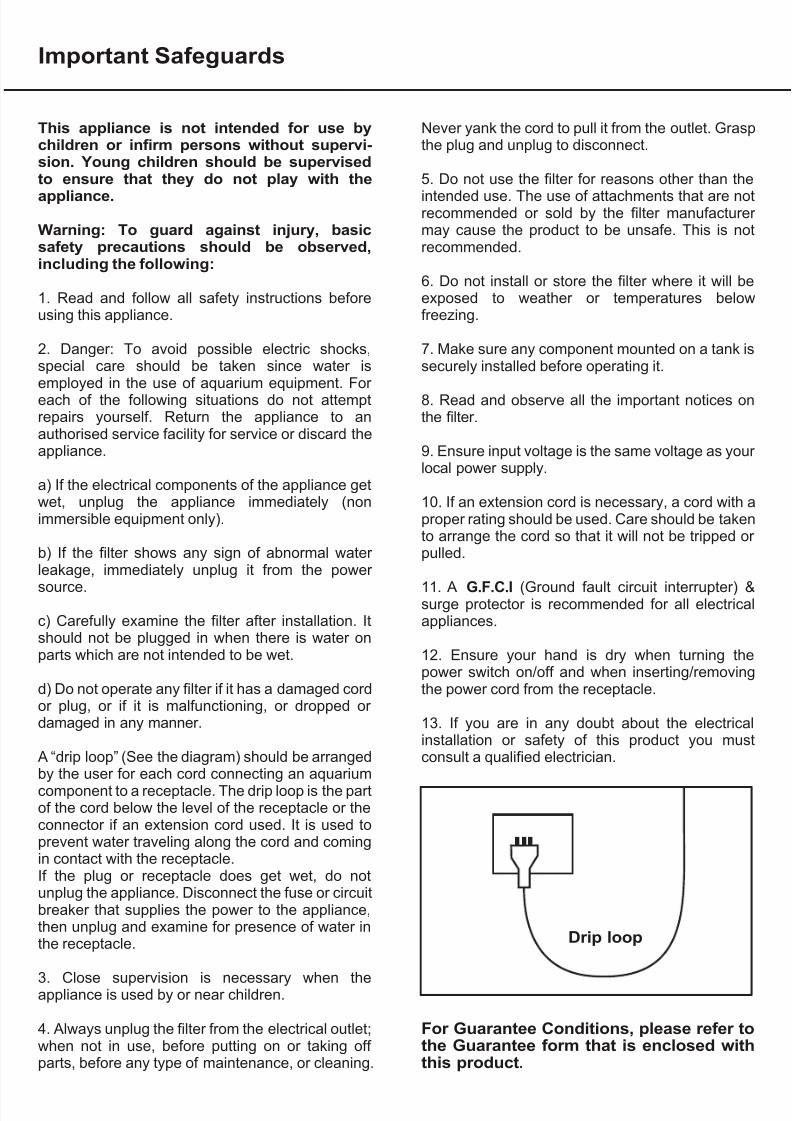
A “drip loop” (See the diagram) should be arrangedby the user for each cord connecting an aquarium
component to a receptacle. The drip loop is the partof the cord below the level of the receptacle or theconnector if an extension cord used. It is used toprevent water traveling along the cord and comingin contact with the receptacle.If the plug or receptacle does get wet, do notunplug the appliance. Disconnect the fuse or circuitbreaker that supplies the power to the appliance,then unplug and examine for presence of water inthe receptacle.
3. Close supervision is necessary when theappliance is used by or near children.
4. Always unplug the filter from the electrical outlet;when not in use, before putting on or taking off parts, before any type of maintenance, or cleaning.
Never yank the cord to pull it from the outlet. Graspthe plug and unplug to disconnect.
5. Do not use the filter for reasons other than the
intended use. The use of attachments that are notrecommended or sold by the filter manufacturer may cause the product to be unsafe. This is notrecommended.
6. Do not install or store the filter where it will beexposed to weather or temperatures belowfreezing.
7. Make sure any component mounted on a tank issecurely installed before operating it.
8. Read and observe all the important notices onthe filter.
9. Ensure input voltage is the same voltage as your local power supply.
10. If an extension cord is necessary, a cord with aproper rating should be used. Care should be takento arrange the cord so that it will not be tripped or pulled.
11. A G.F.C.I (Ground fault circuit interrupter) &surge protector is recommended for all electricalappliances.
12. Ensure your hand is dry when turning thepower switch on/off and when inserting/removingthe power cord from the receptacle.
13. If you are in any doubt about the electricalinstallation or safety of this product you mustconsult a qualified electrician.
For Guarantee Conditions, please refer tothe Guarantee form that is enclosed withthis product.
Drip loop

7/15/2019 Aquis550-1250 Instructions New 001
http://slidepdf.com/reader/full/aquis550-1250-instructions-new-001 3/15
Before First Use / Preparation
Know Your Filter
Read and follow all the instructions, even if you
feel you are familiar with the product and find a
place to keep the instructions handy for future
reference. Your attention is drawn particularly to
the sections concerning “IMPORTANTSAFEGUARDS” and the “GUARANTEE
CONDITIONS”. Please ensure you retain your
original purchase receipt in the event that
guarantee service is required.
Carefully unpack the filter making sure you
keep all the packing material until all the parts
of the product have been found and the product
has been assembled.
This product is shipped to you in a factory
sealed carton. Should the product malfunction
in any way or if the unit is damaged and
requires replacement, contact the retailer
where the product was purchased for
inspection.
Replacement Parts & Filter Media
Use Aqua One Genuine Spare Parts
Only. See your local Aqua One Dealer
and look for the number listed below for
the spare part you require. Alternatively
you will find these numbers on the silver
label located on the product.
550/750 Impeller 401I1050/1250 Impeller 403I550/750 Wool Pad 401W1050/1250 Wool Pad 403W550/750 15ppi Sponge 401S1050/1250 15ppi Sponge 403S
550/750 35ppi Sponge 402S1050/1250 35ppi Sponge 404S
Aqua One Spare Parts
401I
Canister Filter 550 / 750 / 1050 / 1250
1. Integrated Tap Connector
2. Pump Head
3. Clips
4. Primer
5. Filter Media
6. Media Baskets
7. Canister Body
SET UP/PARTS
6
5
3
7
1
5
Note: Models 750 and 1250 have 3 media baskets
4

7/15/2019 Aquis550-1250 Instructions New 001
http://slidepdf.com/reader/full/aquis550-1250-instructions-new-001 4/15
Recomended Filter Media Set Up
M e d i a B a s k e t 1
M e
d i a B a s k e t 2
Wool
Sponge(Blue 15ppi)
Sponge(Black 35ppi)
BioNood
Wool
Sponge(Blue 15ppi)
Sponge(Black 35ppi)
BioNood
Wool
Sponge(Blue 15ppi)
Sponge(Black 35ppi)
BioNood
Sponge(Blue 15ppi)
Aquis 550 Aquis 1050
Aquis 750 Aquis 1250
M e d i a B a s k e t 1
M e d i a B a s k e t 2
M e d i a B a s k e t 1
M e d i a B a s k e t 2
M e d i a B a s k e t 3
Wool
Sponge(Blue 15ppi)
Sponge(Black 35ppi)
BioNood
Sponge(Blue 15ppi)
M e d i a B a s k e t 1
M e d i a B a s k e t 2
M e d i a B a s k e t 3
CeramiSubCeramiSub

7/15/2019 Aquis550-1250 Instructions New 001
http://slidepdf.com/reader/full/aquis550-1250-instructions-new-001 5/15
Set Up Instructions
6. Follow the filter media setup instructions onthe previous page which apply to your filter.Remember to remove all media from the plasticbags and rinse in tap water to remove excess
dust. The simplest way to do this is empty thecorrect media into its basket and run tap water through it. Rinse the inside of the canister bodyin tap water. DO NOT USE ANY SOAPS OR
DETERGENTS. Fig 4
7. Once all the filter media and the canister hasbeen washed and the sponges have beeninserted into the filter baskets place the filter
media baskets in the correct order (Refer toprevious page) back into the canister body.Ensure the filter inlet pipe has the black sealingO-ring at the top of it and that the baskets sit flaton top of each other. Fig 5
8. Ensure the filter grid is then placed back ontop of the last filter basket. This is very impor-tant. Fig 6
Fig 1
Fig 2
Fig 3
Fig 4
Fig 5
1. Remove the 2 boxed accessory packs andthe filter unit from the box.
2. Open the filter unit. To do this release the 4
clips located on the corners of the filter. Fig 1
3. Lift the head unit off the canister body. Placeit somewhere safe where it will not be steppedon or broken. Fig 2
4. Take the canister body to the sink. Ensurethe area is clean and free from detergents.
5. Remove the filter grid and the filter mediabaskets from the canister. Fig 3
7/15/2019 Aquis550-1250 Instructions New 001
http://slidepdf.com/reader/full/aquis550-1250-instructions-new-001 6/15
9. Prior to installing the head unit, turn it over soyou can see the impeller. Make certain that the
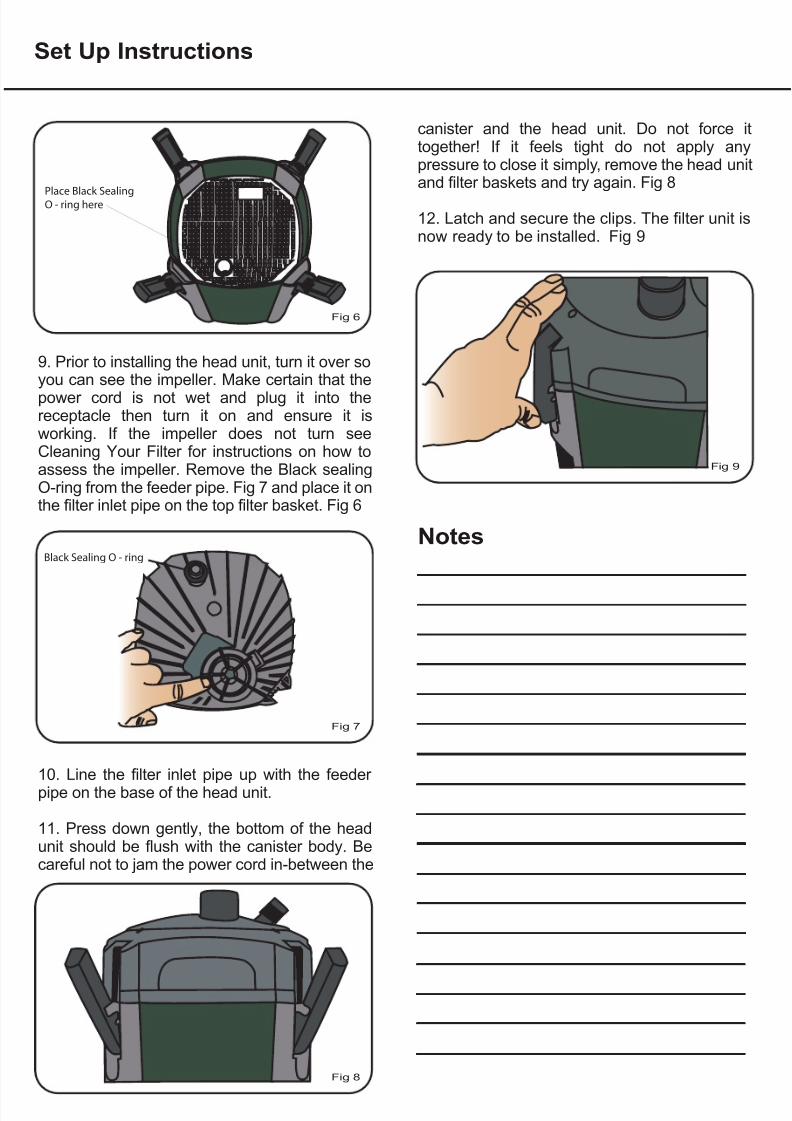
power cord is not wet and plug it into thereceptacle then turn it on and ensure it isworking. If the impeller does not turn seeCleaning Your Filter for instructions on how toassess the impeller. Remove the Black sealingO-ring from the feeder pipe. Fig 7 and place it onthe filter inlet pipe on the top filter basket. Fig 6
10. Line the filter inlet pipe up with the feeder pipe on the base of the head unit.
11. Press down gently, the bottom of the headunit should be flush with the canister body. Becareful not to jam the power cord in-between the
canister and the head unit. Do not force ittogether! If it feels tight do not apply anypressure to close it simply, remove the head unitand filter baskets and try again. Fig 8
12. Latch and secure the clips. The filter unit isnow ready to be installed. Fig 9
Fig 6
Fig 7
Fig 9
Fig 8
Notes
Set Up Instructions
Black Sealing O - ring
Place Black SealingO - ring here

7/15/2019 Aquis550-1250 Instructions New 001
http://slidepdf.com/reader/full/aquis550-1250-instructions-new-001 7/15
1. Open both of the brown accessory boxes andremove all components from there plastic bags.You will find a set of taps and two pieces of hose. Screw the collar on the taps all the way
in. (Clockwise) Fig 1
2. Now push one end of the hose over the hosetail and thread. Push it on as far as possible. Fig2
3. Now turn the collar anti clock wise to lock inthe hose. Do this on both pieces of hose.
4. Attach the taps to the inlet and outlet at thetop of the filter head. There is a sticker on eachtap and a label on the top of the unit which itcorresponds to IN goes to IN & OUT to OUT.Fig 3
5. Be sure not to cross thread the tap as thismay crack the seat and cause it to leak. Over tightening the tap will have the same effect. NOTOOLS ARE REQUIRED. HAND TIGHT IS
ENOUGH.
6. Place the canister in the desired position andfeed the hose through the cabinet or stand. Fig4
7. Choose the outlet you wish to use andassemble it. You will find you have 2 WalkingSticks; the shorter one is generally used for theoutlet. However if you have a shallow aquariumyou can use the longer one.
8. Outlet option 1 is the Spray Bar, this can beset up to run along the back or side wall of theaquarium.
9. Attach a Joiner (b) on to the shorter side of the Walking Stick (a), insert an Elbow (c) intothat. Then attach another Joiner (b) onto theother end of the Elbow. (c) Insert the Spray Bar (e) into the other end of the Joiner (b) . Presstogether firmly. Attach Suction Cups (d) to theSpray Bar.
Fig 1
Fig 2
Fig 4
Fig 3
Installation
a b
c b e
1. Walking Stick (a)
2. Joiners (b)
3. Elbow (c)
dd
4. Suction Cups (d)
5. Spray Bar (e)

7/15/2019 Aquis550-1250 Instructions New 001
http://slidepdf.com/reader/full/aquis550-1250-instructions-new-001 8/15
21. Repeat steps 19 to 22 for the outlet.
22. Place the suction caps on the spray bar or
duck bill then attach it to the back or side of theaquarium. Fig 11
23. You are now ready to start your filter.
METHOD 1
NOTE: Your aquarium must be filled with water
to prime your filter. Ensure both taps are in theon position by shifting the plastic lever from theOFF (Horizontal position) to the ON (Verticalposition). NOTE: Once the filter is running,double check the fittings and seals for water tightness. Fig 1
Fig 10
Fig 1
Installation
Fig 11
Starting Your Filter
On Off
1. The Primmer for your canister filter is locatedat the top of the head unit. Fig 2
2. Press the primmer down either with your thumb or your palm Fig 3
3. Depress all the way then release. Fig 4.Continue to pump the primer until the water flows down the inlet tube and begins to fill thecanister.
4. Stop pumping and allow the canister to fillwith water.
5. The filter is primed when the intake pipe andcanister are completely filled and the water starts to travel up the outlet tube.
Fig 2
Fig 3
Fig 4

7/15/2019 Aquis550-1250 Instructions New 001
http://slidepdf.com/reader/full/aquis550-1250-instructions-new-001 9/15
6. Now the Canister Filter is ready to beplugged in. Fig 5
METHOD 2
1. Temporarily detach the outlet from the tubing.Either the Spray Bar or the Duck Bill. Fig 6
2. Place your mouth over the end of the outletand create siphon effect by sucking on the tube.
Fig 7
3. Once the siphon begins, lower the outlet tubeinto a bucket. Fig 8
4. Now wait until the siphon continues to fill thecanister and eventually overfill into the bucket
via the outlet pipe.
5. The filter is primed when the intake pipe andfilter is completely filled with water.
6. Now place your thumb over the open end of the tubing or turn the taps to the off position.
7. Reattach hose to the outlet pipe and affix theoutlet pipe to your aquarium.
8. Turn the taps back to the ON position.
9. Now the Canister Filter is ready to beplugged in. Fig 5
Starting Your Filter
Fig 5
Fig 6
Fig 7
Fig 8
Fig 5

7/15/2019 Aquis550-1250 Instructions New 001
http://slidepdf.com/reader/full/aquis550-1250-instructions-new-001 10/15
10. You can determine how long or short youwant the Spray Bar. If you would like it shorter simply use a hack saw to cut it. Be careful not tocut and throw the side away with the end cap in
it. DO NOT cut it too short. This will increaseback pressure on the impeller and may causethe pump to become noisy!
11. If you would like to extend the Spray Bar simply remove a Joiner (b) from the spareelbow and attach between the two Spray Bars(e). Make certain that the Spray Bar with theend cap in it is installed at the end.
12. Outlet option 2 is the Duck Bill outlet, this
can simply be set up any where along the backwall or side wall of the aquarium.
13. Attach a Joiner (g) into the shorter side of the Walking Stick. (F) Insert a Elbow (h) into theJoiner (g) then attach the Duck Bill (i) onto theother end of the elbow. (h) Press together firmly. Attach the Suction Cups (j) to theWalking Stick. (f) Fig 6
14. Use the second Walking Stick (k) for theInlet. Simply attach the Strainer (l) to the longer side of the Walking Stick (k). Then Attach twoSuction Cups (m). Fig 7
15. You will notice in your accessory boxes anextension for very deep aquariums. Attach theextension onto the bottom of the Walking Stick(k) then the Strainer (l) onto the bottom of theextension.
16. Install the inlet first. (One with the Strainer (l) Place it into the aquarium, stick it to theglass wall. Fig 8
17. Pull the hose from the inlet side of the filter up next to the inlet Walking Stick and line up.
18. Measure a good 10cm more that what youneed past the bottom of the Walking Stick. Fig 9
19. Cut the hose using a sharp blade, try to cutit straight and be careful not to cut yourself.
20. Force the hose onto the Walking Stick. Youshould be able to get it on 2.5 to 3cm. Fig 10
Fig 7
Fig 9
Installation
Fig 8
f
g
h
i
j
j
1. Walking Stick (f )
2. Joiner (g)3. Elbow (h)
4. Duck Bill (i)
5. Suction Cups (j)
Fig 6
k
lm m
1. Walking Stick (k)
2. Strainer (l)
3. Suction Cups (m)

7/15/2019 Aquis550-1250 Instructions New 001
http://slidepdf.com/reader/full/aquis550-1250-instructions-new-001 11/15
1. Turn the canister filter off at the socket andunplug.
2. Turn both of the taps to the off position. Fig 1
3. Place a towel or a shallow container under the canister unit. This will prevent any water spilling onto your cabinet or stand anddamaging it.
4. Disconnect the taps from the head unit byunscrewing them. Undo the collar closest to thehead of the filter. Not the ones on the same side
as the hose. Please note some water will leakout. Fig 2
5. Fill a bucket with water from your aquariumand take it to the sink or wherever you intend toclean your filter. Keep in mind cleaning your filter can be messy, cleaning is recommendedoutside or at a sink. Ensure the area is cleanand free from soaps and detergents.
6. Open the canister. Release the 4 clips andremove the head unit, place it somewhere safewhere it will not be trodden on or broken.
7. Remove the filter grid, extend the handles onthe media baskets and remove them from thecanister body. Fig 3
8. Remove the filter sponges and the whitewool from the media baskets and dunk thebaskets with the CeramiSub and BioNood (Or any other type of biological media which maybe in them) several times into the bucket. Thiswill clear some of the dirt that can build up andclog the media and prevent the good bacteriawhich aid in breaking down pollutants in your
aquarium from being killed by the chlorine in tapwater.
9. Either replace or rinse the white wool padusing a high pressure hose. It should bereplaced regularly or when it begins todeteriorate and can no longer be cleanedproperly.
10. The sponges can also be rinsed in thebucket of aquarium water (Providing the water
is not dirty. Replace if necessary) they will alsorequire replacement eventually as over timethey clog and prevent water from travelingthrough them easily.
11. Place the sponges back into thererespective positions and reinsert the mediabaskets back into the canister body ensuringthat each media basket sits nicely on top of theother.
Fig 2
Fig 1
Cleaning your filter
Fig 3
Off

7/15/2019 Aquis550-1250 Instructions New 001
http://slidepdf.com/reader/full/aquis550-1250-instructions-new-001 12/15
19. Check your inlet, outlet tubes and hoses. If residue has built up on the inside of themremove them from the aquarium. Take to thesink, run hot water through them to loosen the
slime. Run a double ended pipe brush throughthem, and flush again with hot water. This buildup will reduce the flow rate of your filter considerably, so clean when ever it is possible.
20. Return the canister filter to your cabinet or stand and reattach the taps.
21. Refer to the section in this instructionmanual Starting You Filter for details onrestarting the unit.
THE FILTER UNIT IS LEAKING
1. Check all O-rings are in place and that they
are not damaged or soiled.
2. Re-apply tank safe lubricant.
3. The media baskets may not aligned
properly.
4. The inlet pipe on the pump head is not
aligned with the media basket flow through
pipe.
THE FILTER WILL NOT PRIME
1. Check tubing for kinks.
2. Make sure both taps are in the on position
(vertical).
3. The aquarium needs to be filled.
4. Make sure the intake tube and/or intake
strainer is not blocked.
5. Ensure the hoses are connected to the unit
correctly. IN to IN and OUT to OUT.
6. Ensure the canister has no water in it.
THE FILTER WILL NOT START1. As the previous tips.
2. Check the impeller and shaft are in good
condition.
3. Verify the filter is plugged in.
LOW WATER FLOW
1. As both previous tips.
2. Clean the filter media.
3. Clean the intake and outlet pipes.
4. Clean all tubing.
BOTH WATER & AIR COMING
FROM OUTLET PIPE
1. Leave 3-5 minutes.
2. Make sure an air stone is not operating near
the intake strainer.
3. Check all tubing is connected firmly.
4. Check all O-rings and re-apply tank safe
lubricant.
5. Gently rock filter back and forth trying to
discharge the air in the canister.
FILTER IS MAKING NOISE
1. As per previous tips.
2. Outlet or inlet flow is restricted.
Cleaning your filter
Trouble Shooting

7/15/2019 Aquis550-1250 Instructions New 001
http://slidepdf.com/reader/full/aquis550-1250-instructions-new-001 13/15
12. The impeller should also be cleaned whenever the filter is disassembled.
13. Turn the head unit over and turn the
impeller locking cover anti clock wise andremove it. Fig 4
14. Then pull the impeller cap off and removethe impeller. Fig 5
15. Clean the impeller well and the outletchannel using a double ended pipe brush. Fig 6
16. Use the double ended pipe brush and cleanthe inlet tube which runs through the base of the head unit. Fig 7
17. Pull the rubber end cap off the shaft of theimpeller and run water through the hole in the
middle of the impeller. Clean any debris whichmay have built up on the shaft off, along withany slime build up on the impeller. Fig 8
18. Put the impeller back together and ensurethat it rotates freely on the shaft. Thenreassemble the head unit, ensure there is nowater on the power cord, plug the head unit inand turn on. Make certain the impeller isspinning. Turn it off. Reassemble the filter unit.
Apply an aquarium safe lubricant to the O-ringon the head unit. This will provide a better water seal and make the removal of the head easier next time the filter has to be disassembled for maintenance. Fig 9
Fig 5
Fig 4
Fig 7
Cleaning your filter
Fig 8
Fig 6
Fig 9
OutletChannel
ImpellerWell
RubberEnd Cap
Impeller
O-ring
7/15/2019 Aquis550-1250 Instructions New 001
http://slidepdf.com/reader/full/aquis550-1250-instructions-new-001 14/15
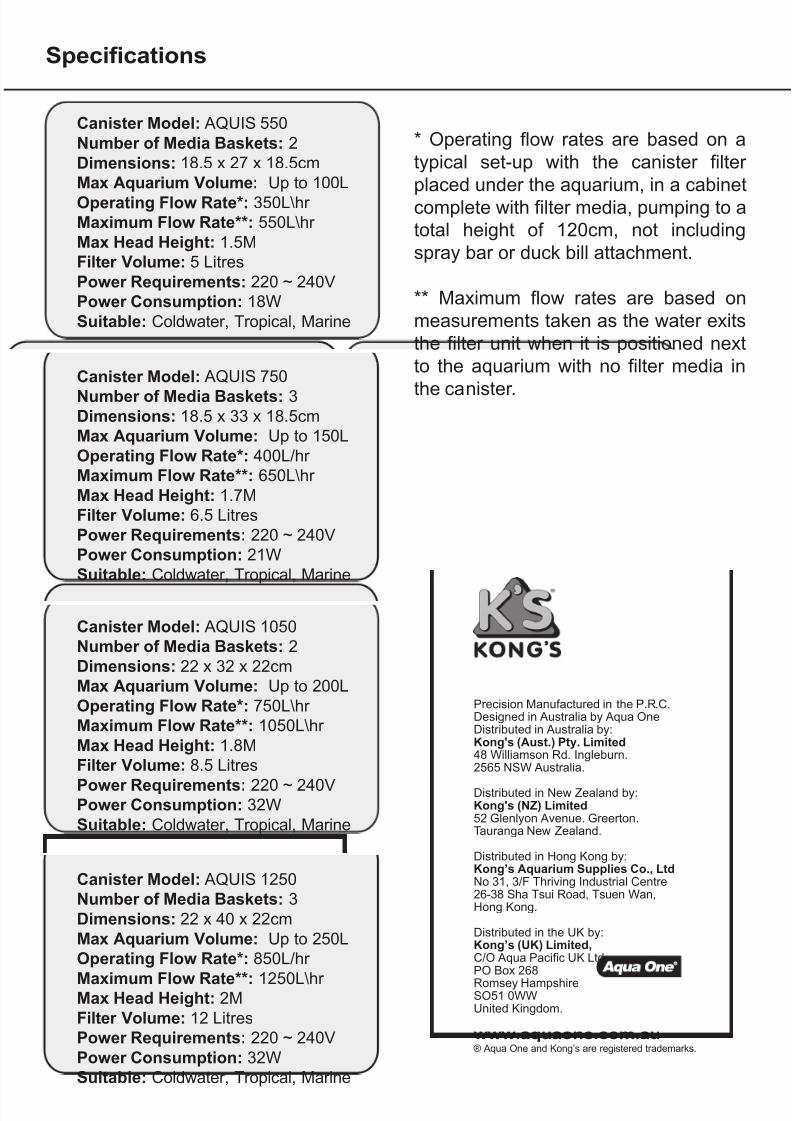
Specifications
Canister Model: AQUIS 550
Number of Media Baskets: 2
Dimensions: 18.5 x 27 x 18.5cm
Max Aquarium Volume: Up to 100L
Operating Flow Rate*: 350L\hr
Maximum Flow Rate**: 550L\hr
Max Head Height: 1.5M
Filter Volume: 5 Litres
Power Requirements: 220 ~ 240V
Power Consumption: 18W
Suitable: Coldwater, Tropical, Marine
Canister Model: AQUIS 750
Number of Media Baskets: 3Dimensions: 18.5 x 33 x 18.5cm
Max Aquarium Volume: Up to 150L
Operating Flow Rate*: 400L/hr
Maximum Flow Rate**: 650L\hr
Max Head Height: 1.7M
Filter Volume: 6.5 Litres
Power Requirements: 220 ~ 240V
Power Consumption: 21W
Suitable: Coldwater, Tropical, Marine
Precision Manufactured in the P.R.C.Designed in Australia by Aqua OneDistributed in Australia by:Kong's (Aust.) Pty. Limited48 Williamson Rd. Ingleburn.2565 NSW Australia.
Distributed in New Zealand by:Kong's (NZ) Limited52 Glenlyon Avenue. Greerton.Tauranga New Zealand.
Distributed in Hong Kong by:Kong’s Aquarium Supplies Co., LtdNo 31, 3/F Thriving Industrial Centre26-38 Sha Tsui Road, Tsuen Wan,Hong Kong.
Distributed in the UK by:Kong’s (UK) Limited,C/O Aqua Pacific UK Ltd.PO Box 268
Romsey HampshireSO51 0WWUnited Kingdom.
www.aquaone.com.au® Aqua One and Kong’s are registered trademarks.
* Operating flow rates are based on a
typical set-up with the canister filter
placed under the aquarium, in a cabinet
complete with filter media, pumping to a
total height of 120cm, not including
spray bar or duck bill attachment.
** Maximum flow rates are based on
measurements taken as the water exits
the filter unit when it is positioned next
to the aquarium with no filter media in
the canister.
Canister Model: AQUIS 1050
Number of Media Baskets: 2
Dimensions: 22 x 32 x 22cm
Max Aquarium Volume: Up to 200L
Operating Flow Rate*: 750L\hr
Maximum Flow Rate**: 1050L\hr
Max Head Height: 1.8M
Filter Volume: 8.5 Litres
Power Requirements: 220 ~ 240VPower Consumption: 32W
Suitable: Coldwater, Tropical, Marine
Canister Model: AQUIS 1250
Number of Media Baskets: 3
Dimensions: 22 x 40 x 22cm
Max Aquarium Volume: Up to 250L
Operating Flow Rate*: 850L/hr
Maximum Flow Rate**: 1250L\hr Max Head Height: 2M
Filter Volume: 12 Litres
Power Requirements: 220 ~ 240V
Power Consumption: 32W
Suitable: Coldwater, Tropical, Marine

7/15/2019 Aquis550-1250 Instructions New 001
http://slidepdf.com/reader/full/aquis550-1250-instructions-new-001 15/15
Fish keeping has never been easier...
Aqua One specialises in all of your aquarium needs.
Aqua One uses state of the art technology which results inthe most efficient and superior aquarium products.
The Aqua One range includes a wide range of curved glass
aquariums, air pumps, filters, power heads, heaters,reflectors, under water lighting, along with fish foods,cleaning and maintenance accessories and decorations.
Keep an eye out for these Aqua One
products at your local retailer...