APPLICATION PART...AMP RESEARCH BEDXTENDER HD™ PARTS LIST AND HARDWARE IDENTIFICATION 74608-01A...
8
rev 11.06.12 1/8 www.amp-research.com ASSEMBLY & INSTALLATION GUIDE 1 APPLICATION GM Truck (Full-size Trucks) Remove contents from box and check for damage. Verify all parts against parts list. Read and understand instructions completely before attempting assembly and installation. INSTALLATION TIME SKILL LEVEL 1= Easy 2 3 4 PART # 74815-00A (Silver) 74815-01A(Black) TOOLS REQUIRED Phillips screw driver Torx T-25 driver Power drill 9/64” drill bit Center punch Supplied templates Soapy Water BEDXTENDER HD™ shown assembled and installed on truck. 1 Hour Invented, engineered and manufactured exclusively by AMP Research in the USA. May be covered by one of the following patents: 5,700,047; 6,113,173; 6,402,215; 6,805,392; 7,063,366; 7,393,035; 7,654,598; 7,681,935; 7,841,638 3-Year Limited Warranty WARRANTY
Transcript of APPLICATION PART...AMP RESEARCH BEDXTENDER HD™ PARTS LIST AND HARDWARE IDENTIFICATION 74608-01A...

rev 11.06.121/8www.amp-research.com
A S S E M B L Y & I N S T A L L A T I O N G U I D E
1
APPLICATION
GM Truck (Full-size Trucks)
Remove contents from box and check for damage. Verify all parts against parts list. Read and understand instructions completely before attempting assembly and installation.
INSTALLATION TIME
SKILL LEVEL
1= Easy2 3 4
PART #
74815-00A (Silver) 74815-01A(Black)
TOOLS REQUIRED
Phillips screw driverTorx T-25 driverPower drill9/64” drill bitCenter punchSupplied templates Soapy Water
BEDXTENDER HD™ shown assembled and installed on truck.
1 Hour
Invented, engineered and manufactured exclusively by AMP Research in the USA. May be covered by one of the following patents: 5,700,047; 6,113,173; 6,402,215; 6,805,392; 7,063,366; 7,393,035; 7,654,598; 7,681,935; 7,841,638
3-Year Limited WarrantyWARRANTY

rev 11.06.122/8www.amp-research.com
A M P R E S E A R C H B E D X T E N D E R H D ™
PARTS LIST AND HARDWARE IDENTIFICATION
74608-01A Quick Mount Bracket Set
1 x274606-01AMounting Bracketkit
2 x6 x4420-3654-90 Bumper
12-03791-24S (Small Silver) 12-03791-24SP (Small Silver with LOGO)12-03791-24B (Small Black) 12-03791-24BP (Small Black with LOGO)12-03791-28B (Large/Deep Black) 12-03791-28BP (Large/Deep Black with LOGO) 12-03791-28S (Large/Deep Silver) 12-03791-28SP (Large/Deep Silver with LOGO)
Center Tube
311-03639-90 PT-Screw
x12 x2580-01671-93 Strap Buckle Assembly
6 x2Silver: 20-74811-00A (Small) Black: 20-74811-01A (Small) Silver: 20-74813-00A (Deep)Black: 20-74813-01A (Deep)Silver: 20-74814-00A (Large)Black: 20-74814-01A (Large)Pivot Upright Assembly
7 x220-3664B-90 (Small/Narrow) 20-3640B-90 (Large/Deep)
Bumper Upright Outer
8 x220-3664A-90 (Small/Narrow) 20-3640A-90 (Large/Deep)
Bumper Upright Inner
9 x3

rev 11.06.123/8www.amp-research.com
A M P R E S E A R C H B E D X T E N D E R H D ™A M P R E S E A R C H B E D X T E N D E R H D ™
1
2
Remove the 2 Phillips screws that are holding the tail lights in place. Carefully pull back to remove tail lights.
Tape template to vehicle to locate upper hole of Mounting Bracket. Mark (Center Punch) & drill hole with 1/8” drill bit. Remove template and drill out hole with 21/64” drill bit. Use fileto remove burrs. Apply primer to edge of hole.Repeat for other side.
Place Mounting Bracket aligned with top hole. Allowbracket to hang vertically. Mark (Center Punch) loca-tion of lower hole using the bracket slot as a template. Remove bracket. Drill hole with 1/8” drill bit then drill out hole with 21/64” drill bit. Use file to remove burrs.Apply primer to edge of hole. Allow primer to dry.
Assemble Mounting Bracket using the M8 bolts & nuts as shown. Tighten & torque to 22ft. lbs. Replace the tail light assembly. Repeat for other side.
MOUNTING BRACKET INSTALLATION - CHEVROLET SILVERADO / GMC SIERRA 2007+
PLEASE READ ENTIRE INSTRUCTIONS BEFORE PROCEEDING WITH INSTALLATION
Use the M5 bolts and nuts to fasten the Quick Mount Bracket to the mounting bracket. Applythread locker to the tip of the M5 bolt. Torque to 8 ft. lbs. Allow 10 minutes to dry before handling. (Passenger side shown) NOTE: Angle brackets may alread be installed onto brackets.
2XQuick Mount Bracket
.

rev 11.06.124/8www.amp-research.com
A M P R E S E A R C H B E D X T E N D E R H D ™
BED X-TENDER ASSEMBLY
Adjust the width of the BEDXTENDER by placing the pivots into the mounting brackets. To keep overlap consant, adjust each tube so that the gap between the edge and the tape is the same.
1 2
3 4
Slide 3 center tubes into the open ends of the bent tubes as shown. Insert center tube with logo into the center tube.
Connect the two halves. Make sure there is at least 3” overlap with the bent tubes on each side.
Measure 7” from each end of the three center tubes and mark with tape. Tape is to be used as a refer-ence point
9
6
9
9 6
6

rev 11.06.125/8www.amp-research.com
A M P R E S E A R C H B E D X T E N D E R H D ™
BED X-TENDER ASSEMBLY – CONTINUED
Adjust Strap Buckles to lock into the tailgate when BEDXTENDER is deployed. Your assembly is now complete.
7
9
8
Tighten PT-Screws using a T-25 torx driver, starting in the middle of each upright, then the outer screws and lastly the remaining two to evenly tighten.
3
8
7
NOTE: Do not over tighten as this may strip out. Fastener will reach a noticable stopping point.8
Attach plastic upright around the tube juncture, plac-ing rubber bumpers into the two ends of the upright.
NOTE: The inside of the upright is stepped to fit correctly around the small and large diameter tubes.
4
8
7 Upright is not positioned in center of tube joint.
rev 11.06.126/8www.amp-research.com
A M P R E S E A R C H B E D X - T E N D E R ™
1
A M P R E S E A R C H B E D X T E N D E R H D ™
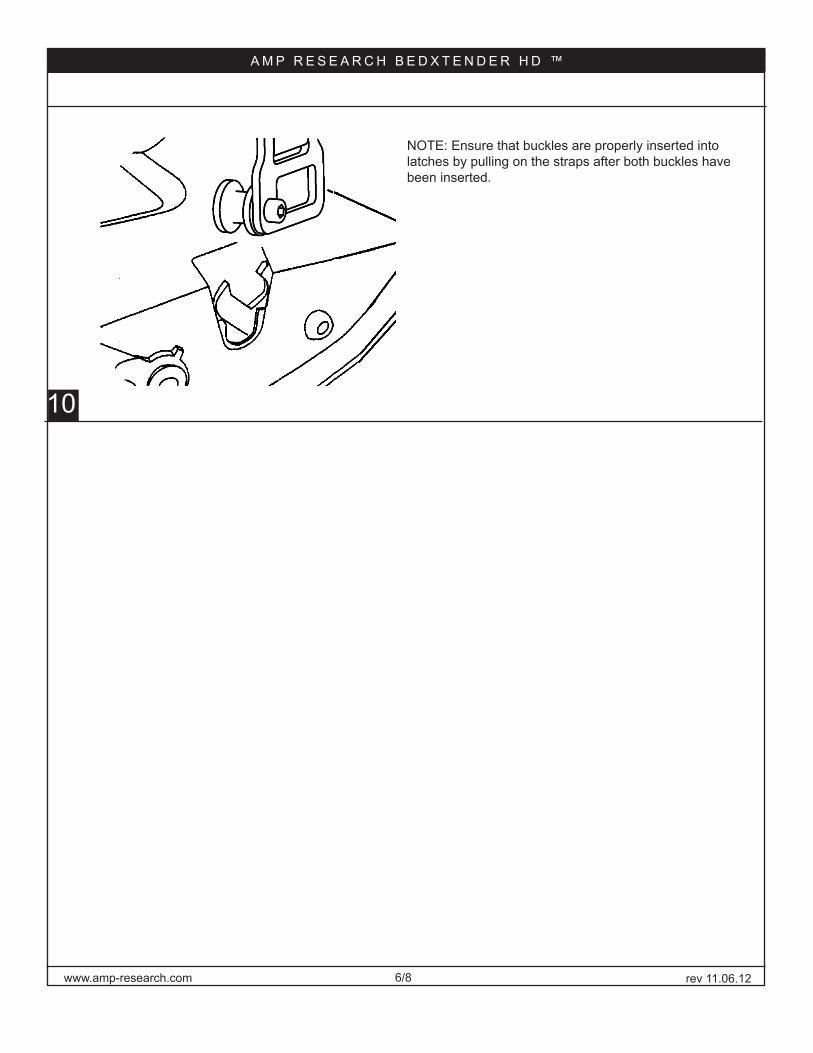
10
NOTE: Ensure that buckles are properly inserted into latches by pulling on the straps after both buckles have been inserted.

rev 01.03.127/8www.amp-research.com
Congratulations on your purchase of the AMP Research BEDXTENDER HD.Here’s what you need know...
BEDXTENDER HD™ OPERATION
With the tailgate open, place BEDXTENDER pivot pins into the left and right mounting brackets. Rotate to 45 until it drops into place, then lower onto the open tailgate.
Flip BEDXTENDER out to contain cargo in the truck bed when the tailgate is open.CAUTION! 200lb maximum load on open tailgate. Always distribute cargo evenly and properly secure inside bed. Do not secure cargo to the BEDXTENDER or the tailgate.
Before driving, secure BEDXTENDER by locking the provided strap buckles into the truck’s tailgate latches. To release, pull tailgate handle. NOTE: Ensure that both buck-les are properly locked into the latches by pulling up on each strap.
Flip BEDXTENDER forward and close the tailgate to keep smaller cargo safe and organized.
LIMITED WARRANTY

1.28”
1.81”
1.3”
1.56”
6.7”
TRUCK BEDTRUCK BED
1.28”
1.81”
1.3”
1.56”
8”
Drill template for BEDXTENDER HD™ mounting brackets
NOTE: FOR TRUCKS WITH BEDLINERS, USE THIS TEMPLATEON TOP OF BEDLINER. DO NOT CUT BEDLINER!
Cut o
r fol
d al
ong
solid
line
s.
(Das
hed
lines
for t
ruck
s w
ith b
edlin
ers.
)
FACING REAR SIDE FOR LEFT BRACKET INSTALLATION FACI
NG R
EAR
SIDE
FOR
RIG
HT B
RACK
ET IN
STAL
LATI
ONUse dashed line for trucks with bedliners.
FACING REAR SIDE FOR LEFT BRACKET INSTALLATIONUse dashed line for trucks with bedliners.
FACI
NG R
EAR
SIDE
FOR
RIG
HT B
RACK
ET IN
STAL
LATI
ONUs
e da
shed
line
for t
ruck
s with
bed
liner
s.
Use
dash
ed lin
e fo
r tru
cks w
ith b
edlin
ers.
Drill
tem
plate
for B
EDXT
ENDE
R HD
™
mou
nting
bra
cket
s