ANZ TRANSACTIVE USER GUIDE · threshold group. Your threshold group determines the value of...
63
ANZ TRANSACTIVE USER GUIDE
Transcript of ANZ TRANSACTIVE USER GUIDE · threshold group. Your threshold group determines the value of...

ANZ TRANSACTIVE USER GUIDE

© Copyright Australia and New Zealand Banking Group Limited (ANZ) 100 Queen Street, Melbourne 3000, ABN 11 005 357 522. ANZ’s colour blue is a trade mark of ANZ.
The purpose of this document is to provide you with information on ANZ’s financial products to assist you in making an assessment in purchasing these financial products. This document is not to be used for any other purpose.
The information contained in this document does not constitute financial advice and does not purport to contain all the relevant information that you may require in order to make a decision to purchase ANZ’s financial products. You should conduct and rely upon your own investigations and analysis of whether to purchase the financial products. ANZ recommends that any decision to purchase our financial products should be based on the appropriate Terms and Conditions. Please contact your Relationship Manager for a copy of the Terms and Conditions.
Neither the issue of this document nor any part of its contents constitutes an offer to sell or solicitation of an offer to buy ANZ’s financial products.
In no circumstances will ANZ or its related bodies corporate and their respective directors, employees, advisers, agents and contractors (together known as “ANZ”), be responsible for any costs or expenses incurred by you in connection with your investigations in a possible purchase of the financial products. Except to the extent permitted at law, ANZ accept no liability (including negligence), for loss or damage arising in connection with the information contained in this document.
NOTICE OF CONFIDENTIALITY
The information disclosed in this document is provided to you strictly on a commercial-in-confidence basis. Except where required at law or with ANZ’s written consent, you may not disclose the information contained in this document to any person other than for the purpose of assisting you in assessing the possibility of purchasing ANZ’s financial products and only if you have made such person aware of your obligations under this document before you disclose information to them.
DISCLAIMER
2

TABLE OF CONTENTS
INTRODUCTION TO ANZ TRANSACTIVE 6
ABOUT THIS GUIDE 6
LEARNING ABOUT ANZ TRANSACTIVE 6Online Help 6General system navigation 8
MINIMUM SPECIFICATIONS 8Firewall and antivirus settings 8Operating system and browser version 8Internet connection 8Video resolution 8Access requirements 8Hardware requirements 8
ANZ TRANSACTIVE SECURITY INFORMATION 9Physical security 9Data encryption 9Firewalls 9Authentication 9Security Profiles 9Template Groups 9Confidential Payment Indicator 10Panel Authority 10Segregation of Duties 10Reporting Categories 10
INTRODUCTION TO ANZ TRANSACTIVE 10
PROTECTING YOUR BANKING 11
ANZ TRANSACTIVE SECURITY DEVICES 11Rsa Tokens 11Vasco Digipass Tokens 12Smartcard and Digital Certificates (Taiwan Only) 12
KEY CONCEPTS AND TERMS 13Messages 13Transactions/Instruments 13Organisation subsidiaries 13
GENERAL SYSTEM TASKS 14
LOGGING IN 14
UNDERSTANDING YOUR HOMEPAGE 14
GENERAL SYSTEM TASKS 15
NAVIGATING THE SYSTEM 15
PERSONALISING YOUR HOMEPAGE 15Personalise Dashboard/Homepage 15Personalise selected sections on your Homepage 16
SETTING UP AND MANAGING ‘MY LINKS’ 17Updating Favourite Tasks 17
3

TABLE OF CONTENTS
Updating Favourite Reports 18
SESSION TIMEOUTS AND SAVING YOUR WORK 19
LOGGING OUT 19
VIEWING YOUR USER PREFERENCES 19What are user preferences? 19How to view your user preferences 20Changing your user preferences 20
PASSWORDS 21If you have a User ID/Password or RSA Token 21If you use a Vasco Digipass Token 22If you have a Smartcard (Taiwan Only) 23
HOW TO CHANGE YOUR PASSWORD 23
FORGOTTEN YOUR PASSWORD? 23
VIEWING ACCOUNT BALANCES 24
WORKING WITH PAYMENT TRANSACTIONS 25
PAYMENT TRANSACTION OVERVIEW 25Transaction Workflow 25Transaction Statuses 26Viewing Transactions 27
TRANSFERRING BETWEEN YOUR OWN ACCOUNTS 30
CREATING PAYMENT TRANSACTIONS 31Ways of Creating Transactions 31Working With Payment Transactions 32
CREATING A PAYMENT MANUALLY 32
CREATING TRANSACTIONS USING A PAYMENT FILE 35What is a Payment File? 35Payment File Upload 35Validation Status 36File Format Specifications 37Verify FX Button 37Upload Log Screen 37
FUNCTION BUTTONS 38Confirm Button 38Reject Button 38Verify FX Button 38Delete Rejected Items Button 39Delete Transactions From The Payment File Upload Tab 39
BENEFICIARY LIST VIEW 39
FUTURE DATED PAYMENTS 40Creating a Future Dated Payment 40Viewing Future Value Dated Transactions 40Editing a Future Dated Payment 41Future Dated Payment Involving FX 41
4

Authorisation Process On Execution Date 41
BENEFICIARY EMAIL NOTIFICATION OVERVIEW 41Email Address Requirements 41Email Trigger Response 41Email Content 41Email Validation 42
CREATING DIRECT DEBITS 42
VERIFYING TRANSACTIONS 43What Is Verification? 43Before You Begin 43Verifying a Transaction 43
AUTHORISING TRANSACTIONS 43What is Authorisation? 43Amending Transactions Prior To Authorisation 44How to Authorise Transactions 45Security Device Types Upon Authorisation 48How to Authenticate a Transaction Using A Vasco Digipass Token and Sig (Online Signing): 48Viewing Authorisation Errors 48Authorisation Requirements 48Authorising a Bulk Payment File 48
EXISTING TRANSACTIONS 49
PENDING TRANSACTIONS 49Editing a Pending Manual Transaction 49Editing a Pending Uploaded File 50
ROUTING TRANSACTIONS 50Routing a Single Transaction Within the Payment Screen 50Routing Multiple Transactions From the Pending Transaction Tab 51
VIEWING AN AUTHORISED TRANSACTION 52
VIEWING TRANSACTION DETAILS 52Transaction History Log 53
DELETING TRANSACTIONS 53
MESSAGES 54
NOTIFICATIONS 56
REPORTS 58
GENERATING A REPORT 59
PRINTING A REPORT 60
DOWNLOADING DATA FROM REPORTS 60
ACCOUNT REPORTING 61
ACCOUNT REPORTING OVERVIEW 61
VIEWING REAL TIME ACCOUNT BALANCES 61
VIEWING CURRENT DAY TRANSACTIONS 61
VIEW / PRINT BANK STATEMENTS 61
TABLE OF CONTENTS
5

INTRODUCTION TO ANZ TRANSACTIVE
ABOUT THIS GUIDE
This document covers essential processes and procedures for ANZ Transactive users. It is recommended that users read this guide in conjunction with the ANZ Transactive Terms and Conditions.
LEARNING ABOUT ANZ TRANSACTIVE
The following range of resources is available to assist you in your use of the ANZ Transactive system.
ONLINE HELPThe Online Help tool should be your primary source of information about using ANZ Transactive.
As new operating features or functions, particularly those relating to security, integrity and authentication are introduced, instructions covering changes and the usage of such features will be provided.
As shown below, there are two ways to access ANZ Transactive help.
1. The Help button at the top of the page provides a complete online help index for the majority of ANZ Transactive functions.
Click the Help button and the Help screen will appear
6

2. The button in the Home menu provides a help function for the specific page you are accessing.
INTRODUCTION TO ANZ TRANSACTIVE
Select the Help button from the screen to display the help page for the page you are working on
7

GENERAL SYSTEM NAVIGATIONTo navigate through ANZ Transactive simply use the page controls available within the system. It is recommended you do not use the controls on your browser’s toolbar (such as Back, Forward and Refresh) to navigate through the system.
General system navigation information is also provided within the ANZ Transactive help. See the Navigating the System section of the ANZ Transactive help.
MINIMUM SPECIFICATIONS
Below is the list of specifications required to access ANZ Transactive.
FIREWALL AND ANTIVIRUS SETTINGSPlease ensure the appropriate permissions are configured for both firewall and antivirus software to allow users to access ANZ Transactive.
OPERATING SYSTEM AND BROWSER VERSION Below is the summary of compatible operating systems and browser versions supported/ required to access ANZ Transactive:
BROWSER TYPE AND VERSION OPERATING SYSTEM JAVA VIRTUAL MACHINE (JVM)
TRUSTEDNET CONNECT (TNC)***
Microsoft Internet Explorer 7 Windows Sun 1.5
Sun 1.6
Yes
Microsoft Internet Explorer 8 Windows Sun 1.6 Yes
Microsoft Internet Explorer 9* Windows Sun 1.6 N/A
Mozilla Firefox 14, 15* Windows Sun 1.6 Yes
Google Chrome* Windows Sun 1.6 N/A
Apple Safari* ** iOS for iPad N/A N/A
* For reporting, only IE7 and IE8 is currently supported by the third party software vendor.** Viewing of images is not supported in Safari due to java limitations. Smart cards not supported in Safari due to hardware required.*** TNC required for Smartcard Users Only (Taiwan)
INTERNET CONNECTIONAn internet speed of 56kbps or higher is recommended.
VIDEO RESOLUTIONA minimum screen resolution of 1024 x 768 is recommended.
ACCESS REQUIREMENTSToken Users: There are no specific access requirements for Token Users.
Smart card Users (Taiwan only): A Smartcard device and Smartcard device reader will be provided to all Smartcard Users.
Local administration rights and an available and enabled USB port are required to install the Smartcard reader.
HARDWARE REQUIREMENTSToken Users and User ID/password Users:
> Token (provided by ANZ) No specific access requirements.
Smartcard Users (Taiwan only):
> CD-ROM drive for software installation (or access over a network)
> USB Smartcard reader (provided by ANZ)
> Available and enabled USB port
> Smartcard (provided by ANZ)
INTRODUCTION TO ANZ TRANSACTIVE
8

ANZ TRANSACTIVE SECURITY INFORMATION
The following security is in place to protect your organisation when using ANZ Transactive.
PHYSICAL SECURITYAll buildings that contain ANZ Transactive web servers and/or database servers use industry-standard physical security to prevent access by unauthorised people.
DATA ENCRYPTIONAll data communication to and from ANZ Transactive uses 128-bit Secure Sockets Layer encryption and HTTPS (Hypertext Transfer Protocol – Secure) as communication protocol.
FIREWALLSFirewalls protect all data used in ANZ Transactive. Firewalls assist to ensure that data is only provided in response to valid requests from the application. It is advisable for your organisation to also have a firewall to protect its own computers and networks.
It is recommended that antivirus and anti-spyware software are installed on computers, particularly when linked to a broadband connection, digital subscriber line or cable modem. It is recommended to update anti-virus and firewall products with security patches or new versions on a regular basis.
AUTHENTICATIONANZ Transactive will verify the identity of each user accessing ANZ Transactive by either of the following authentication methods:
> User ID/password
> A Token (RSA or Vasco Digipass token)
> A Smart Cards (for Taiwan users only)
To authenticate a user the following action is taken
> Determine the type of user, and verify the user’s identity
> Confirm the user is permitted to access ANZ Transactive
Once authenticated, the user’s functionality is controlled by the assigned security profile, which is discussed in the Security Profile section.
SECURITY PROFILESAn Administrator can assign a security profile for all users on ANZ Transactive that do not require a security device.
A security profile determines:
> Which modules of ANZ Transactive users can access
> The functions users can use within each module of ANZ Transactive
Threshold Groups
If your use of ANZ Transactive involves authorising transactions, then your organisation’s Administrator may have assigned you a threshold group.
Your threshold group determines the value of transactions that you can authorise. For each type of transaction, there are limits for the:
> Threshold amount, which is the largest single transaction you can authorise
> Daily maximum value of the transactions you can authorise
TEMPLATE GROUPSIf your use of ANZ Transactive involves initiating/creating transactions then your Administrator may have assigned you one or more Template Groups. The Template Group assigned to you will determine which type of Instruments you can create.
INTRODUCTION TO ANZ TRANSACTIVE
9

CONFIDENTIAL PAYMENT INDICATORA Confidential Payment Indicator may be assigned to your User profile by your Administrator enabling you to have access to confidential payment transactions and templates.
PANEL AUTHORITYIf your use of ANZ Transactive involves authorising payment transactions, then your organisation’s Administrator may have assigned you a panel authority.
Your panel authority determines the value of the transactions that you can authorise and your panel User group. For each account provided, there is a limit assigned to each User and which panel User must authorise the transaction.
SEGREGATION OF DUTIESANZ Transactive allows your organisation to enforce segregation of duties between employees, which provides an additional form of security. For example:
> Transactions may need to be authorised by someone other than the last person who entered data for those transactions.
> Transactions for some types of instruments may require multiple authorisations (i.e. via Token authentication).
REPORTING CATEGORIESANZ Transactive allows the ability to assign users to reports based on their roles and responsibilities within your organisation.
Five report categories (Cash Payments, Trade Services, Confidential, Term Deposit and Administrator) will be available to users and can be assigned to users via their user profile page. Only reports within that selected category will be available to the user from the Reports tab. Users can have up to all five categories assigned to them.
INTRODUCTION TO ANZ TRANSACTIVE
10

PROTECTING YOUR BANKING
> Users should check the authenticity of the financial institution’s website prior to accessing available products and services.
> Users should verify when accessing products and services offered by the financial institution that the browser session is secure. This can be verified by ensuring the webpage begins with “https://” rather than “http://”, and the security lock is displayed on the bottom right of the browser. Users should not commence transactions prior to verifying.
> Always log out of ANZ Transactive by using the log out button in the top right hand corner of the browser.
> Do not install software or run programs of unknown origin.
> Delete junk or chain emails.
> Do not open email attachments from unknown senders.
> Do not disclose personal, financial or credit card information to suspect websites or unknown recipients.
> Do not use a computer or a device which cannot be trusted.
> Do not use public or internet café computers to access banking products and services.
> Do not share resources from your computer, (i.e. hard drives and printers) whilst operating on the internet.
> Do not disclose your password or security device passphrase to anyone else.
> If your Token is lost or stolen you must notify the ANZ Transactive Support Centre immediately to have the Token suspended or revoked.
ANZ TRANSACTIVE SECURITY DEVICES
ANZ Transactive supports three different types of Security Devices as per the following
RSA TOKENSYour RSA Token generates a new six digit number – known as an RSA Token code or One Time Password (OTP)– every 60 seconds. Each Code can only be used once. Only the Code that currently appears on the screen is valid. The countdown bar on the left hand side of the screen shows you how much time you have left until a new Code is generated, by shrinking one block every 10 seconds as it counts down.
Code generation for each RSA Token is completely random, so no two devices will display the same Code at the same time.
You will need to use your RSA Token each time you log on to ANZ Transactive. You will also need to use your RSA Token code if you authorise a cash or trade transaction. When prompted enter the six digit RSA Token code that appears on the screen of your RSA Token at that time. ANZ will verify this code as part of your log on process.
If you enter the RSA Token code incorrectly, you will be asked to enter a new code to successfully log on.
Your RSA Token has a serial number on the back of the device. This number is unique to your RSA Token. Before you can log on to ANZ Transactive, you need to activate your Token. You will need to quote the serial number to link your Token to your ANZ Transactive User ID.
Token Code
Countdown bar
11

VASCO DIGIPASS TOKENS
Your Vasco Digipass Token will first need to be activated by the ANZ Transactive Support Team. You will be required to turn on your device by pressing the arrow button on the bottom right and then while pressing the arrow button press the lock button on the bottom left of the device. The device will remain turned on for 20 seconds only from last use. i.e. last button pressed.
Prior to initial token activation a ‘LOCK PIN’ number will be displayed on the screen. Upon providing the LOCK PIN number to your ANZ Transactive Support Team, the team will in turn provide an UNLOCK PIN. By selecting the arrow button again and entering the UNLOCK PIN, the device will prompt the user to enter in a six-digit NEW PIN and re-enter to confirm. Once successful, the NEW PIN will be the user’s PIN to unlock the device to use going forward.
If you enter the incorrect PIN when unlocking the token with your PIN, it will display the word FAIL and number of failed attempts. Press the back arrow button to re-enter your PIN, though please note after 5 incorrect PIN attempts the token will become blocked.
In the event that you disable your token after five invalid consecutive attempts, you can contact the ANZ Transactive Support Team to have your Vasco Digipass Token PIN reset. Note this is not offered in Singapore due to regulatory requirements therefore any disabled token will require to be replaced.
When logging into ANZ Transactive, you will be required to unlock your device with your PIN and select option 1 for OTP (One Time Password). The random number generated on the device will be the Token OTP to access ANZ Transactive. This OTP must be entered into the log on page together with your password.
Refer to the Authorisation chapter for detailed information on authorising transactions using your VASCO Digipass token.
SMARTCARD AND DIGITAL CERTIFICATES (TAIWAN ONLY)Smartcards use cryptographic technology with an embedded digital certificate:
> Smartcards use a digital signature to verify the user’s identity and create a secure a log on session.
> Information on the smartcard is protected by a user chosen PIN.
> Smartcards are considered a ‘strong authentication method’ also known as two-factor authentication (something you have and something you know).
> Come in two form factors: SIM card size used for USB readers and standard credit card size.
Note: Token and User ID/password Users do not require digital certificates
Your Smartcard will need to be activated by the ANZ Transactive Support Team prior to first use. You will then be required to create your own Passphrase (PIN) which must be used to login to ANZ Transactive together with your User ID. Refer to the Changing your Password section in General System Tasks to change your smartcard Passphrase.
PROTECTING YOUR BANKING
12

KEY CONCEPTS AND TERMS
This section outlines the key concepts and terms to assist you in using ANZ Transactive.
MESSAGESIn ANZ Transactive, a message is an electronic communication between ANZ and a client in relation to a transaction. ANZ Transactive enables you to:
> Send Mail Messages to ANZ.
> Route Mail Messages to other users in your organisation.
> Receive Notifications from ANZ for transactions relating to instruments you’ve initiated using ANZ Transactive.
For more information, see the Mail Messages section.
TRANSACTIONS/INSTRUMENTSA transaction is the term used for a single activity such as a Payment or a Transfer between accounts. These are also known as Instruments however the term is mainly used to define Trade Instruments which usually have multiple Transactions associated to them such as Issue or Payment etc.
You can create a new transaction/Instrument in the following ways:
> Creating from a blank form
> Using a pre-configured template
> Copy from an existing transaction
For more information on using transactions, see Working with Payment Transactions
ORGANISATION SUBSIDIARIESWhen an organisation is added to ANZ Transactive, future subsidiary organisations can be assigned to the assigned organisation.
Using ANZ Transactive subsidiary access you can route messages and transactions to:
> A particular user in any of your subsidiary organisations within your organisation hierarchy
To register for a subsidiary organisations please contact your local Relationship Manager.
PROTECTING YOUR BANKING
ACME Beef Exports Pty Ltd
ACME Forest Products Pty Ltd
ACME Trading Limited
ACME Imports Limited ACME Exports Limited ACME Freight Ltd
ACME Dairy Exports Pty Ltd
ACME Agn Exports Pty Ltd
ACME Auto Exports Pty Ltd
13

This section outlines general system tasks for ANZ Transactive. The following tips will assist you in your use of ANZ Transactive.
LOGGING IN
Each user accessing ANZ Transactive must have valid log on details. This may be requested via an application form, which contains proof of identify and the form must be signed, dated and returned to the bank for processing (see Authentication).
Users with tokens will be required to enter in their User ID and Password together with their OTP (One Time Password) generated by the token. Users with Smart cards will be required to insert their Smart card into their reader then enter in their User ID and PIN.
UNDERSTANDING YOUR HOMEPAGE
When you first log in to ANZ Transactive, you will enter the Homepage which has a number of features including a common header. Additional detail on each of the features is provided in the relevant section. You will notice shortcuts to key functions such as Mail Messages, Help, Notifications, My Links etc.
BUTTON DESCRIPTION
Press to return to the Homepage at any time
Shows the number of messages and navigates to the Messages page
Shows the number of notifications and navigates to the Notifications page
Select for overall system help
Press to logout of the system
Shows the user name and navigates to the User preferences page
Puts your favourites at your fingertips
Refresh Button: Select to receive the most up to date information
Preferences Button: Select to set up you Homepage preferences
Help Button: Select for Homepage help
Announcements Button: Displays key announcements
GENERAL SYSTEM TASKS
14

NAVIGATING THE SYSTEM
Depending on the task you are required to complete, you can navigate to it easily via the various tabs on the Homepage.
TAB DESCRIPTION
Used to initiate new transactions/instruments
Used to access transaction status (e.g. pending, authorised), historical transaction information or initiate additional work on existing instruments (e.g. create amendments, create tracers)
Used to access Accounts and refresh balances
Used to access the suite of reports (standard or custom)
Contains useful information on parameter configuration (e.g. parties, threshold groups, templates)
Used to manage Supply Chain data upload. E.g. Invoice or purchase order file upload
Used to access subsidiary information (where applicable)
Note that user access to the various tabs is determined by your assigned profile.
PERSONALISING YOUR HOMEPAGE
Your Homepage can be personalised and configured in many in different ways to simplify the way you work.
PERSONALISE DASHBOARD/HOMEPAGE
STEP ACTION
1 To customise your Homepage, press the button in the Home section which will open the setup page.
2 Select the Sections you wish to display in the Dashboard menu.
3 Select the order in which you wish the sections to appear.
4 Press the Update button.
5 Press the ‘Save & Close’ button and you will be returned to the Homepage.
GENERAL SYSTEM TASKS
15

PERSONALISE SELECTED SECTIONS ON YOUR HOMEPAGEEach section on your Homepage has further customisation available:
1. Default on the spot filtering for the relevant section.
2. Define how many lines you want to be shown at a time.
3. Select the columns you want to see displayed.
4. Filter by a particular criteria and flexible list view – can lift and shift columns to create your customised view.
GENERAL SYSTEM TASKS
4
1 23
16

SETTING UP AND MANAGING ‘MY LINKS’
The ‘My Links’ function provides you with the ability to display your own custom menu, allowing you to structure it so that the tasks you perform most frequently are always at your fingertips.
To access the ‘My Links’ menu, click on the button.
UPDATING FAVOURITE TASKS
STEP ACTION
1 To update your ‘Favourite Tasks’, press the button which will open the setup page.
2 Select the items you wish to display in the Dashboard menu (You may select up to 10 items).
3 Place the selected tasks in order of preference.
4 Press the ‘Update’ button.
5 Press the ‘Save’ button and you will be returned to the main menu. Your changes will be saved and visible the next time you access ‘My Links’.
GENERAL SYSTEM TASKS
23
4
5
17

UPDATING FAVOURITE REPORTS
STEP ACTION
1 To update your ‘Favourite Reports’, press the button which will open the setup page.
2 Select the reports you wish to display in the Dashboard menu.
3 Place the selected reports in order of preference.
4 Press the ‘Update’ button.
5 Press the ‘Save’ button and you will be returned to the main menu. Your changes will be saved and visible the next time you access ‘My Links’.
GENERAL SYSTEM TASKS
2 3
18

SESSION TIMEOUTS AND SAVING YOUR WORK
When using ANZ Transactive, your session will time out after 15 minutes of inactivity. A pop-up window will appear two minutes prior to session timeout, advising you that you have two minutes left before the session is timed out. When your session times out:
> The system will save any work you have done on the transaction and reference data pages, provided the entry meets the validation criteria.
> The time out page will display any errors encountered in attempting to validate and save the information.
It is recommended that the user should save work periodically while working in ANZ Transactive.
LOGGING OUT
When you’ve finished using ANZ Transactive, it is important to log out properly rather than simply closing the application window.
Please ensure you click the ‘Logout’ button to exit the session in a secure manner.
Log off the online session and turn off the computer when not in use.
VIEWING YOUR USER PREFERENCES
WHAT ARE USER PREFERENCES?Your ANZ Transactive user preferences contain details stored about you in ANZ Transactive. In particular, it contains:
> Personal details, such as your name.
> Details of the security profile and threshold group your organisation’s Administrator has assigned to you.
GENERAL SYSTEM TASKS
19

GENERAL SYSTEM TASKS
HOW TO VIEW YOUR USER PREFERENCESTo view your user preferences, complete the following steps:
STEP ACTION
1 Click on your name - this can be found in the top section of any screen.
2 Your user preferences page appears.
3 When you finish viewing your user profile, click the ‘Close’ button and you will be taken back to your Homepage.
CHANGING YOUR USER PREFERENCESExcept for your password, you cannot change your own user preferences. This action is performed by your organisation Administrator or bank Administrator.
1
3
20

GENERAL SYSTEM TASKS
PASSWORDS
This section explains the password requirements and how to change the password you use when accessing ANZ Transactive for the different type of Users:
IF YOU HAVE A USER ID/PASSWORD OR RSA TOKENPasswords used for accessing ANZ Transactive with a User ID/Password or RSA Token must follow these rules:
PASSWORDS MUST: PASSWORDS MUST NOT:Contain a minimum of 10 characters > Contain three consecutive characters that are the same
> Start or end with a space character
Contain both an upper-case and a lower-case letter
Be the same as your User ID, First Name, Last Name, Login ID, Birthday or other personal information regardless of case
Include a minimum of 1 numerical characters Be the same as any of your last 13 passwords
> Consist of repeating characters (i.e. aaaaaaaa)
> Consist of sequential numbers or letters
IMPORTANT DETAILS ABOUT PASSWORDS WITH USER ID/PASSWORDS OR RSA TOKENS > Passwords are case-sensitive (for example, xyz0123abc is different to Xyz0123abc)
> Passwords expire every 90 days
> After 3 failed login attempts, your will require your company administrator to reset your password. This count is cumulative and is not reset after you successfully log in. However, the count is reset when a password is changed
> After 10 failed login attempts, your account will be locked and will need to be unlocked by the bank. If so please contact your ANZ Transactive support centre to unlock your profile
> ANZ Transactive passwords should not be used for different websites, applications or services, particularly when they relate to different entities
> Users should not select the browser option for storing or retaining user names and passwords.
HOW OFTEN WILL MY PASSWORD EXPIRE?ANZ Transactive passwords expire every 90 days therefore you will be required to change your password at least once every 90 days. Expired passwords will inhibit access to the system and require a new password to be created via prompts at login.
HOW TO CHANGE YOUR PASSWORDFollow these steps to change your password:
STEP ACTION
1 Click on your name - this can be found in the top section of any screen.
2 The User preferences page is displayed.
3 In the Current Password box, type your existing password.
4 In the New Password box, type your new password.
5 In the Retype New Password box, retype your new password again.
6 Click on the ‘Save’ button.
FORGOTTEN YOUR PASSWORD?If you have forgotten your password, contact your organisation’s ANZ Transactive Administrator and request your password to be reset. RSA Token and user ID/password users can be changed by an organisation’s assigned Administrator. If an incorrect password is entered more than 10 times, your account will be locked and will require unlocking by the bank.
21

IF YOU HAVE A VASCO DIGIPASS TOKENThis section explains the password requirements and how to change the password you use when accessing ANZ Transactive for the different type of Users:
Passwords used for accessing ANZ Transactive with VASCO Digipass Token must follow these rules:
PASSWORDS MUST: PASSWORDS MUST NOT:Contain a minimum of 7 characters > Contain three consecutive characters that are the same
> Start or end with a space character
Include a minimum of 2 alphabetical characters Be the same as your User ID, First Name, Last Name, Login ID, Birthday or other personal information regardless of case
Include a minimum of 2 numerical characters Be the same as any of your last 12 passwords
> Consist of repeating characters (i.e. aaaaaaaa)
> Consist of sequential numbers or letters
IMPORTANT DETAILS ABOUT PASSWORDS WITH VASCO TOKENS: > Passwords are case-sensitive (for example, xyz0123abc is different to Xyz0123abc)
> Passwords expire every 60 days
> After 3 failed login attempts your account will be locked and will need to be unlocked by the bank. If so please contact your ANZ Transactive support centre to unlock your profile where a new password will be generated
> ANZ Transactive passwords should not be used for different websites, applications or services, particularly when they relate to different entities
> Users should not select the browser option for storing or retaining user names and passwords.
HOW OFTEN WILL MY PASSWORD EXPIRE?ANZ Transactive passwords expire every 60 days therefore you will be required to change your password at least once every 60 days. Expired passwords will inhibit access to the system and require a new password to be created via prompts at login.
HOW TO CHANGE YOUR PASSWORDFollow these steps to change your password:
STEP ACTION
1 When logged out of ANZ Transactive click on the VASCO Digipass token link on the pre-logon page
2 The Log On page is displayed.
Type in your User ID and click the Submit button
3 The Log on with your token page is displayed.
Click the Change password link on left of page
In the Current Password box, type your existing password.
GENERAL SYSTEM TASKS
22

GENERAL SYSTEM TASKS
STEP ACTION
4 The Change password screen appears
Type in your User ID, Old password, New password, confirm the new password and click on the Save button.
5 A message will appear that your password has successfully been changed. You can then log into ANZ Transactive.
FORGOTTEN YOUR PASSWORD?If you have forgotten your password, contact your organisation’s your ANZ Transactive support centre and request your password to be reset.
IF YOU HAVE A SMARTCARD (TAIWAN ONLY) Passwords used for accessing ANZ Transactive with a smartcard must follow these rules:
PASSWORDS MUST: PASSWORDS MUST NOT:Contain at least 8 characters but no more than 14 characters
> Contain three consecutive characters that are the same
> Start or end with a space character
Contain both upper - and lower-case letters Be the same as your User ID, First Name, Last Name, or Login ID, regardless of case
Contain at least one number (0…9) Be the same as any of your last 13 passwords
> Consist of repeating characters (i.e. aaaaaaaa)
> Consist of sequential numbers or letters
IMPORTANT DETAILS ABOUT PASSWORDS WITH SMARTCARDS: > Passwords are case-sensitive (for example, xyz0123abc is different to Xyz0123abc)
> After 5 consecutive failed login attempts, your security device will be blocked. If your smartcard (Taiwan only) is blocked, contact the ANZ Transactive Support Centre to reissue a new smartcard.
> ANZ Transactive passwords should not be used for different websites, applications or services, particularly when they relate to different entities.
> Users should not select the browser option for storing or retaining user names and passwords.
HOW OFTEN WILL MY PASSWORD EXPIRE?Passwords for smartcards do not expire
HOW TO CHANGE YOUR PASSWORDFollow these steps to change your password:
STEP ACTION
1 Click on the Start button with your Microsoft Windows operating system
2 Go to All Programs, then select TrustedNet Connect 3.4.3Once TrustedNet Connect has loaded, select the Key/Passwords tab
3 Highlight the ‘Smartcard Authentication’ key listed, then select the Change Password button
4 In the Old Password box, type your existing password
5 In the New Password box, type your new password
6 In the Retype Password box, retype your new password again, then click OK
FORGOTTEN YOUR PASSWORD?If you’ve forgotten your password for your smartcard, contact your ANZ Transactive Support Centre to arrange for cancellation of your existing card and a replacement Smartcard to be issued.
23

GENERAL SYSTEM TASKS
VIEWING ACCOUNT BALANCES
The Account Balance section on your Homepage displays your Account Balances as last refreshed in ANZ Transactive showing the date and time last refreshed. You cannot refresh the account balances from the Homepage. To refresh the balances you need to click on the Accounts Tab, then click the refresh button, which will then obtain and display the latest balances from the bank.
24

This section contains details on ANZ Transactive payment transactions
PAYMENT TRANSACTION OVERVIEW
ANZ Transactive offers the following Payment product types:
> Transfer Between Accounts - a transfer between a client’s ANZ accounts within the same region associated with the same organisation.
> Payments – made up of the following: Low value domestic funds transfer (ACH/GIRO), Book Transfer (BKT), Cross Border Funds Transfer (CBFT), Real Time Gross Settlement (RTGS), Bank Cheque (BCHK), and Customer Cheque (CCHK).
> Direct Debits – an instruction to collect an amount directly from another account that is typically held by another account holder.
Note: Product offerings may differ across countries.
If the transaction is not authorised and sent to the bank, you can amend, delete or save it for later. You can also create a mail message for this transaction ID. Each additional transaction you create also progresses through the transaction workflow.
For each transaction created for the above payment types, the system will automatically generate an instrument ID for each transaction. This ID is also known as the transaction ID.
TRANSACTION WORKFLOWAll ANZ Transactive transactions go through the following workflow process:
WORKING WITH PAYMENT TRANSACTIONS
Create Transaction
VerifyTransaction
AuthoriseTransaction
Notification
BankProcessing
25
WORKING WITH PAYMENT TRANSACTIONS
The above steps are described in detail in the following sections.
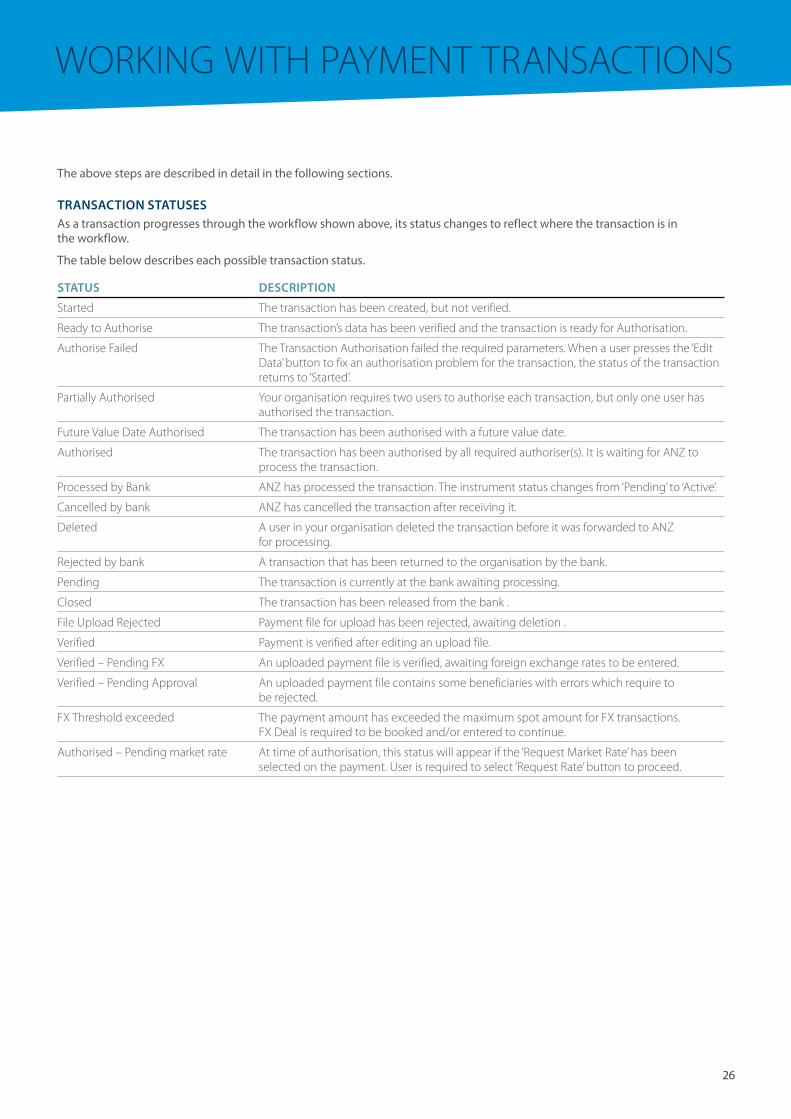
TRANSACTION STATUSESAs a transaction progresses through the workflow shown above, its status changes to reflect where the transaction is in the workflow.
The table below describes each possible transaction status.
STATUS DESCRIPTION
Started The transaction has been created, but not verified.
Ready to Authorise The transaction’s data has been verified and the transaction is ready for Authorisation.
Authorise Failed The Transaction Authorisation failed the required parameters. When a user presses the ‘Edit Data’ button to fix an authorisation problem for the transaction, the status of the transaction returns to ‘Started’.
Partially Authorised Your organisation requires two users to authorise each transaction, but only one user has authorised the transaction.
Future Value Date Authorised The transaction has been authorised with a future value date.
Authorised The transaction has been authorised by all required authoriser(s). It is waiting for ANZ to process the transaction.
Processed by Bank ANZ has processed the transaction. The instrument status changes from ‘Pending’ to ‘Active’.
Cancelled by bank ANZ has cancelled the transaction after receiving it.
Deleted A user in your organisation deleted the transaction before it was forwarded to ANZ for processing.
Rejected by bank A transaction that has been returned to the organisation by the bank.
Pending The transaction is currently at the bank awaiting processing.
Closed The transaction has been released from the bank .
File Upload Rejected Payment file for upload has been rejected, awaiting deletion .
Verified Payment is verified after editing an upload file.
Verified – Pending FX An uploaded payment file is verified, awaiting foreign exchange rates to be entered.
Verified – Pending Approval An uploaded payment file contains some beneficiaries with errors which require to be rejected.
FX Threshold exceeded The payment amount has exceeded the maximum spot amount for FX transactions. FX Deal is required to be booked and/or entered to continue.
Authorised – Pending market rate At time of authorisation, this status will appear if the ‘Request Market Rate’ has been selected on the payment. User is required to select ‘Request Rate’ button to proceed.
26

VIEWING TRANSACTIONSTo view a transaction, there are 2 options:
1. You can view transactions via the Homepage in the ‘All transactions’ section’. You can filter the transactions displayed in this section by:
> Show: All work, My Work, Work for subsidiary’s etc.
> Instrument Group: Trade, Payments, Direct Debits etc.
> Instrument Type: Trade types, Payments, Transfer between Accounts etc.
> Status: All, Authorised, Processed by bank, Ready to Authorise, Verified etc.
Then you can view the details for the relevant transaction by clicking on either the Instrument ID hyperlink which will display the Instrument summary, or click on the ‘Issue’ link to display the actual input screen for that Instrument.
You can also expand the view by clicking on the All Transactions hyperlink which will display the transactions in a whole screen.
WORKING WITH PAYMENT TRANSACTIONS
27

The screen will display as follows and in this view you can also search by Instrument ID.
2. The above screen can also be accessed via The Transactions Tab and selecting the All transactions link.
WORKING WITH PAYMENT TRANSACTIONS
28

You can also narrow the items returned by selecting on of the other links by status under the Trade or Payment sections.
WORKING WITH PAYMENT TRANSACTIONS
29

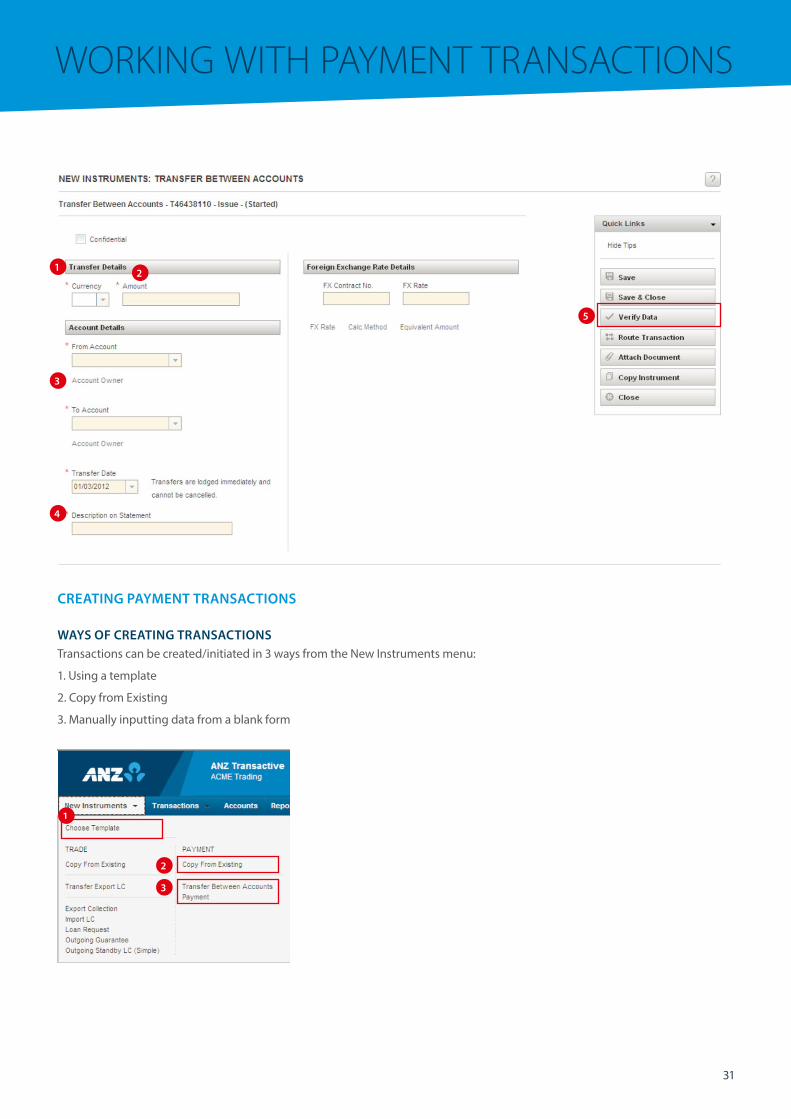
TRANSFERRING BETWEEN YOUR OWN ACCOUNTS
You can transfer funds between your registered accounts by clicking on the New Instruments Tab, then the Transfer Between Accounts link:
STEP ACTION
1 Click on the Transfer Between Accounts link as per above. Select the Currency from the drop down menu. Alternatively typing the first letter of the currency code in this field will display all currencies starting with that letter for easy selection.
2 Type in the Amount to be transferred.
3 Select the From account and To account from the drop-down menu.
Note: Only your organisation’s accounts that have been made available for Transfer between Accounts and assigned to your user profile will be available for selection.
4 Complete the Description on Statement field as you wish to appear of your organisation’s account. The Transfer date is to remain as current date as all Transfers will be set to the bank immediately regardless of the date entered. Enter in Foreign Exchange Rate details only if you have booked a FX rate with ANZ.
5 Once all required fields have been input select the ‘Verify Data’ action button to validate the details entered. If any errors are encountered and error message will be displayed describing the errors. The errors are to be corrected then re-validated. If everything is correct the status will then appear as ‘Ready to Authorise’
6 The transfer can then be authorised by users with authorisation rights. Refer to the Authorising Instruments section for further information, however please note transactions cannot be authorised unless the status is ‘Ready to Authorise’
WORKING WITH PAYMENT TRANSACTIONS
30
CREATING PAYMENT TRANSACTIONS
WAYS OF CREATING TRANSACTIONSTransactions can be created/initiated in 3 ways from the New Instruments menu:
1. Using a template
2. Copy from Existing
3. Manually inputting data from a blank form
WORKING WITH PAYMENT TRANSACTIONS
1
3
4
5
2
1
2
3
31

OPTION 1: USING A TEMPLATECopying from an existing template allows you to copy data from a pre configured template. Selecting this option displays a Template Search page, enabling you to easily select the template from which to use.
OPTION 2 : COPY FROM AN EXISTING INSTRUMENTCopy from an existing Payment allows you to copy data from an existing instrument (Payment or Transfer between Accounts) that you have previously created. Selecting this option displays the Payment search page, where you select the instrument from which you want to copy data.
OPTION 3: STARTING FROM A BLANK FORMStarting from a blank form allows you to create a new instrument manually (Transfer between Accounts or Payment) without any pre-populated fields.
Additionally payments can be created by Uploading a Payment file via the Upload Centre Tab. Please refer to the Creating Transactions from an Upload File for further details.
CREATING A PAYMENT MANUALLY
There are two sections to be completed when creating a Payment. The Terms section contains the general details for the payment and the Beneficiary section where the beneficiary details are entered.
SECTION 1- TERMS
FIELD ACTION
Confidential payment indicator This is to be selected if the payment is to be confidential i.e. only visible to Users that have been assigned the Confidential Payment Indicator. Note this checkbox will only be visible to Users that have been assigned the Confidential Payment Indicator.
Execution Date This will default to current date however can be forward dated if required for a Future value dated payment.
Debit Account To be selected from the drop-down list. Only accounts assigned to the user will be available for selection from the drop-down menu.
Currency The currency for the payment to be selected from the drop-down menu. Alternatively typing the first letter of the currency code in this field will display all currencies starting with that letter for easy selection.
Individual Debits This checkbox is to be selected if a bulk payment requires a matching debit per credit entry created. Please contact your bank to determine if this function is available in your country.
Customer Upload File Reference This is an optional field.
Foreign Exchange Rate Details This section is only to be completed for a Foreign Currency payment when a FX deal has been obtained from the bank.
WORKING WITH PAYMENT TRANSACTIONS
32
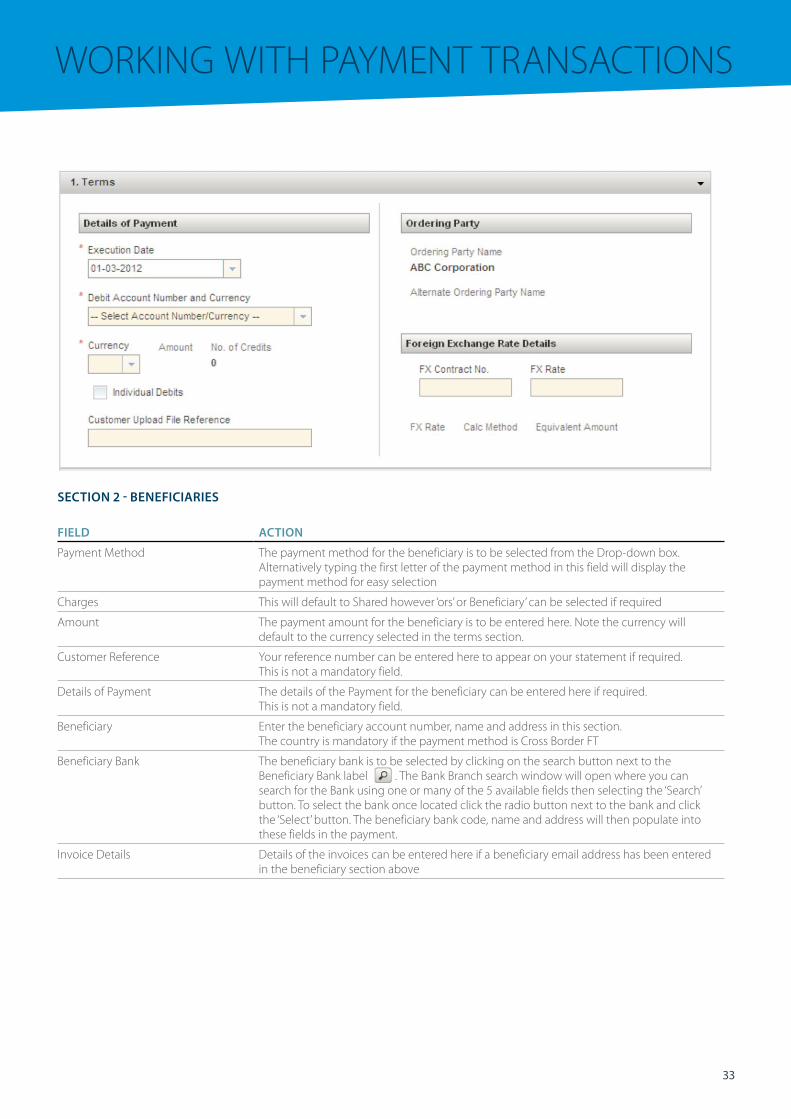
SECTION 2 - BENEFICIARIES
FIELD ACTION
Payment Method The payment method for the beneficiary is to be selected from the Drop-down box. Alternatively typing the first letter of the payment method in this field will display the payment method for easy selection
Charges This will default to Shared however ‘ors’ or Beneficiary’ can be selected if required
Amount The payment amount for the beneficiary is to be entered here. Note the currency will default to the currency selected in the terms section.
Customer Reference Your reference number can be entered here to appear on your statement if required. This is not a mandatory field.
Details of Payment The details of the Payment for the beneficiary can be entered here if required. This is not a mandatory field.
Beneficiary Enter the beneficiary account number, name and address in this section. The country is mandatory if the payment method is Cross Border FT
Beneficiary Bank The beneficiary bank is to be selected by clicking on the search button next to the Beneficiary Bank label . The Bank Branch search window will open where you can search for the Bank using one or many of the 5 available fields then selecting the ‘Search’ button. To select the bank once located click the radio button next to the bank and click the ‘Select’ button. The beneficiary bank code, name and address will then populate into these fields in the payment.
Invoice Details Details of the invoices can be entered here if a beneficiary email address has been entered in the beneficiary section above
WORKING WITH PAYMENT TRANSACTIONS
33

WORKING WITH PAYMENT TRANSACTIONS
34

The steps required to complete a payment are:
STEP ACTION
1 Complete the Terms section as per Section 1 above.
2 Complete the Beneficiary section and click on the ‘Save Beneficiary’ button at the bottom of the screen. The beneficiary information will then display in the Beneficiaries section.
3 Add any further beneficiaries by selecting the ‘Add Beneficiary’ button. Repeat Step 2 until all Beneficiaries have been added.
Beneficiary information can be edited by selecting the radio button next to the Beneficiary which will populate the details for that Beneficiary. After editing the details click on the ‘Update Beneficiary’ button at the bottom of the page.
STEP ACTION
4 Once all required fields/Beneficiaries have been input select the ‘Verify Data’ action button to validate the details entered. If any errors are encountered and error message will be displayed describing the errors. The errors are to be corrected then re-validated. If everything is correct the status of the payment will then appear as ‘Ready to Authorise’.
5 The payment can then be authorised by users with authorisation rights. Refer to the Authorising Instruments section for further information, however please note transactions cannot be authorised unless the status is ‘Ready to Authorise’.
CREATING TRANSACTIONS USING A PAYMENT FILE
WHAT IS A PAYMENT FILE?A payment file is a configured file format containing one or more payees (e.g. Payroll).
PAYMENT FILE UPLOADThe steps required to upload a payment file are:
STEP ACTION
1 Click on the Upload Payment file link form the Upload Centre Tab.
WORKING WITH PAYMENT TRANSACTIONS
35

STEP ACTION
2 Click the ‘Browse’ button and search for the pipe delimited file or fixed length file saved to your PC for uploading.
3 Select the file for upload and double click the file.
4 Select the Upload File button.
5 Click the Refresh button to check progress of the file upload status .
The status will only update when the refresh button is clicked.
VALIDATION STATUSWhen a payment file has been uploaded, ANZ Transactive will commence a series of format validations on the file.
VALIDATION STATUS OCCURRENCE SOLUTIONS
File Validation Pending File has been uploaded to the server after the following validation:
> File Format
> Payment Method
> Debit Account
Nil action required. System will commence second stage of the validation process.
Validation in Progress Verification validations will be performed behind the scenes:
> Beneficiary Level
Nil action required. System will produce a validation status at the end of the process of:
> Validation Successful
> Validated with Errors –or
> Validation Failed
Validation Successful All beneficiary parties have passed validation process. i.e. All 50 beneficiaries loaded in the file are deemed successful
> Ready to Authorise – or Refer to authorising a transaction on Page 44
> Verified-Pending FX Refer to Transaction Status table on Page 26 see row Verified – Pending FX
Validated with Errors Portion of the beneficiary validations fail but not all.
i.e. two beneficiaries have failed out of 50 parties loaded.
Confirm the acceptance of the successfully passed beneficiaries and continue to process the balance of the file.
OR – Reject entire file, repair the file where the errors occurred and re-upload again.
Validation Failed All beneficiaries have failed the validation process.
i.e. all 50 beneficiaries loaded in the file have failed.
User to repair the pipe delimited file and re-upload again.
WORKING WITH PAYMENT TRANSACTIONS
36

VALIDATION STATUS OCCURRENCE SOLUTIONS
File Confirmed When user has Confirmed the acceptance of the successfully passed beneficiaries the validation status will be updated to File Confirmed.
> Ready to Authorise –or Refer to Authorising a payment file on Refer to authorising a transaction on Page 44
> Verified-Pending FX Refer to Transaction Status table on Page 26 see row Verified – Pending FX
File Rejected When user has Rejected the entire file, the validation status will be updated to File Rejected.
User to repair the pipe delimited file and re-upload again.
FILE FORMAT SPECIFICATIONSFor file format specifications, please refer to the ANZ Transactive File Format Guides.
VERIFY FX BUTTONIf the transaction status is ‘Verified – Pending FX’ – refer to ‘Transaction Status’ table on Page 26 you can open the payment via the Transaction ID and enter the exchange rate details. All other fields will be uneditable upon selecting the Verify FX button. The transaction will then appear as ‘Ready to Authorise’.
UPLOAD LOG SCREENOnce the validation has been completed on the payment upload file, the ‘Upload Log’ column will display a link either showing ‘View Log’ or View Errors’. The link is determined by the success, partial success or failure of the uploaded file.
WORKING WITH PAYMENT TRANSACTIONS
In the event the uploaded file has been successful, the link will be displayed as ‘View Log’. If the ‘View Log’ is selected, a log displaying the following information pertaining to the file will be displayed:
> User Name (User whom uploaded the file)
> Validation Status (See also Validation Status)
> Validation Processing Complete Time (Date and time the uploaded file was completed)
In the event the uploaded file has been partially successful, the link will be displayed as ‘View Errors’. Once the View Errors link has been selected, a log displaying the information pertaining to the file and the failed beneficiaries will be displayed as follows:
> User Name (User whom uploaded the file)
> Validation Status (See also Validation Status)
> Validation Processing Complete Time (Date and time the uploaded file was completed)
> Number of Beneficiaries Uploaded (total of Beneficiaries originally loaded in the file)
> Number of Beneficiaries that Failed (number of Beneficiaries that did not pass validation)
> The Listview below will show the Line Number, Beneficiary Information and Error Message related to that Beneficiary 37

WORKING WITH PAYMENT TRANSACTIONS
Dependent on the errors displayed in the Error Message field, there is the option to either:
1. Confirm the file, by accepting the number of successful beneficiaries and opting to omit the failed parties, OR
2. Reject the entire file and re-upload a corrected file.
Refer to Function Buttons below
Once the file has either been confirmed or rejected, select the ‘Close’ button to return to the Payment Upload File tab.
FUNCTION BUTTONS
The function buttons that may appear in the ‘Error Log’ window are described below:
CONFIRM BUTTONIf the Confirm button is selected, this accepts the number of successful beneficiaries and omits the failed parties. The validation status will change to ‘File Confirmed’ with the User Name displaying the user whom confirmed the file.
The transaction status will appear as Ready to Authorise, OR as Verified - Pending FX
REJECT BUTTONIf the Reject button is selected, the whole payment file will be rejected. The validation status will change to ‘File Rejected’ with the User Name displaying the user whom rejected the file.
The transaction status will appear as File Upload Rejected.
VERIFY FX BUTTONIf the transaction status appears as Verified – Pending FX, the user can open the payment via the Transaction ID and enter in the exchange rate details, or select the Request Market Rate checkbox if a live market rate is to be requested upon final authorisation.
All other fields are not editable; therefore the Edit button will not be available in this screen, for this status. Upon selecting the Verify FX button.
The transaction status will appear as Ready to Authorise.
38

DELETE REJECTED ITEMS BUTTONOnly upload files with a transaction status of ‘File Rejected’ can be deleted from this list view. Once removed, the failed file will only be visible from the Transaction History tab, while the Upload Log details for this file will only be available via reporting.
DELETE TRANSACTIONS FROM THE PAYMENT FILE UPLOAD TABOnly transactions with a transaction status of ‘File Rejected’ may be deleted from this tab. The user will select the checkbox against the files that are to be deleted and then select the Delete Rejected Items button. In the event a file that doesn’t meet this status is attempted to be deleted an error message will be displayed showing ‘only transactions with a validation status of ‘Validation failed’ and ‘File Rejected’ may be deleted from this tab’.
For payments at a ‘Started’ or ‘Verified’ status that are required to be deleted, must be verified to a ‘Ready to Release’ status first. The user can then delete the transaction from the Pending Transactions tab
BENEFICIARY LIST VIEW
To view the beneficiaries of a uploaded payment click on the Instrument hyperlink in the Instrument ID column.
The Payment screen will be displayed where all beneficiaries of an uploaded payment file can be viewed via a scrollable screen.
This section allows you to search for a beneficiary using the following criteria:
> Payment status
> Beneficiary name
> Beneficiary bank name
> Amount
The search results are dependent on the criteria you enter within the Beneficiary List View. Where no results are found based on the search criteria entered, the list view will display a ‘No Rows found’ message. Clear the search field and select ‘Search’ again to display all beneficiaries.
You can select the relative radio button to view and/or edit the beneficiary details within the payment depending on the status of your multiple and/or file upload payment transaction.
WORKING WITH PAYMENT TRANSACTIONS
39

FUTURE DATED PAYMENTS
CREATING A FUTURE DATED PAYMENTPayments excluding: Transfers Between Accounts, International Payments (Cash or Trade) and Direct Debits can be future dated by changing the execution date in the payment, then authorised. An authorised future dated payment will be held in the Future Value Transactions tab awaiting the execution date. Users will be able to edit or update the payment and re-authorise or delete the payment prior to the execution date.
A payment that contains two currencies that are not the base currency or a payment that requires a booked rate can not be saved or authorised as a future value dated transaction if a valid forward exchange contract (FEC) rate has not been entered.
VIEWING FUTURE VALUE DATED TRANSACTIONS Future Dated Transactions can be viewed by either selecting the Future Value Transactions from the Transactions Tab.
Or by selecting the Future Value Transactions radio button when in the History view or any other Payments view. E.g. if you selected Pending Transactions and now want to view the Future Value Transactions, simply select the Future Value Transactions radio button.
To view the details of a Future dated transaction either click on Instrument ID from the list view, or the Issue link in the Transaction column to display the payment screen. The following options will be available:
Edit, Route Transaction or Close.
WORKING WITH PAYMENT TRANSACTIONS
40

EDITING A FUTURE DATED PAYMENTIf the ‘Edit’ option is selected the user will be presented with the following payment processing buttons:
Attach a Document, Save, Save and Close, Route Transaction, Verify Data and Close.
FUTURE DATED PAYMENT INVOLVING FXFuture dated payment involving Foreign Exchange requires an FX contract to be booked with the bank. A valid FX Contract No. and FX Rate must be entered into the Foreign Exchange Rate Details fields before the Future Dated payment can be authorised.
AUTHORISATION PROCESS ON EXECUTION DATEUpon the execution date ANZ Transactive will run through the following series of new authorisation checks before it sends the payment to the bank:
> Ensure that all the users that authorised the transaction are still valid users
> Use current FX rates to determine and perform the Daily Limit Exceeded calculation
> Change the transaction status to Authorised
> Send the completed authorised transaction to the bank
BENEFICIARY EMAIL NOTIFICATION OVERVIEW
This section provides details on the ANZ Transactive beneficiary email facility. For further details please refer to the ANZ Transactive Online Help.
The end beneficiary of the payment can be notified via email upon successful processing of the Portal payment by the bank.
EMAIL ADDRESS REQUIREMENTSWhere an email is required to be sent to the beneficiary, enter the beneficiary email address in the Beneficiary Email Address field on payment activities only. Multiple addresses can be input into this field and separated by commas (no spaces) up to maximum character limit of 255.
EMAIL TRIGGER RESPONSEThe email notification to the beneficiary will be triggered upon two scenarios;
> GPP countries will send an email communication to the beneficiary if an email address is present on the payment transaction when the payment status is completed.
> Non GPP countries will send an email communication to the beneficiary if an email address is present on the payment transaction when the payment status is Processed by Bank.
EMAIL CONTENTThe beneficiary will receive an email from ANZ with the Portal payment reference number in the subject title. The body of the email will contain the message of an attached payment credit advice, to which the beneficiary can then in turn contact the ordering party for any queries.
An attachment embedded in the email will contain the entire payment details, inclusive of any invoice details but will omit the complete beneficiary account number by only stating the last 4 digits.
WORKING WITH PAYMENT TRANSACTIONS
41

WORKING WITH PAYMENT TRANSACTIONS
EMAIL VALIDATIONEmail addresses entered in the Beneficiary Email field will not be validated, nor will a notification be sent via the Portal notification tab or email notification feature if the communication has not reached the beneficiary party.
Note: The bank will obtain a report advising the failed beneficiary communication attempts in order to advise of the unsuccessful mail.
An example of the Email communication is shown below.
CREATING DIRECT DEBITS
A direct debit is an instruction that the bank account holder gives to his or her bank to collect an amount directly from another account that is typically held by another account holder.
You have the option of uploading a direct debit file or manually processing a single entry transaction.
STEP ACTION
1 Click the RECEIVABLES MANAGEMENT navigation button.
2 On the Direct Debits table click the CREATE A TRANSACTION button.
The New Transaction, direct debit transaction page will appear
3 Follow the on-screen instructions.
For information about how to complete the page, click the button.
This instruction is then printed by the bank and sent to the debit party for payment.
42

VERIFYING TRANSACTIONS
After you have created a transaction, its data must be verified before it can be authorised. This topic explains what transaction verification is and how to complete this action.
WHAT IS VERIFICATION?Verification is the second stage of the transaction workflow.
When you verify a transaction, the system:
> Checks the transaction against a list of standard data requirements for the transaction
> Changes the transaction’s status from ‘Started’ to ‘Ready to Authorise’ if the verification checks are successful
If the verification is unsuccessful, the system displays an appropriate error message for each verification error.
BEFORE YOU BEGINYou can only verify a transaction if:
> Your security profile includes create/modify permission for the transaction type that you want to verify
> The transaction has a status of Started
VERIFYING A TRANSACTIONFollow these steps to verify a transaction:
STEP ACTION
1 View the transaction.
For instructions, see Viewing transactions.
2 Click the VERIFY DATA button.
The system performs the verification checks, then displays a message at the top of the page to inform you whether the verification was successful.
3 Was the verification successful?
Yes: The transaction is now ready for you to authorise it (see Authorising transactions).
No: Resolve all errors, then go to step 2.
AUTHORISING TRANSACTIONS
After you have created and verified a transaction, it must be authorised before it is sent to the bank for processing. This topic explains what transaction authorisation is and how to complete this action.
WHAT IS AUTHORISATION?Authorisation is the third stage of the transaction workflow before it is sent to the bank for processing.
When you authorise a transaction, the system will:
> Check the User’s profile to determine which security device is assigned to the user:
> If the User has a RSA token it will prompt for the token code (one time password) to be entered
> If the User has a Vasco Digipass token it will display a ’Sign Transaction’ window with the ‘key information number’ this number is to be entered into the Vasco token which will then display the signature code to be entered into the sign transaction field. Please refer to the Vasco token section in the Security device chapter for further information
> If the User has a smart card the PIN authorisation window will appear for the user to enter their smart card PIN.
> Check if the Panel authorisation rules are set-up and the authorisation requirements based on the payment amount
> Check the User’s Panel group or authorisation threshold assigned
> Check the authorisation requirements for the transaction type e.g. can be authorised by 1 user, must be authorised by 2 users etc.
WORKING WITH PAYMENT TRANSACTIONS
43

WORKING WITH PAYMENT TRANSACTIONS
> Change the transaction’s status depending on the outcome of the above checks and requirements as per the below table
> If the payment status is ‘authorised’ moves the payment to the Authorised Transactions page and sends the payment to ANZ for processing. If the payment was partially authorised or unsuccessful, the transaction remains on the Pending Transactions page. If the payment is Future Value dated authorised the payment will move to the Future Value transactions page awaiting the future date to arrive.
STATUS DESCRIPTION
Authorise Failed The Transaction Authorisation failed the required parameters. When a user presses the ‘Edit Data’ button to fix an authorisation problem for the transaction, the status of the transaction returns to ‘Started’.
Partially Authorised Your organisation requires two users to authorise each transaction, but only one user has authorised the transaction.
Future Value Date Authorised The transaction has been authorised with a future value date.
Authorised The transaction has been authorised by all required authoriser(s). It is waiting for ANZ to process the transaction.
If the authorisation is unsuccessful, the system displays an appropriate error message as per the viewing authorisation errors section.
AMENDING TRANSACTIONS PRIOR TO AUTHORISATIONOnce a transaction has been successfully verified, the content of the screen is locked down and is ready to be authorised by a user with “Authorise” permissions. If you need to make changes to the application after you have verified the data, but before it is authorised, you can press the “Edit” button to unlock the transaction.
44

Once any relevant edits are made, you will need to Press the “Verify Data” Button again, and the transaction will then be Ready to Authorise again.
HOW TO AUTHORISE TRANSACTIONSUsers with the appropriate access levels will be required to authorise transactions once they have been successfully verified. These transactions will have a status of ‘Ready to Authorise’.
Only transactions with a status of ready to authorise, or partially authorised can be authorised.
STEP ACTION
1 On the Transactions menu select Pending Transactions.
2 Filter the pending transactions by Status in order to display all the transactions that are ready to be authorised.
3 Select the transactions that you want to authorise and press the Authorise button.
WORKING WITH PAYMENT TRANSACTIONS
45

STEP ACTION
4 You will be prompted to enter your security device code as per the below section Security Devices types upon Authorisation.If the authorisation was successful, the transaction is:
> changed to a status of Authorised or Partially Authorised
> listed on the Pending Transactions page if its status is Partially Authorised, or
> listed on the Authorised Transactions page if its status is Authorised (see Viewing an authorised transaction)
> sent to ANZ for processing.
If the authorisation was unsuccessful the transaction:
> remains on the Pending Transactions page
> have an Authorise Failed in the Status column (see Viewing Authorisation Errors).
WORKING WITH PAYMENT TRANSACTIONS
46

You will receive a message noting the transactions that have been successfully authorised. Any processing issues (e.g. invalid combinations of data inputs) will also be listed here.
Alternatively, any transaction may also be authorised from within the transaction details screen by selecting Authorise Transaction from the floating menu.
WORKING WITH PAYMENT TRANSACTIONS
47
SECURITY DEVICE TYPES UPON AUTHORISATION > RSA Token Authorisation. Upon selecting the Authorise button for a completed transaction within ANZ Transactive, the Authoriser will be presented with a window to enter their RSA token code (one time password)
> Vasco Digipass Token Authorisation using SIG (Online Signing). Upon selecting the Authorise button on a completed transaction within ANZ Transactive you need to unlock your token and select option 2 (SIG) on your Vasco Digipass Token. You will then be prompted to enter in the six-digit Key Information as indicated on the Sign Transaction page of the ANZ Transactive transaction into the Vasco Digipass token then press the back arrow button on the token. Upon selecting the arrow button, the device will return a Signature Code to then be entered into the Sign Transaction page in ANZ Transactive.
> Smartcard Authorisation (Taiwan Only). Upon selecting the Authorise button for a completed transaction within ANZ Transactive, the Authoriser will be presented with a window to enter their smartcard PIN.
HOW TO AUTHENTICATE A TRANSACTION USING A VASCO DIGIPASS TOKEN AND SIG (ONLINE SIGNING):
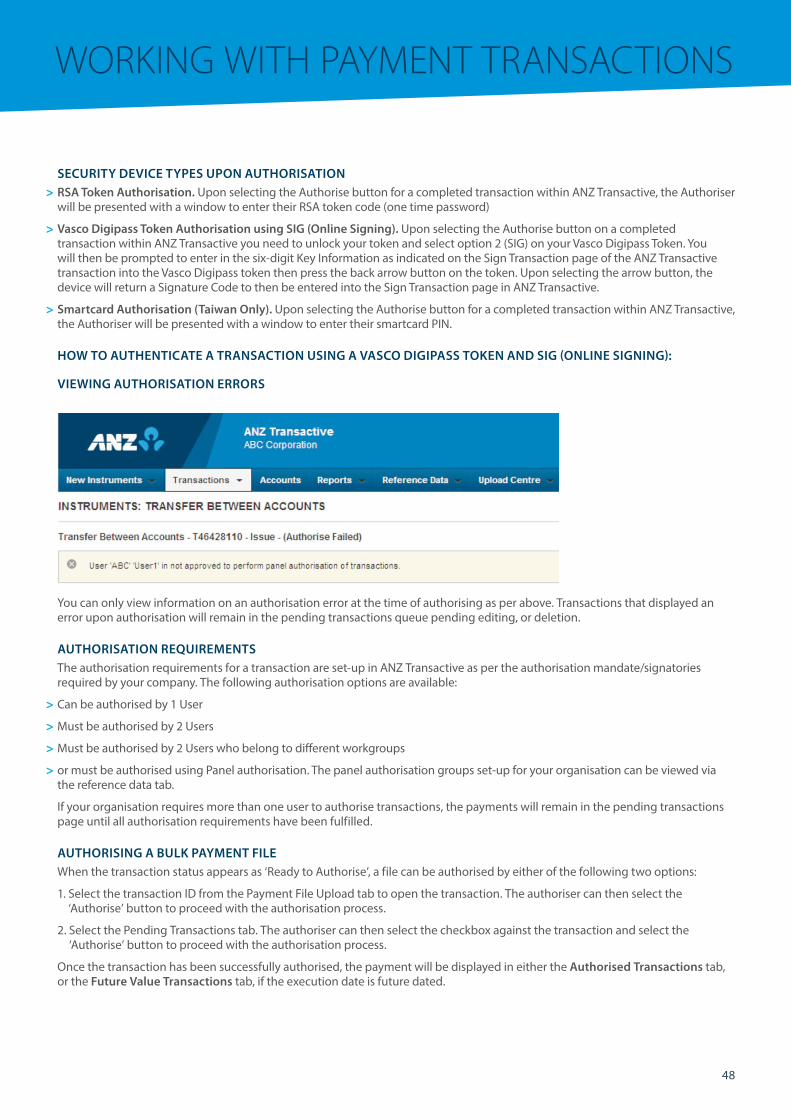
VIEWING AUTHORISATION ERRORS
You can only view information on an authorisation error at the time of authorising as per above. Transactions that displayed an error upon authorisation will remain in the pending transactions queue pending editing, or deletion.
AUTHORISATION REQUIREMENTSThe authorisation requirements for a transaction are set-up in ANZ Transactive as per the authorisation mandate/signatories required by your company. The following authorisation options are available:
> Can be authorised by 1 User
> Must be authorised by 2 Users
> Must be authorised by 2 Users who belong to different workgroups
> or must be authorised using Panel authorisation. The panel authorisation groups set-up for your organisation can be viewed via the reference data tab.
If your organisation requires more than one user to authorise transactions, the payments will remain in the pending transactions page until all authorisation requirements have been fulfilled.
AUTHORISING A BULK PAYMENT FILEWhen the transaction status appears as ‘Ready to Authorise’, a file can be authorised by either of the following two options:
1. Select the transaction ID from the Payment File Upload tab to open the transaction. The authoriser can then select the ‘Authorise’ button to proceed with the authorisation process.
2. Select the Pending Transactions tab. The authoriser can then select the checkbox against the transaction and select the ‘Authorise’ button to proceed with the authorisation process.
Once the transaction has been successfully authorised, the payment will be displayed in either the Authorised Transactions tab, or the Future Value Transactions tab, if the execution date is future dated.
WORKING WITH PAYMENT TRANSACTIONS
48

PENDING TRANSACTIONS
A pending transaction is one that has been started, in progress and/or is awaiting authorisation to be sent to the bank.
Pending transactions can be viewed via the Home Page dashboard in the All transactions section, and selecting the status of ‘Pending’ from the drop down list. You can access pending transactions from the Pending Transactions link or the History link via the Transactions Tab.
If a transaction has been fully authorised it will and no longer be visible on the pending transactions tab, and you will be unable to edit the transaction. You need to contact ANZ Transactive support to arrange for the payment to be rejected back to your organisation.
Note: If the payment has been processed by bank the transaction cannot be stopped or edited.
EDITING A PENDING MANUAL TRANSACTIONFollow these steps to edit a pending transaction:
STEP ACTION
1 View the transaction.
For instructions, see Viewing transactions section.
2 What is the status of the transaction?
Started: The transaction is ready to edit; go to step 3.
Ready to Authorise, Partially Authorised, or Authorise Failed: Click the Edit Data button. The transaction redisplays in edit mode.
For information on authorisation failures, see Viewing authorisation errors.
3 Edit the transaction as required.
4 When you have finished editing the transaction, click save and close or verify button.
For information about which button to click, see the following topic in the ANZ Transactive System online help: Using the System > Instrument Procedures > Working with instruments > Working with Instruments and Transactions > Transaction and Template Action Buttons.
EXISTING TRANSACTIONS
49
EDITING A PENDING UPLOADED FILEWhen the Edit button within the payment screen is selected ANZ Transactive will determine if the payment was either uploaded using a file format, or if the payment details were manually entered.
If the payment was uploaded via a file, the following fields will be editable:
> Execution date
> FX Contract Number
> FX Rate
> Request Market Rate checkbox
> Delete a Beneficiary
Once the details have been added, amended or deleted, then simply select either the Verify or Verify FX button to continue the process.
WHAT’S NEXT?After a transaction is edited the data must be verified before it can be authorised. This is the case even if the transaction was previously verified before it was edited.
ROUTING TRANSACTIONS
To facilitate the processing of transactions with your organisation and related organisations (see Organisation subsidiaries), you can route a transaction to:
> A particular User
> A particular organisation’s default User
For example, when a transaction is ready for authorisation, you could route it to an authoriser.
This topic describes how to route transactions individually and in groups.
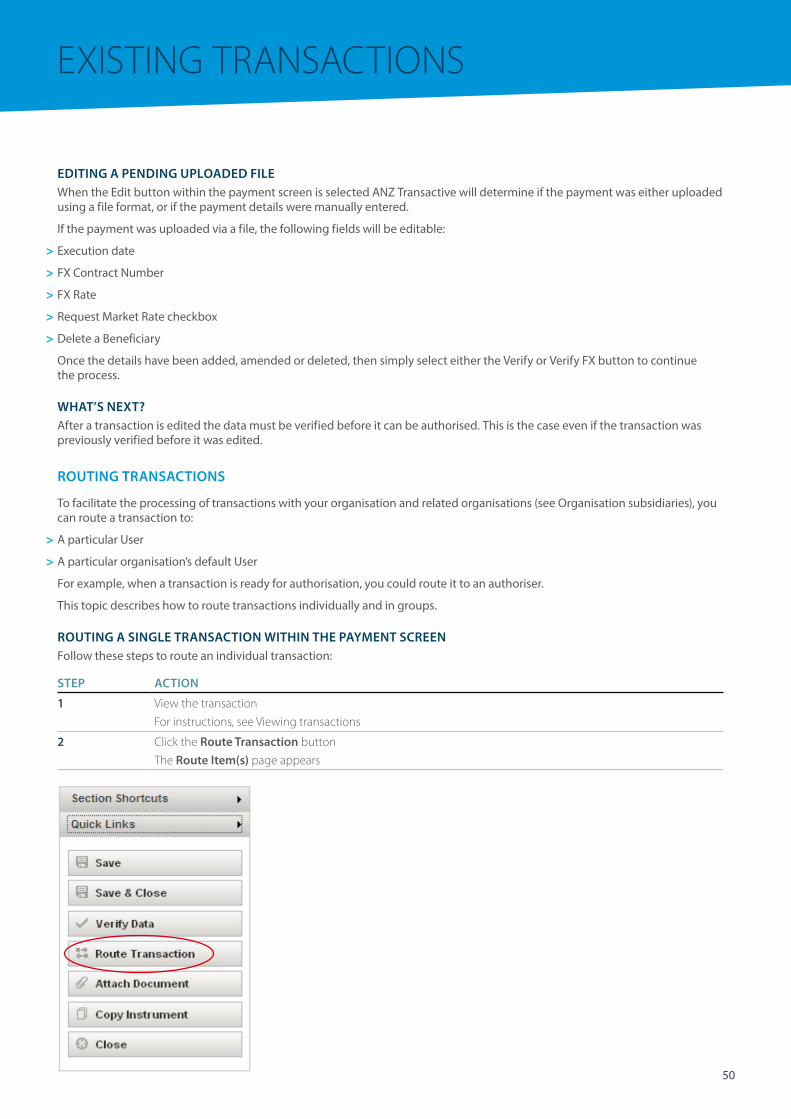
ROUTING A SINGLE TRANSACTION WITHIN THE PAYMENT SCREENFollow these steps to route an individual transaction:
STEP ACTION
1 View the transaction
For instructions, see Viewing transactions
2 Click the Route Transaction button
The Route Item(s) page appears
EXISTING TRANSACTIONS
50

EXISTING TRANSACTIONS
STEP ACTION
3 Select the user or organisation you want to route the transaction to and click the Route Item(s) button. The Transactions area appears, with a message at the top advising you that the transaction has been routed successfully.
ROUTING MULTIPLE TRANSACTIONS FROM THE PENDING TRANSACTION TABFollow these steps to route one or more transactions at the same time:
STEP ACTION
1 Click the Pending Transactions link via the TRANSACTIONS tab to display all pending transactions
2 Select the check box of each transaction you want to route
3 Click the ROUTE SELECTED ITEM(S) button
The Route Item(s) page appears
4 Select the User or organisation you want to route the transaction(s) to view and Click the ROUTE ITEM(S) button
The Transaction area appears, with a message at the top telling you that the transaction(s) have been routed successfully.
51

VIEWING AN AUTHORISED TRANSACTION
Follow these steps to view an authorised transaction:
STEP ACTION
1 Select the Authorised Transactions link from the TRANSACTIONS tab.
The Authorised Transactions page appears.
2 In the Transaction column, click the transaction that you want to view.
The details of the transaction appear.
3 When you’ve finished viewing the transaction, click the Close button.
The Authorised Transactions page redisplays.
Note: Once the bank has processed the transaction, the payment will move from the Authorised Transaction tab to the Transaction History tab.
VIEWING TRANSACTION DETAILS
Follow these steps to view a transaction’s details:
STEP ACTION
1 Click the TRANSACTIONS tab and select the relevant link of the status type of the transaction you want to view. Alternatively you can click the All Transactions link or the History link to show all transactions regardless of transaction status.
2 You can search for the instrument by the Instrument ID if known. If you want to filter the list of transactions that meet certain criteria, select the required option from the relative dropdown boxes then click the search button. Click on the Advanced link for advanced search options.
3 In the Instrument ID column, click the instrument link for the transaction that you want to view. The Payment terms Summary screen appears. Click on the Issue link from within this screen to display the actual payment screen as entered. Alternatively this page can be accessed by clicking the Issue link for the transaction directly from the All Transactions or Home page.
4 To view the advice for transactions that have been processed by Bank, click on the advice link or PDF link from within the transaction summary screen.
EXISTING TRANSACTIONS
52

TRANSACTION HISTORY LOGThis function enables all users with Cash Payment products assigned, to view the history of the cash payment transaction.
The transaction history log is displayed in the payment summary screen under the Transaction Log tab this will be available for the following cash payment products:
> Transfer between Accounts
> Payments
Each time the user selects the ‘Save’ or ‘Save and Close’ or ‘Verify’ or ‘Authorise’ button, the system will capture the entry in the transaction history log in a listview as described below:
COLUMN HEADING DESCRIPTION
Date & Time Date and time of when the action was performed.
Action The type of action that was performed by the user, e.g. Create, Save, Verify, Authorise, Bank*, etc.
User User ID, first & last name of the user whom performed the action.
Panel Level Panel level of the user authorising the transaction. This field will only be updated when the user authorises the transaction. The values in this field will be either A, B or C.
Status The status of the transition as at Save or Save and Close, e.g. Started, Ready to Authorise, Partially Authorised, Authorised, Authorised Failed, Rejected by Bank, Cancelled by Bank, Processed by Bank.
*Where the action status appears as Bank, this function was performed at ANZ and will display a status e.g. Processed by bank, Rejected by Bank, etc.
DELETING TRANSACTIONS
WHEN CAN TRANSACTIONS BE DELETED?You can only delete pending transactions (those that have a status of Started, Ready to Authorise or Partially Authorised).
After a transaction has been authorised, you cannot delete it.
Whether ANZ can cancel a transaction depends on the current state of the transaction’s processing. For example, ANZ cannot cancel a transaction that it has already processed and transmitted.
DELETING PENDING TRANSACTIONSFollow these steps to delete transactions:
STEP ACTION
1 Click the Pending Transactions link via the TRANSACTIONS tab to display all pending transactions.
2 Select the check box of each transaction you want to delete.
3 Click the DELETE SELECTED ITEM(S) button.
A message appears, asking you to confirm the deletion of the transactions.
4 Click the OK button.
The Pending Transactions page redisplays. For each item you deleted, a message appears at the top of the page to inform you whether the deletion was successful.
EXISTING TRANSACTIONS
53

MAIL MESSAGES
In the Mail Messages section, you can view and manage any mail messages sent to and received from ANZ. Your mail messages can also be linked to your email address, so you can be notified immediately of any new messages received from ANZ. Mail Messages can be accessed from your homepage dashboard or at any time by pressing the Envelope Icon in the top of your screen.
A Mail Message is a secure message from ANZ which typically requires a response. You can reply to existing bank messages or simply create a new message.
Setting up a new mail message is easy. Simply select the ‘New’ button, fill in the required information and link it to the relevant instrument. You can also attach pdf documents to the message. Once completed simply click on ‘send to bank’.
MESSAGES
54

Messages can be created from the Mail Messages menu or from within the Instrument itself.
MESSAGES
55

MESSAGES
NOTIFICATIONS
The Notifications screen shows your most recent transactions that have been processed by ANZ. Details can be viewed directly from this Homepage Dashboard or at any time by clicking the “Speech Bubble” icon at the top of your screen.
You can also select the Instrument ID or an individual transaction to view a quick summary, including any commissions & charges, or download electronic copies of any documents attached to your transaction.
56

MESSAGES
57

ANZ Transactive contains a comprehensive set of standard reports to assist you in completing your day-to-day tasks. This section outlines details on ANZ Transactive reports:
THE REPORTS AREAANZ Transactive has two options for reporting in the user’s security profile:
> Users are able to view, create or delete reports
> Users are not able to view, create or delete reports
To access the reports available within ANZ Transactive click the REPORTS navigation button. To learn more about the reports area, see the ANZ Transactive Online Help.
STANDARD AND CUSTOM REPORTSANZ Transactive has two types of reports:
> Standard default reports: Standard Reports are reports provided by the bank and are classified into five different categories:
> Cash Payments
> Trade Services
> Confidential
> Administrator (Audit)
> Term Deposit
Users who are assigned to the report categories can view, run, print and extract reports to excel, PDF or download the data.
For the latest list of standard default reports available please contact your ANZ PCM or Trade Manager.
Note: Standard Reports cannot be edited or deleted by company users.
> Custom reports: Custom reports are reports that your organisation has created, and or customised. Custom reports that you create are only available for your organisation.
REPORTS
58

Most of your use of the reporting function in ANZ Transactive will involve generating existing reports.
WHAT HAPPENS WHEN YOU GENERATE A REPORTWhen you generate a report, ANZ Transactive:
> Retrieves the data for the report
> Prompts you for any additional report criteria, such as date ranges or transaction types
> Produces the report and displays it on the Reports page
GENERATING A REPORT
Follow the below steps to generate a report:
STEP ACTION
1 Select the Standard Reports link from the REPORTS Tab.
The Standard Reports page appears.
2 If you want to generate a custom report rather than a standard report, click the Custom Reports link.
The Custom Reports page appears.
3 In the Report Name column, click the report you want to generate.
If the report requires you to specify any criteria, the Report Criteria page appears.
Otherwise, the system generates the report and displays it on the Reports page.
4 The report will be displayed on screen and is ready for you to print or perform other actions (see Report actions). Use the scroll bars on screen to navigate to bottom of the page if required. Alternatively click the Expand button to display the whole page.
5 If the report contains multiple pages, you can select the page number form the drop down menu or select the arrow buttons to navigate to the next/last page if required.
STEP ACTION
6 Click the Close button to Close the report or if you want to re-run the report with different criteria, click on the Report Criteria Bar or arrow to re-display the report Criteria which can then be entered form here:
REPORTS
59

REPORT ACTIONSAfter generating a report, the report is now ready for you to:
> Print (see Printing a Report)
> Download data from (see Downloading Data from Reports)
PRINTING A REPORT
Follow the below steps to print a report:
STEP ACTION
1 If you haven’t already generated the report, you will be required to do so.
For instructions, see Generating a report.
2 There are two options for printing displayed reports, you will be required to perform one of the two options below:
> Click the PDF icon, then from the File menu in the PDF document, select Print or
> Click the Excel icon, then from the File menu in the Excel document, select Print > The Print dialog box appears.
3 Most reports produce best results when printed with a landscape orientation, so change the page layout settings so that the report prints with this orientation.
For instructions, see your web browser’s online help.
4 Click the OK button.
The report prints on your printer.
If the report does not print, check your printer or network connection.
5 Once completed, close out of the reports and return to the ANZ Transactive reports page.
DOWNLOADING DATA FROM REPORTS
FILE FORMATYou can download a report to your PC or network as a file in CSV format (Comma-Separated Values). CSV is a file format available for exporting data from ANZ Transactive reports to other software packages, especially spreadsheet program. In a CSV file:
> Records are separated by carriage return/line feeds
> Fields are separated by commas
DOWNLOADING DATA FROM A REPORTFollowing the below steps to download data from a report:
STEP ACTION
1 Generate the report if you haven’t already generated it.
For instructions, see Generating a report.
2 Click the CSV Icon.The FileDownload dialog box appears.
3 Select the Save option, to save the report to a specific location click the OK button.
The SaveAs dialog box appears or Select OPEN to view report.
4 Specify the location and file name for the file to be downloaded, then click the SAVE button.
The file containing the report data is downloaded to the specified location.
You can now open the file in your spreadsheet program.
REPORTS
60

This section provides an overview of the cash management transaction and balance reporting available in ANZ Transactive.
ACCOUNT REPORTING OVERVIEW
The account reporting product consists of three distinct functions:
> Real time account balances – View up to date balances on your accounts > Current day transactions – View current day transactions on your accounts > Prior day reporting – Reporting on the previous day balance and transaction data
The combination of the three distinct product capabilities enables an organisation to view real time account balances prior to creating transactions, view transactions incurred during the day, and view or print prior day account statements.
GENERAL RECOMMENDATIONIt is recommended to frequently check your bank account(s) and transaction balances. Any discrepancies noticed should be reported to ANZ.
VIEWING REAL TIME ACCOUNT BALANCES
This topic will outline the steps required to view real time account balances in ANZ Transactive.Follow these steps to view your real time account balances:NOTE: This feature is currently not available for Laos
STEP ACTION
1 Click the ACCOUNTS Tab.
2 Click the Refresh Icon. The page will now be updated with current balances.
VIEWING CURRENT DAY TRANSACTIONS
Follow these steps to view current day transactions:NOTE: This feature is currently not available for Cambodia, Vietnam, Laos or Pacific Countries
STEP ACTION
1 If in Homepage navigate to the Account balances, alternatively select the ACCOUNTS Tab.
2 In the Account Number column, click the account you want to view.
The last 50 transactions processed for that day will be displayed.
VIEW / PRINT BANK STATEMENTS
Follow these steps to view prior day transactions:
STEP ACTION
1 Select the Standard reports link from the REPORTS Tab.
2 In the report name column, click the report titled Account Statement.
3 In the Balance Date From field, enter the from date range from when the statement data is to commence for the report.
In the Balance Date To field, enter the date end date for the settlement data period.
Select the account(s) to view for the date range entered.
4 Click the Show Report button to display the report.
The report is now ready for you to print or perform other actions (see Report actions).
REPORT ACTIONSAfter generating a report, the report is now ready for you to:
> Print (see Printing a Report) > Download data from (see Downloading Data from Reports) > Save as a PDF or Excel document.
ACCOUNT REPORTING
61

ANZ BRANCH DETAILS
JURISDICTION BANK
Fiji Australia and New Zealand Banking Group Limited (ANZ). ABN 11005 357 522
Hong Kong Australia and New Zealand Banking Group Limited (ANZ). ABN 11005 357 522
India Australia and New Zealand Banking Group Limited (ANZ). ABN 11005 357 522
Japan Australia and New Zealand Banking Group Limited (ANZ). ABN 11005 357 522
Philippines Australia and New Zealand Banking Group Limited (ANZ). ABN 11005 357 522
Singapore Australia and New Zealand Banking Group Limited (ANZ). ABN 11005 357 522
United Kingdom Australia and New Zealand Banking Group Limited (ANZ). ABN 11005 357 522
ANZ SUBSIDIARY DETAILS
COUNTRY DETAILS
China Australia and New Zealand Bank (China) Company Limited (ANZ China) is a subsidiary of Australia and New Zealand Banking Group Limited (ANZBGL), which is incorporated in Australia. ANZ China is incorporated and licensed with limited liability in the People’s Republic of China by China Banking Regulatory Commission. ANZ China is not an authorised deposit taking institution within the meaning of the laws of Australia. Deposits or liabilities with ANZ China are not deposits or liabilities of ANZBGL and ANZBGL is not required to meet the obligations of ANZ China.
Laos ANZ Bank (Lao) Limited (ANZL) is a subsidiary of Australia and New Zealand Banking Group
Limited (ANZBGL), which is incorporated in Australia. ANZL is incorporated and licensed in Laos with limited liability. ANZL is not an authorised deposit taking institution within the meaning of the laws of Australia. Deposits or liabilities with ANZL are not deposits or liabilities of ANZBGL and ANZBGL is not required to meet the obligations of ANZL.
Papua New Guinea Australia and New Zealand Banking Group (PNG) Limited (ANZPL) is a subsidiary of Australia and New Zealand Banking Group Limited (ANZBGL), which is incorporated in Australia. ANZPL is incorporated and licensed in Papua New Guinea with limited liability.
ANZPL is not an authorised deposit taking institution within the meaning of the laws of Australia. Deposits or liabilities with ANZPL are not deposits or other liabilities of ANZBGL and ANZBGL is not required to meet the obligations of ANZPL.
Taiwan ANZ Bank (Taiwan) Limited (ANZTW) is a subsidiary of Australia and New Zealand Banking Group Limited (ANZBGL), which is incorporated in Australia. ANZTW is incorporated and licensed in Taiwan with limited liability.
ANZTW is not an authorised deposit taking institution within the meaning of the laws of Australia. Deposits or liabilities with ANZTW are not deposits or other liabilities of ANZBGL and ANZBGL is not required to meet the obligations of ANZTW.
Vietnam ANZ Bank (Vietnam) Limited (ANZVL) is a subsidiary of Australia and New Zealand Banking Group Limited (ANZBGL), which is incorporated in Australia. ANZVL is incorporated and licensed in Vietnam with limited liability. ANZVL is not an authorised deposit taking institution within the meaning of the laws of Australia. Deposits or liabilities with ANZVL are not deposits or liabilities of ANZBGL and ANZBGL is not required to meet the obligations of ANZVL.
Thailand ANZ Bank (Thai) Public Company Limited (ANZTH) is a subsidiary of Australia and New Zealand Banking Group Limited (ANZBGL), which is incorporated in Australia. ANZTH is incorporated and licensed in Thailand with limited liability. ANZTH is not an authorised deposit taking institution within the meaning of the laws of Australia. Deposits or liabilities with ANZTH are not deposits or liabilities of ANZBGL and ANZBGL is not required to meet the obligations of ANZTH.
62

anz.com
This document is issued by A
ustralia and New
Zealand Banking Group Lim
ited (AN
Z). ABN
11 005 357 522. Item N
o. 88720 01.2015 W427752