An introduction to GUI programming with Tkinter introduction to GUI programming with Tkinter Erik...
52
An introduction to GUI programming with Tkinter Erik Spence SciNet HPC Consortium 9 September 2014 Erik Spence (SciNet HPC Consortium) Programming with Tkinter 9 September 2014 1 / 49
Transcript of An introduction to GUI programming with Tkinter introduction to GUI programming with Tkinter Erik...

An introduction to GUI programmingwith Tkinter
Erik Spence
SciNet HPC Consortium
9 September 2014
Erik Spence (SciNet HPC Consortium) Programming with Tkinter 9 September 2014 1 / 49

An introduction to Tkinter
The purpose of this class is to introduce you to the basics of GUIprogramming in Python, using Tkinter . There are several GUI interfacesavailable in Python:
Tkinter is the Python interface to the Tk GUI toolkit.
wxPython is an open-source Python interface for wxWindows.
JPython is a Python port for Java which gives Python scripts accessto Java class libraries.
Many others are also available. We will use Tkinter, due to the fact that itis the de facto standard Python GUI library.
Note that I will be using Python 2.7.8 in this class. The examples willwork with Python 3.X, but with slightly different syntax.
Erik Spence (SciNet HPC Consortium) Programming with Tkinter 9 September 2014 2 / 49

What is Tk?If Tkinter is the Python interface to the Tk GUI toolkit, what is Tk?
Tk started life as Tcl extension (1991). It is now written in C.
Tk is a high-level windowing toolkit. You can interface with it directlyusing C or other languages.
Tk interfaces are also available in Python, Ruby, Perl, Tcl, andprobably other languages.
What Tk itself is interfacing with depends on your system:I Mac: Tk provides interfaces to the MacOS windowing system.I Windows: Tk provides interfaces to the Microsoft windowing system.I Other platforms: Tk 8.X attempts to look like the Motif window
manager, but without using Motif libraries. Prior to that it interfacedwith the X window system.
Let it suffice to say that Tk provides a high-level means of accessing yoursystem’s windowing infrastructure.
Erik Spence (SciNet HPC Consortium) Programming with Tkinter 9 September 2014 3 / 49

Running code in today’s classAll the code for today’s class should be launched from the command line,rather than an interactive prompt. Those using Linux or Macs should runpython from a terminal:
ejspence@mycomp ~>ejspence@mycomp ~> python mycode.py
ejspence@mycomp ~>
If you are running Windows, run your code from the cmd.exe prompt:
C:\Users\ejspence>
C:\Users\ejspence> c:\Python27\python.exe mycode.py
C:\Users\ejspence>
Do NOT use IDLE, or any other graphical Python interface. Some ofthese use Tk as a back end, and today’s code may break or confusethe interface.
Erik Spence (SciNet HPC Consortium) Programming with Tkinter 9 September 2014 4 / 49

Our first Tkinter program
The Tkinter module is neededto build Tkinter widgets.
First thing generated is theparent window, upon whicheverything else will be placed.
The Label widget is generated.
Arrange the Label using thepack command.
The ’mainloop’ command isused to launch the window, andstart the event loop.
The window can be moved,resized, and closed.
# firstTkinter.py
from Tkinter import Tk, Label
# Create the window.
top = Tk()
# Create a Label.
l = Label(top, text = "Hello World")
# Arrange the Label.
l.pack()
# Run the parent, and its children.
top.mainloop()
The window has the ’look’ ofwhatever system youare running.
Erik Spence (SciNet HPC Consortium) Programming with Tkinter 9 September 2014 5 / 49
Event-driven programming
The previous example was trivial, but it illustrates steps which are seen inmost Tkinter programs. Some notes:
The mainloop method puts the label on the window, the window onthe screen and enters the program into a Tkinter wait state.
In the wait state, the code waits for user-generated activity, called’events’.
This is called event-driven programming.
The programs are essentially a set of event handlers that shareinformation rather than a single linear control flow.
This style of programming is notably different from what most of us areaccustomed.
Erik Spence (SciNet HPC Consortium) Programming with Tkinter 9 September 2014 6 / 49

Our first Tkinter program, continued
We can tweak the appearance of ourmain window:
Use the ’title’ option to changethe title of the window.
The ’minsize/maxsize’ argumentsset the minimum/maximum sizeof the window.
The ’configure’ argument can beused to set a variety of differentwindow features, such as thebackground colour.
# firstTkinter2.py
from Tkinter import Tk, Label
top = Tk()
l = Label(top, "Hello World")
l.pack()
# Give the window a title.
top.title("My App")
# Change the minimum size.
top.minsize(400, 400)
# Change the background colour.
top.configure(bg = "green")
# Run the widget.
top.mainloop()
Erik Spence (SciNet HPC Consortium) Programming with Tkinter 9 September 2014 7 / 49

Our second Tkinter program
The Tkinter Button commandcreates a button.
The first argument is theparent window.
The ’pack’ command makesthe widget visible, and tells theparent to resize to fit thechildren.
When the button is pushed,the callback function’hello callback’ is called.
If the upper-right-corner ’X’ isnot visible the window is toosmall. Resize the window.
# secondTkinter.py
from Tkinter import Label, Button, Tk
# The ’callback function’. Invoked
# when the button is pressed.
def hello callback(): print "Hello"
top = Tk()
# Make a Label.
l = Label(top, text = "My Button:")
l.pack()
# Make a button.
b = Button(top, text = "Hello",
command = hello callback)
b.pack()
top.mainloop()
Erik Spence (SciNet HPC Consortium) Programming with Tkinter 9 September 2014 8 / 49
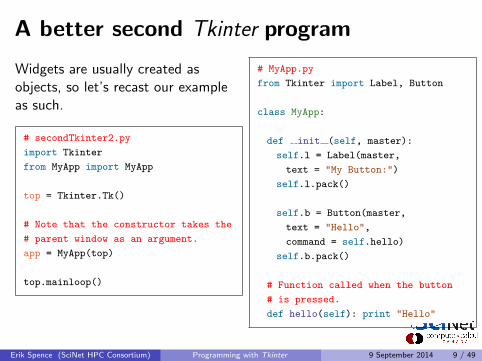
A better second Tkinter program
Widgets are usually created asobjects, so let’s recast our exampleas such.
# secondTkinter2.py
import Tkinter
from MyApp import MyApp
top = Tkinter.Tk()
# Note that the constructor takes the
# parent window as an argument.
app = MyApp(top)
top.mainloop()
# MyApp.py
from Tkinter import Label, Button
class MyApp:
def init (self, master):
self.l = Label(master,
text = "My Button:")
self.l.pack()
self.b = Button(master,
text = "Hello",
command = self.hello)
self.b.pack()
# Function called when the button
# is pressed.
def hello(self): print "Hello"
Erik Spence (SciNet HPC Consortium) Programming with Tkinter 9 September 2014 9 / 49

An even better second Tkinter program
Generally speaking, objects shouldbe invokable on their own.
# MyApp2.py
from Tkinter import Label, Button,
Frame
# Extend the Frame class, to inherit
# the mainloop function.
class MyApp(Frame):
def init (self, master = None):
# Construct the Frame object.
Frame. init (self, master)
self.pack()
# MyApp2.py, continued
self.l = Label(self,
text = "My Button:")
self.l.pack()
self.b = Button(self,
text = "Hello",
command = self.hello)
self.b.pack()
# Function called when the button
# is pressed.
def hello(self): print "Hello"
# Allow the class to run stand-alone.
if name == " main ":
MyApp().mainloop()
Erik Spence (SciNet HPC Consortium) Programming with Tkinter 9 September 2014 10 / 49

Callback functions
’Callback functions’ are invoked by widgets due to an ’event’, such as thepressing of a button. These functions need to be handled carefully:
Notice that we used ”command = self.hello” rather than”command = self.hello()” in the code for the Button in the lastexample.
If you do ”command = func()” in the widget declaration, func() willbe run upon the widget creation, not when it is needed.
But without the brackets there is no way to pass arguments to thefunction! If arguments are needed you must use lambda, or anotherindirection layer.
(Global variables may also work, but are not recommended.)
Functions invoked using lambda are only called at runtime, not whenthe widget is created.
Erik Spence (SciNet HPC Consortium) Programming with Tkinter 9 September 2014 11 / 49
Many different Tkinter widgets are available
The list of widgets which can be added to a Tkinter window is extensive:
Buttons, Checkbuttons, Radiobuttons, Menubuttons
Canvas (for drawing shapes)
Entry (for text field entries)
Message (for displaying text messages to the user)
Labels (text captions, images)
Frames (a container for other widgets)
Scale, Scrollbar
Text (for displaying and editting text)
and others...
Erik Spence (SciNet HPC Consortium) Programming with Tkinter 9 September 2014 12 / 49

Tkinter control variablesMore often then not, we want to tie the value of variables to the specificstates of widgets, or to specific events. This is called tracing.
Native Python variables don’t track events as they occur.
However Tkinter contains wrapper objects for variables which changevalue with changing events. These are called Tkinter variables.
Because they are objects, Tkinter variables are invoked using aconstructor: var = IntVar().
These variables have a number of important functions:
Checkbuttons use a control variable to hold the status of the button.
Radiobuttons use a single control variable to indicate which buttonhas been set.
Control variables hold text strings for several different widgets (Entry,Label, Text).
Erik Spence (SciNet HPC Consortium) Programming with Tkinter 9 September 2014 13 / 49
How to use Tkinter control variables
There are four types of control variables: StringVar (string), IntVar(integers), DoubleVar (floats), BooleanVar (booleans). Each variable has adefault value. How do these variables tend to manifest themselves?
Button: set its ’textvariable’ to a StringVar. When the StringVar ischanged the Button’s text will change.
Checkbutton: set the ’variable’ option to an IntVar. Note that youcan also use other values for a Checkbutton (string, boolean).
Entry: set the ’textvariable’ option to a StringVar.
Radiobutton: the ’variable’ option must be set to either an IntVar orStringVar.
Scale: set the ’variable’ option to any control variable type. Then setthe ’from ’ and ’to’ values to set the range.
Erik Spence (SciNet HPC Consortium) Programming with Tkinter 9 September 2014 14 / 49

Tkinter control variables example# MyCheckbutton.py
from Tkinter import IntVar, BOTH
Checkbutton, Frame
class MyCheckbutton(Frame):
def init (self, master = None):
Frame. init (self, master)
self.pack(expand = True,
fill = BOTH)
self.master.title("")
self.master.minsize(200, 100)
# Object variables.
self.var = IntVar()
# Create a checkbutton.
cb = Checkbutton(self, text =
"Show title", variable =
self.var, command = self.click)
cb.place(x = 50, y = 50)
# MyCheckbutton.py, continued
def click(self):
if (self.var.get() == 1):
self.master.title("Checkbutton")
else: self.master.title("")
if name == " main ":
MyCheckbutton().mainloop()
The IntVar object tracks thecheckbox value (0 or 1).
.get()/.set(’x’) returns/sets thevalue of the control variable.
The ’place’ function locatesthe checkbox in the window,from the upper-rightcorner.
Erik Spence (SciNet HPC Consortium) Programming with Tkinter 9 September 2014 15 / 49

Pop quiz!
Create an application which
Accepts a numeric entry from the user, using the Entry widget.
The Entry widget has a Label widget beside it, which says ”lbs”.
Has a ’Calculate’ button. When the ’Calculate’ button is pressed:I The application calculates the number of kilograms, assuming that the
value given in the Entry widget is numeric, and is in pounds(1 pound = 0.453592 kilograms).
I Prints the value to the command line.
Hint: create a StringVar() for the entry widget. When the button ispressed grab the value and go.
Erik Spence (SciNet HPC Consortium) Programming with Tkinter 9 September 2014 16 / 49
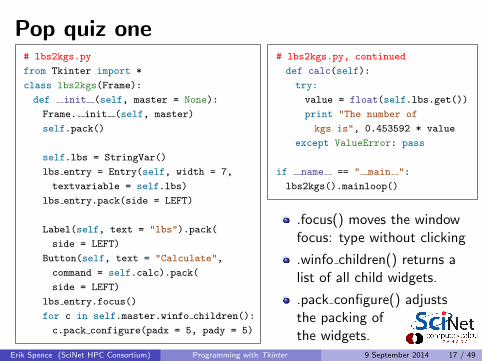
Pop quiz one# lbs2kgs.py
from Tkinter import *
class lbs2kgs(Frame):
def init (self, master = None):
Frame. init (self, master)
self.pack()
self.lbs = StringVar()
lbs entry = Entry(self, width = 7,
textvariable = self.lbs)
lbs entry.pack(side = LEFT)
Label(self, text = "lbs").pack(
side = LEFT)
Button(self, text = "Calculate",
command = self.calc).pack(
side = LEFT)
lbs entry.focus()
for c in self.master.winfo children():
c.pack configure(padx = 5, pady = 5)
# lbs2kgs.py, continued
def calc(self):
try:
value = float(self.lbs.get())
print "The number of
kgs is", 0.453592 * value
except ValueError: pass
if name == " main ":
lbs2kgs().mainloop()
.focus() moves the windowfocus: type without clicking
.winfo children() returns alist of all child widgets.
.pack configure() adjuststhe packing ofthe widgets.
Erik Spence (SciNet HPC Consortium) Programming with Tkinter 9 September 2014 17 / 49

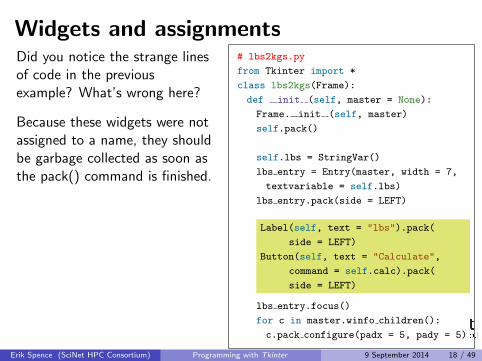
Widgets and assignmentsDid you notice the strange linesof code in the previousexample? What’s wrong here?
Because these widgets were notassigned to a name, they shouldbe garbage collected as soon asthe pack() command is finished.
Tkinter emits Tk calls whenobjects are constructed. Tkinterinternally cross-links widgetobjects into a long-lived treeused to build the display. Assuch the widgets are retained,even if not in the code itself.
# lbs2kgs.py
from Tkinter import *
class lbs2kgs(Frame):
def init (self, master = None):
Frame. init (self, master)
self.pack()
self.lbs = StringVar()
lbs entry = Entry(master, width = 7,
textvariable = self.lbs)
lbs entry.pack(side = LEFT)
Label(self, text = "lbs").pack(
side = LEFT)
Button(self, text = "Calculate",
command = self.calc).pack(
side = LEFT)
lbs entry.focus()
for c in master.winfo children():
c.pack configure(padx = 5, pady = 5)
Erik Spence (SciNet HPC Consortium) Programming with Tkinter 9 September 2014 18 / 49
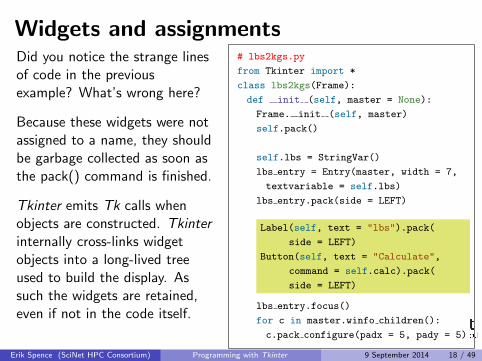

Using images with Tkinter
There are several packages available for using images in Tkinter :
The PhotoImage class can read GIF and PGM/PPM images, as wellas base64-encoded GIF files from strings.
The Python Imaging Library (PIL) contains classes that can handleover 30 file formats. This package is no longer being maintained, andhas been succeeded by the Pillow package.
Important: you must keep a reference to your PhotoImage object (ofeither the PhotoImage of PIL class). This is in direct contrast towhat was shown on the last slide.
If you do not keep a reference the object will be garbage collectedeven if the widget is still operating!
Erik Spence (SciNet HPC Consortium) Programming with Tkinter 9 September 2014 19 / 49

Using images within widgetsTo embed an image in a widget,there are several steps:
First open the image file inquestion.
Then convert it to a Tkinter-compatible image object.
Then embed it into a widget.
Again: you must keep areference to your PhotoImageobject, otherwise the objectwill be garbage collected.
# MyImage.py
from Tkinter import Label, Frame
from PIL import Image, ImageTk
class MyImage(Frame):
def init (self, master = None):
Frame. init (self, master)
self.pack()
img = Image.open("tatras.jpg")
pic = ImageTk.PhotoImage(img)
label = Label(self, image = pic)
# Keep a reference!
# (or don’t and see what happens)
label.image = pic
label.pack()
if name == " main ":
MyImage().mainloop()
Erik Spence (SciNet HPC Consortium) Programming with Tkinter 9 September 2014 20 / 49

Pop quiz two!
Create an application which:
Consists of a single button.
On the button is an image. Start with ”Happy.jpg”.
When the button is pressed the image changes to ”Sad.jpg”.
When the button is pressed again the image changes back to”Happy.jpg”.
And so on.
Hint: use the Button’s ’.configure(image = newimage)’ to change theimage.
Erik Spence (SciNet HPC Consortium) Programming with Tkinter 9 September 2014 21 / 49

Pop quiz two!# switchface.py
from Tkinter import Button, Frame
from PIL.Image import open
from PIL.ImageTk import PhotoImage
class switchface(Frame):
def init (self, master = None):
Frame. init (self, master)
self.pack()
# The pic currently displayed.
self.current = 0
# Open the images.
self.i0 = open("Happy.jpg")
self.i1 = open("Sad.jpg")
# Make them tkinter-compatible.
self.p0 = PhotoImage(self.i0)
self.p1 = PhotoImage(self.i1)
# switchface.py, continued
# Create button, add image.
self.b = Button(master, image =
self.p0, command = self.switch)
self.b.pack()
# Keep a reference.
self.b.image = self.p0
def switch(self):
if (self.current == 0):
self.b.configure(image = self.p1)
self.current = 1
else:
self.b.configure(image = self.p0)
self.current = 0
if name == " main ":
switchface().mainloop()
Erik Spence (SciNet HPC Consortium) Programming with Tkinter 9 September 2014 22 / 49
Arranging your widgets
There are three Geometry Managers in Tkinter for arranging widgets:’grid’, ’pack’ and ’place’. We’ve already used the latter two. Do not try tomix grid and pack in the same window (’container’).
packI Lays widgets out along the sides of a box.I Works best when everything is in one row or one column.I Can be tricky to make more-complicated layouts until you understand
the packing algorithm, which we won’t cover here. It’s best not to try.
gridI Lays out widgets in a grid (along row and column boundaries)I Good for creating tables and other structured types of layouts.
placeI Can place a widget at an absolute position, a given x and yI Can place a widget relatively, such as at the edge of another widget.
Erik Spence (SciNet HPC Consortium) Programming with Tkinter 9 September 2014 23 / 49

GridThe grid Geometry Managerputs widgets in a 2-D table.The ’container’ widget is splitinto rows and columns, andeach cell in the table can holda widget.
The column defaults to 0 if notspecified. The row defaults tothe first unused row in the grid.
# MyGrid.py
from Tkinter import Label, Entry,
Checkbutton, Frame
class MyGrid(Frame):
def init (self, master = None):
Frame. init (self, master)
self.pack()
Label(self, text = "First").grid()
Label(self, text = "Second").grid()
Entry(self).grid(row = 0, column = 1)
Entry(self).grid(row = 1, column = 1)
Checkbutton(self, text = "More?").grid(
columnspan = 2)
if name == " main ":
MyGrid().mainloop()
Erik Spence (SciNet HPC Consortium) Programming with Tkinter 9 September 2014 24 / 49

Grid keywords
Grid takes a number of useful keywords:
column/row: the column or row into which the widget will be placed.I If no column is specified, column = 0 is used.I If no row is specified, the next unused row is used.I If you put two widgets in the same cell, both will be visible, with
potentially odd results.
columnspan/rowspan, number of columns/rows to span, to theright/down.
sticky, defines how to expand the widget if the cell is larger than thewidget.
I Can be any combination of S, N, E, W, NE, NW, SW, SE.I Default is to be centred.
padx/pady, optional horizontal/vertical padding to place around thewidget, within the cell.
Erik Spence (SciNet HPC Consortium) Programming with Tkinter 9 September 2014 25 / 49

Pack, vertical exampleThe pack Geometry Managerlays widgets on the side of abox, in this example on thetop side. Pack can allow thewidget to change size if thewindow is resized.
Using ’fill = X’ will cause thewidget to fill in the horizontaldirection if the window isresized.
# MyPack1.py
from Tkinter import Label, X, Frame, BOTH
class MyPack1(Frame):
def init (self, master = None):
Frame. init (self, master)
self.pack(expand = True, fill = BOTH)
self.master.minsize(100, 70)
Label(self, text = "Red", bg = "red",
fg = "white").pack()
Label(self, text = "Green",
bg = "green").pack(fill = X)
Label(self, text = "Blue", bg = "blue",
fg = "white").pack()
if name == " main ":
MyPack1().mainloop()
Erik Spence (SciNet HPC Consortium) Programming with Tkinter 9 September 2014 26 / 49

Pack, horizontal exampleUse the ’side’ argument toindicate which side of the boxpack should pack against.
Resizing the window will notcause the widgets to grow inthis case, the way that ’fill’does, though they will staycentered on the left side.
# MyPack2.py
from Tkinter import Label, Frame,
BOTH, LEFT
class MyPack2(Frame):
def init (self, master = None):
Frame. init (self, master)
self.pack(expand = True, fill = BOTH)
self.master.minsize(130, 100)
Label(self, text = "Red", bg = "red",
fg = "white").pack(side = LEFT)
Label(self, text = "Green",
bg = "green").pack(side = LEFT)
Label(self, text = "Blue", bg = "blue",
fg = "white").pack(side = LEFT)
if name == " main ":
MyPack2().mainloop()
Erik Spence (SciNet HPC Consortium) Programming with Tkinter 9 September 2014 27 / 49

Pack keywords
Pack takes several useful keywords:
side, which side to pack against. Options are LEFT, TOP (default),RIGHT, BOTTOM. You can mix them within the same parentwidget, but you’ll likely get unexpected results.
fill, specifies whether the widget should occupy all the space providedto it by the parent widget. Options are NONE (default), X(horizontal fill), Y (vertical fill), or BOTH.
expand, specifies whether the widget should be expanded to fill extraspace inside the parent widget. Options are False (default) and True.
Erik Spence (SciNet HPC Consortium) Programming with Tkinter 9 September 2014 28 / 49
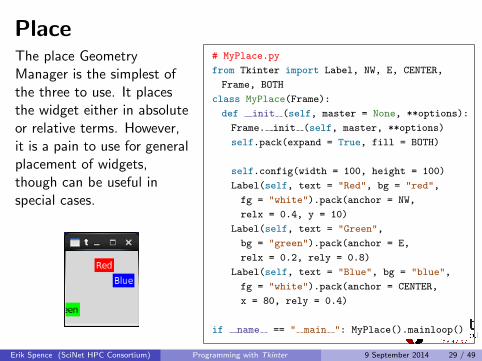
PlaceThe place GeometryManager is the simplest ofthe three to use. It placesthe widget either in absoluteor relative terms. However,it is a pain to use for generalplacement of widgets,though can be useful inspecial cases.
# MyPlace.py
from Tkinter import Label, NW, E, CENTER,
Frame, BOTH
class MyPlace(Frame):
def init (self, master = None, **options):
Frame. init (self, master, **options)
self.pack(expand = True, fill = BOTH)
self.config(width = 100, height = 100)
Label(self, text = "Red", bg = "red",
fg = "white").pack(anchor = NW,
relx = 0.4, y = 10)
Label(self, text = "Green",
bg = "green").pack(anchor = E,
relx = 0.2, rely = 0.8)
Label(self, text = "Blue", bg = "blue",
fg = "white").pack(anchor = CENTER,
x = 80, rely = 0.4)
if name == " main ": MyPlace().mainloop()
Erik Spence (SciNet HPC Consortium) Programming with Tkinter 9 September 2014 29 / 49

Place keywords
Place takes a number of useful keywords:
relx/rely: between 0 and 1, the position of the widget, in the x/ydirection, relative to the parent window in which its embedded.
x/y: in pixels, the absolute position of the widget, in the window inwhich the widget is embedded.
If both relx and x are specified then the relative position is calculatedfirst, and the absolute position is added after.
anchor: the point on the widget that you are actually positioning.Options are the eight points of the compass (E, S, NW, ...) andCENTER.
Erik Spence (SciNet HPC Consortium) Programming with Tkinter 9 September 2014 30 / 49

Centering your widget
The default location ofyour widget depends onthe Window Manager.Generally it’s in theupper-left corner.
Usewinfo screenwidth()to get the windowwidth. Similarly forheight.
The geometrycommand is used toset the location ofthe window’supper-left corner.
# MyCentre.py
from Tkinter import Frame
class MyCentre(Frame):
def init (self, master = None):
Frame. init (self, master)
self.pack()
# Width and height of the window.
w = 200; h = 50
# Upper-left corner of the window.
x = (self.master.winfo screenwidth() - w) / 2
y = (self.master.winfo screenheight() - h) / 2
# Set the height and location.
master.geometry("%dx%d+%d+%d" % (w, h, x, y))
if name == " main ": MyCentre().mainloop()
Erik Spence (SciNet HPC Consortium) Programming with Tkinter 9 September 2014 31 / 49
Pop-up windows
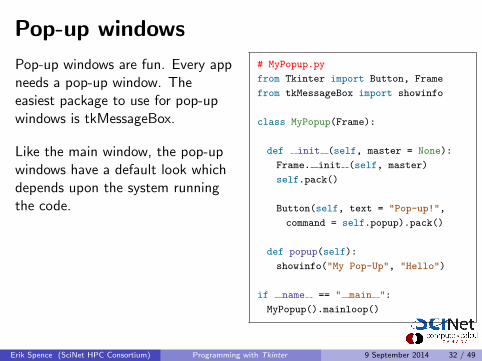
Pop-up windows are fun. Every appneeds a pop-up window. Theeasiest package to use for pop-upwindows is tkMessageBox.
Like the main window, the pop-upwindows have a default look whichdepends upon the system runningthe code.
# MyPopup.py
from Tkinter import Button, Frame
from tkMessageBox import showinfo
class MyPopup(Frame):
def init (self, master = None):
Frame. init (self, master)
self.pack()
Button(self, text = "Pop-up!",
command = self.popup).pack()
def popup(self):
showinfo("My Pop-Up", "Hello")
if name == " main ":
MyPopup().mainloop()
Erik Spence (SciNet HPC Consortium) Programming with Tkinter 9 September 2014 32 / 49

Many pre-made pop-up windows areavailable
If you’re going to use pop-up windows, the defaults that come withtkMessageBox should be sufficient:
single-button pop-ups:I “Ok”: showinfo, showwarning, showerror
double-button pop-ups:I “Yes-No”: askquestion, returns the strings “yes”, “no”I “Yes-No”: askyesno, returns True/FalseI “Ok-Cancel”: askokcancel, returns True/FalseI “Retry-Cancel”: askretrycancel, returns True/False
These functions all have the same syntax:tkMessageBox.function(title, message [, options]).
Erik Spence (SciNet HPC Consortium) Programming with Tkinter 9 September 2014 33 / 49

Toplevel windowsSometimes the pre-madepop-up windows don’t meetyour needs, since these arecanned pop-ups. For these casesone uses Toplevel windows.
Toplevel windows behave likemain windows, but are actuallychildren of whichever windowspawned them.
# MyToplevel.py
from Tkinter import Button, Frame,
Toplevel
class MyToplevel(Frame):
def init (self, master = None):
Frame. init (self, master)
self.pack()
Button(self, text = "A new window!",
command = self.new window).pack()
# A new functional window.
def new window(self):
top = Toplevel(master = self)
Button(top, text = "Quit",
command = top.quit).pack()
if name == " main ":
MyToplevel().mainloop()
Erik Spence (SciNet HPC Consortium) Programming with Tkinter 9 September 2014 34 / 49
File manager windows# MyFile.py
from Tkinter import Button, Frame
from tkFileDialog import
askopenfilename
class MyFile(Frame):
def init (self, master = None):
Frame. init (self, master)
self.pack()
Button(self, text = "Get a file!",
command = self.getfile).pack()
def getfile(self):
filename = askopenfilename(
parent = self,
title = "Please select a file")
if (len(filename) > 0):
print "You chose %s" % filename
# MyFile.py, continued
if name == " main ":
MyFile().mainloop()
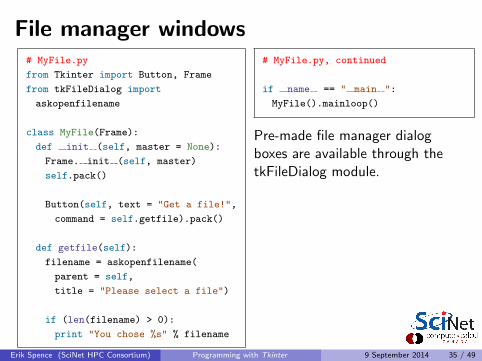
Pre-made file manager dialogboxes are available through thetkFileDialog module.
Erik Spence (SciNet HPC Consortium) Programming with Tkinter 9 September 2014 35 / 49
Quitting cleanly
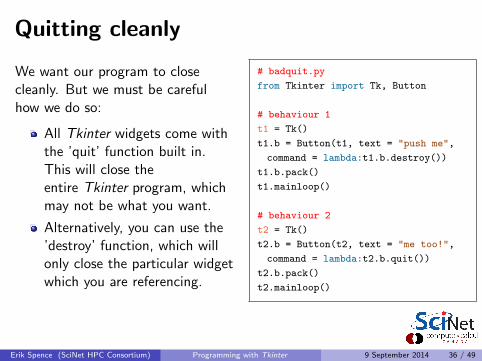
We want our program to closecleanly. But we must be carefulhow we do so:
All Tkinter widgets come withthe ’quit’ function built in.This will close theentire Tkinter program, whichmay not be what you want.
Alternatively, you can use the’destroy’ function, which willonly close the particular widgetwhich you are referencing.
The lambda command needs to beused in this case because thecallback command which is beingreferenced is self-referential.
# badquit.py
from Tkinter import Tk, Button
# behaviour 1
t1 = Tk()
t1.b = Button(t1, text = "push me",
command = lambda:t1.b.destroy())
t1.b.pack()
t1.mainloop()
# behaviour 2
t2 = Tk()
t2.b = Button(t2, text = "me too!",
command = lambda:t2.b.quit())
t2.b.pack()
t2.mainloop()
Erik Spence (SciNet HPC Consortium) Programming with Tkinter 9 September 2014 36 / 49

Quitting cleanly
We want our program to closecleanly. But we must be carefulhow we do so:
All Tkinter widgets come withthe ’quit’ function built in.This will close theentire Tkinter program, whichmay not be what you want.
Alternatively, you can use the’destroy’ function, which willonly close the particular widgetwhich you are referencing.
The lambda command needs to beused in this case because thecallback command which is beingreferenced is self-referential.
# badquit.py
from Tkinter import Tk, Button
# behaviour 1
t1 = Tk()
t1.b = Button(t1, text = "push me",
command = lambda:t1.b.destroy())
t1.b.pack()
t1.mainloop()
# behaviour 2
t2 = Tk()
t2.b = Button(t2, text = "me too!",
command = lambda:t2.b.quit())
t2.b.pack()
t2.mainloop()
Erik Spence (SciNet HPC Consortium) Programming with Tkinter 9 September 2014 36 / 49

A ’Quit’ button classLet’s create a class that we can usein future widgets.
# MyQuitter.py
from Tkinter import Button, LEFT, YES,
BOTH, Frame
from tkMessageBox import askokcancel
# Extends the Frame class.
class MyQuitter(Frame):
def init (self, master = None):
Frame. init (self, master)
self.pack()
b = Button(self, text = "Quit",
command = self.myquit)
b.pack(side = LEFT, expand = YES,
fill = BOTH)
# MyQuitter.py, continued
def myquit(self):
if askokcancel("Quit",
"Do you really wish to quit?"):
Frame.quit(self)
The askokcancel functionreturns True if ’OK’ is pressed.
The ’LEFT’ argument indicatesthe position of the button.
The second ’pack’ is invokedafter the Button is created,and so can go inthe same line.
Erik Spence (SciNet HPC Consortium) Programming with Tkinter 9 September 2014 37 / 49

Capturing destroy events
Tkinter lets you manipulate’protocol handlers’
These handle the interactionbetween the application andthe window manager
The most-used way to do thisis re-assigning theWM DELETE WINDOWprotocol (invoked by pressingthe ’X’ in the upper-rightcorner).
# MyCapture.py
from Tkinter import Frame
from MyQuitter import MyQuitter
class MyCapture(Frame):
def init (self, master = None):
Frame. init (self, master)
self.pack()
q = MyQuitter(self)
q.pack()
self.master.protocol(
"WM DELETE WINDOW", q.myquit)
if name == " main ":
MyCapture().mainloop()
Erik Spence (SciNet HPC Consortium) Programming with Tkinter 9 September 2014 38 / 49

Notes on code re-usability
Modular programming is always to be encouraged, and GUI programmingis no exception.
Throughout this class we have crafted our examples such that theyare classes that can be embedded in other widgets.
Custom GUI classes can be written as extensions of existing classes,the most common choice being Frame.
Using widgets that are extensions of existing classes allows uniformand consistent modification of the look-and-feel of your widgets.
Erik Spence (SciNet HPC Consortium) Programming with Tkinter 9 September 2014 39 / 49

Code re-usability example
Because we set up our previouscode examples as classes, we canjust drop them into other widgets.
# ABunchOfWidgets.py
from Tkinter import Frame, RAISED
from lbs2kgs import lbs2kgs
from MyPopup import MyPopup
from MyPlace import MyPlace
class ABunchOfWidgets(Frame):
def init (self, master = None):
Frame. init (self, master)
self.pack()
lbs2kgs(self).pack()
MyPopup(self).pack()
MyPlace(self, borderwidth = 2,
relief = RAISED).pack()
if name == " main ":
ABunchOfWidgets().mainloop()
Erik Spence (SciNet HPC Consortium) Programming with Tkinter 9 September 2014 40 / 49

Drop-down menus# MyMenus.py
from Tkinter import Menu, Frame
class MyMenus(Frame):
def init (self, master = None):
Frame. init (self, master)
self.pack()
self.master.minsize(100,100)
# Create a menu instance,
# the menu does not need packing.
self.mbar = Menu(self)
# Attach to the root window.
self.master.config(menu =
self.mbar)
# Create a new menu instance...
self.filemenu = Menu(self.mbar,
tearoff = 0)
# MyMenus.py, continued
# ...and stick into the menubar.
self.mbar.add cascade(label =
"File", menu = self.filemenu)
# Add entries to filemenu.
self.filemenu.add command(label =
"New", command = self.new call)
self.filemenu.add command(label =
"Open", command = self.o call)
# The callback functions.
def new call(self): print "New call"
def o call(self): print "o call"
if name == " main ":
MyMenus().mainloop()
Erik Spence (SciNet HPC Consortium) Programming with Tkinter 9 September 2014 41 / 49
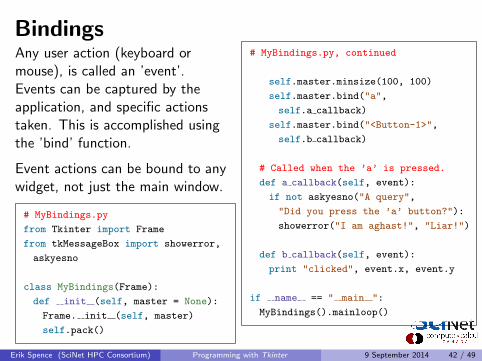
BindingsAny user action (keyboard ormouse), is called an ’event’.Events can be captured by theapplication, and specific actionstaken. This is accomplished usingthe ’bind’ function.
Event actions can be bound to anywidget, not just the main window.
# MyBindings.py
from Tkinter import Frame
from tkMessageBox import showerror,
askyesno
class MyBindings(Frame):
def init (self, master = None):
Frame. init (self, master)
self.pack()
# MyBindings.py, continued
self.master.minsize(100, 100)
self.master.bind("a",
self.a callback)
self.master.bind("<Button-1>",
self.b callback)
# Called when the ’a’ is pressed.
def a callback(self, event):
if not askyesno("A query",
"Did you press the ’a’ button?"):
showerror("I am aghast!", "Liar!")
def b callback(self, event):
print "clicked", event.x, event.y
if name == " main ":
MyBindings().mainloop()
Erik Spence (SciNet HPC Consortium) Programming with Tkinter 9 September 2014 42 / 49
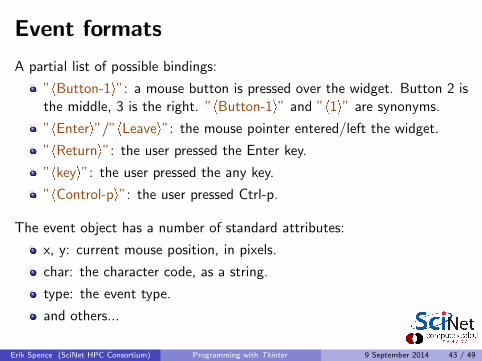
Event formats
A partial list of possible bindings:
”<Button-1>”: a mouse button is pressed over the widget. Button 2 isthe middle, 3 is the right. ”<Button-1>” and ”<1>” are synonyms.
”<Enter>”/”<Leave>”: the mouse pointer entered/left the widget.
”<Return>”: the user pressed the Enter key.
”<key>”: the user pressed the any key.
”<Control-p>”: the user pressed Ctrl-p.
The event object has a number of standard attributes:
x, y: current mouse position, in pixels.
char: the character code, as a string.
type: the event type.
and others...
Erik Spence (SciNet HPC Consortium) Programming with Tkinter 9 September 2014 43 / 49

Bindings pop quiz!
Create an application which
Has a label at the top of the frame which says ”Are you an idiot?”
Has a button below the label which contains the text ”No”.
Moves to a random location on the screen every time you try to pressthe ”No” button.
Don’t bother making this one a class, since that doesn’t really makesense.
Hints:
Use the ”Enter” binding to bind the mouse pointer.
When the mouse enters the ”No” button, move the window (use therandom.random() function to get a random number).
master.winfo screenwidth() and height might be useful.
Erik Spence (SciNet HPC Consortium) Programming with Tkinter 9 September 2014 44 / 49

Bindings pop quiz!
# idiot.py
from Tkinter import Tk, Label, Button
from random import random
def moveme(event):
x = xsize * random()
y = ysize * random()
# Move the window.
master.geometry( "%dx%d+%d+%d" %
(w, h, x, y))
master = Tk()
xsize = master.winfo screenwidth()
ysize = master.winfo screenheight()
w = 200
h = 50
# idiot.py, continued
master.minsize(w, h)
master.title("Let me check")
Label(master,
text = "Are you an idiot?").pack()
b = Button(master, text = "No!")
b.pack()
b.bind("<Enter>", moveme)
master.mainloop()
Erik Spence (SciNet HPC Consortium) Programming with Tkinter 9 September 2014 45 / 49
Threads and GUIs
In general, we recommend against using Python’s threading capabilities:
Python’s Global Interpreter Lock prevents more than one thread fromrunning at a given time.
Consequently there is no increase in computational performance.
However, these concerns do not apply when dealing with GUIs, sincecomputational performance is not usually at issue. There are some detailsworth noting:
The main event loop runs in a single thread.
If a callback function is invoked, it runs in the same thread.
If the function takes a long time to complete, you will notice:I the windows will not update (resize, redraw, minimize)I the windows will not respond to new events.
Threads can be useful to fix this problem.
Erik Spence (SciNet HPC Consortium) Programming with Tkinter 9 September 2014 46 / 49
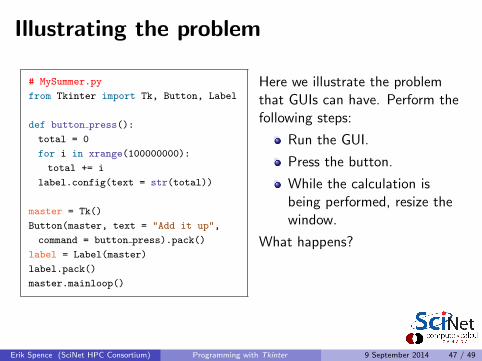
Illustrating the problem
# MySummer.py
from Tkinter import Tk, Button, Label
def button press():
total = 0
for i in xrange(100000000):
total += i
label.config(text = str(total))
master = Tk()
Button(master, text = "Add it up",
command = button press).pack()
label = Label(master)
label.pack()
master.mainloop()
Here we illustrate the problemthat GUIs can have. Perform thefollowing steps:
Run the GUI.
Press the button.
While the calculation isbeing performed, resize thewindow.
What happens?
Erik Spence (SciNet HPC Consortium) Programming with Tkinter 9 September 2014 47 / 49
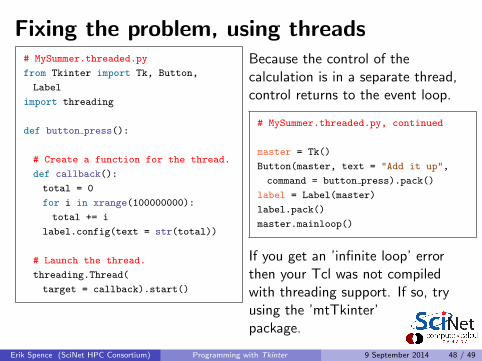
Fixing the problem, using threads# MySummer.threaded.py
from Tkinter import Tk, Button,
Label
import threading
def button press():
# Create a function for the thread.
def callback():
total = 0
for i in xrange(100000000):
total += i
label.config(text = str(total))
# Launch the thread.
threading.Thread(
target = callback).start()
Because the control of thecalculation is in a separate thread,control returns to the event loop.
# MySummer.threaded.py, continued
master = Tk()
Button(master, text = "Add it up",
command = button press).pack()
label = Label(master)
label.pack()
master.mainloop()
If you get an ’infinite loop’ errorthen your Tcl was not compiledwith threading support. If so, tryusing the ’mtTkinter’package.
Erik Spence (SciNet HPC Consortium) Programming with Tkinter 9 September 2014 48 / 49

Enough to get started
Using the material here, you should have enough to get started. Moreinformation can be found on the web. A few good websites are:
http://infohost.nmt.edu/tcc/help/pubs/tkinter/web/index.html
http://www.effbot.org/tkinterbook/tkinter-index.htm
http://cs.mcgill.ca/ hv/classes/MS/TkinterPres
http://www.python-course.eu/python tkinter.php
Erik Spence (SciNet HPC Consortium) Programming with Tkinter 9 September 2014 49 / 49


![Interface graphique · 2018. 3. 12. · Module Tkinter (1) import Tkinter as tk Unexemple(enIPython): In [1]: import Tkinter as tk In [2]: racine = tk.Tk() Figure 1: ZhentaoLi Interfacegraphique](https://static.fdocuments.in/doc/165x107/613aaa570051793c8c012ba2/interface-2018-3-12-module-tkinter-1-import-tkinter-as-tk-unexempleenipython.jpg)