AmpliTube 3 User Manual
326
User Manual AMP & FX MODELING SOFTWARE
description
Amplitube 3, User Manual
Transcript of AmpliTube 3 User Manual

User Manual
A M P & F X M O D E L I N G S O F T W A R E


AmpliTube 3
1
P L E A S E N O T E
AmpliTube®,AmpliTube®Metal™,AmpliTube®X-GEAR™,SVX™,StompIO™,StealthPedal™,StealthPlug™,SpeedTrainer™,DSM™,VRM™,
aretrademarksorregisteredtrademarkspropertyofIKMultimediaProductionSrl.Allotherproductnamesandimages,trademarksandartists
namesarethepropertyoftheirrespectiveowners,whichareinnowayassociatedoraffiliatedwithIKMultimedia.Productnamesareusedsolely
forthepurposeofidentifyingthespecificproductsthatwerestudiedduringIKMultimedia’ssoundmodeldevelopmentandfordescribingcertaintypesoftonesproducedwithIKMultimedia’sdigitalmodelingtechnology.Useof
thesenamesdoesnotimplyanycooperationorendorsement.

2
AmpliTube 3
I - Contents 3
AmpliTube 3
Table of Contents
I Contents 3
II Interface 12
III License Agreement 14
Chapter 1 Overview 17 1.1 Introduction 17 1.2 What’snewinAmpliTube3? 17 1.3 Plug-inArchitecture 19 1.4 UsingtheInterface 22 1.4.1 StandaloneInterface 22 1.4.2 Plug-inInterface 25
Chapter 2 Getting started 27 2.1 Registration/Authorization 27 2.2 StandaloneMode 27 2.2.1 LaunchAmpliTube3Standalone 28 2.2.2 AudioConfiguration 28 2.2.2.1 Windows® 28 2.2.2.2 Macintosh® 29 2.2.3 PlugYourGuitar 30 2.2.3.1 ConnectingYourGuitar/Bass 30 2.2.3.2 AdjustingYourLevels 30 2.2.3.3 QualityModeOptions 31 2.2.3.4 Tuning 32 2.2.4 Hands-onExamples 32 2.2.4.1 LoadingaPreset 32 2.2.4.2 SelectingAmps 33 2.2.4.3 ChoosingtheCabinet 33 2.2.4.4 AddingStompandRackEffects 34 2.2.5 FourTrackAudioPlayer/RecorderwithSpeedTrainer 35 2.2.5.1 ImportanAudioFile 35 2.2.5.2 WaveformDisplay 37 2.2.5.3 UsingtheTransportBar 38 2.2.5.4 TrackControlsDescription 39 2.2.5.5 PlaybackSpeed 41 2.2.5.6 Recording 42 2.2.5.7 AddingEffects 44 2.2.5.8 ManagingYourResources 46 2.2.5.9 MasterVolume 47 2.2.5.10 Export 47 2.2.5.11 UsingtheMetronome 48 2.2.5.12 SavingandLoadingYourAmpliTube3ProjectFiles 49 2.2.5.13 ProjectSampleRate 50 2.2.6 StatusBar 50 2.3 Plug-InMode 50

4
AmpliTube 3
I - Contents
Chapter 3 Input/Output Bar 51 3.1 Input/OutputBar 51 3.2 InputSection 51 3.2.1 InputKnob 51 3.2.2 InputLevelMeter 51 3.3 IKControllerSelector 51 3.3.1 UsingtheStompIO/StealthPedaltoControlAmpliTube3 52 3.4 SelectedModule 52 3.4.1 Pan 53 3.4.2 Volume 53 3.4.3 Phase 53 3.4.4 Mix 54 3.4.5 ImplementationTable 54 3.5 UsingNoiseGate 54 3.5.1 Threshold 54 3.5.2 Release 55 3.5.3 Depth 55 3.6 TunerDisplay 55 3.7 SelectedParameterDisplay 56 3.8 MasterSection 56 3.8.1 MasterKnob 56 3.8.2 OutputLevelMeter 56 3.9 ProgramInformation,PreferencesandMore 57 3.9.1 Lock 57 3.9.2 Preferences(Prefs) 58 3.9.3 Information(Info) 62 3.9.4 UserArea 62 3.10 MIDIControl,Automation,andControllers 63 3.10.1 MIDI 63 3.10.2 Automation(Auto) 63 3.10.3 Control(Ctrl) 63
Chapter 4 Module/Rig Selector 65 4.1 DualRigSignalPath 65 4.1.1 SignalPathPresets 65 4.1.2 StereoIN 66 4.2 SelectingModules 66
Chapter 5 Presets 69 5.1 PresetSelector 69 5.2 PresetBrowser 70 5.2.1 SearchingCapabilities 72 5.2.2 FilterOptions 74 5.3 WorkingwithPresets 75 5.3.1 LoadingPresets 75 5.3.2 SavingPresets 76 5.3.3 DeletingPresets 78 5.4 ModelPresets 78 5.4.1 SavingaModelPreset 78 5.4.2 LoadingaModelPreset 80

I - Contents 5
AmpliTube 3
5.4.3 CopyandPasteSettings 80 5.5 PresetsandProjectsSavingOptions 80 5.6 BPM 81 5.6.1 Host/Global 81 5.6.2 Preset 82 5.6.3 TAP 82
Chapter 6 Tuner Module 83 6.1 On/OffSwitch 83 6.2 Mute 84 6.3 Tune 84 6.4 GraphicalTunerInterface 84 6.5 TuneDisplay 85 6.6 CentsDisplay 85
Chapter 7 Stomp Module (Stomp Effects) 87 7.1 SelectionandNavigationOptions 87 7.2 Drag&Dropfeature 89 7.3 StompModels 90 7.3.1 Delay 90 7.3.1.1 Delay 90 7.3.1.2 EchoMan 91 7.3.1.3 TapDelay 92 7.3.2 Distortion 93 7.3.2.1 BigPig 93 7.3.2.2 Crusher 94 7.3.2.3 DiodeOverdrive 95 7.3.2.4 Distortion 96 7.3.2.5 Feedback 97 7.3.2.6 MetalDistortion 98 7.3.2.7 MetalDistortion2 99 7.3.2.8 Overdrive 100 7.3.2.9 OverScream 101 7.3.2.10 PROdrive 102 7.3.2.11 TheAmbass’dor 103 7.3.3 Dynamics 104 7.3.3.1 Compressor 104 7.3.3.2 Dcomp 105 7.3.4 EQ 106 7.3.4.1 7BandGraphic 106 7.3.4.2 10BandGraphic 107 7.3.5 Filter 108 7.3.5.1 EnvelopeFilter 108 7.3.5.2 LFOFilter 109 7.3.5.3 Rezo 110 7.3.5.4 StepFilter 111 7.3.5.5 Wah 112 7.3.5.6 Wah10 113 7.3.5.7 Wah46 114 7.3.5.8 Wah47 115

I - Contents6
AmpliTube 3
7.3.6 Fuzz 116 7.3.6.1 ClassFuzz 116 7.3.6.2 FuzzAge 117 7.3.6.3 FuzzAge2 118 7.3.6.4 FuzzOne 119 7.3.6.5 Octa-V 120 7.3.6.6 RightFuzz 121 7.3.6.7 XSFuzz 122 7.3.7 Modulation 123 7.3.7.1 AnalogFlanger 123 7.3.7.2 Chorus 124 7.3.7.3 Chorus-1 125 7.3.7.4 ElectricFlanger 126 7.3.7.5 Flanger 127 7.3.7.6 MetalFlanger 128 7.3.7.7 OptoTremolo 129 7.3.7.8 PhazeNine 130 7.3.7.9 Phazer10 131 7.3.7.10 SmallPhazer 132 7.3.7.11 Uni-V 133 7.3.8 Pitch 134 7.3.8.1 Harmonator 134 7.3.8.2 Octav 135 7.3.8.3 PitchShifter 136 7.3.8.4 Wharmonator 137 7.3.9 Other 138 7.3.9.1 Volume 138 7.3.9.2 StepSlicer 139 7.3.9.3 Swell 140 7.4 StompModels(Table) 141
Chapter 8 Amp Module (Amp Head) 145 8.1 Introduction 145 8.2 On/Bypass 146 8.3 EQMatch 146 8.4 AmpMatch 147 8.5 AmpModelTypesandComponents 147 8.5.1 PreModel 148 8.5.2 EQModel 148 8.5.3 AmpModel 149 8.6 PreAmpModels 150 8.6.1 Clean 150 8.6.1.1 AmericanCleanMKIII 150 8.6.1.2 AmericanTubeClean1 152 8.6.1.3 AmericanTubeClean2 153 8.6.1.4 AmericanVintageB 154 8.6.1.5 AmericanVintageD 155 8.6.1.6 AmericanVintageT 156 8.6.1.7 CustomSolidStateClean 157 8.6.1.8 JazzAmp120 158
7
AmpliTube 3
I - Contents
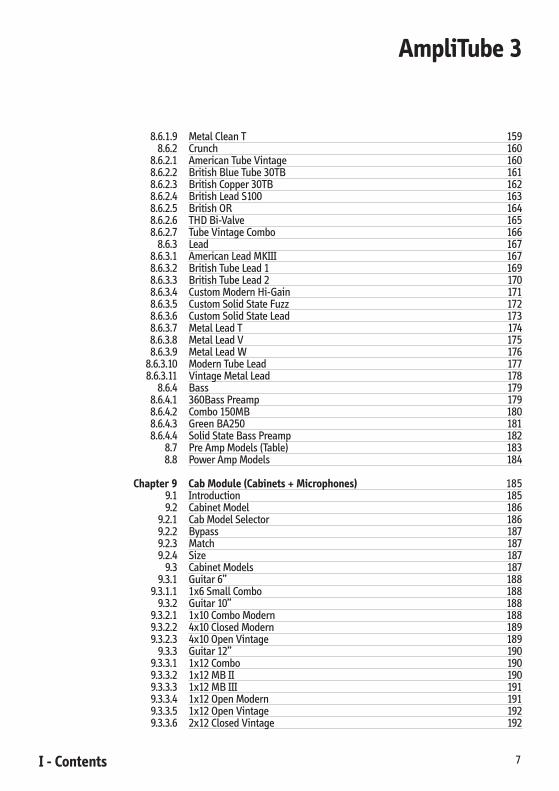
8.6.1.9 MetalCleanT 159 8.6.2 Crunch 160 8.6.2.1 AmericanTubeVintage 160 8.6.2.2 BritishBlueTube30TB 161 8.6.2.3 BritishCopper30TB 162 8.6.2.4 BritishLeadS100 163 8.6.2.5 BritishOR 164 8.6.2.6 THDBi-Valve 165 8.6.2.7 TubeVintageCombo 166 8.6.3 Lead 167 8.6.3.1 AmericanLeadMKIII 167 8.6.3.2 BritishTubeLead1 169 8.6.3.3 BritishTubeLead2 170 8.6.3.4 CustomModernHi-Gain 171 8.6.3.5 CustomSolidStateFuzz 172 8.6.3.6 CustomSolidStateLead 173 8.6.3.7 MetalLeadT 174 8.6.3.8 MetalLeadV 175 8.6.3.9 MetalLeadW 176 8.6.3.10 ModernTubeLead 177 8.6.3.11 VintageMetalLead 178 8.6.4 Bass 179 8.6.4.1 360BassPreamp 179 8.6.4.2 Combo150MB 180 8.6.4.3 GreenBA250 181 8.6.4.4 SolidStateBassPreamp 182 8.7 PreAmpModels(Table) 183 8.8 PowerAmpModels 184
Chapter 9 Cab Module (Cabinets + Microphones) 185 9.1 Introduction 185 9.2 CabinetModel 186 9.2.1 CabModelSelector 186 9.2.2 Bypass 187 9.2.3 Match 187 9.2.4 Size 187 9.3 CabinetModels 187 9.3.1 Guitar6” 188 9.3.1.1 1x6SmallCombo 188 9.3.2 Guitar10” 188 9.3.2.1 1x10ComboModern 188 9.3.2.2 4x10ClosedModern 189 9.3.2.3 4x10OpenVintage 189 9.3.3 Guitar12” 190 9.3.3.1 1x12Combo 190 9.3.3.2 1x12MBII 190 9.3.3.3 1x12MBIII 191 9.3.3.4 1x12OpenModern 191 9.3.3.5 1x12OpenVintage 192 9.3.3.6 2x12ClosedVintage 192
I - Contents8
AmpliTube 3
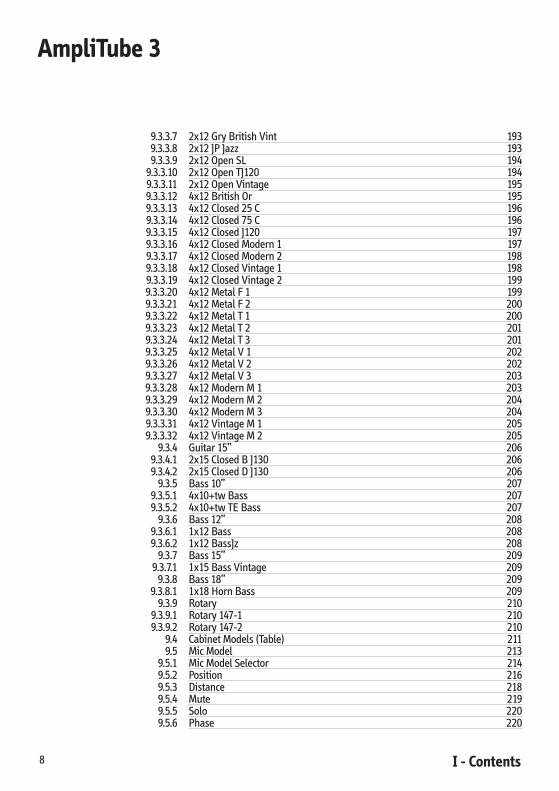
9.3.3.7 2x12GryBritishVint 193 9.3.3.8 2x12JPJazz 193 9.3.3.9 2x12OpenSL 194 9.3.3.10 2x12OpenTJ120 194 9.3.3.11 2x12OpenVintage 195 9.3.3.12 4x12BritishOr 195 9.3.3.13 4x12Closed25C 196 9.3.3.14 4x12Closed75C 196 9.3.3.15 4x12ClosedJ120 197 9.3.3.16 4x12ClosedModern1 197 9.3.3.17 4x12ClosedModern2 198 9.3.3.18 4x12ClosedVintage1 198 9.3.3.19 4x12ClosedVintage2 199 9.3.3.20 4x12MetalF1 199 9.3.3.21 4x12MetalF2 200 9.3.3.22 4x12MetalT1 200 9.3.3.23 4x12MetalT2 201 9.3.3.24 4x12MetalT3 201 9.3.3.25 4x12MetalV1 202 9.3.3.26 4x12MetalV2 202 9.3.3.27 4x12MetalV3 203 9.3.3.28 4x12ModernM1 203 9.3.3.29 4x12ModernM2 204 9.3.3.30 4x12ModernM3 204 9.3.3.31 4x12VintageM1 205 9.3.3.32 4x12VintageM2 205 9.3.4 Guitar15” 206 9.3.4.1 2x15ClosedBJ130 206 9.3.4.2 2x15ClosedDJ130 206 9.3.5 Bass10” 207 9.3.5.1 4x10+twBass 207 9.3.5.2 4x10+twTEBass 207 9.3.6 Bass12” 208 9.3.6.1 1x12Bass 208 9.3.6.2 1x12BassJz 208 9.3.7 Bass15” 209 9.3.7.1 1x15BassVintage 209 9.3.8 Bass18” 209 9.3.8.1 1x18HornBass 209 9.3.9 Rotary 210 9.3.9.1 Rotary147-1 210 9.3.9.2 Rotary147-2 210 9.4 CabinetModels(Table) 211 9.5 MicModel 213 9.5.1 MicModelSelector 214 9.5.2 Position 216 9.5.3 Distance 218 9.5.4 Mute 219 9.5.5 Solo 220 9.5.6 Phase 220

I - Contents 9
AmpliTube 3
9.5.7 Pan 221 9.5.8 MicBlend 221 9.6 MicrophoneModels 222 9.6.1 Dynamic 222 9.6.1.1 Dynamic57 222 9.6.1.2 Dynamic20 223 9.6.1.3 VintageDynamic20 224 9.6.1.4 Dynamic421 225 9.6.1.5 Dynamic441 226 9.6.1.6 Dynamic609 227 9.6.2 Condenser 228 9.6.2.1 Condenser12 228 9.6.2.2 Condenser67 229 9.6.2.3 Condenser84 230 9.6.2.4 Condenser87 231 9.6.2.5 Condenser170 232 9.6.2.6 Condenser414 233 9.6.3 Ribbon 234 9.6.3.1 Ribbon121 234 9.6.3.2 Ribbon160 235 9.6.3.3 Velo-8 236 9.7 MicrophoneModels(Table) 237 9.8 Room 238 9.8.1 RoomTypeSelector 239 9.8.2 Mute 240 9.8.3 Solo 240 9.8.4 Phase 241 9.8.5 RoomMicsControls 242 9.8.6 RoomTypePresets 244 9.9 RotarySpeaker 244 9.9.1 Introduction 245 9.9.2 RotarySpeakerModels 245 9.9.3 Setup 245 9.9.4 Width 246 9.9.5 Balance 247 9.9.6 Speed 248
Chapter 10 Rack FX Module (Post Effects) 249 10.1 Introduction 249 10.2 On/Bypass 249 10.3 RackFXSelector 250 10.4 DragandDropFeature 250 10.5 RackFXModels 251 10.5.1 Delay&Reverb 251 10.5.1.1 DigitalDelay 251 10.5.1.2 DigitalReverb 252 10.5.1.3 TapDelay 253 10.5.2 EQ&Dynamics 254 10.5.2.1 GraphicEQ 254 10.5.2.2 ParametricEQ 255

I - Contents10
AmpliTube 3
10.5.2.3 TubeCompressor 256 10.5.3 Filter 257 10.5.3.1 Rezo 257 10.5.3.2 StepFilter 258 10.5.4 Modulation 259 10.5.4.1 AnalogChorus 259 10.5.4.2 DigitalChorus 260 10.5.4.3 DigitalFlanger 261 10.5.4.4 RotarySpeaker 262 10.5.5 Pitch 263 10.5.5.1 Harmonator 263 10.5.5.2 PitchShifter 264 10.5.6 Other 265 10.5.6.1 StepSlicer 265 10.5.6.2 StereoEnhancer 266 10.5.6.3 Swell 266
Chapter 11 AmpliTube 3 Models 267
Chapter 12 Expanding AmpliTube 3 models 275 12.1 AddingMorePackagestoAmpliTube3 275 12.1.1 AmpliTubeFender™ 275 12.1.2 Ampeg®SVX 277
Chapter 13 Automation 279 13.1 AssignAutomationwithineachModule(Stomp,Amp,CabandRack) 279 13.2 ManageAutomationAssignmentsviatheAutomationPanel 280 13.2.1 Plug-inParameters 281 13.2.2 DAWAutomation 282 13.2.3 AssignmentProcedure 284 13.2.4 AssignmentSaveandRecall 288
Chapter 14 MIDI 289 14.1 Introduction 289 14.2 MIDIConfiguration 290 14.3 AssigningControllers 291 14.3.1 DirectMIDIControlsAssignment(Stomp,Amp,Cab,andRackParameters) 291 14.3.2 ManageMIDIParametersAssignationviatheMIDIControlPanel 292 14.4 AdditionalParametersonMIDIControlWindow 297
Chapter 15 Control 303 15.1 Introduction 303 15.2 StealthPedalControl 303 15.2.1 AssigningContinuousControls 305 15.2.2 AssigningSwitchControls 306 15.2.3 SavingAssignments 309 15.2.4 SwitchingPresets 309 15.2.5 PedalAdjust 310 15.2.6 StealthPedalLEDs 312 15.2.7 Tuningindication 313

I - Contents 11
AmpliTube 3
Chapter 16 Troubleshooting 315
Chapter 17 Support 319 17.1 UserArea 319
Appendix IK Technologies 321 DSM™Technology 321 VRM™Technology 321 BlockDiagram 322

II - Interface12
AmpliTube 3
Module Interface.Choosefromover160guitar&bassgearmodels.
Input, Output Interface.
Hundreds of different guitar amp and effects presets readytogo.
Includes Four Track Audio Player/Recorder with Speed Trainer for playing along with your favorite
recordings.

II - Interface 13
AmpliTube 3
Five Modules:Tuner,StompPedalboard,Amp-Heads,Mic’dCabinets,andRackEffects.
Two Guitar Rigs.ExperiencetheflexibleroutingsystemprovidedbyDualRigtechnology.
Standalone and VST/AU/RTAS plug-in for all popular DAWs.

III - License Agreement14
AmpliTube 3
License AgreementEND-USER LICENSE AGREEMENT FOR IK MULTIMEDIA PRODUCT
Pleasereadthisdocumentcarefullybeforebreakingthesealonthemediapackage.Thisagreementlicensestheenclosedsoftwaretoyouandcontainswarrantyandliabilitydisclaimers.
Bybreakingthesealonthemediaenvelope,youareconfirmingtohavetakennoticeoftermsandconditionsofthisagreementandyouacknowledgeyouracceptanceofthesoftwareaswellasyouracceptanceofthetermsofthisagreement.Ifyoudonotwishtodoso,donotbreaktheseal.Instead,promptlyreturntheentirepackage,includingtheunopenedmediapackage,tothedealerfromwhomyouhaveobtainedit,forafullrefund.
1)DEFINITIONS
“EULA”meansthisenduserlicenseagreement
“IKMultimediaProduct”meansthesoftwareprogramincludedintheenclosedpackage,andallrelatedupdatessuppliedbyIKMultimedia.
“IKMultimediaProduct”meansthesoftwareprogramandhardware(ifany)includedintheenclosedpackage,therelateddocumentation,models,multi-mediacontent(suchasanimation,soundandgraphics)andallrelatedupdatessuppliedbyIKMultimedia.
“Notforresale(NFR)Version”meansaversionofIKMultimediaProduct,soidentified,isintendedforreviewandevaluationpurposes,only.
2)LICENSE
The“IKMultimediaProduct”isprotectedbycopyrightlawsandinternationalcopyrighttreaties,aswellasotherintellectualpropertylawsandtreaties.The“IKMultimediaProduct” is licensed,notsold.ThisEULAgrantsyoutherightsasspecifiedherebelow.AllotheractionsandmeansofusagearereservedtothewrittenpermissionoftherightholderIKMultimediaProductionSrl:
Applications Software.The“IKMultimediaProduct”maybeusedonlybyyou.Youmayinstallandusethe“IKMultimediaProduct”,oranypriorversionthereofforthesameoperatingsystem,onuptothree(3)computers,providedthat(a)eachcomputerisownedby(orleasedto)andundertheexclusivecontrolofthelicensee;(b)theprogram(s)shallNOTbeusedsimultaneouslyonmorethanonemachine,and(c)anycomputer(s)withIKMultimediasoftwareinstalledshallnotbesold,rented,leased,loanedorotherwiseberemovedfromthelicensee’spossessionwithoutfirstremoving(uninstalling)thelicensedsoftware,exceptasprovidedinParagraph4(below)pertainingto“SoftwareTransfer”.
Storage/Network use.Youmayalsostoreorinstallacopyofthe“IKMultimediaProduct”onastoragedevice,suchasanetworkserver,usedonlytoinstallorrunthe“IKMultimediaProduct”onyourothercomputersoveraninternalnetwork;however,youmustacquireanddedicateadistinctlicenseforeachuserofthe“IKMultimediaProduct”fromthestoragedevice.Anygivenlicenseforthe“IKMultimediaProduct”maynotbesharedorusedconcurrentlyorotherwiseondifferentcomputersorbydifferentdevelopersinagivenorganization.
3)AUTHORIZATIONCODE
The“IKMultimediaProduct”onlyfunctionswhenyouareinthepossessionofanauthorizationcode.Youwillreceiveanauthorizationcodeuponcomplet-ingtheauthorizationcoderequestprocedure.Onceyourauthorizationcodeisactivated,youmayusetheproduct.
Youagreetofollowtheauthorizationcoderequestprocedureandwillprovidetrue,accurateandcompleteinformationaboutyourself.Ifyouprovideanyinformationthatisuntrue,inaccurate,notcorrectorincomplete,orIKMultimediahasreasonablegroundstosuspectthatsuchinformationisuntrue,inaccurate,notcorrectorincomplete,IKMultimediahastherighttosuspendortorevokethelicense.
Theterminationofthelicenseshallbewithoutprejudicetoanyrights,whatsoever,ofIKMultimedia.
4)DESCRIPTIONOFOTHERRIGHTSANDLIMITATIONS
Limitations on Reverse Engineering, Decompilation, and Disassembly. You may not reverse engineer, decompile, or disassemble the “IK MultimediaProduct”,exceptandonlytotheextentthatsuchactivityisexpresslypermittedbyapplicablelawnotwithstandingthislimitationofcomponents.The“IKMultimediaProduct”islicensedasasingleproduct.Itscomponentpartsmaynotbeseparatedforuseonmorethanonecomputer.
Not for Resale Version.Ifthe“IKMultimediaProduct”islabeled“NotforResale”or“NFR”or“EvaluationCopy”,then,notwithstandingothersectionsofthisEULA,youmaynotsell,orotherwisetransferthe“IKMultimediaProduct”.
Rental.Youmaynotrent,lease,orlendthe“IKMultimediaProduct”toanyparty.
Software Transfer.Youmaynottransfer,licenseorsublicenseyourrightsasLicenseeofthesoftwareoranyIKMultimediaproduct,aslicensedtoyouunderthisagreementwithoutpriorwrittenconsentoftherightsowner.ThecarrieronwhichtheIKMultimediaproducthasbeendistributedmaybetransferredorotherwisemadeavailabletoanythirdpartyonlywiththepriorwrittenconsentoftherightsownerandprovidedthat(a)theoriginalmedia

III - License Agreement 15
AmpliTube 3
andlicense(s)accompanythecarrierand(b)thepartytransferringthemediadoesnotretainacopyofthemedia.
5)UPGRADES
Ifthe“IKMultimediaProduct”islabeledorotherwiseidentifiedbyIKMultimediaasan“upgrade”,youmustbeproperlylicensedtouseaproductidenti-fiedbyIKMultimediaasbeingeligiblefortheupgradeinordertousethe“IKMultimediaProduct”.
An“IKMultimediaProduct”labeledorotherwiseidentifiedbyIKMultimediaasanupgradereplacesand/orsupplementstheproductthatformedtheba-sisforyoureligibilityforsuchupgrade.YoumayusetheresultingupgradedproductonlyinaccordancewiththetermsofthisEULA.Ifthe“IKMultimediaProduct”isanupgradeofacomponentofapackageofsoftwareprogramsthatyoulicensedasasingleproduct,the“IKMultimediaProduct”maybeusedandtransferredonlyaspartofthatsingleproductpackageandmaynotbeseparatedforuseonmorethanonecomputer.
6)DUAL-MEDIASOFTWARE
Youmayreceivethe“IKMultimediaProduct”inmorethanonemedium.Youmaynotloan,rent,lease,orotherwisetransfertheothermediumtoanotheruser,exceptaspartofthepermanenttransfer(asprovidedabove)ofthe“IKMultimediaProduct”.
7)LIMITEDWARRANTY
IKMultimediawarrantstotheoriginalpurchaserofthecomputersoftwareproduct,foraperiodofninety(90)daysfollowingthedateoforiginalpurchase,thatundernormaluse,thesoftwareprogramandtheuserdocumentationarefreefromdefectsthatwillmateriallyinterferewiththeoperationoftheprogramasdescribedintheencloseduserdocumentation.
8)WARRANTYCLAIMS
Tomakeawarrantyclaimundertheabovelimitedwarranty,pleasereturntheproducttothepointofpurchase,accompaniedbyproofofpurchase,yourname,yourreturnaddressandastatementofthedefect,orsendtheCD(s)tousatthebelowaddresswithinninety(90)daysofpurchase.Includeacopyofthedatedpurchasereceipt,yourname,yourreturnaddressandastatementofthedefect.IKMultimediaoritsauthorizeddealerwillusereasonablecom-mercialeffortstorepairorreplacetheproductandreturnittoyou(postageprepaid)orissuetoyouacreditequaltothepurchaseprice,atitsoption.
9)LIMITATIONSONWARRANTY
IKMultimediawarrantsonlythattheprogramwillperformasdescribedintheuserdocumentation.Nootheradvertising,descriptionorrepresentation,whethermadebyaIKMultimediadealer,distributor,agentoremployee,shallbebindinguponIKMultimediaorshallchangethetermsofthiswarranty.
EXCEPT AS STATED ABOVE, IK MULTIMEDIA MAKES NO OTHER WARRANTY, EXPRESSED OR IMPLIED, REGARDING THIS PRODUCT. IK MULTIMEDIA DIS-CLAIMS ANY WARRANTY THAT THE SOFTWARE IS FIT FOR A PARTICULAR PURPOSE, AND ANY IMPLIED WARRANTY OF MERCHANTABILITY SHALL BE LIMITED TO A NINETY (90) DAY DURATION OF THIS LIMITED EXPRESS WARRANTY AND IS OTHERWISE EXPRESSLY AND SPECIFICALLY DISCLAIMED. IK MULTIMEDIA SHALL NOT BE LIABLE FOR SPECIAL, INCIDENTAL, CONSEQUENTIAL OR OTHER DAMAGES, EVEN IF IK MULTIMEDIA IS ADVISED OF OR AWARE OF THE POSSIBILITY OF SUCH DAMAGES. THIS MEANS THAT IK MULTIMEDIA PRODUCTION SRL SHALL NOT BE RESPONSIBLE OR LIABLE FOR THE LOSS OF PROFITS OR REVENUES, OR FOR DAMAGES OR COSTS AS A RESULT OF LOSS OF TIME, DATA OR USE OF THE SOFTWARE, OR FROM ANY OTHER CAUSE EXCEPT THE ACTUAL COST OF THE PRODUCT. IN NO EVENT SHALL IK MULTIMEDIA LIABILITY EXCEED THE PURCHASE PRICE OF THIS PRODUCT.
10)CHOICEOFLAW
Youagreethatanyandallclaims,suitsorotherdisputesarisingfromyouruseofthesoftwareshallbedeterminedinaccordancewiththelawsofItaly,intheeventIKMultimedia,ismadeapartythereto.YouagreetosubmittothejurisdictionofthecourtinModena,Italyforallactions,whetherincontractorintort,arisingfromyouruseorpurchaseofthesoftware.
11)GENERAL
ThisAgreementcontainsthecompleteagreementbetweenthepartieswithrespecttothesubjectmatterhereof,andsupersedesallpriororcontempora-neousagreementsorunderstandings,whetheroralorwritten.AllquestionsconcerningthisAgreementshallbedirectedto:
IKMultimediaProductionSrlViadell’Industria4641122ModenaItaly
©2010IKMultimedia.Allrightsreserved.

16
AmpliTube 3

1 - Overview 17
AmpliTube 3
Chapter 1 Overview
1.1 Introduction
AmpliTube3istheNewKingofTone.Itisamassiveupgradeoftheleadingguitar and bass tone gear modeling software that sets the new industrystandardofsoundvariety,realism,andcreativepower.
AmpliTube3offersover160piecesofgear(includingmodelsfromthemostsought-aftervintagecollectionsandmoderndayworkhorses),51individualstompboxesandeffects,31amplifierpreamp&powersections,46speakercabinetmodels,15high-endstageandstudiomics,17postamprackeffects,andmuchmore…ThankstothenewAmpliTube3openarchitecture,youareabletoconstantlyexpandyoursonicpalettethroughtheadditionofmorepackagessuchasAmpliTubeFender™,Ampeg®SVX,etc.
IKMultimediaallowsyoutobuildyourcustomintegratedsystemusinganIKAudioInterface/ControllersuchasStompIOorStealthPedal,yourcomputer,andAmpliTube3.Youhavedreamedit.We’vemadeit.
Ifyouareaperformer/producerand/orengineersearchingforthatuniquetone that describes your artistic vision, AmpliTube 3 is the ultimate tonegearcollectionthatyouneed.
1.2 What’s new in AmpliTube 3?
• Over160modelsofvintageandmoderngearincludedinonepackage• 30newvintagegearmodelsandcreativeeffects• New Cabinet Module with two freely movable microphones and
cabinetsizecontrol• NewRoomambiencewithmicrophones’stereowidthcontrol• New rotary speaker simulation using IK’s proprietary Volumetric
ResponseModeling(VRM™)technology• NewStomp&RackFXdrag&dropfeature• Series/Parallel rigs with 8 signal path presets, selectable mono/
stereoinputandtruestereoprocessing• NewadvancedPresetOrganizationandManagementfeature• GlobalandSinglegearpresets• New“MIDILearn”featureforcompatibilitywithanyMIDIcontroller• FreelyassignableDAWAutomation• New4TrackAudioPlayer/Recorderwith independent timestretch/
pitchshift*• Non destructive recording allows post-effect processing of the
recordedaudio*• ImportsanyWav,Aiff,sd2,AppleCaf,Flac,MP3audiofile*• NewQualityModefeature• New built-in expandability (you are able to add “Powered by
AmpliTube”packageslikeAmpliTubeFender™andAmpeg®SVX,etc)
1 - Overview18
AmpliTube 3
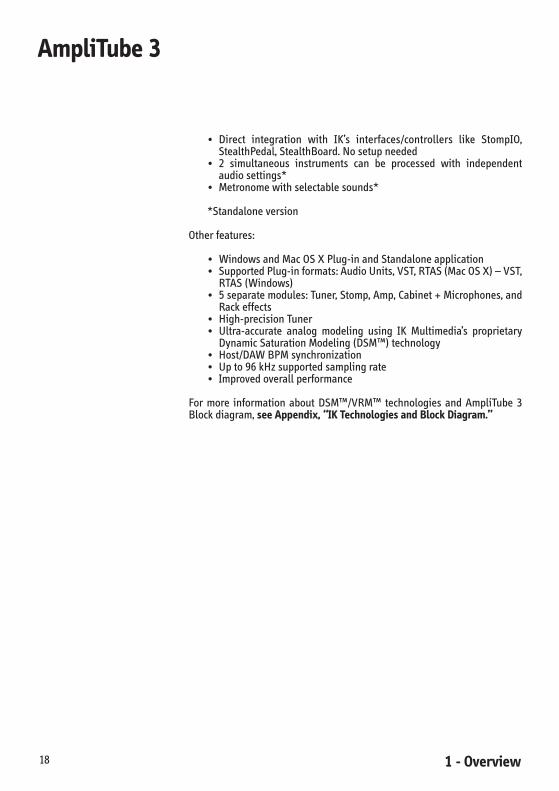
• Direct integration with IK’s interfaces/controllers like StompIO,StealthPedal,StealthBoard.Nosetupneeded
• 2 simultaneous instruments can be processed with independentaudiosettings*
• Metronomewithselectablesounds*
*Standaloneversion
Otherfeatures:
• WindowsandMacOSXPlug-inandStandaloneapplication• SupportedPlug-informats:AudioUnits,VST,RTAS(MacOSX)–VST,
RTAS(Windows)• 5separatemodules:Tuner,Stomp,Amp,Cabinet+Microphones,and
Rackeffects• High-precisionTuner• Ultra-accurate analog modeling using IK Multimedia’s proprietary
DynamicSaturationModeling(DSM™)technology• Host/DAWBPMsynchronization• Upto96kHzsupportedsamplingrate• Improvedoverallperformance
For more information about DSM™/VRM™ technologies and AmpliTube 3Blockdiagram,see Appendix, “IK Technologies and Block Diagram.”

1 - Overview 19
AmpliTube 3
1.3 Plug-in Architecture
AmpliTube3issetupasatraditionalguitarrigtoensurepredictableresultsandrealworldflexibility.Theuserinterfaceissimpleandeasytonavigatebutalsoallowsyoutosetupcomplexguitarrigsandadvancedsignalpaths.
Theinterfaceisdividedinto5modules:
1) Tuner
figure1.1
2) Stomp effects
figure1.2

1 - Overview20
AmpliTube 3
3) Amp
figure1.3
4) Cab
figure1.4
1 - Overview 21
AmpliTube 3
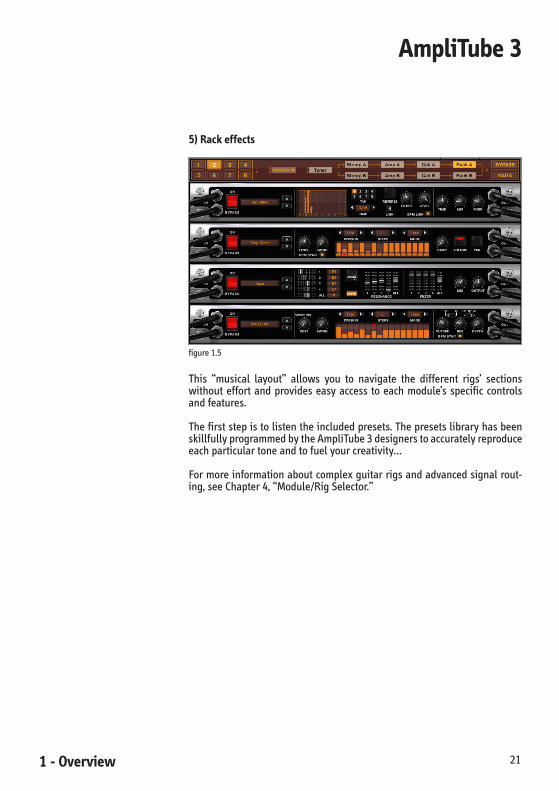
5) Rack effects
figure1.5
This “musical layout” allows you to navigate the different rigs’ sectionswithout effort and provides easy access to each module’s specific controlsandfeatures.
Thefirststepistolistentheincludedpresets.ThepresetslibraryhasbeenskillfullyprogrammedbytheAmpliTube3designerstoaccuratelyreproduceeachparticulartoneandtofuelyourcreativity…
Formoreinformationaboutcomplexguitarrigsandadvancedsignalrout-ing,seeChapter4,“Module/RigSelector.”

1 - Overview22
AmpliTube 3
1.4 Using the Interface
AmpliTube3worksasPlug-inorStandaloneapplication.
1.4.1 Standalone Interface
WhenusingAmpliTube3inStandaloneMode,theinterfacehas6sections(figure1.6):
figure1.6
Belowisabriefdescriptionofeachofthem:
1) Top Header(figure1.7)
ItincludesPresetManager,QualityMode,andIKControllerSelectorareas
figure1.7
1 - Overview 23
AmpliTube 3
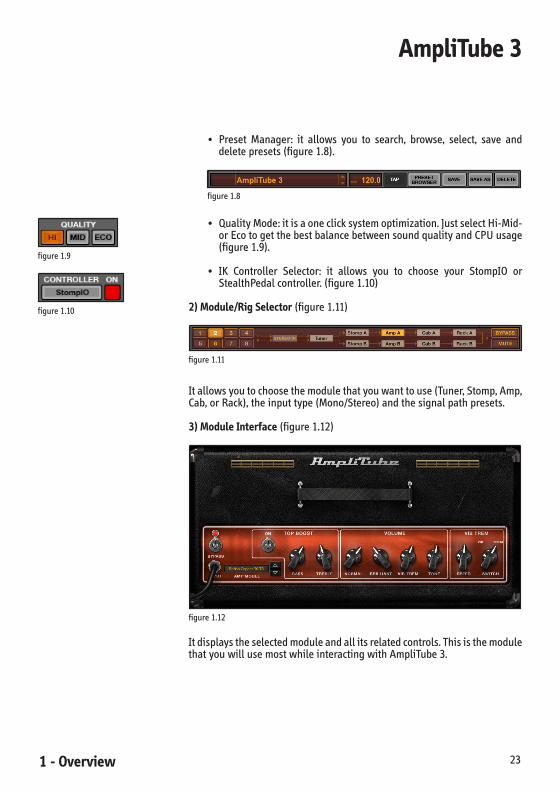
• Preset Manager: it allows you to search, browse, select, save anddeletepresets(figure1.8).
figure1.8
• QualityMode:itisaoneclicksystemoptimization.JustselectHi-Mid-orEcotogetthebestbalancebetweensoundqualityandCPUusage(figure1.9).
• IK Controller Selector: it allows you to choose your StompIO orStealthPedalcontroller.(figure1.10)
2) Module/Rig Selector(figure1.11)
figure1.11
Itallowsyoutochoosethemodulethatyouwanttouse(Tuner,Stomp,Amp,Cab,orRack),theinputtype(Mono/Stereo)andthesignalpathpresets.
3) Module Interface(figure1.12)
figure1.12
Itdisplaystheselectedmoduleandallitsrelatedcontrols.ThisisthemodulethatyouwillusemostwhileinteractingwithAmpliTube3.
figure1.9
figure1.10

1 - Overview24
AmpliTube 3
4) Input/Output Bar(figure1.13)
figure1.13
FromhereyouwillmanagetheInputandOutputlevels,theNoiseGate,andseveralmodulerelatedcontrols.
5) Four Track Audio Player/Recorder with Speed Trainer(figure1.14)
figure1.14
Itallowsyoutoplaybackyourfavoritesongs,learnnewriffs,captureyourideas,recordyourband’sdemo,andmuchmore…
6) Status Bar(figure1.15)
figure1.15
ItincludestheInputGainSliderandgivesyouaquickreferenceoftheCPUloadandMIDI.
1 - Overview 25
AmpliTube 3
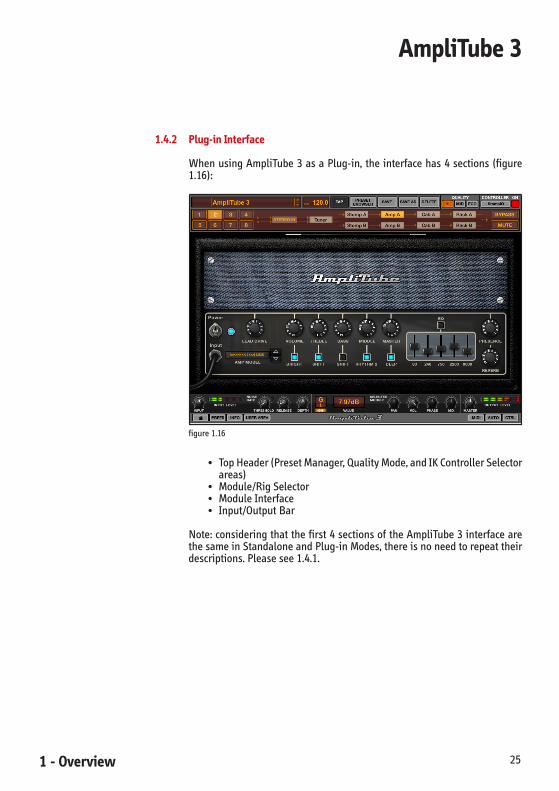
1.4.2 Plug-in Interface
WhenusingAmpliTube3asaPlug-in, theinterfacehas4sections(figure1.16):
figure1.16
• TopHeader(PresetManager,QualityMode,andIKControllerSelectorareas)
• Module/RigSelector• ModuleInterface• Input/OutputBar
Note:consideringthatthefirst4sectionsoftheAmpliTube3interfacearethesameinStandaloneandPlug-inModes,thereisnoneedtorepeattheirdescriptions.Pleasesee1.4.1.

1 - Overview26
AmpliTube 3

2 - Getting started 27
AmpliTube 3
Chapter 2 Getting started
2.1 Registration/Authorization
WeknowthatyouareexcitedaboutAmpliTube3solet’sgetreadytorock!
After you’ve installed AmpliTube 3, you have to register and authorizeyourproduct.Notonlytoenablepermanentunrestrictedfunctionality,butalso to takeadvantageofall theUserArea features.This isaverysimpleprocess; you just need to follow the instructions provided in the ProductAuthorizationWizard.
TheProductAuthorizationWizard isasmartapplication integratedtoourwebsitethatwillguideyouthroughtheRegistrationandAuthorizationpro-cess.WhenyoulaunchAmpliTube3forthefirsttimethewizardwillpopupaskingyoutocompletetheprocess,sobecomeanIKRegisteredUsertodayandenjoyallthebenefitsthatIKMultimediahastoofferyou!
ForinformationaboutAmpliTube3Installation,pleasereadthe“InstallationandAuthorizationManual”locatedhere:
Windows:Start\Programs\IKMultimedia\AmpliTube3\InstallationandAuthorizationManual
Macintosh:HD/Library/Documentation/IK Multimedia/AmpliTube 3/Installation andAuthorizationManual
If you have any problems, see Chapter 16, “Troubleshooting” or visit theFAQwebpageat:www.ikmultimedia.com/faq
2.2 Standalone Mode
TheStandaloneversionofAmpliTube3canbeusedtoperformliveorinarecordingstudiosituation,usingyourcomputerasanextgenerationmodel-ingeffectsprocessor.UsingAmpliTube3inStandaloneModeallowsyoutoruntheprogramwithouttheneedofahostsequencerapplication(DAW).
To play live, we strongly recommend that you control AmpliTube 3(StandaloneMode)withanIKControllersuchasStompIOorStealthPedal,consideringthattheirintegrationishighly-customizedandoptimized.
2 - Getting started28
AmpliTube 3
2.2.1 Launch AmpliTube 3 Standalone
TolaunchAmpliTube3Standalonegoto:
Windows:Start\Programs\AmpliTube3icon
Macintosh:Applicationfolder/AmpliTube3icon
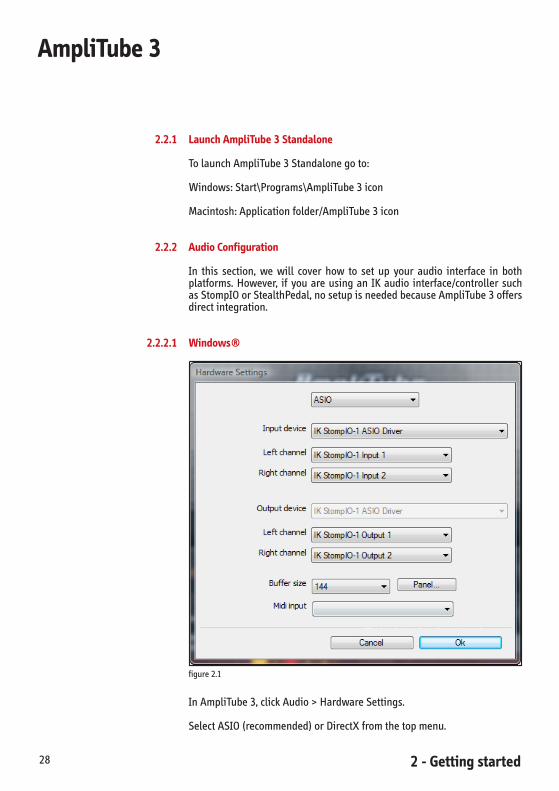
2.2.2 Audio Configuration
In this section, we will cover how to set up your audio interface in bothplatforms. However, if you are using an IK audio interface/controller suchasStompIOorStealthPedal,nosetupisneededbecauseAmpliTube3offersdirectintegration.
2.2.2.1 Windows®
figure2.1
InAmpliTube3,clickAudio>HardwareSettings.
SelectASIO(recommended)orDirectXfromthetopmenu.
2 - Getting started 29
AmpliTube 3
InputDevice:youraudio interfacedriverwillbeautomaticallyselected. Ifnot,pleasechooseitmanually.
Left/RightChannel:selecttheaudiointerfaceinputintowhichyourinstru-ment is plugged. For example, if your instrument is plugged into the firstaudio interface input, you should select Left Channel-Input 1. However, ifitispluggedintothesecondaudiointerfaceinput,youshouldselectRightChannel-Input2,etc.Insomecases,LeftchannelisidentifiedasChannel1andRightchannelasChannel2.
Output Device: select your audio interface output driver. The Input andOutputDeviceshouldbethesame.
Left/RightChannel:selectyourdesiredoutputchannels.Forexample,(LeftChannel-Output1),(RightChannel-Output2).
BufferSize:tochangethebuffersizeofanASIOdevice,clickPanel.Itwillopenyouraudiointerface’sControlPanel.
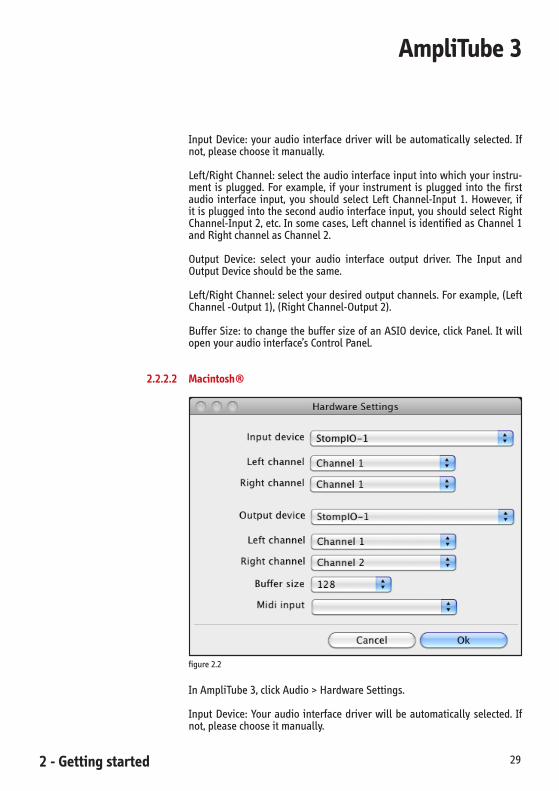
2.2.2.2 Macintosh®
figure2.2
InAmpliTube3,clickAudio>HardwareSettings.
InputDevice:Youraudio interfacedriverwillbeautomaticallyselected. Ifnot,pleasechooseitmanually.

2 - Getting started30
AmpliTube 3
Left/RightChannel:Selecttheaudiointerfaceinputintowhichyourinstru-ment is plugged. For example, if your instrument is plugged into the firstaudiointerfaceinput,youshouldselectLeftChannel/Channel1.However,ifitispluggedintothesecondaudiointerfaceinput,youshouldselectRightChannel/Channel2,etc.However, ifyouraudio interfacehasonly1 input,theLeftandRightchannelsmenuswilldisplayChannel1.
OutputDevice:Selectyouraudiointerfaceoutputdriver.Usually,theInputandOutputDevicesarethesame.
Left/RightChannel:Selectyourdesiredoutputchannels.Forexample,(LeftChannel-Channel1),(RightChannel-Channel2).
Buffer Size: Adjusting the buffer settings will change the audio signallatency. In fact, the amount of latency depends on several factors such ascomputerspeedandaudiointerfaceperformance.Decreasingthebuffersizevaluewillreducetheamountofsignaldelay,sothegoalistogetthelatencyaslowaspossiblewithoutgettinganyaudioartifacts.Asastartingpoint,a buffer size of 144 samples should be fine on most modern computers.However,consideringthateachsystemisdifferent;pleaseexperimentwithyoursettingsuntilyougetthebestresult.
2.2.3 Plug Your Guitar
NowthatAmpliTube3isinstalledandyouraudiointerfaceisconfiguredwearereadytomoveforward.
2.2.3.1 Connecting Your Guitar/Bass
PlugyourinstrumentintoaHi-ZInput,InstrumentInput,oraMicrophoneXLRInput(onlyifyouareusinganactiveDIBOXbetweentheguitar1/4”PlugandtheMicXLRinput).
DonotuseRegularLineInputs,-10dBor+4dBInputs,unlessyou’reusinganactiveinstrumentoryouareaddinganactivebufferbetweentheinstru-mentandthelineinput.
2.2.3.2 Adjusting Your Levels
First of all, check that your instrument volume knob is all the way up…Second,letsanalyzehowyouraudiointerfaceandAmpliTube3interact.
When you are using AmpliTube 3 as Standalone, there are two ways tooptimizetheGlobalInputlevel:

2 - Getting started 31
AmpliTube 3
A)1. DecreasetheAmpliTube3InputGainvalueto0dBbymovingits
slidertotheLeft(figure2.3).
figure2.3
2. Increaseyouraudiointerfacegainuptothepointwheretheclip-pingLEDstartsblinking.
3. To avoid clipping, turn down a little bit your audio interface gainknob.
B)1. KeeptheAmpliTube3InputGainvalueat+6dB(default).2. Toavoidclipping,adjustyouraudiointerfacegainknobaccordingly.
Tosummarize:
• TheGlobalInputLevelisdeterminedbytheaudiointerfacegainplustheAmpliTube3InputGainvalue.
• ThePresetInputLevelisdeterminedbytheAmpliTube3Inputlevelknob(figure2.4).
• TheAmpliTube3OutputleveliscontrolledbytheMasterknob(figure2.5).• TheAudioInterfaceOutputleveliscontrolledbyitsMasterVolume.
Tip:ifwhilebrowsingAmpliTube3presetsyoufindthatallcleansoundsaretooquietandallleadsoundsaretoohigh,thisprobablymeansthatyou’reusingatoolowinputgainonyouraudiointerface.
2.2.3.3 Quality Mode Options
TogetthebestbalancebetweensoundqualityandCPUusage,clickoneachQuality Mode button (located in the Top Header section of AmpliTube 3interface)anddeterminewhichoptionisthebestforyoursystem.
• HI:offersthebestsoundqualityatahigherCPUusage• MID:offersaverygoodsoundqualityatareasonableCPUusage• ECO:offersagoodsoundqualityataverylowCPUusage
figure2.4
figure2.5
figure2.6

2 - Getting started32
AmpliTube 3
2.2.3.4 Tuning
Ifyourinstrumentisoutoftune,youarenotmaximizingAmpliTube3soniccapabilitiessolet’sinvestafewminutes…
1. ClicktheTunerbuttonlocatedintheModule/RigSelector.2. TurnOntheTuner.3. Play one string at a time and check that the Cents indicator is as
closeat0aspossible,bothintheGraphicTunerInterfaceandintheCentsdisplay(figure2.7).
figure2.7
Iftuningyourinstrumentistakingmorethanafewminutes,maybeistimetochangeyourstringsand/orcalibrateyourguitar/bass…
2.2.4 Hands-on Examples
2.2.4.1 Loading a Preset
To taste AmpliTube 3 “sonic flavors” play one of your favorite songs, andselect different presets from the Preset Selector (figure 2.8). Even better,playariffoverandoverandchangethepresetsviatheUp/Downarrows…
figure2.8
Ifyouwanttosearchpresetsbykeywords,attributes,orapplyfilterstoyoursearch,clickPresetBrowserandenjoyitssmartengine.
2 - Getting started 33
AmpliTube 3
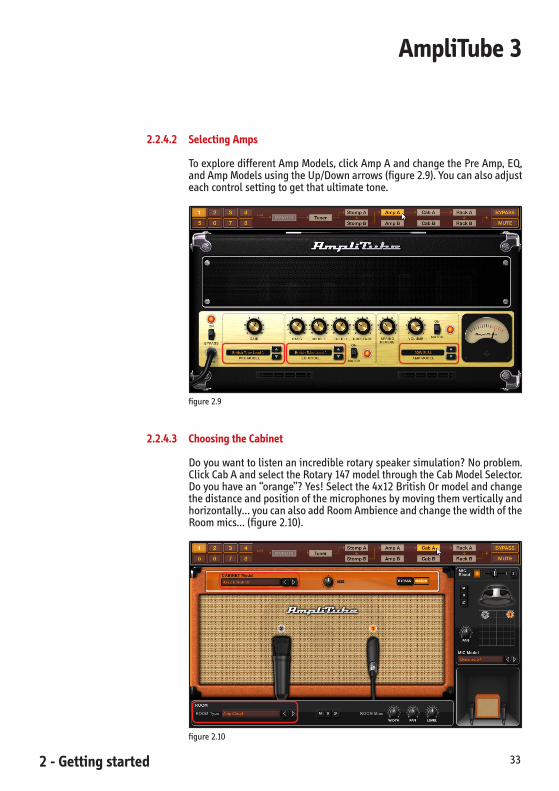
2.2.4.2 Selecting Amps
ToexploredifferentAmpModels,clickAmpAandchangethePreAmp,EQ,andAmpModelsusingtheUp/Downarrows(figure2.9).Youcanalsoadjusteachcontrolsettingtogetthatultimatetone.
figure2.9
2.2.4.3 Choosing the Cabinet
Doyouwanttolistenanincrediblerotaryspeakersimulation?Noproblem.ClickCabAandselecttheRotary147modelthroughtheCabModelSelector.Doyouhavean“orange”?Yes!Selectthe4x12BritishOrmodelandchangethedistanceandpositionofthemicrophonesbymovingthemverticallyandhorizontally…youcanalsoaddRoomAmbienceandchangethewidthoftheRoommics…(figure2.10).
figure2.10
2 - Getting started34
AmpliTube 3
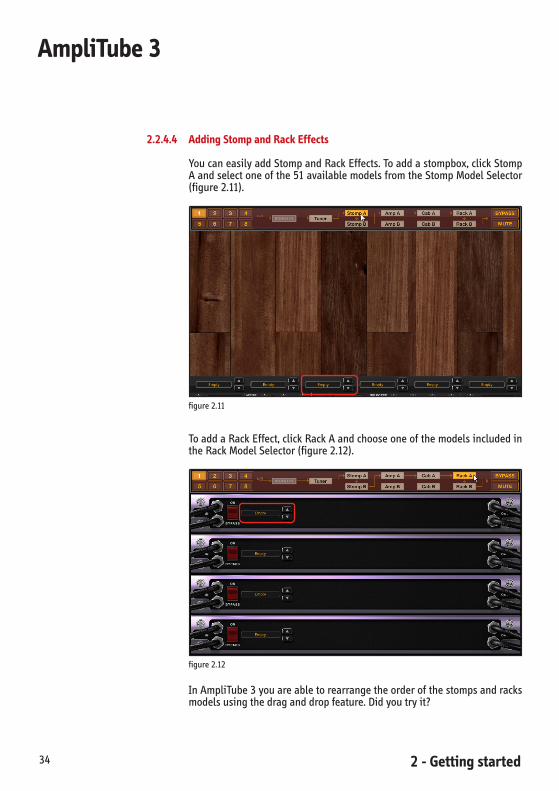
2.2.4.4 Adding Stomp and Rack Effects
YoucaneasilyaddStompandRackEffects.Toaddastompbox,clickStompAandselectoneofthe51availablemodelsfromtheStompModelSelector(figure2.11).
figure2.11
ToaddaRackEffect,clickRackAandchooseoneofthemodelsincludedintheRackModelSelector(figure2.12).
figure2.12
InAmpliTube3youareabletorearrangetheorderofthestompsandracksmodelsusingthedraganddropfeature.Didyoutryit?

2 - Getting started 35
AmpliTube 3
2.2.5 Four Track Audio Player/Recorder with Speed Trainer
The Four Track Audio Player/Recorder with Speed Trainer is a very usefulnewfeaturebecauseitallowsyouto:
• ImportandplaybackuptofourWav,Aiff,sd2,AppleCaf,Flac,MP3audiofiles• ControlVolume,Pan,Pitch,andTempopertrack• UseAmpliTube3asanEffect-oneinstancepertrack• MaximizeyourresourcesviatheFreezefunction• Setaloop• ChangethePlaybackSpeed• Recordyourideas• PracticewithaDigitalMetronome• Exportaudio,andmuchmore…
2.2.5.1 Import an Audio File
Thereare2waystoimportaudiofiles.
A)ThroughLoad(figure2.13):
figure2.13
1. ClickLoad.2. Selecttheaudiofile/sthatyouwanttoimport.3. ClickOpen/Oketc.Theimportedaudiofileswillbedisplayedinthe
AudioFilesListarea(figure2.14).
figure2.14
4. Selectthetrackinwhichyouwanttomovetheaudiofilebyclickinginitsnumber(figure2.15).
figure2.15

2 - Getting started36
AmpliTube 3
5. DragtheselectedaudiofilefromtheAudioFilesListareaanddropit to theWaveformDisplay(figure2.16). If the track inwhichyouare loading an audio file is empty, the file will be automaticallyloadedonit.
figure2.16
6. Theaudiofilerecentlymovedto theWaveformDisplaywillshowtheassignedtrack#intherightcolumnoftheAudioFileList(T1,T2,etc)(figure2.17).
figure2.17
B)Viathedraganddropfeature.
1. DragtheaudiofilesthatyouwanttoimporttotheAudioFilesListarea.
2. DragtheselectedaudiofilefromtheAudioFilesListareaanddropittotheWaveformDisplay.Ifthetrackinwhichyouareloadinganaudiofileisempty,thefilewillbeautomaticallyloadedonit.
3. Theaudiofilerecentlymovedto theWaveformDisplaywillshowtheassignedtrack#intherightcolumnoftheAudioFileList.
Note:ifthesameaudiofilewas“dropped”indifferenttracks,(e.g.,track1and3),bothnumberswillbeshownin therightcolumnof theAudioFileList(T13)(figure2.18).
figure2.18
Todeleteanaudiofile,dragitfromtheAudioFileListareaanddropitany-whereinyourdesktop.

2 - Getting started 37
AmpliTube 3
2.2.5.2 Waveform Display
TheaudiofilepeakwaveformisdisplayedasanaverageoftheL&Rchan-nels.Thismeansthatyouwillonlyseeonewaveform,evenifyouraudiofileisstereo(figure2.19).
figure2.19
TheZoomIn(+)andZoomOut(-)buttonsarelocatedatthebottomrightoftheWaveformDisplay(figure2.20).
figure2.20
TheHorizontalScrollBarwillallowyoutomovethefilewithinthedisplay(figure2.21).ClickitandmoveittothedesiredpositionorusetheLeft/Rightarrows(figure2.22).
figure2.21
figure2.22
TocleartheWaveformDisplayclickEmpty(figure2.23).Theaudiofilewillnotbedeleted(itwillremainintheAudioFilesListarea,butwithouttheassignedtack#).
figure2.23
2 - Getting started38
AmpliTube 3
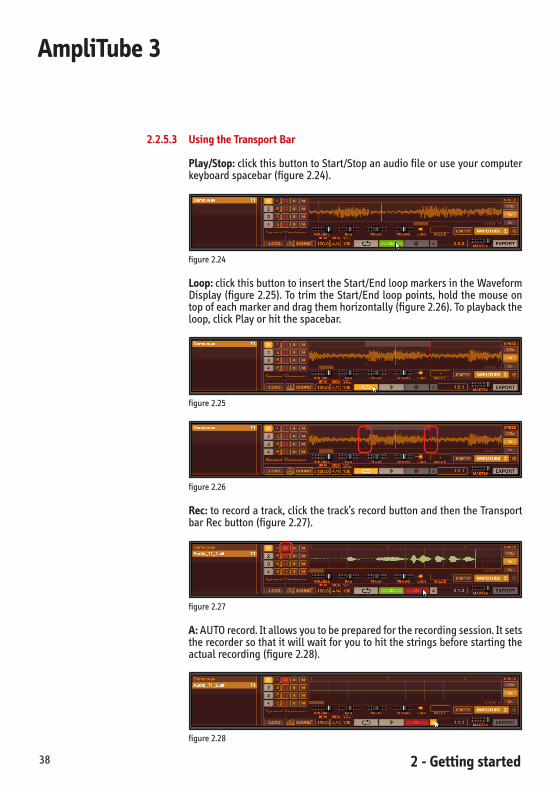
2.2.5.3 Using the Transport Bar
Play/Stop:clickthisbuttontoStart/Stopanaudiofileoruseyourcomputerkeyboardspacebar(figure2.24).
figure2.24
Loop:clickthisbuttontoinserttheStart/EndloopmarkersintheWaveformDisplay(figure2.25).TotrimtheStart/Endlooppoints,holdthemouseontopofeachmarkeranddragthemhorizontally(figure2.26).Toplaybacktheloop,clickPlayorhitthespacebar.
figure2.25
figure2.26
Rec:torecordatrack,clickthetrack’srecordbuttonandthentheTransportbarRecbutton(figure2.27).
figure2.27
A: AUTOrecord.Itallowsyoutobepreparedfortherecordingsession.Itsetstherecordersothatitwillwaitforyoutohitthestringsbeforestartingtheactualrecording(figure2.28).
figure2.28
2 - Getting started 39
AmpliTube 3
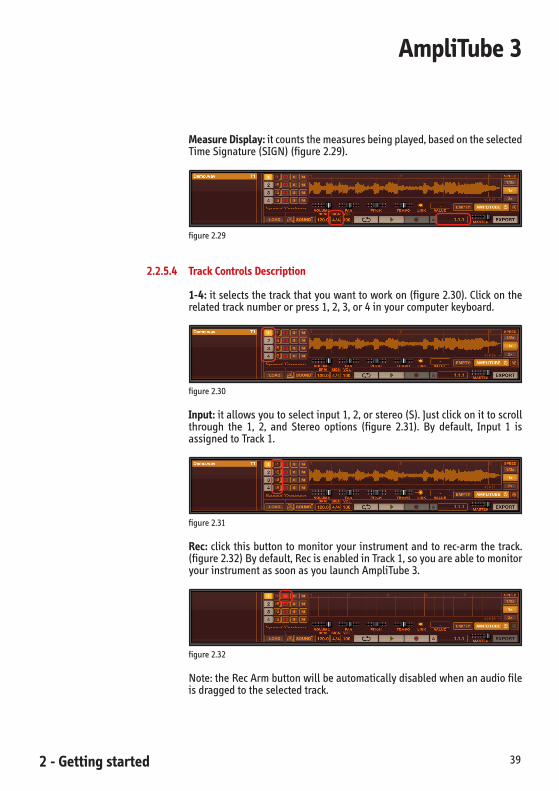
Measure Display:itcountsthemeasuresbeingplayed,basedontheselectedTimeSignature(SIGN)(figure2.29).
figure2.29
2.2.5.4 Track Controls Description
1-4:itselectsthetrackthatyouwanttoworkon(figure2.30).Clickontherelatedtracknumberorpress1,2,3,or4inyourcomputerkeyboard.
figure2.30
Input:itallowsyoutoselectinput1,2,orstereo(S).Justclickonittoscrollthrough the 1, 2, and Stereo options (figure 2.31). By default, Input 1 isassignedtoTrack1.
figure2.31
Rec:clickthisbuttontomonitoryourinstrumentandtorec-armthetrack.(figure2.32)Bydefault,RecisenabledinTrack1,soyouareabletomonitoryourinstrumentassoonasyoulaunchAmpliTube3.
figure2.32
Note:theRecArmbuttonwillbeautomaticallydisabledwhenanaudiofileisdraggedtotheselectedtrack.
2 - Getting started40
AmpliTube 3
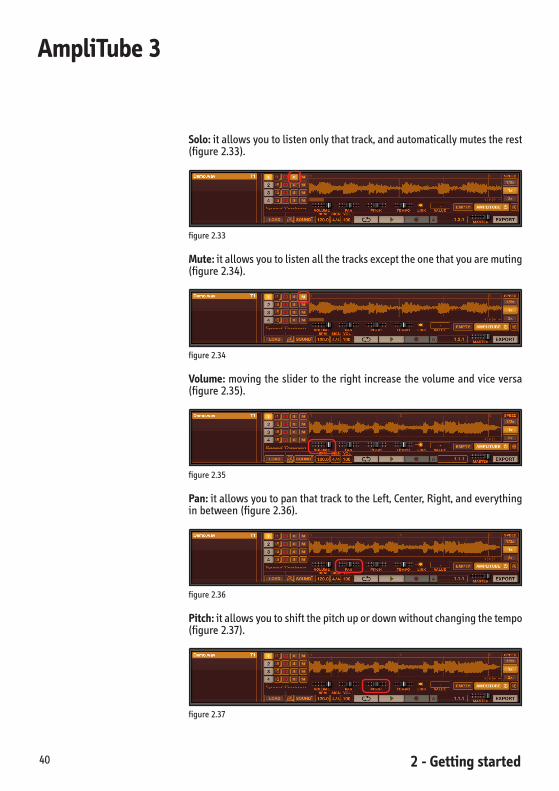
Solo:itallowsyoutolistenonlythattrack,andautomaticallymutestherest(figure2.33).
figure2.33
Mute:itallowsyoutolistenallthetracksexcepttheonethatyouaremuting(figure2.34).
figure2.34
Volume:movingtheslidertotherightincreasethevolumeandviceversa(figure2.35).
figure2.35
Pan:itallowsyoutopanthattracktotheLeft,Center,Right,andeverythinginbetween(figure2.36).
figure2.36
Pitch:itallowsyoutoshiftthepitchupordownwithoutchangingthetempo(figure2.37).
figure2.37
2 - Getting started 41
AmpliTube 3
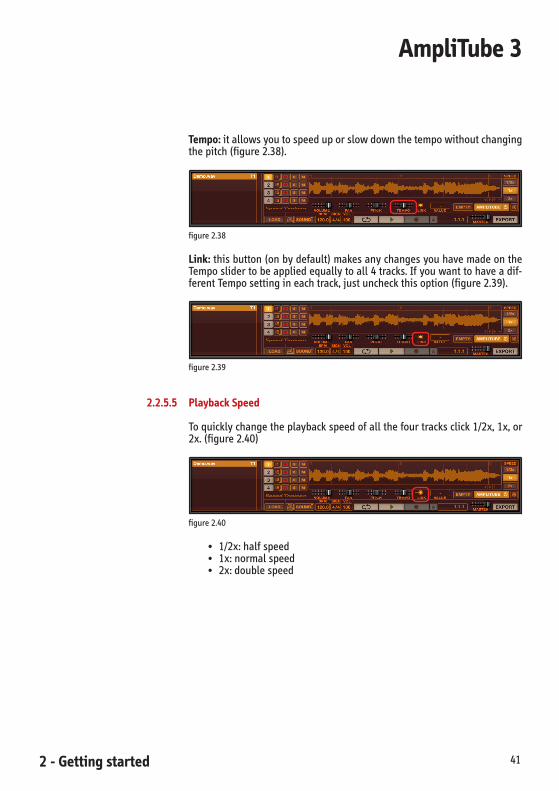
Tempo:itallowsyoutospeeduporslowdownthetempowithoutchangingthepitch(figure2.38).
figure2.38
Link:thisbutton(onbydefault)makesanychangesyouhavemadeontheTemposlidertobeappliedequallytoall4tracks.Ifyouwanttohaveadif-ferentTemposettingineachtrack,justuncheckthisoption(figure2.39).
figure2.39
2.2.5.5 Playback Speed
Toquicklychangetheplaybackspeedofallthefourtracksclick1/2x,1x,or2x.(figure2.40)
figure2.40
• 1/2x:halfspeed• 1x:normalspeed• 2x:doublespeed

2 - Getting started42
AmpliTube 3
2.2.5.6 Recording
Thereare2easywaystorecordinTrack1(selectedandenabledbydefault):
A)RecordingusingtheAUTObutton:
1. ClickA(figure2.41).
figure2.41
2. SelectorcreateanewfoldertosaveyourrecordingsandclickOK(figure2.42).
3. Whenyouareready,startplaying.Therecordingsessionwillbeginautomatically.
4. ClicktheStopbuttontostoprecording.
Note: the recordingdestination folderhas tobeselectedonly for the firsttimearecordingisstartedinthesession.
B)Recordingmanually:
1. ClicktheRecbuttonlocatedintheTransportbar(figure2.43).
figure2.43
2. SelectorcreateanewfoldertosaveyourrecordingsandclickOK.3. Startplaying.4. ClicktheStopbuttontostoprecording.
Note: the recordingdestination folderhas tobeselectedonly for the firsttimearecordingisstartedinthesession.
Ifyouwanttorecordinanyoftheothertracks,addthesetwostepsbeforetheinstructionsprovidedabove:
• Selectthetrackinwhichyouwanttorecord.• Clickitsrecordbutton.
AndthencontinuewiththeAorBinstructions.
figure2.42

2 - Getting started 43
AmpliTube 3
Now that you’ve recorded a couple of licks, let’s learn how to work withaudiofiles.
Ifyouwantto:
Findtheaudiofilethatyou’vejustrecorded,checktheAudioFilesList.Alltakesarenumberedconsecutively.
Removethecurrenttake,dragthefilefromtheAudioFilesListanddropitanywhereinthedesktop.
Note: if you want to actually delete the recorded audio file from the harddiskyouneedtofinditinsidetheselectedrecordingdestinationfolderanddeleteitmanually.OnlyremovingtheaudiorecordingfromtheAmpliTube3AudioFileslistdoesnotactuallydeleteitfromtheharddisk.
Freeupthetrackfromtheaudiofileitcontains,clickEmpty.
2 - Getting started44
AmpliTube 3
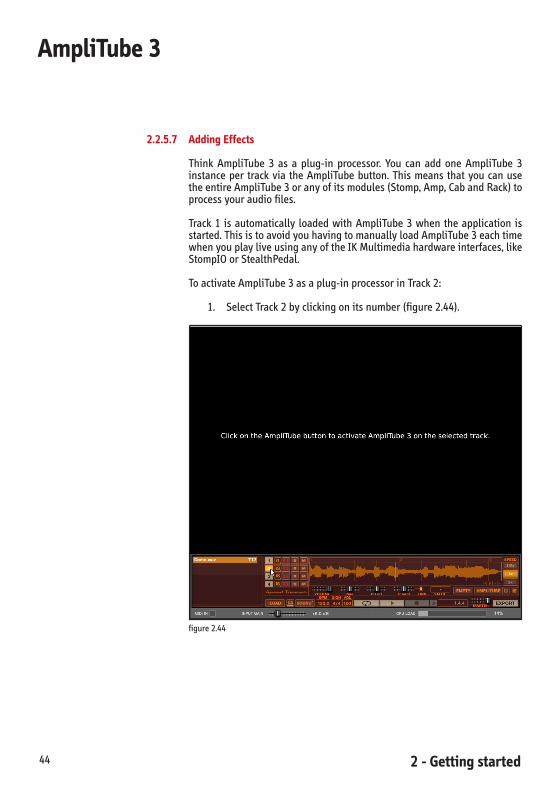
2.2.5.7 Adding Effects
Think AmpliTube 3 as a plug-in processor. You can add one AmpliTube 3instanceper trackvia theAmpliTubebutton.Thismeans thatyoucanusetheentireAmpliTube3oranyofitsmodules(Stomp,Amp,CabandRack)toprocessyouraudiofiles.
Track 1 isautomatically loadedwithAmpliTube3when theapplication isstarted.ThisistoavoidyouhavingtomanuallyloadAmpliTube3eachtimewhenyouplayliveusinganyoftheIKMultimediahardwareinterfaces,likeStompIOorStealthPedal.
ToactivateAmpliTube3asaplug-inprocessorinTrack2:
1. SelectTrack2byclickingonitsnumber(figure2.44).
figure2.44
2 - Getting started 45
AmpliTube 3
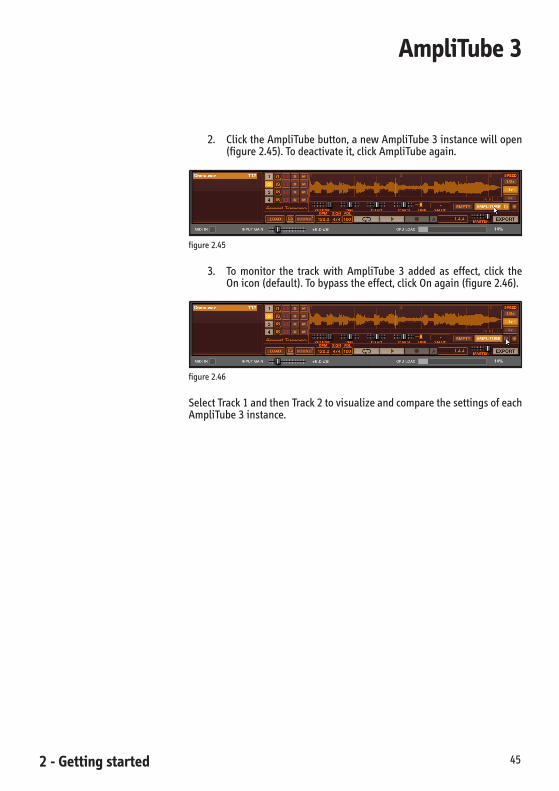
2. ClicktheAmpliTubebutton,anewAmpliTube3instancewillopen(figure2.45).Todeactivateit,clickAmpliTubeagain.
figure2.45
3. To monitor the track with AmpliTube 3 added as effect, click theOnicon(default).Tobypasstheeffect,clickOnagain(figure2.46).
figure2.46
SelectTrack1andthenTrack2tovisualizeandcomparethesettingsofeachAmpliTube3instance.

2 - Getting started46
AmpliTube 3
2.2.5.8 Managing Your Resources
To optimize your system performance, only Track 1 has the Effect featureenabledbydefault.
TopreserveyourCPUusage,werecommendfollowingtheseguidelines:
Freezeallthetracksthatyouarenotworkingon:Select the track that you are not working and click the Freeze icon(figure2.47).
figure2.47
Anaudiofilewillbecreatedandplacedinyourrecordingdestinationfolder(figure2.48).
DeactivateAmpliTubeinthetracksthatyouarenotworkingon:SelecttherelatedtracksandclicktheAmpliTubebutton.Theinterfacewilldisappear.
Usewhatyouneed:Forexample,ifyouwanttoaddalittlebitofambiencetoyoursound,youcouldusetheDigitalReverbRackforexample,soyouwillprobablydon’tneedtheentireAmpliTube3…justbypassthemodulesthatyouarenotusing.SelecttheStomp,Amp,orxmoduleviatheModule/Rigfigure2.48

2 - Getting started 47
AmpliTube 3
SelectorandclickBypass.
UsetheQualityModethatyouneedforthecurrenttask:IfyouarepracticingscalesyoudonotneedtheHiQualityModewith12Stomps,RoomAmbience,and4Racks…However,ifyouaremonitoringdifferentmicmodels,positions,andblendingoptionswithheadphones,youmayneedit.Yougetthepoint.
2.2.5.9 Master Volume
Afteryou’vemadearawmixofyourband’sdemo,youmaywanttocontrolthe volume of the entire Four Track Audio Player/Recorder via its Masterslider(figure2.49).
figure2.49
2.2.5.10 Export
Click Export to export audio files (figure 2.50). Select the settings in theExportFilewindowandbrowseyourrecordingdestinationfolder.ClickSaveintheSaveaswindowandOKintheExportFilewindow.
figure2.50
2 - Getting started48
AmpliTube 3
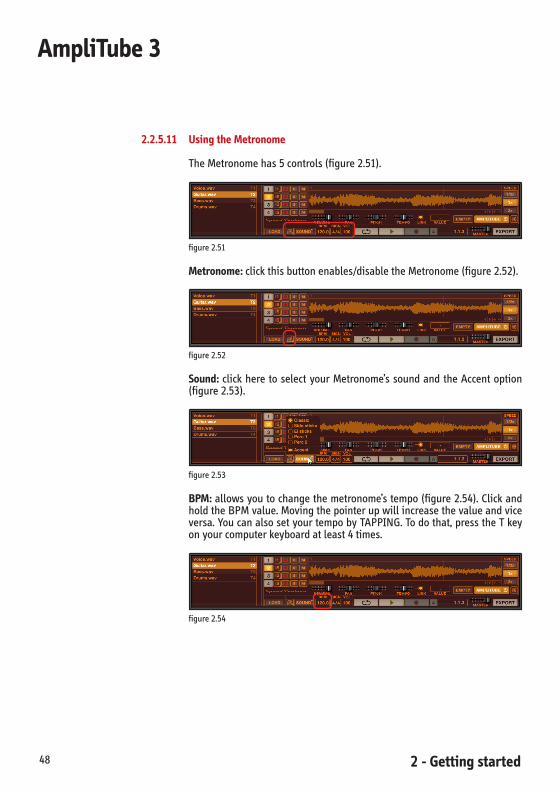
2.2.5.11 Using the Metronome
TheMetronomehas5controls(figure2.51).
figure2.51
Metronome:clickthisbuttonenables/disabletheMetronome(figure2.52).
figure2.52
Sound:clickheretoselectyourMetronome’ssoundandtheAccentoption(figure2.53).
figure2.53
BPM:allowsyoutochangethemetronome’stempo(figure2.54).ClickandholdtheBPMvalue.Movingthepointerupwillincreasethevalueandviceversa.YoucanalsosetyourtempobyTAPPING.Todothat,presstheTkeyonyourcomputerkeyboardatleast4times.
figure2.54
2 - Getting started 49
AmpliTube 3
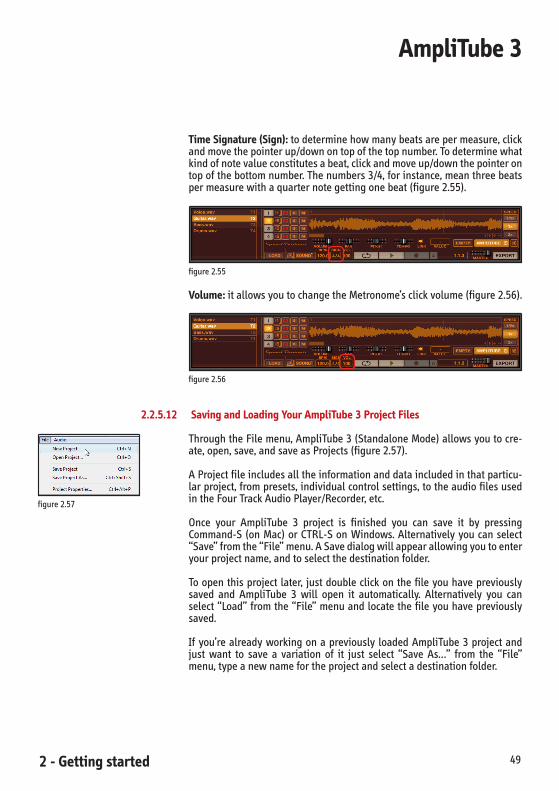
Time Signature (Sign): todeterminehowmanybeatsarepermeasure,clickandmovethepointerup/downontopofthetopnumber.Todeterminewhatkindofnotevalueconstitutesabeat,clickandmoveup/downthepointerontopofthebottomnumber.Thenumbers3/4,forinstance,meanthreebeatspermeasurewithaquarternotegettingonebeat(figure2.55).
figure2.55
Volume:itallowsyoutochangetheMetronome’sclickvolume(figure2.56).
figure2.56
2.2.5.12 Saving and Loading Your AmpliTube 3 Project Files
ThroughtheFilemenu,AmpliTube3(StandaloneMode)allowsyoutocre-ate,open,save,andsaveasProjects(figure2.57).
AProjectfileincludesalltheinformationanddataincludedinthatparticu-larproject,frompresets,individualcontrolsettings,totheaudiofilesusedintheFourTrackAudioPlayer/Recorder,etc.
Once your AmpliTube 3 project is finished you can save it by pressingCommand-S(onMac)orCTRL-SonWindows.Alternativelyyoucanselect“Save”fromthe“File”menu.ASavedialogwillappearallowingyoutoenteryourprojectname,andtoselectthedestinationfolder.
Toopenthisproject later, justdoubleclickonthefileyouhavepreviouslysaved and AmpliTube 3 will open it automatically. Alternatively you canselect“Load”fromthe“File”menuandlocatethefileyouhavepreviouslysaved.
Ifyou’realreadyworkingonapreviously loadedAmpliTube3projectandjust want to save a variation of it just select “Save As…” from the “File”menu,typeanewnamefortheprojectandselectadestinationfolder.
figure2.57

2 - Getting started50
AmpliTube 3
2.2.5.13 Project Sample Rate
ForproperresultstheAmpliTube3ProjectsampleratemustmatchtheonesetonyourAudioInterface.
AmpliTube3automaticallysetstheAudioInterfacesamplerateforyou,soinmostcasestherecan’tbeamismatch.Butincaseyouhearimportedaudiofiles playing at wrong speed first thing to check is Sample Rate on yourAudioInterface,andsettheAmpliTube3oneaccordingly.
TosettheAmpliTube3ProjectSampleRatejustselect“ProjectProperties”from“File”menuandsettheSampleRateyouneed.
2.2.6 Status Bar
The Status Bar includes the MIDI In check box, the Input Gain slider, andtheCPULoaddisplay(figure2.58).FormoreinformationaboutMIDIIn,see Chapter 15, “Control”.
figure2.58
2.3 Plug-In Mode
AmpliTube 3 works as a plug-in inside the most common DAW such asPro Tools, Cubase, Logic Studio, Live, Sonar, Digital Performer, Nuendo,Garageband,AcidPro,Audition,Mainstage,andothers...Inshort,AmpliTube3 works in any DAW that supports the following plug-in formats: AudioUnits,VST,RTAS(MacOSX)–VST,RTAS(Windows).
Considering that DAWs are in constant update, please refer to their UserManualstolearnhowtoinsertAmpliTube3asaplug-in.
3 - Input/Output Bar 51
AmpliTube 3
Chapter 3 Input/Output Bar
3.1 Input/Output Bar
The Input/Output Bar includes a noise gate, tuner and value displays,volume,pan,phaseandmixcontrolsandofcourse,inputandoutputlevelsections.Youcancheckimportantinformationaboutyourproduct,custom-izeyourpreferences,connecttotheUserArea,andopentheMIDI,Auto,andCtrlpanels…
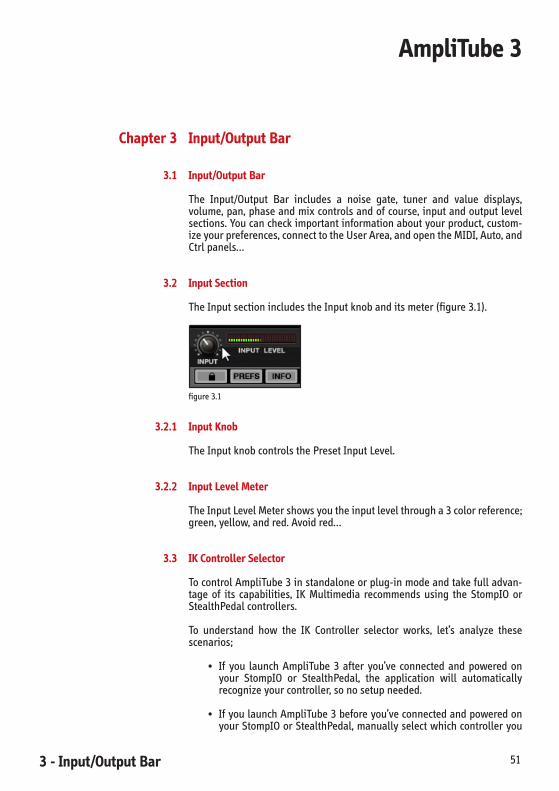
3.2 Input Section
TheInputsectionincludestheInputknobanditsmeter(figure3.1).
figure3.1
3.2.1 Input Knob
TheInputknobcontrolsthePresetInputLevel.
3.2.2 Input Level Meter
TheInputLevelMetershowsyoutheinputlevelthrougha3colorreference;green,yellow,andred.Avoidred…
3.3 IK Controller Selector
TocontrolAmpliTube3instandaloneorplug-inmodeandtakefulladvan-tage of its capabilities, IK Multimedia recommends using the StompIO orStealthPedalcontrollers.
To understand how the IK Controller selector works, let’s analyze thesescenarios;
• If you launch AmpliTube 3 after you’ve connected and powered onyour StompIO or StealthPedal, the application will automaticallyrecognizeyourcontroller,sonosetupneeded.
• IfyoulaunchAmpliTube3beforeyou’veconnectedandpoweredonyourStompIOorStealthPedal,manuallyselectwhichcontrolleryou
3 - Input/Output Bar52
AmpliTube 3
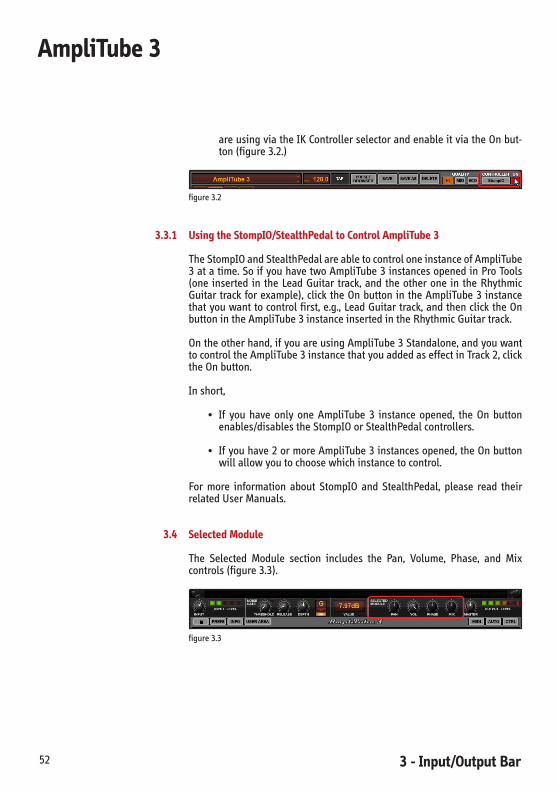
areusingviatheIKControllerselectorandenableitviatheOnbut-ton(figure3.2.)
figure3.2
3.3.1 Using the StompIO/StealthPedal to Control AmpliTube 3
TheStompIOandStealthPedalareabletocontroloneinstanceofAmpliTube3atatime.SoifyouhavetwoAmpliTube3instancesopenedinProTools(one inserted in the Lead Guitar track, and the other one in the RhythmicGuitartrackforexample),clicktheOnbuttonintheAmpliTube3 instancethatyouwanttocontrolfirst,e.g.,LeadGuitartrack,andthenclicktheOnbuttonintheAmpliTube3instanceinsertedintheRhythmicGuitartrack.
Ontheotherhand,ifyouareusingAmpliTube3Standalone,andyouwanttocontroltheAmpliTube3instancethatyouaddedaseffectinTrack2,clicktheOnbutton.
Inshort,
• If you have only one AmpliTube 3 instance opened, the On buttonenables/disablestheStompIOorStealthPedalcontrollers.
• Ifyouhave2ormoreAmpliTube3instancesopened,theOnbuttonwillallowyoutochoosewhichinstancetocontrol.
For more information about StompIO and StealthPedal, please read theirrelatedUserManuals.
3.4 Selected Module
The Selected Module section includes the Pan, Volume, Phase, and Mixcontrols(figure3.3).
figure3.3
3 - Input/Output Bar 53
AmpliTube 3
3.4.1 Pan
ThePancontrolallowsyoutoadjustthepanpositionoftheCabandRackmodules.Usually,thiscontrolshouldbekeptatitsdefaultposition(center)(figure3.4).
figure3.4
3.4.2 Volume
TheVolumecontrolallowsyoutofine-tunetheoutputlevelofeachmodule(figure3.5).
figure3.5
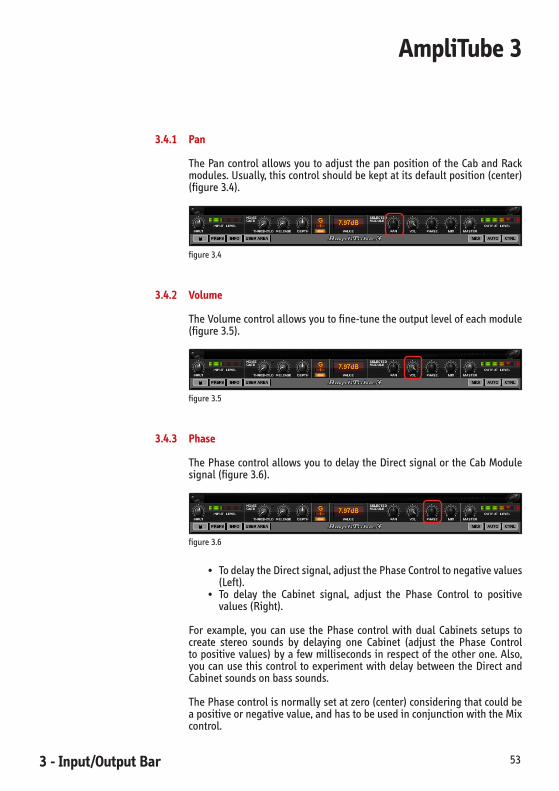
3.4.3 Phase
ThePhasecontrolallowsyoutodelaytheDirectsignalortheCabModulesignal(figure3.6).
figure3.6
• TodelaytheDirectsignal,adjustthePhaseControltonegativevalues(Left).
• To delay the Cabinet signal, adjust the Phase Control to positivevalues(Right).
For example, you can use the Phase control with dual Cabinets setups tocreate stereo sounds by delaying one Cabinet (adjust the Phase Controltopositivevalues)byafewmillisecondsinrespectoftheotherone.Also,youcanuse thiscontrol toexperimentwithdelaybetweentheDirectandCabinetsoundsonbasssounds.
ThePhasecontrolisnormallysetatzero(center)consideringthatcouldbeapositiveornegativevalue,andhastobeusedinconjunctionwiththeMixcontrol.

3 - Input/Output Bar54
AmpliTube 3
3.4.4 Mix
TheMixcontrolisnormallysetatzeroasitmixesthesignalcapturedbytheCabmodelmicrophonewiththedirectsignaltakenfromtheStompsoutput.Thisisusefulwithbassamps,tomixthedirectsignalwiththecabinetone,butitcouldalsobeusedwithcertainkindofguitarsounds(figure3.7).
figure3.7
Note:thiscontrolhastobeusedinconjunctionwiththePhasecontrol.
Thefollowingtableshowsyouwhichcontrolisimplementedineachmodule.
3.4.5 Implementation Table
AmpliTube 3 ModulesSelected Modules Control
Tuner Stomp Amp Cab Rack
Pan – – – √ √Volume √ √ √ √ √Phase – – – √ –Mix – – – √ –
3.5 Using Noise Gate
TheNoiseGateallowsyou tominimize theamountofunnecessarynoise,especiallyifyouareusinghighgain(figure3.8).
figure3.8
3.5.1 Threshold
Itsetsthethresholdlevelforthesignal.Whenthesignaldropsbelowtheset threshold level, the noise gate silences the signal. Usually, keep the

3 - Input/Output Bar 55
AmpliTube 3
thresholdlevelatthelowestpossiblevalue(fullycounterclockwise)andsetithigheronlywhenyouneedtoactivatethegate(figure3.9).
figure3.9
3.5.2 Release
Itsetsthegatereleasetime.Highervalueswillresult inagatethattakesalongeramountoftimetocloseagain,whentheinputsignaldropsbelowthethreshold(figure3.10).
figure3.10
3.5.3 Depth
Thiscontroldetermineshowmuchthesignal isattenuatedwhenthegatecloses,from-20dBto-100dB.
Default is-60dB,whichisastrongattenuationthatusuallyworksfine inmost cases. If you need to add more attenuation, increase this parameter(figure3.11).
figure3.11
3.6 Tuner Display
TheTunerDisplayallowsyoutodoaquickcheckofyourtuningwhileyouareworkinginanymodule. JustclickOn,playastring,andcheckthatthemarkerisexactlyinthemiddle(figure3.12).
figure3.12

3 - Input/Output Bar56
AmpliTube 3
3.7 Selected Parameter Display
When you adjust a Stomp, Amp, Cab or Rack parameter, or change thesettings of the Input/Output bar controls, the actual value (and if applies,its relatedunitofmeasurement)willbeshown in theSelectedParameterDisplay.Forexample,ifyouincreasetheAmpmodulelevel,adB(Decibel)abbreviationwillappearnexttothevalue(figure3.13).
figure3.13
3.8 Master Section
The Master Section includes the Master knob and the Output Level Meter(figure3.14).
figure3.14
3.8.1 Master Knob
TheMasterknobcontrolstheAmpliTube3Outputlevel.
3.8.2 Output Level Meter
The Output Level Meter shows you the output level and an overload lightthatworksasaclippingindicator.
Theclippingindicatorshouldneverlightup.Ifitdoes,you’reprobablyclip-pingyoursignaldigitally,andasaresult,degradingthesoundquality.ThissituationcanbefixedbyreducingtheMasterlevelsothattheoutputmastersignalstaysslightlybelowtheclippinglevel.

3 - Input/Output Bar 57
AmpliTube 3
3.9 Program Information, Preferences and More
3.9.1 Lock
IfyouarerunningAmpliTube3indemomodeandyouclicktheLockbutton(figure3.15),theProductAuthorizationWizardwillappear.
figure3.15
However,ifyou’vealreadyregisteredandauthorizedyourproduct,clickingontheLockbuttonwillshowyoutheproductSerialNumber,DigitalID,andAuthorizationCode(figure3.16).
figure3.16

3 - Input/Output Bar58
AmpliTube 3
3.9.2 Preferences (Prefs)
Use the new Quality Mode feature to automatically optimize your system(figure3.17).
figure3.17
However, if you want to manually change AmpliTube 3 preferences, clickPrefs(figure3.18)andenable/disablethefollowingoptions(figure3.19):
figure3.18
figure3.19
3 - Input/Output Bar 59
AmpliTube 3
Stomps, Pre and Amp Oversampling:
Enablingoversamplingimprovesthesoundqualitysignificantlywhenthesignalisheavilydistorted.However,itwillincreaseyourCPUload.Ifyouusehighgainsounds,wesuggestenablingthePreOversamplingoption.
Oversampling is enabled by default on Stomps, Preamps and PowerampswhenAmpliTube3issettoHiquality.
TIP:youcandisableOversamplingwhenworkingonasessioninreal-timeandactivateitjustbeforebouncingthefinalmix.
High Resolution(enabledbydefault):
Enabling “High Resolution” will improve the dynamic and musicalresponseofthepoweramplifiers,buttheCPUusagewillbesomewhathigher.PleasedisableHighResolutiononlyifyourcomputerdoesnothavesufficientCPUpowerforthecurrentsession.
“HighResolution”makesadeeperandmoresophisticatedusageofIKMultimedia proprietary DSM technology, which on some amps resultin slightly more compression and stronger/more real saturation ofvariousampsstages.Thismeans that incertaincasesenabling“HighResolution”mightresultinaslightdecreaseoftheaudiolevel,asarealampdoeswhenitstartscompressingandsaturatingincomparisonwitha“theoretical”amp,butontheothersidetherealism,musicality,andqualitywillgreatlybeenhanced.
Amps Reverb:
Real Spring: (enabled by default when AmpliTube 3 is set in Hi qualitymode).WhenthisisenabledAmplifierswithbuilt-inreverbwillusearealspringreverbmodel,directlytakenfromeachamplifiermodel.Thisisthemostrealisticoption,andeachAmplifierwillhaveitsownsignaturereverb.
Digital: when this is enabled, Amplifiers with built-in reverb will use adigitalalgorithmicemulationofaspringreverb.Thisoption,stillsoundinggreat,isalessrealisticalternativeandwillalsosoundthesameonallamps.
Room:
Real Ambience: (enabled by default when AmpliTube 3 is set in Hiqualitymode).AmpliTube3willuse impulse response (basedon realrooms and spaces) to achieve maximum realism and deepness fromthe ambience you’re adding to your sound. This will take a little bitmoreCPUpowerthantheDigitaloption,butitwillallowyoutochoosebetween different types of spaces and ambiences delivering an out-standingsound.
Digital:AmpliTube3willuseahigh-qualitydigitalreverberationalgo-

3 - Input/Output Bar60
AmpliTube 3
rithmtogeneratetheambienceyou’readdingtoyoursound.ThiswilltakelessCPUpowerthantheRealAmbienceoption,butyouwillnotbeabletoselectdifferentspaces.
Cabinet Resolution:
High: offers the best sound quality at a slightly higher CPU usage(enabledbydefaultwhenAmpliTube3issetinHiqualitymode).Alwaysuse this setting when it is possible. This will deliver the best qualityfromtheAmpliTube3speakers.
Mid:offersaverygoodsoundqualityatareasonableCPUusage.
Low:offersagoodsoundqualityataverylowCPUusage.Thisoptionhas to be used only when you really need to save CPU power as therealism and musicality of the speakers is not really expressed at itsmaximumpotentialunderthissetting.Also,thissettingshouldnotbeusedonbasscabinetsasthelowfrequencyextensioncouldbeexces-sivelylimited.
Cabinet Global Bypass:
ThisbypassestheCabmoduleglobally,onallpresets,independentlyfromwhateachpresethassetupontheCabinetmodule.
ThisisusefulwhenyouplaylivewithAmpliTube3butareusinganexternalrealguitarcabinet.Inthiscase,itisveryhelpfulbeingabletodisabletheCabmoduleonallyourexistingpresetswithouthavingtoeditallofthemonebyone.
Tempo Source:
ThisoptionallowsyoutoselecttheTemposource.
Host/Global(enabledbydefault):
TheBPMSyncTemposourceistheHostApplicationTempo,(thetempooftheapplicationintowhichAmpliTube3isinsertedasaplug-in).
WhenyouuseAmpliTube3asstandalone,thedefaultGlobaltempois120BPM,anditcanbesettodifferentvaluesonthemetronome“BPM”value(figure3.20).
figure3.20
3 - Input/Output Bar 61
AmpliTube 3
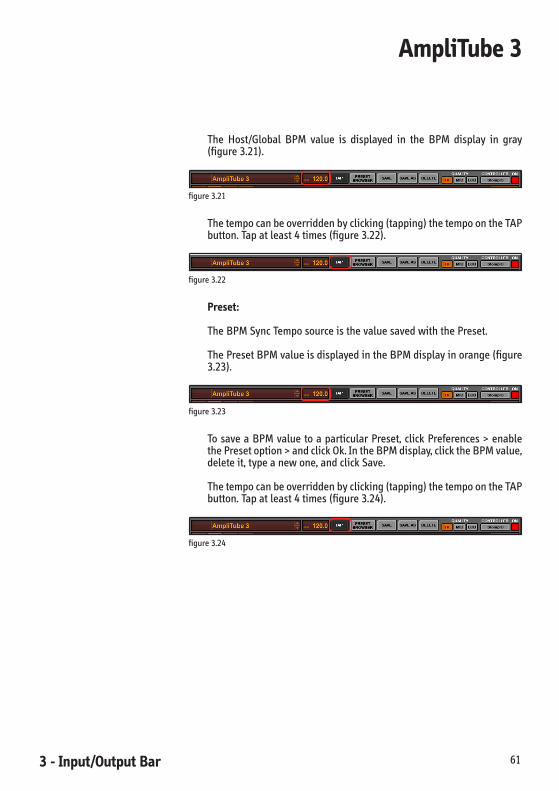
The Host/Global BPM value is displayed in the BPM display in gray(figure3.21).
figure3.21
Thetempocanbeoverriddenbyclicking(tapping)thetempoontheTAPbutton.Tapatleast4times(figure3.22).
figure3.22
Preset:
TheBPMSyncTemposourceisthevaluesavedwiththePreset.
ThePresetBPMvalueisdisplayedintheBPMdisplayinorange(figure3.23).
figure3.23
TosaveaBPMvaluetoaparticularPreset,clickPreferences>enablethePresetoption>andclickOk.IntheBPMdisplay,clicktheBPMvalue,deleteit,typeanewone,andclickSave.
Thetempocanbeoverriddenbyclicking(tapping)thetempoontheTAPbutton.Tapatleast4times(figure3.24).
figure3.24
3 - Input/Output Bar62
AmpliTube 3
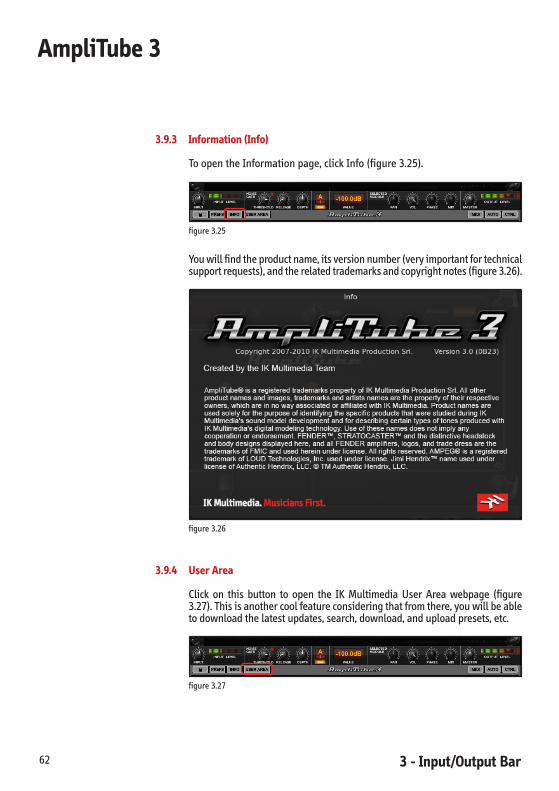
3.9.3 Information (Info)
ToopentheInformationpage,clickInfo(figure3.25).
figure3.25
Youwillfindtheproductname,itsversionnumber(veryimportantfortechnicalsupportrequests),andtherelatedtrademarksandcopyrightnotes(figure3.26).
figure3.26
3.9.4 User Area
Click on this button to open the IK Multimedia User Area webpage (figure3.27).Thisisanothercoolfeatureconsideringthatfromthere,youwillbeabletodownloadthelatestupdates,search,download,anduploadpresets,etc.
figure3.27
3 - Input/Output Bar 63
AmpliTube 3
3.10 MIDI Control, Automation, and Controllers
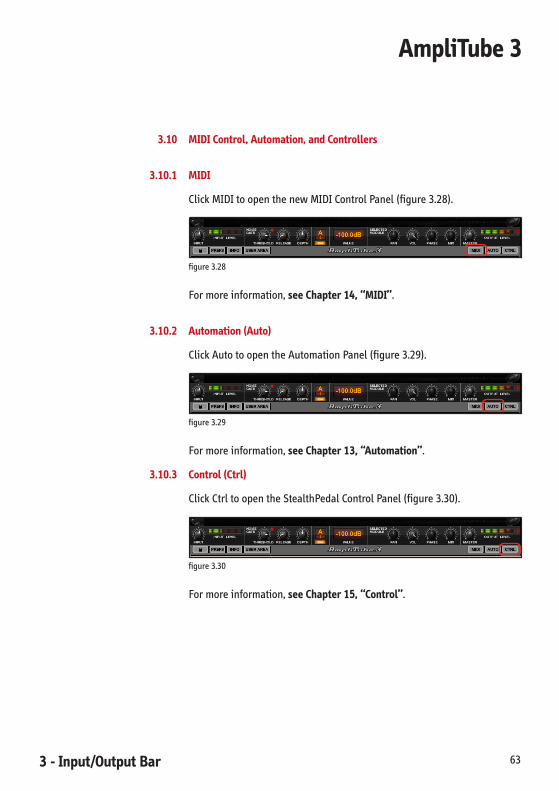
3.10.1 MIDI
ClickMIDItoopenthenewMIDIControlPanel(figure3.28).
figure3.28
Formoreinformation,see Chapter 14, “MIDI”.
3.10.2 Automation (Auto)
ClickAutotoopentheAutomationPanel(figure3.29).
figure3.29
Formoreinformation,see Chapter 13, “Automation”.
3.10.3 Control (Ctrl)
ClickCtrltoopentheStealthPedalControlPanel(figure3.30).
figure3.30
Formoreinformation,see Chapter 15, “Control”.

3 - Input/Output Bar64
AmpliTube 3
4 - Module/Rig Selector 65
AmpliTube 3
Chapter 4 Module/Rig Selector
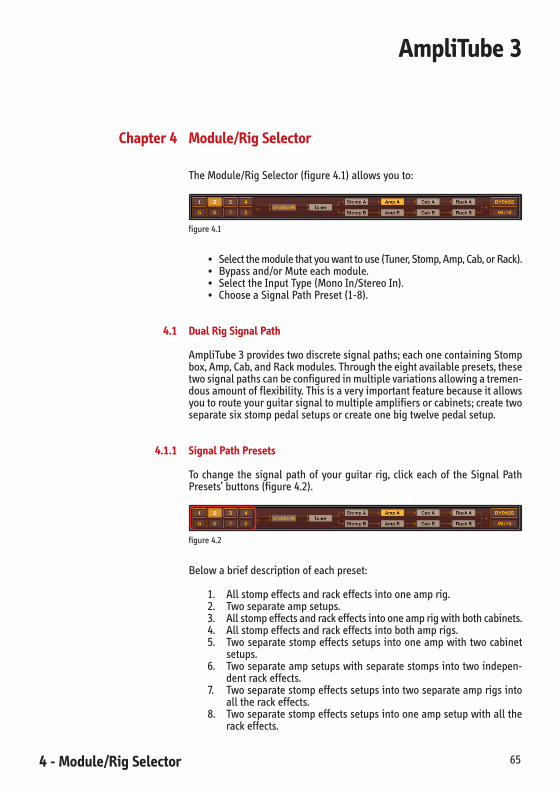
TheModule/RigSelector(figure4.1)allowsyouto:
figure4.1
• Selectthemodulethatyouwanttouse(Tuner,Stomp,Amp,Cab,orRack).• Bypassand/orMuteeachmodule.• SelecttheInputType(MonoIn/StereoIn).• ChooseaSignalPathPreset(1-8).
4.1 Dual Rig Signal Path
AmpliTube3providestwodiscretesignalpaths;eachonecontainingStompbox,Amp,Cab,andRackmodules.Throughtheeightavailablepresets,thesetwosignalpathscanbeconfiguredinmultiplevariationsallowingatremen-dousamountofflexibility.Thisisaveryimportantfeaturebecauseitallowsyoutorouteyourguitarsignaltomultipleamplifiersorcabinets;createtwoseparatesixstomppedalsetupsorcreateonebigtwelvepedalsetup.
4.1.1 Signal Path Presets
To change the signal path of your guitar rig, click each of the Signal PathPresets’buttons(figure4.2).
figure4.2
Belowabriefdescriptionofeachpreset:
1. Allstompeffectsandrackeffectsintooneamprig.2. Twoseparateampsetups.3. Allstompeffectsandrackeffectsintooneamprigwithbothcabinets.4. Allstompeffectsandrackeffectsintobothamprigs.5. Twoseparatestompeffectssetupsintooneampwithtwocabinet
setups.6. Twoseparateampsetupswithseparatestompsintotwoindepen-
dentrackeffects.7. Twoseparatestompeffectssetupsintotwoseparateamprigsinto
alltherackeffects.8. Twoseparatestompeffectssetupsintooneampsetupwithallthe
rackeffects.

4 - Module/Rig Selector66
AmpliTube 3
4.1.2 Stereo IN
Wehaveimplementedanewfullstereo-chainsignalpaththatallowsto:
• UseAmpliTube3ontwoinstrumentssimultaneously,eachonewiththeirownrig.
• UseAmpliTube3asatruestereomulti-effectsunitoneveryinstru-mentinyourDAWsession.
• AddAmpliTube3effectstoyourstereorecordingofdrums,keyboardsandmore.
Select theSignalPathPresets#2or6,andclick theInputTypebuttontochangefromMonoIntoStereoIn(figure4.3).
figure4.3
4.2 Selecting Modules
ToselectanAmpliTube3module,clickontherelatedbutton(Tuner,StompA/B,AmpA/B,CabA/B,andRackA/B)(figure4.4).
figure4.4
The selected module will be displayed in the Module Interface section(figure4.5).
figure4.5

4 - Module/Rig Selector 67
AmpliTube 3
ToBypassand/orMuteaspecificmodule,selectitandclickBypassand/orMute(figure4.6).
figure4.6

4 - Module/Rig Selector68
AmpliTube 3

5 - Presets 69
AmpliTube 3
Chapter 5 Presets
Inthischapter,wewillcoverallthePreset/Projectrelatedfunctionality.
ThePresetManagerincludesthePresetSelector,theBPMdisplay,andtheTap,PresetBrowser,Save,SaveAs,andDeletebuttons(figure5.1).
figure5.1
5.1 Preset Selector
ThePresetSelector(figure5.2)allowsyoutonavigateitsmenusandselectapreset(figure5.3),usetheUp/Downarrowstoscrollthroughthem(figure5.4),andconnecttoPresetXChange.
figure5.2
figure5.3
figure5.4
Presets are organized by “Powered by AmpliTube” applications such asAmpliTube2,AmpliTubeJimiHendrix,AmpliTubeMetal,andeachapplica-tionhasitsownsubcategorizationcriteria.

5 - Presets70
AmpliTube 3
5.2 Preset Browser
To search presets by keywords, attributes, or apply filters to your search,clickPresetBrowser(figure5.5).
figure5.5
ThePreset Browser includes the keywordsearchbox, theAllandRefreshbuttons,13columns,andaverticalandhorizontalscrollbars.
Toseeallthepresets,usetheverticalscrollbar(figure5.6).
figure5.6

5 - Presets 71
AmpliTube 3
Toseeallthe13columns(Name,Description,SoundCharacter,Artist,Style,Pickup Type, Instrument Type, Pickup Position, Band, Song Section, SongPosition,andKeywords),usethehorizontalscrollbar(figure5.7).
figure5.7
The content included in each column is ordered alphabetically. To changehowthecontentwillbedisplayed(A-Z,Z-A),clickonthecolumnname(topcell)(figure5.8).
figure5.8
5 - Presets72
AmpliTube 3
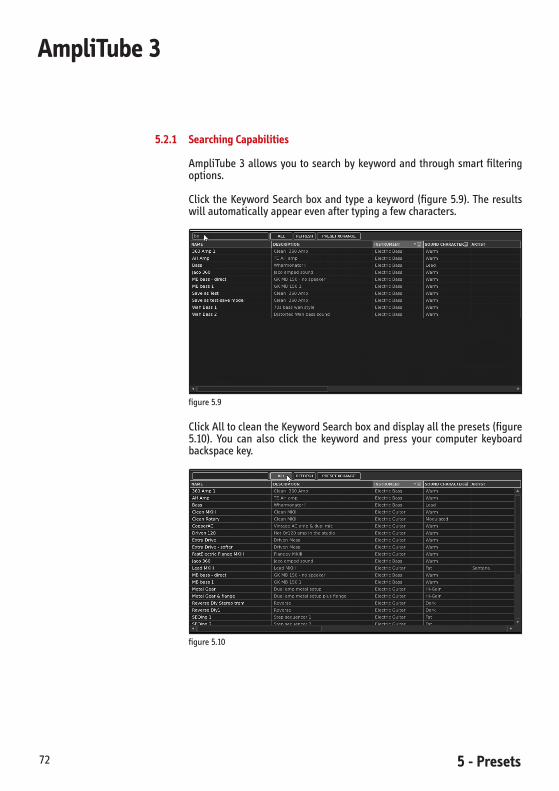
5.2.1 Searching Capabilities
AmpliTube3allowsyoutosearchbykeywordandthroughsmart filteringoptions.
ClicktheKeywordSearchboxandtypeakeyword(figure5.9).Theresultswillautomaticallyappearevenaftertypingafewcharacters.
figure5.9
ClickAlltocleantheKeywordSearchboxanddisplayallthepresets(figure5.10). You can also click the keyword and press your computer keyboardbackspacekey.
figure5.10
5 - Presets 73
AmpliTube 3
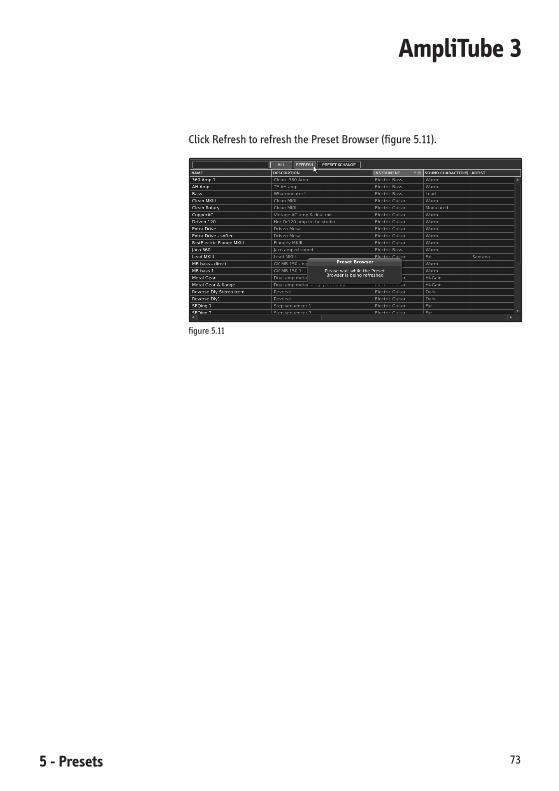
ClickRefreshtorefreshthePresetBrowser(figure5.11).
figure5.11

5 - Presets74
AmpliTube 3
5.2.2 Filter Options
Inadditiontothekeywordsearchoption,youcanalsousethefiltersembed-dedintheInstrument,SoundCharacter,Style,PickupType,InstrumentType,PickupPosition,andSongPositioncolumns.
If you search by Instrument and you want to find all the “bass” presets,clicktheInstrumentcolumnandthentheFiltericon(figure5.12).Thefilteroptionswillappear(figure5.13).
figure5.12
figure5.13
Select Electric Bass. All the related presets will be displayed. Now if youclickagainintheFiltericonandselectElectricGuitar,allthebassandguitarrelatedpresetswillbedisplayed.Ifyouwanttoseeonlytheguitarpresets,unchecktheElectricBassfilteroption.Toresetallthefilteroptionsappliedtothiscolumn,clickontheFiltericonandselectReset.
Now you can apply the same procedure to any of the columns that offerfilteringoptions.
5 - Presets 75
AmpliTube 3
5.3 Working with Presets
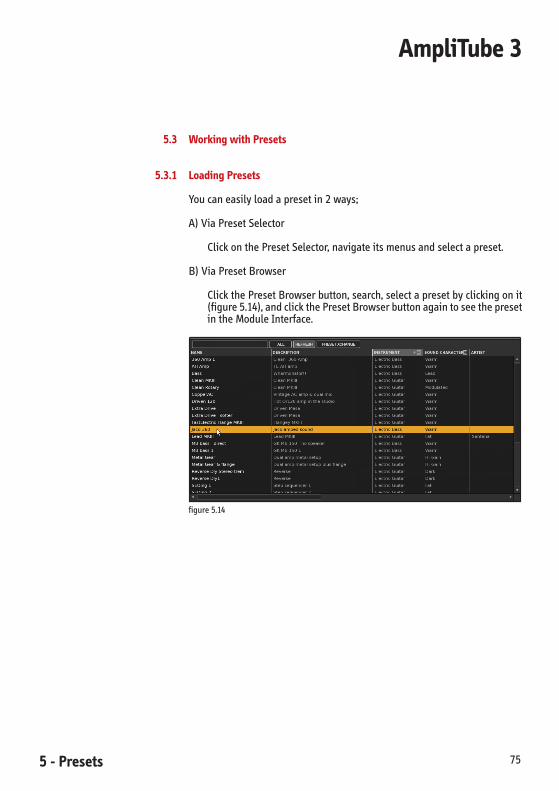
5.3.1 Loading Presets
Youcaneasilyloadapresetin2ways;
A)ViaPresetSelector
ClickonthePresetSelector,navigateitsmenusandselectapreset.
B)ViaPresetBrowser
ClickthePresetBrowserbutton,search,selectapresetbyclickingonit(figure5.14),andclickthePresetBrowserbuttonagaintoseethepresetintheModuleInterface.
figure5.14

5 - Presets76
AmpliTube 3
5.3.2 Saving Presets
YoucansaveapresetviatheSaveandtheSaveasbuttons(figure5.15).
figure5.15
Forexample,ifyouaremakingalotofchangesonaparticularpresetandyouwanttosavethem,youhavetwooptions;
A)ClickSaveas,tokeepthedefaultorsourcepresetandsaveanewpresetthatcontainsallyourmodificationsandcustomization.IntheSaveaswin-dow, complete as much information as possible to make your next searcheasierandmaximizethePresetBrowsercapabilities(figure5.16).
figure5.16
5 - Presets 77
AmpliTube 3
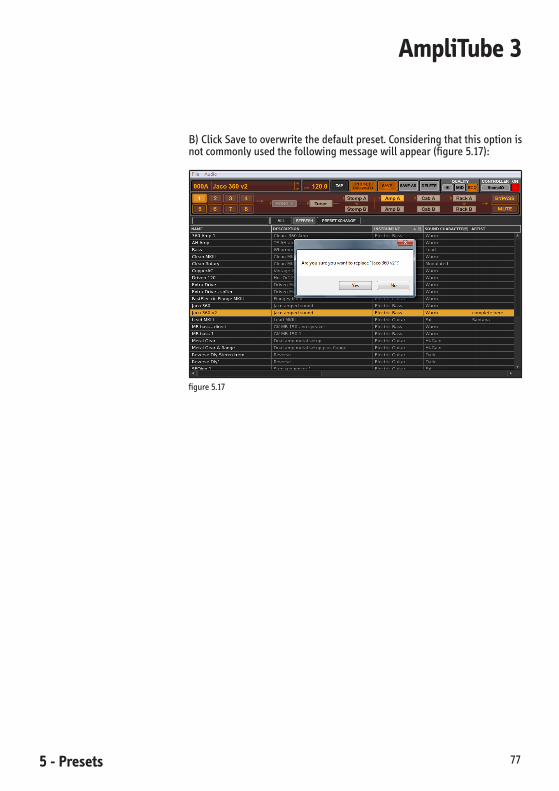
B)ClickSavetooverwritethedefaultpreset.Consideringthatthisoptionisnotcommonlyusedthefollowingmessagewillappear(figure5.17):
figure5.17

5 - Presets78
AmpliTube 3
5.3.3 Deleting Presets
Todeleteapreset,clickDelete(figure5.18).
figure5.18
5.4 Model Presets
Thisisagreatnewfeature.Now,AmpliTube3allowsyoutosave,load,andcopy-pastesettingsbetweenModelPresets.
IntheAmpandCabmodules,youwillbeabletosaveall themoduleset-tings,meaningthatintheCabmodule,savingamodelpresetwillsavetheCabinetModel,MicModel,RoomType,Mixingparameters,etc.
In the Stomp and Rack modules, you will be able to save each individualmodelsettings.Forexample,intheStompmodule,youwillbeabletoright-clickontopofeachStompmodelandsaveitssettings!
5.4.1 Saving a Model Preset
TosaveaStompModelPresetfollowthesesimpleinstructions:
1. Right-click(orCTRL-clickonMac)onthebody(notoncontrols)oftheStompmodelandclickSaveModelPreset.
2. NameyourpresetandclickOK.
To be able to compare between the default settings and the new modelpresetswerecommendthefollowing:

5 - Presets 79
AmpliTube 3
1. Right-click(orCTRL-clickonMac)onthebodyoftheStompmodel(defaultsettings)andclickSaveModelPreset.
2. Nameyourpreset(e.g.,“nameofthestomp-default”)andclickOK.3. Changethesettings.4. Right-clickontopoftheStompmodel(newsettings)andclickSave
ModelPreset.5. Nameyourpreset(e.g.,“nameofthestomp-v1”)andclickOK.6. Right-clickontopoftheStompmodelandselectLoadModelPreset.
The sub menu will display the default and v1 presets so you areabletocomparethem.Now,youcaninsertmoreStompmodelsintheotheremptyslotsandrepeattheaforementionedsteps.
TosavetheCabmodulesettingsandbeabletocomparebetweenthedefaultsettingsandthenewmodelpresetsfollowtheseinstructions:
1. Right-clickontopoftheCabmodule(defaultsettings)andclickSaveModelPreset.
2. Nameyourpreset(e.g.,“nameoftheCabmodel-default”andclickOK.3. ChangethesettingsintheCabmodel,MicmodelandRoomareas).4. Right-click on top of the Cab module (new settings) and click Save
ModelPreset.5. Nameyourpreset(e.g.,“nameoftheCabmodel-v1”andclickOK.6. Right-clickontopof theCabmoduleandselectLoadModelPreset.
Thesubmenuwilldisplaythedefaultandv1presetssoyouareabletocomparethem.
Note: ifyouright-clickontopofaspecificcontrol theAssignAutomation/AssignMIDImenuwillappear,soright-clickanywhere in theStomp/RackmodelorAmp/Cabmodulesthatisnotacontrol.

5 - Presets80
AmpliTube 3
5.4.2 Loading a Model Preset
BeforeloadingaModelPreset,youneedtosaveoneormorepresets,aswedidin5.4.1.Afterthat,right-clickontopoftheStomp/RackmodelorAmp/Cabmodule,selectLoadModelPreset,andclickontheselectedpreset(figure5.19).
figure5.19
5.4.3 Copy and Paste Settings
AmpliTube 3 allows you to copy and paste settings between Stomp/RackmodelandAmp/Cabmodulepresets.
Afteryou’vesavedtwoormoremodelpresets,followthesesteps:
1. Right-clickontopoftheRackmodelandclickCopySettings.2. Right-clickontopoftheRackmodel,selectLoadModelPresetsand
clickoneofthepresets.3. Right-clickontopoftheRackmodelandclickPasteSettings.
ThisisalsoveryusefultocopyandpasteAmpsettingsfromrigAtorigBwhenyouneedthetworigshavingtheexactsameamp.
5.5 Presets and Projects Saving Options
YoualreadyknowhowtosaveaModelPreset,aPreset,andaProject,solet’ssummarizewhattheyaresaving:
Model Preset: A model preset saves the Stomp/Rack individual models’settings,e.g.,anOverdrivestomporaDigitalDelay rackmount. Ifyouare
5 - Presets 81
AmpliTube 3
workingintheAmporCabmodules,itwillsaveallthemodulesettings.
Preset:AnAmpliTube3PresetsaveseverythingexcepttheaudiofilesandsettingsincludedintheFourTrackAudioPlayer/Recorder.
Project: A Project file saves all the information and data included in thatparticularproject,includingtheaudiofilesandsettingsincludedintheFourTrackAudioPlayer/Recorder.
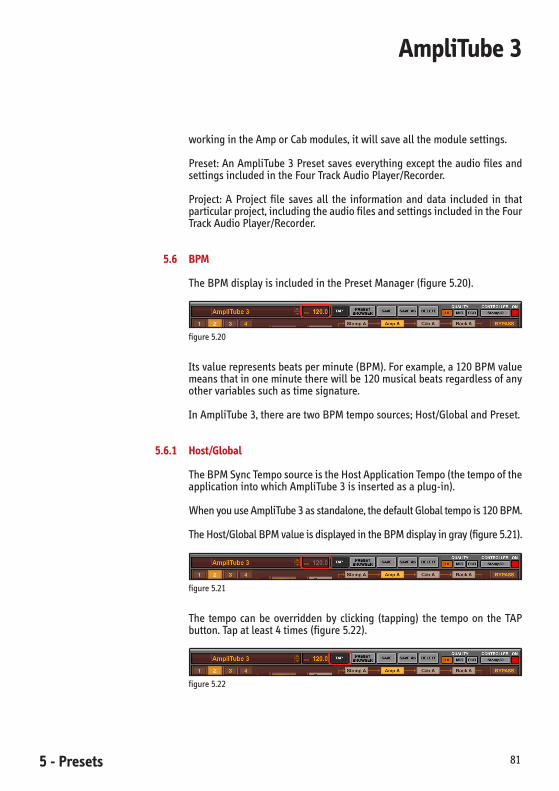
5.6 BPM
TheBPMdisplayisincludedinthePresetManager(figure5.20).
figure5.20
Itsvaluerepresentsbeatsperminute(BPM).Forexample,a120BPMvaluemeansthatinoneminutetherewillbe120musicalbeatsregardlessofanyothervariablessuchastimesignature.
InAmpliTube3,therearetwoBPMtemposources;Host/GlobalandPreset.
5.6.1 Host/Global
TheBPMSyncTemposourceistheHostApplicationTempo(thetempooftheapplicationintowhichAmpliTube3isinsertedasaplug-in).
WhenyouuseAmpliTube3asstandalone,thedefaultGlobaltempois120BPM.
TheHost/GlobalBPMvalueisdisplayedintheBPMdisplayingray(figure5.21).
figure5.21
The tempo can be overridden by clicking (tapping) the tempo on the TAPbutton.Tapatleast4times(figure5.22).
figure5.22
5 - Presets82
AmpliTube 3
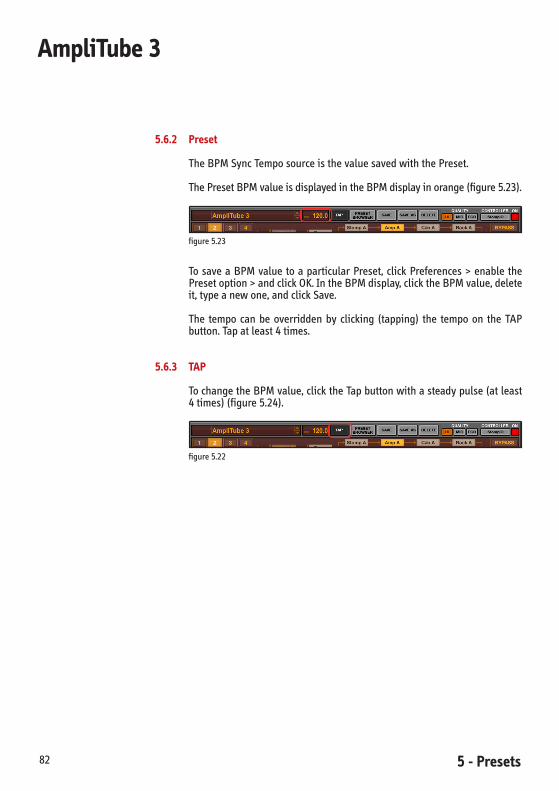
5.6.2 Preset
TheBPMSyncTemposourceisthevaluesavedwiththePreset.
ThePresetBPMvalueisdisplayedintheBPMdisplayinorange(figure5.23).
figure5.23
TosaveaBPMvalue toaparticularPreset,clickPreferences>enable thePresetoption>andclickOK.IntheBPMdisplay,clicktheBPMvalue,deleteit,typeanewone,andclickSave.
The tempo can be overridden by clicking (tapping) the tempo on the TAPbutton.Tapatleast4times.
5.6.3 TAP
TochangetheBPMvalue,clicktheTapbuttonwithasteadypulse(atleast4times)(figure5.24).
figure5.22

6 - Tuner Module 83
AmpliTube 3
Chapter 6 Tuner Module
The Tuner is the first module. On the Module/Rig Selector, click Tuner toopenitsinterface(figure6.1).
figure6.1
Consideringthatthisisafullyautomaticchromatictuner,thereisnoneedtomanuallyselectthenoteyouaregoingtotune.Thetunerwillautomaticallydetectandshowwhichnoteyou’replaying.
6.1 On/Off Switch
ThisswitchturnstheTunerModuleOn/Off(figure6.2).
figure6.2

6 - Tuner Module84
AmpliTube 3
6.2 Mute
TheMuteswitchallowsyoutosilencetheguitarsignalwhiletuning,averyusefulfeatureforliveperformance(figure6.3).
figure6.3
Note:theOn/OffandMuteswitchesarelinkedtotheBypassandMutebut-tonslocatedintheModule/RigSelector.
6.3 Tune
TheTuneDisplayshowsthetuningreferencebeingused.Thedefaultrefer-enceis440Hzbutitcouldbechanged(from425Hzto455Hz)byclickingonthedisplay.Whenthepointerappears,usethebackspacekeyandcursorcontrolkeysonyourcomputerkeyboardtoeditthevalue(figure6.4).
figure6.4
6.4 Graphical Tuner Interface
AmpliTube3’sGraphicalTunerInterfaceisbasedonahigh-endrackmounttunerandallowsyoutotuneyourinstrumentfastandaccurately(figure6.5).
figure6.5

6 - Tuner Module 85
AmpliTube 3
6.5 Tune Display
Itshowsthedetectednotename,e.g.,A,B,etc.(figure6.6).Thisisalsovis-iblefromtheInput/Outputbar.
figure6.6
6.6 Cents Display
Itshowshowmanycentsyouareup(+)ordown(-)inrelationtothenotethatyouaretuning.(figure6.7)
figure6.6
Note:inmusic,acentis1/100ofasemitone.Centsareaconvenientwayofdescribingsmallincrementsofpitch.

6 - Tuner Module86
AmpliTube 3
7 - Stomp Module 87
AmpliTube 3
Chapter 7 Stomp Module (Stomp Effects)
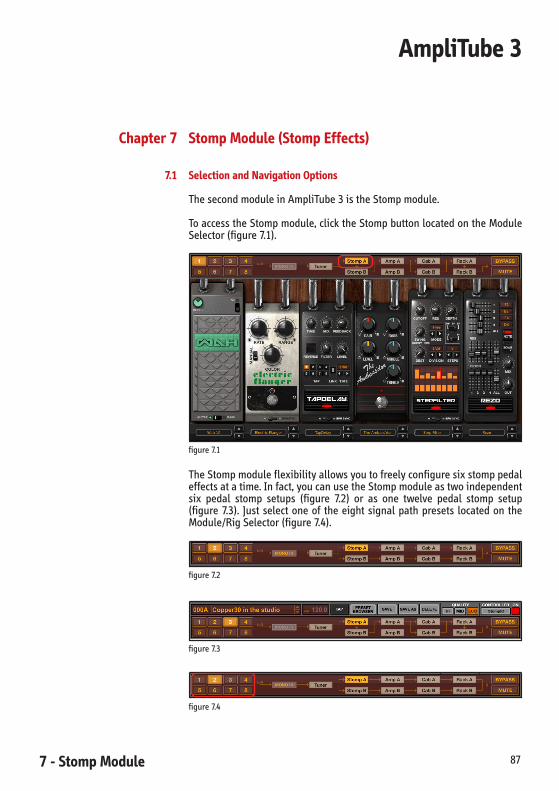
7.1 Selection and Navigation Options
ThesecondmoduleinAmpliTube3istheStompmodule.
ToaccesstheStompmodule,clicktheStompbuttonlocatedontheModuleSelector(figure7.1).
figure7.1
TheStompmoduleflexibilityallowsyoutofreelyconfiguresixstomppedaleffectsatatime.Infact,youcanusetheStompmoduleastwoindependentsix pedal stomp setups (figure 7.2) or as one twelve pedal stomp setup(figure7.3). Justselectoneof theeightsignalpathpresets locatedon theModule/RigSelector(figure7.4).
figure7.2
figure7.3
figure7.4

7 - Stomp Module88
AmpliTube 3
Thesixstompeffectslotsaredisplayedinthemoduleinterfaceas“empty”slotsonawoodenpedalboard(figure7.5).
figure7.5
To select a stomp unit, click on each of the six stomp slots (where it says“Empty”), navigate through each category (Modulation, Delay, etc), andchooseoneofthestompmodels(figure7.6).
figure7.6
Another navigation option is to scroll through the different stomp boxesusingtheUp/Downarrows(figure7.7).
figure7.7
7 - Stomp Module 89
AmpliTube 3
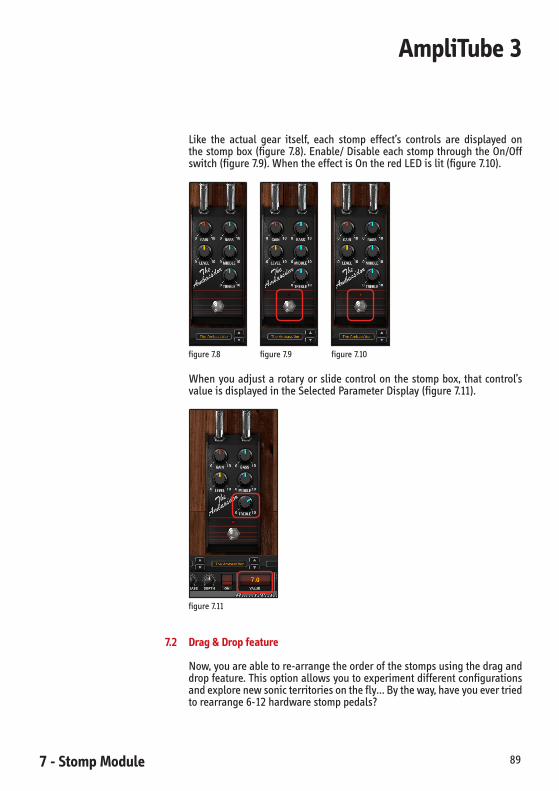
Like the actual gear itself, each stomp effect’s controls are displayed onthestompbox(figure7.8).Enable/DisableeachstompthroughtheOn/Offswitch(figure7.9).WhentheeffectisOntheredLEDislit(figure7.10).
figure7.8 figure7.9 figure7.10
Whenyouadjustarotaryorslidecontrolon thestompbox, thatcontrol’svalueisdisplayedintheSelectedParameterDisplay(figure7.11).
figure7.11
7.2 Drag & Drop feature
Now,youareabletore-arrangetheorderofthestompsusingthedraganddropfeature.Thisoptionallowsyoutoexperimentdifferentconfigurationsandexplorenewsonicterritoriesonthefly…Bytheway,haveyouevertriedtorearrange6-12hardwarestomppedals?
7 - Stomp Module90
AmpliTube 3
7.3 Stomp Models
7.3.1 Delay
7.3.1.1 Delay
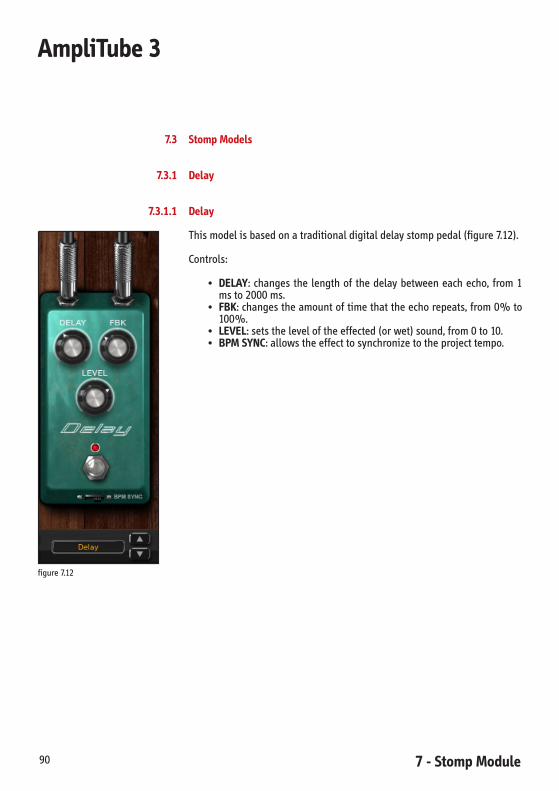
Thismodelisbasedonatraditionaldigitaldelaystomppedal(figure7.12).
Controls:
• DELAY: changes the lengthof thedelaybetweeneachecho, from1msto2000ms.
• FBK:changestheamountoftimethattheechorepeats,from0%to100%.
• LEVEL: setstheleveloftheeffected(orwet)sound,from0to10.• BPM SYNC:allowstheeffecttosynchronizetotheprojecttempo.
figure7.12

7 - Stomp Module 91
AmpliTube 3
7.3.1.2 EchoMan
A model of a classic bucket-brigade analog echo/delay (with modulation)stomppedaleffect(figure7.13).
Controls:
• DELAY:changesthelengthofthedelaybetweeneachecho,from25msto500ms.
• FEEDBACK:changestheamountoftimethattheechorepeats,from0%to100%.
• BLEND:mixestheamountofdrysignalwiththeeffectedsignal,from0%(dry)to100%(effected).
• CH/VIB: sets the amount of Chorus/Vibrato effect added to theeffectedsound,from0%to100%.
• CHORUS VIBRATO:changeswhetherchorusorvibratocanbeaddedtotheeffect.
• BPM SYNC:allowstheeffecttosynchronizetotheprojecttempo.
figure7.13

7 - Stomp Module92
AmpliTube 3
7.3.1.3 TapDelay
Thiscreativedelayeffectunitcanbeusedtocreateinterestingandunusualdelayeffectsthankstothe8totallyindependenttaps.Youcancreategroov-ingrhythmpatternsbycombiningmoretapswithaspecifictimesignature,andyoucanmixthisupwithpsychedelicreversetapeeffectsyouareabletosetforeachtap(figure7.14).
TheTapDelayisactually8delaysinonesingleunit,anditispossibletosettime,timbre,andlevelforeachofthem.Inaddition,youcangloballycontrolwith single knobs parameters for all the 8 taps simultaneously, like time,dry/wetmixandfeedbackamount.
Controls:
• TIME:globallyshiftsthedelaytimeofallthe8taps.Thisisarelativecontrol,whensetatthecenterposition(1x)itdoesnotalterthetimethat has been setup on each Tap, when set to minimum (0.25x) itdividesalltimesbyfourandwhensettomax(4x)itmultiplyalltimesbyfour.Useittogloballychangethedelaytempowithoutchangingtherelationsbetweenalltaps.
• MIX: globally adjust the effect mix between the Dry signal and allthe8delaytaps.
• FEEDBACK: globally adjust the amount of feedback the delay willhave.Whensetatmaximum,thedelaywillbesustainingitself.
• TAP:usethesebuttonstoselectwhichoneamongthe8delaytapsyou’regoingtoeditwithnextcontrols
• LEVEL:setstheaudiolevelfortheselecteddelaytap.• TIME: sets the delay time for the selected tap. It can be shown in
milliseconds or in musical divisions, depending on the BPM Syncswitchposition.
• FILTER:setsthetimbrefortheselecteddelaytap,darkeratminimumandbrighteratmaximum.
• REVERSE:enablethisbuttontotransformtheselecteddelaytapfromnormaltoreverse.Whensettoreverseadelaytapwillsoundlikeareversedtapeloop.
• LINK:enablethisbuttontomakeachangestotheabovementionedparameterstoapplytoallthe8tapsatthesametime.
• BPM SYNC:allowstheeffecttosynchronizetotheprojecttempo.
figure7.14

7 - Stomp Module 93
AmpliTube 3
7.3.2 Distortion
7.3.2.1 BigPig
This effect is modeled after an iconic distortion pedal that has stood thetestoftime.Capableoftonesfromsmoothsustain&compressiontoheavybuzz-saw distortion, this pedal is perfect for all different styles of metal(figure7.15).
Controls:
• VOLUME:controlstheDistortionpedaloutputlevel.Itdoesnotalterthetimbreofthedistortion,unlessanotherdistortingdevicefollow,likeanotherdistortionpedaloranamplifierathighgainorvolume.
• SUSTAIN:controlstheamountofdistortionthepedalgives.• TONE:controlsthetimbreofthedistortionpedal
figure7.15

7 - Stomp Module94
AmpliTube 3
7.3.2.2 Crusher
Thismodelaltersthesoundoftheinputsignalbychangingthesample-rate,cutofffrequencyandbydistortingit.Thiseffectcanproduceveryaggressivedistortedsounds,morenoticeablethanoverdrivestompboxes.TheLowpassfilterisverycreativewhencombinedtohighdistortionlevels(figure7.16).
Controls:
• CUTOFF:controlsthecutofffrequencyofthelowpassfilter.• DECIM: selects the sample-rate-ratio of the processed sound, from
1:1to1:16.• GAIN: sets the amount of signal sent to the effect, therefore the
distortion.Usefulwhencreatingheavilydistortedsounds, from-40dBto+40dB.
• OUT:controlstheoutputvolume,from-40dBto+40dB.
figure7.16

7 - Stomp Module 95
AmpliTube 3
7.3.2.3 Diode Overdrive
Amodelofaclassicoverdrivestompeffect(figure7.17).
Controls:
• TONE:adjustsboostorcutofthehighfrequenciesinthestompeffect,from0to10.
• DIST:setstheamountofdistortionappliedtotheinputsignaloftheeffect,from0to10.
• LEVEL:setstheleveloftheinputfortheeffect,from0to10.
figure7.17

7 - Stomp Module96
AmpliTube 3
7.3.2.4 Distortion
Thiseffectisbasedononeofthemostversatiledistortionboxesevermade.Fromsubtlecrunchtocompletemayhem,thispedalhasbeenusedbycount-lessguitaristsofallstyles(figure7.18).
Controls:
• LEVEL: controls the Distortion pedal output level. It does not alterthetimbreofthedistortion,unlessanotherdistortingdevicefollows,likeanotherdistortionpedaloranamplifierathighgainorvolume.
• DIST:controlstheamountofdistortionthepedalgives.• TONE:controlsthetimbreofthedistortionpedal.
figure7.18

7 - Stomp Module 97
AmpliTube 3
7.3.2.5 Feedback
This effect, modeled after a hard-to-find vintage unit, includes a built-inoscillator for infinite sustain. Hold notes to create amazing synth-likesoundsorboostsolosformorecuttingtone,combinedwithclassicdistortiontimbres(figure7.19).
Controls:
• LEVEL: controls the Distortion pedal output level. It does not alterthetimbreofthedistortion,unlessanotherdistortingdevicefollow,likeanotherdistortionpedaloranamplifierathighgainorvolume.
• TONE:controlsthetimbreofthedistortionpedal.• DIST:controlstheamountofdistortionthepedalgives.• OVERTONE:controlstheoctaveforthefeedbackeffect.• FBKbutton:pressthisbuttontoactivatethefeedback.
Notes:• WhenthestompisOn,clickingontheFBKbuttonwillmaketheled
flash.• WhenusingStompIO,feedbackwillbeautomaticallyactivatedwhen
distortionisOn,andtheOn/Offbuttonforthispedalisholddownfor1secondormore.
figure7.19

7 - Stomp Module98
AmpliTube 3
7.3.2.6 Metal Distortion
This effect is based on one of the favorite pedals of some of the heaviestbandsofalltime.Thisunitisperfectforextremegainandsustain.Nothingcomparestothispedalforpuredistortionmayhem(figure7.20).
Controls:
• LEVEL: controls the Distortion pedal output level. It does not alterthetimbreofthedistortion,unlessanotherdistortingdevicefollows,likeanotherdistortionpedaloranamplifierathighgainorvolume.
• DIST:controlstheamountofdistortionthepedalgives.• LOW – HIGH:coaxialtonecontrol.• Center knob:controlsHighfrequencies.• External knob:controlsLowfrequencies.• MID – MIDFREQ:coaxialparametricmidtonecontrol.• Center knob:controlsMidslevel.• External knob:controlsMidsfrequency.
figure7.20

7 - Stomp Module 99
AmpliTube 3
7.3.2.7 Metal Distortion 2
Thiseffectismodeledafteraclassicfromthe‘80s.Itdeliversdeep,distortedcrunchperfect forheavymetalandhardrock.Longdiscontinued, this isarare vintage find that delivers deep, dark crunch from the ‘70s, ‘80s, andbeyond(figure7.21).
Controls:
• LEVEL: controls the distortion pedal output level. It does not alterthetimbreofthedistortion,unlessanotherdistortingdevicefollows,likeanotherdistortionpedaloranamplifierathighgainorvolume.
• DIST:controlstheamountofdistortionthepedalgives.• COLOR L:controlstheamountofbasstonesonthesound.• COLOR H:controlstheamountofhightonesonthesound.
figure7.21

7 - Stomp Module100
AmpliTube 3
7.3.2.8 Overdrive
Thiseffectisbasedononeofthemostcollectiblepedals.Itisoneofthemostaggressive overdrive pedals ever made. From subtle to over-the-top, thiseffectpushesampsharderwithoutsacrificingclarityandtone(figure7.22).
Controls:
• LEVEL: controls the Overdrive pedal output level. It does not alterthetimbreofthedistortion,unlessanotherdistortingdevicefollows,likeanotherdistortionpedaloranamplifierathighgainorvolume.
• DRIVE:controlstheamountofoverdrivethepedalgives.• TONE:controlsthetimbreoftheoverdrivepedal.
figure7.22

7 - Stomp Module 101
AmpliTube 3
7.3.2.9 OverScream
This is a model of a classic overdrive/distortion pedal which has becomethegotooverdrivepedalforsomeofthemostinfluentialguitarplayersofalltime.Itsbasiccontrolsmakeiteasytodialintheexactsoundyouwant(figure7.23).
Controls:
• DRIVE:increasestheamountofclippinginthedistortioncircuit,from0to10.
• LEVEL:setstheoutputlevelofthepedal,from0to10.• TONE: adjusts boost or cut of high frequencies in the stomp effect,
from0to10.
figure7.23

7 - Stomp Module102
AmpliTube 3
7.3.2.10 PROdrive
Thiseffectismodeledafteroneofthemostversatiledistortionboxesever.Fromsmooth,lightcrunch,toextremeshredsustainandover-the-topgain,thispedalhasbeenaclassiceversinceitsreleaseintheearly‘80s(figure7.24).
Controls:
• DIST:controlstheamountofdistortionthepedalgives.• VOLUME:controlsthePROdrivepedaloutputlevel.Itdoesnotalter
thetimbreofthedistortion.• FILTER:controlsthetimbreofthePROdrivepedal.
figure7.24
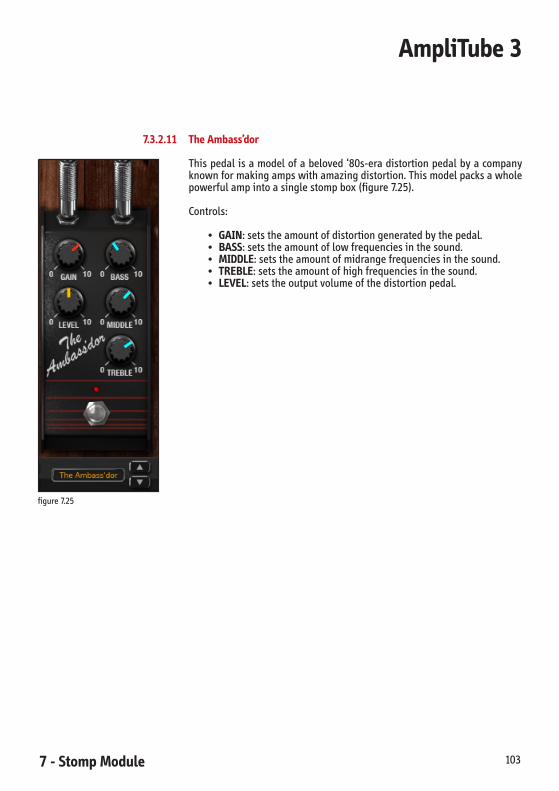
7 - Stomp Module 103
AmpliTube 3
7.3.2.11 The Ambass’dor
Thispedalisamodelofabeloved‘80s-eradistortionpedalbyacompanyknownformakingampswithamazingdistortion.Thismodelpacksawholepowerfulampintoasinglestompbox(figure7.25).
Controls:
• GAIN:setstheamountofdistortiongeneratedbythepedal.• BASS:setstheamountoflowfrequenciesinthesound.• MIDDLE:setstheamountofmidrangefrequenciesinthesound.• TREBLE:setstheamountofhighfrequenciesinthesound.• LEVEL:setstheoutputvolumeofthedistortionpedal.
figure7.25

7 - Stomp Module104
AmpliTube 3
7.3.3 Dynamics
7.3.3.1 Compressor
Thiseffectisamodelofaclassichigh-endcompressor.Itiscapableofmildcompressionorintensesignalslamming,anddoesitallwithatremendousamountoffinesse(figure7.26).
Controls:
• COMP:setstheamountofcompression,from0to100.• LEVEL: changes the output level of the compressor, from -15 dB to
+15dB.
figure7.26

7 - Stomp Module 105
AmpliTube 3
7.3.3.2 Dcomp
Thiseffectismodeledafteravintagecompressionstomppedal(figure7.27).
Controls:
• OUTPUT:setstheoutputlevelfortheeffect,from–infto0.0dB.• SENSITIVITY:setsthesensitivityofthecompression,from0to10.
figure7.27

7 - Stomp Module106
AmpliTube 3
7.3.4 EQ
7.3.4.1 7 Band Graphic
Thismodelisaclean,highlyeffective1octavegraphicequalizer,capableoffinetuninganddialinginthatperfecttone.Itisalsoveryusefulwhenyouneedto“push”thesignalforthenextstompboxoramp(figure7.28).
Controls:
• FREQUENCY BAND LEVEL:eachfrequencybandisoneoctaveapartandallowsfor+/-15dBofadjustment.Thecontrolsinclude100Hz,200Hz,400Hz,800Hz,1.6kHz,3.2kHz,6.4kHz.
• LEVEL:setstheoutputlevelofthegraphicEQ,from-15dBto+15dB.
figure7.28

7 - Stomp Module 107
AmpliTube 3
7.3.4.2 10 Band Graphic
IKMultimediaproprietary10BandGraphicEQ.(figure7.29)
Controls:
• BANDS:31,62,125,250,500,1k,2k,4k,8k,16k.Eachbandhas+/-15dBofboost/cut.
• GAIN:thegainsliderboostsorcuttheoveralllevelby+/-15dB.
figure7.29

7 - Stomp Module108
AmpliTube 3
7.3.5 Filter
7.3.5.1 Envelope Filter
Thisstompisanadvancedfiltereffect.Itusestheenvelopeoftheincomingsignal to control a synthesizer style filter. It is capable of sounds rangingfromverysimpleautowaheffects toextremeneverbeforeheardfilteringeffects(figure7.30).
Controls:
• FREQ:setsthecutofffrequencyofthefilter,from40Hzto20,480Hz.• RESO:setstheresonanceofthefilter,from0.30to10.• DEPTH: changes the amount of effect that the envelope has on the
filter,from0%to100%.• MODE:thesecontrolchangethetypeoffilterusedfortheeffect.• 12/24: sets theslopeof the filter,either12dBperoctaveor24dB
peroctave.• HP/BP/LP:sets thetypeof filterbeingused,eitherhighpass,band
pass,orlowpass.
figure7.30
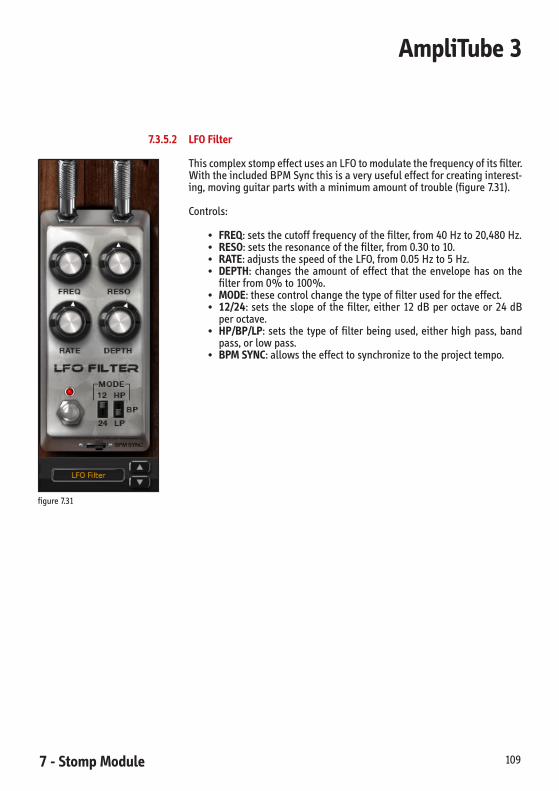
7 - Stomp Module 109
AmpliTube 3
7.3.5.2 LFO Filter
ThiscomplexstompeffectusesanLFOtomodulatethefrequencyofitsfilter.WiththeincludedBPMSyncthisisaveryusefuleffectforcreatinginterest-ing,movingguitarpartswithaminimumamountoftrouble(figure7.31).
Controls:
• FREQ:setsthecutofffrequencyofthefilter,from40Hzto20,480Hz.• RESO:setstheresonanceofthefilter,from0.30to10.• RATE:adjuststhespeedoftheLFO,from0.05Hzto5Hz.• DEPTH: changes the amount of effect that the envelope has on the
filterfrom0%to100%.• MODE:thesecontrolchangethetypeoffilterusedfortheeffect.• 12/24: sets theslopeof the filter,either12dBperoctaveor24dB
peroctave.• HP/BP/LP:sets thetypeof filterbeingused,eitherhighpass,band
pass,orlowpass.• BPM SYNC:allowstheeffecttosynchronizetotheprojecttempo.
figure7.31

7 - Stomp Module110
AmpliTube 3
7.3.5.3 Rezo
Auniqueeffectthatcanaddsynth-likedronesandsustainingresonancestoyourparts.Makeyourguitarsoundlikeasitarorlikeasynth-dronetocre-atesonicresonancestosingonandcontrolthenoteswithyourcontrollertocreatearpeggiosandstepswhileplaying(figure7.32).
Youhave4resonatingvoicesthatcanbetunedindependentlyfromnoteE0tonoteB7,inhalftonesteps.Forexample,ifyouwanttocreatearesonatingCMajorchord,justsetthefirstthreevoicestoC3,E3andG3.
By moving the All slider you can shift the recently created Chord withoutchangingtheintervalsbetweenthevoices.
YoucansetthedesiredvoicenotebynotenumberorbyfrequencyinHz.
Controls:
• 1-4 SLIDERS:setsthepitchforeachresonatingvoice.• 1-4 VALUE DISPLAY:displayswhichnoteeachvoiceistunedon.• NOTE/FREQUENCY SWITCH:turnOnthisswitchtohavethetuningof
eachvoicedisplayedasanote.TurnthisOfftohavethetuningofeachvoicetobedisplayedasfrequencyinHz.
• ALL:shiftsallresonatingnotesbythesameamountkeepingrelativeintervalsbetweenvoicesidentical.
• RES:setstheamountofresonanceforeachvoice,frommintomax.Whensettomaxthenotewillsustainbyitself,whensettominthevoicewillnotberesonating
• SCALE: the Rezo is setup by default to span over a chromatic scalewhenyousettheresonatingvoices,meaningthatallhalftonesarepossible.Ifyouwanttosetanotherscaleandwanttoremovenotesfromthechromaticscalejustopenthismenuandleaveononlythenotesyouneed.
• FILTER:determinesthebrightnessoftheresonatingvoices,fromdark(lowerpositions)tobright(upperpositions).
• MIX:setstheamountofresonatingnotesyouwanttohear.Whenthecontrol isatminyou’llonlyhear theoriginalsound,when fullyupyou’llonlyheartheeffectedsound.
• OUT:theresonatingnotescanbecomeveryloud.UsethiscontroltoadjusttheoveralloutputleveloftheRezonator.
figure7.32

7 - Stomp Module 111
AmpliTube 3
7.3.5.4 Step Filter
Apowerfulanddeepbeatsynchronizedfiltereffect.YoucanapplyLow/HighandBandpassanalogmodeledfilteringonfreelycustomizablepatternstoaddgrooveandrhythmicpulsingtoyourparts.Ifyouwant,thiseffectcouldmakeyourguitarsandbasspartstosoundlikearhythmicsynth(figure7.33).
Controls:
• CUTOFF:setsthecentercutofffrequencyofthefilter.Thisisthecutofffrequencythefilterwillhavewhenthestepsaresettohalfposition.
• STEP BAR:clickontheStepstoseteachsteplevel.Youcanalsodrawacurvewhileholdingthemousewhiledraggingovermultiplesteps.
• RES: sets the center resonance of the filter. This is the resonanceamountthefilterwillhavewhenthestepsaresettohalfposition.
• DEPTH:setshowdeepthefilterismodulatedbythesteps.• HP/BP/LP:setswhichkindoffilterwillbeused:HP:highpass,BP:
bandpass,LP:lowpass.• 12/24:setsthesteepnessofthefilter,12dB/octwillbesofter,24dB/
octwillbesteeper.• DEST:setswhatismodulatedbythestepsbetweenfilterCutoffand/
orfilterResonance.AtfullminimumpositiononlyCutofffrequencyismodulated,atmaxpositiononlyResonanceismodulated.
• DIVISION:setswhattimeintervaleachsteprepresents.• STEPS:setsthenumberofstepsthecyclewillconsistof.• MODE:whensettoFreethecyclewillbecontinuousandwillalways
coverallthestepsthatarespecifiedintheStepsparameter.WhensettoStrikethecyclewillre-starteachtimeachordoranoteisplayed.
• SWING:increasethiscontroltogivetothestepsaswingtypequan-tization.
• BPM SYNC:allowstheeffecttosynchronizetotheprojecttempo.figure7.33
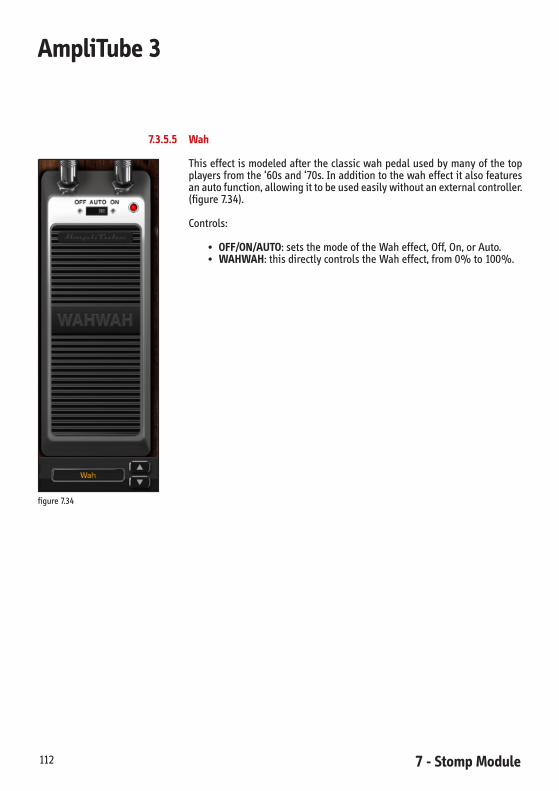
7 - Stomp Module112
AmpliTube 3
7.3.5.5 Wah
Thiseffectismodeledaftertheclassicwahpedalusedbymanyofthetopplayersfromthe‘60sand‘70s.Inadditiontothewaheffectitalsofeaturesanautofunction,allowingittobeusedeasilywithoutanexternalcontroller.(figure7.34).
Controls:
• OFF/ON/AUTO:setsthemodeoftheWaheffect,Off,On,orAuto.• WAHWAH:thisdirectlycontrolstheWaheffect,from0%to100%.
figure7.34
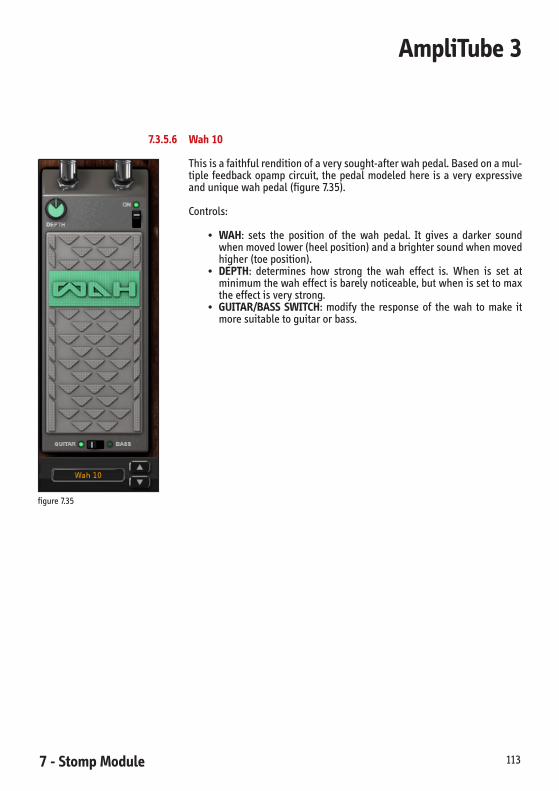
7 - Stomp Module 113
AmpliTube 3
7.3.5.6 Wah 10
Thisisafaithfulrenditionofaverysought-afterwahpedal.Basedonamul-tiple feedbackopampcircuit, thepedalmodeledhere isaveryexpressiveanduniquewahpedal(figure7.35).
Controls:
• WAH: sets the position of the wah pedal. It gives a darker soundwhenmovedlower(heelposition)andabrightersoundwhenmovedhigher(toeposition).
• DEPTH: determines how strong the wah effect is. When is set atminimumthewaheffectisbarelynoticeable,butwhenissettomaxtheeffectisverystrong.
• GUITAR/BASS SWITCH: modify the response of the wah to make itmoresuitabletoguitarorbass.
figure7.35
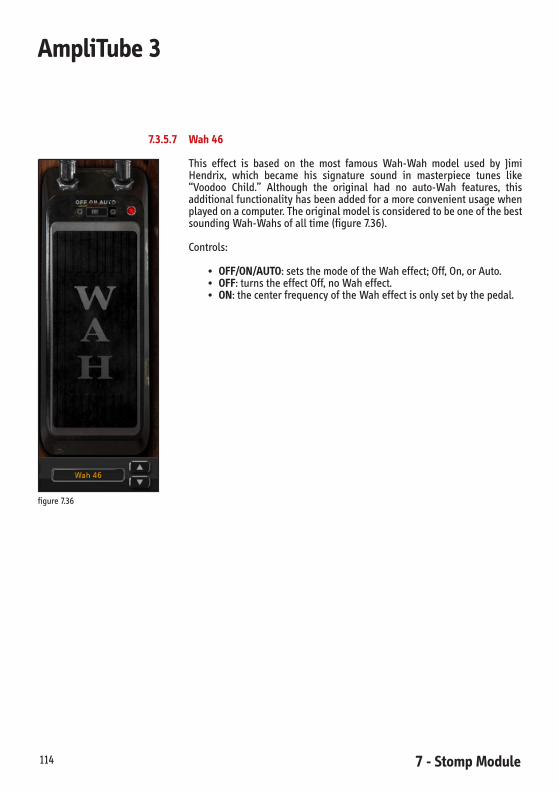
7 - Stomp Module114
AmpliTube 3
7.3.5.7 Wah 46
This effect is based on the most famous Wah-Wah model used by JimiHendrix, which became his signature sound in masterpiece tunes like“Voodoo Child.” Although the original had no auto-Wah features, thisadditionalfunctionalityhasbeenaddedforamoreconvenientusagewhenplayedonacomputer.TheoriginalmodelisconsideredtobeoneofthebestsoundingWah-Wahsofalltime(figure7.36).
Controls:
• OFF/ON/AUTO:setsthemodeoftheWaheffect;Off,On,orAuto.• OFF:turnstheeffectOff,noWaheffect.• ON:thecenterfrequencyoftheWaheffectisonlysetbythepedal.
figure7.36

7 - Stomp Module 115
AmpliTube 3
7.3.5.8 Wah 47
Thiseffect isbasedontheWahpedalusedbythemostinfluentialguitar-istsofthelate‘60sand‘70s.TheAutofunctionallowsyoutousethiseffectwithoutanexternalcontroller(figure7.37).Thisisagreatfeature!
Controls:
• OFF/ON/AUTO:setsthemodeoftheWaheffect,Off,On,orAuto.• WAHWAH:thisdirectlycontrolsthewaheffect,from0%to100%.
figure7.37

7 - Stomp Module116
AmpliTube 3
7.3.6 Fuzz
7.3.6.1 Class Fuzz
Thiseffect isbasedon the fuzzpedal thatcanbeheardon JimiHendrix’searlyrecordings(figure7.38).
Controls:
• VOLUME:setstheoutputvolumeofthestompeffect,from-infto0.0dB.
• DRIVE:setsthefuzzsoundbyincreasingordecreasingtheamountofdistortion,from0to10.
figure7.38
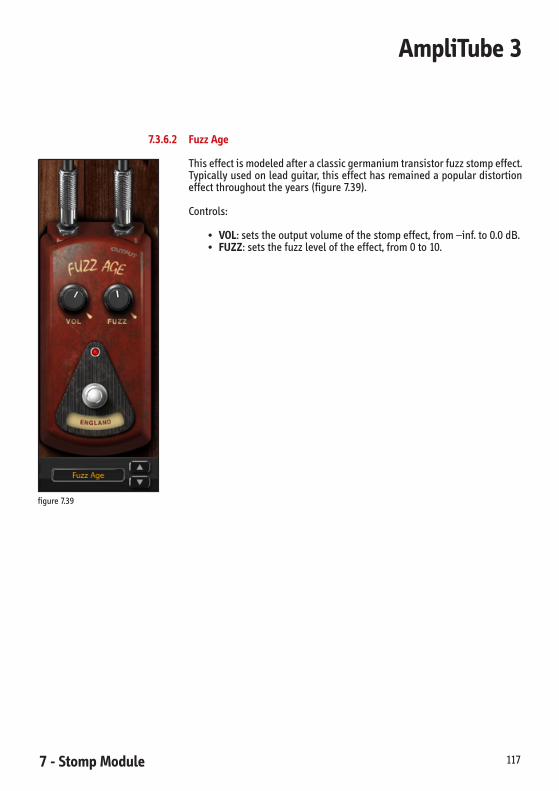
7 - Stomp Module 117
AmpliTube 3
7.3.6.2 Fuzz Age
Thiseffectismodeledafteraclassicgermaniumtransistorfuzzstompeffect.Typicallyusedonleadguitar,thiseffecthasremainedapopulardistortioneffectthroughouttheyears(figure7.39).
Controls:
• VOL:setstheoutputvolumeofthestompeffect,from–inf.to0.0dB.• FUZZ:setsthefuzzleveloftheeffect,from0to10.
figure7.39
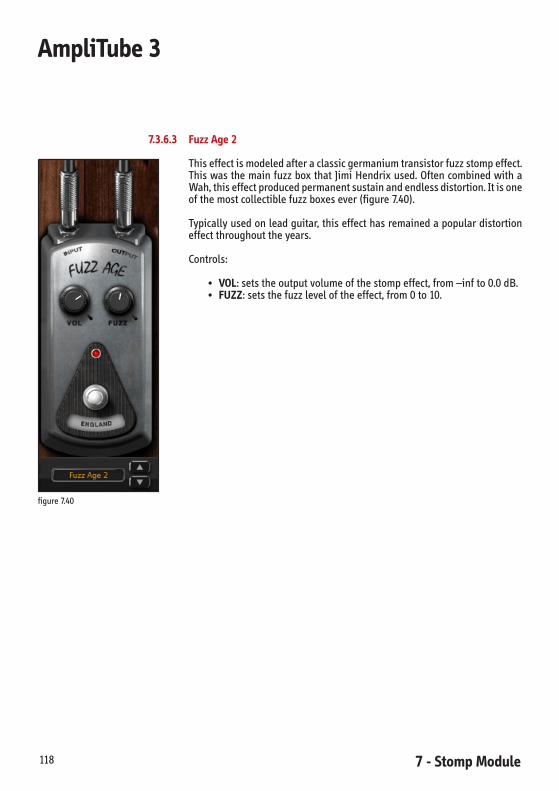
7 - Stomp Module118
AmpliTube 3
7.3.6.3 Fuzz Age 2
Thiseffectismodeledafteraclassicgermaniumtransistorfuzzstompeffect.ThiswasthemainfuzzboxthatJimiHendrixused.OftencombinedwithaWah,thiseffectproducedpermanentsustainandendlessdistortion.Itisoneofthemostcollectiblefuzzboxesever(figure7.40).
Typicallyusedonleadguitar,thiseffecthasremainedapopulardistortioneffectthroughouttheyears.
Controls:
• VOL:setstheoutputvolumeofthestompeffect,from–infto0.0dB.• FUZZ:setsthefuzzleveloftheeffect,from0to10.
figure7.40

7 - Stomp Module 119
AmpliTube 3
7.3.6.4 FuzzOne
JimiHendrixbeganusingthisfuzzboxwhileplayinginNewYorkCitybeforefoundingtheExperience.ItssoundscanbeheardintheenormouslypopularRollingStonessong“Satisfaction”(figure7.41).
Controls:
• VOLUME: sets the output volume of the stomp effect, from –inf to0.0dB.
• ATTACK:adjusts thesoundcharacterbyhavingmoreor lessdistor-tion.
figure7.41

7 - Stomp Module120
AmpliTube 3
7.3.6.5 Octa-V
Thiseffectwasfirstusedon“PurpleHaze”and“Fire.”Itisafuzzboxwithfrequency-doublingcircuitry thatproducesasecondnoteanoctaveabovethefundamentalnote(figure7.42).
Controls:
• VOLUME: sets the output volume of the stomp effect, from –inf to0.0dB.
• DRIVE:setstheamountofdistortiontheunitwillproduce,from0to10.Thehigheroctavecanbemoredistinct formediumpositionsofthiscontrol.
figure7.42
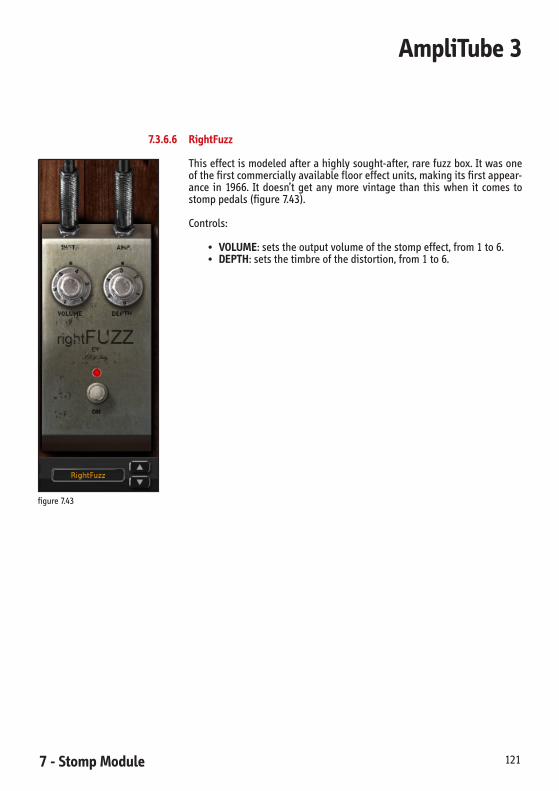
7 - Stomp Module 121
AmpliTube 3
7.3.6.6 RightFuzz
Thiseffectismodeledafterahighlysought-after,rarefuzzbox.Itwasoneofthefirstcommerciallyavailableflooreffectunits,makingitsfirstappear-ance in 1966. It doesn’t get any more vintage than this when it comes tostomppedals(figure7.43).
Controls:
• VOLUME:setstheoutputvolumeofthestompeffect,from1to6.• DEPTH:setsthetimbreofthedistortion,from1to6.
figure7.43

7 - Stomp Module122
AmpliTube 3
7.3.6.7 XS Fuzz
Thiseffect ismodeledafter theeffectusedon the title trackof thealbum“AxisBoldasLove.”Theoriginalstompcanalsobeheardonthe“BandofGypsies”andvariousJimiHendrixrecordingspost1968(figure7.44).
Controls:
• VOLUME: sets the output volume of the stomp effect, from –inf to0.0dB.
• DRIVE:setsthedistortionamount,from0to10.
figure7.44

7 - Stomp Module 123
AmpliTube 3
7.3.7 Modulation
7.3.7.1 Analog Flanger
This effect is based on one of the most flexible flangers ever made. Thisunit delivers everything from classic tape flange to over-the-top sweeps,vibratos,chorus,andmore!Perfectforaddingclassicmetal-styleflangetoyourrig(figure7.45).
Controls:
• MANUAL:setsthetimbreoftheflangingeffect.• DEPTH: sets the amount of modulation the LFO will apply to the
flangingeffect.IfDepthiszero,you’llgeta“static”flangingeffect.• RATE: sets thespeedof theLFOmodulation thatwillbeapplied to
theflangingeffect.• RES:setstheresonancetheflangereffectwillproduce.
figure7.45

7 - Stomp Module124
AmpliTube 3
7.3.7.2 Chorus
ThischorusismodeledafteraclassicDigitalChorusstompbox(figure7.46).
Controls:
• RATE:setstherateofthechoruseffect,from0to10.• DEPTH:setstheintensityofthechoruseffect,from0to10.• LEVEL:setstheinputlevelofthestompeffect,rangesfrom0to10.• BPM SYNC:allowstheeffecttosynchronizetotheprojecttempo.
figure7.46

7 - Stomp Module 125
AmpliTube 3
7.3.7.3 Chorus-1
Amodelofaclassicbucket-brigadeanalogChorus/Vibratounit.ItprovidesbothanalogChorusandanalogVibratoeffects,when inChorusmode themodulationwillbelushandslow,wheninVibratoeffectthemodulationwillbefasterandmorenoticeable(figure7.47).
Controls:
• LEVEL:setstheinputlevel.Rangeisfrom–15dBto+15dB.• CHORUS:setstheintensity(ordepth)oftheChoruseffect,from0to
10.• VIBRATO DEPTH:setstheintensityoftheVibratoeffect,from0to10.• VIBRATO RATE:setstherateoftheVibratoeffect,from0to10.• VIBRATO/CHORUS SWITCH:enablesVibratoorChorusmodes,when
VibratomodeisenabledthecorrespondingLEDwillilluminate.• BPM SYNC:allowstheeffecttosynchronizetotheprojecttempo.
figure7.47
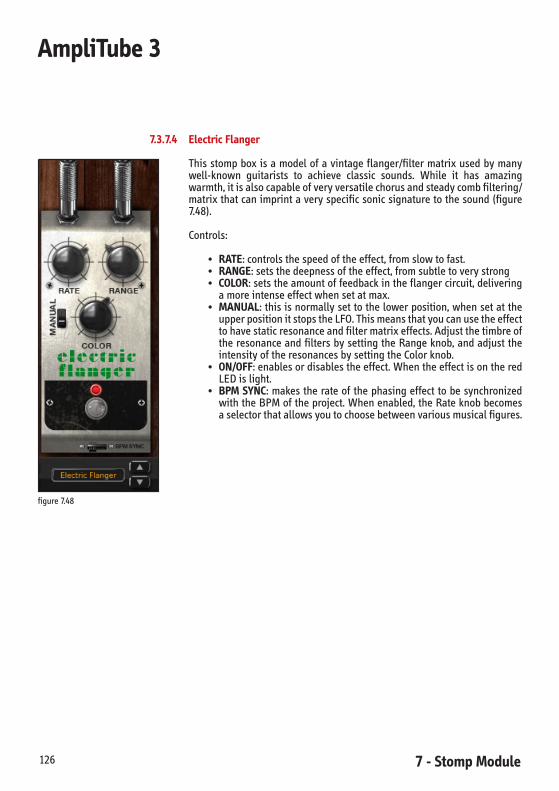
7 - Stomp Module126
AmpliTube 3
7.3.7.4 Electric Flanger
Thisstompboxisamodelofavintageflanger/filtermatrixusedbymanywell-known guitarists to achieve classic sounds. While it has amazingwarmth,itisalsocapableofveryversatilechorusandsteadycombfiltering/matrixthatcanimprintaveryspecificsonicsignaturetothesound(figure7.48).
Controls:
• RATE:controlsthespeedoftheeffect,fromslowtofast.• RANGE:setsthedeepnessoftheeffect,fromsubtletoverystrong• COLOR:setstheamountoffeedbackintheflangercircuit,delivering
amoreintenseeffectwhensetatmax.• MANUAL:thisisnormallysettothelowerposition,whensetatthe
upperpositionitstopstheLFO.Thismeansthatyoucanusetheeffecttohavestaticresonanceandfiltermatrixeffects.AdjustthetimbreoftheresonanceandfiltersbysettingtheRangeknob,andadjusttheintensityoftheresonancesbysettingtheColorknob.
• ON/OFF:enablesordisablestheeffect.WhentheeffectisontheredLEDislight.
• BPM SYNC:makestherateofthephasingeffecttobesynchronizedwiththeBPMoftheproject.Whenenabled,theRateknobbecomesaselectorthatallowsyoutochoosebetweenvariousmusicalfigures.
figure7.48
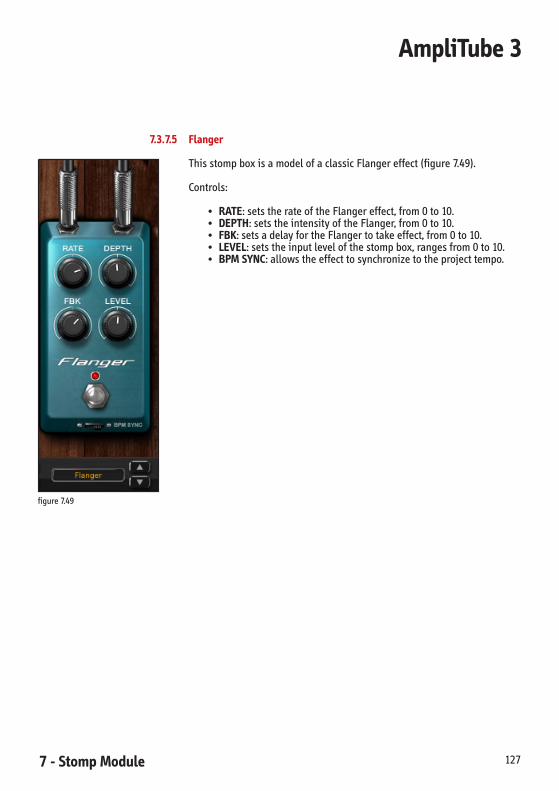
7 - Stomp Module 127
AmpliTube 3
7.3.7.5 Flanger
ThisstompboxisamodelofaclassicFlangereffect(figure7.49).
Controls:
• RATE:setstherateoftheFlangereffect,from0to10.• DEPTH:setstheintensityoftheFlanger,from0to10.• FBK:setsadelayfortheFlangertotakeeffect,from0to10.• LEVEL:setstheinputlevelofthestompbox,rangesfrom0to10.• BPM SYNC:allowstheeffecttosynchronizetotheprojecttempo.
figure7.49

7 - Stomp Module128
AmpliTube 3
7.3.7.6 Metal Flanger
This effect is modeled after one of the best and most musical modulationeffectsever.Aclassicassociationwithaniconic ‘80sguitaristmadepriceseruptsand flooded themarketwithreissues.Still,no flanger ismorerec-ognizable,makingthisperfectforhard-rockandmetaltone(figure7.50).
Controls:
• MANUAL:setsthetimbreoftheflangingeffect.• WIDTH: sets the amount of modulation the LFO will apply to the
flangἀingeffect.IfWidthiszero,you’llgeta“static”flangingeffect.• SPEED:controlstheamountofhightonesonthesound.• REGEN:setstheamountoffeedbacktheinternalflangereffectwill
have.
figure7.50
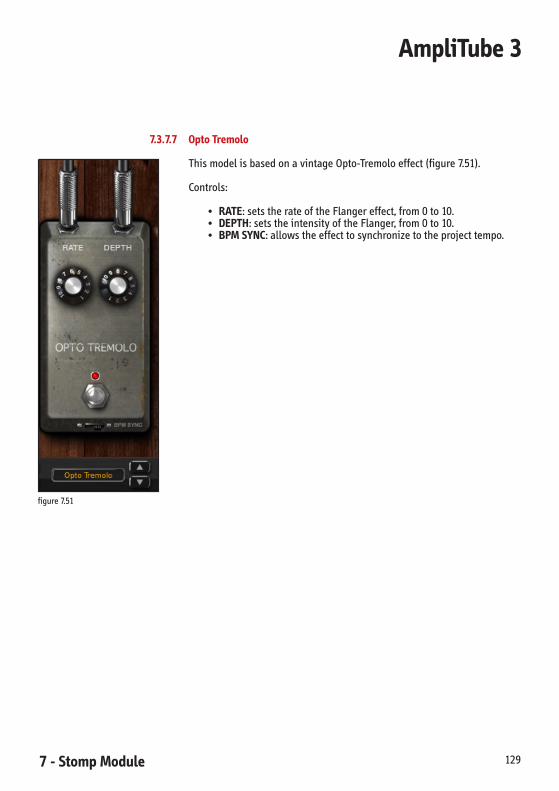
7 - Stomp Module 129
AmpliTube 3
7.3.7.7 Opto Tremolo
ThismodelisbasedonavintageOpto-Tremoloeffect(figure7.51).
Controls:
• RATE:setstherateoftheFlangereffect,from0to10.• DEPTH:setstheintensityoftheFlanger,from0to10.• BPM SYNC:allowstheeffecttosynchronizetotheprojecttempo.
figure7.51

7 - Stomp Module130
AmpliTube 3
7.3.7.8 Phaze Nine
Thiseffect isbasedononeof themostpopularphasepedalsofall times.Usedbyawiderangeoffirst-classguitarists,thisunitcouldaddalittlebitofshimmertoyoursolosorgenerateasmooth,wateryeffectwhileplayingchordsandmutedstrumming (figure7.52).Didyou try thePhazeNineonbass,keyboards,orvocals?
Controls:
• SPEED:controlsthephaseLFOrate.
figure7.52

7 - Stomp Module 131
AmpliTube 3
7.3.7.9 Phazer10
AmodelofaclassicanalogmultimodePhaserstompbox(figure7.53).
Controls:
• INTENSITY:selectsoneofthefourdifferentPhasermodes.Fromlefttorighttheperceivedeffectintensitywillincrease.
• SPEED:setsthespeedofthemodulation,from0to10.
figure7.53

7 - Stomp Module132
AmpliTube 3
7.3.7.10 Small Phazer
Thiseffectisamodelofaclassicanalogphaseshifter,capableofarangeofphasereffectsfromgentletooutlandishswirlingeffects.Youmaywonderwhyitiscalled“small”whenyouhearit(figure7.54).
Controls
• RATE:controlsthespeedoftheeffect,fromslowtofast.• COLOR:setittothelowerpositionforamoregentlephasingeffect,
orsetitattheupperpositionforamorepronouncedanddeepphas-ingeffect.
• BPM SYNC:makestherateofthephasingeffecttobesynchronizedwiththeBPMoftheproject.Whenenabledtherateknobbecomesaselectorthatallowstochoosebetweenvariousmusicalfigures.
figure7.54
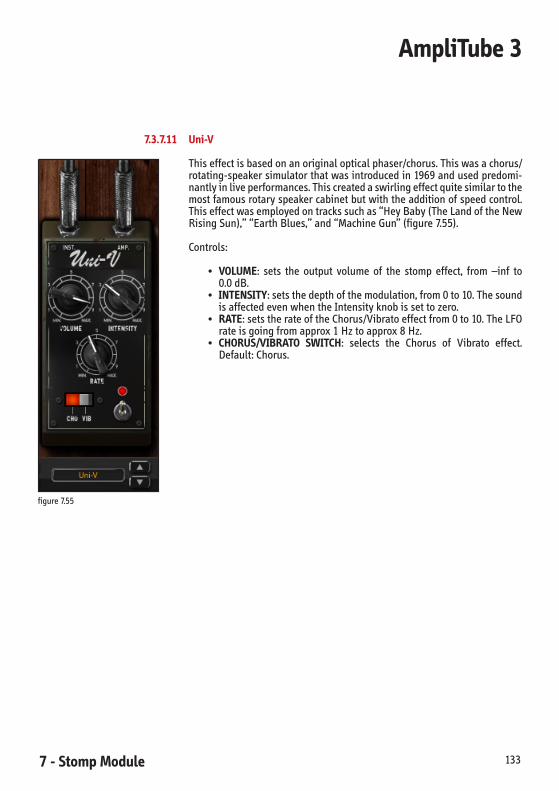
7 - Stomp Module 133
AmpliTube 3
7.3.7.11 Uni-V
Thiseffectisbasedonanoriginalopticalphaser/chorus.Thiswasachorus/rotating-speakersimulatorthatwasintroducedin1969andusedpredomi-nantlyinliveperformances.Thiscreatedaswirlingeffectquitesimilartothemostfamousrotaryspeakercabinetbutwiththeadditionofspeedcontrol.Thiseffectwasemployedontrackssuchas“HeyBaby(TheLandoftheNewRisingSun),”“EarthBlues,”and“MachineGun”(figure7.55).
Controls:
• VOLUME: sets the output volume of the stomp effect, from –inf to0.0dB.
• INTENSITY:setsthedepthofthemodulation,from0to10.ThesoundisaffectedevenwhentheIntensityknobissettozero.
• RATE:setstherateoftheChorus/Vibratoeffectfrom0to10.TheLFOrateisgoingfromapprox1Hztoapprox8Hz.
• CHORUS/VIBRATO SWITCH: selects the Chorus of Vibrato effect.Default:Chorus.
figure7.55

7 - Stomp Module134
AmpliTube 3
7.3.8 Pitch
7.3.8.1 Harmonator
This effect is a 3 voice digital harmonizer effect. More than just a pitchshifter,thispedalwillcreate3separateharmonyvoiceswithindependentinterval values based on a musical scale. Simply select the scale to use,selectthevoiceandthedesiredpitchandplay.Theharmonizednoteswillbeaccordingtotheselectedscale(figure7.56).
Controls:
• MIX:blendstheharmonizedvoicewiththeoriginalvoice,from0to100.
• KEY-SCALE:controlsthekeyandtypeofscalethatwillbeusedbytheharmonizerasareference.Ifyou’replayingasoloinEmajorsetthistoEMajor.Possiblescalestypesare:Major,Dorian,Phrygian,Lydian,Mixolydian,Minor,andLocrian.
• VOICE:controlsthepropertiesofeachofthe3voicesoftheharmo-nizer.
• LEVEL:independentlyadjuststhelevelofeachofthe3voices.• 1:selectsvoice1forediting.• 2:selectsvoice2forediting.• 3:selectsvoice3forediting.• INTERVAL: changes the interval of the selected voice, from octave
downtooctaveup.
figure7.56

7 - Stomp Module 135
AmpliTube 3
7.3.8.2 Octav
Thisstompeffectismodeledafteraclassicdualvoiceoctavepedal.Itwillproducetwoadditionalsounds,oneandtwooctavesbelowthedirectsignal(figure7.57).
Controls:
• OCT 2:setstheoutputlevelofthesecondoctaveeffect,from–infto0.00dB.
• OCT 1: sets the output level of the first octave effect, from –inf to0.00dB.
• DIRECT LEVEL:setstheoutputlevelofthedirectsignal,from–infto0.00dB.
figure7.57

7 - Stomp Module136
AmpliTube 3
7.3.8.3 Pitch Shifter
This effect shifts the pitch of the incoming signal. This new pitch shiftedsignalisblendedwiththeoriginalsoundtocreateharmonyguitarleadsorothertypesofdualpitcheffects(figure7.58).
Controls:
• COARSE: sets the coarse tuning of the pitch shifter. Measured inintervals,from-24to24.
• FINE:setsthefinetuningofthepitchshifter.Measuredincents,from-50to50.
• LEVEL:setstheoutputlevelofthepitchshiftedsound,from0to10.
figure7.58

7 - Stomp Module 137
AmpliTube 3
7.3.8.4 Wharmonator
Thiseffectismodeledafteroneofthemostextremeeffectsofalltime.Fromclassicshredtothemostaggressivemodernmetal,thiseffectisanessentialpartofanyextremeguitarrig(figure7.59).
Controls:
• HARMknob:setstheharmonicintervalrangeyoucanspanwiththeactionofthepedal.
• BENDknob:setsthebendingrangeyoucanspanwiththeactionofthepedal.
• MODE:setstheWharmonatoroperatingmode.• HARM: this mode gives both original and pitched signal mixed
together,usefultocreateharmonies.• BEND:thismodeonlygivesthepitchedsignal,usefultocreategreat
bendingeffects
figure7.59
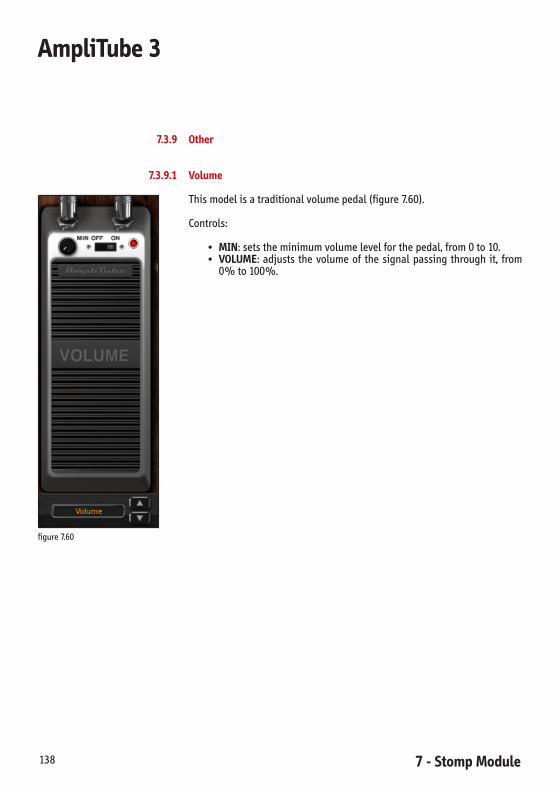
7 - Stomp Module138
AmpliTube 3
7.3.9 Other
7.3.9.1 Volume
Thismodelisatraditionalvolumepedal(figure7.60).
Controls:
• MIN:setstheminimumvolumelevelforthepedal,from0to10.• VOLUME: adjusts the volume of the signal passing through it, from
0%to100%.
figure7.60

7 - Stomp Module 139
AmpliTube 3
7.3.9.2 Step Slicer
Add programmed rhythmic parts to your power chords and phrases withthispowerfulandcreativebeatsyncedslicingeffect.Itcanbesetuptocre-ateanythingfromthemostamazingtremolostothemostcomplexrhythmeffectsthatalwaysstayinperfectsyncwiththebeat(figure7.61).
Controls:
• LEVEL: sets the amount of level modulation the steps will give. Atmin position the steps will not have effect, at maximum the rangewillbefull.
• STEP BAR:clickontheStepstoseteachsteplevel.Youcanalsodrawacurvewhileholdingthemousewhiledraggingovermultiplesteps.
• RAMP:setsthesteepnessofthelevelchangebetweensteps.Setitatlowerpositionstogetamoregate-likeeffectorsetittohigherposi-tionstogetasmoothereffect.
• DIVISION:setswhattimeintervaleachsteprepresent.• STEPS:setsthenumberofstepsthecyclewillconsistof.• MODE:WhensettoFreethecyclewillbecontinuousandwillalways
coverallthestepsthatarespecifiedintheStepsparameter.WhensettoStrikethecyclewillre-starteachtimeachordoranoteisplayed.
• SWING:increasethiscontroltogivetothestepsaswingtypequan-tization.
• BPM SYNC:allowstheeffecttosynchronizetotheprojecttempo.
figure7.61

7 - Stomp Module140
AmpliTube 3
7.3.9.3 Swell
Thisisan“autovolume”swellprocessorthatcanautomaticallycreatefan-tastic swell effects while playing without any manual intervention. Use itsubtlytoaddgroovetoyourrhythmpartsoruseitwithdeepersettingstocreatedreamingpadsorstring-likesounds(figure7.62).
Controls:
• DEPTH:setsthedepthofthevolumeswell,indB.Bydefaultthedepthisatmaxposition,meaningthatthevolumewillstartfromsilence.Byloweringthiscontrolyou’llmaketheeffect tostart theswellphasefrom a level which is higher than silence, up to min position thatmakestheeffecttohavenoaction.
• SENS: this control sets the sensitivity for the Swell to recognize anewnoteorchordandthereforestartanewSwellcycle.Setithigherif you want the Swell cycle to start even at the beginning of softerpassages,orsetitlowerifyouwanttheSwellcycletoonlystartforlouderstrikes.
• TIME:setsthelengthoftheSwellcycle.DuringtheSwellcycle(timetheswelltakesto“open”thepowerLEDbecomesred(itisnormallygreen).Thishelps to immediately recognizewhen theswell is trig-gered.
• BPM SYNC:allowstheeffecttosynchronizetotheprojecttempomak-ingtheswelltimetobespecifiedinmusicalfigures.
figure7.62

7 - Stomp Module 141
AmpliTube 3
7.4 Stomp Models (Table)
Stomp Models Based on*
Delay
Delay IKMultimedia
EchoMan ElectroHarmonix®MemoryMan™
TapDelay IKMultimedia
Distortion
BigPig ElectroHarmonix®BigMuffPi™
Crusher IKMultimedia
DiodeOverdrive IKMultimedia
Distortion Boss®DS-1™Distortion
Feedback Boss®DF-2™Superfeedbacker&Distortion
MetalDistortion Boss®MT-2™Metal-Zone
MetalDistortion2 Boss®HM-2™HeavyMetal
Overdrive Boss®SD-1™Distortion
OverScream Ibanez®TubeScreamer®TS-9™
PROdrive ProCoRAT™Distortion
TheAmbass’dor Marshall®Guv'Nor™
Dynamics
Compressor IKMultimedia
Dcomp MXR®Dynacomp™
EQ
7BandGraphic IKMultimedia
10BandGraphic IKMultimedia
Filter
EnvelopeFilter IKMultimedia
LFOFilter IKMultimedia
Rezo IKMultimedia
StepFilter IKMultimedia
Wah IKMultimedia
Wah10 Ibanez®WH-10™
Wah46 Vox®WahV846™
Wah47 Vox®Wah847™
Fuzz
ClassFuzz RogerMayer™ClassicFuzz®
FuzzAge Arbiter®FuzzFace®
FuzzAge2 Arbiter®FuzzFace®

7 - Stomp Module142
AmpliTube 3
FuzzOne Maestro®FuzzTone™
Octa-V RogerMayer™Octavia®
RightFuzz Mosrite®Fuzzrite®
XSFuzz RogerMayer™AxisFuzz®
Modulation
AnalogFlanger Boss®BF-2™Flanger
Chorus IKMultimedia
Chorus-1 Boss®CE-1™Chorus
ElectricFlanger Electro-Harmonix®ElectricMistress™
Flanger IKMultimedia
MetalFlanger MXR®Flanger117™
OptoTremolo Fender®SuperReverb®AmpOpto-Tremolo™
PhazeNine MXR®Phase90™
Phazer10 MXR®Phase100™
SmallPhazer Electro-Harmonix®SmallStone™
Uni-V Univox™Uni-vibe™
Pitch
Harmonator IKMultimedia
Octav Boss®OC-2™Octaver
PitchShifter IKMultimedia
Wharmonator Digitech®Wahmmy™WH-1™
Other
Volume IKMultimedia
StepSlicer IKMultimedia
Swell IKMultimedia
*Allproductnamesandtrademarksarethepropertyoftheirrespectiveowners,whichareinnowayassociatedoraffiliatedwithIKMultimedia.ProductnamesareusedsolelyforthepurposeofidentifyingthespecificproductsthatwerestudieddurinoIKMultimedia’ssoundmodeldevelop-ment and for describing certain types of tones produced with IK Multimedia’s digital modelingtechnology.Useofthesenamesdoesnotimplyanycooperationorendorsement.
ARBITER®FUZZFACE®isaregisteredtrademarkofArbiterGroupPlc.BOSS®,DS-1™,DF-2™,MT-2™,HM-2™,SD-1™,BF-2™,CE-1™,OC-2™aretrademarksorregis-teredtrademarksofRolandCorporation.DIGITECH®WHAMMY™WH-1™isaregisteredtrademarkofHarmanInternational Industries,Incorporated.ELECTRO-HARMONIX®, Memory Man™, Big Muff Pi™, Electric Mistress™, Small Stone™ aretrademarksorregisteredtrademarksofNewSensorCorporation.FUZZRITE®isaregisteredtrademarkofAndyJ.Moseley.IBANEZ®,TubeScreamer®TS-9™,WH-10™aretrademarksorregisteredtrademarksofHoshinoGakkiCo.Ltd.Corporation.MAESTRO®FUZZTONE™isaregisteredtrademarkofGibsonElectronics.MARSHALL®,Guv’Nor™aretrademarksorregisteredtrademarksofMarshallAmplificationPlc.MOSRITE®isaregisteredtrademarkofLorettaMoseley.MXR®,Dynacomp™,Flanger117™,Phase90™,Phase100™aretrademarksorregisteredtrade-

7 - Stomp Module 143
AmpliTube 3
marksofAppliedResearchandTechnology,Inc.PROCORAT™isatrademarkofProCoSound,Inc.ROGER MAYER™, Classic Fuzz®, Axis Fuzz®, Octavia®, are trademarks and registered trade-marksofRogerMayer.UNI-VIBE™isatrademarkofKorgUSACorporation.UNIVOX™isatrademarkofKorgUSACorporation.VOX®,WahV846™,Wah847™are trademarksor registered trademarksofVOXAmplificationLtd.

7 - Stomp Module144
AmpliTube 3
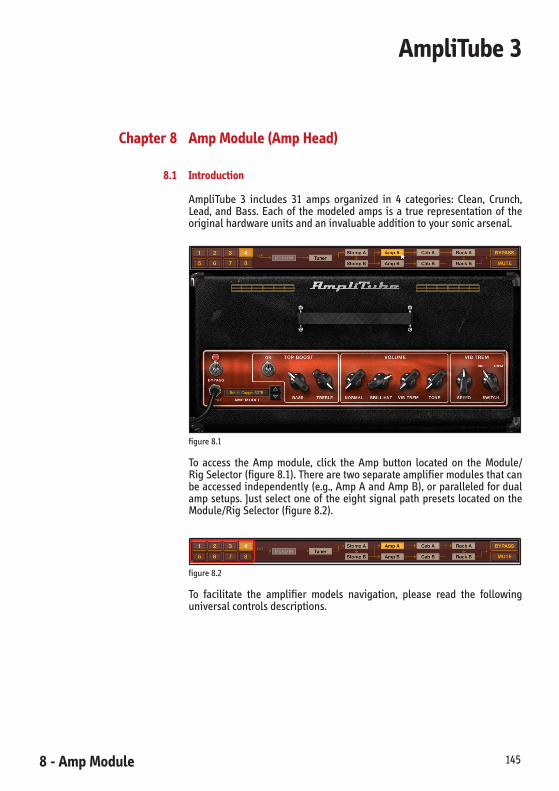
8 - Amp Module 145
AmpliTube 3
Chapter 8 Amp Module (Amp Head)
8.1 Introduction
AmpliTube 3 includes 31 amps organized in 4 categories: Clean, Crunch,Lead,andBass.Eachof themodeledamps isa true representationof theoriginalhardwareunitsandaninvaluableadditiontoyoursonicarsenal.
figure8.1
To access the Amp module, click the Amp button located on the Module/RigSelector(figure8.1).Therearetwoseparateamplifiermodulesthatcanbeaccessedindependently(e.g.,AmpAandAmpB),orparalleledfordualampsetups.JustselectoneoftheeightsignalpathpresetslocatedontheModule/RigSelector(figure8.2).
figure8.2
To facilitate the amplifier models navigation, please read the followinguniversalcontrolsdescriptions.
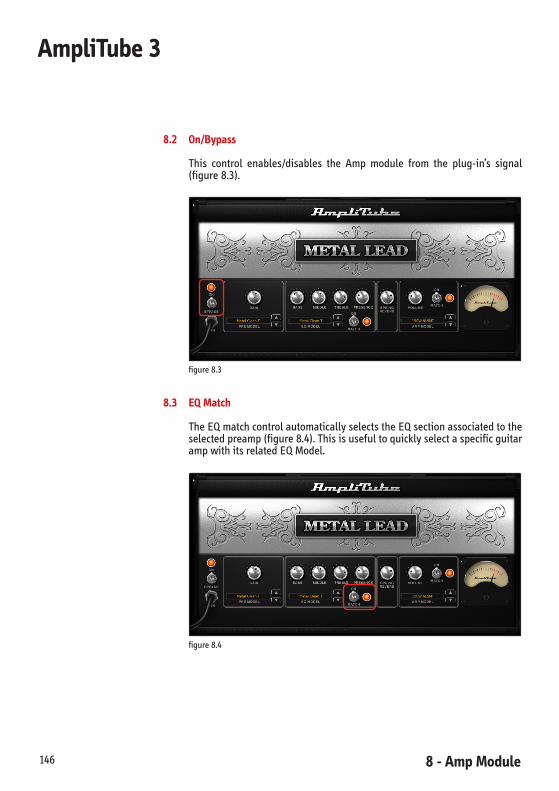
8 - Amp Module 146
AmpliTube 3
8.2 On/Bypass
This control enables/disables the Amp module from the plug-in’s signal(figure8.3).
figure8.3
8.3 EQ Match
TheEQmatchcontrolautomaticallyselectstheEQsectionassociatedtotheselectedpreamp(figure8.4).ThisisusefultoquicklyselectaspecificguitarampwithitsrelatedEQModel.
figure8.4

8 - Amp Module 147
AmpliTube 3
8.4 Amp Match
The Amp match control selects the power amp stage associated to theselectedpreamp(figure8.5).
figure8.5
TheEQandAmpmatchcontrolsallowsyou toselectaspecificvintageorboutiqueguitarriginseconds,givingyouan“instanttonegratification”…
8.5 Amp Model Types and Components
SeveralAmpliTube3ampmodels(typicallythosethatwerealreadyincludedinAmpliTube2,AmpliTubeJimiHendrixandsomeoftheampsincludedinAmpliTube Metal) contain separate stages modeling that can be individu-allyselected.Inthesecases,theAmpmoduleisdividedintothreeseparatemodelsPre,EQ,and(Power)Amp.Thisallowsyoutodesigncustomampschoosingdifferentcomponentsfromavarietyoftop-notchamplifiers.
Thisfeatureallowsyoutocreateyourownmixtureofstagesandpromotesexperimentation.However,wearestillobsessedwithmodels’accuracy.Forthis reason, and to reach a higher level of sonic fidelity (when comparedwith the original real amps) we added more details and finesse to ourmodelingtechniquesandimprovedthelevelofinteractionbetweentheampblocksintheDSP.Basically,makingawholesinglemodeloftheentireamp.That’swhyallrecentmodelsaremodeledasanentireamp,withoutthepos-sibilitytoselectsingleinternalstages(Preamp,EQ,andPoweramp).Thesearecalled“non-flexi”amps.
Award-winning“PoweredbyAmpliTube”productslikeAmpliTubeFenderorAmpegSVXusedthissolutiontoachievemaximumaccuracywhilemodel-ingtheoriginalamps.
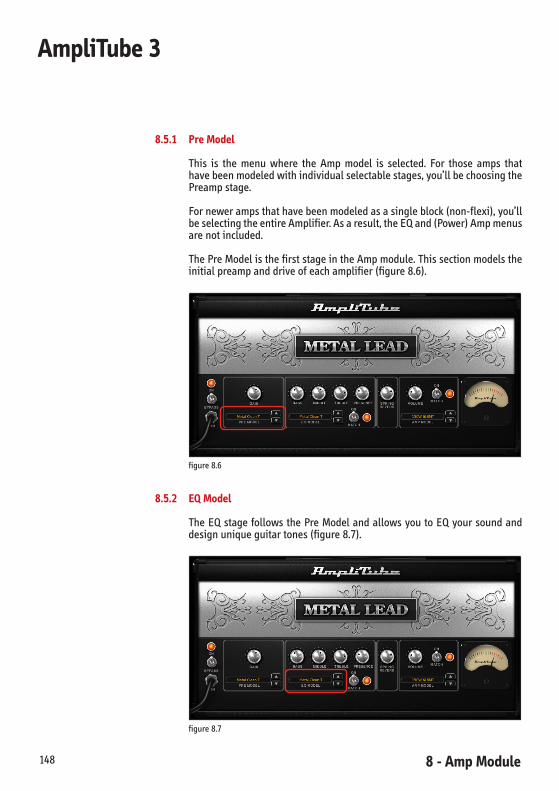
8 - Amp Module 148
AmpliTube 3
8.5.1 Pre Model
This is the menu where the Amp model is selected. For those amps thathavebeenmodeledwithindividualselectablestages,you’llbechoosingthePreampstage.
Fornewerampsthathavebeenmodeledasasingleblock(non-flexi),you’llbeselectingtheentireAmplifier.Asaresult,theEQand(Power)Ampmenusarenotincluded.
ThePreModelisthefirststageintheAmpmodule.Thissectionmodelstheinitialpreampanddriveofeachamplifier(figure8.6).
figure8.6
8.5.2 EQ Model
TheEQstagefollowsthePreModelandallowsyoutoEQyoursoundanddesignuniqueguitartones(figure8.7).
figure8.7
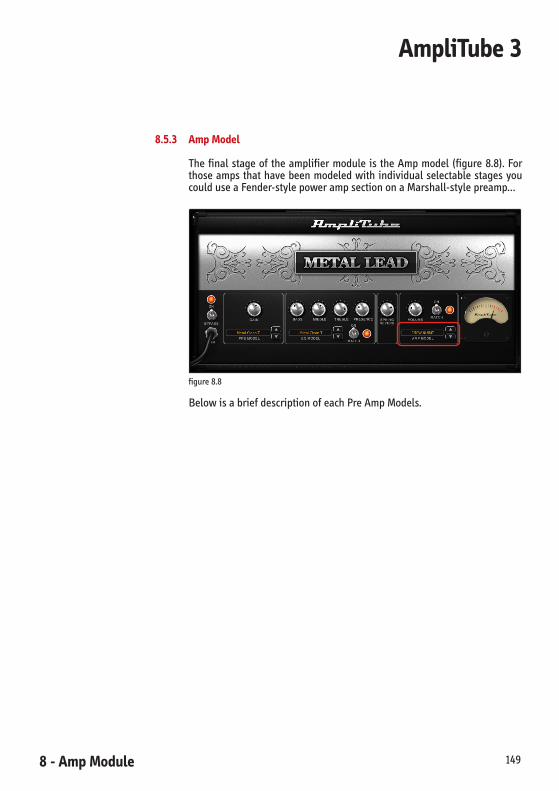
8 - Amp Module 149
AmpliTube 3
8.5.3 Amp Model
Thefinalstageof theamplifiermodule is theAmpmodel (figure8.8).ForthoseampsthathavebeenmodeledwithindividualselectablestagesyoucoulduseaFender-stylepowerampsectiononaMarshall-stylepreamp…
figure8.8
BelowisabriefdescriptionofeachPreAmpModels.
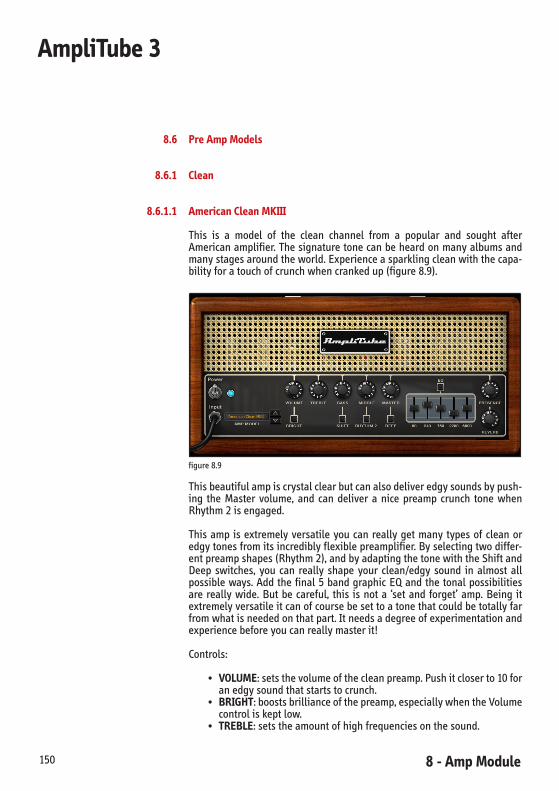
8 - Amp Module 150
AmpliTube 3
8.6 Pre Amp Models
8.6.1 Clean
8.6.1.1 American Clean MKIII
This is a model of the clean channel from a popular and sought afterAmericanamplifier.Thesignaturetonecanbeheardonmanyalbumsandmanystagesaroundtheworld.Experienceasparklingcleanwiththecapa-bilityforatouchofcrunchwhencrankedup(figure8.9).
figure8.9
Thisbeautifulampiscrystalclearbutcanalsodeliveredgysoundsbypush-ing the Master volume, and can deliver a nice preamp crunch tone whenRhythm2isengaged.
Thisamp isextremelyversatileyoucanreallygetmany typesof cleanoredgytonesfromitsincrediblyflexiblepreamplifier.Byselectingtwodiffer-entpreampshapes(Rhythm2),andbyadaptingthetonewiththeShiftandDeep switches, you can really shape your clean/edgy sound in almost allpossibleways.Addthefinal5bandgraphicEQandthetonalpossibilitiesare reallywide. But becareful, this isnota ‘setand forget’amp.Being itextremelyversatileitcanofcoursebesettoatonethatcouldbetotallyfarfromwhatisneededonthatpart.Itneedsadegreeofexperimentationandexperiencebeforeyoucanreallymasterit!
Controls:
• VOLUME:setsthevolumeofthecleanpreamp.Pushitcloserto10foranedgysoundthatstartstocrunch.
• BRIGHT:boostsbrillianceofthepreamp,especiallywhentheVolumecontroliskeptlow.
• TREBLE:setstheamountofhighfrequenciesonthesound.
8 - Amp Module 151
AmpliTube 3
• SHIFT:modifiesthefrequencieswheretheBasscontrolworks.• BASS:setstheamountoflowfrequenciesonthesound.• MIDDLE:setstheamountofmidfrequenciesonthesound.• MASTER:determinesthelevelthatissenttothepoweramp.Turning
this knob up, makes the power amp to saturate and produce greatcrunchsounds.
• RHYTHM 2:whenenabledthepreamphasmoregain,anditisthere-forepossibletoobtainextremelymusicalandsweetcrunchsounds.
• DEEP:whenenabledthebassresponseoftheamplifierisextended.• EQ:enablesthegraphicEQ.• EQ BANDS:thesesliderscancontroltheequalizationoftheampon
5 distinct frequencies areas. You’ll find it extremely musical and apowerfulsoundsculptingtool.
• PRESENCE: when turned up the amp becomes more present andbrighter.
• REVERB: controls the amount of reverb coming from the internalspringunit.

8 - Amp Module 152
AmpliTube 3
8.6.1.2 American Tube Clean 1
ThisampismodeledafteraclassicAmericanguitaramp.Thisampisgreatforcleantodirtysounds,makingidealforcleanandcrunchyrhythm,rock,country,blues,andanythingelserequiringacleanampcapableofgettingalittledirtywhenthemusiccallsforit(figure8.10).
figure8.10
Controls:
EQ MODEL:• BASS: boosts and cuts the bass frequencies of the amp’s EQ stage,
from1to10.• MIDDLE:boostsandcutsthemidfrequenciesoftheamp’sEQstage,
from1to10.• TREBLE:boostsandcutsthehighfrequenciesoftheamp’sEQstage,
from1to10.• PRESENCE:boostthehighfrequenciesoftheEQstage,from1to10.• SPRING REVERB:setsthelevelofspringreverbaddedtotheguitar
ampsound,from1to10.AMP MODEL:
• VOLUME:adjuststheoutputlevelofthepowerampstage,from1to10.
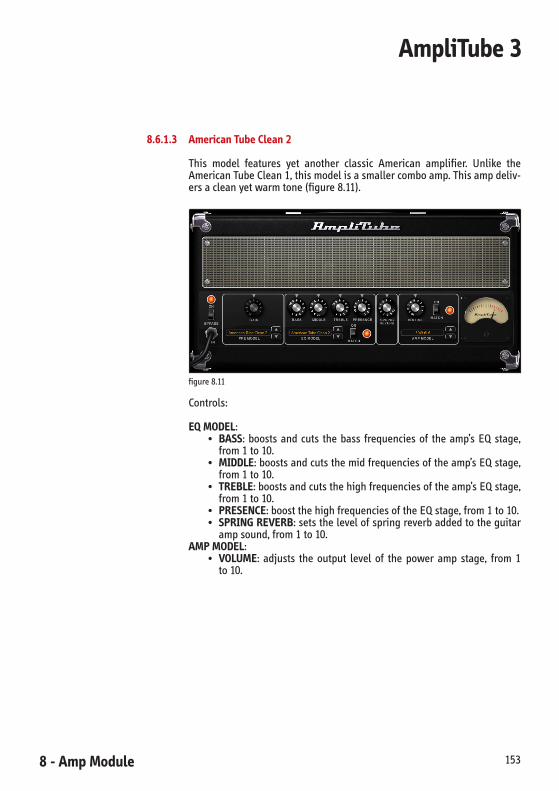
8 - Amp Module 153
AmpliTube 3
8.6.1.3 American Tube Clean 2
This model features yet another classic American amplifier. Unlike theAmericanTubeClean1,thismodelisasmallercomboamp.Thisampdeliv-ersacleanyetwarmtone(figure8.11).
figure8.11
Controls:
EQ MODEL:• BASS: boosts and cuts the bass frequencies of the amp’s EQ stage,
from1to10.• MIDDLE:boostsandcutsthemidfrequenciesoftheamp’sEQstage,
from1to10.• TREBLE:boostsandcutsthehighfrequenciesoftheamp’sEQstage,
from1to10.• PRESENCE:boostthehighfrequenciesoftheEQstage,from1to10.• SPRING REVERB:setsthelevelofspringreverbaddedtotheguitar
ampsound,from1to10.AMP MODEL:
• VOLUME: adjusts the output level of the power amp stage, from 1to10.

8 - Amp Module 154
AmpliTube 3
8.6.1.4 American Vintage B
ThedesignofthisampinfluencedmanyofitssuccessorsandwasusedbyJimiHendrixinthestudiorecordingof“VoodooChild”(figure8.12).
figure8.12
ThisclassicAmericanamplifierwasatfirstdesignedtobeabassamp,butlater became one of the most popular American guitar amps ever made.Great for clean tones, it is also versatile in a variety of music genres andplayingstyles.
Controls:
PRE MODEL:• GAIN:adjuststheinputgainofthepreampstage.Usethissettingto
drivethepreampstage,from1to10.EQ MODEL:
• BASS: boosts and cuts the bass frequencies of the amp’s EQ stage,from1to10.
• MIDDLE:boostsandcutsthemidfrequenciesoftheamp’sEQstage,from1to10.
• TREBLE:boostsandcutsthehighfrequenciesoftheamp’sEQstage,from1to10.
• PRESENCE:boostthehighfrequenciesoftheEQstage,from1to10.• SPRINGREVERB:setsthelevelofspringreverbaddedtotheguitar
ampsound,from1to10.AMP MODEL:
• VOLUME:adjuststheoutputlevelofthepowerampstage,from1to10.

8 - Amp Module 155
AmpliTube 3
8.6.1.5 American Vintage D
JimiHendrixacquiredthis100wattampin1968anduseditin1968-1969withtheExperiencetour, togetherwithanassortmentofotheramps.Theampsportedabuilt-inspringreverbunit(figure8.13).
figure8.13
Controls:
PRE MODEL:• GAIN:adjuststheinputgainofthepreampstage.Usethissettingto
drivethepreampstage,from1to10.EQ MODEL:
• BASS: boosts and cuts the bass frequencies of the amp’s EQ stage,from1to10.
• MIDDLE:boostsandcutsthemidfrequenciesoftheamp’sEQstage,from1to10.
• TREBLE:boostsandcutsthehighfrequenciesoftheamp’sEQstage,from1to10.
• PRESENCE:boostthehighfrequenciesoftheEQstage,from1to10.• SPRING REVERB:setsthelevelofspringreverbaddedtotheguitar
ampsound,from1to10.AMP MODEL:
• VOLUME: adjusts the output level of the power amp stage, from 1to10.
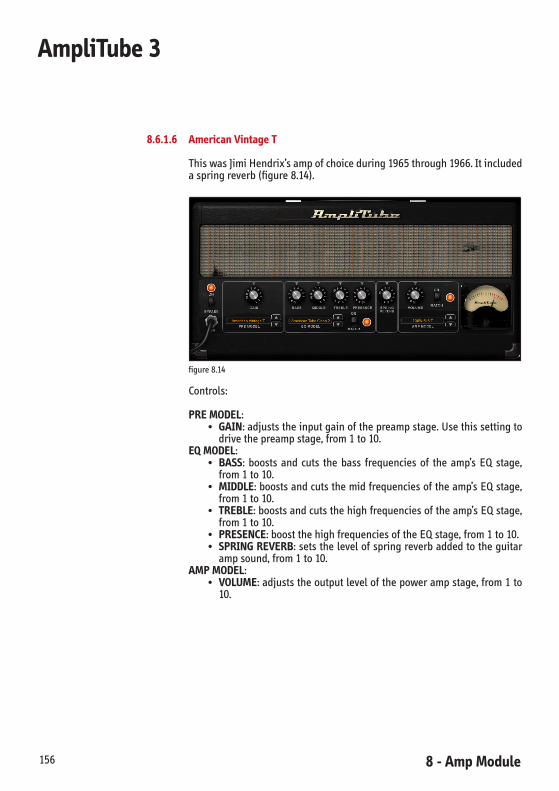
8 - Amp Module 156
AmpliTube 3
8.6.1.6 American Vintage T
ThiswasJimiHendrix’sampofchoiceduring1965through1966.Itincludedaspringreverb(figure8.14).
figure8.14
Controls:
PRE MODEL:• GAIN:adjuststheinputgainofthepreampstage.Usethissettingto
drivethepreampstage,from1to10.EQ MODEL:
• BASS: boosts and cuts the bass frequencies of the amp’s EQ stage,from1to10.
• MIDDLE:boostsandcutsthemidfrequenciesoftheamp’sEQstage,from1to10.
• TREBLE:boostsandcutsthehighfrequenciesoftheamp’sEQstage,from1to10.
• PRESENCE:boostthehighfrequenciesoftheEQstage,from1to10.• SPRING REVERB:setsthelevelofspringreverbaddedtotheguitar
ampsound,from1to10.AMP MODEL:
• VOLUME:adjuststheoutputlevelofthepowerampstage,from1to10.

8 - Amp Module 157
AmpliTube 3
8.6.1.7 Custom Solid State Clean
Thisampmodelisclean.Itprovidesaveryuncoloredsignal,perfectforjazz.ItcouldbecomparedtoampsliketheJazzAmp120,idealforsparklingcleantones(figure8.15).
figure8.15
Controls:
EQ MODEL:• BASS: boosts and cuts the bass frequencies of the amp’s EQ stage,
from1to10.• TREBLE:boostsandcutsthehighfrequenciesoftheamp’sEQstage,
from1to10.• PRESENCE:boostthehighfrequenciesoftheEQstage,from1to10.• SPRING REVERB:setsthelevelofspringreverbaddedtotheguitar
ampsound,from1to10.AMP MODEL:
• VOLUME: adjusts the output level of the power amp stage, from 1to10.

8 - Amp Module 158
AmpliTube 3
8.6.1.8 Jazz Amp 120
ItmayhaveJazz in itsname,but thisversatilecleansoundcanbeheard inmanygenres.Manyofthetopmetalplayerskeepthisnot-so-secretweaponinthestudioforgreatcleansounds.Itssonicfeatureisthefantasticbuilt-inana-logchorusandvibratounitthatreallymadethisampaclassic(figure8.16).
figure8.16
Important:thisampcontainsabuilt-instereoChorus/Vibratounit.Toactu-allybeabletohearthisinstereoyouwillneedtousetwomicrophonesinfrontofitsCabinetandpanthewideL–R.Formoreinformationabouthowtosetthis,see Chapter 9.5.7.
Controls:
• BRIGHT:boostsbrillianceofthepreamp,especiallywhentheVolumecontroliskeptlow.
• VOLUME:setstheoverallampvolume.Theampremainscleanuptovolume3or4andstartsdistortingforhigherpositions.
• DISTORTION: turning thisknobup fromtheminimumpositionbyalittlebitturnsOnthedistortioncircuit.Fromthere,continuingrisingthecontrolbringsmoreandmoredistortion.
• REVERB:controlstheamountofreverb.• TREBLE:setstheamountofhighfrequenciesonthesound.• MIDDLE:setstheamountofmidfrequenciesonthesound.• BASS:setstheamountoflowfrequenciesonthesound.• VIB/OFF/CHORUS:thisisathreepositionswitch;
• WhensettoOff,thesoundwillnotbeaffectedbychorusorvibrato.• WhensettoVib,vibratowillbeturnedOn.• WhensettoChorus,choruswillbeturnedOn.
• SPEED:setsthespeedoftheVibratoeffect.NotethatChorushasnosettings.
• DEPTH:setstheintensityoftheVibratoeffect.NotethatChorushasnosettings.
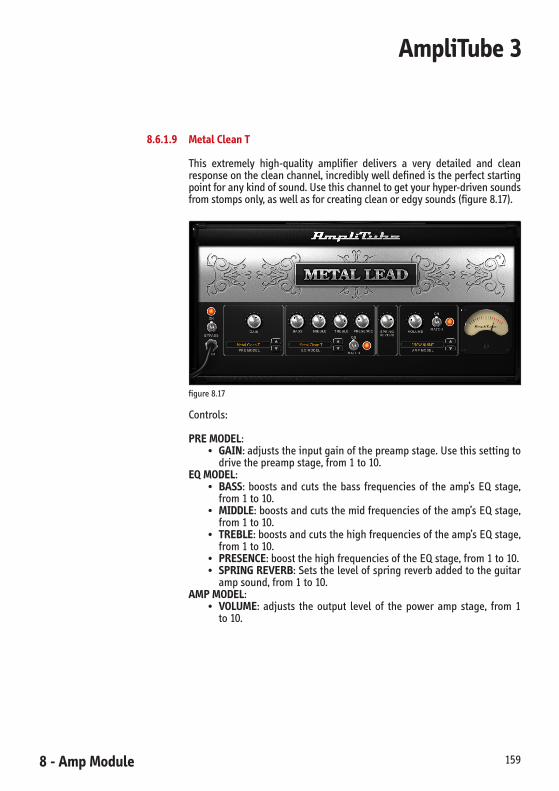
8 - Amp Module 159
AmpliTube 3
8.6.1.9 Metal Clean T
This extremely high-quality amplifier delivers a very detailed and cleanresponseonthecleanchannel,incrediblywelldefinedistheperfectstartingpointforanykindofsound.Usethischanneltogetyourhyper-drivensoundsfromstompsonly,aswellasforcreatingcleanoredgysounds(figure8.17).
figure8.17
Controls:
PRE MODEL:• GAIN:adjuststheinputgainofthepreampstage.Usethissettingto
drivethepreampstage,from1to10.EQ MODEL:
• BASS: boosts and cuts the bass frequencies of the amp’s EQ stage,from1to10.
• MIDDLE:boostsandcutsthemidfrequenciesoftheamp’sEQstage,from1to10.
• TREBLE:boostsandcutsthehighfrequenciesoftheamp’sEQstage,from1to10.
• PRESENCE:boostthehighfrequenciesoftheEQstage,from1to10.• SPRING REVERB:Setsthelevelofspringreverbaddedtotheguitar
ampsound,from1to10.AMP MODEL:
• VOLUME: adjusts the output level of the power amp stage, from 1to10.

8 - Amp Module 160
AmpliTube 3
8.6.2 Crunch
8.6.2.1 American Tube Vintage
ThisclassicAmericanamplifierwasatfirstdesignedtobeabassamp,butlater became one of the most popular American guitar amps ever made.Great for clean tones, it is also versatile in a variety of music genres andplayingstyles(figure8.18).
figure8.18
Controls:
EQ MODEL:• BASS: boosts and cuts the bass frequencies of the amp’s EQ stage,
from1to10.• MIDDLE:boostsandcutsthemidfrequenciesoftheamp’sEQstage,
from1to10.• TREBLE:boostsandcutsthehighfrequenciesoftheamp’sEQstage,
from1to10.• PRESENCE:boostthehighfrequenciesoftheEQstage,from1to10.• SPRING REVERB:setsthelevelofspringreverbaddedtotheguitar
ampsound,from1to10.AMP MODEL:
• VOLUME:adjuststheoutputlevelofthepowerampstage,from1to10.

8 - Amp Module 161
AmpliTube 3
8.6.2.2 British Blue Tube 30TB
This is a model of a legendary British amplifier which is one of the mostwidely recognizable and popular amps of all time. Throughout its life, itslegendarytonehelpedtoputmanyofrock’sfoundingfathers(including4guysfromLiverpool)onthemapandhasbeenahighlysoughtaftersoundthatisstillheardonmanyalbumstoday(figure8.19).
figure8.19
Controls:
EQ MODEL:• BASS: boosts and cuts the bass frequencies of the amp’s EQ stage,
from1to10.• TREBLE:boostsandcutsthehighfrequenciesoftheamp’sEQstage,
from1to10.• CUT: as on the original, cuts the high frequencies of the amp’s EQ
stagewhenturneddown.• SPRING REVERB:setsthelevelofspringreverbaddedtotheguitar
ampsound,from1to10.AMP MODEL:
• VOLUME:adjuststheoutputlevelofthepowerampstage,from1to10.

8 - Amp Module 162
AmpliTube 3
8.6.2.3 British Copper 30TB
Take yourself back to the ‘60s with this quintessential amp. Not just anyversion,butanaccuratemodelofthewell-knownandlovedversionofanalreadyspectacularamplifier.IfyouwantsomeBritishsound,youcanfindithere(figure8.20).
figure8.20
The original copper panel model was non-top boost, and you can find itexactlyreplicatedherewhentheswitchTopBoostisOff.TurnitOntoaddthetopboostcircuitinasecondandbethenabletoadjustyoursoundwithBassandTreblepots.
Controls:
• NORMAL:setsthevolumelevelfortheNormalchannel.Normalchan-nelhasamellowerresponsewhencomparedtotheBrilliantchannel.
• BRILLIANT:setsthevolumelevelfortheBrilliantchannel.• VIB -TREM:setsthevolumelevelfortheVibratoandTremolochan-
nel.• TOP BOOST:addstheTopBoostcircuitintheBrilliantchannelsignal
path.NormalandVib-Tremchannelsarenotaffectedbythis.• BASS:adjuststheleveloflowfrequenciesinthesound.Activeonly
onBrilliantchannelandonlywhenTopBoostisOn.• TREBLE:adjustthelevelofhighfrequenciesinthesound.Activeonly
onBrilliantchannelandonlywhenTopBoostisOn.• TONE:setstheoverallbrightnessoftheamp.It isalwaysactive,on
allchannels.WhensettoMintheampisbright,whensettoMaxtheampismellower.
• SPEED:setsthespeedoftheTremoloorVibratoeffect.• SWITCH:determinesif theVib-TremchannelwillproduceaVibrato
oraTremoloeffect.
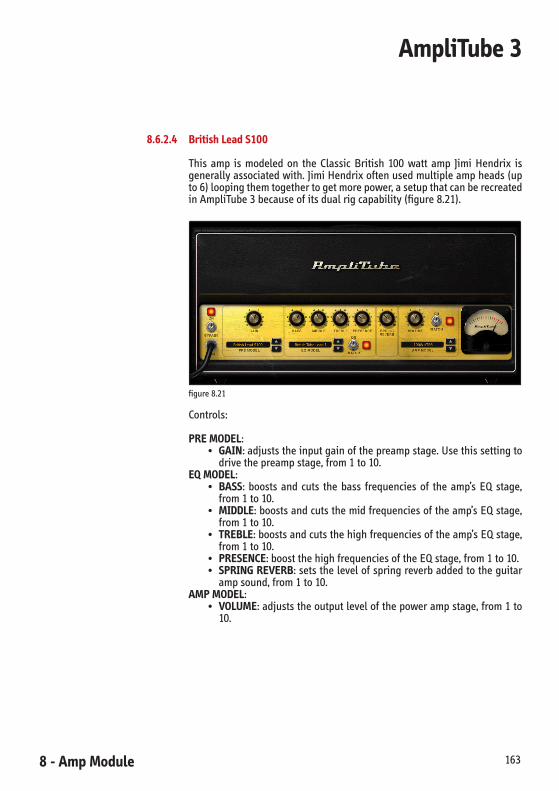
8 - Amp Module 163
AmpliTube 3
8.6.2.4 British Lead S100
This amp is modeled on the Classic British 100 watt amp Jimi Hendrix isgenerallyassociatedwith.JimiHendrixoftenusedmultipleampheads(upto6)loopingthemtogethertogetmorepower,asetupthatcanberecreatedinAmpliTube3becauseofitsdualrigcapability(figure8.21).
figure8.21
Controls:
PRE MODEL:• GAIN:adjuststheinputgainofthepreampstage.Usethissettingto
drivethepreampstage,from1to10.EQ MODEL:
• BASS: boosts and cuts the bass frequencies of the amp’s EQ stage,from1to10.
• MIDDLE:boostsandcutsthemidfrequenciesoftheamp’sEQstage,from1to10.
• TREBLE:boostsandcutsthehighfrequenciesoftheamp’sEQstage,from1to10.
• PRESENCE:boostthehighfrequenciesoftheEQstage,from1to10.• SPRING REVERB:setsthelevelofspringreverbaddedtotheguitar
ampsound,from1to10.AMP MODEL:
• VOLUME:adjuststheoutputlevelofthepowerampstage,from1to10.
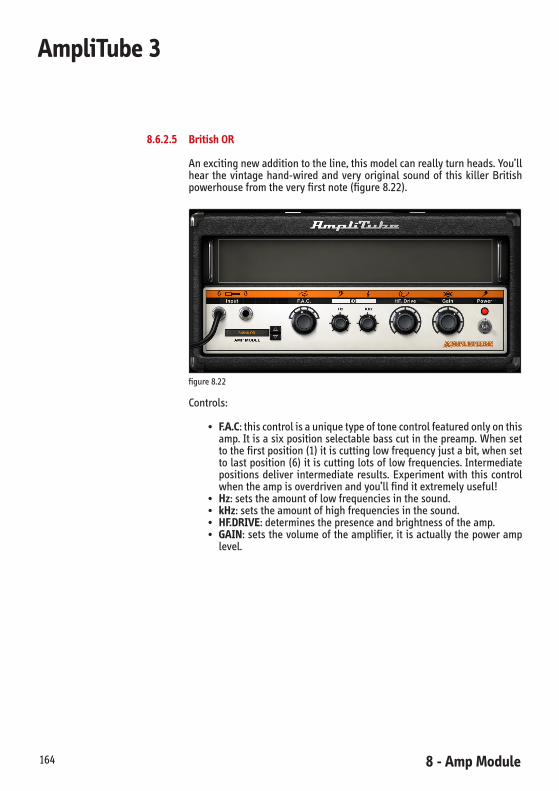
8 - Amp Module 164
AmpliTube 3
8.6.2.5 British OR
Anexcitingnewadditiontotheline,thismodelcanreallyturnheads.You’llhear the vintage hand-wired and veryoriginal soundof thiskillerBritishpowerhousefromtheveryfirstnote(figure8.22).
figure8.22
Controls:
• F.A.C:thiscontrolisauniquetypeoftonecontrolfeaturedonlyonthisamp.Itisasixpositionselectablebasscutinthepreamp.Whensettothefirstposition(1)itiscuttinglowfrequencyjustabit,whensettolastposition(6)itiscuttinglotsoflowfrequencies.Intermediatepositions deliver intermediate results. Experiment with this controlwhentheampisoverdrivenandyou’llfinditextremelyuseful!
• Hz:setstheamountoflowfrequenciesinthesound.• kHz:setstheamountofhighfrequenciesinthesound.• HF.DRIVE:determinesthepresenceandbrightnessoftheamp.• GAIN:setsthevolumeoftheamplifier,itisactuallythepoweramp
level.
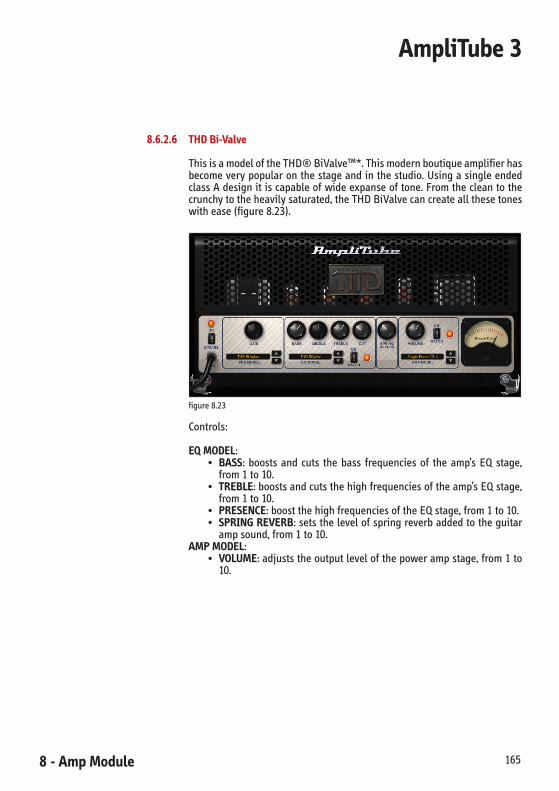
8 - Amp Module 165
AmpliTube 3
8.6.2.6 THD Bi-Valve
ThisisamodeloftheTHD®BiValve™*.Thismodernboutiqueamplifierhasbecomeverypopularonthestageandinthestudio.UsingasingleendedclassAdesignitiscapableofwideexpanseoftone.Fromthecleantothecrunchytotheheavilysaturated,theTHDBiValvecancreateallthesetoneswithease(figure8.23).
figure8.23
Controls:
EQ MODEL:• BASS: boosts and cuts the bass frequencies of the amp’s EQ stage,
from1to10.• TREBLE:boostsandcutsthehighfrequenciesoftheamp’sEQstage,
from1to10.• PRESENCE:boostthehighfrequenciesoftheEQstage,from1to10.• SPRING REVERB:setsthelevelofspringreverbaddedtotheguitar
ampsound,from1to10.AMP MODEL:
• VOLUME:adjuststheoutputlevelofthepowerampstage,from1to10.
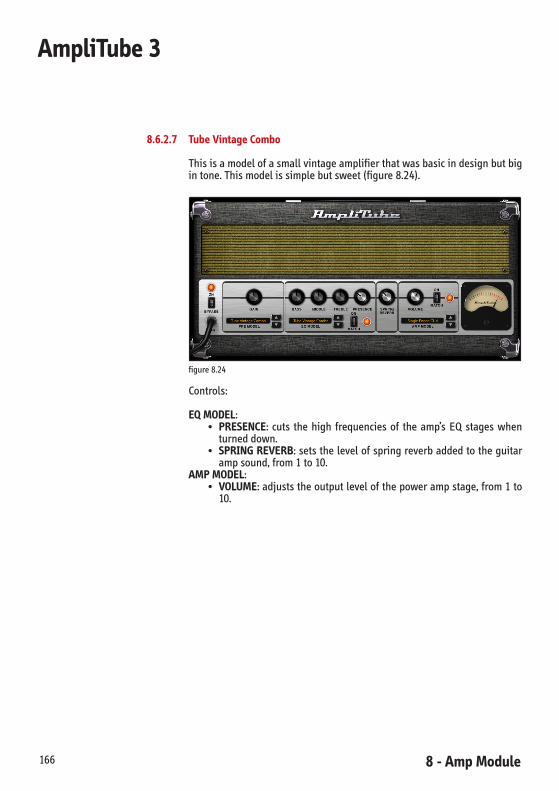
8 - Amp Module 166
AmpliTube 3
8.6.2.7 Tube Vintage Combo
Thisisamodelofasmallvintageamplifierthatwasbasicindesignbutbigintone.Thismodelissimplebutsweet(figure8.24).
figure8.24
Controls:
EQ MODEL:• PRESENCE: cuts the high frequencies of the amp’s EQ stages when
turneddown.• SPRING REVERB:setsthelevelofspringreverbaddedtotheguitar
ampsound,from1to10.AMP MODEL:
• VOLUME:adjuststheoutputlevelofthepowerampstage,from1to10.

8 - Amp Module 167
AmpliTube 3
8.6.3 Lead
8.6.3.1 American Lead MKIII
This is the leadchannelofa renowned three-channelAmericanamplifier,known for excelling at both clean and lead sounds. This channel can bebigandaggressivewhenyouwantsomeCaliforniacrunchandyoucangetsmooth,tastysustainedleadsoundstoo(figure8.25).
figure8.25
Thisampisextremelyversatile,youcanreallygetalmostanytypeofsoundfrom its incredibly flexible preamplifier. By calibrating the various gainstages(Volume->LeadDrive->Master),byselectingtwodifferentpreampshapes(Rhythm2),andbyadaptingthetonewiththeSHIFTswitches,youcan really shape your driven sound in almost all possible ways. Add thefinal5bandgraphicEQandthetonalpossibilitiesarereallyendless.Butbecareful,thisisnota‘setandforget’amp.Beingitextremelyversatileitcanofcoursebesettoatonethatcouldbetotallyfarfromwhatisneededonthatpart.Itneedsadegreeofexperimentationandexperiencebeforeyoucanreallymasterit!
Controls:
• LEAD DRIVE:setstheamountofgainoftheleadstage.Increasethistohavemoresustainingdistortionanddecreaseittogetamoreedgyandcrunchytypeofdistortion.
• VOLUME:setsthegainoftheinitialstage.Thisisthegainthatcomesbeforeallothersintheampsignalpath.
• MASTER:setsthepoweramplevel.Thisisthelatestlevelintheampsignal path. Setting high gains in the preamp (Volume and LeadDrive)andalsosettingMaster toaveryhigh level can result inanoverlypushedsoundthatcouldbedifficult toobtainagoodsound.KeepthisathighlevelsonlyifVolumeandLeaddrivearenotsohigh.
• TREBLE:setstheamountofhighfrequenciesonthesound.

8 - Amp Module 168
AmpliTube 3
• BASS:setstheamountoflowfrequenciesonthesound.• MIDDLE:setstheamountofmidfrequenciesonthesound• BRIGHT:boostsbrillianceofthepreamp,especiallywhentheVolume
controliskeptlow.• SHIFT (BASS):modifiesthefrequencieswheretheBasscontrolworks.• SHIFT (TREBLE): modifies the frequencies where the Treble control
works.• RHYTHM 2: when enabled the preamp has even more gain, and
slightlychangesitstonalcharacter.• DEEP:whenenabledthebassresponseoftheamplifierisextended.• EQ:enablesthegraphicEQ.• PRESENCE: when turned up the amp becomes more present and
brighter.• REVERB: controls the amount of reverb coming from the internal
springunit.

8 - Amp Module 169
AmpliTube 3
8.6.3.2 British Tube Lead 1
Made popular by the hard rockers of the ‘80s this British guitar amp hasremainedaprizedtoneformanyoftoday’sguitarplayers.Abletocrankoutgreattubesaturatedtonewitheasethismodelisagotoampforavarietyofheavyrockguitarsounds(figure8.26).
figure8.26
Controls:
PRE MODEL:• GAIN:adjuststheinputgainofthepreampstage.Usethissettingto
drivethepreampstage,from1to10.EQ MODEL:
• BASS: boosts and cuts the bass frequencies of the amp’s EQ stage,from1to10.
• MIDDLE:boostsandcutsthemidfrequenciesoftheamp’sEQstage,from1to10.
• TREBLE:boostsandcutsthehighfrequenciesoftheamp’sEQstage,from1to10.
• PRESENCE:boostthehighfrequenciesoftheEQstage,from1to10.• SPRING REVERB:setsthelevelofspringreverbaddedtotheguitar
ampsound,from1to10.AMP MODEL:
• VOLUME:adjuststheoutputlevelofthepowerampstage,from1to10.

8 - Amp Module 170
AmpliTube 3
8.6.3.3 British Tube Lead 2
The younger sibling to the British Tube Lead 1, this model is capable ofgreat rock tone, leads, and heavy crunch. While grittier and a little moreaggressive,itstillhastheclassictonethathasmadethisfamilyofampsahouseholdnameinrockguitar(figure8.27).
figure8.27
Controls:
PRE MODEL:• GAIN:adjuststheinputgainofthepreampstage.Usethissettingto
drivethepreampstage,from1to10.EQ MODEL:
• BASS: boosts and cuts the bass frequencies of the amp’s EQ stage,from1to10.
• MIDDLE:boostsandcutsthemidfrequenciesoftheamp’sEQstage,from1to10.
• TREBLE:boostsandcutsthehighfrequenciesoftheamp’sEQstage,from1to10.
• PRESENCE:boostthehighfrequenciesoftheEQstage,from1to10.• SPRING REVERB:setsthelevelofspringreverbaddedtotheguitar
ampsound,from1to10.AMP MODEL:
• VOLUME:adjuststheoutputlevelofthepowerampstage,from1to10.

8 - Amp Module 171
AmpliTube 3
8.6.3.4 Custom Modern Hi-Gain
Based on the classic AmpliTube model, this amp features lots of gain forthatovertheedgedistortionsound.Similartomoderntubeleadsoundincharacter,ModernHi-Gainprovidesanadditionaltakeonthattypeofsound(figure8.28).
figure8.28
Controls:
PRE MODEL:• GAIN:adjuststheinputgainofthepreampstage.Usethissettingto
drivethepreampstage,from1to10.EQ MODEL:
• BASS: boosts and cuts the bass frequencies of the amp’s EQ stage,from1to10.
• MIDDLE:boostsandcutsthemidfrequenciesoftheamp’sEQstage,from1to10.
• TREBLE:boostsandcutsthehighfrequenciesoftheamp’sEQstage,from1to10.
• PRESENCE:boostthehighfrequenciesoftheEQstage,from1to10.• SPRING REVERB:setsthelevelofspringreverbaddedtotheguitar
ampsound,from1to10.AMP MODEL:
• VOLUME:adjuststheoutputlevelofthepowerampstage,from1to10.

8 - Amp Module 172
AmpliTube 3
8.6.3.5 Custom Solid State Fuzz
BasedonAmpliTube1’sfuzzamp,thismodelisaverydistinctanddistortedsound,reminiscentof‘60sfuzzsounds(figure8.29).
figure8.29
Controls:
PRE MODEL:• GAIN:adjuststheinputgainofthepreampstage.Usethissettingto
drivethepreampstage,from1to10.EQ MODEL:
• BASS: boosts and cuts the bass frequencies of the amp’s EQ stage,from1to10.
• TREBLE:boostsandcutsthehighfrequenciesoftheamp’sEQstage,from1to10.
• PRESENCE:boostthehighfrequenciesoftheEQstage,from1to10.• SPRING REVERB:setsthelevelofspringreverbaddedtotheguitar
ampsound,from1to10.AMP MODEL:
• VOLUME:adjuststheoutputlevelofthepowerampstage,from1to10.

8 - Amp Module 173
AmpliTube 3
8.6.3.6 Custom Solid State Lead
Thismodelfeaturesaprecisesolidstateleadsound.Ithasadarkertoneandexcelsathighgainleadtones.Itisverysuitableforhardrockleadsandit’sgainisverystable,makingiteasytouseatlowvolumelevels(figure8.30).
figure8.30
Controls:
PRE MODEL:• GAIN:adjuststheinputgainofthepreampstage.Usethissettingto
drivethepreampstage,from1to10.EQ MODEL:
• BASS: boosts and cuts the bass frequencies of the amp’s EQ stage,from1to10.
• TREBLE:boostsandcutsthehighfrequenciesoftheamp’sEQstage,from1to10.
• PRESENCE:boostthehighfrequenciesoftheEQstage,from1to10.• SPRING REVERB:setsthelevelofspringreverbaddedtotheguitar
ampsound,from1to10.AMP MODEL:
• VOLUME:adjuststheoutputlevelofthepowerampstage,from1to10.

8 - Amp Module 174
AmpliTube 3
8.6.3.7 Metal Lead T
This classic amp provides the tightest bass and fastest response, even atextremespeedsandgain.Theresultisperfectforspeed,thrash,andotheraggressivemetalstylesaswellassmoother,cleanerstyles,anditisamustforallmodernmetalcontaminations(figure8.31).
figure8.31
Controls:
PRE MODEL:• GAIN:adjuststheinputgainofthepreampstage.Usethissettingto
drivethepreampstage,from1to10.EQ MODEL:
• BASS: boosts and cuts the bass frequencies of the amp’s EQ stage,from1to10.
• MIDDLE:boostsandcutsthemidfrequenciesoftheamp’sEQstage,from1to10.
• TREBLE:boostsandcutsthehighfrequenciesoftheamp’sEQstage,from1to10.
• PRESENCE:boostthehighfrequenciesoftheEQstage,from1to10.• SPRING REVERB:setsthelevelofspringreverbaddedtotheguitar
ampsound,from1to10.AMP MODEL:
• VOLUME:adjuststheoutputlevelofthepowerampstage,from1to10.

8 - Amp Module 175
AmpliTube 3
8.6.3.8 Metal Lead V
Engineered to the exacting demands of some of the greatest guitarists ofalltime,thisampquicklybecameafavoriteoftonepuristsandgainheadsalike.Capableofsomeofthecleanest–ortheheaviest–tonesofalltime(figure8.32).
figure8.32
Controls:
PRE MODEL:• GAIN:adjuststheinputgainofthepreampstage.Usethissettingto
drivethepreampstage,from1to10.EQ MODEL:
• BASS: boosts and cuts the bass frequencies of the amp’s EQ stage,from1to10.
• MIDDLE:boostsandcutsthemidfrequenciesoftheamp’sEQstage,from1to10.
• TREBLE:boostsandcutsthehighfrequenciesoftheamp’sEQstage,from1to10.
• BOTTOM:usethisknobtoenhancethespeakerbottomendresonance.• SPRING REVERB:setsthelevelofspringreverbaddedtotheguitar
ampsound,from1to10.AMP MODEL:
• VOLUME:adjuststheoutputlevelofthepowerampstage,from1to10.

8 - Amp Module 176
AmpliTube 3
8.6.3.9 Metal Lead W
Designedbysomeofthehardestrockersofthe‘90s,thisampwasbuiltforpuremetalmayhem.Theremaybenoheavier,moreaggressiveampintheworld(figure8.33).
figure8.33
Controls:
PRE MODEL:• GAIN:adjuststheinputgainofthepreampstage.Usethissettingto
drivethepreampstage,from1to10.EQ MODEL:
• BASS: boosts and cuts the bass frequencies of the amp’s EQ stage,from1to10.
• MIDDLE:boostsandcutsthemidfrequenciesoftheamp’sEQstage,from1to10.
• TREBLE:boostsandcutsthehighfrequenciesoftheamp’sEQstage,from1to10.
• BOTTOM:usethisknobtoenhancethespeakerbottomendresonance.• SPRING REVERB:setsthelevelofspringreverbaddedtotheguitar
ampsound,from1to10.AMP MODEL:
• VOLUME:adjuststheoutputlevelofthepowerampstage,from1to10.

8 - Amp Module 177
AmpliTube 3
8.6.3.10 Modern Tube Lead
Thisampisamodelofoneoftheleadersinhard,drivenrocktonesmadetoday.Capableofsearingleadsandheavycrunch,thisamphasbeenrecti-fiedtocreateamodernrocktonethatishardtobeat(figure8.34).
figure8.34
Controls:
PRE MODEL:• GAIN:adjuststheinputgainofthepreampstage.Usethissettingto
drivethepreampstage,from1to10.EQ MODEL:
• BASS: boosts and cuts the bass frequencies of the amp’s EQ stage,from1to10.
• MIDDLE:boostsandcutsthemidfrequenciesoftheamp’sEQstage,from1to10.
• TREBLE:boostsandcutsthehighfrequenciesoftheamp’sEQstage,from1to10.
• PRESENCE:boostthehighfrequenciesoftheEQstage,from1to10.• SPRING REVERB:setsthelevelofspringreverbaddedtotheguitar
ampsound,from1to10.AMP MODEL:
• VOLUME:adjuststheoutputlevelofthepowerampstage,from1to10.

8 - Amp Module 178
AmpliTube 3
8.6.3.11 Vintage Metal Lead
Thisampisbasedonanall-timeclassic,fromitsorigininthe‘70sthroughAussie hard rock crazy ‘80s metal and beyond. Few amps have rocked ashard,foraslong(figure8.35).
figure8.35
Controls:
PRE MODEL:• GAIN:adjuststheinputgainofthepreampstage.Usethissettingto
drivethepreampstage,from1to10.EQ MODEL:
• BASS: boosts and cuts the bass frequencies of the amp’s EQ stage,from1to10.
• MIDDLE:boostsandcutsthemidfrequenciesoftheamp’sEQstage,from1to10.
• TREBLE:boostsandcutsthehighfrequenciesoftheamp’sEQstage,from1to10.
• PRESENCE:boostthehighfrequenciesoftheEQstage,from1to10.• SPRING REVERB:setsthelevelofspringreverbaddedtotheguitar
ampsound,from1to10.AMP MODEL:
• VOLUME:adjuststheoutputlevelofthepowerampstage,from1to10.
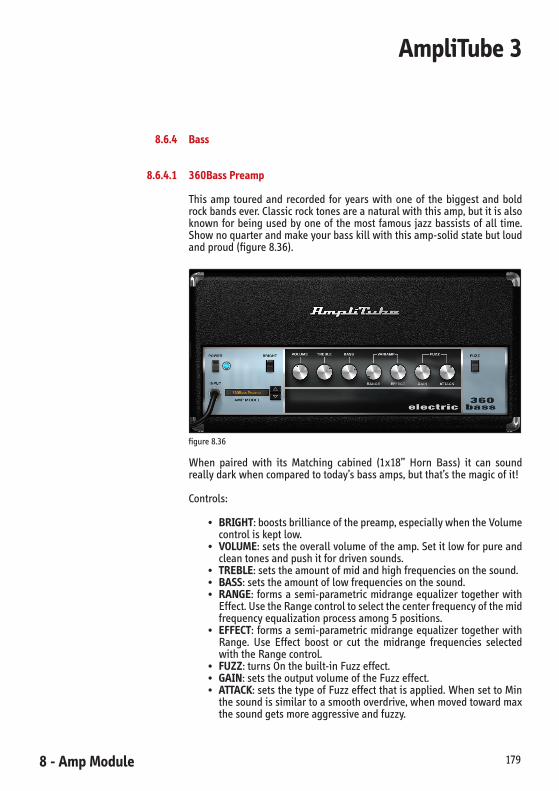
8 - Amp Module 179
AmpliTube 3
8.6.4 Bass
8.6.4.1 360Bass Preamp
This amp toured and recorded for years with one of the biggest and boldrockbandsever.Classicrocktonesareanaturalwiththisamp,butitisalsoknownforbeingusedbyoneof themostfamousjazzbassistsofall time.Shownoquarterandmakeyourbasskillwiththisamp-solidstatebutloudandproud(figure8.36).
figure8.36
When paired with its Matching cabined (1x18” Horn Bass) it can soundreallydarkwhencomparedtotoday’sbassamps,butthat’sthemagicofit!
Controls:
• BRIGHT:boostsbrillianceofthepreamp,especiallywhentheVolumecontroliskeptlow.
• VOLUME:setstheoverallvolumeoftheamp.Setitlowforpureandcleantonesandpushitfordrivensounds.
• TREBLE:setstheamountofmidandhighfrequenciesonthesound.• BASS:setstheamountoflowfrequenciesonthesound.• RANGE: formsasemi-parametricmidrangeequalizer togetherwith
Effect.UsetheRangecontroltoselectthecenterfrequencyofthemidfrequencyequalizationprocessamong5positions.
• EFFECT: formsasemi-parametricmidrangeequalizer togetherwithRange. Use Effect boost or cut the midrange frequencies selectedwiththeRangecontrol.
• FUZZ:turnsOnthebuilt-inFuzzeffect.• GAIN:setstheoutputvolumeoftheFuzzeffect.• ATTACK:setsthetypeofFuzzeffectthatisapplied.WhensettoMin
thesoundissimilartoasmoothoverdrive,whenmovedtowardmaxthesoundgetsmoreaggressiveandfuzzy.

8 - Amp Module 180
AmpliTube 3
8.6.4.2 Combo 150MB
Thisisarenditionof“the”basscombofordoublebass.Thetonedoesn’tstopthere,though.Electricbassistshaveusedthistinybutmighty(andtoneful)comboampwithgreatsuccess.Greatthingscancomeinsmallsizes,andcansoundsurprisinglybigandfull(figure8.37).
figure8.37
Controls:
• VOLUME:setsthegainofthepreampstage.• CONTOUR:setitatminforaflatandnaturalsound,riseittogradu-
allymixinamidrangescoopthatmakesthetonemorebigand“pro-cessed.”
• HI BOOST:deliversagradualboostonmidandhighfrequencies.• LOW CUT ON/OFF: when enabled extremely low frequencies are
removedbythepreamp.Thisistoavoidoverloadingtheampbecauseofunwantedlowfrequenciescontent.
• TREBLE:setstheamountofhighfrequenciesonthesound.• HI MIDDLE:setstheamountofmidhighfrequenciesonthesound.• LOW MIDDLE:setstheamountofmidlowfrequenciesonthesound.• BASS:setstheamountoflowfrequenciesonthesound.• OUTPUT LEVEL:setsthevolumeofthepowerampstage.• LIMITER:enablesthebuilt-inLimiter.Whenenabledthepoweramp
isprotectedfromoverloading.• LIMITER LEVEL:setsthethresholdforthelimitertotriggerin.When
set lower the limiterwill trigger insooner,andwhenset tohighervaluesthelimiterwilltriggerinathigherlevels.

8 - Amp Module 181
AmpliTube 3
8.6.4.3 Green BA250
Thisisamodelofasolidstatepowerhousebassamplifierwithgreattone-shapingcontrols,awarmsoundunlikemostsolidstateamps,andasought-afterpreamp(figure8.38).
figure8.38
Despitebeingsolidstatethisampdeliversanincrediblywarmandtastefultone.Withitssignature“Middlecutpreshaping”featurewillimmediatelybringyoubackto‘80sbasslines!
Controls
• GRAPHIC EQUALIZATION:turnsOnthegraphicEQwhenenabled.• MIDDLE CUT PRE-SHAPING:engagesamidfrequencyshapingthat’s
verycharacteristicofthisamp.WhenitisOff,thepreampisalmostflatandnaturalsounding.
• GAIN:setsthepreampinputgain.FollowwhatthefancyinputlevelLEDmetertells…andyoucan’tgowrong!Unlessyouwantoverdriveit!
• GRAPHIC EQUALIZATION:11sliderstocreateyourtone.OnlyafewgraphicEQhavethemusicalqualityofthispowerfulsculptingtool.
• BALANCE: it balances the levels when you engage or disable theGraphicEQ.
• LEVEL:overallampvolume.Itsetsthelevelthatissenttothepowerampstage.

8 - Amp Module 182
AmpliTube 3
8.6.4.4 Solid State Bass Preamp
Thismodelfeaturesasolidstatebasspreamp,EQ,andasolidstatepowerampmodule.Itcleansupbeautifullyanddrivesjustashard(figure8.39).
figure8.39
Controls:
PRE MODEL:• GAIN:adjuststheinputgainofthepreampstage.Usethissettingto
drivethepreampstage,from1to10.EQ MODEL:
• BASS: boosts and cuts the bass frequencies of the amp’s EQ stage,from1to10.
• MIDDLE:boostsandcutsthemidfrequenciesoftheamp’sEQstage,from1to10.
• TREBLE:boostsandcutsthehighfrequenciesoftheamp’sEQstage,from1to10.
• PRESENCE:boostthehighfrequenciesoftheEQstage,from1to10.• SPRING REVERB:setsthelevelofspringreverbaddedtotheguitar
ampsound,from1to10.AMP MODEL:
• VOLUME:adjuststheoutputlevelofthepowerampstage,from1to10.
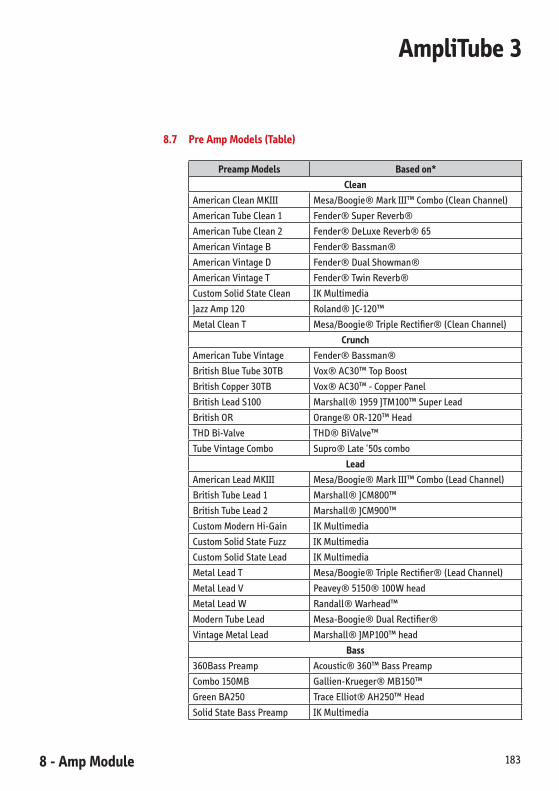
8 - Amp Module 183
AmpliTube 3
8.7 Pre Amp Models (Table)
Preamp Models Based on*
Clean
AmericanCleanMKIII Mesa/Boogie®MarkIII™Combo(CleanChannel)
AmericanTubeClean1 Fender®SuperReverb®
AmericanTubeClean2 Fender®DeLuxeReverb®65
AmericanVintageB Fender®Bassman®
AmericanVintageD Fender®DualShowman®
AmericanVintageT Fender®TwinReverb®
CustomSolidStateClean IKMultimedia
JazzAmp120 Roland®JC-120™
MetalCleanT Mesa/Boogie®TripleRectifier®(CleanChannel)
Crunch
AmericanTubeVintage Fender®Bassman®
BritishBlueTube30TB Vox®AC30™TopBoost
BritishCopper30TB Vox®AC30™-CopperPanel
BritishLeadS100 Marshall®1959JTM100™SuperLead
BritishOR Orange®OR-120™Head
THDBi-Valve THD®BiValve™
TubeVintageCombo Supro®Late'50scombo
Lead
AmericanLeadMKIII Mesa/Boogie®MarkIII™Combo(LeadChannel)
BritishTubeLead1 Marshall®JCM800™
BritishTubeLead2 Marshall®JCM900™
CustomModernHi-Gain IKMultimedia
CustomSolidStateFuzz IKMultimedia
CustomSolidStateLead IKMultimedia
MetalLeadT Mesa/Boogie®TripleRectifier®(LeadChannel)
MetalLeadV Peavey®5150®100Whead
MetalLeadW Randall®Warhead™
ModernTubeLead Mesa-Boogie®DualRectifier®
VintageMetalLead Marshall®JMP100™head
Bass
360BassPreamp Acoustic®360™BassPreamp
Combo150MB Gallien-Krueger®MB150™
GreenBA250 TraceElliot®AH250™Head
SolidStateBassPreamp IKMultimedia
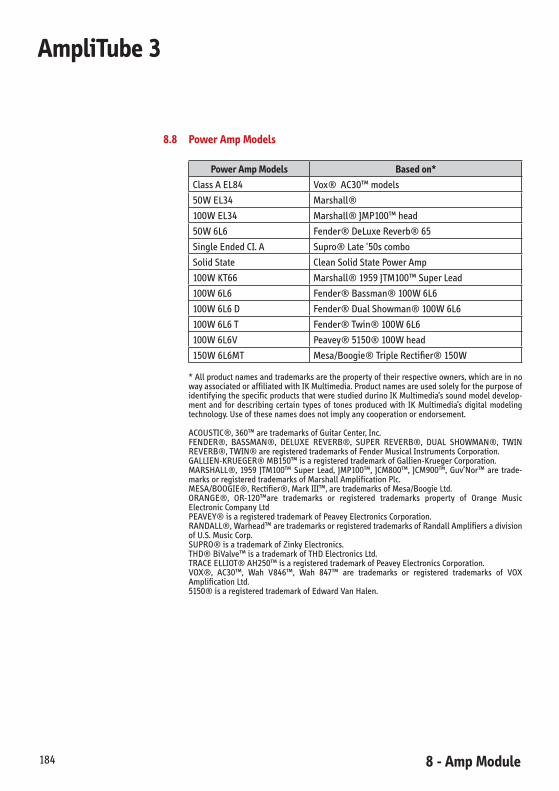
8 - Amp Module 184
AmpliTube 3
8.8 Power Amp Models
Power Amp Models Based on*
ClassAEL84 Vox®AC30™models
50WEL34 Marshall®
100WEL34 Marshall®JMP100™head
50W6L6 Fender®DeLuxeReverb®65
SingleEndedCI.A Supro®Late'50scombo
SolidState CleanSolidStatePowerAmp
100WKT66 Marshall®1959JTM100™SuperLead
100W6L6 Fender®Bassman®100W6L6
100W6L6D Fender®DualShowman®100W6L6
100W6L6T Fender®Twin®100W6L6
100W6L6V Peavey®5150®100Whead
150W6L6MT Mesa/Boogie®TripleRectifier®150W
*Allproductnamesandtrademarksarethepropertyoftheirrespectiveowners,whichareinnowayassociatedoraffiliatedwithIKMultimedia.ProductnamesareusedsolelyforthepurposeofidentifyingthespecificproductsthatwerestudieddurinoIKMultimedia’ssoundmodeldevelop-ment and for describing certain types of tones produced with IK Multimedia’s digital modelingtechnology.Useofthesenamesdoesnotimplyanycooperationorendorsement.
ACOUSTIC®,360™aretrademarksofGuitarCenter,Inc.FENDER®, BASSMAN®, DELUXE REVERB®, SUPER REVERB®, DUAL SHOWMAN®, TWINREVERB®,TWIN®areregisteredtrademarksofFenderMusicalInstrumentsCorporation.GALLIEN-KRUEGER®MB150™isaregisteredtrademarkofGallien-KruegerCorporation.MARSHALL®, 1959 JTM100™ Super Lead, JMP100™, JCM800™, JCM900™, Guv’Nor™ are trade-marksorregisteredtrademarksofMarshallAmplificationPlc.MESA/BOOGIE®,Rectifier®,MarkIII™,aretrademarksofMesa/BoogieLtd.ORANGE®, OR-120™are trademarks or registered trademarks property of Orange MusicElectronicCompanyLtdPEAVEY®isaregisteredtrademarkofPeaveyElectronicsCorporation.RANDALL®,Warhead™aretrademarksorregisteredtrademarksofRandallAmplifiersadivisionofU.S.MusicCorp.SUPRO®isatrademarkofZinkyElectronics.THD®BiValve™isatrademarkofTHDElectronicsLtd.TRACEELLIOT®AH250™isaregisteredtrademarkofPeaveyElectronicsCorporation.VOX®, AC30™, Wah V846™, Wah 847™ are trademarks or registered trademarks of VOXAmplificationLtd.5150®isaregisteredtrademarkofEdwardVanHalen.

9 - Cab Module 185
AmpliTube 3
Chapter 9 Cab Module (Cabinets + Microphones)
9.1 Introduction
ToaccesstheCabmodule,click theCabbuttonlocatedontheModule/RigSelector(figure9.1).
figure9.1
TheCabmoduleincludes2models:theCabinetModelandtheMicModel,andanewsectioncalledRoom(figure9.2).
figure9.2

9 - Cab Module186
AmpliTube 3
9.2 Cabinet Model
TheCabinetModelincludestheCabModelSelector,theBypassandMatchbuttonsandanewexcitingfeaturecalled“Size”(figure9.3).
figure9.3
9.2.1 Cab Model Selector
To select a Cabinet model, click the Cab Model Selector (figure 9.4) andnavigatethroughitscategoriesorusetheforward/backarrows(figure9.5).
figure9.4
figure9.5
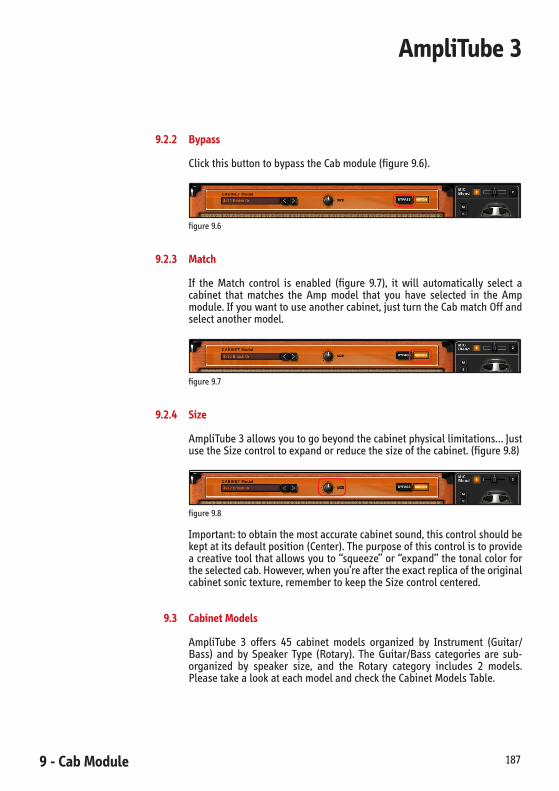
9 - Cab Module 187
AmpliTube 3
9.2.2 Bypass
ClickthisbuttontobypasstheCabmodule(figure9.6).
figure9.6
9.2.3 Match
If the Match control is enabled (figure 9.7), it will automatically select acabinet that matches the Amp model that you have selected in the Ampmodule.Ifyouwanttouseanothercabinet,justturntheCabmatchOffandselectanothermodel.
figure9.7
9.2.4 Size
AmpliTube3allowsyoutogobeyondthecabinetphysicallimitations…JustusetheSizecontroltoexpandorreducethesizeofthecabinet.(figure9.8)
figure9.8
Important:toobtainthemostaccuratecabinetsound,thiscontrolshouldbekeptatitsdefaultposition(Center).Thepurposeofthiscontrolistoprovideacreativetoolthatallowsyouto“squeeze”or“expand”thetonalcolorfortheselectedcab.However,whenyou’reaftertheexactreplicaoftheoriginalcabinetsonictexture,remembertokeeptheSizecontrolcentered.
9.3 Cabinet Models
AmpliTube 3 offers 45 cabinet models organized by Instrument (Guitar/Bass) and by Speaker Type (Rotary). The Guitar/Bass categories are sub-organized by speaker size, and the Rotary category includes 2 models.PleasetakealookateachmodelandchecktheCabinetModelsTable.
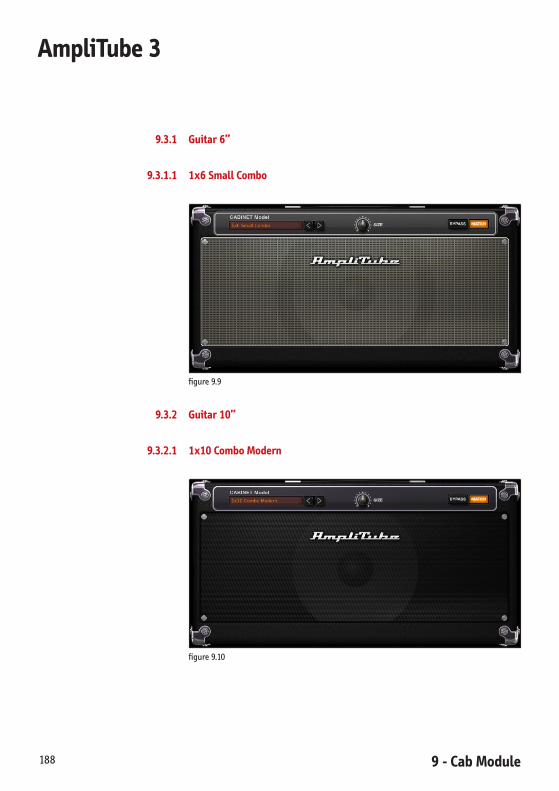
9 - Cab Module188
AmpliTube 3
9.3.1 Guitar 6”
9.3.1.1 1x6 Small Combo
figure9.9
9.3.2 Guitar 10”
9.3.2.1 1x10 Combo Modern
figure9.10

9 - Cab Module 189
AmpliTube 3
9.3.2.2 4x10 Closed Modern
figure9.11
9.3.2.3 4x10 Open Vintage
figure9.10

9 - Cab Module190
AmpliTube 3
9.3.3 Guitar 12”
9.3.3.1 1x12 Combo
figure9.13
9.3.3.2 1x12 MB II
figure9.14

9 - Cab Module 191
AmpliTube 3
9.3.3.3 1x12 MB III
figure9.15
9.3.3.4 1x12 Open Modern
figure9.11
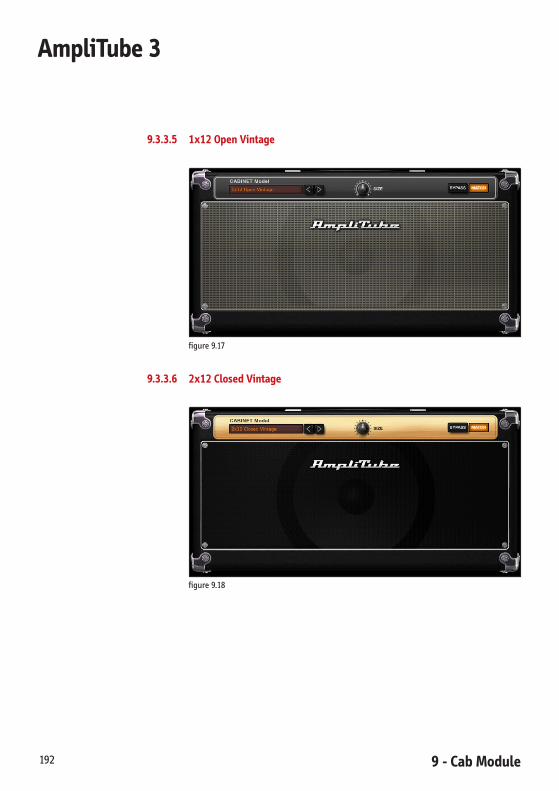
9 - Cab Module192
AmpliTube 3
9.3.3.5 1x12 Open Vintage
figure9.17
9.3.3.6 2x12 Closed Vintage
figure9.18
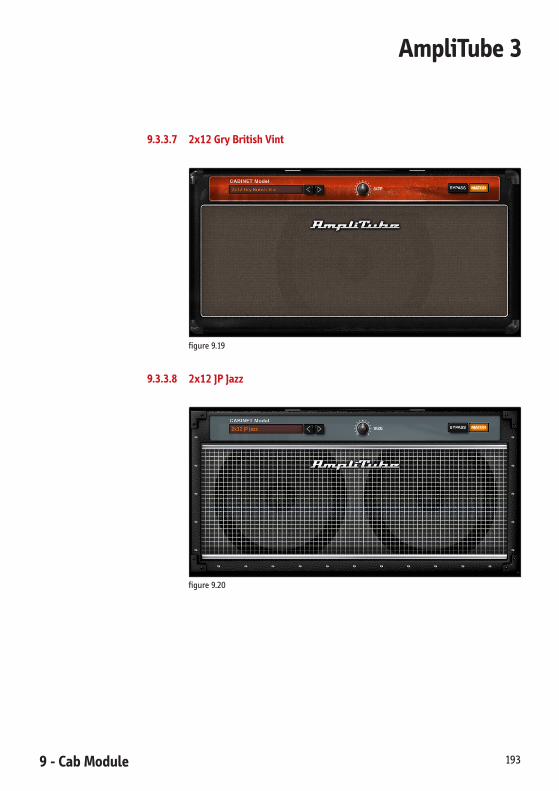
9 - Cab Module 193
AmpliTube 3
9.3.3.7 2x12 Gry British Vint
figure9.19
9.3.3.8 2x12 JP Jazz
figure9.20

9 - Cab Module194
AmpliTube 3
9.3.3.9 2x12 Open SL
figure9.21
9.3.3.10 2x12 Open TJ120
figure9.22

9 - Cab Module 195
AmpliTube 3
9.3.3.11 2x12 Open Vintage
figure9.23
9.3.3.12 4x12 British Or
figure9.24

9 - Cab Module196
AmpliTube 3
9.3.3.13 4x12 Closed 25 C
figure9.25
9.3.3.14 4x12 Closed 75 C
figure9.26

9 - Cab Module 197
AmpliTube 3
9.3.3.15 4x12 Closed J120
figure9.27
9.3.3.16 4x12 Closed Modern 1
figure9.28

9 - Cab Module198
AmpliTube 3
9.3.3.17 4x12 Closed Modern 2
figure9.29
9.3.3.18 4x12 Closed Vintage 1
figure9.30

9 - Cab Module 199
AmpliTube 3
9.3.3.19 4x12 Closed Vintage 2
figure9.31
9.3.3.20 4x12 Metal F 1
figure9.32
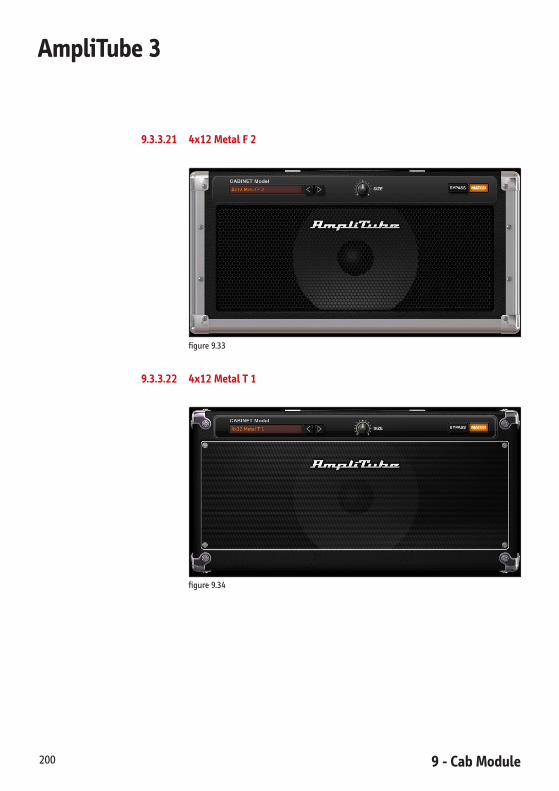
9 - Cab Module200
AmpliTube 3
9.3.3.21 4x12 Metal F 2
figure9.33
9.3.3.22 4x12 Metal T 1
figure9.34

9 - Cab Module 201
AmpliTube 3
9.3.3.23 4x12 Metal T 2
figure9.35
9.3.3.24 4x12 Metal T 3
figure9.37

9 - Cab Module202
AmpliTube 3
9.3.3.25 4x12 Metal V 1
figure9.37
9.3.3.26 4x12 Metal V 2
figure9.38
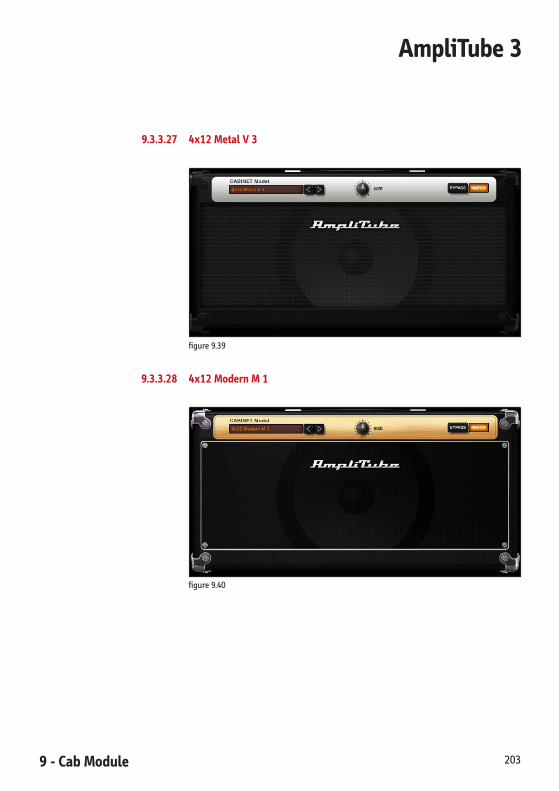
9 - Cab Module 203
AmpliTube 3
9.3.3.27 4x12 Metal V 3
figure9.39
9.3.3.28 4x12 Modern M 1
figure9.40

9 - Cab Module204
AmpliTube 3
9.3.3.29 4x12 Modern M 2
figure9.41
9.3.3.30 4x12 Modern M 3
figure9.42

9 - Cab Module 205
AmpliTube 3
9.3.3.31 4x12 Vintage M 1
figure9.43
9.3.3.32 4x12 Vintage M 2
figure9.44
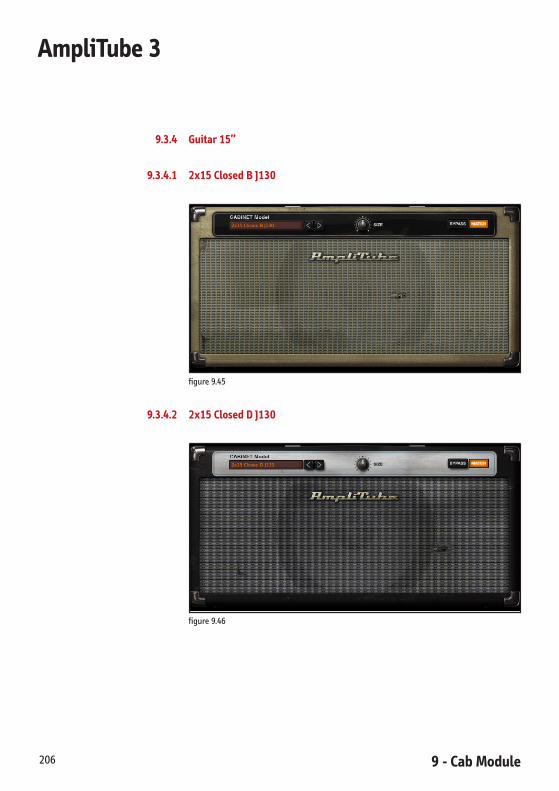
9 - Cab Module206
AmpliTube 3
9.3.4 Guitar 15”
9.3.4.1 2x15 Closed B J130
figure9.45
9.3.4.2 2x15 Closed D J130
figure9.46

9 - Cab Module 207
AmpliTube 3
9.3.5 Bass 10”
9.3.5.1 4x10+tw Bass
figure9.47
9.3.5.2 4x10+tw TE Bass
figure9.48
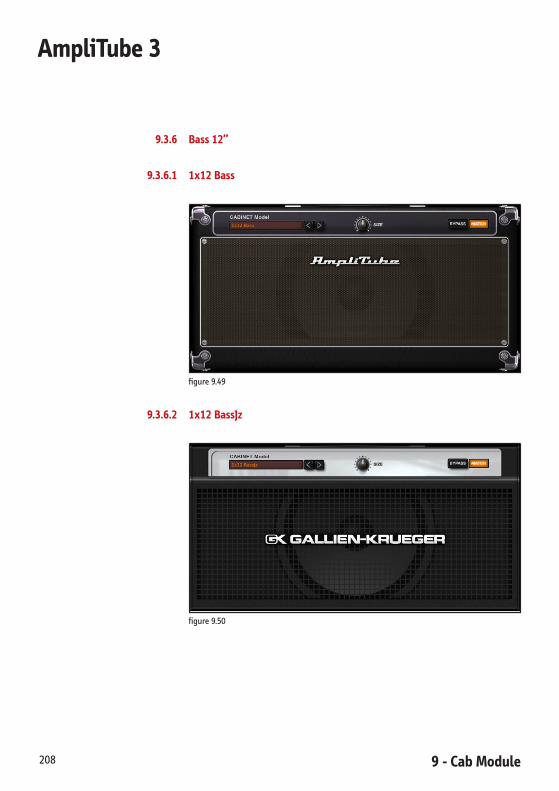
9 - Cab Module208
AmpliTube 3
9.3.6 Bass 12”
9.3.6.1 1x12 Bass
figure9.49
9.3.6.2 1x12 BassJz
figure9.50

9 - Cab Module 209
AmpliTube 3
9.3.7 Bass 15”
9.3.7.1 1x15 Bass Vintage
figure9.51
9.3.8 Bass 18”
9.3.8.1 1x18 Horn Bass
figure9.52

9 - Cab Module210
AmpliTube 3
9.3.9 Rotary
9.3.9.1 Rotary 147-1
figure9.53
9.3.9.2 Rotary 147-2
figure9.54

9 - Cab Module 211
AmpliTube 3
9.4 Cabinet Models (Table)
Cabinet Model Based on*
Guitar 6”
1x6SmallCombo Fender®SSCombo
Guitar10”
1x10ComboModern Mesa/Boogie®1x10"SubwayRocket®
4x10ClosedModern Marshall®4x10'90sJCM410™
4x10OpenVintage Fender®SuperReverb®1967
Guitar 12”
1x12Combo Marshall®1x12Valvestate™12
1x12MBII Mesa/Boogie®MarkII™1x12"EV
1x12MBIII Mesa/Boogie®MarkIII™1x12"EV
1x12OpenModern VHT®Pitbull™1x12Combo
1x12OpenVintage Fender®DeLuxe®65
2x12ClosedVintage Marshall®19222x12Greenbacks
2x12GryBritishVint Vox®AC30™2x12"'60sGraybacks
2x12JPJazz Roland®JC-120™2x12"
2x12OpenSL Sears®Silvertone®2x12”
2x12OpenTJ120 Fender®Twin®2x12”JBL®D120F
2x12OpenVintage Vox®AC30'60sBluebacks
4x12BritishOr 4x12"Orange®PPC412™
4x12Closed25C Marshall®4x12”,Greenbacks
4x12Closed75C Marshall®4x12”,G1275
4x12ClosedJ120 Marshall®4x12”,JBL®D120F
4x12ClosedModern1 Marshall®4x12'80s1982A
4x12ClosedModern2 Mesa/Boogie®4x12Rectifier™
4x12ClosedVintage1 Marshall®4x12Angled,'70sGreenbacks
4x12ClosedVintage2 Marshall®4x12Straight,Greenbacks
4x12MetalF1 Fender®4x12MH™1
4x12MetalF2 Fender®4x12MH™2
4x12MetalT1 Mesa/Boogie®4x12”Rectifier®1
4x12MetalT2 Mesa/Boogie®4x12”Rectifier®2
4x12MetalT3 Mesa/Boogie®4x12”Rectifier®3
4x12MetalV1 Peavey®5150®4x12”1
4x12MetalV2 Peavey®5150®4x12”2
4x12MetalV3 Peavey®5150®4x12”3
4x12ModernM1 Marshall®4x12”JCM8001
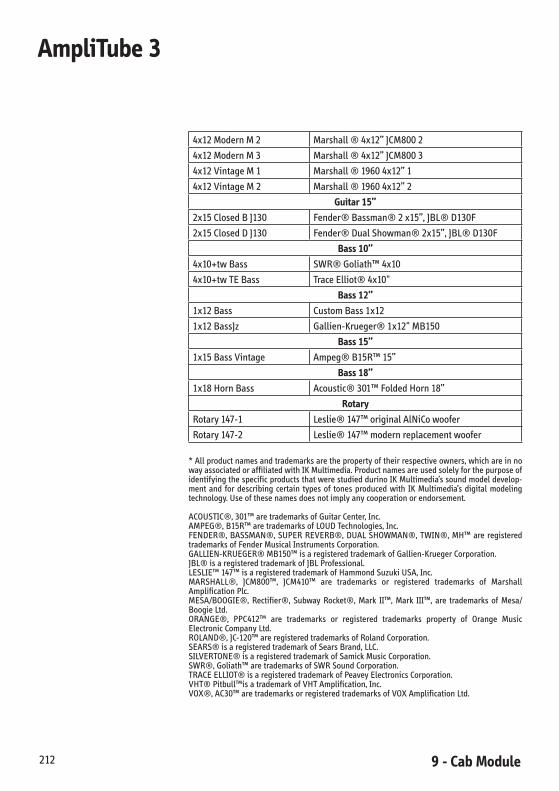
9 - Cab Module212
AmpliTube 3
4x12ModernM2 Marshall®4x12”JCM8002
4x12ModernM3 Marshall®4x12”JCM8003
4x12VintageM1 Marshall®19604x12”1
4x12VintageM2 Marshall®19604x12”2
Guitar 15”
2x15ClosedBJ130 Fender®Bassman®2x15”,JBL®D130F
2x15ClosedDJ130 Fender®DualShowman®2x15”,JBL®D130F
Bass 10”
4x10+twBass SWR®Goliath™4x10
4x10+twTEBass TraceElliot®4x10"
Bass 12”
1x12Bass CustomBass1x12
1x12BassJz Gallien-Krueger®1x12"MB150
Bass 15”
1x15BassVintage Ampeg®B15R™15”
Bass 18”
1x18HornBass Acoustic®301™FoldedHorn18”
Rotary
Rotary147-1 Leslie®147™originalAlNiCowoofer
Rotary147-2 Leslie®147™modernreplacementwoofer
*Allproductnamesandtrademarksarethepropertyoftheirrespectiveowners,whichareinnowayassociatedoraffiliatedwithIKMultimedia.ProductnamesareusedsolelyforthepurposeofidentifyingthespecificproductsthatwerestudieddurinoIKMultimedia’ssoundmodeldevelop-ment and for describing certain types of tones produced with IK Multimedia’s digital modelingtechnology.Useofthesenamesdoesnotimplyanycooperationorendorsement.
ACOUSTIC®,301™aretrademarksofGuitarCenter,Inc.AMPEG®,B15R™aretrademarksofLOUDTechnologies,Inc.FENDER®,BASSMAN®,SUPERREVERB®,DUALSHOWMAN®,TWIN®,MH™areregisteredtrademarksofFenderMusicalInstrumentsCorporation.GALLIEN-KRUEGER®MB150™isaregisteredtrademarkofGallien-KruegerCorporation.JBL®isaregisteredtrademarkofJBLProfessional.LESLIE™147™isaregisteredtrademarkofHammondSuzukiUSA,Inc.MARSHALL®, JCM800™, JCM410™ are trademarks or registered trademarks of MarshallAmplificationPlc.MESA/BOOGIE®, Rectifier®, Subway Rocket®, Mark II™, Mark III™, are trademarks of Mesa/BoogieLtd.ORANGE®, PPC412™ are trademarks or registered trademarks property of Orange MusicElectronicCompanyLtd.ROLAND®,JC-120™areregisteredtrademarksofRolandCorporation.SEARS®isaregisteredtrademarkofSearsBrand,LLC.SILVERTONE®isaregisteredtrademarkofSamickMusicCorporation.SWR®,Goliath™aretrademarksofSWRSoundCorporation.TRACEELLIOT®isaregisteredtrademarkofPeaveyElectronicsCorporation.VHT®Pitbull™isatrademarkofVHTAmplification,Inc.VOX®,AC30™aretrademarksorregisteredtrademarksofVOXAmplificationLtd.
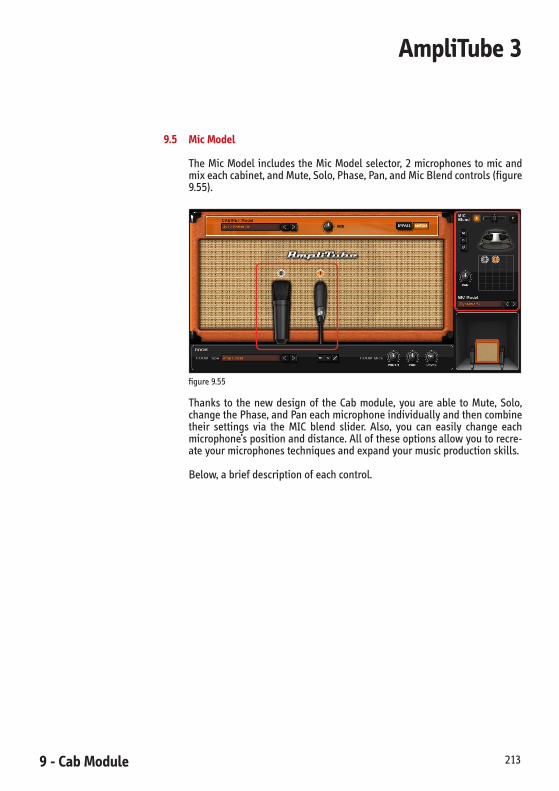
9 - Cab Module 213
AmpliTube 3
9.5 Mic Model
TheMicModel includestheMicModelselector,2microphonestomicandmixeachcabinet,andMute,Solo,Phase,Pan,andMicBlendcontrols(figure9.55).
figure9.55
Thanks to the new design of the Cab module, you are able to Mute, Solo,changethePhase,andPaneachmicrophoneindividuallyandthencombinetheir settings via the MIC blend slider. Also, you can easily change eachmicrophone’spositionanddistance.Alloftheseoptionsallowyoutorecre-ateyourmicrophonestechniquesandexpandyourmusicproductionskills.
Below,abriefdescriptionofeachcontrol.
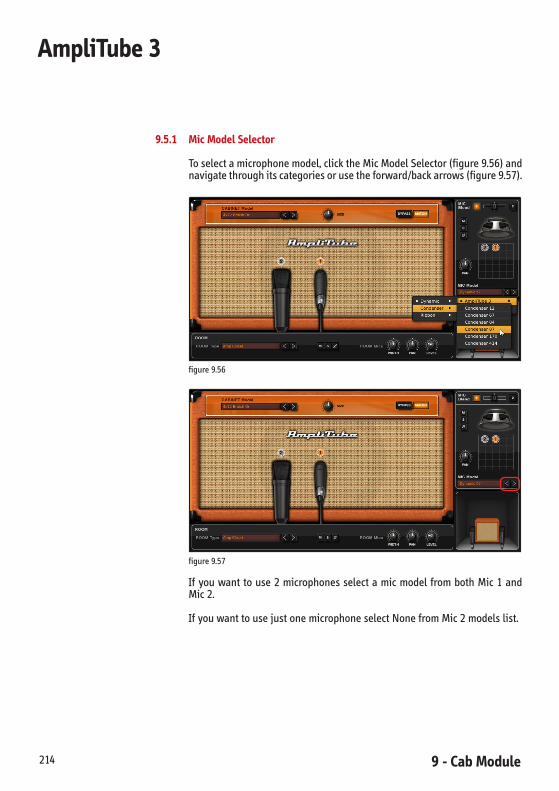
9 - Cab Module214
AmpliTube 3
9.5.1 Mic Model Selector
Toselectamicrophonemodel,clicktheMicModelSelector(figure9.56)andnavigatethroughitscategoriesorusetheforward/backarrows(figure9.57).
figure9.56
figure9.57
Ifyouwanttouse2microphonesselectamicmodelfrombothMic1andMic2.
IfyouwanttousejustonemicrophoneselectNonefromMic2modelslist.

9 - Cab Module 215
AmpliTube 3
Note: when loading presets from previous AmpliTube products Mic 2 willbeselectedtoNoneautomaticallybecausepreviousproductsonlyhaveonemic.Toaddasecondmicrophone inAmpliTube3 just click theMicModelSelectorandchooseamicmodelinsteadofNone(figure9.58).
figure9.58
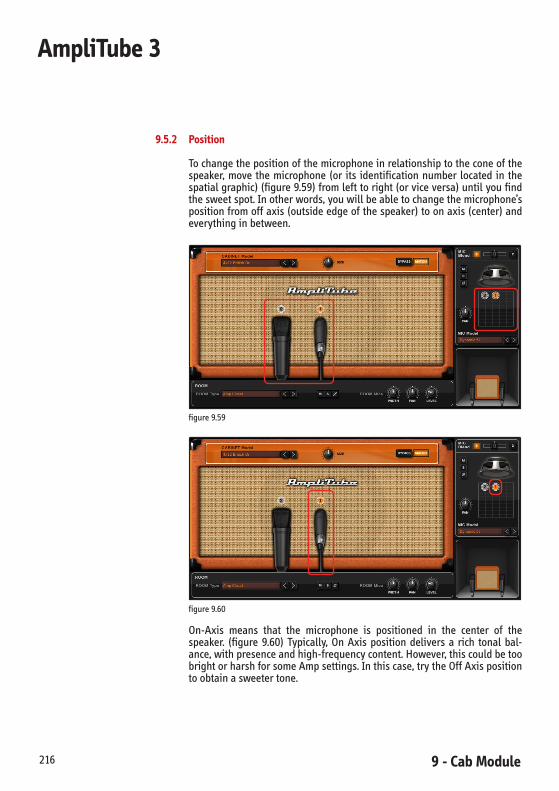
9 - Cab Module216
AmpliTube 3
9.5.2 Position
Tochangethepositionofthemicrophoneinrelationshiptotheconeofthespeaker,move themicrophone (or its identificationnumber located in thespatialgraphic)(figure9.59)fromlefttoright(orviceversa)untilyoufindthesweetspot.Inotherwords,youwillbeabletochangethemicrophone’spositionfromoffaxis(outsideedgeofthespeaker)toonaxis(center)andeverythinginbetween.
figure9.59
figure9.60
On-Axis means that the microphone is positioned in the center of thespeaker. (figure 9.60) Typically, On Axis position delivers a rich tonal bal-ance,withpresenceandhigh-frequencycontent.However,thiscouldbetoobrightorharshforsomeAmpsettings.Inthiscase,trytheOffAxispositiontoobtainasweetertone.
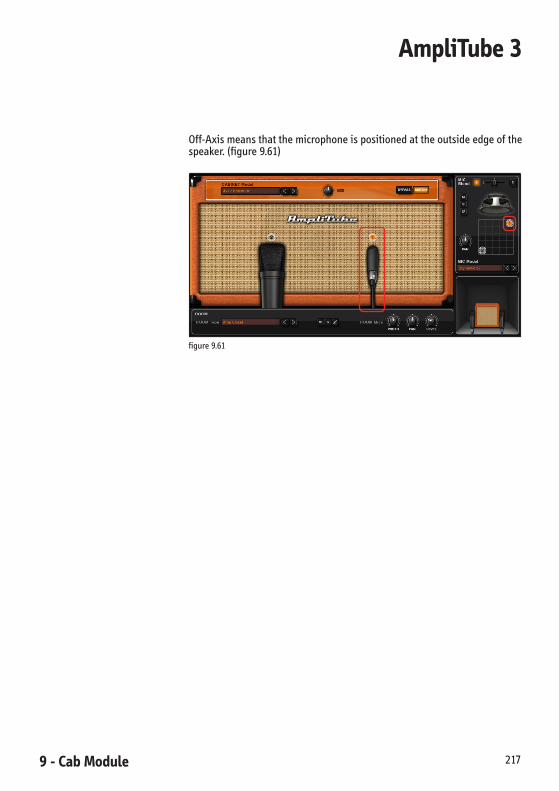
9 - Cab Module 217
AmpliTube 3
Off-Axismeansthatthemicrophoneispositionedattheoutsideedgeofthespeaker.(figure9.61)
figure9.61

9 - Cab Module218
AmpliTube 3
9.5.3 Distance
To change the distance of the microphone in relationship to the speaker,movethemicrophoneUp(Near)(figure9.62)orDown(Far)(figure9.63)orviceversauntilyoufindtheproperdistance.
figure9.62
figure9.63
Tosummarize,movingthemicrophonehorizontallywillchangeitsposition(On/Offaxis)andmovingitverticallywillchangeitsdistance(Near/Far).
ProductionTips:
To obtain detailed clean sounds, mic up your Cab using the On AxispositionandNeardistancesettings.Ifthesoundistoobigforyourmix,changethemicdistancetoFar.
In general, extremely high-gain sounds match well together with anOff-AxispositionandNeardistancesettings,(especiallyifyouareusingabrightmicrophoneliketheDynamic57).

9 - Cab Module 219
AmpliTube 3
Important:exactlyasit’shappeninginrealitywhenyoucombinetwomicro-phonesplacedaddifferentdistances in frontofanamplifierandyoumixthemuptheresultcanbeaphaseysoundaffectedbyweirdcombfiltering.
Sometimesthis iswhat it’sactuallywanted,but incaseyouhear thisandyoudonotlikewhatyougetjustbesuretoalignthetwomicrophonesmoreorlessatthesamedistancefromthespeaker.
Youcanalsoblendthemicrophonesat25%or75%insteadof50%,thiswill reduce thephaseyeffectwhenmicsareplacedatdifferentdistances.Although,again,thisissometimessomethingwanted!
Tip:experimentwiththefantastic3Dand“senseofspace”AmpliTube3candeliverbypanningthetwomicrophoneswideL-R(orjustabit)andmovingthe microphones in front of the cab. You’ll discover some amazingly nicewaysofhavingyourtonestobeplacedonthestereofieldandhavingthemtogoinsidethemixoroutside,withamazingspatialpresence.
9.5.4 Mute
Click this button to Mute the selected microphone (its number will bedimmed(figure9.64).
figure9.64

9 - Cab Module220
AmpliTube 3
9.5.5 Solo
Click this button to Solo the selected microphone (the other microphone’snumberwillbedimmed)(figure9.65).
figure9.65
9.5.6 Phase
ClickthisbuttontochangetheselectedmicrophonePhase(figure9.66).Youcangetsomereallyweirdtonesbycombiningtwomicrophonesindifferentpositionsandreversingphaseonone.Experiment!
figure9.66

9 - Cab Module 221
AmpliTube 3
9.5.7 Pan
Tochangeamicrophonepansetting,movethePanknob(figure9.67)tothedesiredpositionandcheckitsvalueintheSelectedParameterDisplay.
figure9.67
Tip:whencombiningtwomicrophonesitissometimeveryusefultoslightly“open” their Pan controls. This can result in some extremely realistic andnicely3Dsoundingtonesthatcanfitbetterinthemixbecausetheycantakeadvantageofspatial“cuttrough”inadditionto2Dnormalpanning.
9.5.8 Mic Blend
To combine both microphone settings, move the Mic Blend slider to yourdesiredposition(figure9.68).
figure9.68

9 - Cab Module222
AmpliTube 3
9.6 Microphone Models
AmpliTube3offersmicrophonemodelsorganizedin3categories,Dynamic,Condenser,andRibbon.
9.6.1 Dynamic
9.6.1.1 Dynamic 57
This mic model is based on one of the most popular small diaphragmdynamic microphones. Its bright, edgy sound has made it a widely usedguitarampmic(figure9.69).
figure9.69
Typicallyusedinstudiospairedwithasmootherandwarmercondensermic.

9 - Cab Module 223
AmpliTube 3
9.6.1.2 Dynamic 20
Thismicmodelrecreatesasmoothreactionacrossawidespectrumoffre-quencies,especiallyattractiveinthelowarea.ThismeansthattheDynamic20isagreatselectionforacousticandelectricbass(figure9.70).
figure9.70

9 - Cab Module224
AmpliTube 3
9.6.1.3 Vintage Dynamic 20
This model is a vintage dynamic large diaphragm microphone that usedto be the standard mic for bass amps and kick drums during the ‘60s. It’swarmandpresent,andhasasmoothroll-offathigh frequencies. Ithasaverypleasantmidrangepresencetogetherwithasmoothhighfrequenciesrolloffthatdeliversanicevintagesheentothetone(figure9.71).
figure9.71
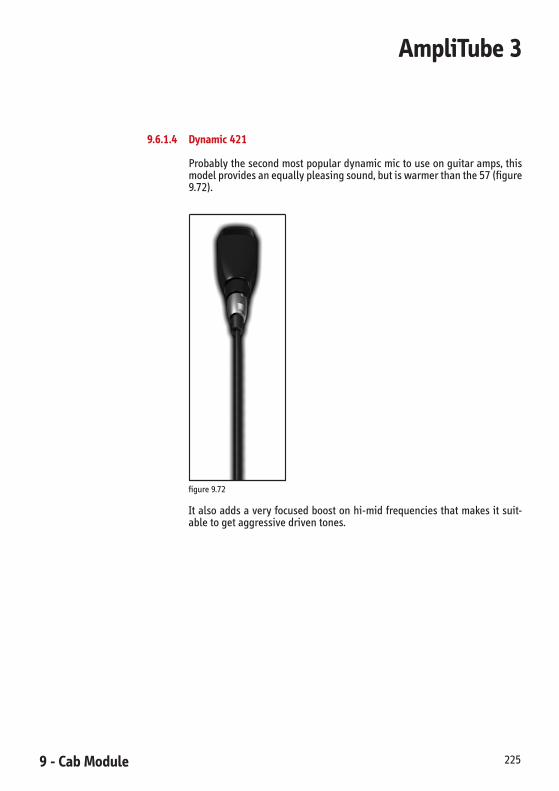
9 - Cab Module 225
AmpliTube 3
9.6.1.4 Dynamic 421
Probablythesecondmostpopulardynamicmictouseonguitaramps,thismodelprovidesanequallypleasingsound,butiswarmerthanthe57(figure9.72).
figure9.72
Italsoaddsaveryfocusedboostonhi-midfrequenciesthatmakesitsuit-abletogetaggressivedriventones.
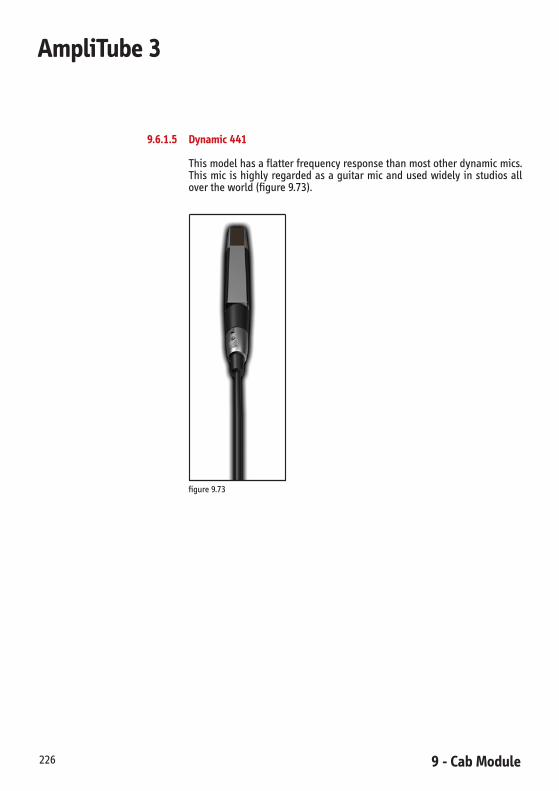
9 - Cab Module226
AmpliTube 3
9.6.1.5 Dynamic 441
Thismodelhasaflatterfrequencyresponsethanmostotherdynamicmics.Thismic ishighlyregardedasaguitarmicandusedwidely instudiosallovertheworld(figure9.73).
figure9.73
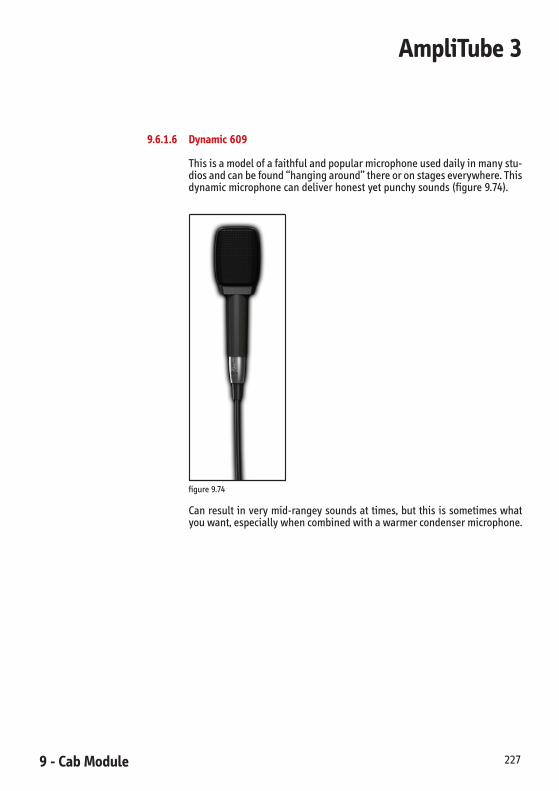
9 - Cab Module 227
AmpliTube 3
9.6.1.6 Dynamic 609
Thisisamodelofafaithfulandpopularmicrophoneuseddailyinmanystu-diosandcanbefound“hangingaround”thereoronstageseverywhere.Thisdynamicmicrophonecandeliverhonestyetpunchysounds(figure9.74).
figure9.74
Canresultinverymid-rangeysoundsattimes,butthisissometimeswhatyouwant,especiallywhencombinedwithawarmercondensermicrophone.
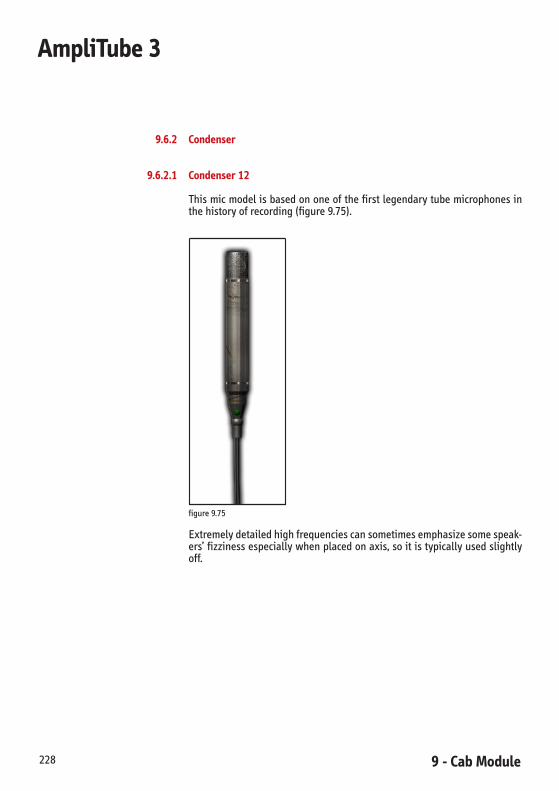
9 - Cab Module228
AmpliTube 3
9.6.2 Condenser
9.6.2.1 Condenser 12
Thismicmodelisbasedononeofthefirstlegendarytubemicrophonesinthehistoryofrecording(figure9.75).
figure9.75
Extremelydetailedhighfrequenciescansometimesemphasizesomespeak-ers’fizzinessespeciallywhenplacedonaxis,soitistypicallyusedslightlyoff.
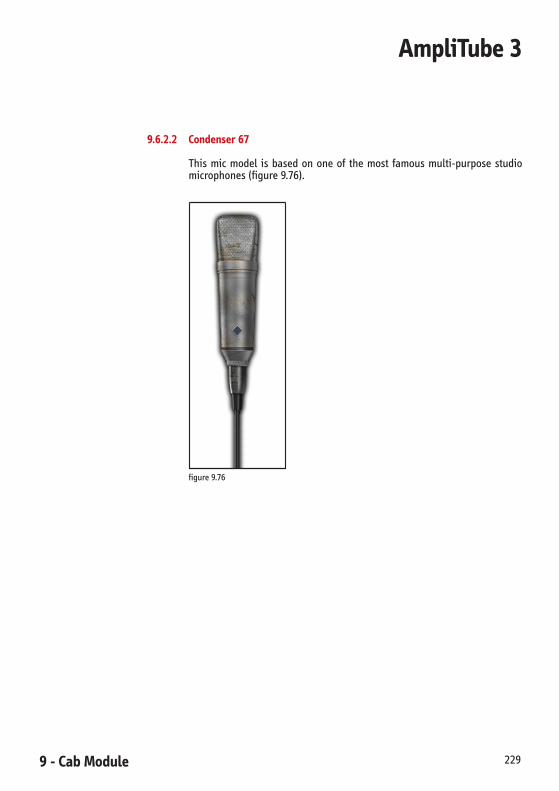
9 - Cab Module 229
AmpliTube 3
9.6.2.2 Condenser 67
This mic model is based on one of the most famous multi-purpose studiomicrophones(figure9.76).
figure9.76
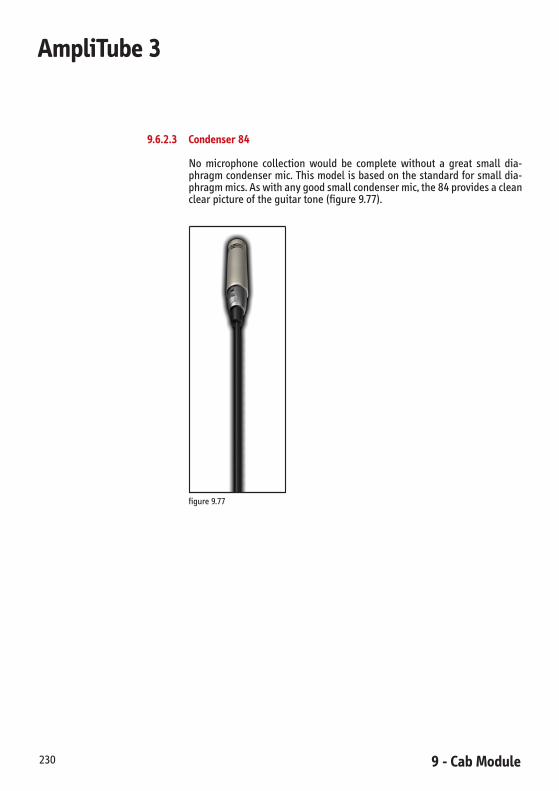
9 - Cab Module230
AmpliTube 3
9.6.2.3 Condenser 84
No microphone collection would be complete without a great small dia-phragmcondensermic.Thismodelisbasedonthestandardforsmalldia-phragmmics.Aswithanygoodsmallcondensermic,the84providesacleanclearpictureoftheguitartone(figure9.77).
figure9.77

9 - Cab Module 231
AmpliTube 3
9.6.2.4 Condenser 87
Thisisamodelofoneofthemostpopularlargediaphragmmicsever(figure9.78).Itcanbefoundinanylargerecordingstudiomiclocker.Becauseofitsexcellentfrequencyresponsecurve,the87hasbecomethego-tomicwhenneedingaclean,flatteringsound.
figure9.78

9 - Cab Module232
AmpliTube 3
9.6.2.5 Condenser 170
This is a model of a high-quality large-diaphragm condenser microphoneused in famous studios around the world. One of the first with transfor-merless technology, this microphone came into the world boasting a veryhigh-quality sound with low noise and a very impressive dynamic range(figure9.79).
figure9.79
Thismicrophonewillnotcolorthesoundofthespeaker,oratleastwillcoloritverylittle.That’swhyitisagreatchoicetohearaverynaturalrenderingofthespeakersoundevenwhenusedalone.

9 - Cab Module 233
AmpliTube 3
9.6.2.6 Condenser 414
The Condenser 414 is modeled after another highly regarded large dia-phragm condenser microphone (figure 9.80). It is a flat and clean/openmicrophone that will flatter big full tones and will also blend beautifullywhencombinedwithanothercabinet/micsetup.
figure9.80
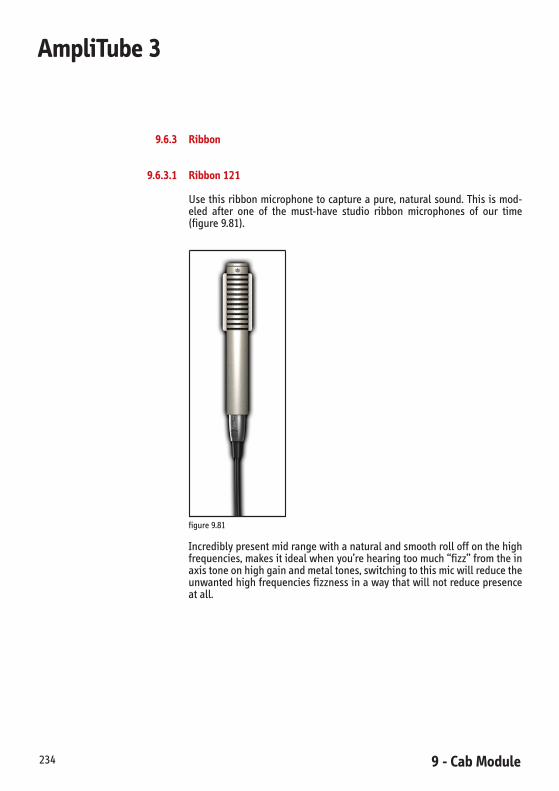
9 - Cab Module234
AmpliTube 3
9.6.3 Ribbon
9.6.3.1 Ribbon 121
Usethisribbonmicrophonetocaptureapure,naturalsound.Thisismod-eled after one of the must-have studio ribbon microphones of our time(figure9.81).
figure9.81
Incrediblypresentmidrangewithanaturalandsmoothrolloffonthehighfrequencies,makesitidealwhenyou’rehearingtoomuch“fizz”fromtheinaxistoneonhighgainandmetaltones,switchingtothismicwillreducetheunwantedhighfrequenciesfizznessinawaythatwillnotreducepresenceatall.
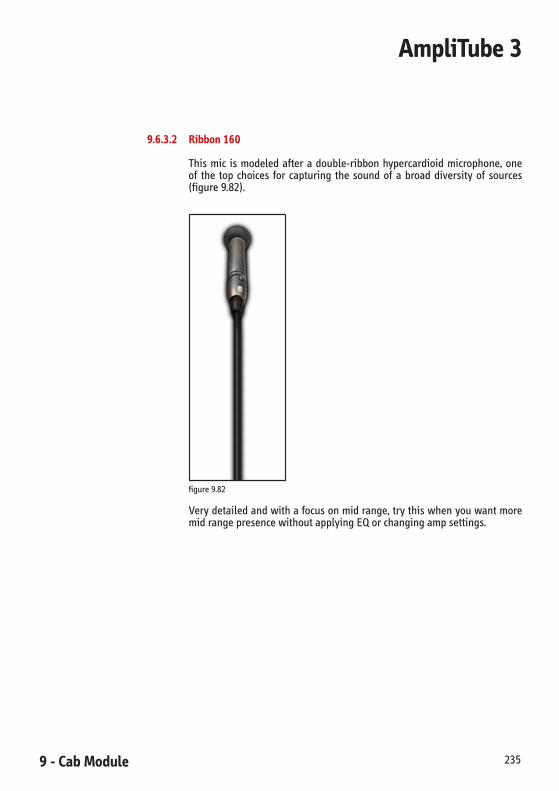
9 - Cab Module 235
AmpliTube 3
9.6.3.2 Ribbon 160
This mic is modeled after a double-ribbon hypercardioid microphone, oneof the top choices for capturing the sound of a broad diversity of sources(figure9.82).
figure9.82
Verydetailedandwithafocusonmidrange,trythiswhenyouwantmoremidrangepresencewithoutapplyingEQorchangingampsettings.
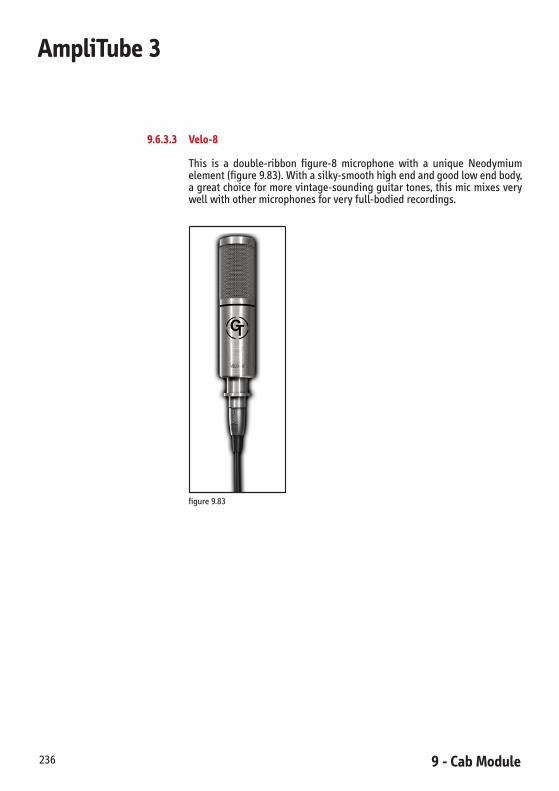
9 - Cab Module236
AmpliTube 3
9.6.3.3 Velo-8
This is a double-ribbon figure-8 microphone with a unique Neodymiumelement(figure9.83).Withasilky-smoothhighendandgoodlowendbody,agreatchoiceformorevintage-soundingguitartones,thismicmixesverywellwithothermicrophonesforveryfull-bodiedrecordings.
figure9.83

9 - Cab Module 237
AmpliTube 3
9.7 Microphone Models (Table)
Mic Model Based on*
Dynamic
Dynamic57 Shure®SM57™
Dynamic20 Electro-Voice®RE20™
VintageDynamic20 AKG®D20™
Dynamic421 Sennheiser®MD-421™
Dynamic441 Sennheiser®MD-441™
Dynamic609 Sennheiser®MD609™
Condenser
Condenser12 AKG®C12™
Condenser67 Neumann®U67
Condenser84 Neumann®KM-84™
Condenser87 Neumann®U-87™
Condenser170 Neumann®TLM170™
Condenser414 AKG®C-414ULS™
Ribbon
Ribbon121 Royer®R121™
Ribbon160 Beyerdynamic®M160™
RibbonVelo-8 GrooveTubes®Velo-8™
*Allproductnamesandtrademarksarethepropertyoftheirrespectiveowners,whichareinnowayassociatedoraffiliatedwithIKMultimedia.ProductnamesareusedsolelyforthepurposeofidentifyingthespecificproductsthatwerestudieddurinoIKMultimedia’ssoundmodeldevelop-ment and for describing certain types of tones produced with IK Multimedia’s digital modelingtechnology.Useofthesenamesdoesnotimplyanycooperationorendorsement.
AKG®,C12™,D20™,C-414ULS™areregisteredtrademarksofAKGAcousticsGmbH.BEYERDYNAMIC®,M160™areregisteredtrademarksofBeyerdynamicGmbH&Co.ELECTRO-VOICE®,RE20™areregisteredtrademarksofElectro-Voice,Inc.GROOVETUBES®,Velo-8™areregisteredtrademarksofGrooveTubes,LLC.NEUMANN®,U67™,U87™,KM-84™,TLM170™areregistered trademarksofGeorgNeumannGmbH.ROYER®,R121™areregisteredtrademarksofBulldogAudio,Inc.DBARoyerLabsCorporation.SENNHEISER®, MD-421™, MD-441™, MD609™ are registered trademarks of SennheiserElectronicCorp.SHURE®,SM57™areregisteredtrademarksofShureIncorporated.

9 - Cab Module238
AmpliTube 3
9.8 Room
ThenewRoomsectionallowsyoutoplacethecabinetinaparticularambi-enceandcontrolthewidth,pan,andleveloftheRoomMics.Inaddition,itincludestheMute,Solo,andPhasebuttons.ExperimentwithalltheCab,MicModels,andRoomTypestocreateyourperfectcabinetsound(figure9.84).
figure9.84

9 - Cab Module 239
AmpliTube 3
9.8.1 Room Type Selector
ClicktheRoomTypeSelector(figure9.85)toselectaRoompresetorusetheforward/backarrows(figure9.86).
figure9.85
figure9.86
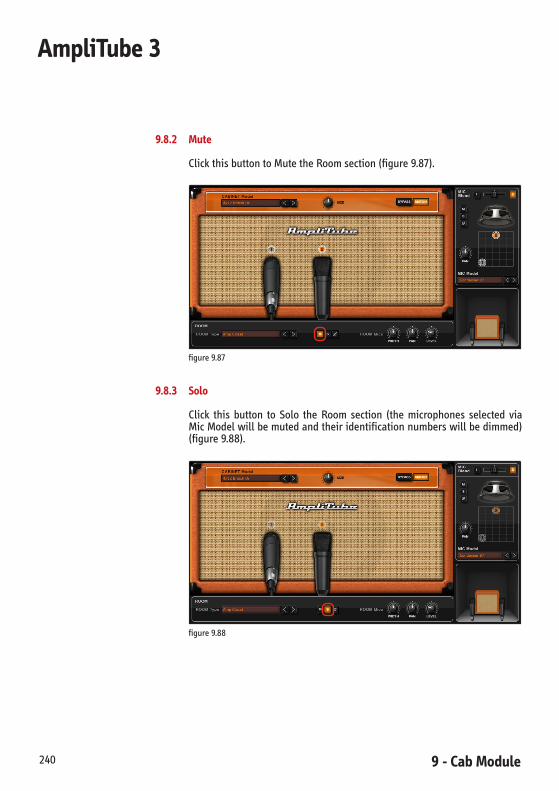
9 - Cab Module240
AmpliTube 3
9.8.2 Mute
ClickthisbuttontoMutetheRoomsection(figure9.87).
figure9.87
9.8.3 Solo
Click this button to Solo the Room section (the microphones selected viaMicModelwillbemutedandtheiridentificationnumberswillbedimmed)(figure9.88).
figure9.88

9 - Cab Module 241
AmpliTube 3
9.8.4 Phase
ClickthisbuttontochangetheRoom’sPhase(figure9.89).
figure9.89
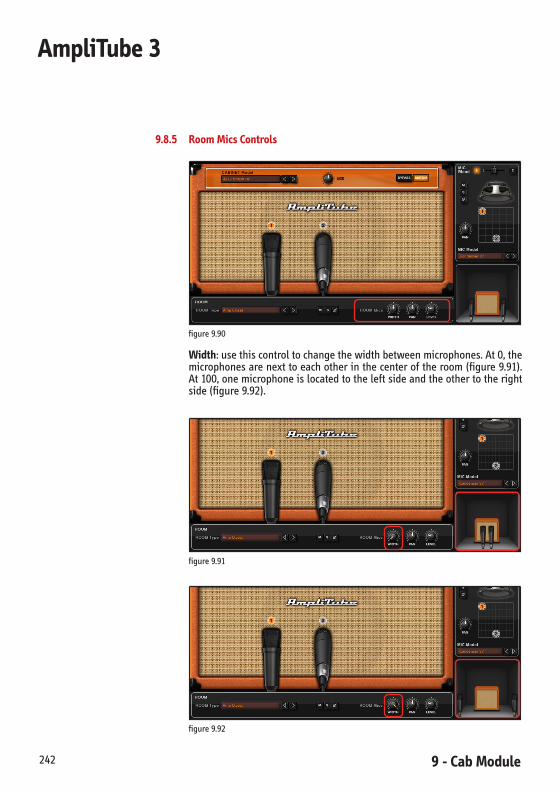
9 - Cab Module242
AmpliTube 3
9.8.5 Room Mics Controls
figure9.90
Width:usethiscontroltochangethewidthbetweenmicrophones.At0,themicrophonesarenexttoeachotherinthecenteroftheroom(figure9.91).At100,onemicrophoneislocatedtotheleftsideandtheothertotherightside(figure9.92).
figure9.91
figure9.92

9 - Cab Module 243
AmpliTube 3
UsethiscontroltosettheStereoimagewidththatwillbeproducedbytheambiencesignal.
When set to default (Center), the ambience will be producing a naturalstereoroomsound.
Iflowered,theimagewillgraduallynarrowuptobecomecompletelymonoattheminimumposition.
Ifincreased,theimagewillbeexpandedcausingtheimpressionoftheste-reofieldtobewiderthanthespeakers.Becarefulnotoverdothisbecausethesoundmightbecancelled(orpartially)whenlisteninginmono.
Pan:thiscontrolallowsyoutopanbothmicrophonestotheleft,center,orrightwithinthestereoimage(figure9.93).
figure9.93
Level:controlstheRoomMicsLevels.Thisisagreattooltocreatedifferentdimensionswithinyourmix(figure9.94).
figure9.94
ThevaluesoftheWidth,Pan,andLevelcontrolsareshownintheSelectedParameterDisplay.

9 - Cab Module244
AmpliTube 3
9.8.6 Room Type Presets
Thereare5RoomTypePresets;AmpCloset,SmallStudio,MidStudio,LargeStudioandHall.Listentoeachpresetandselecttheonethatbestfitsyoursound(figure9.95).
figure9.95
9.9 Rotary Speaker
figure9.96
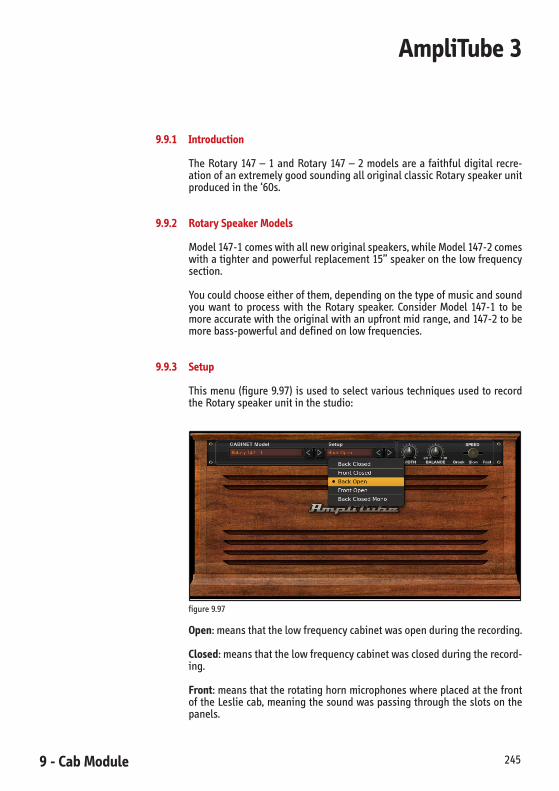
9 - Cab Module 245
AmpliTube 3
9.9.1 Introduction
TheRotary147–1andRotary147–2modelsareafaithfuldigitalrecre-ationofanextremelygoodsoundingalloriginalclassicRotaryspeakerunitproducedinthe‘60s.
9.9.2 Rotary Speaker Models
Model147-1comeswithallneworiginalspeakers,whileModel147-2comeswithatighterandpowerfulreplacement15”speakeronthelowfrequencysection.
Youcouldchooseeitherofthem,dependingonthetypeofmusicandsoundyou want to process with the Rotary speaker. Consider Model 147-1 to bemoreaccuratewiththeoriginalwithanupfrontmidrange,and147-2tobemorebass-powerfulanddefinedonlowfrequencies.
9.9.3 Setup
Thismenu(figure9.97)isusedtoselectvarioustechniquesusedtorecordtheRotaryspeakerunitinthestudio:
figure9.97
Open:meansthatthelowfrequencycabinetwasopenduringtherecording.
Closed:meansthatthelowfrequencycabinetwasclosedduringtherecord-ing.
Front:meansthattherotatinghornmicrophoneswhereplacedatthefrontoftheLesliecab,meaningthesoundwaspassingthroughtheslotsonthepanels.

9 - Cab Module246
AmpliTube 3
Back: means that the horn microphones where placed at the back of theLeslie cabinet, meaning the sound was directly taken from the horn, notpassingthroughtheslotsonpanels,orjustpartially.
Mono: means the bass drum was recorded with only one microphone, inmono.
9.9.4 Width
UsethiscontroltosettheStereoimagewidththatwillbeproducedbytheRotaryspeaker(figure9.98).
figure9.98
Whensettodefault(Center)theRotaryspeakerisproducingaconvincingandnaturalstereoimage.
Iflowered,theimagewillgraduallynarrowuptobecomecompletelymonoattheminimumposition.
If increased, the image will be expanded causing the impression of thestereo field to be wider than the speakers. Be careful not to overdo thisbecausethesoundmightbecancelled(orpartiallycancelled)whenlisten-inginmono.

9 - Cab Module 247
AmpliTube 3
9.9.5 Balance
UsethiscontroltoalterthebalancebetweenthetoprotatinghornsandthebottomrotatingdrumontheRotarySpeakerunit.(figure9.99)
figure9.99
At default (center) position the sound is usually balanced, moving thecontrol toward the minimum position makes the level of the top rotatinghorns(midandhighfrequencies)tobereduced,movingthecontroltowardthe maximum position makes the level of the bottom rotating drum (lowfrequencies)tobereduced.

9 - Cab Module248
AmpliTube 3
9.9.6 Speed
SetsthespeedoftheRotarySpeaker(figure9.100).
figure9.100
Slow:makesthehornanddrumtorotateatslowspeed.Fast:makesthehornanddrumtorotateathighspeed.Brake:makesthehornanddrumtostoprotating.
Therealrotatingspeakersinsidethisunitaretakingtheirtimetobothslowdownorspeedup;thischaracteristicisalsopartofitssound.Themodelhereisbehavinginthesameway,withtheexacttimes.That’swhyspeedchangesarenotinstantaneous.

10 - Rack FX Module 249
AmpliTube 3
Chapter 10 Rack FX Module (Post Effects)
10.1 Introduction
ToaccesstheRackmodule,clicktheRackbuttonlocatedontheModule/RigSelector(figure10.1).TherearetwoindependentRackmodulesfeaturing4stereorackeffectseach.Theycanbeusedindependentlyortogetherforatotalof8rackeffects.
figure10.1
TofacilitatetheRackmodelsnavigation,pleasereadthefollowingcontrolsdescriptions.
10.2 On/Bypass
This control enables/disables the Rack module from the plug-in’s signal.WhenisOn,theswitchlooksred.(figure10.2)
figure10.2

10 - Rack FX Module 250
AmpliTube 3
10.3 Rack FX Selector
To select a rack model, click the Rack Model Selector (figure 10.3) andnavigatethroughitscategoriesorusetheforward/backarrows.(figure10.4)
figure10.3
figure10.4
10.4 Drag and Drop Feature
ThankstoAmpliTube3drag&dropfeatureyouareabletore-arrangetheorderoftheracksontheflyandmonitortheresultsinreal-time…

10 - Rack FX Module 251
AmpliTube 3
10.5 Rack FX Models
AmpliTube3offers17 rack modelsorganized in6 categories,Modulation,Delay&Reverb,Filter,Pitch,EQ&Dynamics,andOther.
10.5.1 Delay & Reverb
10.5.1.1 Digital Delay
Thisadvanceddelaymodeledeffectcanaddavarietyofdepthtothesound,byprovidingfivedifferentdelaymodes.Thedelaycanalsobesynchedtothehosttempoprovidingevenmoreflexibility(figure10.5).
figure10.5
Controls:
• MODE: sets the output mode of the Delay effect; Stereo, Left/Right,Mono,Left/Center/Right,andDoubler.
• DELAY TIME:setsthetimebetweentheechoes,from1msto2000ms.• BPM SYNC:allowstheeffecttosynchronizetotheprojecttempoand
changestheRatecontroltobeatvalues.• FEEDBACK:changestheamountoftimethatthedelayrepeats,from
0%to100%.• FILTER: sets the low pass filter for the delay effect, from 200 Hz to
20kHz.Whensettomidvaluesitgivesanicewarmthtothedelaytimbre.
• MIX:adjuststheamountofwetsoundwiththedrysound,from0%to100%.
• OUT LEVEL:setstheoutputleveloftheeffect,from-15dBto+15dB.
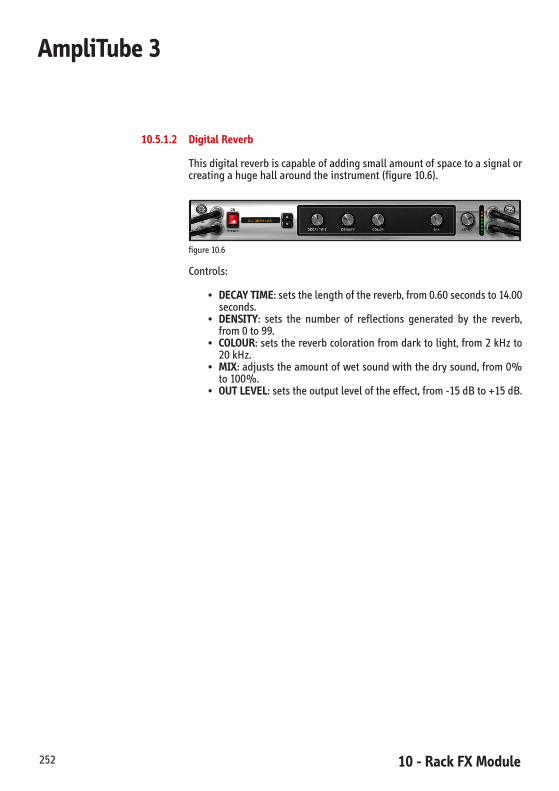
10 - Rack FX Module 252
AmpliTube 3
10.5.1.2 Digital Reverb
Thisdigitalreverbiscapableofaddingsmallamountofspacetoasignalorcreatingahugehallaroundtheinstrument(figure10.6).
figure10.6
Controls:
• DECAY TIME:setsthelengthofthereverb,from0.60secondsto14.00seconds.
• DENSITY: sets the number of reflections generated by the reverb,from0to99.
• COLOUR:setsthereverbcolorationfromdarktolight,from2kHzto20kHz.
• MIX:adjuststheamountofwetsoundwiththedrysound,from0%to100%.
• OUT LEVEL:setstheoutputleveloftheeffect,from-15dBto+15dB.

10 - Rack FX Module 253
AmpliTube 3
10.5.1.3 Tap Delay
Thiscreativedelayeffectunitcanbeusedtocreateinterestingandunusualdelayeffectsthankstothe8totallyindependenttaps.Youcancreategroov-ingrhythmpatternsbycombiningmoretapswithaspecifictimesignature,andyoucanmixthisupwithpsychedelicreversetapeeffectsyouareabletosetforeachtap(figure10.7).
figure10.7
TheTapDelayisactually8delaysinonesingleunit,anditallowsyoutosettime,timbreandlevelforeachoneoftheseunits.Inaddition,youcanglob-allycontrolwithsingleknobsparametersforallthe8tapsatthesametime,liketime,dry/wetmixandfeedbackamount.
Controls:
• TIME:globallyshiftsthedelaytimeofallthe8taps.Thisisarelativecontrolthatworksinthisway:• Whensetatthecenterposition(1x)itdoesnotalterthetimethat
hasbeensetuponeachtap.• Whensettominimum(0.25x)itdividesalltimesbyfour.• Whensettomax(4x)itmultiplyalltimesbyfour.Useittogloballychangethedelaytempowithoutchangingtherela-tionsbetweenalltaps.
• MIX: globally adjust the effect mix between the Dry signal and allthe8delaytaps.
• FEEDBACK: globally adjust the amount of feedback the delay willhave.Whensetatmaximum,thedelaywithbesustainingitself.
• TAP:usethesebuttonstoselectwhichoneamongthe8delaytapsyou’regoingtoeditwithnextcontrols.
• LEVEL:setstheaudiolevelfortheselecteddelaytap.• TIME: sets the delay time for the selected tap. It can be shown in
milliseconds or in musical divisions, depending on the BPM Syncswitchposition.
• TAPS DISPLAY: shows each Tap as a vertical bar. The horizontalposition of the bar represent the delay time, the height of the barrepresenttheaudiolevel.
• FILTER:setsthetimbrefortheselecteddelaytap,darkeratminimumandbrighteratmaximum.
• REVERSE:enablethisbuttontotransformtheselecteddelaytapfromnormaltoreverse.Whensettoreverseadelaytapwillsoundlikeareversedtapeloop.
• LINK:enablethisbuttontomakeachangeyoudoontheabovemen-tionedparameterstoapplytoallthe8tapsatthesametime.
• BPM SYNC:allowstheeffecttosynchronizetotheprojecttempo.
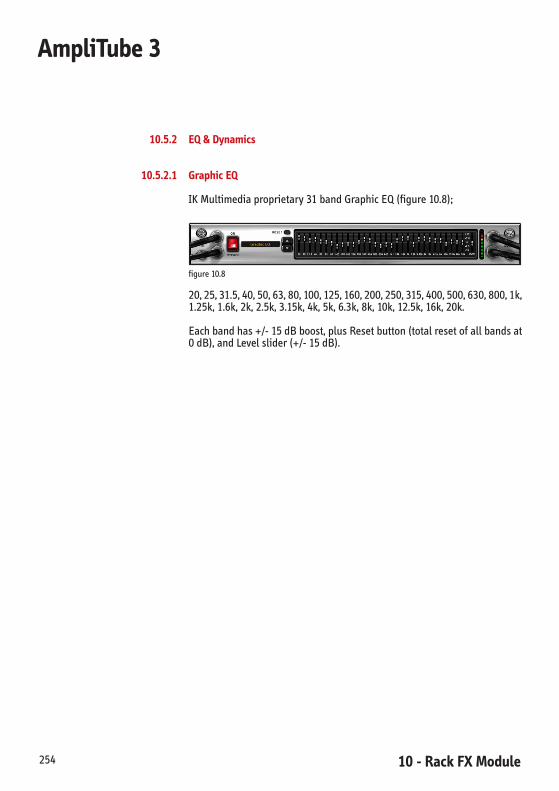
10 - Rack FX Module 254
AmpliTube 3
10.5.2 EQ & Dynamics
10.5.2.1 Graphic EQ
IKMultimediaproprietary31bandGraphicEQ(figure10.8);
figure10.8
20,25,31.5,40,50,63,80,100,125,160,200,250,315,400,500,630,800,1k,1.25k,1.6k,2k,2.5k,3.15k,4k,5k,6.3k,8k,10k,12.5k,16k,20k.
Eachbandhas+/-15dBboost,plusResetbutton(totalresetofallbandsat0dB),andLevelslider(+/-15dB).

10 - Rack FX Module 255
AmpliTube 3
10.5.2.2 Parametric EQ
WithitsthreetotallyindependentEQs,thisparametricEQprovidesenoughpowertosculpttheperfectguitartoneorsurgicallyenhanceandalteranysignalsentthroughit(figure10.9).
figure10.9
Controls:
• BASS:• GAIN:adjuststheboostorcutofthebassparametricEQ,from-15
dBto+15dB.• FREQ: changes the center frequency of the bass parametric EQ,
from20Hzto20kHz.• Q: sets the bandwidth of the bass parametric EQ, from 0.1 (very
wide)to8.0(verynarrow).• MID:
• GAIN:adjuststheboostorcutofthemidparametricEQ,from-15dBto+15dB.
• FREQ:changesthecenterfrequencyofthemidparametricEQ,from20Hzto20kHz.
• Q: sets the bandwidth of the mid parametric EQ, from 0.1 (verywide)to8.0(verynarrow).
• HI:• GAIN: adjusts theboost or cutof theHiparametricEQ, from-15
dBto+15dB.• FREQ:changesthecenterfrequencyoftheHiparametricEQ,from
20Hzto20kHz.• Q:setsthebandwidthoftheHiparametricEQ,from0.1(verywide)
to8.0(verynarrow).• OUT LEVEL:setstheoutputleveloftheeffect,from-15dBto+15dB.

10 - Rack FX Module 256
AmpliTube 3
10.5.2.3 Tube Compressor
This compressor was modeled after a classic tube compressor. It is a veryversatile,smoothcompressor,andcanaddgreatcolortothesignal(figure10.10).
figure10.10
Controls:
• DRIVE:controlstheamountofsignalthatisinputintotheeffect,set-tingthecompressionlevel.
• ATTACK: controls the amount of time that the compressor takes toreacttotheaudiosignal.
• RELEASE: controls theamountof timethat thecompressor takes toreturntonormalgainaftersomecompressionhasoccurred.
• RATIO:controlsthestrengthofthecompression.Highervalueswillresultinamoreevidenteffect.
• OUT LEVEL:setstheoutputleveloftheeffect,from-15dBto+15dB.
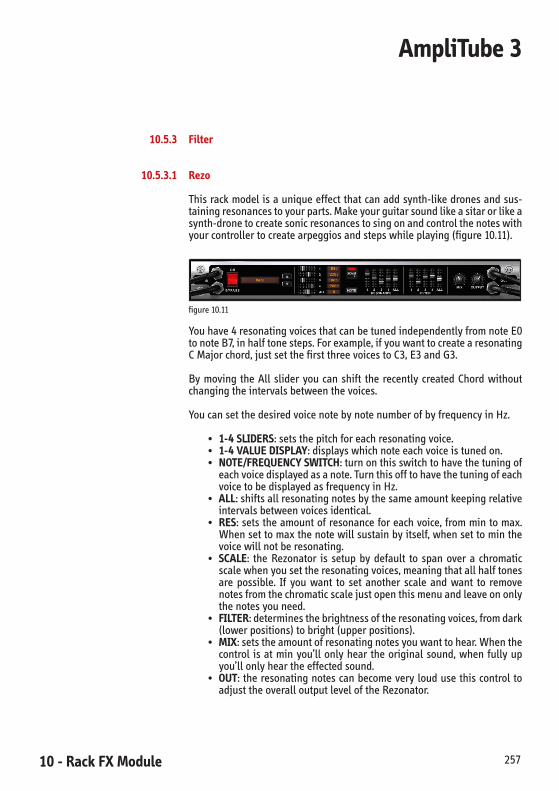
10 - Rack FX Module 257
AmpliTube 3
10.5.3 Filter
10.5.3.1 Rezo
Thisrackmodelisauniqueeffectthatcanaddsynth-likedronesandsus-tainingresonancestoyourparts.Makeyourguitarsoundlikeasitarorlikeasynth-dronetocreatesonicresonancestosingonandcontrolthenoteswithyourcontrollertocreatearpeggiosandstepswhileplaying(figure10.11).
figure10.11
Youhave4resonatingvoicesthatcanbetunedindependentlyfromnoteE0tonoteB7,inhalftonesteps.Forexample,ifyouwanttocreatearesonatingCMajorchord,justsetthefirstthreevoicestoC3,E3andG3.
By moving the All slider you can shift the recently created Chord withoutchangingtheintervalsbetweenthevoices.
YoucansetthedesiredvoicenotebynotenumberofbyfrequencyinHz.
• 1-4 SLIDERS:setsthepitchforeachresonatingvoice.• 1-4 VALUE DISPLAY:displayswhichnoteeachvoiceistunedon.• NOTE/FREQUENCY SWITCH:turnonthisswitchtohavethetuningof
eachvoicedisplayedasanote.TurnthisofftohavethetuningofeachvoicetobedisplayedasfrequencyinHz.
• ALL:shiftsallresonatingnotesbythesameamountkeepingrelativeintervalsbetweenvoicesidentical.
• RES:setstheamountofresonanceforeachvoice,frommintomax.Whensettomaxthenotewillsustainbyitself,whensettominthevoicewillnotberesonating.
• SCALE: the Rezonator is setup by default to span over a chromaticscalewhenyousettheresonatingvoices,meaningthatallhalftonesare possible. If you want to set another scale and want to removenotesfromthechromaticscalejustopenthismenuandleaveononlythenotesyouneed.
• FILTER:determinesthebrightnessoftheresonatingvoices,fromdark(lowerpositions)tobright(upperpositions).
• MIX:setstheamountofresonatingnotesyouwanttohear.Whenthecontrol isatminyou’llonlyhear theoriginalsound,when fullyupyou’llonlyheartheeffectedsound.
• OUT: theresonatingnotescanbecomeveryloudusethiscontroltoadjusttheoveralloutputleveloftheRezonator.

10 - Rack FX Module 258
AmpliTube 3
10.5.3.2 Step Filter
Thisisapowerfulanddeepbeatsyncfiltereffect.YouwillbeabletoapplyLow/High and Band pass analog modeled filtering on freely customizablepatternstoaddgrooveandrhythmicpulsingtoyourparts.Thiswillmakeyour guitars and bass parts to sound like a rhythmic synth, if you want it(figure10.12).
figure10.12
Controls:
• CUTOFF:setsthecentercutofffrequencyofthefilter.Thisisthecutofffrequencythefilterwillhavewhenthestepsaresettohalfposition.
• STEP BAR:clickontheStepstoseteachsteplevel.Youcanalsodrawacurvewhileholdingthemousewhiledraggingovermultiplesteps.
• RES: sets the center resonance of the filter. This is the resonanceamountthefilterwillhavewhenthestepsaresettohalfposition.
• DEPTH:setshowdeepthefilterismodulatedbythesteps.• HP/BP/LP:setswhichkindoffilterwillbeused:HP:highpass,BP:
bandpass,LP:lowpass• 12/24:setsthesteepnessofthefilter,12dB/octwillbesofter,24dB/
octwillbesteeper.• DEST:setswhatismodulatedbythestepsbetweenfilterCutoffand/
orfilterResonance.AtfullminimumpositiononlyCutofffrequencyismodulated,atmaxpositiononlyResonanceismodulated.
• DIVISION:setswhattimeintervaleachsteprepresent.• STEPS:setsthenumberofstepsthecyclewillconsistof.• MODE:WhensettoFreethecyclewillbecontinuousandwillalways
coverallthestepsthatarespecifiedintheStepsparameter.WhensettoStrikethecyclewillre-starteachtimeachordoranoteisplayed.
• SWING:increasethiscontroltogivetothestepsaswingtypequan-tization.
• BPM SYNC:allowstheeffecttosynchronizetotheprojecttempo.

10 - Rack FX Module 259
AmpliTube 3
10.5.4 Modulation
10.5.4.1 Analog Chorus
Thisclassicanalogstereochorusmodeladdsdepthandspacetotheinputsignal(figure10.13).Itcanalsobeusedasavibratoeffect.
figure10.13
Controls:
• CHORUS/VIBRATO:enablesVibratoorChorusmodes.ChorusmodeisenabledwhenthecorrespondingLEDisilluminated.
• CHORUS:setstheintensity(ordepth)oftheChoruseffect,from0to99.
• VIB RATE:setstherateoftheVibratoeffect,from0.02Hzto8Hz.• VIB DEPTH:setstheintensityoftheVibratoeffect,from0to99.• STEREO/MONO: changes the rack effect from a stereo to a mono
effect.StereoisenabledwhenthecorrespondingLEDisilluminated.• OUT LEVEL:setstheoutputleveloftheeffect,from-15dBto+15dB.

10 - Rack FX Module 260
AmpliTube 3
10.5.4.2 Digital Chorus
This modeled digital chorus effect creates a clear articulate chorus effect(figure10.14).Liketheanalogchorus,thiseffectaddsdepthandspacetotheinputsignal,butaddsadifferentcolortotheoverallsignal.
figure10.14
Controls:
• WAVEFORM:selectstheshapeofthechoruseffect,sine,triangle,orsquarewave.
• RATE:setstherateofthechoruseffect,from0.1Hzto8Hz.• BPM SYNC:allowstheeffecttosynchronizetotheprojecttempoand
changestheRatecontroltobeatvalues.• DEPTH:setstheintensityofthechorus,from0to100.• STEREO/MONO: changes the rack effect from a stereo to a mono
effect.StereoisenabledwhenthecorrespondingLEDisilluminated.• MIX:adjuststheamountofwetsoundwiththedrysound,from0%
to100%.• OUT LEVEL:setstheoutputleveloftheeffect,from-15dBto+15dB.
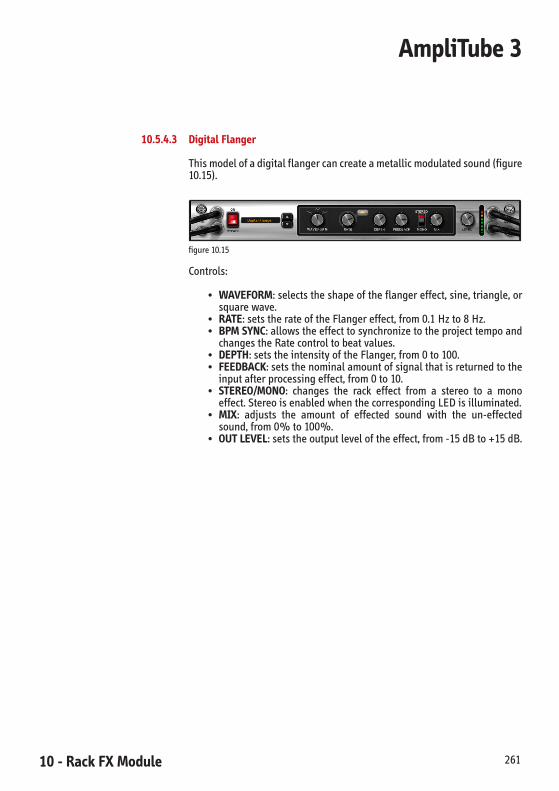
10 - Rack FX Module 261
AmpliTube 3
10.5.4.3 Digital Flanger
Thismodelofadigitalflangercancreateametallicmodulatedsound(figure10.15).
figure10.15
Controls:
• WAVEFORM:selectstheshapeoftheflangereffect,sine,triangle,orsquarewave.
• RATE:setstherateoftheFlangereffect,from0.1Hzto8Hz.• BPM SYNC:allowstheeffecttosynchronizetotheprojecttempoand
changestheRatecontroltobeatvalues.• DEPTH:setstheintensityoftheFlanger,from0to100.• FEEDBACK:setsthenominalamountofsignalthatisreturnedtothe
inputafterprocessingeffect,from0to10.• STEREO/MONO: changes the rack effect from a stereo to a mono
effect.StereoisenabledwhenthecorrespondingLEDisilluminated.• MIX: adjusts the amount of effected sound with the un-effected
sound,from0%to100%.• OUT LEVEL:setstheoutputleveloftheeffect,from-15dBto+15dB.
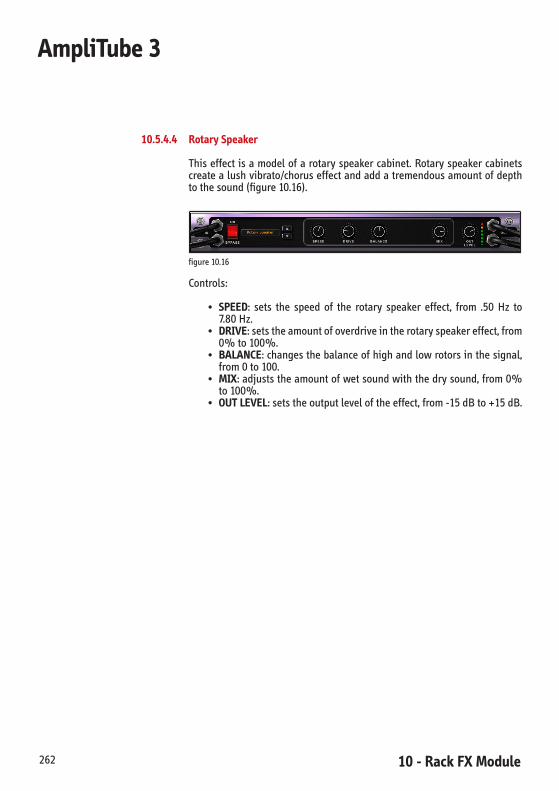
10 - Rack FX Module 262
AmpliTube 3
10.5.4.4 Rotary Speaker
Thiseffect isamodelofarotaryspeakercabinet.Rotaryspeakercabinetscreatealushvibrato/choruseffectandaddatremendousamountofdepthtothesound(figure10.16).
figure10.16
Controls:
• SPEED: sets the speed of the rotary speaker effect, from .50 Hz to7.80Hz.
• DRIVE:setstheamountofoverdriveintherotaryspeakereffect,from0%to100%.
• BALANCE:changesthebalanceofhighandlowrotorsinthesignal,from0to100.
• MIX:adjuststheamountofwetsoundwiththedrysound,from0%to100%.
• OUT LEVEL:setstheoutputleveloftheeffect,from-15dBto+15dB.

10 - Rack FX Module 263
AmpliTube 3
10.5.5 Pitch
10.5.5.1 Harmonator
The Harmonator is an advanced harmonizing effect with three separatevoices,eachwithindependentharmony,levelandpan.Byenteringthekeyandscalethattheinstrumentisplaying,theharmonatoranalyzestheinputsignalandtrackthethreeindependentvoicestothecorrectmusickeyandscale(figure10.17).
figure10.17
Controls:
• KEY:controlsthekeyandtypeofscalethatwillbeusedbythehar-monizerasareference.Ifyou’replayingasoloinEmajorsetthistoEMajor,fromCtoB.
• SCALE:changesthescaleoftheharmonizer,includingMajor,Dorian,Phrygian,Lydian,Mixolydian,Minor,andLocrian.
• VOICE:controlsthepropertiesofeachofthe3voicesoftheharmo-nizer.• 1:selectsvoice1forediting.• 2:selectsvoice2forediting.• 3:selectsvoice3forediting.
• INTERVAL:changestheintervaloftheselectedvoice,fromlowoctavetoupoctave.
• LEVEL:independentlyadjuststhelevelofeachofthe3voices,from0to100.
• PAN:independentlyadjuststhepanningofeachofthe3voices,from1.0Lto1.0R.
• DRY PAN:adjuststhepanningofthedrysignalindependentlyfromtheharmonizedvoices,from1.0Lto1.0R.
• MIX:blendstheharmonizedvoicewiththeoriginalvoice,from0%to100%.

10 - Rack FX Module 264
AmpliTube 3
10.5.5.2 Pitch Shifter
Thispitchshiftingeffectcreatesanindependentharmonyvoicethatcanbeblendedwiththeoriginalsignaltocreateharmonyleadpartsandduettypeguitarlines(figure10.18).
figure10.18
Controls:
• SHIFT COARSE:setsthecoarsetuningofthepitchshifter.Measuredinintervals,from-24to24.
• SHIFT FINE: sets the fine tuning of the pitch shifter. Measured incents,from-50to50.
• STEREO/SPLIT:setstheoutputoftheeffecttosplitthepitchshiftedsoundandthedrysoundorblendtheminastereolayeredfashion.
• MIX:adjuststheamountofpitchedshiftedsoundwiththedrysound,from0%to100%.
• OUT LEVEL:setstheoutputleveloftheeffect,from-15dBto+15dB.
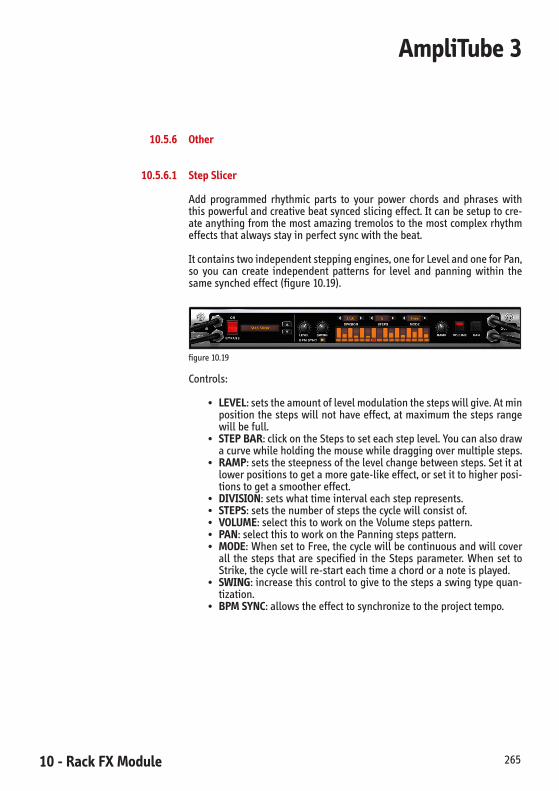
10 - Rack FX Module 265
AmpliTube 3
10.5.6 Other
10.5.6.1 Step Slicer
Add programmed rhythmic parts to your power chords and phrases withthispowerfulandcreativebeatsyncedslicingeffect.Itcanbesetuptocre-ateanythingfromthemostamazingtremolostothemostcomplexrhythmeffectsthatalwaysstayinperfectsyncwiththebeat.
Itcontainstwoindependentsteppingengines,oneforLevelandoneforPan,so you can create independent patterns for level and panning within thesamesynchedeffect(figure10.19).
figure10.19
Controls:
• LEVEL:setstheamountoflevelmodulationthestepswillgive.Atminpositionthestepswillnothaveeffect,atmaximumthestepsrangewillbefull.
• STEP BAR:clickontheStepstoseteachsteplevel.Youcanalsodrawacurvewhileholdingthemousewhiledraggingovermultiplesteps.
• RAMP:setsthesteepnessofthelevelchangebetweensteps.Setitatlowerpositionstogetamoregate-likeeffect,orsetittohigherposi-tionstogetasmoothereffect.
• DIVISION:setswhattimeintervaleachsteprepresents.• STEPS:setsthenumberofstepsthecyclewillconsistof.• VOLUME:selectthistoworkontheVolumestepspattern.• PAN:selectthistoworkonthePanningstepspattern.• MODE:WhensettoFree,thecyclewillbecontinuousandwillcover
all thesteps thatarespecified in theStepsparameter.Whenset toStrike,thecyclewillre-starteachtimeachordoranoteisplayed.
• SWING:increasethiscontroltogivetothestepsaswingtypequan-tization.
• BPM SYNC:allowstheeffecttosynchronizetotheprojecttempo.
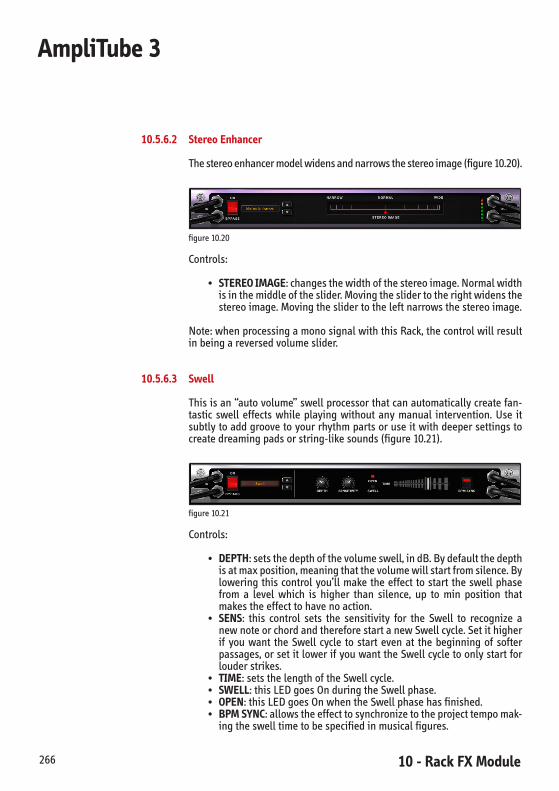
10 - Rack FX Module 266
AmpliTube 3
10.5.6.2 Stereo Enhancer
Thestereoenhancermodelwidensandnarrowsthestereoimage(figure10.20).
figure10.20
Controls:
• STEREO IMAGE:changesthewidthofthestereoimage.Normalwidthisinthemiddleoftheslider.Movingtheslidertotherightwidensthestereoimage.Movingtheslidertotheleftnarrowsthestereoimage.
Note:whenprocessingamonosignalwiththisRack,thecontrolwillresultinbeingareversedvolumeslider.
10.5.6.3 Swell
Thisisan“autovolume”swellprocessorthatcanautomaticallycreatefan-tastic swell effects while playing without any manual intervention. Use itsubtlytoaddgroovetoyourrhythmpartsoruseitwithdeepersettingstocreatedreamingpadsorstring-likesounds(figure10.21).
figure10.21
Controls:
• DEPTH:setsthedepthofthevolumeswell,indB.Bydefaultthedepthisatmaxposition,meaningthatthevolumewillstartfromsilence.Byloweringthiscontrolyou’llmaketheeffect tostart theswellphasefrom a level which is higher than silence, up to min position thatmakestheeffecttohavenoaction.
• SENS: this control sets the sensitivity for the Swell to recognize anewnoteorchordandthereforestartanewSwellcycle.Setithigherif you want the Swell cycle to start even at the beginning of softerpassages,orsetitlowerifyouwanttheSwellcycletoonlystartforlouderstrikes.
• TIME:setsthelengthoftheSwellcycle.• SWELL:thisLEDgoesOnduringtheSwellphase.• OPEN:thisLEDgoesOnwhentheSwellphasehasfinished.• BPM SYNC:allowstheeffecttosynchronizetotheprojecttempomak-
ingtheswelltimetobespecifiedinmusicalfigures.

11 - AmpliTube 3 Models 267
AmpliTube 3
Chapter 11 AmpliTube 3 Models
Stomp Models Based on*
Delay
Delay IKMultimedia
EchoMan ElectroHarmonix®MemoryMan™
TapDelay IKMultimedia
Distortion
BigPig ElectroHarmonix®BigMuffPi™
Crusher IKMultimedia
DiodeOverdrive IKMultimedia
Distortion Boss®DS-1™Distortion
Feedback Boss®DF-2™Superfeedbacker&Distortion
MetalDistortion Boss®MT-2™Metal-Zone
MetalDistortion2 Boss®HM-2™HeavyMetal
Overdrive Boss®SD-1™Distortion
OverScream Ibanez®TubeScreamer®TS-9™
PROdrive ProCoRAT™Distortion
TheAmbass’dor Marshall®Guv'Nor™
Dynamics
Compressor IKMultimedia
Dcomp MXR®Dynacomp™
EQ
7BandGraphic IKMultimedia
10BandGraphic IKMultimedia
Filter
EnvelopeFilter IKMultimedia
LFOFilter IKMultimedia
Rezo IKMultimedia
StepFilter IKMultimedia
Wah IKMultimedia
Wah10 Ibanez®WH-10™
Wah46 Vox®WahV846™
Wah47 Vox®Wah847™
Fuzz
ClassFuzz RogerMayer™ClassicFuzz®
FuzzAge Arbiter®FuzzFace®
FuzzAge2 Arbiter®FuzzFace®

11 - AmpliTube 3 Models268
AmpliTube 3
FuzzOne Maestro®FuzzTone™
Octa-V RogerMayer™Octavia®
RightFuzz Mosrite®Fuzzrite®
XSFuzz RogerMayer™AxisFuzz®
Modulation
AnalogFlanger Boss®BF-2™Flanger
Chorus IKMultimedia
Chorus-1 Boss®CE-1™Chorus
ElectricFlanger Electro-Harmonix®ElectricMistress™
Flanger IKMultimedia
MetalFlanger MXR®Flanger117™
OptoTremolo Fender®SuperReverb®AmpOpto-Tremolo™
PhazeNine MXR®Phase90™
Phazer10 MXR®Phase100™
SmallPhazer Electro-Harmonix®SmallStone™
Uni-V Univox™Uni-vibe™
Pitch
Harmonator IKMultimedia
Octav Boss®OC-2™Octaver
PitchShifter IKMultimedia
Wharmonator Digitech®Wahmmy™WH-1™
Other
Volume IKMultimedia
StepSlicer IKMultimedia
Swell IKMultimedia
Preamp Models Based on*
Clean
AmericanCleanMKIII Mesa/Boogie®MKIII™Combo(CleanChannel)
AmericanTubeClean1 Fender®SuperReverb®
AmericanTubeClean2 Fender®DeLuxeReverb®65
AmericanVintageB Fender®Bassman®
AmericanVintageD Fender®DualShowman®
AmericanVintageT Fender®TwinReverb®
CustomSolidStateClean IKMultimedia
JazzAmp120 Roland®JC-120™
MetalCleanT Mesa/Boogie®TripleRectifier®(CleanChannel)

11 - AmpliTube 3 Models 269
AmpliTube 3
Crunch
AmericanTubeVintage Fender®Bassman®
BritishBlueTube30TB Vox®AC30™TopBoost
BritishCopper30TB Vox®AC30™-CopperPanel
BritishLeadS100 Marshall®1959JTM100™SuperLead
BritishOR Orange®OR-120™Head
THDBi-Valve THD®BiValve™
TubeVintageCombo Supro®Late'50scombo
Lead
AmericanLeadMKIII Mesa/Boogie®MKIII™Combo(LeadChannel)
BritishTubeLead1 Marshall®JCM800™
BritishTubeLead2 Marshall®JCM900™
CustomModernHi-Gain IKMultimedia
CustomSolidStateFuzz IKMultimedia
CustomSolidStateLead IKMultimedia
MetalLeadT Mesa/Boogie®TripleRectifier®(LeadChannel)
MetalLeadV Peavey®5150®100Whead
MetalLeadW Randall®Warhead™
ModernTubeLead Mesa-Boogie®DualRectifier®
VintageMetalLead Marshall®JMP100™head
Bass
360BassPreamp Acoustic®360™BassPreamp
Combo150MB Gallien-Krueger®MB150™
GreenBA250 TraceElliot®AH250™Head
SolidStateBassPreamp IKMultimedia
Power Amp Models Based on*
ClassAEL84 Vox®AC30™models
50WEL34 Marshall®
100WEL34 Marshall®JMP100™head
50W6L6 Fender®DeLuxeReverb®65
SingleEndedCI.A Supro®Late'50scombo
SolidState CleanSolidStatePowerAmp
100WKT66 Marshall®1959JTM100™SuperLead
100W6L6 Fender®Bassman®100W6L6
100W6L6D Fender®DualShowman®100W6L6
100W6L6T Fender®Twin®100W6L6

11 - AmpliTube 3 Models270
AmpliTube 3
100W6L6V Peavey®5150®100Whead
150W6L6MT Mesa/Boogie®TripleRectifier®150W
Cabinet Model Based on*
Guitar 6”
1x6SmallCombo Fender®SSCombo
Guitar10”
1x10ComboModern Mesa/Boogie®1x10"SubwayRocket®
4x10ClosedModern Marshall®4x10'90sJCM410™
4x10OpenVintage Fender®SuperReverb®1967
Guitar 12”
1x12Combo Marshall®1x12Valvestate™12
1x12MBII Mesa/Boogie®MarkII™1x12"EV
1x12MBIII Mesa/Boogie®MarkIII™1x12"EV
1x12OpenModern VHT®Pitbull™1x12Combo
1x12OpenVintage Fender®DeLuxe®65
2x12ClosedVintage Marshall®19222x12Greenbacks
2x12GryBritishVint Vox®AC30™2x12"'60sGraybacks
2x12JPJazz Roland®JC-120™2x12"
2x12OpenSL Sears®Silvertone®2x12”
2x12OpenTJ120 Fender®Twin®2x12”JBL®D120F
2x12OpenVintage Vox®AC30'60sBluebacks
4x12BritishOr 4x12"Orange®PPC412™
4x12Closed25C Marshall®4x12”,Greenbacks
4x12Closed75C Marshall®4x12”,G1275
4x12ClosedJ120 Marshall®4x12”,JBL®D120F
4x12ClosedModern1 Marshall®4x12'80s1982A
4x12ClosedModern2 Mesa/Boogie®4x12Rectifier™
4x12ClosedVintage1 Marshall®4x12Angled,'70sGreenbacks
4x12ClosedVintage2 Marshall®4x12Straight,Greenbacks
4x12MetalF1 Fender®4x12MH™1
4x12MetalF2 Fender®4x12MH™2
4x12MetalT1 Mesa/Boogie®4x12”Rectifier®1
4x12MetalT2 Mesa/Boogie®4x12”Rectifier®2
4x12MetalT3 Mesa/Boogie®4x12”Rectifier®3
4x12MetalV1 Peavey®5150®4x12”1
4x12MetalV2 Peavey®5150®4x12”2

11 - AmpliTube 3 Models 271
AmpliTube 3
4x12MetalV3 Peavey®5150®4x12”3
4x12ModernM1 Marshall®4x12”JCM8001
4x12ModernM2 Marshall®4x12”JCM8002
4x12ModernM3 Marshall®4x12”JCM8003
4x12VintageM1 Marshall®19604x12”1
4x12VintageM2 Marshall®19604x12”2
Guitar 15”
2x15ClosedBJ130 Fender®Bassman®2x15”,JBL®D130F
2x15ClosedDJ130 Fender®DualShowman®2x15”,JBL®D130F
Bass 10”
4x10+twBass SWR®Goliath™4x10
4x10+twTEBass TraceElliot®4x10"
Bass 12”
1x12Bass CustomBass1x12
1x12BassJz Gallien-Krueger®1x12"MB150
Bass 15”
1x15BassVintage Ampeg®B15R™15”
Bass 18”
1x18HornBass Acoustic®301™FoldedHorn18”
Rotary
Rotary147-1 Leslie®147™originalAlNiCowoofer
Rotary147-2 Leslie®147™modernreplacementwoofer
Mic Model Based on*
Dynamic
Dynamic57 Shure®SM57™
Dynamic20 Electro-Voice®RE20™
VintageDynamic20 AKG®D20™
Dynamic421 Sennheiser®MD-421™
Dynamic441 Sennheiser®MD-441™
Dynamic609 Sennheiser®MD609™
Condenser
Condenser12 AKG®C12™
Condenser67 Neumann®U67
Condenser84 Neumann®KM-84™
Condenser87 Neumann®U-87™
Condenser170 Neumann®TLM170™

11 - AmpliTube 3 Models272
AmpliTube 3
Condenser414 AKG®C-414ULS™
Ribbon
Ribbon121 Royer®R121™
Ribbon160 Beyerdynamic®M160™
RibbonVelo-8 GrooveTubes®Velo-8™
*Allproductnamesandtrademarksarethepropertyoftheirrespectiveowners,whichareinnowayassociatedoraffiliatedwithIKMultimedia.ProductnamesareusedsolelyforthepurposeofidentifyingthespecificproductsthatwerestudieddurinoIKMultimedia’ssoundmodeldevelop-ment and for describing certain types of tones produced with IK Multimedia’s digital modelingtechnology.Useofthesenamesdoesnotimplyanycooperationorendorsement.
ACOUSTIC®,360™,301™aretrademarksofGuitarCenter,Inc.AKG®,C12™,D20™,C-414ULS™areregisteredtrademarksofAKGAcousticsGmbH.AMPEG®,B15R™aretrademarksofLOUDTechnologies,Inc.ARBITER®FUZZFACE®isaregisteredtrademarkofArbiterGroupPlc.BEYERDYNAMIC®,M160™areregisteredtrademarksofBeyerdynamicGmbH&Co.BOSS®,DS-1™,DF-2™,MT-2™,HM-2™,SD-1™,BF-2™,CE-1™,OC-2™aretrademarksorregis-teredtrademarksofRolandCorporation.DIGITECH®WHAMMY™WH-1™isaregisteredtrademarkofHarmanInternational Industries,Incorporated.ELECTRO-HARMONIX®, Memory Man™, Big Muff Pi™, Electric Mistress™, Small Stone™ aretrademarksorregisteredtrademarksofNewSensorCorporation.ELECTRO-VOICE®,RE20™areregisteredtrademarksofElectro-Voice,Inc.FENDER®, BASSMAN®, DELUXE REVERB®, SUPER REVERB®, DUAL SHOWMAN®, TWINREVERB®,TWIN®,MH™areregisteredtrademarksofFenderMusicalInstrumentsCorporation.FUZZRITE®isaregisteredtrademarkofAndyJ.Moseley.GALLIEN-KRUEGER®MB150™isaregisteredtrademarkofGallien-KruegerCorporation.GROOVETUBES®,Velo-8™areregisteredtrademarksofGrooveTubes,LLC.IBANEZ®,TubeScreamer®TS-9™,WH-10™aretrademarksorregisteredtrademarksofHoshinoGakkiCo.Ltd.Corporation.JBL®isaregisteredtrademarkofJBLProfessional.LESLIE™147™isaregisteredtrademarkofHammondSuzukiUSA,Inc.MAESTRO®FUZZTONE™isaregisteredtrademarkofGibsonElectronics.MARSHALL®,1959JTM100™SuperLead,JMP100™,JCM800™,JCM900™,JCM410™,Valvestate™,Guv’Nor™aretrademarksorregisteredtrademarksofMarshallAmplificationPlc.MESA/BOOGIE®,Rectifier®,MKIII™,SubwayRocket®,MarkII™,MarkIII™,aretrademarksofMesa/BoogieLtd.MOSRITE®isaregisteredtrademarkofLorettaMoseley.MXR®,Dynacomp™,Flanger117™,Phase90™,Phase100™aretrademarksorregisteredtrade-marksofAppliedResearchandTechnology,Inc.NEUMANN®,U67™,U87™,KM-84™,TLM170™areregistered trademarksofGeorgNeumannGmbH.ORANGE®, OR-120™, PPC412™ are trademarks or registered trademarks property of OrangeMusicElectronicCompanyLtd.PEAVEY®isaregisteredtrademarkofPeaveyElectronicsCorporation.PROCORAT™isatrademarkofProCoSound,Inc.RANDALL®,Warhead™aretrademarksorregisteredtrademarksofRandallAmplifiersadivisionofU.S.MusicCorp.ROGER MAYER™, Classic Fuzz®, Axis Fuzz®, Octavia®, are trademarks and registered trade-marksofRogerMayer.ROLAND®,JC-120™areregisteredtrademarksofRolandCorporation.ROYER®,R121™areregisteredtrademarksofBulldogAudio,Inc.DBARoyerLabsCorporation.SEARS®isaregisteredtrademarkofSearsBrand,LLC.SENNHEISER®, MD-421™, MD-441™, MD609™ are registered trademarks of SennheiserElectronicCorp.SHURE®,SM57™areregisteredtrademarksofShureIncorporated.SILVERTONE®isaregisteredtrademarkofSamickMusicCorporation.
11 - AmpliTube 3 Models 273
AmpliTube 3
SUPRO®isatrademarkofZinkyElectronics.SWR®,Goliath™aretrademarksofSWRSoundCorporation.THD®BiValve™isatrademarkofTHDElectronicsLtd.TRACEELLIOT®AH250™isaregisteredtrademarkofPeaveyElectronicsCorporation.UNI-VIBE™isatrademarkofKorgUSACorporation.UNIVOX™isatrademarkofKorgUSACorporation.VHT®Pitbull™isatrademarkofVHTAmplification,Inc.VOX®, AC30™, Wah V846™, Wah 847™ are trademarks or registered trademarks of VOXAmplificationLtd.5150®isaregisteredtrademarkofEdwardVanHalen.

11 - AmpliTube 3 Models274
AmpliTube 3

12 - Expanding AmpliTube 3 275
AmpliTube 3
Chapter 12 Expanding AmpliTube 3 models
12.1 Adding More Packages to AmpliTube 3
ThankstothenewAmpliTube3openarchitecture,youareabletoconstantlyexpandyoursonicpalette through theadditionofmorepackagessuchasAmpliTubeFender™,Ampeg®SVX,etc.Infact,inthenearfutureyouwillbeabletopurchase“singles”on-demand!
Below, a brief introduction to the AmpliTube Fender™ and Ampeg® SVXpackages.
12.1.1 AmpliTube Fender™
AmpliTube Fender™ is the first and only guitar amp and effects model-ing software authorized and created in cooperation with Fender MusicalInstrumentsCorporation.Itcomesstockedwith6decades’worthoflegend-arytones,offeringacollectionofAmps,Cabs,StompsandRackEffectsspan-ningtheentirehistoryofFender®.
AmpliTubeFender™isthefirstsoftwareamplificationsystemtotrulymodelthe amps of the Fender® collection with the respect and accuracy theydeserve. AmpliTube Fender™ includes models of iconic Fender® stompboxes, amp heads & cabinets, from the bluesy Bassman® all the way upto the brutal Metalhead™. It includes 6 stomp boxes, 12 amp models, 12cabinetsand8mics,6Rackeffectsandmore.
AmpliTube Fender™ offers the same 2 series/parallel rig structure of theaward-winning AmpliTube 2 and has 5 separate modules: tuner, configu-rablestomppedalboard,amphead,cabinet+mic,andrackeffects,ensuringacompleteandflexiblerigconfigurationthatcanbeusednotonlytorecre-atetheauthenticFender®tonesbutalsotoexpandyoursonicspectrumandenrichanyartisticprojectthatyouareworkingon.
AmpliTube Fender™ can be controlled live with the StompIO andStealthPedal,ortraditionalMIDIcontroller,fortheultimatesoftwarestagerigusingtheAmpliTubeX-GEARshell-host.
CombiningAmpliTubeFender™withother“PoweredbyAmpliTube”prod-uctsinsideAmpliTubeX-GEARandusingStompIO/StealthPedalallowsyoutobuildyourowncustomandexpandablesoftware-basedrigwiththewid-estchoiceofsuperiormodeledampsandeffects.Getthemostlegendarycollectionofguitartonesrightonyourdesktop!

12 - Expanding AmpliTube 3276
AmpliTube 3
AmpliTubeFender™mainfeatures:
• AmpliTubeFender™worksasastandaloneapplicationaswellasaplug-ininWindowsXP/VistaandMacOSX(UniversalBinary).
• Supported Plug-in formats: Audio Units, VST, RTAS (Mac OS X®) -VST,RTAS(Windows®).
• Ultra accurate analog modeling with DSM™ technology, “PoweredbyAmpliTube.”
• HighestsupportedSamplingRate:96kHz.• 6 analog modeled stomps: Fuzz Wah, Blender™, Volume, Phaser,
TapeEchoand’63Reverb,plusgreatroutingflexibility.• High-precisionTuner.• 12 Amps modeled: ’59 Bassman® LTD, ’65 Twin Reverb®, ’57
Deluxe™, ’65 Deluxe Reverb®, ’64 Vibroverb™ Custom, Super-Sonic™, Vibro-King®, Pro Junior™, Metalhead™, Champion™ 600,TBP-1Pre-amp,andBassman®300.
• 13Speakeremulations:’59Bassman®LTD4x10”,’65TwinReverb®2x12”,’57Deluxe™1x12”,’65DeluxeReverb®1x12”,’64Vibroverb™Custom1x15”,Super-Sonic™1x12”,Vibro-King®3x10”,ProJunior™1x10”,MH-412SL™4x12,Champion600™1x6”,Vibratone1x10”and810PRO8x10”.
• 144Amp+Cabinetcombinations(includingnospeaker).• 9Microphonemodels:Condenser87,Condenser84,Condenser414,
Dynamic57,Dynamic421,Dynamic441,Ribbon160,GrooveTubes®MD1-bFETandGrooveTubes®Velo-8.
• 6RackEffects:PitchShift,TapeEcho,TriangleChorus,SineFlange,WahandCompressor.
• HostsequencerBPMsynchronization.• SpeedTrainer™: imports any WAV, AIFF, MP3, and WMA audio file
(Standaloneversion).• AssignableDAWautomation.• Metronome(Standaloneversion).
Visit: www.ikmultimedia.com/fender to find more information aboutAmpliTubeFender™.

12 - Expanding AmpliTube 3 277
AmpliTube 3
12.1.2 Ampeg® SVX
IKMultimedia,theleaderinamp-modelingplug-intechnologyinconjunc-tion with Ampeg®, the historic brand that invented bass amplification,bringyoutheworld’sfirstcompleterecordingplug-insolutionforbass.IKMultimedia’s Ampeg® SVX is a complete Bass Amplification and Effectssoftware package based on the highly acclaimed Ampeg amplifier andcabinetmodels.
Mainfeatures:
• Ultra accurate analog modeling with DSM™ technology, “PoweredbyAmpliTube.”
• 4Modules:Tuner,Stomp,Amp,Cabinet+Micselectionandplacement.• High-precisionTuner.• 8 analog modeled stomps on 6 slots with flexible routing (Chorus,
Delay,Octaver,Wah,EnvelopeFilter,OverdriveandCompressor).• 4signatureAmpeg®bassampsmodeled(BA-500,B-15R“Portaflex,”
SVT-CL,andtheSVT4PRO).• 6 signature Ampeg® cabinet models (BA-500 2x10”, SVT-410H
4x10”, SVT-810E 8x10”, PB-212H 2x12”, Ampeg B-15R 1x15”, BXT-410H4x10”).
• 6 Microphone models: Dynamic 20, Dynamic 57, Dynamic 421,VintageDynamic20,Condenser87,andtheCondenser414.
• 24bassampcombinations.• HostsequencerBPMsynchronization.• Two parallel signal paths make it possible to have the direct bass
sound mixed with the processed amped signal for instant high-qualitystudiosound.
Visit: www.ikmultimedia.com/ampegsvx to find more information aboutAmpeg®SVX.
12 - Expanding AmpliTube 3278
AmpliTube 3

13 - Automation 279
AmpliTube 3
Chapter 13 Automation
AmpliTube3hasaversatileandflexibleAutomationengine.ItallowsyoutoassignautomationwithineachmoduleandviatheAutomationPanel.
13.1 Assign Automation within each Module (Stomp, Amp, Cab and Rack)
SelecttheStomp,Amp,CaborRackmodulefromtheModule/RigSelector(figure13.1).
figure13.1
Right-clickontopoftheAmpliTube3parameterthatyouaregoingtoassigntoAutomation(figure13.2).
figure13.2

13 - Automation280
AmpliTube 3
ChoosewhichDAWAutomationparameter#youaregoing touse for theAmpliTube3parameterselectedonstep#2(figure13.3).
figure13.3
13.2 Manage Automation Assignments via the Automation Panel
AmpliTube3hasmoreparametersthanaudiosequencers(DAWs)cansup-port.Forthisreason,ithasitsownAutomationPanel,sothattheenormousnumber of theoretically automatable parameters in AmpliTube 3 can begrouped in a smaller number to allow all DAWs being able to handle it.Toopenit,clickAUTOontheInput/Outputbar(figure13.4).
figure13.4

13 - Automation 281
AmpliTube 3
The Automation Panel has two panes. The Left Pane is called Plug-inParameters,andtheRightPaneiscalledDAWAutomation(13.5).
figure13.5
ThisPanelcanalsobeusedtorecaptheAutomationassignmentmadewiththeproceduredescribedon13.1.
13.2.1 Plug-in Parameters
The Plug-in Parameters Pane displays AmpliTube 3 Global and Moduleparameters, as well as all the Stomp, Amp, Cab, and Rack Modules gear(figure13.6).
figure13.6

13 - Automation282
AmpliTube 3
Considering that AmpliTube 3 offers dual rig setup, each Module is listedseparatelyasStompA,StompB,AmpA,AmpB,CabA,CabB,andRackA,RackB(figure13.7).
figure13.7
ThePlug-inParametersPaneallowsyoutoselectwhichAmpliTube3param-eteryouaregoingtoassigntoAutomation.
13.2.2 DAW Automation
The DAW Automation Pane lists the 16 Automation parameters that aredeclaredtotheDAW(figure13.8).
figure13.8
These parameters names (Param 1 to Param 16) are fixed because most
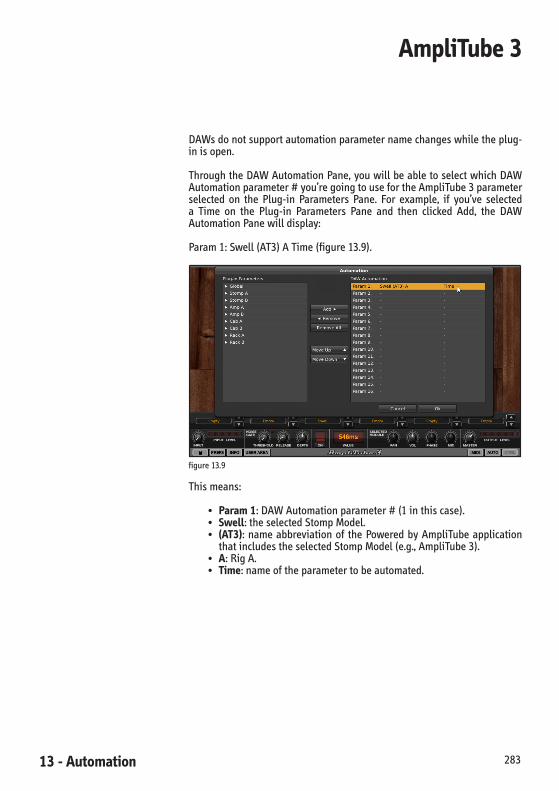
13 - Automation 283
AmpliTube 3
DAWsdonotsupportautomationparameternamechangeswhiletheplug-inisopen.
ThroughtheDAWAutomationPane,youwillbeabletoselectwhichDAWAutomationparameter#you’regoingtousefortheAmpliTube3parameterselected on the Plug-in Parameters Pane. For example, if you’ve selecteda Time on the Plug-in Parameters Pane and then clicked Add, the DAWAutomationPanewilldisplay:
Param1:Swell(AT3)ATime(figure13.9).
figure13.9
Thismeans:
• Param 1:DAWAutomationparameter#(1inthiscase).• Swell:theselectedStompModel.• (AT3):nameabbreviationof thePoweredbyAmpliTubeapplication
thatincludestheselectedStompModel(e.g.,AmpliTube3).• A:RigA.• Time:nameoftheparametertobeautomated.

13 - Automation284
AmpliTube 3
13.2.3 Assignment Procedure
Theeasiestwaytoassignautomationiswithineachmodule,asdescribedin 13.1. However, you can also use the Automation Panel to manage yourparameters(moveup/down),usetheRemoveAlloption,etc.
To assign an AmpliTube 3 parameter to one of the 16 DAW AutomationparametersviatheAutomationPanel,pleasefollowthesesteps:
1. ClickAutoontheInput/Outputbar(figure13.10).
figure13.10
2. OnthePlug-inParametersPane,selectwhichAmpliTube3param-eteryouaregoingtoassigntoAutomation(figure13.11).
figure13.11

13 - Automation 285
AmpliTube 3
3. On the DAW Automation Pane, select which DAW Automationparameter#youaregoing touse for theAmpliTube3parameterselectedonstep#2(figure13.12).
figure13.12
4. ClickAddtoestablishtheactualassignment(figure13.13).
figure13.13

13 - Automation286
AmpliTube 3
5. ClickOKtosavethesetupandclosetheAutomationwindow(figure13.14).
figure13.14
Toremoveaparticularassignment,pleaseselectitandclickRemove(figure13.15).
figure13.15

13 - Automation 287
AmpliTube 3
Toremovealltheassignments,clickRemoveAll(figure13.16).
figure13.16
To move up/down an assignment click the Move Up/Move Down arrows(figure13.17).
figure13.17
Thisisaveryusefulfeaturebecauseitsavesyoutoremovetheassignmentfrom“Param1”andcreateanewassignmentfor“Param2.”

13 - Automation288
AmpliTube 3
13.2.4 Assignment Save and Recall
ClickingOKwillsaveandclosetheAutomationwindow.
IfyouareusingAmpliTube3asaplug-in,theautomationassignmentmapwillbestoredandrestoredtoandfromthesessionyou’reworkingon.
EachAmpliTube3instanceisindependentfromtheothers.ThismeansthatsavingyourDAWsessionwillsaveeachAmpliTube3instancewithitsownAutomationassignmentssetup.
14 - MIDI 289
AmpliTube 3
Chapter 14 MIDI
14.1 Introduction
AmpliTube 3 MIDI control allows you to assign MIDI control changes toparametersorcommands,soyoucanremotecontrolAmpliTube3withanykindofhardwareorsoftwaredeviceabletogenerateMIDIControlChanges.
AmpliTube3respondstoMIDIControlChangeandProgramChangesmes-sagesonly.MIDINotenumbers,Aftertouch,PitchBendandothertypesofmessagesarenotrecognizedorsupported.
TherearetwotypesofMIDIcontrol;GlobalandPreset.
Global MIDI control allows you to specify MIDI Control Changes that willcontroltheselectedparameterforallpresets.TheparametersorcommandsthatcanbespecifiedforGlobalMIDIcontrolare:
• Presetswitch(Previous/Next)• Volumepedalcontrol• Wahpedalcontrol• Wharmonatorpedalcontrol• All12stompslotsbypasscontrol
PresetMIDIcontrolallowsyou tospecifyMIDIControlsChanges thatwillcontroltheselectedparameterspecificallyforthecurrentpreset.

14 - MIDI290
AmpliTube 3
14.2 MIDI Configuration
Whenrunningasaplug-in,AmpliTube3willbeabletoreceiveMIDIfromthehost.RefertoyourhostsequencerorDAWonhowtosetitupsothatitcansendMIDItoaudioplug-ins.
WhenrunningasaStandalone,AmpliTube3needstobeconfiguredtoknowfromwhichMIDIportitshouldreadMIDIdatafrom.Todothat;
1. ClickAudio>HardwareSettings…2. Select theMIDI interfacewhereyourcontroller isconnectedfrom
theMIDIInputmenu(figure14.1).
figure14.1
To check that you’ve correctly setup MIDI Input, try sending MIDI ControlChangesorProgramChangesfromyourcontrollerwhilewatchingthe“MIDIIN”indicator(Standaloneversiononly)(figure14.2).
figure14.2
IftheMIDIInhasbeensetproperly,thisindicatorwilllightupwhenaMIDIcommandisreceived.

14 - MIDI 291
AmpliTube 3
14.3 Assigning Controllers
14.3.1 Direct MIDI Controls Assignment (Stomp, Amp, Cab, and Rack Parameters)
This method allows you to quickly assign the MIDI control to a specificAmpliTubeparameterwithouthavingtosetupanythingmanually.
1. Right-clickontopof theAmpliTube3parameter thatyouwanttocontrolviaMIDIandclickAssignMIDI>Learn“parametername”(figure14.3).
figure14.3
2. Move the knob, slider, switchorpedal youwant touse to controlthisparameteronyourMIDIdeviceandtheassignmentwillauto-maticallybeapplied.
Youcandothisforalltheparametersthatyouwanttocontrolonthispreset.Remember that thisassignment is perpresetand itneeds be doneon allthepresetsthatyouwanttocontrol.ThisallowsyoutoapplydifferentMIDIcontrolschemesforallyourpresets.
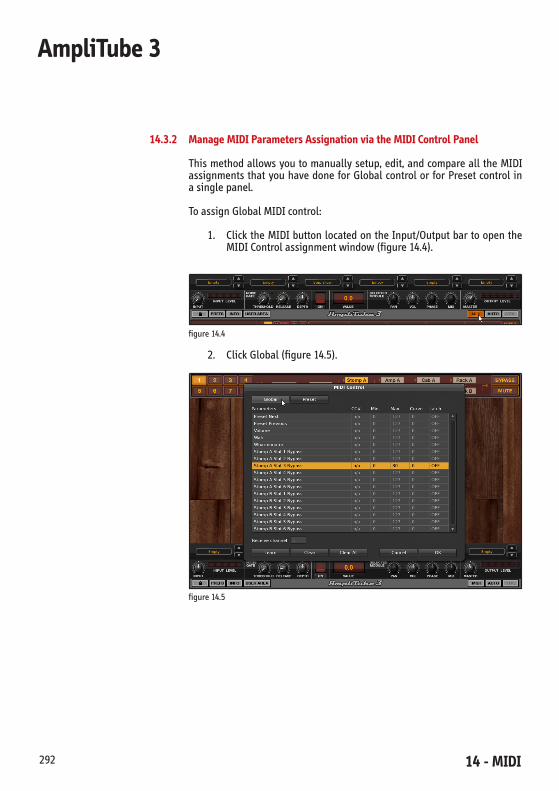
14 - MIDI292
AmpliTube 3
14.3.2 Manage MIDI Parameters Assignation via the MIDI Control Panel
Thismethodallowsyoutomanuallysetup,edit,andcomparealltheMIDIassignmentsthatyouhavedoneforGlobalcontrolorforPresetcontrol inasinglepanel.
ToassignGlobalMIDIcontrol:
1. ClicktheMIDIbuttonlocatedontheInput/OutputbartoopentheMIDIControlassignmentwindow(figure14.4).
figure14.4
2. ClickGlobal(figure14.5).
figure14.5
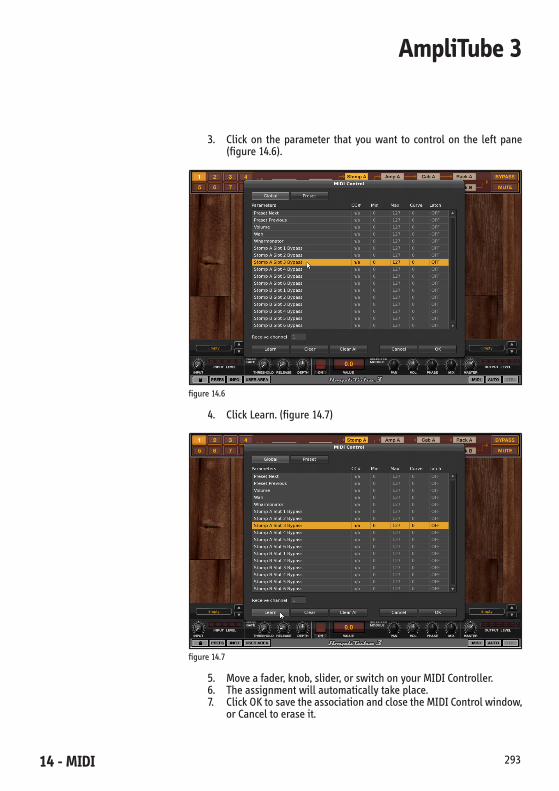
14 - MIDI 293
AmpliTube 3
3. Click on the parameter that you want to control on the left pane(figure14.6).
figure14.6
4. ClickLearn.(figure14.7)
figure14.7
5. Moveafader,knob,slider,orswitchonyourMIDIController.6. Theassignmentwillautomaticallytakeplace.7. ClickOKtosavetheassociationandclosetheMIDIControlwindow,
orCanceltoeraseit.

14 - MIDI294
AmpliTube 3
Thecontrolassignmentthatyou’vecreatedinthisway(Global)isvalidforallpresets,andwillapplyanypresetloadedornewlycreated.
ToassignPresetMIDIcontrol:
1. ClicktheMIDIbuttonlocatedontheInput/OutputbartoopentheMIDIControlassignmentwindow(figure14.8).
figure14.8
2. ClickPreset(figure14.9).
figure14.9

14 - MIDI 295
AmpliTube 3
3. ClickAdd(figure14.10).
figure14.10
4. FromtheTreemenuselectthecurrentAmpliTube3presetparam-eteryou’regoingtocontrol(figure14.11).
figure14.11
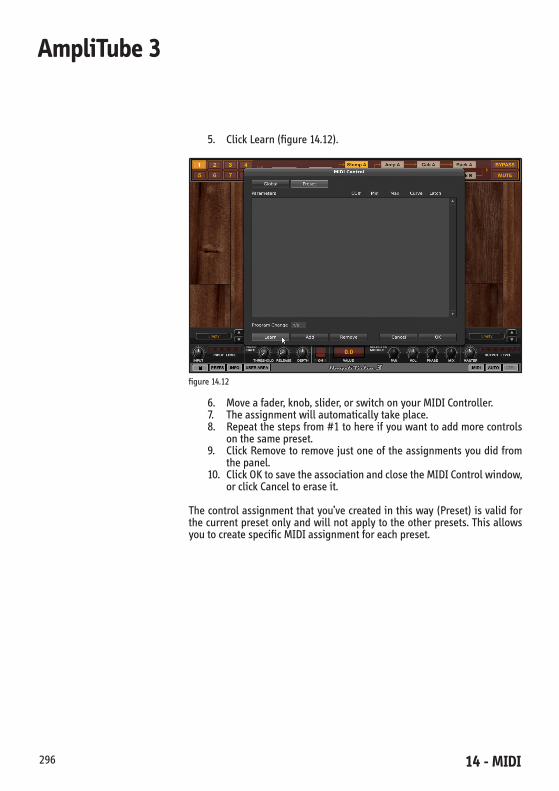
14 - MIDI296
AmpliTube 3
5. ClickLearn(figure14.12).
figure14.12
6. Moveafader,knob,slider,orswitchonyourMIDIController.7. Theassignmentwillautomaticallytakeplace.8. Repeatthestepsfrom#1tohereifyouwanttoaddmorecontrols
onthesamepreset.9. ClickRemovetoremovejustoneoftheassignmentsyoudidfrom
thepanel.10. ClickOKtosavetheassociationandclosetheMIDIControlwindow,
orclickCanceltoeraseit.
Thecontrolassignmentthatyou’vecreatedinthisway(Preset)isvalidforthecurrentpresetonlyandwillnotapplytotheotherpresets.ThisallowsyoutocreatespecificMIDIassignmentforeachpreset.

14 - MIDI 297
AmpliTube 3
14.4 Additional Parameters on MIDI Control Window
TodeleteaparticularAmpliTube3parameter/MIDICC#association,selectit,andclickClear(figure14.13).
figure14.13
TodeleteallAmpliTube3parameters/MIDICC#associationsatonce,clickClearAll(figure14.14).
figure14.14
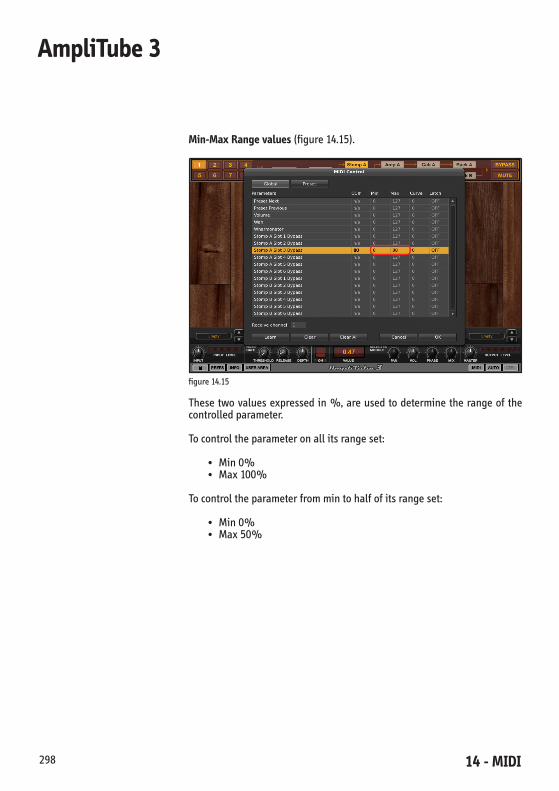
14 - MIDI298
AmpliTube 3
Min-Max Range values(figure14.15).
figure14.15
Thesetwovaluesexpressedin%,areusedtodeterminetherangeof thecontrolledparameter.
Tocontroltheparameteronallitsrangeset:
• Min0%• Max100%
Tocontroltheparameterfrommintohalfofitsrangeset:
• Min0%• Max50%

14 - MIDI 299
AmpliTube 3
Curve(figure14.16)
figure14.16
ThisaffectsthewaythecontrolledparameterwillchangewiththepositionoftheMIDIcontrolknob,sliderorpedal.Curverangeisfrom0to10with5asdefault.
• Whenit’ssetto5thecontrolwillbelinear,meaningtheplacingtheMIDIcontrolleratonehalfof its travelwill result in thecontrolledparametertoalsosetat50%ofitsrange.
• Setting lower values on Curve will result in an expanded controlcurve.
• Setting higher values on Curve will result in a compressed controlcurve.
Alwaysstartwith5asadefault(linear).
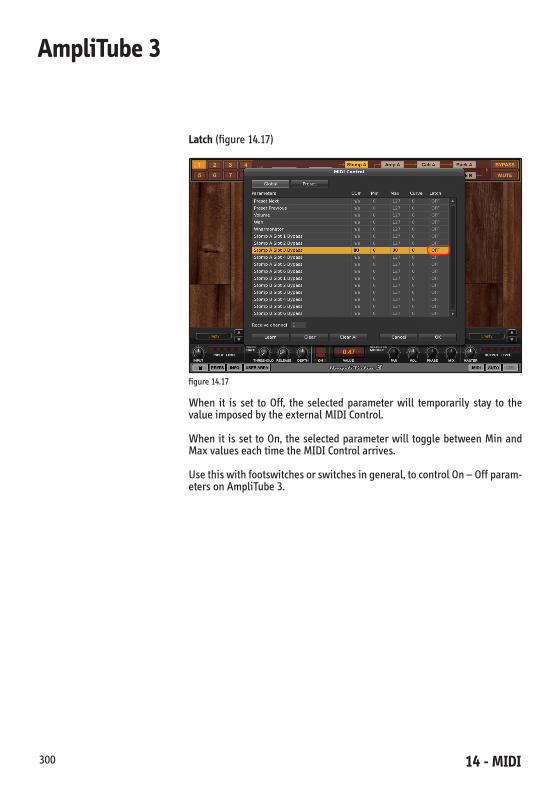
14 - MIDI300
AmpliTube 3
Latch(figure14.17)
figure14.17
When it is set to Off, the selected parameter will temporarily stay to thevalueimposedbytheexternalMIDIControl.
Whenit isset toOn, theselectedparameterwill togglebetweenMinandMaxvalueseachtimetheMIDIControlarrives.
Usethiswithfootswitchesorswitchesingeneral,tocontrolOn–Offparam-etersonAmpliTube3.

14 - MIDI 301
AmpliTube 3
Receive channel(14.18)
figure14.18
TochangetheMIDIchannel#,clicktheMIDIChanneldisplayandmovethepointerUptoselectfrom1-16.
Note: AmpliTube 3 MIDI implementation is not associated with StompIO/StealthPedal MIDI and it works independently from their MIDI ports. TolearnmoreaboutStompIO/StealthPedalMIDIimplementation,pleasereadtheirUserManuals.

14 - MIDI302
AmpliTube 3

15 - Control 303
AmpliTube 3
Chapter 15 Control
15.1 Introduction
AmpliTube 3 can be directly controlled by IK Multimedia StompIO-1 andStealthPedalfloorcontrollers.
Allpowerful controlassignments and management theStompIO-1candoisdone fromtheStompIO-1 interfacedirectlyon itspanel.Pleaserefer totheStompIO-1UserManualforallinformationandinstructionsabouthowtoprogramanduseit.Ontheotherend,theStealthPedalcontrolisentirelyconfigureddirectlyinsideAmpliTube3.
15.2 StealthPedal Control
StealthPedalcanbeusedtocontrolyourAmpliTube3instudioorduringalivegigbyswitchingamongallyourAmpliTube3presetsandbycontrollingeverysingleparameterofthemwithitscontinuouscontrollersandswitches.
EachAmpliTube3presetcanhaveadifferentcontrolsetup,soyouareabletocontrolspecificparametersoneachpreset,dependingonwhatyouneed.
WhenStealthPedalisconnected,selectitfromtheControllermenu(figure15.1) and press On to activate it (figure 15.2). Once the communication isestablishedtheRedLedwillturnOn.
figure15.1
figure15.2
ToaccesstheStealthPedalControlsetupwindowclickCTRL(figure15.3).
figure15.3
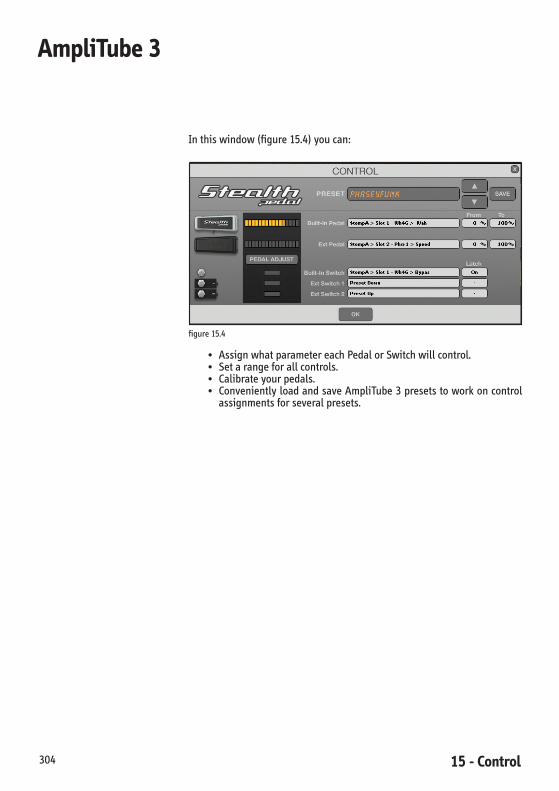
15 - Control304
AmpliTube 3
Inthiswindow(figure15.4)youcan:
figure15.4
• AssignwhatparametereachPedalorSwitchwillcontrol.• Setarangeforallcontrols.• Calibrateyourpedals.• ConvenientlyloadandsaveAmpliTube3presetstoworkoncontrol
assignmentsforseveralpresets.

15 - Control 305
AmpliTube 3
15.2.1 Assigning Continuous Controls
StealthPedal’s built-in and optional external expression pedals are twocontinuouscontrolsthatcanbeassociatedtoanyAmpliTube3parameter.
Bydefault,thebuilt-inStealthPedalexpressionpedalisautomaticallyassignedtothefirstpedaleffectloadedontheAmpliTube3pedalboard,fromlefttoright.Likewise,theexternalexpressionpedalisautomaticallyassignedtothesecondpedaleffect loadedon theAmpliTube3pedalboard, fromleft toright.PedaleffectscanbeWah’s,Volume’s,Wharmonator,Fuzz-Wah…etc.
However, both expression pedals can be assigned to control any otherparameterwithinAmpliTube3. Justselect fromthe fieldsnamed“Built-InPedal” or “Ext Pedal” the parameter you’re going to control, by selectingModule,Model,andParameter(figure15.5).
figure15.5
OnceyouhaveselectedaParametertobecontrolleditsabbreviatednamewillappear(figure15.6).
figure15.6

15 - Control306
AmpliTube 3
Sometimes you don’t need to span the whole parameter range with theexternal control, in this case you can limit it by changing values in the“From” and “To” fields from 0% - 100% to, for example, 30% - 80%. Inthiscaseamovementofthepedalfrommintomaxpositionwillmakethecontrolledparametertogofrom30%ofitsrangeto80%.
Forexample,itisusefultolimittherangewhenyou’recontrollingtheAmpVolumeknobtocreateswells,orwhenyou’recontrollingafeedbackparam-eterforaDelayeffect.Inallofthesecasesaswellasinmanyothers,youmightjustneedasubtlevariation.
Toreversethecontroldirectionset“From”higherthan“To.”
15.2.2 Assigning Switch Controls
StealthPedal built-in footswitch is located under the pedal rocker, as youexpectfromanystandardWah-stylepedal(Built-InSwitch).
YoucanconnecttwoadditionalfootswitchestoStealthPedal,orusetheonespecifi-callymadeforitthatcontainstwofootswitchesonthesamebox(ExtSwitch1&2).
Bydefault,thebuilt-inStealthPedalswitchisautomaticallyassignedtothefirstpedaleffectbypassloadedontheAmpliTube3pedalboard,fromlefttoright,however,itcanbeconfigured,togetherwiththetwoexternalswitchestocontrolanyAmpliTube3parameter,orturningOn/OfftheTuner.
Inaddition,thetwoexternalfootswitchescanbesettoswitchtoPreviousorNextAmpliTube3preset(setbydefaultwhenfirstattached).Itisnotpos-sibletousethebuilt-infootswitchtoselectPreviousorNextpreset.
Selectfromthefieldsnamed“Built-InSwitch”,“ExtSwitch1”or“ExtSwitch2” the parameter you’re going to control by selecting Module, Model, andParameter(figure15.7).
figure15.7

15 - Control 307
AmpliTube 3
OnceyouhaveselectedaParametertobecontrolleditsabbreviatednamewillbedisplayed(figure15.8).
figure15.8
Switch controls are normally working in Latched mode, meaning that thecontrolledparameterwilltogglebetweenOnandOffeverytimetheSwitchispressed.TheycanhoweversettooperateinTemporarymodebysettingOffonthe“Latch”field.
If“Latch”issettoOff,afootswitchwillsetthecontrolledparametertoOnonlywhenitiskeptpressed(figure15.9).
figure15.9

15 - Control308
AmpliTube 3
To allow External Switches 1 & 2 to select the Previous and Next presetsselect“PresetDown”forExternalSwitch1. Inthiscase,ExternalSwitch2willautomaticallysetto“PresetUp”(figure15.10).
figure15.10
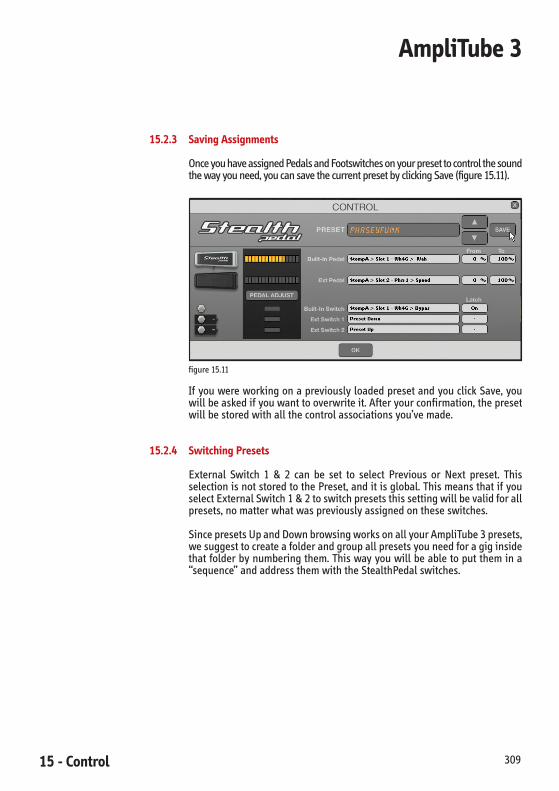
15 - Control 309
AmpliTube 3
15.2.3 Saving Assignments
OnceyouhaveassignedPedalsandFootswitchesonyourpresettocontrolthesoundthewayyouneed,youcansavethecurrentpresetbyclickingSave(figure15.11).
figure15.11
IfyouwereworkingonapreviouslyloadedpresetandyouclickSave,youwillbeaskedifyouwanttooverwriteit.Afteryourconfirmation,thepresetwillbestoredwithallthecontrolassociationsyou’vemade.
15.2.4 Switching Presets
External Switch 1 & 2 can be set to select Previous or Next preset. ThisselectionisnotstoredtothePreset,anditisglobal.ThismeansthatifyouselectExternalSwitch1&2toswitchpresetsthissettingwillbevalidforallpresets,nomatterwhatwaspreviouslyassignedontheseswitches.
SincepresetsUpandDownbrowsingworksonallyourAmpliTube3presets,wesuggesttocreateafolderandgroupallpresetsyouneedforagiginsidethatfolderbynumberingthem.Thiswayyouwillbeabletoputthemina“sequence”andaddressthemwiththeStealthPedalswitches.

15 - Control310
AmpliTube 3
15.2.5 Pedal Adjust
Expression pedals are mechanical devices that might need adjustment ontheirrangefromtimetotimetogetaperfectlycoveredrange.
This isespeciallyneeded ifyouuseadifferentbrandexpressionpedalastheexternalone.
Toadjustthepedal’srangeclickPedalAdjust(figure15.12).
figure15.12
ThePedalAdjustwindowwillopen(figure15.13).
figure15.13
WhenmovingtheBuilt-InorExternalpedalsyou’llnoticethemeterindica-tionontherightofthePedalsicontomove.

15 - Control 311
AmpliTube 3
ToproperlysetthePedalrangesetthephysicalpedaltotheheelpositionandclickMin(figure15.14).
figure15.14
Then,movethephysicalpedaltothetoepositionandclickMax(figure15.15).
figure15.15
Nowthepedalrangeisproperlyset.Doublecheckitbymovingthepedalovertheentirerangeandlookingatthebargraph.
ThisprocedureisvalidforbothBuilt-InandExternalpedals.
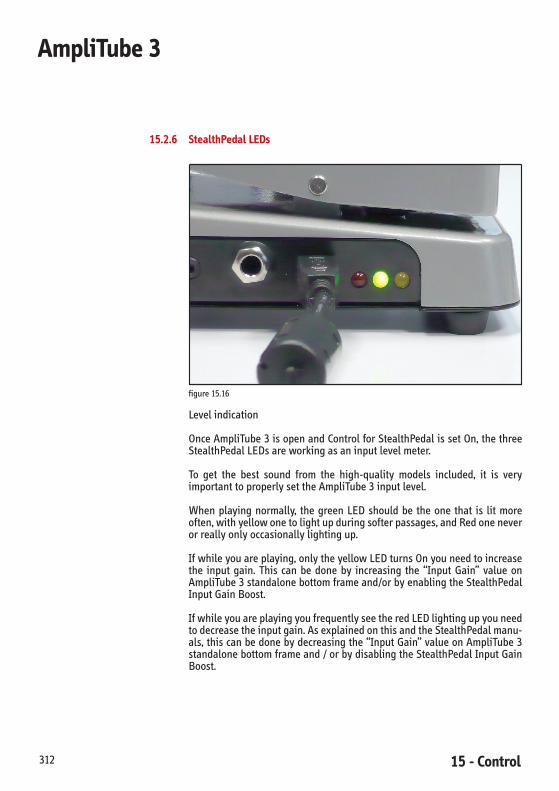
15 - Control312
AmpliTube 3
15.2.6 StealthPedal LEDs
figure15.16
Levelindication
OnceAmpliTube3isopenandControlforStealthPedalissetOn,thethreeStealthPedalLEDsareworkingasaninputlevelmeter.
To get the best sound from the high-quality models included, it is veryimportanttoproperlysettheAmpliTube3inputlevel.
When playing normally, the green LED should be the one that is lit moreoften,withyellowonetolightupduringsofterpassages,andRedoneneverorreallyonlyoccasionallylightingup.
Ifwhileyouareplaying,onlytheyellowLEDturnsOnyouneedtoincreasethe input gain. This can be done by increasing the “Input Gain” value onAmpliTube3standalonebottomframeand/orbyenablingtheStealthPedalInputGainBoost.
IfwhileyouareplayingyoufrequentlyseetheredLEDlightingupyouneedtodecreasetheinputgain.AsexplainedonthisandtheStealthPedalmanu-als,thiscanbedonebydecreasingthe“InputGain”valueonAmpliTube3standalonebottomframeand/orbydisablingtheStealthPedalInputGainBoost.

15 - Control 313
AmpliTube 3
15.2.7 Tuning indication
StealthPedalLEDswillworkastuningindicatorwhenyouturnOntheTuneronAmpliTube3.
The AmpliTube 3 tuner can be turned On from the AmpliTube 3 interface(figure 15.17) or from one of the StealthPedal footswitches if it has beenassignedto“Tuner.”(figure15.18).
figure15.17
figure15.18

15 - Control314
AmpliTube 3
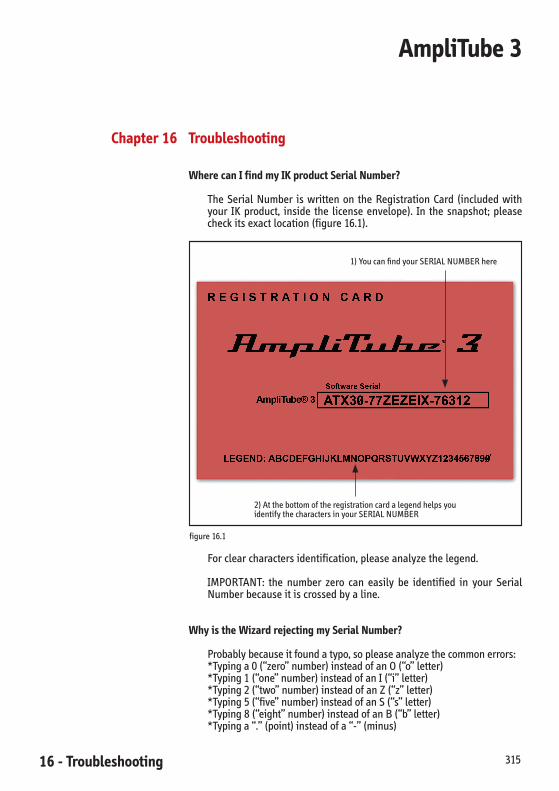
16 - Troubleshooting 315
AmpliTube 3
Chapter 16 Troubleshooting
Where can I find my IK product Serial Number?
The Serial Number is written on the Registration Card (included withyour IK product, inside the license envelope). In the snapshot; pleasecheckitsexactlocation(figure16.1).
figure16.1
1)YoucanfindyourSERIALNUMBERhere
2)AtthebottomoftheregistrationcardalegendhelpsyouidentifythecharactersinyourSERIALNUMBER
Forclearcharactersidentification,pleaseanalyzethelegend.
IMPORTANT: the number zero can easily be identified in your SerialNumberbecauseitiscrossedbyaline.
Why is the Wizard rejecting my Serial Number?
Probablybecauseitfoundatypo,sopleaseanalyzethecommonerrors:*Typinga0(“zero”number)insteadofanO(“o”letter)*Typing1(“one”number)insteadofanI(“i”letter)*Typing2(“two”number)insteadofanZ(“z”letter)*Typing5(“five”number)insteadofanS(“s”letter)*Typing8(“eight”number)insteadofanB(“b”letter)*Typinga“.”(point)insteadofa“-”(minus)
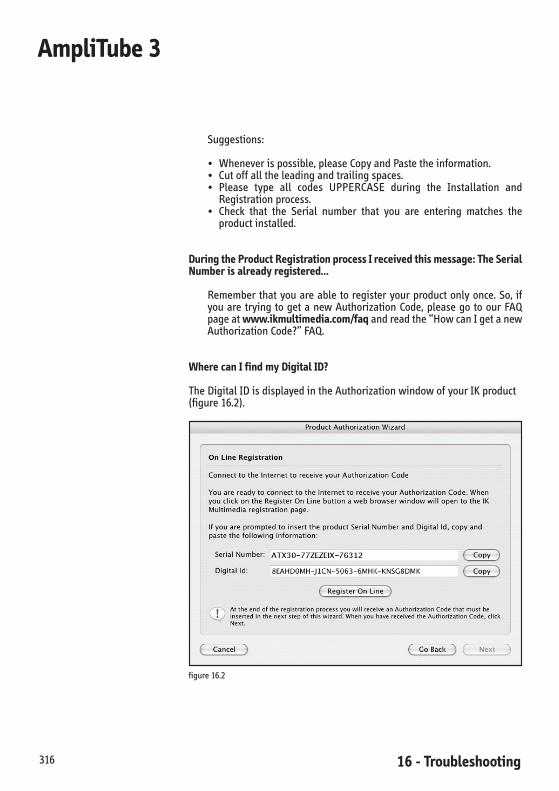
16 - Troubleshooting 316
AmpliTube 3
Suggestions:
• Wheneverispossible,pleaseCopyandPastetheinformation.• Cutoffalltheleadingandtrailingspaces.• Please type all codes UPPERCASE during the Installation and
Registrationprocess.• Check that the Serial number that you are entering matches the
productinstalled.
During the Product Registration process I received this message: The Serial Number is already registered...
Remember thatyouareable toregisteryourproductonlyonce.So, ifyouare trying togetanewAuthorizationCode,pleasego toourFAQpageatwww.ikmultimedia.com/faqandreadthe“HowcanIgetanewAuthorizationCode?”FAQ.
Where can I find my Digital ID?
TheDigitalIDisdisplayedintheAuthorizationwindowofyourIKproduct(figure16.2).
figure16.2
16 - Troubleshooting 317
AmpliTube 3
Why is my Digital ID being rejected during the Online Registration process?
There probably is a typo on it. Remember that the Digital ID has NOletter“I”and“O”,onlythenumbers“1”(one)and“0”(zero). Inorderto prevent any further mistakes, please Copy the Digital ID from theAuthorizationFormtotheRegistrationForm.
Where can I find my Serial Number, Digital ID, and the Authorization Code of a registered IK Product?
In your IK product interface, locate the Authorization button (the onewithasmall lockon it)andclickon it. IfyourproductversionhasnoAuthorizationbutton,loginintotheUserArea,andclickAuthorizations.YouwillbeabletocheckyourproductSerialNumber.ThenclickontheView/Requestbutton.YouwillbeabletochecktheDigital IDandtheAuthorizationCodeinformation.
How can I get a new Authorization Code?
PleasegotoourFAQpageatwww.ikmultimedia.com/faqandreadthe“HowcanIgetanewAuthorizationCode?”FAQ.
I have already registered my product online, but I did not get an Authorization Code.
Usually, this happens because the Digital ID was not submitted dur-ing the registration process. In order to get a new AuthorizationCode, please go to our FAQ page and read the “How can I get a newAuthorizationCode?”FAQ.
I need to log in into the User Area but I forgot my User Name and Password. What should I do?
Pleasegotowww.ikmultimedia.com.OnthenavigationbarclickUserArea.Onthetopleft,pleaseclickonthe“Iforgotmyusernameand/orpassword”link,locatedbelowtheloginbutton.
I have already installed, registered, and authorized my IK product in my main computer. What do I have to do to use my IK product in other computers?
You need to install the program and get a new Authorization Code.Please go to our FAQ page and read the “How can I get a newAuthorizationCode?”FAQ.
16 - Troubleshooting 318
AmpliTube 3
I just bought an IK product. What should I do to register and authorize my new product?
Visitourwebsite www.ikmultimedia.com
IntheSupportArea,clickontheProductRegistrationlink.
In the Serial Number field of the Product Registration Form, pleaseinsert the Serial Number written on the Registration Card (includedwith your IK boxed product, inside the license envelope) or the onethathasbeendeliveredtoyou(e.g.,Onlinepurchase,suchasaDigitalDelivery,orupdate).
CompletetheRegistrationFormandclickSubmit.
RegardingtheAuthorizationprocess,ifyoualreadytypedyourDigitalID while filling the Product Registration Form, you will receive anemailfromuswithyourAuthorizationCode.Ifnot,afteryoulaunchtheprogramtheProductAuthorizationWizardwillappear.Pleasereadandfollowtheinstructionsprovidedineachofthewizard’swindowsandgetanAuthorizationCode.

17 - Support 319
AmpliTube 3
Chapter 17 Support
Foranyquestionyoumayhave,pleaserefertotheFAQwebpageat:www.ikmultimedia.com/faqHereyouwillfindanswerstothemostcommonquestions.
TosubmitaTechnicalSupportForm,goto:www.ikmultimedia.com/Support.php
ForotherrequestssuchasProduct,Sales,orWebinfo,pleasegoto:www.ikmultimedia.com/ContactIKForm.php
17.1 User Area
TheUserArea isaspecialsectionofourwebsitespecificallydesignedforourusers.(figure17.1).
figure17.1
17 - Support320
AmpliTube 3
Ifyouareamemberofourregisteredusers’database,youwillbeableto:
• EdityourPersonaldata• ManageyourproductAuthorizationCodes• Downloadthelatestproductsupdatesandfreecontent• TransferyourLicense• GetYourFreeProducts• ShareyourAmpliTubepresets• RedeemyourIKJamPoints
To access the User Area go to www.ikmultimedia.com/userarea or go towww.ikmultimedia.comandclickUserAreafromthenavigationbar.
To enter the User Area for the first time, you have to Log in with theUsername and Password that you’ve received from us via e-mail afteryourfirstIKproductregistration.IfyouhavechangedyourUsernameandPassword,pleaseuseyourmostcurrentinformationtoLogin.

IK Technologies 321
AmpliTube 3
Appendix IK Technologies
DSM™ Technology
DSM™isanewandexclusiveIKMultimediatechnologyusedintheemula-tion of analog circuitry. DSM was designed to increase the response real-ismandplayabilityofcriticalanalogcircuitmodels.Musiciansalways feltdigitalemulationsofhigh-qualityanaloggear(suchasguitaramplifiers)tobegoodbutnotcompletelysatisfyingbecauseofthelackofcertain“play-ability”and“musicality”qualitiesthatonlytherealthingprovides.DSMhasbeendesignedtoimprovethisaspect.
DSM gives special and unique results when applied to circuit emulationswherethenon-linearityisthemaincharacteristicoftheprocessor,suchasindistortion,fuzz,overdrivestompboxes,tubeguitarpreamplifiersandpoweramps,andanalogcompressorsandlimiters.TheDSMworkingprincipleisbasedonanewapproachneverappliedtoDSP“analogmodeling”untilnow.
Analogcircuits,especiallyTubeandClass-Adiscreteones,arenotdynami-cally-linear,buthavebeenmodeledthiswaybytoday’stechnology.Anana-logcircuit’s character isnever constantlyshapedbutvariesdepending onlotsofparameters,firstandforemostthestrength,frequency,andharmoniccontentoftheincomingsignal.
DSMtakesthenextstep. Itcontinuouslyadapts the“shape”of theanalogcircuitinsteadofapplyingastaticsnapshot.Byusingmorecomplexmath-ematical functions, a more articulated and musical response is possible,makingDSMidealformodelingtubepreampsandtubepoweramps.
Traditionalemulationsareforcedtoatradeoffbetween,forexample,thosekindofdistortionsthatappearonlywhena22x6L6tubepoweramplifierisdriventoitslimitandthecleanersoundithaswhenit’sdrivennormally.
DSMdeliversadynamicresponsethatcontinuouslymorphsand“follows”theincomingsignal;inotherwords,thatfollowsthemusic.
This leads to an accuracy that cannot be found in any other modelinghardwareorsoftware today, respectingall thesignalnuancesexactly likearealanalogcircuitwoulddowithagradeofrealismandmusicalityneverachievedbefore.
VRM™ Technology
VRM™ (Volumetric Response Modeling) is a new proprietary technologythatIKMultimediadevelopedtoimprovequalityondigitalreproductionofspeakersandacousticcabinetsusedwithmusicalinstruments.
This technology involves complex and numerous measurements of real
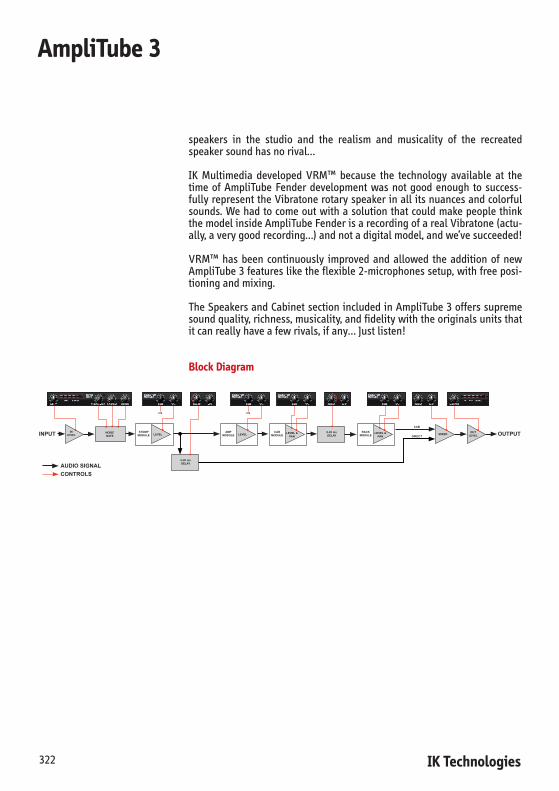
IK Technologies322
AmpliTube 3
speakers in the studio and the realism and musicality of the recreatedspeakersoundhasnorival…
IK Multimedia developed VRM™ because the technology available at thetime of AmpliTube Fender development was not good enough to success-fullyrepresenttheVibratonerotaryspeakerinallitsnuancesandcolorfulsounds.WehadtocomeoutwithasolutionthatcouldmakepeoplethinkthemodelinsideAmpliTubeFenderisarecordingofarealVibratone(actu-ally,averygoodrecording…)andnotadigitalmodel,andwe’vesucceeded!
VRM™ has been continuously improved and allowed the addition of newAmpliTube3featuresliketheflexible2-microphonessetup,withfreeposi-tioningandmixing.
TheSpeakersandCabinetsectionincludedinAmpliTube3offerssupremesoundquality,richness,musicality,andfidelitywiththeoriginalsunitsthatitcanreallyhaveafewrivals,ifany…Justlisten!
Block Diagram
LEVELSTOMP
MODULE0-20 msDELAY

AmpliTube®,AmpliTube®Metal™,AmpliTube®X-GEAR™,SVX™,StompIO™,StealthPedal™,StealthPlug™,SpeedTrainer™,DSM™,VRM™,aretrademarksorregisteredtrademarkspropertyofIKMultimediaProductionSrl.Allotherproductnamesandimages,trademarksandartistsnamesaretheproperty
oftheirrespectiveowners,whichareinnowayassociatedoraffiliatedwithIKMultimedia.ProductnamesareusedsolelyforthepurposeofidentifyingthespecificproductsthatwerestudiedduringIKMultimedia’ssoundmodel
developmentandfordescribingcertaintypesoftonesproducedwithIKMultimedia’sdigitalmodelingtechnology.Useofthesenamesdoesnotimply
anycooperationorendorsement.www.amplitube.com/amplitube
IKMultimediaProduction,Viadell’industria46,41122,Modena,Italy.Phone:+39-059-285496-Fax:+39-059-2861671
IKMultimediaUSLLC,1153SawgrassCorporatePkwy.Sunrise,FL33323Phone:(954)846-9101-Fax:(954)846-9077
www.ikmultimedia.com
Allspecificationsaresubjecttochangewithoutfurthernotice.

PN:M
NU
-AT3-0002