Ampalaya - AHRFARMER FACTSHEET Ampalaya 2 Ampalaya Field ProductionTrelising Set up bamboo poles of...
3
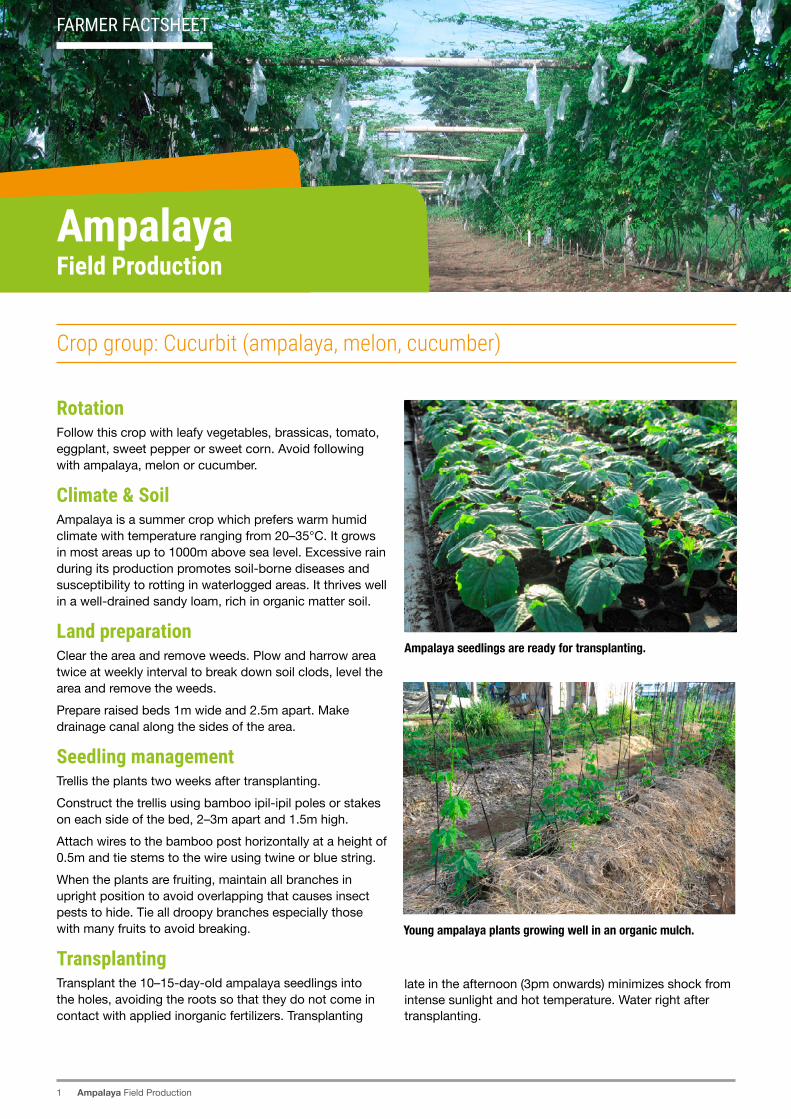
FARMER FACTSHEET Ampalaya 1 Ampalaya Field Production Rotation Follow this crop with leafy vegetables, brassicas, tomato, eggplant, sweet pepper or sweet corn. Avoid following with ampalaya, melon or cucumber. Climate & Soil Ampalaya is a summer crop which prefers warm humid climate with temperature ranging from 20–35°C. It grows in most areas up to 1000m above sea level. Excessive rain during its production promotes soil-borne diseases and susceptibility to rotting in waterlogged areas. It thrives well in a well-drained sandy loam, rich in organic matter soil. Land preparation Clear the area and remove weeds. Plow and harrow area twice at weekly interval to break down soil clods, level the area and remove the weeds. Prepare raised beds 1m wide and 2.5m apart. Make drainage canal along the sides of the area. Seedling management Trellis the plants two weeks after transplanting. Construct the trellis using bamboo ipil-ipil poles or stakes on each side of the bed, 2–3m apart and 1.5m high. Attach wires to the bamboo post horizontally at a height of 0.5m and tie stems to the wire using twine or blue string. When the plants are fruiting, maintain all branches in upright position to avoid overlapping that causes insect pests to hide. Tie all droopy branches especially those with many fruits to avoid breaking. Transplanting Transplant the 10–15-day-old ampalaya seedlings into the holes, avoiding the roots so that they do not come in contact with applied inorganic fertilizers. Transplanting FARMER FACTSHEET Ampalaya Field Production Crop group: Cucurbit (ampalaya, melon, cucumber) late in the afternoon (3pm onwards) minimizes shock from intense sunlight and hot temperature. Water right after transplanting. Ampalaya seedlings are ready for transplanting. Young ampalaya plants growing well in an organic mulch.
Transcript of Ampalaya - AHRFARMER FACTSHEET Ampalaya 2 Ampalaya Field ProductionTrelising Set up bamboo poles of...
FARMER FACTSHEET Ampalaya
1 Ampalaya Field Production
RotationFollow this crop with leafy vegetables, brassicas, tomato, eggplant, sweet pepper or sweet corn. Avoid following with ampalaya, melon or cucumber.
Climate & SoilAmpalaya is a summer crop which prefers warm humid climate with temperature ranging from 20–35°C. It grows in most areas up to 1000m above sea level. Excessive rain during its production promotes soil-borne diseases and susceptibility to rotting in waterlogged areas. It thrives well in a well-drained sandy loam, rich in organic matter soil.
Land preparationClear the area and remove weeds. Plow and harrow area twice at weekly interval to break down soil clods, level the area and remove the weeds. Prepare raised beds 1m wide and 2.5m apart. Make drainage canal along the sides of the area.
Seedling management Trellis the plants two weeks after transplanting.Construct the trellis using bamboo ipil-ipil poles or stakes on each side of the bed, 2–3m apart and 1.5m high. Attach wires to the bamboo post horizontally at a height of 0.5m and tie stems to the wire using twine or blue string.When the plants are fruiting, maintain all branches in upright position to avoid overlapping that causes insect pests to hide. Tie all droopy branches especially those with many fruits to avoid breaking.
TransplantingTransplant the 10–15-day-old ampalaya seedlings into the holes, avoiding the roots so that they do not come in contact with applied inorganic fertilizers. Transplanting
FARMER FACTSHEET
AmpalayaField Production
Crop group: Cucurbit (ampalaya, melon, cucumber)
late in the afternoon (3pm onwards) minimizes shock from intense sunlight and hot temperature. Water right after transplanting.
Ampalaya seedlings are ready for transplanting.
Young ampalaya plants growing well in an organic mulch.

FARMER FACTSHEET Ampalaya
2 Ampalaya Field Production
TrelisingSet up bamboo poles of about 2m long at 5m intervals in each plot and tie them with wire near the top. Beside each plant spaced 1m between hills, tie securely straws to two 12 inch-sticks established near the base of the plant at both sides. The straws serve as support for the ampalaya to climb on. Install trellising net on top to support spreading of vines.
PruningPruning removes lateral shoots starting about 2 weeks from transplanting. All laterals below 1.5m length of vine must be removed using pruning shears or sharp cutters. Pruning should be hygienic and avoid all sources of infections or contamination. The cutting tool should be dipped in 70% ethyl alcohol after cutting. Re-pruning will be done as new lateral shoots arises.
BaggingBagging of fruit is done daily to prevent fruit fly infestation. Wrap the fruit individually when petals turn pale yellow (indicating successful fertilization) using 10cm x 16cm cellophane or other similar wrapping materials.
HarvestingMarketable fruits can be harvested about 45–50 days after sowing. Fully developed fruit for market is thick, green, and juicy. Cut the fruit stem using a sharp knife or scissors. It is best to harvest the fruit early in the morning to have heavier fruit weight than in late afternoon. Harvest frequently with an interval of 2–4 days because the fruit ripens easily. Apply 10g of complete fertilizer after the first harvest and every two weeks thereafter.
Postharvest Handling Harvested fruit should be placed directly in dry, shady place to minimize field heat, which is responsible for faster respiration rate. Transport the fruit in well cushioned boxes or crates. Banana leaves make good packing cushions. Avoid overpacking to stop damage and losses.
Follow up in the field Finished crop should immediately be removed and destroyed, and the ground ploughed to prevent pest and disease populations spreading to other crops. This is extremely important!
Trellising system as applied to an ampalaya crop. Bagging ampalaya fruit is done to stop fruit flies getting to it.
These harvestable size fruits are ready for market.

3 Ampalaya Field Production
Applied Horticultural Research Pty Ltd (AHR), the Australian Centre for International Agricultural Research (ACIAR) and NSW Department of Primary Industries (NSW DPI) make no representations and expressly disclaims all warranties (to the extent permitted by law) about the accuracy, completeness, or currency of information in this fact sheet. Users of this material should take independent action before relying on it’s accuracy in any way. Reliance on any information provided by AHR, ACIAR or NSW DPI is entirely at your own risk. AHR, ACIAR or NSW DPI are not responsible for, and will not be liable for, any loss, damage, claim, expense, cost (including legal costs) or other liability arising in any way from your use or non-use of information in this fact sheet, or from reliance on information AHR, ACIAR or NSW DPI provides to you by any other means.
Fertilizer, irrigation, pest and disease management
Ampalaya growth stages
Pre plant Transplant / Establishment
Vegetative Flowering/ fruit development
Maturity
Fertilizer Before planting apply fertilizer into each planting hole and mix in with soil. During plant growth, apply fertilizer to each plant an inch away from the base of the plant. Ensure no fertilizer touches the leaf of the plant to avoid leaf burning. Additional application can be applied 2 weeks apart during fruit development and harvest. Use the following rates per plant.
Timing At planting 2 weeks after planting 4 weeks after planting 6 weeks after planting Additional applications
Rate 500g compost or dried manure and 10g complete (16-16-16 N, P
2O5, & K2O) fertilizer per plant.
5g urea (45%N) and 5g of complete fertilizer per plant by side dressing. Cultivate or water in as soon as possible.
5g complete fertilizer and 5g muriate of potash (0-0-60) per plant. Cultivate or water in.
5g complete fertilizer and 5g muriate of potash (0-0-60) per plant. Cultivate or water in.
5g complete fertilizer and 5g muriate of potash (0-0-60) per plant. Cultivate or water in.
Irrigation Lay out trickle irrigation drip tube along the beds. Use one tube along each planting row. The spacing of drippers in the tube should be about 25cm or closer. The best strategy is to fully wet the soil profile and encourage roots to grow out into the moist soil. To prevent rapid spread of fungal diseases, water only in the morning, not in the afternoon. Do not over or under water plants.
Water immediately after transplanting until soil profile is fully wet
Water every 2–-3 days for 4–-6 hours or until soil is fully wet
Water every 1-2 days for 2-3 hours or untilsoil is fully wet.
Water every 1-2 days for 2-3 hours or until soil is fully wet.
Pests Monitor the crop regularly for pest infestations, look in growing points and on underside of leaves. Approved insecticide should be used as indicated on product labels. Where possible squash eggs and young larvae, prune leaf miner infested leaves and remove caterpillar infested fruit. Bury or bag pruned leaves and removed fruit. Avoid moving from a mite-infested crop into an uninfested crop.
Squash and flea beetles, Aphids, white flies, and leaf folder
Fruit worm, aphids, white fly, mites, mirids and leaf miner, fruit fly
Fruit worm, aphids, white fly and leaf miner, fruit fly
Diseases Monitor the crop regularly for early disease symptoms. Rogue infected plants showing systemic symptoms and carefully prune away infected parts for localized diseases. If pruning needs to be done, i.e. disinfect pruning tools after use on every plant. Bacterial wilt and blight can be transmitted via pruning tools. Preferably carry a container for pruned plant materials (e.g. a plastic bag) during pruning and immediately place the pruned diseased or infested plant parts inside the bag to minimize dispersal of inoculum to healthy plants. Approved fungicides should be used as indicated on product labels.
Bacterial wilt, Cercospora, downy mildew, and Namamarako
Bacterial wilt, Cercospora, downy mildew, and Namamarako
Bacterial wilt, Cercospora, downy mildew, little leaf and Namamarako