AIX Migration in a CATIA Environment -...
212
SG24-5394-00 International Technical Support Organization http://www.redbooks.ibm.com AIX Migration in a CATIA Environment Richard Cutler, Markus Maier
Transcript of AIX Migration in a CATIA Environment -...

SG24-5394-00
International Technical Support Organization
http://www.redbooks.ibm.com
AIX Migration in a CATIA Environment
Richard Cutler, Markus Maier

AIX Migration in a CATIA Environment
May 1999
SG24-5394-00
International Technical Support Organization
© Copyright International Business Machines Corporation 1999. All rights reserved.Note to U.S Government Users – Documentation related to restricted rights – Use, duplication or disclosure is subject to restrictions set forth in GSA ADP Schedule Contract with IBM Corp.
First Edition (May 1999)
This edition applies to Version 4, Release 3 of the AIX Operating System, Program Number 5765-C34, and Version 4, Release 2 of the CATIA-CADAM Solutions for use with the AIX Operating System.
Comments may be addressed to:IBM Corporation, International Technical Support OrganizationDept. JN9B Building 003 Internal Zip 283411400 Burnet RoadAustin, Texas 78758-3493
When you send information to IBM, you grant IBM a non-exclusive right to use or distribute the information in any way it believes appropriate without incurring any obligation to you.
Before using this information and the product it supports, be sure to read the general information in Appendix F, “Special Notices” on page 177.
Take Note!

Contents
Figures . . . . . . . . . . . . . . . . . . . . . . . . . . . . . . . . . . . . . . . . . . . . . . . . . . . .ix
Tables. . . . . . . . . . . . . . . . . . . . . . . . . . . . . . . . . . . . . . . . . . . . . . . . . . . . .xi
Preface . . . . . . . . . . . . . . . . . . . . . . . . . . . . . . . . . . . . . . . . . . . . . . . . . . . xiiiThe Team That Wrote This Redbook . . . . . . . . . . . . . . . . . . . . . . . . . . . . . . . . xiiiComments Welcome . . . . . . . . . . . . . . . . . . . . . . . . . . . . . . . . . . . . . . . . . . . . xiv
Chapter 1. Reasons for Migration . . . . . . . . . . . . . . . . . . . . . . . . . . . . . . 11.1 Why Migrate to AIX 4.3.2 . . . . . . . . . . . . . . . . . . . . . . . . . . . . . . . . . . . 1
1.1.1 Support for File Sizes Greater Than 2 GB . . . . . . . . . . . . . . . . . . 11.1.2 Mirroring of Root Volume Group . . . . . . . . . . . . . . . . . . . . . . . . . . 11.1.3 Support for Executables Larger Than 256 MB . . . . . . . . . . . . . . . 11.1.4 Network Installation Manager Enhancements . . . . . . . . . . . . . . . . 21.1.5 New Graphics Adapter Support . . . . . . . . . . . . . . . . . . . . . . . . . . 21.1.6 New Workstation Support . . . . . . . . . . . . . . . . . . . . . . . . . . . . . . . 21.1.7 X11R6 and Motif 2.1 . . . . . . . . . . . . . . . . . . . . . . . . . . . . . . . . . . . 31.1.8 OpenGL and graPHIGS Included at No Charge . . . . . . . . . . . . . . 31.1.9 Introduction of NFS Version 3. . . . . . . . . . . . . . . . . . . . . . . . . . . . 41.1.10 Support for NFS over TCP . . . . . . . . . . . . . . . . . . . . . . . . . . . . . 41.1.11 Multithreaded NFS Server Implementation . . . . . . . . . . . . . . . . . 51.1.12 Improved NFS File Locking. . . . . . . . . . . . . . . . . . . . . . . . . . . . . 51.1.13 Cache File System Introduced . . . . . . . . . . . . . . . . . . . . . . . . . . 51.1.14 Enhanced Automatic Mounting of File Systems with AutoFS . . . 51.1.15 Alternate Disk Installation Utility . . . . . . . . . . . . . . . . . . . . . . . . . 51.1.16 Increased Logical Volume Manager Limits . . . . . . . . . . . . . . . . . 61.1.17 Improved JFS File-Locking Mechanism . . . . . . . . . . . . . . . . . . . 71.1.18 Additional Performance Tools . . . . . . . . . . . . . . . . . . . . . . . . . . . 71.1.19 Web-Based System Manager . . . . . . . . . . . . . . . . . . . . . . . . . . . 71.1.20 HTML-Based Online Documentation . . . . . . . . . . . . . . . . . . . . . . 71.1.21 Java Development Kit Upgraded . . . . . . . . . . . . . . . . . . . . . . . . 81.1.22 Extended Scalability and System Limits . . . . . . . . . . . . . . . . . . . 81.1.23 PC Integration with AIX Fast Connect . . . . . . . . . . . . . . . . . . . . . 81.1.24 Improved Paging Space Utilization . . . . . . . . . . . . . . . . . . . . . . . 91.1.25 AIX 4.3.2 Is Year 2000 Ready . . . . . . . . . . . . . . . . . . . . . . . . . 10
1.2 Why Migrate to CATIA V4.2.0 R1? . . . . . . . . . . . . . . . . . . . . . . . . . . . 101.2.1 New Components . . . . . . . . . . . . . . . . . . . . . . . . . . . . . . . . . . . . 101.2.2 Enhancements to Existing Components . . . . . . . . . . . . . . . . . . . 111.2.3 Basis for Future Enhancements . . . . . . . . . . . . . . . . . . . . . . . . . 111.2.4 CATIA V4.2.0 R1 Is Year 2000 Ready . . . . . . . . . . . . . . . . . . . . 111.2.5 New Enhancements in CATweb V2.2 . . . . . . . . . . . . . . . . . . . . . 13
© Copyright IBM Corp. 1999 iii

Chapter 2. Definition of CATIA Migration Terminology . . . . . . . . . . . . 152.1 AIX Maintenance Model . . . . . . . . . . . . . . . . . . . . . . . . . . . . . . . . . . . 152.2 CATIA Maintenance Model . . . . . . . . . . . . . . . . . . . . . . . . . . . . . . . . . 162.3 What Is CASIL? . . . . . . . . . . . . . . . . . . . . . . . . . . . . . . . . . . . . . . . . . 17
2.3.1 The CASIL Testing Process . . . . . . . . . . . . . . . . . . . . . . . . . . . . 182.3.2 More CASIL Information . . . . . . . . . . . . . . . . . . . . . . . . . . . . . . . 19
2.4 CASIL Level . . . . . . . . . . . . . . . . . . . . . . . . . . . . . . . . . . . . . . . . . . . . 202.4.1 Operating Environment . . . . . . . . . . . . . . . . . . . . . . . . . . . . . . . . 202.4.2 FORTRAN License Requirements . . . . . . . . . . . . . . . . . . . . . . . 21
2.5 Migration Scenario . . . . . . . . . . . . . . . . . . . . . . . . . . . . . . . . . . . . . . . 22
Chapter 3. Planning for Migration . . . . . . . . . . . . . . . . . . . . . . . . . . . . . 233.1 Minimum System Requirements for AIX 4.3.2. . . . . . . . . . . . . . . . . . . 233.2 Hardware Unsupported by AIX 4.3 . . . . . . . . . . . . . . . . . . . . . . . . . . . 243.3 Requirements for CATIA V4.2.0 R1 . . . . . . . . . . . . . . . . . . . . . . . . . . 25
3.3.1 Hardware Requirements for CATIA V4.2.0 R1 . . . . . . . . . . . . . . 253.3.2 Software Requirements for CATIA V4.2.0 R1 . . . . . . . . . . . . . . . 263.3.3 Prerequisites for CATweb Server . . . . . . . . . . . . . . . . . . . . . . . . 27
3.4 Other Software Dependencies . . . . . . . . . . . . . . . . . . . . . . . . . . . . . . 283.5 Documenting the Existing Environment . . . . . . . . . . . . . . . . . . . . . . . 29
3.5.1 Using Standard AIX Commands . . . . . . . . . . . . . . . . . . . . . . . . . 293.5.2 Using the snap Command . . . . . . . . . . . . . . . . . . . . . . . . . . . . . 313.5.3 Information to Collect . . . . . . . . . . . . . . . . . . . . . . . . . . . . . . . . . 31
3.6 Is Migration Possible? . . . . . . . . . . . . . . . . . . . . . . . . . . . . . . . . . . . . 323.7 LUM Considerations . . . . . . . . . . . . . . . . . . . . . . . . . . . . . . . . . . . . . . 32
3.7.1 Planning for the License Server . . . . . . . . . . . . . . . . . . . . . . . . . 333.7.2 Types of LUM Licenses . . . . . . . . . . . . . . . . . . . . . . . . . . . . . . . 343.7.3 New LUM Bindings . . . . . . . . . . . . . . . . . . . . . . . . . . . . . . . . . . . 373.7.4 CATIA and LUM Dependencies . . . . . . . . . . . . . . . . . . . . . . . . . 39
3.8 CATIA Installation Strategy . . . . . . . . . . . . . . . . . . . . . . . . . . . . . . . . 393.8.1 Hardware Considerations . . . . . . . . . . . . . . . . . . . . . . . . . . . . . . 393.8.2 Company Structure. . . . . . . . . . . . . . . . . . . . . . . . . . . . . . . . . . . 403.8.3 CATIA Environment Structures . . . . . . . . . . . . . . . . . . . . . . . . . . 413.8.4 CATIA Data Access Strategies . . . . . . . . . . . . . . . . . . . . . . . . . . 423.8.5 CATIA Client Directory Structures . . . . . . . . . . . . . . . . . . . . . . . 44
3.9 NIM Scenarios . . . . . . . . . . . . . . . . . . . . . . . . . . . . . . . . . . . . . . . . . . 483.9.1 Executing Scripts on Clients . . . . . . . . . . . . . . . . . . . . . . . . . . . . 483.9.2 NIM Network Scenarios . . . . . . . . . . . . . . . . . . . . . . . . . . . . . . . 49
Chapter 4. Preparing for Migration . . . . . . . . . . . . . . . . . . . . . . . . . . . . 534.1 Ordering Additional or Replacement Hardware and Software . . . . . . . 534.2 Check and Update Firmware . . . . . . . . . . . . . . . . . . . . . . . . . . . . . . . 544.3 Installation Methods . . . . . . . . . . . . . . . . . . . . . . . . . . . . . . . . . . . . . . 54
iv AIX Migration in a CATIA Environment

4.3.1 New and Complete Overwrite Install . . . . . . . . . . . . . . . . . . . . . . 554.3.2 Migration Install . . . . . . . . . . . . . . . . . . . . . . . . . . . . . . . . . . . . . 554.3.3 mksysb Install . . . . . . . . . . . . . . . . . . . . . . . . . . . . . . . . . . . . . . . 564.3.4 Choosing an Installation Method. . . . . . . . . . . . . . . . . . . . . . . . . 57
4.4 Checklists for Starting the Migration . . . . . . . . . . . . . . . . . . . . . . . . . . 57
Chapter 5. Performing the Migration . . . . . . . . . . . . . . . . . . . . . . . . . . . 595.1 Maintenance Level AIX Upgrade . . . . . . . . . . . . . . . . . . . . . . . . . . . . 595.2 Create and Test Backups . . . . . . . . . . . . . . . . . . . . . . . . . . . . . . . . . . 605.3 Machine Categories . . . . . . . . . . . . . . . . . . . . . . . . . . . . . . . . . . . . . . 615.4 Upgrade the NIM Servers . . . . . . . . . . . . . . . . . . . . . . . . . . . . . . . . . . 62
5.4.1 Upgrade NIM Master . . . . . . . . . . . . . . . . . . . . . . . . . . . . . . . . . 625.4.2 Create New lpp_source Resource . . . . . . . . . . . . . . . . . . . . . . . 645.4.3 Customizing the lpp_source Resource . . . . . . . . . . . . . . . . . . . . 645.4.4 Create New SPOT Resource . . . . . . . . . . . . . . . . . . . . . . . . . . . 675.4.5 Upgrade NIM Resource Servers . . . . . . . . . . . . . . . . . . . . . . . . . 68
5.5 Other Server Machines. . . . . . . . . . . . . . . . . . . . . . . . . . . . . . . . . . . . 685.5.1 ADSM Server Machines . . . . . . . . . . . . . . . . . . . . . . . . . . . . . . . 695.5.2 License Server Machines . . . . . . . . . . . . . . . . . . . . . . . . . . . . . . 695.5.3 NIS and NFS Server Machines . . . . . . . . . . . . . . . . . . . . . . . . . . 695.5.4 DB2 Server Machines . . . . . . . . . . . . . . . . . . . . . . . . . . . . . . . . . 705.5.5 CDM and VPM Server Machines . . . . . . . . . . . . . . . . . . . . . . . . 70
5.6 Update First Client Machine . . . . . . . . . . . . . . . . . . . . . . . . . . . . . . . . 715.6.1 Upgrade AIX Component . . . . . . . . . . . . . . . . . . . . . . . . . . . . . . 715.6.2 Update CATIA Component . . . . . . . . . . . . . . . . . . . . . . . . . . . . . 745.6.3 Creating a Standard Image. . . . . . . . . . . . . . . . . . . . . . . . . . . . . 76
5.7 Upgrade Other Clients . . . . . . . . . . . . . . . . . . . . . . . . . . . . . . . . . . . . 775.7.1 Concurrent Group Operations. . . . . . . . . . . . . . . . . . . . . . . . . . . 775.7.2 Non-Prompted NIM Install . . . . . . . . . . . . . . . . . . . . . . . . . . . . . 78
5.8 Post Migration Tasks . . . . . . . . . . . . . . . . . . . . . . . . . . . . . . . . . . . . . 80
Chapter 6. Exploiting New Functionality . . . . . . . . . . . . . . . . . . . . . . . 816.1 Configuring a LUM License Server . . . . . . . . . . . . . . . . . . . . . . . . . . . 81
6.1.1 New LUM Commands . . . . . . . . . . . . . . . . . . . . . . . . . . . . . . . . . 826.1.2 LUM Scenarios for CATIA Environments . . . . . . . . . . . . . . . . . . 836.1.3 Configuring a Direct Binding Server . . . . . . . . . . . . . . . . . . . . . . 876.1.4 Configuring a Direct Binding Client . . . . . . . . . . . . . . . . . . . . . . . 906.1.5 Enrolling New CATIA Licenses . . . . . . . . . . . . . . . . . . . . . . . . . . 926.1.6 Problem Determination with CATIA and LUM . . . . . . . . . . . . . . . 936.1.7 Tracing CATIA License Requests . . . . . . . . . . . . . . . . . . . . . . . . 95
6.2 Using CAT_MEM . . . . . . . . . . . . . . . . . . . . . . . . . . . . . . . . . . . . . . . . 966.3 Migration of Automount Maps . . . . . . . . . . . . . . . . . . . . . . . . . . . . . . . 98
6.3.1 Automount Basics. . . . . . . . . . . . . . . . . . . . . . . . . . . . . . . . . . . . 99
v
6.3.2 Migration to AutoFS . . . . . . . . . . . . . . . . . . . . . . . . . . . . . . . . . 1006.4 Configuring CATIA Clients to Use CacheFS . . . . . . . . . . . . . . . . . . . 101
6.4.1 How CacheFS Works . . . . . . . . . . . . . . . . . . . . . . . . . . . . . . . . 1026.4.2 Configuring CacheFS for Use with CATIA. . . . . . . . . . . . . . . . . 103
6.5 The New Online Documentation . . . . . . . . . . . . . . . . . . . . . . . . . . . . 1076.5.1 Installing Online Manuals . . . . . . . . . . . . . . . . . . . . . . . . . . . . . 1086.5.2 Using the Documentation . . . . . . . . . . . . . . . . . . . . . . . . . . . . . 1096.5.3 Man Page Changes . . . . . . . . . . . . . . . . . . . . . . . . . . . . . . . . . 1106.5.4 SMIT Documentation . . . . . . . . . . . . . . . . . . . . . . . . . . . . . . . . 110
6.6 Documentation Search Service . . . . . . . . . . . . . . . . . . . . . . . . . . . . 1106.6.1 Installation of Documentation Search Service . . . . . . . . . . . . . . 1116.6.2 Configuring Documentation Search Service . . . . . . . . . . . . . . . 1146.6.3 Invoking Documentation Search Service. . . . . . . . . . . . . . . . . . 115
6.7 Configuring CATWeb V2.2 . . . . . . . . . . . . . . . . . . . . . . . . . . . . . . . . 1176.7.1 Installing CATweb Navigator. . . . . . . . . . . . . . . . . . . . . . . . . . . 1186.7.2 Configuring the HTTP Server . . . . . . . . . . . . . . . . . . . . . . . . . . 1196.7.3 Configuring the CATweb Server Machine . . . . . . . . . . . . . . . . . 1206.7.4 Customizing CATweb . . . . . . . . . . . . . . . . . . . . . . . . . . . . . . . . 1236.7.5 Crossing Firewalls with CATweb. . . . . . . . . . . . . . . . . . . . . . . . 125
6.8 IBM SecureWay Network Dispatcher in a CATweb Environment . . . 1256.8.1 The Need to Scale to Multiple Servers . . . . . . . . . . . . . . . . . . . 1266.8.2 The Clustered CATweb Navigator Server . . . . . . . . . . . . . . . . . 1276.8.3 Configure IBM SecureWay Network Dispatcher . . . . . . . . . . . . 1296.8.4 Troubleshooting IBM SecureWay Network Dispatcher . . . . . . . 133
6.9 CATIA Version 5 . . . . . . . . . . . . . . . . . . . . . . . . . . . . . . . . . . . . . . . 1346.9.1 Installation of CATIA Version 5 . . . . . . . . . . . . . . . . . . . . . . . . . 1356.9.2 How to Start CATIA Version 5 . . . . . . . . . . . . . . . . . . . . . . . . . 1416.9.3 Customizing CATIA Version 5 . . . . . . . . . . . . . . . . . . . . . . . . . 1426.9.4 Installing CATIA Online Documentation . . . . . . . . . . . . . . . . . . 147
6.10 AIX Fast Connect for Windows . . . . . . . . . . . . . . . . . . . . . . . . . . . . 1486.10.1 Configuring Fast Connect on AIX . . . . . . . . . . . . . . . . . . . . . . 1496.10.2 Configuring NT Clients . . . . . . . . . . . . . . . . . . . . . . . . . . . . . . 1516.10.3 CATIA Specific Requirements. . . . . . . . . . . . . . . . . . . . . . . . . 151
Appendix A. CASIL 9903 Bundle File . . . . . . . . . . . . . . . . . . . . . . . . . . . 153
Appendix B. Sample Files for Use with NIM . . . . . . . . . . . . . . . . . . . . . 157B.1 Sample bosinst.data File for mksysb Install . . . . . . . . . . . . . . . . . . . . . . 157B.2 Sample bosinst.data File for Migration Install . . . . . . . . . . . . . . . . . . . . . 159B.3 Sample NIM Customization Script . . . . . . . . . . . . . . . . . . . . . . . . . . . . . 160B.4 Sample Data Collection Script for Use with NIM. . . . . . . . . . . . . . . . . . . 163B.5 Sample Workstation Information File . . . . . . . . . . . . . . . . . . . . . . . . . . . 164
vi AIX Migration in a CATIA Environment

Appendix C. Sample i4ls.ini File . . . . . . . . . . . . . . . . . . . . . . . . . . . . . . . 167
Appendix D. Sample CATIA V5 Environment File . . . . . . . . . . . . . . . . . 169
Appendix E. PTF Information . . . . . . . . . . . . . . . . . . . . . . . . . . . . . . . . . . 171E.1 AIX PTFs. . . . . . . . . . . . . . . . . . . . . . . . . . . . . . . . . . . . . . . . . . . . . . . . . 171E.2 CATIA PTFs . . . . . . . . . . . . . . . . . . . . . . . . . . . . . . . . . . . . . . . . . . . . . . 176
Appendix F. Special Notices. . . . . . . . . . . . . . . . . . . . . . . . . . . . . . . . . . . 177
Appendix G. Related Publications . . . . . . . . . . . . . . . . . . . . . . . . . . . . . 181G.1 International Technical Support Organization Publications . . . . . . . . . . 181G.2 Redbooks on CD-ROMs. . . . . . . . . . . . . . . . . . . . . . . . . . . . . . . . . . . . . 181G.3 Other Publications . . . . . . . . . . . . . . . . . . . . . . . . . . . . . . . . . . . . . . . . . 181G.4 Internet Sites . . . . . . . . . . . . . . . . . . . . . . . . . . . . . . . . . . . . . . . . . . . . . 182
How to Get ITSO Redbooks . . . . . . . . . . . . . . . . . . . . . . . . . . . . . . . . . 185IBM Redbook Fax Order Form . . . . . . . . . . . . . . . . . . . . . . . . . . . . . . . . . . . . 186
List of Abbreviations. . . . . . . . . . . . . . . . . . . . . . . . . . . . . . . . . . . . . . . 187
Index . . . . . . . . . . . . . . . . . . . . . . . . . . . . . . . . . . . . . . . . . . . . . . . . . . . 189
ITSO Redbook Evaluation . . . . . . . . . . . . . . . . . . . . . . . . . . . . . . . . . . . 195
vii

viii AIX Migration in a CATIA Environment

Figures
1. Definition of the CASIL 9903 Level . . . . . . . . . . . . . . . . . . . . . . . . . . . . . . 222. Namespace Binding versus Direct Binding . . . . . . . . . . . . . . . . . . . . . . . . 383. Sample Client Directory Structure . . . . . . . . . . . . . . . . . . . . . . . . . . . . . . . 474. Web-based System Manager NIM interface . . . . . . . . . . . . . . . . . . . . . . . 495. Flat NIM Network . . . . . . . . . . . . . . . . . . . . . . . . . . . . . . . . . . . . . . . . . . . . 506. NIM Master in a Backbone Environment . . . . . . . . . . . . . . . . . . . . . . . . . . 517. NIM Master in a WAN Environment . . . . . . . . . . . . . . . . . . . . . . . . . . . . . . 528. SMIT Screen for NIM Installation of a CATIA Client . . . . . . . . . . . . . . . . . 739. i4blt Command Graphical User Interface. . . . . . . . . . . . . . . . . . . . . . . . . . 8210. Default LUM Migration Scenario . . . . . . . . . . . . . . . . . . . . . . . . . . . . . . . . 8411. Namespace and Direct Binding Combination Scenario . . . . . . . . . . . . . . . 8512. Hierarchical Direct Binding Structure . . . . . . . . . . . . . . . . . . . . . . . . . . . . . 8613. i4cfg Command Graphical User Interface . . . . . . . . . . . . . . . . . . . . . . . . . 8814. Configuration Tool Direct Binding Servers Page . . . . . . . . . . . . . . . . . . . . 8915. Configuration Tool Log Page . . . . . . . . . . . . . . . . . . . . . . . . . . . . . . . . . . . 9016. Direct Binding Client Configuration . . . . . . . . . . . . . . . . . . . . . . . . . . . . . . 9117. Sample CATIA License Key Information . . . . . . . . . . . . . . . . . . . . . . . . . . 9218. Default Process Address Space Layout . . . . . . . . . . . . . . . . . . . . . . . . . . 9719. Impact of CAT_MEM on Segment Use . . . . . . . . . . . . . . . . . . . . . . . . . . . 9820. Output of mount Command . . . . . . . . . . . . . . . . . . . . . . . . . . . . . . . . . . . 10021. CacheFS Components. . . . . . . . . . . . . . . . . . . . . . . . . . . . . . . . . . . . . . . 10222. SMIT Create a CacheFS Screen . . . . . . . . . . . . . . . . . . . . . . . . . . . . . . . 10423. Output of the mount Command . . . . . . . . . . . . . . . . . . . . . . . . . . . . . . . . 10624. SMIT CacheFS Administration Screen . . . . . . . . . . . . . . . . . . . . . . . . . . 10725. Netscape Filesets . . . . . . . . . . . . . . . . . . . . . . . . . . . . . . . . . . . . . . . . . . 11226. Lotus Domino Go Web Server Filesets . . . . . . . . . . . . . . . . . . . . . . . . . . 11327. Documentation Search Service Filesets . . . . . . . . . . . . . . . . . . . . . . . . . 11428. Documentation Search Service Web Interface . . . . . . . . . . . . . . . . . . . . 11629. CATweb Server Cluster . . . . . . . . . . . . . . . . . . . . . . . . . . . . . . . . . . . . . . 12830. CATIA Version 5 Welcome Dialog Box . . . . . . . . . . . . . . . . . . . . . . . . . . 13731. CATIA Version 5 Destination Dialog Box. . . . . . . . . . . . . . . . . . . . . . . . . 13832. CATIA Version 5 Configuration and Products Dialog Box . . . . . . . . . . . . 13933. CATIA Version 5 Options Menu. . . . . . . . . . . . . . . . . . . . . . . . . . . . . . . . 14634. CATIA Version 5 Documentation . . . . . . . . . . . . . . . . . . . . . . . . . . . . . . . 14735. SMIT AIX Fast Connect Attributes Panel. . . . . . . . . . . . . . . . . . . . . . . . . 150
© Copyright IBM Corp. 1999 ix

x AIX Migration in a CATIA Environment

Tables
1. Relationship between PPs and The Number of Disks . . . . . . . . . . . . . . . . . 62. LVM Limits for AIX Version 4.3.2 . . . . . . . . . . . . . . . . . . . . . . . . . . . . . . . . . 73. Expanded System Limits . . . . . . . . . . . . . . . . . . . . . . . . . . . . . . . . . . . . . . . 84. Disk Requirements for AIX 4.1.5 and AIX 4.3.2. . . . . . . . . . . . . . . . . . . . . 245. Hardware Requirements for CATIA V4.2.0 R1 . . . . . . . . . . . . . . . . . . . . . 256. Software Requirements for CATIA V4.2.0 R1 . . . . . . . . . . . . . . . . . . . . . . 267. Prerequisites for CATweb . . . . . . . . . . . . . . . . . . . . . . . . . . . . . . . . . . . . . 278. Checklist for Proceeding with Migration. . . . . . . . . . . . . . . . . . . . . . . . . . . 589. CacheFS Resource Parameters . . . . . . . . . . . . . . . . . . . . . . . . . . . . . . . 10510. Configuration Options for CATweb . . . . . . . . . . . . . . . . . . . . . . . . . . . . . 12311. CATweb Navigator Server . . . . . . . . . . . . . . . . . . . . . . . . . . . . . . . . . . . . 12912. Commands for SWND Cluster . . . . . . . . . . . . . . . . . . . . . . . . . . . . . . . . . 13113. Install SWND . . . . . . . . . . . . . . . . . . . . . . . . . . . . . . . . . . . . . . . . . . . . . . 13114. Install the CATweb Scripts on SWND Servers . . . . . . . . . . . . . . . . . . . . 13215. CATIA Environment Variables . . . . . . . . . . . . . . . . . . . . . . . . . . . . . . . . . 145
© Copyright IBM Corp. 1999 xi

xii AIX Migration in a CATIA Environment

Preface
This redbook is intended to provide insight to AIX and CATIA system administrators on the steps that are required when planning, preparing, and actually migrating a system to a newer level of AIX and CATIA from earlier versions of AIX and CATIA releases.
Before discussing the actual migration steps, this redbook gives some of the main reasons why you should upgrade your system both from the AIX perspective and the CATIA perspective. It then details the terminology used throughout the remainder of the book and explains the function of the CATIA AIX/NT System Integration Laboratory (CASIL). The chapters that follow explain how to plan, prepare, and perform the steps involved in the migration of a CATIA system environment.
Given the vast range of components available in the CATIA-CADAM Solutions product family, and in an effort to make this book applicable to future CATIA migrations, the concepts behind each step of the migration will be explained rather than detailing an exhaustive keystroke-by-keystroke description.
This book was written based on the scenario of migrating a CATIA environment from the 9803 CASIL level, which consists of AIX 4.1.5 with fixes and CATIA V4.1.9 Refresh 1, to the 9903 CASIL level, which consists of AIX 4.3.2 with fixes and CATIA V4.2.0 Refresh 1 with fixes. The information provided should also enable you to migrate systems from the 9706 CASIL level, which consists of AIX 4.1.5 with fixes and CATIA V4.1.8.
The Team That Wrote This Redbook
This redbook was produced by a team of specialists from around the world working at the International Technical Support Organization, Austin Center.
Richard Cutler is an AIX and RS/6000 Technical Specialist at the ITSO, Austin Center. Before joining the ITSO, he worked in the RS/6000 Technical Center in the UK where he assisted customers and independent software vendors to port their applications to AIX.
Markus Maier is an AIX and CATIA Technical Specialist in the Engineering Technology Solution Group (ETS/G) in IBM Germany. He has worked with CATIA on the RS/6000 platform since its introduction. At present, he works as a customer consultant specializing in CATIA Client/Server questions and downsizing projects.
© Copyright IBM Corp. 1999 xiii

Thanks to the following people for their invaluable contributions to this project:
Tim BrockKay FreundJames HammondTracey HensonGary T. HornyakSandra J. WilliamsIBM CATIA AIX/NT System Integration Lab (CASIL)
James BaysTeri DeWaltJohn D. SpangenbergIBM Visual Systems Marketing in the RS/6000 Division
Comments Welcome
Your comments are important to us!
We want our redbooks to be as helpful as possible. Please send us your comments about this or other redbooks in one of the following ways:
• Fax the evaluation form found in “ITSO Redbook Evaluation” on page 195 to the fax number shown on the form.
• Use the electronic evaluation form found at:
http://www.redbooks.ibm.com
• Send us a note at the following address:
xiv AIX Migration in a CATIA Environment

Chapter 1. Reasons for Migration
There are many factors involved in considering whether to migrate your CATIA environment to a later level. This chapter details the main reasons for reaching the decision to migrate, both from the AIX perspective and the CATIA perspective.
1.1 Why Migrate to AIX 4.3.2
Version 4.3.2 of the AIX operating system contains many new features when compared with earlier releases of AIX Version 4. This section details those features that may be of benefit in CATIA environments.
1.1.1 Support for File Sizes Greater Than 2 GBIn AIX Version 4.1, it was possible to build file systems that were larger than 2 GB, up to a maximum of 64 GB; however, the maximum size of a file was still limited to just under 2 GB in size. AIX Version 4.3.2 provides support for files greater than 2 GB in size so that users can store large quantities of data in a single file. Many, but not all, AIX commands support the use of files larger than 2 GB. Additionally, some commands have large file support with limitations. Depending upon the type of file system, files can reach a size just under 64 GB.
1.1.2 Mirroring of Root Volume GroupRoot volume group (rootvg) mirroring is the use of the Logical Volume Manager (LVM) mirroring function, originally designed for mirroring user data, in order to keep a system operational in the event of a disk failure of one or more of the drives that make up the rootvg. Additionally, this feature also provides multiple identical boot images that may be used to allow a system to boot in the event that one boot image becomes damaged. This feature can be used to enhance the availability of machines that are used as CATIA code and data servers to many clients.
1.1.3 Support for Executables Larger Than 256 MBIn AIX Version 4.1, the text, data, and loader sections of an executable had to reside in the first 256 MB of the file. If a program contained a large amount of text or initialized data, then AIX was unable to execute the program. AIX Version 4.2 added support for executables larger than 256 MB. The text and loader sections must still fit within the first 256 MB of the file, but large amounts of initialized data can now be used. This feature can be useful when performing large CATIA FEM calculations.
© Copyright IBM Corp. 1999 1
1.1.4 Network Installation Manager EnhancementsThe main enhancements made to the Network Installation Manager (NIM) system are:
• Groups of logically related machines can be managed as a single object.
• Automatic installation of missing device drivers when restoring from a mksysb image. This happens if the source and target systems are not identical.
• NIM interface available in the Web-based System Management tool.
• Simplification of the SMIT menus used for NIM operations.
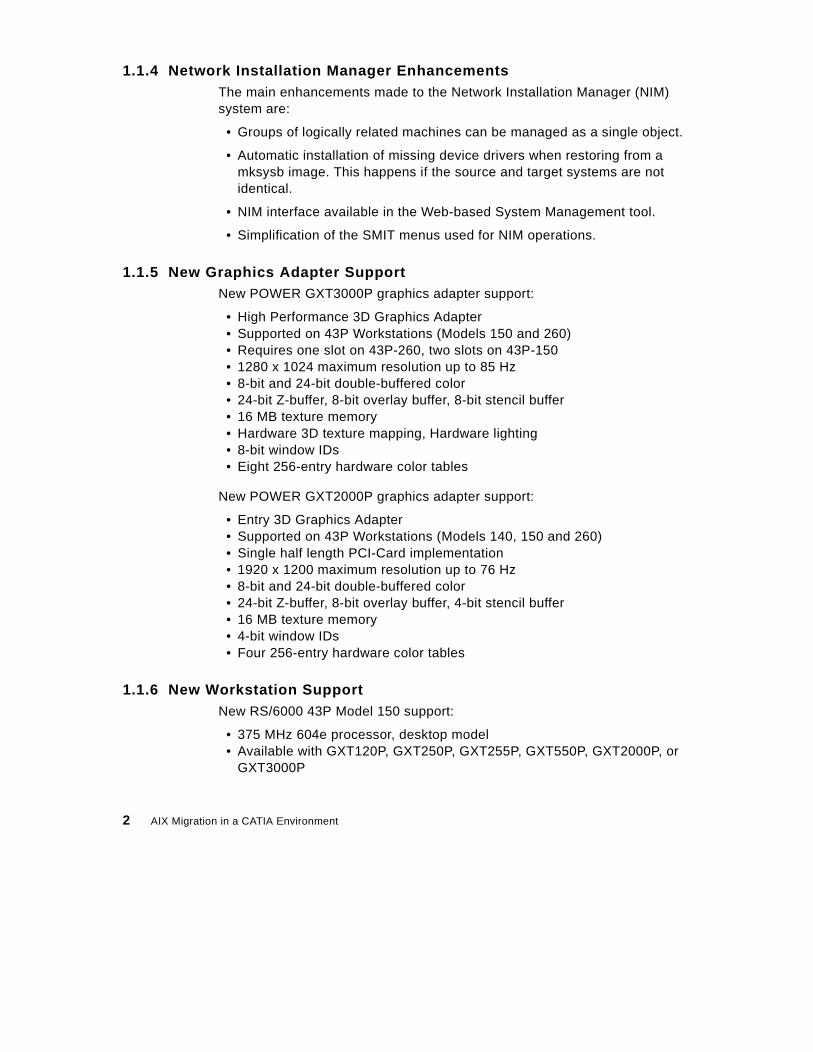
1.1.5 New Graphics Adapter SupportNew POWER GXT3000P graphics adapter support:
• High Performance 3D Graphics Adapter • Supported on 43P Workstations (Models 150 and 260) • Requires one slot on 43P-260, two slots on 43P-150 • 1280 x 1024 maximum resolution up to 85 Hz • 8-bit and 24-bit double-buffered color • 24-bit Z-buffer, 8-bit overlay buffer, 8-bit stencil buffer • 16 MB texture memory • Hardware 3D texture mapping, Hardware lighting • 8-bit window IDs • Eight 256-entry hardware color tables
New POWER GXT2000P graphics adapter support:
• Entry 3D Graphics Adapter • Supported on 43P Workstations (Models 140, 150 and 260) • Single half length PCI-Card implementation • 1920 x 1200 maximum resolution up to 76 Hz • 8-bit and 24-bit double-buffered color • 24-bit Z-buffer, 8-bit overlay buffer, 4-bit stencil buffer • 16 MB texture memory • 4-bit window IDs • Four 256-entry hardware color tables
1.1.6 New Workstation SupportNew RS/6000 43P Model 150 support:
• 375 MHz 604e processor, desktop model • Available with GXT120P, GXT250P, GXT255P, GXT550P, GXT2000P, or
GXT3000P
2 AIX Migration in a CATIA Environment
• 128 MB - 1 GB memory, 4.5 GB - 27.3 GB Ultra SCSI disk, SSA support • Integrated 10/100 Mbps Ethernet, 5 disk/media bays, 5 expansion slots
New RS/6000 43P Model 260 support:
• 1- to 2-way 200 MHz 64-bit POWER3 RISC processor • Runs 32-bit and 64-bit programs • Better floating point performance than Model 397 • Available with GXT120P, GXT250P, GXT255P, GXT2000P, or GXT3000P • 256 MB - 4 GB memory, 4.5 GB - 27.3 GB Ultra SCSI disk, SSA support • Integrated 10/100 Mbps Ethernet, 5 disk/media bays, 5 expansion slots
1.1.7 X11R6 and Motif 2.1The sixth release of the X-window system has been ported to AIX Version 4.3 from software provided by the X Consortium. The actual source for the AIX port was X11 Release 6.2, which is a proper subset of X11 R6.3 produced at the request of the OSF Common Desktop Environment (CDE) program. The X11 libraries shipped with AIX are backward-compatible, and client applications that access these libraries will work as on previous releases of AIX. AIX Version 4.3.2 also includes X11R3, X11R4, and X11R5 compatibility options for maximum customer flexibility.
The Motif libraries supplied with AIX Version 4.3 contain both Motif 1.2 and Motif 2.1 shared objects. The default installation of Motif provides support for existing Motif 1.2 applications and for development of 64-bit and threaded applications using Motif 2.1.
1.1.8 OpenGL and graPHIGS Included at No ChargeAIX Version 4.3 includes the OpenGL and graPHIGS 3D graphics API components as part of the base AIX package. In previous versions of AIX, these components were offered as separately chargeable licensed program products. In addition, performance improvements were made to the OpenGL and graPHIGS components for AIX Version 4.3 resulting in better performance for certain application scenarios and improved memory utilization by the graphics libraries. Performance of graPHIGS surfaces, which includes CATIA shaded mode, has improved by up to 10 percent on the GXT800P adapter.
Another enhancement supplied in AIX Version 4.3 is that OpenGL may now be used with 64-bit applications that request an indirect context. You can perform early application development of 64-bit OpenGL clients and remote display of 64-bit OpenGL clients on 32-bit graphics workstations. This 64-bit support is provided for OpenGL libraries and development tools. In AIX
Reasons for Migration 3

Version 4.3, 64-bit OpenGL supports indirect rendering contexts only. Indirect rendering specifies that OpenGL rendering for the context is performed through the X server.
OpenGL also supports Virtual Frame Buffering (VFB). VFB allows you to use network based graphical applications, such as the CATweb product, on an RS/6000 server without the need for a 3D graphics adapter. For example, a node in an SP system can be used as a CATweb e-business server. Since every CATweb session starts its own CATIA environment, an SMP node can be utilized effectively. Users can take advantage of multiple processors for near linear scalability because each client can render into their own frame buffer without interaction with the X11 server.
1.1.9 Introduction of NFS Version 3The Network File System (NFS) has been updated to the latest protocol update, NFS Version 3. The AIX implementation continues to provide both NFS Version 2 client and server capability in addition to NFS Version 3 and is, therefore, backwards compatible with the existing installed base of NFS clients and servers.
NFS Version 3 allows the NFS client to request an asynchronous write and commit sequence for writing file data, which allows for faster file writes to the NFS server. In NFS Version 2, the NFS server had to write file data to disk before responding to the NFS client.
NFS Version 3 relaxes the transfer size for READ and WRITE requests. Like most in the industry, the AIX implementation offers a 32 KB READ and WRITE size for both the client and server. NFS Version 2 limited the size of READ and WRITE requests to 8 KB.
In NFS Version 2, reading a 128 KB file required the NFS client to send 16 individual remote procedure calls to the NFS server. With NFS Version 3, the same file can be read with four remote procedure calls.
NFS Version 3 was developed with the ability to access files greater than 2 GB in size. The AIX NFS client and server have been implemented to take advantage of this ability to provide access to files greater than 2 GB.
1.1.10 Support for NFS over TCPThe NFS client and server implementations have been improved to allow them to utilize the TCP network transport for communication. Before AIX Version 4.2.1, NFS was limited to the UDP transport for remote procedure calls. AIX 4.2.1 introduced support for NFS over TCP, but the default transport
4 AIX Migration in a CATIA Environment

remained UDP. In AIX Version 4.3, the default transport for NFS is now TCP. The transport protocol can be specified as an option to the mount command used when the NFS client mounts the remote file system.
1.1.11 Multithreaded NFS Server ImplementationThe NFS client and server daemons are implemented by using the multithreading capabilities of AIX. The NFS server daemon, nfsd, had previously been a multiprocess implementation. With the multithreaded NFS server, load balancing the server becomes much easier, as NFS server threads can be created and destroyed on demand as the incoming NFS client requests increase and decrease.
1.1.12 Improved NFS File LockingIn previous AIX releases, the NFS daemon that services network file locking requests was a separate, user-level process. In AIX Version 4.2 and 4.3, the NFS file locking requests are serviced in a similar fashion to normal NFS requests. The rpc.lockd daemon is now a multithreaded kernel-level implementation, which allows for better throughput and response times.
1.1.13 Cache File System IntroducedThe Cache File System (CacheFS) is a general purpose file system caching mechanism available in AIX Version 4.3 that can be used on NFS clients to improve NFS server performance and scalability by reducing server and network load. Designed as a layered file system, CacheFS provides the ability to cache one file system on another. In an environment where CATIA code and models are made available to clients over NFS, the use of CacheFS on the client system can improve performance for clients on slow links, or networks with low throughput. It can also reduce the load on servers and networks, hence, allowing an increase in the number of clients per server.
1.1.14 Enhanced Automatic Mounting of File Systems with AutoFSAIX Version 4.3 includes a port of the Sun ONC+ implementation of automatic mounting known as AutoFS. This function replaces the previous automount facility.
1.1.15 Alternate Disk Installation UtilityAlternate Disk Installation is a new utility that allows a customer to install a completely new release or maintenance level of AIX on an alternate (unused) disk without requiring the system to be taken down for an extended period of time. This is a significant usability enhancement for continuous (24 x 7)
Reasons for Migration 5

operations. The installation on the alternate disk is carried out while the system is still running and providing a normal service to users. Once the installation has completed, the service impact to the user of performing the update is reduced to the time taken to reboot the machine from the newly installed disk.
1.1.16 Increased Logical Volume Manager LimitsPhysical partition (PP) sizes of 512 MB and 1024 MB are now supported allowing for the flexible use of larger capacity disk drives. In addition, having more than 1016 physical partitions per physical volume is now supported. This provides support for most existing volume groups (VG) that violate the 1016 physical partitions per physical volume limit. It should be noted, however, that this support alters the volume group descriptor area, which means these volume groups can not be imported by previous versions of AIX. This feature is implemented as a trade off between the number of disks in a volume group and the number of PPs per disk. The limit of 32 disks per volume group, and 1016 PPs per disk result in a hard limit of 32512 PPs per volume group. As the maximum number of PPs per disk is increased in multiples of 1016, this reduces the maximum number of disks in the volume group. Table 1 shows the relationship between these two values.
Table 1. Relationship between PPs and The Number of Disks
It is important to keep in mind that all physical partitions in a volume group must be the same size regardless of the size of the individual disks.
AIX Version 4.3.2 has also added support for big volume groups. The previous limit of 32 disks per volume group was insufficient in many cases particularly when mirroring large amounts of data. New volume groups can be created with support for a larger number of disks and logical volumes per volume group. Existing volume groups can be converted to use the new
Number of PPs per disk Maximum number of disks per VG
1016 32
2032 16
3048 10
4064 8
8128 4
6 AIX Migration in a CATIA Environment

format. Table 2 compares the Logical Volume Manager (LVM) limits for AIX Version 4.3.2.
Table 2. LVM Limits for AIX Version 4.3.2
Once converted, volume groups can not be changed back to their original configuration. The volume group descriptor areas for big volume groups are larger than those used for default volume groups. Big volume groups can not be imported by systems running previous versions of AIX.
1.1.17 Improved JFS File-Locking MechanismThe JFS locking mechanism has been streamlined to allow read access up to four times faster in situations where two processes sequentially read different parts of the same file.
1.1.18 Additional Performance ToolsTo assist users in getting the best out of their system and to improve system serviceability, AIX Version 4.3 now provides tools formerly in the Performance Toolbox licensed program product at no additional charge.
These tools include: bf, fdpr, filemon, fileplace, lockstat, netpmon, rmss, stem, svmon, and tprof.
1.1.19 Web-Based System ManagerAIX Version 4.3.0 introduced an initial technology version of Web-based System Manager for AIX, a tool that allows administrators to manage AIX systems either locally or over a network from virtually any client platform. This initial technology version became a fully supported release with AIX Version 4.3.1. With Web-based System Manager, you can manage AIX systems remotely from anywhere on your network. It features an intuitive, object-oriented, easy-to-use GUI that simplifies unfamiliar or, otherwise, complex tasks.
1.1.20 HTML-Based Online DocumentationThe online documentation for AIX is now supplied in HTML format, so that it can be accessed through a web browser. This preserves all of the features of the previous infoexplorer viewer and retains a similar look and feel. New
Logical Volume Manager Parameter Default VG Big VG
Maximum No. of Disks per VG 32 128
Maximum No. of Logical Volumes per VG 255 512
Reasons for Migration 7
functionality includes the ability to view documentation residing on a remote server. For more information, see section 6.5, “The New Online Documentation” on page 107.
1.1.21 Java Development Kit UpgradedAIX Version 4.3.2 includes the Java Development Kit (JDK) Version 1.1.6 and IBMs Just-in-Time (JIT) Compiler Version 3.0. These new versions have improved Java performance by up to 40 percent.
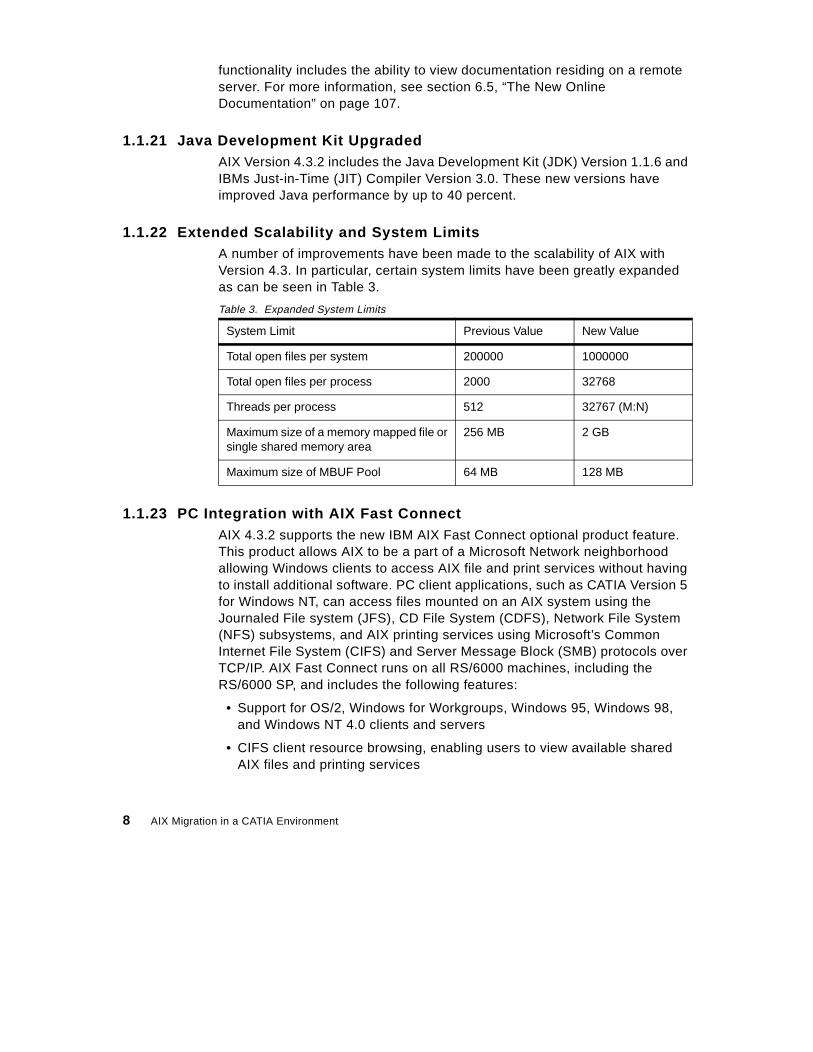
1.1.22 Extended Scalability and System LimitsA number of improvements have been made to the scalability of AIX with Version 4.3. In particular, certain system limits have been greatly expanded as can be seen in Table 3.
Table 3. Expanded System Limits
1.1.23 PC Integration with AIX Fast ConnectAIX 4.3.2 supports the new IBM AIX Fast Connect optional product feature. This product allows AIX to be a part of a Microsoft Network neighborhood allowing Windows clients to access AIX file and print services without having to install additional software. PC client applications, such as CATIA Version 5 for Windows NT, can access files mounted on an AIX system using the Journaled File system (JFS), CD File System (CDFS), Network File System (NFS) subsystems, and AIX printing services using Microsoft’s Common Internet File System (CIFS) and Server Message Block (SMB) protocols over TCP/IP. AIX Fast Connect runs on all RS/6000 machines, including the RS/6000 SP, and includes the following features:
• Support for OS/2, Windows for Workgroups, Windows 95, Windows 98, and Windows NT 4.0 clients and servers
• CIFS client resource browsing, enabling users to view available shared AIX files and printing services
System Limit Previous Value New Value
Total open files per system 200000 1000000
Total open files per process 2000 32768
Threads per process 512 32767 (M:N)
Maximum size of a memory mapped file orsingle shared memory area
256 MB 2 GB
Maximum size of MBUF Pool 64 MB 128 MB
8 AIX Migration in a CATIA Environment

• Support for CIFS long file names
• Microsoft WINS server support
• AIX authentication/authorization with encrypted passwords
• Use of the TCP/IP Domain Name System (DNS) to resolve NetBIOS machine names
• Support for SMB Opportunistic Locking to provide better performance in I/O operations
• Interaction with Windows NT Server Version 4.0 to provide PC user authentication and authorization to find/publish shared resources across TCP/IP subnets using NT Server’s Domain Master Browser and to resolve NetBIOS machine names using NT Server’s Windows Name Server (WINS)
• Unicode user, file, and printer name support
Administration of the SMB server and the configuration of accessible network shares, are managed by AIX system management interfaces, such as SMIT, Web-based System Manager, or simply with the command line.
AIX Fast Connect uses the TCP/IP send_file API with an in-kernel Network File Cache to improve network TCP/IP performance among other AIX capabilities. Currently, the presence of at least one Windows NT server is assumed when an NT Primary or Backup Domain Controller is needed, or when Network Neighborhood icons must span multiple subnets. For more information, see the Web site:
http://www.rs6000.ibm.com/software/Apps/fastconn
1.1.24 Improved Paging Space UtilizationPrior to AIX 4.3.2, a paging space block was allocated for the executing process at the time a physical memory block was requested or accessed. This required paging space blocks to be allocated for all pages in real memory for use when the page was required to be paged out. On large memory machines where paging was never or rarely required, these paging space blocks were allocated but never used. In addition, each process used CPU time to find and allocate the paging space block. If the physical memory block was never paged out, the CPU cycles used initially to find and reserve the paging space block were effectively wasted.
In AIX 4.3.2, the policy for paging space allocation has been modified to allow a deferred paging space allocation. The allocation of paging space is delayed until the page in physical memory actually needs to be paged out, which
Reasons for Migration 9

results in no wasted paging space blocks, and stops wasting CPU cycles on pages that are never paged out. This new algorithm greatly improves the efficiency of paging space use and can reduce the paging space requirements for machines with large amounts of physical memory.
1.1.25 AIX 4.3.2 Is Year 2000 ReadyAIX is Year 2000 ready. When used in accordance with its associated documentation, it is capable of correctly processing, providing, and/or receiving date data within and between the twentieth and twenty-first centuries provided all other products (for example, software, hardware, and firmware) used with the product properly exchange accurate date data with it.
IBM continues to work with its products to prepare for the year 2000, and as it does so, updates may be made available as needed for AIX 4.3 or other AIX products. For more information, consult AIX, UNIX Operating Systems and the Year 2000 Issue available at:
http://www.software.ibm.com/year2000/papers/aixy2k.html
This document, which is updated regularly, describes the Year 2000 issue as it affects UNIX-based operating systems, such as AIX, and gives complete listings of Year 2000 fixes available for all supported AIX versions and releases.
1.2 Why Migrate to CATIA V4.2.0 R1?
CATIA Version 4.2.0 R1 is the latest release of Version 4 of the CATIA-CADAM Solutions product family that has been tested and verified in the AIX environment by CASIL. It contains many new components along with enhancements to existing components. It is also the minimum level of CATIA required for use with CATweb Version 2.2.
1.2.1 New ComponentsCATIA V4.2.0 R1 introduces three new products:
• CATIA Assembly and Substructure Analysis product (ASA) • CATIA Generative Composites Manufacturing product (GCM) • CATIA Lathe Machining Programmer product (LMP)
CATIA V4.2.0 R1 introduces one new configuration and one new add-on configuration:
• Multi-Axis Manufacturer (MXM) • Generative Part Analysis (GPA)
10 AIX Migration in a CATIA Environment
1.2.2 Enhancements to Existing ComponentsCATIA V4.2.0 R1 provides the following enhancements to existing components.
• Adds functions of the CATIA Dynamic Sketcher product to two existing configurations
• Increases the productivity of drawing creation through 2D view sketching, NT-like wizards for automatic drawing layout, and faster annotations
• Enhances the product set for accelerated, expanded, and easier to use manufacturing solutions
• Addresses specialized featured assembly and car body meshing needs
• Facilitates further implementation of Digital Mock Up-centric processes involving enhanced assembly tolerancing, wire harnessing, and mock-up inspection
• Extends digital product definition opportunities to manufacturing plants and ships
• Strengthens the shipbuilding solutions by enhancing the ship structure design, work preparation, and integration facilities
• Continues productivity improvements of body engineering capabilities
• Offers new features, such as manufacturing tabs and electrical cutouts, for Generative Aerospace Sheetmetal design
• Integrates composite laser projection process support and preparation for nesting
1.2.3 Basis for Future EnhancementsCATIA V4.2.0 R1 helps you prepare for migration to CATIA Version 5. When installed with the CASIL 9903 CATIA fixes, it includes interoperability enhancements that allow cooperation between CATIA V5 and CATIA V4 in a shared environment. For information on the installation and customization of CATIA Version 5, see section 6.9, “CATIA Version 5” on page 134.
1.2.4 CATIA V4.2.0 R1 Is Year 2000 ReadyThe approach of the year 2000 has caused a major problem in the computer industry with many customers and vendors trying to determine the ability of their systems and products to function correctly in the year 2000. This sections details the Year 2000 issue as it affects CATIA and provides the plans for ongoing support.
Reasons for Migration 11

1.2.4.1 The Year 2000 Issue and CATIAThe Year 2000 challenge arises from the long-standing programming practice of using two digits to represent the year, for example representing 1997 as 97. In this way, the Year 2000 would appear as 00 resulting in an ambiguity that some computer systems may not be equipped to handle. Likewise, 2036 would be represented as 36. The formulas used to calculate dates may implicitly assume that the dates will be in the 1900s, for example 2036 represented as 36 could be assumed to be 1936. Consequently, systems that use dates either for internal or external operations may yield incorrect results when dealing with dates on and after January 1, 2000.
In the case of CATIA Version 4, models are stored with date stamps that use only two digits for year identification. Corrective service has been provided for CATIA Versions 4 releases 1.6, 1.7 and 1.8 to make them Year 2000 ready. Beginning with CATIA Version 4, Release 1.8 Refresh 1 for Workstations and CATIA Version 4, Release 1.7 Refresh 3 for Host Systems, no PTFs are required. Using the correct maintenance level, it will be possible, in the Year 2000, to read models that have been created since CATIA Version 2, Release 2 PTF4. Consequently, there is no need for customers to move (read and then write) all the data created before Version 4, Release 1.6 to a more recent CATIA level.
1.2.4.2 Beyond Year 2000 ReadinessTo support CATIA in the year 2000, Dassault Systemes has made a full inventory of the tools used to build and support CATIA products. These tools must be Year 2000 Ready and must also be supported in the year 2000. This support is required to enable Dassault Systems to build, test, and deliver corrections as requested by customers.
Dassault Systemes has defined a minimum environment for each of the supported platforms on which Year 2000 Ready CATIA applications can be run and which the manufacturer’s advise will be fully supported for Year 2000 Ready CATIA applications. Customers should contact the vendors of these platforms directly to obtain their current position regarding the Year 2000 readiness of the platforms and support.
IBM and Dassault Systemes have determined that all CATIA Version 4 products released in the fourth quarter of 1998 must have these operating environment prerequisites to be supported after year-end 1999.
12 AIX Migration in a CATIA Environment

1.2.4.3 Information About CATIA and the Year 2000To ensure you have current and accurate information about your products, you should periodically refer to the dedicated CATIA Web sites at:
http://www.catia.ibm.com/other/y2kmain.html
http://www.catia.ibm.com/other/y2kfixes.html
Bear in mind that you are solely responsible for the installation and implementation of any Product Temporary Fix, Customer Service Diskette(s) or other related Year 2000 modification required for an IBM product to be considered Year 2000 Ready. IBM shall not in any way be responsible for your failure to apply such correction.
1.2.5 New Enhancements in CATweb V2.2The CATIA Network Computing Solutions products, otherwise known as CATweb products, provide intuitive web-based viewing and reviewing for CAD/CAM models, drawings, product structures, and alphanumeric Virtual Product Model information. These products provide access to a broad user community base running on typical client platforms, such as PCs or thin UNIX workstations.
CATIA Network Computing Solutions Version 2 Release 2.0 products offer:
• Viewing of native CATIA solids, volumes, surfaces, wireframes, drawings, comments, and multiple standard 2D CAD formats, such as CGM, CCD-Drawings, DXF, DWG, and HPGL.
• The ability to query, explode, and retrieve bills-of-materials and configurations from Virtual Product Models and CATIA Data Manager data.
• Ease-of-use with improved status displays and controls.
• Design reviews with redline/markup, annotation, sectioning, measurement, mass properties, and clash analysis.
• The publishing of HTML pages containing snapshot images, 2D and 3D applets, redline/markups, and comments using HTML templates.
CATIA V4 Release 2.0 Refresh 1 for Workstations and CATIA Version 4 Release 1.7 Refresh 5 for OS/390 are the first CATIA Version 4 levels that will be supported beyond January 1, 2000.
Note:
Reasons for Migration 13

• Thin client strategies that require no browser plug-ins with server support for all major UNIX-based workstations.
• Local 2D and 3D viewing with e-mail, ENOVIA-VPM, and CATIA Data Management files.
• Compliance with Internet security protocols and Year 2000 readiness.
14 AIX Migration in a CATIA Environment

Chapter 2. Definition of CATIA Migration Terminology
This chapter introduces the CATIA related terminology used in the rest of the book by describing the version naming conventions and software maintenance strategies of both AIX and CATIA. It also describes the main function of the CATIA AIX/NT System Integration Lab.
2.1 AIX Maintenance Model
The packaging of the AIX operating system, and most of the Licensed Program Products (LPPs) available for AIX, is divided into three categories: Products, packages, and filesets. A product may be composed of several packages, which in turn, are composed of different filesets. Depending on the product, you may have to install all of the product filesets for the installation to be valid. Some products allow the installation of a subset of the filesets to provide reduced functionality. The installation packaging of a software product is divided in this way because many software products are large and have many pieces that can be used independently of each other. Dividing a product into separately installable filesets allows you to install only those filesets you need. You may prefer to install all the filesets included in a package or the entire product, or you may want to install only selected filesets especially if you have limited hard disk space on your system.
As an example, consider the AIX operating system product. It is delivered as a number of packages, such as bos.rte and bos.net. Each package consists of a number of filesets, for example, the bos.net package consists of multiple filesets, such as bos.net.nfs.client, bos.net.nfs.server, and so on.
Each fileset has a name and a level number. The level of a fileset in AIX Version 4 is defined as vv.rr.mmmm.ffff, where:
• vv is a numeric field of 1 to 2 digits that identifies the version number.
• rr is a numeric field of 1 to 2 digits that identifies the release number.
• mmmm is a numeric field of 1 to 4 digits that identifies the modification level.
• ffff is a numeric field of 1 to 4 digits that identifies the fix level.
For example, 04.03.0000.0000 is a software product level number, and 04.03.0001.0032 is a software product update level. It is not necessary to include the leading zeroes in the version, release, modification level, and fix level fields of the fileset level number. Level 04.03.0000.0000 can also be written as 4.3.0.0.
© Copyright IBM Corp. 1999 15

When a fix for a fileset is being installed on a system, the fileset level number is checked to determine if the level being installed is later than that on the system. These fields increase for each subsequent release of a product. The higher precedence of the four fields goes from left to right (that is, level 4.2.0.0 is a later level than 4.1.3.4).
When a specific version of AIX is released, for example AIX Version 4.3.2.0, almost all of the filesets that compose that release will have the same software level number. In this example, it is 4.3.2.0. Exceptions to this are products that are not tied to a specific level of AIX, for example, the C++ compiler runtime, xlC.rte, and components that have not changed since the previous release. Filesets which may not have changed are typically message filesets, such as bos.msg.en_US.txt.tfs, compatibility filesets, such as bos.compat.links, and device drivers, such as devices.mca.8fbc.ucode.
A software package distributed to fix a problem in a product is called an update. Updates are installed with either the Web-based System Manager application or with SMIT. Updates can also be installed from the command line with the installp command.
For example, consider the fileset bos.net.tcp.client.4.3.2.0. The package bos.net.tcp.client.4.3.2.1 is an update to that fileset. If another fileset update, bos.net.tcp.client.4.3.2.2, is generated, this update will also contain all the fixes that were in the bos.net.tcp.client.4.3.2.1 update. If a cumulative AIX update, otherwise known as a maintenance level, is generated, the modification level of the fileset will increment resulting in bos.net.tcp.client.4.3.3.0, which would contain all previous fixes.
A fix for a problem is referenced by an authorized program analysis report (APAR) number. Each APAR can contain updates to a number of filesets, which when applied together, fix the problem.
A CASIL level for AIX is a single packaging APAR number, which includes a set of fileset updates that have been tested together in the CASIL lab. It is not generally advisable to install further individual fixes on a machine that has a CASIL level installed other than fixes for critical problems or security issues. This is because the fixes that are newer than the CASIL level are unlikely to have been tested in a CATIA environment and may unintentionally introduce new problems.
2.2 CATIA Maintenance Model
CATIA software is packaged in one of three different ways depending on the type of the software. The three types are the General Availability (GA) level, a
16 AIX Migration in a CATIA Environment

Program Temporary Fix (fix), and a Refresh. The GA and the Refresh deliveries are normally stacked on one media type, either tape or CD. The program temporary fix can be stacked along with GA and refresh packages and is also available separately. The delivery may be the result of a customer order to purchase a newly marketed product or a request for a specific enhancement or correction to existing software.
The General Availability release of a product or configuration of products corresponds to a marketed version of a licensed program. A global CATIA solution (GA level) does not require any other CATIA software as a prerequisite. This solution corresponds to delivery V4Rx.y where x is the Release and y is the modification level. This type of software is the equivalent of a new release level of AIX, for example, AIX 4.3.0.0.
A product refresh is for preventive service and is available approximately every three months for the current modification level. As with the GA release, a refresh delivery does not require any other CATIA software as a prerequisite. The naming convention is V4Rx.y-z where z is the refresh level, for example, V4R1.9-2. The product refresh is the equivalent of the AIX maintenance level release, for example, AIX 4.3.2.0.
A program temporary fix (PTF) is created to fix a problem in a currently supported product. Fixes are formatted in such a way as to allow stacking of multiple fix orders on the same delivery media along with their prerequisites and co-requisites. A UB code is associated with each fix. The code consists of seven characters in the form of UBXXXXX where XXXXX is a current number. Note that the letters UB do not stand for anything in particular but simply serve to identify CATIA. The CATIA PTF concept is identical to the AIX PTF concept. The CASIL 9903 CATIA level consists of PTFs on top of the base CATIA V4.2.0 R1 release.
2.3 What Is CASIL?
The CATIA AIX/NT System Integration Lab (CASIL) was formed in June 1994 to integrate, test, document, and promote validated levels of RS/6000 hardware, AIX, and CATIA.
CASIL provides customers with a reliable and stable migration path to a new level of AIX and CATIA.
The IBM organizations contributing to the CASIL team are RS/6000 Development, Manufacturing Industries, and World Wide Marketing and Support. The team includes resource from Dassault Systemes.
Definition of CATIA Migration Terminology 17

CASIL is located in Austin, Texas, which is also the location of AIX and RS/6000 development, and works with groups around the world.
2.3.1 The CASIL Testing ProcessA CASIL test cycle begins when significant benefits to the CATIA user will soon be available, such as a new release of AIX or CATIA or new RS/6000 hardware and graphics adapters.
Working closely with Dassault Systemes, the test environment definition is established with CASIL determining the AIX content, while Dassault Systemes determines the CATIA content. CASIL systems are configured to represent a typical CATIA user environment with servers, networking, and workstations.
The entire test cycle includes several types of testing.
Pre-GA testing CASIL starts testing before GA of new software or hardware. The members of the team work closely with development to provide early feedback on any integration problems.
CASIL Expert Testing The CASIL CATIA experts perform initial evaluation of the software to determine if it is ready for further customer testing.
Guest Expert Testing Customers who come to the CASIL facility are typical CATIA system administrators or expert CATIA users who represent typical users within their field. Testers bring their own models and continue to do their normal job using the CASIL test environment. Customers may also be RS/6000 oriented and focus on testing the latest IBM workstations.
CASIL Residency Testing CATIA field support personnel and/or IBM Business Partners, who are at CASIL for an extended period, assist in the test cycle while gaining knowledge and exposure to new AIX levels and latest IBM workstations. CASIL residents also may write white papers on technology of interest to the CATIA community.
Beta Site Testing Beta site testing takes place using the same software levels as the CASIL test environment. Testing is done in single and multibyte
18 AIX Migration in a CATIA Environment
languages by beta sites in the USA, Europe, and in the Asia-Pacific region.
Dassault Systemes Testing Dassault Systemes performs CATIA functional and system testing on the latest software levels.
Most testing is performed at the CASIL test facility, which contains the latest RS/6000 hardware and graphics adapters to which a CATIA customer would migrate. The facility does not contain all possible RS/6000 hardware combinations, although it does contain a representative sample of each recent CPU and graphics adapter family. CASIL relies on beta sites to compliment the lab facilities and expand the number of machine and graphics adapter combinations covered by the testing.
The major focus for each tester is to determine if the system is ready for use in a production environment. With this in mind, daily feedback is given to the CASIL team, RS/6000 development, and Dassault Systemes. Experts from each area, along with the tester, discuss any problems and determine its solution.
At the conclusion of the test cycle, CASIL publishes a report that reflects the testing done at all test sites and the customer-readiness of the CASIL level. Customers can then use the CASIL reports to assist in establishing a stable environment.
Outside of the test cycle, customers also come to the CASIL facility for customized testing, such as benchmarking RS/6000 hardware or testing the integration of custom applications with a CASIL level.
2.3.2 More CASIL InformationMore information on CASIL can be obtained from:
• IBM Dassault Systemes International Competency Center (IDSICC) home page on the World Wide Web at:
http://www.developer.ibm.com/welcome/icc/dassault.html
• CASIL home page on the World Wide Web at:
http://service.software.ibm.com/catia.us/go?/rpts/casil/casil.html
• CATIA user conferences
• Any IBM marketing representative
For additional details on CASIL, and to learn more about how you can contribute to the success of CASIL, please contact:
Definition of CATIA Migration Terminology 19

E-Mail Address: [email protected]
2.4 CASIL Level
At the end of a CASIL test cycle, a new CASIL level is defined. The name of the CASIL level is based on the year and month when the test cycle was started. For example, the CASIL 9903 level was created in March 1999. The AIX component of the CASIL level is a single packaging APAR that contains all of the fixes required to bring a machine up to an identical fix level to that used in the lab for the CASIL test cycle. The CATIA component of the CASIL level is specified in terms of the GA release, refresh level, and CATIA PTFs required to match the level used in the test cycle. At the end of a test cycle, reports and further information about the tests are published on the CASIL webpage. Another component produced with the CASIL level is the associated bundle file. This file is simply a list of the filesets that should be installed to replicate the software environment of the systems validated during the CASIL testing.
2.4.1 Operating EnvironmentThe CASIL level definition is also used as a basis for the product IBM RS/6000 Operating Environment for CATIA, program number 5765-D80. The product media contains all of the required AIX fixes that make up the AIX component of the CASIL level along with automated install scripts and sample code. The product also contains try-and-buy and trial install images and fixes for other IBM optional products, such as compilers and database products. In order to install CATIA, you still need the base AIX and CATIA installation media along with the corresponding licenses.
Previous CASIL levels have been based on GA or Refresh levels of CATIA. This meant that no CATIA PTFs were required to install a system with the CASIL level, only the appropriate CATIA GA or Refresh install images. In order to include functions for interoperability with CATIA V5, the CATIA component of the 9903 CASIL level includes some CATIA PTFs in addition to the base CATIA V4.2.0 R1 release. These CATIA PTFs are not included on the Operating Environment product media and should be ordered through your normal CATIA support process. The AIX and CATIA PTFs required to install a machine with the CASIL 9903 level are listed in Appendix E, “PTF Information” on page 171.
The latest version of the Operating Environment product is version 2.2.1, which includes products, such as:
• RS/6000 CATIA Welcome Center
20 AIX Migration in a CATIA Environment

• RS/6000 CATIA/CATweb Installation Utility
• CASIL 9903 AIX PTFs (for AIX 4.3.2 and other products)
• XL FORTRAN Runtime Environment for AIX (5765-C11) Version 5.1.1
• Lotus Domino Go Webserver, International Version 4.6.2
• Device Drivers (including Spaceball Version 7.4.7, Spaceball Version 9, and Spacemouse Version 4.0.5)
• Netscape Navigator V4.0.8, International 40-bit encryption version
• Adobe Acrobat Reader V3.0
• Ultimedia Services V 2.2.1
• Several IBM Try-and-Buy products
• IBM C and C++ Compiler for AIX, Version 3.6.4
• IBM DB2 Universal Database Server Enterprise Edition for AIX, Version 5.2.0.7 with IBM DB2 Data Links Manager Optional Feature 3887.
• IBM IGES Processor for AIX, Version 2.3
• IBM SecureWay Network Dispatcher V2.1
• IBM Trial Product
• XL FORTRAN for AIX, Version 5.1.1.
This solution provides a fast and easy method to set up a CATIA environment by supplying all the additional software required to run CATIA on one product media. Installation scripts help to automate the installation of all the products. It is intended mainly for customers installing a new CATIA operating environment on AIX 4.3.2, although it can also be useful when performing a migration, as it provides the AIX component of the CASIL level on CD.
2.4.2 FORTRAN License RequirementsIt is not necessary for you to order a license for the FORTRAN runtime, as the FORTRAN runtime may be used without support from IBM on any CATIA workstation. This is because CATIA is written using the IBM FORTRAN compiler, and the re-use of the FORTRAN runtime on CATIA workstations is equivalent to the use of the FORTRAN runtime as redistributed legally by the application vendor. You should refer to the FORTRAN announcement letter for full details. However, if you want IBM support for the FORTRAN runtime, then you must purchase licenses for the FORTRAN runtime product from IBM. The FORTRAN runtime may be purchased separately from the
Definition of CATIA Migration Terminology 21

FORTRAN compiler; FORTRAN compiler licenses include FORTRAN runtime licenses.
2.5 Migration Scenario
The migration scenarios described in this redbook are based on migrating from CATIA systems installed with the CSL9803 level, which consists of:
• AIX 4.1.5 with CSL9803 PTF
• CATIA 4.1.9 Refresh 1
• CASIL 9803 DB2 Level (UDB 5.0 with Fixpack U453187)
The target CASIL level after the migration is the 9903 CASIL level (March 1999), which is defined as shown in Figure 1.
Figure 1. Definition of the CASIL 9903 Level
The instructions given in this book are equally applicable to migrations starting at the CASIL 9706 level since it is also based on AIX Version 4.1.5. Extra information about compilers when migrating from the 9706 level is included in section 3.4, “Other Software Dependencies” on page 28.
AIX 4.3.2+
CSL9903 PTF (IX89143)
CATIA V4.2.0 R1 (UB92010)+
CAT9903 PTF
DB2 UDB Enterprise Edition
Version 5.2+ Fixpack 7 (UB61709)
CASIL 9903 LEVEL
22 AIX Migration in a CATIA Environment

Chapter 3. Planning for Migration
Migrating a working CATIA environment from any version of an operating system to another, accompanied with a migration to a higher level of CATIA, is a complex procedure that should not be underestimated. In most cases, the systems being migrated are vital to the running of the company, and any downtime must be minimized. It is, therefore, important to carefully plan the migration to ensure that all possible risks are discovered, all dependencies are investigated, and all additional hardware and software orders have been made. Always try to think of areas where your environment is unique and may be different from those used as examples in this book. In particular, pay attention to any third-party additions or extensions beyond the standard set of products. The success of the migration will depend on your ability to identify and assess possible problems over and above those addressed in this redbook.
The migration planning process should not be viewed as an overhead or cost. Under no circumstances should you consider migrating your system without first developing and reviewing a formal plan. In addition to greatly assisting your migration, the planning process results in up-to-date documentation and an improved understanding of your system. This can be used as a starting point for establishing procedures, such as change control, problem management and resolution, disaster recovery, and capacity planning.
In order to perform a successful migration, you should complete the following planning tasks:
• Document your existing environment (both hardware and software)
• Review the hardware, software, and licensing issues
• Determine if migration is achievable
3.1 Minimum System Requirements for AIX 4.3.2
Before considering a migration, you should be aware of the following minimum requirements for AIX Version 4.3, which are greater than previous versions.
• AIX Version 4.3 requires a minimum of 32 MB of physical memory.
• AIX Version 4.3 requires the initial paging space (/dev/hd6) to be a minimum of 64 MB in size.
• AIX Version 4.3 requires additional disk space for the same set of installed filesets due to the increased library sizes and additional function. Refer to
© Copyright IBM Corp. 1999 23

Table 4 for approximate disk space requirements for the AIX component of typical CATIA client systems.
Table 4. Disk Requirements for AIX 4.1.5 and AIX 4.3.2
These measurements are given as a guide only and are based on an initial configuration using the CASIL 9803 level, which was then migrated to the CASIL 9903 level. The system did not have CATIA code or models installed locally. You can see from the table that the CASIL 9903 level requires approximately 220 MB more for the /usr file system.
3.2 Hardware Unsupported by AIX 4.3
The following graphics adapters, which may be found in a CATIA environment, are no longer supported by AIX Version 4.3:
• POWER GTO Accelerator Adapter
• 2780 High-Performance 8-bit 3D Color Graphics Processor
• 2781 High-Performance 24-bit 3D Color Graphics Processor
• 2782 24-bit Z-Buffer Solid Rendering Option
• 2783 24-bit Color Graphics Frame Buffer Upgrade
• 7235 GTO accelerator, feature 4350
If you have any machines that use these adapters, they will not be able to function as graphical systems. It should be possible to configure the machine with an ASCII console and perhaps use it as a server rather than a graphical workstation. Depending on the machine, you may be able to purchase a newer graphics card, which is supported. Contact your IBM marketing representative for more information.
AIX 4.1.5 with CASIL9803 Level Allocated (Used)
AIX 4.3.2 with CASIL9903 LevelAllocated (Used)
/ 8 MB (4.5 MB) 8 MB (5.3 MB)
/usr 422 MB (419 MB) 650 MB (618 MB)
/var 4 MB (0.7 MB) 4 MB (0.7 MB)
/tmp 20 MB (0.5 MB) 20 MB (0.3 MB)
24 AIX Migration in a CATIA Environment

3.3 Requirements for CATIA V4.2.0 R1
This section details the hardware and software requirements for running CATIA V4.2.0 R1.
3.3.1 Hardware Requirements for CATIA V4.2.0 R1The hardware requirements for CATIA V4.2.0 R1 are shown in Table 5.
Table 5. Hardware Requirements for CATIA V4.2.0 R1
Hardware Description
RS/6000Workstation
Any model that supports any of the following AIX levels: • AIX 4.3.0 with CSL9801 PTF (CASIL 9801 level) • AIX 4.3.1 with CSL9808 PTF (CASIL 9808 level) • AIX 4.3.2 with CSL9903 PTF (CASIL 9903 level)
Real Memory A minimum of 64 MB is required although 128 MB or higher is recommended. For 3D applications, 256 MB or more is realistic in a production environment.
Hard Disk CATIA Solutions Version 4 licensed programs and configurations, user data, and user programs may be stored on any internal or external disks supported by the RS/6000.Disk Space requirements for CATIA Solutions Version 4 are approximately as follows: • All installed CATIA Solutions Version 4 products: 700MB.
Please refer to the Program Directory to estimate disk space requirements for specific products and configurations.
• User environment: 40 MB. • Administration environment: up to 100 MB (without
demonstration files). • Minimum Paging Space: 128 MB (size of paging space
must be at least twice the size of memory).
GraphicsAdapters
At least one of the following supported graphics adapters:GXT250P, GXT255P GXT500(D) GXT500P,GXT550PGXT800P, GXT800MGXT1000 (-1,-2)GXT3000PGXT2000PGt4xi (8 or 24 bit)
Planning for Migration 25

3.3.2 Software Requirements for CATIA V4.2.0 R1The software requirements for CATIA V4.2.0 R1 are shown in Table 6
Table 6. Software Requirements for CATIA V4.2.0 R1
InputPeripherals
Three-button mouse, or IBM 5083, or 6093 Tablet and cursor.An alphanumeric keyboard from the range supported by graPHIGS; specific keyboard may be required for National Language Support, for example: The Japanese keyboard is required for Kanji support.
OutputPeripherals
One display compatible with the graphics devices listed above (for example: P202 Power Display).
OptionalPeripherals
Dials, Spaceball, or Spacemouse for graphical manipulations, such as object rotate, pan, and zoom.LPFK-Lighted Programmable Function Keyboard for selecting CATIA functions.Note: These functions are available with mouse or tablet/puck and keyboard combinations.
Software Description
AIX One of:AIX 4.3.0 with CSL9801 PTF (CASIL 9801 level)AIX 4.3.1 with CSL9808 PTF (CASIL 9808 level)AIX 4.3.2 with CSL9903 PTF (CASIL 9903 level)Note: Levels of AIX 4.1 and 4.2 are not supported with CATIAV4.2.0 R1.
Runtime AIX XL FORTRAN Runtime Environment, Version 5.1 (5765-C11)
IBM C and C++ Compiler for AIX Application Runtime at minimumlevel 3.6.2 for AIX 4.3.0, and 3.6.4 for AIX 4.3.1 and 4.3.2
User interface PHIGS included with AIX 4.3OpenGL included with AIX 4.3
Hardware Description
CATIA V4.2.0 R1 no longer supports any POWER Gt4 family graphics adapters other than the POWER Gt4xi. CATIA V4.2.0 will be the last level of CATIA to support the POWER Gt4xi graphics adapter.
Note
26 AIX Migration in a CATIA Environment

3.3.3 Prerequisites for CATweb ServerThe requirements for CATweb Version 2.2 are shown in Table 7.
Table 7. Prerequisites for CATweb
Compilers(Required wheninstalling VPM)
IBM XL FORTRAN Compiler for AIX, Version 5.1 (5765-C10)
IBM C and C++ Compilers for AIX Version 3.6.2 on AIX 4.3.0, Version 3.6.4 on AIX 4.3.1 or 4.3.2
Note: IBM C and C++ Compilers for AIX was withdrawn on December 1st, 1998; however, the product CD is included with the IBM VisualAge C++ Professional for AIX product (5765-D52).Upgrade pricing to VisualAge C++ is available for existing CSet++ 3.1 and IBM C and C++ Compilers for AIX customers.
Software Description
CATIA The following components of CATIA V4.2.0 R1 are required on a system installed with the CASIL 9903 level: CATIA.Object Manager (COMS410): required CATweb Navigator (WEBS410): required CATweb Publisher (WPBS410): optional CATweb Space (WSPS410): optional Space Analysis (SPAS410): optional AEC Infrastructure (ABAS410): optional CATIA.Data Management - Access Product (CDAS410): optional CATIA.Data Management-Runtime Product (CDRS410): optional
IMPORTANT: In the case of using a DBCS environment, the CATIA.double_bytes Fonts Product (FONS410) also has to be installed and referenced in the CATweb licensing.
CATIA PTFs Product Explorer HC406862D local and 2D remote viewers HC41722 HC41913Reporter HC40913VPM 1.1 Product Explorer HC42500(These are included in the 9903 CASIL level)
HTTP Server One of:Lotus Domino Go 4.6.2Apache 1.2.5 Netscape Enterprise Server 2.0
Software Description
Planning for Migration 27

3.4 Other Software Dependencies
There may be a requirement for you to migrate or upgrade other software components of your system, such as compilers and backup software, to the minimum level that is supported on AIX 4.3.2. You can determine the minimum required level of IBM supplied LPPs by visiting the IBM AIX Application Availability Guide Web page:
http://www.ibm.com/servers/aix/products/ibmsw/list/
The C, C++, and FORTRAN compiler and runtime components of the CASIL 9706 level, CSet++ V3.1.4, XL FORTRAN V3.2 and XL FORTRAN V4.1, are not supported on AIX 4.3 and above. Newer compiler and runtime levels were included in the CASIL 9803 level in preparation for the migration to AIX 4.3.
The AIX 4.3.2 product media includes updates to the minimum required levels for the DCE client filesets.
If you use ADSM software to perform backups of your machines, it needs to be updated to ADSM Version 3.1, the minimum level required for AIX 4.3. ADSM V3.1 clients can interact with ADSM Version 2 servers. If your ADSM server is an AIX machine, and you intend to upgrade the server to AIX 4.3.2, you will also need to upgrade the ADSM server software. If you do not intend upgrading the ADSM server to AIX 4.3, or it is a non-AIX machine, then there may be no need to upgrade the ADSM server software. For more information on ADSM software levels, see the ADSM web page at:
http://www.storage.ibm.com/software/adsm/adsmhome.htm
HTML Browsers One of:Netscape Communicator 4.5 (Supplied on AIX 4.3.2 Bonus Pack)For other platforms download from:http://www.netscape.com/computing/download/index.html
Internet Explorer 4.0 or higher (only for client)
Client Platforms Windows 95/98Windows NTAIXIRIXSolarisHP-UX
Software Description
28 AIX Migration in a CATIA Environment

Once you have identified the minimum levels of the required software, you should order them with plenty of time to spare before the planned start date of the migration. It would be inconvenient to start a migration only to discover that a vital software upgrade had not been ordered and then have to cancel the migration.
Some RS/6000 machines contain microcode or firmware, which configures the hardware correctly at system boot time in preparation for running AIX. The method of determining the currently installed version of firmware varies from machine to machine. Before performing a migration, it is worthwhile to ensure that your machines are running the latest available level of firmware. You can download firmware images for RS/6000 machines from the RS/6000 Microcode Updates Website:
http://www.rs6000.ibm.com/support/micro/
3.5 Documenting the Existing Environment
There are normally two classes of machines in large CATIA environments, namely end user workstations and servers. Depending on the history of your environment, and how it has evolved over time, the end user workstations may consist mainly of identical clients each with the same hardware and software configuration. In specialized environments, the end user workstations may consist mainly of different machine types each with a unique hardware and software configuration. The number of servers in the environment may range from a single large machine to many tens of servers.
The amount of work involved in documenting your environment depends on the nature of your end user workstations and the number of server machines. If you have many identical machines, you may only need to examine one of each type in detail to determine if migration of all machines is possible. If you have many customized machines, you may need to examine each one on an individual basis to determine if it can be migrated.
There are several ways to document your existing environment. One way is to use multiple AIX commands to display the information and then print or write down the data displayed. For each part of the system, you will need to use the appropriate command to extract the information. An alternative is to use the snap command.
3.5.1 Using Standard AIX CommandsAIX provides a large collection of standard commands that provide you with information about the system configuration. For example, many commands
Planning for Migration 29

beginning with the letters ls (for list) can be used to display configuration information. Normally, you must add options and parameters to the command to specify more accurately what information you would like to be displayed.
The following are helpful configuration-list commands for documenting your hardware:
lsvg The lsvg command displays information about a volume group.
lsvg shows a list of all volume groupslsvg -p rootvg shows information on physical hdisks in a vglsvg -l rootvg shows information on filesystems in the vg
lspv The lspv command displays information about physical volumes.
lspv shows a list of available hdiskslspv -l hdisk0 shows information on filesystems in a hdisk
lsattr The lsattr command lists the attributes of a particular device.
lsattr -EHl mem0 shows the available main memory on PCI machineslsattr -EHl tok0 shows all information about the Token Ring card
lsdev The lsdev command lists the availability of a device class.
lsdev -Chc adapter shows all adapters which are availablelsdev -Chc disk shows all disks which are availablelsdev -Chs scsi shows all scsi devices which are available
lscfg The lscfg command lists the whole system configuration.
lscfg -v shows a detailed list of the system configuration, which includes revision levels and part numbers (if available).
The following are helpful configuration-list commands for documenting your hardware:
oslevel The oslevel command displays the level of the operating system.
oslevel shows the operating system leveloslevel -l 4.3.1.0 list filesets levels earlier than maintenance level
lslpp The lslpp command lists the information on installed software products stored in the software Vital Product Data ODM.
lslpp -L lists all installed Products and the latest level
lslpp -icq|tr ’ ’ ’:’|awk -F: ’{print substr($5,1,8),$3,$2}’ |sort +2list of filesets at maintainance level and Program ID
The output of the commands is displayed on standard output and may be further processed or redirected for saving and printing. If you will be using standard configuration commands to document your system and sufficient time is available, you may wish to combine the commands into a snap-like script that can be reused to document the systems in an individual way.
30 AIX Migration in a CATIA Environment

3.5.2 Using the snap CommandThe snap command is a utility that was originally provided by IBM to assist users and support staff when trying to troubleshoot problems. It collects almost all system information and places it in the /tmp/ibmsupt (or user-specified) directory where it can be examined or copied to removable media for shipping to technical support. In this way, you can use a single command to capture almost all the system-related information that will be required. The only problem with using snap is that, although it collects all the information you require, much of the information is collected through commands and options that some users may not be intimately familiar with. Consequently, the format and content of the information in the output files may not be immediately obvious to you. For this reason, we recommend that you run the snap utility and take a look at the output files. If you feel comfortable with the content, go ahead and use it. If not, then use the individual AIX commands that you are probably already familiar with. It is, however, a good idea to run the snap command immediately prior to actually performing the migration. In this way, you should have most of the information that would be required by support personnel if you were to experience a problem after your migration.
3.5.3 Information to CollectThe information you need to collect about the machines in your environment serves two purposes. The first is to help you determine if migration of the machine is possible. Once you have determined that migration is possible, the information can be used when you are configuring the NIM environment. It can help you to create appropriate NIM groups of similar machines and help you create customized configuration files to aid in the NIM installation.
The information that can be useful in configuring the NIM environment is listed below along with a suggestion for the commands you can use to collect the information.
• Number and size of disks (lspv, lsattr)
• Information about rootvg (lsvg)
• Presence of other volume groups (lsvg)
• Amount of paging space (lsps)
• Amount of memory (lsattr)
• Type of graphics adapter (lsdisp)
• Version of operating system (oslevel)
• Type of network interfaces (netstat -i)
Planning for Migration 31
• TCP/IP information (netstat)
See Appendix B.4, “Sample Data Collection Script for Use with NIM” on page 163 for more details on how to collect the required information.
3.6 Is Migration Possible?
Once you have documented your existing environment, you need to examine each component and determine if it can be migrated. For most machines running AIX 4.1 or AIX 4.2, migration to AIX 4.3 should be very simple. Some machines may require a new graphics adapter, or perhaps additional disk space, if they are going to be used for the same function after the migration.
Once you have determined which machines in your environment can be migrated, you need to decide if you are going to migrate them as is, or if you are going to use the task of migration as an opportunity to implement new functionality in your environment. There are two schools of thought about this area of a migration project. The first is the view that you should change as made as little as possible during the migration. This way, if a problem is encountered, it should ,in theory, be easier to trace the source of the problem and then fix it. The second viewpoint takes the approach that if you are going to disrupt your environment for a migration, you may as well take the opportunity to implement some new functionality at the same time.
The rest of this chapter details some of the functional improvements you can make to your environment during the migration. The information is presented here for you to consider as part of the planning process. Information on new functionality that can be implemented after the migration is contained in Chapter 6, “Exploiting New Functionality” on page 81.
3.7 LUM Considerations
IBM License Use Management Runtime, referred to hereafter as License Use Management (LUM), contains the tools needed in an end user environment to manage licenses and to get up-to-date information about license usage.
LUM is the replacement for iFOR/LS which is used in older levels of AIX. However, it is still possible to use an AIX 4.1 iFOR/LS license server to serve CATIA licenses to AIX 4.1, AIX 4.2, and AIX 4.3 clients. As more applications become LUM-enabled, for example CATIA 4.1.9 Refresh 1 and version 5.1 of the FORTRAN compiler, you may want to upgrade your license server to use AIX 4.3 and LUM.
32 AIX Migration in a CATIA Environment
A comprehensive description of the new functionality can be found in the LUM online documentation supplied on the AIX 4.3.2 product media in the ifor_ls.html.en_US.base.cli fileset. The latest information and whitepapers can be found at:
http://www.software.ibm.com/is/lum/
Information relating to the implementation of LUM in a CATIA environment can also be found on the CASIL homepage:
http://service.software.ibm.com/catia.us/go?/rpts/casil/casil.html
3.7.1 Planning for the License ServerThe license server system depends on a stable network. If routing and name resolution in a network are not running properly, then the network license servers, network license clients, and central registry license server may be unable to communicate properly. In designating machines to be network license servers or the central registry license server, keep the following criteria in mind:
• A license server should be a system that is available at all times. Machines that are frequently unavailable or unreliable, such as those brought down often for testing or maintenance, are not good candidates.
• It is important to keep license servers for production environments separate from those for test environments.
• A computer that has already been designated as a CATIA file server may well be a good choice because it satisfies these criteria assuming the system resources are not already heavily loaded by other tasks.
• If you have multiple subnetworks then, ideally, the servers should be on the same subnetwork as the majority of clients that will run the licensed products. Accessing a license server on another subnetwork across a bridge or router may not be quite as fast.
If the network spans subnetworks, you need to spread the licenses out among network license servers. Each client request for a license generates network traffic; therefore, it can be useful to spread the application licenses across more than one network license server machine. When a computer is down, the licenses assigned to the network license server on that system are unavailable, but licenses assigned to other network license servers remain available. Having several license servers on the network will help to prevent bottlenecks associated with many clients communicating with a single network license server. It will also allow some users to continue to work in the event of a license server being unavailable either because of a hardware or software failure or for planned maintenance.
Planning for Migration 33

When you have identified the machines that will act as network license servers, and before you configure them, you must organize the servers into one or more groups such that the servers in a group form an independent licensing environment and serve a common set of clients. You must also identify a central registry license server for the group if it requires one.
3.7.2 Types of LUM Licenses Licensed products developed using IBMs License Use Toolkit or Gradient’s Application Developer’s Kit, such as CATIA prior to V4.1.9, can be managed by LUM, as backward compatibility is preserved. This allows customers to migrate to a LUM environment while still using NET/LS and iFOR/LS licenses without modification.
3.7.2.1 Nodelocked License A nodelocked license allows the use of a product at the particular node for which the license was created and for as long as the license remains valid. When you purchase a nodelocked license for a product, the vendor associates the license with the unique identifier or target ID of the system where the license and the product itself will reside.
A license server is not required to install or manage nodelocked licenses. The Nodelock Administration Tool (NAT) on the client permits you to install and manage nodelocked licenses.
When the LUM client code is installed on a machine, it performs a migration operation on the nodelock license file if one is present. The migration consists of moving the nodelock file from the /usr/lib/netls/conf directory to the /var/ifor directory. A symbolic link is created in the old location that points to the new location.
If your nodelock file contains licenses that were migrated to iFOR/LS from the old RLM licensing system, they are not transferrable to the LUM system. You must request new license keys from the key center.
If you use iFOR/LS nodelock licenses, check the format of the entries in the nodelock file. Most iFOR/LS enabled applications have been able to use iFOR/LS generated nodelock licence keys that have been configured in the nodelock file in RLM format. The nodelock licences must be changed to iFOR/LS format in order to be used by CATIA V4.2.0 and newer versions.
The old format RLM licence consists of a single line in the format:
<vendor_id> <product_password>
34 AIX Migration in a CATIA Environment
The new format has two extra fields, which must be present for the LUM client code in CATIA V4.2.0 to correctly parse the licence. The new format is:
<vendor_id> <product_password> "<annotation>" "<version>"
For example, the old RLM nodelock licence:
5242378dbf8d.02.c0.09.c8.93.00.00.00 kxda8bjs97imkavh32mtatfqy2aa
needs to be changed to:
5242378dbf8d.02.c0.09.c8.93.00.00.00 kxda8bjs97imkavh32mtatfqy2aa "" "410"
3.7.2.2 Dynamic Nodelocked LicenseDynamic nodelocked licenses are similar to classic nodelocked licenses, but they differ in the way that they are installed on the client. This type is not used by CATIA at this time.
Dynamic nodelocked licenses are installed on the license server using the Basic License Tool (BLT). The first time the end user uses the licensed product on the client, the client workstation requests the dynamic nodelocked license from the server. If a license of this type is available, it is granted to the client where it is then installed. For later uses of the licensed product, the client has its own nodelocked license, and there is no need to request a license from the server.
3.7.2.3 Concurrent Nodelocked License Similar to a nodelocked license, the concurrent nodelocked license is bound to a particular node. It can be installed and managed by the Nodelock Administration Tool (NAT) on the client. Furthermore, it allows a limited number of users to run the licensed application simultaneously and provides a way of controlling the distribution of a product both on a per user and per system basis. This type is not used by CATIA at this time.
3.7.2.4 Trial or Try-And-Buy LicenseA trial or try-and-buy license is a special kind of nodelocked license that a vendor can distribute to allow a customer to evaluate a product for a set period of time. The license period starts when the product is enrolled or when the product is run for the first time.
3.7.2.5 Concurrent Access License A concurrent-access license is a server-based license, which, under the direction of the license server on which it is installed, can be temporarily granted to run the product for which the license was created on a client machine.
Planning for Migration 35

Concurrent access licenses allow controlled distribution of products on a per user basis over networks. This type is the best way to use CATIA licenses in a large network.
When the product is running, the license remains unavailable to other instances of the product. When the application exits, the license is returned to the server where it again becomes available to other users.
Concurrent access licenses allow as many users to run a licensed software application simultaneously as there are valid licenses for the product available from the license servers in your licensing environment.
3.7.2.6 Use-Once License A use-once license is a server-based license that permits the single use of a particular licensed product within the period for which the license is valid. Use of a use-once license typically begins when the licensed product is started and typically ends when the licensed product stops running. This type is not used by CATIA at this time.
3.7.2.7 Central Registry License ServerSome of the scenarios shown in the License Use Management Runtime for AIX online product documentation show the use of a special server called the central registry license server. The central registry is a repository of information that all the other network license servers can use. If you plan to install customer-managed use products where the vendor does not directly associate licenses with a particular license server, for example version 5.1 of the FORTRAN compiler, you must identify one (and only one) central registry server. If there are only vendor-managed use products, such as CATIA Version 4, the central registry license server is not required. No licenses are required to use the FORTRAN runtime component. You only need a license if you intend to compile FORTRAN code. See section 2.4.2, “FORTRAN License Requirements” on page 21 for more information.
Some of the uses of the central registry are:
• All the per-seat licenses in the licensing environment are installed on the central registry.
• The list of application clients to which per-seat licenses have been granted is maintained in the central registry.
• Soft stop licenses are tracked in the central registry. • The high-water mark is recorded in the central registry. • Reserved licenses that have not yet been granted to a user are kept in the
central registry.
36 AIX Migration in a CATIA Environment
3.7.3 New LUM Bindings The new License Use Management Runtime provides two types of network configuration to enable clients to locate (or bind to) the network license servers and the central registry server.
3.7.3.1 Direct BindingDirect binding is the simpler of the binding mechanism and is suitable for small networks and for networks that do not change frequently.
With direct binding, you make a list of your network license servers and the central registry.
During configuration of servers and clients, you specify the network addresses of all the servers on the list. They are stored on every server and every client in a local text file called the configuration file.
All network license servers, and the central registry license server, listen for incoming communications on well-known ports, 1515 and 10999 by default. The LUM client code uses these port numbers, together with the network addresses of the server systems specified in the local configuration file, to locate and connect to the servers.
For environments with one or two network license servers, direct binding provides a simple, effective licensing environment. Direct binding was the primary method used in the CASIL lab during the 9903 test cycle.
Planning for Migration 37

Figure 2. Namespace Binding versus Direct Binding
3.7.3.2 Namespace BindingAs the number of clients and servers in the licensing environment increases, keeping the direct binding environment up-to-date becomes more complex and namespace binding becomes the better way to manage the LUM environment. Namespace binding is a powerful method for administering large client/server networks and networks that change frequently.
With namespace binding, one or more network license servers must run a subsystem called the global location broker (GLB). All the network license servers register themselves with the global location broker. The global location broker maintains a database of all the network license servers and the license-enabled products for which they have licenses. When a client requests a license, the global location broker locates a server for the client.
The client machine does not need to have a list of all the network license servers. It needs only the address of a server where a global location broker runs.
glbd
NCSNCS
NCS Binding
TCP/IPTCP/IP
NCS Lib llbd
Direct Binding
Server
Server
Application
ApplicationWS Client License Server
38 AIX Migration in a CATIA Environment

The global location broker dynamically updates network location information for each license server. If you configure new license servers, or move existing license servers to new locations on the network, licensed applications will always be able to find them.
You may want to set up your namespace binding environment so that some of the servers serve only some of the clients. Such a grouping of clients and servers is called an NCS cell or just a cell. A request for a license from a network license client can be satisfied only by a license server in the same cell as the client.
3.7.4 CATIA and LUM DependenciesIn consideration of CATIA V5 and mixed environments with both Windows NT and Unix Systems, direct binding will become the default License Use Management binding method for CATIA networks. This is because LUM only supports direct binding on NT systems. Direct binding is only supported with CATIA V4.1.9 R1 and higher. The CATIA 4.1.9 R1 documentation recommends using direct binding for better reliability and performance. In order to correctly use direct binding with CATIA 4.1.9, you must set the CATIA environment variable CATLICLS=LUM since iFOR/LS was the default license mechanism prior to CATIA V4.1.9.
In CATIA V4.2.0, the default license system was changed to LUM. You no longer need to set the CATLICLS environment variable to use LUM. If you are not yet using CATIA V4.1.9 R1 and above, or are still supporting AIX 4.1.5 clients that you do not want to modify, then you should use namespace binding. It is not advisable to use an AIX 4.1.5 based iFOR/LS server in the same IP network environment as LUM Namespace Binding with a replication GLB database. Refer to section 6.1, “Configuring a LUM License Server” on page 81, for more information on how to configure different LUM server scenarios.
3.8 CATIA Installation Strategy
There are many different ways to install and configure CATIA code and administration components on workstations in a large scale environment. Most implementations are highly customized to take customer specific requirements and preferences into account.
3.8.1 Hardware ConsiderationsVarious hardware factors can have an impact on the method chosen for configuring CATIA on multiple workstations. The two options are to have the
Planning for Migration 39

CATIA product installed locally on each workstation or mounted remotely from a network server. A similar choice can be made for CATIA model data although, in most cases with multiple workstations, a central repository is used.
If you have any older RS/6000 machines, such as a model 42T or model 43P-100, it may not be very productive to use them as high end graphical workstations. It might be a good opportunity to upgrade the machine, or perhaps replace it with a new machine, at the same time as the migration to a higher level of AIX and CATIA and so help minimize the disruption to end users. The older, less powerful, machines could be used for less demanding tasks or perhaps used as license servers.
If a machine has enough disk space to store two or more levels of CATIA and associated administration data, there is much more flexibility in the use of CATIA directory structures.
The amount of memory in a machine can also have an impact. Paging space on CATIA workstations is normally set to at least double the amount of memory. This amount should be allocated before considering the amount required for CATIA code. If the workstation does not have much memory, it makes no sense to use it as a high end CATIA workstation.
In addition to considering the relative power of the CPU and its suitability to function as a high end workstation, you should also consider the relative performance of the graphics adapter. The new GXT2000P graphics adapter offers better performance than the previous GXT800P adapter at a price that is similar to a GXT255P. If the graphics adapter can not be upgraded, consider using the machine for less demanding work.
3.8.2 Company StructureThe organizational structure of a company can have an impact on the configuration of the CATIA environment. You may want particular departments to be able to share CATIA data. You may also want to restrict access to particular data sets.
If particular departments have dependencies on CATIA models produced by another department, this may have an impact on the order in which CATIA machines are upgraded. For example, if the production department use the CATIA models produced by the product design department, then you should ensure that the CATIA level of the production department machines is upgraded first since newer CATIA levels can read models produced by earlier
40 AIX Migration in a CATIA Environment

versions. If you upgrade the product design department first, they may be producing models that can not be read by the other departments.
If the physical location of a client workstation is far away from the server, with multiple bridges or routers on the way, it can be inefficient to mount the CATIA code or the administration data from the server over the LAN network. In this case, it may be better to install the CATIA code and administration data locally on the remote machines.
3.8.3 CATIA Environment StructuresDepending on the customer organization, there may be an access strategy to read and write the engineering data in the CATIA environment. There are two mechanisms that can be used to control access to CATIA data from a particular client machine.
• The CATIA Declaration set, which is defined in the CATIA environment and is read during the startup process. This determines if a particular CATIA user can access the data using the CATIA File->Open functionality.
• The default AIX file access control mechanism, which uses the read, write, and execute permissions for owner, group, and other, to determine if a particular user can open the file. In this mode, the user can browse to any file system available on the local workstation.
3.8.3.1 The CATIA EnvironmentThe CATIA environment is defined through a set of UNIX shell variables. To simplify the manner in which CATIA administrators and end users can access a specific CATIA environment, all variables are stored in a CATIA environment file. Environment files normally have a .env suffix and are stored in the $CAT_CUST/env directory.
In addition to the default CATIA environment file, multiple environment files can be used to define different sets of values for the shell variables.
For example, you can have multiple environment files to define and differentiate between the following environments:
• Different CATIA code levels • Different project environments • Different declaration environments
The default active environment file is $CAT_CUST/env/YOUR.env, unless there is a .catia_environment file in the users home directory. The variable $CAT_CUST points to the administrator environment, and has a default value of /home/catadm. The switch to another CATIA environment is done by
Planning for Migration 41

simply using a different CATIA environment file. There are different ways to use a different environment file.
• Run a CATIA start script from a GUI interface where you can select the proper environment. You load the new environment file by running it in the context of the start script by using the dot notation to call the script in the current shell environment.
. /myadmin/envdir/MYENV.env
• Call the catiaenv script located in $CATIA/code/bin. This can only be done from a running CATIA environment.
• For switching between different environment files, you can also use the .env file icons in the env directory window on the CATIA Desktop (CATENV Desktop tool). Refer to the desktop description in your Motif CATIA Solutions User’s Guide, SH52-0606, for instructions on using the icons.
3.8.3.2 The CATIA Declaration SetThe CATIA Declaration Set is defined in the environment file. There are many parameters and files to choose from when customizing your CATIA environment. To quickly locate the required shell variable, parameter, or declaration file to be modified or added, refer to the road map section in Chapter one of Declaration Quick Reference for UNIX Workstation, SH52-0858.
3.8.4 CATIA Data Access StrategiesThere is no real best practice strategy for CATIA environment configuration. It is very customer specific, and something that works well for one customer may be completely unsuitable for another. This section details some tips you should bear in mind when designing your environment.
The order of calling the declarations is defined in the environment file with the CATDEC variable, which is defined as:
CATDEC=$CATIA/dec:$CAT_CUST/dec
where $CATIA is the directory for the configuration, and $CAT_CUST is the home directory of the CATIA administrator.
The last declaration file that is called after those in the CATDEC path is the CATMSTR file, which is defined in the environment file as:
CATMSTR=$HOME/USRENV.dcls
Additionally, each declaration file can use the INCLUDE statement to include another directory or file; so, the hierarchy can become very complex.
42 AIX Migration in a CATIA Environment

Here are suggestions for three different methods to load a CATIA environment.
1. The simplest way is to call your environment file from a start script and then set the value of the CATDEC variable based on the primary AIX group of the user. For example:
#!/bin/ksh.... $CATENV...mysysdec=/home/sysadmin/decmycatgrp=‘lsuser -a pgrp $LOGNAME|cut -d= -f2‘CATDEC=$CATIA/dec:$CAT_CUST/dec:$mysysdec/mycompany:$mysysdec/$mycatgrp...catini $start_options
2. Another popular method is to run the default environment file from a start script and then set a variable dependent of the primary AIX group of the user, which is then used with the include statement to customize the environment based on the users group ID. For example:
#!/bin/ksh.... $CATENV...mysysdec=/home/sysadmin/decmycatgrp=‘lsuser -a pgrp $LOGNAME|cut -d= -f2‘...catini $start_options
The file defined by the $CATMSTR variable can then contain an include statement at the end, which uses the previously defined variable.
include( ’$mysysdec/mycompany.dcls’ ) ;include( ’$mysysdec/$mycatgrp.dcls’ ) ;
This differs from the previous use of the group ID, in that you only need to maintain a single file to customize a particular group of users rather than a complete directory structure.
3. Another way to organize the access to the CATIA data is to use the gecos field in the password file. This field can be accessed and changed using the User INFORMATION field in SMIT or simply by editing the password file. The main advantage of this method is that it adds one additional access layer to the UNIX access modes, and the gecos field is also distributed with the password information when using NIS functionality.
#!/bin/ksh...
Planning for Migration 43

. $CATENV
...mysysdec=/home/sysadmin/decmycatgrp=‘lsuser -a gecos $LOGNAME|cut -d= -f2‘CATDEC=$CATIA/dec:$CAT_CUST/dec:$mysysdec/mycompany:$mysysdec/$mycatgrp...catini $start_options
4. Rather than creating a new shell script to start the CATIA system, you can use the techniques described in the previous examples in combination with the default Your.env environment file. You can either make the changes to the Your.env file directly or create a new environment file by copying the Your.env file and making the changes to the copy. The new file must have a .env suffix.
3.8.5 CATIA Client Directory StructuresThe directory hierarchy structure used to store the CATIA code and administration data is independent of the physical location of the code. Some of the most commonly used directory hierarchy structures are discussed in this section. There are many other layouts possible using variations of the ones described here.
3.8.5.1 CATIA Default Directory StructureBy default, the CATIA administrator is created in /home/catadm and the CATIA code, and sample files are located in /usr/catia/unload. After you have generated the runtime system, one or more new directories are created, for example, /usr/catia/cfg, which contain symbolic links for the selected modules that point to the real code location in the /usr/catia/unload directory.
In the default generation of the administration environment, the starting environment file, for example, /home/cadadm/env/YOUR.env, is configured in the .dtprofile file; so, it is automatically activated when logging on using the Common Desktop Environment.
The advantages of the default structure and installation are:
• All of the generated CATIA parts of the CDE Desktop can be used without any configuration changes required.
• The code is structured in the same way as it is shown in the CATIA documentation.
The drawbacks to the default installation are:
• You must overwrite the /usr/catia directory structure every time a new CATIA Version or Release is installed.
44 AIX Migration in a CATIA Environment

• The default installation is not very flexible if your environment requires having multiple versions of CATIA on the same machine.
• The disk space used is more than the minimum actually required.
3.8.5.2 CATIA Release Directory StructureIn this type of configuration, you create a CATIA administrator and a /usr/catia4xx file system for each level. For example, this could result in having /home/catadm419 and /usr/catia419 for CATIA V4.1.9, and /home/catadm420 and /usr/catia420 for CATIA V4.2.0. The CATIA code and sample files are located in /usr/catia419/unload and /usr/catia420/unload. After you generate the runtime system, the new configuration directories are created. In this example, they are /usr/catia419/cfg and /usr/catia420/cfg. The configuration directories contain symbolic links to the selected modules in the specific /usr/catia4xx/unload directories.
The advantages of this method are:
• It is possible to configure more than one level of CATIA on a client. • It is very easy to see which versions are installed. • The directory structures are very similar to those used in the CATIA
documentation.
The disadvantages to this method are:
• You must create a new file system or rename an existing one each time a new CATIA release level is installed.
• The administration of a GUI driven switch between the CATIA levels by an end user will become a very complex affair because of the directory name changes at every new level.
• Normally, the disk space of each file system is not 100 percent used; so, some space is wasted with every installed level.
• The automated distribution of the new level to a large number of workstations is much more complex than a simple copy operation mainly because of the directory name changes.
3.8.5.3 CATIA Release Name Independent StructureA modified version of the CATIA Release Strategy can be used, which retains most of the benefits and reduces the number of disadvantages.
• Create a single file system that contains all of the CATIA code and administrator levels. This can reduce the amount of wasted disk space when multiple levels are installed. In addition, there is no need to create a new file system when you install a new CATIA level. Figure 3 on page 47 shows a sample /cat file system holding multiple versions of CATIA. For
Planning for Migration 45

each CATIA level X, the runtime is located in /cat/catiaX/cfg, and the administrator levels are stored in /cat/catiaX/catadm.
• Do not distribute both the unload and cfg directories. Generate the runtime environment on a builder workstation. Test the configuration and then distribute the new level by copying the contents of the cfg directory. In this way only the files that are linked from the cfg directory to the unload directory are actually distributed. The unused files in the unload directory are not distributed, therefore, saving disk space on each client.
• Use directory names that are independent of CATIA levels. This makes it easy to administrate GUI Interfaces that start multiple versions of CATIA. This structure also simplifies the task of automatically distributing new versions of CATIA using tools, such as NIM, the rcp command, the rdist command, and the software distribution components of the Tivoli product family. This is because there is no longer a need to create a new file system or directory structure on the client machines.
• Since a lot of framing functionality and catalogs have been moved into the administrator data, you can treat it like CATIA code and use a separate NFS mounted file system. This allows for centralized customization and general administration of customer dependent tasks.
• If you have two levels of CATIA on each workstation, it becomes possible to distribute CATIA code during work hours. For example, all users can be using code from /cat/catiaA/cfg while the code in /cat/catiaB/cfg is being updated. After the code has been distributed to all CATIA clients, you can activate the code by logging out then logging in and selecting the new code from your environment setup.
46 AIX Migration in a CATIA Environment
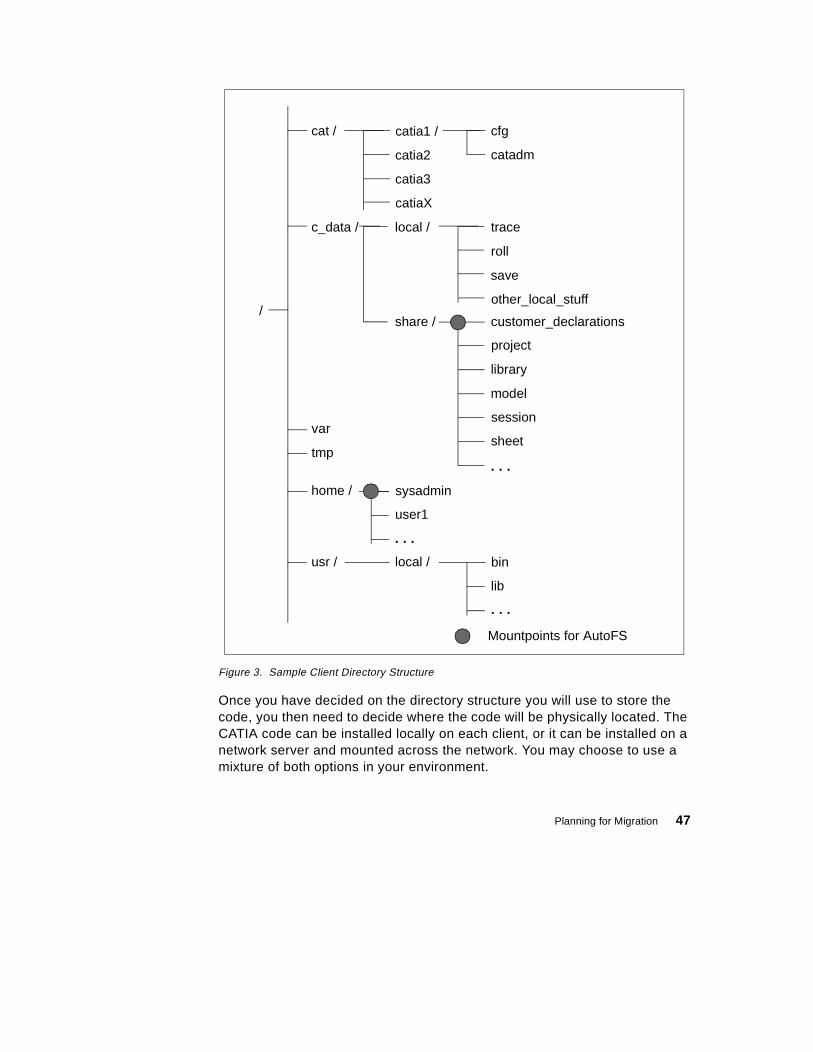
Figure 3. Sample Client Directory Structure
Once you have decided on the directory structure you will use to store the code, you then need to decide where the code will be physically located. The CATIA code can be installed locally on each client, or it can be installed on a network server and mounted across the network. You may choose to use a mixture of both options in your environment.
local / trace
roll
save
other_local_stuff
share / customer_declarations
model
library
project
session
sheet
. . .
var
tmp
home / sysadmin
user1
usr / local / bin
lib
. . .
. . .
/
catia1 /
catia2
catia3
catiaX
c_data /
cat / cfg
catadm
Mountpoints for AutoFS
Planning for Migration 47
A workstation will give the best CATIA performance when using code that is installed on local hard disk. This presents the additional administration task of maintaining the CATIA code on each workstation. When you have a new version of CATIA, you need to install it on each individual workstation. You can eliminate this task by storing the CATIA code on a network server and mounting the code on the client workstations. This has the advantage of being easier to maintain, and each workstation has a lower disk space requirement. These advantages are at the expense of a slight loss in workstation performance due to the code coming across the network.
If you choose to store the code on a network server, and the client machines are running AIX 4.3.2, then you have the choice of mounting the CATIA code and administration data on each client using a normal NFS mount or using CacheFS. The use of CacheFS on the client systems can reduce the overall load on CATIA code network servers. See section 6.4, “Configuring CATIA Clients to Use CacheFS” on page 101 for information on how to use CacheFS.
3.9 NIM Scenarios
The Network Installation Management (NIM) component of AIX allows a systems administrator to carry out a wide range of software installation and maintenance tasks on remote machines from a central master server. It is also possible to use the NIM system to run scripts on a set of client machines without having to log on to each individual machine. In this book, we assume that you are familiar with installing and configuring a NIM environment. For more information on NIM, refer to the product documentation, Network Installation Management Guide and Reference, SC23-4113.
3.9.1 Executing Scripts on ClientsIn most large environments, a number of customized system administration tasks are performed by locally written shell scripts. It is possible to use a combination of NIM and either NFS mounted file systems or the rcp command to facilitate this procedure.
NIM assumes that the shell script to be run is available on the client where it is executed. The best way to satisfy this demand is to mount a directory from the NIM server to every NIM client. For example, you may have a shared common /usr/local/bin directory structure mounted on all client machines. Another way to distribute the script is with the rcp command. This is possible because, by default, the root user on the NIM master machine can rlogin and, hence, rcp to each NIM client.
48 AIX Migration in a CATIA Environment

The execution of scripts on client machines can be performed from an AIX 4.3.2 NIM master machine using the Web-based System Manger NIM interface.
Figure 4. Web-based System Manager NIM interface
3.9.2 NIM Network ScenariosThis section discusses the typical NIM configurations seen in larger environments and offers some tips for smooth day to day running.
3.9.2.1 Flat NetworkThis is the simplest NIM environment. An example is shown in Figure 5. In this kind of network, you should use one NIM server that is configured as the NIM master. The NIM master contains all of the NIM resources, such as lpp_source, spot, and mksysb resources, required to install and maintain the client machines.
Planning for Migration 49

Figure 5. Flat NIM Network
3.9.2.2 NIM Master in a Backbone EnvironmentIn most large installations, a backbone topology is used to balance the network load. In this scenario, it is likely that a large number of client machines are connected to a different physical network segment than the NIM master server. See Figure 6 for an example of this type of network.
An average mksysb image of a system with CATIA installed locally is just over 2 GB in size. When you are installing a client machine, this data must be transferred over the network and across every network bridge or gateway from the NIM server to the client workstation. To reduce the load on the backbone network, it is possible to configure a NIM resource server on each subnet. The NIM resource servers can be configured with the resources required to install the clients on the local subnet. The NIM operations are still initiated from the NIM master server.
In many large networks, intelligent bridges and uplinks are used to connect different physical network segments to form one logical IP network. This can help maximize the use of the IP addresses available to an organization without having to use netmasks to split the network into subnets. Each network segment could be a different physical network type. For example, you could have a single logical network consisting of token ring and ethernet segments joined by an intelligent bridge.
The NIM system uses a single network object to define a logical network. It automatically assumes that the entire logical network segment is of the same physical type. Using Figure 6 as an example, assume Network1 is token ring, and Network2 is ethernet, and the two physical networks are connected to form one logical network. The NIM master will assume client 1 is connected to a token ring network since it exists on the same logical network segment as the NIM master, and the NIM master is connected to the network segment
nim_server1 client1
NIM master NIM-resources
spotlpp_sourcescriptsbosinst.data
etc.
withCATIA
50 AIX Migration in a CATIA Environment

using the token ring. AIX Version 4.3 uses the new other_net_type attribute of the network object to indicate that the logical network consists of multiple physical network types. You can define a NIM client machine that has the same interface type as the network object by using SMIT or the command line. You must use the command line interface to define a NIM client machine that has a network type listed in the other_net_type field of the logical network.
You can define a local NIM resource server on each physical network segment to reduce traffic across the bridge or backbone network.
Using the example shown in Figure 6, NIM operations on client1 can be initiated from the NIM master machine across the bridge/backbone network. The NIM system can be configured so that all of the resources required to install and configure client1 are available from a local NIM server on the same network segment. In the case of restoring a mksysb image, client1 can request a boot image from the local NIM resource server. Once it has booted, it mounts the SPOT and lpp_source resources required to perform the restore of the mksysb image, which is also obtained from the local NIM resource server. The lpp_source resource is used to supply any device drivers required for the target machine that are not included in the mksysb image.
Figure 6. NIM Master in a Backbone Environment
nim_server1 nim_server2
NIM master NIM resources
spotlpp_sourcescriptsbosinst.data
etc.
ResourceServer
client1
withCATIA
Backbone network
NIM resources
mksysblpp_source
Network1 Network2
orintelligent bridge
spot
Planning for Migration 51
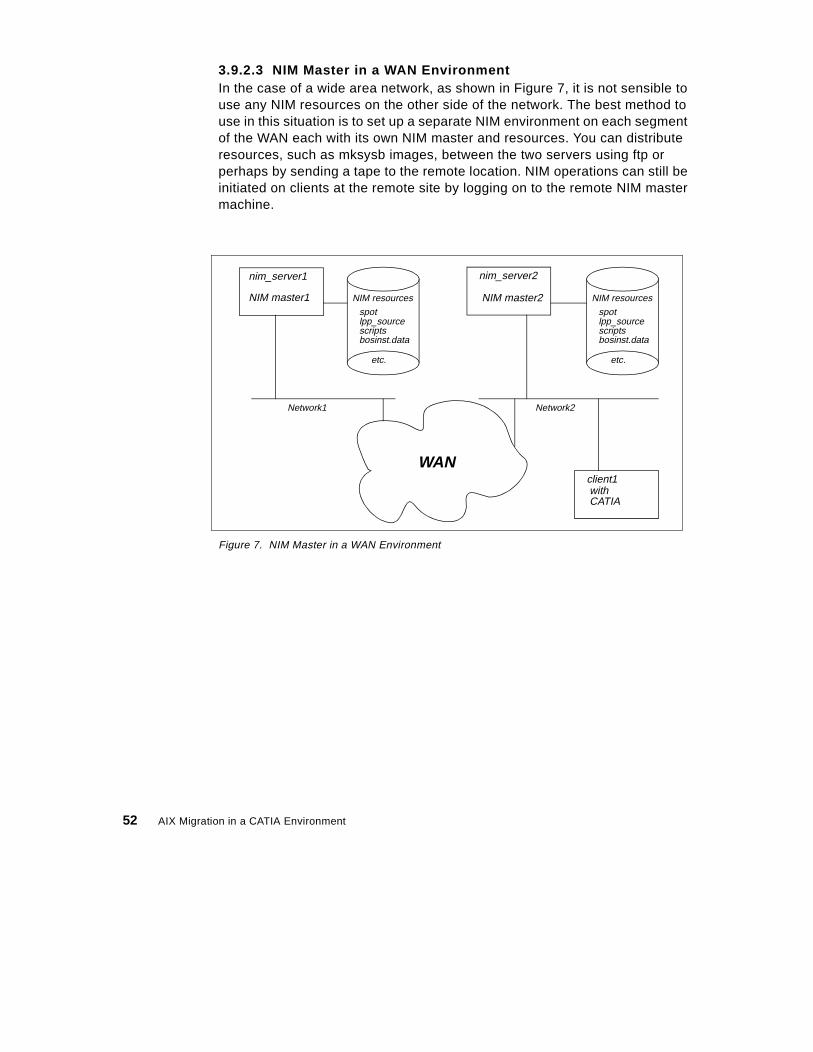
3.9.2.3 NIM Master in a WAN EnvironmentIn the case of a wide area network, as shown in Figure 7, it is not sensible to use any NIM resources on the other side of the network. The best method to use in this situation is to set up a separate NIM environment on each segment of the WAN each with its own NIM master and resources. You can distribute resources, such as mksysb images, between the two servers using ftp or perhaps by sending a tape to the remote location. NIM operations can still be initiated on clients at the remote site by logging on to the remote NIM master machine.
Figure 7. NIM Master in a WAN Environment
nim_server1 nim_server2
NIM master1 NIM resources
spotlpp_sourcescriptsbosinst.data
etc.
NIM master2
client1
withCATIA
Network1 Network2
WAN
NIM resources
spotlpp_sourcescriptsbosinst.data
etc.
52 AIX Migration in a CATIA Environment
Chapter 4. Preparing for Migration
This chapter covers the preparation phase of migrating to AIX Version 4.3. When preparing for the migration, there are a number of questions that you must consider.
1. If you need to order additional or replacement hardware, how long will it take?
2. How long will it take to obtain any software updates that are needed, including AIX, if you do not already have it?
3. Do you have somewhere to keep everything safe until you are ready to begin?
4. Decide on your migration method: Should it be a complete overwrite or a migration install?
5. Do you have a number of systems to migrate: Should you use NIM?6. If your applications need upgrading, is it just a patch to existing code or a
completely new installation and reconfiguration?7. When can the actual migration be done such that it will cause least
disruption to operations?8. If, during the migration, things are not going to plan, at what point must
you stop, restore your system to its original condition, and replan the migration?
All of the above, and more, need to be considered very carefully before you can commit yourself to a timetable. The following sections should assist you in answering some of the above questions and help you in preparing a timetable for the migration. We also recommend that you check the comp.unix.aix newsgroup and archive for any additional material that may be relevant to your particular circumstances. The archive can be found at the following URL:
http://www.thp.uni-duisburg.de/cuaix/cuaix.html
4.1 Ordering Additional or Replacement Hardware and Software
During the planning stage, you should have already discovered if additional or replacement hardware and software will be needed. If this is the case, you should also have obtained information about availability and delivery lead-times for these items since it is probably impossible for the migration to proceed without them. You should begin your preparation by noting the delivery lead-times on your timetable. When placing the actual orders, you should obtain firm commitments to these times by all suppliers. If any of the timescales seem unrealistic, do not be afraid to question them. If necessary, make adjustment or allowances in your timetable. Do not plan to begin the
© Copyright IBM Corp. 1999 53

migration until all additional items have been received, checked, and confirmed to be complete and undamaged.
Depending on the current levels of AIX and CATIA on your machines, there may be a charge for obtaining the latest levels. Consult your IBM marketing representative for more information.
4.2 Check and Update Firmware
After you have ordered the new hardware and software, you can prepare the machines for the migration by ensuring that each one is running the latest level of the appropriate firmware, and if required, service processor microcode. The firmware can be installed on a machine without having to reinstall the operating system. This process can be done during a normal maintenance window before the start of the migration. Each machine will need to be rebooted as part of the firmware installation process.
The firmware can be obtained from:
http://www.rs6000.ibm.com/support/micro/
4.3 Installation Methods
In an environment consisting of more than three or four RS/6000 machines, you should consider the use of the Network Install Management system for performing software installation and maintenance tasks. Most of the information presented in this redbook is based on the assumption that you will be using NIM to perform the migration. Although migration can still be achieved without using NIM, if you have more than three or four machines, it can become a very labor intensive and time consuming process.
When upgrading a machine to a later level of AIX Version 4, there are three types of installation available. Each type of installation can be performed using NIM, or by using other product media, such as CD or tape. Two advantages of using NIM are:
• Each machine does not need to have its own CD or tape drive for software installation.
• Custom scripts can be used to automate the installation process with no user interaction required on the machine being upgraded.
54 AIX Migration in a CATIA Environment

4.3.1 New and Complete Overwrite InstallThis method, as its name implies, will perform an overwrite install. All existing data on the target disks will be overwritten. The resulting system has a clean AIX installation with all configuration files containing default information only. This type of installation is also performed on new machines where the target disks do not have a version of AIX already installed.
Once the basic installation has completed, the system will need to be configured. The amount of work involved in doing this depends on the complexity of the target configuration. The tasks you will have to perform include:
• Set a root password to control access to system resources.
• Check the system storage and paging space needed for installing and using additional software.
• Set your National Language Environment.
• Create groups, user accounts and passwords, or configure NIS.
• Install additional AIX components not automatically installed.
• Install and configure additional 3rd party software, such as CATIA.
• Configure local and remote printers.
If you performed this type of installation from CD or tape instead of using NIM, you may need to perform the following additional tasks:
• Configure TCP/IP and other networking information.
• Set the system date and time zone information.
AIX Version 4 provides you with the Configuration Assistant to guide you through the above operations either in a SMIT-based ASCII version or in a full graphical user interface. You should not underestimate the amount of time required to perform a total reconfiguration; this can be quite considerable in some circumstances. If you have a large number of machines, you will have to perform these tasks for each machine. In addition, if you did not use NIM for the installation, you will need to be physically present at the machine to initiate the install and to perform the initial network configuration.
4.3.2 Migration InstallA migration install, as with the complete overwrite install, can be performed either from product media, such as CD or tape, or across the network using NIM. This is the default type of installation if the target machine is already running AIX 3.2 or later. It is the easiest way to migrate your system to the
Preparing for Migration 55

latest level of AIX. The migration install upgrades the level of AIX on the system, while at the same time, maintaining the customized configuration information. In the vast majority of cases, you will have to perform few if any reconfiguration tasks after the migration installation has completed. This has obvious time saving advantages.
If, for any reason, there are particular configuration files that cannot be migrated, they will be saved in a specific directory under /tmp/bos. This allows you to compare them with the new default files and transfer any changes to the new files after migration. System messages will inform you of the location of the saved files. Information will also be stored in log files in the directories /var/adm/ras and /var/adm/sw.
For some filesets, the migration process simply consists of installing the latest version. Some filesets may be obsolete, redundant, or no longer supported in the new level of AIX and will be removed as part of the migration process. For example, in the migration to AIX 4.3.2, the old iFOR/LS software filesets will be replaced by the new LUM filesets.
4.3.3 mksysb InstallA system can also be installed with AIX Version 4.3 by restoring a backup taken from another AIX Version 4.3 system. Since an AIX system backup is usually made with the mksysb command, this installation method is referred to as a mksysb install.
Technically, this method can be considered a variation on the new or complete overwrite install since all data on the target disks is overwritten by the process of restoring the mksysb image. The mksysb image used can be taken from a system, which, itself, has been subject to either a migration install or a new and complete overwrite.
This method is typically used to upgrade (actually install) a system that has a very similar configuration to the system from which the backup was taken. When used for installing systems that have dissimilar configurations, there are some limitations. In all cases, information specific to each individual system, such as groups and users, hostname, and so on, will need to be reconfigured. The mksysb install method is particularly suitable for cloning multiple identical systems from a previously migrated and tested system especially when any individual customization is relatively simple or can be automated by use of a customization script and data file.
When using NIM to restore the mksysb image, missing device drivers can be installed automatically, and the basic TCP/IP configuration can also be
56 AIX Migration in a CATIA Environment

performed automatically. This reduces the need for further manual reconfiguration after the machine has been upgraded.
4.3.4 Choosing an Installation MethodAs previously mentioned, the use of NIM is strongly recommended when dealing with environments of more than three or four machines. The convenience and productivity advantages are considerable and well worth the effort required to set up the NIM server.
The installation methods listed each have their own advantages and drawbacks. You may find that no single method is suitable for all of the machines in your environment, and that you end up using a combination of all three.
For large CATIA environments, it is worth spending time to develop a standard client image that can be used with the mksysb install process. This makes upgrading the system very simple since all you have to do is create a new mksysb image and distribute the new image to the other machines. The new mksysb image can be created from a machine that has a fresh install of the standard image at the latest AIX level or a machine running the previous standard image that has been migrated to the latest AIX level.
If you have specialist machines in your environment, it may not be possible to develop a standard image for these machines since the configuration may be constantly changing, or you may have a large number of different configurations. In this case, the migration install is the most sensible method of upgrading the system.
The server machines in your environment should be considered as specialist machines and should be upgraded using the migration install method.
Using the information about your environment collected during the planning phase, you should now decide on the type of migration to be performed on each machine.
4.4 Checklists for Starting the Migration
Once you have collected the information about your environment, you may find the checklist shown in Table 8 useful in deciding when you are ready to
Preparing for Migration 57

proceed with the tasks detailed in Chapter 5, “Performing the Migration” on page 59.
Table 8. Checklist for Proceeding with Migration
Description
Are all of the installed machines in the environment supported by AIX 4.3.2?
Are all of the installed graphics adapters in the environment supported by AIX4.3.2?
Are all of the installed graphics adapters in the environment supported byCATIA V4.2.0 R1?
Installation method chosen for each machine?
Are there spaceball devices installed in the environment?
Are there spacemouse devices installed in the environment?
Has the new hardware and software been ordered?
Has the new hardware and software been delivered?
Enough tapes for backing up each system?
Contingency plan for rollback
Inform users of migration
58 AIX Migration in a CATIA Environment

Chapter 5. Performing the Migration
This chapter describes the steps you need to perform to migrate your CATIA environment. The steps here assume that you have read Chapter 3, “Planning for Migration” on page 23, and Chapter 4, “Preparing for Migration” on page 53. If you have not already done so, please read these chapters before proceeding with the migration. See section 4.4, “Checklists for Starting the Migration” on page 57 for help in deciding if you are ready to proceed with the migration.
Throughout this chapter, we refer to machines being upgraded. This term is used to refer to the process of altering the machine to provide the same functionality but running the latest level of AIX. The actual method used could be a new overwrite install or one of the other methods described in section 4.3, “Installation Methods” on page 54.
5.1 Maintenance Level AIX Upgrade
If you are upgrading your AIX version across maintenance levels, that is, from AIX 4.n.X to AIX 4.n.Y, such as from AIX 4.3.1 to AIX 4.3.2, then the upgrade process is much simpler. Rather than performing a migration install operation, which requires the machine to boot from installation media, you must use the SMIT update_all facility or the NIM update_all facility. You will have to reboot the machine as part of the update process.
It is not possible to perform a migration install on a machine to upgrade to a different maintenance level of AIX, for example from AIX 4.3.1 to AIX 4.3.2. The migration install will fail with an error message stating that the requested operation could not be performed. The failure is non-destructive and will not harm the original AIX configuration on the system. You will have to use the console of the machine to reset the boot list to get the machine to boot from disk since the boot list will still be set to boot from the product media or from the network if you used NIM to initiate the install.
You should still plan this type of migration with the same attention to detail as if you were migrating across AIX release levels. In particular, you should still determine the minimum required levels of the other LPPs and third party software applications in your environment.
The process of upgrading the NIM servers will still require you to create new lpp_source and SPOT resources along with any optional mksysb images you wish to use.
© Copyright IBM Corp. 1999 59

The process of upgrading client machines to a later maintenance level of AIX from the NIM server is also simplified into a SMIT or NIM update_all action rather than a migration install.
The process of upgrading the CATIA component of the workstations remains the same however; so, there is no significant reduction in the time required to perform the migration of your entire environment.
The order of migration of machines in your environment should be the same regardless of whether you are performing a migration install, that is, migrating across AIX release levels such as AIX 4.2 to AIX 4.3, or performing a software update across maintenance levels.
5.2 Create and Test Backups
The first step in the migration is to ensure that, if things go wrong, you can at least return the environment to its original state. In order to do this, you need to have adequate backups of each machine, or in the case of standard configuration images, each type of configuration.
There are many commands and tools available for creating machine backups. Backup policies, and the tools used to implement them, vary from customer to customer. We will assume that before starting the migration of a machine, you have adequate backups of the user data.
In addition to your normal user data backups, we strongly suggest that you create a mksysb image backup of each machine about to be migrated using the mksysb command. The mksysb image is the quickest way to restore a system to its premigration state if a problem is encountered.
See Chapter 9 of the AIX Version 4.3 System Management Guide: Operating System and Devices online product documentation for more information on the use of the mksysb and savevg commands.
The documentation can be viewed online at:
http://www.rs6000.ibm.com/doc_link/en_US/a_doc_lib/aixbman/baseadmn/toc.htm
Once you have created system backups and validated that they can be used, you are ready to proceed with the migration.
60 AIX Migration in a CATIA Environment

5.3 Machine Categories
The different types of machines in a large CATIA environment can be classified by the functions they perform. Certain machines, particularly large servers, may perform more than one function in the environment. For example, the machine that is acting as your NIM master server may also be acting as the NIS master server. This section will discuss the different functions that may be present in a large CATIA environment and the process of upgrading the machines performing those functions to the latest level of AIX.
• NIM master server
• NIM resource server
• NIS Servers (master/slave)
• NFS Code server (CATIA code and admin data)
• NFS Data Server (CATIA models)
• License servers
• ADSTAR Distributed Storage Management (ADSM) servers
• CDM/VPM servers
• DB2 servers (model repository)
• Client machines (machines at which people use the CATIA product)
The machine types listed here are the ones most commonly found in large CATIA environments. Your environment may not have all of the servers described here, in which case, you can ignore any migration instructions specifically for that type of server.
In general, all of the products likely to be installed in a CATIA environment are backwards compatible. That is, a server component can be upgraded, and it will still function with the previous version of the client component of the application. For this reason, we suggest that you upgrade your server environment as the first stage of the project.
The first server that needs to be upgraded is the NIM master server. This is because a NIM master server should be running at least the same version of the highest level of AIX that it is using to install on client machines. Therefore, if you want to use a NIM master to install clients machines with AIX 4.3.2, then the NIM master should also be running AIX 4.3.2.
If you are using NIM resource servers in your environment, in addition to the NIM master, they should be upgraded to the same level of AIX as the master.
Performing the Migration 61
If you upgrade the NIM master first, you can then use NIM to upgrade the resource servers after you have created the required resources on the NIM master.
If the physical machine that you are using as your NIM master also provides one or more of the other server functions listed above, then you will also have to upgrade those components to the latest level of AIX.
5.4 Upgrade the NIM Servers
In an environment consisting of many RS/6000 machines, the most efficient way of performing software maintenance of the AIX operating system and IBM Licensed Program Products installed on the machines is by using the AIX Network Installation Management (NIM) facility. The NIM component of AIX Version 4.3.2 contains many new features and enhancements over NIM in AIX Version 4.1.5. You can now perform many more functions on client machines from the NIM master than was previously possible. The administration of NIM software resources is also considerably easier, and is similar to the administration of the same resources on a normal AIX system. This redbook assumes you are familiar with the concepts and procedures involved in using NIM to manage client machines. If you are not familiar with NIM, or would like to understand the new functionality in AIX 4.3.2, please read the AIX Version 4.3 Network Installation Management Guide and Reference, SC23-4113 for full details. The guide can also be viewed online at:
http://www.rs6000.ibm.com/doc_link/en_US/a_doc_lib/aixins/aixnimgd/toc.htm
5.4.1 Upgrade NIM MasterYou should perform the following steps to upgrade the machine that is acting as your NIM master. The best way to upgrade a NIM master machine is to perform a migration install. This will preserve the current NIM configuration for use at the newer level of AIX.
The process of upgrading the NIM master must be performed from product media and requires input from the user to select menu options to start the install.
1. Take a mksysb backup of the machine. This will be used to restore the machine if a problem is encountered.
2. Insert CD number 1 of the AIX 4.3.2 set into the CD-ROM drive of the machine.
62 AIX Migration in a CATIA Environment

3. Ensure all other users are logged off the machine and that no NIM operations are in progress.
4. Use the lspv command to determine the physical disks that are in the root volume group. You should note the disks by the physical location code, rather than logical name, as the logical name may change when the machine boots from CD-ROM.
5. Boot the machine from the CD-ROM either by setting the keyswitch to the service position if the machine has one or by selecting the service mode bootlist as the machine boots.
6. Select the system console and then the install menu language at the prompts presented on the screen.
7. At the main installation menu screen, select the option to Change/Display Settings to check that the machine will perform a migration installation. In addition, you should ensure that the migration installation will use the same disks that are currently in the root volume group.
8. Start the migration install with the chosen settings.
9. During the first stage of a migration installation, the system is processing the configuration files to determine which ones it can migrate to the new system and which ones it will replace. The replaced files are saved in the /tmp/bos directory. After a few minutes, the system will present a menu allowing you to view information on the configuration files that will be migrated, and those which will be saved. After you have viewed this information, select the option to continue with the install.
When the machine has completed the installation, it will reboot and start the configuration assistant. The configuration assistant is normally used to complete the install process by setting the system date, system time, root password, and other configuration information. Since this is a migration installation, all of this information will already be configured correctly.
10.Select the option to Update installed software after a migration installation. This menu option will allow you to upgrade the remainder of the AIX software on the machine to be at the latest level. Depending on the software installed on the machine, you may be prompted to insert the second or third AIX CD before the upgrade has completed.
11.Check the output of the software update to determine if the system must be rebooted before the update fully takes effect.
12.Exit from the installation assistant and reboot the system if this is required for the software update to fully take effect.
13.When the system comes back up, log in and use the oslevel command to check that the machine is now at the new level of AIX.
Performing the Migration 63

Once you have performed these tasks, the NIM master server will be at the required AIX level. At this point, you have a choice in the PTF strategy you can adopt for the NIM server. When you order AIX version 4.3.x, the package will contain a number of CDs. The base CDs will contain the requested level of AIX; so, most of the filesets on the media will be at level 4.3.x.0. Depending on when you receive the product, a considerable period of time may have elapsed since that version of AIX was first released. Any important problems fixed during that time period will be supplied on an additional AIX update CD as part of the delivery.
You can either update the NIM server with the AIX update CD, or you can install the CASIL level PTFs on the NIM server. If the NIM server also performs another function in your CATIA environment, such as NIS server or DB2 server, then it would be better to install the CASIL level PTFs. In this way the software maintenance of your AIX systems is simplified if you have a policy of keeping all AIX systems at the same PTF level.
CASIL level AIX PTFs and the PTFs contained on the AIX update CD are somewhat synchronized. For example, the 9903 CASIL level AIX PTFs are a superset of the PTFs that were available on the AIX update CD in March 1999. Any update CD published after March 1999 will contain a superset of the 9903 CASIL level AIX PTFs.
You should now install either the AIX update CD or the CASIL level PTFs on the NIM server and reboot if required.
5.4.2 Create New lpp_source ResourceAfter performing a migration install on the NIM server to bring it up to the latest level of AIX, you will still be able to use all of your previously defined NIM resources. This means that you can still install and maintain clients at the previous level of AIX. In order to install or migrate clients to the latest level of AIX, as a minimum, you will need to create new SPOT and lpp_source NIM resources from the AIX CDs used to upgrade the server.
You should now create a new lpp_source NIM resource for the new level of AIX. The disk space required will depend on the number of optional LPP products you need to install in the lpp_source.
5.4.3 Customizing the lpp_source ResourceThe default action when creating a NIM lpp_source resource is for the system to copy only the minimum set of fileset images required to install a machine. This means that the lpp_source will contain all of the device support filesets but only a small subset of the AIX product filesets. In order to be able to use
64 AIX Migration in a CATIA Environment

this lpp_source to perform migration installation of clients, you need to add extra filesets into the resource.
The NIM system will also copy message and locale filesets for all supported languages into the lpp_source. These filesets can take up a considerable amount of space, both in the lpp_source, and when they are installed in the SPOT resource which is created from the lpp_source. This disk space can be recovered after adding the additional filesets to the lpp_source, and before creating the SPOT.
5.4.3.1 Adding Required FilesetsOnce you have created the base lpp_source NIM resource, you are ready to add the additional filesets required to allow the resource to be used to perform a migration installation on client CATIA machines.
The list of additional filesets you should copy into the lpp_source is contained in the bundle file for the target CASIL level. The bundle file can be obtained from the CASIL Web page:
http://service.software.ibm.com/indsolutns.us/go?/casildocs/casil.html
A sample CASIL bundle file is shown in Appendix A, “CASIL 9903 Bundle File” on page 153.
The software can be copied directly from the AIX product CD-ROM into the lpp_source directory using SMIT with the nim_bffcreate fastpath. You can select the lpp_source directory directly if you use the select menu option to list the available options for the DIRECTORY for storing software packages field.
After copying the required filesets in the lpp_source, you should define the bundle file as a NIM resource.
The CASIL bundle file lists the minimum set of additional filesets required to run the version of CATIA defined in the CATIA level. CATIA V4.2.0 uses the OpenGL API for certain graphics functions where previous versions of CATIA used the GL3.2 API. This means that the CATIA workstations you are upgrading are likely to have OpenGL.GL32.xxx filesets installed. If this is the case, you have two options to avoid a possible problem.
The first option is to add the OpenGL.GL32.xxx filesets to the lpp_source resource to be used for the migration installations and also add the names of the filesets to the CASIL bundle file. If these filesets are not available in the lpp_source resource used to migrate a machine that has the older levels of the filesets installed, then the migration is not considered complete. The
Performing the Migration 65

oslevel command will still show the old AIX level even though all of the other filesets on the machine have been migrated to the latest level.
The other option is to delete the OpenGL.GL32.xxx filesets on the client machine before performing the migration install. In order to do this, you should make sure that no other application software you intend to install on the client machines requires the GL3.2 API.
5.4.3.2 Adding Required AIX PTFsThe PTFs required for AIX are specified by a single packaging APAR defined as part of the CASIL level.
There are two possible strategies for storing and using the AIX PTFs required to upgrade a machine from the base level AIX to the level required to match the CASIL level.
The first strategy is to store the required PTFs in the lpp_source resource. This has the benefit that, when you perform a migration install on a client machine, it will be migrated to the level of AIX required for the CASIL level in a single operation. The slight drawback to this method is that if a new CASIL level is announced that is based on the same base level of AIX, it can be a time consuming task to remove the original CASIL level PTFs from the lpp_source directory before installing the new set of PTFs. The other option is to just install the new PTFs in the lpp_source directory, but this could lead to a great deal of disk space being used to store redundant PTFs.
The second strategy is to create a separate lpp_source resource to store the PTFs. This method has a slight disadvantage, as once you have performed a migration install on a client machine, you must also perform an update_all operation using the lpp_source resource containing the PTFs. This is because you can only specify one lpp_source resource for use during a NIM install operation. The main advantage of this method of storing the PTFs is that if a new CASIL level is release based on the same base level of AIX, it is a simple matter to create a new lpp_source with the new CASIL level PTFs and optionally remove the previous CASIL level PTFs lpp_source.
There are benefits and disadvantages to both methods; so, use the one that fits in best with your strategy for defining and storing NIM resources.
5.4.3.3 Removing Redundant Language FilesetsRegardless of how you decide to manage the CASIL level PTFs in your NIM environment, you will want to save some disk space by removing the redundant national language filesets. The national language filesets use a component of the form <language-specifier>_<Country-Specifier> in the
66 AIX Migration in a CATIA Environment
name. The language specifier is two characters in length, and each character can be either uppercase or lower case. This is followed by an underscore character between the language specifier and the country specifier. The country specifier consists of two uppercase characters. For example, devices.msg.de_DE, which specifies German language messages in the German locale for the devices filesets. For most product filesets, the default language fileset contains the en_US component in the fileset name. The default language filesets must be available in the lpp_source.
There may be multiple versions of a messages fileset for the same language, each using a different codepage. For example, devices.msg.En_US, which uses the IBM-850 codepage, and devices.msg.en_US using the default ISO codepage. In a particular environment, it is possible that the only message and locale filesets that actually get installed on a machine are the filesets for the particular national language used in that environment and the default en_US filesets. For example, in France it may be that only filesets containing the fr_FR and en_US components are installed. The other national language message and locale filesets can be removed.
The following command sequence can be run in the lpp_source directory and will allow you to identify the unused national language message and locale filesets to remove. In the example, YOURLANG should be replaced by your default country specifier, for example, DE for Germany.
LANG=C ls *.[a-zA-Z][a-zA-Z]_[A-Z][A-Z].* | grep -v US | grep -v YOURLANG
You should check the output from this command sequence to ensure that it does not contain the names of any filesets you wish to keep in the lpp_source. If it does not contain any required fileset names, you can remove the listed files by simply running the command sequence again, and piping the output to the following command, which will remove the filesets one by one.
xargs -L1 rm
After removing the redundant filesets, you should run the inutoc command to recreate the table of contents, or use SMIT with the nim_res_op fastpath, select the required lpp_source resource and perform a check operation.
5.4.4 Create New SPOT ResourceOnce you have created and customized the lpp_source resource for the new level of AIX, you need to create a SPOT resource that will be used when installing NIM client machines.
Performing the Migration 67

In previous versions of AIX, the process of creating a SPOT would also result in the creation of boot images for all machine type and network adapter combinations. If you only have a single network type, or a single class of machine architecture, this could result in a great deal of wasted disk space. NIM in AIX 4.3.2 has cured this problem by only creating boot images for the machine and adapter combinations that have currently been defined as NIM clients.
The new boot images will be placed in the /tftpboot directory. Before creating the SPOT resource and new boot images, you should check to see if /tftpboot is a file system or just a directory in the root file system. If it is just a directory in the root file system, we suggest that you create a new /tftpboot file system and copy the current boot images into the file system. Each time you create a new SPOT, the new boot images will be created in the /tftpboot file system. If there is not enough space, then the file system can be expanded without impacting the root file system.
5.4.5 Upgrade NIM Resource ServersIf you have NIM resource servers in your environment that contain SPOT resources, you should upgrade them at this time. Administration of a NIM system is much easier if all of the NIM servers are at the same level of AIX. There are two options for upgrading a NIM resource server. You can either use product media and follow the same procedure used for upgrading the NIM master server, or you can use the newly created NIM resources on the master server and upgrade the resource server by performing a migration install. We suggest you use the migration install using NIM. Depending on your network configuration, you may also have to create new lpp_source and SPOT resources on the NIM resource servers.
5.5 Other Server Machines
Once you have upgraded the NIM servers, you are ready to upgrade the other servers in your environment. The decision to upgrade the other servers in your environment needs to be taken on a machine by machine basis. If you have a heterogeneous environment, with a mixture of servers and workstations from different vendors, then the upgrade strategy may be slightly more complicated. The general steps for using NIM to upgrade a single machine are described in section 5.6.1, “Upgrade AIX Component” on page 71.
68 AIX Migration in a CATIA Environment

5.5.1 ADSM Server MachinesClient machines running AIX 4.3.2 must be upgraded to use version 3.1 of the ADSM client code. If your ADSM server machine is not an RS/6000 machine, or you have no plans to upgrade it to AIX 4.3, then there may be no need to upgrade the server component. If you need to upgrade the ADSM server machine to AIX 4.3 for another reason, for example, the machine may also be your NIM server, then you will also need to upgrade the ADSM server component to ADSM 3.1. See section 3.4, “Other Software Dependencies” on page 28 for more information on ADSM considerations.
5.5.2 License Server MachinesA machine acting as an iFOR/LS network license server can be migrated from AIX 4.1 or AIX 4.2 to AIX 4.3.2. During the migration install process, the iFOR/LS server filesets will be removed from the system and replaced with the new LUM server and client filesets.
The iFOR/LS configuration information will be migrated to the new LUM system. Existing iFOR/LS format product licenses will continue to be served by the LUM system. The original iFOR/LS configuration files are preserved in the /usr/lib/netls/conf directory with a .V2 extension appended to the name.
By default, the newly migrated LUM system will continue to use the existing NCS namespace configuration. This means that you can safely migrate your license server machine to AIX 4.3.2 and LUM and existing clients using either NetLS or iFOR/LS client code, such as older versions of CATIA, will still be able to obtain a license.
Refer to section 6.1, “Configuring a LUM License Server” on page 81 for more information on different LUM configuration options.
5.5.3 NIS and NFS Server MachinesRS/6000 machines running AIX 4.x and acting as a NIS master server, NIS slave server, or NFS code and data server, can safely be migrated to AIX 4.3.2. The migration installation will preserve all NIS and NFS server functionality and configuration information.
If you choose to perform a fresh overwrite install on these machines, you will have to manually reconfigure the NIS system along with any NFS exported file systems.
Performing the Migration 69

5.5.4 DB2 Server MachinesMigrating a database from DB2 V2.1 to DB2 UDB V5.2 is beyond the scope of this redbook. For more information on this type of migration, refer to the ITSO redbook Migrating to DB2 Universal Database Version 5, SG24-2006.
The migration of a DB2 database server machine from UDB 5.0 on AIX 4.1.5 to UDB 5.2 on AIX 4.3.2 consists of the following steps:
• Complete all database transactions.
• Ensure all applications disconnect from the instance.
• Ensure all databases are catalogued.
• Take a complete backup of the databases.
• Stop the database manager.
• Take a complete image backup of the AIX system using the mksysb command for rootvg and the savevg command for non-rootvg volume groups.
• Perform a migration install of the AIX component either from product media or by using NIM.
• Install the new DB2 V5.2 software, then install the DB2 fixpack required for the CASIL level.
• Update the DB2 Administration Server using the dasiupdt command.
• Update each instance using the db2iupdt command.
• Start the DB2 system.
• Update the catalog of each database in the instance using the db2upd52 command.
For more information, see the product documentation supplied with DB2 or refer to the DB2 product documentation available on the Internet at:
http://www.software.ibm.com/data/db2/library
5.5.5 CDM and VPM Server MachinesThe migration of CDM and VPM machines, and the migration from CDM to VPM, is beyond the scope of this redbook.
70 AIX Migration in a CATIA Environment

5.6 Update First Client Machine
Once you have upgraded your servers, there are a number of ways of upgrading the CATIA client machines. There are two steps to the migration of the client machine.
The first step is to update the AIX component either by doing a migration install on each machine or by performing a complete overwrite install on each machine. The other option is to perform a fresh install on a sample machine to create a standard workstation image for your environment. You can then create a mksysb image of this workstation, and use NIM to restore it on the other client machines. The use of this option is most useful when you have a large number of machines with similar or identical configurations. Machines with special configurations, such as those used to test new products, are better served by the individual migration install. You should have decided on the method to use for each machine as part of the planning process, detailed in Chapter 3, “Planning for Migration” on page 23.
The second step is to upgrade the CATIA component used by the client machine. The method of updating the CATIA component will depend on how the client machines currently access the CATIA code. Normally, the CATIA code will either be installed locally on the client machine or NFS mounted from a code server.
Depending on how you intend to install the remaining clients in your environment, you may want to use the task of installing the first machine as a test-bed for developing scripts that will allow subsequent migrations to take place unattended.
If you are going to create a standard mksysb image for upgrading many client machines, you should also read Chapter 6, “Exploiting New Functionality” on page 81 before proceeding. This will allow you to implement any desired new functionality on the machine used to create the standard image.
5.6.1 Upgrade AIX ComponentWhen upgrading your first client machine, you have a choice to either perform a migration installation or a new and complete overwrite. You should have decided which method to use as part of the planning process, detailed in Chapter 3, “Planning for Migration” on page 23. Regardless of the method you choose, you can perform the installation using NIM or product media.
Performing the Migration 71

This section describes using NIM to perform the upgrade. See section 5.4.1, “Upgrade NIM Master” on page 62 for a description of performing an upgrade from product media.
You can use the process of upgrading your first client machine as a test-bed for developing a bosinst.data file and an optional customization script for use when upgrading the remainder of your client machines. The bosinst.data file can be used to perform a non-prompted install on the client machine. This is very useful when you have large numbers of client machines, or client machines that are remote from the central administration site. Appendix B, “Sample Files for Use with NIM” on page 157 contains two sample bosinst.data files.
The NIM resources used for both the new and complete overwrite install and the migration install are the same. The choice between a new and complete overwrite installation and the migration installation is made either at the menu prompts on the console of the client machine being installed, or in the value of the INSTALL_METHOD variable in the bosinst.data file used in the installation.
If you want to use a bosinst.data file as part of a NIM installation, you will have to create the file and define it as a NIM bosinst_data resource before starting the NIM install operation.
Invoke SMIT with the nim_bosinst fastpath to access the appropriate dialogs for performing a NIM installation. Select the target machine (or NIM group) for the operation, then select the installation type. The installation type is either rte for migration or overwrite installs to use the product images in the lpp_source resource or mksysb if you are restoring from a previously created mksysb image. Next, select the SPOT and lpp_source resources to use for the install. The SPOT, lpp_source and optional mksysb image resources used to perform the install should all be at an identical level of AIX. You will see a SMIT panel similar to that shown in Figure 8. You should now select any additional options, such as bosinst_data resources for performing a non-prompted install, and a bundle file, such as the CASIL bundle, for installing additional software components. You should then press ENTER to start the installation.
72 AIX Migration in a CATIA Environment
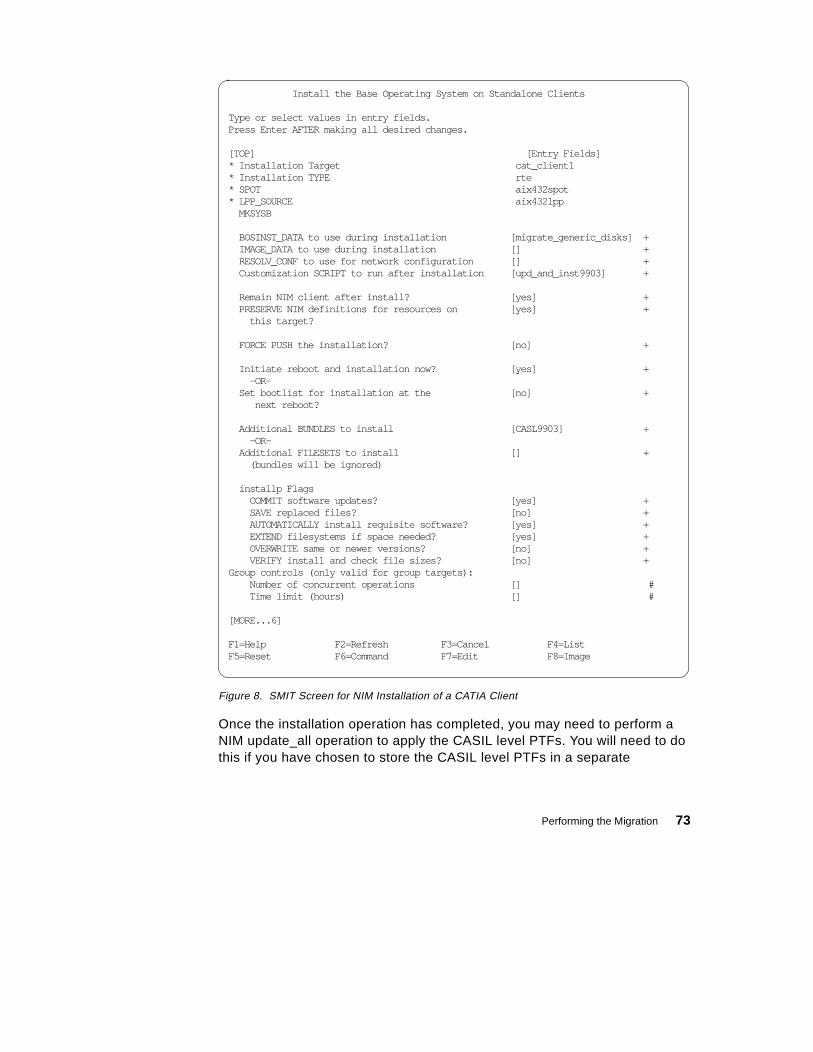
Figure 8. SMIT Screen for NIM Installation of a CATIA Client
Once the installation operation has completed, you may need to perform a NIM update_all operation to apply the CASIL level PTFs. You will need to do this if you have chosen to store the CASIL level PTFs in a separate
Install the Base Operating System on Standalone Clients
Type or select values in entry fields.Press Enter AFTER making all desired changes.
[TOP] [Entry Fields]* Installation Target cat_client1* Installation TYPE rte* SPOT aix432spot* LPP_SOURCE aix432lpp MKSYSB BOSINST_DATA to use during installation [migrate_generic_disks] + IMAGE_DATA to use during installation [] + RESOLV_CONF to use for network configuration [] + Customization SCRIPT to run after installation [upd_and_inst9903] + Remain NIM client after install? [yes] + PRESERVE NIM definitions for resources on [yes] + this target? FORCE PUSH the installation? [no] + Initiate reboot and installation now? [yes] + -OR- Set bootlist for installation at the [no] + next reboot? Additional BUNDLES to install [CASL9903] + -OR- Additional FILESETS to install [] + (bundles will be ignored) installp Flags COMMIT software updates? [yes] + SAVE replaced files? [no] + AUTOMATICALLY install requisite software? [yes] + EXTEND filesystems if space needed? [yes] + OVERWRITE same or newer versions? [no] + VERIFY install and check file sizes? [no] +Group controls (only valid for group targets): Number of concurrent operations [] # Time limit (hours) [] # [MORE...6] F1=Help F2=Refresh F3=Cancel F4=List F5=Reset F6=Command F7=Edit F8=Image
Performing the Migration 73
lpp_source. See section 5.4.3.2, “Adding Required AIX PTFs” on page 66 for more information.
If you need to perform the update, start SMIT with the nim_update_all fastpath. Select the target machine, or group of machines, for the operation, and then select the lpp_source resource where the PTFs are stored. You may need to reboot the client system after updating it with the PTFs. You should check the output of the update_all NIM operation to see if this is required.
5.6.2 Update CATIA ComponentThe method used to update the CATIA component will depend on whether the client machine has the CATIA code installed locally in the default directory or in a multiversion structure as discussed in section 3.8, “CATIA Installation Strategy” on page 39, or NFS mounted from a code server. You may have a mixture of all configurations in your environment. If this is the case, you may have to prepare a number of mksysb images for use by the NIM server, one for each type of CATIA install.
5.6.2.1 Update CATIA in a Default EnvironmentTo update your CATIA installation from V4.1.9 to V4.2.0 R1, there is no way to really update, since every Refresh level must be activated by a new installation process. The easiest way to bring your system to a higher CATIA level during a migration or an overwrite installation is to use a NIM configuration script, which runs the CATIA installation steps. For a sample, see Appendix B.3, “Sample NIM Customization Script” on page 160. The script should perform the following steps. We assume a migration installation, and that CATIA V4.1.9 is installed in /usr/catia and the catadm administrator in /home/catadm.
1. Unmount the CATIA and catadm file systems.
2. Use the mkfs command to reformat the file systems. This is much faster than using the rm command to delete the contents of the file system. This assumes the file system does not contain any additional information you wish to keep.
3. Mount the new /usr/catia and /home/catadm file systems.
4. Mount the CATIA install directory from an install server. (This directory holds the contents of the CATIA install CD.)
5. Mount the CATIA PTF directory from an install server. (This directory holds the PTFs for the CASIL 9903 CATIA level.)
6. Create the /usr/catia/unload directory.
74 AIX Migration in a CATIA Environment

7. Change directory to /usr/catia/unload and use the tar command to extract the CATIA STARTER after you have set the CAT_UNLOAD variable to /usr/catia/unload.
8. Unload the CATIA code with the /usr/catia/unload/code/bin/wfunload command.
9. Unload the CATIA PTF code with the /usr/catia/unload/code/bin/wfunload command.
10.Use the /usr/catia/unload/code/bin/wfbascfg command for a Create in one Step operation to create the CATIA run time environment.
11.Install the catalogs and create the CNEXT environment with the /usr/catia/cfg/code/bin/catmenu command.
12.Copy the declaration environment from a server to /home/catadm/dec.
5.6.2.2 Update CATIA in a Multiversion StructureThere is much more flexibility in a CATIA environment when using a multiversion structure as described in section 3.8, “CATIA Installation Strategy” on page 39. With this structure, you can add a new release or refresh level of CATIA during a normal working day when users are working with another CATIA level.
The idea is to use one CATIA workstation as a builder machine on which the CATIA code and administrator data is installed in a structure similar to the default layout as described in section 5.6.2.1, “Update CATIA in a Default Environment” on page 74. The difference, in this case, is that the CATIA code, cfg and catadm directories are under /cat/catia1 as shown below:
/cat/catia1--/unload-/cfg-/catadm
After installation, the new code can be tested on the builder machine. If the new code passes the evaluation criteria, define this level as a new checkpoint and distribute it to all clients. When distributing the data, only the cfg and the catadm directories are copied to the client structure, which is shown in Figure 3 on page 47. The symbolic links in the cfg directory to files in the unload directory are resolved, and only the files that are used are copied to the clients. Files in the unload directory that are not referenced from the cfg directory are not copied. You can use a NIM script, or other software, such as Tivoli Software Distribution for distributing the code.
Performing the Migration 75

While a CATIA user is working with the /cat/catia1 code, a new level can be copied to the /cat/catia2 directory. The switch between the two versions can be done in different ways:
• Create symbolic links from /cat/catia<n>/cfg to /usr/catia/cfg and /cat/catia<n>/catadm to /home/catadm. In this way, you can use the default CDE utilities that are delivered by CATIA.
• Use a GUI interface written in Dtscript or Tcl/TK (graphical script languages for creating windows interfaces) where the CATIA user can select the proper environment.
• Use Ksh commands or a script to start CATIA:
. /cat/catia1/catadm/env/YOUR.envcatini -XM -qs
5.6.3 Creating a Standard ImageThe process of creating a standard image is relatively straightforward. You can create as many different standard images as you want assuming that you have enough disk space on the NIM servers to store them.
The procedure starts with installing an RS/6000 client machine from the NIM server using a fresh overwrite install. As part of the install, you should remember to select the correct CASIL bundle file resource to ensure that the additional AIX components required to run CATIA are installed. Note that the CASIL bundle file may not reference all of the filesets you require in your environment, such as DB2 client filesets or compiler filesets. The client should also be configured to remain a NIM client after the install.
You can create a standard image by taking a mksysb backup of a machine that has had a migration install performed to upgrade it to the latest version of AIX. There is little difference between distributing this mksysb to other clients and performing a migration install directly on the client. For this reason, we do not discuss this method.
After the AIX installation has completed, you will need to configure the system to fit into your CATIA environment. This could include such tasks as configuring the machine as a NIS client, adding any required NFS mounted file systems, and configuring printer information. You will also need to install and configure the CATIA component. The CATIA code can be installed on local disk or mounted from a remote NFS server. The choice is yours depending on how you have decided to configure your environment.
After creating the new standard image, you should test the functionality available. This is to ensure that the CATIA users can still perform their job
76 AIX Migration in a CATIA Environment

tasks when using the new standard image. You should check for such things as:
• Can the user log on to the new image using their NIS userid and password.
• Can they start the required version of CATIA? This tests that the license configuration is working correctly.
• Can they access the CATIA models and data they require to perform their job?
• Are other environment services, such as backups and printers, working as expected?
• Once you are satisfied that the new client is correctly configured in the environment, you can use the NIM master machine to define a NIM mksysb resource. This process allows the NIM master to create a new mksysb NIM resource by performing a mksysb image backup of the client machine. This can be performed without the need to use a tape device to create the image on the client.
The new mksysb resource, along with the other NIM resources you have defined, can then be used to upgrade other client machines. If the target client machine has a different hardware configuration than the machine used to create the mksysb resource, the missing device drivers will be installed from the lpp_source resource used as part of the NIM install.
5.7 Upgrade Other Clients
Once you have updated the first client machine, you are ready to roll out the new configuration to the rest of your environment. Regardless of the installation method you choose to upgrade the rest of your client machines, you can use the new machine group functionality in NIM to initiate operations on multiple machines at the same time. This functionality can be used with the new and complete overwrite install, the migration install, and when restoring from a previously created mksysb image.
5.7.1 Concurrent Group OperationsA NIM machine group allows an administrator to treat a group of related client machines as a single object. The administrator can create a NIM group and define which machines are members of the group. The group can then be used as the target for certain NIM operations. Under the covers, the NIM system will initiate the same NIM action on each machine in the group. A machine can be in more than one NIM group.
Performing the Migration 77

The most sensible way to manage a large NIM environment with many clients is to group the clients in related NIM groups. You may define groups of related machines, such as all machines with a spacemouse device, all machines in the same department, all machines of a particular CPU type, and so on.
For example, if you wanted to install a software update for the GXT800P device driver, you would use the NIM group containing all machines with GXT800P graphics adapters as the target for the NIM software update operation.
Depending on the NIM operation and numbers of machines involved, resource constraints can sometimes be encountered. For example, many machines performing a mksysb install action could saturate a network segment.
To counter this, two new settings are available when performing NIM operations on group resources. Together, they allow the administrator to specify how many concurrent operations should be attempted on machines in the group and for how long the NIM server should continue to initiate the operations.
For example, this would allow the administrator of a NIM environment with a machine group of 100 machines to initiate a NIM operation on the group and to specify that no more than 10 machines in the group should have the operation in progress at any one time. This ensures that the network bandwidth is not exhaustively consumed. When a NIM operation completes on a client machine, the NIM server initiates an operation on the next machine in the group until all group members have been processed, or the time limit has been exceeded. The options are in place for the duration of the NIM operation.
5.7.2 Non-Prompted NIM InstallIt is possible to provide additional configuration scripts as part of the NIM install process that removes the need for a system administrator to respond to menu prompts on the console of the machine being installed. As with the NIM group operations, this functionality can be used with any of the three NIM installation types you can choose from, namely the new and complete overwrite install, the migration install, and the mksysb install.
The functionality is implemented by supplying a customized bosinst.data file along with the lpp_source and SPOT resources for use by the installation program. The file contains stanzas that control various installation options,
78 AIX Migration in a CATIA Environment

such as the device to be used as the console, the keyboard language setting, and the disks to be used for the install. Some of the most important ones are detailed below.
CONSOLE Defines the device to be used as the system console. If the value is not set, or is set to a device that is not present, for example /dev/tty4 on a machine with only two rs232 serial ports, then the installation will prompt the user for a console definition.
INSTALL_METHOD Defines the installation method to be used. A value of overwrite should be used when performing a new and complete overwrite or when restoring from a mksysb image. A value of migrate should be used when a migration installation is desired.
PROMPT Defines whether the installation should proceed without prompting the user. For a non-prompted install, use the value no. If other required values in the bosinst.data are missing or incompatible with other settings, then the install program will revert to prompting the user for input.
EXISTING_SYSTEM_OVERWRITE Possible values are yes, no, and any. This value determines if the install program will overwrite disks that already have data on them. A value of yes means the install program will only use disks already in the current rootvg volume group. A value of no means the install program will only use disks not in any volume group. A value of any means the install program can use any disk on the system.
A sample bosinst.data file for use when restoring from a mksysb NIM resource is shown in Appendix B.1, “Sample bosinst.data File for mksysb Install” on page 157. A sample bosinst.data file for use when performing a non-prompted migration install is shown in Appendix B.2, “Sample bosinst.data File for Migration Install” on page 159.
Performing the Migration 79

If you have bosinst.data files from your AIX 4.1 or 4.2 NIM system, then they can still be used with the AIX 4.1 or 4.2 SPOT and lpp_source resources with which they were configured to work. The bosinst.data file has some new fields for use when installing AIX 4.3. See the "bosinst.data File Stanza Descriptions" section of the AIX Version 4.3 Installation Guide product documentation for more information on the format of the bosinst.data file. The document can be viewed online at:
http://www.rs6000.ibm.com/doc_link/en_US/a_doc_lib/aixins/aixinsgd/toc.htm
5.8 Post Migration Tasks
After you have performed the successful migration of your environment, you should monitor system performance more closely than you normally do. You should do this for a period of time to ensure that the new environment offers at least the same performance as your old environment.
You should also take backups of the machines in the new environment. This is so you can restore a machine to its post-migration state if you have to recover from a backup for any reason rather than restoring a pre-migration backup and having to perform the migration of that machine for a second time.
80 AIX Migration in a CATIA Environment
Chapter 6. Exploiting New Functionality
This chapter explains some of the new functionality available when using CATIA V4.2.0 R1 with AIX 4.3.2. Once you have completed the migration and tested that your environment is working correctly, you can use this chapter for suggestions on how to enhance your configuration. Some tasks, such as making use of the new LUM functionality, are highly recommended. Implementation of some of the new NFS related features, such as AutoFS and CacheFS, will depend on the specific configuration of your environment.
The chapter concludes with an overview of the latest CATIA family products, CATweb V2.2.1, and CATIA Version 5. These sections are included to give you an insight into the new functionality and are provided as input for the medium term planning for your environment.
6.1 Configuring a LUM License Server
The License Use Management system retains all of the functionality of the previous iFOR/LS system and improves ease of use and configuration for the end user. LUM provides a new graphical user interface (GUI) that makes the installation and configuration of both servers and clients much easier and more user-friendly. A command line interface is also supplied to satisfy the requirements of environments that do not have a graphics display on the license server machines.
As with iFOR/LS, the LUM system still relies on the Network Computing System (NCS) to provide binding features. It can be installed in existing NCS cells and coexist with other NCS served applications. A new feature of LUM is the ability to perform direct binding between servers and clients without using the Global Location Broker daemon to advertise services. In these situations, license clients can be set up without installing bos.net.ncs as a prerequisite.
If you have performed an AIX migration install on a license server machine that was previously running an iFOR/LS license server, the configuration information and product license details will have been migrated. After the migration, the LUM system will be configured to use the same namespace binding configuration as the previous iFOR/LS configuration. Vendor and product license information will also have been migrated, and the license server will continue to issue iFOR/LS format product licenses.
For more information, install the online LUM product documentation, which is supplied on the AIX product media in the ifor_ls.html.en_US.base.cli fileset.
© Copyright IBM Corp. 1999 81

6.1.1 New LUM CommandsThe LUM system provides a new set of commands for configuration purposes. Most of the commands are in the /var/ifor directory, which is not on the default PATH environment variable. If you are going to be running the LUM commands on a regular basis, it is worth adding this directory to your PATH variable in your shell startup file, for example, $HOME/.profile for ksh users.
6.1.1.1 i4blt CommandThe i4blt command, otherwise known as the Basic License Tool, is used to obtain information about the installed licenses and to add or delete licenses from a license server. If invoked with no options, the command starts the LUM Basic License Tool graphical user interface, as shown in Figure 9. The GUI includes support for performing operations on individual licenses by selecting the required license, then pressing the right mouse button to access a popup menu offering various license administration options.
Figure 9. i4blt Command Graphical User Interface
When invoked with options, the command will display the requested information and then exit without starting the graphical user interface. This allows the command to be used in user written shell scripts.
Examples of command line use include:
• To list the active license servers:i4blt -ln
• To list the vendors of products licensed by the server server_name:i4blt -lv -n server_name
• To list the vendors of products licensed by all available servers:i4blt -lv
• To list the products licensed by server server_name:
82 AIX Migration in a CATIA Environment

i4blt -lp -n server_name
• To list all of the licenses on all available servers along with current usage information:i4blt -s -lc
• To list the licenses granted to the user user on server server_name:i4blt -s -lc -n server_name -u user
6.1.1.2 i4cfg CommandIf invoked with no options, the command starts the graphical user interface for the LUM Configuration Tool graphical user interface, as shown in Figure 13 on page 88.
If invoked with command line options, it performs the requested action and exits without starting the graphical tool. This allows the command to be incorporated into user written shell scripts. The main command line options are:
-list Displays the list of active subsystems. -script Enables you to configure your machine with a guided step-by-step
procedure. -start Starts all the subsystems you have configured to run on the
machine. -stop Stops all the subsystems that are running on your machine.
6.1.1.3 i4tv CommandThe i4tv command is a test and verification tool. It can be used to test that license servers are running and properly configured.
6.1.1.4 LUM DaemonsA machine configured as a license server can have many daemon processes started depending on the LUM configuration options chosen. The purpose of each damon is identified in the following list.
• llbd (Local Location Broker Subsystem) • glbd (Global Location Broker Subsystem) • i4lmd (License Server Subsystem) • i4llmd (Nodelocked License Server Subsystem) • i4gdb (Central Registry Subsystem) • i4glbcd (Global Location Broker Data Cleaner Subsystem)
6.1.2 LUM Scenarios for CATIA EnvironmentsThe following sections demonstrate how the different bindings, namespace and direct can be used in customer environments. The use of the new direct binding can be a smooth way to migrate to the new LUM functionality. You can
Exploiting New Functionality 83
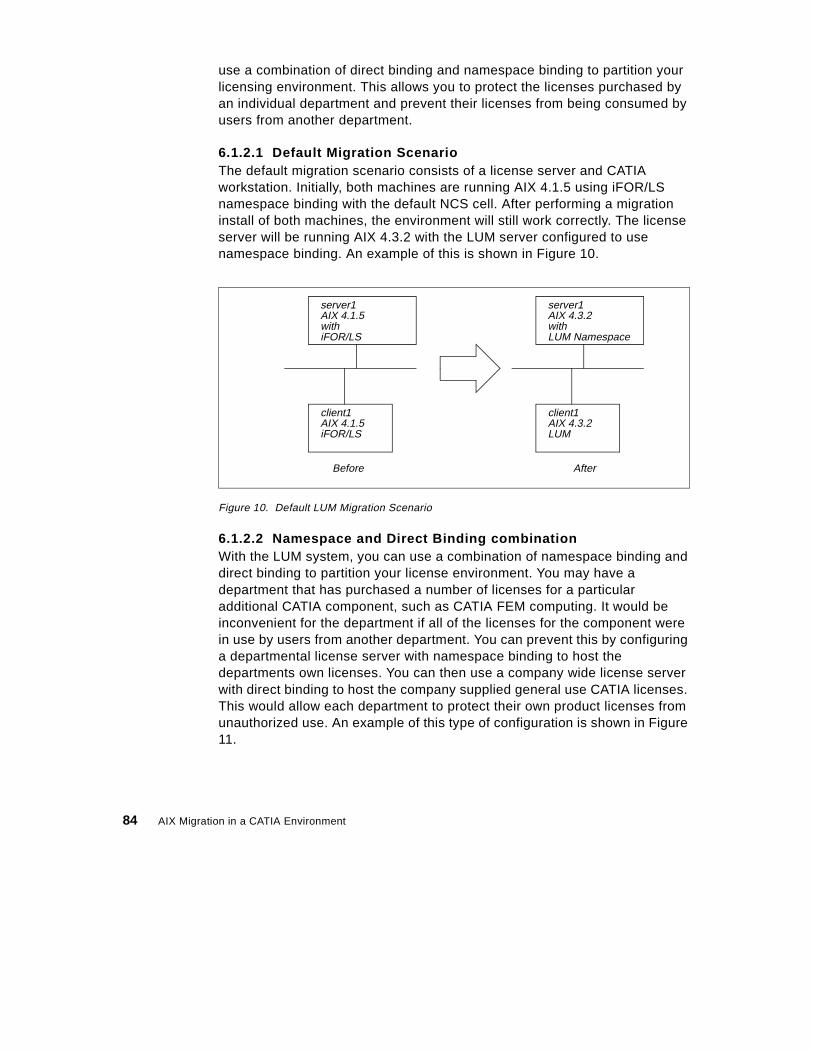
use a combination of direct binding and namespace binding to partition your licensing environment. This allows you to protect the licenses purchased by an individual department and prevent their licenses from being consumed by users from another department.
6.1.2.1 Default Migration ScenarioThe default migration scenario consists of a license server and CATIA workstation. Initially, both machines are running AIX 4.1.5 using iFOR/LS namespace binding with the default NCS cell. After performing a migration install of both machines, the environment will still work correctly. The license server will be running AIX 4.3.2 with the LUM server configured to use namespace binding. An example of this is shown in Figure 10.
Figure 10. Default LUM Migration Scenario
6.1.2.2 Namespace and Direct Binding combinationWith the LUM system, you can use a combination of namespace binding and direct binding to partition your license environment. You may have a department that has purchased a number of licenses for a particular additional CATIA component, such as CATIA FEM computing. It would be inconvenient for the department if all of the licenses for the component were in use by users from another department. You can prevent this by configuring a departmental license server with namespace binding to host the departments own licenses. You can then use a company wide license server with direct binding to host the company supplied general use CATIA licenses. This would allow each department to protect their own product licenses from unauthorized use. An example of this type of configuration is shown in Figure 11.
server1AIX 4.3.2with LUM Namespace
client1AIX 4.3.2LUM
server1AIX 4.1.5with iFOR/LS
client1AIX 4.1.5iFOR/LS
Before After
84 AIX Migration in a CATIA Environment

Figure 11. Namespace and Direct Binding Combination Scenario
Only client1 can obtain the licenses held by server1 since client2 does not belong to the NCS cell running on server1. For the same reason, client1 is unable to obtain a license from server2. Both clients can obtain licenses from server3, which is using direct binding.
To configure a client to use both namespace binding and direct binding, edit the file /etc/ncs/glb_site.txt on the client. The file lists the machines in the NCS cell. Using Figure 11 as an example, the file on client1 would contain the lines:
ip:client1ip:server1
For the next step in the configuration, copy the file /etc/ncs/glb_obj.txt, which contains the namespace cell identifier, from the server to the client.
You must also modify the /var/ifor/i4ls.ini file on all clients to enable both namespace binding and direct binding.
...NamespaceBindingSupport=yesDefaultCell=noUseDirectBindingOnly=noNumDirectBindServers=1DirectBindServer1=ip:dserver1[1515]
You can, if you wish, implement a similar scenario but instead use namespace binding for a single large cell including all of the machines and use direct binding for the local department administered licenses.
server1LUM
NSB in cell1with
server2LUMwith NSB cell2
server3LUMwith Direct Binding
client1inNSB cell1
client2inNSB cell2
NSB - Name Space Binding
Exploiting New Functionality 85

6.1.2.3 Hierarchical Direct Binding StructureThe mixture of namespace and direct binding, as described in section 6.1.2.2, “Namespace and Direct Binding combination” on page 84, can be useful for protecting department owned licenses. The drawback, however, is that if a client is unable to obtain a product license from the namespace license server, for example, if the server is not running or has no more licenses, then it is not able to make use of any unused licenses on other namespace servers. This problem can be solved with the use of hierarchical direct binding. This allows you to configure a client machine with a list of direct binding servers to attempt to obtain licenses from. By careful configuration, you can maintain the equivalent of NCS cells in your environment by having configuration files that use different sets of direct binding servers.
For example, you may have two departments with their own product licenses, and a company wide pool of additional licenses, for use if all the licenses in a department are in use. Each department uses its own direct binding LUM server and will contact the common pool server if the local server is unable to issue a product license.
Figure 12. Hierarchical Direct Binding Structure
The NCS configuration files /etc/ncs/glb_site.txt and /etc/ncs/glb_obj.txt are not used since the clients are not using namespace binding and are only using direct binding. The configuration is performed by editing the /var/ifor/i4ls.ini file on each client to contain a list of the servers it should contact to obtain product licenses.
The /var/ifor/i4ls.ini file on client1 contains information on server1 and the pool server:
...
server1LUM
Direct Bindingwith
server2LUMwith Direct Binding
pool_serverLUMwith Direct Binding
client1with access to
client2with access toserver2 andserver1 and
pool_server pool_server
86 AIX Migration in a CATIA Environment
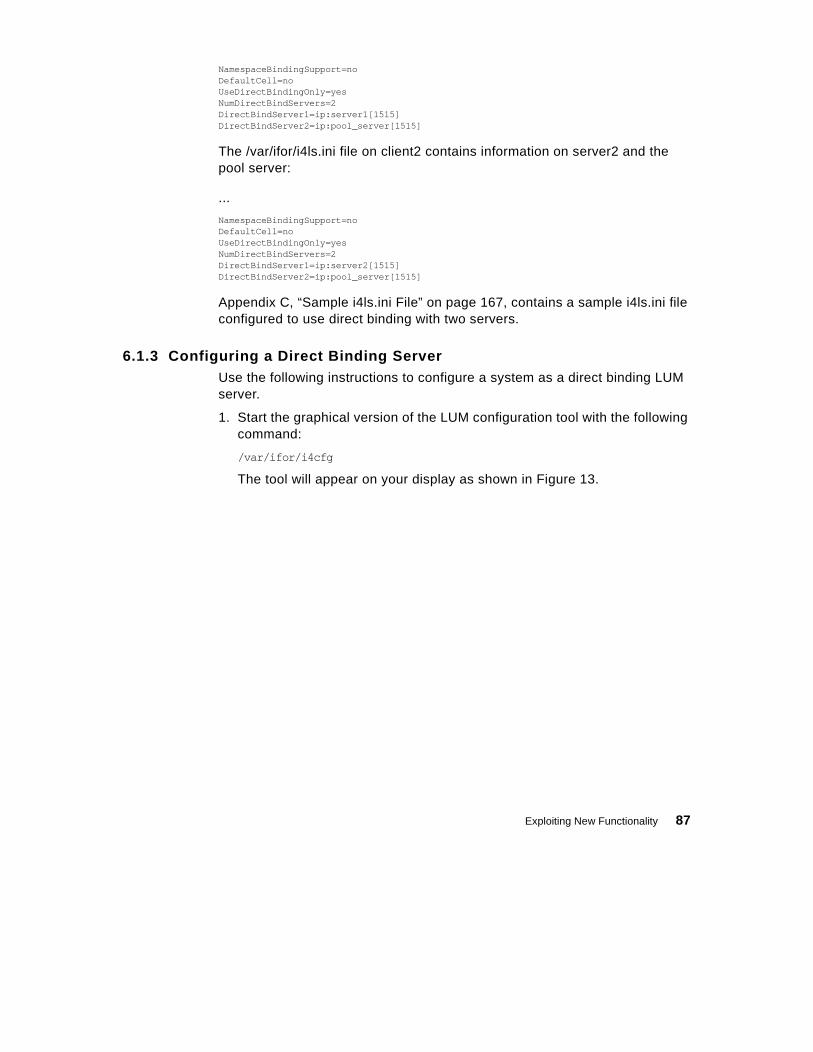
NamespaceBindingSupport=noDefaultCell=noUseDirectBindingOnly=yesNumDirectBindServers=2DirectBindServer1=ip:server1[1515]DirectBindServer2=ip:pool_server[1515]
The /var/ifor/i4ls.ini file on client2 contains information on server2 and the pool server:
...
NamespaceBindingSupport=noDefaultCell=noUseDirectBindingOnly=yesNumDirectBindServers=2DirectBindServer1=ip:server2[1515]DirectBindServer2=ip:pool_server[1515]
Appendix C, “Sample i4ls.ini File” on page 167, contains a sample i4ls.ini file configured to use direct binding with two servers.
6.1.3 Configuring a Direct Binding ServerUse the following instructions to configure a system as a direct binding LUM server.
1. Start the graphical version of the LUM configuration tool with the following command:
/var/ifor/i4cfg
The tool will appear on your display as shown in Figure 13.
Exploiting New Functionality 87

Figure 13. i4cfg Command Graphical User Interface
2. Select the Configure As tab and ensure that the following options are checked:
• NodeLocked License Server (NodLS)
• Network License Server (NetworkLS)
• Advanced configuration
3. Select the Direct Binding tab, to display the page as shown in Figure 14.
For CATIA LUM servers, you do not need to check the boxes for Central Registry License Server since CATIA does not utilize Customer-Managed Licences. You should start the NodeLocked License Server if you will be installing nodelock licenses, such as compilers, on the server machine.
Note
88 AIX Migration in a CATIA Environment

Figure 14. Configuration Tool Direct Binding Servers Page
4. Define the direct binding servers by entering the server hostname and checking the boxes for the functionality required for each server. For the example shown in Figure 12, all three boxes should be checked for the pool_server, but only the NetworkLS box should be checked for the department servers. Select the Add button after entering information about each server.
5. Select the Start Up tab and check the Start services at system startup box.
6. Select the Log tab, as shown in Figure 15, and configure the license events you want to be logged by the server.
Exploiting New Functionality 89
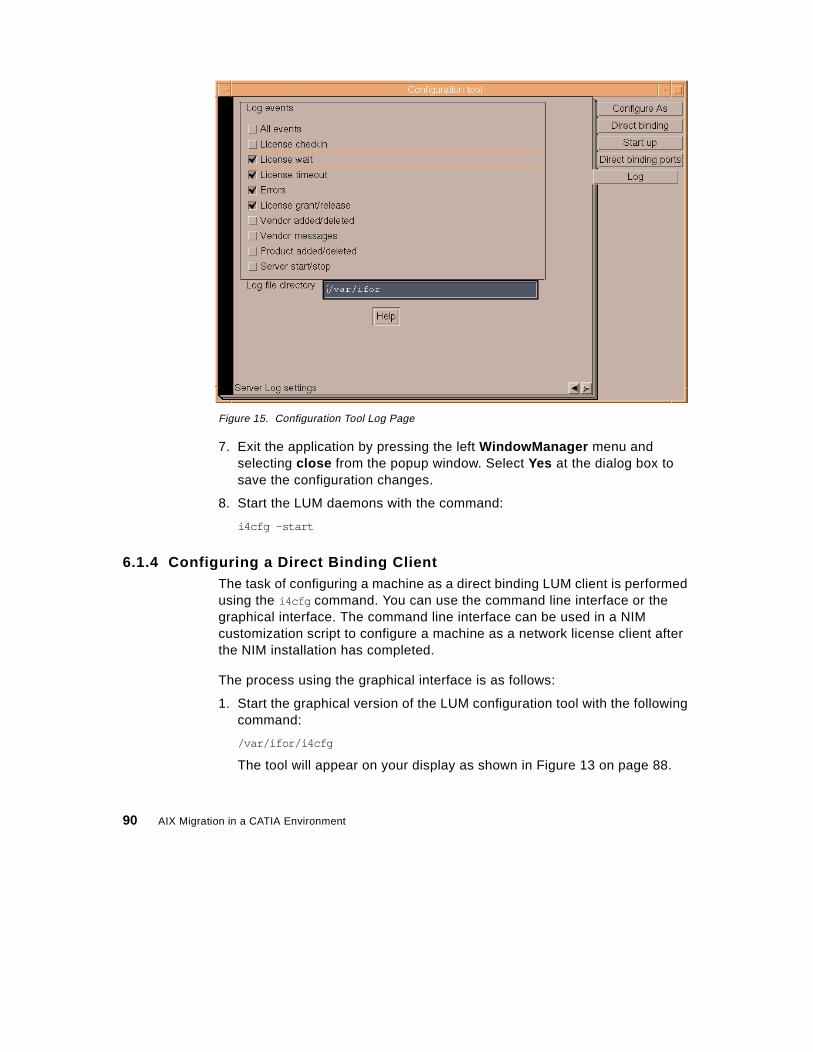
Figure 15. Configuration Tool Log Page
7. Exit the application by pressing the left WindowManager menu and selecting close from the popup window. Select Yes at the dialog box to save the configuration changes.
8. Start the LUM daemons with the command:
i4cfg -start
6.1.4 Configuring a Direct Binding ClientThe task of configuring a machine as a direct binding LUM client is performed using the i4cfg command. You can use the command line interface or the graphical interface. The command line interface can be used in a NIM customization script to configure a machine as a network license client after the NIM installation has completed.
The process using the graphical interface is as follows:
1. Start the graphical version of the LUM configuration tool with the following command:
/var/ifor/i4cfg
The tool will appear on your display as shown in Figure 13 on page 88.
90 AIX Migration in a CATIA Environment

2. Ensure that only the Network License Client option is checked.
3. Select the Direct binding tab to display the page as shown in Figure 16.
4. Enter the hostname of a direct binding server you want this client to be able to use: Check NetworkLS, Central Registry LS, or both, depending on the roles the server plays in the network.
5. Press the <<Add button to add the server. The list of servers this client can access is displayed in the panel at the top of the window.
6. Repeat this process until you have entered all of the servers you want this client to access.
7. When you have finished entering the names of the license servers, exit the application by pressing the left WindowManager menu and selecting close from the popup window. Select Yes at the dialog box to save the configuration changes.
Figure 16. Direct Binding Client Configuration
Using the server names as shown in Figure 16 as an example, the command line which would configure a network license client to use the same direct binding servers is:
Exploiting New Functionality 91
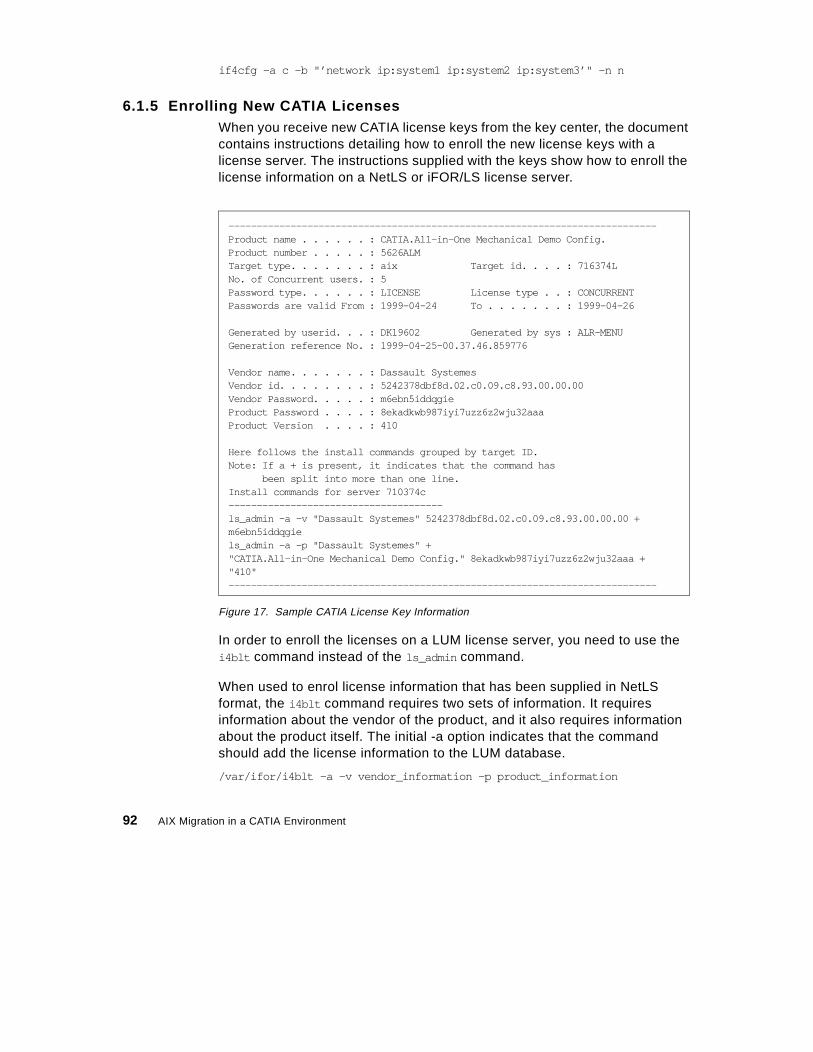
if4cfg -a c -b "’network ip:system1 ip:system2 ip:system3’" -n n
6.1.5 Enrolling New CATIA LicensesWhen you receive new CATIA license keys from the key center, the document contains instructions detailing how to enroll the new license keys with a license server. The instructions supplied with the keys show how to enroll the license information on a NetLS or iFOR/LS license server.
Figure 17. Sample CATIA License Key Information
In order to enroll the licenses on a LUM license server, you need to use the i4blt command instead of the ls_admin command.
When used to enrol license information that has been supplied in NetLS format, the i4blt command requires two sets of information. It requires information about the vendor of the product, and it also requires information about the product itself. The initial -a option indicates that the command should add the license information to the LUM database.
/var/ifor/i4blt -a -v vendor_information -p product_information
----------------------------------------------------------------------------Product name . . . . . . : CATIA.All-in-One Mechanical Demo Config.Product number . . . . . : 5626ALMTarget type. . . . . . . : aix Target id. . . . : 716374LNo. of Concurrent users. : 5Password type. . . . . . : LICENSE License type . . : CONCURRENTPasswords are valid From : 1999-04-24 To . . . . . . . : 1999-04-26
Generated by userid. . . : DK19602 Generated by sys : ALR-MENUGeneration reference No. : 1999-04-25-00.37.46.859776
Vendor name. . . . . . . : Dassault SystemesVendor id. . . . . . . . : 5242378dbf8d.02.c0.09.c8.93.00.00.00Vendor Password. . . . . : m6ebn5iddqgieProduct Password . . . . : 8ekadkwb987iyi7uzz6z2wju32aaaProduct Version . . . . : 410
Here follows the install commands grouped by target ID.Note: If a + is present, it indicates that the command has been split into more than one line.Install commands for server 710374c--------------------------------------ls_admin -a -v "Dassault Systemes" 5242378dbf8d.02.c0.09.c8.93.00.00.00 +m6ebn5iddqgiels_admin -a -p "Dassault Systemes" +"CATIA.All-in-One Mechanical Demo Config." 8ekadkwb987iyi7uzz6z2wju32aaa +"410"----------------------------------------------------------------------------
92 AIX Migration in a CATIA Environment

The vendor information is required in the form of a single string containing three components: The vendor name, the vendor identifier, and the vendor password. The vendor name is included in single quotes, to allow spaces to be used. The format is as follows:
"’vendor name string’ vendor_NetLS_Identifier vendor_NetLS_password"
The product information is also required in the form of a single string containing a number of components: The product name, the product version information, the product password, and an optional license annotation. The format is as follows:
"’product name string’ ’product_version’ product_password annotation"
If the license key information supplied by the key center includes an annotation, it must be included with the product license information used with the i4blt command.
Using the license information shown in Figure 17 as an example, the single command to enrol both the vendor information and the product license information is:
/var/ifor/i4blt -a \-v "’Dassault Systemes’ 5242378dbf8d.02.c0.09.c8.93.00.00.00 m6ebn5iddqgie" \-p"’CATIA.All-in-One Mechanical Demo Config.’ ’410’ 8ekadkwb987iyi7uzz6z2wju32aaa "
If you add more products from the same vendor, you still need to supply the complete vendor information, that is, vendor name, vendor identifier, and vendor password.
You can use the i4blt tool to confirm that the licenses have been added correctly to the LUM server.
6.1.6 Problem Determination with CATIA and LUMThe CATIA licensing mechanism in a large scale network can sometimes be very erratic. In most cases, the environment can be cleaned up with a simple stop and start of the license servers. The following sections detail some of the most common LUM problems experienced in CATIA environments.
6.1.6.1 CATIA Startup ProcessWhen a CATIA client session is started, the application has to obtain individual licenses for each CATIA component in the configuration. In order to do this, it potentially has to contact many license servers, some of which may not be responding. The licensing system waits for a timeout period before trying the next server in the list.
Exploiting New Functionality 93

6.1.6.2 Nodelock License ProblemsIf the CATIA client uses nodelock licenses, you can perform the following checks if you suspect a licensing problem.
• Check that the nodelock file is in the directory /var/ifor after a migration. • Check that the nodelock file has read permission for everyone:
# ls -l /var/ifor/nodelock-rw-r--r-- 1 root system 187 Feb 19 19:45 /var/ifor/nodelock
• Check the characters used in the nodelock file. • Use only lower case character • Check 1 and l (lower case L) if you received the keys by fax. • Check 0 (zero) and O (upper case o) if you received the keys by fax. • Check for use of the ’ character instead of ". • There should be no space between the double quotes in the
annotation. • If you received the keys through email on a PC, check if there are
carriage return character in the file. These show up as ^M when using the vi editor.
• If it is an old RLM format nodelock file, add the annotation and version fields as detailed in section 3.7.2.1, “Nodelocked License” on page 34.
6.1.6.3 Namespace Binding ProblemsIf the CATIA client uses namespace binding, use the following checks to try and correct any problems.
• If you use an alternate cell, that is, a cell other than the NCS default cell, copy the /etc/ncs/glb_obj.txt file from the server.
• Check the /etc/ncs/glb_site.txt file for the correct server name. • Check if all expected license servers are running with the following
command:/var/ifor/i4cfg -list
• Check the /var/ifor/i4ls.ini file to ensure that namespace binding is activated. The file should contain the following lines:UseDirectBindingOnly=noNamespaceBindingSupport=yes
• If the problem still exists, clean up the environment using the following process on the license server machine.1. Stop the LUM daemons with the command
i4cfg -stop
2. Use the lssrc -a command to ensure all the following daemons are inactive. • llbd (Local Location Broker Subsystem) • glbd (Global Location Broker Subsystem) • i4lmd (License Server Subsystem)
94 AIX Migration in a CATIA Environment
• i4llmd (Nodelocked License Server Subsystem) • i4gdb (Central Registry Subsystem) • i4glbcd (Global Location Broker Data Cleaner Subsystem)
3. Remove the LUM status files with the command: rm /tmp/lic* /tmp/llbdbase.dat
4. Kill any remaining CATIA catlic processes:ps -ef | grep -i catlic kill -9 pid of all catlic processes
5. Restart the LUM daemons with the following command:/var/ifor/i4cfg -start
6. Use the following command to check that the LUM daemons are running:/var/ifor/i4cfg -list
6.1.6.4 Direct Binding ProblemsUse the following checks to resolve license problems if the CATIA client uses direct binding.
• Check if the direct binding server is responding by using the ping command:ping server_name
• Check the /var/ifor/i4ls.ini file to ensure that the direct binding servers are referenced and that the NumDirectBindServers value reflects the number of servers listed. NumDirectBindServers=1DirectBindServer1=ip:dserver1[1515]
• Examine the /etc/services file to see if the default port numbers used by LUM are in use by other applications. The default port numbers are 1515, 10999, 11999, and 12999. If the ports are being used by other applications, then you need to edit the /var/ifor/i4ls.ini file on all client and server machines to configure alternate port numbers.
6.1.7 Tracing CATIA License RequestsYou can find out more information on license problems by starting CATIA with tracing enabled. The following instructions show how to start CATIA with tracing enabled.
1. Stop CATIA2. Check the CATLIC.REPORT declaration with the following command:
catpath -l -A catlic.*
3. The variable must be set to CATLIC.REPORT=2;4. Kill all catlic processes.5. Remove any old tracing information with the following command:
rm -f /tmp/Li*
Exploiting New Functionality 95
6. Create two special CATIA marker files with the command:touch $HOME/catlicsr.trc $HOME/SERVAPI
7. Start CATIA8. Read the debug information in the /tmp/Licensing_$LOGNAME.trc1 file
6.2 Using CAT_MEM
On AIX systems, you can use the CAT_MEM environment variable to increase the number of 256 MB memory segments that can be used by CATIA processes for dynamic data structures. The value of the CAT_MEM variable can range between one and five. If you do not set the CAT_MEM variable in your environment, it is set to a default value of two by the catini startup script.
The use of the CAT_MEM variable to tune your CATIA configuration can offer dramatic performance improvements in certain situations. The enhanced paging space algorithm used in AIX 4.3.2, explained in section 1.1.24, “Improved Paging Space Utilization” on page 9, reduces the overhead of using the CAT_MEM feature when compared with earlier releases of AIX Version 4.
A normal 32-bit AIX process has a virtual address space composed of 16 segments, each a maximum of 256 MB in size. The kernel address space is always segment 0, and the process text segment is always segment 1. By default, segment 2 is used for the process stack data along with both initialized and dynamic memory heap data. This means a process can have a combined maximum of 256 MB of initialized data, dynamic data and stack data, since they share a single 256 MB segment. Segments 3 to 10 are available for use when attaching shared memory areas. Segments 11 to 15 are reserved for use by the operating system and are used for mapping shared library text and data segments. Figure 18 shows the virtual address space layout of a normal AIX user process.
96 AIX Migration in a CATIA Environment

Figure 18. Default Process Address Space Layout
Some CATIA functions use the CAT_MEM shell variable to increase the amount of memory that can be used by the process for initialized and dynamic heap data. The application code is compiled in such a way as to allow the process to use segment 2 for stack data only. The initialized data and dynamic heap data is then stored in segment 3, and an additional CAT_MEM-1 contiguous segments are used to allow the dynamic heap to grow. This formula allows a process with a CAT_MEM value of 5 to use up to 1.25 GB of memory for initialized and dynamic heap data. It also leaves three remaining segments available for use in attaching to shared memory segments of other processes if this is required. Figure 19 shows the impact of the CAT_MEM variable on the number of segments used, and the placement of process data. If you do not set a value for CAT_MEM in your environment, the catini startup script sets it to a default value of 2, which will result in a CATIA function using up to 500 MB for initialized and dynamic heap data.
KernelProcess
text
Stackand
Data
0 1 2 11 - 153 - 10
SharedObjects
Shared Memory
use
InitializedData
DynamicMemoryHeap
ProcessStack
Exploiting New Functionality 97

Figure 19. Impact of CAT_MEM on Segment Use
The sizes mentioned previously refer to virtual memory and are the maximum values that the segments can grow to. The amount of physical memory required for the dynamic heap will vary depending on the utilization. Very often, large amounts of dynamic heap memory are allocated by the process, but only small portions are actually used.
The amount of physical memory that can actually be used by a process is based on a number of factors including the amount of memory in the machine, the amount of paging space, and the process resource limits of the user running the process. The default process resource limits allow a normal user process to use a maximum of 128 MB of virtual memory for initialized and dynamic heap data and 32 MB of physical memory. These values should be increased for CATIA users. See the manual page for the ulimit command for instructions on how to change the resource limit values.
6.3 Migration of Automount Maps
The use of the NFS automount capability can give some significant advantages when compared with a normal NFS static remote mount.
• Remote mounts are only done on demand, and unused mounts are unmounted after a period of inactivity. This reduces network traffic and enhances security.
KernelProcess
text
Stackand
Data
0 1 2 11 - 153
SharedObjects
Shared
use
ProcessStack
InitializedData
DynamicMemoryHeap
1 to 5 segmentsdepending onCAT_MEM
Memory
(3+CAT_MEM-1) 10
98 AIX Migration in a CATIA Environment

• The maintenance of the mount points can be done once on a server in an easy way. There is no need to customize the individual /etc/filesystems file on each client.
AIX 4.3.2 supports the AutoFS file system type. This feature provides similar functionality as the previous automountd. If you perform a migration install on a machine configured to use the old automountd, then the configuration will still run correctly in compatibility mode after the migration. You will need to alter some of the configuration files in order to use the new AutoFS functionality instead of the old automount system. The changes required are described in section 6.3.2, “Migration to AutoFS” on page 100.
It used to be a requirement to alter one of the system startup files, or add an inittab entry, in order to start the automount daemon at system startup. This is no longer necessary as the new AutoFS automount functionality is now supported by the default startup files in AIX 4.3.2.
There are two methods of configuring the new AutoFS system:
1. Create ASCII tables as described below.
2. Use NIS automount tables and distribute it to the Network.
6.3.1 Automount Basics The simplest way to mount files from a remote NFS server is the use of local ASCII maps. This makes it possible to mount individual files on each workstation. The best flexibility is provided by the use of a two level configuration, using a single master map and multiple automount maps. The advantage of this concept is that the second level automount maps can be changed in a running environment without having to restart the automount system. By default, the master map is stored in the file /etc/auto_master. The master map file contains a list of mount point and automount map file pairs.
Contents of a sample auto_master file are as follows:
# /etc/auto_master#DirectoryPath AutomountMapName/home /usr/local/etc/auto.home/CatiaMod /usr/local/etc/auto.catia.model/CatiaLib /usr/local/etc/auto.catia.library/CatiaSes /usr/local/etc/auto.catia.session
The second level automount map files resolve each subdirectory in the mountpoint to the actual remote file system used for the mount.
Contents of a sample automount map are as follows:
Exploiting New Functionality 99

# /usr/local/etc/auto.home#Subdirectory MountOptions ServerName:ServerDirectory
john -rw,hard,intr host1:/home/john/&* -rw,hard,intr,rsize=4096,wsize=4096 host2:/host2/vg1_lv3/uhome/&
Use the asterisk (*) only at the end of the table for the last statement.
When the system is booting up, the /etc/rc.nfs startup file checks for the existence of the /etc/auto_master file. If the auto_master file exists, the script starts the AutoFS system by invoking the /usr/sbin/automount command.
To check if the AutoFS daemon is running, use the following command:
ps -ef | grep auto
Use the output from the mount command to check if the automount maps have been loaded in the correct way. An example of this is shown in the Figure 20.
Figure 20. Output of mount Command
6.3.2 Migration to AutoFSIf your system used the old automount system on a previous release of AIX, it will work in backwards compatibility mode if the system is migrated to AIX 4.3.2. To start using the new AutoFS system, you need to rename the master file to be /etc/auto_master. You should also remove any inittab entries or scripts that start the old automount daemon.
If for some reason it is not desirable to use an auto_master map, you can use the automount command in conjunction with the -m option.
# mount node mounted mounted over vfs date options -------- --------------- --------------- ------ ------------ --------------- /dev/hd4 / jfs Feb 15 10:09 rw,log=/dev/hd8 /dev/hd2 /usr jfs Feb 15 10:09 rw,log=/dev/hd8 /dev/hd9var /var jfs Feb 15 10:09 rw,log=/dev/hd8 /dev/hd3 /tmp jfs Feb 15 10:10 rw,log=/dev/hd8 /dev/hd1 /home jfs Feb 15 10:10 rw,log=/dev/hd8
/usr/local/etc/auto.catia.model /CatiaMod autofs Feb 19 17:38 ignore /usr/local/etc/auto.catia.library /CatiaLib autofs Feb 19 17:38 ignore /usr/local/etc/auto.catia.session /CatiaSes autofs Feb 19 17:38 ignore
100 AIX Migration in a CATIA Environment
In the new implementation of the automount system, the automount command is used as an administration tool for AutoFS, which is implemented as a kernel extension. If the tables have been changed, invoke the automount command to reread the updated tables.
Normally, there is no need to stop the automountd process, but if you have to you should use:
kill -15 automountd_pid
If you use kill -9, the machine will have to be rebooted.
During the CASIL 9903 test cycle, a performance problem was detected when using automounted file systems. The problem was avoided by adding the NFS mount option proto=tcp to the automount map entry for file systems mounted from machines supporting the NFS V3 protocol.
6.4 Configuring CATIA Clients to Use CacheFS
CacheFS is a local disk cache mechanism for NFS clients. It provides the ability for an NFS client to cache file system data on its local disk, thereby avoiding use of the network and NFS server when the data is accessed and is not in physical memory. This improves NFS server performance and scalability by reducing server and network load. Designed as a layered file system, CacheFS provides the ability to cache one file system on another. In an NFS environment, CacheFS increases the clients per server ratio, reduces server and network loads, and improves performance for clients, particularly those on slow links. CacheFS is a client side only function, and no changes are required on the NFS server machine.
CacheFS is contained in the bos.net.cachefs fileset, which is not automatically installed when installing AIX but is in the CASIL 9903 bundle definition file. If you used the bundle file during the installation of the client machine, then the fileset will be installed.
The syntax of the automount command line has changed in this implementation. Some of the arguments (-n -M) are accepted but have no other purpose other than to maintain compatibility between the new AutoFS implementation of automatic mounting and the previous implementation.
Note:
Exploiting New Functionality 101
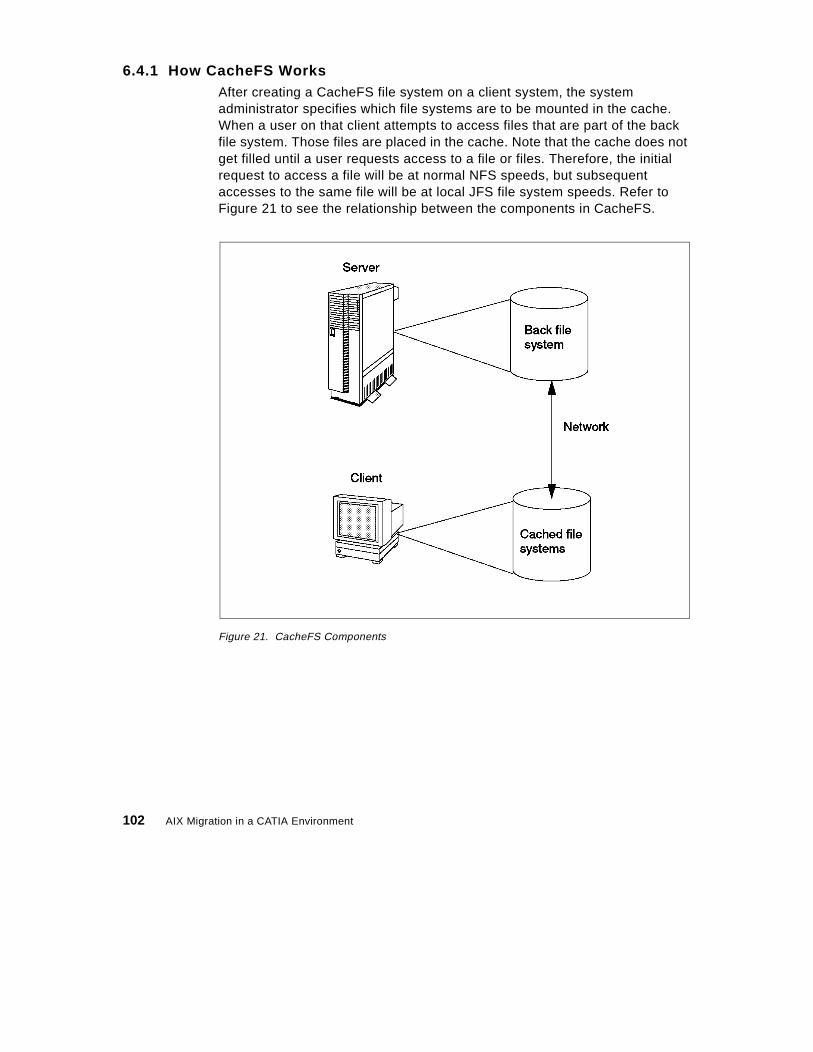
6.4.1 How CacheFS WorksAfter creating a CacheFS file system on a client system, the system administrator specifies which file systems are to be mounted in the cache. When a user on that client attempts to access files that are part of the back file system. Those files are placed in the cache. Note that the cache does not get filled until a user requests access to a file or files. Therefore, the initial request to access a file will be at normal NFS speeds, but subsequent accesses to the same file will be at local JFS file system speeds. Refer to Figure 21 to see the relationship between the components in CacheFS.
Figure 21. CacheFS Components
102 AIX Migration in a CATIA Environment

One example where CacheFS would be suitable is in a CATIA environment where CATIA code, libraries, and CATIA administrator data is read only or read mostly. The CATIA online documentation is also an ideal candidate for the use of CacheFS. Another reason to use CacheFS to mount CATIA code is to avoid having to distribute new releases of code to the clients. The code components of CATIA can be held on the server, and cached-copies can be kept on the client workstation when in use. When you update the CATIA code on the server, the clients will notice the change and cache the new copy. Do not use CacheFS for CATIA model or session directories. These files are read-write and could suffer from consistency problems if used with CacheFS.
6.4.2 Configuring CacheFS for Use with CATIAThe following example shows the actions required to allow an NFS client machine to mount the remote filesystem /cat from the server cat_serv, where it is exported, and use the CacheFS mechanism to reduce network load. This file system contains a multilevel CATIA environment as described in section 3.8.5, “CATIA Client Directory Structures” on page 44; so, CATIA code and the default administrator environment is included.
In normal day to day use, the data in this file system is read only, so it is well qualified for use with CacheFS. There are four steps involved in setting up a cached file system.
6.4.2.1 Create JFS for the CacheThe first step in mounting a remote file system using a local cache is to create a local JFS for use as the cache. With root authority, use SMIT or the command line to create the new local JFS file system. For example:
mklv -y cache rootvg 150crfs -v jfs -d cache -m /cache -A yes -p rw -t yes -a frag=4096 \
-a nbpi=4096 -a ag=8
It is important to remember that CacheFS is intended to be used as a mechanism for reducing network and server workload. Because the remote file system data is held locally on the client, and consistency is only checked at intervals, it means that the data on the server can change, and the client is unaware of this for a period of time. You should, therefore, only use it for read-only, or read-mostly, file systems where the file system contents do not change frequently.
Note:
Exploiting New Functionality 103

This will create a /dev/cache logical volume, then use it for the /cache file system.
Mount the file system using the mount command, for example:
mount /cache
6.4.2.2 Format the CacheThe next step is to prepare the new file system for use as a cache. Although the cache is referred to as a cache file system, it is not a file system in the true sense. It is, in fact, a cache directory, which resides on a normal JFS. For this reason, if you are creating a large cache file system, such as for CATIA code, it is advisable to create a dedicated JFS to be used for this purpose. Do not use an existing data file system, such as /home, as a cache directory. This is because the cache is created with parameters that indicate the percentage of the underlying JFS file system it is allowed to use. Use SMIT with the cachefs_admin_create fastpath to create the cache directory. The menu presented will be as shown in Figure 22.
Figure 22. SMIT Create a CacheFS Screen
Create a Cache File System
Type or select values in entry fields.Press Enter AFTER making all desired changes.
[Entry Fields] Cache Directory [/cache/cat] / Maximum Blocks (Percentage) [90] # Minimum Blocks (Percentage) [0] # Threshold Blocks (Percentage) [85] # Maximum Files (Percentage) [90] # Minimum Files (Percentage) [0] # Threshold Files (Percentage) [85] # Maximum File Size (Megabytes) [3] #
F1=Help F2=Refresh F3=Cancel F4=ListF5=Reset F6=Command F7=Edit F8=ImageF9=Shell F10=Exit Enter=Do
104 AIX Migration in a CATIA Environment

The SMIT input fields are described in Table 9.
Table 9. CacheFS Resource Parameters
6.4.2.3 Check Cache IntegrityThe fsck_cachefs command checks the integrity of cached file systems (this step is not mandatory, but useful). By default, it corrects any CacheFS problems it finds. Unlike the standard fsck command, there is no interactive mode.
fsck_cachefs /cache/cat
6.4.2.4 Mount the Remote File SystemMount the remote file system from the server as a CacheFS file system type specifying the cache object to use for backing store and the name of the
Parameter Description
Cache Directory The name of the directory where the cache resides.
Maximum Blocks Maximum amount of storage space that CacheFS can use expressed as a percentage of the total number of blocks in the front file system. Default=90%Means that 90% of /cache can be used.
Minimum Blocks Minimum amount of storage space that CacheFS is always allowed to use, expressed as a percentage of the total number of blocks in the front file system. Default=0%
Threshold Blocks A percentage of the total blocks in the front file system beyond which CacheFS cannot claim resources once its block usage has reached the Minimum Blocks level. Default=85%
Maximum Files Maximum number of files that CacheFS can use expressed as a percentage of the total number of inodes in the front file system. Default=90%
Minimum Files Minimum number of files that CacheFS is always allowed to use expressed as a percentage of the number of inodes in the front file system. Default=0%
Threshold Files A percentage of the total number of inodes in the front file system beyond which CacheFS cannot claim inodes once its usage has reached the level specified by the Minimum Files parameter. Default=85%
Maximum File Size Largest file size, expressed in megabytes, this CacheFS is allowed to cache. Default=3For CATIA environments, we suggest this is set to 8.
Exploiting New Functionality 105

mount point that will be used to access the file system. Use the mount command or SMIT with the cachefs_mount_nfs fastpath.
mount -V cachefs -o backfstype=nfs,cachedir=/cache/cat cat_serv:/cat /cat
The result of the action can be checked using the mount command. Three new entries are present. The first entry is for the JFS used to store the cache object. The second shows the remote file system mounted onto the cache object as an NFS mount. The remote file system should not be accessed through this mount point. The third new file system mount shows /cat as a CacheFS mount on the cache object. Sample output is shown in Figure 23.
Figure 23. Output of the mount Command
6.4.2.5 Combining CacheFS with AutoFSA cached remote file system can also be mounted automatically using the AutoFS environment. To mount the same CacheFS file system using AutoFS, perform the following two steps:
1. Create or add the following entry to the /etc/auto_master file:
# /etc/auto_master#DirectoryPath AutomountMapName/cat /usr/local/etc/auto.catiacode
2. Create the new map file /usr/local/etc/auto.catiacode, which is referenced from the master map.
# /usr/local/etc/auto.catiacode* -fstype=cachefs,cachedir=/cache/cat,backfstype=nfs cat_serv:/cat/&
# mount node mounted mounted over vfs date options -------- --------------- --------------- ------ ------------ --------------- /dev/hd4 / jfs Mar 03 21:06 rw,log=/dev/hd8 /dev/hd2 /usr jfs Mar 03 21:06 rw,log=/dev/hd8 /dev/hd9var /var jfs Mar 03 21:06 rw,log=/dev/hd8 /dev/hd3 /tmp jfs Mar 03 21:07 rw,log=/dev/hd8 /dev/hd1 /home jfs Mar 03 21:08 rw,log=/dev/hd8 /dev/fscache /cache jfs Mar 04 13:06 rw,log=/dev/hd8 cat_serv /cat /cache/cat/.cfs_mnt_points/_cat nfsv3 Mar 04 13:16 cat_serv /cat /cat cachefs Mar 04 13:16 backfstype=nfs,cachedir=/cache/cat
106 AIX Migration in a CATIA Environment

6.4.2.6 CacheFS AdministrationFor the administration of CacheFS file systems, you can use the cfsadmin command line interface or use SMIT with the cachefs_admin fastpath as shown in Figure 24. Either interface allows you to create and delete cached file systems, list cache contents and statistics, and change CacheFS resource parameters.
Figure 24. SMIT CacheFS Administration Screen
6.4.2.7 Cached File Systems Consistency CheckingTo ensure that the cached directories and files are kept up to date, CacheFS periodically checks consistency of files stored in the cache. To check consistency, CacheFS compares the current modification time of the object in the back file system with the modification time of the copy of the object stored in the cache. If the modification times are different, all data and attributes for the object are purged from the cache, and a new copy of the object is retrieved from the back file system.
When a user requests an operation on a directory or file, CacheFS checks if it is time to verify consistency. If so, CacheFS obtains the modification time from the back file system and performs the comparison.
6.5 The New Online Documentation
The online documentation supplied with AIX Version 4.3 is now in HTML format as compared to the use of InfoExplorer hypertext format in earlier releases. This means that the documentation can now be accessed from
CacheFS Administration
Move cursor to desired item and press Enter.
Create a Cache File System Change / Show Attributes of a Cache File System Remove a Cache File System Run a Consistency Check
F1=Help F2=Refresh F3=Cancel F8=Image F9=Shell F10=Exit Enter=Do
Exploiting New Functionality 107

virtually any client platform with a Web browser. However, you will need to do some basic configuration before the documentation is available.
For more information, please refer to the AIX Version 4.3 Installation Guide, SC23-4112. You can also point your browser to one of the following webpages:
http://www.rs6000.ibm.com/resource/aix_resource/Pubs/ http://www.rs6000.ibm.com/doc_link/en_US/a_doc_lib/aixgen/
and access the AIX documentation using the Internet.
6.5.1 Installing Online ManualsYou can either install the documentation information onto the hard disk or mount the documentation CD in the CD-ROM drive. Mounting the CD will save some amount of hard disk space, but it requires the CD to be kept in the CD-ROM drive at all times. Also, searching the documentation from the CD-ROM drive can be significantly slower (in some cases up to 10 times slower) than searching the information if it is installed on a hard disk. In addition, there are two documentation CDs:
• The AIX Version 4.3 Base Documentation CD
• The AIX Version 4.3 Extended Documentation CD
To access the documentation on CD-ROM perform the following:
1. Insert the documentation CD-ROM in the CD-ROM drive.
2. Create a CD-ROM file system, for example, using smit crcdrfs. When asked for the mount points, please specify /infocd for the base and /exinfocd for the extended documentation CD.
3. Mount the CD-ROM file system.
4. Run the script (linkbasecd or linkextcd) located in the /infocd or /exinfocd directory to create the documentation links.
You are now ready to access the AIX documentation from the CD-ROM by using the man command.
108 AIX Migration in a CATIA Environment

You are also able to install the documentation on a local hard drive, which is usually much faster and ensures that the documentation is available at all times. To install on a hard drive:
1. Insert the base documentation CD-ROM into the CD-ROM drive.
2. Run the command smit install_latest.
3. Select the CD-ROM drive as the input device.
4. Choose the individual filesets to be installed for a selective installation or keep _all_latest in order to install all the documentation filesets.
5. Once the installation has completed, remove the CD-ROM from the drive.
6. Repeat the above steps with the Extended Documentation CD if required.
Use smit install_latest to install the online manuals onto the hard disk. The fileset bos.docregister is a prerequisite for all online manuals. It will be automatically installed the first time you install any online manuals even if you have not selected this fileset.
6.5.2 Using the DocumentationIn order to access the documentation through a browser in addition to the man command, you must have installed a Web browser, such as Netscape Navigator, and invoke:
file:/usr/share/man/info/en_US/a_doc_lib/aixgen/topnav/topnav.htm
Before unmounting the CD-ROM, make sure that you run the unlinkbasecd or unlinkextcd script in order to remove the links from the file system pointing to the CD-ROM. After unmounting, you will not be able to access the online documentation.
Note:
The installation images located on the AIX Version 4.3 Base Documentation and Extended Documentation CDs do not contain the HTML files. These files exist separately on the CD to allow access from non-AIX platforms. Installing the images from the CD will work correctly; however, copying the installation images by themselves to another location is not enough for a proper install.
Note:
Exploiting New Functionality 109

to access the top-level navigation entry that provides links to all the available documentation.
You are also ready to access the online documentation from the network by pointing your browser to the following URL:
http://yourhost/doc_link/en_US/a_doc_lib/aixgen/topnav/topnav.htm
6.5.3 Man Page ChangesPrior to AIX Version 4.3, the man command had to search the InfoExplorer database to locate the information that it required. Now, under AIX Version 4.3, the information is stored in HTML files. The HTML files are stored in the directory structure by COLLECTION_ID and BOOK_ID. The man command uses this structure to locate the required information. This new structure provides the user with performance benefits because the search criteria is more narrowly defined.
In terms of overall function, the man command remains unchanged performing the way it always has.
6.5.4 SMIT DocumentationWith the introduction of HTML-based product libraries, the SMIT documentation that is used in the SMIT help menus have been converted to HTML. SMIT is updated to access the HTML versions of the help files. The naming convention of the filesets has also been changed to reflect the introduction of the Web-based System Manager tool.
6.6 Documentation Search Service
AIX 4.3 provides an optionally installable component called the Documentation Search Service. It allows you to search online HTML documents, such as the AIX product documentation. It provides a search form for use with a Web browser. When you enter key words into the search form, the Document Search Service searches for the words and then presents a search results page that contains links that lead to the documents that contain the target words.
The Documentation Search Service contains all of the features that you would normally expect to see from InfoExplorer, such as:
• List of Books
• Commands Reference
110 AIX Migration in a CATIA Environment

• Programming Reference
• Search Facility
6.6.1 Installation of Documentation Search ServiceYou can set up one of your AIX systems in your organization to be the documentation server and all other systems as documentation clients. This will allow documentation to be installed only on one system, and all other systems can access this system without needing the documentation installed locally.
You need the following products and components installed for a complete set of services:
• For the client:
1. A Web browser
2. The bos.docsearch.client.* filesets (for AIX integration)
• For the documentation server (which may also act as a client)
1. The entire bos.docsearch package
2. The documentation libraries
3. A Web browser
4. A Web server
The browser must be a forms-capable browser, and the Web server must be CGI-compliant.
If you are planning on integrating your own documentation on the documentation server, you will also need to build the document's indexes.
There are a variety of ways to install the documentation, Web server, and Document Search Service. You can use the Configuration Assistant TaskGuide, Web-based Systems Management, or SMIT.
The easiest way for a non-technical user to install and configure Documentation Search Services is by using Configuration Assistant TaskGuide. To run the Configuration Assistant TaskGuide, use the configassist command. Then select the item titled Configure Online Documentation and Search.
If you would rather install Documentation Search Services manually, you can use SMIT.
Exploiting New Functionality 111

6.6.1.1 Installing the Web BrowserUse smit install_latest to install Netscape supplied on the AIX 4.3 Bonus Pack CD. Use smit list_installed to check whether you have the following filesets installed as shown in Figure 25:
Figure 25. Netscape Filesets
If you are installing the Netscape browser from other sources, or you are installing other Web browsers, follow the installation instructions that come with the software. Note that there will not be any records in the ODM if your product source is not in installp format.
6.6.1.2 Installing the Web ServerYou may install any CGI-compliant Web Server. The Lotus Domino Go Web Server is used here. It is supplied on one of the AIX 4.3 Bonus Pack CDs.
The Documentation Search Service uses its own search engine CGIs. Therefore, you do not need to install the NetQ fileset, the Web Server Search Engine. Figure 26 shows the filesets installed.
112 AIX Migration in a CATIA Environment
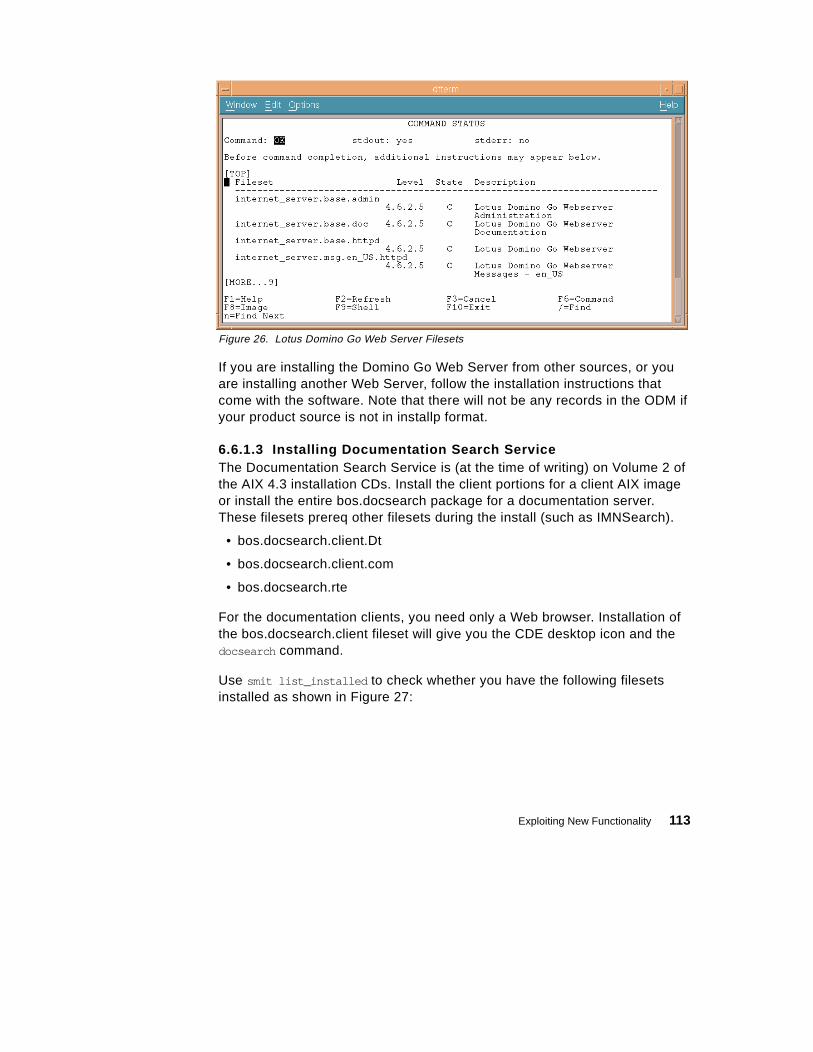
Figure 26. Lotus Domino Go Web Server Filesets
If you are installing the Domino Go Web Server from other sources, or you are installing another Web Server, follow the installation instructions that come with the software. Note that there will not be any records in the ODM if your product source is not in installp format.
6.6.1.3 Installing Documentation Search ServiceThe Documentation Search Service is (at the time of writing) on Volume 2 of the AIX 4.3 installation CDs. Install the client portions for a client AIX image or install the entire bos.docsearch package for a documentation server. These filesets prereq other filesets during the install (such as IMNSearch).
• bos.docsearch.client.Dt
• bos.docsearch.client.com
• bos.docsearch.rte
For the documentation clients, you need only a Web browser. Installation of the bos.docsearch.client fileset will give you the CDE desktop icon and the docsearch command.
Use smit list_installed to check whether you have the following filesets installed as shown in Figure 27:
Exploiting New Functionality 113

Figure 27. Documentation Search Service Filesets
6.6.2 Configuring Documentation Search ServiceUse either wsm or smit to configure the documentation search service. If you used the Configuration Assistant TaskGuide to install and configure the Documentation Search Service, you will not need to perform any further configuration.
For wsm, double-click on the Internet Environment icon, or you can use smit web_configure to configure the following:
• Default browser
Type into the field the command that launches the browser that you want to be the default browser for all users on this computer, for example, /usr/bin/netscape. This will set the /etc/environment variable DEFAULT_BROWSER to the string you type in.
• Documentation and search server
You can define the documentation search server location to be:
• None - disabled
• Remote computer
Type the remote documentation server name. The default TCP/IP port address is 80. Change it to the port address used by the documentation server.
• Local - this computer
114 AIX Migration in a CATIA Environment
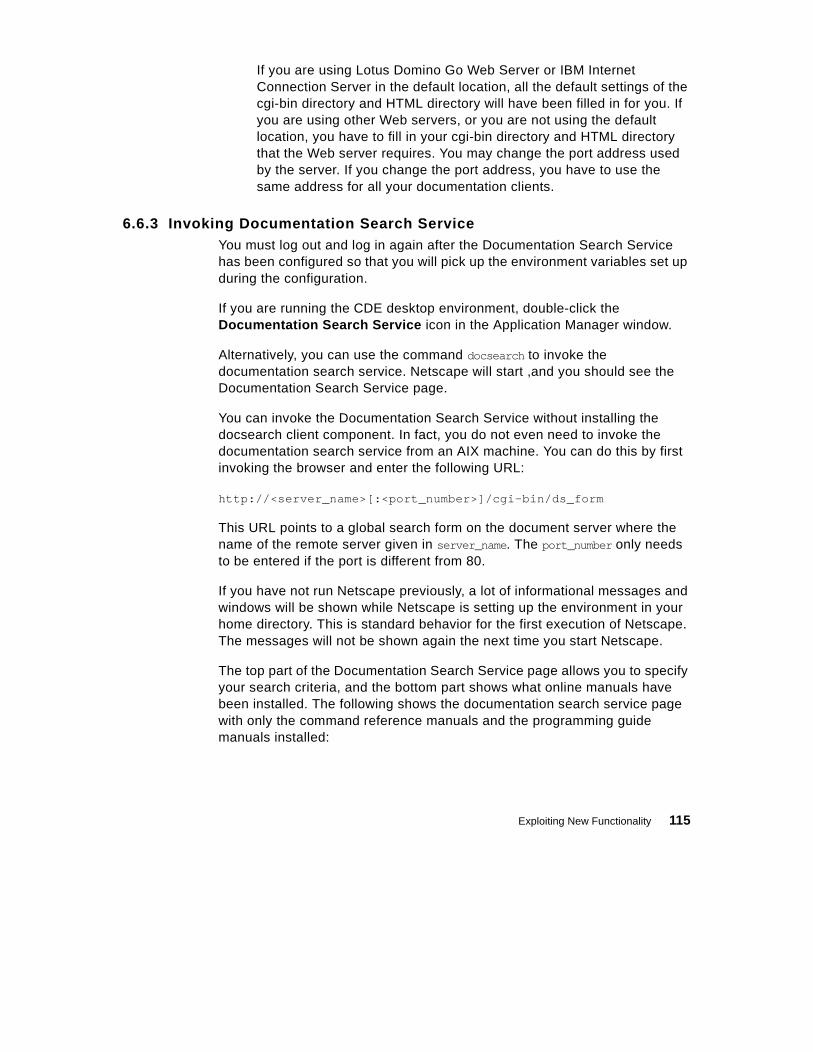
If you are using Lotus Domino Go Web Server or IBM Internet Connection Server in the default location, all the default settings of the cgi-bin directory and HTML directory will have been filled in for you. If you are using other Web servers, or you are not using the default location, you have to fill in your cgi-bin directory and HTML directory that the Web server requires. You may change the port address used by the server. If you change the port address, you have to use the same address for all your documentation clients.
6.6.3 Invoking Documentation Search ServiceYou must log out and log in again after the Documentation Search Service has been configured so that you will pick up the environment variables set up during the configuration.
If you are running the CDE desktop environment, double-click the Documentation Search Service icon in the Application Manager window.
Alternatively, you can use the command docsearch to invoke the documentation search service. Netscape will start ,and you should see the Documentation Search Service page.
You can invoke the Documentation Search Service without installing the docsearch client component. In fact, you do not even need to invoke the documentation search service from an AIX machine. You can do this by first invoking the browser and enter the following URL:
http://<server_name>[:<port_number>]/cgi-bin/ds_form
This URL points to a global search form on the document server where the name of the remote server given in server_name. The port_number only needs to be entered if the port is different from 80.
If you have not run Netscape previously, a lot of informational messages and windows will be shown while Netscape is setting up the environment in your home directory. This is standard behavior for the first execution of Netscape. The messages will not be shown again the next time you start Netscape.
The top part of the Documentation Search Service page allows you to specify your search criteria, and the bottom part shows what online manuals have been installed. The following shows the documentation search service page with only the command reference manuals and the programming guide manuals installed:
Exploiting New Functionality 115
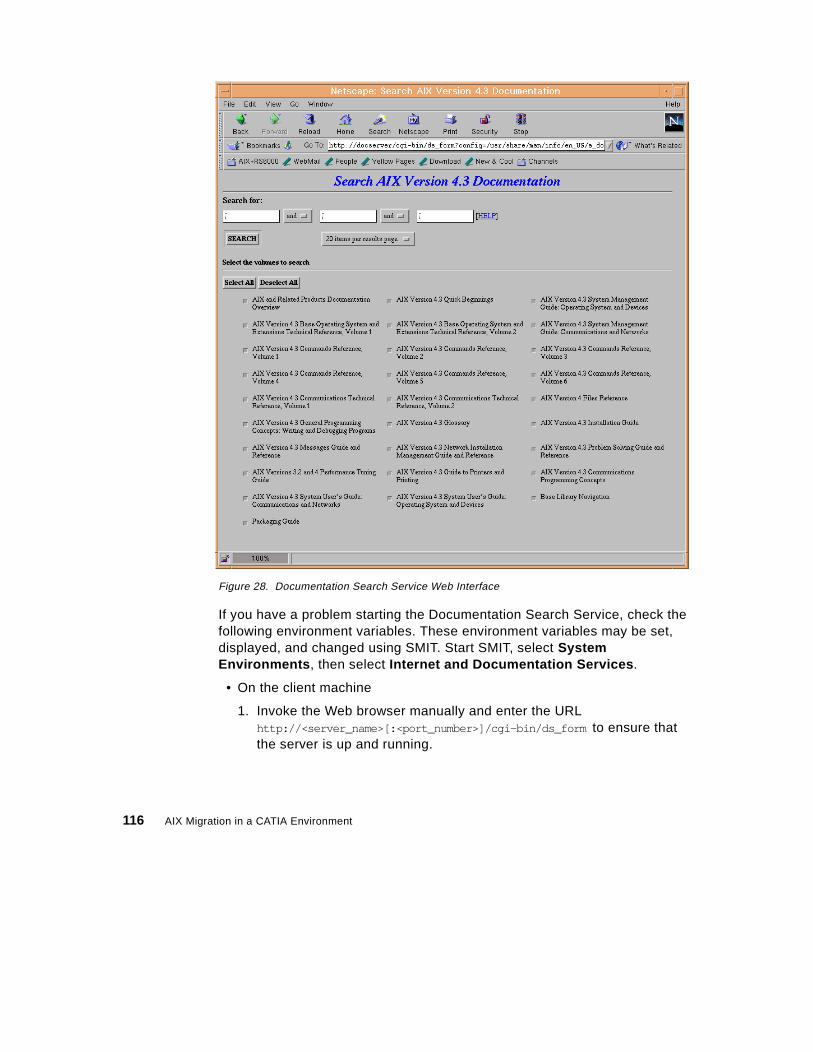
Figure 28. Documentation Search Service Web Interface
If you have a problem starting the Documentation Search Service, check the following environment variables. These environment variables may be set, displayed, and changed using SMIT. Start SMIT, select System Environments, then select Internet and Documentation Services.
• On the client machine
1. Invoke the Web browser manually and enter the URL http://<server_name>[:<port_number>]/cgi-bin/ds_form to ensure that the server is up and running.
116 AIX Migration in a CATIA Environment

2. Ensure the DEFAULT_BROWSER variable is set to the command for starting your Web browser.
3. Use the command echo $DEFAULT_BROWSER to find out the command used in starting the browser. Test whether that command can bring up the browser by manually entering it on the command line.
4. Ensure the DOCUMENT_SERVER_MACHINE_NAME variable is set to the document server’s hostname or IP address.
5. Ensure the DOCUMENT_SERVER_PORT variable is set to the port address used by the document server’s port address.
6. On the server machine
7. Ensure the DEFAULT_BROWSER variable is set to the command for starting your Web browser.
8. Use the command echo $DEFAULT_BROWSER to find out the command used in starting the browser. Test whether that command can bring up the browser by manually entering it on the command line.
9. Ensure the DOCUMENT_SERVER_MACHINE_NAME variable is set to the local hostname.
10.Ensure the DOCUMENT_SERVER_PORT variable is set to the port address used by the local Web server.
11.Ensure that the CGI_DIRECTORY variable is set to the correct cgi-bin directory used by the local Web server.
12.Ensure that the DOCUMENT_DIRECTORY is set to the directory where the symbolic links doc_link and ds_images reside. If you have not changed the default, it should be in /usr/lpp/internet/server_root/pub for both the IBM Internet Connection Server and the Lotus Domino Go Web Server.
13.If you are not using the default directory, ensure that you have defined the necessary directory mapping in your Web server configuration file such that the directory can be resolved.
6.7 Configuring CATWeb V2.2
The growing influence of the World Wide Web has made the Web browser a common element of users day-to-day work. For many, the Web browser is a core component of how they perform their engineering tasks. To meet this user need, Dassault Systemes developed a CORBA based Java Web interface for CATIA. The CATIA Network Computing Solutions products (CATweb) provide intuitive Web-based viewing and reviewing for CAD/CAM
Exploiting New Functionality 117

models, drawings, product structures, and alphanumeric Virtual Product Model information. The data can be accessed using a Web browser from client platforms, such as PCs or thin UNIX workstations.
This section describes how to:
• Unload the CATweb Navigator software and its online documentation.
• Install CATweb Navigator using the shell script provided.
• Configure and customize your CATweb installation.
You can install from a CD-ROM drive on your local system or from a remote system. More information about installing and configuring CATweb can be found in the README.html file on the CATweb Navigator software CD.
6.7.1 Installing CATweb NavigatorThe CATweb Navigator requires a customized Web server to function correctly. This can affect any other services configured on the Web server, such as the AIX online documentation. It is recommended that you do not install the AIX online documentation service and CATweb Navigator on the same machine.
The CATweb Navigator product is available on the RS/6000 Operating Environment for CATIA product media in addition to dedicated product media if it is ordered separately. The Operating Environment media includes additional shell scripts and installation procedures to help automate the installation and customization of CATweb products. See the Installation Guide supplied with the Operating Environment media for instructions on how to use the installation scripts. The remainder of this section describes the individual steps required to install and customize the CATweb Navigator product when using the dedicated product media instead of the Operating Environment product media.
To install the CATweb Navigator product, log in as the root user and perform the following tasks.
1. Insert the CATweb CD-ROM in the CD-ROM drive.
2. Create a CD-ROM file system, for example, using smit crcdrfs. Specify /cdrom when asked for the mount point.
3. Mount the CD-ROM file system.
4. Change directory to the CD-ROM file system.
cd /cdrom
5. Run the install shell script.
118 AIX Migration in a CATIA Environment

./install
6. The install script will prompt you to enter the following parameters:
• The HTTP directory which will contain the CATweb Navigator server file tree. This parameter is known as the CATweb_install_directory.
• The composite machine name. If you use a DNS server, the default composite machine name displayed may not be correct.
• The CATIA administrator home directory, for example, /home/catadm.
• A yes or no answer to determine if you want to access VPM data.
• The VPM administrator home directory, for example, /home/vpmadm.
• The Publisher database directory: A directory where the Publisher will generate its persistent data
7. Once you have entered the required information, the install script will complete the following tasks:
• Save and remove any existing CATweb Navigator installation.
• Create the CATweb Navigator server directories.
• Create the resources directories for CCD and DXF formats.
• Create the Publisher Database sub-directories.
• Install the Orbix run-time component.
• Configure the CATweb Navigator server.
• Start the Orbix daemon
• Register the CATIA Server Manager with the Orbix system.
6.7.2 Configuring the HTTP ServerAfter you have installed and configured the CATweb Navigator binaries, you need to configure your HTTP server to be able to use the CATweb code. Since every HTTP server has a unique configuration method, we will describe the configuration for the Lotus Domino Go Web Server which is included on the AIX bonus pack.
The Lotus Domino Go Web Server configuration is defined in the /etc/httpd.conf file. If the server is configured to run under the non-default language, the file is located in a language specific directory. For example, if you are using the Japanese language environment, the configuration file is /etc/httpd/config/Ja_JP/httpd.conf.
Exploiting New Functionality 119
1. Configure the mime type for files with the .dsar suffix. This is done by associating files with the .dsar suffix with the mime-type application/octet-stream.
For the Lotus Domino Go Web Server, this can be done by adding the following type definition line to the appropriate section of the httpd.conf file:
AddType .dsar application/octet-stream binary 1.0
2. Declare the CATweb alias catweb to be mapped to the CATweb docs directory, CATweb_install_directory/CATwebNavigator/docs. This means that the URL http://server/catweb can be used to access the CATweb system.
For the Lotus Domino Go Web Server, this is achieved by adding the following line to the appropriate section of the httpd.conf file:
Pass /catweb/* CATweb_install_directory/CATwebNavigator/docs/*
3. Additional URL mapping is required to achieve the following links.
• Map the URL http://server/Views/ to the Publisher database directory.
• Map the URL http://server/u/ to the /u directory.
When using the Lotus Domino Go Web Server, this is accomplished by adding the following lines to the appropriate section of the httpd.conf file:
Pass /Views/* Publisher_database_directory/* Pass /u/* /u/*
4. Add the CATweb cgi-bin directory, CATweb_install_directory/CATwebNavigator/cgi-bin to the list of permitted cgi-bin directories.
For the Lotus Domino Go Web Server, this is performed by adding the following line to the appropriate section of the httpd.conf file:
Exec /cgi-bin/* CATweb_install_directory/CATwebNavigator/cgi-bin/*
5. You will need to restart the HTTP server after changing the configuration.
For the Lotus Domino Go Web Server, this can be done by running the following command sequence:
stopsrc -s httpd/etc/rc.httpd
6.7.3 Configuring the CATweb Server MachineFor rendering capabilities the CATweb server needs to use the 3D framebuffer of a graphics card. Alternatively, AIX 4.3.2 has an enhanced Virtual Frame Buffering (VFB) capability, which allows a CATweb server to be run on
120 AIX Migration in a CATIA Environment

machines without a 3D graphics adapter. This reduces the overall cost and complexity of the CATweb server system.
Direct Software OpenGL (DSO) is a pure software implementation of OpenGL that runs as a direct OpenGL context. The use of DSO means that all of the CPU intensive 3D rendering work is running as part of the application process and not part of the X server process. By running direct, most of the interprocess communication with the X server is eliminated making 3D rendering much more efficient. In addition, the operating system is dealing with a reduced number of context switches between the X server and the 3D rendering applications making system utilization more efficient.
The use of VFB in conjunction with DSO enables the CATweb server to exploit multiple CPUs on multiprocessor systems and operate asynchronously, thereby, improving the response time of the CATweb server. DSO and VFB enable SMP machines to serve as viable and scalable CATweb servers. DSO actually creates a private rendering area for each 3D rendering application. When it comes time to render a new image, the application draws to its private rendering area. If two CATweb clients request new images at exactly the same time, each application can draw concurrently exploiting the multiple CPUs in the system.
There are three ways to configure a CATweb server with an appropriate graphics context. The first allows CATweb to use the framebuffer of a 3D graphics card on the server. The second method uses the VFB feature to allow CATweb to run on a system that does not have a graphics adapter. The third method allows CATweb to use VFB technology on a system that has a graphics adapter.
6.7.3.1 Rendering on a Graphics CardA user needs to be logged in on a normal CDE session on the graphics console of a machine if CATweb is to use the framebuffer of the graphics card for 3D rendering work. The X server needs to be configured to allow connections from any host with the use of the xhost + command.
The X session on the server must always be active and should not be used for other normal work. In particular, the windows where the CATweb renderer is running should not be moved or resized.
The X11 screen saver and the X11 screen lock need to be disabled; otherwise, they will impact the CATweb work.
Note:
Exploiting New Functionality 121

6.7.3.2 Rendering on the Virtual Frame BufferIn general. the VFB is used on a workstation or SP node that does not have a graphics card and can only be accessed through Telnet or an ASCII console. The best way to start the VFB is from an inittab entry.
1. To start the X server with the required X extensions running on the VFB, use the following command. The display :0 is used by default.
/usr/bin/X11/X -force -vfb -x GLX -x abx -x dbe &
2. You can start the X server on the VFB automatically at system restart by adding an inittab entry. Add the following information all on one line to the end of /etc/inittab.
xvfb:2:respawn:/usr/bin/X11/X -force -vfb -x GLX -x abx -x dbe >/dev/null
3. To verify that the X Server is running with the VFB, you can use the following command if the X11.samples.apps.clients fileset is installed.
/usr/lpp/X11/Xamples/bin/xprop -root | grep XVFB
If the value of the XVFB_SCREEN(STRING) variable is TRUE, then VFB is being used.
4. Unlocking the CATweb rendering:
By default, CATweb does not use the VFB feature. Instead, the image server rendering is done using the X11 frame buffer, and all the concurrent CATweb renderings are synchronized to share this single resource using a lock called the CATweb rendering lock. When enabled to use VFB, each CATweb process uses its own private X11 virtual frame buffer. In this case, lock synchronization is no longer required, thus improving the overall performance of CATweb in a multi-user environment.
You can configure CATweb to use VFB by changing the value of the VirtualFrameBuffer variable in the configuration file CATweb_install_directory/CATwebNavigator/bin/conf from the default value of 0 to a value of 1. The change will be taken into account at the next CATweb connection.
6.7.3.3 Configuring VFB with Graphics CardYou can use the VFB feature on a machine that has a graphics card. In order to allow the graphics screen to be used for a normal interactive X session, you need to start a second instance of the X server using the VFB. Starting VFB using the display :1 will allow the default display :0 to be used for interactive X sessions. To start the X server with VFB when there is already a graphics display, add the display specifier :1 to the command used previously:
122 AIX Migration in a CATIA Environment

/usr/bin/X11/X -vfb -x abx -x dbe -x GLX :1 &
You also need to change the CATweb configuration file CATweb_install_directory/CATwebNavigator/bin/conf to use the alternate display. This is done by setting the value of the DISPLAY environment variable.
export DISPLAY=‘uname -n‘:1
6.7.3.4 The Orbix daemonThe ORBIX Object Request Broker is used to allow the CATweb server to respond to client CORBA requests. The daemon must run with root authority, and is started with the following command:
<CATweb_install_directory>/CATwebNavigator/bin/runOrbixDaemon &
Alternatively, you can create an inittab entry to start the Orbix daemon at system startup.
6.7.4 Customizing CATwebThis section details the CATweb parameters that can be customized by a CATweb administrator, along with the default values.
All of the parameters are located in the CATweb configuration file CATweb_install_directory/CATwebNavigator/bin/conf, where CATweb_install_directory is the directory where you installed CATweb.
For changes to be taken into account, you need to stop all the server CATweb processes, including the Orbix daemon, and then restart the Orbix daemon.
Table 10. Configuration Options for CATweb
Parameter Definition
SERVER_TIMEOUT(default=600000)
Defines the time in milliseconds after which aCATweb process will exit if the client is inactive. Thedefault value is also the minimum value.
DCETimeout(default=3000)
CATweb is configured to navigate the server machinefilespace using DCE/DFS. This parameter definesthe period in seconds for CATweb DCE tokens toremain valid. This timeout must be less than the DCEtoken timeout to guarantee continued access.
BACKGROUND_COLOR(default=25 125 200)
This parameter defines the RGB value used as thedefault background color in the 3D remote viewer.
Exploiting New Functionality 123

The client uses a default TCP/IP port for communications with the orbix daemon, and a default set of TCP/IP ports for communications with the CATweb processes. Other existing applications on the server machine may use these ports and prevent the CATweb connections from functioning. The default port numbers used by Orbix are defined by the values IT_DAEMON_PORT and IT_DAEMON_SERVER_BASE in the configuration file CATweb_install_directory/CATwebNavigator/orbix/Orbix.cfg.
CATN4D_CACHE_DEFAULT(default=$HOME/cgr_cache)
Defines the cache directory used to store the cgr filesgenerated during the tessellation. By default, thevalue is unique for each user. A better configurationis to use a common directory for all users, thusreducing the overall space requirement.
SECONDARY_CACHES(default=$CATN4D_CACHE)
Defines the path to be searched when looking for cgrfiles which may have been previously generated.Many directories can be specified using the formatSECONDARY_CACHES=dirpath1:dirpath2:dirpath3
MulProcModOff(default=1)
Defines the visualization multi-processing mode. ForSMP machines, the value should be set to 0.
VirtualFrameBufferOn(default=0)
Defines whether CATweb uses the VFB by controllingthe locking mode.
WireFrameMode(default=0)
Defines the tessellation mode. The impact isrestricted to the remote 3D viewer.
TRACE_SERVER_MANAGER(default=YES)
If set to YES, trace information will be logged to thefile /tmp/ServerManager.web
TRACE_SERVER_CATIA(default=YES)
If set to YES, trace information on each CATwebsession will be logged to the file/tmp/$USER.$SERVER.web, where $USER is theuser of the CATweb session, and $SERVER is theinternal identifier of the CATweb session.
TRACE_SERVER_VPM(default=YES)
If set to YES, trace information on CATweb VPMsessions will be logged in the file/tmp/$USER.$SERVER.web, where $USER is theuser of the CATweb session, and $SERVER is theinternal identifier of the CATweb session.
Parameter Definition
124 AIX Migration in a CATIA Environment

6.7.5 Crossing Firewalls with CATwebIn most cases, a company intranet is protected from the internet by a firewall. This can pose a problem if a customer wants to provide access to CATweb data from clients outside the firewall.
There are three types of communication between the CATweb client and the CATweb server which must be allowed to cross the firewall.
• HTTP communications: HTTP (protocol HTTP, port 80)
• Orbix communications: CORBA (protocol TCP/IP, port 1570)
• CATweb communications: CORBA (protocol TCP/IP, one port per CATweb session above 1590)
The firewall has to let the CORBA communications pass through to the CATweb server machine. Most firewalls allow the HTTP protocol to pass through by default.
The CATweb process started for each CATweb session is dynamically assigned the next free port number above the base port value IT_DAEMON_SERVER_BASE, which is defined in the Orbix configuration file. The default value is 1590. The port is released at the end of the CATweb session. This means that the ports used on a CATweb site are the port 1570, and ports in the range 1590 to 1590 plus the maximum number of CATweb sessions.
The firewall must be configured to allow TCP/IP protocol access to CATweb server machines using port 1570 and ports in the correct range above the base port of 1590.
For example, if you have potentially 50 concurrent users on your CATweb site, then the firewall should allow TCP/IP access to ports 1570 and ports between 1590 and 1639 on the CATweb server machine.
6.8 IBM SecureWay Network Dispatcher in a CATweb Environment
This section describes how to combine IBM SecureWay Network Dispatcher Version 2.1 (SWND), and CATweb Navigator server to enhance CATweb Navigator server scalability. This guide also describes how to setup, configure, and troubleshoot such a server environment.
Exploiting New Functionality 125
IBM SecureWay Network Dispatcher is a very powerful software technology, with many features that are not discussed in this section. The full IBM SecureWay Network Dispatcher documentation and the latest trial product levels are available online at:
http://www.software.ibm.com/network/dispatcher
The CATIA/CATweb Installation Utility does not offer assistance with installation of IBM SecureWay Network Dispatcher. The following procedure should be followed to install the SecureWay Dispatcher. You must have the following hardware and software to complete the steps described in this guide:
• CATIA Version 4.2.0 R1
• CATweb Navigator Version 2.2
• An HTTP Server (Lotus Domino Go Webserver, for instance)
• IBM SecureWay Network Dispatcher, Version 2.1
(A Try-and-Buy copy of these files can be found on the RS/6000 Operating Environment for CATIA, Version 2.2.1, Volume 2 CD-ROM in the /SecureWay directory)
• CATweb load files: ADV_catwebload.class, catwebload.ksh, and catwebsetup.ksh.
(These files can be found on the RS/6000 Operating Environment for CATIA, Version 2.2.1, Volume 2 CD-ROM in the /SecureWay/loadl_files directory.)
6.8.1 The Need to Scale to Multiple ServersIn a typical CATweb Navigator session, you will:
1. Connect to the CATweb Navigator server (by typing in the CATweb Navigator server URL)
2. Login to the CATweb Navigator server
3. Select a CATIA model for viewing (using the 3D viewer for instance)
4. View and manipulate the CATIA model
A trial version of IBM SecureWay Network Dispatcher is provided on the RS/6000 Operating Environment for CATIA, Version 2.2.1, Volume 2 CD-ROM.
Note:
126 AIX Migration in a CATIA Environment

The CATweb Navigator server responds by:
1. Starting a dedicated server process for the end user
2. Loading the selected CATIA model
3. Rendering the 3D CATIA model into a 2D image
4. Sending the image back to the end user (CATweb Client) for viewing
Using CATweb Navigator to view CATIA data remotely enables a thin client system to function more efficiently. Although the software keeps demands on the client system fairly small, the processing load on the CATweb Navigator server can become quite large. For example, if an end user chooses to view a 100MB CATIA model, the CATweb Navigator server must load and render the entire 100MB CATIA model. This alone is a substantial load on the server, both in terms of memory and CPU utilization. If, hypothetically, 20 end users attempt to simultaneously connect to the same CATweb Navigator server, and all choose to view 100MB CATIA models at the same time, then the CATweb Navigator server must run 20 separate dedicated processes, each processing a 100MB model, for a concurrent processing load of 2GB of CATIA model data. Such a processing load could overwhelm most CATweb Navigator server systems.
This example shows that overloading a single CATweb Navigator server is possible with only a moderate number of users and that scaling your CATweb Navigator server solution to incorporate multiple machines is required.
6.8.2 The Clustered CATweb Navigator ServerThe following section shows how to cluster CATweb Navigator servers using IBM SecureWay Network Dispatcher, Version 2.1 (SWND).
One way to solve the problem of scalability is to add another CATweb Navigator server. You then have catwebserver1 and catwebserver2. Although this solution works, it is not very user friendly, as explained in the following example.
Suppose a user connects to catwebserver1 and receives a busy response. The user then tries to connect, using catwebserver2. The more servers your cluster has, the more time consuming it becomes. For instance, if you have 10 CATweb Navigator servers, the end user has to individually try each server to find one that is available. The end user would then be responsible for searching for a usable CATweb Navigator server.
Fortunately, SWND offers a solution to this problem. SWND is a proven technology that has powered demanding projects such as the Olympic Web
Exploiting New Functionality 127

Sites and the Deep Blue/Gary Kasparov Chess match Web Site. SWND is designed to allow a cluster of network servers to appear as a single large network server. With SWND, end users can connect to a central server, and then be automatically dispatched to the "most available" server in the cluster. Figure 29 illustrates this process. This particular configuration shows a pool of 3 CATweb Navigator Servers, all being controlled by SWND.
In order to present a consistent interface to clients connecting to the server cluster, the CATweb server machines must have identical configurations and have access to the same data. This is because the client has no control over which server will be asked by SWND to respond to a network request. You can make the data available to all servers using remote file systems, such as NFS or DFS. If the data is read only, you could make a copy available locally on each server.
Figure 29. CATweb Server Cluster
Once the IBM SecureWay Network Dispatcher and CATweb Navigator Server environment is setup, additional CATweb Navigator servers can be added to the cluster.
InternetIntranetExtranet
CATwebS1.abc.com
CATwebS2.abc.com
CATwebS3.abc.com
NetDisp.abc.com
CATwebCluster.abc.com
Client
Client
Client
Client
Client
CATweb Server Cluster
128 AIX Migration in a CATIA Environment

6.8.3 Configure IBM SecureWay Network DispatcherThis section describes how to setup and configure the IBM SecureWay Network Dispatcher and CATweb Navigator server environment shown in Figure 29. It is assumed that the reader already is familiar with setting up an individual CATweb Navigator Server system and with AIX in general. In the following example, the class C network is 199.1.1.0, the subnet mask is 255.255.255.0, and the network interface is en0. Use the following commands to find out the corresponding network interface and netmask information for your systems:
• To list the network interfaces enter:
lsdev -C -c if -F "name description"
• To show the IP address and netmask enter:
ifconfig en0
1. Identify Hostnames and IP Addresses.
The first step is to identify the systems that make up the CATweb Navigator server cluster. In general, you have 1 Dispatcher/Cluster system, and 2 or more CATweb Navigator Servers. All of these systems must be on the same subnet. In addition, you need one extra IP address and hostname that represent the cluster (called the Cluster address). This IP address is aliased to the Dispatcher/Cluster system.
In our example, we have 3 CATweb Navigator Servers and 1 Dispatcher/Cluster system, for a total of 4 systems. The hostnames and the IP addresses are shown in Table 11. A similar table should be created for your system, reflecting all IP addresses and hostnames of your systems.
Table 11. CATweb Navigator Server
2. Install CATweb Navigator server.
1. Install CATweb Navigator Server on each of the CATweb Navigator Server systems in the cluster. This includes installing CATIA, CATweb, an HTTP Server, and any required licenses.
Hostname IP Address
NetDisp.abc.com 199.1.1.10
CATwebS1.abc.com 199.1.1.11
CATwebS2.abc.com 199.1.1.12
CATwebS3.abc.com 199.1.1.13
CATwebCluster.abc.com 199.1.1.9
Exploiting New Functionality 129
2. Test each of these systems as individual CATweb Navigator servers.
In our example, we install CATweb Navigator server on CATwebS1.abc.com, CATwebS2.abc.com, and CATwebS3.abc.com. Each of the 3 servers are tested by connecting, logging in, and performing a few general CATweb functions.
For SWND to function correctly with CATweb Navigator Server, you also need to modify the default html document that is downloaded when a user connects to the CATweb Navigator Server. This ensures the user has correct permissions to connect to the actual CATweb Navigator Server. Currently, CATweb Navigator Server installs several default pages (indexIE4.html and indexNS4.html). You also need to create a new index.html file, as shown below. In the example below, HOSTNAME is replaced with CATwebS1.abc.com, CATwebS2.abc.com, and CATwebS3.abc.com.
Add the following index.html file to your document root directory for each CATweb Navigator Server (replace HOSTNAME with CATwebS1.abc.com, etc...):
<html> <head> <meta http-equiv="refresh" content="O;URL=’http://HOSTNAME/indexNS4.html <head> <body bgcolor=’#05347D" text="#FFFFFF"> reloading... </body> </html>
3. Configure addresses on the Dispatcher/Cluster System and CATweb Navigator Server
1. Alias the loopback interface to the cluster address on the CATweb Navigator servers using the command:
ifconfig lo0 alias <ClusterAddress> netmask <netmask>
2. Alias the network interface to the cluster address on the Dispatcher/Cluster system using the command:
ifconfig en0 alias <ClusterAddress> netmask <netmask>
Even after IBM SecureWay Network Dispatcher is configured, it is still possible to connect directly to the individual CATweb Navigator servers.
Note
130 AIX Migration in a CATIA Environment

One way to accomplish this is to append these commands to the bottom of the /etc/rc.tcpip file. This ensures that the command gets executed when the system boots. If you do not reboot once this line is added, the ifconfig command must be run manually for it to take affect.
In our example, we execute the following commands and also append them to the bottom of the /etc/rc.tcpip file. This ensures the command executes automatically on the next reboot.
Table 12. Commands for SWND Cluster
4. Install SWND on the Dispatcher/Cluster System.
Use smit to install the SWND software on the Dispatcher/Cluster System. In our example, we issue the commands shown in Table 13.
Note: You must copy the temporary license files into the correct directory.
Table 13. Install SWND
5. Add catwebload files to the Dispatcher/Cluster and CATweb Navigator servers.
The ADV_catwebload.class file contains a custom SWND advisor. Advisors are used by SWND to help control how network traffic is dispatched. This advisor is loaded into SWND and is responsible for querying the CATweb Navigator servers with the question "How busy are you?". The returned load information is then used to route future CATweb Navigator connects to the "most available server". The ADV_catwebload.class file needs to be installed on the Dispatcher machine.
Hostname Command
NetDisp.abc.com ifconfig en0 alias 199.1.1.9 netmask 255.255.255.0
CATwebS1.abc.com ifconfig en0 alias 199.1.1.9 netmask 255.255.255.0
CATwebS2.abc.com ifconfig en0 alias 199.1.1.9 netmask 255.255.255.0
CATwebS3.abc.com ifconfig en0 alias 199.1.1.9 netmask 255.255.255.0
Hostname Command
NetDisp.abc.com smit -C installp
Install and Update from Latest Available SW /CDROM/SecureWay
enter:cp /CDROM/SecureWay/nd21Try.LIC \/usr/lpp/nd/dispatcher/conf
Exploiting New Functionality 131

The catwebload.ksh script must be installed on each of the CATweb Navigator Servers. The purpose of the catwebload.ksh script is to determine the load on the server, and save the load information in the catwebload.txt file in the http server root document directory. The catwebload.ksh script should be started by the /etc/inittab file to ensure that it is always running, even after system reboots. The catwebload.ksh script file currently calculates load based on the amount of free real memory on the system.
In our example, we install the following files:
Table 14. Install the CATweb Scripts on SWND Servers
6. Configure the Dispatcher/Cluster System.
SWND must be up and running on the Dispatcher/Cluster System in order to route CATweb Navigator Server connect requests. The commands to start SWND are generally executed together in a script. A sample script can be found on the installation CD under SecureWay/load_files/catwebsetup.ksh.sample. Modify this script to reflect the IP addresses that were recorded in step 1. Run the script on your Dispatcher/Cluster System.
The script found in the above file configures SWND for our example. This includes specifying the CATweb Navigator Servers that participates in the cluster, and specifying the TCP port numbers that are dispatched.
7. Test the SWND and CATweb Navigator Server.
The easiest way to test your new SWND and CATweb Navigator Server environment is to try it out. Using your web browser, connect to the Cluster
Hostname Command
CATwebS1.abc.comCATwebS2.abc.comCATwebS3.abc.com
cp /CDROM/SecureWay/load_files/catwebload.ksh /usr/bin/chmod 755 /usr/bin/catwebload.kshmkitab "catwebload:2:once:/usr/bin/catwebload.ksh & \ >/dev/null"
NetDisp.abc.com cp /CDROM/SecureWay/load_files/ADV_catwebload.class \/usr/lpp/nd/dispatcher/lib/
The vmstat command must be installed on your system. It is used by the catwebload.ksh script. The vmstat command is part of the bos.acct fileset, and is installed in /usr/bin/vmstat.
Note
132 AIX Migration in a CATIA Environment

hostname or IP address (type in the URL). You should then see the standard CATweb Navigator Login screen. At the top of the page, you see the name of the actual CATweb Navigator Server. The active server name showing is the name of server on your cluster that was "most available" at the time.
In our example, when we connect using the URL:
http://CATwebCluster.abc.com
We see the CATweb Login screen, with a greeting text from CATwebServer1.abc.com, as this was the "most available" server when we connected.
You are now ready to begin using SWND and your Clustered CATweb Navigator Server. Each time you connect, SWND automatically routes your request to the most available server. Please see the troubleshooting section for more details on how to examine and debug SWND.
6.8.4 Troubleshooting IBM SecureWay Network Dispatcher If the SWND and CATweb Navigator Server are not working correctly, use the following steps to debug the root cause:
1. Test the CATweb Navigator Servers Individually.
Test each of the CATweb Navigator Server machines individually by connecting to them with your web browser, logging in to CATweb Navigator, and performing general CATweb Navigator functions. If this process does not work, there is a CATweb Navigator server problem, not an SWND problem. The problem should be debugged just like any standalone CATweb Navigator Server installation.
2. Check the SWND log files.
SWND records good debugging information in log files. The files are saved in /usr/lpp/ind/nd/logs on the Dispatcher/Cluster System. Read the files for error information. If there is an error in your configuration script, or if there is a network problem, the log files help identify the problem.
3. Test SWND using the telnet command.
The configuration script catwebsetup.ksh.sample sets up SWND to route both telnet and http traffic. Telnet was added to make it easier to do a quick test of SWND. Try using telnet to connect to the cluster address. SWND should route you to a server in the cluster. Login and type hostname to confirm that you have logged into a cluster server. If the telnet fails, check the following:
Exploiting New Functionality 133

• Make sure the loopback address on the servers is aliased to the cluster (Step 3a).
• Make sure the network address on the Network Dispatcher is aliased to the cluster (Step 3b).
• Check the SWND log files (/usr/lpp/ind/nd/logs).
4. Use SWND Reporting to check on SWND.
SWND has the following built in reporting features that you can use to check your configuration:
• ndcontrol manager report (a very good debugging command)
• ndcontrol manager status
• ndcontrol cluster report clusterAddress
• ndcontrol cluster status clusterAddress
• ndcontrol advisor report catwebload 80
• ndcontrol advisor status catwebload 80.
6.9 CATIA Version 5
CATIA Version 5 is the first release of the next generation of CATIA Solutions, and addresses advanced mechanical process centric design requirements. CATIA Version 5 is a completely new product, and is based on new object technologies, architectures, and standards, such as STEP, Java, CORBA and OLE. It does not contain any legacy code from previous versions of CATIA. Available on both UNIX and Windows NT environments, CATIA Version 5 is built to be totally compliant with Windows NT presentation standards. Version 5 is the beginning of a new technology curve that assures the future of the CATIA product line.
If you have followed the migration steps outlined in this redbook, your CATIA environment is now running the CASIL 9903 level, which is required for you to start taking advantage of the CATIA Version 5 interoperability features provided with CATIA Version 4.2.0 R1.
To use the above commands effectively, see the complete IBM SecureWay Network Dispatcher documentation, which can be found at:
http://www.software.ibm.com/network/dispatcher
Important:
134 AIX Migration in a CATIA Environment
The interoperability between the two versions make the process of evaluating and migrating to CATIA Version 5 much simpler. The main component of the interoperability feature is a common CATIA data format, which allows data to be used by either version of CATIA with no conversion required. The data format is platform independent, as well as CATIA version independent. For more information, see CATIA - V4 Integration User’s Guide for Version 5 Release 1.
The ability to share data files between the different CATIA versions makes the process of evaluating Version 5 in your production environment much simpler. You no longer have to install and configure the new product on a standalone machine and transfer model data. The new features mean you can interact with the existing environment during the evaluation period. The same features mean that when you decide to deploy CATIA Version 5, there is no need to perform the upgrade of your entire environment at the same time. The new Version 5 installations can be rolled out on a group by group basis, without impacting the users still on Version 4.
In this section we show how to install and customize CATIA Version 5.
6.9.1 Installation of CATIA Version 5This section explains how to install CATIA Version 5 for the first time on a single workstation running AIX. More information about the installation of CATIA Version 5 can be found in CATIA-Infrastructure User’s Guide for Version 5 Release 1.
The concepts, procedures and look and feel of the installation procedure for Windows NT have been carried over to the UNIX environment in order to provide a common CATIA Version 5 installation interface for all supported operating systems.
For the next steps we assume you are logged in as the root user and the CATIA Version 5 CD is in the CD-ROM drive.
1. Create and mount the file system for CATIA code. If you are using the multiversion structure, as described in section 3.8.5, “CATIA Client
At the time of writing this redbook, only pre-GA code was available to test and verify the installation and customization procedures of CATIA Version 5 on AIX. The final procedures in the GA code and the GA documentation may be slightly different from those given in this book.
Note:
Exploiting New Functionality 135

Directory Structures” on page 44, then you may not need to create a new JFS. If this is the case just create a new directory in your structure, and ensure that the filesystem has enough free disk space.
Use smit or the command line to create a local JFS of around 700 MB in size for the CATIA Version 5 code. For example:
mklv -y catia rootvg 100crfs -v jfs -d catia -m /cat -A yes -p rw -t yes -a frag=4096 \
-a nbpi=4096 -a ag=8
mount /catmkdir /cat/catia5
2. Mount the CD-ROM for installation.
mount -o ro -v cdrfs /dev/cd0 /cdrom
3. Change to the cdrom directory and install CATIA
cd /cdrom
./start
The CATIA Version 5 setup program will be run. The setup program checks that you have the correct prerequisites. Then, the Welcome dialog box greets you. The setup program invokes a self-explanatory graphical interface, shown in Figure 30, which walks you through the installation.
136 AIX Migration in a CATIA Environment

Figure 30. CATIA Version 5 Welcome Dialog Box
4. Press Next to see the License dialog box
5. If you want to use a nodelock license, and you already have received a license file from the Key Registration Center, import the file with the Import Certificate button or press Next.
6. In the Choose Destination Location dialog box a default destination directory (/usr/DassaultSystemes/B01) is shown. The chosen directory must be empty. However, you can also specify a new directory, since the install script will create it at installation time. We use the name of our test location /cat/catia5/B01 as shown in Figure 31 and press Next.
Exploiting New Functionality 137

Figure 31. CATIA Version 5 Destination Dialog Box
7. In the Choose CATIA V5 Configuration and Products dialog box, as shown in Figure 32, a list of all available CATIA configurations and products is shown. Select the configurations and products which you want to install, using the control key (ctrl) to make multiple selections. The dialog box specifies the space available for the installation. Clicking on configurations or products will recalculate the amount of space required for installing. The space required is updated progressively as you select from the list. If there is not enough space in the filesystem, you will get an error message after the confirmation with next. Press Next to see the next dialog box.
138 AIX Migration in a CATIA Environment

Figure 32. CATIA Version 5 Configuration and Products Dialog Box
8. Now all the selections are finished and you will get a new Recap dialog box. Check that it shows all configurations and products which you want to install, and shows the correct installation directory. If the information is not correct, you can go back to the appropriate dialog and change the choice. If the dialog shows the correct selections press the Install button to start the installation to disk.
9. The following steps will now be done by the installation script:
• Places the software in the destination directory (in our case /cat/catia5/B01)
• Creates the CATEnv directory in the home directory of the root user, which is "/" by default. The following global (public) environments required to set the CATIA Version 5 runtime environment variables are generated in the CATEnv directory.
• CATIA.V5R1.B01.sh (for use with Korn or Bourne shells) • CATIA.V5R1.B01.csh (for use with C shell)
See section 6.9.3, “Customizing CATIA Version 5” on page 142 for more information.
Exploiting New Functionality 139
• Creates the CATCDE directory required for desktop management in the home directory of the root user, and configures the CATIA directory in the Application Manager cabinet, accessible via the front panel on UNIX systems running the CDE (Common Desktop Environment) desktop.
10.A progress indicator is displayed during the installation. When the installation is complete, a Setup Complete dialog box must be confirmed with the Finish button.
11.In our test environment, we used /root as the home directory of the root user. We did not want the CATEnv and CATCDE directories in this directory, so we moved CATEnv and CATCDE to the CATIA directory where the B01 code is located. This keeps all of the configuration information on the same filesystem as the CATIA code.
mv /root/CATEnv /cat/catia5/CATEnvmv /root/CATCDE /cat/catia5/CATCDE
We then created the symbolic links required to allow other users to use CATIA with the default environment:
ln -s /cat/catia5/CATEnv /CATEnvln -s /cat/catia5/CATCDE /CATCDE
Check the contents of the default CDE startup file:
vi /CATCDE/CATIA/dt/appconfig/types/C/CATIA.V5R1.B01.dt
Make sure CDE uses the correct desktop definition files by performing the following commands:
cd /etc/dt/appconfig/types/C ls -l CATIA*
Ensure that all the files are linked to a file with the same name in the /CATCDE/CATIA/dt/appconfig/types/C directory.
If your installation does not use / as the default $HOME directory for the root user, you must create links to CATEnv and CATCDE in the / directory:
ln -s /$HOME/CATEnv /CATEnvln -s /$HOME/CATCDE /CATCDE
If this is not done, your default global environment will not work, and end users will be unable to start CATIA with the default environment.
Note:
140 AIX Migration in a CATIA Environment

This step is only necessary if you want to use a default environment. See section 6.9.3, “Customizing CATIA Version 5” on page 142 for information on how to use individual environments.
12.To display the default global environment icon CATIA V5R1, you must first click the Application Manager icon on the CDE front panel, then go into the Desktop Tools cabinet, then double-click the Reload Applications icon. Alternatively you can log out and log in to display the icon.
Now the installation of the CATIA code is finished and all the users on this workstation can run a CATIA Version 5 session.
6.9.2 How to Start CATIA Version 5There are different methods available to start CATIA Version 5 on a UNIX workstation:
• Start with the CDE desktop:
1. Open the Application Manager cabinet on the CDE front panel.
2. Open the CATIA folder.
3. Double-click the CATIA V5R1 icon.
In this case the environment file that is defined in:
/CATCDE/CATIA/dt/appconfig/types/C/CATIA.V5R1.B01.dt
is used.
• Start CATIA in a shell:
1. Open a dtterm to get a command prompt.
2. Enter the following commands for the Korn Shell:
. /cat/catia5/CATEnv/CATIA.V5R1.B01.shCNEXT
For this start method, it is not necessary for CATEnv and CATCDE to exist in the / or root $HOME directory.
• Start CATIA with the catstart command:
The catstart command is located in: <catia_destination_directory>/code/command/catstart
In our example, this is:
/cat/catia5/B01/code/command/catstart
Alternatively you can specify the environment to use as an argument to the catstart command:
Exploiting New Functionality 141

/cat/catia5/B01/code/command/catstart -env CATIA.V5R1.B01 -d /CATEnv
If you do not use any options, catstart takes the name of the environment from <catia_destination_directory>/EnvName.txt and expects a file with this name and a suffix .sh to exist in the /CATEnv (public) or in $HOME/CATEnv (private) directory.
The following options can be used with the catstart command:
SYNTAX : catstart [ -env environment_name ]
[ -d environment_directory ] [ -object object ] [-h ]
env Followed by environment name (without the .sh suffix), which can be used by CATIA V5.
d Followed by environment directory where the environment files are located.
object Followed by object to load when starting CATIA V5, for example, a model name.
h Display help on the catstart command
6.9.3 Customizing CATIA Version 5In CATIA Version 5 there is no longer a Declaration Set to customize the environment as there is in CATIA Version 4. Most of the customization is now be done in the interactive session, and is called Settings. Only a small set of system environments are exported before starting CATIA, this is called the CATIA environment.
6.9.3.1 The CATIA EnvironmentThe new CATIA environment is a set of runtime environment variables. Each variable defines a path to be searched by the software when you start a session. On Windows NT, these variables are contained in the registry, and on UNIX, they are exported by shell scripts, such as the file /cat/catia5/CATEnv/CATIA.V5R1.B01.sh used in the example installation described in section 6.9.1, “Installation of CATIA Version 5” on page 135. A sample CATIA V5 environment file is shown in Appendix D, “Sample CATIA V5 Environment File” on page 169.
For example, on UNIX, the CATDocView variable is set by default to:
CATDocView=/usr/DassaultSystemes/B01/docexport CATDocView
142 AIX Migration in a CATIA Environment
This means that the online documentation files are installed in the directory
/usr/DassaultSystemes/B01/doc
When you want to access the online documentation, the software will look for the documentation files in this location.
CATIA distinguishes between two kinds of environments.
global A global environment is created by an administrator and is installed in the CATEnv directory which is in the home directory of the root user. By default, this results in the environment being stored in the directory /CATEnv. If your installation does not use / as the home directory for the root user, create the symbolic links /CATEnv and /CATCDE which refer to the actual location of the directories in the root users home directory. The global environment can be used by all CATIA users so there is no need to have a private environment. The UNIX access mode should be 755 and the file should be owned by root or a CATIA administrator.
private A private CATIA environment is visible and can be used or manipulated (customized or deleted) only by the user who created it, and is located in the home directory of the user.
6.9.3.2 Managing CATIA EnvironmentsCATIA provides commands to create and delete environments. Modification of the environment files can be performed using your favorite text editor.
Create an EnvironmentThe command setcatenv is used to create a CATIA environment file in a specified directory. Additional CDE desktop files in the $HOME/.dt directories are created. The usage of the command is:
setcatenv [-e environment file name] [-d environment directory name (on UNIX only)] -p CATIA code path (e.g /usr/DassaultSystemes/B01)
For example, to create a CATIA environment file in /cat/catia5/CATEnv, use:
setcatenv -e CATIAV5.ENV -d /cat/catia5/CATEnv -p /cat/catia5/B01
This command creates the files CATIAV5.ENV.sh and CATIAV5.ENV.csh in the /cat/catia5/CATEnv directory. For selecting the environment with CDE, the action file CATIAV5.ENV.dt is created in the $HOME/.dt/types directory and a dummy file is created in $HOME/.dt/appmanager/my_CATIA/CATIAV5.ENV
Exploiting New Functionality 143
To activate the CDE files for all CATIA users, perform the following steps after running setcatenv:
cp $HOME/.dt/types/CATIAV5.ENV.dt /CATCDE/CATIA/dt/appconfig/types/Ccp $HOME/.dt/appmanager/my_CATIA/CATIAV5.ENV \
/CATCDE/CATIA/dt/appconfig/appmanager/C/CATIA
If a CATIA user creates a new environment in their $HOME directory, they should use $HOME/CATEnv as the directory option, as some scripts use $HOME/CATEnv as the only accepted path:
setcatenv -e MY.CATIAV5.ENV -d $HOME/CATEnv -p /cat/catia5/B01
MY.CATIAV5.ENV.sh and MY.CATIAV5.ENV.csh are created in the $HOME/CATEnv directory. For the selection with CDE desktop, MY.CATIAV5.ENV.dt is created in $HOME/.dt/types and a representation dummy file $HOME/.dt/appmanager/my_CATIA/MY.CATIAV5.ENV.
If a CATIA environment is created by an editor or copied by UNIX commands, make sure that the environment file ends with the .sh suffix for the Korn or Bourne shell, and the .csh suffix for the C Shell environment.
Delete an EnvironmentThe command delcatenv is used to delete a CATIA environment. All the files which have been created with setcatenv are deleted with this command.
delcatenv [-e environment file name]
For example, to delete a CATIA environment file in $HOME/CATEnv, use:
delcatenv -e MY.CATIAV5.ENV
The following files are deleted:
• $HOME/CATEnv/MY.CATIAV5.ENV.sh
• $HOME/CATEnv/MY.CATIAV5.ENV.csh
• $HOME/.dt/types/MY.CATIAV5.ENV.dt
• $HOME/.dt/appmanager/my_CATIA/MY.CATIAV5.ENV
The delcatenv command can only delete environments in $HOME/CATEnv there is no -d option to specify a environment directory. The environment files must end with a .sh or a .csh suffix
Note:
144 AIX Migration in a CATIA Environment

Modify an EnvironmentFor example, you may install the online documentation at a location different from the default location. If this is the case, you need to specify where the documentation files are located by modifying the value for the CATDocView variable. Use your favorite text editor and edit the environment file, which for example may be in your $HOME/CATEnv directory. Do not create new variables, or rename existing variables in the CATIA environment file.
The runtime environment variables you can customize are listed in Table 15.
Table 15. CATIA Environment Variables
6.9.3.3 Manage CATIA SettingsMost of the customization of a CATIA Version 5 session is now done during the interactive work, and stored in a directory which is defined in the CATIA
Variable Name Description
PATH Executable code search path
LIBPATH Library search path (AIX)
LD_LIBRARY_PATH Library search path (Solaris and IRIX)
SHLIB_PATH Library search path (HP-UX)
CATTemp 1 Temporary user setting search path
CATReferenceSettingPath 1 Default reference setting search path
CATUserSettingPath 1 Permanent user setting search path
CATDocView 1 Online documentation search path
CATMsgCatalogPath Application message file search path
CATStartupPath Sample file search path
CATFontPath Font search path
CATGraphicPath Graphic and icon search path
CATReffilesPath Reference file search path
CATDictionaryPath Library dictionary search path
CATCommandPath Command search path
CATGalaxyPath Search path for CATIA Galaxy online information files
CATICPath Search path for product identification (internal use)
1 These variables are the ones you are most likely to change.
Exploiting New Functionality 145

environment. All non-application data which is stored in CATIA documents are called Settings. There are two types of Settings.
Temporary settings contain settings of a temporary nature, such as album files, screen captures and roll file information. They are created in a location referenced by the CATTemp environment variable. The default location is the $HOME/$CATTemp directory. The CATTemp directory contains two sub-directories:
Album This path contains screen captures created using the Tools->Image->Capture... command
CNext01.roll This path contains the roll file which is a permanently written backup of the working environment.
Figure 33. CATIA Version 5 Options Menu
Permanent settings files store customization data, and are mainly stored when manipulating the settings in the various tabs of the option menu, shown in Figure 33. The option menu is started by selecting Tools->Options from the menu. Permanent settings include data such as licenses, application window customization, background colors, part and print settings. These files are created in a location referenced by the CATUserSettingPath variable. The default location of the directory is $HOME/$CATSettings. Permanent setting
146 AIX Migration in a CATIA Environment

files are identified by the suffix .settings. Be careful when deleting one of these files with a UNIX command, because deleting either types of files deletes a part of your working customization.
6.9.4 Installing CATIA Online DocumentationThe online Documentation for CATIA Version 5 is HTML based, and can be viewed from any HTML web browser. See Figure 34 for an example of the initial documentation screen.
Figure 34. CATIA Version 5 Documentation
On UNIX, you can not install the online documentation directly from a dialog within the installation procedure, and there is no tool for installing the online documentation from the CD-ROM.
Exploiting New Functionality 147

To install the documentation, copy the contents of the CD-ROM into a directory with sufficient free disk space. You could, for example, copy the documentation files to the default directory, so you do not need to change the environment file. In our example, this would be /cat/c5/B01/doc.
If the documentation is copied into a location other than the default, you must modify the value for the CATDocView variable in the environments which are used by CATIA users. To specify the location of the documentation files in the environment, see section 6.9.3, “Customizing CATIA Version 5” on page 142. The CATIA documentation is a good candidate for the use of CacheFS. See section 6.4, “Configuring CATIA Clients to Use CacheFS” on page 101 for more information.
Optionally, you may use the CD-ROM directly and set the value of the CATDocView variable to the CD-ROM mount point, but the use of the CD is not recommended because the interactive performance in a web browser is much better when accessing the data from disk or CacheFS.
If you want to consult the documentation directly from the documentation directory or the CD-ROM drive, and without first running a CATIA Version 5 session, insert the documentation CD-ROM into the drive, mount the CD-ROM where necessary, then use your HTML browser to open the following file (depending on the language) to display the CATIA Version 5 online documentation homepage:
• homepage.htm (English)
• Frenchhomepage.htm (French)
• Germanhomepage.htm (German)
• Japanesehomepage.htm (Japanese).
or use the following command:
netscape <catia_destination_directory>/doc/[language]homepage.htm
netscape /cat/catia5/B01/doc/homepage.htm
Adobe Acrobat Reader must be installed and configured in order to print the documentation.
6.10 AIX Fast Connect for Windows
Fast Connect for Windows allows AIX to be a part of a Microsoft Network neighborhood, providing Windows clients with access to AIX file and print services without having to install additional software on the clients. Windows
148 AIX Migration in a CATIA Environment
clients can access AIX files using the Journaled File system (JFS), CD File System (CDFS), Network File System (NFS) mounted subsystems, and AIX printing services using Microsoft Common Internet File System (CIFS) and Server Message Block (SMB) protocols over TCP/IP.
As an IBM-developed feature, Fast Connect takes advantage of the AIX operating systems scalability and performance capabilities, and is supported on AIX Version 4.3.2 and later releases.
6.10.1 Configuring Fast Connect on AIXThe Fast Connect software is supplied on CD-ROM media. Install all of the software on the CD using SMIT with the installp fastpath.
At the time of writing this book, certain fixes are required for the Fast Connect product to work correctly in CATIA environments. These fixes are not included on the RS/6000 Operating Environment product media. After installing the Fast Connect product, you should verify that fixes for the following APAR numbers have also been installed.
• IX88571 • IX88572 • IX88573 • IX88575 • IX88576 • IX88577
You can check if these fixes are installed using the instfix command. The following example checks to see if the fix for APAR IX88577 is installed on the system.
instfix -i -k IX88577
If the fixes have not been installed, then you should obtain them through your normal support process.
The configuration of Fast Connect can be performed using SMIT menus.
• From an AIX prompt, enter smit smb
• Select the Configuration option.
• From the Configuration panel, select the Attributes option.
• At the Attributes panel, as shown in Figure 35, complete the requested information:
• Select when to start the server, one of Now, Reboot, or Both.
Exploiting New Functionality 149

• Enter the name of the Windows domain this machine will be part of.
• Select Force Encryption for the Use Encrypted Passwords field.
• Enter the IP address of your WINS and backup WINS servers.
• Enter the IP address of your passthrough authentication server and backup passthrough authentication server.
• Set NetBIOS Name Server (NBNS) to off, unless you need this.
• Press enter to confirm your settings.
Figure 35. SMIT AIX Fast Connect Attributes Panel
This will configure the server system, and also setup a default share of the AIX $HOME environment variable, with the share name \\server\home.
To configure additional shares:
• From an AIX prompt, enter smit smb
• Select the Server Shares option.
• Select the File Systems (Shared Volumes) option.
• Select the Add File Systems (Shared Volumes) option.
• Enter the share name, filesystem path, and a description.
• Press enter to configure the share.
File system security is set using standard AIX commands. Note that Windows NT access control lists are not supported, since these are Microsoft
150 AIX Migration in a CATIA Environment

proprietary. However, file security management for Fast Connect NT shared files is no different than for AIX file systems. The security that can be seen on NT clients is in the form of DOS attributes, a published standard.
6.10.2 Configuring NT ClientsWhen Fast Connect is configured on the server as specified above, authentication of the NT client is handled by the NT domain controller. The only requirement is that users of the same name must exist on both AIX and NT. NT passwords are managed by the NT domain controller and do not have to match AIX passwords. Mapping the Fast Connect shared file system as a network drive on the NT client is handled just like any other network share.
File system security is managed on the AIX server. This is consistent with a client/server environment. If you wish to manage the server from a client, then the standard Telnet facility should be used to log on to the AIX server to perform any necessary resource management. This is identical to the way you manage resources within an AIX environment.
6.10.3 CATIA Specific RequirementsThe default configuration for Fast Connect handles long filenames, mixed case, and special characters. It is important to avoid using illegal NT characters for AIX file and directory names. In order to handle file locking within CATIA, you will need to edit the /etc/cifs/cifsConfig configuration file. Change the value of the oplockfiles parameter to no. You should then stop and restart the Fast Connect server.
• From an AIX prompt, enter smit smb.
• Select the Administration option.
• Select Stop Server.
• Once the server has stopped, press F3, and then select Start Server.
This change is required because of the locking mechanism used by CATIA. If you do not make this change, then you may encounter problems if you attempt to open a data file that is already in use by another CATIA session.
Exploiting New Functionality 151

152 AIX Migration in a CATIA Environment

Appendix A. CASIL 9903 Bundle File
This appendix contains the CASIL 9903 bundle file used during the CASIL 9903 test cycle.
# AIX 4.3.2 INSTALLATION BUNDLE FOR CATIA 4.2.0 Refresh 1
# ADDED FOR CASIL 9903 (AIX 432):# device support for GXT2000P# ADDED FOR CASIL 9811 (AIX 432):# device support for GXT3000P# perfagent.tools## You may comment out any filesets by adding ’#’ in the first column# of the fileset.## Listed below are some examples of optional filesets for a client# installation. If you need any of these fileset installed, just uncomment # it by DELETING ’#’ (not replacing with space) in the first column of # the fileset.
#=========================================================================## DEVICES FILESETS##=========================================================================
# (*) indicates required if corresponding device(s) are installed## For those of you need all the graphics device drivers on the machine# you may add:## Gt4/Gt3devices.mca.8ee3## GXT500devices.buc.00004002## GXT150devices.buc.00004005## GXT150Ldevices.buc.00004006##GXT800M - NEW FOR AIX 4.3.0devices.mca.8f61## GXT150Mdevices.mca.8f9a##GXT1000devices.mca.8fbc##GXT255Pdevices.pci.14103c00 ##GXT500P/550Pdevices.pci.14105400##GXT800Pdevices.pci.14105e00
© Copyright IBM Corp. 1999 153

## GXT1000 pcidevices.pci.14102000## GXT2000P devices.pci.1410b800## GXT3000P devices.pci.14108e00## Dials and/or lighted program function keyboard (*)devices.mca.edd5## AIXwindows Serial Tablet Input Device Software (*)devices.serial.tablet1## AIXwindows Serial Graphics Input Adapter Software (*)devices.serial.gio## AIXwindows 6094-030 Spaceball 3-D Input Device Software (*)devices.serial.sb1## 5085/86/88 Attachment Adapter device driver (*)#devices.mca.8787## common printersprinters.hpJetDirect.attachprinters.hplj-3.rteprinters.hplj-4.rteprinters.ibm4019.rteprinters.ibm4029.rteprinters.ibm4039.rte## CATIA products 4D Navigator and File-based Assembly now require OpenGLOpenGL.OpenGL_X.devOpenGL.OpenGL_X.rte# grapHIGS is required for graPHIGS or Motif CATIA user interfacePEX_PHIGS.graPHIGS.fntPEX_PHIGS.graPHIGS.rtePEX_PHIGS.dev# Common Desktop Environment (COSE desktop)X11.Dt.helpinfo X11.Dt.helpmin X11.Dt.helprun X11.Dt.bitmaps X11.Dt.lib X11.Dt.ToolTalk X11.Dt.rte # X11 applicationsX11.apps.configX11.apps.customX11.apps.xterm# X11 runtimeX11.base# X11 compatibility productsX11.compat.fnt.pc# X11 fontsX11.fnt.coreXX11.fnt.defaultFontsX11.fnt.iso1# MotifX11.motif# X11 locale (US English)
154 AIX Migration in a CATIA Environment

X11.loc.En_US.Dt.rteX11.loc.En_US.base.libX11.loc.En_US.base.rte# X11 application messages for En_US (US English)X11.msg.En_US.apps.configX11.msg.En_US.apps.customX11.msg.En_US.Dt.rteX11.msg.En_US.vsm.rte# Support of xdpyinfo commandX11.samples.apps.clients# INed editor bos.INed# Minimum compatibility productsbos.compat.linksbos.compat.netbos.compat.cmds# Base Operating System Databos.databos.iconv.com# Support of LUM on client machine# ifor_ls.compatifor_ls.base# Code set definition (PC, iso or IBM-850)bos.loc.pc_compat.En_USbos.loc.pc_compat.com# Network communication for a client machinebos.net.ncsbos.net.nfs.clientbos.net.nfs.cachefsbos.net.nis.clientbos.net.tcp.clientbos.net.tcp.smit# Base Performancebos.perf# System management for a client machinebos.sysmgt.nim.clientbos.sysmgt.tracebos.sysmgt.serv_aidbos.sysmgt.smitbos.sysmgt.sysbr# Base terminal definition and runtime environmentbos.terminfo.com.databos.terminfo.print.data# Printer backendprinters.rtebos.txt.ts# new fileset to be used with which_fileset commandbos.content_list# new fileset for searching documents#bos.docsearch# Minimum required for some of the CATIA function or IGESbos.adt.basebos.adt.includebos.adt.libbos.adt.libmbos.adt.syscallsbos.adt.includebos.adt.samples# Required for dbx - a debug toolbos.adt.debug# C set ++ runtime xlC.rte# XL Fortran runtime
CASIL 9903 Bundle File 155

xlfrte# Netscape Navigator, US-only encryption# Netscape.nav-us# Netscape Navigator, non-restricted encryptionNetscape.nav-us# DOS utilitiesbos.dosutil# Only needs to be installed if using X11R5 environment on AIX 4.3.0X11.compat.lib.X11R5# performance measurement toolsperfagent.tools##=========================================================================## DEVELOPMENT FILESETS##=========================================================================
# Required for make file#bos.adt.base# Required for application development environment#bos.adt# X11 development files#X11.adt.bitmaps#X11.adt.imake#X11.adt.include#X11.adt.lib#X11.samples.common#X11.samples.lib.Core## network application development#bos.net.nfs.server# Network communication development environment tools#bos.net.tcp.adt#bos.net.nfs.adt#bos.net.uucp
#====================================================================# UMS LPP filesets#====================================================================
#UMS#UMS.dictation#UMS.html.en_US#UMS.info.en_US#UMS.info.en_US.hypertext#UMS.loc#UMS.msg.En_US#UMS.msg.en_US#UMS.video_ext
#====================================================================# DCE Client Filesets#====================================================================#dce.client.core.rte#dce.xdsxom.rte#dce.pthreads.rte#dce.compat.client.core.smit# DFS Filesets#dce.client.dfs.rte#dce.dfs_server.rte#dce.compat.dfs_server.smit#dce.compat.client.dfs.smit
156 AIX Migration in a CATIA Environment
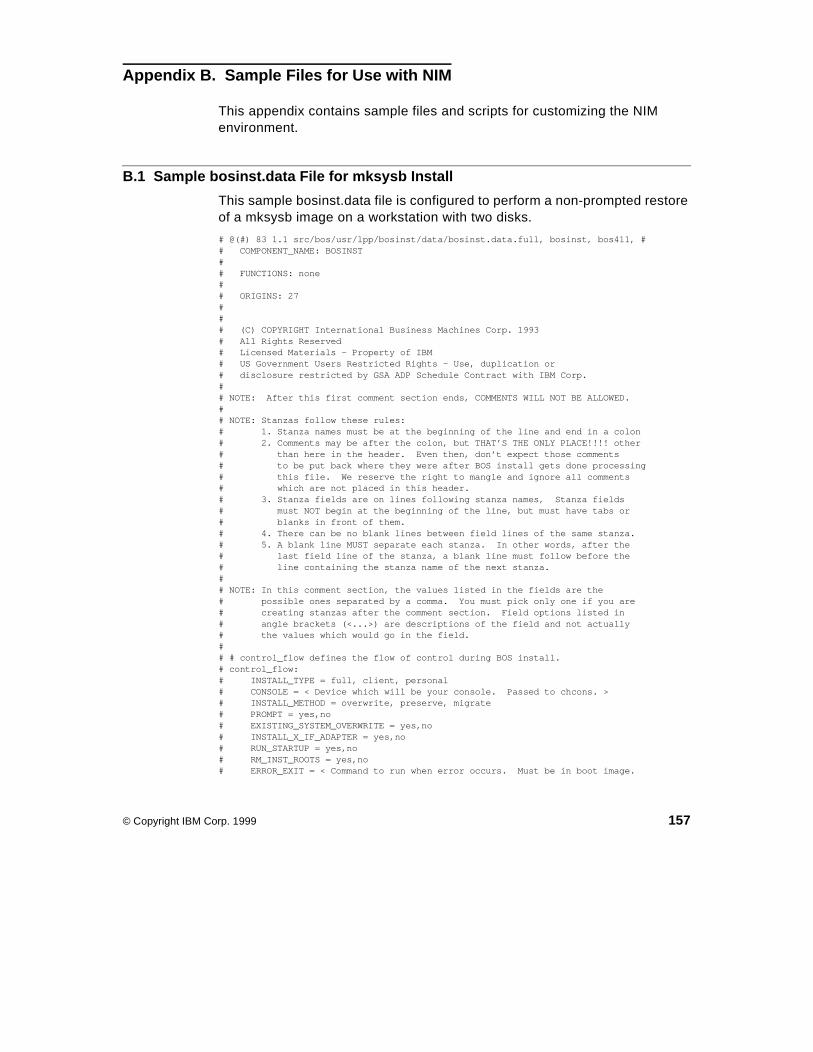
Appendix B. Sample Files for Use with NIM
This appendix contains sample files and scripts for customizing the NIM environment.
B.1 Sample bosinst.data File for mksysb Install
This sample bosinst.data file is configured to perform a non-prompted restore of a mksysb image on a workstation with two disks.
# @(#) 83 1.1 src/bos/usr/lpp/bosinst/data/bosinst.data.full, bosinst, bos411, ## COMPONENT_NAME: BOSINST## FUNCTIONS: none## ORIGINS: 27### (C) COPYRIGHT International Business Machines Corp. 1993# All Rights Reserved# Licensed Materials - Property of IBM# US Government Users Restricted Rights - Use, duplication or# disclosure restricted by GSA ADP Schedule Contract with IBM Corp.## NOTE: After this first comment section ends, COMMENTS WILL NOT BE ALLOWED.## NOTE: Stanzas follow these rules:# 1. Stanza names must be at the beginning of the line and end in a colon# 2. Comments may be after the colon, but THAT’S THE ONLY PLACE!!!! other# than here in the header. Even then, don’t expect those comments# to be put back where they were after BOS install gets done processing# this file. We reserve the right to mangle and ignore all comments# which are not placed in this header.# 3. Stanza fields are on lines following stanza names, Stanza fields# must NOT begin at the beginning of the line, but must have tabs or# blanks in front of them.# 4. There can be no blank lines between field lines of the same stanza.# 5. A blank line MUST separate each stanza. In other words, after the# last field line of the stanza, a blank line must follow before the# line containing the stanza name of the next stanza.## NOTE: In this comment section, the values listed in the fields are the# possible ones separated by a comma. You must pick only one if you are# creating stanzas after the comment section. Field options listed in# angle brackets (<...>) are descriptions of the field and not actually# the values which would go in the field.## # control_flow defines the flow of control during BOS install.# control_flow:# INSTALL_TYPE = full, client, personal# CONSOLE = < Device which will be your console. Passed to chcons. ># INSTALL_METHOD = overwrite, preserve, migrate# PROMPT = yes,no# EXISTING_SYSTEM_OVERWRITE = yes,no# INSTALL_X_IF_ADAPTER = yes,no# RUN_STARTUP = yes,no# RM_INST_ROOTS = yes,no# ERROR_EXIT = < Command to run when error occurs. Must be in boot image.
© Copyright IBM Corp. 1999 157

# CUSTOMIZATION_FILE = < Command to run after BOS install finishes. ># TCB = yes, no <turns on/off trusted computing base># BUNDLES = < Bundle file to install after auto install. ># # There can be multiple target_disk_data stanzas. They define which disk(s)# will contain the root volume group. Only one field (LOCATION, SIZE_MB,# HDISKNAME) must be non-null for BOS install to choose a disk. The order of# precedence is LOCATION, then SIZE_MB, then HDISKNAME. If LOCATION is set,# BOS install will ignore SIZE_MB and HDISKNAME. If LOCATION is not set and# SIZE_MB is, BOS install will select disks based on SIZE_MB and ignore# HDISKNAME. If LOCATION and SIZE_MB are both empty, BOS install will choose# the disk specified in HDISKNAME. If all three are empty, BOS install will# choose for you.# WARNING: Don’t leave the target_disk_data stanza(s) empty if PROMPT = no# unless you don’t care which disk BOS install overwrites, because# the algorithm for determining the default disk on which to install# is not always predictable.# The SIZE_MB field can contain either a size or the word ’largest’. If a size# is listed, BOS install will do a best-fit on the disks. If the word ’largest# is in that field, BOS install will pick the largest disk. If there are more# than one target_disk_data stanza, BOS install will pick the two ’largest’# disks, etc.## target_disk_data:# LOCATION = # SIZE_MB = # HDISKNAME = # # locale:# BOSINST_LANG = <language to use during installation># CULTURAL_CONVENTION = <primary cc to use after reboot># MESSAGES = <primary message catalogs to use after reboot># KEYBOARD = <keyboard map to use after reboot>control_flow: CONSOLE = /dev/lft0 INSTALL_METHOD = overwrite PROMPT = no EXISTING_SYSTEM_OVERWRITE = yes INSTALL_X_IF_ADAPTER = all RUN_STARTUP = no RM_INST_ROOTS = no ERROR_EXIT = CUSTOMIZATION_FILE = TCB = no INSTALL_TYPE = full BUNDLES =
target_disk_data: LOCATION = SIZE_MB = HDISKNAME = hdisk0
target_disk_data: LOCATION = SIZE_MB = HDISKNAME = hdisk1
locale: BOSINST_LANG = en_US CULTURAL_CONVENTION = en_US MESSAGES = en_US KEYBOARD = en_US
158 AIX Migration in a CATIA Environment
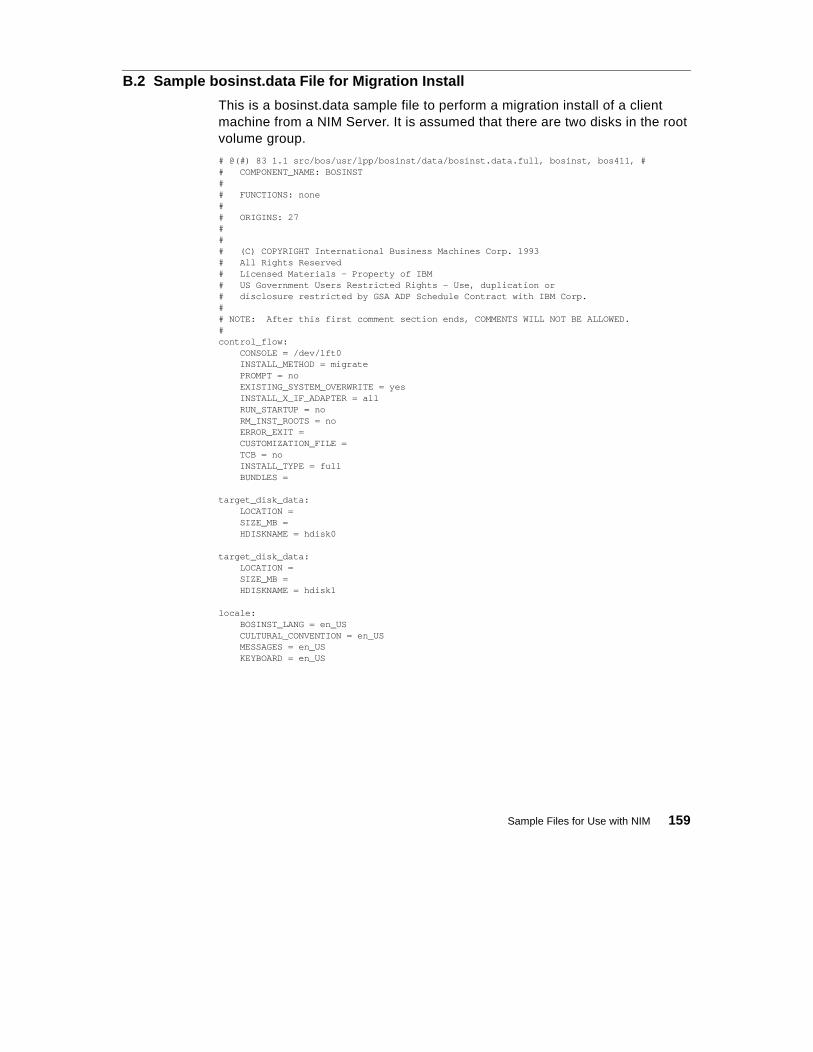
B.2 Sample bosinst.data File for Migration Install
This is a bosinst.data sample file to perform a migration install of a client machine from a NIM Server. It is assumed that there are two disks in the root volume group.
# @(#) 83 1.1 src/bos/usr/lpp/bosinst/data/bosinst.data.full, bosinst, bos411, ## COMPONENT_NAME: BOSINST## FUNCTIONS: none## ORIGINS: 27### (C) COPYRIGHT International Business Machines Corp. 1993# All Rights Reserved# Licensed Materials - Property of IBM# US Government Users Restricted Rights - Use, duplication or# disclosure restricted by GSA ADP Schedule Contract with IBM Corp.## NOTE: After this first comment section ends, COMMENTS WILL NOT BE ALLOWED.#control_flow: CONSOLE = /dev/lft0 INSTALL_METHOD = migrate PROMPT = no EXISTING_SYSTEM_OVERWRITE = yes INSTALL_X_IF_ADAPTER = all RUN_STARTUP = no RM_INST_ROOTS = no ERROR_EXIT = CUSTOMIZATION_FILE = TCB = no INSTALL_TYPE = full BUNDLES =
target_disk_data: LOCATION = SIZE_MB = HDISKNAME = hdisk0
target_disk_data: LOCATION = SIZE_MB = HDISKNAME = hdisk1
locale: BOSINST_LANG = en_US CULTURAL_CONVENTION = en_US MESSAGES = en_US KEYBOARD = en_US
Sample Files for Use with NIM 159

B.3 Sample NIM Customization Script
This script is used as a customization script to install CATIA after a migration install of a NIM client machine.
#!/bin/ksh#-----------------------------------------------------# this script runs as customize-script started by NIM# all the necessary PTF’s for CASIL 9903 will be installed# and CATIA is installed and customized#-----------------------------------------------------
#-----------------------------------------------------# set the defaults#-----------------------------------------------------MOUNTWS=code_server.ibm.comMOUNTDIR=/export/aix432_9903ptfsLOG=/tmp/casil9903_update.logCATLV=rootvgCATIALVSIZE=232CATADMLVSIZE=87CATIASRC=/export/catia420_1_imagesCATPTFS=/export/catia420_1_ptfs/9903INSTALL="ALMCG20"ADMIN=/export/catadm
#-----------------------------------------------------# update the client to the CASIL#-----------------------------------------------------echo "Start update_all for casil9903 "echo "the output is written to $LOG"
echo "Start update_all for casil9903" | tee $LOGping $MOUNTWS 64 1 > /dev/nullRC=$?
if [ $RC -eq 0 ] then mount ${MOUNTWS}:${MOUNTDIR} /mnt RC1=$? if [ $RC1 -ne 0 ] then echo "Mount of $MOUNTDIR from $MOUNTWS failed" |tee -i -a $LOG exit 1 fi /usr/lib/instl/sm_inst installp_cmd -a -d /mnt -f _update_all \
-c -N -X -g |tee -i -a $LOG
else echo " Server $MOUNTWS not responding " |tee -i -a $LOGfiunmount /mntecho "update finished ..." | tee -i -a $LOG
#-----------------------------------------------------# prepare the CATIA installation#-----------------------------------------------------
echo "\n# Preparation for Catia Installation..." | tee -i -a $LOGumount /usr/catiaumount /home/catadmrmfs /usr/catia
160 AIX Migration in a CATIA Environment

rmfs /home/catadm
PPSIZE=$( lsvg $CATLV |grep ’PP SIZE:’|awk ’{print $6}’ ) if [ "$PPSIZE" -gt 4 ]; then (( CATIALVSIZE = $CATIALVSIZE / ($PPSIZE/4) )) (( CATADMLVSIZE = $CATADMLVSIZE / ($PPSIZE/4) )) fi
echo " Create Catia and Catadm LV" | tee -i -a $LOG
mklv -y catia -x 512 -w n $CATLV $CATIALVSIZEmklv -y catadm -a im -w n $CATLV $CATADMLVSIZE
echo " Create Catia and Catadm JFS " | tee -i -a $LOGcrfs -v jfs -d catia -m /usr/catia -A yes -p rw -t no \ -a frag=’4096’ -a nbpi=’4096’ -a compress=’no’
crfs -v jfs -d catadm -m /home/catadm -A yes -p rw -t no \ -a frag=’4096’ -a nbpi=’4096’ -a compress=’no’
mount /usr/catiamkdir -p /usr/catia/unloadmount /home/catadm
echo "\n# Preparation for Catia finished ..." | tee -i -a $LOG
#-----------------------------------------------------# CATIA installation=#-----------------------------------------------------
echo "\n## Install Catia..." | tee -i -a $LOG
mkdir /mntptfchown -R catadm.catia /home/catadm
mount ${MOUNTWS}:${CATIASRC} /mntmount ${MOUNTWS}:${CATPTFS} /mntptf
export CAT_UNLOAD=/usr/catia/unloadcd /usr/catia/unloadtar xvf /mnt/STARTER
echo " Unload Catia code " | tee -i -a $LOG/usr/catia/unload/code/bin/wfunload -d /mnt -t "code" -X $INSTALL
echo " Unload Catia PTFs " | tee -i -a $LOGPTFS=$(ls /mntptf/code)/usr/catia/unload/code/bin/wfunload -d "/mntptf" -t "code" -X $PTFS
umount /mntumount /mntptf
echo "\n## Unload of Catia finished ..." | tee -i -a $LOG
#-----------------------------------------------------# Configure CATIA ##-----------------------------------------------------
echo "\n## Configure Catia..." | tee -i -a $LOG
echo " Create CATIA runtime environment " | tee -i -a $LOG/usr/catia/unload/code/bin/wfbascfg -f -X -r rif_def -c /usr/catia/cfg
Sample Files for Use with NIM 161

echo " Unload CNEXT data " | tee -i -a $LOG/usr/catia/cfg/code/bin/catmenu code/bin/as8cnext none "/usr/catia/cfg" \ "/usr/catia/unload/code/bin/B20CNEXT.tar"
#-----------------------------------------------------# Create new CATLIC.dcls file ##-----------------------------------------------------
echo " Creating new CATLIC.dcls file..." | tee -i -a $LOG
if [ -f /home/catadm/dec/CATLIC.dcls ]; then mv /home/catadm/dec/CATLIC.dcls /home/catadm/dec/CATLIC.dcls.savefi
while read License ; do echo $License >> /home/catadm/dec/CATLIC.dcls done<<- ""EOF CATLIC.SERVER.PORTNUMBER = 2418 ; CATLIC.REPORT = 1 ; CATLIC.LICENSE.OPTIONAL = ’ALMC410’ ; CATLIC.N4DMAST.REQUIRED = ’ALMC410’ ; CATLIC.N4DREMO.REQUIRED = ’COMS410’ ; EOF
chown catadm.catia /home/catadm/dec/CATLIC.dcls chmod 644 /home/catadm/dec/CATLIC.dcls
#-----------------------------------------------------# Install Catalogs ##-----------------------------------------------------
echo " Creating new Catalogs..." | tee -i -a $LOG
su - catadm -c \ "(
echo "current users should be catadm, and is..." | tee -i -a $LOG whoami | tee -i -a $LOG
/usr/catia/cfg/code/bin/catmenu code/bin/iniftr "/home/catadm" \ "/usr/catia/cfg" "LIBFEA" "precise" if (( $? )) ; then echo "Error when creating the LIBFEA Catalog ..." | tee -i -a $LOG fi
/usr/catia/cfg/code/bin/catmenu code/bin/inishm "/home/catadm" \ "/usr/catia/cfg"
if (( $? )) ; then echo "Error when creating the Sheetmetal Catalog ..." | tee -i -a $LOG fi
)"
echo "Copy Declarations from Server ...." | tee -i -a $LOG
mount ${MOUNTWS}:${ADMIN} /mntcp /mnt/dec/* /home/catadm/dec
echo "Config Script finished ..." | tee -i -a $LOGexit
162 AIX Migration in a CATIA Environment

B.4 Sample Data Collection Script for Use with NIM
This script can be used to collect system data from NIM clients. The script generates a workstation information file that can then be used for any other administration task, for example, the creation of customized bosinst.data files.
#!/bin/ksh# This is a sample script to create CATIA Workstation# Information files
ADMSERVER="admins.ibm.com"ADMPATH="/admin/ws_data"
LPATH="/mnt"OUTF=${LPATH}/‘hostname|awk -F. ’{print $1}’‘.infoDATE=‘date‘
mount ${ADMSERVER}:${ADMPATH} ${LPATH}
# TCPIP informationHOST=‘hostname‘interf=‘netstat -i |awk ’{print $1}’|egrep -v "Name"|sort -u‘INTERFACES=‘echo $interf‘DEF_GATEWAY=‘netstat -rn|grep default|awk ’{print $2}’‘
echo "#Workstation Informationfile from: $DATE\n" > $OUTFecho "#tcpip" >> $OUTFecho "HOSTNAME=${HOST}" >> $OUTFecho "INTERFACES=\"${INTERFACES}\"" >> $OUTFecho "DEF_GATEWAY=${DEF_GATEWAY}" >> $OUTF
ypwhich > /dev/null 2>&1if [ $? -eq 0 ];then NIS_SERVER=‘ypwhich‘ NIS_DOM=‘domainname‘fiecho "\n#nis" >> $OUTFecho "NIS_SERVER=${NIS_SERVER}\nNIS_DOM=${NIS_DOM}" >> $OUTF
if [ -f /etc/resolv.conf ];then DNS=TRUE dserver=‘awk ’{if($1=="nameserver") print $2}’ /etc/resolv.conf‘ DNS_DOM=‘awk ’{if($1=="domain") print $2}’ /etc/resolv.conf‘else DNS=FALSEfiDNS_SERVERS=‘echo $dserver‘
echo "\n#dns" >> $OUTFecho "DNS=${DNS}\nDNS_SERVERS=\"$DNS_SERVERS\"\nDNS_DOM=${DNS_DOM}" >> $OUTF
echo "\n#interfaces" >> $OUTFecho "# if address netmask" >> $OUTF
j=1for i in $INTERFACESdo
Sample Files for Use with NIM 163

IF_ADDRESS=‘lsattr -El $i -a netaddr|awk ’{print $2}’‘ IF_NETMASK=‘lsattr -El $i -a netmask|awk ’{print $2}’‘ IF=$i echo "IF_$j=\"$IF $IF_ADDRESS $IF_NETMASK\"" >> $OUTF let j=j+1done
# disk information
NUMDISK=‘lspv |wc -l|awk ’{print $1}‘NUMVGS=‘lsvg |wc -l|awk ’{print $1}‘vgs=‘lsvg‘VGS=‘echo $vgs‘disrvg=‘lspv |grep rootvg|awk ’{print $1}’‘DISK_IN_ROOTVG=‘echo $disrvg‘vginf=‘lsvg rootvg |egrep "TOTAL PP|FREE PP"|cut -c40-80‘
ROOTVG_TOTAL_MB=‘echo $vginf|cut -d"(" -f2|awk ’{print $1}’‘ROOTVG_FREE_MB=‘echo $vginf|cut -d"(" -f3|awk ’{print $1}’‘
echo "\n#disk" >> $OUTFecho "NUMDISK=$NUMDISK\nNUMVGS=$NUMVGS" >> $OUTFecho "DISK_IN_ROOTVG=\"${DISK_IN_ROOTVG}\"" >> $OUTFecho "ROOTVG_TOTAL_MB=${ROOTVG_TOTAL_MB}" >> $OUTFecho "ROOTVG_FREE_MB=${ROOTVG_FREE_MB}" >> $OUTFecho "VGS=\"$VGS\"" >> $OUTF
# RAM and paging
PG=‘lsps -s|grep MB|awk -FM ’{print $1}’‘PAGING_MB=‘echo $PG‘
let m=‘bootinfo -r‘/1024RAM_MB=$m
echo "\n#mem" >> $OUTFecho "RAM_MB=$RAM_MB\nPAGING_MB=$PAGING_MB" >> $OUTF
# AIX levelAIX_VERSION=‘oslevel‘
echo "\n#aix" >> $OUTFecho "AIX_VERSION=\"${AIX_VERSION}\"" >> $OUTF# graphic adapterGRAPHIC=‘lsdisp -l‘
echo "\n#graphic" >> $OUTFecho "#GRAPHIC=$GRAPHIC" >> $OUTF
B.5 Sample Workstation Information File
The following is sample output as produced by the data collection script.
#Workstation Informationfile from: Wed Mar 24 20:57:46 CST 1999
#tcpipHOSTNAME=ausres59.itsc.austin.ibm.comINTERFACES="lo0 tr0"DEF_GATEWAY=9.3.240.1
#nis
164 AIX Migration in a CATIA Environment

NIS_SERVER=NIS_DOM=
#dnsDNS=TRUEDNS_SERVERS="119.31.240.2 91.33.248.2"DNS_DOM=mynet.ibm.com
#interfaces# if address netmaskIF_2="tr0 9.3.240.10 255.255.255.0"
#diskNUMDISK=1NUMVGS=1DISK_IN_ROOTVG="hdisk0"ROOTVG_TOTAL_MB=2060ROOTVG_FREE_MB=444VGS="rootvg"
#memRAM_MB=192PAGING_MB=192
#aixAIX_VERSION="4.3.2.0"
#graphic#GRAPHIC=mag0 0J buc GXT500 GXT500 Graphics Adapter
Sample Files for Use with NIM 165

166 AIX Migration in a CATIA Environment
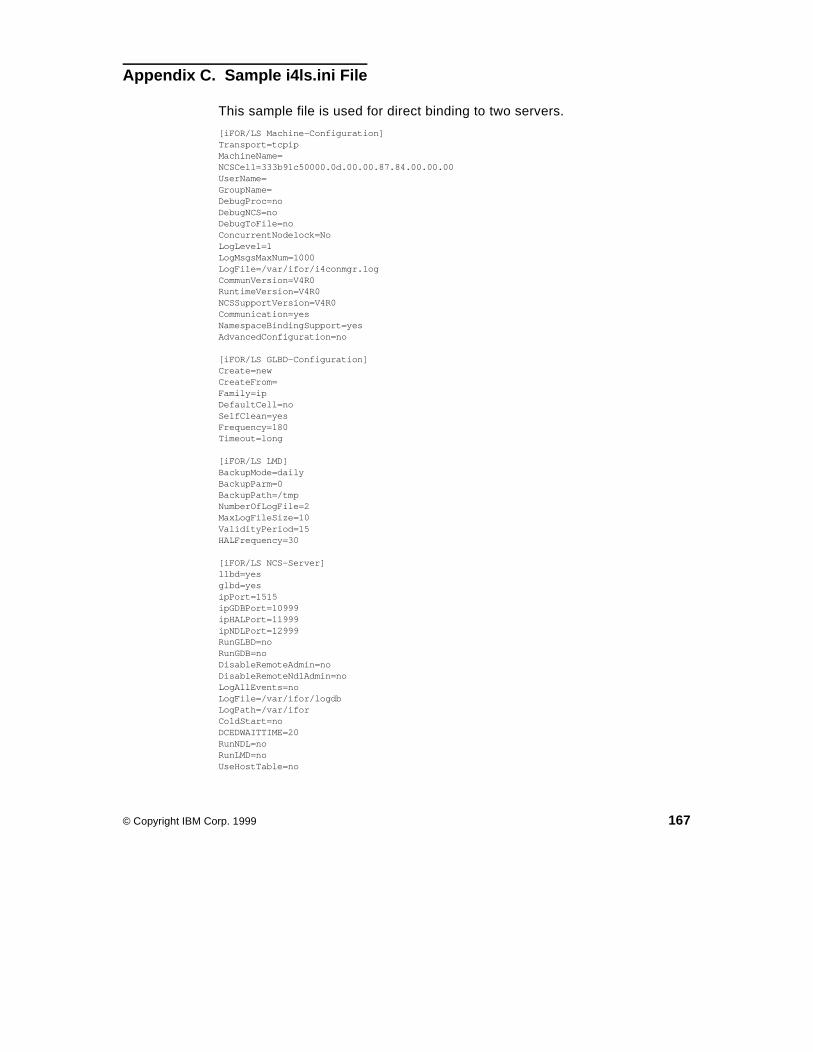
Appendix C. Sample i4ls.ini File
This sample file is used for direct binding to two servers.
[iFOR/LS Machine-Configuration]Transport=tcpipMachineName=NCSCell=333b91c50000.0d.00.00.87.84.00.00.00UserName=GroupName=DebugProc=noDebugNCS=noDebugToFile=noConcurrentNodelock=NoLogLevel=1LogMsgsMaxNum=1000LogFile=/var/ifor/i4conmgr.logCommunVersion=V4R0RuntimeVersion=V4R0NCSSupportVersion=V4R0Communication=yesNamespaceBindingSupport=yesAdvancedConfiguration=no
[iFOR/LS GLBD-Configuration]Create=newCreateFrom=Family=ipDefaultCell=noSelfClean=yesFrequency=180Timeout=long
[iFOR/LS LMD]BackupMode=dailyBackupParm=0BackupPath=/tmpNumberOfLogFile=2MaxLogFileSize=10ValidityPeriod=15HALFrequency=30
[iFOR/LS NCS-Server]llbd=yesglbd=yesipPort=1515ipGDBPort=10999ipHALPort=11999ipNDLPort=12999RunGLBD=noRunGDB=noDisableRemoteAdmin=noDisableRemoteNdlAdmin=noLogAllEvents=noLogFile=/var/ifor/logdbLogPath=/var/iforColdStart=noDCEDWAITTIME=20RunNDL=noRunLMD=noUseHostTable=no
© Copyright IBM Corp. 1999 167
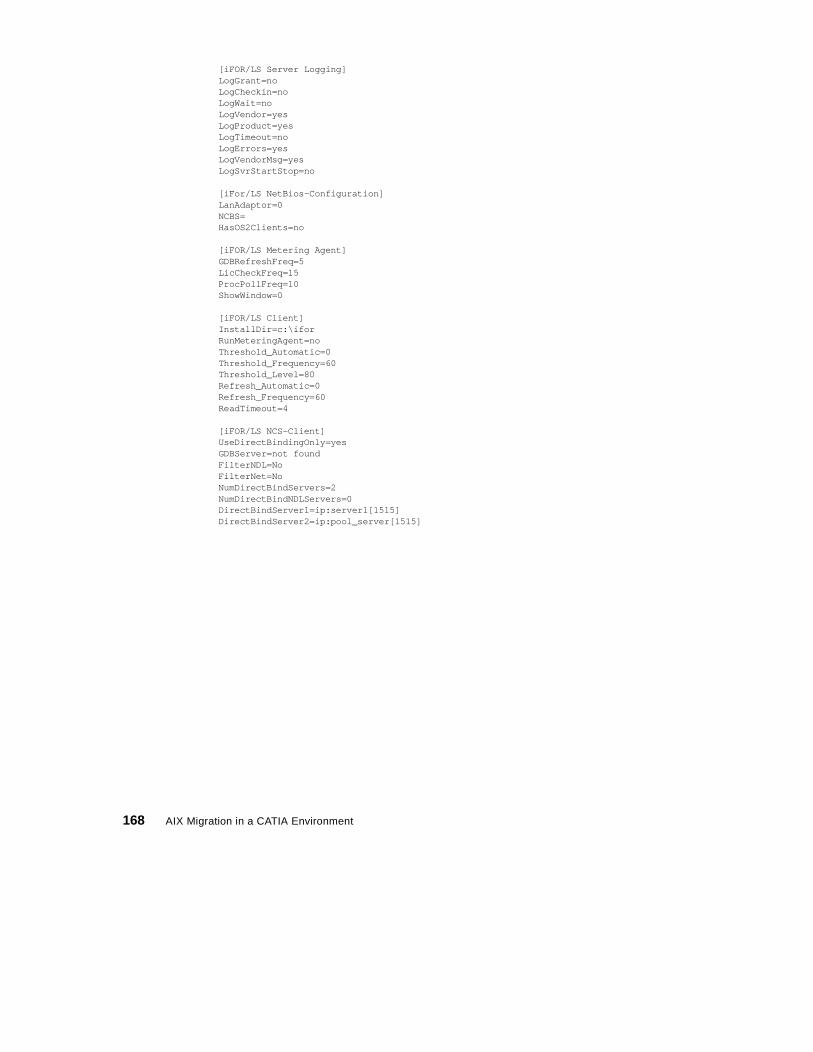
[iFOR/LS Server Logging]LogGrant=noLogCheckin=noLogWait=noLogVendor=yesLogProduct=yesLogTimeout=noLogErrors=yesLogVendorMsg=yesLogSvrStartStop=no
[iFor/LS NetBios-Configuration]LanAdaptor=0NCBS=HasOS2Clients=no
[iFOR/LS Metering Agent]GDBRefreshFreq=5LicCheckFreq=15ProcPollFreq=10ShowWindow=0
[iFOR/LS Client]InstallDir=c:\iforRunMeteringAgent=noThreshold_Automatic=0Threshold_Frequency=60Threshold_Level=80Refresh_Automatic=0Refresh_Frequency=60ReadTimeout=4
[iFOR/LS NCS-Client]UseDirectBindingOnly=yesGDBServer=not foundFilterNDL=NoFilterNet=NoNumDirectBindServers=2NumDirectBindNDLServers=0DirectBindServer1=ip:server1[1515] DirectBindServer2=ip:pool_server[1515]
168 AIX Migration in a CATIA Environment

Appendix D. Sample CATIA V5 Environment File
This sample file was used during our tests at the CASIL Lab.
set +uCATEnvironment=/cat/c5/B01export CATEnvironment
if [ -z "$CATIA_OS" ]then CATIA_OS=‘uname‘|| exit 1
if [ "$(echo $CATIA_OS | cut -c1-4)" = "IRIX" ] ; then CATIA_OS="IRIX" ; fi export CATIA_OSfi
PATH=/cat/c5/B01/code/bin:$PATHexport PATH
LIBPATH=/cat/c5/B01/code/bin:$LIBPATHexport LIBPATH
LD_LIBRARY_PATH=/cat/c5/B01/code/bin:$LD_LIBRARY_PATHexport LD_LIBRARY_PATH
SHLIB_PATH=/cat/c5/B01/code/bin:$SHLIB_PATHexport SHLIB_PATH
CATICPath=/cat/c5/B01/code/productICexport CATICPath
CATCommandPath=/cat/c5/B01/code/commandexport CATCommandPath
CATDictionaryPath=/cat/c5/B01/code/dictionaryexport CATDictionaryPath
CATDocView=/cat/c5/B01/docexport CATDocView
CATReffilesPath=/cat/c5/B01/reffilesexport CATReffilesPath
CATReferenceSettingPath=/cat/c5/B01/resources/defaultsettingexport CATReferenceSettingPath
© Copyright IBM Corp. 1999 169

CATFontPath=/cat/c5/B01/resources/fontsexport CATFontPath
CATGalaxyPath=/cat/c5/B01/resources/galaxyexport CATGalaxyPath
CATGraphicPath=/cat/c5/B01/resources/graphic:/cat/c5/B01/resources/graphic/icons:/cat/c5/B01/resources/graphic/figures:/cat/c5/B01/resources/graphic/pointers:/cat/c5/B01/resources/graphic/splashscreens:/cat/c5/B01/resources/graphic/symbolsexport CATGraphicPath
CATMsgCatalogPath=/cat/c5/B01/resources/msgcatalogexport CATMsgCatalogPath
CATStartupPath=/cat/c5/B01/startupexport CATStartupPath
CATInstallPath=/cat/c5/B01export CATInstallPath
CATErrorLog=export CATErrorLog
CATTemp=$HOME/CATTempexport CATTemp
CATUserSettingPath=$HOME/CATSettingsexport CATUserSettingPath
LDR_CNTRL=PREREAD_SHLIBexport LDR_CNTRL
_HP_DLDOPTS=’-symtab_enable -symtab_size 70000’export _HP_DLDOPTS
170 AIX Migration in a CATIA Environment
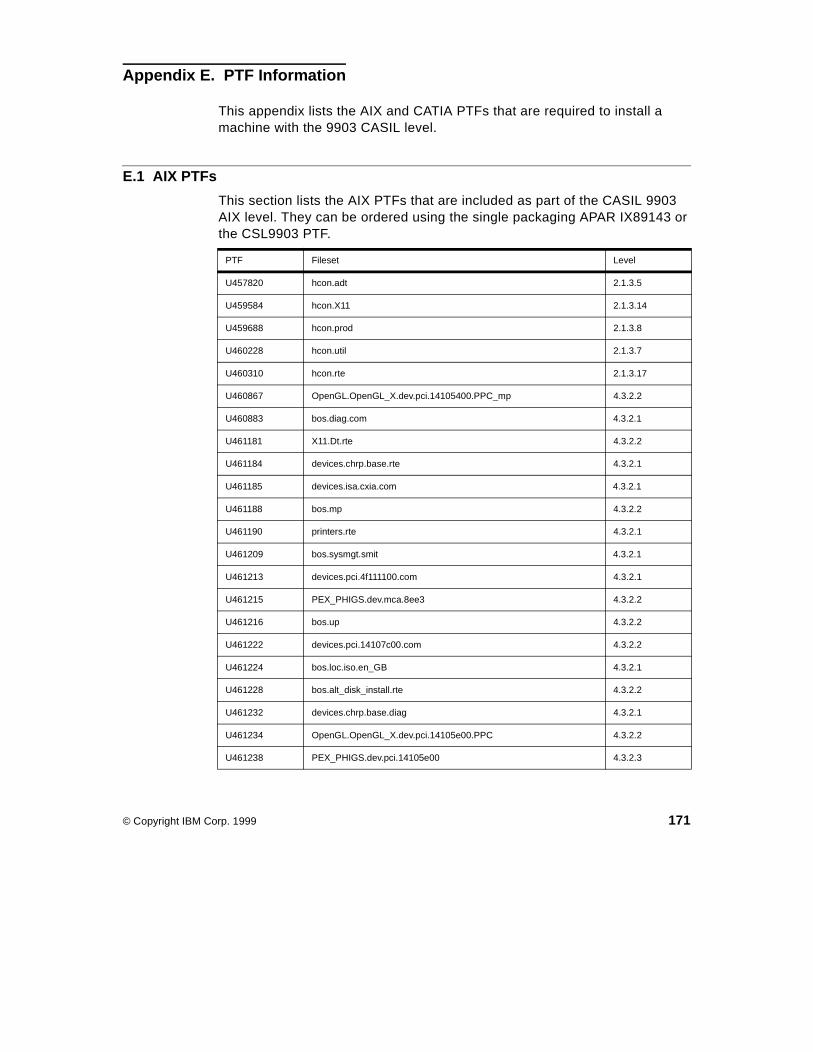
Appendix E. PTF Information
This appendix lists the AIX and CATIA PTFs that are required to install a machine with the 9903 CASIL level.
E.1 AIX PTFs
This section lists the AIX PTFs that are included as part of the CASIL 9903 AIX level. They can be ordered using the single packaging APAR IX89143 or the CSL9903 PTF.
PTF Fileset Level
U457820 hcon.adt 2.1.3.5
U459584 hcon.X11 2.1.3.14
U459688 hcon.prod 2.1.3.8
U460228 hcon.util 2.1.3.7
U460310 hcon.rte 2.1.3.17
U460867 OpenGL.OpenGL_X.dev.pci.14105400.PPC_mp 4.3.2.2
U460883 bos.diag.com 4.3.2.1
U461181 X11.Dt.rte 4.3.2.2
U461184 devices.chrp.base.rte 4.3.2.1
U461185 devices.isa.cxia.com 4.3.2.1
U461188 bos.mp 4.3.2.2
U461190 printers.rte 4.3.2.1
U461209 bos.sysmgt.smit 4.3.2.1
U461213 devices.pci.4f111100.com 4.3.2.1
U461215 PEX_PHIGS.dev.mca.8ee3 4.3.2.2
U461216 bos.up 4.3.2.2
U461222 devices.pci.14107c00.com 4.3.2.2
U461224 bos.loc.iso.en_GB 4.3.2.1
U461228 bos.alt_disk_install.rte 4.3.2.2
U461232 devices.chrp.base.diag 4.3.2.1
U461234 OpenGL.OpenGL_X.dev.pci.14105e00.PPC 4.3.2.2
U461238 PEX_PHIGS.dev.pci.14105e00 4.3.2.3
© Copyright IBM Corp. 1999 171

U461243 devices.pci.14108c00.rte 4.3.2.1
U461244 devices.common.IBM.atm.rte 4.3.2.1
U461247 bos.net.ipsec.rte 4.3.2.1
U461251 bos.net.nfs.client 4.3.2.3
U461255 devices.pci.14105400.X11 4.3.2.1
U461259 bos.rte.control 4.3.2.1
U461262 PEX_PHIGS.dev.pci.14103c00 4.3.2.1
U461269 bos.adt.graphics 4.3.2.1
U461274 X11.apps.xterm 4.3.2.1
U461275 devices.mca.8f67.rte 4.3.0.1
U461279 devices.mca.8ef2.diag.com 4.3.2.1
U461282 devices.pci.2b101a05.diag 4.3.2.1
U461284 bos.rte.serv_aid 4.3.2.3
U461285 bos.iconv.com 4.3.2.1
U461286 X11.motif.lib 4.3.2.2
U461290 bos.loc.com.bidi 4.3.2.1
U461298 X11.base.smt 4.3.2.1
U461302 devices.mca.edd5.X11 4.3.0.1
U461310 X11.base.lib 4.3.2.1
U461314 bos.adt.prt_tools 4.3.0.1
U461316 OpenGL.GL32.rte.base 4.3.2.1
U461319 X11.Dt.lib 4.3.2.1
U461321 bos.rte.aio 4.3.2.1
U461334 bos.loc.adt.imk 4.3.2.1
U461336 bos.diag.rte 4.3.2.2
U461338 bos.rte.odm 4.3.2.1
U461340 sysmgt.msg.en_US.websm.apps 4.3.2.1
U461341 PEX_PHIGS.graPHIGS.rte.soft 4.3.2.1
U461346 bos.rte.iconv 4.3.2.2
U461351 bos.loc.adt.locale 4.3.2.1
PTF Fileset Level
172 AIX Migration in a CATIA Environment

U461353 OpenGL.OpenGL_X.dev.common.bbl 4.3.2.1
U461358 devices.msg.en_US.rspc.base.com 4.3.2.1
U461365 sysmgt.websm.apps 4.3.2.1
U461366 devices.pci.14105e00.X11 4.3.2.1
U461367 devices.pci.14102e00.diag 4.3.2.1
U461370 bos.adt.include 4.3.2.2
U461371 devices.mca.8f95.rte 4.3.2.1
U461372 OpenGL.OpenGL_X.rte.base+ 4.3.2.3
U461375 bos.net.ipsec.keymgt 4.3.2.1
U461390 OpenGL.GL32.dev.buc.00004002.com 4.3.2.1
U461391 bos.rte.bind_cmds 4.3.2.1
U461397 devices.buc.00004002.X11 4.3.2.1
U461402 bos.rte.shell 4.3.2.1
U461404 devices.pci.23100020.rte 4.3.2.2
U461408 Java.adt.src 1.1.6.2
U461419 devices.msg.en_US.base.com 4.3.2.1
U461425 bos.diag.util 4.3.2.1
U461430 bos.rte.libc 4.3.2.3
U461432 X11.adt.include 4.3.2.1
U461433 perfagent.tools 2.2.32.1
U461435 printers.msg.en_US.rte 4.3.1.1
U461437 X11.adt.motif 4.3.2.1
U461440 bos.acct 4.3.2.1
U461442 PEX_PHIGS.graPHIGS.rte.rnuc 4.3.2.2
U461443 bos.rte 4.3.2.1
U461445 OpenGL.OpenGL_X.dev.pci.14108e00.PPC 4.3.2.3
U461449 X11.vsm.lib 4.3.2.1
U461455 X11.fnt.fontServer 4.3.2.1
U461456 bos.sysmgt.sysbr 4.3.2.2
U461458 devices.mca.ffe1.rte 4.3.2.1
PTF Fileset Level
PTF Information 173

U461461 X11.apps.rte 4.3.2.1
U461464 devices.pci.2b101a05.rte 4.3.2.3
U461468 X11.fnt.ucs.com 4.3.2.1
U461472 bos.net.tcp.client 4.3.2.2
U461475 Java.adt.includes 1.1.6.1
U461479 bos.net.ipsec.websm 4.3.2.1
U461490 bos.atm.atmle 4.3.2.2
U461491 bos.adt.debug 4.3.2.1
U461642 devices.isa_sio.IBM0017.rte 4.3.2.1
U461803 OpenGL.OpenGL_X.dev.common.rby 4.3.2.1
U461806 OpenGL.OpenGL_X.dev.pci.14103c00.PPC 4.3.2.2
U461826 devices.isa_sio.chrp.ecp.rte 4.3.2.2
U461830 bos.rte.loc 4.3.2.2
U461831 bos.rte.lvm 4.3.2.2
U461832 Java.rte.classes 1.1.6.2
U461837 bos.rte.tty 4.3.2.2
U461842 OpenGL.OpenGL_X.tools.debugger 4.3.2.2
U461845 sysmgt.websm.rte 4.3.2.2
U461851 devices.rs6ksmp.base.rte 4.3.2.1
U461854 bos.adt.prof 4.3.2.3
U461856 devices.common.IBM.ppa.diag 4.3.2.1
U461871 OpenGL.OpenGL_X.rte.soft 4.3.2.3
U461872 OpenGL.OpenGL_X.dev.pci.14105400.PPC 4.3.2.2
U461874 OpenGL.OpenGL_X.dev.buc.00004002.PPC 4.3.2.2
U461876 bos.net.tcp.server 4.3.2.2
U461877 devices.pci.14103c00.X11 4.3.2.1
U461878 devices.pci.331121b9.diag 4.3.2.1
U461881 devices.common.IBM.async.diag 4.3.2.1
U461882 Java.rte.lib 1.1.6.2
U461887 PEX_PHIGS.dev.buc.00004002 4.3.2.3
PTF Fileset Level
174 AIX Migration in a CATIA Environment
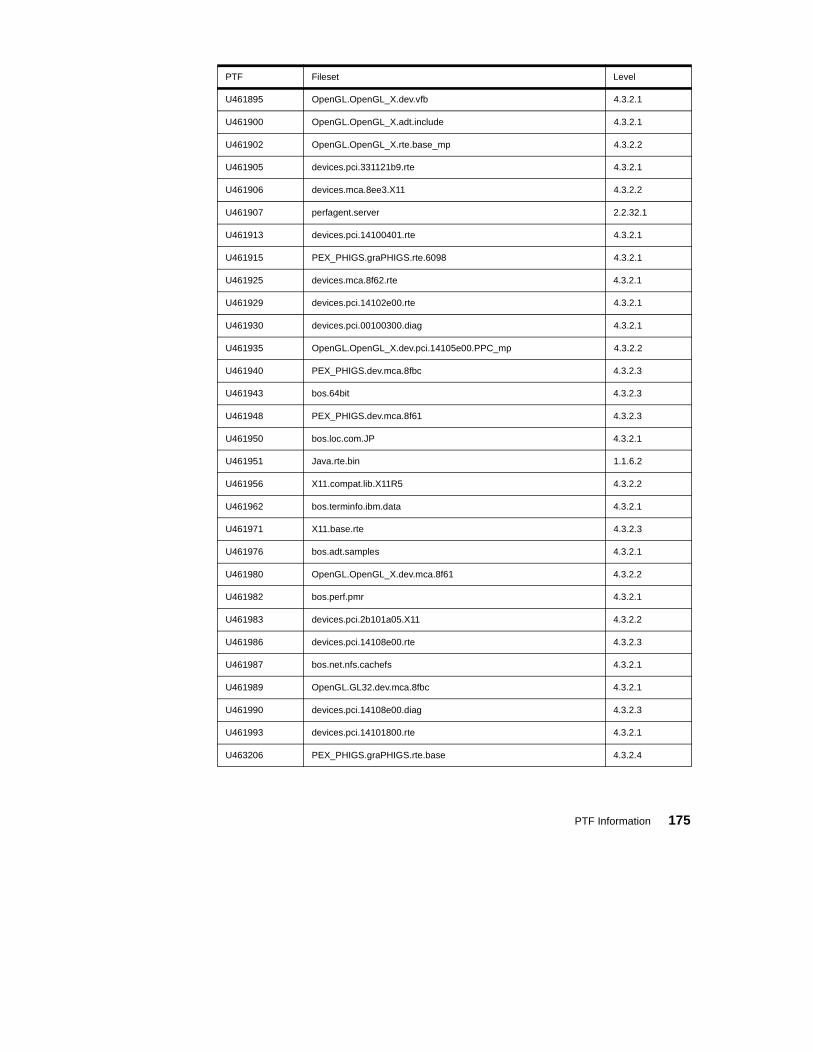
U461895 OpenGL.OpenGL_X.dev.vfb 4.3.2.1
U461900 OpenGL.OpenGL_X.adt.include 4.3.2.1
U461902 OpenGL.OpenGL_X.rte.base_mp 4.3.2.2
U461905 devices.pci.331121b9.rte 4.3.2.1
U461906 devices.mca.8ee3.X11 4.3.2.2
U461907 perfagent.server 2.2.32.1
U461913 devices.pci.14100401.rte 4.3.2.1
U461915 PEX_PHIGS.graPHIGS.rte.6098 4.3.2.1
U461925 devices.mca.8f62.rte 4.3.2.1
U461929 devices.pci.14102e00.rte 4.3.2.1
U461930 devices.pci.00100300.diag 4.3.2.1
U461935 OpenGL.OpenGL_X.dev.pci.14105e00.PPC_mp 4.3.2.2
U461940 PEX_PHIGS.dev.mca.8fbc 4.3.2.3
U461943 bos.64bit 4.3.2.3
U461948 PEX_PHIGS.dev.mca.8f61 4.3.2.3
U461950 bos.loc.com.JP 4.3.2.1
U461951 Java.rte.bin 1.1.6.2
U461956 X11.compat.lib.X11R5 4.3.2.2
U461962 bos.terminfo.ibm.data 4.3.2.1
U461971 X11.base.rte 4.3.2.3
U461976 bos.adt.samples 4.3.2.1
U461980 OpenGL.OpenGL_X.dev.mca.8f61 4.3.2.2
U461982 bos.perf.pmr 4.3.2.1
U461983 devices.pci.2b101a05.X11 4.3.2.2
U461986 devices.pci.14108e00.rte 4.3.2.3
U461987 bos.net.nfs.cachefs 4.3.2.1
U461989 OpenGL.GL32.dev.mca.8fbc 4.3.2.1
U461990 devices.pci.14108e00.diag 4.3.2.3
U461993 devices.pci.14101800.rte 4.3.2.1
U463206 PEX_PHIGS.graPHIGS.rte.base 4.3.2.4
PTF Fileset Level
PTF Information 175

E.2 CATIA PTFs
This section lists the CATIA PTFs, which together make up the CAT9903 PTF required to upgrade a CATIA V4.2.0 R1 install to the CASIL 9903 level.
UB56044, UB56045, UB56111, UB56115, UB56119, UB56219, UB56245, UB56246, UB56248, UB56302,UB56350, UB56364, UB56376, UB56400, UB56438, UB56439, UB56450, UB56480, UB56482, UB56483,UB56484, UB56509, UB56678, UB56680, UB56747, UB56820, UB56821, UB56823, UB56824, UB56825,UB56826, UB56827, UB56828, UB56829, UB56875, UB56941, UB56950, UB56980, UB56983, UB57138,UB57203, UB57206, UB57207, UB57208, UB57343, UB57348, UB57349, UB57351, UB57387, UB57417,UB57418, UB57618, UB57623, UB57712, UB57738, UB57739, UB57741, UB57767, UB57768, UB57790,UB57791, UB57802, UB57853, UB57899, UB57901, UB57939, UB57974, UB57977, UB57978, UB57979,UB57980, UB57991, UB57993, UB58046, UB58047, UB58064, UB58180, UB58213, UB58215, UB58217,UB58218, UB58219, UB58221, UB58253, UB58256, UB58257, UB58259, UB58260, UB58268, UB58270,UB58272, UB58275, UB58386, UB58389, UB58390, UB58393, UB58394, UB58466, UB58469, UB58471,UB58503, UB58619, UB58620, UB58621, UB58622, UB58623, UB58624, UB58625, UB58626, UB58684,UB58697, UB58701, UB58710, UB58741, UB58804, UB58847, UB58853, UB58891, UB58892, UB58894,UB58895, UB58918, UB58920, UB58939, UB58952, UB58957, UB58958, UB58978, UB58985, UB59002,UB59003, UB59005, UB59072, UB59073, UB59237, UB59248, UB59348, UB59351, UB59352, UB59353,UB59368, UB59389, UB59419, UB59420, UB59429, UB59430, UB59435, UB59469, UB59500, UB59501,UB59502, UB59503, UB59515, UB59516, UB59517, UB59532, UB59545, UB59546, UB59552, UB59555,UB59577, UB59579, UB59587, UB59588, UB59589, UB59611, UB59622, UB59623, UB59625, UB59657,UB59676, UB59682, UB59716, UB59724, UB59725, UB59775, UB59786, UB59787, UB59789, UB59864,UB59867, UB59914, UB59916, UB59920, UB59921, UB59930, UB59931, UB59945, UB59947, UB59951,UB59958, UB60055, UB60056, UB60057, UB60058, UB60059, UB60060, UB60061, UB60062, UB60139,UB60141, UB60143, UB60144, UB60145, UB60147, UB60148, UB60149, UB60150, UB60216, UB60253,UB60258, UB60259, UB60260, UB60261, UB60423, UB60503, UB60528, UB60529, UB60531, UB60533,UB60560, UB60562, UB60574, UB60575, UB60576, UB60589, UB60596, UB60722, UB60841, UB60845,UB60846, UB60847, UB60869, UB60870, UB60889, UB60890, UB61039, UB61040, UB61041, UB61042,UB61043, UB61044, UB61045, UB61046, UB61047, UB61048, UB61119, UB61396, UB61471, UB61473,UB61474, UB61475, UB61476, UB61477
U463214 devices.pci.1410b800.X11 4.3.2.3
U463219 PEX_PHIGS.dev.pci.14108e00 4.3.2.4
U463230 OpenGL.OpenGL_X.rte.base 4.3.2.4
U463258 devices.pci.14108e00.X11 4.3.2.4
U463263 PEX_PHIGS.graPHIGS.rte.pipe 4.3.2.4
U463302 PEX_PHIGS.dev.pci.14105400 4.3.2.4
U463325 PEX_PHIGS.dev.pci.1410b800 4.3.2.3
U463972 bos.rte.install 4.3.2.5
U464275 devices.pci.1410b800.rte 4.3.2.2
U464275 devices.pci.1410b800.diag 4.3.2.2
U464276 OpenGL.OpenGL_X.dev.pci.1410b800.PPC 4.3.2.5
PTF Fileset Level
176 AIX Migration in a CATIA Environment
Appendix F. Special Notices
This publication is intended to help system administrators to migrate a CATIA environment to the latest CASIL verified versions of AIX 4.3.2 and CATIA V4.2.0 R1. The information in this publication is not intended as the specification of any programming interfaces that are provided by AIX 4.3.2 and CATIA V4.2.0 R1. See the PUBLICATIONS section of the IBM Programming Announcement for AIX 4.3.2 and CATIA V4.2.0 R1 for more information about what publications are considered to be product documentation.
References in this publication to IBM products, programs or services do not imply that IBM intends to make these available in all countries in which IBM operates. Any reference to an IBM product, program, or service is not intended to state or imply that only IBM’s product, program, or service may be used. Any functionally equivalent program that does not infringe any of IBM’s intellectual property rights may be used instead of the IBM product, program or service.
Information in this book was developed in conjunction with use of the equipment specified, and is limited in application to those specific hardware and software products and levels.
IBM may have patents or pending patent applications covering subject matter in this document. The furnishing of this document does not give you any license to these patents. You can send license inquiries, in writing, to the IBM Director of Licensing, IBM Corporation, 500 Columbus Avenue, Thornwood, NY 10594 USA.
Licensees of this program who wish to have information about it for the purpose of enabling: (i) the exchange of information between independently created programs and other programs (including this one) and (ii) the mutual use of the information which has been exchanged, should contact IBM Corporation, Dept. 600A, Mail Drop 1329, Somers, NY 10589 USA.
Such information may be available, subject to appropriate terms and conditions, including in some cases, payment of a fee.
The information contained in this document has not been submitted to any formal IBM test and is distributed AS IS. The information about non-IBM ("vendor") products in this manual has been supplied by the vendor and IBM assumes no responsibility for its accuracy or completeness. The use of this information or the implementation of any of these techniques is a customer responsibility and depends on the customer’s ability to evaluate and integrate
© Copyright IBM Corp. 1999 177

them into the customer’s operational environment. While each item may have been reviewed by IBM for accuracy in a specific situation, there is no guarantee that the same or similar results will be obtained elsewhere. Customers attempting to adapt these techniques to their own environments do so at their own risk.
Any pointers in this publication to external Web sites are provided for convenience only and do not in any manner serve as an endorsement of these Web sites.
Any performance data contained in this document was determined in a controlled environment, and therefore, the results that may be obtained in other operating environments may vary significantly. Users of this document should verify the applicable data for their specific environment.
Reference to PTF numbers that have not been released through the normal distribution process does not imply general availability. The purpose of including these reference numbers is to alert IBM customers to specific information relative to the implementation of the PTF when it becomes available to each customer according to the normal IBM PTF distribution process.
The following terms are trademarks of the International Business Machines Corporation in the United States and/or other countries:
The following terms are trademarks of other companies:
Java and all Java-based trademarks and logos are trademarks or registered trademarks of Sun Microsystems, Inc. in the United States and/or other countries.
Microsoft, Windows, Windows NT,Internet Explorer, OLE, Visual Basic and
IBM ADSTAR AIX AIXwindows AS/400 BookManager CT DB2 Deep BlueGXT1000 GXT150LGXT150M Language Environment OS/2 OS/390 POWER GTO RS/6000 S/390 SecureWay SP System/390 VisualAge 400
178 AIX Migration in a CATIA Environment
the Windows logo are trademarks of Microsoft Corporation in the United States and/or other countries.
MMX, Pentium, and ProShare are trademarks of Intel Corporation in the United States, other countries, or both.
UNIX is a registered trademark in the United States and/or other countries licensed exclusively through X/Open Company Limited.
Acrobat Reader, PDF and PostScript are registered trademarks in the United States and/or other countries licensed exclusively through Adobe Systems Inc..
CADAM and PROFESSIONAL CADAM are registered trademarks in the United States and/or other countries licensed exclusively through Dassault Systemes of America Corp..
CATIA is a registered trademark in France and/or other countries licensed exclusively through Dassault Systemes S.A. .
ENOVIA, ENOVIAPM and ENOVIAVPM are registered trademarks in the United States and/or other countries licensed exclusively through ENOVIA Corp..
Netscape Navigator, Netscape Communicator and JavaScript registered trademarks in the United States and/or other countries licensed exclusively through Netscape Communications Corporation.
SET and the SET Logo are trademarks owned by SET Secure Electronic Transaction LLC. (For further information, see http://www.setco.org/aboutmark.html).
Other company, product, and service names may be trademarks or service marks of others.
Special Notices 179

180 AIX Migration in a CATIA Environment
Appendix G. Related Publications
The publications listed in this section are considered particularly suitable for a more detailed discussion of the topics covered in this redbook.
G.1 International Technical Support Organization Publications
For information on ordering these ITSO publications see “How to Get ITSO Redbooks” on page 185.
• AIX Version 4.3 Migration Guide, SG24-5116
• AIX Version 4.3 Differences Guide, SG24-2014
• Migrating to DB2 Universal Database Version 5, SG24-2006
G.2 Redbooks on CD-ROMs
Redbooks are also available on the following CD-ROMs. Order a subscription and receive updates a year.
G.3 Other Publications
These publications are also relevant as further information sources:
• AIX Version 4.3 Installation Guide, SC23-4112
• Network Installation Management Guide and Reference, SC23-4113
• CATIA Solutions Version 4 Installation Guide UNIX Workstation, SH52-1189
CD-ROM Title Collection Kit Number
System/390 Redbooks Collection SK2T-2177Networking and Systems Management Redbooks Collection SK2T-6022Transaction Processing and Data Management Redbook SK2T-8038
Lotus Redbooks Collection SK2T-8039Tivoli Redbooks Collection SK2T-8044AS/400 Redbooks Collection SK2T-2849
RS/6000 Redbooks Collection (HTML, BkMgr) SK2T-8040RS/6000 Redbooks Collection (PostScript) SK2T-8041RS/6000 Redbooks Collection (PDF Format) SK2T-8043
Application Development Redbooks Collection SK2T-8037
© Copyright IBM Corp. 1999 181
• CATIA Solutions Version 4 Software Administration Guide UNIX Workstation, SH52-0601
• CAITA Solutions Version 4 Declaration Quick Reference UNIX Workstation, SH52-0858
• CAITA Solutions Version 4 Motif CATIA Solutions User’s Guide, SH52-0606
The following publication is product documentation and can only be acquired through the purchase of the related product.
• RS/6000 Operating Environment for CATIA V2.2.1 Quick Start Installation Guide
The following publications can be found in the CATIA Version 5 Softcopy Collection Kit (The English version is SK3T-4124).
• CATIA-V4 Integration User’s Guide for Version 5 Release 1
• CATIA-Infrastructure User’s Guide for Version 5 Release 1
G.4 Internet Sites
The following are valuable resources located on the Internet.
• http://www.rs6000.ibm.com/software/Apps/fastconn
• http://www.software.ibm.com/year2000/papers/aixy2k.html
• http://www.catia.ibm.com/other/y2kmain.html
• http://www.catia.ibm.com/other/y2kfixes.html
• http://www.developer.ibm.com/welcome/icc/dassault.html
• http://service.software.ibm.com/catia.us/go?/rpts/casil/casil.html
• http://www.netscape.com/computing/download/index.html
• http://www.ibm.com/servers/aix/products/ibmsw/list/
• http://www.storage.ibm.com/software/adsm/adsmhome.htm
• http://www.rs6000.ibm.com/support/micro/
• http://www.software.ibm.com/is/lum/
• http://www.thp.uni-duisburg.de/cuaix/cuaix.html
• http://www.rs6000.ibm.com/doc_link/en_US/a_doc_lib/aixins/aixnimgd/toc.htm
• http://www.software.ibm.com/data/db2/library
• http://www.rs6000.ibm.com/doc_link/en_US/a_doc_lib/aixins/aixinsgd/toc.htm
182 AIX Migration in a CATIA Environment

• http://www.rs6000.ibm.com/resource/aix_resource/Pubs/
• http://www.rs6000.ibm.com/doc_link/en_US/a_doc_lib/aixgen/
• http://www.software.ibm.com/network/dispatcher
• http://www.catia.ibm.com
• http://www.catia.com
Related Publications 183

184 AIX Migration in a CATIA Environment
How to Get ITSO Redbooks
This section explains how both customers and IBM employees can find out about ITSO redbooks, redpieces, and CD-ROMs. A form for ordering books and CD-ROMs by fax or e-mail is also provided.
• Redbooks Web Site http://www.redbooks.ibm.com/
Search for, view, download or order hardcopy/CD-ROM redbooks from the redbooks web site. Also read redpieces and download additional materials (code samples or diskette/CD-ROM images) from this redbooks site.
Redpieces are redbooks in progress; not all redbooks become redpieces and sometimes just a few chapters will be published this way. The intent is to get the information out much quicker than the formal publishing process allows.
• E-mail Orders
Send orders via e-mail including information from the redbooks fax order form to:
• Telephone Orders
• Fax Orders
This information was current at the time of publication, but is continually subject to change. The latest information for customer may be found at http://www.redbooks.ibm.com/ and for IBM employees at http://w3.itso.ibm.com/.
In United StatesOutside North America
e-mail [email protected] information is in the “How to Order” section at this site:http://www.elink.ibmlink.ibm.com/pbl/pbl/
United States (toll free)Canada (toll free)Outside North America
1-800-879-27551-800-IBM-4YOUCountry coordinator phone number is in the “How to Order” section at this site:http://www.elink.ibmlink.ibm.com/pbl/pbl/
United States (toll free)CanadaOutside North America
1-800-445-92691-403-267-4455Fax phone number is in the “How to Order” section at this site:http://www.elink.ibmlink.ibm.com/pbl/pbl/
IBM employees may register for information on workshops, residencies, and redbooks by accessing the IBM Intranet Web site at http://w3.itso.ibm.com/ and clicking the ITSO Mailing List button. Look in the Materials repository for workshops, presentations, papers, and Web pages developed and written by the ITSO technical professionals; click the Additional Materials button. Employees may also view redbook. residency, and workshop announcements at http://inews.ibm.com/.
IBM Intranet for Employees
© Copyright IBM Corp. 1998 185

IBM Redbook Fax Order Form
Please send me the following:
We accept American Express, Diners, Eurocard, Master Card, and Visa. Payment by credit card notavailable in all countries. Signature mandatory for credit card payment.
Title Order Number Quantity
First name Last name
Company
Address
City Postal code
Telephone number Telefax number VAT number
Invoice to customer number
Country
Credit card number
Credit card expiration date SignatureCard issued to
186 All About Tivoli Management Agents
List of Abbreviations
ACL Access Control List
AH Authentication Header
BLT Basic License Tool
CAD Computer Aided Design
CASIL CATIA AIX/NT System Integration Lab
CATIA Computer Aided Three Dimensional Interactive Architecture
CCD CATIA CADAM Drafting
CDE Common Desktop Environment
CGM Computer Graphic Metafile
CRK Client Runtime Kit
DCE Distributed Computing Environment
DMU Digital Mock Up
DNS Domain Name System
DXF Data Exchange File
FDDI Fiber Distributed Data Interface
FEM Finite Element Model
GLB Global Location Broker
GUI Graphical User Interface
IBM International Business Machines Corporation
IP Internet Protocol
IPF/X Interactive Presentation Facility eXtended
ITSO International Technical Support Organization
JDK Java Development Kit
JIT Just-In-Time
© Copyright IBM Corp. 1999
LAN Local Area Network
LLB Local Location Broker
LPP Licensed Program Product
LUM License Use Management
LVM Logical Volume Manager
NAT Nodelock Administration Tool
NCS Network Computing System
NFS Network File System
NIM Network Installation Management
NIS Network Information Service
NLS National Language Support
ODM Object Data Manager
RPC Remote Procedure Call
SMP Symmetric Multi Processor
SMS System Management Services
SPOT Shared Product Object Tree
UDP User Datagram Protocol
VFB Virtual Frame Buffer
VPM Virtual Product Management
187

188 AIX Migration in a CATIA Environment
Index
Symbols/tftpboot directory 68
Numerics43P Model 150 243P Model 260 364-bit OpenGL 3
Aabbreviations 187abx 122access control 41acronyms 187ADSM
minimum level 28ADSM server 69AIX
maintenance level 16migration 71software packaging 15
AIX Fast Connect 148configuration 149description 8file locking 151long filenames 151
AIX update 59alternate disk install 5application availability guide 28ASA 10auto_master 99AutoFS 5, 98, 106automount maps 98
Bbackup domain controller 9backups 60, 80Basic License Tool (BLT) 35bf command 7big volume groups 6boot images 1, 68bosinst.data
CONSOLE 79EXISTING_SYSTEM_OVERWRITE 79INSTALL_METHOD 72, 79
© Copyright IBM Corp. 1999
PROMPT 79bosinst.data file 72, 78bosinst_data resource 72builder machine 75bundle file 20, 65, 72, 76
CCacheFS 5, 101
formatting 104installing 101
CASILbenchmarking 19bundle file 20description 17report 19testcycle 18testing 18
CASIL level 16bundle file 65definition 20
CAT_CUST 41CAT_MEM 96CAT_UNLOAD 75CATDEC 42CATIA
access control 41beta testing 18CacheFS 48CAT_CUST 41CAT_MEM 96CAT_UNLOAD 75catstart command 141data access 42declaration set 42delcatenv command 144directory structure 44environment 41GA level 17global environment 143installation 39interoperability 11, 135memory usage 96mksysb image 50model data 103model dependency 40multiple levels 41multiple release directory structure 45
189

network server 48performance 48, 96permanent settings 146private environment 143PTF 17refresh level 17setcatenv command 143settings 145software requirements 26software testing 18startup problems 93structure 41temporary settings 146tracing license requests 95using CacheFS 103version 4 10version 5 11, 134version 5 customization 145version 5 installation 135version 5 online documentation 147
CATLIC.REPORT 95CATLICLS 39catmenu command 75CATMSTR 42catstart command 141CATweb 4, 10, 117
enhancements 13firewall configuration 125port numbers 125rendering lock 122scaling 126software requirements 27
CATweb clusters 127catwebload.ksh script 132CGI-compliant Web server, online documentation 111, 112CIFS 8, 148clients, online documentation 111, 113cloning a system 56commands
docsearch 113, 115wsm 114
comp.unix.aix newsgroup 53compilers
minimum level 28components, Documentation Search Service 111, 115concurrent access license 35concurrent nodelocked license 35
configuration assistant 55configuring, Documentation Search Service 114CONSOLE 79CORBA 117customized machines 29
DDB2 server 70dbe 122DCE
minimum level 28DEFAULT_BROWSER, online documentation 114, 117delcatenv command 144direct binding 37, 39disk space requirements 23, 24docsearch command 113, 115document indexes, online documentation 111documentation clients, online documentation 113Documentation Search Service 110
components 111, 115configuring 114installing 113invoking 115problem starting 116Web based 110
documentation server, online documentation 114, 115, 117documenting the existing environment 29, 48domain controller 9DOS attributes 151DSO 121dynamic heap data 96dynamic nodelocked license 35
Eenvironment variable
DEFAULT_BROWSER 114, 117EXISTING_SYSTEM_OVERWRITE 79
Ffdpr command 7file access control 150file locking
CATIAfile locking 151
JFS 7
190 AIX Migration in a CATIA Environment

NFS 5filemon command 7fileplace command 7fileset
NetQ, online documentation 112online manuals 109Web browser 112Web browser, online documentation 112
fileset removal 56filesystem sizes 24firewall configuration 125firmware 29, 54forms-capable browser, online documentation 111fortran runtime license 21fsck_cachefs command 105
GGCM 10gecos field 43GL3.2 65GLB 38glbd 83global environment 143global location broker 38, 81, 83GLX 122GPA 10graphics adapter
evaluating 40inventory 31
graphics adaptersnew 2unsupported 24
graphics card rendering 121graPHIGS 3GXT2000P 2GXT3000P 2
Hhardware
requirements, AIX 23requirements, CATIA 25unsupported 24
Ii4blt command 82i4cfg command 83i4gdb 83
i4glbcd 83i4llmd 83i4lmd 83i4tv command 83iFOR/LS 32iFOR/LS server 69indexes, online documentation 111InfoExplorer 107INSTALL_METHOD 72, 79installation methods 54Installing
online manuals 108Web browser, online documentation 112Web server, online documentation 112
installingDocumentation Search Service 113
installp command 16inutoc command 67invoking, Documentation Search Service 115IT_DAEMON_SERVER_BASE 125
JJava Development Kit 8JFS file locking 7Just-in-time(JIT) Compiler 8
Kkey 92
Llarge executables 1large files 1large memory systems 9lead-times 53license annotation 35license protection 84license server 69linkbasecd script 108linkextcd script 108llbd 83LMP 10lockstat command 7long filenames 151LPP 15lpp_source 64ls_admin command 92lsattr command 30
191
lscfg command 30lsdev command 30lslpp command 30lspv command 30lssrc command 94lsvg command 30LUM
central registry license server 36description 32direct binding 37, 39direct binding client configuration 90direct binding problems 95direct binding server configuration 87enrolling a license 92glbd 83global location broker 38i4blt command 82i4cfg command 83i4gdb 83i4glbcd 83i4llmd 83i4lmd 83i4tv command 83license annotation 93license partitioning 84license types 34llbd 83ls_admin command 92migration from iFOR/LS 84mixing binding methods 84multiple networks 33multiple servers 33namespace binding 38namespace binding problems 94NCS cell 39nodelock problems 94planning 33port numbers 37product password 93server configuration 81server criteria 33tracing license requests 95troubleshooting 93vendor id 93vendor name 93vendor password 93
LVMbig volume groups 6limits 6
mirroring 1volume group descriptor 6, 7
Mmachine groups 78maintenance level 16maintenance level update 59man command 110MBUF pool 8memory requirements 23microcode 29, 54migration
fileset removal 56performing 59planning 23preparing 53saved configuration files 56
migration install 55, 71minimum system requirements 23mirroring volume groups 1mksysb command 60mksysb image 71mksysb install 56Motif 2.1 3mount command 100MXM 10
Nname resolution 33namespace binding 38, 69NCS cell 39netpmon command 7network neighborhood 8, 148new functionality 32new install 55NFS
automatic mounting 98enhancements 4file locking 5large files 4performance 4protocol selection 5server 5, 69TCP 4UDP 4
NIMadvantages 54boot images 68
192 AIX Migration in a CATIA Environment
bosinst_data resource 72bundle file 72, 76client machines 71configuration scenarios 49data collection 48enhancements 2group operations 77installation methods 54lpp_source resource 64machine groups 31, 78master server 49, 61migration install 55mksysb install 56multiple networks 50multiple servers 51network performance 50network types 50new install 55NLS filesets 66non-prompted install 72, 78other_net_type attribute 51overwrite install 55performance 78PTF strategy 66reducing disk space usage 66saved files 56SPOT resource 67SPOT server 51, 61, 68storing PTFs 66upgrading servers 62
NIS client 76NIS functionality 43NIS server 69NLS filesets 66Nodelock Administration Tool (NAT) 34nodelocked license 34number of open files 8
OODM 112Online Assistance
smit documentation 110online documentation 7online HTML documents 110OpenGL 3, 121
64bit support 3OpenGL.GL32 filesets 65Operating Environment for CATIA 20
Orbix 123oslevel command 30, 66overwrite install 55, 71
Ppaging space 9, 23, 31partition sizes 6password file 43passwords 151PC integration 8PC user authentication 9Performance Toolbox 7permanent settings 146physical partitions 6ping command 95primary domain controller 9private environment 143problem starting, Documentation Search Service 116PROMPT 79protocol selection
NFS 5
Rrcp command 48registry 142removal of filesets 56rendering lock 122RLM nodelock license 34rlogin command 48rmss command 7rootvg 31rootvg mirroring 1rpc.lockd 5
Ssavevg command 60scalability 8search engine, online documentation 112search results page, online documentation 110send_file 9sequential reads 7service processor 54setcatenv command 143shared library data 96SMB 8, 148smit, documentation 110
193
snap command 29, 31software
ADSM 28microcode 29, 54requirements, CATIA 26requirements, CATweb 27requirements, other 28
software installationnon-prompted 72
software maintenanceAIX 15CATIA 16
spaceball 21spacemouse 21standard image 29, 76stem command 7svmon command 7system limits 8system requirements
disk space 23physical memory 23
Ttarget words, online documentation 110TCP port numbers 125temporary settings 146threads per process 8TIVOLI 75Tivoli 46tprof command 7try-and-buy license 35
Uulimit command 98unlinkbasecd script 109unlinkextcd script 109update CD 64use-once license 36
VVFB 4, 120VFB rendering 122virtual address space 96volume group descriptor 6, 7volume groups 31
WWeb browser, online documentation 110, 112, 113, 116Web server, online documentation 111, 112, 115, 117Web-based System Manager 7, 49wfbasecfg command 75wfunload command 75WindowsNT integration 8WINS 9wsm command 114
XX server extensions 122X11R6 3xhost command 121
Yyear 2000
AIX 10CATIA 11problem description 12
194 AIX Migration in a CATIA Environment
© Copyright IBM Corp. 1999 195
ITSO Redbook Evaluation
AIX Migration in a CATIA Environment SG24-5394-00
Your feedback is very important to help us maintain the quality of ITSO redbooks. Please complete this questionnaire and return it using one of the following methods:
• Use the online evaluation form found at http://www.redbooks.ibm.com • Fax this form to: USA International Access Code + 1 914 432 8264 • Send your comments in an Internet note to [email protected]
Which of the following best describes you?_ Customer _ Business Partner _ Solution Developer _ IBM employee_ None of the above
Please rate your overall satisfaction with this book using the scale:(1 = very good, 2 = good, 3 = average, 4 = poor, 5 = very poor)
Overall Satisfaction __________
Please answer the following questions:
Was this redbook published in time for your needs? Yes___ No___
If no, please explain:
What other redbooks would you like to see published?
Comments/Suggestions: (THANK YOU FOR YOUR FEEDBACK!)

Printed in the U.S.A.SG24-5394-00
AIX
Migration in a C
AT
IA E
nvironment
SG
24-5394-00