AiM Overview and Basic Navigation User Guide 8 overview navigation user guide.pdf · AssetWorks AiM...
31
AssetWorks AiM 8 AiM Overview and Basic Navigation User Guide Responsible office: Associate Vice Chancellor of Facilities Julie Hendricks pg. 1 AiM Overview and Basic Navigation User Guide University of North Carolina Wilmington Department of Facilities Administration Version 1.0 Last Revised: March 18, 2018
Transcript of AiM Overview and Basic Navigation User Guide 8 overview navigation user guide.pdf · AssetWorks AiM...
AssetWorks AiM 8
AiM Overview and Basic Navigation User Guide Responsible office: Associate Vice Chancellor of Facilities
Julie Hendricks pg. 1
AiM Overview and Basic Navigation User Guide
University of North Carolina Wilmington Department of Facilities Administration
Version 1.0 Last Revised: March 18, 2018
AssetWorks AiM 8
AiM Overview and Basic Navigation User Guide Responsible office: Associate Vice Chancellor of Facilities
Julie Hendricks pg. 2
AIM OVERVIEW AND BASIC NAVIGATION USER GUIDE Welcome to AiM! AiM, "Intelligence within Asset Management”, is an Asset Works product used by Facilities to maintain building,
property, maintenance and mechanical asset data. AiM collects purchasing transactions (materials, contracted services, and labor)
for work orders and special projects through an interface with uShop (SciQuest).
The purpose of this user guide is to familiarize all AiM users with the basic functionality of AiM. This user guide covers the main AiM screens, icons, and search processes that are applicable to all users. Additional user guides are available to describe specific AiM tasks performed by various users within the system.
AssetWorks AiM 8
AiM Overview and Basic Navigation User Guide Responsible office: Associate Vice Chancellor of Facilities
Julie Hendricks pg. 3
AIM OVERVIEW AND BASIC NAVIGATION USER GUIDE....................................................................................................................................................... 2
1. NAVIGATE TO AIM ................................................................................................................................................................................................... 4
2. LOG INTO AIM .......................................................................................................................................................................................................... 4
3. AIM NAVIGATION ICONS ................................................................................................................................................................................................ 5
3.1 HEADER TOOLBAR BUTTONS ................................................................................................................................................................................... 5
3.2 ACTION MENU BUTTONS ......................................................................................................................................................................................... 6
3.3 DETAIL TOOLBAR BUTTONS ..................................................................................................................................................................................... 6
3.4 FOOTER TOOLBAR BUTTONS ................................................................................................................................................................................... 7
4. WORKDESK SCREEN ....................................................................................................................................................................................................... 8
5. SEARCHING AIM ............................................................................................................................................................................................................. 8
5.1 NAVIGATE TO A SEARCH SCREEN ............................................................................................................................................................................. 9
5.2 COMPONENTS OF A SEARCH SCREEN ....................................................................................................................................................................... 9
5.2.1 Queries List ..................................................................................................................................................................................................... 9
5.2.2 Search Body..................................................................................................................................................................................................... 9
5.2.3 Advanced Search Items .................................................................................................................................................................................. 10
5.2.4 Execute Search .............................................................................................................................................................................................. 10
5.3 VIEW SEARCH RESULTS .......................................................................................................................................................................................... 10
5.3.1 Column Headings ........................................................................................................................................................................................... 11
5.3.2 Data List ........................................................................................................................................................................................................ 11
5.3.3 Footer Page Navigation ................................................................................................................................................................................. 11
5.3.4 Action Menu .................................................................................................................................................................................................. 11
5.3.5 View Menu .................................................................................................................................................................................................... 11
6. DATA ENTRY SCREEN.................................................................................................................................................................................................... 12
7. WORKDESK CHANNELS................................................................................................................................................................................................. 13
7.1 ADD A CHANNEL TO WORK DESK ........................................................................................................................................................................... 13
8. QUICK SEARCH ....................................................................................................................................................................................................... 14
9. PERSONAL QUERIES ............................................................................................................................................................................................... 16
9.1 ADD A PERSONAL QUERY ..................................................................................................................................................................................... 16
9.2 EDIT A PERSONAL QUERY ..................................................................................................................................................................................... 19
10. QUICK LINKS ...................................................................................................................................................................................................... 20
10.1 ADD A QUICK LINK ........................................................................................................................................................................................ 20
10.2 DELETING A QUICK LINK ............................................................................................................................................................................... 22
11. REQUIRED FIELDS ON THE AIM SCREENS ........................................................................................................................................................... 24
12. ZOOM FUNCTIONALITY ..................................................................................................................................................................................... 25
13. EMAIL NOTIFICATION ........................................................................................................................................................................................ 26
14. RELATED DOCUMENTS ...................................................................................................................................................................................... 26
14.1 ADDING A NEW DOCUMENT......................................................................................................................................................................... 27
14.2 ATTACHING AN EXISTING DOCUMENT .......................................................................................................................................................... 29
14.3 REMOVING A DOCUMENT ............................................................................................................................................................................ 31

AssetWorks AiM 8
AiM Overview and Basic Navigation User Guide Responsible office: Associate Vice Chancellor of Facilities
Julie Hendricks pg. 4
1. NAVIGATE TO AIM To access UNCW’s AiM application, open Internet Explorer and type the link below into the address bar or Ctrl + Click to follow
link. https://ba-aim1.uncw.edu/production
2. LOG INTO AIM Login to AiM by entering the domain credentials provided to you.
1. User Name - Enter your domain username (the same as logging onto computer). 2. Password - Enter your AiM password (the same as logging onto computer). 3. Login - Click Login

AssetWorks AiM 8
AiM Overview and Basic Navigation User Guide Responsible office: Associate Vice Chancellor of Facilities
Julie Hendricks pg. 5
3. AIM NAVIGATION ICONS AiM uses a variety of buttons, most commonly found in the top, left corner of the screen. These quick reference charts provide the name, picture and description for each icon.
3.1 HEADER TOOLBAR BUTTONS These icons appear above many AiM screens. They are used to create new records, find existing records, update existing records, and view a list of records that the search function found. After a new record has been added or a current record has been edited; remember to click Save to commit the changes that were made to the screen.
Name Icon Description
New
The New button is selected to create a new record.
Edit
The Edit button is selected to update a record.
Save
The Save button is selected to save edits made on a record.
Cancel
The Cancel button cancels the current transaction/action without saving.
Browse
The Browse button takes the user back to the last search results list.
Help
The Help button opens online help descriptions.
Search
The Search button opens the search screen tailored to the primary screen (e.g., Work Order screen)
Execute
The Execute button initiates a search based on the entered search criteria.
Quick Search
The quick Search icon enables the user to search quickly without entering detailed search criteria. The Quick Search performs a search based on the record’s primary data field. (e.g. A work order search would be based on work order number).

AssetWorks AiM 8
AiM Overview and Basic Navigation User Guide Responsible office: Associate Vice Chancellor of Facilities
Julie Hendricks pg. 6
3.2 ACTION MENU BUTTONS The Action menu is available on the left side of the AiM screen and contains several buttons for features such as; printing, emailing, exporting, etc.
Name Icon Description
ViewFinder
The Viewfinder button displays a series of hyperlinks to all transactions associated to the work order/phase. The Viewfinder has two tabs, one for documents, and one for associated transactions.
The Email button enables the user to send an email with the record URL attached. For instance, the user could send an email with a link to a specific work order.
The Print button opens the record in a printer-friendly view.
Copy
The Copy button enables the copying of the retrieved record. This button is found on a number of screens including the Work Order, PM Template, Master Asset Profile, etc.
Export
The Export button allows you to export the information you are currently viewing into Excel.
AssetWorks AiM 8
AiM Overview and Basic Navigation User Guide Responsible office: Associate Vice Chancellor of Facilities
Julie Hendricks pg. 7
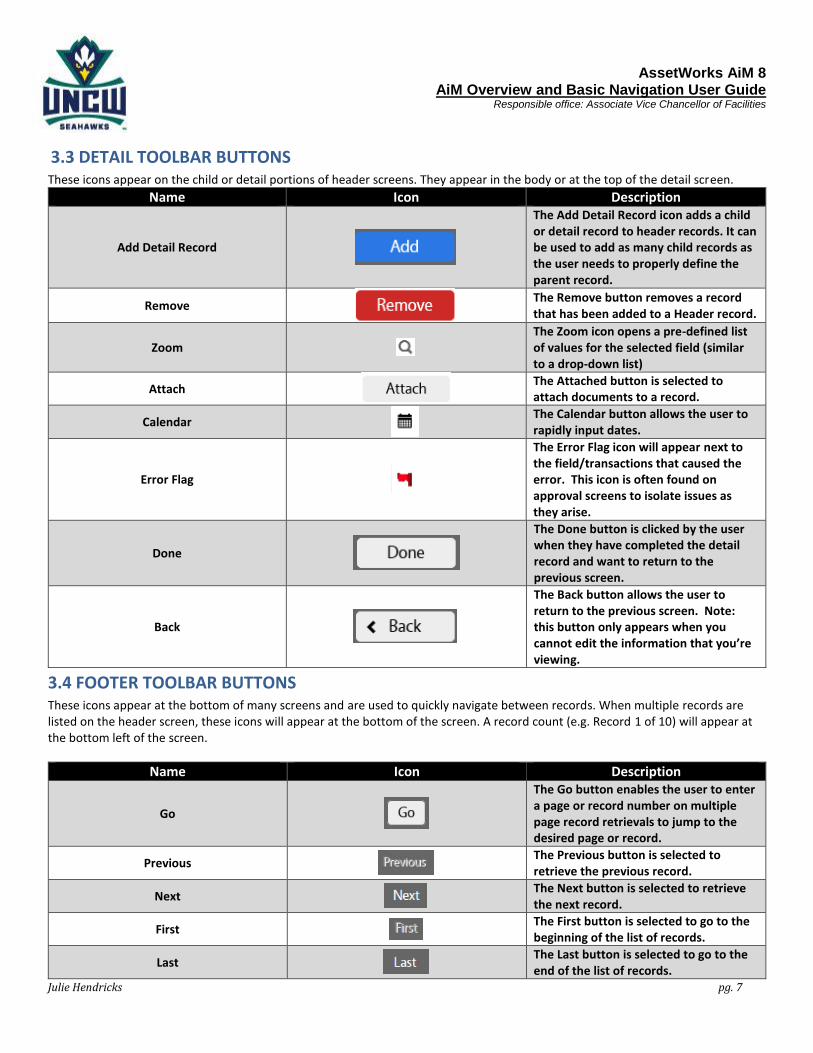
3.3 DETAIL TOOLBAR BUTTONS These icons appear on the child or detail portions of header screens. They appear in the body or at the top of the detail screen.
Name Icon Description
Add Detail Record
The Add Detail Record icon adds a child or detail record to header records. It can be used to add as many child records as the user needs to properly define the parent record.
Remove
The Remove button removes a record that has been added to a Header record.
Zoom
The Zoom icon opens a pre-defined list of values for the selected field (similar to a drop-down list)
Attach
The Attached button is selected to attach documents to a record.
Calendar
The Calendar button allows the user to rapidly input dates.
Error Flag
The Error Flag icon will appear next to the field/transactions that caused the error. This icon is often found on approval screens to isolate issues as they arise.
Done
The Done button is clicked by the user when they have completed the detail record and want to return to the previous screen.
Back
The Back button allows the user to return to the previous screen. Note: this button only appears when you cannot edit the information that you’re viewing.
3.4 FOOTER TOOLBAR BUTTONS These icons appear at the bottom of many screens and are used to quickly navigate between records. When multiple records are listed on the header screen, these icons will appear at the bottom of the screen. A record count (e.g. Record 1 of 10) will appear at the bottom left of the screen.
Name Icon Description
Go
The Go button enables the user to enter a page or record number on multiple page record retrievals to jump to the desired page or record.
Previous
The Previous button is selected to retrieve the previous record.
Next
The Next button is selected to retrieve the next record.
First
The First button is selected to go to the beginning of the list of records.
Last
The Last button is selected to go to the end of the list of records.
AssetWorks AiM 8
AiM Overview and Basic Navigation User Guide Responsible office: Associate Vice Chancellor of Facilities
Julie Hendricks pg. 8
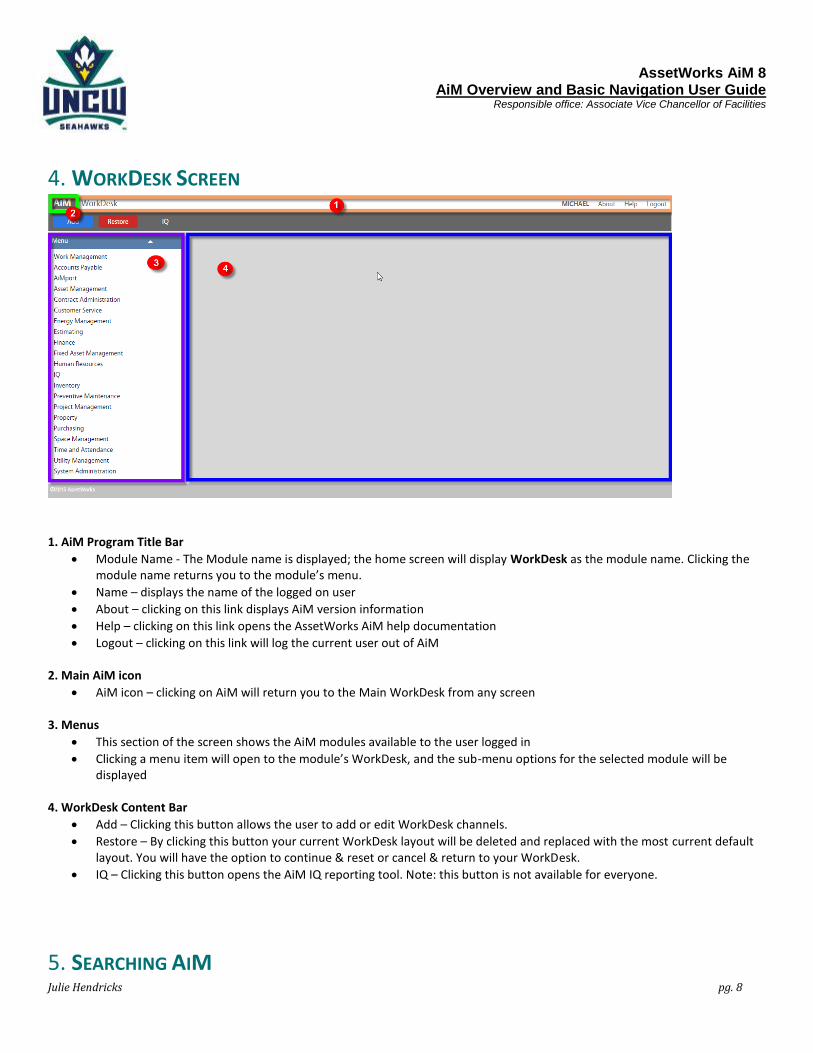
4. WORKDESK SCREEN
1. AiM Program Title Bar
Module Name - The Module name is displayed; the home screen will display WorkDesk as the module name. Clicking the module name returns you to the module’s menu.
Name – displays the name of the logged on user
About – clicking on this link displays AiM version information
Help – clicking on this link opens the AssetWorks AiM help documentation
Logout – clicking on this link will log the current user out of AiM 2. Main AiM icon
AiM icon – clicking on AiM will return you to the Main WorkDesk from any screen 3. Menus
This section of the screen shows the AiM modules available to the user logged in
Clicking a menu item will open to the module’s WorkDesk, and the sub-menu options for the selected module will be displayed
4. WorkDesk Content Bar
Add – Clicking this button allows the user to add or edit WorkDesk channels.
Restore – By clicking this button your current WorkDesk layout will be deleted and replaced with the most current default layout. You will have the option to continue & reset or cancel & return to your WorkDesk.
IQ – Clicking this button opens the AiM IQ reporting tool. Note: this button is not available for everyone.
5. SEARCHING AIM
AssetWorks AiM 8
AiM Overview and Basic Navigation User Guide Responsible office: Associate Vice Chancellor of Facilities
Julie Hendricks pg. 9
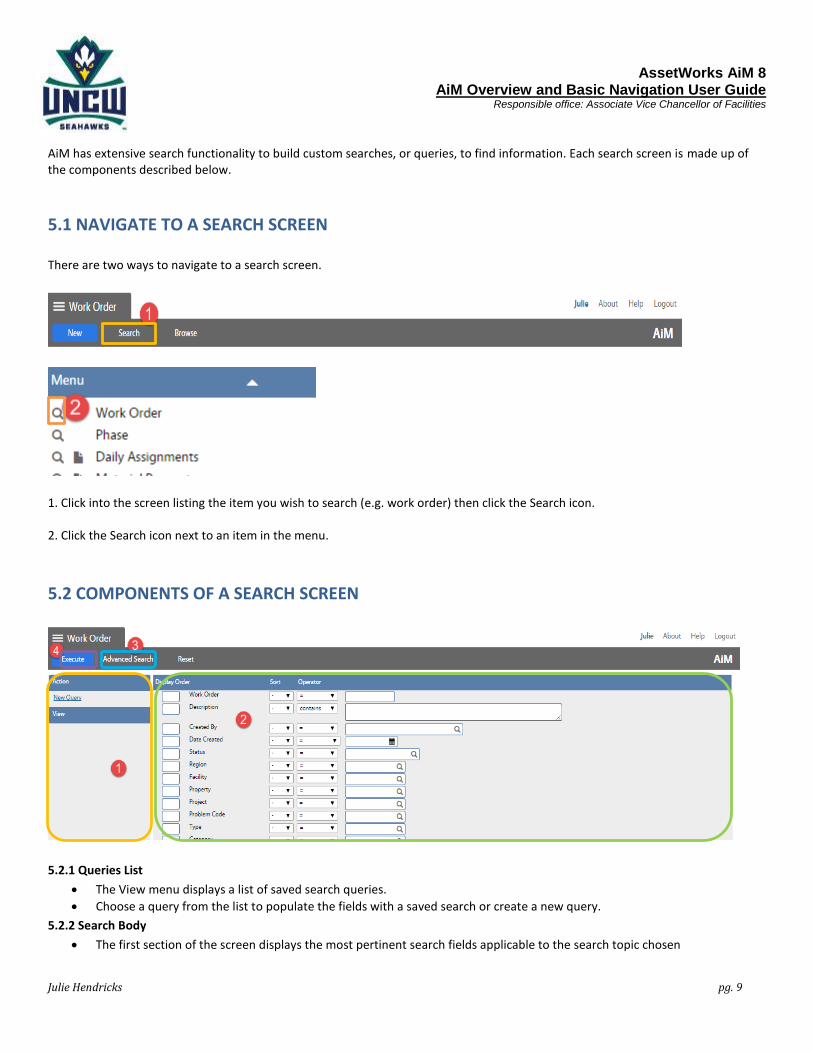
AiM has extensive search functionality to build custom searches, or queries, to find information. Each search screen is made up of the components described below.
5.1 NAVIGATE TO A SEARCH SCREEN There are two ways to navigate to a search screen.
1. Click into the screen listing the item you wish to search (e.g. work order) then click the Search icon. 2. Click the Search icon next to an item in the menu.
5.2 COMPONENTS OF A SEARCH SCREEN
5.2.1 Queries List
The View menu displays a list of saved search queries.
Choose a query from the list to populate the fields with a saved search or create a new query.
5.2.2 Search Body
The first section of the screen displays the most pertinent search fields applicable to the search topic chosen
AssetWorks AiM 8
AiM Overview and Basic Navigation User Guide Responsible office: Associate Vice Chancellor of Facilities
Julie Hendricks pg. 10
The four boxes beside each data element control what information the search finds and the way the search results are displayed a) The first box, “Display Order”, sequences the columns that display on the screen. The record’s unique value (i.e.
primary key) will always display first. If you fill in one or more sorting sequence boxes, only those fields will display, in the order you designate. If left blank, the default selection of data columns will appear in the search results.
b) The second box, “Sort”, allows you to choose to sort the search results by the selected data element. This is an optional field. If nothing is chosen, the search results will automatically sort by the primary field. Asc will sort data in alpha/numeric ascending order. Dsc will sort data in alpha/numeric descending order. Search results can be re-sorted on the Search Results screen. See View Search Results for more information about sorting search results.
c) The third box, “Operator”, displays operators that instruct the search what information to return and display.
=, >, <, >=, <=, <>: use these operators to find search results based on standard mathematical operators to find exact matches (=) or numerical values:
Starts With or Ends With: use to find search results that start with or end with the text entered
Contains: use to find search results that contain the text entered anywhere in the field. Note: % is a wildcard and can be used effectively (e.g. “white%paint” will find “white paint, latex”,
“white, enamel paint”, and “white, painter’s coveralls”)
Null: use to find search results where the data does not have a value for the selected field
Not null: use to find search results where the data must have a value for the selected field
In: use to choose multiple items from a list and find search results that match any one of the items listed
Not in: use to choose multiple items from a list and find search results that do not match any of the items listed
Between: use to find search results in between a set of dates (e.g. between 6/1/2014 and 6/30/2014)
Within: use to find search results with dates that fall into the range selected (e.g. within next 7 days) d) The fourth box is the specific Criteria you wish to search for. Enter data or use the Zoom icon to search for the
appropriate selection.
5.2.3 Advanced Search Items
Some searches have additional panels of related information that can be used to create a more complex search. Click Advanced Search at the top of the screen to open additional panels of search options.
5.2.4 Execute Search
Click the Execute button to run the search.
5.3 VIEW SEARCH RESULTS

AssetWorks AiM 8
AiM Overview and Basic Navigation User Guide Responsible office: Associate Vice Chancellor of Facilities
Julie Hendricks pg. 11
5.3.1 Column Headings
The column/field names for the search results are displayed across the top of the screen. Clicking on a column heading will sort data by that column.
A down-facing arrow sorts in ascending order, e.g.
An up-facing arrow sorts in descending order, e.g.
No arrow indicates that the field is not currently used for sorting
You can only sort data one column at a time
5.3.2 Data List
The search results display across the main portion of the screen. The first column will contain an underlined link to navigate to the selected record.
5.3.3 Footer Page Navigation
Page Numbers: The page number and total pages display. Type a page number in the box and click Go to navigate to another page.
Display Option: Search screens provide an option to change the number of records that appear on a screen. Click the desired number to refresh the screen to show that amount.
Navigation Buttons: Navigate between pages by using the buttons on the bottom of the screen. Click Previous and Next to go backward /forward one page; click First and Last to move to the beginning/end of the list.
Record Count: Displays the total number of records found for the search selection.
5.3.4 Action Menu
Using the Export or Print buttons, the search results can be exported to an Excel list or printed.
5.3.5 View Menu
A list of saved search queries is displayed; choose a query from the list to execute the saved search.

AssetWorks AiM 8
AiM Overview and Basic Navigation User Guide Responsible office: Associate Vice Chancellor of Facilities
Julie Hendricks pg. 12
6. DATA ENTRY SCREEN
NOTE: The view and edit screens for a record will have the same fields as the entry screen
1. Body All entry screens contain the same format.
Fields bordered in red are required.
2. Detail Data If there is dependent data (Phases are dependent to a work order), there will be a Title Bar across the bottom section of the
screen, with an ‘Add’ (and sometimes a ‘Remove’) record button.

AssetWorks AiM 8
AiM Overview and Basic Navigation User Guide Responsible office: Associate Vice Chancellor of Facilities
Julie Hendricks pg. 13
7. WORKDESK CHANNELS You can add available channels to your AiM WorkDesk to help AiM become more efficient to your needs.
7.1 ADD A CHANNEL TO WORK DESK
Step Field/Icon Description
1 Click on the Add button
2
Chose Available Channels you would like to display in WorkDesk (choose as many or as few depending on what you would like quick access to). Common channels are; Personal Query Count, Personal Query Listing, Quicklinks and Quick Search
3
Click on the Add button
4 Save your changes
5
Return to WorkDesk to see the Channels that were added.

AssetWorks AiM 8
AiM Overview and Basic Navigation User Guide Responsible office: Associate Vice Chancellor of Facilities
Julie Hendricks pg. 14
8. QUICK SEARCH Quick Search are search fields that can be added to your WorkDesk. They are defined by each user to provide to look up Work Order, Customer Request or other transactions by their transaction number. Please see section 7 for detailed instructions on personalizing the WorkDesk to assist in adding Quick Search to your WorkDesk.
AssetWorks AiM 8
AiM Overview and Basic Navigation User Guide Responsible office: Associate Vice Chancellor of Facilities
Julie Hendricks pg. 15
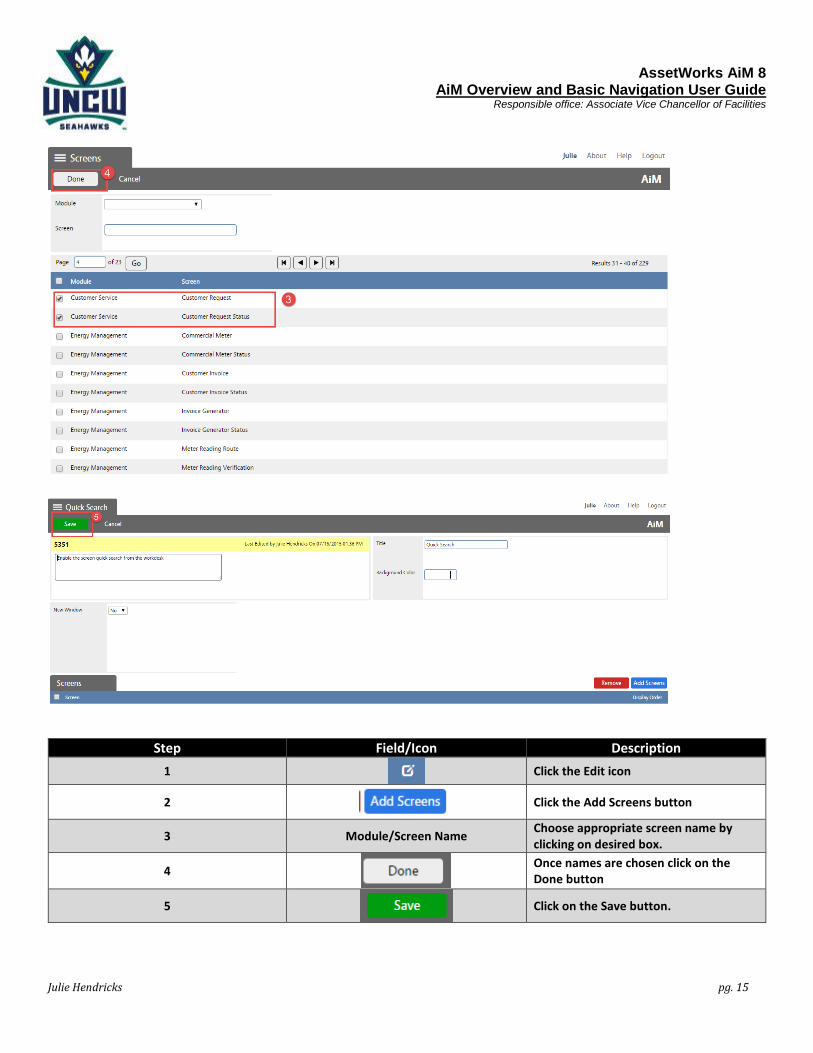
Step Field/Icon Description
1
Click the Edit icon
2
Click the Add Screens button
3 Module/Screen Name Choose appropriate screen name by clicking on desired box.
4
Once names are chosen click on the Done button
5
Click on the Save button.
AssetWorks AiM 8
AiM Overview and Basic Navigation User Guide Responsible office: Associate Vice Chancellor of Facilities
Julie Hendricks pg. 16
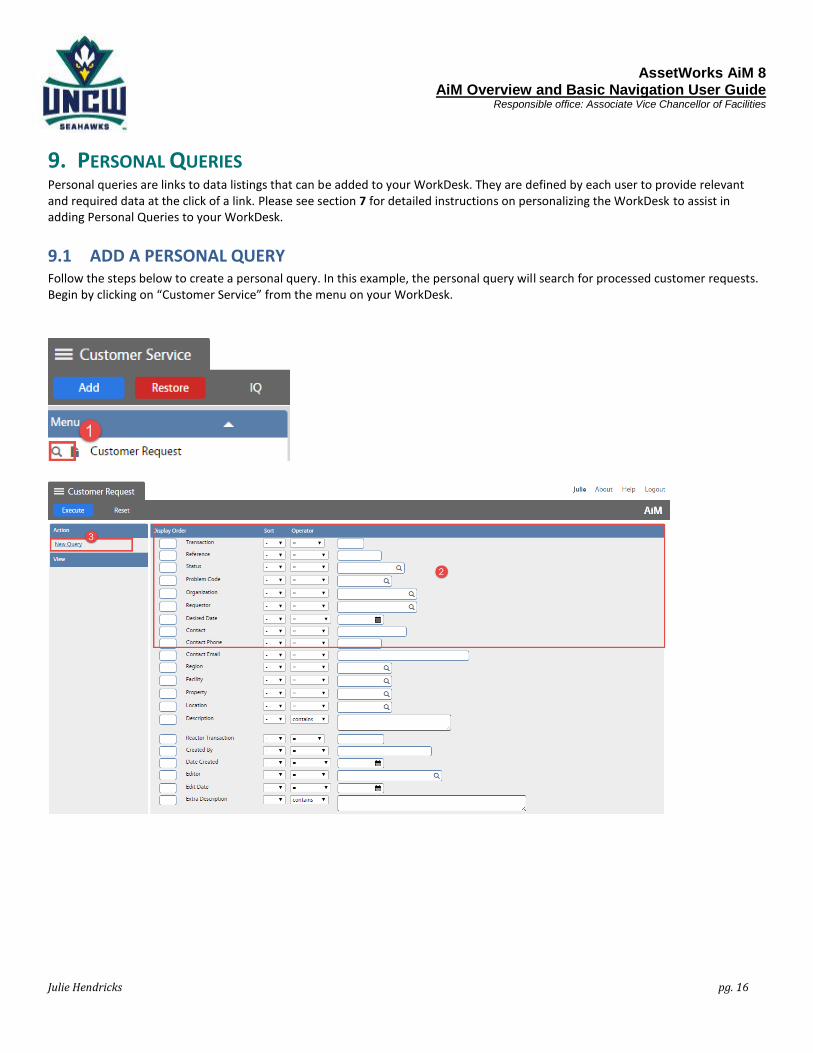
9. PERSONAL QUERIES Personal queries are links to data listings that can be added to your WorkDesk. They are defined by each user to provide relevant and required data at the click of a link. Please see section 7 for detailed instructions on personalizing the WorkDesk to assist in adding Personal Queries to your WorkDesk.
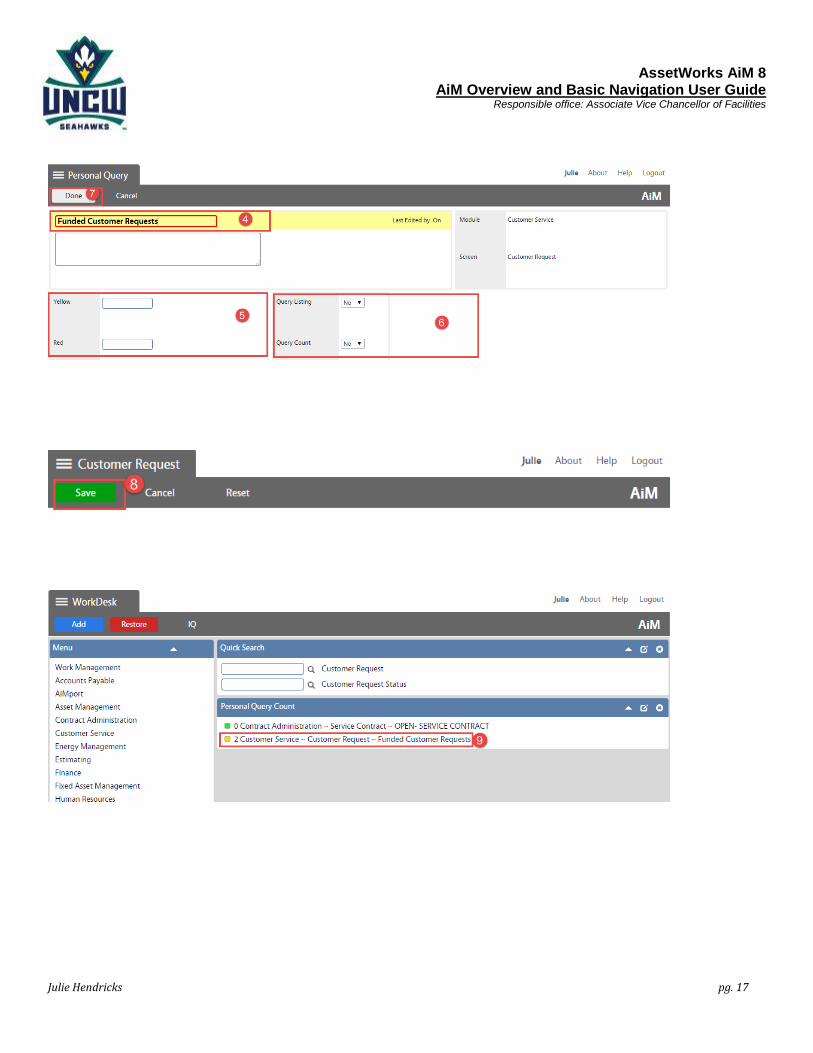
9.1 ADD A PERSONAL QUERY Follow the steps below to create a personal query. In this example, the personal query will search for processed customer requests. Begin by clicking on “Customer Service” from the menu on your WorkDesk.
AssetWorks AiM 8
AiM Overview and Basic Navigation User Guide Responsible office: Associate Vice Chancellor of Facilities
Julie Hendricks pg. 17

AssetWorks AiM 8
AiM Overview and Basic Navigation User Guide Responsible office: Associate Vice Chancellor of Facilities
Julie Hendricks pg. 18
Step Field/Icon Description
1
Click the search icon on any AiM screen to launch the search criteria for the selected item.
2
Enter the criteria desired in the search screen fields.
3
Click the New Query button.
4 Query
In the yellow Query box, add a descriptive “Name” that identifies what the search is for.
5
Yellow/Red
Enter numeric values in the Alert Level fields, if desired. If numbers are entered, the green box beside the search will change to yellow or red when the value reaches the number entered. For example, typing 1 in the yellow text box will change the green square to yellow when 1 item is found.
6
Query Listing /Query Count
Select Yes or No based on your preference to display the search link on the Work Desk:
Query Listing will list all the records matching the search on the WorkDesk
Query Count will display a number count matching how many records are found by the search.
Choosing No for both options will save the query for future use but will not add it to the WorkDesk.
7
Click Done in the upper left-hand corner of the screen.
8
Click Save. The newly saved personal query now appears in the View menu. Once defined, this query can be selected and used any time this search screen is viewed.
9*
WorkDesk
If Query Listing or Query Count were selected in Step 6, the query will appear on your WorkDesk. Click the link to view the search results.

AssetWorks AiM 8
AiM Overview and Basic Navigation User Guide Responsible office: Associate Vice Chancellor of Facilities
Julie Hendricks pg. 19
9.2 EDIT A PERSONAL QUERY Personal queries may be changed at any time by navigating to the search criteria of the personal query, making changes to the search, then re‐saving the personal query.
Step Field/Icon Description
1 Click the query, under the View menu, to edit it. Once selected, the query will be grayed out.
2
Click Edit Query to open the editing screen.
3 In the search screens, change the search criteria as desired.
4*
Click the Save button to save the personal query.

AssetWorks AiM 8
AiM Overview and Basic Navigation User Guide Responsible office: Associate Vice Chancellor of Facilities
Julie Hendricks pg. 20
10. QUICK LINKS Quick Links are shortcuts on your WorkDesk to direct you to specific AiM screens or reports, or to external websites. Quick Links provide a shortcut to the selected screen without having to use the menu structure to navigate to the screen. Please see section 7 for detailed instructions on personalizing the WorkDesk to assist in adding Quick Links to your WorkDesk.
10.1 ADD A QUICK LINK Follow the steps below to add a Quick Link to your WorkDesk. In this example, we’ll be adding a quick link to the WorkDesk to create a new customer work request. Keep in mind that the menus & options displayed are dependent on your user role.

AssetWorks AiM 8
AiM Overview and Basic Navigation User Guide Responsible office: Associate Vice Chancellor of Facilities
Julie Hendricks pg. 21
Step Field/Icon Description Notes
1 System
Administration Click System Administration in the main menu.
2 Quicklink Click Quicklink in the system administration menu.
3 Module Name Click on the appropriate module name to view the screens within the module that you can create a Quicklink to.
After choosing the module, AiM will display any previously setup Quicklinks for screens in that module.
4
Click Add on the far right-hand side of the screen.
5 Screen Report
Web
Select Screen, Report or Web. Screen will create a Quicklink to an AiM screen. Report will create a Quicklink to an AiM Report. Web will create a Quicklink to an external website address.
6
Click Next in the upper left-hand corner of the screen.
7
Title Sequence
Path WorkDesk
Enter a Title to display on your Work Desk for the Quicklink.
Enter a Sequence number to arrange the order of links to display on the Work Desk.
Choose the desired screen to link to from the Path drop down list.
Choose Yes or No in the Work Desk dropdown box to determine whether the Quicklink will appear on the main WorkDesk
Typically, you will enter “10” for the 1st sequence number and choose “Yes” in the WorkDesk drop-down. Try to increment each sequence by “10” to leave space for future additions
8
Click Save.
AssetWorks AiM 8
AiM Overview and Basic Navigation User Guide Responsible office: Associate Vice Chancellor of Facilities
Julie Hendricks pg. 22
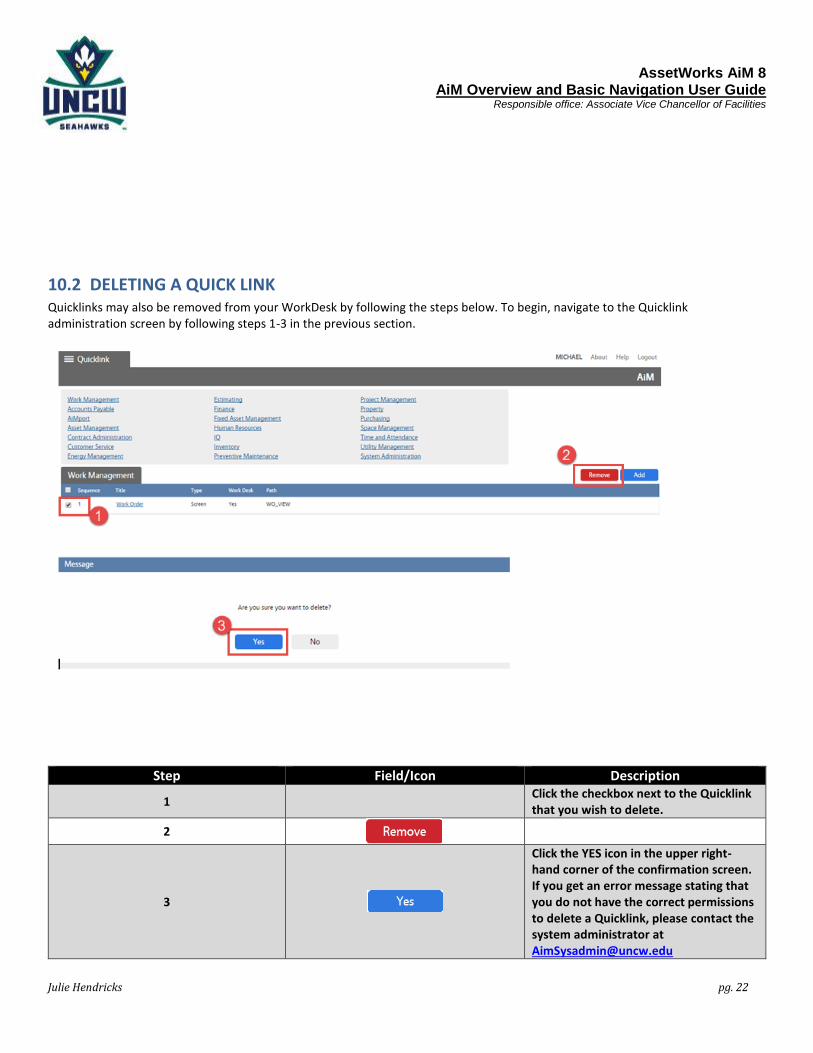
10.2 DELETING A QUICK LINK Quicklinks may also be removed from your WorkDesk by following the steps below. To begin, navigate to the Quicklink administration screen by following steps 1-3 in the previous section.
Step Field/Icon Description
1 Click the checkbox next to the Quicklink that you wish to delete.
2
3
Click the YES icon in the upper right-hand corner of the confirmation screen. If you get an error message stating that you do not have the correct permissions to delete a Quicklink, please contact the system administrator at [email protected]

AssetWorks AiM 8
AiM Overview and Basic Navigation User Guide Responsible office: Associate Vice Chancellor of Facilities
Julie Hendricks pg. 23
10.3 WAYS TO USE QUICK LINKS
10.3.1 Add Quicklink for Email and Phone contact
Add a Web Quicklink like the above example for your commonly contacted co-workers. This will allow you to quickly find their
phone number and the link can also be used to email them through outlook. (Note: Sent emails used through this link will not be
recorded in AiM)
10.3.2 Add Quicklink to Web Page
Add a Web Quicklink like the above example for your commonly used webpages. (Note: Hit CTRL + Click the link to open link in a new window)

AssetWorks AiM 8
AiM Overview and Basic Navigation User Guide Responsible office: Associate Vice Chancellor of Facilities
Julie Hendricks pg. 24
11. REQUIRED FIELDS ON THE AIM SCREENS Fields that are required to save a screen in AiM are clearly identified by a red box circling the field. If you forget to enter a required field, the system will prompt you with an error message when saving.
Error messages appear in a red box and indicate the field name that is missing information. In this example Description, Facility, Property, and Region are required fields missing data. To save a record successfully, enter a value into the field being referenced in the error message and click the save button again

AssetWorks AiM 8
AiM Overview and Basic Navigation User Guide Responsible office: Associate Vice Chancellor of Facilities
Julie Hendricks pg. 25
12. ZOOM FUNCTIONALITY AiM uses the Zoom icon to display lists of pre-defined data choices (Zoom is similar to drop-down lists). When zooming into a field in AiM, it will take you into a new screen which displays a list of values to choose from. In previous versions of AiM, a pop-up window appeared; however, in AiM 8.0 there are no longer pop-up windows. Here is an example of results when the “Property” zoom lens is chosen:
AssetWorks AiM 8
AiM Overview and Basic Navigation User Guide Responsible office: Associate Vice Chancellor of Facilities
Julie Hendricks pg. 26
13. EMAIL NOTIFICATION AiM sends automatic email notifications to budget authority for requests that need funding approval. The Contact person will be emailed once their customer request is approved in the system and entered into a Work Order and they will also receive an email when the phase is marked as “Work Complete”. The email contains your unique customer request or work order number to be used as reference to follow-up on your request. It is important that the person entering the request into AiM uses a valid UNCW for the “Contact Email” field to ensure successful email notifications. Please note, the system administrators may choose to change the frequency of email notifications at any time based on user feedback on the frequency of messages. If a change to email notifications is made in AiM, system administrators will notify users to communicate the change.
14. RELATED DOCUMENTS The Related Documents View enables you to attach electronic records, such as PDF documents, spreadsheets, or pictures from the document repository to the record on which the user is working.

AssetWorks AiM 8
AiM Overview and Basic Navigation User Guide Responsible office: Associate Vice Chancellor of Facilities
Julie Hendricks pg. 27
14.1 ADDING A NEW DOCUMENT Related documents can be added to both customer requests and work orders. Note: Related documents can only be added when in edit mode.

AssetWorks AiM 8
AiM Overview and Basic Navigation User Guide Responsible office: Associate Vice Chancellor of Facilities
Julie Hendricks pg. 28

AssetWorks AiM 8
AiM Overview and Basic Navigation User Guide Responsible office: Associate Vice Chancellor of Facilities
Julie Hendricks pg. 29
Step Field/Icon Description Notes 1
Click the Edit button located at the top left of the screen if editing a saved record.
There is no need to use edit if you are creating a new record
2 Related Documents
Click Related Documents located under the View menu on the left.
If left blank, all documents will display in the search results.
3
Click Add to add a document.
4
Click “Browse…” to open up a window to browse your computer for a file. Select the file & click OK.
5
Click Next to move onto the next screen “Add Meta Data”
6
Fill out the Title (required) & Tags section (optional) to give your document unique identifying information. Select Zoom next to Type and select the appropriate category from the list.
The Type of document should be relative to the type of document you are uploading. E.g. A jpeg is an image file so the type of document is “Images”. Projects should be titled with (PM project number) e.g. PM1234. Assets should be title (vendor) (equipment) e.g. Daikin Mcquay Package System Manual
7
Click Next to move onto the next screen “Add Attributes”
8
We are currently not using this aspect of AiM so click Next to move onto the next screen - “Add Permissions”.
9 Your document is now listed under Document Listing.
14.2 ATTACHING AN EXISTING DOCUMENT
AssetWorks AiM 8
AiM Overview and Basic Navigation User Guide Responsible office: Associate Vice Chancellor of Facilities
Julie Hendricks pg. 30
Step Field/Icon Description Notes 1
Click Attach to attach an existing document to the customer request or work order.
2 Enter in the desired search criteria. If left blank, all documents will
display in the search results.
3
Click Execute to execute the search.
4
Select the desired document(s) by checking the box(es) next to the line item(s).
5*
Click Done to attach the documents and to return the Related Documents screen.
Your documents will now appear under the Document Listing.

AssetWorks AiM 8
AiM Overview and Basic Navigation User Guide Responsible office: Associate Vice Chancellor of Facilities
Julie Hendricks pg. 31
14.3 REMOVING A DOCUMENT
Step Field/Icon Description Notes 1
Select the document(s) you wish to remove by checking the box(es) next to the line item(s).
2
Click Remove to remove the document(s)
3
Click Yes to confirm that you want to remove the document(s)
Your documents have now been removed from the Document Listing.
*Once you are done adding new documents, attaching existing documents or removing documents from the Related Documents screen, make sure you click Done and then click Save to save your changes to the record.