AiM Infotech Gear calculation procedure Release 1€¦ · Gear calculation procedure . Release 1.09...
20
AiM Infotech Gear calculation procedure Release 1.09
-
Upload
truongkiet -
Category
Documents
-
view
231 -
download
2
Transcript of AiM Infotech Gear calculation procedure Release 1€¦ · Gear calculation procedure . Release 1.09...

AiM Infotech
Gear calculation procedure
Release 1.09

This tutorial describes gear calculation procedure with different AiM devices:
MXL Strada/Pista/Pro05
EVO4
ECU Bridge
SoloDL
MyChron4+eBox (possible only if connected to a MyChron4 eBox).
The procedure is made up of three steps: activation, learning lap and calculation.
In order to get a correct gear calculation it is important to follow carefully the instructions below.
1

1 Prerequisites
Gear channel calculation works using RPM and speed channels. They have to be correctly configured and the related sensors installation is to be faultless.
1.1 RPM and speed channel used by different AiM devices
Each AiM device uses different RPM and speed channels for gear calculation:
• MXL Strada/Pista/Pro05, EVO4 and
ECU Bridge: RPM and reference speed channels set in Race Studio 2;
• SoloDL: first choice is speed channel coming from the ECU; in case it is not available, GPS speed will be automatically selected;
• MyChron4: RPM and speed channels coming from the eBox.
2

2 Gear calculation with MXL Strada/Pista/Pro05
Activate gear calculation via software using Race Studio 2, coming with the MXL or downloadable free of charge from www.aim-sportline.com, download area, software.
2.1 Activation
Run Race Studio 2 software and – as shown here below – follow the indicated path:
1. Device configuration –> 2. MXL –> 3. Go to.
3

Select the configuration where the calculation is to be set or create a new one.
then enter “System configuration” layer (4), set “Calculated” (5) – motorbikes can opt for “Calculated + Neutral signal: Channel 8” and fill in the highest gear number. Transmit the configuration to MXL (6).
At power on, before starting the calculation, MXL display shows “running gear cal”.
RUNNING GEAR CAL
4

2.2 Learning lap
Once gear calculation has been activated a track lap has to be run. During this lap follow carefully these instructions. Engage all gears. Keep each gear engaged for at least 5 seconds. Drive smoothly, avoiding sudden accelerations, tyre slip or wheel blocks when braking; let RPM grow gradually and keep braking as long as possible according to track and traffic conditions; if using a non driving wheel speed as reference pay particular attention to your driving style: reduce as much as you can sliding between driving and driven wheels. Go to the pit lane at the end of the lap and power the engine off; absolutely avoid “revs” while the vehicle is moving: avoid running the pit lane with the clutch pedal/lever engaged. You can press the accelerator pedal before switching the engine off if needed but with the vehicle completely stopped.
2.3 Gear calculation and visualization
Turn on MXL and it will start the calculation.
At the end MXL Strada/Pista/Pro05 display shows: “Gear Cal OK” if the procedure has been successful or “Error Gear Calc” if the procedure has been unsuccessful.
5

2.4 Calculation restart
To restart gear calculation on MXL press “Menu/<<” until the display shows “Start Gear Calib” and then press twice “MEM/OK”.
3 Gear calculation on EVO4
Activate gear calculation via software Race Studio 2, coming with EVO4 and downloadable free of charge from www.aim-sportline.com, download area, software.
6

3.1 Activation
Run Race Studio 2 software and – as shown here below – follow the indicated path:
1. Device configuration –> 2. EVO4 –> 3. Go to
Select the configuration where the calculation is to be set or create a new one.
7

Go to “System configuration” layer (4); set “Calculated” (5) – motorbikes can opt for “Calculated + Neutral signal: Channel 5” – and fill in the highest gear number.
Transmit the configuration to EVO4 (6).
If EVO4 is connected to a Formula steering wheel, when powered on – before starting the calculation – it will show a hourglass where the gear is set to be shown.
If EVO4 is connected to a GT Steering wheel or to a G-Dash, the icon shown here on the right appears during gear calculation in “RPM and lap time” page. At the end engaged gear is displayed.
8

3.2 Learning lap
Once gear calculation has been activated a track lap has to be run. During this lap follow carefully these instructions. Engage all gears. Keep each gear engaged for at least 5 seconds. Drive smoothly avoiding sudden acceleration, tyre slip or wheel blocks when braking; let RPM grow gradually and keep braking as long as possible according to track and traffic conditions; if using a non driving wheel speed as reference pay particular attention to your driving style: reduce as much as you can sliding between driving and driven wheels.
3.3 Gear calculation and visualization
Calculation is performed while running the lap; once over, the logger shows the engaged gear on the connected display.
9

3.4 Calculation restart
To restart gear calculation use the display keyboard and follow these paths:
• Formula steering wheel: Control Panel>>Restart Gear calib.
• GT Steering wheel/G-Dash: press Menu>>System Management>>Restart Gear Calib until the display shows “Clearing gear calib”. The logger is now ready to perform the new calculation.
In case of EVO4 without any dash the calculation can be restarted via software this way.
Go to “System configuration”, select “None” in gear box and transmit the configuration to the logger.
Enter again “System Configuration”, select “Calculated” or “Calculated+Neutral signal: channel 5“, insert the highest gear number and re-transmit the configuration to the logger.
10

4 Gear calculation with ECU Bridge
Activate gear calculation via software Race Studio 2, coming with the ECU Bridge or downloadable free of charge from www.aim-sportline.com, download area, software.
4.1 Activation
Run Race Studio 2 software and – as shown here below – follow the indicated path: Device configuration –> SMC Bridge–> Go to
11

select the configuration where the calculation is to be set on (1) or create a new one (2a/2b).
Go to “System Configuration” layer (4), set “Calculated” gear and fill in the highest gear number. Transmit the configuration to ECU Bridge (6).
12

If ECU Bridge is connected to a Formula steering wheel, when powered on – before starting the calculation – it will show a hourglass where the gear is set to be shown.
If ECU Bridge is connected to a GT Steering wheel or to a G-Dash, the icon shown here on the right appears during gear calculation in “RPM and lap time” page. At the end engaged gear is displayed.
4.2 Learning lap
Once gear calculation has been activated a track lap has to be run. During this lap follow carefully these instructions. Engage all gears. Keep each gear engaged for at least 5 seconds. Drive smoothly avoiding sudden acceleration, tyre slip or wheel blocks when braking; let RPM grow gradually and keep braking as long as possible according to track and traffic conditions; if using a non driving wheel speed as reference pay particular attention to your driving style: reduce as much as you can sliding between driving and driven wheels.
13
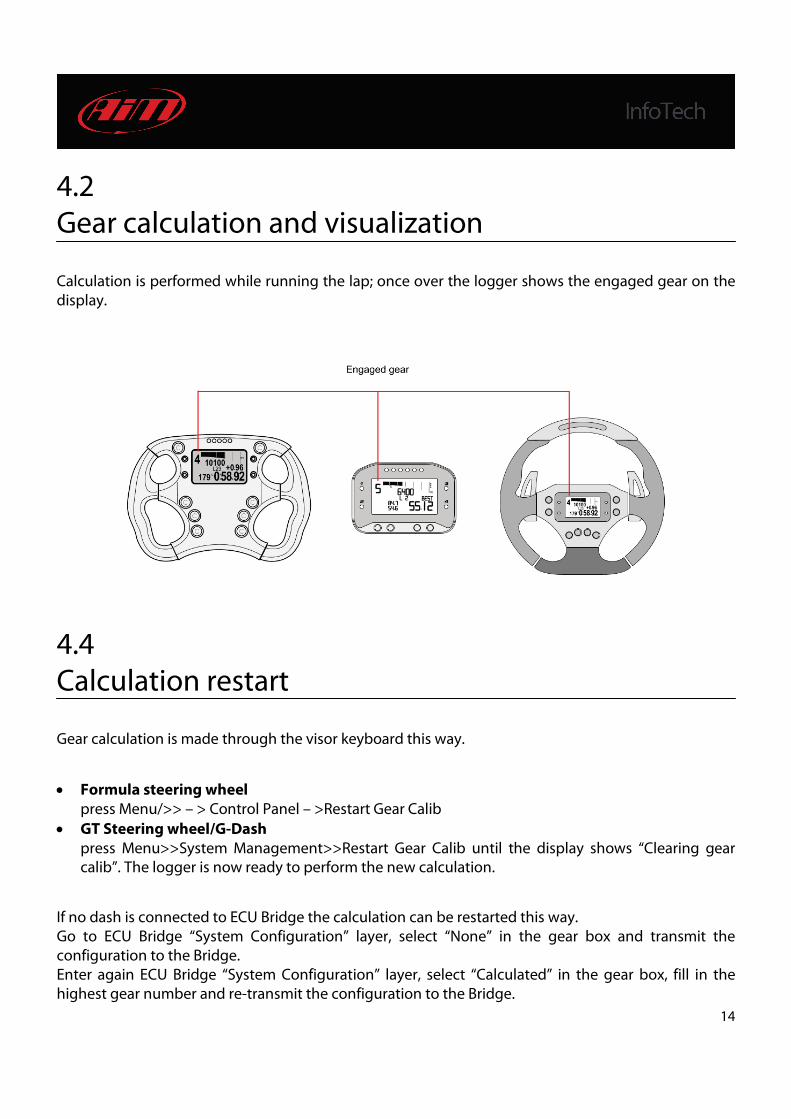
4.2 Gear calculation and visualization
Calculation is performed while running the lap; once over the logger shows the engaged gear on the display.
4.4 Calculation restart
Gear calculation is made through the visor keyboard this way.
• Formula steering wheel press Menu/>> – > Control Panel – >Restart Gear Calib
• GT Steering wheel/G-Dash press Menu>>System Management>>Restart Gear Calib until the display shows “Clearing gear calib”. The logger is now ready to perform the new calculation.
If no dash is connected to ECU Bridge the calculation can be restarted this way. Go to ECU Bridge “System Configuration” layer, select “None” in the gear box and transmit the configuration to the Bridge. Enter again ECU Bridge “System Configuration” layer, select “Calculated” in the gear box, fill in the highest gear number and re-transmit the configuration to the Bridge.
14

5 Gear calculation with SoloDL
Activate gear calculation via software using Race Studio 2 software, coming with SoloDL or downloadable free of charge from www.aim-sportline.com, Download Area, Software.
5.1 Activation
Run Race Studio 2 software and – as shown here below – follow the indicated path: System configuration –> SoloDL –> Go to;
15

Then press “Configuration Manager” (1) to select the configuration where the calculation is to be set (2). To create a new one press “New” (3a), fill in the panel that shows up (3b) and press OK. The software sets automatically on this last configuration. Now press “Calculated” on the box right of the page and fill in the highest gear number (4). Transmit the configuration to SoloDL (5).
To display the engaged gear create a custom page and set the gear in one of the fields to be shown. See SoloDL user manual for further information.
5.2 Learning lap
Once gear calculation has been activated a track lap has to be run. During this lap follow carefully these instructions. Engage all gears. Keep each gear engaged for at least 5 seconds. Drive smoothly avoiding sudden acceleration, tyre slip or wheel blocks when braking; let RPM grow gradually and keep braking as long as possible according to track and traffic conditions; if using a non driving wheel speed as reference pay particular attention to your driving style: reduce as much as you can sliding between driving and driven wheels.
16

5.3 Gear calculation and visualization
Calculation is performed while running the lap; once over SoloDL shows the engaged gear on its “Custom” page (Paragraph 5.1).
5.4 Calculation restart
Calculation restart on SoloDL is made via the logger keyboard this way:
• Menu>>System Management>>Restart gear calibration.
17
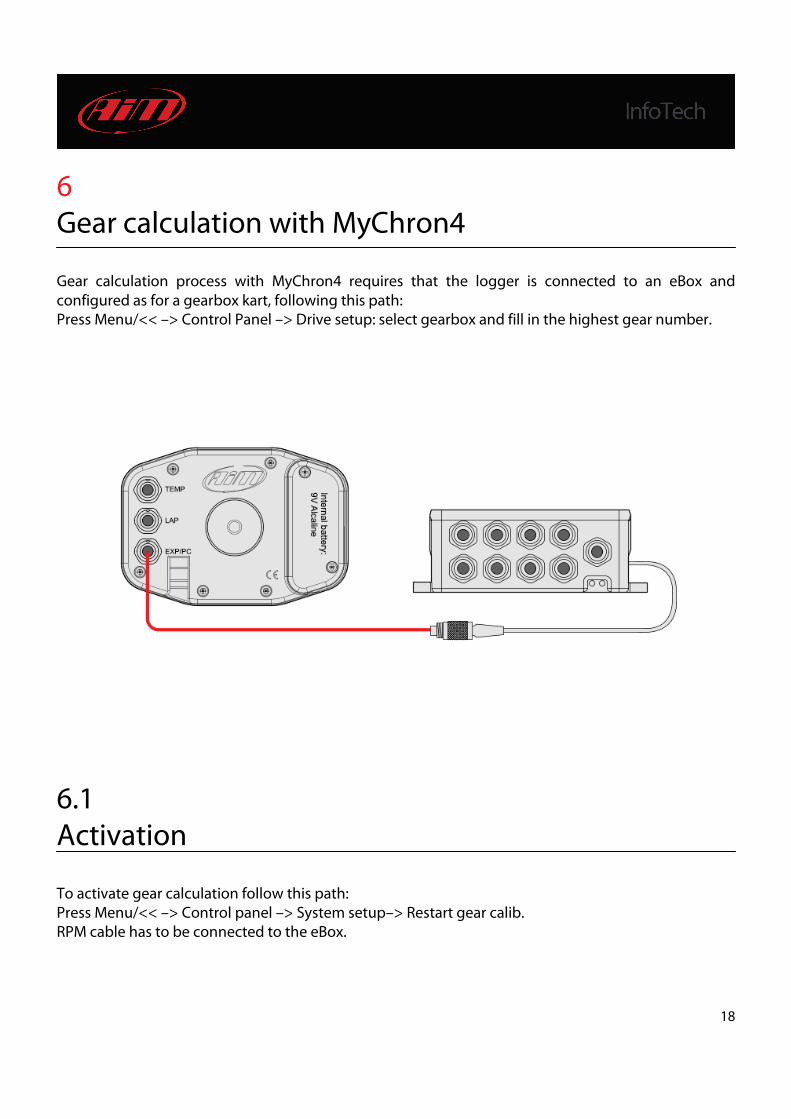
6 Gear calculation with MyChron4
Gear calculation process with MyChron4 requires that the logger is connected to an eBox and configured as for a gearbox kart, following this path: Press Menu/<< –> Control Panel –> Drive setup: select gearbox and fill in the highest gear number.
6.1 Activation
To activate gear calculation follow this path: Press Menu/<< –> Control panel –> System setup–> Restart gear calib. RPM cable has to be connected to the eBox.
18

6.2 Learning lap
Once gear calculation has been activated a track lap has to be run. During this lap follow carefully these instructions. Engage all gears. Keep each gear engaged for at least 5 seconds. Drive smoothly avoiding sudden acceleration, tyre slip or wheel blocks when braking; let RPM grow gradually and keep braking as long as possible according to track and traffic conditions; if using a non driving wheel speed as reference pay particular attention to your driving style: reduce as much as you can sliding between driving and driven wheels.
6.3 Gear calculation and visualization
Once the calculation over MyChron4 shows the engaged gear on the dedicated area of the display.
6.4 Calculation restart
Gear calculation restart on MyChron4 is made via keyboard following this path: Press Menu/<< –> Control panel –> System setup –> Restart gear calib.
19