aeriaaeriaB x ultraultra - Dish...
25
User Manual aeria aerialB x - ultra ultra
Transcript of aeriaaeriaB x ultraultra - Dish...
User Manual
aeriaaerialB x - ultraultra

Warranty & Product RegistrationPlease register your product to assist with warranty and product updates.
To do this please visit www.dishtv.co.nz and click on Warranty & Registration
2
Thank you for choosing this DishTV Freeview High Definition Digital Set Top Box. You will be be able to receive all Freeview|HD UHF High Definition and Standard Definition digital TV channels, as well as detailed Freeview program information with the Freeview 8 Day Electronic Program Guide. For more information about Freeview visit www.freeviewnz.tv
A Freeview Digital Set Top Box gives you access over 10 free to air digital channels, without a subscription or contract. For more information on Freeview please visit www.freeviewnz.tv
With
Digital UHFA digital box lets you access the free digitalchannels that are broadcast in New Zealand.It uses a digital signal, received through yournormal UHF aerial and lets you watch it through your existing television.

AV Cable
USB Firmwareupgrade +HDD connection
RF IN UHF Aerialinput
RF OUT UHF Signaloutput
3
DC 12VConnect 230V - 12v adapter
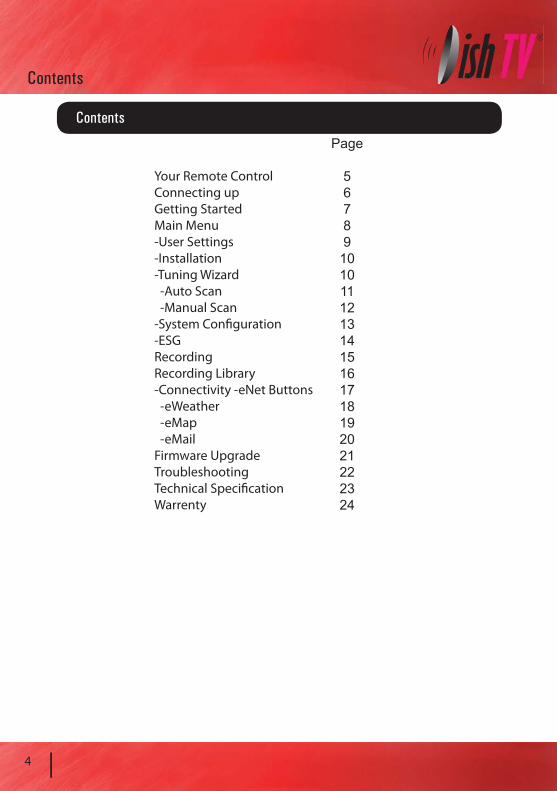
Your Remote ControlConnecting upGetting StartedMain Menu-User Settings-Installation-Tuning Wizard -Auto Scan -Manual Scan-System Configuration-ESGRecordingRecording Library-Connectivity -eNet Buttons -eWeather -eMap -eMailFirmware UpgradeTroubleshootingTechnical SpecificationWarrenty
Page
56789
10101112131415161718192021222324
4
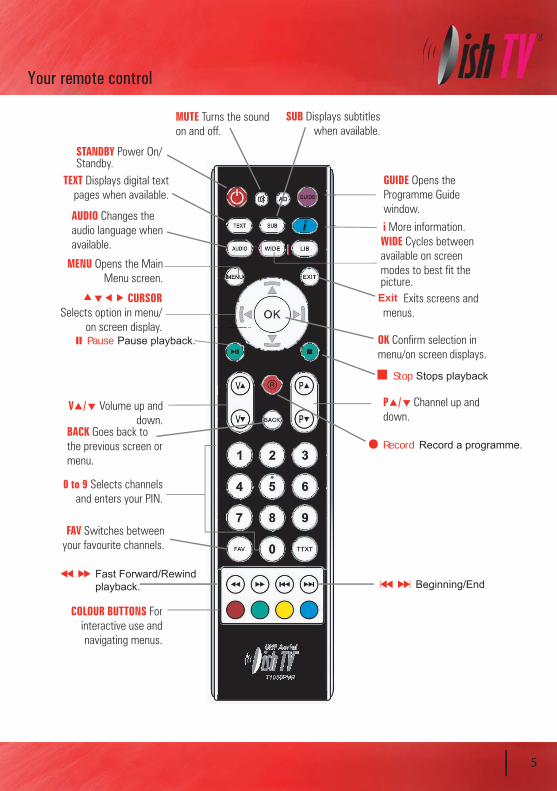
Pause Pause playback.
Record Record a programme.
Stop
Beginning/End
Stops playback
Fast Forward/Rewindplayback.
5
Exit
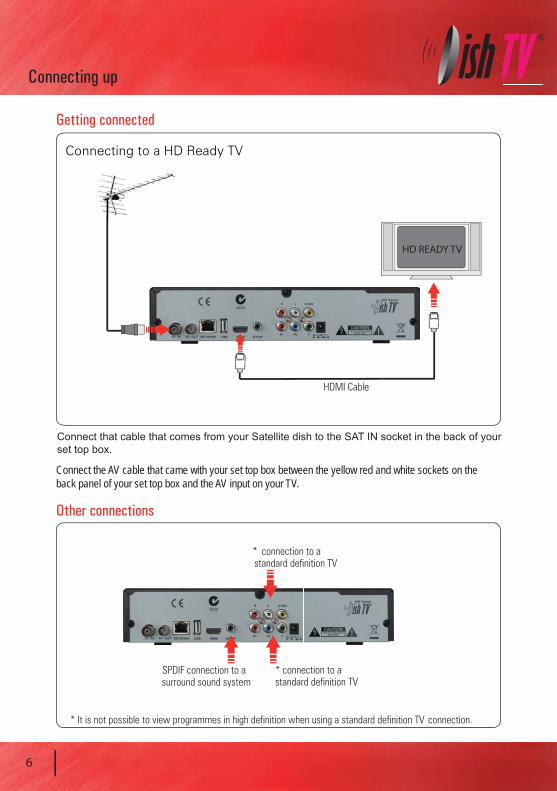
Connect the AV cable that came with your set top box between the yellow red and white sockets on theback panel of your set top box and the AV input on your TV.
Connect that cable that comes from your Satellite dish to the SAT IN socket in the back of yourset top box.
6
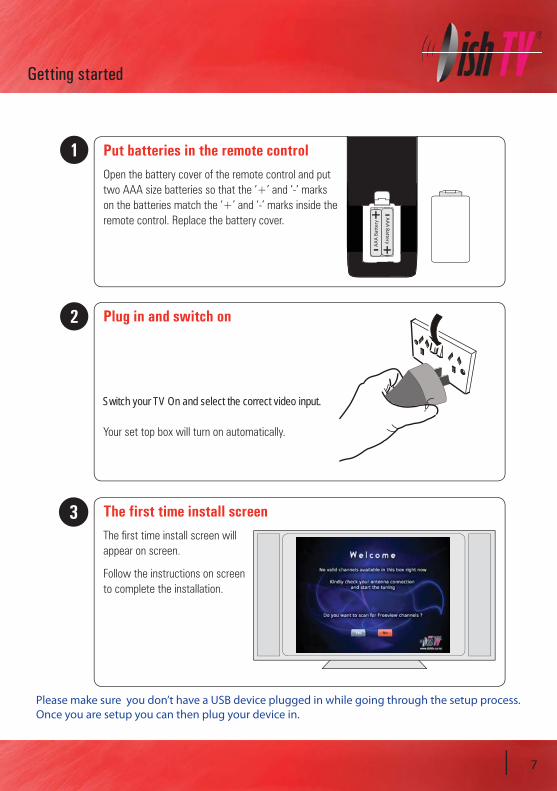
Please make sure you don’t have a USB device plugged in while going through the setup process. Once you are setup you can then plug your device in.
Switch your TV On and select the correct video input.
7
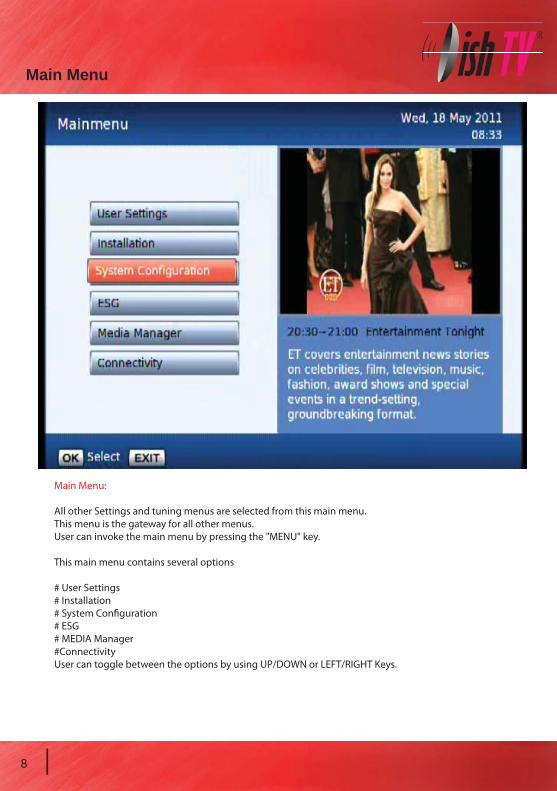
Main Menu: All other Settings and tuning menus are selected from this main menu. This menu is the gateway for all other menus. User can invoke the main menu by pressing the "MENU" key.
This main menu contains several options
# User Settings # Installation# System Configuration# ESG# MEDIA Manager#ConnectivityUser can toggle between the options by using UP/DOWN or LEFT/RIGHT Keys.
Main Menu
8

Organizer:Channels related settings like Lock. (Allows you to lock a selected channel, access to it then requiring a PIN)Skip. (Means browsing with P+/- selected channel will be skipped over, but still able to access it by pressing channel button) Delete. (Deletes a channel off list)can be Configured only from this menu.
Favourite View:Channels related setting, allowing you to view your favourite channel list.Allowing you to classify channels and group them together to be viewed throughFavourites later.
Main Menu - User Settings
User Preference:Contains settings such as Brightness/Contrast/OSD Time Out etc that are adjusted from this menu.
9

Main Menu - Installation
Tuning Wizard:
System Setting:From here you can change more of the visual settings. i.e. HD Resolution, Aspect Ratio etc
Factory Default:Allows you to reset all information on yourreciever taking it back to factory settings.
S/W upgrade via OTA:Software upgrade via over the air. This option willonly work when the software is being broadcast over the air.
10
By selecting Tuning Wizard, you will be asked to inputyour password - the system default is “0000”
-Auto Scan:Allows you to automatically search for servicesand carriers.
-Manual Scan:Allows you to select a UHF channel, scan mode (All, FTA, Scrambled) and check Signal strength and Quality.And then search the selected UHF frequency.

Tuning Wizard - Auto Scan
11
- Auto Scan:When the OK key is pressed, the confirmation dialog will be displayed. Select the Yes option to start the scanning process.
The Scan progress will be displayed along with the Signal Strength and quality for the current frequency.

Tuning Wizard - Manual Scan
12
The Progress screen will display any channels found and once complete, prompt if you want to save the changes.
- Manual Scan:The strength bar shows the signal strength of the current frequency
Press OK to start scanning the selected frequency for available channels.
Main Menu- System Configuration
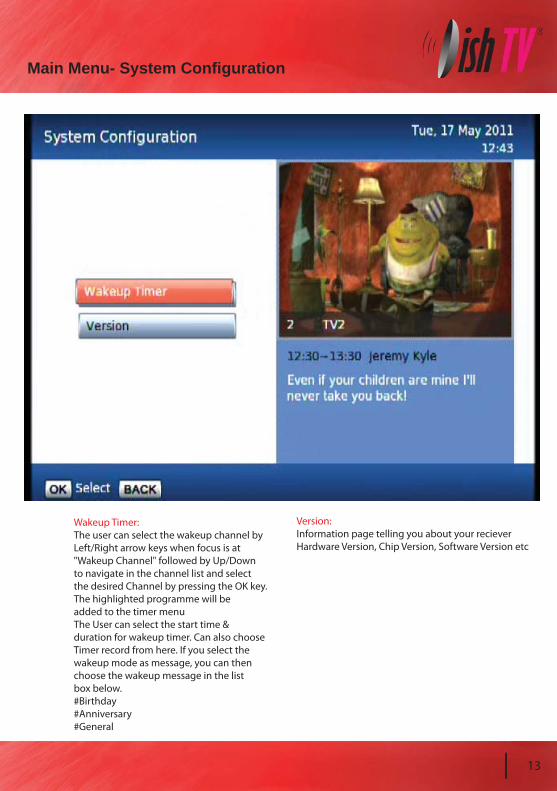
Wakeup Timer:The user can select the wakeup channel by Left/Right arrow keys when focus is at "Wakeup Channel" followed by Up/Down to navigate in the channel list and select the desired Channel by pressing the OK key. The highlighted programme will be added to the timer menuThe User can select the start time & duration for wakeup timer. Can also choose Timer record from here. If you select the wakeup mode as message, you can then choose the wakeup message in the list box below.#Birthday #Anniversary#General
Version:Information page telling you about your recieverHardware Version, Chip Version, Software Version etc
13

Main Menu - ESG
The ESG is and Electronic Service Guide. This is in addition to the freeview EPG(accessed using the GUIDE button) . The ESG will be displayed when selecting the ESG option from the Main Menu. It will list down the available services and when focus is set to the current service then its corresponding current and next events are displayed. In the ESG schedule dialog if Info key is pressed on the selected event, a shortdescription is shown, pressing the Info key again will give an extended description of the selected event that will be displayed.
14
Recording
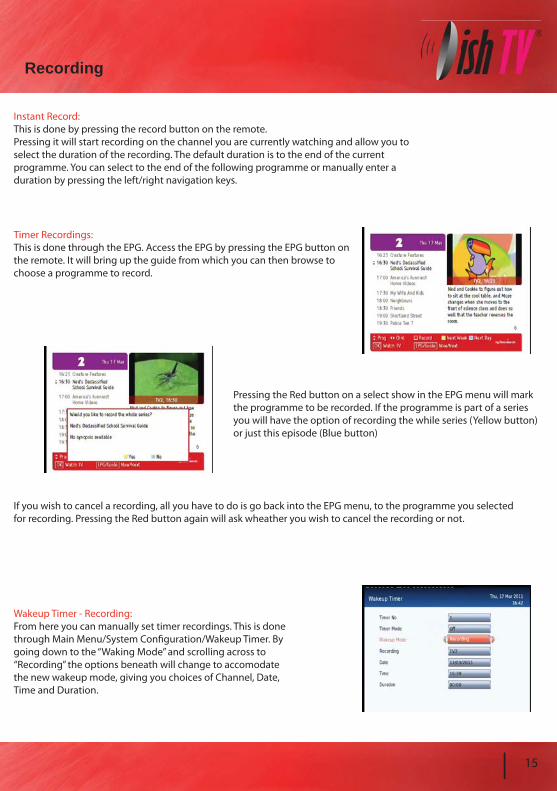
Instant Record:This is done by pressing the record button on the remote.Pressing it will start recording on the channel you are currently watching and allow you to select the duration of the recording. The default duration is to the end of the current programme. You can select to the end of the following programme or manually enter a duration by pressing the left/right navigation keys.
Timer Recordings:This is done through the EPG. Access the EPG by pressing the EPG button on the remote. It will bring up the guide from which you can then browse to choose a programme to record.
Wakeup Timer - Recording:From here you can manually set timer recordings. This is done through Main Menu/System Configuration/Wakeup Timer. By going down to the “Waking Mode” and scrolling across to “Recording” the options beneath will change to accomodate the new wakeup mode, giving you choices of Channel, Date, Time and Duration.
15
Pressing the Red button on a select show in the EPG menu will mark the programme to be recorded. If the programme is part of a series you will have the option of recording the while series (Yellow button) or just this episode (Blue button)
If you wish to cancel a recording, all you have to do is go back into the EPG menu, to the programme you selected for recording. Pressing the Red button again will ask wheather you wish to cancel the recording or not.

101011101010
Recording Library
16
You can also access the Thumbnail Browser in the Main MenuBy selecting Media Manager then Thumbnail Browser.
To view recorded programmes, press Library button.It will be labeled LIB on the remote.From here you can select the programme you wish to play.To sort, rename, delete recordings follow on screen instructions.
By pressing the Library button (LIB) a second time, the Thumbnailbrowser menu of your video recordings will be opened.
To view Booked Recordings, press the Options button (Blue)an select it in the Options list that appears.From here you can delete bookings, choose to convert to a series recording or not by following on screen instructions.

Main Menu - Connectivity - eNet Buttons
eWeather - Allows you to view the weather conditions for the day. Humidity, Temperature etc.
eMap viewer - Allows you to browse and search maps on the internet.
eMail - Allows you to log in to your email address, to send/recieve messages, view attached files.
All of the eNet features require an internet connection via the LAN port on the rear panel of the aerialBox-Ultra. The weather and map services are provided by secondary providers and are not under the control of DishTV. DishTV cannot guarantee the ongoing availablility of these free services.
11111111111117

18
eNet Buttons - eWeather
From the eNet Buttons menu you can select eWeather. Use Up/Down to navigate between eNet buttons Use SMS type (entry using number keys )keyboard to enter letters.
Press the OK key to load the weather page.
Press Blue key to change the view betweenCelsius, Fahrenheit and Kelvin.
Press the info key to toggle between minimum & maximum mode.
Type in the Country you desire and then the closest city name to you.
19
eNet Buttons - eMap
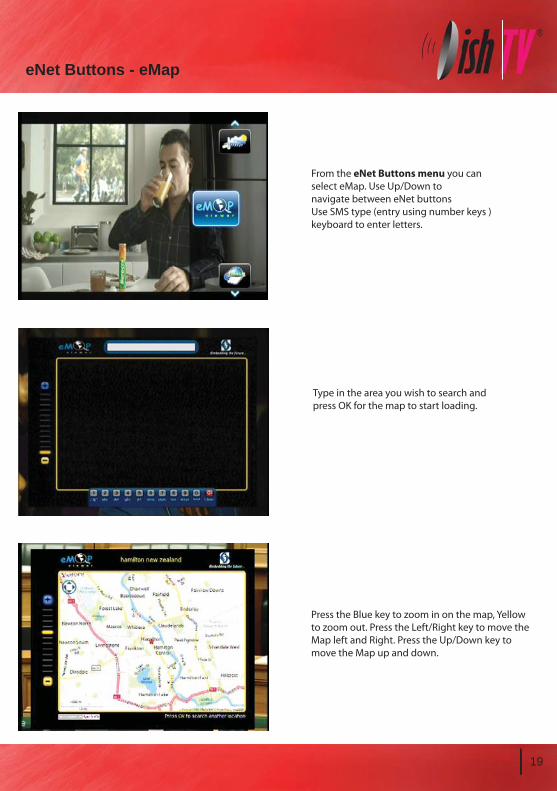
From the eNet Buttons menu you can select eMap. Use Up/Down to navigate between eNet buttons Use SMS type (entry using number keys )keyboard to enter letters.
Type in the area you wish to search andpress OK for the map to start loading.
Press the Blue key to zoom in on the map, Yellowto zoom out. Press the Left/Right key to move theMap left and Right. Press the Up/Down key to move the Map up and down.
20
eNet Buttons - eMail
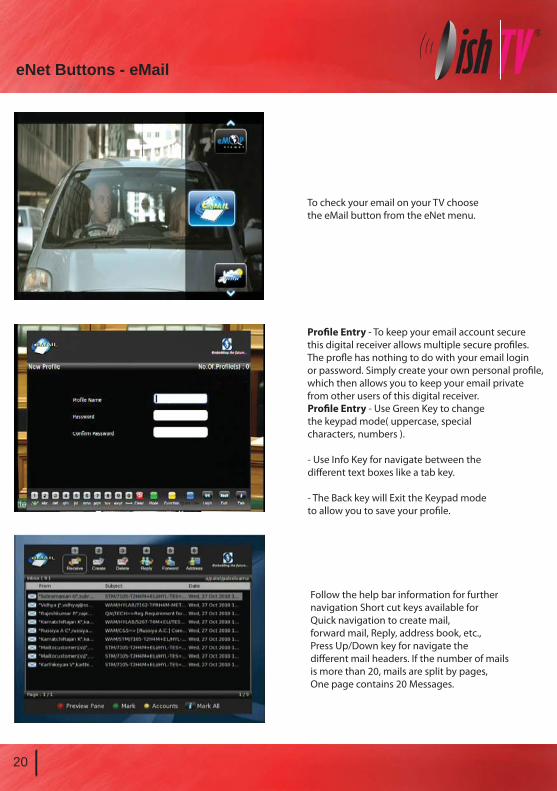
To check your email on your TV choose the eMail button from the eNet menu.
Profile Entry - To keep your email account secure this digital receiver allows multiple secure profiles.The profle has nothing to do with your email login or password. Simply create your own personal profile,which then allows you to keep your email private from other users of this digital receiver.Profile Entry - Use Green Key to change the keypad mode( uppercase, special characters, numbers ).
- Use Info Key for navigate between the different text boxes like a tab key.
- The Back key will Exit the Keypad modeto allow you to save your profile.
Follow the help bar information for further navigation Short cut keys available for Quick navigation to create mail, forward mail, Reply, address book, etc.,Press Up/Down key for navigate the different mail headers. If the number of mails is more than 20, mails are split by pages, One page contains 20 Messages.
21
Firmware Upgrade
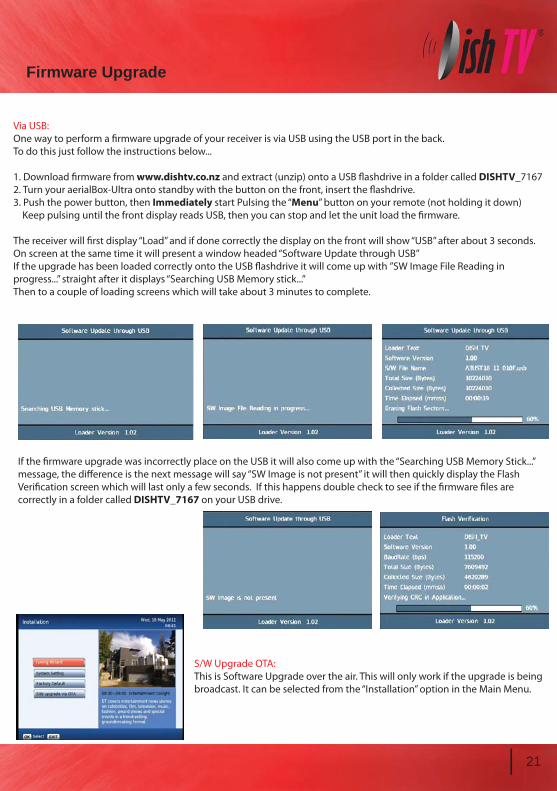
If the firmware upgrade was incorrectly place on the USB it will also come up with the “Searching USB Memory Stick...”message, the difference is the next message will say “SW Image is not present” it will then quickly display the Flash Verification screen which will last only a few seconds. If this happens double check to see if the firmware files are correctly in a folder called DISHTV_7167 on your USB drive.
S/W Upgrade OTA:This is Software Upgrade over the air. This will only work if the upgrade is being broadcast. It can be selected from the “Installation” option in the Main Menu.
Via USB:One way to perform a firmware upgrade of your receiver is via USB using the USB port in the back.To do this just follow the instructions below...
1. Download firmware from www.dishtv.co.nz and extract (unzip) onto a USB flashdrive in a folder called DISHTV_71672. Turn your aerialBox-Ultra onto standby with the button on the front, insert the flashdrive. 3. Push the power button, then Immediately start Pulsing the “Menu” button on your remote (not holding it down) Keep pulsing until the front display reads USB, then you can stop and let the unit load the firmware.
The receiver will first display “Load” and if done correctly the display on the front will show “USB” after about 3 seconds.On screen at the same time it will present a window headed “Software Update through USB”If the upgrade has been loaded correctly onto the USB flashdrive it will come up with ”SW Image File Reading in progress...” straight after it displays “Searching USB Memory stick...”Then to a couple of loading screens which will take about 3 minutes to complete.

22
Troubleshooting
No picture T1050 is not plugged in or turnedon at the wall.
Check the front panel. If nothingis illuminated then it is a power issue - please check power socket and plug socket.
Remote control is not working
Your display isn’t able to display the current Output Format.
No batteries or batteries incorrectlyinserted.
Insert the supplied 2x AAA batteriesas shown on page 7.
Batteries are flat. Insert fresh batteries as shown onpage 6.
The Infrared reciever on T1050 is obstructed.
Check that there is a clear “line of sight” from the remote to the sensor on the front panel.
Picture is distorted - too wide or narrow
Wrong TV shape is set. Go to Main Menu/Installation/System Setting/Aspect Ratio, make sure it is set to match the shape of your display.
Please make sure that Main Menu - Installation - System Setting - HD Resolution is set to one thatyour TV will be able to display. You can view this using thecomposite output
Problem Possible Causes Solution
No Channels loaded.Database is Empty
No Signal In. UHF aerial Cable not plugged into RF in.
Your UHF signal levels are to low for the aerialBox-Ultra to operate.
Have your signal levels checked then try Main Menu/Installation/Factory Default and scan again.
23
YUV via RCA sockets
For internet connection
Composite via RCA sockets
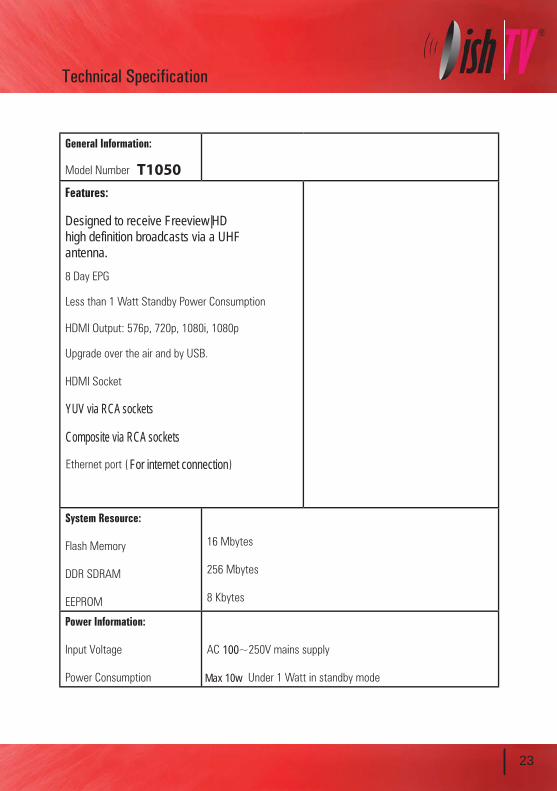
T1050
Max 10w
100
Designed to receive Freeview|HD high definition broadcasts via a UHF antenna.

Warranty
Please keep your receipt as proof of purchase. This product is warranted for any defect in materials or workmanship for one year after the original date of purchase. This product is for normal domestic use only. this warranty does not cover damage from misuse or neglect, accidental damage, vermin infestation, eccessive voltages such us lightning or power surges or any alteration that affects the performance or reliability of the product.
In the unlikely event that your product fails to work normally please contact your supplier and have your receipt
This warranty is subject to the following provisions:
● This is only valid within New Zealand.
● The product must be correctly connected and operated in accordance with the instructions contained in the manual.
● This product must be used solely for domestic purposes.
● The warranty does not cover accidental damage.
● The warranty will be rendered invalid if the product is resold or has been damaged by unauthorised repair.
● The manufacturer disclaims any liability for incidental or consequential damages.
of purchase on hand.
Warranty & Product RegistrationPlease register your product to assist with warranty and product updates.
To do this please visit www.dishtv.co.nz and click on Warranty & Registration
24

25


![Elber Usermanuals Stl Systems - Mt-mr-(Spm-series) [en]](https://static.fdocuments.in/doc/165x107/5452ec37b1af9f72248b54fa/elber-usermanuals-stl-systems-mt-mr-spm-series-en.jpg)