
Adobe Acrobat X Pro, Adobe Acrobat X Standard and/or Adobe Reader X Third Party Software
-i Tags
~- -
Adobe Acrobat Pro DC - Common Accessibility Issues Any electronic document that you post to the web and/or send out through email or other forms of communication must be ADA accessible. This QRD will cover how to address specific accessibility issues in Adobe Acrobat Pro DC. If you are confused about a term used in this document, please refer to the Terminology and Tags sections at the end of this document.
Document This section covers common issues in the Document section of the Adobe Accessibility Checker.
Tagged PDF The tagged PDF rule check fails if the document is not tagged. This is important because you need the tags in order to check the logical reading order.
To fix the Tagged PDF issue:
1. Right-click Tagged PDF – Failed and then click Fix
Logical Reading Order Verify this rule check manually. Make sure that the reading order displayed in the tags panel coincides with the logical reading order of the document. Important: This issue should be checked last after you have fixed all other issues.
To manually check Logical Reading Order:
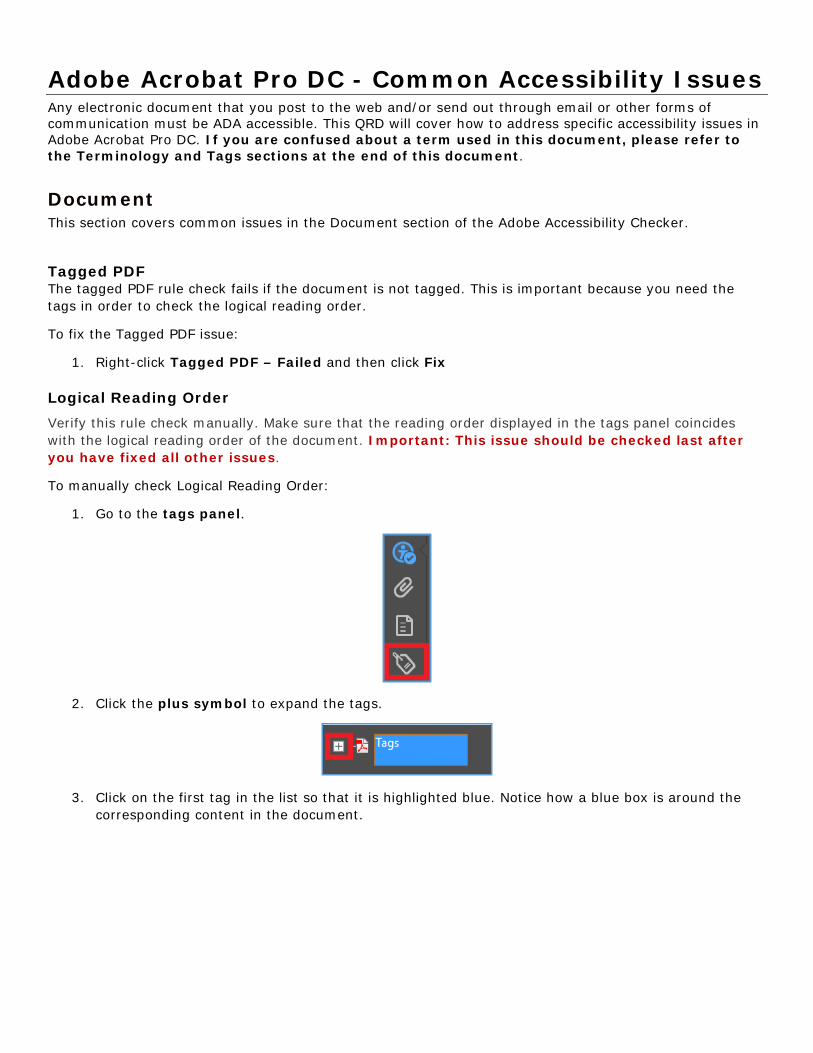
1. Go to the tags panel.
2. Click the plus symbol to expand the tags.
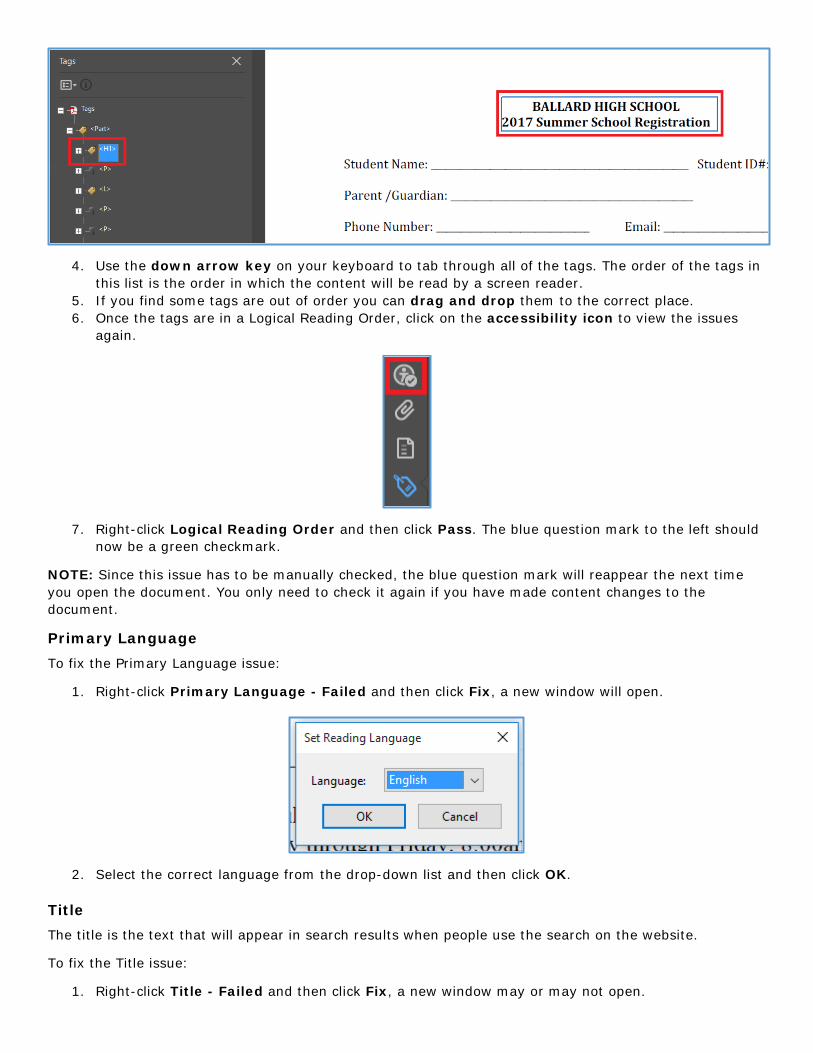
3. Click on the first tag in the list so that it is highlighted blue. Notice how a blue box is around the corresponding content in the document.
BALLARD HIGH SCHOOL I 2017 Summer School Registration
Student Name: ________________ _ Student ID#
Parent /Guardian: _______________ _
Phone Number: _________ _ Email : ______ _
Set Rea ding Language X
Language: 11111111111 v I OK I I Cancel
4. Use the down arrow key on your keyboard to tab through all of the tags. The order of the tags in this list is the order in which the content will be read by a screen reader.
5. If you find some tags are out of order you can drag and drop them to the correct place. 6. Once the tags are in a Logical Reading Order, click on the accessibility icon to view the issues
again.
7. Right-click Logical Reading Order and then click Pass. The blue question mark to the left should now be a green checkmark.
NOTE: Since this issue has to be manually checked, the blue question mark will reappear the next time you open the document. You only need to check it again if you have made content changes to the document.
Primary Language To fix the Primary Language issue:
1. Right-click Primary Language - Failed and then click Fix, a new window will open.
2. Select the correct language from the drop-down list and then click OK.
Title The title is the text that will appear in search results when people use the search on the website.
To fix the Title issue:
1. Right-click Title - Failed and then click Fix, a new window may or may not open.
Document Properties
Description Security Fonts Initi al View Custom Advanced
De!;cript ion
Fil e: Non -SPSParentReferra1_2017-l 8_ADA
I Tit le: I
C,ol,or C,ontrast Checker Home > Rea.ouroea. > Color Contrast Check,er
Foregrnund color: u1ooontt 1• Kighten I darken
--Background collor: #lfffflf I U g hten I darken
Contrast Ratio: 8.59:1
Normal Text I WCAG M : Pass I
WCAG MA: Pass
Sampl.e: 111 am normal textl
Large Text I WCAG M : Pass I
WCAG MA: Pass
Sample: 11 am large te·xtl
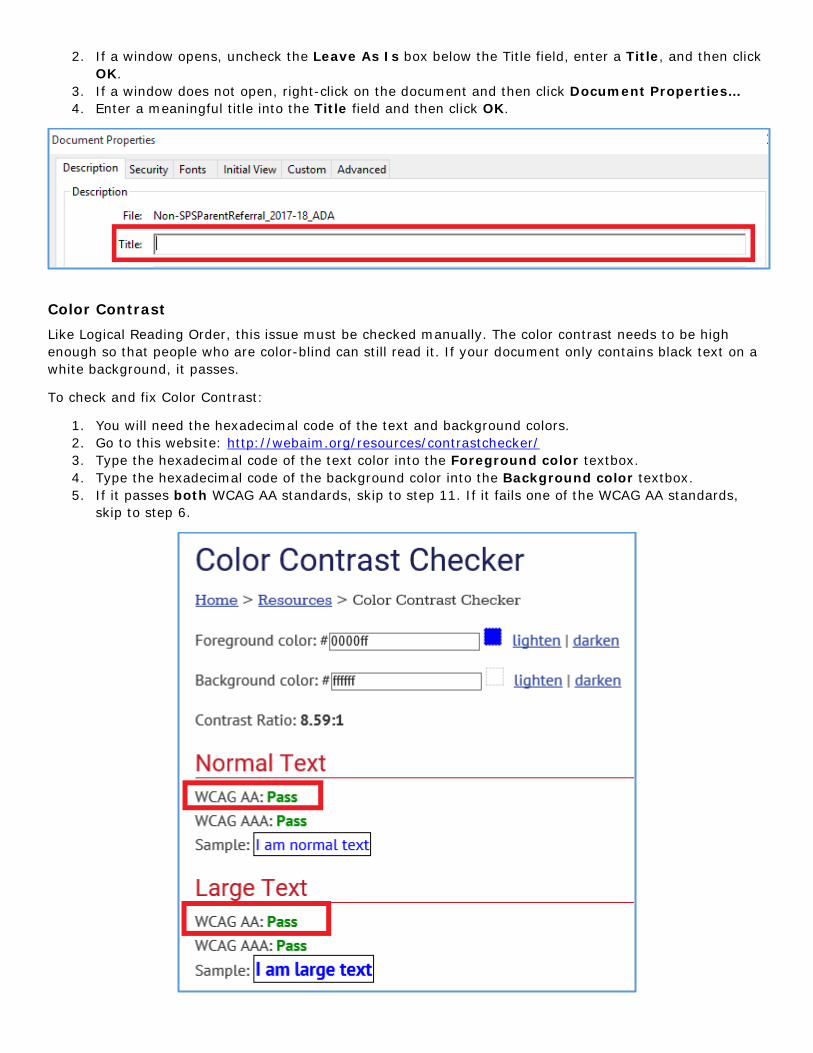
2. If a window opens, uncheck the Leave As Is box below the Title field, enter a Title, and then click OK.
3. If a window does not open, right-click on the document and then click Document Properties… 4. Enter a meaningful title into the Title field and then click OK.
Color Contrast Like Logical Reading Order, this issue must be checked manually. The color contrast needs to be high enough so that people who are color-blind can still read it. If your document only contains black text on a white background, it passes.
To check and fix Color Contrast:
1. You will need the hexadecimal code of the text and background colors. 2. Go to this website: http://webaim.org/resources/contrastchecker/ 3. Type the hexadecimal code of the text color into the Foreground color textbox. 4. Type the hexadecimal code of the background color into the Background color textbox. 5. If it passes both WCAG AA standards, skip to step 11. If it fails one of the WCAG AA standards,
skip to step 6.

l Document (1 issue)
~ Accessibility permission flag - Passed
~ Image-only PDF - Passed
~@ Tagged PDF - Failed
Logical Reading Order - Passed manually
Primary language - Passed
Title - Passed
Bookmarks - Passed
Color contrast - Passed manually
6. In Adobe, go to Edit > Preferences. 7. Select Accessibility in the left-hand menu. 8. Check Replace Document Colors. 9. Select Use High-Contrast colors. 10.Choose the color combination you want from the drop-down list and then click OK. 11. In the accessibility checker, right-click Color Contrast and then click Pass.
NOTE: Since this issue has to be manually checked, the blue question mark will reappear the next time you open the document. You only need to check it again if you changed the colors in the document.
Page Content This section covers common issues in the Page Content section of the Adobe Accessibility Checker.
Tagged Content This fails when there is content in the document that is not tagged in the tags panel.
To fix the Tagged Content issue:
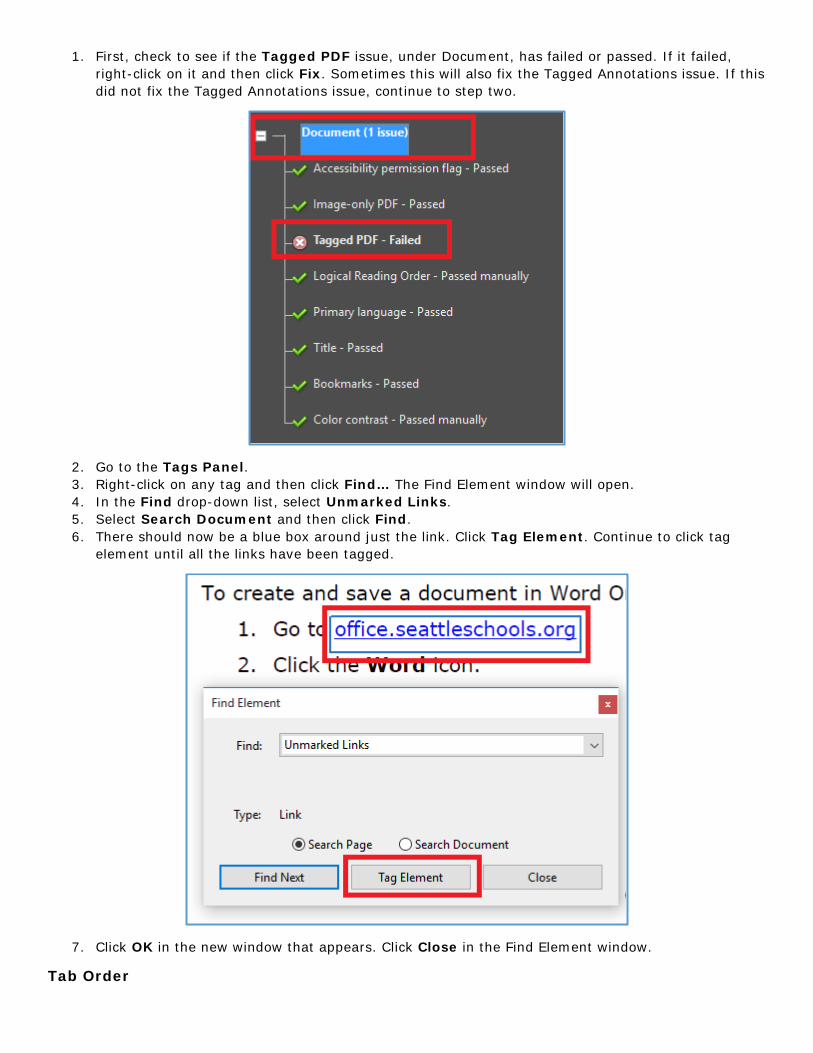
1. First, check to see if the Tagged PDF issue, under Document, has failed or passed. If it failed, right-click on it and then click Fix. Sometimes this will also fix the Tagged Content issue. If this did not fix the Tagged Content issue, continue to step two.
2. Click the plus symbol to the left of Tagged content – Failed, so you can see the list of elements causing this issue.
3. Click Element 1, the corresponding content in the document should be highlighted. 4. In the tools pane, click Reading Order. The Touch Up Reading Order window opens.

[} Autotag Document
C. .~1 __ :o:a9 -c, ··1~-1 =ielcls
[ill] - Pe a cl 1 ·-, 9 c: r=:: i C .-, s
0 Fu ll Check
® Accessibili ty Report
Q -... Identify Form Fields
~ Set Alterna te Text
.. ·., Setup Assista nt
~ Read ing Order
To1Uch Up Reading Order
Draw a rectangle aro1Und t he content t hen click on e o,f th e b1Uttons below:
Te:ict Fi g me
form Fi eld Figme/Ca pt io,n
Hea ding 1 I I Hea ding 4
Hea ding 2 I I Hea ding 5
Hea ding 3, I I Hea ding 5
Backgro1Un d
Table Editor
1;21 Show page content gro1Ups
0 Page content o,rd er
@ Strn ct me typ es
1;21 Show table cell s
1;21 Display li ke elements in a sing le block
1;21 Show tables and f ig mes
Table
Cell
Form1U la
•
• •
.___ __ C_I e_a_r _P_ag_e_ St_r_1U _ct_1U_re_._ .. _ ___.I l.___s_·h_o_w_O_rd_e_r_P_a_n_e_l _ _,
.___ _____ H_e_lP_' ____ ___.I l.__ ____ c_.1 0_,s_e ___ ~
5. Draw a box around the highlighted content by holding down the left mouse button and dragging the crosshair until all of the content is inside the box. Release the mouse button. There should now be blue boxes around all of the content.
6. In the Touch Up Reading Order window, click the appropriate button. For example, if the content you highlighted in step five is text then click Text, if it is an image then click Figure, if it is a form field then click Form Field, etc.
7. Click Close. 8. Right-click on Element 1 and then click Check Again. There should be one less element in the list
now. 9. Repeat steps 2-8 until all elements have been tagged and there is a green checkmark to the left of
Tagged Content.
Tagged Annotations The most common thing that causes this issue is links that are not properly tagged.
To fix the Tagged Annotations issue:
create a111d save a document in Word 0
1. Go t loffice,.seattleschools.org I 2. Clllick•
1Mll!!PI...,.,......,...,.. ___ ......
Find Elem ent
Find: I Unm arked Lin ks
Type: Lin k
@ Sea rch Page O Sea rch Do,cument
....__Fi_nd_ N_ext _ ____.l 11 Tag El em eot I 11 Close
1. First, check to see if the Tagged PDF issue, under Document, has failed or passed. If it failed, right-click on it and then click Fix. Sometimes this will also fix the Tagged Annotations issue. If this did not fix the Tagged Annotations issue, continue to step two.
2. Go to the Tags Panel. 3. Right-click on any tag and then click Find… The Find Element window will open. 4. In the Find drop-down list, select Unmarked Links. 5. Select Search Document and then click Find. 6. There should now be a blue box around just the link. Click Tag Element. Continue to click tag
element until all the links have been tagged.
7. Click OK in the new window that appears. Click Close in the Find Element window.
Tab Order
Home Tools - I
To fix the Tab Order issue:
1. Right-click Tab order – Failed and then click Fix. If a message appears click OK.
Forms This section covers common issues in the Forms section of the Adobe Accessibility Checker.
Tagged Form Fields This fails when the document contains form fields and they are not tagged in the tags panel.
To fix the Tagged Form Fields issue:
1. Click the plus symbol to the left of Tagged form fields – Failed, so you can see the list of fields causing this issue.
2. Click Field 1, the corresponding form field in the document should be highlighted. 3. Follow steps 4-7 in the Tagged Content section of this document. For step 6, you will click
Form Field in the Touch Up Reading Order window. 4. Right-click on Field 1 and then click Check Again. There should be one less field in the list now. 5. Repeat until all fields have been tagged and there is a green checkmark to the left of Tagged form
fields.
Field Descriptions This fails when you do not have a text description, or tooltip, for a form field.
To fix the Field Descriptions issue:
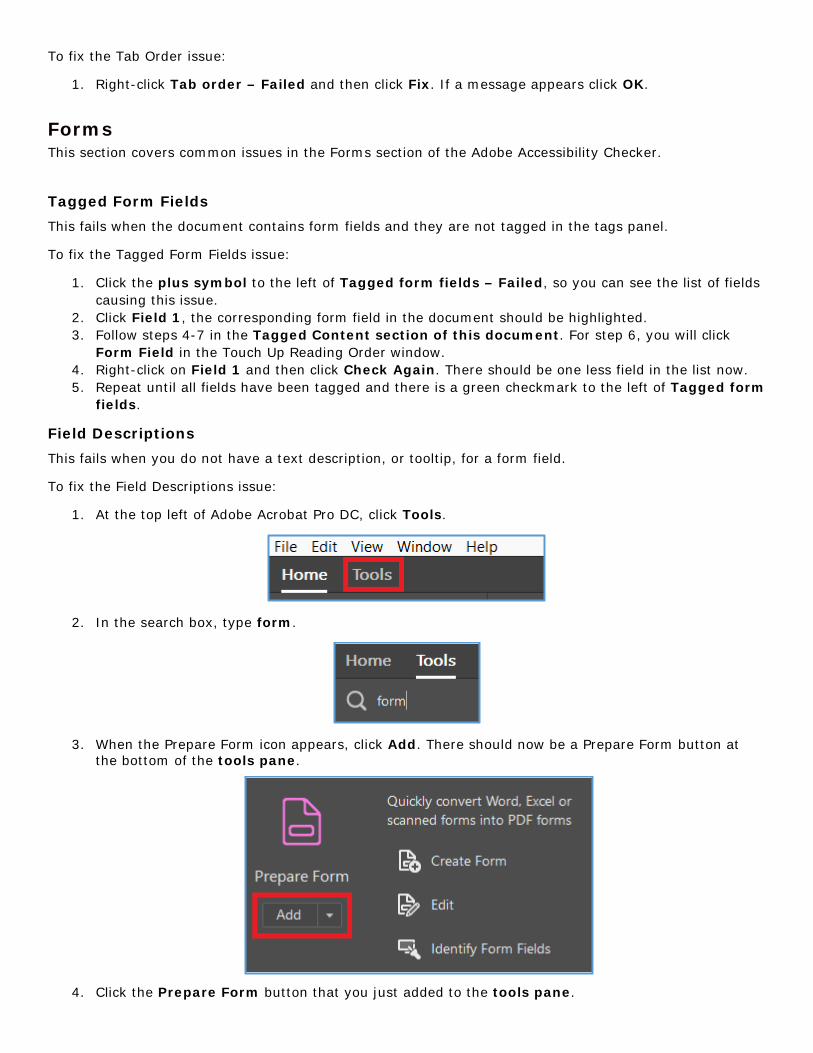
1. At the top left of Adobe Acrobat Pro DC, click Tools.
2. In the search box, type form.
3. When the Prepare Form icon appears, click Add. There should now be a Prepare Form button at the bottom of the tools pane.
4. Click the Prepare Form button that you just added to the tools pane.

5. The list of Form Fields should be displayed on the bottom right-hand side.
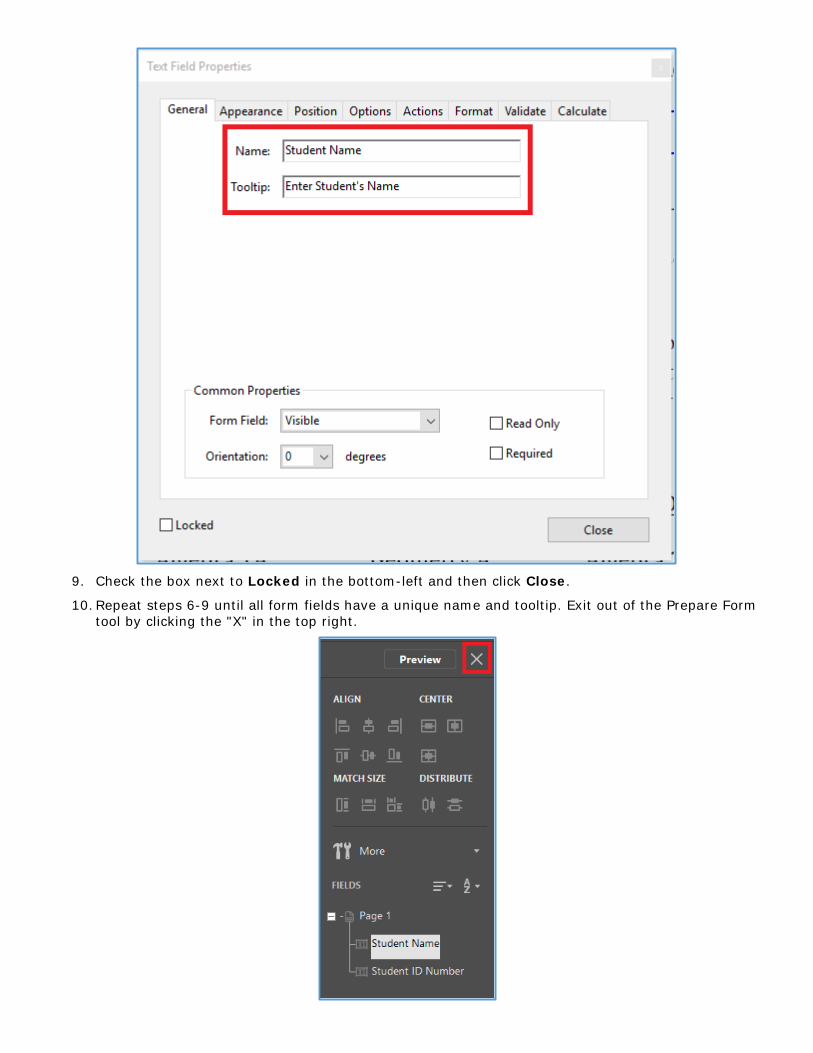
6. Right-click on one of the fields and then click Properties… The Text Field Properties window will open.
7. Click the General tab.
8. In the Name field, type a unique name that makes it clear what information is being asked for. In the Tooltip field, type instructions for what a person should do. See example below.
Text: Field Properties
General App earan ce Po,sit ion Optiom: Action s format Vali date Calcu late
Name: I stud ent Nam e
Toolt ip,: IEnter Stud ent's Name
Common Properties
~orm Field: I Visible v I Orientat ion: IO v I degrees
D Locked
D Read Only
D Requ ired
Clo,se
9. Check the box next to Locked in the bottom-left and then click Close.
10.Repeat steps 6-9 until all form fields have a unique name and tooltip. Exit out of the Prepare Form tool by clicking the "X" in the top right.

Log In Set Alternate Text X
Image 1 o,f 11 4 [E] Altern ate text: D D·ecorative fig me
11eowe,School lo9ll I I Save & Close I I Cancel I
11.Right-click on Field descriptions – Failed and then click Check Again. If there is a green checkmark next to Field descriptions, you are done.
Alternate Text This section covers common issues in the Alternate Text section of the Adobe Accessibility Checker.
Figures Alternate Text All images must have alternate text that describes the image to a screen reader user.
To fix the Figures Alternate Text issue:
1. Click the plus symbol to the left of Figures alternate text – Failed. 2. Click Figure 1 to see which image needs alternate text. The image should now be highlighted in
the document.
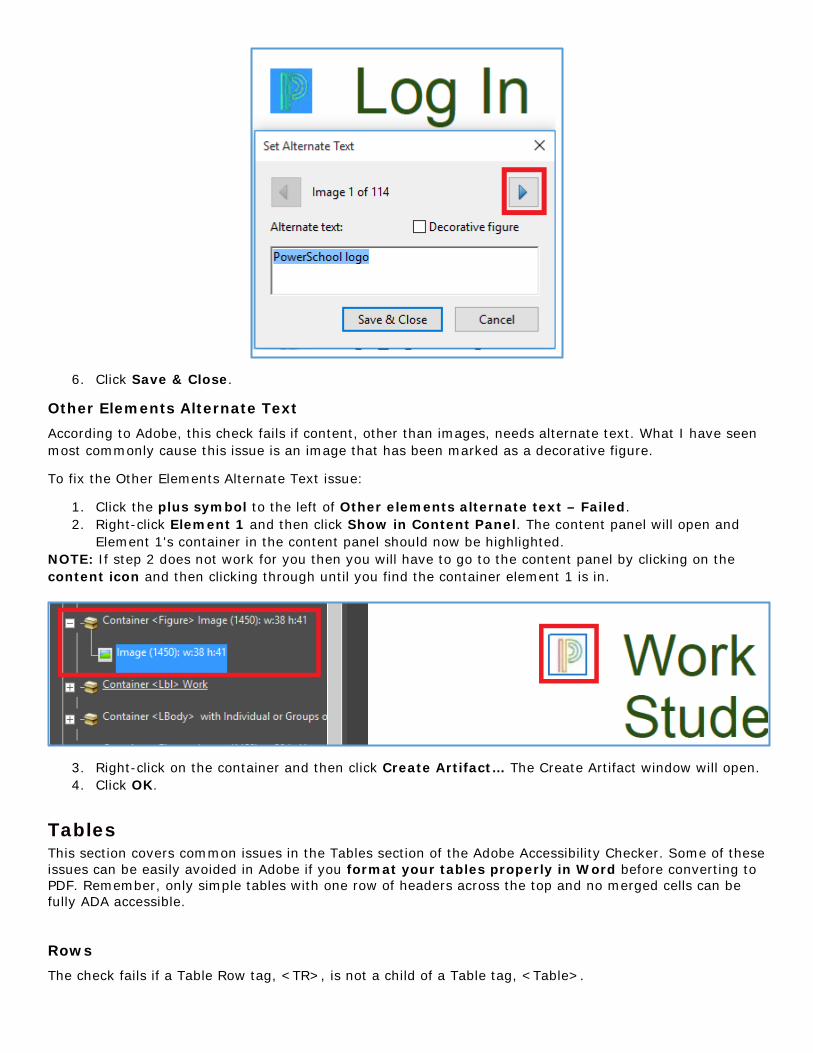
3. Right-click Figure 1 and then click Fix. The Set Alternate Text window opens. 4. Enter Alternate text that describes the image. If the image is purely decorative and does not
contain any meaningful information to readers, you can check the decorative figure box instead of entering alternate text.
5. When you are done adding alternate text to figure 1, click the right arrow button. The next image that needs alternate text will now be highlighted in the document. Repeat steps 4 and 5 until all images have alternate text.
Log In Set Al1tern ate Text X
Image 1 of 114 11 11
Altern ate text: D Decorative fig me
I owe'5chool lo
= -~ Container < Figure> Image (145-0) : w :38 h:41
~ Image (1450): w:38 n:41
i::I -~ Container < Lbl> Work
i::I -~ Container < LBody> w ith Indiv idual or Groups
I
i-~ v-e &O-me I I ~n~ I
~ Work Stud,
6. Click Save & Close.
Other Elements Alternate Text According to Adobe, this check fails if content, other than images, needs alternate text. What I have seen most commonly cause this issue is an image that has been marked as a decorative figure.
To fix the Other Elements Alternate Text issue:
1. Click the plus symbol to the left of Other elements alternate text – Failed. 2. Right-click Element 1 and then click Show in Content Panel. The content panel will open and
Element 1's container in the content panel should now be highlighted. NOTE: If step 2 does not work for you then you will have to go to the content panel by clicking on the content icon and then clicking through until you find the container element 1 is in.
3. Right-click on the container and then click Create Artifact… The Create Artifact window will open. 4. Click OK.
Tables This section covers common issues in the Tables section of the Adobe Accessibility Checker. Some of these issues can be easily avoided in Adobe if you format your tables properly in Word before converting to PDF. Remember, only simple tables with one row of headers across the top and no merged cells can be fully ADA accessible.
Rows The check fails if a Table Row tag, <TR>, is not a child of a Table tag, <Table>.
-m iii I . = ~<TR> - ··j··
I =, -ifa <TD>
I ;; -ifa <TD>
I U -ifa <TD>
I ;; -a <TR>
I ;; ~ <TR>
I ;; -si <TR>
I =, -s§'. <TR>
To fix the Rows issue:
1. Click the plus symbol to the left of Rows – Failed. 2. Right-click Element 1 and then click Show in Tags Panel. The <TR> tag in the tags panel should
now be highlighted. 3. Drag and drop the <TR> tag to its proper place under the <Table> tag. 4. Click the accessibility icon and then right-click Rows – Failed and then click Check Again.
Repeat steps 2 – 4 until it passes.
TH and TD The check fails if a Table Header Cell, <TH>, or a Table Data Cell, <TD>, is not a child of a Table Row, <TR>.
To fix the TH and TD issue:
1. Click the plus symbol to the left of TH and TD – Failed. 2. Right-click Element 1 and then click Show in Tags Panel. The <TH> or <TD> tag in the tags
panel should now be highlighted. 3. Drag and drop the <TH> or <TD> tag to its proper place under the correct<TR> tag. 4. Click the accessibility icon and then right-click TH and TD – Failed and then click Check Again.
Repeat steps 2 – 4 until it passes.
Headers This check fails if a table does not have a header row specified.
To fix the Headers issue:
1. Click the plus symbol to the left of Headers – Failed. 2. Right-click Element 1 and then click Show in Tags Panel, the <Table> tag in the tags panel
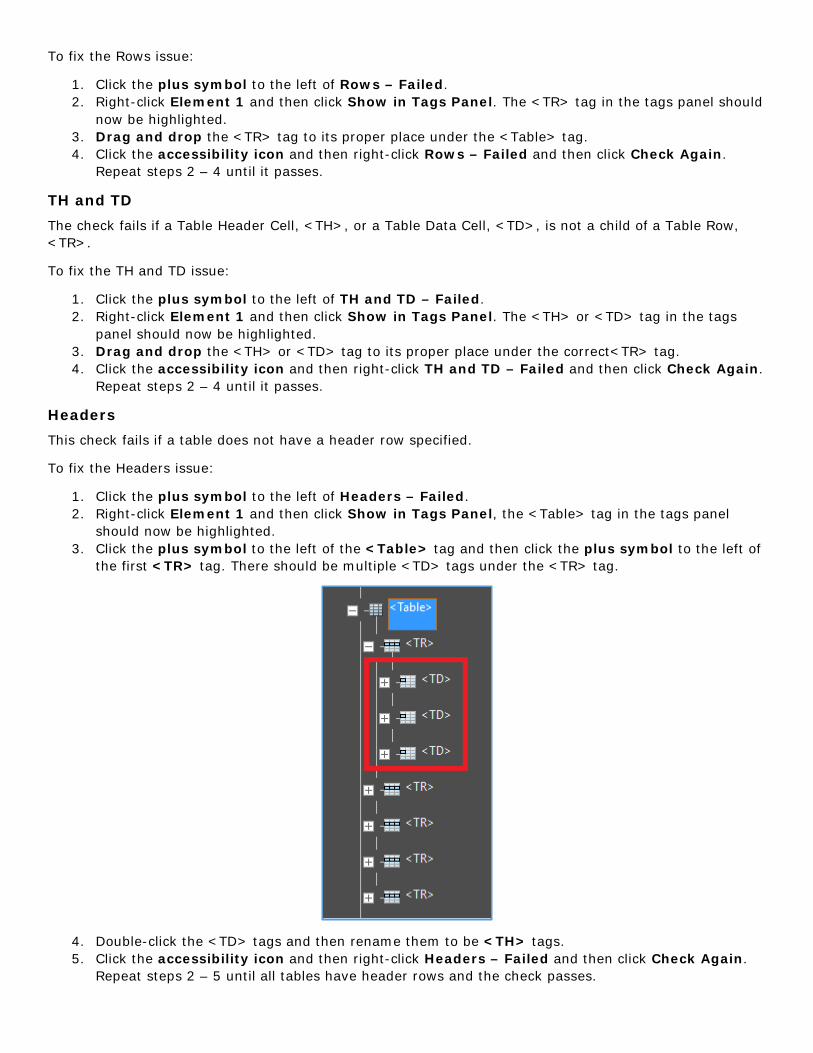
should now be highlighted. 3. Click the plus symbol to the left of the <Table> tag and then click the plus symbol to the left of
the first <TR> tag. There should be multiple <TD> tags under the <TR> tag.
4. Double-click the <TD> tags and then rename them to be <TH> tags. 5. Click the accessibility icon and then right-click Headers – Failed and then click Check Again.
Repeat steps 2 – 5 until all tables have header rows and the check passes.

Fema les M ales
Lucy Sara Dave Bob
1 mi le 8:32 7:45 7:34 8:12
5 km 28:04 26 :47 26:08 27:30
Females
Regularity This check fails when a table does not contain the same number of columns in each row, and rows in each column. Merged cells are the most common cause. The only way to avoid this issue is to reformat your table in Word so there are no merged cells. Here is an example of a table that fails regularity because of the merged cells in the top row:
Summary If this check fails, you do not have to fix it. Table summaries are optional, but can improve accessibility.
To fix the Summary issue:
1. Click the plus symbol to the left of Summary – Failed. 2. Click Element 1 so that you know which table needs a summary. 3. Click Reading Order in the tools pane. The Touch Up Reading Order window will open and there
should now be a grey box on top of the table.
4. Right-click in the grey box that is above the table and then click Edit Table Summary. 5. Type a brief summary of what the data in the table represents and then click OK.
Lists This section covers common issues in the Lists section of the Adobe Accessibility Checker.
List Items The check fails if a List Item tag, <LI>, is not a child of a List tag, <L>. Content should be tagged as a list if it is in a bulleted or numbered list.
To fix the List Items issue:
1. Right-click Element 1 and then click Show in Tags Panel. The list item tag, <LI>, should now be highlighted in the Tags Panel.
2. If a List tag, <L>, already exists in the Tags Panel, skip to step 4. If a list tag does not exist, you can create one by right clicking on the <LI> tag and then click New Tag… The New Tag window will open.
3. From the Type drop-down list, select or type List and then click OK. An <L> tag should now be in the Tags Panel.
4. Drag and drop the <LI> tag to the correct location under the <L> tag.
Lbl and LBody
-i Tag s
I = -• <Part>
I
I
U -• <H4> I
U - <P>
This check is very similar to the List Items check. It fails if a Label tag, <Lbl>, or a List Item Body tag, <LBody>, is not a child of a List Item tag, <LI>.
To fix the Lbl and LBody issue:
1. Click the plus symbol to the left of Lbl and Lbody – Failed, so you can see the list of Lbl/LBody causing this issue.
2. Right-click Lbl/LBody 1 and then click Show in Tags Panel. The <Lbl> or <Lbody> in question will be highlighted.
3. Drag and drop the <Lbl> or <LBody> tag so that it is under an <LI> tag.
Headings This section covers common issues in the Headings section of the Adobe Accessibility Checker.
Appropriate Nesting This rule checks that headings are in a proper order. If you are not sure how to properly order headings, I found this website helpful: http://oregonstate.edu/accessibility/headings
To fix the Appropriate Nesting issue:
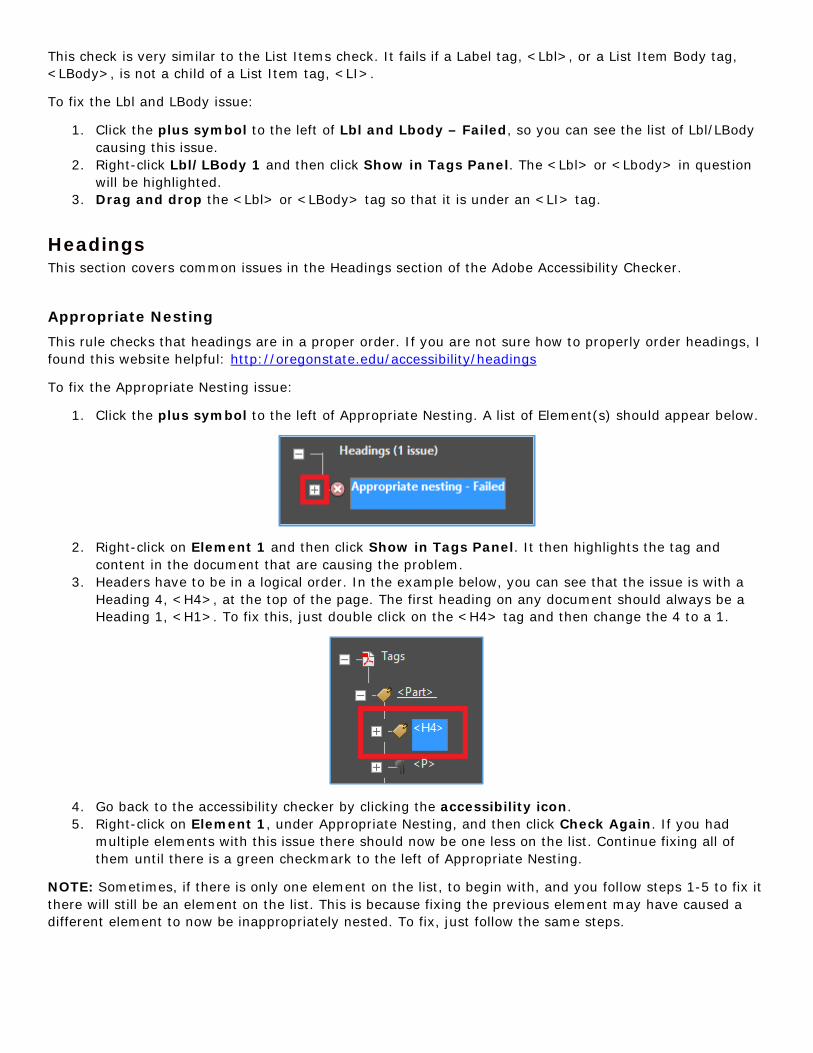
1. Click the plus symbol to the left of Appropriate Nesting. A list of Element(s) should appear below.
2. Right-click on Element 1 and then click Show in Tags Panel. It then highlights the tag and content in the document that are causing the problem.
3. Headers have to be in a logical order. In the example below, you can see that the issue is with a Heading 4, <H4>, at the top of the page. The first heading on any document should always be a Heading 1, <H1>. To fix this, just double click on the <H4> tag and then change the 4 to a 1.
4. Go back to the accessibility checker by clicking the accessibility icon. 5. Right-click on Element 1, under Appropriate Nesting, and then click Check Again. If you had
multiple elements with this issue there should now be one less on the list. Continue fixing all of them until there is a green checkmark to the left of Appropriate Nesting.
NOTE: Sometimes, if there is only one element on the list, to begin with, and you follow steps 1-5 to fix it there will still be an element on the list. This is because fixing the previous element may have caused a different element to now be inappropriately nested. To fix, just follow the same steps.

- -~
II -0, Tags
Additional Resources and Help
Terminology
Accessibility Icon – easiest way to get back to the accessibility checker and list of issues.
Content Panel/Icon – where you will fix the other elements alternate text issue. Can access by clicking on the content icon:
Issue – the problems that appear in the Adobe Accessibility Checker that you must fix in order to make the PDF ADA compliant.
Plus Symbol – click this to expand issues to see all the elements with that particular issue. Also, expand tags in the tags panel to see the content that is inside a tag.
Tag or Tagged – if content is tagged it means that there is a tag in the tags panel that specifies the content's type. I.E. paragraph, form, table, heading, link, etc.
Tags Panel – where you will check the logical reading order. Easiest way to access it is by clicking the tags icon:
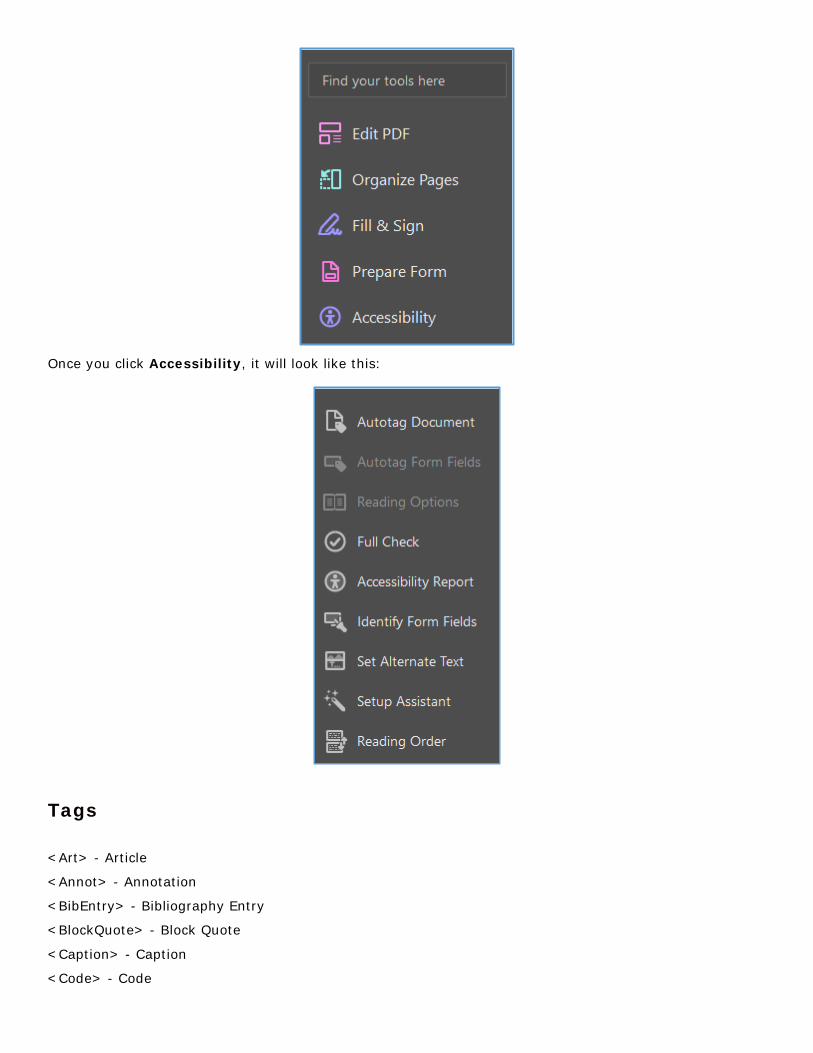
Tools Pane – The tools pane is the panel on the right-hand side of the document. It will look similar to this when you first open Adobe Acrobat:
Autotag Document
0 Full Check
® Accessibility Report
Q -4' Identify Form Fields
B Set Alternate Text
.. ·., Setup Assistant
~ Reading Order
Once you click Accessibility, it will look like this:
Tags
<Art> - Article
<Annot> - Annotation
<BibEntry> - Bibliography Entry
<BlockQuote> - Block Quote
<Caption> - Caption
<Code> - Code
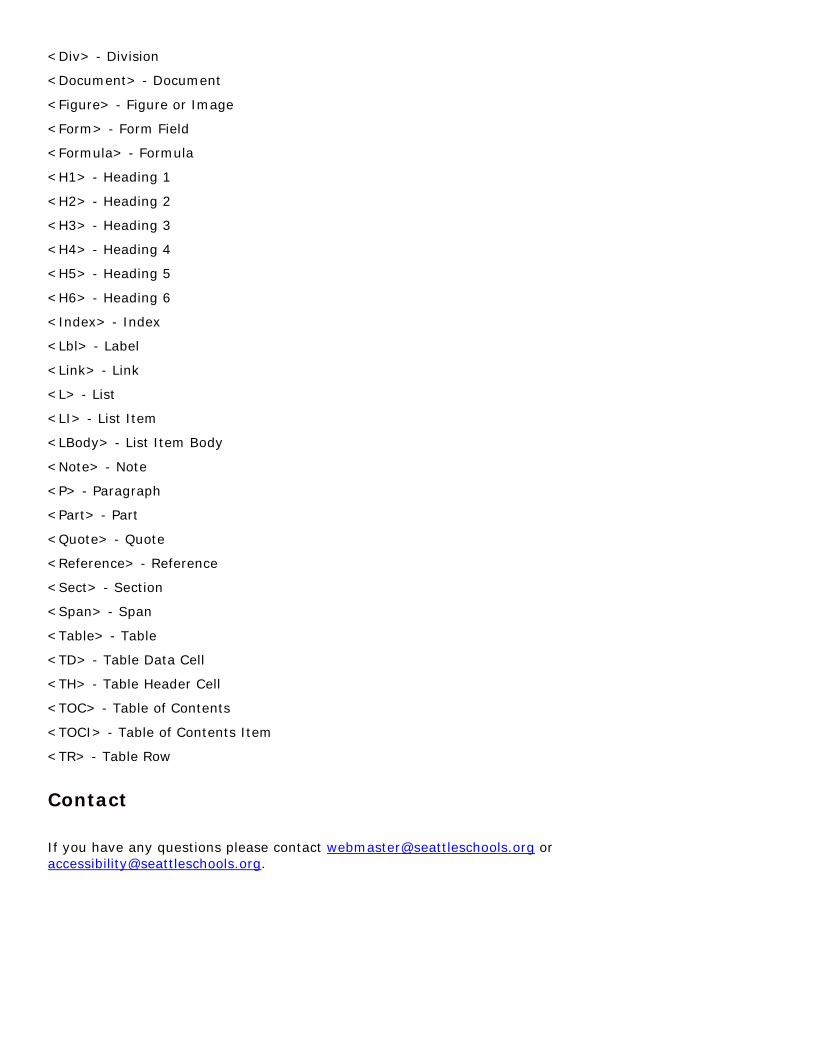
<Div> - Division
<Document> - Document
<Figure> - Figure or Image
<Form> - Form Field
<Formula> - Formula
<H1> - Heading 1
<H2> - Heading 2
<H3> - Heading 3
<H4> - Heading 4
<H5> - Heading 5
<H6> - Heading 6
<Index> - Index
<Lbl> - Label
<Link> - Link
<L> - List
<LI> - List Item
<LBody> - List Item Body
<Note> - Note
<P> - Paragraph
<Part> - Part
<Quote> - Quote
<Reference> - Reference
<Sect> - Section
<Span> - Span
<Table> - Table
<TD> - Table Data Cell
<TH> - Table Header Cell
<TOC> - Table of Contents
<TOCI> - Table of Contents Item
<TR> - Table Row
Contact
If you have any questions please contact [email protected] or [email protected].