Adobe Acrobat 7.0 Professional - UF Health Information ... · PDF filePage 1 What is Adobe...
21
-
Upload
truongthien -
Category
Documents
-
view
226 -
download
3
Transcript of Adobe Acrobat 7.0 Professional - UF Health Information ... · PDF filePage 1 What is Adobe...

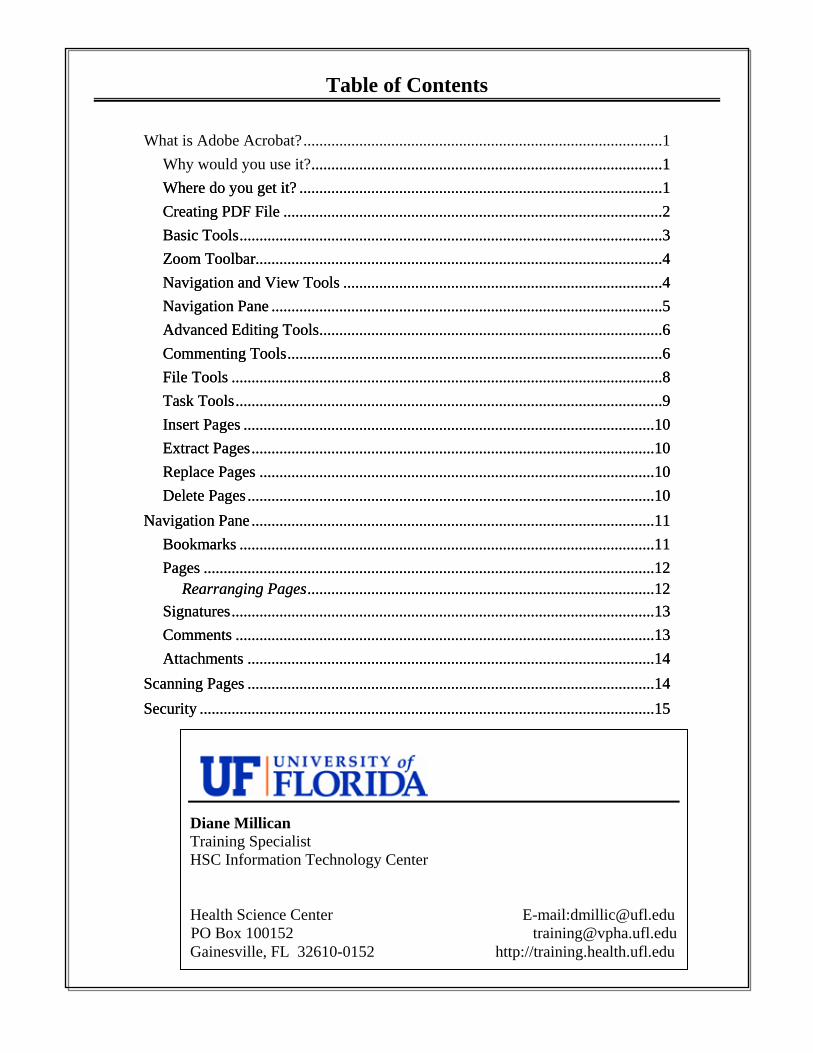
Table of Contents
What is Adobe Acrobat? ..........................................................................................1
Why would you use it? ........................................................................................1 ........................................................................................1 Where do you get it? ...........................................................................................1 Where do you get it? ...........................................................................................1 Creating PDF File ...............................................................................................2 Creating PDF File ...............................................................................................2 Basic Tools ..........................................................................................................3 Basic Tools ..........................................................................................................3 Zoom Toolbar......................................................................................................4 Zoom Toolbar......................................................................................................4 Navigation and View Tools ................................................................................4 Navigation and View Tools ................................................................................4 Navigation Pane ..................................................................................................5 Navigation Pane ..................................................................................................5 Advanced Editing Tools ......................................................................................6 Advanced Editing Tools ......................................................................................6 Commenting Tools ..............................................................................................6 Commenting Tools ..............................................................................................6 File Tools ............................................................................................................8 File Tools ............................................................................................................8 Task Tools ...........................................................................................................9 Task Tools ...........................................................................................................9 Insert Pages .......................................................................................................10 Insert Pages .......................................................................................................10 Extract Pages .....................................................................................................10 Extract Pages .....................................................................................................10 Replace Pages ...................................................................................................10 Replace Pages ...................................................................................................10 Delete Pages ......................................................................................................10 Delete Pages ......................................................................................................10
Navigation Pane .....................................................................................................11 Navigation Pane .....................................................................................................11 Bookmarks ........................................................................................................11 Bookmarks ........................................................................................................11 Pages .................................................................................................................12 Pages .................................................................................................................12
Rearranging Pages .......................................................................................12 Rearranging Pages .......................................................................................12 Signatures ..........................................................................................................13 Signatures ..........................................................................................................13 Comments .........................................................................................................13 Comments .........................................................................................................13 Attachments ......................................................................................................14 Attachments ......................................................................................................14
Scanning Pages ......................................................................................................14 Scanning Pages ......................................................................................................14 Security ..................................................................................................................15 Security ..................................................................................................................15
Diane Millican Training Specialist HSC Information Technology Center Health Science Center E-mail:[email protected] Box 100152 [email protected] Gainesville, FL 32610-0152 http://training.health.ufl.edu


Page 1 What is Adobe Acrobat? With Adobe Acrobat anyone can open your document across a broad range of hardware and software, and it will look exactly as you intended — with layout, fonts, links, and images intact. Adobe allows you to convert documents into the Portable Document Format (PDF) that your audience can view with the free Adobe Reader. Why would you use it? When you create a file in a program, you spend a fair amount of time trying to have it appear just the way you wish it to be. However, people who do not have the software you used to create your document, or possibly even a different version of the software you are using, may not be able to view your document as you created it. The PDF format also has the ability to greatly reduce the size of the file—this helps those in your audience who may have slow internet connections. You also have the ability to create color or black and white versions of your document. You can secure your documents with a password to prevent unauthorized people from accessing particular documents. And converting to the PDF format discourages people from electronically copying your work. Another benefit of the PDF is that you can combine several different files and file types into one document so that it can then be easily shared. Where do you get it? Typically, you can obtain a copy of the full version of Adobe Acrobat Professional from your Information Technology (IT) Department. Offices, departments and colleges of the University of Florida can place orders from Software Licensing Services (f/k/a The Sodashoppe) (http://software.ufl.edu) for approximately $50.00 for the license and $30.00 more if you also need the media. Employees and individuals wanting to obtain this software for personal use should contact an Adobe reseller. (Check with the bookstore, they may have an educational version that is less expensive.)
The free Adobe Acrobat Reader can be found at http://www.adobe.com. Click on the Get Adobe Reader button. The Reader will only allow you to look at
Adobe PDF Files. You need the full version of Adobe Acrobat to create and edit PDFs. Adobe offers a 30 day tryout download at http://www.adobe.com/products/acrobatpro/tryout.html
2/27/2008
Page 2
Creating PDF Files Before you can work with PDF files, you need to know how they are created. There are several ways that PDF files can be created and they can be created from several different programs. With Acrobat Professional, PDF files can be created with one click from Word, Excel, and PowerPoint files. PDF files can be created from Internet Explorer web pages. PDF files can be created from Outlook, Visio, Project, Publisher, Access and AutoCAD. PDF files can be created from hard (paper) copies, by scanning. PDF files can be created by combining several separate documents. Once the PDF file is created it can be shared by email on online. It can be sent for review and the reviewers can add comments to the file and return it to the originator. Quite a bit of editing can be done to a PDF file, however the best practice is to save your original document in case major editing must be done.
2/27/2008
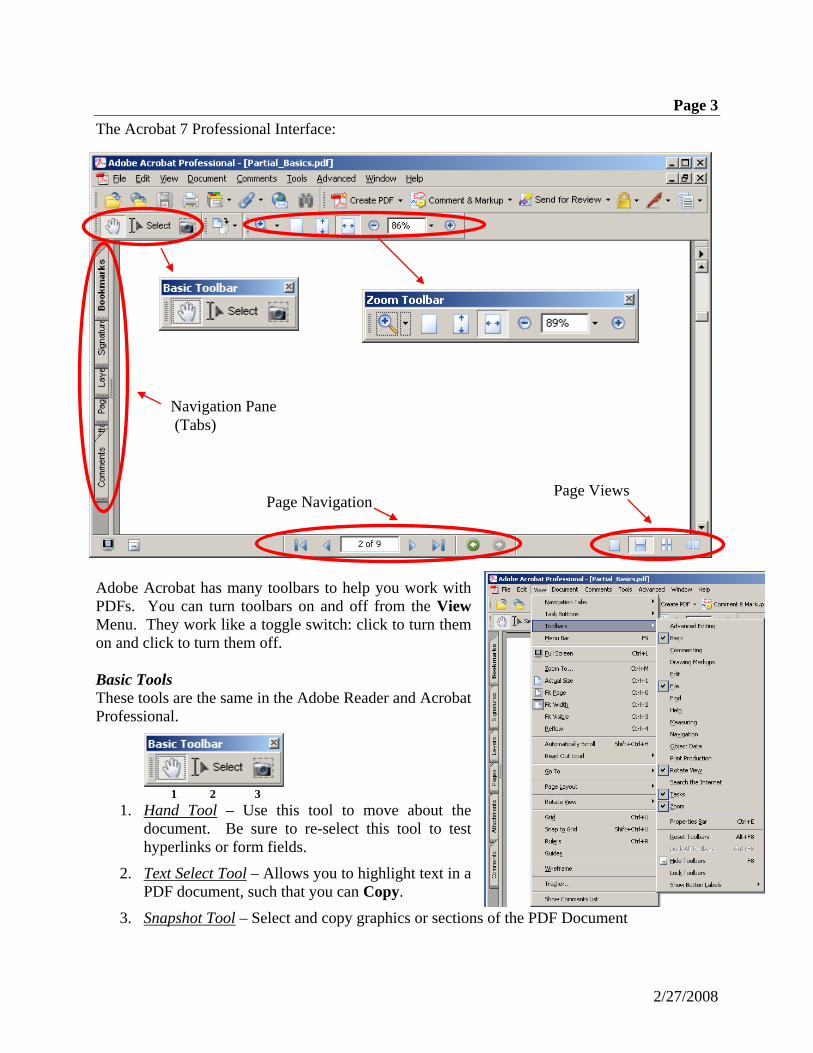
Page 3 The Acrobat 7 Professional Interface:
Navigation Pane (Tabs)
Page Navigation Page Views
Adobe Acrobat has many toolbars to help you work with PDFs. You can turn toolbars on and off from the View Menu. They work like a toggle switch: click to turn them on and click to turn them off. Basic Tools These tools are the same in the Adobe Reader and Acrobat Professional.
1 2 3
1. Hand Tool – Use this tool to move about the document. Be sure to re-select this tool to test hyperlinks or form fields.
2. Text Select Tool – Allows you to highlight text in a PDF document, such that you can Copy.
3. Snapshot Tool – Select and copy graphics or sections of the PDF Document
2/27/2008

Page 4 Zoom Toolbar
1 2 3 4 5 6
1. Zoom Tools– This group of tools includes Zoom In, Zoom Out, Dynamic Zoom, Loupe Tool, and Pan and Zoom. By choosing the Zoom In or Out tool you can click on your document and zoom in and out. The Dynamic Zoom tool allows you to zoom by clicking and dragging on your document; dragging up zooms in and dragging down zooms out. The loupe tool opens a small window with a zoomed in area of your document; allowing you to view the full document as well as the zoomed in area. The Pan and Zoom tool opens a small window with a thumbnail of your document and then you can zoom in on the document in the main window again allowing you to see the full page in the thumbnail and the zoomed area as well.
2. Actual Size – View the PDF in its actual size (100%).
3. Fit Page – View one entire page at a time.
4. Fit Width – Usually a larger view than the others, view your page as wide as possible while still fitting on the screen.
5. Zoom – Use the and buttons to zoom in or out of the document. You can also click the down arrow and choose a set number from the list or type your own percentage in the box.
Rotate View – Rotates your document 90-degrees, (turns it on its side).
Navigation and View Tools
1 2 3 4 5 6 7 8
1. Full Screen/Hide Toolbars - Use these buttons to show the document full screen (Use the Escape key to get back to the interface) or hide the toolbars. The hide toolbar button is a toggle, just choose it to hide the toolbars and choose again to show the toolbars. When the toolbars are hidden Acrobat shows the Hand tool and the Zoom options on the status bar.
2. First Page – Go to the first page of the current document.
3. Previous Page – Go to the page just before the current page.
4. Page of # Pages – Allows you to type in a page number and jump to that page.
2/27/2008

Page 5 5. Next Page – Goes to the page following the current page.
6. Last Page – Goes to the last page of the document.
7. Go to Previous View – This is the “back” button, and will return you to the last view.
8. Go to Next View – This is the “forward” button if you have backed out of a series of views, this button will return you to the next view.
9. Page view – Determines the way you see the document you are viewing. The first choice is single page which shows just one page at a time. When you get to the bottom of the page, it jumps to the next page. You are not able to view the bottom of one page and the top of the next
page at the same time. The second button shows a continuous view. This choice allows for you to transition from one page to the next allowing you to view both the bottom of one page and the top of the next page. The third choice is continuous facing, which shows both an odd and an even page and will allow viewing of the bottom of one page and the top of the next. The last choice is facing which allows viewing of both an odd and an even page, but not the bottom of one page and the top of the next.
Navigation Pane On the left side of the interface there are several tabs. This is called the Navigation Pane. This area shows links and attachments to your document. You can see and follow bookmarks, see if there are any signatures, see if there are any attachments, view any layers in the document from InDesign, AutoCAD or Visio as well as in the pages tab, see a thumbnail preview of all the pages in the document. The pages in the document can be reordered in the page tab just by clicking and dragging the page thumbnail to the new location.
2/27/2008

Page 6 Advanced Editing Tools
1 2 3 4 5 6 7 8
1. Select Object Tool – Allows you to select text to copy.
2. Article Tool – Allows you to link parts of your PDF as one “article” or “story”. For example, if you are reading a newsletter PDF and the story on the front page is continued on page 4, if the Article tool had been used to link the story together, you could double click on the first part and it would take you automatically to the second part.
3. Crop Tool – Allows you to crop the current page, that is, this tool allows you to remove any excess from the outer edges of your document.
4. Link Tool – Creates a hyperlink to another page in your document or a web page.
5. 3D Tool – Allows insertion of a 3D file ( for example a CAD file).
6. Form Tool – Places a form field on your page, see Creating & Using Forms - Handout online (http://training.health.ufl.edu/handouts.shtml) for more information about creating Forms in Adobe Acrobat.
7. Movie/Sound Tool – Allows insertion of movie files or audio files.
8. Text Touch Up Tool – Allows you to select and edit text in your document.
Commenting Tools
1 2 3 4 5 6
1. Note Tool –Allows you to insert notes. Leaves little notepads on the page.
2. Text Edits Tools – This tool expands into several other tools. What edits are required determines how you use this tool, as show in this dialog box.
2/27/2008
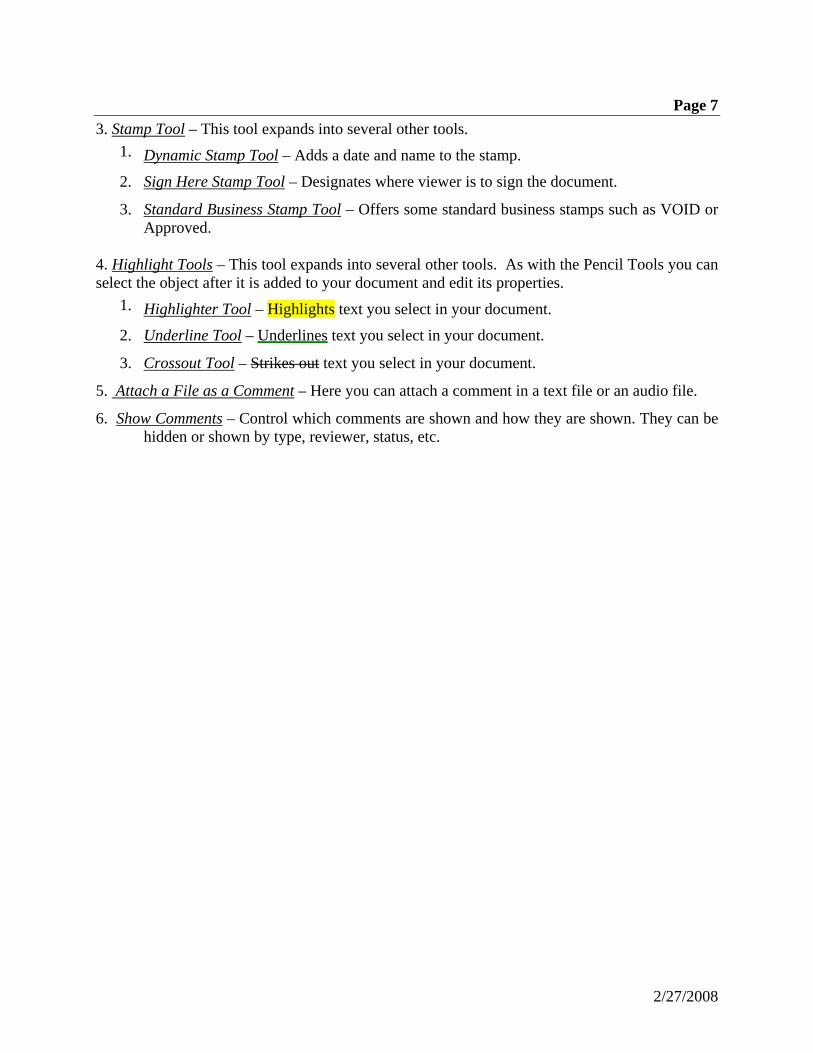
Page 7 3. Stamp Tool – This tool expands into several other tools.
1. Dynamic Stamp Tool – Adds a date and name to the stamp.
2. Sign Here Stamp Tool – Designates where viewer is to sign the document.
3. Standard Business Stamp Tool – Offers some standard business stamps such as VOID or Approved.
4. Highlight Tools – This tool expands into several other tools. As with the Pencil Tools you can select the object after it is added to your document and edit its properties.
1. Highlighter Tool – Highlights text you select in your document.
2. Underline Tool – Underlines text you select in your document.
3. Crossout Tool – Strikes out text you select in your document.
5. Attach a File as a Comment – Here you can attach a comment in a text file or an audio file.
6. Show Comments – Control which comments are shown and how they are shown. They can be hidden or shown by type, reviewer, status, etc.
2/27/2008

Page 8 File Tools
1 2 3 4 5 6 7 8
1. Open – Allows you to open a PDF File.
2. Open Web Page – Allows you to open a Web Page, and convert it into a PDF file.
3. Save – Allows you to save the current PDF.
4. Print – Allows you to print the current PDF.
5. Organizer – Create an easy way to organize and save PDF files. You can view recently opened PDF files, create collections of similar PDF files or view history up to two years of viewed PDF files.
6. Attach a file – Add a file to the PDF or attach a comment as a file.
7. Email – If your computer is set up properly, such that applications can send files directly to your email program, this button will open your email program, open a new email message and attach the current PDF.
8. Search – This tool will allow you to search through a directory, searching for a particular word or phrase in any PDF in that directory. Here you can use comparison operators (<, <=, =, >=, >) and wild cards (*, ?), as well as Boolean (& (and), | (or)).
2/27/2008

Page 9
Task Tools
Create Adobe PDF – PDF files can be created in several ways. You can start with a file from another program, you can combine several different files (from the same or different programs), take the information from a web page, or scan a hard copy. When scanned with `Recognize text using OCR` on, the document can be searched and edited the same as if the document came from a file.
Comment & Markup – Add or Track Comments
Send for Review – Send by email or upload for a browser based review.
Secure – Allows you to password protect the document (require password to open) or set permissions for actions affecting the document. You can view the security on this document and manage permission policies.
Sign – Digitally sign the document or certify the document. A certified document will show if it has been altered.
2/27/2008

Page 10
Working with Pages
Insert Pages You can combine PDF documents by inserting them into other PDF documents. There are a couple of ways to do this: Open one of your PDF documents and go to the page just after or before where you want the other document to appear. Choose Document->Insert Pages….
Select the PDF document that you want to add to the opened document. Next, select where in the document you want this page to appear.
An alternate way is to click on the thumbnails tab on the left of the screen and then to open Windows Explorer (or My Computer) to the location of the document you want to add and then drag and drop the PDF file. You will be prompted where to place the pages of the new document, into your current document.
If you need to insert a blank page, you will need to create a blank page PDF to insert into the proper location. Extract Pages This option allows you to “copy” pages from an existing PDF to a new PDF. You have the option to delete the page after extracting or leave it in the current document Replace Pages This option allows you to “replace” existing pages in the PDF with pages from an existing file. Delete Pages This option allows you to remove pages permanently from your PDF.
2/27/2008
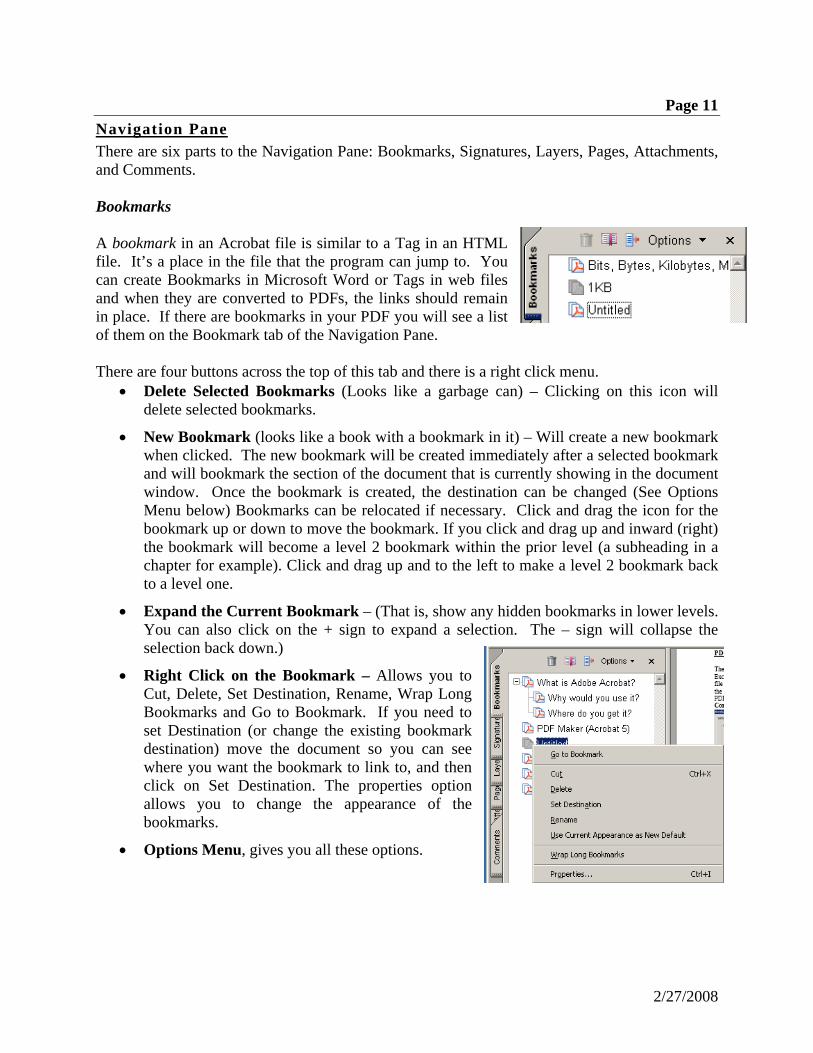
Page 11 Navigation Pane There are six parts to the Navigation Pane: Bookmarks, Signatures, Layers, Pages, Attachments, and Comments. Bookmarks A bookmark in an Acrobat file is similar to a Tag in an HTML file. It’s a place in the file that the program can jump to. You can create Bookmarks in Microsoft Word or Tags in web files and when they are converted to PDFs, the links should remain in place. If there are bookmarks in your PDF you will see a list of them on the Bookmark tab of the Navigation Pane. There are four buttons across the top of this tab and there is a right click menu.
• Delete Selected Bookmarks (Looks like a garbage can) – Clicking on this icon will delete selected bookmarks.
• New Bookmark (looks like a book with a bookmark in it) – Will create a new bookmark when clicked. The new bookmark will be created immediately after a selected bookmark and will bookmark the section of the document that is currently showing in the document window. Once the bookmark is created, the destination can be changed (See Options Menu below) Bookmarks can be relocated if necessary. Click and drag the icon for the bookmark up or down to move the bookmark. If you click and drag up and inward (right) the bookmark will become a level 2 bookmark within the prior level (a subheading in a chapter for example). Click and drag up and to the left to make a level 2 bookmark back to a level one.
• Expand the Current Bookmark – (That is, show any hidden bookmarks in lower levels. You can also click on the + sign to expand a selection. The – sign will collapse the selection back down.)
• Right Click on the Bookmark – Allows you to Cut, Delete, Set Destination, Rename, Wrap Long Bookmarks and Go to Bookmark. If you need to set Destination (or change the existing bookmark destination) move the document so you can see where you want the bookmark to link to, and then click on Set Destination. The properties option allows you to change the appearance of the bookmarks.
• Options Menu, gives you all these options.
2/27/2008

Page 12 Pages The Pages tab shows a thumbnail or a small graphical representation of your page. As you increase and decrease the size of the frame, you will be able to see more or less of your documents pages. The Pages Toolbar let’s you delete a selected page, with the trashcan button, and the Options menu shows many of the Page options, Insert Pages, Extract Pages, Replace Pages, Delete Pages, etc. Directly from this view, you can crop or rotate your pages as well as set page transitions which can be seen when your PDF is viewed in full screen mode.
Rearranging Pages From this view you can rearrange your pages by selecting and then dragging and dropping the thumbnail pages to their new location. You can use the shift and control keys to make multiple selections.
2/27/2008

Page 13 Signatures A digital signature, like a conventional handwritten signature, identifies a person or entity signing a document. Unlike traditional signatures, however, each digital signature stores information “behind the scenes” about the person signing and about the exact state of the document when it was signed. Once a document is signed, any changes made since the signing are recorded in the Signatures palette. You can track changes made between signings using the Signatures palette or by comparing signed versions of the document.
This tab shows all valid and invalid signatures that have been applied to this PDF. The Signature Button allows you to add, remove and edit existing signatures. Comments The Comments tab will show a list of any comments that have been added to the PDF file in Adobe Acrobat, using the Comment Tools. The Comments Toolbar let’s you delete a selected comment, with the trashcan button. You can maneuver around the comments and sort them as well as print just the comments. By default they are listed by Page Number. Notice that, just as there are different Commenting Tools, there are different Comment Types appearing on the Comment tab.
2/27/2008

Page 14 Attachments Acrobat 7 Professional added the ability of attaching files (PDF or other types of files) to a PDF document so that they can be opened from the PDF file. They are linked and will follow the original file if it is moved. Scanning Pages
may not appear as clear as when you use a scanning application, you can
e PDF r
he following screen will appear where you can choose your scanner and if the pages are single
Although the pages scan pages directly into your PDF document. Acrobat 7 appears to do a better job of scanning documents than previous versions. Be sure to check that your originals are of good quality and that they are lined up straight.
1. File 2. Creat3. From Scanne
Tor double-sided (double-sided will prompt you to turn pages around). You also have the choice to have these pages appear in a new document or have them appear in the current document (append). You can have the ability to edit text once the scan is complete if you check the box to Recognize Text Using OCR (Optical Character Recognition).
2/27/2008

Page 15 If you have a sheet feeder for your document scanner, the double-sided feature will allow you to scan all of one side and then you’ll be asked to flip the stack over to scan all of the other side. Acrobat then proceeds to collate the scanned images in the appropriate order.
ecurityS Document Security allows you to:
the document f the document
or modified
ts or filling out form fields
o add security to your PDF document, from the Document menu option, choose Security >
o create a new policy, choose New, and this dialog box will open.
• Require a password to open• Require a password to change the security o• Prevent your document from being printed • Prevent your document from being changed• Prevent others from copying text or graphics • Prevent others from adding/changing commen
TSecure this document. The following screen will appear. From here you can choose an existing security policy to add or you can create a new policy.
T
2/27/2008

Page 16
ecide if you are using a password or public key for security. Press next y name.
ith the policy,
Here, decide what type of security you
DThe next screen will ask if you want to save this policy and ask for a policYou may also add a description here. There is a check box to Save passwords wbut that is probably not a good security choice. Click Next and bring up the following dialog box.
want on your document. The higher version of compatibility creates a higher encryption level. If you set the compatibility to a newer version no one with an older version will be able to open the document. The document can be protected from opening, or you can set restrictions. Some restrictions would be No printing or low resolution printing, No changes allowed to the document, or some specific changes such as filling in form fields (which can be changed by using the drop down menu). You can also prevent the viewer from copying text or other content.
2/27/2008
Page 17
2/27/2008
Once you set your restrictions, click OK. It is strongly suggested that if you choose to “lock” any of the permissions (i.e. No Printing, No Changing the Document…), you also choose to set a password to Change Permissions otherwise anyone can turn these options back on. Once you finish creating the security policy you will then apply it to your document. The password options will have you type in a password and verify it.