Administering Oracle Sales Planning Cloud · Advanced Sales Forecasting provides a robust platform...
43
Oracle ® Cloud Administering Oracle Sales Planning Cloud E95906-10
Transcript of Administering Oracle Sales Planning Cloud · Advanced Sales Forecasting provides a robust platform...
Oracle® CloudAdministering Oracle Sales Planning Cloud
E95906-10

Oracle Cloud Administering Oracle Sales Planning Cloud,
E95906-10
Copyright © 2018, 2019, Oracle and/or its affiliates. All rights reserved.
Primary Author: EPM Information Development Team
This software and related documentation are provided under a license agreement containing restrictions onuse and disclosure and are protected by intellectual property laws. Except as expressly permitted in yourlicense agreement or allowed by law, you may not use, copy, reproduce, translate, broadcast, modify,license, transmit, distribute, exhibit, perform, publish, or display any part, in any form, or by any means.Reverse engineering, disassembly, or decompilation of this software, unless required by law forinteroperability, is prohibited.
The information contained herein is subject to change without notice and is not warranted to be error-free. Ifyou find any errors, please report them to us in writing.
If this is software or related documentation that is delivered to the U.S. Government or anyone licensing it onbehalf of the U.S. Government, then the following notice is applicable:
U.S. GOVERNMENT END USERS: Oracle programs, including any operating system, integrated software,any programs installed on the hardware, and/or documentation, delivered to U.S. Government end users are"commercial computer software" pursuant to the applicable Federal Acquisition Regulation and agency-specific supplemental regulations. As such, use, duplication, disclosure, modification, and adaptation of theprograms, including any operating system, integrated software, any programs installed on the hardware,and/or documentation, shall be subject to license terms and license restrictions applicable to the programs.No other rights are granted to the U.S. Government.
This software or hardware is developed for general use in a variety of information management applications.It is not developed or intended for use in any inherently dangerous applications, including applications thatmay create a risk of personal injury. If you use this software or hardware in dangerous applications, then youshall be responsible to take all appropriate fail-safe, backup, redundancy, and other measures to ensure itssafe use. Oracle Corporation and its affiliates disclaim any liability for any damages caused by use of thissoftware or hardware in dangerous applications.
Oracle and Java are registered trademarks of Oracle and/or its affiliates. Other names may be trademarks oftheir respective owners.
Intel and Intel Xeon are trademarks or registered trademarks of Intel Corporation. All SPARC trademarks areused under license and are trademarks or registered trademarks of SPARC International, Inc. AMD, Opteron,the AMD logo, and the AMD Opteron logo are trademarks or registered trademarks of Advanced MicroDevices. UNIX is a registered trademark of The Open Group.
This software or hardware and documentation may provide access to or information about content, products,and services from third parties. Oracle Corporation and its affiliates are not responsible for and expresslydisclaim all warranties of any kind with respect to third-party content, products, and services unless otherwiseset forth in an applicable agreement between you and Oracle. Oracle Corporation and its affiliates will not beresponsible for any loss, costs, or damages incurred due to your access to or use of third-party content,products, or services, except as set forth in an applicable agreement between you and Oracle.

Contents
Documentation Accessibility
Documentation Feedback
1 Welcome to Oracle Sales Planning Cloud
About Oracle Sales Planning Cloud 1-1
About Quota Planning 1-1
About Advanced Sales Forecasting 1-2
Learning More About Oracle Sales Planning Cloud 1-3
Related Guides 1-3
Navigating in Oracle Sales Planning Cloud 1-4
2 Setting Up Your Application
Implementation Checklist 2-1
Creating an Application 2-3
About Oracle Sales Planning Cloud Applications 2-4
Setting Substitution Variables for Quota Planning 2-5
Setting User Variables 2-5
Integrating Quota Planning and Advanced Sales Forecasting 2-6
3 Configuring Quota Planning
Enabling Quota Planning Features 3-1
Configuring Quota Planning 3-4
Adding Custom Measures 3-6
Post Configuration Tasks 3-7
Quota Planning Rules 3-7
iii
4 Configuring Advanced Sales Forecasting
Enabling Advanced Sales Forecasting 4-1
Configuring Advanced Sales Forecasting 4-4
Post Configuration Tasks 4-5
Importing Advanced Sales Forecasting Metadata and Data 4-5
Preparing Compensation Assumptions 4-6
Advanced Sales Forecasting Rules 4-6
A Importing Data
Importing Quota Planning Data A-2
Importing Advanced Sales Forecasting Data A-2
B Personalizing Oracle Sales Planning Cloud
C Integrating with Oracle Engagement Cloud
Integrating Dimension Metadata from Oracle Engagement Cloud with Oracle SalesPlanning Cloud C-1
Integrating Sales Data from Oracle Engagement Cloud with Oracle Sales PlanningCloud C-2
iv

Documentation Accessibility
For information about Oracle's commitment to accessibility, visit the OracleAccessibility Program website at http://www.oracle.com/pls/topic/lookup?ctx=acc&id=docacc.
Access to Oracle Support
Oracle customers that have purchased support have access to electronic supportthrough My Oracle Support. For information, visit http://www.oracle.com/pls/topic/lookup?ctx=acc&id=info or visit http://www.oracle.com/pls/topic/lookup?ctx=acc&id=trsif you are hearing impaired.
v

Documentation Feedback
To provide feedback on this documentation, send email to [email protected],or, in an Oracle Help Center topic, click the Feedback button located beneath theTable of Contents (you may need to scroll down to see the button).
Follow EPM Information Development on these social media sites:
LinkedIn - http://www.linkedin.com/groups?gid=3127051&goback=.gmp_3127051
Twitter - http://twitter.com/hyperionepminfo
Facebook - http://www.facebook.com/pages/Hyperion-EPM-Info/102682103112642
Google+ - https://plus.google.com/106915048672979407731/#106915048672979407731/posts
YouTube - https://www.youtube.com/oracleepminthecloud
Documentation Feedback
vi

1Welcome to Oracle Sales Planning Cloud
Related Topics
• About Oracle Sales Planning CloudOracle Sales Planning Cloud provides an extensible framework for planning andmanaging sales performance.
• Related GuidesSee these related guides for more information about working with Oracle SalesPlanning Cloud.
• Navigating in Oracle Sales Planning CloudReview these useful tips for navigating in Oracle Sales Planning Cloud.
About Oracle Sales Planning CloudOracle Sales Planning Cloud provides an extensible framework for planning andmanaging sales performance.
Using Oracle Sales Planning Cloud enables you to automate critical processes byeliminating spreadsheets in key sales operations processes and improvescollaboration for planning, modeling and reporting of sales quotas, attainment, andsales forecasts.
Oracle Sales Planning Cloud is extensible using the EPM Cloud platform to further addadditional configurations and personalization into your sales planning application withcustom navigation flows, dashboards, and infolets. Use tasks and approvals tomanage the quota planning process. Use Groovy rules to customize even further forenhanced calculation and business rules. Oracle Sales Planning Cloud can beintegrated with Oracle Engagement Cloud – Sales Cloud for pushing quota targets toincentive compensation or bring in actual attainment.
Watch this overview video to learn more about Oracle Sales Planning Cloud.
Overview Video
About Quota PlanningThe Quota Planning business process offers top-down and bottom-up target quotaplanning by territory, product, account, or other custom dimensions. Use PredictivePlanning and what if scenario planning to explore and compare different quotascenarios for informed decision making. Quota Planning builds best practices into itscontent, including its forms, calculations, dashboards, infolets, drivers, and measures.
Quota Planning helps you plan reliable target quotas by engaging all of theparticipants of the process, for example, the VP of Sales, Sales Operations, SalesManagers, and Sales Reps. Set a target quota for the next year. Then, optimize yourresults by making adjustments by product, applying padding or seasonality, orperforming predictive planning or what-if analysis. When the target is ready, planners
1-1

perform top-down or waterfall planning to allocate the target quota throughout thehierarchy.
If needed in your organization, you can also perform bottom-up planning to get quotacommitments from Sales Reps, allowing a collaborative approach. After the targetquotas are pushed up to the next level of the hierarchy and aggregated, you cancompare top-down and bottom-up results. Use the built-in dashboards to analyze andevaluate your quota plans with quota attainments.
Enhance the planning process in your organization by adding additional measures,task lists, or approvals.
Watch this overview video to learn more about Quota Planning.
Overview Video
About Advanced Sales ForecastingAdvanced Sales Forecasting provides a robust platform for the sales forecastingprocess, allowing multidimensional sales forecasting across territory, products,accounts, channels, or other custom dimensions.
It offers sales teams connected sales planning with integration between QuotaPlanning, compensation planning, and sales forecasts. With Advanced SalesForecasting, you can plan at the weekly or monthly level, and use a rolling forecast ifyour business requires it. It offers these key features:
• Out-of-box best practice content for sales forecasting and analysis, includingmetrics, KPIs, and measures to help data-driven sales forecasting across theSales hierarchy.
• Extensibility using the Planning Cloud platform, allowing additional configurations,such as custom forms and dashboards, measures, dimensions, navigation flows,and Groovy rules for custom calculations.
• Ability to adjust forecast commitment at the territory level or detailed level (forexample, by product or account) to facilitate collaborative data-driven forecastcommitment.
• Predictive Planning to take the guesswork out of your forecasting.
Chapter 1About Oracle Sales Planning Cloud
1-2

• Oracle Smart View for Office, which provides a common Microsoft Office interfacedesigned specifically for Oracle Enterprise Performance Management Cloudservices, including Oracle Sales Planning Cloud.
• Instantaneous aggregations and reporting using out-of-box reporting cube.
Advanced Sales Forecasting ensures greater reliability in your forecasts, andaccountability and collaboration between Sales Management and Sales Reps.
Watch this overview video to learn more about Advanced Sales Forecasting.
Overview Video
Learning More About Oracle Sales Planning CloudUse these resources to get more information or help about Oracle Sales PlanningCloud and related services.
• Click Academy on the Home page.
• To get Help, click the arrow next to your user icon in the upper right corner of thescreen, and then click Help.
• See related guides. See Related Guides.
Related GuidesSee these related guides for more information about working with Oracle SalesPlanning Cloud.
Oracle Sales Planning Cloud is supported by the many Oracle Enterprise PerformanceManagement Cloud components.
To get started using Oracle Sales Planning Cloud, see these guides:
• Getting Started for Administrators
• Getting Started for Users
Chapter 1Related Guides
1-3

To extend the power and flexibility of Oracle Sales Planning Cloud, see the followingguides. Note that some functionality described in the related guides may vary fromwhat is available in Oracle Sales Planning Cloud. For example, Oracle Sales PlanningCloud does not allow classic dimension editor.
Design:
Designing with Calculation Manager for information related to designing Groovy rules
Designing with Financial Reporting Web Studio for Oracle Enterprise PerformanceManagement Cloud
User:
• Working with Planning
• Working with Smart View
• Working with Predictive Planning in Smart View
• Working with Financial Reporting for Oracle Enterprise Performance ManagementCloud
• Accessibility Guide
Administration:
• Administering Planning
• Administering Data Management
• Administering Access Control
• Administering Migration
• Working with EPM Automate
• Third-Party Acknowledgments
Development:
• Java API Reference for Groovy Rules
• Smart View for Office Developer's Guide
Navigating in Oracle Sales Planning CloudReview these useful tips for navigating in Oracle Sales Planning Cloud.
• To return to the Home page when you’ve navigated away from it, click the Oracle
logo in the upper left corner (or your custom logo) or the Home icon.
• To see additional administrator tasks in the Navigator, click the horizontal bars
next to the Oracle logo (or your custom logo) .
• Expand a dashboard to full screen by clicking the Show/Hide bar at the top of thedashboard; click it again to return to normal view.
• Hover the cursor in the upper right corner of a form or dashboard to see a menu ofoptions appropriate to the context, such as Actions, Save, Refresh, Settings,
Maximize .
Chapter 1Navigating in Oracle Sales Planning Cloud
1-4

• In a subcomponent, use the horizontal and vertical tabs to switch tasks andcategories.
For example, in the Quota Planning Set Targets component, use the vertical tabsto switch between reviewing overview dashboards, setting target quotas, andperforming predictive planning. The vertical tabs are different depending on thefeatures that are enabled. Use the horizontal tabs to switch categories within atask. For example, in Set Targets, choose between setting overall targets andadjusting targets by product.
The icon indicates a reporting form for reviewing data, not for data entry. The
icon indicates that a form is a data entry form for entering planning details.
Chapter 1Navigating in Oracle Sales Planning Cloud
1-5

2Setting Up Your Application
Related Topics
• Implementation ChecklistPerform these tasks to set up Oracle Sales Planning Cloud.
• Creating an ApplicationTo get started, create a Sales application.
• Setting Substitution Variables for Quota PlanningSet the substitution variables for Quota Planning for the current planning year forwhich you are setting targets and the immediately preceding planning year.
• Setting User VariablesEach planner must set the user variables described in this topic.
• Integrating Quota Planning and Advanced Sales Forecasting
Implementation ChecklistPerform these tasks to set up Oracle Sales Planning Cloud.
1. Create a Sales application. See Creating an Application.
2. If your application is multicurrency, use the Dimension Editor to add dimensionmembers for each reporting currency. See About Editing Dimensions in theSimplified Dimension Editor. Use the Exchange Rates form to define theexchange rates between the main currency and each reporting currency.
3. If you are using Quota Planning, enable and configure Quota Planning and importmetadata:
• Enabling Quota Planning Features
• Configuring Quota Planning
4. If you are using Advanced Sales Forecasting, enable and configure AdvancedSales Forecasting and import metadata.
Note:
If you are using both Advanced Sales Forecasting and Quota Planning,enable and configure Quota Planning first.
If you want to enable integration between Advanced Sales Forecasting and QuotaPlanning, in the Integrations section on the Enable page for Advanced SalesForecasting, select Target Quota from Quota Planning:
• Enabling Advanced Sales Forecasting
• Configuring Advanced Sales Forecasting
• Importing Advanced Sales Forecasting Metadata and Data
2-1

5. After you configure, and whenever you make configuration changes or importmetadata, refresh the database:
Click Application , and then Configure . Then from the Actionsmenu, select Refresh Database, then Create, and then Refresh Database.
6. Import data, including the previous year bookings or revenue. See Importing Data.
To import metadata or data from Oracle Engagement Cloud, see Integrating withOracle Engagement Cloud.
7. Run rules to process actuals data. From the Home page, click Rules ,launch the rule, specify required options, and then click Launch. Run these rulesany time you import data.
• Process Actuals rule for Quota Planning. Enter the historical years for whichyou have data, and select the scenario and version to which to load data. Formore information about Quota Planning rules, see Quota Planning Rules.
• Prepare Actual and Forecast Prep rules for Advanced Sales Forecasting.For more information about Advanced Sales Forecasting rules, see AdvancedSales Forecasting Rules.
Tip:
• To see only Quota Planning rules, click All Cubes next to the Filter,and from the Cube list, select OEP_QTP.
• To see only Advanced Sales Forecasting rules, click All Cubes nextto the Filter, and from the Cube list, select OEP_GSP.
8. Set substitution variables for Quota Planning. See Setting Substitution Variablesfor Quota Planning.
9. Set required user variables. See Setting User Variables.
10. For Advanced Sales Forecasting, set application settings for predictions to indicatewhere to find actual values. See What Application and System Settings Can ISpecify?
11. Create the required user and group accounts and grant permissions. See GettingStarted with Oracle Enterprise Performance Management Cloud forAdministrators.
Watch this tutorial video to learn more about setting up users and groups.
Tutorial Video
Watch this tutorial video to learn more about setting up roles and permissions.
Tutorial Video
Chapter 2Implementation Checklist
2-2
12. Make the application available to planners. From the Home page, click
Application , and then Settings . In System Settings, changeEnable Use of the Application for to All Users.
13. Use any of the following methods to configure and extend the framework:
• Manage dimensions and members. See About Editing Dimensions in theSimplified Dimension Editor.
• Customize the navigation flow for your business needs. For example, you canset up different navigation flows for different roles in your organization. See Designing Custom Navigation Flows.
• Modify the existing forms, dashboards, or infolets, or create new ones. See Administering Forms, Designing Dashboards, and Designing Infolets.
• Define the approval process by defining the approval units and promotionalpaths for approving plans in your organization, for example, to approvebottom-up plans. See Managing Approvals.
• Create task lists to help guide your organization through the quota planningprocess. See Administering Task Lists.
• Design and work with reports. See Designing with Financial Reporting WebStudio for Oracle Enterprise Performance Management Cloud.
• Define Groovy rules to perform custom calculations. For information aboutdesigning Groovy rules, see Creating a Groovy Business Rule in Designingwith Calculation Manager for Oracle Enterprise Performance ManagementCloud and Oracle Enterprise Performance Management Cloud, Groovy RulesJava API Reference. You can write custom calculations using the Groovyobject model. To simplify writing the calculations, the traditional Essbasecalculation language has been disabled in Oracle Sales Planning Cloud.
Watch these tutorial videos to learn more about creating an application, enabling, andconfiguring Quota Planning.
Tutorial Video
Tutorial Video
Watch these tutorial videos to learn more about creating an application, enabling, andconfiguring Advanced Sales Forecasting.
Tutorial Video
Tutorial Video
Creating an ApplicationTo get started, create a Sales application.
1. Log in and select Start under Sales Planning.
Chapter 2Creating an Application
2-3
2. Enter an application name and description and then click Next.
3. Specify this information.
• Start and End year—Years to include in the application. Make sure to includethe year that contains the historic actuals required for planning and analysis.For example, for an application beginning in 2019, select 2018 as the startyear so that the latest actuals are available for setting targets using year overyear growth percentage, and for reporting purposes.
• First Month of Fiscal Year—Month in which your fiscal year begins.
• Weekly Distribution—Sets the monthly distribution pattern, based on thenumber of fiscal weeks in a month.
This selection determines how data in summary time periods spreads withinthe base time period. When users enter data into summary time periods, suchas quarters, the value is distributed over base time periods in the summarytime period.
If you select a weekly distribution pattern other than Even, the applicationtreats quarterly values as if they were divided into 13 weeks and distributesweeks according to the selected pattern. For example, if you select 5-4-4, thefirst month in a quarter has five weeks, and the last two months in the quarterhave four weeks.
• Main Currency—For a multicurrency application, this is the default reportingcurrency and the currency against which exchange rates are loaded.
• Multicurrency—Multicurrency support is provided by the Currency dimension,and enables reporting in different currencies.
• Name of Reporting Cube—Oracle Sales Planning Cloud delivers a reportingcube called SALESREP. You can configure the dimensionality of the cube foryour reporting requirements.
4. Click Next, review your selections, and then click Create.
5. Click Configure to enable and configure the application. See Configuring QuotaPlanning and Configuring Advanced Sales Forecasting.
Watch this tutorial video to learn more about creating an application for QuotaPlanning.
Tutorial Video
Watch this tutorial video to learn more about creating an application for AdvancedSales Forecasting.
Tutorial Video
About Oracle Sales Planning Cloud ApplicationsWhen you create an Oracle Sales Planning Cloud application, the following cubes arecreated:
• SalesRep—Reporting cube (ASO)
Chapter 2Creating an Application
2-4

• If you enabled Quota Planning: OEP_QTP—Planning input cube for data entry(BSO)
• If you enabled Advanced Sales Forecasting:
– OEP_GSP— Planning input cube for data entry (BSO). All of the planning atthe leaf level is performed in this cube.
– OEP_GREP—Reporting cube (ASO). This out-of-box reporting cube offersinstantaneous aggregations and reporting. When you save data in a form, thedata is pushed from OEP_GSP to OEP_GREP for fast aggregation.
Setting Substitution Variables for Quota PlanningSet the substitution variables for Quota Planning for the current planning year forwhich you are setting targets and the immediately preceding planning year.
This steps is for Quota Planning only.
1. From the Home page, click Tools , then Variables , and thenclick the Substitution Variables tab.
2. Select members for OEP_CurYr and OEP_PriorYr. Optionally set the othersubstitution variables if you want to use something other than the default values.
Setting User VariablesEach planner must set the user variables described in this topic.
User variables define the context for forms and dashboards.
1. On the Home page, click Tools , and then User Preferences
.The User Variables page lists the user variables that the administrator has set upfor each dimension and under Member, the currently selected member for eachvariable.
2. If you enabled Quota Planning, select members for these user variables:
• Accounts—Select your account.
• Overlay Territory—Typically used for the overlay territory.
• Product—Select your product.
• Sales Rep Territory—Typically used for Sales Reps for use in bottom-upplanning.
• Scenario—Select your scenario.
Chapter 2Setting Substitution Variables for Quota Planning
2-5

• Territory—Typically used for the main process for Sales Managers and SalesVPs.
3. If you enabled Advanced Sales Forecasting, select members for these uservariables:
• Currency— Select your input currency.
• Period Granularity—Select the granularity applicable to your forecasting,reporting, and analysis. Select Weekly Plan to forecast at the weekly level.Select YearTotal to forecast at the monthly level.
• Forecasting Scenario—Select either Forecast or Rolling Forecast,depending on which features are enabled and how you want to do yourforecasting.
• Reporting currency— Select your reporting currency.
• Forecasting Version—Select Working Bottom Up if you are building yourforecast in detail.
• Years—Typically select the current year. Most forms use the substitutionvariable set for OEP_CurYr (Current Year), but you can select a different year;for example, to see future years.
• Account Segments—Select the account segment to use for detailed analysis.
• Product Family—Select the product to use for detailed product analysis.
• Territory or Resource—Select the territory or resource of focus.
• Drivers—Select the measure (or parent member of a set of measures) toanalyze, depending on what is set up in your application, such as units oraverage selling price. If the Product dimension is enabled, selectOGS_Product Measure.
4. Click Save.
Integrating Quota Planning and Advanced SalesForecasting
Oracle Sales Planning Cloud uses data maps for out of box integration between QuotaPlanning and Advanced Sales Forecasting for connected sales planning. Aftercompleting the quota planning process, you can push the target quota from QuotaPlanning to seed the forecast target in Advanced Sales Forecasting, as a starting pointfor your sales forecast.
This section describes the overall process for integrating.
To implement integration between Quota Planning and Advanced Sales Forecasting,follow this overall process.
1. Enable and configure Quota Planning.
2. Enable and configure Advanced Sales Forecasting. In the Integrations section onthe Enable page, you must select Target Quota from Quota Planning.Enabling Advanced Sales Forecasting with this option creates a data map: QuotaPlanning Sales Forecast Integration. The data map's detailed mappings areautomatically populated between the dimension members in Quota Planning andin Advanced Sales Forecasting.
Chapter 2Integrating Quota Planning and Advanced Sales Forecasting
2-6

The final target quota value from Quota Planning, along with the paddingadjustment value from the Plan scenario (if there is one), is mapped to the targetforecast value in the Forecast scenario in Advanced Sales Forecasting.
3. In Quota Planning, perform the quota planning process to achieve a target quota.
4. When the quota plan is complete, an administrator pushes the target quota fromQuota Planning using the predefined data map:
a. From the Home page, click Application , then Data Exchange ,and then Data Maps.
b. From the Actions menu for Quota Planning Sales Forecast Integration,select Synchronize to synchronize dimensions and members between sourceand target.
c. From the Actions menu for Quota Planning Sales Forecast Integration,select Push Data. This pushes the target quota value from Quota Planning toAdvanced Sales Forecasting.
5. Run the Base Forecast Push rule. From the Home page, click Rules , andthen click Launch next to Base Forecast Push. Select only the Version and Yearthat have been updated.
You see the target quota as a starting point for the base forecast target in the forecastscenario of Advanced Sales Forecasting at all levels of the hierarchy.
Rerun these data maps whenever the target quota is updated.
Watch this tutorial video to learn more about integrating Quota Planning and AdvancedSales Forecasting.
Tutorial Video
Chapter 2Integrating Quota Planning and Advanced Sales Forecasting
2-7

3Configuring Quota Planning
Related Topics
• Enabling Quota Planning FeaturesBefore users can start planning, you must enable Quota Planning features.
• Configuring Quota PlanningPerform these steps after enabling Quota Planning features to import metadata,add or import additional measures, and configure features.
• Post Configuration TasksAfter configuring Quota Planning, perform these tasks.
• Quota Planning RulesReview the rules used to calculate values in Quota Planning.
Enabling Quota Planning FeaturesBefore users can start planning, you must enable Quota Planning features.
Based on your selections, dimensions, forms, and measures are created.
Note:
• Define all optional and custom dimensions the first time you enablefeatures. This creates the Quota Planning business model. Because youcan’t add additional dimensions later, consider carefully the dimensionsrequired for your business. Note that you can add reporting (attribute)dimensions later using the Dimension Editor.
• You can’t disable features later.
1. From the Home page, click Application , and then click Configure
.
2. From the Configure list, select Quota Planning.
3. On the Configure page, click Enable Features.
4. Select the features to enable, and then click Enable.While you can enable more features later, Oracle recommends that you enableonly the features that planners currently require.
3-1

Table 3-1 Enabling Quota Planning Features
Enable Description
Planning Model Enable quota planning by territory or resourceand add custom dimensions.
Select the type of hierarchy for quota planning.You can plan by territory or by resource. Thelowest level in each hierarchy for territory orresource often maps to a Sales Rep, but youcan create territories or resources based onyour sales organization hierarchy.
Optionally, enable these additional commonly-used dimensions:
• Accounts (customers)• Product (high-level product families)• Geography (a reporting dimension,
configured as an attribute of Territory)These core custom dimensions havepredefined functionality and artifactsassociated with them.
You must add custom dimensions when youfirst enable Quota Planning.
You can add additional custom dimensions inMap/Rename Dimensions.
Unit of Measure Select whether to plan by Amount (such ascurrency) or Units (such as volume).
Key Functionality Enable additional features for setting,analyzing, and optimizing target quotas.
• Overlay Targets—Use to perform quotaplanning for a specialist team; theseteams often have a separate quota toachieve.
• Seasonality—By default, quota targets arespread based on historical trends or data.Use Seasonality to adjust the year totalallocation by month according to yourbusiness's seasonality.
• Padding—After setting a target, usepadding to make a global adjustment byincreasing or decreasing targets by apercentage.
• What If Scenarios—Use to evaluate worstcase, best case, and conservativescenarios.
Chapter 3Enabling Quota Planning Features
3-2
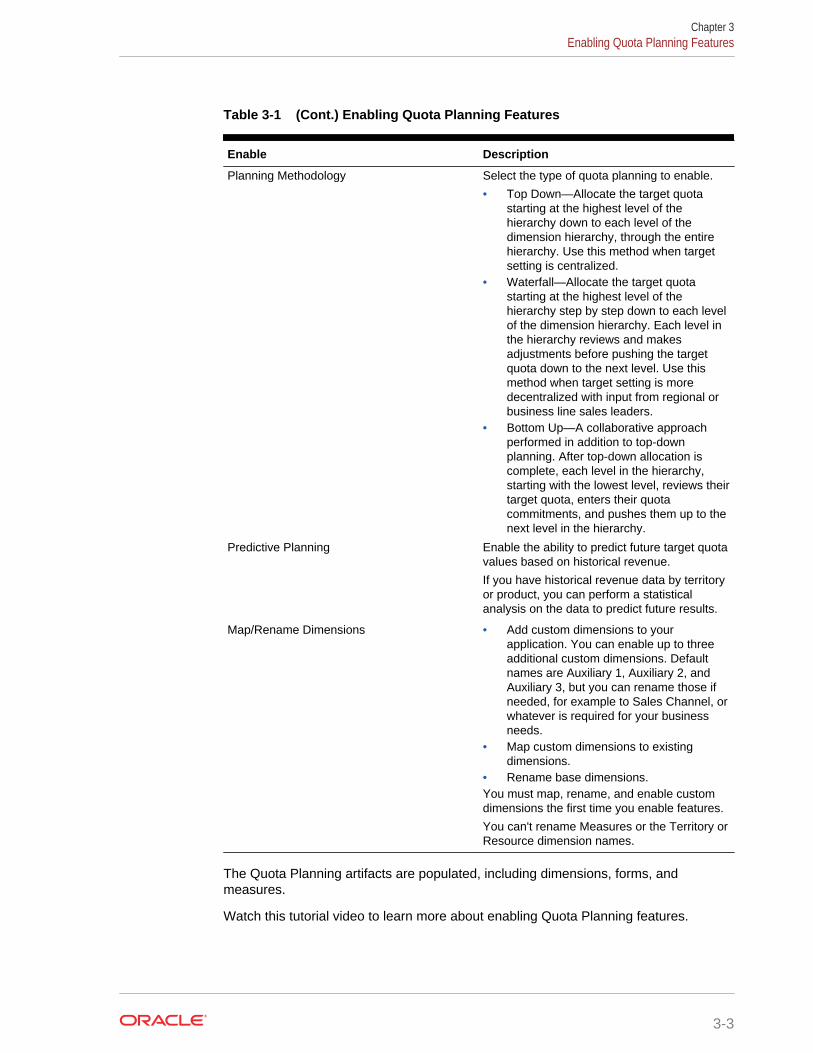
Table 3-1 (Cont.) Enabling Quota Planning Features
Enable Description
Planning Methodology Select the type of quota planning to enable.
• Top Down—Allocate the target quotastarting at the highest level of thehierarchy down to each level of thedimension hierarchy, through the entirehierarchy. Use this method when targetsetting is centralized.
• Waterfall—Allocate the target quotastarting at the highest level of thehierarchy step by step down to each levelof the dimension hierarchy. Each level inthe hierarchy reviews and makesadjustments before pushing the targetquota down to the next level. Use thismethod when target setting is moredecentralized with input from regional orbusiness line sales leaders.
• Bottom Up—A collaborative approachperformed in addition to top-downplanning. After top-down allocation iscomplete, each level in the hierarchy,starting with the lowest level, reviews theirtarget quota, enters their quotacommitments, and pushes them up to thenext level in the hierarchy.
Predictive Planning Enable the ability to predict future target quotavalues based on historical revenue.
If you have historical revenue data by territoryor product, you can perform a statisticalanalysis on the data to predict future results.
Map/Rename Dimensions • Add custom dimensions to yourapplication. You can enable up to threeadditional custom dimensions. Defaultnames are Auxiliary 1, Auxiliary 2, andAuxiliary 3, but you can rename those ifneeded, for example to Sales Channel, orwhatever is required for your businessneeds.
• Map custom dimensions to existingdimensions.
• Rename base dimensions.You must map, rename, and enable customdimensions the first time you enable features.
You can't rename Measures or the Territory orResource dimension names.
The Quota Planning artifacts are populated, including dimensions, forms, andmeasures.
Watch this tutorial video to learn more about enabling Quota Planning features.
Chapter 3Enabling Quota Planning Features
3-3

Tutorial Video
Configuring Quota PlanningPerform these steps after enabling Quota Planning features to import metadata, add orimport additional measures, and configure features.
1. From the Home page, click Application , and then click Configure
.
2. From the Configure list, select Quota Planning.
3. Perform all mandatory tasks for importing metadata, configuring Quota Planning,and adding or importing additional measures. Perform the optional tasks requiredfor your business.
4. After configuring, and any time you make changes in configuration or importmetadata, refresh the database. From the Configure page, select RefreshDatabase from the Actions menu. Click Create, and then click RefreshDatabase.
5. Import your business data to populate the application and then run the ProcessActuals rule. See Importing Data.
Table 3-2 Configuring Quota Planning
Configure Description
Accounts, Product, Geography Import the dimension members (master data)and hierarchy that represent your business'saccounts or customers, products, orgeography.
For the Accounts dimension, create ahierarchy with logical parent members insteadof a flat structure.
<Custom Dimension> Import the dimension members (master data)and hierarchy to populate the <customName>dimension. Use if you enabled the<customName> dimension.
Territory Import the dimension members (master data)and hierarchy that represent your business'ssales territories.
Resource Import the dimension members (master data)and hierarchy that represent your business'sresources. If you are integrating with OracleEngagement Cloud Incentive Compensation,use numerical IDs for Resource dimensionmembers.
Chapter 3Configuring Quota Planning
3-4
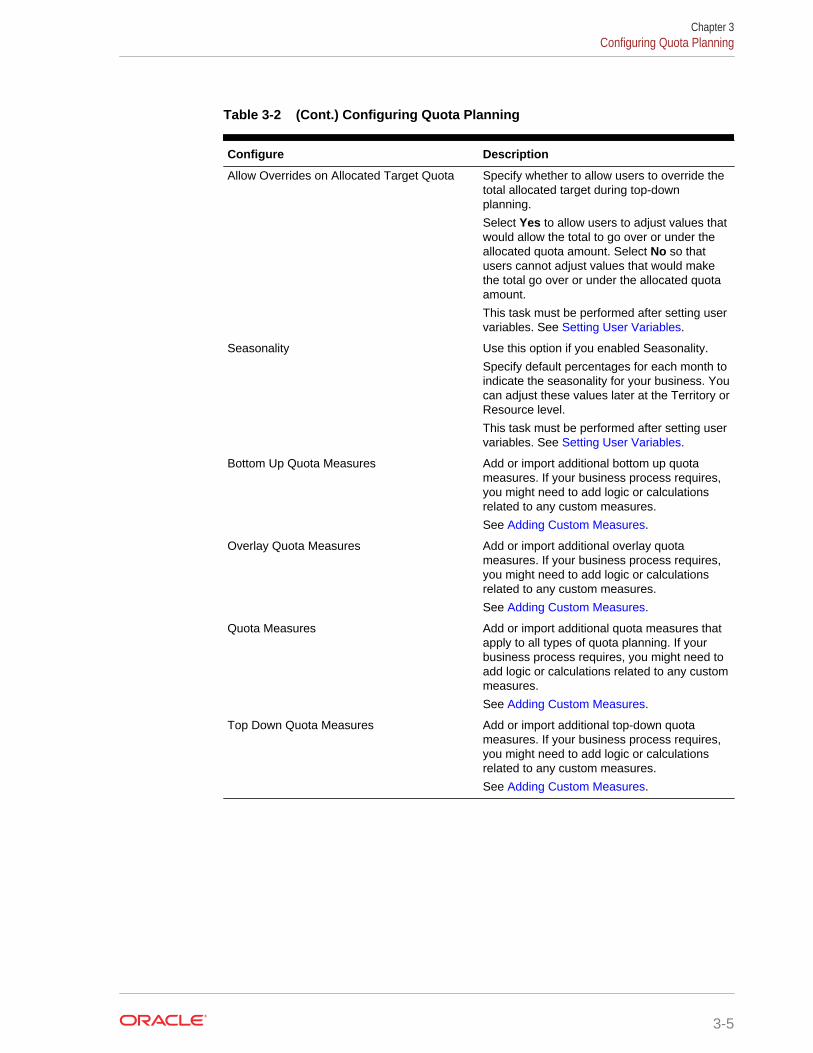
Table 3-2 (Cont.) Configuring Quota Planning
Configure Description
Allow Overrides on Allocated Target Quota Specify whether to allow users to override thetotal allocated target during top-downplanning.
Select Yes to allow users to adjust values thatwould allow the total to go over or under theallocated quota amount. Select No so thatusers cannot adjust values that would makethe total go over or under the allocated quotaamount.
This task must be performed after setting uservariables. See Setting User Variables.
Seasonality Use this option if you enabled Seasonality.
Specify default percentages for each month toindicate the seasonality for your business. Youcan adjust these values later at the Territory orResource level.
This task must be performed after setting uservariables. See Setting User Variables.
Bottom Up Quota Measures Add or import additional bottom up quotameasures. If your business process requires,you might need to add logic or calculationsrelated to any custom measures.
See Adding Custom Measures.
Overlay Quota Measures Add or import additional overlay quotameasures. If your business process requires,you might need to add logic or calculationsrelated to any custom measures.
See Adding Custom Measures.
Quota Measures Add or import additional quota measures thatapply to all types of quota planning. If yourbusiness process requires, you might need toadd logic or calculations related to any custommeasures.
See Adding Custom Measures.
Top Down Quota Measures Add or import additional top-down quotameasures. If your business process requires,you might need to add logic or calculationsrelated to any custom measures.
See Adding Custom Measures.
Chapter 3Configuring Quota Planning
3-5
Note:
Oracle recommends that you use Configure to import metadata, whichensures that metadata is loaded correctly to work with the provided rules andforms. If you choose to use the Dimension Editor to load metadata, theprimary hierarchy for a dimension should go under the All member for thedimension. You can add alternative hierarchies under the Root member aswell, but the member should be a Parent or rollup type member. No parent ormember should be set to rollup/aggregate to the root member of adimension, because the root member can't be displayed on any form,dashboard, or report.
Watch this tutorial video to learn more about configuring Quota Planning.
Tutorial Video
Adding Custom MeasuresDepending on the number of custom measures you need to add, perform one of thesetasks:
• A small quantity—Add them directly in the Configure page.
• A large quantity—Import them by:
– Exporting the existing set.
– Modifying the exported spreadsheet to add rows and data for the custommeasures.
– Importing the spreadsheet.
This export and import process speeds up the design and maintenance of theapplication. When requirements change, you can repeat this process as many timesas needed.
To add measures:
1. Select the configuration task.
2. Perform a task:
• To add a measure, select Add from the Actions menu, and then enter detailsin the new row.
• To modify a group of measures, or to add many new ones, export the set ofpredefined measures (select Export from the Actions menu), and then modifythe export file in Excel. You can edit predefined measures, make a copy of ameasure and modify it to create a new one, or add new measures. Then,import the modified file (select Import from the Actions menu).
• To export or import all measures, use Batch Export or Batch Import.
Chapter 3Configuring Quota Planning
3-6
Note:
• Specify unique member names and aliases for custom members so theydon’t conflict with any provided members.
• If you must delete a measure, check the formulas of the other measuresin its group to see if they reference the measure that you want toremove. If they do, update their logic accordingly.
• You can't edit or delete provided measures.
Post Configuration TasksAfter configuring Quota Planning, perform these tasks.
• Refresh the cube after configuring and any time you import metadata.
• Import data, including the previous year bookings/revenue, and then run theProcess Actuals rule for Quota Planning. See Importing Data.
• Set substitution variables. See Setting Substitution Variables for Quota Planning.
• Set user variables. See Setting User Variables.
Quota Planning RulesReview the rules used to calculate values in Quota Planning.
From the Home page, click Rules .
Tip:
To see only Quota Planning rules, click All Cubes next to the Filter, and fromthe Cube list select OEP_QTP.
Many of these rules are associated with forms, either from the Actions menu,or set to Run on Save. Planners run these rules as part of the planningprocess.
Table 3-3 Quota Planning Rules
Rule
Add Account (Bottom Up)
Add Product (Bottom Up)
Adjust Aggregation (Bottom Up)
Apply Seasonality
Apply Top Down Seasonality
Apply Waterfall Seasonality
Chapter 3Post Configuration Tasks
3-7

Table 3-3 (Cont.) Quota Planning Rules
Rule
Bottom Up Aggregation
Bottom Up Aggregation by Account
Bottom Up Allocation
Bottom Up Seasonality
Clear Bottom Up What If Scenarios
Clear What If Scenarios
Copy Bottom Up What If
Copy Data What If
Copy What If Scenarios
Global Seasonality
Overlay Seasonality
Predictive Aggregation
Process Actuals
Quota Aggregation
Seed Bottom Up What If Scenarios
Seed What If Scenarios
Set Overlay Target
Set Predicted Values As Target
Set Target
Set Target by Product
Top Down Adjustment
Top Down Allocation
Top Down Padding
Validate Adjustment
Validate Adjustment by Dimension
OQP_ValidateSeasonality
Validate Seasonality
Waterfall Adjustment
Waterfall Allocation
Chapter 3Quota Planning Rules
3-8

4Configuring Advanced Sales Forecasting
Related Topics
• Enabling Advanced Sales ForecastingBefore users can start planning, you must enable Advanced Sales Forecastingfeatures.
• Configuring Advanced Sales ForecastingPerform these steps after enabling Advanced Sales Forecasting features toconfigure features.
• Post Configuration TasksAfter configuring Advanced Sales Forecasting, perform these tasks.
• Advanced Sales Forecasting RulesReview the rules used to calculate values in Advanced Sales Forecasting.
Enabling Advanced Sales ForecastingBefore users can start planning, you must enable Advanced Sales Forecastingfeatures.
Based on your selections, dimensions, forms, and measures are created.
Note:
• If you will also be using Quota Planning, enable and configure QuotaPlanning first.
• Define all optional and custom dimensions the first time you enablefeatures. This creates the Advanced Sales Forecasting business model.Because you can’t add additional dimensions later, consider carefully thedimensions required for your business. Note that you can add reporting(attribute) dimensions later using the Dimension Editor.
• You can’t disable features later.
1. From the Home page, click Application , and then click Configure .
2. From the Configure list, click Advanced Sales Forecasting.
3. On the Configure page, click Enable Features.
4. Select the features to enable, and then click Enable.While you can enable more features later, Oracle recommends that you enableonly the features that planners currently require.
4-1

Table 4-1 Enabling Advanced Sales Forecasting Features
Enable Description
Planning By Enable sales forecast planning by territory orresource and add custom dimensions.
Select the type of hierarchy for advancedsales forecasting. You can plan by territory orby resource.
If you've already enabled Quota Planning, thePlanning By dimension is selected for you.For example, if you chose to plan by Territoryin Quota Planning, planning by Territory isautomatically selected for you in AdvancedSales Forecasting.
Optionally, enable these additional commonly-used dimensions, which can be different thanthe dimensions selected for Quota Planning.
• Accounts (customers)• Product (high-level product families)• Geography (an attribute dimension for
Territory)These core custom dimensions have pre-defined functionality and artifacts associatedwith them.
You must add custom dimensions when youfirst enable Advanced Sales Forecasting.
You can add up to three additional customdimensions in Map/Rename Dimensions.
Chapter 4Enabling Advanced Sales Forecasting
4-2

Table 4-1 (Cont.) Enabling Advanced Sales Forecasting Features
Enable Description
Planning Time Granularity Enable planning by the selected timegranularity.
You can plan at the monthly level or at theweekly level. By default, monthly planning isenabled.
If you select weekly and monthly planning, youmust also select an option for mapping weeklydata to monthly data. Forms are designed soyou can view plan data at the granularity youselect. If you select both weekly and monthly,you can see data in the forms at either themonthly or weekly level.
You can also leverage a rolling forecast rangeat a weekly, monthly, or quarterly granularity.You can plan continuously at a weekly level for13, 26, or 52 weeks, at a monthly level for 12,18, 24, 30, 36, 48, or 60 months, or at aquarterly level for 4, 6, or 8 quarters. Whenyou enable rolling forecast, the RollingForecast scenario is created. When youupdate the current time period, forms areupdated to add or drop time periods to reflectthe updated rolling forecast range.
Watch this tutorial video to learn more aboutenabling and configuring forecasting withdifferent time granularities.
Tutorial Video
Predictive Planning Enable the ability to predict future salesforecast values based on historical revenue.
If you have historical revenue data by territoryor detail level (such as product or customer),you can perform a statistical analysis on thedata to predict future results.
Integrations: Target Quota from QuotaPlanning
Enable the ability to integrate target quota datafrom Quota Planning.
If you've also enabled Quota Planning,enabling this option creates a data map:Quota Planning Sales Forecast Integration.When your quota planning is finalized, you canpush the final target quota numbers byTerritory or Resource from Quota Planning touse as a starting point for your sales forecastin Advanced Sales Forecasting.
For more information, see Integrating QuotaPlanning and Advanced Sales Forecasting.
Chapter 4Enabling Advanced Sales Forecasting
4-3

Table 4-1 (Cont.) Enabling Advanced Sales Forecasting Features
Enable Description
Map/Rename Dimensions • Add custom dimensions to yourapplication. You can enable up to threeadditional custom dimensions.
• Map custom dimensions to existingdimensions.
• Rename base dimensions.You must enable, map, and rename customdimensions the first time you enable features.
You can't rename Measures or the Territory orResource dimension names.
The Advanced Sales Forecasting artifacts are populated, including dimensions, forms,and measures.
Watch this tutorial video to learn more about enabling Advanced Sales Forecasting.
Tutorial Video
Configuring Advanced Sales ForecastingPerform these steps after enabling Advanced Sales Forecasting features to configurefeatures.
1. From the Home page, click Application , and then click Configure .
2. From the Configure list, select Advanced Sales Forecasting.
3. Click Time Period Configuration and make your selections.
• Select the current fiscal year, period, week (if weekly planning is enabled), andthe start year for the plan.
• If you enabled rolling forecast, select the planning frequency and number ofperiods for the rolling forecast. The rolling forecast range, if you enabled rollingforecast, is updated based on your selections.
Watch this tutorial video to learn more about configuring Advanced Sales Forecasting.
Tutorial Video
Watch this tutorial video to learn more about enabling and configuring forecasting withdifferent time granularities.
Tutorial Video
Chapter 4Configuring Advanced Sales Forecasting
4-4
Post Configuration TasksAfter configuring Advanced Sales Forecasting, perform these tasks.
1. Import metadata. See Importing Advanced Sales Forecasting Metadata and Data.
2. Refresh the cube after configuring and any time you import metadata.
3. Import data, including historical revenue data, and then run the Prepare Actualrule for Advanced Sales Forecasting. See Importing Advanced Sales ForecastingMetadata and Data.
4. Set user variables. See Setting User Variables.
5. Set application settings for predictions to indicate where to find actual values. See What Application and System Settings Can I Specify?.
6. Enter compensation assumptions. See Preparing Compensation Assumptions.
7. Run Advanced Sales Forecasting rules. See Advanced Sales Forecasting Rules.In preparation for planning, make sure to run these rules:
• Prepare Actual
• Forecast Prep
• RptTotals to GSP, if you enabled if Predictive Planning
Importing Advanced Sales Forecasting Metadata and Data1. Add or import metadata for each enabled dimension using the Dimension Editor.
From the Home page, click Application, and then click Overview. Click theDimensions tab and then from the Cube list, select OEP_GSP.See Importing Metadata.
Note:
When you use the Dimension Editor to load metadata, the primaryhierarchy for a dimension should go under the All member for thedimension. You can add alternative hierarchies under the Root memberas well, but the member should be a Parent or rollup type member. Noparent or member should be set to roll up and aggregate to the rootmember of a dimension, because the root member can't be displayed onany form, dashboard, or report.
Note:
When you import metadata, ensure that metadata is set for bothOEP_GSP and OEP_GREP. Both the planning cube (BSO) andreporting cube (ASO) must be enabled because aggregations forforecast measures occur in the reporting cube.
2. After configuring, and any time you make changes in configuration or importmetadata, refresh the database. From the Configure page, select Refresh
Chapter 4Post Configuration Tasks
4-5

Database from the Actions menu. Click Create, and then click RefreshDatabase.
3. Import your business data to populate the application and then run the PrepareActual rule. Oracle Sales Planning Cloud includes templates for loading AdvancedSales Forecasting data. See Importing Advanced Sales Forecasting Data.See Importing Data for general information about importing data.
Preparing Compensation AssumptionsYou can analyze compensation as part of your sales forecasting.
If you want to analyze compensation and see commission compensation ondashboards, enter compensation assumptions for different scenarios.
1. From the Home page, click Data , navigate to Sales Forecasting, PlanSheets, and then open Enter Compensation Percentage.
2. Enter the commission percentage for each scenario and then click Save.
Sales analysts can see the commission compensation on the Overview and ForecastSummary dashboards.
Advanced Sales Forecasting RulesReview the rules used to calculate values in Advanced Sales Forecasting.
In preparation for forecast planning, make sure to run these rules:
• Prepare Actual
• Forecast Prep
• RptTotals to GSP, if you enabled if Predictive Planning
From the Home page, click Rules .
Tip:
To see only Advanced Sales Forecasting rules, click All Cubes next to theFilter, and from the Cube list select OEP_OGS.
Some of these rules are associated with forms, either from the Actions menu,or set to Run on Save. Planners run these rules as part of the planningprocess.
Table 4-2 Advanced Sales Forecasting Rules
Rule Type Description
Base Forecast Push Groovy rule. Smart push onform.
Executes push to the reportingcube on a data form.
Chapter 4Advanced Sales Forecasting Rules
4-6

Table 4-2 (Cont.) Advanced Sales Forecasting Rules
Rule Type Description
Execute Data Push Rule Pushes data for a particularslice to the reporting cube.Pushes data based on run-time prompt for Scenario,Years, and Version.
Forecast Prep Ruleset Copies actuals for selectedperiods to the Forecastscenario and then pushesdata to the reporting cube forthe selected Year andVersion.
The ruleset includes:
• Prepare Forecast• Execute Data Push
Convert Monthly Data toWeekly in Form
Rule Converts monthly data in aform to weekly data.
Run this rule only when it isassociated with a form, notfrom the Rules card.
Convert Monthly Data toWeekly
Rule Converts monthly data toweekly data (batchconversion).
Prepare Actual Ruleset Copies data from OGS_CYBookings to OGS_SalesRevenue and then pushesdata to the reporting cube forthe selected Actual, Period(s),and Years.
The ruleset includes:
• Process Actual• Execute Data PushRun this rule at these times:
• For Current Year—Runany time you import anew period of actualsdata.
• For Previous years—Runone time when you buildthe application, if youimport historical data. Runfor all periods and yearsfor which historical dataexists. You don't need torun this rule again unlessdata changes forhistorical years.
Prepare Forecast Rule Copies data from Actual toForecast. Don't run this rule onits own. Run Forecast Prepinstead.
Chapter 4Advanced Sales Forecasting Rules
4-7
Table 4-2 (Cont.) Advanced Sales Forecasting Rules
Rule Type Description
Process Actual Rule Copies data from OGS_CYBookings to OGS_SalesRevenue. Don't run this ruleon its own. Run PrepareActual instead.
Push To Reporting Cube Groovy Rule. Smart Push onform.
Executes Smart Push for anyAdjustments made in a form.Pushes data to the reportingcube.
Roll Up Rule Rolls up the cube. Typicallynot needed, becauseaggregation is performed inthe reporting cube. Alldashboards and reportingforms are associated with thereporting cube for fastaggregation.
RptTotals to GSP Rule Takes the total for enabledcustom dimensions to AnyMember for PredictivePlanning purposes. Thisallows users to run predictionsat the Territory level and not ata detailed level.
Convert Weekly Data toMonthly in Form
Rule Converts weekly data in aform to monthly data.
Run this rule only when it isassociated with a form, notfrom the Rules card.
Convert Weekly Data toMonthly
Rule Converts weekly data tomonthly data (batchconversion).
Chapter 4Advanced Sales Forecasting Rules
4-8
AImporting Data
You can download data import templates from within the application. The templatesare generated based on the features you’ve enabled and the custom dimensions thatwere added.
To download the data import templates:
1. From the Home page, click Application and then click Configure
.
2. From the Configure list, select the module for which you want to downloadtemplates, and then from the Actions menu, select Download Data LoadTemplates.
3. Save the zip file locally, and then extract the csv files.
Perform these tasks to import data:
1. Before importing data, configure the application as described in this help systemand use Configure to import the dimensional metadata.
Note:
Oracle recommends that you use Configure to import metadata, whichensures that metadata is loaded correctly to work with the provided rulesand forms. If you choose to use the Dimension Editor to load metadata,the primary hierarchy for a dimension should go under the All memberfor the dimension. You can add alternative hierarchies under the Rootmember as well, but the member should be a Parent or rollup typemember. No parent or member should be set to rollup/aggregate to theroot member of a dimension, because the root member can't bedisplayed on any form, dashboard, or report.
2. Specify the appropriate data import settings. See Administering Data LoadSettings.
3. Optional: Make a backup copy of the data import templates to which you canrevert if necessary.
4. Optional: Back up the application.
5. If you created custom Smart Lists, import them before the associated data(available only for some modules.)
To identify the Smart List to import and their entry names:
A-1

a. Click Navigator , and then Smart Lists from Create and Manage.
b. Select the Smart List, click Edit, and then Entries.
c. Note the associated names.
6. Open the templates in Microsoft Excel, and customize them to specify yourbusiness data.
7. Optional: To ensure that your data will import and calculate correctly, import it intoa test application first.
8. Import the data into your production application.
9. For the first data import, run the rules required to process and calculate the data.
When customizing the templates:
• Don’t enter zeros.
• To import data, you must have one member at least from all dimensions in the fileto import.
• Remove columns for which you have no data. For example, if your periodocity ismonthly, you can delete columns for Qtrly 1 - 4.
• If member names start with zeros (0), change numeric columns to text.
Importing Quota Planning DataUse the provided templates to import data for Quota Planning.
Quota Planning templates are available based on the options selected when youenable features, and include any custom dimensions you added when you enabledfeatures.
• ImpactedRevenueBookings.csv
—If you are planning overlay targets by amount, loads current year and previousyear impacted bookings.
• ImpactedUnitsBookings.csv
—If you are planning overlay targets by units, loads current year and previous yearimpacted bookings.
• RevenueBookings.csv
—If you are planning by amount, loads current year and previous actual bookings.
• UnitsBookings.csv
—If you are planning by units, loads current year and previous actual bookings.
After importing data, run the Process Actuals rule. From the Home page, click Rules
, launch the Process Actuals rule, enter the historical years for which you havedata, and then click Launch. Run this rule any time you import data.
Importing Advanced Sales Forecasting DataImport data for Advanced Sales Forecasting.
Appendix AImporting Quota Planning Data
A-2
Import the following data:
• Actuals data. Historical data is required to use predictions. Typically, load data toOGS_CY Booking as the Measure for historical data.
• Other data:
– OGS_Pipeline
– OGS_Committed Forecast
– Quota. If you enabled integration with Quota Planning, run the data map topush data from Quota Planning to Advanced Sales Forecasting whenever thequota target is updated. See Integrating Quota Planning and Advanced SalesForecasting.
– Load data to OGS_Base Forecast, to differentiate it from Adjustments.
Note:
When loading the data for committed forecast and pipeline, you can load atspecific product or customer level or at the territory level. If you are loadingdata at the territory level, load the data at Any Product, Any Customer, Any<Custom Dimension> level.
Advanced Sales Forecasting provides templates for importing data.
1. From the Home page, click Application , and then click Configure .
2. From the Configure list, click Advanced Sales Forecasting.
3. From the Actions menu, select Download Data Load Templates, and then savethe file.
The following templates are available:
• Advanced Sales Forecasting CRM Data Load File.csv
• Advanced Sales Forecasting CRM Weekly Data Load File.csv
• Advanced Sales Forecasting Data Load File.csv
• Advanced Sales Forecasting Weekly Data Load File.csv
After importing data, run the Prepare Actual rule. From the Home page, click Rules
, launch the Prepare Actual rule, enter the historical years for which you havedata, and then click Launch. Run this rule any time you import data.
Appendix AImporting Advanced Sales Forecasting Data
A-3
BPersonalizing Oracle Sales Planning Cloud
Oracle Sales Planning Cloud offers a comprehensive, end-to-end data-driven solution.It includes a pre-build solution for Quota Planning. Additionally, Oracle Sales PlanningCloud is extensible using the EPM Cloud framework to add additional configurationsand personalization into your sales planning application with personalized navigationflows, measures, dashboards, and infolets.
This topic shows some of the ways you can personalize Oracle Sales Planning Cloud.For example, you can enable territory and resource modeling and include optimizationtools including account segmentation for strategic account planning and resourceassignment.
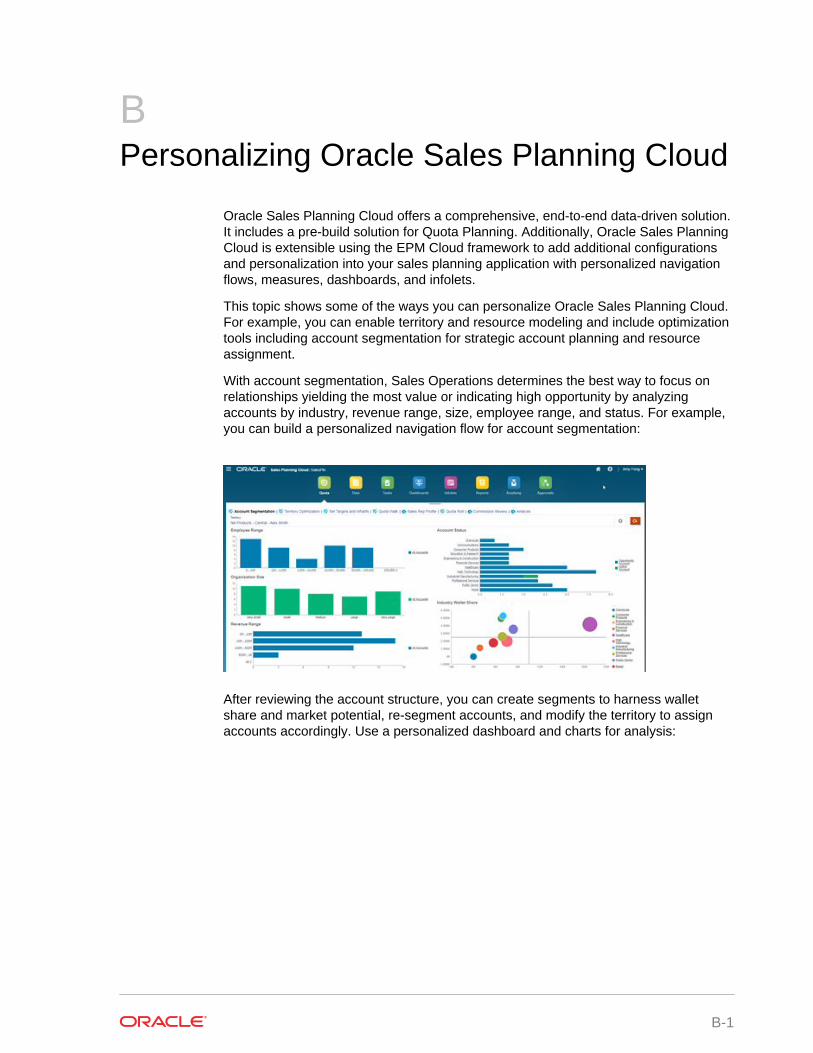
With account segmentation, Sales Operations determines the best way to focus onrelationships yielding the most value or indicating high opportunity by analyzingaccounts by industry, revenue range, size, employee range, and status. For example,you can build a personalized navigation flow for account segmentation:
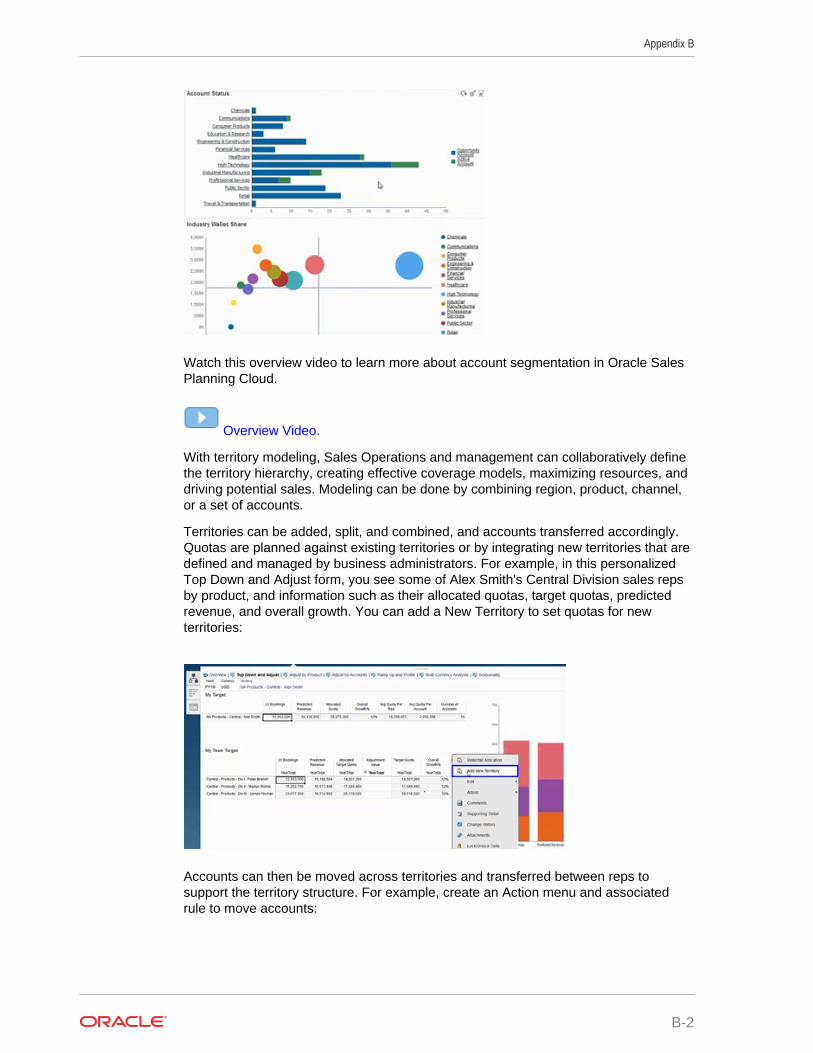
After reviewing the account structure, you can create segments to harness walletshare and market potential, re-segment accounts, and modify the territory to assignaccounts accordingly. Use a personalized dashboard and charts for analysis:
B-1
Watch this overview video to learn more about account segmentation in Oracle SalesPlanning Cloud.
Overview Video.
With territory modeling, Sales Operations and management can collaboratively definethe territory hierarchy, creating effective coverage models, maximizing resources, anddriving potential sales. Modeling can be done by combining region, product, channel,or a set of accounts.
Territories can be added, split, and combined, and accounts transferred accordingly.Quotas are planned against existing territories or by integrating new territories that aredefined and managed by business administrators. For example, in this personalizedTop Down and Adjust form, you see some of Alex Smith's Central Division sales repsby product, and information such as their allocated quotas, target quotas, predictedrevenue, and overall growth. You can add a New Territory to set quotas for newterritories:
Accounts can then be moved across territories and transferred between reps tosupport the territory structure. For example, create an Action menu and associatedrule to move accounts:
Appendix B
B-2
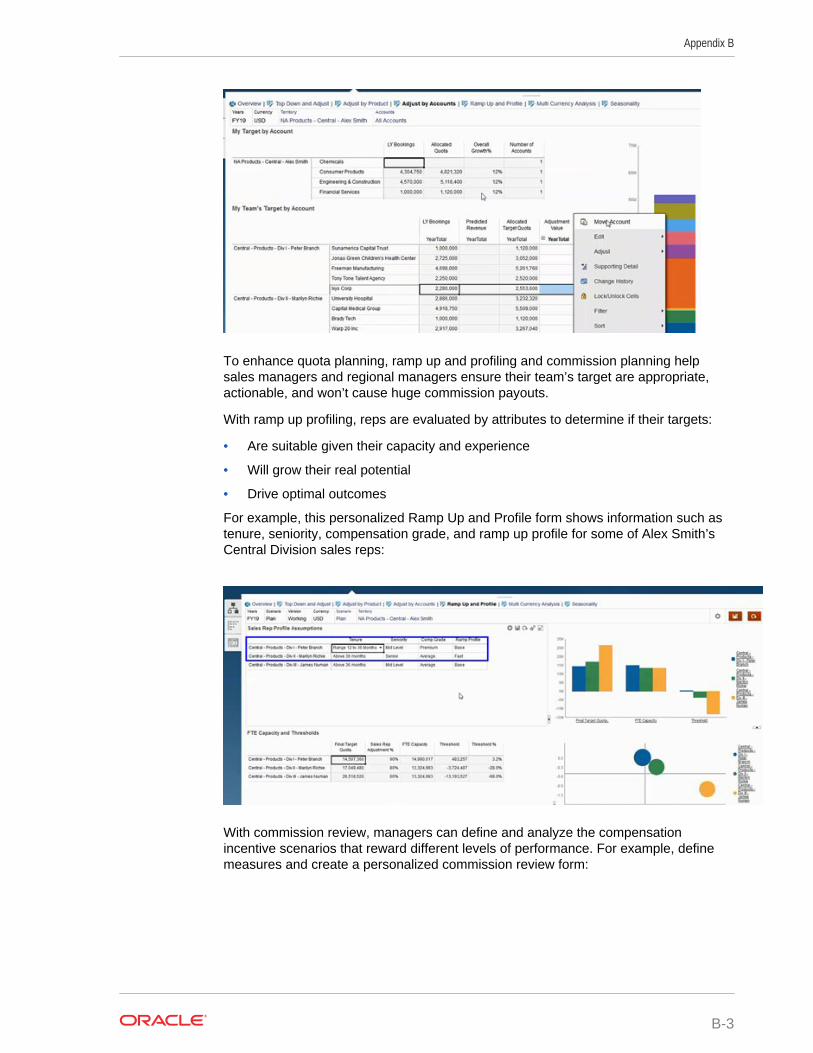
To enhance quota planning, ramp up and profiling and commission planning helpsales managers and regional managers ensure their team’s target are appropriate,actionable, and won’t cause huge commission payouts.
With ramp up profiling, reps are evaluated by attributes to determine if their targets:
• Are suitable given their capacity and experience
• Will grow their real potential
• Drive optimal outcomes
For example, this personalized Ramp Up and Profile form shows information such astenure, seniority, compensation grade, and ramp up profile for some of Alex Smith’sCentral Division sales reps:
With commission review, managers can define and analyze the compensationincentive scenarios that reward different levels of performance. For example, definemeasures and create a personalized commission review form:
Appendix B
B-3

With sales forecasting, regional managers and their reps can perform collaborativeweekly reviews to determine how opportunities align with target quotas. They can:
• Analyze forecasts by territory, key accounts, and opportunity
• Get more insight using predictive planning and probability metrics
• Make adjustments accordingly to ensure forecast accuracy
For example, create an Opportunity Overview dashboard showing a variety of graphsthat indicate forecast values for measures such as revenue, revenue by sales reps,predicted pipeline revenue, and the probability of reps reaching their quotas. Thesecan be evaluated by territory, opportunity and account:
Watch this overview video to learn more about Oracle Sales Planning Cloud.
Overview Video
Appendix B
B-4

CIntegrating with Oracle Engagement Cloud
Related Topics
• Integrating Dimension Metadata from Oracle Engagement Cloud with Oracle SalesPlanning CloudYou can extract dimension metadata from Oracle Engagement Cloud and import itinto Oracle Sales Planning Cloud for use with Quota Planning.
• Integrating Sales Data from Oracle Engagement Cloud with Oracle Sales PlanningCloudYou can extract historical actual order data from Oracle Engagement Cloud andimport it into Oracle Sales Planning Cloud for use with Quota Planning.
Integrating Dimension Metadata from Oracle EngagementCloud with Oracle Sales Planning Cloud
You can extract dimension metadata from Oracle Engagement Cloud and import it intoOracle Sales Planning Cloud for use with Quota Planning.
There are several methods for integrating your Quota Planning data and metadatawith Engagement Cloud. For example, you can use Data Management or themetadata import in Oracle Sales Planning Cloud.
This topic gives an overview of how to export data from Engagement Cloud usingOracle BI, and then import the data to Oracle Sales Planning Cloud using DataManagement.
For details on using Data Management, see Administering Data Management forOracle Enterprise Performance Management Cloud.
1. In Oracle BI, create a report that returns the dimension members you want toexport for loading into Oracle Sales Planning Cloud.
2. In Engagement Cloud, navigate to Reports and Analytics, click Browse Catalog,select the report, and then export the file in CSV format.
3. Import the data to Oracle Sales Planning Cloud:
a. In Oracle Sales Planning Cloud, navigate to Data Management: From the
Home page, click Navigator , and then under Integration, click DataManagement. You can also perform many of the steps using the simplifieduser interface: From the Home page, click Application, then Data Exchange,and then Data Integration.
b. In Data Management, import the file. See Integrating Metadata for details.
c. After running the data load rule, make sure to refresh the outline.
4. In Oracle Sales Planning Cloud, verify that the new members were loaded.
Watch this tutorial video to learn more about integrating dimension metadata fromOracle Engagement Cloud with Oracle Sales Planning Cloud.
C-1

Tutorial Video
Integrating Sales Data from Oracle Engagement Cloud withOracle Sales Planning Cloud
You can extract historical actual order data from Oracle Engagement Cloud and importit into Oracle Sales Planning Cloud for use with Quota Planning.
There are several methods for integrating your Quota Planning data and metadatawith Engagement Cloud. For example, you can use Data Management or the dataimport in Oracle Sales Planning Cloud.
This topic gives an overview of how to export data from Engagement Cloud usingOracle BI, and then import the data to Oracle Sales Planning Cloud using DataManagement.
For details on using Data Management, see Administering Data Management forOracle Enterprise Performance Management Cloud.
1. In Oracle BI, create a report that returns the order data for the year that you wantto export for loading into Oracle Sales Planning Cloud.
2. In Engagement Cloud, navigate to Reports and Analytics, click Browse Catalog,select the report, and then export the file in CSV format.
3. Import the data to Oracle Sales Planning Cloud:
a. In Oracle Sales Planning Cloud, navigate to Data Management: From the
Home page, click Navigator , and then under Integration, click DataManagement. You can also perform many of the steps using the simplifieduser interface: From the Home page, click Application, then Data Exchange,and then Data Integration.
b. In Data Management, import the file. See Integrating Data Using a File fordetails.
c. After running the data load rule, make sure to refresh the outline.
4. In Oracle Sales Planning Cloud, run the Process Actuals rule: Navigate to Rules,launch Process Actuals, select the year, scenario, and version, and then clickLaunch. The prompts let you aggregate actual data from the selected year andcopy it to the selected version and scenario.
5. Now there is data in the form, and you’re ready to start the quota planning processby setting targets based on the growth rate from last year’s revenue. See SettingQuota Targets.
Watch this tutorial video to learn more about integrating sales data from OracleEngagement Cloud with Oracle Sales Planning Cloud.
Tutorial Video
Appendix CIntegrating Sales Data from Oracle Engagement Cloud with Oracle Sales Planning Cloud
C-2


![sales forecasting[1]](https://static.fdocuments.in/doc/165x107/54bf4f244a7959885b8b4574/sales-forecasting1.jpg)