Admin & User Guide
318
Admin & User Guide GeoManager January 2010
Transcript of Admin & User Guide

Admin & User Guide
GeoManager
January 2010

GeoManager Admin & User Guide
AUG-GM-26Jan10US
January 2010
www.trimble.com/mobile_resource_management
Copyright © 2009, Trimble Navigation Limited. All rights reserved. Trimble and the Globe & Triangle logo are trademarks of Trimble Navigation Limited registered in the United States Patent and TrademarkOffice and other countries. TrimWeb and TrimView are trademarks of Trimble Navigation Limited. GeoManager is a service mark of Trimble Navigation Limited. All other trademarks are the property of their respective owners.
Trimble reserves the right to make changes at any time, in order to improve the reliability, function or design of its devices, products or services and to supply the best devices, products and services possible. Trimble devices, products and services are protected under one or more of the following U.S. Patents: 5,477,228; 5,694,594; 5,959,577; 5,990,827; 6,459,988; 6,529,159; 6,552,682; 6,594,576; 6,664,922; 6,578,005; 5,963,911; 6,862,524; 6,795,017; 6,882,313; 6,867,733; 6,832,140; 6,922,566 and numerous other patents and patents pending in jurisdictions worldwide. Trimble does not represent that the devices, products or services shown or described herein are free from patent infringement or from any other third party right. Trimble assumes no obligation to correct any errors contained herein or to advise any user of liability for the accuracy or correctness of any engineering software support or assistance provided to a user.
The Trimble devices, products and services are dependent on the coverage and calling areas of wireless networks owned and operated by third parties. Coverage and calling areas are approximate and may not cover significant portions of the United States. Actual coverage and operation of the devices, products and services depend on a variety of factors, including without limitation: system availability and capacity; system and equipment upgrades, repairs, maintenance, modifications and relocation; user equipment; terrain; signal strength; structural conditions; weather and atmospheric conditions; availability of power; governmental regulations; suspected fraudulent activities; acts of God and other conditions beyond the reasonable control of Trimble. Trimble will not be responsible for limits in coverage or performance degradation due to any such conditions. The user acknowledges that coverage and calling areas may be interrupted, halted or curtailed or the quality of the transmission may be diminished at any time.
The devices, products and services are dependent upon the availability of the Internet, which is owned and operated by and accessed through third parties. Trimble assumes no responsibility for improper storage of data or information, or delivery of messages. The user assumes the entire risk in downloading or otherwise accessing any data, information, files or other materials obtained from the Trimble web site, even if the user has paid for or otherwise been provided virus protection services from Trimble.
The Trimble devices, products and services and any modifications, alterations, additions or changes to the devices, products or services are not fault tolerant and are not designed, manufactured or intended for use in life support, emergency, mission-critical or other ultra-hazardous activities (“High Risk Activities”). Trimble specifically disclaims any express or implied warranty of fitness for such High Risk Activities. Use of a Trimble device, product or services in any application without the written consent of Trimble is prohibited.
All customer information is governed by the Trimble Privacy Policy located on the Trimble web site www.trimble.com/mrm.
Notice of Rights. All rights reserved. No part of this manual may be reproduced or transmitted in any form by any means—electronically, mechanically, by photocopying, via recording or otherwise—without the prior written permission of Trimble Navigation Limited For information on getting permission for reprints, contact Corporate Communications at Trimble Navigation Limited Headquarters.
Notice of Liability. The information in this manual is distributed on an “As Is” basis, without warranty, and was current at the time of publication. While precautions have been taken in the preparation of the manual, Trimble will not have any liability to any person or entity with respect to any loss or damage caused or alleged to be caused directly or indirectly by the instructions contained in this manual or by the software or hardware products described in it.
Privacy and Use. This product is intended to monitor and make available information concerning the vehicle’s activities. It is the customer’s sole responsibility to ensure that its use complies with any applicable laws and regulations. It is the customer’s responsibility to develop and communicate policies concerning use of the application prior to implementing the product. Customers are urged to consult with their own legal counsel in connection with the particular use to which the customer puts the product and the potential implications from that use.
Trimble MRM Confidential ii

GeoManager Admin & User Guide
Table of ContentsPreface . . . . . . . . . . . . . . . . . . . . . . . . . . . . . . . . . . . . . . . . . . . . . . . . . . . . . . . . . . . . . . . . . . . . . . . . . . . . ix
System Requirements . . . . . . . . . . . . . . . . . . . . . . . . . . . . . . . . . . . . . . . . . . . . . . . . . . . . . . . . . . . . . ix
New in This Document . . . . . . . . . . . . . . . . . . . . . . . . . . . . . . . . . . . . . . . . . . . . . . . . . . . . . . . . . . . . ix
Introduction . . . . . . . . . . . . . . . . . . . . . . . . . . . . . . . . . . . . . . . . . . . . . . . . . . . . . . . . . . . . . . . . . . . . . . . . 1
Getting Started. . . . . . . . . . . . . . . . . . . . . . . . . . . . . . . . . . . . . . . . . . . . . . . . . . . . . . . . . . . . . . . . . . . . . . 2
Logging In . . . . . . . . . . . . . . . . . . . . . . . . . . . . . . . . . . . . . . . . . . . . . . . . . . . . . . . . . . . . . . . . . . . . . . 2
Live Chat. . . . . . . . . . . . . . . . . . . . . . . . . . . . . . . . . . . . . . . . . . . . . . . . . . . . . . . . . . . . . . . . . . . . . . . . 7
Alerts . . . . . . . . . . . . . . . . . . . . . . . . . . . . . . . . . . . . . . . . . . . . . . . . . . . . . . . . . . . . . . . . . . . . . . . . . . 9
Navigation . . . . . . . . . . . . . . . . . . . . . . . . . . . . . . . . . . . . . . . . . . . . . . . . . . . . . . . . . . . . . . . . . . . . . 12
Status View. . . . . . . . . . . . . . . . . . . . . . . . . . . . . . . . . . . . . . . . . . . . . . . . . . . . . . . . . . . . . . . . . . . . . 14
Service Center . . . . . . . . . . . . . . . . . . . . . . . . . . . . . . . . . . . . . . . . . . . . . . . . . . . . . . . . . . . . . . . . . . 15News . . . . . . . . . . . . . . . . . . . . . . . . . . . . . . . . . . . . . . . . . . . . . . . . . . . . . . . . . . . . . . . . . . . . . . . . . 15Service Request. . . . . . . . . . . . . . . . . . . . . . . . . . . . . . . . . . . . . . . . . . . . . . . . . . . . . . . . . . . . . . . . . 16
Setting Up GeoManager . . . . . . . . . . . . . . . . . . . . . . . . . . . . . . . . . . . . . . . . . . . . . . . . . . . . . . . . . . 16
Map View . . . . . . . . . . . . . . . . . . . . . . . . . . . . . . . . . . . . . . . . . . . . . . . . . . . . . . . . . . . . . . . . . . . . . . . . . 18
Map View . . . . . . . . . . . . . . . . . . . . . . . . . . . . . . . . . . . . . . . . . . . . . . . . . . . . . . . . . . . . . . . . . . . . . . 19
Map View Navigation . . . . . . . . . . . . . . . . . . . . . . . . . . . . . . . . . . . . . . . . . . . . . . . . . . . . . . . . . . . . 23Clusters . . . . . . . . . . . . . . . . . . . . . . . . . . . . . . . . . . . . . . . . . . . . . . . . . . . . . . . . . . . . . . . . . . . . . . . 27Map View Right Click Menu . . . . . . . . . . . . . . . . . . . . . . . . . . . . . . . . . . . . . . . . . . . . . . . . . . . . . . 28Drive From Here . . . . . . . . . . . . . . . . . . . . . . . . . . . . . . . . . . . . . . . . . . . . . . . . . . . . . . . . . . . . . . . 28Drive To Here. . . . . . . . . . . . . . . . . . . . . . . . . . . . . . . . . . . . . . . . . . . . . . . . . . . . . . . . . . . . . . . . . . 29Using Drive From Here and Drive To Here to View Driving Directions . . . . . . . . . . . . . . . . . . . . 30Clear Directions . . . . . . . . . . . . . . . . . . . . . . . . . . . . . . . . . . . . . . . . . . . . . . . . . . . . . . . . . . . . . . . . 31Create Landmark. . . . . . . . . . . . . . . . . . . . . . . . . . . . . . . . . . . . . . . . . . . . . . . . . . . . . . . . . . . . . . . 31Closest Device . . . . . . . . . . . . . . . . . . . . . . . . . . . . . . . . . . . . . . . . . . . . . . . . . . . . . . . . . . . . . . . . . 32Closest Landmark . . . . . . . . . . . . . . . . . . . . . . . . . . . . . . . . . . . . . . . . . . . . . . . . . . . . . . . . . . . . . . 33Clear Closest . . . . . . . . . . . . . . . . . . . . . . . . . . . . . . . . . . . . . . . . . . . . . . . . . . . . . . . . . . . . . . . . . . 33Find POIs (Points of Interest) Near Here . . . . . . . . . . . . . . . . . . . . . . . . . . . . . . . . . . . . . . . . . . . . 34Clear POIs. . . . . . . . . . . . . . . . . . . . . . . . . . . . . . . . . . . . . . . . . . . . . . . . . . . . . . . . . . . . . . . . . . . . . 34
Mobile Device Table. . . . . . . . . . . . . . . . . . . . . . . . . . . . . . . . . . . . . . . . . . . . . . . . . . . . . . . . . . . . . 35Landmark Table . . . . . . . . . . . . . . . . . . . . . . . . . . . . . . . . . . . . . . . . . . . . . . . . . . . . . . . . . . . . . . . . 38
Device Actions . . . . . . . . . . . . . . . . . . . . . . . . . . . . . . . . . . . . . . . . . . . . . . . . . . . . . . . . . . . . . . . . . . 41Path . . . . . . . . . . . . . . . . . . . . . . . . . . . . . . . . . . . . . . . . . . . . . . . . . . . . . . . . . . . . . . . . . . . . . . . . . . 41Configure Mobile Device Details . . . . . . . . . . . . . . . . . . . . . . . . . . . . . . . . . . . . . . . . . . . . . . . . . . . 44Activities . . . . . . . . . . . . . . . . . . . . . . . . . . . . . . . . . . . . . . . . . . . . . . . . . . . . . . . . . . . . . . . . . . . . . . 44Exception . . . . . . . . . . . . . . . . . . . . . . . . . . . . . . . . . . . . . . . . . . . . . . . . . . . . . . . . . . . . . . . . . . . . . 45Find Closest Device . . . . . . . . . . . . . . . . . . . . . . . . . . . . . . . . . . . . . . . . . . . . . . . . . . . . . . . . . . . . . . 45Find Closest Landmark . . . . . . . . . . . . . . . . . . . . . . . . . . . . . . . . . . . . . . . . . . . . . . . . . . . . . . . . . . . 45Find Closest (Device) to Address . . . . . . . . . . . . . . . . . . . . . . . . . . . . . . . . . . . . . . . . . . . . . . . . . . . 46Find Closest (Device) to Location. . . . . . . . . . . . . . . . . . . . . . . . . . . . . . . . . . . . . . . . . . . . . . . . . . . 47Update . . . . . . . . . . . . . . . . . . . . . . . . . . . . . . . . . . . . . . . . . . . . . . . . . . . . . . . . . . . . . . . . . . . . . . . 48Send Message . . . . . . . . . . . . . . . . . . . . . . . . . . . . . . . . . . . . . . . . . . . . . . . . . . . . . . . . . . . . . . . . . . 48
Trimble MRM Confidential iii

GeoManager Admin & User Guide
Messaging . . . . . . . . . . . . . . . . . . . . . . . . . . . . . . . . . . . . . . . . . . . . . . . . . . . . . . . . . . . . . . . . . . . . . 49
Landmark Actions . . . . . . . . . . . . . . . . . . . . . . . . . . . . . . . . . . . . . . . . . . . . . . . . . . . . . . . . . . . . . . . 49Create Landmark . . . . . . . . . . . . . . . . . . . . . . . . . . . . . . . . . . . . . . . . . . . . . . . . . . . . . . . . . . . . . . . 50Edit Landmarks . . . . . . . . . . . . . . . . . . . . . . . . . . . . . . . . . . . . . . . . . . . . . . . . . . . . . . . . . . . . . . . . . 54Deleting Landmarks . . . . . . . . . . . . . . . . . . . . . . . . . . . . . . . . . . . . . . . . . . . . . . . . . . . . . . . . . . . . . 55Find Closest Device . . . . . . . . . . . . . . . . . . . . . . . . . . . . . . . . . . . . . . . . . . . . . . . . . . . . . . . . . . . . . . 56Find Closest Landmark . . . . . . . . . . . . . . . . . . . . . . . . . . . . . . . . . . . . . . . . . . . . . . . . . . . . . . . . . . . 57Find Closest (Landmark) to Address . . . . . . . . . . . . . . . . . . . . . . . . . . . . . . . . . . . . . . . . . . . . . . . . 57Find Closest (Device) to Location. . . . . . . . . . . . . . . . . . . . . . . . . . . . . . . . . . . . . . . . . . . . . . . . . . . 58
Map Actions . . . . . . . . . . . . . . . . . . . . . . . . . . . . . . . . . . . . . . . . . . . . . . . . . . . . . . . . . . . . . . . . . . . . 59Manage Custom Views. . . . . . . . . . . . . . . . . . . . . . . . . . . . . . . . . . . . . . . . . . . . . . . . . . . . . . . . . . . 59Add a New Custom View . . . . . . . . . . . . . . . . . . . . . . . . . . . . . . . . . . . . . . . . . . . . . . . . . . . . . . . . 60Delete a Custom View. . . . . . . . . . . . . . . . . . . . . . . . . . . . . . . . . . . . . . . . . . . . . . . . . . . . . . . . . . . 61
Follow Selection . . . . . . . . . . . . . . . . . . . . . . . . . . . . . . . . . . . . . . . . . . . . . . . . . . . . . . . . . . . . . . . . 62Driving Directions. . . . . . . . . . . . . . . . . . . . . . . . . . . . . . . . . . . . . . . . . . . . . . . . . . . . . . . . . . . . . . . 62Clear Directions . . . . . . . . . . . . . . . . . . . . . . . . . . . . . . . . . . . . . . . . . . . . . . . . . . . . . . . . . . . . . . . . 66Show Traffic . . . . . . . . . . . . . . . . . . . . . . . . . . . . . . . . . . . . . . . . . . . . . . . . . . . . . . . . . . . . . . . . . . . 66View Distance . . . . . . . . . . . . . . . . . . . . . . . . . . . . . . . . . . . . . . . . . . . . . . . . . . . . . . . . . . . . . . . . . . 67Zoom to Location . . . . . . . . . . . . . . . . . . . . . . . . . . . . . . . . . . . . . . . . . . . . . . . . . . . . . . . . . . . . . . . 68Zoom to Address . . . . . . . . . . . . . . . . . . . . . . . . . . . . . . . . . . . . . . . . . . . . . . . . . . . . . . . . . . . . . . . 69Clear Closest . . . . . . . . . . . . . . . . . . . . . . . . . . . . . . . . . . . . . . . . . . . . . . . . . . . . . . . . . . . . . . . . . . . 70Find POI. . . . . . . . . . . . . . . . . . . . . . . . . . . . . . . . . . . . . . . . . . . . . . . . . . . . . . . . . . . . . . . . . . . . . . . 70Clear POIs . . . . . . . . . . . . . . . . . . . . . . . . . . . . . . . . . . . . . . . . . . . . . . . . . . . . . . . . . . . . . . . . . . . . . 71Show Device Layer . . . . . . . . . . . . . . . . . . . . . . . . . . . . . . . . . . . . . . . . . . . . . . . . . . . . . . . . . . . . . . 71Show Device Labels . . . . . . . . . . . . . . . . . . . . . . . . . . . . . . . . . . . . . . . . . . . . . . . . . . . . . . . . . . . . . 71Show Landmark Layer . . . . . . . . . . . . . . . . . . . . . . . . . . . . . . . . . . . . . . . . . . . . . . . . . . . . . . . . . . . 72Show Landmark Fences . . . . . . . . . . . . . . . . . . . . . . . . . . . . . . . . . . . . . . . . . . . . . . . . . . . . . . . . . . 72Show Landmark Label . . . . . . . . . . . . . . . . . . . . . . . . . . . . . . . . . . . . . . . . . . . . . . . . . . . . . . . . . . . 73Print Map . . . . . . . . . . . . . . . . . . . . . . . . . . . . . . . . . . . . . . . . . . . . . . . . . . . . . . . . . . . . . . . . . . . . . 73
Messaging . . . . . . . . . . . . . . . . . . . . . . . . . . . . . . . . . . . . . . . . . . . . . . . . . . . . . . . . . . . . . . . . . . . . . 74Sending a Message to Specific Device . . . . . . . . . . . . . . . . . . . . . . . . . . . . . . . . . . . . . . . . . . . . . . 74Sending and Receiving Messages. . . . . . . . . . . . . . . . . . . . . . . . . . . . . . . . . . . . . . . . . . . . . . . . . . 75
Messaging Alerts . . . . . . . . . . . . . . . . . . . . . . . . . . . . . . . . . . . . . . . . . . . . . . . . . . . . . . . . . . . . . . . 77Setting up Messaging Alerts. . . . . . . . . . . . . . . . . . . . . . . . . . . . . . . . . . . . . . . . . . . . . . . . . . . . . . 77
Normal Alert Mode . . . . . . . . . . . . . . . . . . . . . . . . . . . . . . . . . . . . . . . . . . . . . . . . . . . . . . . . . . . . . 77Messaging Window Maximized . . . . . . . . . . . . . . . . . . . . . . . . . . . . . . . . . . . . . . . . . . . . . . . . . . . 77Messaging Window Minimized . . . . . . . . . . . . . . . . . . . . . . . . . . . . . . . . . . . . . . . . . . . . . . . . . . . 77
Away Alert Mode . . . . . . . . . . . . . . . . . . . . . . . . . . . . . . . . . . . . . . . . . . . . . . . . . . . . . . . . . . . . . . . 77Messaging Window Maximized . . . . . . . . . . . . . . . . . . . . . . . . . . . . . . . . . . . . . . . . . . . . . . . . . . . 77Messaging Window Minimized . . . . . . . . . . . . . . . . . . . . . . . . . . . . . . . . . . . . . . . . . . . . . . . . . . . 78
No Alert Mode . . . . . . . . . . . . . . . . . . . . . . . . . . . . . . . . . . . . . . . . . . . . . . . . . . . . . . . . . . . . . . . . . 78
Work Flow Status. . . . . . . . . . . . . . . . . . . . . . . . . . . . . . . . . . . . . . . . . . . . . . . . . . . . . . . . . . . . . . . . 78
Maintenance . . . . . . . . . . . . . . . . . . . . . . . . . . . . . . . . . . . . . . . . . . . . . . . . . . . . . . . . . . . . . . . . . . . 80
Vehicle Diagnostics . . . . . . . . . . . . . . . . . . . . . . . . . . . . . . . . . . . . . . . . . . . . . . . . . . . . . . . . . . . . . . 82Vehicle Diagnostics Summary . . . . . . . . . . . . . . . . . . . . . . . . . . . . . . . . . . . . . . . . . . . . . . . . . . . . . 82Fault Code Detail (Freeze Frame). . . . . . . . . . . . . . . . . . . . . . . . . . . . . . . . . . . . . . . . . . . . . . . . . . 85
Trimble MRM Confidential iv

GeoManager Admin & User Guide
Exceptions . . . . . . . . . . . . . . . . . . . . . . . . . . . . . . . . . . . . . . . . . . . . . . . . . . . . . . . . . . . . . . . . . . . . . 89
Reports . . . . . . . . . . . . . . . . . . . . . . . . . . . . . . . . . . . . . . . . . . . . . . . . . . . . . . . . . . . . . . . . . . . . . . . . . . . 92
Report Options. . . . . . . . . . . . . . . . . . . . . . . . . . . . . . . . . . . . . . . . . . . . . . . . . . . . . . . . . . . . . . . . . . 93
Generating Standard Reports . . . . . . . . . . . . . . . . . . . . . . . . . . . . . . . . . . . . . . . . . . . . . . . . . . . . . . 93
Exception Reports . . . . . . . . . . . . . . . . . . . . . . . . . . . . . . . . . . . . . . . . . . . . . . . . . . . . . . . . . . . . . . . 99Exception Report Uses . . . . . . . . . . . . . . . . . . . . . . . . . . . . . . . . . . . . . . . . . . . . . . . . . . . . . . . . . . 100Exception Notification Console . . . . . . . . . . . . . . . . . . . . . . . . . . . . . . . . . . . . . . . . . . . . . . . . . . . 100Generating Exception Reports. . . . . . . . . . . . . . . . . . . . . . . . . . . . . . . . . . . . . . . . . . . . . . . . . . . . 102
Administration . . . . . . . . . . . . . . . . . . . . . . . . . . . . . . . . . . . . . . . . . . . . . . . . . . . . . . . . . . . . . . . . . . . . 109
Device Administration. . . . . . . . . . . . . . . . . . . . . . . . . . . . . . . . . . . . . . . . . . . . . . . . . . . . . . . . . . . 110Billing Management. . . . . . . . . . . . . . . . . . . . . . . . . . . . . . . . . . . . . . . . . . . . . . . . . . . . . . . . . . . . 110Configuring Billing Info Upload. . . . . . . . . . . . . . . . . . . . . . . . . . . . . . . . . . . . . . . . . . . . . . . . . . 110
Configuring Custom Fields. . . . . . . . . . . . . . . . . . . . . . . . . . . . . . . . . . . . . . . . . . . . . . . . . . . . . . . 113Configuring Messaging Details . . . . . . . . . . . . . . . . . . . . . . . . . . . . . . . . . . . . . . . . . . . . . . . . . . . 114Configuring Driver Messages . . . . . . . . . . . . . . . . . . . . . . . . . . . . . . . . . . . . . . . . . . . . . . . . . . . . 115Configuring Forms . . . . . . . . . . . . . . . . . . . . . . . . . . . . . . . . . . . . . . . . . . . . . . . . . . . . . . . . . . . . 116Configuring Hot Keys . . . . . . . . . . . . . . . . . . . . . . . . . . . . . . . . . . . . . . . . . . . . . . . . . . . . . . . . . . 119Configuring Work Flow Status . . . . . . . . . . . . . . . . . . . . . . . . . . . . . . . . . . . . . . . . . . . . . . . . . . . 119Dispatching Messages . . . . . . . . . . . . . . . . . . . . . . . . . . . . . . . . . . . . . . . . . . . . . . . . . . . . . . . . . . 120
Configuring Mobile Device Details . . . . . . . . . . . . . . . . . . . . . . . . . . . . . . . . . . . . . . . . . . . . . . . . 122Configure Business Hours . . . . . . . . . . . . . . . . . . . . . . . . . . . . . . . . . . . . . . . . . . . . . . . . . . . . . . . 122Configure Mobile Device . . . . . . . . . . . . . . . . . . . . . . . . . . . . . . . . . . . . . . . . . . . . . . . . . . . . . . . 123Mobile Device Settings Screen . . . . . . . . . . . . . . . . . . . . . . . . . . . . . . . . . . . . . . . . . . . . . . . . . . . 124Assigning Organizational Hierarchy to a Device. . . . . . . . . . . . . . . . . . . . . . . . . . . . . . . . . . . . . 126Updating Device Custom Field Information . . . . . . . . . . . . . . . . . . . . . . . . . . . . . . . . . . . . . . . . 126Assigning Multiple Exceptions to a Device . . . . . . . . . . . . . . . . . . . . . . . . . . . . . . . . . . . . . . . . . 127Assigning Multiple Scheduled Report to a Device . . . . . . . . . . . . . . . . . . . . . . . . . . . . . . . . . . . 129Work Shift Editor . . . . . . . . . . . . . . . . . . . . . . . . . . . . . . . . . . . . . . . . . . . . . . . . . . . . . . . . . . . . . 131Configure Mobile Devices (Batch Configuration) . . . . . . . . . . . . . . . . . . . . . . . . . . . . . . . . . . . . 133Upload Mobile Device Configuration . . . . . . . . . . . . . . . . . . . . . . . . . . . . . . . . . . . . . . . . . . . . . 135Inactivity Settings . . . . . . . . . . . . . . . . . . . . . . . . . . . . . . . . . . . . . . . . . . . . . . . . . . . . . . . . . . . . . 138Upload Mobile Device Custom Fields. . . . . . . . . . . . . . . . . . . . . . . . . . . . . . . . . . . . . . . . . . . . . . 139Work Shift Definition File Upload . . . . . . . . . . . . . . . . . . . . . . . . . . . . . . . . . . . . . . . . . . . . . . . . 141
Exception Administration . . . . . . . . . . . . . . . . . . . . . . . . . . . . . . . . . . . . . . . . . . . . . . . . . . . . . . . 144Fleet Management . . . . . . . . . . . . . . . . . . . . . . . . . . . . . . . . . . . . . . . . . . . . . . . . . . . . . . . . . . . . . 144Benchmark Definitions . . . . . . . . . . . . . . . . . . . . . . . . . . . . . . . . . . . . . . . . . . . . . . . . . . . . . . . . . 145Creating New Benchmark Definitions . . . . . . . . . . . . . . . . . . . . . . . . . . . . . . . . . . . . . . . . . . . . . 146Trip Definitions . . . . . . . . . . . . . . . . . . . . . . . . . . . . . . . . . . . . . . . . . . . . . . . . . . . . . . . . . . . . . . . 151Creating Trip Definitions . . . . . . . . . . . . . . . . . . . . . . . . . . . . . . . . . . . . . . . . . . . . . . . . . . . . . . . 151Editing Trip Definitions. . . . . . . . . . . . . . . . . . . . . . . . . . . . . . . . . . . . . . . . . . . . . . . . . . . . . . . . . 153Assigning Trip Definitions . . . . . . . . . . . . . . . . . . . . . . . . . . . . . . . . . . . . . . . . . . . . . . . . . . . . . . 154Editing Trip Definition Assignments . . . . . . . . . . . . . . . . . . . . . . . . . . . . . . . . . . . . . . . . . . . . . . 155Engine RPM – Road Speed Definitions . . . . . . . . . . . . . . . . . . . . . . . . . . . . . . . . . . . . . . . . . . . . 156Creating New Engine RPM – Road Speed Definitions . . . . . . . . . . . . . . . . . . . . . . . . . . . . . . . . 156Editing Engine RPM – Road Speed Definitions . . . . . . . . . . . . . . . . . . . . . . . . . . . . . . . . . . . . . . 158
Trimble MRM Confidential v

GeoManager Admin & User Guide
Assigning Engine RPM – Road Speed Definitions . . . . . . . . . . . . . . . . . . . . . . . . . . . . . . . . . . . . 159Top Gear Definitions. . . . . . . . . . . . . . . . . . . . . . . . . . . . . . . . . . . . . . . . . . . . . . . . . . . . . . . . . . . 161Creating Top Gear Definitions . . . . . . . . . . . . . . . . . . . . . . . . . . . . . . . . . . . . . . . . . . . . . . . . . . . 161Editing Top Gear Definitions . . . . . . . . . . . . . . . . . . . . . . . . . . . . . . . . . . . . . . . . . . . . . . . . . . . . 163Assigning Top Gear Definitions . . . . . . . . . . . . . . . . . . . . . . . . . . . . . . . . . . . . . . . . . . . . . . . . . . 164Editing Top Gear Assignments . . . . . . . . . . . . . . . . . . . . . . . . . . . . . . . . . . . . . . . . . . . . . . . . . . . 166Carbon Emission Profile . . . . . . . . . . . . . . . . . . . . . . . . . . . . . . . . . . . . . . . . . . . . . . . . . . . . . . . . 167Carbon Emission Profile Assignment . . . . . . . . . . . . . . . . . . . . . . . . . . . . . . . . . . . . . . . . . . . . . . 169
Mobile Device Group Administration . . . . . . . . . . . . . . . . . . . . . . . . . . . . . . . . . . . . . . . . . . . . . . 171TimeConnect Administration. . . . . . . . . . . . . . . . . . . . . . . . . . . . . . . . . . . . . . . . . . . . . . . . . . . . . 171Vehicle Maintenance Administration . . . . . . . . . . . . . . . . . . . . . . . . . . . . . . . . . . . . . . . . . . . . . . 171Maintenance Items . . . . . . . . . . . . . . . . . . . . . . . . . . . . . . . . . . . . . . . . . . . . . . . . . . . . . . . . . . . . 172Maintenance Schedule . . . . . . . . . . . . . . . . . . . . . . . . . . . . . . . . . . . . . . . . . . . . . . . . . . . . . . . . . 174Mileage and Purchase Date . . . . . . . . . . . . . . . . . . . . . . . . . . . . . . . . . . . . . . . . . . . . . . . . . . . . . 176GPS Drift . . . . . . . . . . . . . . . . . . . . . . . . . . . . . . . . . . . . . . . . . . . . . . . . . . . . . . . . . . . . . . . . . . . . 177Audit Mileage Adjustments . . . . . . . . . . . . . . . . . . . . . . . . . . . . . . . . . . . . . . . . . . . . . . . . . . . . . 177Update Comments . . . . . . . . . . . . . . . . . . . . . . . . . . . . . . . . . . . . . . . . . . . . . . . . . . . . . . . . . . . . 178Notifications . . . . . . . . . . . . . . . . . . . . . . . . . . . . . . . . . . . . . . . . . . . . . . . . . . . . . . . . . . . . . . . . . 179Uploading Odometer Information. . . . . . . . . . . . . . . . . . . . . . . . . . . . . . . . . . . . . . . . . . . . . . . . 180
WLAN Security Administration . . . . . . . . . . . . . . . . . . . . . . . . . . . . . . . . . . . . . . . . . . . . . . . . . . . 182
Landmark Administration . . . . . . . . . . . . . . . . . . . . . . . . . . . . . . . . . . . . . . . . . . . . . . . . . . . . . . . . 183Editing a Landmark . . . . . . . . . . . . . . . . . . . . . . . . . . . . . . . . . . . . . . . . . . . . . . . . . . . . . . . . . . . . 185Defining a Landmark Type . . . . . . . . . . . . . . . . . . . . . . . . . . . . . . . . . . . . . . . . . . . . . . . . . . . . . . 188Landmark Batch Files . . . . . . . . . . . . . . . . . . . . . . . . . . . . . . . . . . . . . . . . . . . . . . . . . . . . . . . . . . . 189Exporting Landmarks from a Spreadsheet or Database Application. . . . . . . . . . . . . . . . . . . . . 191Creating a text file . . . . . . . . . . . . . . . . . . . . . . . . . . . . . . . . . . . . . . . . . . . . . . . . . . . . . . . . . . . . 192
Uploading a Landmarks File . . . . . . . . . . . . . . . . . . . . . . . . . . . . . . . . . . . . . . . . . . . . . . . . . . . . . 192List of result messages for Address Landmarks . . . . . . . . . . . . . . . . . . . . . . . . . . . . . . . . . . . . . . 195
Removing a Landmark Type . . . . . . . . . . . . . . . . . . . . . . . . . . . . . . . . . . . . . . . . . . . . . . . . . . . . . 196
Employees . . . . . . . . . . . . . . . . . . . . . . . . . . . . . . . . . . . . . . . . . . . . . . . . . . . . . . . . . . . . . . . . . . . . 198Driver Logs Administration . . . . . . . . . . . . . . . . . . . . . . . . . . . . . . . . . . . . . . . . . . . . . . . . . . . . . . 198Employee Administration . . . . . . . . . . . . . . . . . . . . . . . . . . . . . . . . . . . . . . . . . . . . . . . . . . . . . . . 199Creating Employee Details . . . . . . . . . . . . . . . . . . . . . . . . . . . . . . . . . . . . . . . . . . . . . . . . . . . . . . 199Uploading Employee Details . . . . . . . . . . . . . . . . . . . . . . . . . . . . . . . . . . . . . . . . . . . . . . . . . . . . 205
Employee Management. . . . . . . . . . . . . . . . . . . . . . . . . . . . . . . . . . . . . . . . . . . . . . . . . . . . . . . . . 209Associating Employees to Devices . . . . . . . . . . . . . . . . . . . . . . . . . . . . . . . . . . . . . . . . . . . . . . . . 209Terminating Device to Employee Associations . . . . . . . . . . . . . . . . . . . . . . . . . . . . . . . . . . . . . . 212Uploading Employee Device Assignments. . . . . . . . . . . . . . . . . . . . . . . . . . . . . . . . . . . . . . . . . . 213
Organizational Hierarchy Administration . . . . . . . . . . . . . . . . . . . . . . . . . . . . . . . . . . . . . . . . . . 216Creating an Organizational Hierarchy. . . . . . . . . . . . . . . . . . . . . . . . . . . . . . . . . . . . . . . . . . . . . 217Searching Organizational Hierarchy . . . . . . . . . . . . . . . . . . . . . . . . . . . . . . . . . . . . . . . . . . . . . . 221
Assign Mobile Devices . . . . . . . . . . . . . . . . . . . . . . . . . . . . . . . . . . . . . . . . . . . . . . . . . . . . . . . . . . 222Assign Employees . . . . . . . . . . . . . . . . . . . . . . . . . . . . . . . . . . . . . . . . . . . . . . . . . . . . . . . . . . . . . . 224Assign Users . . . . . . . . . . . . . . . . . . . . . . . . . . . . . . . . . . . . . . . . . . . . . . . . . . . . . . . . . . . . . . . . . . 226Changing the Organizational Hierarchy. . . . . . . . . . . . . . . . . . . . . . . . . . . . . . . . . . . . . . . . . . . . 228Uploading an Organizational Hierarchy. . . . . . . . . . . . . . . . . . . . . . . . . . . . . . . . . . . . . . . . . . . . 230
Trimble MRM Confidential vi

GeoManager Admin & User Guide
Uploading Organizational Unit Configurations . . . . . . . . . . . . . . . . . . . . . . . . . . . . . . . . . . . . . 230Uploading Employee Details . . . . . . . . . . . . . . . . . . . . . . . . . . . . . . . . . . . . . . . . . . . . . . . . . . . . 233Uploading Devices to Organizational Units . . . . . . . . . . . . . . . . . . . . . . . . . . . . . . . . . . . . . . . . 236Uploading Users to Organizational Units . . . . . . . . . . . . . . . . . . . . . . . . . . . . . . . . . . . . . . . . . . 239
Reports Administration . . . . . . . . . . . . . . . . . . . . . . . . . . . . . . . . . . . . . . . . . . . . . . . . . . . . . . . . . . 242Creating Scheduled Reports . . . . . . . . . . . . . . . . . . . . . . . . . . . . . . . . . . . . . . . . . . . . . . . . . . . . . 242Choosing Report Formats . . . . . . . . . . . . . . . . . . . . . . . . . . . . . . . . . . . . . . . . . . . . . . . . . . . . . . . 243Scheduling a New Report . . . . . . . . . . . . . . . . . . . . . . . . . . . . . . . . . . . . . . . . . . . . . . . . . . . . . . . 243
Edit Current Scheduled Reports . . . . . . . . . . . . . . . . . . . . . . . . . . . . . . . . . . . . . . . . . . . . . . . . . . 246
User Administration. . . . . . . . . . . . . . . . . . . . . . . . . . . . . . . . . . . . . . . . . . . . . . . . . . . . . . . . . . . . . 246Organizational Hierarchy. . . . . . . . . . . . . . . . . . . . . . . . . . . . . . . . . . . . . . . . . . . . . . . . . . . . . . . . 247Role Based Management . . . . . . . . . . . . . . . . . . . . . . . . . . . . . . . . . . . . . . . . . . . . . . . . . . . . . . . . 247Administration Capability. . . . . . . . . . . . . . . . . . . . . . . . . . . . . . . . . . . . . . . . . . . . . . . . . . . . . . . 248Change User Password Capability . . . . . . . . . . . . . . . . . . . . . . . . . . . . . . . . . . . . . . . . . . . . . . . . 249Cover Sheet Password Capability . . . . . . . . . . . . . . . . . . . . . . . . . . . . . . . . . . . . . . . . . . . . . . . . . 249Driver Logs Capability . . . . . . . . . . . . . . . . . . . . . . . . . . . . . . . . . . . . . . . . . . . . . . . . . . . . . . . . . . 250Employee Management Capability . . . . . . . . . . . . . . . . . . . . . . . . . . . . . . . . . . . . . . . . . . . . . . . 251Exceptions Capability . . . . . . . . . . . . . . . . . . . . . . . . . . . . . . . . . . . . . . . . . . . . . . . . . . . . . . . . . . 252Maintenance Capability . . . . . . . . . . . . . . . . . . . . . . . . . . . . . . . . . . . . . . . . . . . . . . . . . . . . . . . . 254MapView Capability . . . . . . . . . . . . . . . . . . . . . . . . . . . . . . . . . . . . . . . . . . . . . . . . . . . . . . . . . . . 255Messaging Capability . . . . . . . . . . . . . . . . . . . . . . . . . . . . . . . . . . . . . . . . . . . . . . . . . . . . . . . . . . 255Mobile Device Status Capability. . . . . . . . . . . . . . . . . . . . . . . . . . . . . . . . . . . . . . . . . . . . . . . . . . 256Reports Capability . . . . . . . . . . . . . . . . . . . . . . . . . . . . . . . . . . . . . . . . . . . . . . . . . . . . . . . . . . . . . 256Routing Capability . . . . . . . . . . . . . . . . . . . . . . . . . . . . . . . . . . . . . . . . . . . . . . . . . . . . . . . . . . . . 259Service Request Capability . . . . . . . . . . . . . . . . . . . . . . . . . . . . . . . . . . . . . . . . . . . . . . . . . . . . . . 259Creating a New Role . . . . . . . . . . . . . . . . . . . . . . . . . . . . . . . . . . . . . . . . . . . . . . . . . . . . . . . . . . . 260Editing Roles . . . . . . . . . . . . . . . . . . . . . . . . . . . . . . . . . . . . . . . . . . . . . . . . . . . . . . . . . . . . . . . . . 264Deleting Roles . . . . . . . . . . . . . . . . . . . . . . . . . . . . . . . . . . . . . . . . . . . . . . . . . . . . . . . . . . . . . . . . 265
Service Request Administration. . . . . . . . . . . . . . . . . . . . . . . . . . . . . . . . . . . . . . . . . . . . . . . . . . . 266User Administration . . . . . . . . . . . . . . . . . . . . . . . . . . . . . . . . . . . . . . . . . . . . . . . . . . . . . . . . . . . . 267Creating a User . . . . . . . . . . . . . . . . . . . . . . . . . . . . . . . . . . . . . . . . . . . . . . . . . . . . . . . . . . . . . . . 267Editing and Deleting Users . . . . . . . . . . . . . . . . . . . . . . . . . . . . . . . . . . . . . . . . . . . . . . . . . . . . . . 273Uploading User Information . . . . . . . . . . . . . . . . . . . . . . . . . . . . . . . . . . . . . . . . . . . . . . . . . . . . 274
Service Requests . . . . . . . . . . . . . . . . . . . . . . . . . . . . . . . . . . . . . . . . . . . . . . . . . . . . . . . . . . . . . . . . . . . 277
Creating New Service Requests. . . . . . . . . . . . . . . . . . . . . . . . . . . . . . . . . . . . . . . . . . . . . . . . . . . . 277
Viewing a Service Request . . . . . . . . . . . . . . . . . . . . . . . . . . . . . . . . . . . . . . . . . . . . . . . . . . . . . . . 281
Troubleshooting. . . . . . . . . . . . . . . . . . . . . . . . . . . . . . . . . . . . . . . . . . . . . . . . . . . . . . . . . . . . . . . . . . . 282
Trimble Customer Technical Support . . . . . . . . . . . . . . . . . . . . . . . . . . . . . . . . . . . . . . . . . . . . . . . 28224x7 Online Customer Service . . . . . . . . . . . . . . . . . . . . . . . . . . . . . . . . . . . . . . . . . . . . . . . . . . . . 282Other Options for Contacting Trimble Technical Support. . . . . . . . . . . . . . . . . . . . . . . . . . . . . . 282
Frequently Asked Questions . . . . . . . . . . . . . . . . . . . . . . . . . . . . . . . . . . . . . . . . . . . . . . . . . . . . . . 282General . . . . . . . . . . . . . . . . . . . . . . . . . . . . . . . . . . . . . . . . . . . . . . . . . . . . . . . . . . . . . . . . . . . . . . 282Logging In. . . . . . . . . . . . . . . . . . . . . . . . . . . . . . . . . . . . . . . . . . . . . . . . . . . . . . . . . . . . . . . . . . . . 284Custom Views . . . . . . . . . . . . . . . . . . . . . . . . . . . . . . . . . . . . . . . . . . . . . . . . . . . . . . . . . . . . . . . . . 285Devices . . . . . . . . . . . . . . . . . . . . . . . . . . . . . . . . . . . . . . . . . . . . . . . . . . . . . . . . . . . . . . . . . . . . . . 285
Trimble MRM Confidential vii

GeoManager Admin & User Guide
Landmarks. . . . . . . . . . . . . . . . . . . . . . . . . . . . . . . . . . . . . . . . . . . . . . . . . . . . . . . . . . . . . . . . . . . . 288Dynamic Results . . . . . . . . . . . . . . . . . . . . . . . . . . . . . . . . . . . . . . . . . . . . . . . . . . . . . . . . . . . . . . . 291The Map View. . . . . . . . . . . . . . . . . . . . . . . . . . . . . . . . . . . . . . . . . . . . . . . . . . . . . . . . . . . . . . . . . 291Device Actions . . . . . . . . . . . . . . . . . . . . . . . . . . . . . . . . . . . . . . . . . . . . . . . . . . . . . . . . . . . . . . . . 295Map Actions . . . . . . . . . . . . . . . . . . . . . . . . . . . . . . . . . . . . . . . . . . . . . . . . . . . . . . . . . . . . . . . . . . 296Status View . . . . . . . . . . . . . . . . . . . . . . . . . . . . . . . . . . . . . . . . . . . . . . . . . . . . . . . . . . . . . . . . . . . 297Alerts . . . . . . . . . . . . . . . . . . . . . . . . . . . . . . . . . . . . . . . . . . . . . . . . . . . . . . . . . . . . . . . . . . . . . . . . 297Consoles . . . . . . . . . . . . . . . . . . . . . . . . . . . . . . . . . . . . . . . . . . . . . . . . . . . . . . . . . . . . . . . . . . . . . 298Reports . . . . . . . . . . . . . . . . . . . . . . . . . . . . . . . . . . . . . . . . . . . . . . . . . . . . . . . . . . . . . . . . . . . . . . 298Administration . . . . . . . . . . . . . . . . . . . . . . . . . . . . . . . . . . . . . . . . . . . . . . . . . . . . . . . . . . . . . . . . 298
Associated Hardware . . . . . . . . . . . . . . . . . . . . . . . . . . . . . . . . . . . . . . . . . . . . . . . . . . . . . . . . . . . . . . . 301
The iLM Features and Benefits . . . . . . . . . . . . . . . . . . . . . . . . . . . . . . . . . . . . . . . . . . . . . . . . . . . . 301
The iDTTM Internet Data Terminal (Optional Feature). . . . . . . . . . . . . . . . . . . . . . . . . . . . . . . . . 301Driver Features . . . . . . . . . . . . . . . . . . . . . . . . . . . . . . . . . . . . . . . . . . . . . . . . . . . . . . . . . . . . . . . . 302Dispatcher Features . . . . . . . . . . . . . . . . . . . . . . . . . . . . . . . . . . . . . . . . . . . . . . . . . . . . . . . . . . . . 303
Satellite Modem. . . . . . . . . . . . . . . . . . . . . . . . . . . . . . . . . . . . . . . . . . . . . . . . . . . . . . . . . . . . . . . . 303
Troubleshooting Hardware. . . . . . . . . . . . . . . . . . . . . . . . . . . . . . . . . . . . . . . . . . . . . . . . . . . . . . . 303Trimble Customer Technical Support . . . . . . . . . . . . . . . . . . . . . . . . . . . . . . . . . . . . . . . . . . . . . . 30524x7 Online Customer Service . . . . . . . . . . . . . . . . . . . . . . . . . . . . . . . . . . . . . . . . . . . . . . . . . . . 305Other Options for Contacting Trimble Technical Support . . . . . . . . . . . . . . . . . . . . . . . . . . . . . 305
Glossary. . . . . . . . . . . . . . . . . . . . . . . . . . . . . . . . . . . . . . . . . . . . . . . . . . . . . . . . . . . . . . . . . . . . . . . . . . 306
Trimble MRM Confidential viii

Preface
System Requirements
New in This Document
The following feature(s) are new in this version of GeoManager:
• Navigation – The tabs for different pages are shown at the top of the screen. Navigation within each tab (after you click one of the tabs at the top) will vary depending on the feature.
• Map Functionality – Easier access to vehicle and Landmark information from the map. Maps can be detached and opened in a new window.
• Device and Landmark Dialogs – Pop up dialogs that appear when you mouse over any device or landmark. Device and Landmark dialogs allow you to view information or perform actions specific to the selected device or Landmark.
• Clusters – Improves the identification of closely located devices and Landmarks on the map.
• Exceptions Alerts – Faster and more obvious notification about Exceptions.
Item Description
Operating System Microsoft Windows 2000, XP, Vista Microsoft Windows 2000 Professional, XP Professional
CPU Pentium-class processor (Pentium IV CPU, 2.5 GHz or faster recommended)
Memory 512 MB minimum (1 GB or more recommended)
Display VGA or better display (1024x768 resolution recommended)
Browser Internet Explorer: 6.0 and above (IE 8.0 recommended).
Note:
• All pop-up blockers should be disabled when using GeoManager to prevent conflict with the MapView Control Panel
• The Run ActiveX control option must be enabled
Internet Access High speed access via DSL, Cable or ISDN
Trimble MRM Confidential ix

• Quick Administration – Allows you to assign multiple exceptions or scheduled reports to a mobile device simultaneously in addition to setting up work shift definitions and modifying custom field information.
• Live Chat – Provides real‐time customer support during business hours via chat for US and Canadian customers.
• Device Path – Improved functionality including tabular display of bread‐crumb points and play back option.
• Show Traffic – Provides traffic information on the map in areas where available.
• Driving Directions – Provides detailed driving directions from start to end addresses to help drivers and field technicians get from site to site.
• Point of Interest – Allows user to search for points of interests in a specific area.
• Service Center – Customer News, Support, Training and Service Request information has been moved to the Service Center tab
Trimble MRM Confidential x

GeoManager Admin & User Guide
Trimble MRM Confidential 1
1 Introduction
Trimble GeoManager provides a leading Field Productivity & Management (FPM) solution that integrates GPS, wireless, satellite data transmission and Internet technologies into mobile software applications that strengthen your ability to manage your mobile workforce. Trimble GeoManager is the flagship Trimble FPM product line, offering a robust set of Mobile Resource Management (MRM) tools with an array of features and options.
Whether you want to instantly map the location of your fleet, find the nearest vehicle to a job, dispatch text messages to workers, log work hours or view and print detailed reports, the Trimble GeoManager solution helps you manage overall mobile workforce performance, reduce costs and maximize customers’ satisfaction with your field services. And because it is an on‐demand solution, you can use it from any location where you have Internet access.
Trimble GeoManager gives you the following features to help you manage your mobile workforce:
• Measure and manage your mobile workforce daily
• Use location information, reports, exception notifications to:
• Measure and set baselines
• Look for changes
• Improve driving habits and safety
• Dispatch
• Manage field operating costs
• Correct costly problems like speeding and indirect driving, reduce fuel costs
• Better manage vehicle maintenance, raise MPG
• Improve the quality of customer experience
• Faster customer response
• Better service level documentation
Note:Note:
Not all GeoManager features are available on all accounts.

GeoManager Admin & User Guide
2 Getting Started
Trimble GeoManager is a web‐based application that you can access from anywhere you have an Internet connection.
Logging In
To log into GeoManager:
1. Enter the address http://www.trimble.com/mobile_resource_management in the Universal Resource Locator (URL) The Trimble home page, shown in Figure 2–1, appears.
Figure 2–1: Trimble MRM Home Page
2. Select GeoManager Region 1 from the Customer Login drop‐down menu. The GeoManager Login screen, shown in Figure 2–2, appears.
Trimble MRM Confidential 2

GeoManager Admin & User Guide
Figure 2–2: The Trimble GeoManager Login Screen
3. At the prompt, enter the Username and Password, sent with your equipment.
Username and Password are case sensitive. If you did not receive a Username or Password, please contact the Trimble MRM Administrator or send an email to Trimble Customer Service at [email protected].
4. Click the Sign In button or press Enter.
You can select the Remember Username check box if you want the computer to automatically store your username. This is not recommended if more than one person uses a computer.
Click System Requirements to view the system requirements recommended to run GeoManager.
The GeoManager home page, shown in Figure 2–3, appears.
Note:Note:
GeoManager does not store password information. Please keep your password in a secure location for reference.
Trimble MRM Confidential 3

GeoManager Admin & User Guide
Figure 2–3: GeoManager Home Page
On the top of the screen are informational links that allow you to get help and information you need about your account:
• Switch Back to GeoManager Classic ‐ This link allows you to view GeoManager in the classic format. This helps users who are not yet comfortable or have not taken instruction in the new GeoManager format to quickly find the information they need. This link will be removed in the future.
• Welcome User ‐ This line displays the name of the user currently logged into the account.
• My Account ‐ This link opens a dialog box, that allows you to change your password for your account. You may only change the password for the current account.
Trimble MRM Confidential 4

GeoManager Admin & User Guide
Figure 2–4: My Account Dialog Box
To change your password:
1. Enter your Current Password.
2. Enter your New Password. Passwords are case sensitive and must be at least four characters long but no more than 18 characters in length.
3. Re‐enter your new password to Confirm your Password.
4. Click Save to change your password.
Click Cancel to close the dialog box without changing your password.
• Help ‐ This link opens a new window which displays the Customer Support information from the home page.
• Logout ‐ This link allows the user to log out of GeoManager. By using this, you can log out of one account and log into another without needing to close your browser window.
• Notify Me ‐ This link allows you to sign up for email notices about unexpected issues or planned system maintenance.
• System Status ‐ This icon shows you the current system status:
• Green ‐ System is running normally.
• Yellow ‐ Some system features may be unavailable.
• Red ‐ System is currently unavailable or experiencing technical difficulties.
• Planned Maintenance ‐ This icon shows you when planned maintenance is about to occur.
• Green ‐ There is no planned maintenance for 48 hours.
Trimble MRM Confidential 5

GeoManager Admin & User Guide
• Yellow ‐ Maintenance is planned within the next 48 hours.
• Red ‐ Maintenance is currently being performed.
To get to classic GeoManager:
Click the Switch back to GeoManager Classic banner in the top, left corner of GeoManager. The GeoManager Classic home page, shown in Figure 2–5, appears.
Figure 2–5: GeoManager Classic Main Page
The GeoManager Classic home page has a new look, but the functionality for Classic is the same as before. For more information about using GeoManager Classic, please see the GeoManager Classic Admin & User Guide.
To get back to the new GeoManager interface:
1. Click the See the New GeoManager banner in the top, left corner of GeoManager.
The first time you sign into the new GeoManager interface, you will see a dialog box, shown in Figure 2–6, asking you to accept the terms of the beta test.
Trimble MRM Confidential 6

GeoManager Admin & User Guide
Figure 2–6: GeoManager Conditions Acknowledgement Dialog
If you do not want this dialog box to appear each time you sign in, check the Do Not Show This Message Again check box.
2. Click Accept to open the New GeoManager interface. The new GeoManager home page, shown in Figure 2–3, appears.
Live Chat
GeoManager allows you to access real‐time assistance with the Live Help chat feature.
To start a Live Chat session:
1. Click Live Chat in the upper right corner of GeoManager. The Live Chat screen, shown in Figure 2–7, appears.
Trimble MRM Confidential 7

GeoManager Admin & User Guide
Figure 2–7: Live Chat Input Fields
2. Enter Your name. This is a required field.
3. Enter your Phone Number, if available.
4. Enter Your company name. This is a required field.
5. Enter the service request number, if available.
6. Select your problem type:
• General Inquiry
• Unit not tracking/Website issues
• Unit De‐install and Re‐install Request
7. Click Start Chat. The Live Chat session, shown in Figure 2–8 displays.
Trimble MRM Confidential 8

GeoManager Admin & User Guide
Figure 2–8: Live Help Chat Session
8. Enter your question in the provided text field.
9. Click Send.
Press Enter.
Once your issue has been resolved, click Close to end the session. You can also click Print to save a copy of the exchange for future reference or click Email to send an email copy for your records.
Alerts
GeoManager allows you to receive real‐time Exception alerts when drivers or field technicians perform an activity that crosses a threshold you create, such as a speed threshold of 55 mph or an idling threshold of 10 minutes.
The Alerts notification box, shown in Figure 2–9, shows the label for the mobile device that has most recently crossed an Exception threshold.
Trimble MRM Confidential 9

GeoManager Admin & User Guide
Figure 2–9: Alerts Notification Box
When you click the Restore window (double boxes) on the right side of the Alerts box, you see a drop‐down list of the most recent Exception alerts, shown in Figure 2–10. This list shows you the mobile device label, type of Exception and the name of the Exception.
Figure 2–10: Alerts Drop-Down List
On the right side of the Alerts drop‐down list next to the Alert information is another double arrow signifying an expanded view. When you click the double arrows, an expanded view appears, shown in Figure 2–11, with more specifics about the Alert, such as date and time, location, Exception parameters and number of times the mobile device has exceeded the Exception parameters.
Figure 2–11: Alerts Drop-Down List with Expanded Information
Trimble MRM Confidential 10

GeoManager Admin & User Guide
In either the Alerts drop‐down list or the list with expanded information, when you roll your pointer over the name of the mobile device, a yellow square and green circle appear. When you roll the cursor over the yellow square, specific information about the mobile device appears, as shown in Figure 2–12.
Figure 2–12: mobile device Information from the Alerts Drop-Down List
This is the same information that you will see in the device table and map view pop ups. From this mobile device information box, you can view and print reports, send messages, update the mobile device, etc. For more information on using the mobile device information box, see ‘Map View’ on page 18.
When you roll the cursor over the green circle, a mini map showing the location of the mobile device appears, as shown in Figure 2–13.
Figure 2–13: mobile device Information from the Alerts Drop-Down List
Trimble MRM Confidential 11

GeoManager Admin & User Guide
This is the same information that you will see in the device table pop up. From the mini map pop up, you can see either the road view or aerial view of the mobile device’s location. For more information on using mini map, see ‘Map View’ on page 18.
Click Minimize window to collapse the Alerts view.
Navigation
Navigating through GeoManager is easy and fairly intuitive for all types of users. As mentioned before, the first screen shown is the GeoManager home page, which contains several components. The central and largest portion of the screen which shows the Mapview in Figure 2–5, contains the working screen, which allows users to view, enter, edit and otherwise interact with GeoManager.
Above the working screen are four tabs, shown in Figure 2–14, that allow you to navigate to different sections of GeoManager.
Figure 2–14: Navigation Tabs
These navigation tabs include:
• Home
• Reports
• Administration
• Service Center
When you click any of these tabs, the working screen changes to show features and options that are covered in the next chapters of this guide.
Below the navigation tabs are device navigation tabs used to navigate the different features of the GeoManager section you are currently viewing. These tabs change to correspond to the selected navigation tab.
Figure 2–15: Navigation Buttons
These device navigation tabs include:
• Map
• Messaging
Trimble MRM Confidential 12

GeoManager Admin & User Guide
• Work Flow Status
• Maintenance
• Diagnostics
• Exceptions
• Routing
Below the device navigation tabs are the Devices and Landmarks tabs which provide the status and location of your devices as well as a list of your landmarks.
Figure 2–16: Devices Tab
Below the Devices and Landmarks view is a Quick Find box, shown in Figure 2–17, that allows you to find specific mobile devices or Landmarks.
Figure 2–17: Search Box
Trimble MRM Confidential 13

GeoManager Admin & User Guide
You may search using a complete or partial name. You must select the type of search you want from the drop menu. Search types include:
• Search Landmarks
• Search Devices
To search for a mobile device or Landmark:
1. Enter the partial or full name or label for which you want to search.
2. Click the magnifying glass next to the text box. This defaults to searching for the last type of searched performed.
If this is the first search performed after opening GeoManager, then the search defaults to a Landmark search.
Below the secondary navigation tabs is the Status View, which gives you a quick overview of the status of your mobile devices. A complete description of the Status View is shown in the Status View section on page 14.
Status View
The Status View, shown in Figure 2–18, is a new feature that allows you to get a quick overview about the status of the mobile devices in your fleet.
Figure 2–18: Status View
When you login to GeoManager, the Status View is shown as in Figure 2–18, with the minimum information showing. This view lets you see:
• The number and status of the mobile devices in your fleet
• The status of mobile devices’ scheduled maintenance
• If any drivers have surpassed Hours of Service (HOS) rules within the last 24 hours (only shown with Driver Logs enabled)
• If there are any Exception alerts triggered by any of your drivers within the last 24 hours
Hover over each item as shown in Figure 2–19, to view the legend for each section, which shows you what each color on each different bar represents.
Trimble MRM Confidential 14

GeoManager Admin & User Guide
Figure 2–19: The Popup Status View
Service Center
The GeoManager main page initially displays map view. Click the Service Center tab to see current customer news shown in Figure 2–20 including product updates, webinars, training information and upcoming events.
Figure 2–20: Service Center News Screen
News
On the right side of the news page are buttons that allow you to view more information about GeoManager. These buttons include:
• News (default) ‐ This shows you current customer news and other relevant information.
Trimble MRM Confidential 15

GeoManager Admin & User Guide
• New Customers ‐ This page offers the tools needed to get you started, links to support and our Best Practices Guide and a sample billing statement that helps you understand how to read your invoices.
• Customer Support ‐ This screen contains the links you need when you require help, including technical support, billing questions, training information and product documentation.
• Troubleshooting FAQs ‐ These frequently asked questions may answer or help you fix the most common questions and problems that you encounter.
• Refer a Friend ‐ This allows you to send information about friends and colleagues who would benefit from Mobile Resource Management solutions.
• Training ‐ This box helps you get information about and register for Trimble MRM training.
• Training Schedule ‐ This page shows you which classes are available for the current month.
• Register for Courses ‐ This link allows you to register for WebEx classes.
• Webinar Schedule ‐ This link shows you the current webinar schedule and allows you to register for the webinar.
• Legal ‐ This shows you current legal information.
• Terms of Use ‐ This link displays the general terms of use for Trimble products.
• Service Description ‐ This link displays the available Trimble services, products and their descriptions.
• Privacy Policy ‐ This link displays Trimble’s online privacy policy.
• Legal Notice‐ This link displays Trimble’s copyright and trademark information.
Service Request
The Service Request tab allows you to create a service request online. For more information on creating and viewing service requests, see ‘Service Requests’ on page 277.
Setting Up GeoManager
In the Devices tab after you first login to GeoManager, you will see default mobile device information. This allows you to track your mobile devices from the first day your account is active and your mobile devices are installed with hardware.
In order to get more specific information from your GeoManager account, you will need to enter mobile device and employee information, create users, set Exception parameters for your drivers or field technicians and enter other information that will help you get the specific information you need about your fleet. While this seems like a long, time‐consuming process, this major set‐
Trimble MRM Confidential 16

GeoManager Admin & User Guide
up only needs to occur once. Any changes to your account after the initial set‐up should be much less involved.
Trimble MRM suggests that you complete these steps in the following order:
1. Enter your mobile device information and create labels for your mobile devices.
2. Create custom fields for your mobile devices.
3. Enter your employee information. This includes drivers, field technicians, etc.
4. Create your Organizational Hierarchy. This will create groups for you to select when generating reports.
5. Create users for GeoManager. Using role‐based access, you can limit your users to the appropriate amount of information including groups.
6. Create Landmarks.
7. Set up Exception parameters.
8. Schedule any reports.
9. Set up maintenance schedules for your mobile devices.
The Administration section of this guide explains how to complete these steps and set up your GeoManager account. For more information about naming conventions and helpful suggestions to get the most from your GeoManager account, please see the Best Practices guide.
Trimble MRM Confidential 17

GeoManager Admin & User Guide
3 Map View
The Map tab in GeoManager allows you to see your mobile devices and landmarks both in a list and on a map in real time where ever they are in the world. Maps are updated regularly to include new roads, street names and addresses. The standard default refresh rate for Map View is every two minutes. With the enhanced map capabilities, you can find a mobile device or mobile technician, get current status information and view reports specific to the mobile device.
Customizing MapView enables you to create and save maps at country, town or city, or street level.
Figure 3–1: Map View Main Page
The map section of the screen has viewing options and navigation objects in the top left corner of the screen.
Above the map to the left are the device navigation tabs that allow you to view different screens for specific types of mobile device or employee information.
Figure 3–2: Device Navigation Tabs
Trimble MRM Confidential 18

GeoManager Admin & User Guide
Above the map to the right are three action drop‐down menus that allow you to perform different actions for devices, landmarks and the map.
Figure 3–3: Actions Drop Down Menus
Map View
The GeoManager Map View, shown in Figure 3–8, helps you manage your mobile workforce using detailed maps and icons. Maps are updated regularly to include new roads, street names and addresses. The default refresh rate for MapView is every two minutes. Color‐coded icons—representing mobile devices—change based on various device conditions, such as parked, moving, or not reporting.
When you mouse over any mobile device in the device table or Map View, a yellow square appears. Hovering over the yellow square displays a dialog box with mobile device information, shown in Figure 3–4. You can see information about each device, such as device name, date, time and current speed. If the device is parked, instead of current speed, you will see time parked.
Figure 3–4: Device Dialog Box
You can click the buttons in the lower section of the mobile device dialog box for faster access to common activities, such as:
• Update – This allows you to get a status update on the selected vehicle in between your automatic updates, which may be 15, 5 or 2 minute intervals.
• Zoom – This changes the map to show the landmark or mobile device closest to the selected mobile device
• Zoom to Closest Landmark – This changes the map to show the closest Landmark(s) to the selected mobile device.
• Zoom to Closest Device – This changes the map to show the closest mobile devices to the selected mobile device.
Trimble MRM Confidential 19

GeoManager Admin & User Guide
• Closest Landmarks – This finds the closest Landmarks to the mobile device and displays them in the Dynamic Results box on the left side of the screen.
• Reports – This displays a number of reports specific to the selected mobile device.
• Activities Report – This allows you to generate an Activities report for this vehicle for the current business day.
• Exceptions Reports – This generate an Exception History report for the selected vehicle. The Exception History report shows the last 10 Exceptions the mobile device has trig‐gered in the past 14 days.
• Forms Report – This generates a report in a separate window that shows the number and type of forms sent within the last 24 hours.
• Message Report – This generates a Message report that shows the number and types of messages the employee sent in the past 24 hours using the mobile device.
• Stop Detail Report – This generates a Stop Detail report that shows the number and length of time the mobile device stopped during the current business day.
• Send Message – This opens a separate window with the Messages for device screen, shown in Figure 3–81.
• Show Device Path – This changes the map to show the path of the selected mobile device.
If you have created custom fields for your mobile devices and filled in information for each of those fields (up to eight), it will appear in the mouse over information. For more information about Custom Fields, see “Configuring Custom Fields” on page 113.
If you have entered employee information into Organizational Hierarchy, it will also appear in the mouse over information, along with all your custom fields information. For more information about Organizational Hierarchy, see “Organizational Hierarchy Administration” on page 216.
When you mouse over any mobile device in the device table, a yellow square and green circle appear. Hovering over the green circle displays a Mini Map showing the location of the mobile device on the map, shown in Figure 3–5.
Trimble MRM Confidential 20

GeoManager Admin & User Guide
Figure 3–5: Mini Map Road View
Click the Aerial button to display the aerial view in Mini Map, shown in Figure 3–5. The Aerial button will appear yellow to indicate it is selected.
Figure 3–6: Mini Map Road View
• Click the yellow Aerial button to return Mini Map to the road view.
• Click the Magnifying Glass with (+) to zoom in incrementally for a closer look at the map.
• Click the Magnifying Glass with (‐) to zoom out incrementally for a more extensive view of the map.
• Click Reset to return Mini Map to the default view.
When you mouse over any Landmark, a dialog box with Landmark information appears, as shown in Figure 3–7. You can see information about each landmark, such as address, Lat/Long, start date and end date.
Trimble MRM Confidential 21

GeoManager Admin & User Guide
Figure 3–7: Landmark Dialog Box
You can click the buttons in the lower section of the landmark device dialog box for faster access to common activities, such as:
• Edit – This opens the Edit Landmark fields to the right of Map View where you can make desired changes to the selected landmark.
• Zoom – This changes the map to show the landmark or mobile device closest to the selected mobile device
• Zoom to Closest Landmark – This changes the map to show the closest landmark to the selected landmark.
• Zoom to Closest Device – This changes the map to show the closest landmark to the selected mobile device.
• Closest Devices – This finds the closest devices to the selected landmark and displays them in the Dynamic Results box on the left side of the screen.
• Delete – This deletes the landmark from your account and Map View.
Trimble MRM Confidential 22

GeoManager Admin & User Guide
Figure 3–8: GeoManager Map View
When you first open GeoManager, you are shown a default view of the world. Each user may change this view to a customized view that shows the area most important to them. For more information about managing custom views, see “Manage Custom Views” on page 59.
Map View Navigation
In the top, left corner of the map are navigation tools, shown in Figure 3–9, that help you move around the map and get a better idea about where your drivers and field technicians are when in the field.
Figure 3–9: Map View Navigation Tools
Trimble MRM Confidential 23

GeoManager Admin & User Guide
The Follow Selection icon allows you to view the selected devices and landmarks on the map. When enabled, the map will automatically adjust and update to continuously locate the selected mobile device(s) or Landmark(s) on the map. The button will appear yellow to indicate it is selected. This allows you to monitor the progress of specific mobile devices during the day.
Figure 3–10: Follow Selection Icon
To no longer follow the selected device(s) or Landmark(s), click the icon again.
On the far right of the Map View navigation bar is the View drop‐down list. From this menu, you can select the previously saved map views. If a custom view is selected the current map name is shown in the custom view box. If you adjust the map, the custom view box resets to the default Please select view.
Figure 3–11: View Drop-Down List
For more information about customizing map views, see “Manage Custom Views” on page 59.
Below the row of drop‐down features are viewing options for the map.
Figure 3–12: Viewing Options for the Map
The default view for the map is the 2D, Road view, shown in Figure 3–8. This view shows you the least map detail so you can easily find your mobile devices on the map.
The Aerial view, shown in Figure 3–13, allows you to see a satellite image of the area in the map.
Trimble MRM Confidential 24

GeoManager Admin & User Guide
Figure 3–13: Aerial View
The Bird’s Eye view allows you to see the building and immediate surrounding area for map areas. This can help increase driver safety through cautious driving through particular areas.
Note:Note:Not all areas have Bird’s Eye views available.
Trimble MRM Confidential 25

GeoManager Admin & User Guide
Note:Note:Bird’s Eye view of the United States, Canada, Mexico, New Zealand, Australia and Japan may not be used by any government entity or agency or branch thereof (municipal, state, federal state or other form of government and their equivalents in any jurisdiction) unless the parties enter into an explicit agreement for such use, signed by their duly authorized representatives.
Figure 3–14: Bird’s Eye View
On the left side of the navigation tools are a series of navigation buttons that help you incrementally adjust the map as needed. Depending on the view you select, different navigation buttons will display. The navigation buttons shown in Figure 3–15 display all possible navigation button options.
Figure 3–15: Map View Navigation Buttons
Trimble MRM Confidential 26

GeoManager Admin & User Guide
Just above the zoom tools are the navigation arrows. These arrows move the map incrementally in the direction of the arrow, with North pointing up, East pointing right, South pointing down and West pointing left.
Figure 3–16: Map Navigation Arrows
Clusters
The map automatically replaces groups of device or landmark icons with cluster icons to avoid cluttering, shown in Figure 3–17.
Figure 3–17: Cluster Icons
Note:Note:Note: The red oval is for illustration purposes only. It does not appear in GeoManager.
Icon Description
Magnifying Glass with (+) – Zooms in incrementally for a closer look at the map.
Magnifying Glass with (-) – Zooms out incrementally for a more extensive view of the map.
Trimble MRM Confidential 27

GeoManager Admin & User Guide
Hover the mouse over the cluster icons to display a list of all devices or landmarks that form the cluster.
Figure 3–18: Cluster Icons Pop Ups
Map View Right Click Menu
When you right click on Map View a menu displays allowing you to perform a number of different tasks pertaining to the management of your mobile devices and Landmarks on the map.
Figure 3–19: Map View Right Click Menu
Drive From Here
The Drive From Here feature from the Map View right click menu, shown in Figure 3–19, menu, displays a red push pin and address of the selected location in Map View. Drive From Here works in conjunction with Drive To Here to display driving directions from one location to another using the Map View right click menu. For more information see Using Drive From Here and Drive To Here to View Driving Directions on page 30.
To view a desired start location for a mobile device using the right click menu:
1. Place your mouse over the desired start location.
2. Select Drive From Here from the Map View right click menu, shown in Figure 3–19. A red push pin icon displays at the start location and the Driving Directions fields will display with the corresponding address in the Start field, shown in Figure 3–20.
Trimble MRM Confidential 28

GeoManager Admin & User Guide
For more detailed information on driving directions, please see Driving Directions on page 62.
Figure 3–20: Drive From Here
Drive To Here
Selecting Drive To Here from the Map View right click menu, shown in Figure 3–19, menu, initiates the second step in accessing driving directions from the right click menu.
To view a desired end location for a mobile device using the right click menu:
1. Place your mouse over the desired end location.
2. Select Drive From Here from the Map View right click menu, shown in Figure 3–19. A red push pin icon displays at the end location and the Driving Directions fields will display with the corresponding address in the End field, shown in Figure 3–20.
For more detailed information on driving directions, please see Driving Directions on page 62.
Trimble MRM Confidential 29

GeoManager Admin & User Guide
Figure 3–21: Drive To Here
Using Drive From Here and Drive To Here to View Driving Directions
To view Driving Directions for a mobile device using the right click menu:
1. Place your mouse over the desired start location.
2. Select Drive From Here. A red push pin icon displays at the start location and the Driving Directions fields will display with the corresponding address in the Start field, shown in Figure 3–20.
3. Select Drive To Here. Map View and the Driving Directions fields update with the driving path on the map and detailed directions, shown in Figure 3–22.
Trimble MRM Confidential 30

GeoManager Admin & User Guide
Figure 3–22: Drive To Here Results
For more detailed information on driving directions, please see Driving Directions on page 62.
Clear Directions
Selecting Clear Directions from the Map View right click menu, shown in Figure 3–19, menu, clears the Driving Directions fields and resets Map View.
Create Landmark
You can create new Landmarks in three ways, by selecting Create from the Landmark Actions drop down menu, the Map View right‐click menu or in the Landmark Administration section of GeoManager shown in “Landmark Administration” on page 183.
To create a Landmark from the Map View right click menu:
1. Place your mouse over the desired location.
2. Selected Create Landmark from the Map View right click menu, shown in Figure 3–19. The map updates with the selected location and the Create Landmark options display to the right of the map pre‐populated with address information, shown in Figure 3–23.
Trimble MRM Confidential 31

GeoManager Admin & User Guide
Figure 3–23: Create Landmark Fields
For more detailed information on creating new Landmarks, please see Create Landmark on page 50.
Closest Device
To see the closest mobile device to a selected location:
1. Place your mouse over the desired location.
2. Select Closest Device from the Map View right click menu, shown in Figure 3–19. The map updates showing the closest mobile device and selected location connected with a line displaying the distance between the two, shown in Figure 3–24.
Trimble MRM Confidential 32

GeoManager Admin & User Guide
Figure 3–24: Closest Mobile Device to Selected Location
Closest Landmark
To see the closest Landmark to a selected location:
1. Place your mouse over the desired location.
2. Select Closest Landmark from the Map View right click menu, shown in Figure 3–19. The map updates showing the closest landmark and selected location connected with a line displaying the distance between the two, shown in Figure 3–25.
Figure 3–25: Closest Landmark to Selected Location
Clear Closest
Selecting Clear Closest from the Map View right click menu, shown in Figure 3–19 clears the line and distance measurements from Map View following the selection of either Closest Device or Closest Landmark from the Map View right click menu.
Trimble MRM Confidential 33

GeoManager Admin & User Guide
Find POIs (Points of Interest) Near Here
Find POIs Near Here allows you to search for points of interest in a specific area.
To find a point of interest using the right click menu:
1. From the Map View right click menu, shown in Figure 3–19, select Find POIs Near Here. The Enter Point of Interest dialog displays in the upper left corner of the map, shown in Figure 3–73.
Figure 3–26: Enter Point of Interest Dialog Map View Right Click
2. Enter the desired point of interest in the What field.
Click the Clear Previous Results check box to clear previous selections.
3. Click OK. The map zooms in and displays red push pin representing all relevant points of interest for the entered criteria, shown in Figure 3–74.
Hover your mouse over a red push pin to see more information about the point of interest.
Click Cancel to exit without zooming to the point(s) of interest.
Figure 3–27: Find POI Near Here Results
Clear POIs
Selecting Clear POIs From the Map View right click menu, shown in Figure 3–19, menu, clears the point(s) of interest and resets Map View.
Trimble MRM Confidential 34

GeoManager Admin & User Guide
Mobile Device Table
The left side of the Map View, shown in Figure 3–28, displays the mobile device table which displays the device type, label, status, location and employee associated with the mobile device.
Figure 3–28: Device Table
When you click a mobile device in the list, the Map View changes to show the current location of the mobile device, as shown in Figure 3–29. You may also select multiple mobile devices to view by holding down the CTRL key while clicking the mobile device names.
Icon Description
Colored Diamond – Displayed when the selected vehicle is parked.
Up Arrow – Displays when the selected vehicle is travelling North.
Upper Right Arrow – Displays when the selected vehicle is travelling North East.
Trimble MRM Confidential 35

GeoManager Admin & User Guide
Note:Note: Icon colors are customer specified per device.
Status colors are:
• Red circles indicate vehicles that are inactive (the vehicle has not moved in 24 hours)
• Green circles indicate moving vehicles
• Blue circles indicate parked vehicles
• Grey circles indicate vehicles that are not reporting (the vehicle is not communicating with GeoManager)
Right Arrow – Displays when the selected vehicle is travelling East.
Lower Right Arrow – Displays when the selected vehicle is travelling South East.
Down Arrow – Displays when the selected vehicle is travelling South.
Lower Left Arrow – Displays when the selected vehicle is travelling South West.
Left Arrow – Displays when the selected vehicle is travelling West.
Upper Left Arrow – Displays when the selected vehicle is travelling North West.
Grey Triangle with Question Mark – Displays when the selected vehicle is not reporting.
Icon Description
Trimble MRM Confidential 36

GeoManager Admin & User Guide
Figure 3–29: Current Mobile Device Location
Note:Note:Note: The red oval is for illustration purposes only. It does not appear in GeoManager.
You can shorten the list of mobile devices in the mobile device table by using the Device Filter, shown in Figure 3–30. The Device Filter allows you to enter certain mobile device name criteria and shorten the list from all your mobile devices to just the ones you want to see in the map.
Figure 3–30: Device Filter
To filter your vehicle list:
1. Enter the Device Filter information. Once you have entered the information, you can reselect the information from the drop‐down menu.
2. Click the Magnifying Glass. The mobile device status box changes to show only the mobile devices with the selected criteria.
Click the blue Down Arrow to see more mobile device filtering options, shown in Figure 3–31.
Trimble MRM Confidential 37

GeoManager Admin & User Guide
Figure 3–31: Device Filter Options Expanded
Click the Plus sign to expand additional filtering criteria.
Click Clear to erase all filtering criteria from the Device Filter field and see all the mobile devices in your fleet.
Click Apply to show only the mobile devices with the selected criteria.
Click the blue Up Arrow to collapse the expanded device filter options view.
The expanded filter options allow you to filter mobile devices by groups and employees as well as mobile device label information. You can also select the same filter option more than once to filter within the specified criteria.
Landmark Table
From the mobile device table view, shown in Figure 3–28, click the Landmark tab to show the Landmark Table which displays information about landmarks including the landmark type, name and address associated with the landmark, shown in Figure 3–32.
Trimble MRM Confidential 38

GeoManager Admin & User Guide
Figure 3–32: Landmark Table
When you click a Landmark in the list, the Map View changes to show the current location of the landmark, as shown in Figure 3–33. You may also select multiple landmarks to view by holding down the CTRL key while clicking the landmarks names.
Figure 3–33: Current Mobile Device Location
Trimble MRM Confidential 39

GeoManager Admin & User Guide
Note:Note:Note: The red oval is for illustration purposes only. It does not appear in GeoManager.
You can shorten the list of landmarks by using the Landmark Filter, shown in Figure 3–30. The Landmark Filter allows you to enter certain landmark criteria and shorten the list from all your landmarks to just the ones you want to see in the map.
Figure 3–34: Landmark Filter
To filter your landmark list:
1. Enter the Landmark Filter information. Once you have entered the information, you can reselect the information from the drop‐down menu.
2. Click the Magnifying Glass. The landmark box changes to show only the landmarks with the selected criteria.
Click the blue Down Arrow to see more landmark filtering options, shown in Figure 3–35.
Figure 3–35: Landmark Filter Options Expanded
Click the Plus sign to expand additional filtering criteria.
Click Clear to erase all filtering criteria from the Landmark Filter field and see all the mobile devices in your fleet.
Click Apply to show only the landmarks with the selected criteria.
Click the blue Up Arrow to collapse the expanded landmark filter options view.
The expanded filter options allow you to filter landmarks by group, type, city and zip code information.
Trimble MRM Confidential 40

GeoManager Admin & User Guide
Device Actions
Above Map View there are three drop down menus, shown in Figure 3–3, that allow you to perform actions specific to Devices, Landmarks and Map View. The Device Actions drop down menu allows you to perform a number of different tasks pertaining to the management of your mobile devices.
Figure 3–36: Device Actions Drop Down Menu
Path
GeoManager allows you to view the traveled path of any or multiple devices for a selected time frame.
To see a mobile device path:
1. From the Devices List, select the desired mobile device. You may select multiple mobile devices by holding down the Ctrl key.
2. Select Path from the Device Actions drop down menu, shown in Figure 3–36.
3. The Device Path options, shown in Figure 3–37, display. Perform the following:
Trimble MRM Confidential 41

GeoManager Admin & User Guide
Figure 3–37: Device Path Options
a. Select the Date when you want to see the path the mobile device traveled.
b. Click the Clock button to select the From time using the up and down arrows below the time units.
c. Click the Clock button to select the To time using the up and down arrows below the time units.
d. Select the Device Path Options you want shown:
• Select the check box for Show Stop Sequence Only to show only stop sequences.
• Select the check box for to Show Sequence Labels for the path.
4. Click Show. The map changes to show the path of the selected device. The device path options display information for each directional change as well as stop, shown in Figure 3–38.
When you mouse over a point in the device path additional information is displayed.
Click Clear to clear your previous selection.
Trimble MRM Confidential 42

GeoManager Admin & User Guide
Figure 3–38: Mobile Device Path in Map View
If you selected Show Stop Sequence Only, just the stops made by the mobile device will appear on the map, shown in Figure 3–39.
Trimble MRM Confidential 43

GeoManager Admin & User Guide
Figure 3–39: Mobile Device Path Showing Stops Only in Map View
Configure Mobile Device Details
Configure Mobile Device Details enables you to configure labels and color icons in map view for each mobile device or vehicle.
Select Configure Mobile Device Details from the Device Actions drop down menu, shown in Figure 3–36. The Mobile Device Settings screen shown in Figure 5–19 displays. For more information on configuring mobile device settings, please see “: Mobile Device Settings Screen” on page 125.
Activities
Selecting Activities from the Device Actions drop down menu displays the Activity Detail report for the selected device on the current date.
For more information about reports, see the GeoManager Reports Overview Guide.
p
Trimble MRM Confidential 44

GeoManager Admin & User Guide
Exception
Selecting Exception from the Device Actions drop down menu displays the Exception History report for the selected device. This displays up to ten exceptions triggered by the mobile device if any, up to 14 days from the current date.
For more information about exception reports, see the GeoManager Reports Overview Guide.
Find Closest Device
To see the closest mobile device to the selected mobile device:
1. From the Devices List, select the desired mobile device.
2. Select Find Closest Devices from the Device Actions drop down menu, shown in Figure 3–36. The closest mobile devices, within a 25‐mile radius, display in the Dynamic Results list shown in Figure 3–40.
Figure 3–40: Closest Mobile Devices Dynamic Results
Find Closest Landmark
To see the closest mobile device to the selected mobile device:
1. From the Devices List, select the desired mobile device.
2. Select Find Closest Landmarks from the Device Actions drop down menu, shown in Figure 3–36. The closest Landmarks, within a 25‐mile radius, display in the Dynamic Results list, shown in Figure 3–41.
Trimble MRM Confidential 45

GeoManager Admin & User Guide
Figure 3–41: Closest Landmarks Dynamic Results
Find Closest (Device) to Address
To see the closest mobile devices to an address:
1. From the Devices List, select the desired mobile device.
2. Select Find Closest to Address from the Device Actions drop down menu, shown in Figure 3–36. The Enter Address dialog displays in the upper left corner of the map, shown in Figure 3–42.
Figure 3–42: Enter Address Dialog
3. Enter the desired address in the Address field.
4. Enter the desired distance in the Radius field. The default distance is 25 miles.
5. Click OK. The closest mobile devices, within the specified distance radius, display in the Dynamic Results list shown in Figure 3–43.
Trimble MRM Confidential 46

GeoManager Admin & User Guide
Figure 3–43: Closest Devices to Address Dynamic Results
Find Closest (Device) to Location
To see the closest mobile devices to an address:
1. From the Devices List, select the desired mobile device.
2. Select Find Closest to Location from the Device Actions drop down menu, shown in Figure 3–36. The Enter Location dialog displays in the upper left corner of the map, shown in Figure 3–44.
Figure 3–44: Enter Location Dialog
3. Enter the desired latitude coordinates in the Latitude field.
4. Enter the desired longitude coordinates in the Longitude field.
5. Enter the desired distance in the Radius field. The default distance is 25 miles.
6. Click OK. The closest mobile devices, within the specified distance radius, display in the Dynamic Results list shown in Figure 3–43.
Trimble MRM Confidential 47

GeoManager Admin & User Guide
Figure 3–45: Closest Devices to Location Dynamic Results
Update
Update provides you a status update on the selected vehicle in between your automatic updates, which may be 15, 5 or 2 minute intervals.
To update your mobile device:
1. From the Devices List, select the desired mobile device.
2. Select Update from the Device Actions drop down menu, shown in Figure 3–36. GeoManager will send a message to the device to get the latest information on its status.
Send Message
Send Message is an optional GeoManager feature that allows you to easily communicate with drivers.
To send a message to your mobile device:
1. From the Devices List, select the desired mobile device.
2. Select Send Message from the Device Actions drop down menu, shown in Figure 3–36. The Messages for Device window opens in a separate window, shown in Figure 3–46.
Trimble MRM Confidential 48

GeoManager Admin & User Guide
Figure 3–46: Messages for Device
3. Select a canned message from the Select a Pre‐defined Message drop down menu.
Enter a message in the Type New Message field.
4. Click SEND.
Click Clear to clear all fields.
For more detailed information on Messaging, please see Messaging on page 74.
Messaging
Messaging, an optional GeoManager feature, provides an easy‐to‐use communication tool.
For more detailed information on Messaging, please see Messaging on page 74.
Landmark Actions
Landmarks enable you to define and post special destinations and locations in the GeoManager Map View, then view them in relation to current mobile device locations. Landmarks are an excellent tool for administrators looking to streamline their mobile device routing process while reducing wasted time, fuel costs and other expenses. The Landmark Actions drop down menu allows you to perform a number of different tasks pertaining to the management of your Landmarks.
Trimble MRM Confidential 49

GeoManager Admin & User Guide
Figure 3–47: Landmark Actions Drop Down Menu
Create Landmark
You can create new Landmarks in three ways, by selecting Create from the Landmark Actions drop down menu, the Map View right‐click menu or in the Landmark Administration section of GeoManager shown in “Landmark Administration” on page 183.
To create a Landmark from the Landmark Actions drop down menu:
1. Selected Create from the Landmark Actions drop down menu, shown in Figure 3–47. The Create Landmark options display to the right of the map for creating a new Landmark, shown in Figure 3–48.
Trimble MRM Confidential 50

GeoManager Admin & User Guide
Figure 3–48: Create Landmark Fields
2. Enter the new Landmark Name.
3. Select the Landmark Type from the drop‐down menu.
4. Select the Organization from the drop‐down menu. This list contains the groups you created in Organizational Hierarchy.
5. There are three ways to place a Landmark on the map:
• Enter the Latitude and Longitude
• Select the location on the map
• Enter the street address
To enter the Latitude and Longitude:
a. Enter the Latitude for the Landmark.
Trimble MRM Confidential 51

GeoManager Admin & User Guide
b. Enter the Longitude for the Landmark.
c. Click Show on Map. If the Landmark appears in the correct location on the map, con‐tinue with the Fence step.
To select the location from the map:
a. Click Select from Map. When you move the mouse to the map, you will see that the cur‐sor has changed to a cross hair.
b. Click the place on the map where you want the Landmark. A temporary push‐pin icon appears, as shown in Figure 3–49.
Figure 3–49: Landmark Push Pin Icon
c. Verify that the location is correct. If it is, continue with the Fence step.
If not, click Select from Map again and relocate the Landmark.
To Enter a street address:
a. Enter the Landmark Street address.
b. Enter the Landmark City.
c. Enter the Landmark County.
d. Enter the Landmark State/Province.
e. Enter the Landmark Zip/Postal Code.
f. Select the Country from the drop‐down menu.
g. Click Show on Map. If the Landmark appears in the correct location on the map, con‐tinue with the Fence step.
If not, check the address information and correct any mistakes.
6. Select the Fence type from the drop‐down menu. You may select Circle, Polygon or Rectangle.
7. Enter the Height, if known.
8. Enter the Width, if known.
Trimble MRM Confidential 52

GeoManager Admin & User Guide
9. Click Draw on Map. When you move the mouse to the Landmark location on the map, you will see that the cursor has changed to a cross hair which you can use to create colored circle, rectangle or line for creating a polygon shape, as shown in Figure 3–50. This will create the border around the Landmark.
Figure 3–50: Fence Types
To create a circle or rectangle shape:
a. Click the spot where you want to start the fence border.
b. Drag the mouse across the map to select the area for the border.
c. Right click when you achieve the size you want.
To create a polygon shape:
a. Click the spot where you want to start the radius.
b. Move the mouse to draw a line to the next point.
c. Click the mouse to add a corner.
d. Repeat steps b and c until you achieve the desired area.
e. Right click the mouse when finished.
10. Enter the Start date for the Landmark. You can also click the calendar and select a date.
11. Enter an optional End date for the Landmark. If you enter an end date, the Landmark disappears at midnight of the entered date.
12. Click Save. A confirmation dialog box, appears.
Click Cancel to erase the information without saving the Landmark.
13. Click OK. The Landmark list refreshes to show your current list of Landmarks including the one you just created.
Trimble MRM Confidential 53

GeoManager Admin & User Guide
Edit Landmarks
You can edit Landmarks in three ways, by selecting Edit from the Landmark Actions drop down menu, editing the Landmark in Map View or in the Landmark Administration section of GeoManager shown in “Editing a Landmark” on page 185.
To edit a Landmark using Landmark Actions:
1. From the Landmarks List, select the Landmark you wish to edit.
2. Select Edit from the Landmark Actions drop down menu, shown in Figure 3–47. The Edit Landmark options, shown in Figure 3–51, display.
Figure 3–51: Edit Landmark Options
3. Change the necessary information.
4. Click Save.
Click Cancel to exit Edit Landmark without saving changes.
Trimble MRM Confidential 54

GeoManager Admin & User Guide
To edit a Landmark in Map View:
1. Find the Landmark you want to edit in the map view.
2. Hover your mouse over it until you see the little yellow square appear, shown in Figure 3–52.
Figure 3–52: Open Landmark Dialog Box
3. Hover over the yellow square. A Landmark dialog box, shown in Figure 3–53, appears with information about the Landmark.
Figure 3–53: Landmark Dialog Box
4. Click Edit. The Edit Landmark options, shown in Figure 3–51, display.
5. Change the necessary information.
6. Click Save.
Click Cancel to exit Edit Landmark without saving changes.
Deleting Landmarks
You can delete unnecessary Landmarks in three ways, by selecting Delete from the Landmark Actions drop down menu, deleting the Landmark in Map View or in the Landmark Administration section of GeoManager shown in “Removing a Landmark Type” on page 196.
To delete a Landmark using Landmark Actions:
1. From the Landmarks List, select the Landmark you wish to delete.
Trimble MRM Confidential 55

GeoManager Admin & User Guide
2. Select Delete from the Landmark Actions drop down menu, shown in Figure 3–47. A confirmation dialog box appears, shown in Figure 3–54.
3. Click OK to delete the Landmark.
Click Cancel to close the confirmation dialog without deleting the Landmark.
Figure 3–54: Delete Landmark Confirmation Dialog Box
To delete a Landmark using Map View:
1. Find the Landmark you want to delete in the map view.
2. Hold your mouse over it until you see the little yellow square appear, shown in Figure 3–52.
3. Click the yellow square. A Landmark dialog box, shown in Figure 3–53, appears with information about the Landmark.
4. Click Delete Landmark. A confirmation dialog box appears, shown in Figure 3–54.
5. Click OK to delete the Landmark.
Click Cancel to close the confirmation dialog without deleting the Landmark.
Find Closest Device
To see the closest mobile device to the selected Landmark:
1. From the Landmarks List, select the desired Landmark.
2. Select Find Closest Devices from the Landmark Actions drop down menu, shown in Figure 3–47. The closest mobile devices, within a 25‐mile radius, display in the Dynamic Results list shown in Figure 3–55.
Trimble MRM Confidential 56

GeoManager Admin & User Guide
Figure 3–55: Closest Mobile Devices to Landmark Dynamic Results
Find Closest Landmark
To see the closest Landmark to the selected landmark:
1. From the Landmarks List, select the desired Landmark.
2. Select Find Closest Landmarks from the Landmarks Actions drop down menu, shown in Figure 3–47. The closest Landmarks, within a 25‐mile radius, display in the Dynamic Results list, shown in Figure 3–56.
Figure 3–56: Closest Landmarks to Landmark Dynamic Results
Find Closest (Landmark) to Address
To see the closest Landmark to an address:
1. From the Landmarks List, select the desired Landmark.
2. Select Find Closest to Address from the Landmark Actions drop down menu, shown in Figure 3–47. The Enter Address dialog displays in the upper left corner of the map, shown in Figure 3–42.
3. Enter the desired address in the Address field.
4. Enter the desired distance in the Radius field. The default distance is 25 miles.
Trimble MRM Confidential 57

GeoManager Admin & User Guide
5. Click OK. The closest Landmark, within the specified distance radius, display in the Dynamic Results list shown in Figure 3–43.
Figure 3–57: Closest Landmarks to Address Dynamic Results
Find Closest (Device) to Location
To see the closest Landmarks to an address:
1. From the Landmarks List, select the desired Landmark.
2. Select Find Closest to Location from the Landmark Actions drop down menu, shown in Figure 3–47. The Enter Location dialog displays in the upper left corner of the map, shown in Figure 3–44.
3. Enter the desired latitude coordinates in the Latitude field.
4. Enter the desired longitude coordinates in the Longitude field.
5. Enter the desired distance in the Radius field. The default distance is 25 miles.
6. Click OK. The closest Landmarks, within the specified distance radius, display in the Dynamic Results list shown in Figure 3–43.
Figure 3–58: Closest Devices to Location Dynamic Results
Trimble MRM Confidential 58

GeoManager Admin & User Guide
Map Actions
The Map Actions drop down menu allows you to perform a number of different tasks pertaining to the management of Map View.
Figure 3–59: Map Actions Drop Down Menu
Manage Custom Views
The Map View allows you to customize specific views for different geographical areas of your business and select a default Map View which initially appears when you log into GeoManager.
To manage your current Map View(s) Select Manage Custom Views from the Map Actions drop down menu, shown in Figure 3–59. The Custom View List, shown in Figure 3–60, appears.
Trimble MRM Confidential 59

GeoManager Admin & User Guide
Figure 3–60: Custom Views List
Add a New Custom View
To add a new Custom View to your Custom Views drop‐down list:
1. Locate the view you want to create as custom in your map. This may entail zooming in or out and shifting the map around.
2. Once you have the map situated the way you like, click the Add New View button at the top of the Custom View List.
3. A new, highlighted item appears at the end of the Custom View List. The new view has a default name of New View, shown in Figure 3–61.
Trimble MRM Confidential 60

GeoManager Admin & User Guide
Figure 3–61: New Custom View
4. Enter the desired name for the new view.
Select the Default radio button next to the new view if you want to make it the default view for this account.
Click the Share check box next to the new view if you want to share this view with other users.
The map now shows the new view.
Note:Note:The number of custom views you can create is unlimited.
Delete a Custom View
To delete a Custom View:
1. Select the radio button next to the view you want to delete.
2. Click Delete. The Delete view dialog, shown in Figure 3–62, displays.
Trimble MRM Confidential 61
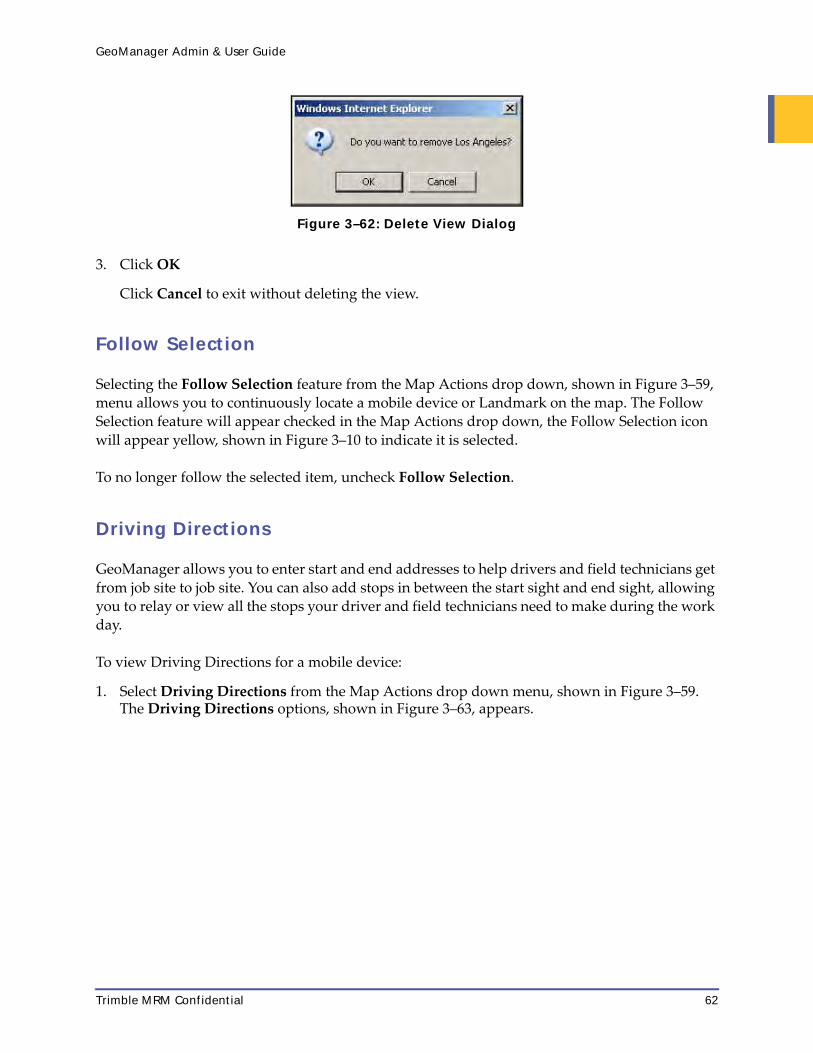
GeoManager Admin & User Guide
Figure 3–62: Delete View Dialog
3. Click OK
Click Cancel to exit without deleting the view.
Follow Selection
Selecting the Follow Selection feature from the Map Actions drop down, shown in Figure 3–59, menu allows you to continuously locate a mobile device or Landmark on the map. The Follow Selection feature will appear checked in the Map Actions drop down, the Follow Selection icon will appear yellow, shown in Figure 3–10 to indicate it is selected.
To no longer follow the selected item, uncheck Follow Selection.
Driving Directions
GeoManager allows you to enter start and end addresses to help drivers and field technicians get from job site to job site. You can also add stops in between the start sight and end sight, allowing you to relay or view all the stops your driver and field technicians need to make during the work day.
To view Driving Directions for a mobile device:
1. Select Driving Directions from the Map Actions drop down menu, shown in Figure 3–59. The Driving Directions options, shown in Figure 3–63, appears.
Trimble MRM Confidential 62

GeoManager Admin & User Guide
Figure 3–63: Enter Driving Directions
2. Enter the Start address. You may enter the street address, street name, city, state and zip code separated by commas. While you do not need to enter the entire address, you should enter as much as possible for accurate direction information.
If you do not enter a valid address, an error dialog box appears. Click OK and correct the address reverts to the previously entered address.
Figure 3–64: Incorrect Address Dialog Box
3. Click Add a Stop if you want to add a stop for your driver or field technician. You must click this button for each stop you want to add.
Note:Note:You cannot add stops after the addresses are mapped.
If you have added too many Add a Stop fields, you can close the unnecessary ones by clicking the red X next to the right side of the field, as shown in Figure 3–65.
Trimble MRM Confidential 63

GeoManager Admin & User Guide
Figure 3–65: Close Stop Field
4. Enter the End address. You may enter the street address, street name, city, state and zip code separated by commas. While you do not need to enter the entire address, you should enter as much as possible for accurate direction information.
5. Select your Route Option:
• Shortest Time
• Shortest Distance
• Place a check in the Use Clearflow to route based on traffic check box to avoid heavy traffic areas.
6. Click Get Directions. The map view changes, shown in Figure 3–66, to show the best route based on your criteria.
Trimble MRM Confidential 64

GeoManager Admin & User Guide
Figure 3–66: Driving Directions Map
Note:Note:While relaying or printing driving directions are good for a small fleet or occasional use, large fleets may require dispatching software.
You can edit any of the addresses you entered by:
1. Click the Edit link next to the address you want to change. A Stop field appears below the previously entered address.
2. Enter the new stop address. You may enter the street address, street name, city, state and zip code separated by commas. While you do not need to enter the entire address, you should enter as much as possible for accurate direction information.
3. Click the Get Directions link just below the Stop field.
The map view changes to show the new directions.
Trimble MRM Confidential 65
GeoManager Admin & User Guide
Note:Note:You can also access driving directions using the Map View right click menu. For more detailed information on viewing driving directions using the Map View right click menu, please see Using Drive From Here and Drive To Here to View Driving Directions on page 30.
Clear Directions
Selecting Clear Directions from the Map Actions drop down, shown in Figure 3–59, menu, clears the Driving Directions fields and resets Map View.
Show Traffic
Selecting Show Traffic from the Map Actions drop down, shown in Figure 3–59, menu, the map view roads change to show a color coded system of how heavy or light traffic may be on the highways, shown in Figure 3–67. A legend displays just beneath the Map View navigation tools indicating the color coding for the traffic flow. Black and red highways show areas of heavy traffic, yellow areas are slow traffic and green areas are light, free flowing traffic.
Trimble MRM Confidential 66
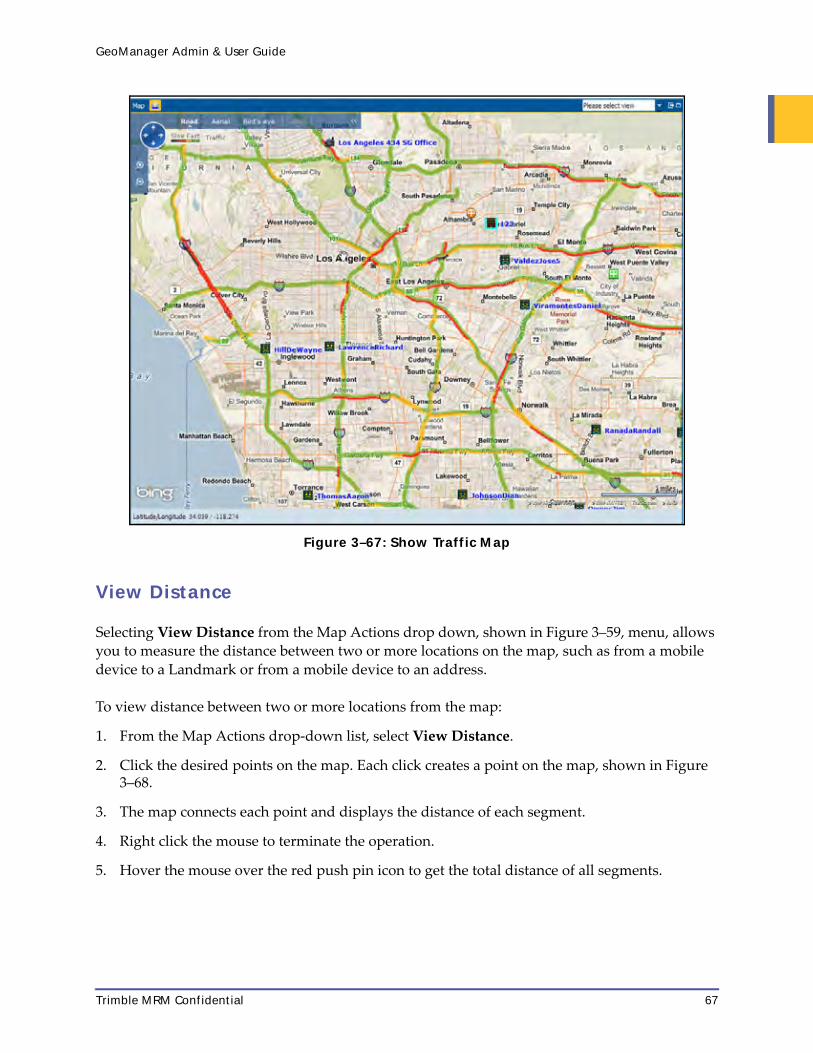
GeoManager Admin & User Guide
Figure 3–67: Show Traffic Map
View Distance
Selecting View Distance from the Map Actions drop down, shown in Figure 3–59, menu, allows you to measure the distance between two or more locations on the map, such as from a mobile device to a Landmark or from a mobile device to an address.
To view distance between two or more locations from the map:
1. From the Map Actions drop‐down list, select View Distance.
2. Click the desired points on the map. Each click creates a point on the map, shown in Figure 3–68.
3. The map connects each point and displays the distance of each segment.
4. Right click the mouse to terminate the operation.
5. Hover the mouse over the red push pin icon to get the total distance of all segments.
Trimble MRM Confidential 67

GeoManager Admin & User Guide
Figure 3–68: View Distance Map
6. Un‐check View Distance from the Map Actions list to clear the distance segments from the map.
Zoom to Location
To zoom to a location on the map using latitude and longitude coordinates:
1. From the Map Actions drop down menu, shown in Figure 3–59, select Zoom to Location. The Enter Location dialog displays in the upper left corner of the map, shown in Figure 3–69.
Figure 3–69: Enter Location Dialog Map Actions
2. Enter the desired latitude coordinates in the Latitude field.
3. Enter the desired longitude coordinates in the Longitude field.
Trimble MRM Confidential 68

GeoManager Admin & User Guide
4. Click OK. The map zooms in and displays a red push pin indicating the exact latitude and longitude coordinates entered, shown in Figure 3–70.
Click Cancel to exit without zooming to location.
Figure 3–70: Enter Location Results Map Actions
Zoom to Address
To zoom to an address on the map:
1. From the Map Actions drop down menu, shown in Figure 3–59, select Zoom to Address. The Enter Address dialog displays in the upper left corner of the map, shown in Figure 3–71.
Figure 3–71: Enter Address Dialog Map Actions
2. Enter the desired address in the Address field.
3. Click OK. The map zooms in and displays a red push pin indicating the exact latitude and longitude coordinates entered, shown in Figure 3–72.
Click Cancel to exit without zooming to location.
Trimble MRM Confidential 69

GeoManager Admin & User Guide
Figure 3–72: Enter Address Results Map Actions
Clear Closest
Selecting Clear Closest from the Map Actions drop down, shown in Figure 3–59, menu, clears the line and distance measurements from Map View following the selection of either Closest Device or Closest Landmark from the Map View right click menu.
Find POI
Find POI allows you to search for points of interest in a specific area.
To find a point of interest:
1. From the Map Actions drop down menu, shown in Figure 3–59, select Find POI. The Enter Point of Interest dialog displays in the upper left corner of the map, shown in Figure 3–73.
Figure 3–73: Enter Point of Interest Dialog Map Actions
2. Enter the desired point of interest in the What field.
3. Enter the desired location in the Where field.
Click the Clear Previous Results check box to clear previous selections.
4. Click OK. The map zooms in and displays red push pin representing all relevant points of interest for the entered criteria, shown in Figure 3–74.
Trimble MRM Confidential 70

GeoManager Admin & User Guide
Hover your mouse over a red push pin to see more information about the point of interest.
Click Cancel to exit without zooming to the point(s) of interest.
Figure 3–74: Point of Interest Results Map Actions
Clear POIs
Selecting Clear POIs from the Map Actions drop down, shown in Figure 3–59, menu, clears the point(s) of interest and resets Map View.
Show Device Layer
Selecting Show Device Layer from the Map Actions drop down, shown in Figure 3–59, shows mobile devices icons in Map View, shown in Figure 3–75.
Figure 3–75: Show Device Layer
Uncheck Show Device Layer to hide mobile device icons.
Show Device Labels
Selecting Show Device Labels from the Map Actions drop down, shown in Figure 3–59, menu, shows mobile devices labels in Map View, shown in Figure 3–76.
Trimble MRM Confidential 71
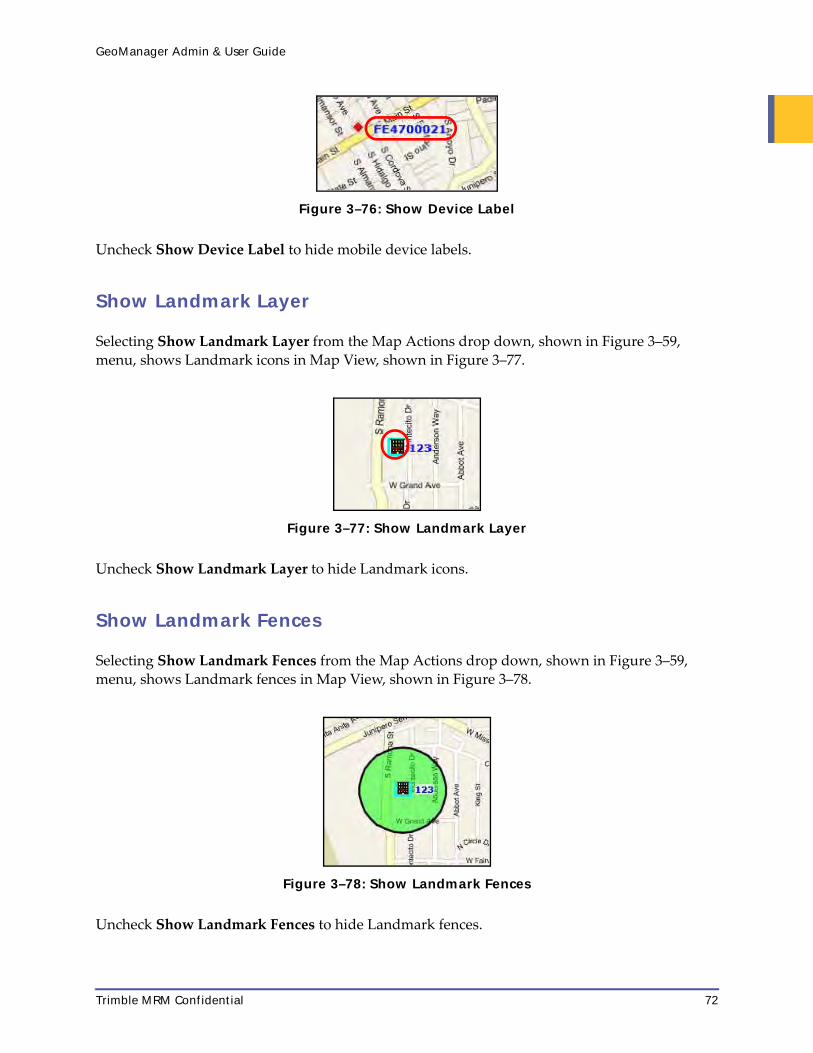
GeoManager Admin & User Guide
Figure 3–76: Show Device Label
Uncheck Show Device Label to hide mobile device labels.
Show Landmark Layer
Selecting Show Landmark Layer from the Map Actions drop down, shown in Figure 3–59, menu, shows Landmark icons in Map View, shown in Figure 3–77.
Figure 3–77: Show Landmark Layer
Uncheck Show Landmark Layer to hide Landmark icons.
Show Landmark Fences
Selecting Show Landmark Fences from the Map Actions drop down, shown in Figure 3–59, menu, shows Landmark fences in Map View, shown in Figure 3–78.
Figure 3–78: Show Landmark Fences
Uncheck Show Landmark Fences to hide Landmark fences.
Trimble MRM Confidential 72

GeoManager Admin & User Guide
Show Landmark Label
Selecting Show Landmark Label from the Map Actions drop down, shown in Figure 3–59, menu, shows Landmark label in Map View, shown in Figure 3–79.
Figure 3–79: Show Landmark Layer
Uncheck Show Landmark Layer to hide Landmark labels.
Print Map
You can print the current view Map Actions drop down, shown in Figure 3–59.
To print the current view:
1. Select Print Map from the Map Actions drop down. The Print dialogue box appears.
2. Select the correct printer and number of copies.
3. Click Print. An example of the printed MapView, shown in Figure 3–80.
Trimble MRM Confidential 73

GeoManager Admin & User Guide
Figure 3–80: Print Map Sample
Messaging
Messaging, an optional GeoManager feature, provides an easy‐to‐use communication tool. With Messaging, administrators can streamline and manage current business processes. It enables the administrator to give instructions as and when required.
Sending a Message to Specific Device
To send a message to a specific device:
1. Select a device from the Device table, shown in Figure 3–28, or hover your mouse over the desired device to view the Device Dialog box, shown in Figure 3–4.
2. Select Send Message from the Device Dialog box, shown in Figure 3–4, or the Device Actions drop down menu, shown in Figure 3–36. The Messages for Device window opens in a separate window shown in Figure 3–81.
Trimble MRM Confidential 74

GeoManager Admin & User Guide
Figure 3–81: Send Message Dialog Box
3. Select a Pre‐defined Message from the Select a Pre‐defined Message drop down menu, or enter a new text message containing up to 480 characters.
4. Click Send to send the message.
Click Clear to clear the Type New Message field without sending.
Sending and Receiving Messages
Select Messaging from the Device Actions drop down menu, shown in Figure 3–36. The Messaging window opens in a separate window, shown in Figure 3–82. The mouse can be used to roll over the inbound/outbound messages and display the entire contents of a selected message or form.
Trimble MRM Confidential 75

GeoManager Admin & User Guide
Figure 3–82: Messaging Screen
Field Description
Inbox/Outbox Use drop-down menu to view the Inbox, Outbox or both.
View Messages or Forms Click check boxes to see either or both.
Organize Click the links to sort messages by Device, Time or Status.
Alert Mode Select from the drop-down menu, Normal, Away or No Alert.
To Select a message recipient here or choose a group from Select Group. To select multiple recipients, press and hold the [Ctrl] key and click the recipients.
Select Predefined Message Use the drop-down menu to choose a message.
Type New Message Enter a new text message containing up to 480 characters.
From Enter sender’s name in this field.
Send Click here to send a message.
Clear Click here to clear the text box.
Trimble MRM Confidential 76

GeoManager Admin & User Guide
Messaging Alerts
Messaging Alerts notify you of new messages using audible sounds and/or pop‐up window alerts. You may keep the Messaging window open and minimized while you work on other applications.
To use Messaging Alerts, you will need:
• Sound card and speakers for Audible Alerts
• Messaging window must be open, minimized or maximized
Setting up Messaging Alerts
You may use Messaging Alerts in one of three different modes: Normal, Away and No Alert. Each new message session begins in Normal mode.
• Select Messaging from the Device Actions drop down menu.
• Select the desired mode from the Alert Mode drop down menu.
Normal Alert Mode
Messaging Window Maximized
When the Messaging window is maximized, you will receive a single audible alert when receiving a new message.
Messaging Window Minimized
When the Messaging window is minimized, a pop‐up window appears and an audible alert signals a new message. Click the OK button to acknowledge the new message and close the pop‐up window.
Away Alert Mode
Messaging Window Maximized
When the Messaging window is maximized, a pop‐up window appears and a continuous audible alert signals a new message.
• Click OK to acknowledge the new message and remain in Away mode.
• Click OK and Switch to Normal Mode to acknowledge the new message and switch to Normal mode.
After clicking either button, the pop‐up window closes and the continuous audible sound stops.
Trimble MRM Confidential 77

GeoManager Admin & User Guide
Messaging Window Minimized
When the Messaging window is minimized, a pop‐up window appears, a continuous audible alert sounds, and a New Message task bar item appears and blinks to signal a new message.
• Click OK to acknowledge the new message and remain in Away mode.
• Click OK and Switch to Normal Mode to acknowledge the new message and switch to Normal mode.
After clicking either button, the pop‐up window and blinking task bar close, and the continuous audible sound stops.
No Alert Mode
All alert functions are disabled in No Alert mode.
Work Flow Status
Work Flow Status, an optional GeoManager feature, gives dispatchers and administrators instant visibility of mobile worker status. The Work Flow Status screen, shown in Figure 3–83, is an electronic replacement of the old‐fashioned dispatcher’s bulletin board showing which workers are on‐duty and available, on‐duty and busy, off‐duty, at lunch, out sick or any other status in an easy to read table format.
Figure 3–83: Work Flow Status Screen
Trimble MRM Confidential 78

GeoManager Admin & User Guide
Used with Messaging capabilities, a Work Flow Status is attached to a pre‐defined message. When the driver sends a message that has an associated status, the Work Flow Status screen updates to reflect the new worker status.
For example, if a mobile worker has completed a job at a customer site, he sends a pre‐defined message to the office (dispatch) that the work is complete. After the office (dispatch) receives the electronic message, the worker’s status changes from Working to Available, informing dispatch that he’s ready for the next assignment.
Clicking on the mobile device name opens a Work Flow Status Messaging screen, shown in Figure 3–84. Enter any message into the text field, then click send to deliver a message to any mobile device using Work Flow Status.
Figure 3–84: Work Flow Status Messaging Screen
Figure 3–85: Work Flow Status
Trimble MRM Confidential 79

GeoManager Admin & User Guide
Maintenance
Trimble GeoManager helps you keep track of your vehicle’s maintenance records, making it easier for you to keep your fleet performing at optimum efficiency.
The Vehicle Maintenance Status Details screen, shown in Figure 3–86, allows you to view the vehicle maintenance status details for a selected mobile device group.
Figure 3–86: Vehicle Maintenance Status Details Screen
You can retrieve the maintenance details for mobile devices classified under a specific group. You can distinguish the mobile device and its components that are due for maintenance by different color codes. A specific color code shown under each component states whether a vehicle requires no service, is due for service or is overdue for service. Check the Show Comments box to view comments.
When you mouse over any color coded dots, a message appears, as shown in Figure 3–87, showing the status details for each maintenance item.
Figure 3–87: Vehicle Maintenance Status Details Mouse Over
Trimble MRM Confidential 80

GeoManager Admin & User Guide
To update any of the maintenance items:
1. In the Vehicle Maintenance Status Details screen, click the Device Name of the vehicle for which you want to update status. The Update Maintenance Record for Vehicle screen, shown in Figure 3–88, appears.
Figure 3–88: Update Maintenance Record for Vehicle Screen
2. Select Add New Maintenance Record or Apply Changes to Existing Record from the drop‐down list.
3. In the Vehicle Service Performed At (Miles) field, enter the mileage when the service was performed.
4. In the Vehicle Service Performed At (Date) field, enter the date when the service was per‐formed.
Trimble MRM Confidential 81

GeoManager Admin & User Guide
5. In the Update Record column, select the check boxes of the maintenance items that were ser‐viced.
6. Enter any New Comments. You can enter comments up to 2000 characters.
7. Click Save. The Vehicle Maintenance Status Details screen appears with the selected main‐tenance items updated by color code.
Click Reset to clear any unsaved information.
Click Cancel to return to the Vehicle Maintenance Status Details screen.
Vehicle Diagnostics
The Vehicle Diagnostics section provides you a summary of all the diagnostic faults for each vehicle for which they are set up.
Vehicle Diagnostics Summary
The Diagnostics Summary, shown in Figure 3–89, shows what fault codes have been triggered for each mobile device. To access Diagnostics:
1. Click the Diagnostics link. The Vehicle Diagnostics Summary screen, shown in Figure 3–89, appears.
Trimble MRM Confidential 82

GeoManager Admin & User Guide
Figure 3–89: The Vehicle Diagnostics Summary Screen
Field Description
Vehicle Diagnostics Summary
The summary of vehicle status for the selected vehicle.
Driver The driver ID that who is assigned to the device.
Odometer The odometer reading at the time the fault occurred.
Date The date the report was requested.
Time The time the report was requested.
Location The location of the mobile device when the fault code was triggered. The link in this field opens a MapView window showing the location of the event, shown in Figure 3–89
Status The status of the mobile device at the time of the report.
Date Last Reported The most recent update reported for the fault code.
Time Last Reported The time the fault code was last reported.
Date First Reported The initial date the fault code was reported.
Time First Reported The initial time the fault code was reported.
Status The status of the vehicle at the time the fault was reported.
Trimble MRM Confidential 83

GeoManager Admin & User Guide
2. Click the Select Another Device link to view summaries for other mobile devices.The Select Mobile Device screen, shown in Figure 3–90, appears.
Figure 3–90: Select Mobile Device
3. Click on the mobile device for which you want to display a summary. If the mobile devices are not shown, you can find them by:
a. Select the group name from the Show devices in drop‐down menu.
b. Select Starting With, Ending With or Containing from the drop‐down menu.
c. Enter the known criteria in the text box.
Data Link The BUS type installed in the vehicle.
Ecu Address The address of the electronic controlling unit.
Ecu Description The description of the electronic controlling unit.
Manufacturer The manufacturer of the part reporting the fault.
Flash Code The firmware version # in the ECU.
ID The source id of the reported fault (e.g. Engine)
FMI The failure mode indicator code.
Description The description of the fault code.
FMI Description The description of the failure mode indicator code.
Total Count The total number of times the fault occurred.
Rolling Freeze Frame A link that opens a detailed account of the event in a new window showing the 30 seconds prior to the event, the actual event and the 10 seconds following the event, as shown in Figure 3–91.
Field Description
Trimble MRM Confidential 84

GeoManager Admin & User Guide
Fault Code Detail (Freeze Frame)
If you click the link under Rolling Freeze Frame in the online Fault History report, a detailed account of the 30 seconds before the fault code was triggered and the following 10 seconds after the event displays. This can help determine the behavior that led to the event.
Trimble MRM Confidential 85

GeoManager Admin & User Guide
Figure 3–91: The Fault Code Location Detailed Report (Freeze Frame)
Trimble MRM Confidential 86

GeoManager Admin & User Guide
Field Description
Vehicle The name of the mobile device.
Driver The employee assigned to drive the mobile device.
Summary
Event Type The type of Fault Code event. For this report it will always be hard brake.
Date The date the event occurred.
Time The time the event occurred.
Odometer The odometer reading when the event occurred.
Location The location of the mobile device when the event occurred.
Fault Detail
Status /
Time
Status
• The current status of the fault code or (DTC). This column has one of the following values:
• J1708 or J1939 (CAN) - Active or Inactive
• PBDII - Stored or Pending
Time
• The time the event occurred.
Datalink The type of data link to the vehicle. This column has one of the following values:
• J1708
• J1939 (CAN)
• OBDII
ECU Address • The numeric identifier of the ECU module reporting the fault or DTC
• MID for 1587, source address for 1939
• Module address for OBDII
ECU Description • The SAE defined definition of the source address. MID 128 = Engine #1, Source Address 003 = Transmission #1
• For OBDII the column value will be Powertrain, Chassis or Network
Trimble MRM Confidential 87

GeoManager Admin & User Guide
Manufacturer /
Flash Code
Manufacturer
• For J1587 or J1939, the name of the company that pro-duced the ECU reporting the fault code.
• For OBDII, if the code is generic or manufacturer specific
Flash Code
• For J1587 or J1939, the OEM manufacturer’s flash code. Derived from the PID/SID/SPN and FMI combination
• For OBDII, column is not needed.
ID
FMI
ID
• For J1587 or J1939, the numeric PID/SID or SPN defined by SAE.
• For OBDII, the 4 character DTC. Example: P0101
FMI
• The failure mode indicator code.
Description
FMI Description
Description
• For J1587 or J1939, the SAE defined text description of the ID field
• For OBDII, the description of the DTC
FMI Description
• For J1587 or J1939, the SAE defined text description of the FMI field
• For OBDII, not needed
Count • For J1587 or J1939 the number of times the ECU has detected the fault description
• For OBDII, not needed
• Not all ECU’s report this value
ID The source id of the reported fault (e.g. Engine)
FMI The failure mode indicator code.
Description The description of the fault code.
FMI Description The description of the failure mode indicator code.
Freeze Frame Detail
Time (sec) The number of seconds before, during and after the event occurred. This shows 30 seconds before, the second of and 10 seconds after the event occurs.
Road Speed (mph) The miles per hour the mobile device was traveling during the event and the 30 seconds before and 10 seconds after it occurred.
Field Description
Trimble MRM Confidential 88

GeoManager Admin & User Guide
Exceptions
The Exceptions Notification Console is a GeoManager browser‐based tool that allows you to easily view, sort and manage Exception alerts online. This provides a timely way to learn about Exceptions created by your mobile workers if real‐time notifications are not available or enabled for an Exception.
Online Console Notifications are delivered real‐time or next day based on how the Exception was configured. Real‐time Exception Notifications are immediately sent to the console, if console delivery was selected. Standard Exception Notifications are sent to the Console the following day. If Organizational Hierarchy or Group is enabled, only the devices you manage will be visible, making management of your fleet easier.
To view the Exception Notification Console:
1. Log into GeoManager. For more information about logging in, see the beginning of “Getting Started” on page 2.
2. Click Exception link. The Exception Notification Console, shown in Figure 3–92, appears in the right part of the screen.
Clicking the Alerts link will also launch the Exception Notification Console.
Engine Speed The RPM of the mobile device’s engine during the event and the 30 seconds before and 10 seconds after it occurred.
Accelerator Pedal Position (%) The position of the accelerator pedal before, during and after the event occurred. This shows 30 seconds before, the second of and 10 seconds after the event occurs.
Percent Engine Load (%) The engine load before, during and after the event occurred. This shows 30 seconds before, the second of and 10 seconds after the event occurs.
Battery Voltage (V) The battery voltage before, during and after the event occurred. This shows 30 seconds before, the second of and 10 seconds after the event occurs.
Coolant Temperature (°F) The coolant temperature before, during and after the event occurred. This shows 30 seconds before, the second of and 10 seconds after the event occurs.
Ambient Temperature (°F) The outside temperature before, during and after the event occurred. This shows 30 seconds before, the second of and 10 seconds after the event occurs.
Transmission Temperature (°F) The temperature of the transmission fluid before, during and after the event occurred. This shows 30 seconds before, the second of and 10 seconds after the event occurs.
Field Description
Trimble MRM Confidential 89

GeoManager Admin & User Guide
Figure 3–92: Exceptions Console
You can sort Exceptions shown in the Exceptions Notification Console by any of the column headers. To sort data, click on the column heading you want as your sort filter.
You may rearrange the order in which Exception data columns appear on screen. To change the order of your columns, click on the column header you want to move and drag it to the spot on the table in which you would like it to appear.
Message Types are color coded to make identification of like Exceptions easy to find and read.
If you set up real‐time alerts, you can elect to receive an audible alert each time a new notification is sent to the Notification Console. To enable or disable this option, click the alert icon. When it is disabled, the icon will appear with a red slash across it.
For additional details on any of the alerts:
Field Description
Row Delineates the order Exceptions were received, with the most recent appearing in row 1.
Date Date and time the Exception occurred.
Mobile Device The name of the mobile device that incurred the Exception.
Exception Type General Exception type.
Exception Name Specific Exception based upon custom parameters.
Exception Value Details that indicate why Exception was triggered.
Trimble MRM Confidential 90

GeoManager Admin & User Guide
1. Scroll to the alert you want to select.
2. Click the alert anywhere on the row.
Details appear in the Exception Details area at the bottom of the Exception Notification Console.
The Notification Console highlights your selection and additionally shows the Criteria that had to be met to generate the Exception as well as the Location of the mobile device when the Exception occurred.
To generate a printable version of this information, press the print icon in the upper right‐hand corner of the screen. The system will display the same information in a text format that can be easily printed.
You can print two ways:
• By clicking the Print link in the Details column of the Exception Summary screen. This will print the details for that specific Exception.
• By clicking the Print Summary button in the top right corner. This opens the typical Print dialogue box. Click Print to print the Exception Summary. Click Cancel to close the dialogue without printing.
Trimble MRM Confidential 91

GeoManager Admin & User Guide
4 Reports
GeoManager reports are designed to help you improve productivity by providing information on the historical activity of your organization’s mobile devices.
This feature allows you to generate reports based upon a set of parameters you define. Reports can be emailed to specified personnel on a scheduled basis (i.e., daily, weekly, monthly, etc.) Reports can also be delivered to a custom‐created FTP site address hosted by Trimble MRM with private access for just your company so you can download them at your convenience.
If you use Organizational Hierarchy, you can create roll‐up reports that give you specific information about each tier of your business, from the branch level up to the corporate level.
In order to set‐up or edit GeoManager scheduled reports, you will need GeoManager administration access. For complete information on scheduling reports, see the Reports Overview Guide.
The standard GeoManager On‐Demand Reports screen, shown in Figure 4–1, has two tabbed areas for different types of reports:
• Standard Reports
• Exception Reports
Figure 4–1: On-Demand Reports Screen
The screen defaults to the Standard Reports available in your GeoManager account. The list and types of reports will vary if you have any GeoManager value‐added packages. For a complete list of reports available in GeoManager, including their benefits and availability, see the Trimble MRM Reports Overview.
If you subscribe to Driver Logs, you will also see a tab for Driver Logs Reports, as shown in Figure 4–2.
Trimble MRM Confidential 92

GeoManager Admin & User Guide
Figure 4–2: On-Demand Reports Tabs with Driver Logs Reports
Note:Note:
If you do not subscribe to Driver Logs, you will not see the Driver Logs Reports tab.
Report Options
View the reports online using any supported browser or download the information to your desktop.
You may create downloadable reports using any of the following formats:
• Comma Delimited – Creates a file with report data separated by commas
• Tab Delimited – Creates a file with report data separated by tabs
• Excel Version – Creates a file with the report information in Microsoft® Excel format
These formats are suitable for importing to or exporting from any standard spreadsheet or database.
Note:Note:
The Excel version is compatible to Microsoft Excel 97 or later.
Generating Standard Reports
Before using GeoManager Reports, you must log into the GeoManager web site.
To create a standard report, complete the following procedure:
1. Click the Reports tab at the top of GeoManager. The Reports screen, shown in Figure 4–2, appears.
The GeoManager Reports screen has two tabbed areas for different types of reports:
Trimble MRM Confidential 93

GeoManager Admin & User Guide
• Standard Reports
• Exception Reports
2. Click the tab for the type of report you want.
3. Select the name of the report from the drop‐down menu as shown in Figure 4–3; Activity‐Detail, for example.
Figure 4–3: Standard Reports Tab
The input fields, shown in Figure 4–4, appear.
Trimble MRM Confidential 94

GeoManager Admin & User Guide
Figure 4–4: Activity – Detail Input Fields
Field Description
Select Report to Generate
This is filled in from the previous screen and shows Consolidated Exception report.
Mobile Device(s) / Group(s)
Combination of radio buttons, drop-menu and text box for organi-zation of mobile devices available for reporting. One radio button must be selected. One or more mobile devices or groups listed must be selected.
Search Text box and button that help users to shorten the mobile device or group list. Search criteria can be any alpha-numeric character con-tained within the mobile device or group name.
Time Period The length of time you want the report to contain.
An online report can contain one month or less of data. If you want to generate a report containing more than one month of data, then you must use the Scheduled Reports Tool. For more information about Scheduled Reports, see Section 5.
Trimble MRM Confidential 95

GeoManager Admin & User Guide
4. Select the Mobile Device(s) / Group(s) you want included on the report:
a. Select the radio button for mobile devices, Groups or mobile devices from Group.
If you select mobile devices from Group, select the Group from the drop‐menu.
b. Select the mobile devices for the report from the text box. Hold down [Ctrl] key to select more than one mobile device or group.
You can also search for the desired mobile device by entering the name or part of the name for the device and clicking Search. The mobile device list updates with any mobile devices matching the search criteria, making it easier to find the correct device.
5. Select the Time Period from the From and To Day, Month, Year, Hour and Min drop‐menus.
6. Select the Report Format from the drop‐menu.
If you choose to download the Exception Assignment Report select the check box to Include header in Comma and Tab Delimited downloadable reports if you want headers included in the report.
7. Click Generate Report. The Activity – Detail report, shown in Figure 4–5, appears.
Report Format Shows you the available formats for the Exception Reports. Cur-rently:
Online
Downloadable Format (Tab delimited)
Downloadable Format (Comma delimited)
Downloadable Format (Excel version)
Check Box Select if you want to include the header in Comma and Tab delim-ited downloadable reports.
Field Description
Trimble MRM Confidential 96

GeoManager Admin & User Guide
Figure 4–5: Activity - Detail Report
Please email [email protected] or call toll‐free 1‐877‐728‐7623 for more assistance.
You may generate the following standard reports:
• Account Grouping Reconciliation Detail
• Account Grouping Reconciliation Summary
• Activity – Detail
• Activity – Detail (Employee Based)
• Activity – Summary
• Activity – Sweeping
• Activity – Detail (with seconds)
• Braking Summary
• Daily Activity
• Data Usage Report
• Detailed Activity with Lat/Lon
• Engine Speed / Road Speed Detail – Distance
Trimble MRM Confidential 97

GeoManager Admin & User Guide
• Engine Speed / Road Speed Detail – Duration
• Engine Speed / Road Speed Detail – Fuel
• Engine Speed / Road Speed Detail – Fuel Economy
• Engine Speed / Road Speed Summary – Distance
• Engine Speed / Road Speed Summary – Duration
• Engine Speed / Road Speed Summary – Fuel
• Engine Speed / Road Speed Summary – Fuel Economy
• Following Distance Detail
• Following Distance Trend
• Form
• Forms Sent
• Fuel Usage Summary
• Message
• RBAC Audit Trail
• Shift Report
• State Mileage
• Stop
• Stop (Employee Based)
• Stop – Sweeping
• Stop Detail
• Stop Summary at Landmark Type Device
• Stop Summary at Landmark Type by Landmark
• Time Period Evaluation
• Timecard (Employee Based)
• Trip Report – Detail
• Trip Report – Summary
• User Logon Report
• Vehicle Maintenance History
• Vehicle Maintenance Overdue
• Vehicle Mileage Record
• WLAN Hourly Usage Report
• Weekly Time Variance
Trimble MRM Confidential 98

GeoManager Admin & User Guide
• Work Flow Status
For more information about individual Standard reports, see the GeoManager Reports Overview.
Exception Reports
The GeoManager Exceptions feature offers comprehensive monitoring and reporting tools that help efficiently manage daily mobile workforce operations and improve business productivity. Through various notifications and reports, Exceptions help managers monitor activities and events that are unexpected or out of company‐set bounds.
The various Exception reports available are:
• Diagnostics Fault
• Forms
• Handset Usage
• Hard Brake
• Idling
• Landmark
• Landmark Proximity
• Low Battery
• Messaging
• Mileage
• Mobile Device Vicinity
• Off Hours Use
• Speed
• Stop
• Stop Count
• Stop Duration
• Sudden Acceleration
• Switch Status
• Temp Status
• Zone
For more information about individual Exception reports, see the GeoManager Reports Overview.
Trimble MRM Confidential 99

GeoManager Admin & User Guide
Exception Report Uses
• Helps you maximize productivity and resources (mobile device, work force)
• Effective fuel management tool
• Helps driver compliance with regulatory norms such as speed limits, hours‐of‐service, hazmat transportation, fuel tax etc.
Exception Notification Console
The Exception Notification Console is a browser‐based tool that allows you to easily view, sort and manage alerts online. This provides a timely way to learn about Exceptions created by your mobile workers if real‐time notifications are not available or enabled for an Exception.
Online Console Notifications are delivered real‐time or next day based on how the Exception was configured. Real‐time Exception Notifications are immediately sent to the console, if console delivery was selected. Standard Exception Notifications are sent to the Console the following day.
To view the Exception Notification Console:
1. Log in to your Trimble Solution. For more information about logging in, see the beginning of Section 2, Getting Started
2. From the Trimble home page, click Exceptions under the Control Panel on the left of the home page. The Exception Notification Console, shown in Figure 4–6, opens.
Figure 4–6: Exceptions Notification Console
Trimble MRM Confidential 100

GeoManager Admin & User Guide
You can sort Exceptions shown in the Exceptions Notification Console by any of the column headers. To sort data, click on the column heading you want as your sort filter.
You may rearrange the order in which Exception data columns appear on screen. To change the order of your columns, click on the column header you want to move and drag it to the spot on the table in which you would like it to appear.
Message Types are color coded to make identification of like Exceptions easy to find and read.
If you set up real‐time alerts, you can elect to receive an audible alert each time a new notification is sent to the Notification Console. To enable or disable this option, click the alert icon. When it is disabled, the icon will appear with a red slash across it.
For additional details on any of the alerts:
1. Scroll to the alert you want to select.
2. Click the alert anywhere on the row.
Details appear in the Exception Details area at the bottom of the Exception Notification Console.
The Notification Console highlights your selection and additionally shows the Criteria that had to be met to generate the Exception as well as the Location of the mobile device when the Exception occurred.
To generate a printable version of this information, press the print icon in the upper right‐hand corner of the screen. The system will display the same information in a text format that can be easily printed.
You can print two ways:
• By clicking the Print link in the Details column of the Exception Summary screen. This will print the details for that specific Exception.
Field Description
Row Delineates the order Exceptions were received, with the most recent appearing in row 1.
Date Date and time the Exception occurred.
Mobile Device The name of the mobile device that incurred the Exception.
Exception Type General Exception type.
Exception Name Specific Exception based upon custom parameters.
Exception Value Details that indicate why Exception was triggered.
Trimble MRM Confidential 101

GeoManager Admin & User Guide
• By clicking the Print Summary button in the top right corner. This opens the typical Print dialogue box. Click Print to print the Exception Summary. Click Cancel to close the dialogue without printing.
Generating Exception Reports
Exception Reports may be generated at any time. Steps for creating reports for all of the Exceptions are virtually the same. Below are steps for generating each report format:
1. Click the Reports link from the Control Panel on the left. The Reports screen, shown in Figure 4–2, opens.
2. Click the Exceptions Reports tab, shown in Figure 4–7.
Figure 4–7: Exceptions Reports Tab
3. Select the type of Exception report to generate from the Select Report to Generate drop‐menu.
• If you select Consolidated Exception Report, the Exception Report Options screen, shown in Figure 4–8, appears.
Trimble MRM Confidential 102

GeoManager Admin & User Guide
Figure 4–8: Consolidated Exception Report Options
Field Description
Select Report to Generate
This is filled in from the previous screen and shows Consolidated Exception report.
Mobile Device(s) / Group(s)
Combination of radio buttons, drop-menu and text box for organi-zation of mobile devices available for reporting. One radio button must be selected. One or more mobile devices or groups listed must be selected.
Search Text box and button that help users to shorten the mobile device or group list. Search criteria can be any alpha-numeric character con-tained within the mobile device or group name.
Time Period The length of time you want the report to contain.
An online report can contain one month or less of data. If you want to generate a report containing more than one month of data, then you must use the Scheduled Reports Tool. For more information about Scheduled Reports, see Section 5.
Trimble MRM Confidential 103

GeoManager Admin & User Guide
a. Select the radio button for Mobile Devices, Groups or Mobile Devices from Group.
If you select Mobile Devices from Group, select the group from the drop‐menu.
You can also search Mobile Devices, Groups or Mobile Devices from Group by entering your search criteria in the Search text box and clicking Search.
b. Select the mobile devices for the report from the text box. Hold down [Ctrl] key to select more than one mobile device or group.
c. Select the Time Period from the From and To Day, Month, Year, Hour and Min drop‐menus.
d. Select the Report Format from the drop‐menu.
If you choose to download the Exception Assignment Report select the check box to Include header in Comma and Tab Delimited downloadable reports if you want head‐ers included in the report.
e. Click Generate Report.
• If you chose to view the report online, a new browser window opens with the Con‐solidated Exception Report, as shown in Figure 4–9.
Report Format Shows you the available formats for the Exception Reports. Cur-rently:
• Online
• Downloadable Format (Tab delimited)
• Downloadable Format (Comma delimited)
• Downloadable Format (Excel version)
Check Box Select if you want to include the header in Comma and Tab delim-ited downloadable reports.
Field Description
Trimble MRM Confidential 104

GeoManager Admin & User Guide
Figure 4–9: Online Consolidated Exception Report
• If you chose to download the Consolidated Exception Report, a download dialogue box, as shown in Figure 4–10, appears.
Figure 4–10: File Download dialogue Box
f. Click Open to open the file in a default application. Click Save to save the file to your computer. Click Cancel to return to the Exception Reports Options screen.
• If you select any other individual Exception Report, the Exception Report Options screen, shown in Figure 4–11, appears.
Trimble MRM Confidential 105

GeoManager Admin & User Guide
Figure 4–11: Individual Exception Report Options
Field Description
Select Report to Generate
This is filled in from the previous screen and shows Consolidated Exception report.
Exception Name Contains a list of all the Exceptions available for report creation.
Select mobile device(s) to Include in the Report
Combination of radio buttons, drop-menu and text box for organi-zation of mobile devices available for reporting. One radio button must be selected. One or more mobile devices or groups listed must be selected.
Time Period The length of time you want the report to contain.
An online report can contain one month or less of data. If you want to generate a report containing more than one month of data, then you must use the Scheduled Reports Tool. For more information about Scheduled Reports, see Section 5.
Trimble MRM Confidential 106

GeoManager Admin & User Guide
a. Select Exception Name from the drop‐menu.
b. Select the radio button for Mobile Devices, Groups or Mobile Devices from Group.
c. If you select Mobile Devices from Group, select the Group from the drop‐menu.
d. Select the mobile devices for the report from the text box. Hold down [Ctrl] key to select more than one mobile device or group.
e. Select the Time Period from the From and To Day, Month, Year, Hour and Min drop‐menus.
f. Select the Report Format from the drop‐menu.
If you choose to download the Exception Assignment Report select the check box to Include header in Comma and Tab Delimited downloadable reports if you want head‐ers included in the report.
g. Click Generate Report.
• If you chose to view the report online, a new browser window opens with the Excep‐tion Report, as shown in Figure 4–12.
Report Format Shows you the available formats for the Exception Reports. Cur-rently:
Online
Downloadable Format (Tab delimited)
Downloadable Format (Comma delimited)
Downloadable Format (Excel version)
Check Box Select if you want to include the header in Comma and Tab delim-ited downloadable reports.
Field Description
Trimble MRM Confidential 107

GeoManager Admin & User Guide
Figure 4–12: Online Exception Report
• If you chose to download the Exception Report, a download dialogue box, as shown in Figure 4–13, appears.
Figure 4–13: File Download dialogue Box
• Click Open to open the file in a default application. Click Save to save the file to your desktop.
Trimble MRM Confidential 108

GeoManager Admin & User Guide
5 Administration
GeoManager Administration enables you to configure Trimble GeoManager to match your business processes and get the information your business requires to make intelligent business decisions.
Note:Note:There are varying degrees of administrative access to GeoManager due to Role-Based Management. Users with complete administrative access can create other users with limited or no administrative access. Users with no administration access will not see the Administration navigation tab. For complete information about User Administration, see “User Administration” on page 246.
To access Administration, click the Administration tab at the top of GeoManager. The Administration drop down menus appear on the left‐hand side of the screen. The number of navigation links will vary depending upon your level of administrative access in GeoManager.
Figure 5–1: Devices Administration Links
Users who have complete administration access will see:
• Devices
• Landmarks
• Employees
Trimble MRM Confidential 109

GeoManager Admin & User Guide
• Reports
• User
Users with limited administration access will see some of these tabs.
Second level administration screens have a link in the upper right hand corner of the screen to navigate to the previous menu.
Device Administration
GeoManager Device Administration allows you to enter and configure the information about your mobile devices to get the information you need to make intelligent business decisions.
To administer mobile device information:
From the Administration tab, click the Devices drop down menu under the Navigation links. The Devices Administration links, shown in Figure 5–2, appear.
Figure 5–2: Devices Administration Links
Billing Management
Configuring Billing Info Upload
This function allows larger organizations to localize billing, enabling you to upload information with a billing template.
1. From the Devices drop down menu, shown in Figure 5–2, click the Billing Management link. The Billing Information Upload Details screen, shown in Figure 5–3, appears.
Trimble MRM Confidential 110

GeoManager Admin & User Guide
Figure 5–3: Billing Information Upload Screen
2. Download the Billing Management Template.
3. Open the file in Excel. Notice that there are 13 columns, Mobile Device Label, Serial Number, Employee Number, Mobile Device Cell Number, District name/number, Dept Cost Center, Vehicle Identification Number, Vehicle Lease Number, Additional Data Field1, Additional Data Field2, Additional Data Field3, Additional Data Field4 and Account Name.
WARNING!DO NOT CHANGE THE COLUMN HEADERS, ORDER OF COLUMNS OR NUMBER OF COLUMN!
4. Modify the appropriate definitions. Each line must have Mobile Device Label, Serial Number, Employee Number, Mobile Device Cell Number, District name/number, Dept Cost Center, Vehicle Identification Number, Vehicle Lease Number, Additional Data Field1, Additional Data Field2, Additional Data Field3, Additional Data Field4 and Account Name.
5. Name the file billing_info_upload.csv.
6. Save the file as .csv (comma‐delimited). The File size is limited to 1MB.
7. Click Browse to locate the .csv file you created.
8. Click Upload File. A confirmation dialogue box, shown in Figure 5–4, appears.
Figure 5–4: Upload File Confirmation Dialog Box
9. Click OK.
Trimble MRM Confidential 111

GeoManager Admin & User Guide
• If the upload is successful, the Upload Completed screen, shown in Figure 5–5, appears.
Figure 5–5: Upload Completed Screen
• If the upload is not successful, the Upload Failed screen, shown in Figure 5–6, appears.
Figure 5–6: Upload Failed Screen
10. Click Done. The Billing Information Upload Details screen appears.
After the files are uploaded, you can see the results from the last upload by clicking the Show Last Billing Information Upload Result link. The Show Billing Information Last Upload screen, shown in Figure 5–7, appears.
Figure 5–7: Show Billing Information Upload Screen
You can open the .csv file by clicking the Processed x of x Records (Download Results File) link to see if any errors occurred.
Trimble MRM Confidential 112

GeoManager Admin & User Guide
You can view the upload history by clicking the Show Billing Information Upload History link in the Billing Information Upload Details screen. The Billing Information Upload Details screen, shown in Figure 5–8, appears.
Figure 5–8: Show Billing Information Upload History Screen
To return to the Billing Information Upload Details screen, click the Billing Information Upload link.
Configuring Custom Fields
GeoManager permits administrators to create custom fields for report information and mobile device location in MapView. After you set up the custom field labels, you must go to the Mobile Device settings page to enter the custom field information.
To create Custom Field Labels:
1. From the Devices drop down menu, shown in Figure 5–2, click Device Custom Field Labels The Configure Device Custom Field Labels screen, shown in Figure 5–9, appears.
Trimble MRM Confidential 113

GeoManager Admin & User Guide
Figure 5–9: Configure Device Custom Field Labels Screen
2. Enter the name for each custom field.
3. Click Save. The Configure Custom Field Labels screen refreshes, saving the custom field information.
Click Reset to clear any unsaved information.
4. Click Custom Fields Home to return to the Custom Field Labels screen.
Configuring Messaging Details
If you have the optional Messaging feature as part of GeoManager, you can create pre‐defined messages, send free‐form messages, define and receive work status, set hot‐keys for faster messaging and create simple forms for drivers to send using the optional iDT 3000 or the mDT 4000. For more information about the iDT 3000, please see the iDT 3000 User Guide. For more information about the mDT 4000, please see the mDT 4000 User Guide.
To configure messaging details:
1. From the Devices drop down menu, shown in Figure 5–2, click Configure Messaging Details. The Messaging Administration screen, shown in Figure 5–10, appears. The Driver Messaging screen is shown as the default screen.
Trimble MRM Confidential 114

GeoManager Admin & User Guide
Figure 5–10: Messaging Administration Screen
2. Select the type of messaging detail you require by clicking the down arrow on the drop‐down menu near the top right of the screen, shown in Figure 5–11.
Figure 5–11: Messaging Drop-Down Menu
Configuring Driver Messages
The Driver Messages menu item enables you to configure up to 30 predefined messages for users. You may predefine up to 20 characters in each Driver Message, and users may customize these messages by adding up to 20 characters at the end of each message. These user‐defined characters enable further explanation or detail for a predefined message.
Trimble MRM Confidential 115

GeoManager Admin & User Guide
Figure 5–12: Driver Messages Administration Screen
To configure a Driver Message:
1. From the Devices drop down menu, shown in Figure 5–2, click the Configure Messaging Details link.
2. Select Driver Messages from the Messaging Administration drop‐down menu.
3. Enter the text for the message in the Message Text column.
4. Select the appropriate attached message length for the message in the Attached Field Size column. The default size is zero.
5. After you have entered the information for 10 messages, click Save. You must save the first 10 messages before you can set up the next 10.
6. Click the <11‐20> link to set up the next 10 user messages.
7. Click Save to keep all changes, refresh the window and display the new configuration. Click Cancel to exit without making any changes.
Configuring Forms
The Forms menu enables you to configure up to 10 forms. Each form may contain up to 10 fields, with each field containing up to 20 characters. You may configure each field to accept alpha (text), numeric (numbers), alphanumeric (text and numbers), currency, or Yes/No as user input.
Trimble MRM Confidential 116

GeoManager Admin & User Guide
Figure 5–13: Forms Administration Screen
To configure Forms:
1. From the Devices drop down menu, shown in Figure 5–2, click the Configure Messaging Details link.
2. Select Forms from the Messaging Administration drop‐down menu.
3. Enter a form name in the Name box. For example, enter Invoice Confirmation in the box under Name for Form 1.
4. The Status/Inbox column contains a predefined list of Work Flow Status labels. Refer to the Setting up Work Flow Status section to use the form for Work Flow Status.
5. Click Save.
If you do not save the form name, a dialogue box, shown in Figure 5–14, appears. Click OK to save the form and create custom fields for the form.
Trimble MRM Confidential 117

GeoManager Admin & User Guide
Figure 5–14: Save Form Dialog Box
6. Click the Edit link to create custom fields for the form. The Form Fields screen, shown in Figure 5–15, appears.
Figure 5–15: Form Fields Screen
7. Enter labels for the fields in the Field Labels column.
8. Choose Yes in the Required column if users must complete a field.
9. Enter an appropriate input length in the Length column, (up to 20 characters, for each field.
10. Select an appropriate input type in the Type column for each field:
• Alphanumeric
• Alpha (text)
• Numeric (numbers)
• Currency
• Yes/No
11. For numeric and currency type fields, enter a minimum and maximum value in the Numeric/Currency/Min/Max column.
12. Click the Save button to keep the form. The screen returns to the Forms Administration screen, shown in Figure 5–13.
Click the Cancel button to exit without making changes.
Trimble MRM Confidential 118

GeoManager Admin & User Guide
The Trimble MRM servers send the newly created forms to mobile devices the next time each reports its status.
Configuring Hot Keys
The Hot Keys screen enables you to select frequently used messages and allows users to send these messages back to your dispatchers with the touch of a button. You may configure up to two Hot Keys.
To set up Hot Keys:
1. From the Devices drop down menu, shown in Figure 5–2, click the Configure Messaging Details link.
2. Select Hot Keys from the Messaging Administration drop‐down menu. The Configure Hot Keys screen, shown in Figure 5–16, appears.
Figure 5–16: Messaging Administration – Configure Hot Keys Screen
3. Select a canned message for the appropriate key from the Message Text drop‐down menu. SPCL1 and SPCL2 correspond to keys on the iDT.
Note:Note:You must set up the messages first.
4. Click Save to apply the configuration. Click Cancel to exit the screen.
As soon as mobile devices report to the Trimble MRM servers, the Hot Keys will upload onto the iDT terminals.
Configuring Work Flow Status
Work Flow Status enables you to create up to 10 status events. You may assign a status to any predefined message or form. The statuses entered here appear on the Status/Inbox menu when configuring forms and predefined messages.
Trimble MRM Confidential 119

GeoManager Admin & User Guide
To configure Work Flow Status:
1. From the Devices drop down menu, shown in Figure 5–2, click the Configure Messaging Details link.
2. Select Work Flow Status from the Messaging Administration drop‐down menu. The Configure Workflow Status screen, shown in Figure 5–17, appears.
Figure 5–17: Messaging Administration – Configure Workflow Status Screen
3. Enter a label of up to 20 characters for each status under the Status Header column.
4. Enter a corresponding abbreviation of up to four characters under the Abbreviation column. The abbreviations are displayed in the Status Header.
5. Click Save to keep all changes, refresh the window and display the new configuration. Click Cancel to exit without making changes.
Note:Note:Each configured status header appears in the Work Flow Status screen.
Dispatching Messages
The Dispatch Messages feature enables the dispatcher to predefine frequently sent messages. Configuring these messages allows the dispatcher to send a message by simply selecting from a drop‐down menu on the Messaging window. The dispatcher has the ability to configure up to 10 predefined messages with up to 480 characters each.
Trimble MRM Confidential 120

GeoManager Admin & User Guide
To configure dispatch messages:
1. From the Devices drop down menu, shown in Figure 5–2, click the Configure Messaging Details link.
2. Select Dispatch Messages from the Messaging Administration drop‐down menu. The Dispatch Messages screen, shown in Figure 5–16, appears.
Figure 5–18: Messaging Administration – Dispatch Messages Screen
3. Enter a message into one of the ten available message boxes.
4. Click Save to keep all changes, refresh the window and display the new configuration. Click Cancel to exit without making changes.
Trimble MRM Confidential 121

GeoManager Admin & User Guide
Configuring Mobile Device Details
Configure Mobile Device Details enables you to configure labels and color icons in MapView and several different reports for each mobile device or vehicle.
From the Devices drop down menu, shown in Figure 5–2, click Configure Mobile Device Details. The Configure Mobile Device Details screen, shown in Figure 5–19, appears.
Figure 5–19: Configure Mobile Device Details Screen
The following options appear after you click Configure Mobile Device Details:
• Configure Business Hours
• Configure Mobile Device
• Configure Mobile Devices (Batch Configuration)
• Inactivity Settings
• Upload Mobile Device Configuration
• Upload Mobile Device Custom Fields
• Upload Work Shift Definitions
Configure Business Hours
The Configure Business Hours screen, shown in Figure 5–20, allows you to set the hours of operation for your mobile devices.
1. Click Configure Business Hours from the Configure Mobile Device Details screen. The Configure Business Hours screen, shown in Figure 5–20, appears.
Trimble MRM Confidential 122
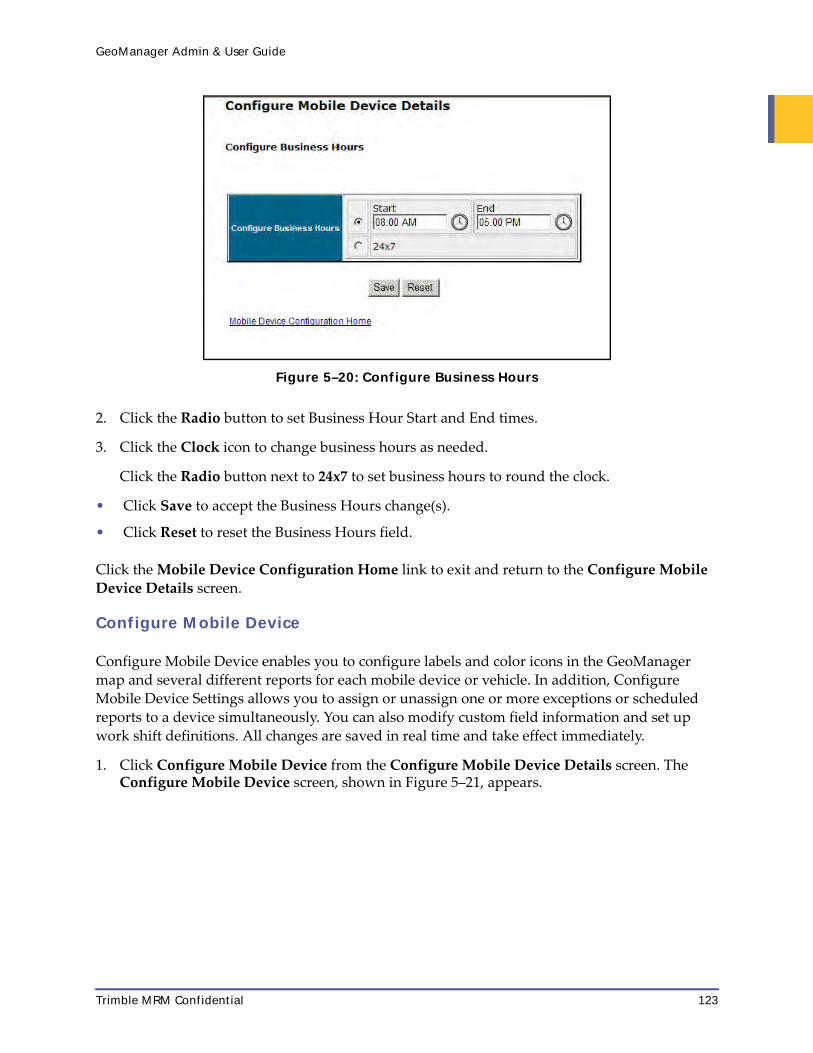
GeoManager Admin & User Guide
Figure 5–20: Configure Business Hours
2. Click the Radio button to set Business Hour Start and End times.
3. Click the Clock icon to change business hours as needed.
Click the Radio button next to 24x7 to set business hours to round the clock.
• Click Save to accept the Business Hours change(s).
• Click Reset to reset the Business Hours field.
Click the Mobile Device Configuration Home link to exit and return to the Configure Mobile Device Details screen.
Configure Mobile Device
Configure Mobile Device enables you to configure labels and color icons in the GeoManager map and several different reports for each mobile device or vehicle. In addition, Configure Mobile Device Settings allows you to assign or unassign one or more exceptions or scheduled reports to a device simultaneously. You can also modify custom field information and set up work shift definitions. All changes are saved in real time and take effect immediately.
1. Click Configure Mobile Device from the Configure Mobile Device Details screen. The Configure Mobile Device screen, shown in Figure 5–21, appears.
Trimble MRM Confidential 123

GeoManager Admin & User Guide
Figure 5–21: Configure Mobile Device
2. Enter a new name with up to 20 characters, no spaces, for each mobile device under the New Label column.
3. Click Save to accept the change(s).
Click Reset to reset the New Label field.
The screen lists 10, 15, 20, or 25 devices at a time. If you manage more than 15 devices, the screen also shows the number of pages. Select the appropriate page number to move to the desired page.
Mobile Device Settings Screen
The Mobile Device Settings screen, shown in Figure 5–22, allows you to change the color for the amount of time your mobile devices are stopped if you want different stop status definition colors. These colors appear in the Mobile Device Status screen, shown in Figure 5–22.
Trimble MRM Confidential 124

GeoManager Admin & User Guide
The following options can also be customized from one location using Mobile Device Settings:
• Update Mobile Device Settings including:
• Stop Status Definitions
• Time Zone
• Device Icon Color
• Organization Hierarchy
• Custom Field Information
• Exceptions assigned to the device
• Scheduled Reports assigned to the device
• Work Shift Definitions
1. From the Configure Mobile Device screen, shown in Figure 5–21, click the check box next to the mobile device to configure the Stop Status Definition, Time Zone, Automatic Update Rate and the display icon color for the selected device.
2. Click Settings. The Mobile Device (iLM) Settings screen, shown in Figure 5–22, appears.
Figure 5–22: Mobile Device Settings Screen
Trimble MRM Confidential 125

GeoManager Admin & User Guide
Note:Note:The Automatic Update Rate can not be changed by some accounts.
• Click Submit to accept the Mobile Device change(s).
• Click Cancel to exit and return to the Configure Mobile Device screen.
Assigning Organizational Hierarchy to a Device
To assign organization hierarchy to a device:
1. Click the OrgHierarchy button from the Mobile Device (iLM) Settings screen, shown in Figure 5–22. The Select Org Hierarchy Tree dialog, shown in Figure 5–23, displays
You can search for the desired organization by entering the name of part of the name for the organization and clicking the Magnifying Glass. The organization list updates with any organizations that match the search criteria, making it easier to find the correct organization.
Figure 5–23: Select Org Hierarchy Tree Dialog
2. Select the desired organization from the list.
3. Click Done.
Click Cancel to close the dialog without making changes.
Updating Device Custom Field Information
To update custom field information for a device:
Trimble MRM Confidential 126

GeoManager Admin & User Guide
1. Click the Custom Information about this Mobile Device link from the Mobile Device (iLM) Settings screen, shown in Figure 5–22. The Custom Information about this Mobile Device link expands, shown in Figure 5–24, displays
Figure 5–24: Custom Information about this Mobile Device
2. Change the desired information.
3. Click Submit.
Click Cancel to close the dialog without making changes.
Assigning Multiple Exceptions to a Device
To assign multiple exceptions to a device:
1. Click the Exception Reassignment link from the Mobile Device (iLM) Settings screen, shown in Figure 5–22. The Exception Reassignment link expands, shown in Figure 5–25, displays.
Trimble MRM Confidential 127

GeoManager Admin & User Guide
Figure 5–25: Exception Reassignment
2. Select the exception(s) from the Available exception field to assign to the mobile device.
3. Click the > button to move the exception(s) to the Assign field.
Click All >> to add all available exceptions to the device.
Click < to unassign the selected exception(s) to the device.
Click All << to unassign all exceptions to the device.
4. Click Submit to save changes.
Click Cancel to close the dialog without making changes.
You can also assign exceptions using the Exceptions list:
1. From the Exception Reassignment screen, check the exception(s) you would like assign to the mobile device. If you have a large number of exceptions, you can search for a specific exception:
a. Select the search criteria from the drop‐down menu. Available criteria are:
Trimble MRM Confidential 128

GeoManager Admin & User Guide
• Exception Name
• Exception Type
• Email ID
• Mobile Device
b. Select Starting With, Ending With, or Containing from the drop‐down menu to further narrow down the search.
c. In the Search Text box, enter the first few letters of the search criteria.
d. Click Search. The Exception Reassignment screen refreshes to show only the results that match your criteria.
2. Click Submit.
Click Cancel and no changes will be saved.
Assigning Multiple Scheduled Report to a Device
To assign multiple reports to a device:
1. Click the Scheduled Report Reassignment link from the Mobile Device (iLM) Settings screen, shown in Figure 5–22. The Scheduled Report Reassignment link expands, shown in Figure 5–26, displays.
Trimble MRM Confidential 129

GeoManager Admin & User Guide
Figure 5–26: Scheduled Report Reassignment
2. Select the report(s) from the Available report field to assign to the mobile device.
3. Click the > button to move the report(s) to the Assign field.
Click All >> to add all available reports to the device.
Click < to unassign the selected report(s) to the device.
Click All << to unassign all reports to the device.
4. Click Submit to save changes.
Click Cancel and no changes will be saved.
You can also assign reports using the Reports list:
1. From the Scheduled Report Reassignment screen, check the reports(s) you would like assign to the mobile device. If you have a large number of scheduled reports, you can search for a specific report:
a. Select the search criteria from the drop‐down menu. Available criteria are:
Trimble MRM Confidential 130

GeoManager Admin & User Guide
• Scheduled Report Name
• Scheduled Report Type
• Email ID
• Mobile Device
b. Select Starting With, Ending With, or Containing from the drop‐down menu to further narrow down the search.
c. In the Search Text box, enter the first few letters of the search criteria.
d. Click Search. The Scheduled Report Reassignment screen refreshes to show only the results that match your criteria.
2. Click Submit.
Click Cancel to close the dialog without making changes.
Work Shift Editor
The accuracy of many reports is determined by the values entered for work shift start‐time and end‐times. GeoManager allows a user to create up to 10 work shift definitions per vehicle.
To define a work shift:
1. Click the Work Shift Editor link from the Mobile Device (iLM) Settings screen, shown in Figure 5–22. The Scheduled Report Reassignment link expands, shown in Figure 5–27, displays.
Trimble MRM Confidential 131

GeoManager Admin & User Guide
Figure 5–27: Work Shift Editor for Mobile Device
2. Select the Effective Date for the work shift using the Calendar pop up menu.
3. Select the Start and End times for the work shift using the Clock icon.
4. Click Submit.
Click Cancel to exit without saving changes.
5. Repeat for each mobile device for which you want to define work shifts.
To remove a work shift, select the check box in the Remove column of the Work Shift Editor and click Submit.
Note:Note:You can also define work shifts by clicking the Work Shift Definitions link from the Configure Mobile Device screen, shown in Figure 5–21.
Trimble MRM Confidential 132

GeoManager Admin & User Guide
Configure Mobile Devices (Batch Configuration)
The Configure Mobile Devices (Batch Configuration) screen, shown in Figure 5–28, allows you to make stop status definition color changes for multiple mobile devices or groups of mobile devices. These colors appear in the Mobile Device Status screen, shown in Figure 5–21.
1. From the Configure Mobile Device Details screen, shown in Figure 5–19, click Configure Mobile Device Details (Batch Configuration). The Configure Mobile Devices (Batch Configuration) screen, shown in Figure 5–28, appears.
2. Select the Radio button for:
• Mobile Device(s)
• Group(s)
• Mobile Devices from Group
You can search for the desired mobile device or group by entering the name or part of the name for the device or group and clicking Search. The mobile device or group list updates with any mobile devices or groups matching the search criteria, making it easier to find the correct device or group.
Figure 5–28: Configure Mobile Devices Batch Configuration Screen
Trimble MRM Confidential 133

GeoManager Admin & User Guide
Figure 5–29: Configure Groups Batch Configuration Screen
3. Select the mobile device(s) or group(s) from the Available Mobile Devices or Available Groups field you want to configure.
4. Click the > button to move the device(s) or group(s) to the Mobile Device to Configure or Groups to Configure field.
5. Make desired configuration changes.
• Click Save to accept the change(s). The Configure Mobile Devices (Batch Configuration) screen, shown in Figure 5–28, appears with a message that the configuration was success‐fully applied.
• Click Reset to clear the Mobile Device or Group field.
• Click Mobile Device Configuration Home to exit and return to the Configure Mobile Device Details screen.
Trimble MRM Confidential 134
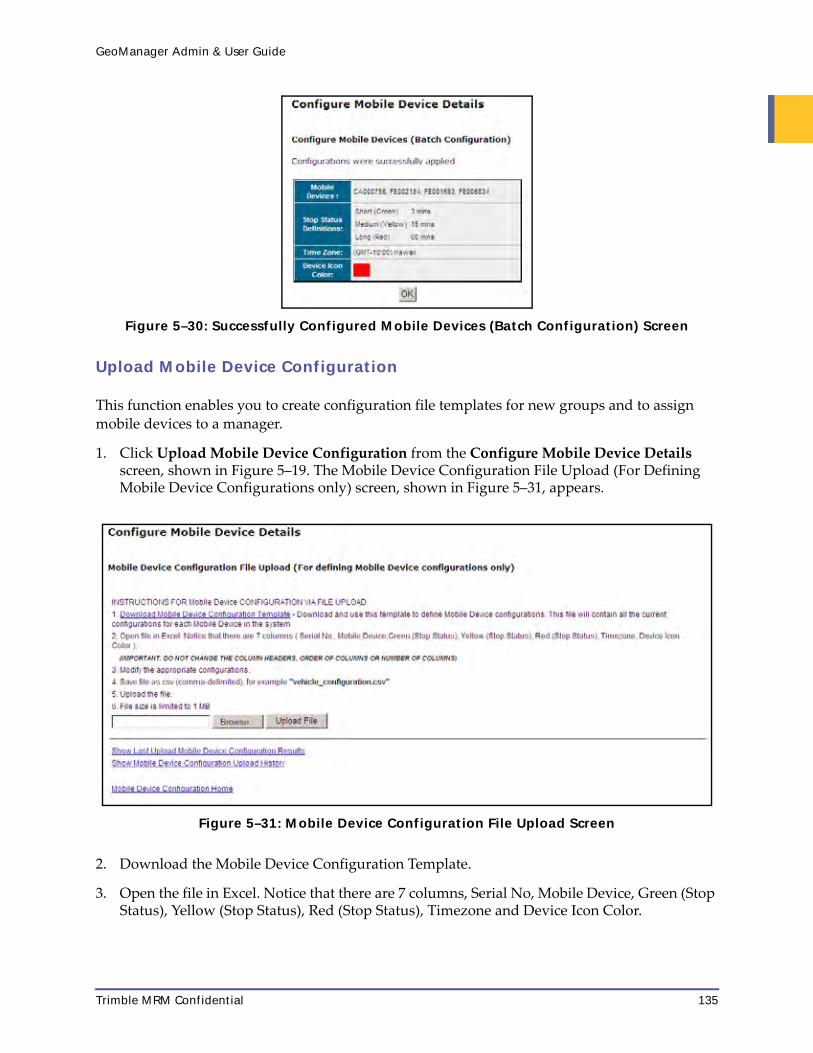
GeoManager Admin & User Guide
Figure 5–30: Successfully Configured Mobile Devices (Batch Configuration) Screen
Upload Mobile Device Configuration
This function enables you to create configuration file templates for new groups and to assign mobile devices to a manager.
1. Click Upload Mobile Device Configuration from the Configure Mobile Device Details screen, shown in Figure 5–19. The Mobile Device Configuration File Upload (For Defining Mobile Device Configurations only) screen, shown in Figure 5–31, appears.
Figure 5–31: Mobile Device Configuration File Upload Screen
2. Download the Mobile Device Configuration Template.
3. Open the file in Excel. Notice that there are 7 columns, Serial No, Mobile Device, Green (Stop Status), Yellow (Stop Status), Red (Stop Status), Timezone and Device Icon Color.
Trimble MRM Confidential 135

GeoManager Admin & User Guide
WARNING!DO NOT CHANGE THE COLUMN HEADERS, ORDER OF COLUMNS OR NUMBER OF COL-UMN!
4. Modify the appropriate definitions. Each line must have Serial No, Mobile Device, Green (Stop Status), Yellow (Stop Status), Red (Stop Status), Timezone and Device Icon Color.
5. Name the file vehicle_configuration.csv.
6. Save the file as csv (comma‐delimited). The File size is limited to 1MB.
7. Click Browse to locate the .csv file you created.
8. Click Upload File. A confirmation dialogue box, shown in Figure 5–32, appears.
Figure 5–32: Upload File Confirmation Dialog Box
9. Click OK.
• If the upload is successful, the Upload Completed screen, shown in Figure 5–33, appears.
Figure 5–33: Upload Completed Screen
• If the upload is not successful, the Upload Failed screen, shown in Figure 5–34, appears.
Trimble MRM Confidential 136

GeoManager Admin & User Guide
Figure 5–34: Upload Failed Screen
10. Click Done. The Custom Fields File Upload screen appears.
After the files are uploaded, you can see the results from the last upload by clicking the Show Last Custom Fields Upload Result link. The Show Last Custom Fields Upload Result screen, shown in Figure 5–35, appears.
Figure 5–35: Show Last Mobile Device Configuration Upload Screen
You can open the .csv file by clicking the Processed x of x Records (Download Results File) link to see if any errors occurred.
You can view the upload history by clicking the Show Mobile Device Configuration Upload History link in the Mobile Device Configuration File Upload screen. The Configuration Upload ‐ Last Mobile Device Configuration Upload Results screen, shown in Figure 5–36, appears.
Trimble MRM Confidential 137

GeoManager Admin & User Guide
Figure 5–36: Show Configuration Upload - Last Mobile Device Configuration Upload Results Screen
To return to the Mobile Device Configuration File Upload screen, click the Configure Mobile Device Upload link.
Inactivity Settings
Inactivity Settings allow you to specify the amount of time a vehicle can be inactive prior to displaying not reporting status. You can also specify the amount of time after which the vehicle will no longer display on the map.
1. Click Inactivity Settings from the Configure Mobile Device Details screen, shown in Figure 5–19. The Define behavior for devices that are “Not Reporting” screen, shown in Figure 5–37, appears.
Figure 5–37: Inactivity Settings Screen
Trimble MRM Confidential 138

GeoManager Admin & User Guide
2. Enter the desired number of minutes in the Mark devices as “Not Reporting” after field. Devices inactive for longer than the specified time with display with a Not Reporting icon indicating they are inactive. The default inactive time prior to displaying the “Not Reporting” icon is 5 minutes.
3. Enter the desired number of minutes in the Remove “Not Reporting” devices from the map after field. Devices inactive for longer than the specified time will be removed from Map View. The default inactive time prior to removing vehicles from the map is 50,000 minutes.
4. Click Save.
Click Reset the default values.
Note:Note:In the Devices Table the icon Type will display as one of the following depending on the device’s length of inactivity:
• A yellow triangle with a question mark indicates the vehicle is not reporting.
• A grey triangle with a question mark indicates the vehicle is not reporting for an extended time and has been removed from Map View.
Upload Mobile Device Custom Fields
This function enables you to create configuration file templates for custom fields which provide additional information you need to know about your mobile devices. Examples of custom fields can include: make, model, year, vin number etc.
1. Click Upload Mobile Device Custom Fields from the Configure Mobile Device Details screen. The Custom Fields File Upload screen, shown in Figure 5–38, appears.
Trimble MRM Confidential 139

GeoManager Admin & User Guide
Figure 5–38: Mobile Device Custom Fields to Device Assignment File Upload Screen
2. Download the Custom Fields to Device Assignment Template.
3. Edit the template and save the file as customfields_deviceassignment.csv to your computer.
4. Click Browse to locate the .csv file you created.
5. After locating the file, click Upload File.
To see the results of the last upload, click Show Last Custom Fields Upload Result. Example shown in Figure 5–39.
Figure 5–39: Show Last Custom Fields Upload Result Screen
Trimble MRM Confidential 140

GeoManager Admin & User Guide
To see the mobile device configuration upload history, click Show Custom Fields Upload History. Example shown in Figure 5–40.
Figure 5–40: Show Last Custom Fields Upload History Screen
To return to the Custom Fields File Upload screen, click the Custom File Upload link.
Work Shift Definition File Upload
This allows the administrator to modify work shift definitions for multiple mobile devices.
1. Click Upload Work Shift Definition from the Configure Mobile Device Details screen. The Work Shift File Upload screen, shown in Figure 5–41, appears.
Trimble MRM Confidential 141

GeoManager Admin & User Guide
Figure 5–41: Work Shift File Upload Screen
2. Download the Work Shift Definition Configuration.
3. Edit the template and save the file as work_shift.csv to your computer.
4. Click Browse to locate the .csv file you created.
5. After locating the file, click Upload File.
• Uses the same directions, as Vehicle Configurations Upload except the file format is differ‐ent.
• File must be uploaded under the “Work Shift Definition Upload” section of the File Upload page.
• Download the file “Work Shift Definition Configuration File” first.
• The file will contain the most current work shift for each mobile device. The file must contain four columns: Mobile Device, Effective Date, Start Time, and End Time.
When uploading work shift definitions:
• Mobile Device must belong to the account. Otherwise the Results column in the Result file will be updated as ‘Mobile Device not found’
• Effective Date Format: MM/DD/YY. Otherwise the Results column in the Result file will be updated as ‘Incorrect Date Format’
• Start / End are time values that need to be in the following format HH:MM AM/PM. Other‐wise the Results column in the Result file will be updated as ‘Incorrect Time Format’.
Trimble MRM Confidential 142

GeoManager Admin & User Guide
• If the Effective Date already exists for a mobile device, the Start and End times will be updated to the defined time, if and only if the input Start and End times are different than the times already present in the system.
• If the Effective Date does not exist for a mobile device in the system, then this shift definition is added to the system.
• The Start Time should be lesser than End Time. Otherwise the Results column in the Result file will be updated as ‘Invalid Time Range’.
• Duplicate records in the uploaded .csv file are just ignored and updated in the Result file as ʹDuplicate Effective Date for a Mobile Deviceʹ.
• If a row has more than one error, all the errors are shown in the Results column of the result file separated by comma.
To see the results of the last work shift upload, click Show Last Upload Work Shift Definition Results. Example shown in Figure 5–42.
Figure 5–42: Show Last Work Shift Upload Results Screen
To see the Work Shift upload history, click Show Work Shift Definition Upload History. Example shown in Figure 5–43.
Trimble MRM Confidential 143

GeoManager Admin & User Guide
Figure 5–43: Show Work Shift Upload History Screen
Exception Administration
GeoManager addresses the challenges of managing mobile workers with Exceptions, a comprehensive monitoring and reporting tool that helps efficiently manage daily mobile workforce operations and improve business productivity through event‐based monitoring and timely alerts.
Exceptions give you the ability to define a normal range of parameters for events or activities, then capture any deviance from this range. The parameters and range settings vary by Exception type but most often include less than and/or greater than values, duration and time frame for monitoring.
For information about using Exceptions, see the GeoManager Exceptions Admin and User Guide.
Fleet Management
Fleet Management enables you to configure carbon emission profiles and assign them for each mobile device or vehicle.
From the Devices drop down menu, shown in Figure 5–2, click Fleet Management from the Devices drop down menu. The Fleet Administration screen, shown in Figure 5–44, appears.
Trimble MRM Confidential 144

GeoManager Admin & User Guide
Figure 5–44: Fleet Administration Screen
The following options appear after you click Fleet Administration:
• Carbon Emission Profile
• Carbon Emission Profile Assignment
Benchmark Definitions
Benchmark Definitions are perfect‐world scenarios showing how your mobile devices should perform if all systems are working correctly and drivers are performing within specified parameters. Types of Benchmark Definitions available in Vehicle Diagnostics are:
• Following Distance – The optimum distance behind other vehicles that a vehicle should be for safety.
• Brake Summary – The acceptable amount of braking that a vehicle performs.
• Engine RPM Road Speed – Managers may determine the amount of time vehicles are operat‐ing in the optimum zone when in use and when they may be lugging, idling, coasting or over speed, giving them better information about vehicle and driver performance.
• Fuel Usage – Managers can specify the acceptable percentage of time that drivers can spend idling, in top gear, coasting, etc. for better fuel consumption statistics.
Note:Note:While Benchmark Definitions are perfect-world scenarios, they must reflect the actual capabilities of the vehicle. Heavy duty trucks are not likely to get 45 MPG, even with
Trimble MRM Confidential 145
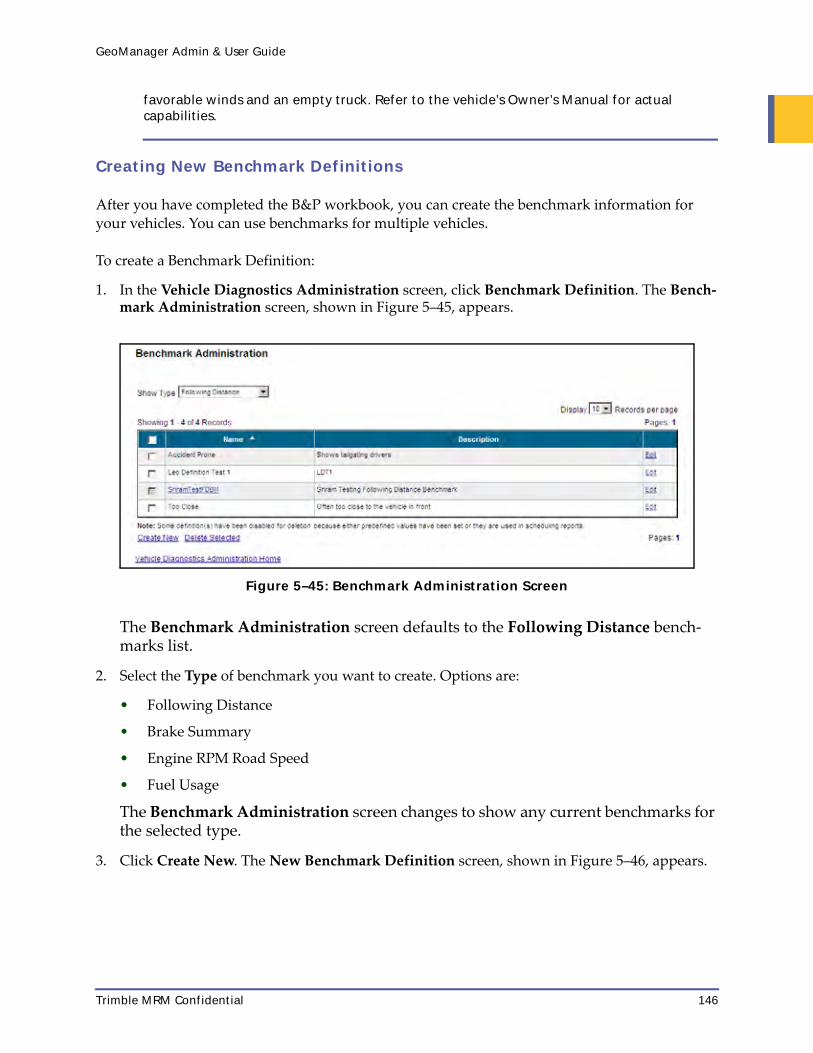
GeoManager Admin & User Guide
favorable winds and an empty truck. Refer to the vehicle’s Owner’s Manual for actual capabilities.
Creating New Benchmark Definitions
After you have completed the B&P workbook, you can create the benchmark information for your vehicles. You can use benchmarks for multiple vehicles.
To create a Benchmark Definition:
1. In the Vehicle Diagnostics Administration screen, click Benchmark Definition. The Bench‐mark Administration screen, shown in Figure 5–45, appears.
Figure 5–45: Benchmark Administration Screen
The Benchmark Administration screen defaults to the Following Distance bench‐marks list.
2. Select the Type of benchmark you want to create. Options are:
• Following Distance
• Brake Summary
• Engine RPM Road Speed
• Fuel Usage
The Benchmark Administration screen changes to show any current benchmarks for the selected type.
3. Click Create New. The New Benchmark Definition screen, shown in Figure 5–46, appears.
Trimble MRM Confidential 146

GeoManager Admin & User Guide
Figure 5–46: New Benchmark Definition Screen
4. Enter a Name for the benchmark.
5. Enter a Description of the benchmark.
6. Click Next. The New Benchmark Definition screen changes to show fields for the required information, as shown in Figure 5–47 through Figure 5–50.
• To set Following Distance benchmarks, shown in Figure 5–47:
a. In the Following Distance Distribution area, enter the percentage amounts that show the optimal following distances for safety.
Figure 5–47: Following Distance Fields
b. In the Net Following Distance % of Road Time area, enter the optimal percentage of road time that drivers can follow other vehicles for that distance.
• To set Brake Summary benchmarks, shown in Figure 5–48:
Trimble MRM Confidential 147

GeoManager Admin & User Guide
Figure 5–48: Brake Summary Fields
a. In the Braking area, enter the acceptable amount of times the driver can use Hard Braking per 1000 Miles.
b. Enter the optimum percentage for Brake Miles % of Road Time.
• To set Engine RPM Road Speed benchmarks, shown in Figure 5–49:
Figure 5–49: Engine RPM Road Speed Fields
a. In the % Engine on Time column, enter:
• The acceptable percentage of time the engine can be Idle.
• The acceptable percentage of time the engine can be in Fast Idle.
• The acceptable percentage of time the engine can Coast.
Trimble MRM Confidential 148
GeoManager Admin & User Guide
• The acceptable percentage of time the engine can be Lugging.
• The percentage of time the engine should be Optimum.
• The acceptable percentage of time the engine can be Governed.
b. In the % Driving Distance column, enter:
• The acceptable percentage of time the engine can Coast.
• The acceptable percentage of time the engine can be Lugging.
• The percentage of time the engine should be Optimum.
• The acceptable percentage of time the engine can be Governed.
c. In the % Fuel Used column, enter:
• The acceptable percentage of time the engine can be Idle.
• The acceptable percentage of time the engine can be in Fast Idle.
• The acceptable percentage of time the engine can Coast.
• The acceptable percentage of time the engine can be Lugging.
• The percentage of time the engine should be Optimum.
• The acceptable percentage of time the engine can be Governed.
d. In the MPG column, enter:
• The acceptable percentage of time the engine can Coast.
• The acceptable percentage of time the engine can be Lugging.
• The percentage of time the engine should be Optimum.
• The acceptable percentage of time the engine can be Governed.
• The acceptable percentage of time the engine can be Overspeed.
Note:Note:Benchmark percentages (%) must add up to 100%.
• To set Fuel Usage benchmarks, shown in Figure 5–50:
Trimble MRM Confidential 149

GeoManager Admin & User Guide
Figure 5–50: Fuel Usage Fields
a. Enter the optimum MPG.
b. Enter the optimum Cruise % Distance.
c. Enter the acceptable Top Gear % Distance.
d. Enter the optimum Driving % Time.
e. Enter the acceptable Idle % Time.
f. Enter the acceptable PTO % Time.
g. Enter the optimum Cruise % Driving Time.
h. Enter the acceptable Top Gear % Driving Time.
Note:Note:Whenever Benchmark percentages (%) are entered, they must add up to 100%.
7. After you have entered the necessary benchmark information, click Save. The system saves the benchmark and the screen returns to the Benchmark Definition screen showing the new benchmark.
8. Repeat the benchmark creation process for each needed benchmark.
After you have created all the necessary benchmarks, you can create Trip, RPM‐Road Speed and Top Gear Definitions.
Trimble MRM Confidential 150

GeoManager Admin & User Guide
Trip Definitions
Trip Definitions help managers differentiate drivers who are moving around a yard or a site from actual travel time between customer sites. By creating Trip Definitions, managers can get more accurate reports about vehicle and driver performance.
Creating Trip Definitions
To create a new Trip Definition:
1. From the Fleet Administration screen, click Trip Definition. The Trip Administration screen, shown in Figure 5–51, appears.
Figure 5–51: Trip Administration Screen
2. Click Create New. The Create Trip Definition screen, shown in Figure 5–52, appears.
Trimble MRM Confidential 151
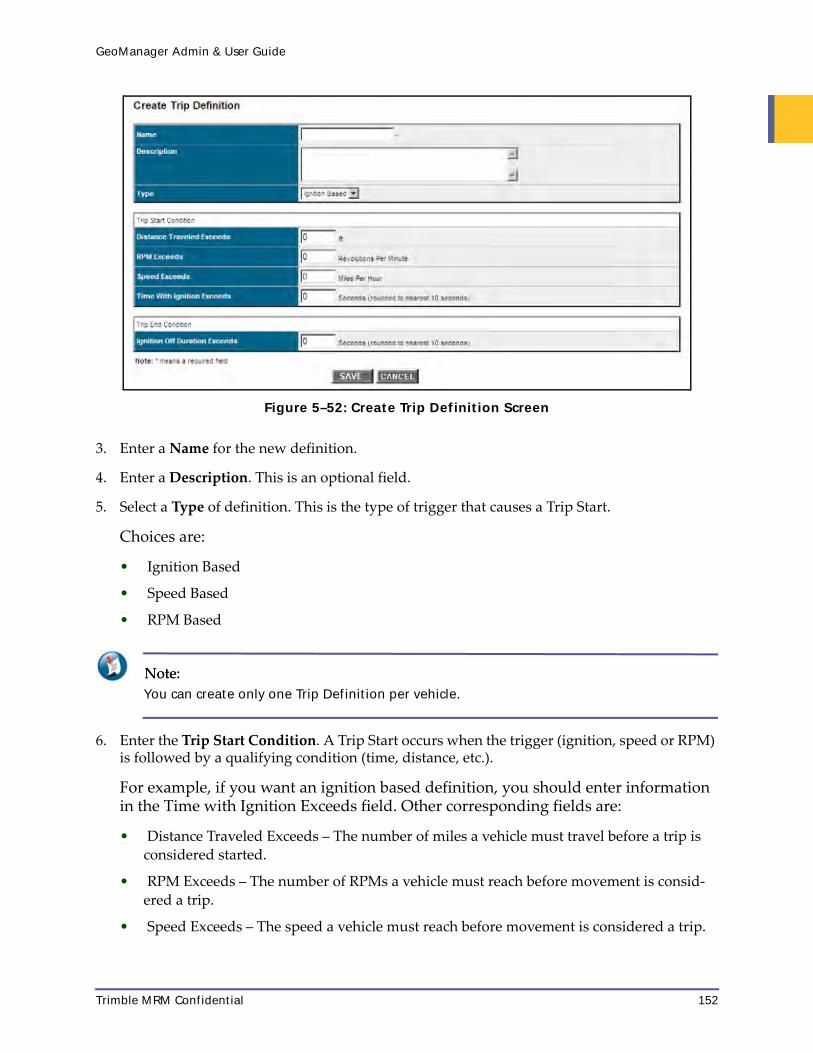
GeoManager Admin & User Guide
Figure 5–52: Create Trip Definition Screen
3. Enter a Name for the new definition.
4. Enter a Description. This is an optional field.
5. Select a Type of definition. This is the type of trigger that causes a Trip Start.
Choices are:
• Ignition Based
• Speed Based
• RPM Based
Note:Note:You can create only one Trip Definition per vehicle.
6. Enter the Trip Start Condition. A Trip Start occurs when the trigger (ignition, speed or RPM) is followed by a qualifying condition (time, distance, etc.).
For example, if you want an ignition based definition, you should enter information in the Time with Ignition Exceeds field. Other corresponding fields are:
• Distance Traveled Exceeds – The number of miles a vehicle must travel before a trip is considered started.
• RPM Exceeds – The number of RPMs a vehicle must reach before movement is consid‐ered a trip.
• Speed Exceeds – The speed a vehicle must reach before movement is considered a trip.
Trimble MRM Confidential 152

GeoManager Admin & User Guide
• Time with Ignition Exceeds – The amount of time the engine must be running before a trip is considered started.
7. Enter the Ignition Off Duration to signal the Trip End Condition. This is rounded to the nearest 10 seconds.
8. Click Save. The screen returns to the Trip Administration screen showing the new Trip Definition.
9. Repeat steps 2 through 8 for each Trip Definition.
When you’ve finished creating the necessary Trip Definitions, you can assign them to vehicles.
Editing Trip Definitions
To edit existing Trip Definitions:
1. From the Trip Administration screen, click Edit next to the definition you want to change. The Edit Trip Definition screen, shown in Figure 5–53, appears.
Figure 5–53: Edit Trip Definition Screen
2. Change the definition Name or Description, if desired.
3. Change the parameters required by the trip Type. For example, if the trip Type is Speed Based, then change the Speed Exceeds text.
4. Click Update. The new settings for this Trip Definition are saved.
5. Click Cancel to return to the Trip Administration screen which shows the changed definition.
Trimble MRM Confidential 153
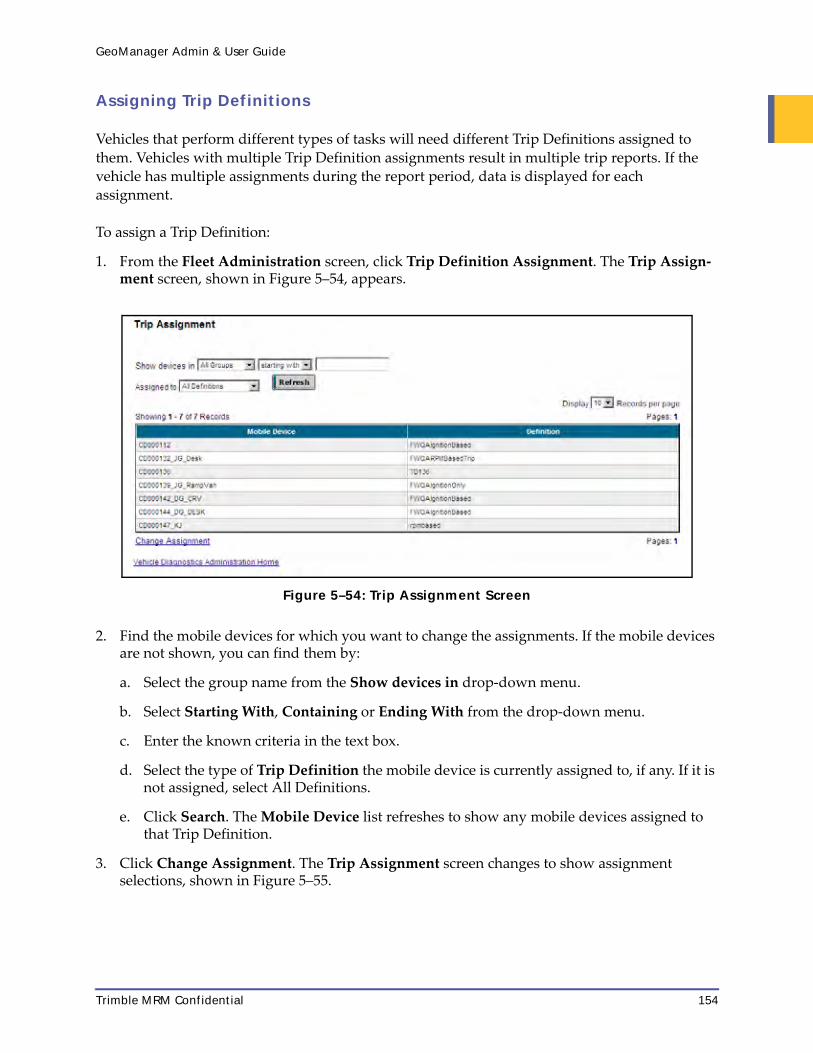
GeoManager Admin & User Guide
Assigning Trip Definitions
Vehicles that perform different types of tasks will need different Trip Definitions assigned to them. Vehicles with multiple Trip Definition assignments result in multiple trip reports. If the vehicle has multiple assignments during the report period, data is displayed for each assignment.
To assign a Trip Definition:
1. From the Fleet Administration screen, click Trip Definition Assignment. The Trip Assign‐ment screen, shown in Figure 5–54, appears.
Figure 5–54: Trip Assignment Screen
2. Find the mobile devices for which you want to change the assignments. If the mobile devices are not shown, you can find them by:
a. Select the group name from the Show devices in drop‐down menu.
b. Select Starting With, Containing or Ending With from the drop‐down menu.
c. Enter the known criteria in the text box.
d. Select the type of Trip Definition the mobile device is currently assigned to, if any. If it is not assigned, select All Definitions.
e. Click Search. The Mobile Device list refreshes to show any mobile devices assigned to that Trip Definition.
3. Click Change Assignment. The Trip Assignment screen changes to show assignment selections, shown in Figure 5–55.
Trimble MRM Confidential 154

GeoManager Admin & User Guide
Figure 5–55: Trip Assignment Screen with Assignment Selection
4. If not previously done, select the Trip Definition to Assign from the drop‐down menu. This defaults to show the currently selected Trip Definition.
5. Select the radio button to Assign this Definition to:
• All Mobile Devices – shows all mobile devices.
• Selected Mobile Devices – allows user to select specific groups from which to choose mobile devices.
6. If you chose Selected Mobile Devices, select the desired group from the Select Group drop‐down menu.
7. Select the mobile device(s) that you want to assign to the Trip Assignment. You can select mobile devices in either the Available Mobile Devices list or the Selected Mobile Devices list.
8. Click the > button to move the selected mobile device(s) to the Selected Mobile Devices list.
Click the >> button to move all mobile devices to the Selected Mobile Devices list.
9. Click Update. The screen refreshes to show the mobile devices in their new assignments.
10. Click Cancel to return to the Trip Assignment screen
Editing Trip Definition Assignments
1. From the Trip Assignment screen, click Change Assignment.
2. Select the Trip Definition for which you want to change assignments from the Select Definition to Assign drop‐down menu.
Trimble MRM Confidential 155

GeoManager Admin & User Guide
Note:Note:You can also select the Trip Definition from the Trip Assignment screen before clicking Change Assignment.
3. Select the mobile device for which you want to change the Trip Assignment. You can select mobile devices in either the Available Mobile Devices list or the Selected Mobile Devices list.
4. Click the > button to move the selected mobile device(s) to the Selected Mobile Devices list.
Click the < button to move the selected mobile device(s) to the Available Mobile Devices list.
Click the >> button to move all mobile devices to the Selected Mobile Devices list.
Click the << button to move all mobile devices to the Available Mobile Devices list.
5. Click Update. The screen refreshes to show the mobile devices in their new Trip Assignments.
6. Click Cancel to return to the Trip Assignments screen.
Engine RPM – Road Speed Definitions
Engine RPM – Road Speed Definitions allow managers to get more accurate information about employee driving patterns and engine performance. By setting an Engine RPM – Road Speed definition, you can see when the vehicle is coasting, lugging or performing in an acceptable manner, saving both fuel and wear and tear on your vehicles.
Creating New Engine RPM – Road Speed Definitions
To create a new Engine RPM – Road Speed definition:
1. From the Vehicle Diagnostics Administration screen, click Engine RPM – Road Speed Def‐inition. The Engine RPM – Road Speed Administration screen, shown in Figure 5–56, appears.
Trimble MRM Confidential 156

GeoManager Admin & User Guide
Figure 5–56: Engine RPM – Road Speed Administration Screen
2. Click Create New. The New Engine RPM – Road Speed Definition screen, shown in Figure 5–57, appears.
Figure 5–57: New Engine RPM – Road Speed Definition Screen
3. Enter a Name for the definition.
4. Enter a Description for the definition.
5. Click Next >>. The New Engine RPM – Road Speed Definition screen changes, as shown in Figure 5–58.
Trimble MRM Confidential 157

GeoManager Admin & User Guide
Figure 5–58: Next Engine RPM – Road Speed Definition Screen
6. Enter the Speed (MPH) increments from the B&P workbook across the top of the definition table.
7. Enter the RPM increments from the B&P workbook down the rows of the definition table.
8. Select the transmission performance for each speed and RPM cell. These can be:
• Coasting
• Lugging
• Optimum
You can select the settings from the B&P workbook.
Tip:Using keyboard shortcuts makes entering RPM/Speed values faster and easier. Simply tab between cells, then use the up and down arrow keys to change the values.
9. Click Save. The settings for this Engine RPM – Road Speed Definition are saved.
10. Click Cancel to return to the Engine RPM – Road Speed Administration screen which shows the new definition.
Editing Engine RPM – Road Speed Definitions
To edit existing Engine RPM – Road Speed Definitions:
1. From the Engine RPM – Road Speed Administration screen, click Edit next to the definition you want to change. The Edit Engine RPM – Road Speed Definition screen, shown in Figure 5–59, appears.
Figure 5–59: Edit Engine RPM – Road Speed Definition Screen
2. Change the definition Name or Description, if desired.
Trimble MRM Confidential 158

GeoManager Admin & User Guide
3. Click Next >>. The Edit Engine RPM – Road Speed Definition screen changes, as shown in Figure 5–60.
Figure 5–60: Next Edit Engine RPM – Road Speed Definition Screen
4. Change the RPM or the Speed (MPH) increments in the table.
5. Change any transmission performances.
6. Click Save. The new settings for this Engine RPM – Road Speed Definition are saved.
7. Click Cancel to return to the Engine RPM – Road Speed Administration screen which shows the changed definition.
Assigning Engine RPM – Road Speed Definitions
Vehicles that perform different types of tasks will need different Engine RPM – Road Speed Definitions assigned to them.
To assign a Engine RPM – Road Speed Definition:
1. From the Vehicle Diagnostics Administration screen, click Trip Definition Assignment. The Engine RPM – Road Speed Assignment screen, shown in Figure 5–61, appears.
Trimble MRM Confidential 159

GeoManager Admin & User Guide
Figure 5–61: Engine RPM – Road Speed Assignment Screen
2. Find the mobile devices for which you want to change the assignments. If the mobile devices are not shown, you can find them by:
a. Select the group name from the Show devices in drop‐down menu.
b. Select Starting With, Containing or Ending With from the drop‐down menu.
c. Enter the known criteria in the text box.
d. Select the type of Engine RPM – Road Speed Definition the mobile device is currently assigned to, if any. If it is not assigned, select All Definitions.
e. Click Search. The Mobile Device list refreshes to show any mobile devices assigned to that Trip Definition.
3. Click Change Assignment. The Engine RPM – Road Speed Assignment screen changes to show assignment selections, as shown in Figure 5–62.
Figure 5–62: Engine RPM – Road Speed Assignment Screen with Assignment Selection
Trimble MRM Confidential 160

GeoManager Admin & User Guide
4. If not previously done, select the Engine RPM – Road Speed Definition to Assign from the drop‐down menu. This defaults to show the currently selected Trip Definition.
5. Select the radio button to Assign this Definition to:
• All Mobile Devices – shows all mobile devices.
• Selected Mobile Devices – allows user to select specific groups from which to choose mobile devices.
6. If you chose Selected Mobile Devices, select the desired group from the Select Group drop‐down menu.
7. Select the mobile device(s) that you want to assign to the Engine RPM – Road Speed Assignment. You can select mobile devices in either the Available Mobile Devices list or the Selected Mobile Devices list.
8. Click the > button to move the selected mobile device(s) to the Selected Mobile Devices list.
Click the >> button to move all mobile devices to the Selected Mobile Devices list.
9. Click Update. The screen refreshes to show the mobile devices in their new assignments.
10. Click Cancel to return to the Engine RPM – Road Speed Assignment screen.
Top Gear Definitions
Top Gear Definitions allow reporting of time of spent, distance traveled and fuel burned when a vehicle was traveling in it’s highest gear.
Creating Top Gear Definitions
To create a Top Gear Definition:
1. From the Vehicle Diagnostics Administration screen, click To Gear Definition. The Top Gear Administration screen, shown in Figure 5–63, appears.
Figure 5–63: Top Gear Administration Screen
Trimble MRM Confidential 161

GeoManager Admin & User Guide
2. Click Create New. The Create Top Gear Definition screen, shown in Figure 5–64, appears.
Figure 5–64: Create Top Gear Definition Screen
3. Enter a Name for the definition.
4. Enter a Description for the definition.
5. Select the Type of Top Gear Definition. The Create Top Gear Definition screen changes to show the required fields for the selected type. This can be either:
• Gear Ratio Based (default), as shown in Figure 5–64
a. Enter the Top Transmission Gear Ratio.
b. Enter the Auxiliary Transmission Gear Ratio, if there is one. This is an optional field.
c. Enter the Rear Axle Ratio.
d. Enter the Tire Revs Per Mile.
• RPM/MPH Ratio Based, as shown in Figure 5–65
Trimble MRM Confidential 162

GeoManager Admin & User Guide
Figure 5–65: Create Top Gear RPM/MPH Ratio Based Definition Screen
a. Enter the Engine Speed (Revolutions per Minute).
b. Enter the Road Speed (Miles per Hour).
6. Click Save. GeoManager saves the Top Gear Definition and the Top Gear Administration screen reappears showing the new definition.
Editing Top Gear Definitions
To edit existing Top Gear Definitions:
1. From the Top Gear Administration screen, click Edit next to the definition you want to change. The Top Gear Definition screen, shown in Figure 5–66, appears.
Figure 5–66: Edit Top Gear Definition Screen
2. Change any incorrect information:
Trimble MRM Confidential 163

GeoManager Admin & User Guide
• Name
• Description
• Ratio Information
Note:Note:You cannot change the Type.
If you do not need to change any information, click Cancel.
3. Click Update. GeoManager saves the Top Gear Definition information and the Top Gear Administration screen reappears.
Assigning Top Gear Definitions
Vehicles that perform different types of tasks will need different Top Gear Definitions assigned to them.
To assign a Top Gear Definition:
1. From the Vehicle Diagnostics Administration screen, click Top Gear Definition Assign‐ment. The Top Gear Assignment screen, shown in Figure 5–67, appears.
Figure 5–67: Top Gear Assignment Screen
2. Find the mobile devices for which you want to change the assignments. If the mobile devices are not shown, you can find them by:
a. Select the group name from the Show devices in drop‐down menu.
b. Select Starting With, Containing or Ending With from the drop‐down menu.
c. Enter the known criteria in the text box.
d. Select the type of Top Gear Definition the mobile device is currently assigned to, if any. If it is not assigned, select All Definitions.
Trimble MRM Confidential 164

GeoManager Admin & User Guide
e. Click Search. The Mobile Device list refreshes to show any mobile devices assigned to that Trip Definition.
3. Click Change Assignment. The Top Gear Assignment screen changes to show assignment selections, as shown in Figure 5–68.
Figure 5–68: Top Gear Assignment Screen with Assignment Selection
4. If not previously done, select the Top Gear Definition to Assign from the drop‐down menu. This defaults to show the currently selected Trip Definition.
5. Select the radio button to Assign this Definition to:
• All Mobile Devices – shows all mobile devices.
• Selected Mobile Devices – allows user to select specific groups from which to choose mobile devices.
6. If you chose Selected Mobile Devices, select the desired group from the Select Group drop‐down menu.
7. Select the mobile device(s) that you want to assign to the Top Gear Assignment. You can select mobile devices in either the Available Mobile Devices list or the Selected Mobile Devices list.
8. Click the > button to move the selected mobile device(s) to the Selected Mobile Devices list.
Click the >> button to move all mobile devices to the Selected Mobile Devices list.
9. Click Update. The screen refreshes, shown in Figure 5–69, to show the mobile devices in their new assignments.
Trimble MRM Confidential 165

GeoManager Admin & User Guide
Figure 5–69: Top Gear Assignment Screen with Updating Assignment Selection
10. Click Cancel to return to the Top Gear Assignment screen.
Editing Top Gear Assignments
1. From the Top Gear Assignment screen, click Change Assignment.
2. Select the Top Gear Definition for which you want to change assignments from the Select Definition to Assign drop‐down menu.
Note:Note:You can also select the Top Gear Definition from the Top Gear Assignment screen before clicking Change Assignment.
3. Select the mobile device for which you want to change the Top Gear Assignment. You can select mobile devices in either the Available Mobile Devices list or the Selected Mobile Devices list.
4. Click the > button to move the selected mobile device(s) to the Selected Mobile Devices list.
Click the < button to move the selected mobile device(s) to the Available Mobile Devices list.
Click the >> button to move all mobile devices to the Selected Mobile Devices list.
Click the << button to move all mobile devices to the Available Mobile Devices list.
5. Click Update. The screen refreshes to show the mobile devices in their new Top Gear Assignments.
6. Click Cancel to return to the Top Gear Assignments screen.
Trimble MRM Confidential 166

GeoManager Admin & User Guide
After all your definitions are created, assigned and your vehicles have started their daily workloads, you can run reports for the affected mobile devices.
Carbon Emission Profile
The Carbon Emission Profile screen allows you to specify the conversion rules to apply in computing the carbon emissions for your vehicles. Carbon dioxide (CO2) emission from vehicles is primarily determined by the amount of Carbon burned in the fuel used. GeoManager uses the following factors to calculate the Carbon emission from fuel used:
• 1 gallon diesel fuel = 22.2 pounds or equivalent of CO2
• 1 gallon gasoline fuel = 19.4 pounds or equivalent of CO2
Note:Note:The diesel fuel is assumed for Heavy duty fleets and gasoline for Light and Medium duty vehicles.
While the above assignment will work for most fleets, there are exceptional cases for example, a light duty vehicle using diesel fuel. In such cases the customer can define their own translation factor, create a Carbon Emission Profile and assign it to specific vehicles.
1. Click Carbon Emission Profile from the Fleet Administration screen, shown in Figure 5–44. The Carbon Emission Profile screen, shown in Figure 5–70, appears.
Figure 5–70: Carbon Emission Profile Screen
2. Click Create New. The Create New Carbon Emission Profile screen, shown in Figure 5–71, appears.
Trimble MRM Confidential 167

GeoManager Admin & User Guide
Figure 5–71: Create New Carbon Emission Profile Screen
3. Enter the Name. This is a required field.
4. Enter the Description, if known.
5. Enter the Carbon Emission per 1 Unit of Measure of Fuel. This is a required field.
6. Click Save to accept the Carbon Emission Profile change(s).
Click Cancel to return to the Carbon Emission Profile screen without saving changes.
To edit Carbon Emission Profile:
1. From the Carbon Emission Profile screen, shown in Figure 5–72, check the box next to the Carbon Emission Profile you want to edit.
2. Click Edit.
Figure 5–72: Edit Carbon Emission Profile Screen
3. Make the necessary changes.
4. Click Update. The Carbon Emission Profile screen reappears.
Click Cancel to return to the Carbon Emission Profile screen without saving changes.
Trimble MRM Confidential 168

GeoManager Admin & User Guide
To Delete Carbon Emission Profile:
1. From the Carbon Emission Profile screen, shown in Figure 5–70, check the box next to the Carbon Emission Profile you want to edit.
2. Click Delete Selected.
Figure 5–73: Delete Carbon Emission Profile Confirmation Dialog
3. Click OK. The Carbon Emission Profile screen reappears without the deleted carbon emission profile.
Click Cancel to close the dialog box without making changes.
Carbon Emission Profile Assignment
Carbon Emission Profile Assignment allows you to assign a Carbon Emission Profile to use while generating Carbon Emission reports. Once assigned, the system will use the new translation factor from the assigned profile instead of the default rules for computing the Carbon Emission.
1. Click Carbon Emission Profile Assignment from the Fleet Administration screen, shown in Figure 5–44. The Carbon Emission Profile Assignment screen, shown in Figure 5–74, appears.
Figure 5–74: Carbon Emission Profile Screen
2. Click Change Assignment. The Carbon Emission Profile Assign Mobile Device screen, shown in Figure 5–75, appears.
Trimble MRM Confidential 169

GeoManager Admin & User Guide
Figure 5–75: Carbon Emission Profile Assign Mobile Device Screen
3. Select the desired profile from the Select Profile to Assign drop down menu if not selected.
4. Select the mobile device(s) from the Available Mobile Devices field you want to assign the carbon emission profile.
5. Click the > button to move the mobile device(s) to the Selected Mobile Devices field.
6. Click Update.
7. Click Done to save the carbon emission profile assignment. The Carbon Emission Profile Assignment screen refreshes with the mobile device assigned, shown in Figure 5–76
Figure 5–76: Carbon Emission Profile Mobile Device Assigned Screen
Click Fleet Administration to return to the Fleet Administration screen, shown in Figure 5–44.
Trimble MRM Confidential 170

GeoManager Admin & User Guide
Mobile Device Group Administration
Some GeoManager customers use Mobile Device Grouping to administer their mobile workers into groups. For more information about Mobile Device Grouping, please see the GeoManager Mobile Device Grouping Administration Addendum.
TimeConnect Administration
TimeConnect is an optional GeoManager feature. It allows managers and administrators to keep track of the amount of time users and drivers use when sending data to and from the iLM installed in the vehicle. This helps reconcile wireless usage time.
To configure TimeConnect for your account, click TimeConnect in the Navigation links under Devices. The TimeConnect Administration screen, shown in Figure 5–77, appears.
Figure 5–77: TimeConnect Administration Screen
For more information about TimeConnect and its administration, please see the TimeConnect Admin & User Guide.
Vehicle Maintenance Administration
GeoManager Vehicle Maintenance is designed to streamline the planning of regular fleet maintenance, helping you realize the benefits of fuel savings, reduced downtime and service interruptions, and reduced maintenance costs.
With the Vehicle Maintenance module, you can designate which maintenance items to track, access reports showing maintenance status and set up automatic reminder notifications when maintenance is due.
You can set up your own maintenance items or choose from the 13 default maintenance items:
• Change oil and filter
• Rotate tires
• Lubricate suspension/steering
Trimble MRM Confidential 171

GeoManager Admin & User Guide
• Repack front wheel bearings
• Replace air filter
• Replace auto transmission fluid and filter
• Change engine coolant
• Replace spark plugs
• Replace fuel filter
• Replace manual transmission fluid
• Replace accessory drive belts
• Replace rear axle lubricant
• Registration/smog check
From the Devices drop down menu, shown in Figure 5–2, click Vehicle Maintenance under Devices to go to the main Vehicle Maintenance administration screen, shown in Figure 5–78.
Figure 5–78: Vehicle Maintenance Administration Screen
Maintenance Items
You can add, update and delete vehicle maintenance items.
To add a Vehicle Maintenance item:
1. From the Vehicle Maintenance screen, shown in Figure 5–78, click Add/Update/Delete Maintenance Items. The Add/Update/Delete Maintenance Items screen, shown in Figure 5–79, appears.
Trimble MRM Confidential 172

GeoManager Admin & User Guide
Figure 5–79: Add Vehicle Maintenance Item Screen
2. Enter any new Maintenance Item(s) you want to track:
a. Enter a name in an empty Maintenance Item text field.
b. Enter the number of days you want to be notified prior to the maintenance due date in the Maintenance Notification Lead Time text field.
c. Enter the number of miles you want to be notified prior to the mileage due date in the Maintenance Notification Lead Mileage text field.
d. A check mark already appears in the Select to Update column.
e. Click Save. The screen refreshes, saving the new maintenance item.
Click Reset to clear any unsaved maintenance items.
Click Cancel to return to the Administration screen without making any changes.
Trimble MRM Confidential 173

GeoManager Admin & User Guide
3. To update any Maintenance Item:
a. Update the Maintenance Item information. You can change the Maintenance Notifica‐tion Lead Time and/or Maintenance Notification Lead Mileage text. You can change multiple items.
b. Click the Select to Update check box for each changed item.
c. Click Save. The screen refreshes, saving the new maintenance item.
Click Reset to clear any unsaved maintenance items.
Click Cancel to return to the Administration screen without making any changes.
4. To delete any Maintenance Item:
a. Click the Select to Update check box for each item you want to delete.
b. Click Delete. A confirmation dialogue box, shown in Figure 5–80, appears.
Figure 5–80: Delete Maintenance Item Confirmation Dialog Box
c. Click OK. The Add Vehicle Maintenance Item screen refreshes without the selected items.
Maintenance Schedule
After you have decided which maintenance items you want to track, you must configure a Maintenance Schedule for each mobile device you want to track.
To configure a Maintenance Schedule:
1. From the Vehicle Maintenance screen, shown in Figure 5–78, click Configure Maintenance Schedule. The Configure Vehicle Maintenance Schedules screen, shown in Figure 5–81, appears.
Trimble MRM Confidential 174

GeoManager Admin & User Guide
Figure 5–81: Configure Vehicle Maintenance Schedule Screen
2. Select the Vehicle Group from the drop‐down list.
3. Select the Mobile Device from the drop‐down list.
4. For each Maintenance Item, enter the number of miles between each service in the Schedule Service Every X Miles text box.
5. For each Maintenance Item, enter the number of months between each service in the Schedule Service Every X Months text box.
6. If desired, select any other vehicles to which you want to apply this schedule. You can select more than one vehicle by holding down the [Ctrl] key and clicking with the mouse.
7. Click Save to save the maintenance schedule. The Configure Vehicle Maintenance Schedules screen refreshes, saving the schedule information.
Click Reset to clear any unsaved schedule information.
Click Cancel to return to the Vehicle Maintenance screen.
Trimble MRM Confidential 175

GeoManager Admin & User Guide
Mileage and Purchase Date
GeoManager allows you to enter the current vehicle mileage and purchase date to accurately schedule maintenance for your vehicles.
To enter a vehicle’s mileage and purchase date:
1. From the Vehicle Maintenance screen, shown in Figure 5–78, click Update Mileage/Purchase Date. The Update Mileage/Purchase Date screen, shown in Figure 5–82, appears.
Figure 5–82: Update Mileage/Purchase Date Screen
2. Select the Vehicle Group from the drop‐down list.
Enter search criteria in the Search Device field to locate devices not displayed.
If there are 10 or more devices, you can select 10, 20, 50 or 100 from the Display drop down menu.
3. If known, enter the Purchase Date for each device. If not known, the purchase date defaults to January 1 of this year.
4. Enter the New Mileage for each device based on the odometer readings if it differs significantly from the GPS Reported Mileage.
5. Click Save. The Update Mileage screen saves the information and refreshes.
Click Reset to clear any unsaved information.
Trimble MRM Confidential 176

GeoManager Admin & User Guide
Click Cancel to return to the Vehicle Maintenance screen.
GPS Drift
Note:Note:Due to GPS drift, it may be necessary to adjust the GPS mileage to match the actual mileage. If you know the actual mileage based on odometer readings enter it in the New Mileage field.
1. Check the % box to enable mileage adjustment by percentage.
Enter the numeric percentage in the Adjustment field. The fields are automatically updated with the change.
Audit Mileage Adjustments
All mileage updates and changes can be viewed in the Mileage Audit Report.
To view the Mileage Audit Report:
1. From the Vehicle Maintenance screen, shown in Figure 5–78, click Audit Mileage Adjustments. The Mileage Audit Report screen, shown in Figure 5–82, appears.
Figure 5–83: Mileage Audit Report Screen
2. Select the From Date and To Date for the mileage adjustment using the Calendar pop up menu.
3. Select the From Time and To Time times for the mileage adjustment using the Clock icon.
4. Select the Vehicle Group from the drop down list.
Trimble MRM Confidential 177

GeoManager Admin & User Guide
5. Enter search criteria in the Select Device field to locate devices not displayed.
If there are 10 or more devices, you can select 10, 20, 50 or 100 from the Display drop down menu.
6. Click Search.
Click Back to Vehicle Maintenance Administration to return to the Vehicle Maintenance screen.
Update Comments
You can enter and save comments about each vehicle in Vehicle Maintenance. This can by any type of information about the vehicle, including repair work, cosmetic defects, recurring issues or any other pertinent information.
To enter a comment about a vehicle:
1. From the Vehicle Maintenance screen, shown in Figure 5–78, click Update Comments. The Update Maintenance Comments screen, shown in Figure 5–84, appears.
Figure 5–84: Update Maintenance Comments Screen
2. Select the Mobile Device from the drop‐down list.
3. Enter any comments about the vehicle’s maintenance. You can enter a maximum of 2000 characters. The Characters Left field shows you the number of characters still available to enter.
Trimble MRM Confidential 178

GeoManager Admin & User Guide
4. Click Save. The Update Maintenance Comments screen refreshes, saving the enter comment(s).
Click Reset to clear any unsaved comments.
Click Cancel to return to the Vehicle Maintenance screen.
Click Delete to delete all comments. A confirmation dialogue box, shown in Figure 5–85, appears.
Figure 5–85: Delete All Comments Confirmation Dialog Box
Click OK to delete all comments.
Notifications
You can select who gets notified by email when vehicles need maintenance.
To enter or update email addresses when vehicles need maintenance:
1. From the Vehicle Maintenance screen, shown in Figure 5–78, click Update Email Addresses for Maintenance Alert Notification. The Maintenance Alert Notification screen, shown in Figure 5–86, appears.
Figure 5–86: Maintenance Alert Notification Screen
2. Enter the email address(es) where you want alerts sent. You can enter up to 4 email addresses.
Trimble MRM Confidential 179
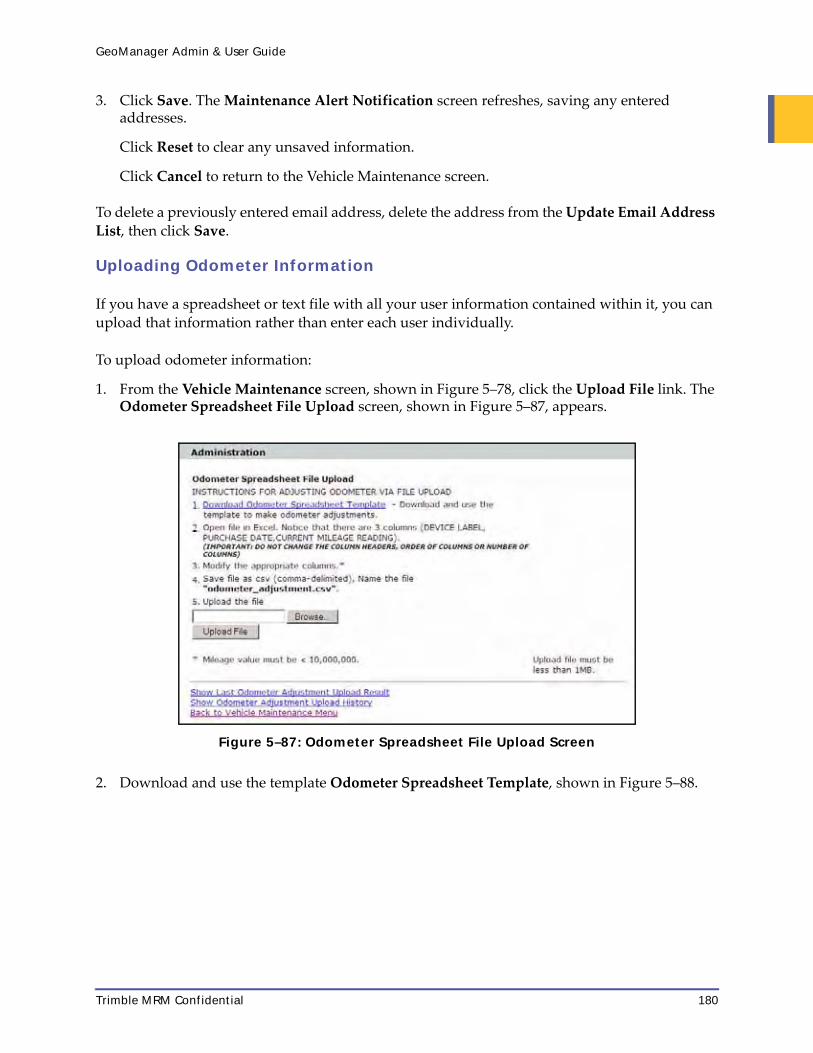
GeoManager Admin & User Guide
3. Click Save. The Maintenance Alert Notification screen refreshes, saving any entered addresses.
Click Reset to clear any unsaved information.
Click Cancel to return to the Vehicle Maintenance screen.
To delete a previously entered email address, delete the address from the Update Email Address List, then click Save.
Uploading Odometer Information
If you have a spreadsheet or text file with all your user information contained within it, you can upload that information rather than enter each user individually.
To upload odometer information:
1. From the Vehicle Maintenance screen, shown in Figure 5–78, click the Upload File link. The Odometer Spreadsheet File Upload screen, shown in Figure 5–87, appears.
Figure 5–87: Odometer Spreadsheet File Upload Screen
2. Download and use the template Odometer Spreadsheet Template, shown in Figure 5–88.
Trimble MRM Confidential 180

GeoManager Admin & User Guide
Figure 5–88: Odometer Spreadsheet Template Sample
3. Open the file in Excel. Notice that there are three columns:
• Device Label
• Purchase Date
• Current Mileage Reading
WARNING!DO NOT CHANGE THE COLUMN HEADERS, ORDER OF COLUMNS OR NUMBER OF COL-UMNS!
4. Modify the appropriate definitions.
5. Save the file as csv (comma‐delimited) without renaming it. The File size is limited to 1 MB.
6. Click Browse to find and select the saved file.
7. Click Upload File. A confirmation dialogue box, shown in Figure 5–156, appears.
8. Click OK.
• If the upload is successful, the Upload Completed screen, shown in Figure 5–157, appears.
• If the upload is not successful, the Upload Failed screen, shown in Figure 5–158, appears.
9. Click Done. The Odometer Spreadsheet File Upload screen appears.
After the files are uploaded, you can see the results from the last upload by clicking the Show Last Odometer Adjustment Upload Result link. The Last Odometer Adjustment Upload screen, shown in Figure 5–215, appears.
Trimble MRM Confidential 181

GeoManager Admin & User Guide
Figure 5–89: Last Odometer Adjustment Upload Result Screen
You can view the upload history by clicking the Show Odometer Adjustment Upload History link in the Odometer Spreadsheet File Upload screen. The Odometer Adjustment Upload History screen, shown in Figure 5–216, appears.
Figure 5–90: Odometer Adjustment Upload History Screen
To return to the Odometer Spreadsheet File Upload screen, click the Upload Config File link.
WLAN Security Administration
The WLAN Administration feature of Trimble GeoManagerSM enables customers to remotely configure iLM 3100‐W Series access point security, authentication, and other parameters. The current and/or new access point configurations can be viewed at any time via the Trimble GeoManager WLAN Security Administration screen.
Note:Note:Only a Super Admin has access to WLAN Administration capabilities.
Trimble MRM Confidential 182

GeoManager Admin & User Guide
WLAN access point administration relates to two types of data: Configuration Data and Usage Data. Configuration Data includes all parameter data required to configure the access point. Usage Data includes hourly statistics of traffic through the WLAN interface.
The WLAN Administration feature consists of three sub‐features:
• WLAN remote configuration – Allows access point configuration via browser.
• CSV Upload – Enables the upload of many iLM 3100‐W Series access point configurations in bulk using CSV format.
• Reports – Provides configuration audit and data usage reports.
For more information about WLAN Security Administration, see the GeoManager iLM® 3100‐W Series WLAN Admin Guide.
Landmark Administration
You can create Landmarks in the administration section of GeoManager if you know the address. If you do not know the address, you can create Landmarks by placement in MapView.
To create a Landmark by address:
1. From the Landmarks drop down menu, shown in Figure 5–91, click the Landmarks drop down menu under the Navigation links. The Devices Administration link, shown in Figure 5–91, appear. The default screen shown is Landmark Administration.
The Landmark Administration screen, shown in Figure 5–92, appears.
Figure 5–91: Landmark Administration Drop Down Menu
Figure 5–92: Landmark Administration Screen
Trimble MRM Confidential 183

GeoManager Admin & User Guide
2. Click Add Landmark. The Administration – Add Landmark screen, shown in Figure 5–93, appears.
Figure 5–93: Administration - Add Landmark Screen
3. Enter the Landmark Address.
4. Enter the Landmark City.
5. Enter the Landmark State/Province.
6. Enter the Landmark Zip/Postal Code.
7. Select the Country from the drop‐down menu.
8. Enter the Landmark Name.
9. Select the Landmark Type from the drop‐down menu.
10. Select the Fence type from the drop‐down menu.
11. Enter the Radius for the proximity fence.
12. Enter the Start date for the Landmark. You can also click the calendar and select a date.
13. Enter an optional End date for the Landmark. If you enter an end date, the Landmark disappears at midnight of the entered date.
14. Click Add. An Administration – Confirm Customer Landmark screen, shown in Figure 5–94, appears.
Click Reset to clear the entered information.
Trimble MRM Confidential 184

GeoManager Admin & User Guide
Click Cancel to return to the Administration screen.
Figure 5–94: Add Landmark Confirmation Screen
15. Check the Landmark information.
16. Click Confirm. The Customer Landmark is Added screen, shown in Figure 5–95, appears.
Click Redefine to change any information.
Click Cancel to return to the Administration screen without creating the Landmark.
Figure 5–95 Customer Landmark Added Screen
17. Click Add Another Landmark if you have more Landmarks to create.
Click Done to return to the Administration screen.
Editing a Landmark
After Landmarks have been created, you can review the current Landmarks, edit the Landmark’s information, give it an end date or remove it from GeoManager.
Trimble MRM Confidential 185

GeoManager Admin & User Guide
To edit a Landmark:
1. From the Landmark Administration menu, shown in Figure 5–92, click List/Edit/Remove Landmark. The List Landmark screen, shown in Figure 5–96, appears.
Figure 5–96: List Landmark Screen
2. Find the Landmark you want to edit. All search criteria are optional.
a. In the Search Criteria section, select the Landmark type from the drop‐down menu.
b. Select the Location type from the drop‐down menu:
• All
• City
• State
• Zip
c. In the Location text box, enter the Location information. For example, CA for California.
d. Enter the Landmark Name. You can search using the first letter or number of the name. You cannot search for letters or numbers in the middle of a Landmark name.
e. Click Search. The List Landmark screen refreshes with a list of matching Landmarks.
3. In the Landmark column, click the name of the Landmark you want to edit. The Edit Landmark screen, shown in Figure 5–97, appears.
Trimble MRM Confidential 186

GeoManager Admin & User Guide
Note:Note:If the Landmark is not editable because it is associated with a Landmark Proximity Exception, the Landmark name is not a hyperlink. You must dissociate the Exception before making any modifications.
Figure 5–97: Edit Landmark Screen
4. Change the Landmark information.
5. Click Modify. The Landmark Confirmation screen, shown in Figure 5–94, appears.
6. Click Confirm. The Customer Landmark is Modified screen, shown in Figure 5–98, appears.
Figure 5–98: Customer Landmark is Modified Screen
7. Click Done if you are finished modifying Landmarks.
Click Modify Another Landmark to return to the Landmark List screen.
Trimble MRM Confidential 187

GeoManager Admin & User Guide
Defining a Landmark Type
You can create categories for Landmarks in GeoManager, allowing you to locate specific Landmark types when generating reports or looking at MapView. If a Landmark Type name is changed, the changed name appears in any reports that show that Landmark Type.
To define a Landmark type:
1. From the Landmark Administration menu, shown in Figure 5–92, click Define Landmark Type. The Define Landmark Type screen, shown in Figure 5–99, appears.
Figure 5–99: Define Landmark Type Screen
The Define Landmark Type screen contains default Landmark type information.
2. Change the Landmark Type Label. This can be any alpha‐numeric combination.
3. If desired, enter the number of days before the Landmark’s Expiration date. After this date, the Landmark disappears from MapView.
Trimble MRM Confidential 188

GeoManager Admin & User Guide
4. Click Save. The Landmark Types are updated in the system. The Cancel button changes to a Done button.
Click Reset to undo any changes without saving them.
Click Done or Cancel to return to the Landmark Administration screen.
Landmark Batch Files
A Landmarks batch file is a text file containing one or more Landmarks—up to 2,000 for a basic subscription. The file must use comma‐separated values (*.csv) or text (*.txt) format, and the information for each Landmark must be in a specific order. You can set up a Landmarks list in either a spreadsheet or database application. Most of these applications can save your file using the proper format in one step.
You can also create a Landmark batch file manually, using a text editor.
A Landmark batch file requires specific fields in a specific order, separated by commas. Retain the comma as a placeholder in the case of missing or blank fields, so that the application can keep track when uploading the data. The file format for Landmarks identified by latitude/longitude is as follows:
[Landmark Name],[Latitude],[Longitude],[Address],[City],[Post Code],[Range],[Landmark Type],[Start Date],[End Date]
The file format for Landmarks identified by address is as follows:
[Landmark Name], [Address], [City], [Post Code], [Range], [Landmark Type], [Start Date], [End Date]
The system enables you to correct unprocessed Landmarks for up to 72 hours after the original file upload. The field requirements for Landmarks identified by latitude/longitude are as follows:
FieldRequired/Optional
Rules
Landmark Name
Required 30 characters maximum. Over 30 characters will be truncated.
Latitude Required South indicated by minus sign (-), otherwise numeric with up to six digits after the decimal point. Over 6 dig-its will be truncated.
Longitude Required West indicated by minus sign (-), otherwise numeric with up to six digits after the decimal point. Over 6 dig-its will be truncated.
Trimble MRM Confidential 189

GeoManager Admin & User Guide
The field requirements for a Landmark identified by address are as follows:
Address Optional Alphanumeric. Must be a valid street address.
Town or City Optional Alphanumeric.
Post Code Optional Alphanumeric. Five digits (00000) or 5+4 digits (00000-0000). If fewer than five digits, leading zeroes are entered (e.g., 00456).
Range Optional (default value if blank)
Circle: Enter the number of feet for the radius. The range is from 250 to 52800. Use numbers only, for example, 2500.
Rectangle: Enter the number of feet for the length and width, from 500 to 105600 per side. Use an “x” between the length and width, for example, 500x500).
A blank field defaults to a circle with a 250-feet radius.
Landmark Type
Required Landmark Type (1 to 20). A blank field defaults to a Type 1. For an explanation of the fields, click the Define Landmark Type link in the Administration area of GeoManager.
Start Date Optional Landmark is not active until this date. Must be a date in the future. (Date formats: dd-mm-yy,dd-mm-yyyy)
End Date Optional Landmark is inactive after this date. Must be a date in the future. (Date formats: dd-mm-yy, dd-mm-yyyy)
FieldRequired/Optional
Rules
Landmark Name
Required 30 characters maximum. Over 30 characters will be truncated.
Address Required Alphanumeric. Must be a valid street address. City Required Alphanumeric.
Post Code Required Alphanumeric. Five digits (00000) or 5+4 digits (00000-0000). If fewer than five digits, leading zeroes are entered (e.g., 00456).
FieldRequired/Optional
Rules
Trimble MRM Confidential 190

GeoManager Admin & User Guide
Exporting Landmarks from a Spreadsheet or Database Application
If you maintain Landmarks in a spreadsheet or database application, you may translate your file directly into the required comma‐separated *.csv file using, for example, the Microsoft Excel Save As function.
• Enter all required fields for each Landmark, even if you want to modify only a single field.
• For Landmarks identified by latitude/longitude, use 11 columns. For Landmarks identified by address, use 9 columns.
You can also download a pre‐formatted file, sample shown in Figure 5–100, by clicking the Download by Address or Download by Lat/Lon link in the Upload Landmarks screen, shown in Figure 5–101.
Figure 5–100: Upload Landmarks by Address Template Sample
Range Optional (default value if blank)
Circle: Enter the number of feet for the radius. The range is 250 to 52800. Use numbers only, for example, 2500.
Rectangle: Enter the number of feet for the length and width, from 500 to 105600 per side. Use an “x” between the length and width, for example, 500x500.
A blank field defaults to a circle with a 250-feet radius.
Landmark Type Required Landmark Type (1 to 20). A blank field defaults to a Type 1. For an explanation of the fields, click the Define Landmark Type link in the Administration area of GeoManager.
Start Date Optional Landmark is not active until this date. Must be a date in the future. (Date formats: dd-mm-yy, dd-mm-yyyy)
End Date Optional Landmark is inactive after this date. Must be a date in the future. (Date formats: dd-mm-yy, dd-mm-yyyy)
FieldRequired/Optional
Rules
Trimble MRM Confidential 191

GeoManager Admin & User Guide
Creating a text file
GeoManager reads the text (*.txt) file format. Use this file format if you do not have a database or spreadsheet application, or your application does not process the translation correctly. In addition, database and spreadsheet applications can translate files into this format.
• Enter each Landmark in its own line.
• Separate each field in a line by a comma with no spaces.
• If any field is blank, retain the comma as a placeholder.
• Enter all required fields for each Landmark, even if you only want to modify a single field.
• Place a carriage return at the end of each Landmark. The Enter or Return key on the key‐board produces a carriage return.
• Enter the data into the Landmarks file without extra keystrokes, such as spaces around the commas or at the end of the line.
• List as few or as many Landmarks as you want to add or modify.
Uploading a Landmarks File
To make entering Landmarks easier, you can upload Landmarks in a batch file.
1. From Landmark Administration, click Batch Upload Landmarks. The Upload Landmark screen, shown in Figure 5–101, appears.
Figure 5–101: Upload Landmark Screen
2. Click Browse.
Trimble MRM Confidential 192

GeoManager Admin & User Guide
3. Locate the desired .csv or .txt file.
4. Click Upload File.
Note:Note:Every field in the .csv or .txt file requires some kind of entered data. If that particular field does not require data, enter a blank space by pressing the space bar on your keyboard.
The Upload Landmark screen allows users to see current Landmark uploading information, such as limits and upload numbers. The items in the Account Information box at the top are:
• Current Number of Customer Landmarks – shows the number of Landmarks currently contained in the Landmarks file.
• Customer Landmark Limit – shows the maximum number of Landmarks you may define for your account.
• Uploads per month allowed – shows the maximum number of uploads the system allows per month.
• Uploads completed this month – shows the number of uploads actually completed for the current month.
If you have completed the maximum number of uploads for the month, the form near the bottom of the window changes.
Note:Note:You are allowed eight uploads per month unless otherwise noted in your contract.
If a duplicate Landmark is in the file, the system replaces or adds the Landmarks according to the following rules:
• New Landmarks will be added to the existing database.
If the old and new Landmark both have the same:
This happens:
Name and either Address or Lat/Long
The new Landmark replaces the old Landmark.
Name only The new Landmark is added. The old Landmark remains. You will have two Landmarks with the same name and different addresses or latitudes/longitudes.
Address or Lat/Long only The new Landmark replaces the old Landmark.
Trimble MRM Confidential 193

GeoManager Admin & User Guide
• Certain Landmarks may not be processed properly due to an incorrect address, incom‐plete information, or map data limitations.
If the upload fails, click the OK button in the resulting window and review the file. Correct any errors and upload the file again.
When the upload completes a confirmation window, shown in Figure 5–102, appears.
Figure 5–102: Upload Completed Screen
Click Done to go back to the Administration window.
Click Show Last Upload Results to see results of the last uploaded file, as shown in Figure 5–103.
Figure 5–103: Last Upload Results Screen
The drop‐down menu provides links to other locations in the Administration area. Use the links at the bottom of the window to do any of the following:
Show Last Updated Results displays the upload file and the results of the most recent upload in a column to the right of the Landmark entry.
Trimble MRM Confidential 194

GeoManager Admin & User Guide
List of result messages for Address Landmarks
List of result messages for Lat/Long Landmarks
Show Upload History displays a summary of all uploads, as shown in Figure 5–104.
• Invalid Post Code • Successfully Replaced• Invalid Street Address • Invalid Range• Invalid Type • Successfully Added
• Invalid Post Code • Invalid Range • Successfully Replaced• Invalid Street Address • Invalid Lat/Long• Invalid Type • Successfully Added
Trimble MRM Confidential 195

GeoManager Admin & User Guide
Figure 5–104: Show Upload History Screen
• Download Landmark File (by Address or by Lat/Long) includes links for downloading the Landmarks files identified by address or by latitude/longitude.
Removing a Landmark Type
You can remove Landmarks by type from your account. To remove Landmarks by type:
1. From the Landmark Administration screen, click Remove All Landmarks by Type. The Remove Landmarks by Type screen, shown in Figure 5–105, appears.
Trimble MRM Confidential 196

GeoManager Admin & User Guide
Figure 5–105: Remove Landmarks by Type Screen
2. From the list, select the Landmark type you want to remove.
WARNING!Warning! Removing Landmarks by type deletes all the Landmark information from the system for the selected type of Landmark.
WARNING!Any Landmarks that are associated with Exceptions must be disassociated before you can delete the Landmarks.
3. Click Remove. A confirmation dialogue box, shown in Figure 5–106, appears.
Figure 5–106: Remove Landmarks by Type Confirmation Dialog Box
Trimble MRM Confidential 197

GeoManager Admin & User Guide
4. Click OK. A successfully completed dialogue box, shown in Figure 5–107, appears stating that the Landmarks of the selected type have been removed from the system.
Figure 5–107: Remove Landmarks by Type Successful Screen
5. Click OK. The Remove Landmarks by Type screen reappears.
6. Click Done. The Landmark Administration screen appears.
Employees
The creation and administration of employee information is important for you to get the most from your GeoManager solution. By entering employee information and creating an organizational hierarchy structure, you can gather more specific information about your employees and their activities so that you can increase productivity and get more deliveries or jobs completed per day.
You can access the Employee Administration links by clicking the down‐arrow next to Employees under the Administration Navigation links, as shown in Figure 5–108.
Figure 5–108: Employee Administration Drop Down Menu
Driver Logs Administration
Driver Logs, an optional GeoManager feature, allows driver hours and activities to be recorded throughout the day with the use of the iDT. Entries such as location, date, time, mileage, time calculations, etc. are automatically transmitted from the vehicle via wireless. The system accurately monitors driver hours and availability on a real‐time basis and aids in downloading this information onto computers for viewing at a later time.
For more information about using Driver Logs, see the GeoManager Driver Logs User Guide.
Trimble MRM Confidential 198
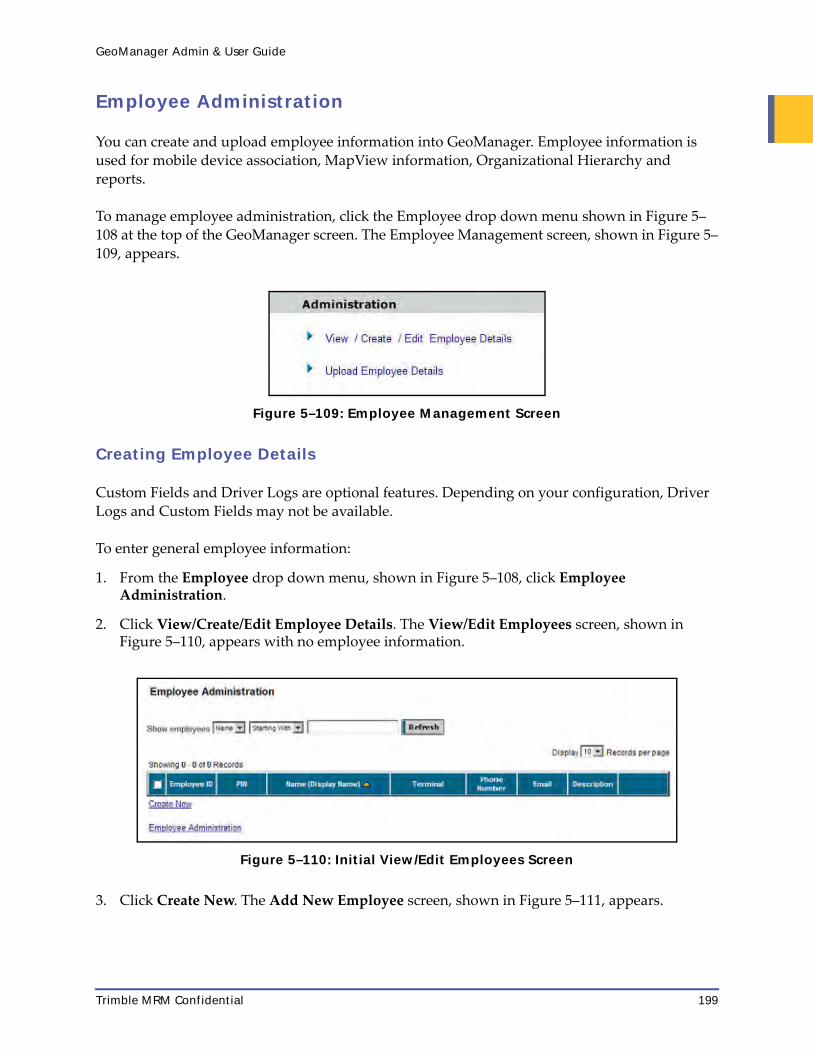
GeoManager Admin & User Guide
Employee Administration
You can create and upload employee information into GeoManager. Employee information is used for mobile device association, MapView information, Organizational Hierarchy and reports.
To manage employee administration, click the Employee drop down menu shown in Figure 5–108 at the top of the GeoManager screen. The Employee Management screen, shown in Figure 5–109, appears.
Figure 5–109: Employee Management Screen
Creating Employee Details
Custom Fields and Driver Logs are optional features. Depending on your configuration, Driver Logs and Custom Fields may not be available.
To enter general employee information:
1. From the Employee drop down menu, shown in Figure 5–108, click Employee Administration.
2. Click View/Create/Edit Employee Details. The View/Edit Employees screen, shown in Figure 5–110, appears with no employee information.
Figure 5–110: Initial View/Edit Employees Screen
3. Click Create New. The Add New Employee screen, shown in Figure 5–111, appears.
Trimble MRM Confidential 199

GeoManager Admin & User Guide
Figure 5–111: Add New Employee Screen
4. Enter the employee’s First Name. This is a required field.
5. Enter the employee’s Last Name. This is a required field.
6. Enter the Display Name, if known.
7. Enter the Employee ID. This is a required field.
8. Click the calendar and select the Date of Joining, if known.
9. Select the employee’s Status. This is a required field.
10. Enter the employee’s Street Address, if known.
11. Enter the employee’s City, if known.
12. Select the employee’s State from the drop down‐menu, if known.
13. Enter the employee’s Zip Code, if known.
14. Enter the employee’s Home Phone Number, if known.
15. Enter the employee’s Mobile Phone Number, if known.
Trimble MRM Confidential 200

GeoManager Admin & User Guide
16. Enter the employee’s Work Phone Number, if known.
17. Enter the employee’s Fax Phone Number, if known.
18. Enter the employee’s Email address, if known.
19. Enter a Description for the employee. This can be their title, level or any other identifying information.
20. Click Save to save the employee information and return to the View/Edit Employee screen.
Click Cancel to return to the Employee Administration screen without saving the informa‐tion.
To enter driver log employee information:
1. In the Add New Employee screen, click the Driver Log tab. The Add New Employee Driver Log screen, shown in Figure 5–112, appears.
Figure 5–112: Add New Employee Driver Log Screen
2. Select the HOS Rule. This is a required field.
3. Select the Terminal. This is a required field.
4. Select the Terminal Logon PIN, if known.
5. Enter the License Type, if known.
6. Enter the Previous Company, if known.
Trimble MRM Confidential 201

GeoManager Admin & User Guide
7. Click Save to save the employee information and return to the Add New Employee screen.
8. Click Cancel to return to the Employee Administration screen without saving the information.
To enter custom employee information:
1. In the Add New Employee screen, click the Custom tab. The Add New Employee Custom Fields screen, shown in Figure 5–112, appears.
Note:Note:Custom Fields need to be configured in the Configure Custom Fields section
Figure 5–113: Add New Employee Driver Log Screen
2. Enter the requested information in the fields provided.
3. Click Save to save the employee information and return to the Add New Employee screen.
Click Cancel to return to the Employee Administration screen without saving the informa‐tion.
To edit employee details:
1. From the View/Edit Employee screen, shown in Figure 5–114, check the box next to the Employee ID for whom you want to change information.
Trimble MRM Confidential 202

GeoManager Admin & User Guide
Figure 5–114: View/Edit Employees Screen
2. Click Edit. The Edit Employee screen, shown in Figure 5–115, appears.
Trimble MRM Confidential 203

GeoManager Admin & User Guide
Figure 5–115: Edit Employee Screen
3. Make the necessary changes.
4. Click Save. The View/Edit Employees screen reappears.
Click Cancel to return to the View/Edit Employees screen without saving the changes.
To delete an employee:
1. From the View/Edit Employee screen, shown in Figure 5–114, check the box next to the Employee ID(s) you want to delete. You can delete multiple employees at a time.
2. Click Delete Selected. A confirmation dialogue box, shown in Figure 5–116, appears.
Figure 5–116: Delete Employee(s) Confirmation Dialogue Box
Trimble MRM Confidential 204

GeoManager Admin & User Guide
3. Click OK. The View/Edit Employees screen refreshes without the deleted employee.
Click Cancel to close the dialogue box without deleting the employee.
To enter employee shift threshold definitions:
1. From the View/Create/Edit Employee Details screen, shown in Figure 5–114, click the Employee Shift Threshold Definition link. The Employee Shift Threshold Definition screen, shown in Figure 5–117, appears with no employee information.
Figure 5–117: Employee Shift Threshold Definition Screen
2. Select the Shift Start Threshold from the drop down menu.
3. Select the Shift End Threshold from the drop down menu.
4. Click Save.
Click Done to return to the View/Create/Edit Employee Details.
Click Employee Administration to return to the Employee Management screen.
Uploading Employee Details
GeoManager allows you to upload CSV files pre‐populated with employee details, saving you time and effort.
WARNING!Save a copy of the current CSV file and verify that all edits to the new CSV file are correct before uploading it to the system. The new file will overwrite the old file, making the previously uploaded file non-recoverable if there is a problem.
To upload employee definition and shift definition CSV files:
1. From the Employee drop down menu, shown in Figure 5–108, click the Upload Employee Details link. The Employee Definition File Upload and Shift Definition File Upload screen, shown in Figure 5–118, appears.
Trimble MRM Confidential 205

GeoManager Admin & User Guide
Figure 5–118: Employee to Device Assignment File Upload Screen
2. Download and use the template Employee Device Assignment Template.
a. Click the Download Employee Definition Template link.
b. A File Download dialogue box appears.
c. Click Save.
d. Navigate to the correct location on your hard drive.
e. Save the file with a new name. Suggested names are employee_definition_12Oct.csv or employee_definition1.csv.
f. Click Save. The file is saved to your hard drive.
3. Open the file in Excel. Notice that there are 8 predefined columns: Employee ID, First Name, Last Name, Email, Phone Number, Description Category and Org Unit Name.
Trimble MRM Confidential 206

GeoManager Admin & User Guide
Figure 5–119: Employee Device Assignment CSV File Sample
WARNING!Do NOT change the column headers, order of columns or number of columns!
4. Modify the appropriate definitions.
5. Rename the file. Suggested file names are employee_device_assignment1.csv or employee_device_assignment_12Oct.csv.
6. Save file as CSV (comma‐delimited). The File size is limited to 1 MB. If files are bigger than 1 MB, break the big file into smaller files and then upload the smaller files.
7. In the GeoManager Employee Definition File Upload screen, click Browse to find and select the saved file.
8. Click Upload File. A confirmation dialogue box, shown in Figure 5–120, appears.
Figure 5–120: Upload File Confirmation dialogue Box
9. Click OK. An Upload Completed screen, shown in Figure 5–121, appears.
Figure 5–121: File Upload Completed Screen
Trimble MRM Confidential 207

GeoManager Admin & User Guide
10. Click Done. The Employee Definition File Upload screen, shown in Figure 5–118, appears.
After you have finished uploading the Employee device assignment file(s) successfully, if you need to verify which and when files were uploaded last, you can click the Show Last Employee Definition Upload Result link at the bottom of the Employee Definition File Upload screen, shown in Figure 5–118. The Last Employee Device Assignment Upload Result screen, shown in Figure 5–135, appears.
Figure 5–122: Last Employee Device Assignment Upload Result Screen
This screen shows the file name, date and time that the file was uploaded and processed, as well as the number of records processed.
If you click the Processed X of X Records (Download Results File), you are prompted to Save or Open the file.
If you want to view the history of Employee Device Assignment uploads, you can click the Show Employee Device Assignment Upload History link at the bottom of the Employee to Device Assignment File Upload screen, shown in Figure 5–131. The Show Employee Device Assignment Upload History screen, shown in Figure 5–136, appears.
Trimble MRM Confidential 208

GeoManager Admin & User Guide
Figure 5–123: Employee Device Assignment Upload History Screen
The Employee Device Assignment Upload History screen shows the file name, upload date and time, processed date and time, and number of records processed for all uploaded files
Employee Management
An additional feature of GeoManager is the ability to manage information about employees who use mobile devices.
To manage employee information, click the Employee tab at the top of the GeoManager screen. The Employee Management screen, shown in Figure 5–124, appears.
Figure 5–124: Employee Management Screen
Associating Employees to Devices
Employee Management allows you to associate employees to mobile devices.
To associate an employee to a mobile device:
1. From the Employee Management screen, click Associate Employee to Devices. The Associ‐ate Employee(s) to Devices screen, shown in Figure 5–125, appears.
Trimble MRM Confidential 209

GeoManager Admin & User Guide
Figure 5–125: Assign Employee(s) to Devices Screen
2. Locate the name of the employee with whom you want to associate a device.
You can search for the correct employee name by entering the first few letters or the entire name in the Search text box and clicking Search.
3. Click New in the last column of the employee’s information. The Employee to Device Association screen, shown in Figure 5–126, appears.
Figure 5–126: Select Employee Screen
4. Select the desired mobile device from the Available Device list.
You can search for the correct employee name by entering the first few letters or the entire name in the Search text box and clicking Search.
Trimble MRM Confidential 210

GeoManager Admin & User Guide
5. Select the Start date by clicking the calendar icon next to the Start text box. A pop‐up calendar, shown in Figure 5–127, appears.
Figure 5–127: Pop-Up Calendar
6. Click on the effective date. This must be the current date or later.
The selected date appears in the Start Date box in the Employee to Device Associa‐tion screen.
7. Select the Start time by clicking the clock icon. A pop‐up menu, shown in Figure 5–128, appears.
Figure 5–128: Pop-Up Clock
8. Select the effective time.
The selected date appears in the Start Time box in the Employee to Device Associa‐tion screen.
9. Select the End Date, if desired, by clicking the calendar icon next to the End Date text box. A pop‐up calendar, shown in Figure 5–127, appears.
10. Click on the end date. This must be the current date or later.
The selected date appears in the End Date box in the Employee to Device Associa‐tion screen.
11. Select the End Time, if desired, by clicking the clock icon. A pop‐up calendar, shown in Figure 5–128, appears.
12. Select the end time.
Trimble MRM Confidential 211

GeoManager Admin & User Guide
The selected date appears in the End Time box in the Employee to Device Associa‐tion screen.
13. Click Save. The Successful Device Association screen, shown in Figure 5–129, appears.
Figure 5–129: Successful Device Association Screen
14. Click Ok. The Associate Employees to Device(s) screen reappears with the new employee/device association displayed, shown in Figure 5–125.
Note:Note:Devices can be unassigned from an Employee, but another device has to be assigned the Employee. Otherwise the System prompts a Please Select a Device alert. The other option is to delete the Employee Device Assignment completely by clicking Delete Checked in the View / Edit Employee Device Assignment page.
Terminating Device to Employee Associations
If you want to associate an employee with a different device or an association is no longer needed, you can terminate the association by:
1. In the Associate Employee(s) to Devices screen, click the check box next to the name of the employee for whom you wish to terminate mobile device association.
2. Click Terminate Checked Associations. The Terminate Device Association dialogue box, shown in Figure 5–130, appears.
Figure 5–130: Terminate Device Association dialogue Box
3. Click OK to terminate the association.
Click Cancel to return to the Associate Employee(s) to Devices screen without termi‐nating the association.
Trimble MRM Confidential 212

GeoManager Admin & User Guide
Uploading Employee Device Assignments
GeoManager allows you to upload CSV files pre‐populated with employee information, saving you time and effort.
WARNING!Save a copy of the current CSV file and verify that all edits to the new CSV file are correct before uploading it to the system. The new file will overwrite the old file, making the previously uploaded file non-recoverable if there is a problem.
To upload device assignment CSV files:
1. From the Employee Management screen, click the Upload Employee to Device Assignment link. The Employee to Device Assignment File Upload screen, shown in Figure 5–131, appears.
Figure 5–131: Employee to Device Assignment File Upload Screen
2. Download and use the template Employee Device Assignment Template.
a. Click the Download Employee Device Association Template link.
b. A File Download dialogue box appears.
c. Click Save.
d. Navigate to the correct location on your hard drive.
e. Save the file with a new name. Suggested names are employee_device_assignment_12Oct.csv or employee_device_assignment1.csv.
f. Click Save. The file is saved to your hard drive.
Trimble MRM Confidential 213

GeoManager Admin & User Guide
3. Open the file in Excel. Notice that there are 6 predefined columns: Device Label, Serial Number, Employee ID, Effective Date, First Name and Last Name.
Figure 5–132: Employee Device Assignment CSV File Sample
WARNING!Do NOT change the column headers, order of columns or number of columns!
4. Modify the appropriate definitions.
5. Rename the file. Suggested file names are employee_device_assignment1.csv or employee_device_assignment_12Oct.csv.
6. Save file as CSV (comma‐delimited). The File size is limited to 1 MB. If files are bigger than 1 MB, break the big file into smaller files and then upload the smaller files.
7. In the GeoManager Employee Management File Upload screen, click Browse to find and select the saved file.
8. Click Upload File. A confirmation dialogue box, shown in Figure 5–133, appears.
Figure 5–133: Upload File Confirmation dialogue Box
9. Click OK. An Upload Completed screen, shown in Figure 5–134, appears.
Figure 5–134: File Upload Completed Screen
Trimble MRM Confidential 214

GeoManager Admin & User Guide
10. Click Done. The Employee to Device Assignment File Upload screen, shown in Figure 5–131, appears.
After you have finished uploading the Employee device assignment file(s) successfully, if you need to verify which and when files were uploaded last, you can click the Show Last Employee Device Assignment Upload Results link at the bottom of the Employee to Device Assignment File Upload screen, shown in Figure 5–131. The Last Employee Device Assignment Upload Result screen, shown in Figure 5–135, appears.
Figure 5–135: Last Employee Device Assignment Upload Result Screen
This screen shows the file name, date and time that the file was uploaded and processed, as well as the number of records processed.
If you click the Processed X of X Records (Download Results File), you are prompted to Save or Open the file.
If you want to view the history of Employee Device Assignment uploads, you can click the Show Employee Device Assignment Upload History link at the bottom of the Employee to Device Assignment File Upload screen, shown in Figure 5–131. The Show Employee Device Assignment Upload History screen, shown in Figure 5–136, appears.
Trimble MRM Confidential 215

GeoManager Admin & User Guide
Figure 5–136: Employee Device Assignment Upload History Screen
The Employee Device Assignment Upload History screen shows the file name, upload date and time, processed date and time, and number of records processed for all uploaded files.
Organizational Hierarchy Administration
Organizational Hierarchy administration is an optional feature that gives you the ability to organize your business in a multi‐tier configuration within GeoManager.
Note:Note:Before you can create roll-up reports, you must first create the hierarchy structure, enter mobile devices, then create users in User Administration and employees in Employee Management.
From the Employee drop down menu, shown in Figure 5–108, click Organizational Hierarchy. The Organizational Hierarchy Administration screen, shown in Figure 5–137, appears.
Figure 5–137: Organizational Hierarchy Administration Screen
Trimble MRM Confidential 216

GeoManager Admin & User Guide
Creating an organizational hierarchy requires you to create the hierarchy structure, enter employee and user information and then organize those employees and their mobile devices. You can also upload organizational information from a previously created file.
Creating an Organizational Hierarchy
From the Organizational Hierarchy Administration screen:
1. Click the View/Edit/Create Organizational Hierarchy link. The GeoManager Organizational Hierarchy screen, shown in Figure 5–138, appears, showing the current name for your organization. This can be changed at any time by entering the new information, then clicking Update.
Figure 5–138: View/Edit/Create Organizational Hierarchy Screen
Item Description
Org Entities The building blocks that make up your organizational hierarchy.
Organizational Cate-gory
Pre-defined hierarchy levels that can be assigned to your hierarchy information.
Organizational Unit Specific information assigned to each piece of the hierarchy, such as name, description, category, etc.
Org Hierarchy The organizational hierarchy structure you set up. This will change as units are added to your hierarchy.
Search Allows users to search the Organizational Hierarchy for specific information, such as employee, mobile devices and organizational units.
Trimble MRM Confidential 217

GeoManager Admin & User Guide
2. Click Organizational Category. The right side of the screen changes to the Organizational Category screen, shown in Figure 5–139.
Figure 5–139: Organizational Category Screen
3. Verify the Category Names are correct for the Organizational Hierarchy.
• If you need to create a new category:
a. Click Create New. The Organizational Category screen changes to an empty screen, shown in Figure 5–140.
Figure 5–140: Create Organizational Category Screen
b. Enter a Name for the new category.
c. Enter a Description for the new category.
Configure Organiza-tional Unit
This is a dynamic section of the screen that changes depending on the unit, tab or entity you click.
Properties The properties assigned to the hierarchy root. This includes name, organization code and description.
Assign Users A list of users who have the authority to create and edit an organi-zational hierarchy.
Item Description
Trimble MRM Confidential 218

GeoManager Admin & User Guide
d. Click Save. The screen returns to the Organizational Category screen with the new category listed.
Click Cancel to return to the Organizational Category screen without saving the new cat‐egory.
• If you need to edit a category:
a. Click the check box next to the Category Name you want to change. You can select only one category at a time.
b. Click Edit. The Organizational Category tab changes to an editable screen, as shown in Figure 5–141.
Figure 5–141: Edit Organizational Category Screen
c. Change the Category Name.
d. Change the Category Description.
e. Click Save. The Organizational Category screen re‐appears.
4. Under the Org Entities area, click Organizational Units. The Create Organizational Unit screen, shown in Figure 5–142, appears.
Trimble MRM Confidential 219

GeoManager Admin & User Guide
Figure 5–142: Create Organizational Unit Screen
5. Enter the Name for the organizational unit.
If you are creating the Organizational Hierarchy from the top level down to the lowest level, the first name you enter will be the Business Unit name, such as Long Haul Tucking. The cor‐porate name is automatically entered as the account name or the root name.
6. Enter the Organization Code.
7. Enter the unit’s Description. This is an optional field that should be used to document the department number and name.
8. Select the Business Unit from the Category drop‐down menu. These are the categories you previously created. Examples are shown in Figure 5–143.
Figure 5–143: Business Unit Drop-Down Menu
WARNING!Be sure to select the correct organizational unit level. If an organizational unit is deleted, then any units beneath that level move up to the next level and cannot be re-assigned to a lower level. If you need to delete an organizational unit, first re-assign any dependent units to a different organizational unit of the same level as the one you need to delete, then delete the unit. For more information, please see the Changing the Organizational Hierarchy section of this guide.
9. Click the Assign Parent link next to the Parent field. The Select Parent pop‐up screen, shown in Figure 5–144, appears.
Trimble MRM Confidential 220

GeoManager Admin & User Guide
Figure 5–144: Select Parent Pop-Up Screen
A parent unit is the unit directly above the unit you are currently creating. For example, DOT25_ps, the Corporate entity, is the parent unit for Long Haul Trucking, a Business Unit.
10. Select the parent unit from the Select Parent text box. You may have to scroll through options to find the correct parent.
You can use the Search feature by entering the first few letters of the desired parent name and clicking Search. This field is not case sensitive.
11. Click Select. You return to the Configure Organizational Unit screen, which shows the parent you selected.
Click Cancel to close the screen without selecting a parent.
12. Click Save. The Org Hierarchy section of the screen updates to show the new organizational unit.
13. Repeat steps 3 through 12 for your entire organization’s hierarchy, for example, starting with Business Units, then Divisions, Regions and Branches. Following this top‐down order helps keep your hierarchy units at the correct unit level.
When you are finished entering the Organizational Hierarchy, you must assign mobile devices, employees and users to the correct hierarchy unit. Only units assigned to the lowest hierarchy level will appear on roll‐up reports.
Searching Organizational Hierarchy
You can easily find an employee, mobile device, user or an organizational unit by using the Search function in the Organizational Hierarchy navigation bar, shown in Figure 5–145.
Figure 5–145: Search Function
To search the Organizational Hierarchy:
1. Select the desired search type from the By drop‐down menu. Choices are:
• Orgunit name
• Employee first name
Trimble MRM Confidential 221

GeoManager Admin & User Guide
• Employee last name
• Employee ID
• Mobile device label
• Mobile device serial number
• User name
• User first name
• User last name
2. Select Starts With or Contains from the next drop‐down menu.
3. Enter the search criteria in the text box. This is case sensitive.
4. Click Search. The results are returned in a text box, shown in Figure 5–146.
Figure 5–146: Search with Results Text Box
Assign Mobile Devices
After the Organizational Hierarchy is complete, you must assign mobile devices to the correct hierarchy unit.
1. In the Org Hierarchy section of the screen, select the name of the unit to which you want to assign mobile devices. This should be the Service Manager level if you want the information to appear on roll‐up reports.
For this example, we’ll use Service Manager Marion Berry at the Cherry Hill branch.
Trimble MRM Confidential 222

GeoManager Admin & User Guide
2. Click the Assign Devices tab in the Configure Organizational Unit section of the screen. The section changes to show the Assign Devices tab, shown in Figure 5–147. The default view shows any currently assigned devices.
Figure 5–147: Assign Devices Tab
Note:Note:Device search is case sensitive. Maximum of 500 users will be displayed. If you do not see the desired user in the Devices list, please change your search criteria.
3. In the Search area of the Assign Devices tab, click the Show drop‐down menu.
4. Select Available Devices.
5. Click Search. The text box refreshes to show all devices available for assignment.
If you know the Device Label or Serial Number for the mobile devices, you can enter the first few letters or numbers into the Find text box, select either Device Label or Serial Num‐ber from the By drop‐down menu, then click Search.
Trimble MRM Confidential 223

GeoManager Admin & User Guide
6. Click the check box next to the Device Label for the desired mobile device(s).
To select all available mobile devices, click the check box in the header of the table.
7. Click Assign Checked. The devices disappear from the available devices list.
To see the assigned devices, select Assigned Devices or All Devices from the Show drop‐down menu and click Search.
Assign Employees
After you have assigned devices to the organizational unit, you must assign employees to the organizational unit.
1. Click the Assign Employees tab in the Organizational Unit Configuration section of the screen. The Assign Employees tab, shown in Figure 5–148, appears.
Trimble MRM Confidential 224

GeoManager Admin & User Guide
Figure 5–148: Assign Employees Tab
Note:Note:Employee search is case sensitive. Maximum of 500 users will be displayed. If you do not see the desired user in the Employees list, please change your search criteria.
2. In the Search area of the Assign Employees tab, click the Show drop‐down menu.
3. Select Available Employees.
4. Click Search. The text box refreshes to show all devices available for assignment.
If you know the Employee ID, First Name or Last Name for the employee, you can enter the first few letters or numbers into the Find text box, select either Employee ID, First Name or Last Name from the By drop‐down menu, then click Search.
5. Click the check box next to the desired Employee(s).
To select all available employees, click the check box in the header of the table.
Trimble MRM Confidential 225

GeoManager Admin & User Guide
6. Click Assign Checked. The employees disappear from the available employees list.
To see the assigned employees, select Assigned Employees or All Employees from the Show drop‐down menu and click Search.
Assign Users
Depending upon the size of your fleet and the number of people you have using Trimble GeoManager, you can assign users to the organizational unit after you are finished assigning employees. A user can be assigned to more than one organizational unit.
Note:Note:Users have administrative access to the Organizational Hierarchy, so they can make organizational changes. If you do not have more than one account administrator or user, you do not need to assign users to Organizational Hierarchy units.
To assign users to an Organizational Unit:
1. Click the Assign Users tab in the Organizational Unit Configuration section of the screen. The Assign Users tab, shown in Figure 5–149, appears.
Trimble MRM Confidential 226
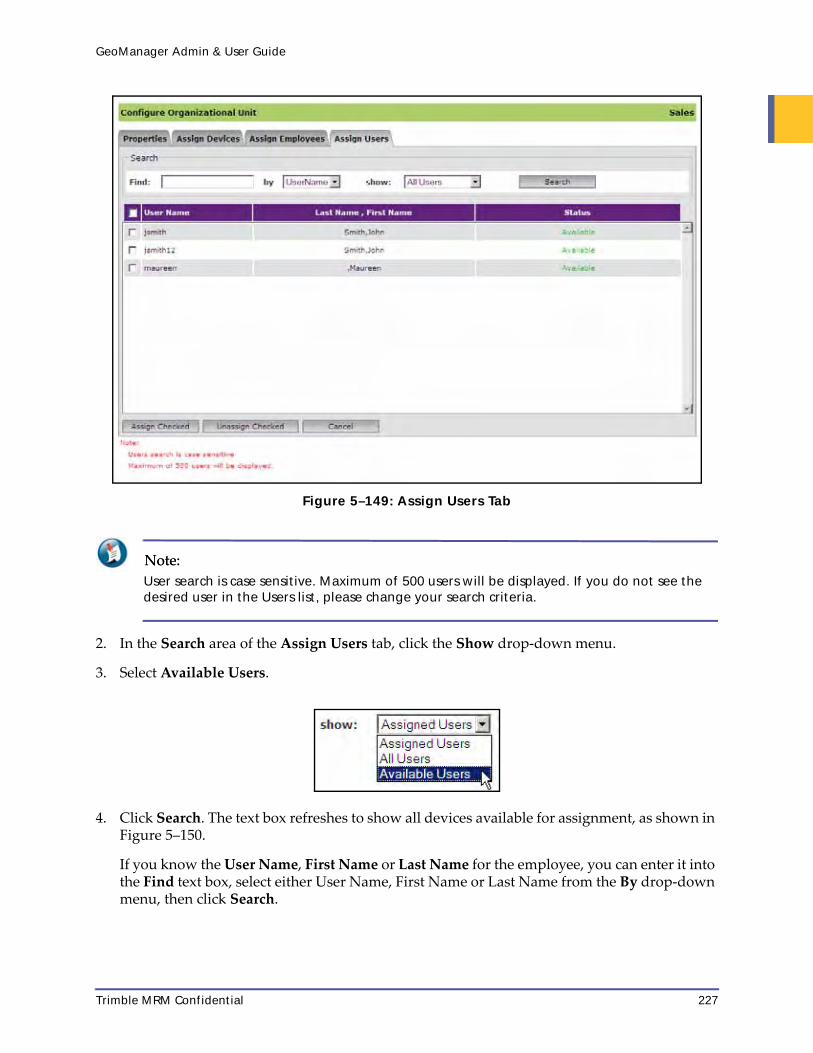
GeoManager Admin & User Guide
Figure 5–149: Assign Users Tab
Note:Note:User search is case sensitive. Maximum of 500 users will be displayed. If you do not see the desired user in the Users list, please change your search criteria.
2. In the Search area of the Assign Users tab, click the Show drop‐down menu.
3. Select Available Users.
4. Click Search. The text box refreshes to show all devices available for assignment, as shown in Figure 5–150.
If you know the User Name, First Name or Last Name for the employee, you can enter it into the Find text box, select either User Name, First Name or Last Name from the By drop‐down menu, then click Search.
Trimble MRM Confidential 227

GeoManager Admin & User Guide
Figure 5–150: Assign Available Users Tab
5. Click the check box next to the desired User(s).
To select all available users, click the check box in the header of the table.
6. Click Assign Checked. The users disappear from the available users list.
To see the assigned users, select Assigned Users or All Users from the Show drop‐down menu and click Search.
Repeat assigning mobile devices, employees and users for each organizational unit.
When you are finished assigning mobile devices, employees and users, you are finished creating your organizational hierarchy.
Changing the Organizational Hierarchy
If the Organizational Hierarchy changes for some reason, you can rearrange it with some careful planning.
If a division, region or branch is being consolidated or closed, you must be sure to reassign the service managers, branches or regions to their new parents before deleting the organizational unit, as shown in Figure 5–151 through Figure 5–153.
Trimble MRM Confidential 228
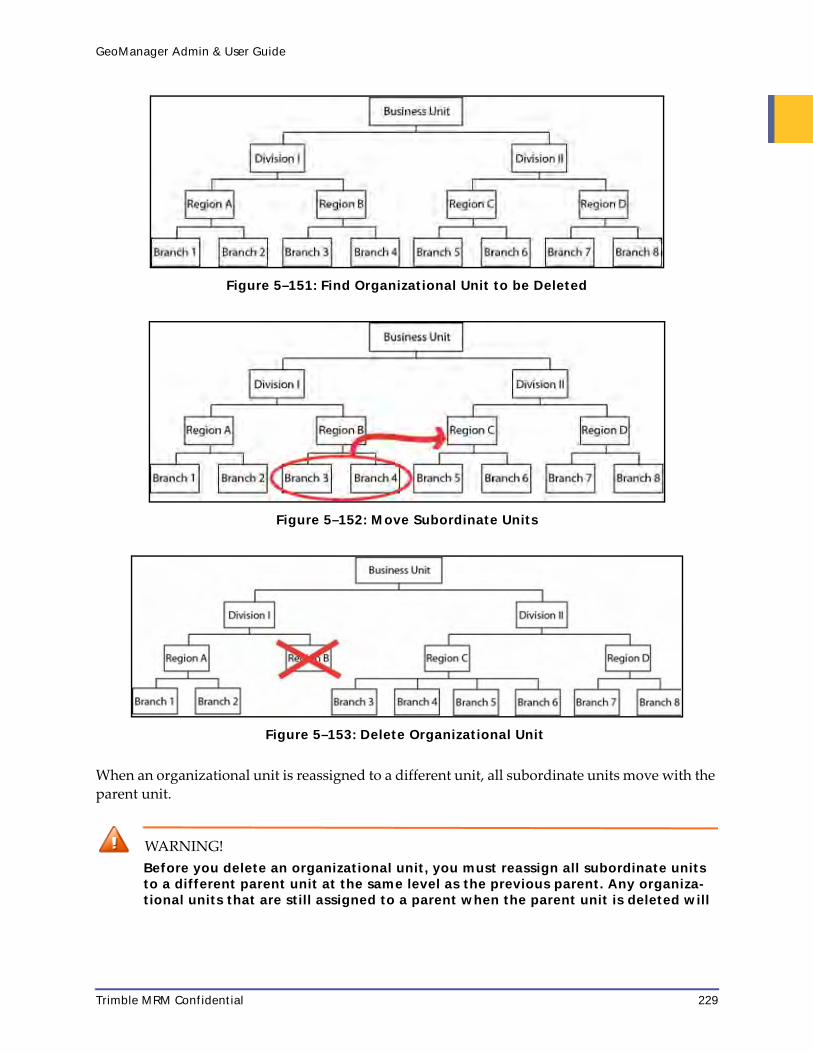
GeoManager Admin & User Guide
Figure 5–151: Find Organizational Unit to be Deleted
Figure 5–152: Move Subordinate Units
Figure 5–153: Delete Organizational Unit
When an organizational unit is reassigned to a different unit, all subordinate units move with the parent unit.
WARNING!Before you delete an organizational unit, you must reassign all subordinate units to a different parent unit at the same level as the previous parent. Any organiza-tional units that are still assigned to a parent when the parent unit is deleted will
Trimble MRM Confidential 229

GeoManager Admin & User Guide
move up to the parent’s level and cannot be shifted back down to a lower unit level.
If a new division, region or branch is being created, you must be sure to select the correct organizational level when you are creating the new organizational unit.
Uploading an Organizational Hierarchy
To save time and effort, you can create your organizational hierarchy information in a comma delimited .txt file or an Excel .csv file. You can upload:
• Organizational unit configurations
• Employee details
• Device to organizational unit assignments
• Users to organizational unit assignments
Uploading Organizational Unit Configurations
To upload organizational unit information:
1. From the Organizational Hierarchy Administration screen, shown in Figure 5–137, click the Upload Organizational Hierarchy link. The Organizational Unit Configuration File Upload screen, shown in Figure 5–154, appears.
Figure 5–154: Organizational Unit Configuration File Upload Screen
Trimble MRM Confidential 230

GeoManager Admin & User Guide
2. Download and use the template Organizational Unit Organization Template, shown in Figure 5–155.
Figure 5–155:Organizational Unit Organization Template Sample
3. Open the file in Excel. Notice that there are five columns:
• Org Unit Name
• Org Unit Code
• Description
• Category
• Parent
WARNING!DO NOT CHANGE THE COLUMN HEADERS, ORDER OF COLUMNS OR NUMBER OF COL-UMNS!
4. Modify the appropriate definitions. Each line must have Org Unit Name, Org Unit Code, Category and Parent information filled in. Description information is optional.
5. Save the file as csv (comma‐delimited) without renaming it. The File size is limited to 1 MB.
6. Click Browse to find and select the saved file.
7. Click Upload File. A confirmation dialogue box, shown in Figure 5–156, appears.
Figure 5–156: Upload File Confirmation Dialog Box
Trimble MRM Confidential 231

GeoManager Admin & User Guide
8. Click OK.
• If the upload is successful, the Upload Completed screen, shown in Figure 5–157, appears.
Figure 5–157: Upload Completed Screen
• If the upload is not successful, the Upload Failed screen, shown in Figure 5–158, appears.
Figure 5–158: Upload Failed Screen
9. Click Done. The Organizational Unit Configuration File Upload screen appears.
After the files are uploaded, you can see the results from the last upload by clicking the Show Last Org Unit Configuration Upload Result link. The Last Org Unit Configuration Upload Result screen, shown in Figure 5–159, appears.
Figure 5–159: Last Org Unit Configuration Upload Result Screen
Trimble MRM Confidential 232
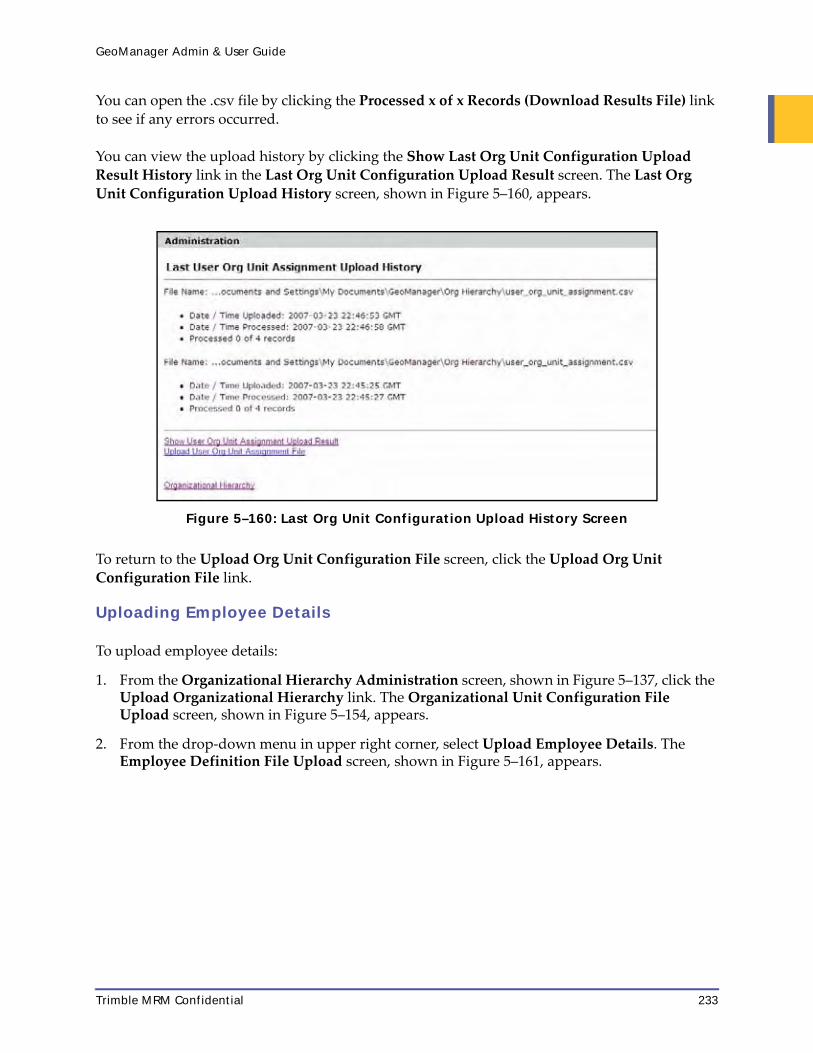
GeoManager Admin & User Guide
You can open the .csv file by clicking the Processed x of x Records (Download Results File) link to see if any errors occurred.
You can view the upload history by clicking the Show Last Org Unit Configuration Upload Result History link in the Last Org Unit Configuration Upload Result screen. The Last Org Unit Configuration Upload History screen, shown in Figure 5–160, appears.
Figure 5–160: Last Org Unit Configuration Upload History Screen
To return to the Upload Org Unit Configuration File screen, click the Upload Org Unit Configuration File link.
Uploading Employee Details
To upload employee details:
1. From the Organizational Hierarchy Administration screen, shown in Figure 5–137, click the Upload Organizational Hierarchy link. The Organizational Unit Configuration File Upload screen, shown in Figure 5–154, appears.
2. From the drop‐down menu in upper right corner, select Upload Employee Details. The Employee Definition File Upload screen, shown in Figure 5–161, appears.
Trimble MRM Confidential 233

GeoManager Admin & User Guide
Figure 5–161: Employee Definition File Upload Screen
3. Download and use the template Employee Definition Template, shown in Figure 5–162.
Figure 5–162: Employee Definition Template Sample
4. Open the file in Excel. Notice that there are nine columns:
• Employee ID
• Card ID
• First Name
• Last Name
• Phone Number
Trimble MRM Confidential 234

GeoManager Admin & User Guide
• Description
• Category
• Org Unit Name
WARNING!DO NOT CHANGE THE COLUMN HEADERS, ORDER OF COLUMNS OR NUMBER OF COL-UMNS!
5. Modify the appropriate definitions. Each line must have Employee ID, First Name and Last Name information filled in. Card ID, Email, Phone Number, Description, Category and Org Unit Name information is optional.
6. Save the file as csv (comma‐delimited) without renaming it. The File size is limited to 1 MB.
7. Click Browse to find and select the saved file.
8. Click Upload File. A confirmation dialogue box, shown in Figure 5–156, appears.
9. Click OK.
• If the upload is successful, the Upload Completed screen, shown in Figure 5–157, appears.
• If the upload is not successful, the Upload Failed screen, shown in Figure 5–158, appears.
10. Click Done. The Employee Definition File Upload screen appears.
After the files are uploaded, you can see the results from the last upload by clicking the Show Last Employee Definition Upload Result link. The Last Employee Definition Upload Result screen, shown in Figure 5–163, appears.
Figure 5–163: Last Employee Definition Upload Result Screen
You can open the .csv file by clicking the Processed x of x Records (Download Results File) link to see if any errors occurred.
Trimble MRM Confidential 235

GeoManager Admin & User Guide
You can view the upload history by clicking the Show Last Employee Definition Upload Result History link in the Last Employee Definition Upload Result screen. The Last Employee Definition Upload History screen, shown in Figure 5–164, appears.
Figure 5–164: Employee Definition Upload History Screen
To return to the Upload Employee Details screen, click the Upload Employee Details link.
Uploading Devices to Organizational Units
To upload devices that are already assigned to organizational units:
1. From the Organizational Hierarchy Administration screen, shown in Figure 5–137, click the Upload Organizational Hierarchy link. The Organizational Unit Configuration File Upload screen, shown in Figure 5–154, appears.
2. From the drop‐down menu in upper right corner, select Upload Device to Org Unit Assignment. The Device to Org Unit File Upload screen, shown in Figure 5–165, appears.
Trimble MRM Confidential 236

GeoManager Admin & User Guide
Figure 5–165: Device to Org Unit File Upload Screen
3. Download and use the template Device Org Unit Assignment Template, shown in Figure 5–166.
Figure 5–166: Device Org Unit Assignment Template Sample
4. Open the file in Excel. Notice that there are three columns:
• Device Label
• Serial Number
• Org Unit Name
WARNING!DO NOT CHANGE THE COLUMN HEADERS, ORDER OF COLUMNS OR NUMBER OF COL-UMNS!
Trimble MRM Confidential 237

GeoManager Admin & User Guide
5. Modify the appropriate definitions. Each line must have all information filled in.
6. Save the file as csv (comma‐delimited) without renaming it. The File size is limited to 1 MB.
7. Click Browse to find and select the saved file.
8. Click Upload File. A confirmation dialogue box, shown in Figure 5–156, appears.
9. Click OK.
• If the upload is successful, the Upload Completed screen, shown in Figure 5–157, appears.
• If the upload is not successful, the Upload Failed screen, shown in Figure 5–158, appears.
10. Click Done. The Device to Org Unit File Upload screen appears.
After the files are uploaded, you can see the results from the last upload by clicking the Show Last Device to Org Unit Assignment Upload Result link. The Last Device to Org Unit Assignment Upload Result screen, shown in Figure 5–167, appears.
Figure 5–167: Last Device to Org Unit Assignment Upload Result Screen
You can open the .csv file by clicking the Processed x of x Records (Download Results File) link to see if any errors occurred.
You can view the upload history by clicking the Show Last Device to Org Unit Assignment Upload Result History link in the Last Device to Org Unit Assignment Upload Result screen. The Last Device to Org Unit Assignment Upload History screen, shown in Figure 5–168, appears.
Trimble MRM Confidential 238

GeoManager Admin & User Guide
Figure 5–168: Device to Org Unit Assignment History Screen
To return to the Device to Org Unit Assignment Details screen, click the Upload Device to Org Unit Assignment link.
Uploading Users to Organizational Units
To upload devices that are already assigned to organizational units:
1. From the Organizational Hierarchy Administration screen, shown in Figure 5–137, click the Upload Organizational Hierarchy link. The Organizational Unit Configuration File Upload screen, shown in Figure 5–154, appears.
2. From the drop‐down menu in upper right corner, select Upload Users to Org Unit Assignment. The User to Org Unit Assignment Upload screen, shown in Figure 5–169, appears.
Trimble MRM Confidential 239

GeoManager Admin & User Guide
Figure 5–169: User to Org Unit File Upload Screen
3. Download and use the template User Org Unit Assignment Template, shown in Figure 5–170.
Figure 5–170: User Org Unit Assignment Template Sample
4. Open the file in Excel. Notice that there are four columns:
• Username
• Firstname
• Lastname
• Orgunitname
Trimble MRM Confidential 240

GeoManager Admin & User Guide
WARNING!DO NOT CHANGE THE COLUMN HEADERS, ORDER OF COLUMNS OR NUMBER OF COL-UMNS!
5. Modify the appropriate definitions. Username and Orgunitname must have all information filled in. Firstname and Lastname are optional fields.
6. Save the file as csv (comma‐delimited) without renaming it. The File size is limited to 1 MB.
7. Click Browse to find and select the saved file.
8. Click Upload File. A confirmation dialogue box, shown in Figure 5–156, appears.
9. Click OK.
• If the upload is successful, the Upload Completed screen, shown in Figure 5–157, appears.
• If the upload is not successful, the Upload Failed screen, shown in Figure 5–158, appears.
10. Click Done. The Device to Org Unit File Upload screen appears.
After the files are uploaded, you can see the results from the last upload by clicking the Show Last User to Org Unit Assignment Upload Result link. The Last User to Org Unit Assignment Upload Result screen, shown in Figure 5–171, appears.
Figure 5–171: Last User to Org Unit Assignment Upload Result Screen
You can open the .csv file by clicking the Processed x of x Records (Download Results File) link to see if any errors occurred.
You can view the upload history by clicking the Show Last User to Org Unit Assignment Upload Result History link in the Last User to Org Unit Assignment Upload Result screen. The Last User to Org Unit Assignment Upload History screen, shown in Figure 5–172, appears.
Trimble MRM Confidential 241

GeoManager Admin & User Guide
Figure 5–172: User to Org Unit Assignment History Screen
To return to the User to Org Unit Assignment Details screen, click the Upload User to Org Unit Assignment link.
Reports Administration
You can access the Reports Adminsitration links by clicking the down‐arrow next to Reports under the Administration Navigation links, as shown in Figure 5–173.
Figure 5–173: Reports Administration Drop Down Menu
Creating Scheduled Reports
Scheduled Reporting is a function you will use to establish the type, format, time, recipient and frequency of all end‐user reports you wish to generate.
Scheduling reports enables you to generate a specific report using a set of parameters you define. The Trimble MRM system generates reports after peak hours using the frequency you determine such as daily, weekly or monthly.
Scheduled Reporting also enables you to edit parameters for existing reports, including adding or deleting recipients.
Trimble MRM Confidential 242

GeoManager Admin & User Guide
Choosing Report Formats
You may generate reports using any of these formats:
• PDF – Adobe® Acrobat page layout format
• HTML – Internet standard format
• Microsoft Excel – enables additional file manipulation, such as sorting, grouping, and other data management capabilities
• Comma‐delimited – for export into standard applications or databases
Note:Note:• To access downloaded Excel files, you need the Microsoft Excel application. The format is
compatible with Microsoft Excel version 97 or above.
• To view HTML reports, use Microsoft Internet Explorer version 6.0.
Scheduling a New Report
To create a new Scheduled report:
1. From the Reports drop down menu, shown in Figure 5–173, click Create Scheduled Report. The Schedule a Standard Report screen, shown in Figure 5–174, appears.
Figure 5–174: Schedule a Standard Report Screen
2. Select the type of report you would like to generate from the Select Report to Schedule drop‐down menu. For this example, an Activity ‐ Detail report is selected.
3. Enter a unique name for this report
4. Select Mobile Devices/Groups, or a selected set of devices from a Group.
5. Schedule the frequency:
• Daily – Generates a report every day or every weekday, using data from the previous day—up to 23:59.
• Weekly – Generates a report once a week on a day you select—Monday through Sun‐day—using data accumulated for the seven days prior to the selected date.
Trimble MRM Confidential 243

GeoManager Admin & User Guide
• Monthly – Generates a report once a month on a day you select—using data accumu‐lated from the same day the previous month through the day prior to the selected date.
• One Time Only – Generates a report once with a start date for the report to begin retriev‐ing data, up to one month prior to the current date. If your company subscribes to the Trimble MRM Extended Storage service, you may receive reports on data starting from the beginning of your subscription period, or up to one year prior, based on your sub‐scription. The end date can be any date up to and including the day on which you sched‐ule the report.
6. Click the drop‐down box next to Deliver By.
7. Select a delivery time for your report.
8. Select a time zone.
9. Select the local time zone to receive the report by the local time zone in which you are present.
10. Select the Deliver To recipient (s). You can choose:
• Email – enter the email address for the recipients. You can enter up to four main recipi‐ents.
• FTP – enter the FTP site information where report will be uploaded.
11. Enter any Email CC information. You can enter up to four CC recipients.
12. Click Save to save and schedule the report. The Scheduled Report Successfully Created screen, shown in Figure 5–175, appears.
Click Cancel to return to the Administration screen.
Trimble MRM Confidential 244

GeoManager Admin & User Guide
Figure 5–175: Scheduled Report Successfully Created Screen
If the information is correct, click OK. The Currently Scheduled Reports screen, shown in Figure 5–176, appears.
If the information is incorrect, click Edit Schedule to change the scheduled report.
Figure 5–176: Currently Scheduled Reports Screen
Trimble MRM Confidential 245

GeoManager Admin & User Guide
Edit Current Scheduled Reports
After creating a scheduled report, you can edit, enable, disable or remove the schedule report.
1. From the Administration screen, click the Edit Currently Scheduled Reports link. The Currently Scheduled Reports screen, shown in Figure 5–177, appears.
Figure 5–177: Editing Currently Scheduled Reports Screen
You will see a table displaying all the pre configured, scheduled reports.
Select the check box in column 1 and click Edit, Enable, Disable or Remove to change any of the reports.
After making your selections, the screen will refresh and the Status column will display the updated status of the report.
User Administration
You can access the User Administration links by clicking the down‐arrow next to User under the Administration Navigation links, as shown in Figure 5–178.
Figure 5–178: User Drop Down Menu
Trimble MRM Confidential 246

GeoManager Admin & User Guide
Organizational Hierarchy
Organizational Hierarchy administration is an optional feature that gives you the ability to organize your business in a multi‐tier configuration within GeoManager.
For more information on Organizational Hierarchy, see “Organizational Hierarchy Administration” on page 216.
Role Based Management
Role Based Management allows organizations to manage users based on their business function. Administrators can create roles and users as well as set up different levels of role based access reflecting the organizational structure and responsibilities given to each user. Administrative users will no longer require a password to access administrative capabilities. Each user will have an assigned username and password to improve security. Based upon the roles assigned, users will have read only, read/write or customized access to a specific set of capabilities. Multiple languages are supported. There are four default role types in addition to unlimited customer definable roles. Examples of default roles and their assigned capabilities are displayed below.
• Administrative User ‐ Accesses all administrative capabilities which can include the follow‐ing.
• Create Users
• Create Roles
• Setup Groups
• Configure devices
• Access Reports
• Access Maps
• Standard User ‐ Accesses primarily view only capabilities unless otherwise specified.
• MapView
• Mobile Device Status
• Standard Reports
• Exceptions
• Vehicle Maintenance
• Service Request
• Driver Logs Restricted Role ‐ Provides read only access to Driver Logs capability.
• WLAN Restricted Administrative Role ‐ Provides access to all administrative capabilities except for WLAN.
Trimble MRM Confidential 247

GeoManager Admin & User Guide
Administrators may either assign default roles to users, customize existing roles or create new roles based on business need. Administrators for example, may want to give standard users the ability to set up exceptions or schedule reports. Existing customers with users assigned default roles will have features the customer currently subscribes to.
When creating new roles, first determine what kind of role you want to create and what permissions and capabilities you want users assigned that role to be able to access.
Administration Capability
The administration capability allows you to set up administrative access for different roles. Administrative users will generally receive access to all capabilities unless specifically restricted from performing certain actions (e.g. WLAN Restricted Admin).
Figure 5–179: Administration Capabilities Screen
Administration Capability
Description
Configure Custom Fields
Allows administrators to create custom fields for report information and mobile device location in MapView.
Configure Mobile Device Details
Allows the user to configure labels and color icons in MapView and several different reports for each mobile device or vehicle.
Edit Mobile Device Details
Allows the user to edit labels and color icons in MapView and sev-eral different reports for each mobile device or vehicle.
View Mobile Device Details
Allows the user to view labels and color icons in MapView and sev-eral different reports for each mobile device or vehicle.
Role Administration Allows the administrator to create, edit and assign capabilities to roles and users.
Edit Role Allows the administrator to create, edit and assign capabilities to roles as necessary.
View Role Allows the user read only access to existing roles and users.
Trimble MRM Confidential 248

GeoManager Admin & User Guide
Change User Password Capability
The Change User Password capability enables the user access to change user passwords as necessary.
Figure 5–180: Change User Password Capabilities Screen
Cover Sheet Password Capability
The Cover Sheet capability enables the user access to create, edit and generate cover sheets.
Figure 5–181: Cover Sheet Capabilities Screen
User Administration Allows the administrator to create, edit and view users.
Edit Users Allows the administrator to create and edit users as necessary.
View Users Allows the user read only access to existing users.
Change User Password Capability
Description
Change User Password Allows the user to change user passwords should they need to be reset.
Administration Capability
Description
Trimble MRM Confidential 249

GeoManager Admin & User Guide
Driver Logs Capability
The Driver Logs capability provides the user access to set up and/or view driver logs.
Figure 5–182: Driver Logs Capabilities Screen
Cover Sheet Capability
Description
Cover Sheet Adminis-tration
Allows the user to create, edit and generate cover sheets.
Edit Cover Sheet Allows the user to create and edit cover sheets as needed.
Generate Cover Sheet Allows the user to generate existing cover sheets.
Driver Logs Capability
Description
Driver Profile Manage-ment
Allows the user to create, edit and delete driver profiles.
Create/Update/Delete Driver
Allows the user to create, update and delete driver profiles.
View Drivers Allows the user to view driver profiles.
Launch Terminal Logon Allows the user to initiate and launch terminal logons.
Log Details and Daily Log Management
Allows the user to create, edit and delete log details and daily logs.
Create/Update/Delete Log Details and Daily Log
Allows the user to create, update and delete log details and daily logs.
View Log Details and Daily Log
Allows the user to view log detail and daily logs.
Trimble MRM Confidential 250

GeoManager Admin & User Guide
Employee Management Capability
The Employee Management capability enables you to set up employees and the features they can access or view.
Mobile Device Settings Management
Allows the admin user to set up and edit mobile device settings.
Update Mobile Device Settings
Allows the user to create, update and delete mobile device settings.
View Mobile Device Settings
Allows the user to view mobile device settings.
Reports Please refer to both the Exception and Reports capabilities sections for more information.
Rule Exception Man-agement
Allows the admin user to set up and edit rules that govern excep-tion reports.
Update Rule Excep-tion
Allows the user to create, update and delete rules that govern exception reports.
View Rule Exception Allows the user to view rules that govern exception reports.
Terminals Management Allows the user to create, edit and delete terminals.
Create/Update/Delete Terminals
Allows the user to create, update and delete terminals.
View Terminals Allows the user to view terminals.
Warnings/Errors Man-agement
Allows the user to create, edit warnings and errors.
Update/Delete Warn-ings/Errors
Allows the user to create, update and delete warnings and errors.
View Warnings/Errors Allows the user to view warnings and errors.
Driver Logs Capability
Description
Trimble MRM Confidential 251

GeoManager Admin & User Guide
Figure 5–183: Employee Management Capabilities Screen
Exceptions Capability
The Exceptions capability enables you to set up exceptions, and give employees permission to view and/or edit and the features they can access or view.
Employee Management Capability
Description
Employee Definitions Allows the user to manage information about employees who use mobile devices.
Create/Edit Employee Details
Allows the user to create, edit and delete employee general profiles.
Upload Employee Details
Allows the user to upload CSV files pre-populated with employee information.
View Employee Details
Allows the user to view employee details.
Employee to Device Associations
Allows the user to manage and assign employees to mobile devices.
Create/Edit Any Asso-ciations
Allows the user create, edit and delete employee associations.
Note: If selected, the user will be able to view, edit and/or correct historical employee associations.
Create/Edit Future Associations
Allows the user to create, edit and delete employee associations.
Upload Future Associ-ations
Allows the admin user to upload CSV files pre-populated with employee information to associate mobile devices.
View Associations Allows the user to view mobile devices and which users are assigned to those devices.
Trimble MRM Confidential 252

GeoManager Admin & User Guide
Figure 5–184: Exceptions Capabilities Screen
Exceptions Capability Description
Consolidated Excep-tions
Lists all exceptions triggered during a selected time frame for each vehicle or mobile worker in one combined report.
Handset Usage (if Pocket Edition)
Tracks and displays handset usage in excess of a specified duration.
Idling Displays when a Mobile Device is stopped for more than a specified duration while the vehicle engine is running.
Landmark Displays stops at a specific Landmark type or address. This can track pickups and deliveries or flag unscheduled customer stops.
Landmark Proximity Displays arrivals to and departures from a specific Landmark type or address.
Low Battery Sends warnings when handset or vehicle battery levels fall to a point at which no location data can be transmitted.
Mileage Displays when a mobile device exceeds a predefined number of miles within a specified work day.
Mobile Device Vicinity (congregation of vehi-cles)
Monitors the occurrences of multiple mobile devices stopping within a defined distance from each other for a period of time com-mon to both or all.
Off Hours Use Displays when a mobile device is used outside of designated work hours, an Off Hours Use Exception occurs.
Speed Displays when vehicles drive above a maximum speed for a specific block of time.
Stop (anywhere) Monitors total daily stop time accumulated at specific locations (Landmarks).
Stop Count Monitors the total number of stops a vehicle makes.
Stop Duration (by Landmark)
Displays when the total amount of time a mobile worker spends at a stop exceeds a set threshold during a defined workday.
Trimble MRM Confidential 253

GeoManager Admin & User Guide
Maintenance Capability
The Maintenance capability provides the user access to set up and/or view scheduled maintenance.
Figure 5–185: Maintenance Capabilities Screen
Switch Status Report Displays non-drive time fuel use (e.g. dome light, PTO, Lift up/down) including switch location duration, start and end times.
Zone Displays arrivals to and departures from multiple specified zones defined as Zip Code, City, County, State or Country.
Summary - Time in Yard Before First Depar-ture
Summarizes the actual vehicle departure time and compares the expected departure time with the work shift information.
Detail - Travel Time and Mileage
Displays the amount of time each selected mobile device travelled during the selected time frame.
Summary - Time Travel and Mileage
Summarizes the amount of time each selected mobile device trav-elled during the selected time frame.
Time in Work Center, C.O., or Remote
Displays the total time spent by a mobile worker at work centers, excluding the time before the first departure.
Detail - Time in Yard - End of Day
Displays the actual vehicle arrival time in yard and compares the expected shift end time with the work shift information.
Summary - Time in Yard - End of Day
Summarizes the actual vehicle arrival time in yard and compares the expected shift end time with the work shift information.
Detail - Mileage Displays the total mileage and average mileage per vehicle for the selected period.
Summary - Mileage Summarizes the total mileage and average mileage per vehicle for the selected period.
Exception - Time in Work Center, C.O., or Remote
Displays instances where Time in Work Centers is more than the Exception threshold. The threshold is calculated in minutes and is based on the average of the selected vehicles.
Exception - Travel Time Generates the total travel time (drive time) and total mileage for the specified reporting period. Travel time is defined as time when the vehicle is moving. The mileage is a total for a 24-hour period.
Exceptions Capability Description
Trimble MRM Confidential 254

GeoManager Admin & User Guide
MapView Capability
The MapView capability provides the user access to set up and/or view Landmarks and additional MapView functionality.
Figure 5–186: MapView Capabilities Screen
Messaging Capability
The Messaging capability provides the user access to view, create, send and/or set up Messaging functionality.
Figure 5–187: Messaging Capabilities Screen
Maintenance Capability
Description
Maintenance Displays the vehicle maintenance status details for a selected mobile device group.
Maintenance Admin Allows the admin user to set up and edit maintenance status details.
MapView Capability Description
Edit MapView Allows the user to view and create Landmarks by placement within MapView. Landmarks can also be created in Landmark Administra-tion if the address is not known.
View MapView Allows read only access to MapView.
Trimble MRM Confidential 255

GeoManager Admin & User Guide
Mobile Device Status Capability
The Mobile Device Status capability provides the user access to view Mobile Device Status.
Figure 5–188: Mobile Device Status Capabilities Screen
Reports Capability
The Reports capability enables the administrative user to set up and select which reports users are able to view, download and/or schedule.
Figure 5–189: Reports Capabilities Screen
Messaging Capability Description
Configure Messaging Details
Allows the user to configure and edit messaging details and forms. Administrative users can also provide instructions as necessary
View/ Create/ Send Messages
Allows the user to view, create and send messages or forms.
Mobile Device Status Capability
Description
View Mobile Device Status
Displays device status, type, name and the last reported location of each mobile device or vehicle.
Trimble MRM Confidential 256

GeoManager Admin & User Guide
Reports Capability Description
Standard Reports
Account Grouping Rec-onciliation Detail
Displays the details about which devices belong to which groups, as well as the details and relationships among all groups, users and devices.
Account Grouping Rec-onciliation Summary
Displays the summary of which devices belong to which groups for quick reference.
Activity – Detail Displays the driving activity for a mobile device as far back as 95 days from the current date.
Activity – Summary Displays the totals for distance, stops and stop times for each mobile device.
Asset Snapshot Displays an inventory of all devices and hardware installed on a cus-tomer’s account, such as the number and type of iLMs installed, the type of peripheral devices connected (iDTs, barcode wands, etc.) and the data plan carrier associated with each iLM.
Data Usage Displays cellular and satellite data usage to and from the iLM and Trimble MRM server systems.
Inactivity Displays all mobile devices or groups of mobile devices that have not shown any communication within the last number of designated days.
Mileage Totals Displays the mileage for each mobile device during the selected reporting period.
RBAC Audit Trail Displays all actions having to do with roles created, edited or deleted.
Parameterized Stop Displays the mileage for each mobile device during the selected reporting period.
Stop Displays the date range selected, mobile device name, Summary table and all the stops each selected mobile device(s) have made during the report timeframe.
Stop Summary at Land mark Type by Device
Displays the number of stops a mobile device made at a particular Landmark. It also shows a summary of average and total time spent at the Landmark.
Stop Summary at Land-mark Type by Landmark
Displays the summary for all stops made by mobile device(s) at a particular Landmark Type. It also shows the average stop duration and the number of stops made at the Landmark Type.
User Logon Allows GeoManager administrators to capture logon/logout session time, enabling frequency and duration tracking of the users that are logging into the system.
Trimble MRM Confidential 257

GeoManager Admin & User Guide
Vehicle Maintenance History
Highlights vehicles with maintenance items that were addressed in the selected date range. The customer has the provision to define the maintenance items that are of concern for them; the mainte-nance schedule is configurable as well.
Vehicle Maintenance Overdue
Summarizes the items that are overdue for service for the selected vehicle. The customer has the provision to define the maintenance items that are of concern for them and the maintenance schedule is configurable as well.
Work flow Status Provides status changes based upon messages received from the driver.
Add-On Module Reports
Forms & Messaging
Form Provides detailed information from all forms filled out during the report period including Date/Time/Location information.
Form Sent Displays all forms sent during the selected reporting period.
Message Displays the messages sent to and received from the mobile device during the selected reporting period.
Driver Logs
Audit History Allows users to see what changes were made to the Driver Logs and by whom.
Combined Report Provides summarized information for a reporting period.
Grid/Graph Displays the total number of stops or speeding incidents over a period of time in a line graph format.
Hours Worked and Available
Provides information about the hours worked and available during the reporting period.
Log Hours (Detail) Provides detailed log information for a reporting period.
Log Hours (Summary) Provides summarized log information for a reporting period.
Missing Logs Provides summarized missing log information for the reporting period.
Violations (Detail) Provides detailed driver violation information for a reporting period.
Violations (Summary) Provides summarized driver violation information for the reporting period.
Engine Diagnostics
Trip Details Report Provides diagnostic information for each trip (defined as ignition on to ignition off).
Trip Day Summary Report
Summarizes all trip detail reports for a specified period of time.
Reports Capability Description
Trimble MRM Confidential 258

GeoManager Admin & User Guide
Routing Capability
The Routing capability provides the user access to set up and/or view routing functionality.
Figure 5–190: Routing Capabilities Screen
Service Request Capability
The Service Request capability provides the user access to view and/or set up Service Request functionality.
Pocket Edition
TimeConnect Detail Report
Allows the user to record and edit the start and end of numerous items including:
• Workdays
• Jobs
• Tasks within a job
• Task detail during a job
Compares workday times with scheduled work shifts. Reports sum-mary and detail information related to workday reported activities.
TimeConnect Sum-mary Report
Summarizes tasks for a selected group of people during a specified time period.
TimeConnect Edit His-tory Report
Shows what tasks have been added by the administrator for the captured time and tasks.
Routing Capability Description
Routing Administration Allows the user to configure and edit routing details.
Routing Console Allows the user to view the routing console.
Reports Capability Description
Trimble MRM Confidential 259

GeoManager Admin & User Guide
Figure 5–191: Service Request Capabilities Screen
Creating a New Role
To create a new role:
1. From the Users drop down menu, shown in Figure 5–178, click Role Management. The Role Management screen, shown in Figure 5–192, appears.
Figure 5–192: Role Administration Screen
2. Click Create New. The Role Creation screen appears as shown in Figure 5–193.
Service Request Description
Service Request Admin-istration
Allows the admin user control of where copies of a service request are sent, so more than one person can be notified when a service request is sent.
View Service Requests Allows the user to view service requests.
Trimble MRM Confidential 260

GeoManager Admin & User Guide
Figure 5–193: Role Creation Screen
3. Enter the name of the new role in the Role Name field.
4. Enter a description of the role in the Description field.
5. In the Assign Capabilities field, click the Plus sign next to Exceptions. This will expand the Exceptions menu.
Figure 5–194: Exception Capabilities Screen
Trimble MRM Confidential 261

GeoManager Admin & User Guide
6. Click the Plus sign next to Exception Administration. This will expand the Exception Administration menu.
7. Check the following selections in the Exceptions menu.
• View Exception
• Exception Console
• Reports
Note:Note:Click the Minus sign next to an expanded capability to minimize it. The parent capability check box will appear grey with a minus sign indicating selections have been made within that capability as shown in Figure 5–195.
Note:Note:Click the Check All link to select all capabilities. This can be helpful if you wish to assign all but a few capabilities to a user. Select Uncheck All to deselect all previously checked capabilities.
Figure 5–195: Maintenance Capability Screen
8. In the Assign Capabilities field, click the Plus button next to Maintenance. This will expand the Maintenance menu.
9. Check the Maintenance check box.
Trimble MRM Confidential 262

GeoManager Admin & User Guide
10. Repeat steps 5 ‐ 8 selecting additional capabilities and sub‐capabilities you want to assign to a role.
To assign users to a role:
11. Click the Assign Users button. The Assign User To Role screen appears.
Figure 5–196: Assign User To Role Screen
12. Click the user in the Available Users field that you would like to assign to this role.
13. Click the > button to move the user to the Assigned Users field.
Figure 5–197: Assigned Users Screen
14. Click Save. The View Role screen shown in Figure 5–195 appears.
15. Click Save.
Trimble MRM Confidential 263

GeoManager Admin & User Guide
Editing Roles
As your business grows and changes, you may need to change roles and the users assigned to them.
To edit information about a user:
1. From the Role Administration screen, click the Role you would like to edit. If you have a large number of roles, you can search for a specific role:
a. In the Refresh text box, enter the first few letters of the search criteria.
b. Select the search criteria from the drop‐down menu. Available criteria are:
• Role Name
• Capability
• User Name
• First Name
• Last Name
c. Select Starting With, Ending With, or Containing from the drop‐down menu to further narrow down the search.
d. Click Refresh. The Role Administration screen refreshes to show only the results that match your criteria.
2. Click the role you want to edit. The Edit Role screen appears as shown in Figure 5–198.
Trimble MRM Confidential 264

GeoManager Admin & User Guide
Figure 5–198: Edit Role Screen
3. Change the desired information.
4. Click Save. The Role Administration screen re‐appears.
Click Cancel to return to the Role Administration screen without saving the changes.
Note:Note:The Save button saves changes made to the capabilities, not to assigned users. Changes made to assigned users are automatically saved.
Deleting Roles
If you want to delete a user role:
1. From the Role Administration screen, click the radio button next to the Role you would like to delete.
2. Click Delete Selected. A confirmation dialogue box, shown in Figure 5–199, appears.
Trimble MRM Confidential 265

GeoManager Admin & User Guide
Figure 5–199: Delete Selected Roles Confirmation Dialogue Box
3. Click OK. The Role Administration screen re‐appears.
Click Cancel to return to the Role Administration screen without saving the changes.
Note:Note:You will need to un-assign any users associated with a role prior to deleting it. If there are no users assigned to a role you can also delete it from the Edit Role screen by clicking Delete Role.
User Administration setup enables you to assign users’ unique sign in and password information for users to access GeoManager administration web pages. The user information requested includes the user name, login name, password, department and title and email information.
Note:Note:Users created in User Administration will not have access to Administration capabilities. To create users with administration capabilities, you must call Trimble Customer Support
Service Request Administration
GeoManager allows you to make Service Requests using an online form located in the Control Panel. Service Request administration allows you to control where copies of that request are sent, so more than one person can be notified when a service request is sent.
To administer Service Requests:
1. From the Users drop down menu, shown in Figure 5–178, click Service Request Administration. The Online Service Request Administration screen, shown in Figure 5–200, appears.
Trimble MRM Confidential 266

GeoManager Admin & User Guide
Figure 5–200: Service Request Administration Screen
2. Enter the Service Request Notification Email(s). These are all email addresses you want notified when a Service Request is sent.
3. Enter the Service Request Escalation Email(s). These are all email addresses you want notified when a Service Request is escalated.
4. Click Save. The Online Service Request Administration screen changes, as shown in Figure 5–201.
Click Reset to clear all but the default email address from the form.
Figure 5–201: Saved Online Service Request Administration
User Administration
Creating a User
To create a new user or edit an existing user:
1. From the Users drop down menu, shown in Figure 5–178, click User Administration. The User Administration screen, shown in Figure 5–202, appears.
Trimble MRM Confidential 267

GeoManager Admin & User Guide
Figure 5–202: User Administration Screen
2. Click Create Users to create a new user. The User Page, shown in Figure 5–203, appears.
Figure 5–203: Enter User Information Screen
3. Enter a Username. This must be unique through out the Trimble MRM system. Suggested user names are first initial followed by last name: jsmith; or first initial, last name followed by a number: jsmith123. This is a required field.
Trimble MRM Confidential 268

GeoManager Admin & User Guide
4. Enter a Password. The password must be at least four characters long. This is a required field.
5. Enter the password again to Confirm it. This is a required field.
6. Select the Driver Logs Edit Restriction box if you do not want this user to have editing capabilities for Driver Logs.
7. Enter the user’s First Name. This is optional.
8. Enter the user’s Last Name. This is optional.
9. Enter the user’s Title. This is optional.
10. Enter the user’s Department. This is optional.
11. Enter a valid Email address for the user. This is a required field.
12. Click Select Organization. The Organizational Hierarchy screen, shown in Figure 5–204, appears.
Figure 5–204: Select User Hierarchy Unit Screen
This is an optional feature allowing you to assign the user to an Organizational Hierarchy unit when they are created. Once a user is assigned to a particular unit, only they and employees assigned to units
To assign a user to an Organizational Hierarchy unit:
a. Find the organizational unit to which you want the user assigned. To search for an orga‐nizational unit, use the Organizational Hierarchy search feature, shown in the Searching Organizational Hierarchy section on page 221.
b. Click the check box next to the unit name.
Trimble MRM Confidential 269

GeoManager Admin & User Guide
c. Click Assign. The Organizational Unit name appears in the Selected Organization text box in the User Page.
13. Click Assign Role(s). The Assign Roles screen, shown in Figure 5–205 appears.
Figure 5–205: Assign Roles to User Screen
a. Select the role(s) from the Available Roles field you want to assign the user.
b. Click the > button to move the role(s) to the Assigned Roles field.
c. Click Save. The assigned role appears in the Assign Role(s) text box in the User Page. The View Capabilities link appears shown in Figure 5–206.
Figure 5–206: View Capabilities Link Screen
d. Click the View Capabilities link. The User Administration View Capabilities screen appears shown in Figure 5–207.
Trimble MRM Confidential 270

GeoManager Admin & User Guide
Figure 5–207: User Administration View Capabilities Screen
e. Click Cancel to exit the User Administration View Capabilities screen.
14. Click Save in the User Page.
Figure 5–208: Create User Email Notification Dialog Box
15. A dialogue box, shown in Figure 5–208, appears asking if you would like to send an email to the newly created user.
Click OK to send an email. The Email the Logon Details to the User window appears
Trimble MRM Confidential 271

GeoManager Admin & User Guide
Figure 5–209: Email the Logon Details to the User Dialog Box
Click Cancel to close the dialog box without sending an email.
16. The User Added Successfully screen, shown in Figure 5–210, appears.
Figure 5–210: User Added Successfully Screen
17. Click Add Next User if you need to add more users.
Click Done if you are finished creating users.
Trimble MRM Confidential 272

GeoManager Admin & User Guide
Editing and Deleting Users
As your business grows and changes, you may need to change information about some of your users or delete them from the system.
To edit information about a user:
1. From the Edit/Delete Users screen, shown in Figure 5–211, put a check mark next to the name of the user you want to edit. You can only edit one user at a time.
If you have a large number of users, you can search for a specific user:
a. In the Search text box, enter the first few letters of the search criteria.
b. Select the search criteria from the drop‐down menu. Available criteria are:
• Username
• First Name
• Last Name
• Department
• Title
• Role Name
• Role Capability Name
c. Click Search. The Edit/Delete Users screen refreshes to show the search results.
To show all users, click Show All.
Figure 5–211: Edit/Delete Users Screen
2. Click Edit Checked. The User Page, shown in Figure 5–203, appears.
3. Make the required changes.
4. Click Save.
Trimble MRM Confidential 273

GeoManager Admin & User Guide
To return to the Edit/Delete Users screen without saving changes, click Cancel.
To delete a user:
1. From the Edit/Delete Users screen, shown in Figure 5–211, put a check mark next to the name(s) of the user(s) you want to delete.
2. Click Delete Checked. A confirmation dialogue box, shown in Figure 5–212, appears.
Figure 5–212: Delete User(s) Confirmation Dialog Box
3. Click OK. The Edit/Delete Users screen refreshes, deleting the selected user(s).
Click Cancel to close the dialogue box without deleting the user.
Uploading User Information
If you have a spreadsheet or text file with all your user information contained within it, you can upload that information rather than enter each user individually.
To upload user information:
1. From the User Administration screen, shown in Figure 5–202, click the Upload Users link. The User Definition File Upload screen, shown in Figure 5–213, appears.
Figure 5–213: User Definition File Upload Screen
2. Download and use the template Users Definition Template, shown in Figure 5–170.
Trimble MRM Confidential 274

GeoManager Admin & User Guide
Figure 5–214: Users Definition Template Sample
3. Open the file in Excel. Notice that there are four columns:
• Username
• Firstname
• Lastname
• Title
• Department
• Password
WARNING!DO NOT CHANGE THE COLUMN HEADERS, ORDER OF COLUMNS OR NUMBER OF COL-UMNS!
4. Modify the appropriate definitions.
5. Save the file as csv (comma‐delimited) without renaming it. The File size is limited to 1 MB.
6. Click Browse to find and select the saved file.
7. Click Upload File. A confirmation dialogue box, shown in Figure 5–156, appears.
8. Click OK.
• If the upload is successful, the Upload Completed screen, shown in Figure 5–157, appears.
• If the upload is not successful, the Upload Failed screen, shown in Figure 5–158, appears.
9. Click Done. The Device to Org Unit File Upload screen appears.
After the files are uploaded, you can see the results from the last upload by clicking the Show Last User Definition Upload Result link. The Last User Definition Upload Result screen, shown in Figure 5–215, appears.
Trimble MRM Confidential 275

GeoManager Admin & User Guide
Figure 5–215: Last User Definition Upload Result Screen
You can open the .csv file by clicking the Processed x of x Records (Download Results File) link to see if any errors occurred.
You can view the upload history by clicking the Show Last User Definition Upload Result History link in the Last User Definition Upload Result screen. The Last User Definition Upload History screen, shown in Figure 5–216, appears.
Figure 5–216: User Definition History Screen
To return to the User Definition Details screen, click the Upload User Definition link.
Trimble MRM Confidential 276

6 Service Requests
GeoManager allows you to create and view the status of Service Requests online.
Creating New Service Requests
To create a new service request:
1. In the GeoManager home page under the Control Panel, click Service Request. The Service Request screen, shown in Figure 6–1, appears.
Figure 6–1: Service Request Screen
2. Click Create New Service Request. The first of three New Service Request screens, shown in Figure 6–2, appears.
Trimble MRM Confidential 277

Figure 6–2: New Service Request (1 of 3)
3. Enter the Email address where you want to send the request.
4. Enter the Contact Number of the person who requested service. This is a required field.
5. Enter the City and State.
6. Enter the District.
7. Enter the Division.
8. Select the Service Request Type from the drop‐down menu.
9. Enter the Service Request Description in the text box. The description must be an adequate description of the problem the mobile device has. This is a required field.
10. Click Next. An email confirmation dialogue box, shown in Figure 6–3, appears.
Figure 6–3: Email Confirmation dialogue Box
11. Click OK if the email address is correct.
Trimble MRM Confidential 278

Click Cancel if you need to change the email address.
12. Screen two for the New Service Request, shown in Figure 6–4, appears.
Figure 6–4: New Service Request Screen (2 of 3)
13. Select the Mobile Device Number from the drop‐down list.
14. Select the Make/Model of Mobile Device from the drop‐down list.
15. Enter any Additional Description for the service request. This is an optional field.
16. Enter the Driver’s Name.
17. Enter the Driver’s Contact information.
18. Enter the Mobile Device Location.
19. Enter the Supervisor Name.
20. Enter the Supervisor Contact information.
21. Enter the 2nd Line Manager Name.
22. Enter the 2nd Line Manager Contact information.
23. Click Next. Screen three for the New Service Request, shown in Figure 6–5, appears.
Trimble MRM Confidential 279

Figure 6–5: New Service Request Screen (3 of 3)
24. Enter the Name of the person who will provide keys at the time of service.
25. Enter the Contact information for the person.
26. Enter the Requested Appointment Date and Time. The date is a required field.
27. Enter any Additional Location Information, such as directions to the mobile device location. This is a required field.
28. Enter the name of the Contact Who will be At the Appointment Date and Time. This may be the same person who provided the keys.
29. Enter the Contact information for the person who will be at the appointment.
30. Click Submit. The final screen for the New Service Request, shown in Figure 6–6, appears.
Trimble MRM Confidential 280

Figure 6–6: New Service Request Submitted
31. Click Print to print a copy of the service request for your files.
Click Done when finished viewing the service request. The Service Request screen appears.
Viewing a Service Request
After a service request has been created, you can view its status online.
Trimble MRM Confidential 281

GeoManager Admin & User Guide
7 Troubleshooting
Trimble Customer Technical Support
24x7 Online Customer Service
The most effective way to report a service issue is through our 24x7 on‐line service request system (webSR). Simply log in to your Trimble account and click on the Service Request button in the left‐hand Control Panel. A service representative will respond as quickly as possible.
Other Options for Contacting Trimble Technical Support
Email: [email protected]
Phone: 1‐877‐428‐7623 (5 a.m. to 5 p.m. PST/PDT Monday through Friday)
Frequently Asked Questions
General
What is new in the GeoManager Pericles Release?
The GeoManager Pericles Release is the next major release after the GeoManager 9.0.
The following features are new:
• Improved User Interface
• Improved Geocoding
• Logical grouping of related functions
• Cluster functionality to improve identification of closely located devices and Landmarks on the map
• Improved system performance
• Improved user navigation
• Improved Driving Directions
Trimble MRM Confidential 282

GeoManager Admin & User Guide
• Improved Device Path functionality, with playback option
• Traffic information on the map for certain geography
• Realistic alert management with improved Driver Alerts
• Online chat support
Which browser(s) may I use with the latest version of GeoManager?
The GeoManager can be best accessed using Internet Explorer 7.0. Explorer 8.0 will be supported shortly after release.
What are the recommended system requirements to use the latest version of GeoManager?
Trimble MRM recommends the following system requirements for a best in class experience of GeoManager.
Will I notice performance difference between the GeoManager 9.0 and the GeoManager Pericles?
Mobile device status table and landmark information will load faster after the initial system load.
Will I notice differences when I am using Citrix?
Citrix offers high security at the cost of some performance degradation.
Item Description
Operating System Microsoft Windows 2000, XP, Vista Microsoft Windows 2000 Professional, XP Professional
CPU Pentium-class processor (Pentium IV CPU, 2.5 GHz or faster recommended)
Memory 1 GB minimum (2 GB or more recommended)
Display VGA or better display (1024x768 resolution recommended)
Browser Internet Explorer: 7.0 and above (IE 8.0 recommended).
Note:
• All pop-up blockers should be disabled when using GeoManager to prevent conflict with the MapView Control Panel
• The Run ActiveX control option must be enabled
Internet Access High speed access via DSL, Cable or ISDN
Trimble MRM Confidential 283

GeoManager Admin & User Guide
What is the bandwidth required for me to run the latest GeoManager Release?
Trimble recommends using High speed access via DSL, cable or equivalent broadband speeds.Why are the navigation controls moved?
The latest version of GeoManager introduces a concept called work areas.
The top level tabs such as Home, Reports, and Administration et al are functionally classified, and each tab has its own work area.
The Home tab includes work areas such as Map, Messaging, Work Flow Status, Maintenance, and Exceptions.
The rationale is to offer a more logical approach to managing your GeoManager account.
Will the Latest version of GeoManager offer Role Management?
Yes! The latest version of GeoManager will continue to facilitate Role Management.
Logging In
Where is my Mobile Device Status Page?
The latest version of GeoManager introduces a concept called work areas. The location information for devices can be found in the Map work area under the Home tab.
Will I also see Landmarks on the map when I log in?
Yes! With the latest version, you will be able to see both devices and Landmarks that are within the map borders.
Where is the Customer News section?
The Customer News section is now located on the Service Center tab.
From where do I create Service Requests?
You create Service Requests from the Service Request work area under the Service Center tab.
How do I access the Training section?
The Training section is now available under Service Center >> News.
Do all users see my username at the top?
No! Each user will see their username at the top panel.
Trimble MRM Confidential 284
GeoManager Admin & User Guide
Why do I see the world map when I log in?
The world map is the default map. It is displayed until you have set a custom view as default.
Custom Views
How do I setup a new custom view?
To set up a new custom view:
1. Set the map geography to the desired view on the map.
2. Select Map Actions >> Manage Custom Views.
3. Click the Add New View button.
4. Enter a new name for the view.
How do I share a custom view?
To share a custom view:
1. Select Map Actions >> Manage Custom Views.
2. Enable the check box under the Share column next to the custom view you want to share.
How many custom views can I setup?
There is no limit for custom views. You may set-up as many custom views as you need.
Which custom view do I see when I login to the solution?
You can select any Custom View you would like use as the default view. If you have not selected a default custom view, the world map is displayed.
How do I switch to a different custom view?
Select different custom views by choosing the desired view from the drop‐down list located at the right hand top corner of the map.
Devices
How do I see desired device(s) on the map?
To view desired devices on the map:
1. From the list of devices in the Devices list, click the desired device(s). To select more than one device, hold down the Control key.
2. The map will pan and zoom automatically and highlight the selected devices.
Trimble MRM Confidential 285

GeoManager Admin & User Guide
How do I get a device’s latest location information?
To get latest device status:
1. Select the device(s) from the Devices list, hover the mouse over the desired device icon on the map. A small yellow icon displays above the device.
2. Hover the mouse over the small yellow icon to bring up the action tool tips.
3. Click Update from the action tool tips.
4. GeoManager sends a request to the device to get its latest location.
How do I find the closest Landmarks to a device?
To see closest Landmarks to a device:
1. From the list of devices in the Devices list, hover the mouse over the desired device icon.
2. Hover the mouse over the small yellow icon to bring up the action tool tips.
3. Click Closest Landmarks from the action tool tips.
4. GeoManager lists the closest Landmarks, within 25-mile radius, in the Dynamic Results list below the Devices list.
How do I find a device with partial name?
To find a device with partial name:
1. Enter the partial name in the Filter box.
2. Click the search lens.
3. The Devices list will display the devices that match the search criteria.
How do I find or filter devices that belong to a particular device group?
To find or filter devices that belong a particular group:
1. Click the down arrow next to the Filter area. Group filter criteria display.
2. Select the desired group from the drop down list next to the Group list.
3. Click Apply. The Devices list shows the devices that belong to the selected group.
How do I find a device associated with a particular Employee?
To find a device that is associated with an Employee:
1. Click the down arrow next to the Filter area.
2. Select First Name, Last Name or ID from the filter options. You may select a combination by clicking the + button on the right.
3. Enter employee first name, last name and/or id depending on the selected filters.
4. Click Apply.
Trimble MRM Confidential 286
GeoManager Admin & User Guide
5. The device associated with the employee is listed.
Where do I see custom information for a device?
To view custom information for a device:
1. From the list of devices in the Devices list, hover the mouse over the desired device icon. A small yellow icon appears.
2. Hover the mouse over the small yellow icon to open the action tool tips.
3. The action tool tips display the device’s custom information.
How do I sort devices by Status?
To sort devices based on status:
1. Click the Status header once in the Devices list. The Device list is sorted.
2. Click the Status header again to sort the device list in the opposite way.
I only see 20 devices in the Devices list. How do I view more devices?
To view more devices into the Devices list:
Click the Next 20 link in the Devices list, on the left hand bottom corner of the table to load more devices.
From the Devices list, how do I zoom to the closest device?
To zoom to the closest device:
1. From the list of devices in the Devices list, hover the mouse over the desired device icon. A small yellow icon appears.
2. Hover the mouse over the small yellow icon to open the action tool tips.
3. Click Zoom.
4. Select Zoom To Closest Device. GeoManager displays the closest device on the map.
From the Devices list, how do I generate Activity Detail report?
To generate an Activity Detail report:
1. From the list of devices in the Devices list, hover the mouse over the desired device icon. A small yellow icon appears.
2. Hover the mouse over the small yellow icon to open the action tool tips.
3. Click Reports.
4. Select Activities. The Activity Detail report for the day is generated.
Trimble MRM Confidential 287

GeoManager Admin & User Guide
From the Devices list, how do I send messages to a device?
To send messages to a device:
1. From the list of devices in the Devices list, hover the mouse over the desired device icon. A small yellow icon appears.
2. Hover the mouse over the small yellow icon to open the action tool tips.
3. Click Send Message. This opens the Messaging page.
4. Type a message on the Messaging page.
5. Click the Send button.
How many devices will be displayed on the map at a given time?
The latest version of GeoManager is capable of displaying all devices on the map.
What do the reddish circular icons (with a plus sign) on the map represent?
The latest version of GeoManager introduces a new concept called clustering. The map automatically replaces groups of device icons with cluster icons to avoid cluttering. Hovering the mouse over these cluster icons will display a list of all devices that form the cluster.
Landmarks
How do I see desired Landmarks on the map?
To view desired Landmarks on the map:
1. Click the Landmarks tab.
2. From the list of Landmarks in the Landmarks list, click the desired Landmarks (hold-down the Control key to select multiple Landmarks). The map will pan and zoom automatically to display the selected Landmarks.
How do I find the closest devices from a Landmark?
To get closest devices from a Landmark:
1. Click the Landmarks tab.
2. From the list of devices in the Devices list, hover the mouse over the desired device icon. A small yellow icon appears.
3. Hover the mouse over the small yellow icon to open the action tool tips.
4. Click Closest Devices from the action tool tips. GeoManager lists the closest devices, within 25-mile radius, in the Dynamic Results list below the Landmarks list.
How do I find a Landmark with partial name?
To find a Landmark with partial name:
Trimble MRM Confidential 288

GeoManager Admin & User Guide
1. Click the Landmarks tab.
2. Enter the partial name in the Filter box.
3. Click the search lens. Landmarks list shows the Landmarks that match the search criteria.
How do I find or filter Landmarks that belong to a particular group?
To find or filter Landmarks that belong a particular group:
1. Click the Landmarks tab.
2. Click the down arrow next to the Filter area. The group filter criteria displays.
3. Select the desired group from the drop down list, next to the Group list.
4. Click Apply. The Landmarks list shows the Landmarks that belong to the selected group.
How do I find Landmarks that are located in a particular city?
To find Landmarks that is located in a particular city:
1. Click the Landmarks tab.
2. Click the down arrow next to the Filter area.
3. From the filter options, select City.
4. Enter the city name.
5. Click Apply. Landmarks that are located in the input city are listed.
How do I sort Landmarks based on their Type?
To sort Landmarks based on Type:
1. Click the Landmarks tab.
2. Click the Type header in the Landmarks list. The Landmark list is sorted.
3. Click the Type header again to sort the Landmark list in the other way.
I see just 20 Landmarks in the Landmarks list? How do I load more Landmarks?
To load more Landmarks into the Landmarks list:
1. Click the Landmarks tab.
2. From the Landmarks list, click the Next 20 link on the left hand bottom corner of the table to load more Landmarks.
From the Landmarks list, how do I zoom to the closest device?
To zoom to the closest device:
1. Click the Landmarks tab.
Trimble MRM Confidential 289

GeoManager Admin & User Guide
2. From the list of devices in the Devices list, hover the mouse over the desired device icon. A small yellow icon appears.
3. Move the mouse over the small yellow icon to open the action tool tips.
4. Click Zoom and then on Zoom to Closest Device. GeoManager displays the closest device on the map.
From the Landmarks list, how do I edit a Landmark?
To edit a Landmark:
1. Click the Landmarks tab.
2. From the list of devices in the Devices list, hover the mouse over the desired device icon. A small yellow icon appears.
3. Hover the mouse over the small yellow icon to open the action tool tips.
4. Click Edit >> this will bring up the Landmark Update tab on the right.
5. Change desired parameters.
6. Click Save.
From the Landmarks list, how do I delete a Landmark?
To delete a Landmark:
1. Click the Landmarks tab.
2. From the list of devices in the Devices list, hover the mouse over the desired device icon. A small yellow icon appears.
3. Hover the mouse over the small yellow icon to open the action tool tips.
4. Click Delete.
5. Click OK.
Note:Note:Note: A Landmark cannot be deleted if it is associated with an Exception. The Exception asso-ciation has to be terminated prior to deleting the Landmark.
How many Landmarks will be displayed on the map at a given time?
The latest version of GeoManager is capable of displaying all Landmarks on the map.
What do the green square icons (with a plus sign) on the map represent?
The Latest version of GeoManager introduces a new concept called clustering. The map automatically replaces groups of Landmark icons with cluster icons to avoid cluttering. Hovering the mouse over these cluster icons will display the Landmark list that forms the cluster.
Trimble MRM Confidential 290

GeoManager Admin & User Guide
Dynamic Results
How do I see Dynamic Result items on the map?
To view Dynamic Result items on the map:
1. Perform any Closest Device or Landmark operation. The results for the Closest Device or Landmark operation will be listed under Dynamic Results.
2. From the list of devices/Landmarks, click the desired devices (hold-down the Control key to select multiple items). The map will pan and zoom automatically and highlight the selected items.
The Map View
What Map View options do I have?
The available Map View options are: Road View, Aerial View, and Bird’s eye with 2D and 3D view.
Is there a way to increase the size of the map?
Yes, with the latest version, you can maximize the map to get a bigger view it.
To maximize the map window:
1. Click the Maximize Window button next to the custom view list, shown below, the map changes to display the maximized view.
Figure 7–1: Increase Map Size Icon
2. Click the Maximize Window button to restore the map to the previous view.
Trimble MRM Confidential 291

GeoManager Admin & User Guide
How do I view the map at all times, even when I’m accessing other functions in GeoManager? Is this possible?
Yes, with the latest release, you could open the map in a new window and access other GeoManager functions in the main window.
To detach the map window:
Click the Open in New Window button, shown below. The map opens in a new window.
Figure 7–2: Detach Map Icon
How I get the latest location information of a device?
To update a device from the map:
1. Click a device in the Devices list. The device is highlighted on the map.
2. Hover the mouse over the device icon. A small yellow icon appears.
3. Hover the mouse over the small yellow icon to open the action tool tips.
4. Click Update. GeoManager sends a request to the device to get its latest location.
How do I generate reports from map? Which reports may I generate?
To generate reports from Map:
1. Click a device in the Devices list. The device is highlighted on the map.
2. Hover the mouse over the device icon. A small yellow icon appears.
3. Move the mouse over the small yellow icon to open the action tool tips.
4. Click Reports and select the report that you want to generate.
Trimble MRM Confidential 292

GeoManager Admin & User Guide
The following reports can be generated from the map:
• Activity Report
• Message Report
• Forms Report
• Exceptions Report
How do I add Landmarks from the map?
To add Landmarks from Map:
1. Select an area on the map where you want to add the Landmark.
2. Right click and select Create Landmark. The Create Landmark tab will appear to the right of the map.
3. Fill all required fields.
4. Click Save.
How do I move a Landmark on the map?
To move Landmarks on the Map:
1. Click the Landmarks tab.
2. Click the Landmark that you want to move. The Landmark will appear highlighted on the map.
3. Hover the mouse over the Landmark icon. A small yellow icon appears.
4. Move the mouse over the small yellow icon to open the action tool tips.
5. Click Edit. Edit Landmark tab appears to the right of the map.
6. From the Edit Landmark tab, click Select from Map button.
7. Place the mouse pointer on the new location for the Landmark.
8. Select a Fence Type.
9. Click Draw on Map.
10. Draw the Landmark fence.
11. Click Save.
How do I edit a Landmark from the map?
To add Landmarks from Map:
1. Click the Landmarks tab.
2. Click the Landmark that you want to edit. The Landmark will appear highlighted on the map.
3. Hover the mouse over the Landmark icon. A small yellow icon appears.
Trimble MRM Confidential 293

GeoManager Admin & User Guide
4. Move the mouse over the small yellow icon to open the action tool tips.
5. Click Edit. Edit Landmark tab will appear to the right of the map.
6. From the Edit Landmark tab, edit all required field values.
7. Click Save.
How do I add a Landmark of a particular dimension?
To add Landmarks from Map:
1. Select an area on the map where you want to add the Landmark.
2. Right Click and select Create Landmark.
3. Create Landmark tab will appear to the right of the map.
4. Select Fence Type (Circle or Rectangle).
5. Enter radius value for circular or height & width for rectangular fence type.
6. Fill all other required fields.
7. Click Save.
How do I add a Landmark that exactly captures a building’s dimension?
To add a Landmark that exactly captures a building’s dimension:
1. Switch to Aerial view by clicking the Aerial button on the map.
2. Select an area on the map where you want to add the Landmark.
3. Zoom-in to get a clear view of the building.
4. Right Click and select Create Landmark. Landmark Update tab will appear to the right of the map.
5. Select Polygon Fence Type.
6. Draw the fence exactly surrounding the building.
7. Fill all other required fields.
8. Click Save.
When I pan or zoom out, will I see more devices and Landmarks getting displayed on the map?
Yes, panning and zooming operations will display devices and Landmarks that were outside the original map frame.
Can I copy‐paste device and Landmark action icon tool tip information?
Yes, the latest version of GeoManager allows you to copy-paste the information in the Device and Landmark action tool tips.
Trimble MRM Confidential 294

GeoManager Admin & User Guide
How do I get driving directions between two locations?
To get driving directions:
1. On the map, identify the start and finish locations for the driving directions.
2. Place the mouse on the start point, right click, and select Drive from here. The Driving Directions tab appears to the right of map. It automatically populates the address of the Drive from here location.
3. Place the mouse on the finish point, right click and select Drive to here. The address of the Drive to here location automatically populates in the Driving Directions tab. The map displays the driving directions. The Driving Directions tab displays the turn-by-turn navigation in text format.
Can I copy driving directions information into another application?
Yes, the latest version of GeoManager allows you to copy-paste the driving directions information to other applications.
Device Actions
How do I view device path?
To view device path on the map:
1. From the list of devices in the Devices list, click the desired devices (hold down the Control key to select multiple devices). The map will pan and zoom automatically and highlight the selected devices.
2. Select Device Path from the Device Actions drop down list. The Device Path tab will appear to the right of the map.
3. Select a date.
4. Click Show. The map will adjust it’s zoom level automatically to display device path of all selected devices.
How do I view stop sequence?
To view stop sequence on the map:
1. From the list of devices in the Devices list, click the desired devices (hold down the Control key to select multiple devices). The map will pan and zoom automatically and highlight the selected devices.
2. Select Device Path from the Device Actions drop down list. A Device Path tab will appear to the right of the map.
3. Select a date and enable the check box for Show Stop Sequence Only.
4. Click Show. The map will adjust its zoom level automatically to display stop sequence of all selected devices.
Trimble MRM Confidential 295
GeoManager Admin & User Guide
Map Actions
How do I show traffic information on the map?
To view stop sequence on the map:
From the Map Actions drop-down list, select Show Traffic. The map displays traffic information in available areas.
A legend (just beneath the 2D and 3D buttons) indicates the color coding for the traffic flow.
How do I calculate distance between two or more locations from the map?
To calculate distance between two or more locations from the map:
1. From the Map Actions drop-down list, select View Distance.
2. Click desired points on the map. The map keeps connecting each point and displays the length of each segment.
3. Perform a right click the mouse to terminate the operation.
4. Hover the mouse over the red colored push pin icon to get the total length of all segments.
How do I zoom to a latitude/longitude on the map?
To zoom to a latitude-longitude point on the map:
1. From the Map Actions drop-down list,
2. Select Zoom to Location. A small box appears with Latitude and Longitude labels.
3. Enter the latitude and longitude values.
4. Click OK. The map will zoom to the entered latitude-longitude point.
How do I zoom to an address on the map?
To zoom to an address on the map:
1. From the Map Actions drop-down list, select Zoom to Address. A small box appears with an Address label.
2. Enter the desired address.
3. Click OK. The map will zoom to the entered address location.
Can I hide device or Landmark icons or their labels from being displayed on the map?
Yes! Latest version of GeoManager allows you to hide device icons, device labels, Landmark icons, Landmark labels, and Landmark fences from the map.
To hide or show Device or Landmark icons in the map, check or uncheck the various options from the Map Actions drop-down list:
Trimble MRM Confidential 296

GeoManager Admin & User Guide
• Show Device Layer
• Show Device Labels
• Show Landmark Layer
• Show Landmark Fences
• Show Landmark Labels
How do I print a map view?
To print the map view:
1. From the Map Actions drop-down list, select Print Map.
2. From the Print pop-up, select the desired printer name.
3. Click OK. The map view is printed.
Note:Note:Please consider our environment before printing the map. Creating a PDF allows you to save an electronic version of the desired map view.
Status View
How many Key Performance Indicators are available?
There are four Key Performance Indicators:
• Device Status
• Maintenance Status
• Rule Exceptions
• Driver Alerts
Does the Status View include show all the devices in the account?
No! The devices displayed in the Status View are the ones that you have access to.
Alerts
How many Exceptions are listed in the Alerts list?
Alerts will list the ten most recent Exceptions in the 24 hour period.
Trimble MRM Confidential 297

GeoManager Admin & User Guide
Consoles
How do I launch the Messaging window?
There are several ways to launch the Messaging window:
• Under the Home tab, click on Messaging next to Map.
• Select Messaging from the Device Actions drop-down list.
• Select Send Message from the action icon tool tip for a device (from the Devices list or from the map).
How do I launch the Exceptions Console?
There are two ways to launch the Exceptions Console.
• Under the Home tab, click the Exceptions option.
• Click Alerts in the right hand top corner.
Where do I see Vehicle Maintenance status details?
Vehicle Maintenance status details can be viewed by clicking Maintenance under the Home tab.
Reports
Where to I generate On‐demand reports?
On-demand reports can be generated from the Reports tab.
Administration
Where do I create driver and dispatcher canned messages?
To create driver and dispatcher canned messages:
1. Click the Administration tab.
2. From the Devices drop-down list, select Configure Messaging Details. Messaging Administration page displays.
3. You can create driver and dispatcher canned messages from this section.
Where do I input custom information for devices?
To input custom information for devices:
1. Click the Administration tab.
Trimble MRM Confidential 298

GeoManager Admin & User Guide
2. From the Devices drop-down list, select Configure Mobile Device Details. Configure Mobile Device Details page displays.
3. Click Configure Mobile Device.
4. Enter custom information for desired devices.
Where do I create new Organization Hierarchy nodes?
To create new Organizational Hierarchy nodes:
1. Click the Administration tab.
2. From the Devices drop-down list, select Organizational Hierarchy.
3. Click View/Create/Edit Organizational Hierarchy. Configure Organizational Unit window is displayed.
4. Enter and edit Organizational information.
Where do I perform Landmark batch uploads?
To perform Landmark batch uploads:
1. Click the Administration tab.
2. From the Landmarks drop-down list, select Landmarks Administration. Landmark Administration page is displayed.
3. Click Batch Upload Landmarks.
4. Perform desired Landmark uploads.
Where do I create a new employee?
To create new employees:
1. Click the Administration tab.
2. From the Employees drop-down list, select Employee Administration. Administration page is displayed.
3. Click View/Create/Edit Employee Details. Employee Administration page is displayed.
4. Create new employees.
Where do I assign devices to employees?
To assign devices to employees:
1. Click the Administration tab.
2. From the Employees drop-down list, select Employee Management. Employee Management page is displayed.
3. Click Associate Device to Employee. Associate Employee(s) to Devices page is displayed.
4. Associate employees to devices.
Trimble MRM Confidential 299

GeoManager Admin & User Guide
Where do I schedule reports?
To create scheduled reports:
1. Click the Administration tab.
2. From the Reports drop-down list, select Create Scheduled Reports. Reports page is displayed.
3. Schedule new reports.
Where do I assign users to Organizational Hierarchy nodes?
To assign users to Organizational Hierarchy nodes:
1. Click the Administration tab.
2. From the User drop-down list, select Organizational Hierarchy.
3. Click View/Create/Edit Organizational Hierarchy. Configure Organizational Unit window is displayed.
4. Assign users to Organizational Hierarchy.
Where do I create new users?
To create new users:
1. Click the Administration tab.
2. From the User drop-down list, select User Administration. User Administration page is displayed.
3. Click Create User.
4. Create new users.
Where do I create new roles and assign them to users?
To create new roles and assign them to users:
1. Click the Administration tab.
2. From the User drop-down list, select Role Management. Role Administration page is displayed.
3. Create new roles and assign them to different users.
Trimble MRM Confidential 300

8 Associated Hardware
The iLM Features and Benefits
Trimble GeoManager combines the easily installed in‐vehicle iLM device with Trimble online services to deliver vehicle location information and reports to the customer’s back office.
• Acquire location information between update intervals by employing the Mobile Device Status and MapView features to manually update individual iLMs.
• The iLM shifts into energy conservation mode if the vehicle is parked or is inactive for a period of time.
• While the unit is in energy conservation mode, the location cannot be updated until the vehi‐cle moves again.
• The iLM emerges from energy conservation mode once the vehicle moves.
• The iLM has several key features including four status LEDs indicating:
• GPS (Global Positioning System) ‐ indicates that the iLM is actively locating.
• COM ‐ indicates wireless connectivity.
• ACTIVE (when flashing) ‐ indicates that the iLM is operating.
• DATA ‐ indicates that location points are stored in the iLM memory.
• The ability to report speed, distance and position to the Trimble MRM Web server. Reports vehicle location at 15 minutes intervals.
• Determines whether the vehicle is moving or parked using a combination of ignition input and GPS speed information.
• Location accuracy within 300 feet 90% of the time.
• Stores up to five days of data when out of coverage area.
The iDTTM Internet Data Terminal (Optional Feature)
The iDT in‐vehicle messaging unit, shown in Figure 8–1, works in conjunction with the iLM, using Wireless Technology and the Internet to facilitate 2‐way communication between a dis‐patcher and drivers.
Trimble MRM Confidential 301

Figure 8–1: iDT 3000 In-Vehicle Unit
Note:Note:
You may add the optional iDT for an additional fee by calling Trimble Inside Sales at 877-728-7623 8 a.m. to 5 p.m. PST Monday-Friday.
The Trimble iDT 3000 integrates valuable functions that can help optimize planning efficiency, reduce operational costs, determine and optimize asset performance, increase business produc‐tivity and deliver improved customer service.
Note:Note:
The Trimble iDT 2500 and iDT 3000 messaging devices are designed for use in vehicles operat-ing under a wide range of field conditions. The operating temperature range is -4° to 158° F (-20° to 70° C). Temperatures outside of the specified operating range can have a negative impact on the readability of the LCD (Liquid Crystal Display).
Driver Features
• Choose from up to 30 predefined text messages
• Add up to 20 characters to any predefined message
• Assign two frequently used messages to two specially designated soft keys (SPCL 1 & SPCL 2)
• Store up to 20 inbound and 40 outbound messages
• Choose from 10 user‐defined forms with 10 fields each
• Automatically chart duty status for Hours of Service, using the Driver Logs add‐on feature
• Enjoy a high‐resolution display with the ability to chart Hours of Service graphs
Trimble MRM Confidential 302

• iLM stores messages in memory queue when vehicle travels outside wireless coverage areas
• Create messages even when outside wireless coverage areas — the iLM will store messages in memory queue and automatically send when coverage is available
• Receive instant confirmation of package delivery using form‐fill capabilities and optional barcode wand
Dispatcher Features
• Predefine and program up to 30 defined messages of 20 alphanumeric characters each
• Deliver messages of up to 480 characters
• Send to one, multiple or all drivers
• Receive messages and prioritize responses more efficiently than with phone dispatching
• Generate professional reports on all inbound and outbound messages
• View location details on all reports
• Enjoy OTAP compatibility
• Enable support of future two‐way communications applications
Satellite Modem
Trimble Satellite Modem is an advanced communications device that gives companies complete 24x7 coverage when cellular connections are unavailable. Satellite Modem, with hardware from EMS Technologies, is an optional feature of the Trimble GeoManager iLM solution that offers dual‐mode wireless capabilities, combining L‐band satellite technology with standard Trimble wireless data transmission and messaging capabilities.
Companies that operate in remote locations, such as nationwide, long‐distance transportation and distribution operations, require the additional connectivity capabilities that the Satellite Modem offers.
Troubleshooting Hardware
From the table below, choose the problem that is closest to yours. The row identifies possible causes, explanations and “What To Do” for a solution.
Trimble MRM Confidential 303

Problem Possible Causes Why This Occurs What To Do
Mobile device doesn’t update loca-tion, even when the Update button is clicked.
Out of wireless cov-erage area.
If your mobile device travels outside the wire-less coverage area, it cannot receive an update request nor can it send information back to our server.
Check with your wire-less carrier for cover-age maps.
Wireless carrier/net-work problems.
Occasionally the carriers that provide the wireless network experience out-ages that prevent com-munication to or from vehicles. Additionally, there may be times when random Internet nodes are temporarily down and data will not transmit.
Check with your Inter-net Service Provider if you suspect disabled Internet nodes.
The location doesn’t seem to change when a new update is requested.
Mobile device is stopped.
The mobile device must be moving to update the location informa-tion. All updates while the mobile device is parked will update the duration of parked time.
Start the application and change location. To ensure that the application recognizes the change of location, the device should exceed 15 mph.
Wrong location in vehicle status or reports.
Variance in GPS accuracy.
GPS location data is accurate to within 300 feet, 90% of the time.
Check that the loca-tion being reported is within the variance of the actual location.
Can’t see the maps. Missing one or more components necessary for full functionality.
Minimum system requirements have not been met.
See “Minimum Sys-tem Requirements” at the beginning of this manual.
Trimble MRM Confidential 304

Trimble Customer Technical Support
24x7 Online Customer Service
If your problem is not explained in the troubleshooting tips, the most effective way to report a service issue is through our 24x7 on‐line service request system (webSR). Simply log in to your Trimble account and click on the Service Request button in the left‐hand Control Panel. A service representative will respond as quickly as possible.
Other Options for Contacting Trimble Technical Support
Email: [email protected]
Phone: 1‐877‐428‐7623 (5 a.m. to 5 p.m. PST/PDT Monday through Friday)
Can’t see a roadway on the map.
Not viewing at a close enough Zoom level.
You may be “Zoomed out” too far, in which case you would not see less-major roads.
Zoom in to the appro-priate level.
General map errors. Stale data is stored in the browser cache.
Often stale data stored in the browser cache will become corrupt and needs to be deleted.
Delete the cache in your browser. If you need assistance com-pleting this task, please consult the help sys-tem from your browser or your PC support group.
Problem Possible Causes Why This Occurs What To Do
Trimble MRM Confidential 305

Glossary
affiliate
Companies who work with larger carriers to build a nationwide network. Affiliates may use the larger carrierʹs brand name, network operations, customer service or other resources.
antenna
A device for transmitting and receiving signals. Often camouflaged on existing buildings, trees, water towers or other tall structures, the size and shape of antennas are generally determined by the frequency of the signal they manage.
AP
Access point is a WLAN transceiver or ʺbase stationʺ that can connect a network to one or many wireless devices. APs can also bridge to one another.
carrier
Also known as service provider or operator, a carrier is the communications company that provides customers with air time and other services for their wireless phones.
channel
A path along which a communications signal is transmitted.
FSM
Field Service Management is the process of managing mobile resources to improve the performance of tasks in the field. FSM includes scheduling, dispatching and Intelligent Appointing, as reflected in the Trimble Taskforce solution.
GPS
Global Positioning System is a worldwide satellite navigational system, made up of 24 satellites orbiting the earth and their receivers on the earth’s surface. The GPS satellites continuously transmit digital radio signals so that up‐to‐the‐minute information may be used in location tracking, navigation and other location or mapping technologies.
iLMTM
Internet Location Manager is a patented Trimble in‐vehicle mobile resource management device using GPS and wireless network communications technologies. The Trimble iLM captures location‐based information in the field and securely transmits it over high‐speed wireless
Trimble MRM Confidential 306

networks to Trimble subscribers. This data shows up in the form of on‐demand, exception or scheduled web‐based reports that reflect information such as mobile worker location, vehicle speed, starts and stops on customizable maps.
IP
Internet Protocol sends data packets, called data‐grams, across multiple networks, but does not ensure that they arrive at their destination reliably (TCP ensures reliable delivery). Each IP datagram has a header containing source and destination information, allowing each datagram to travel independently to its destination directly or through gateways, with each datagram perhaps traveling a different route to reach its destination.
IP address
Also called ʺInternet address.ʺ The 32‐bit address assigned to hosts using TCP/IP. Most Internet addresses consist of a network portion and a node portion. The address for each device must be unique on the network.
LAN
Local Area Network is a small data network covering a limited area, such as a building or group of buildings. Most LANs connect workstations or personal computers, allowing many users to share devices such as laser printers, as well as data. A LAN also allows easy communication by facilitating e‐mail or supporting chat sessions.
Landmarks
The GeoManager Landmarks feature—available with all Trimble MRM Field Productivity & Management solutions—is an enhanced scheduling and reporting tool that enables you to define and post special destinations and locations in the GeoManager customized mapping database, then view them conveniently on a map in relation to current field asset locations. Landmarks feature option is an excellent tool for administrators looking to streamline their vehicle routing process while reducing wasted time, fuel costs and other expenses.
MRM
Mobile Resource Management is a category of business solutions designed to maximize the productivity of mobile workforces. The most effective MRM solutions—such as those offered by Trimble—combine Internet services with applications that leverage on‐demand GPS, wireless capabilities and transaction processes to help companies reduce operating costs and raise the quality of customer experience.
Trimble MRM Confidential 307

Wi‐Fi
Wireless fidelity is the generic term for 802.11 technology.
WLAN
Wireless Local Area Networks use radio waves instead of a cable to connect a user device, such as a laptop computer, to a LAN. They provide Ethernet connections over the air and operate under the 802.11 family of specifications developed by the IEEE.
wireless
General term for using radio‐frequency spectrum for transmitting and receiving voice, data and video communications.
wireless Internet
A general term for using wireless services to access the Internet, e‐mail and/or the web.
wireless IT
Wireless Information Technology is the monitoring, managing and troubleshooting of computer equipment throughout a wireless network.
Trimble MRM Confidential 308