Add/Edit in Stratus - torontomls.netedu.torontomls.net/AddEdit_NewStratusManual.pdf · Notes...
136
Add/Edit in Stratus
Transcript of Add/Edit in Stratus - torontomls.netedu.torontomls.net/AddEdit_NewStratusManual.pdf · Notes...

Add/Edit in Stratus

© Toronto Real Estate Board5 February 2015All rights reserved.
No part of this book may be reproduced or transmitted in any form or by any means, electronic or mechanical, including photocopying and recording without permission in writing from the Toronto Real Estate Board.
The Toronto Real Estate Board is solely responsible for the content of this course material.

Add/Edit in Stratus
Table of Contents
About This Workbook . . . . . . . . . . . . . . . . . . . . . . . . . . . . . . . . . . . 1
Learning objectives . . . . . . . . . . . . . . . . . . . . . . . . . . . . . . . . . . . . . . . . . . . . . . . . 1Prerequisites. . . . . . . . . . . . . . . . . . . . . . . . . . . . . . . . . . . . . . . . . . . . . . . . . . . . . . 2
A Few Tips Before Getting Started . . . . . . . . . . . . . . . . . . . . . . . . . 3
Important Note on System Usage . . . . . . . . . . . . . . . . . . . . . . . . . . . . . . . . . . . . . 5Can I use the browser BACK button? . . . . . . . . . . . . . . . . . . . . . . . . . . . . . . . . . . 5Can anyone access the Add/Edit feature of Stratus? . . . . . . . . . . . . . . . . . . . . . . . 5Can listings from any class be entered?. . . . . . . . . . . . . . . . . . . . . . . . . . . . . . . . . 5Can I use my keyboard to move my cursor around the screen? . . . . . . . . . . . . . . 5What should I do if I can’t complete all data entry screens in one session? . . . . . 6Does Stratus automatically save my draft? . . . . . . . . . . . . . . . . . . . . . . . . . . . . . . 6How do I get from one section of the Listing Detail Edit Form to the next? . . . . 6What if I don’t know what information goes in a particular data field? . . . . . . . . 6How do I know what fields are mandatory? . . . . . . . . . . . . . . . . . . . . . . . . . . . . . 7Will Stratus pre-fill some of the fields?. . . . . . . . . . . . . . . . . . . . . . . . . . . . . . . . . 7Is there a way to look up street names? . . . . . . . . . . . . . . . . . . . . . . . . . . . . . . . . . 7Is there a way to look up Area, Municipality, and Community?. . . . . . . . . . . . . . 8Does the system flag any errors? . . . . . . . . . . . . . . . . . . . . . . . . . . . . . . . . . . . . . . 8Can I select more than one item in a data field? . . . . . . . . . . . . . . . . . . . . . . . . . . 8Is there a specific format for entering dates?. . . . . . . . . . . . . . . . . . . . . . . . . . . . . 8What is the difference between Edit Listing Details and Status/Price Change? . . 9Summary . . . . . . . . . . . . . . . . . . . . . . . . . . . . . . . . . . . . . . . . . . . . . . . . . . . . . . . 10
Using the Permissions Manager . . . . . . . . . . . . . . . . . . . . . . . . . 11
Setting Add/Edit privileges . . . . . . . . . . . . . . . . . . . . . . . . . . . . . . . . . . . . . . . . . 13Summary . . . . . . . . . . . . . . . . . . . . . . . . . . . . . . . . . . . . . . . . . . . . . . . . . . . . . . . 15
Enabling Training Mode for Add/Edit . . . . . . . . . . . . . . . . . . . . . . 17
Enabling Training Mode . . . . . . . . . . . . . . . . . . . . . . . . . . . . . . . . . . . . . . . . . . . 18
Adding a Listing . . . . . . . . . . . . . . . . . . . . . . . . . . . . . . . . . . . . . . . 23
Accessing Add Listing. . . . . . . . . . . . . . . . . . . . . . . . . . . . . . . . . . . . . . . . . . . . . 25

Add/Edit in New Stratus
Completing the Location section . . . . . . . . . . . . . . . . . . . . . . . . . . . . . . . . . . . . . 27Completing the Amounts/Dates section . . . . . . . . . . . . . . . . . . . . . . . . . . . . . . . . 31Completing the Exterior section. . . . . . . . . . . . . . . . . . . . . . . . . . . . . . . . . . . . . . 34Completing the Interior section . . . . . . . . . . . . . . . . . . . . . . . . . . . . . . . . . . . . . . 37Completing the Rooms/Details section . . . . . . . . . . . . . . . . . . . . . . . . . . . . . . . . 40Completing the Comments section. . . . . . . . . . . . . . . . . . . . . . . . . . . . . . . . . . . . 42Completing the Other section. . . . . . . . . . . . . . . . . . . . . . . . . . . . . . . . . . . . . . . . 44Completing the Photos Section . . . . . . . . . . . . . . . . . . . . . . . . . . . . . . . . . . . . . . 49
Adding an Exterior Image using iLOOKABOUT . . . . . . . . . . . . . . . . . 49Uploading Photos . . . . . . . . . . . . . . . . . . . . . . . . . . . . . . . . . . . . . . . . . . 55Changing the order of the photos . . . . . . . . . . . . . . . . . . . . . . . . . . . . . . 64
Completing the Attachments section . . . . . . . . . . . . . . . . . . . . . . . . . . . . . . . . . . 64Completing the Map Section . . . . . . . . . . . . . . . . . . . . . . . . . . . . . . . . . . . . . . . . 67Editing a Draft . . . . . . . . . . . . . . . . . . . . . . . . . . . . . . . . . . . . . . . . . . . . . . . . . . . 70
Deleting a saved draft . . . . . . . . . . . . . . . . . . . . . . . . . . . . . . . . . . . . . . . 71Submitting the Listing . . . . . . . . . . . . . . . . . . . . . . . . . . . . . . . . . . . . . . . . . . . . . 73Summary . . . . . . . . . . . . . . . . . . . . . . . . . . . . . . . . . . . . . . . . . . . . . . . . . . . . . . . 78
Cloning an Existing Listing . . . . . . . . . . . . . . . . . . . . . . . . . . . . . 79
Summary . . . . . . . . . . . . . . . . . . . . . . . . . . . . . . . . . . . . . . . . . . . . . . . . . . . . . . . 84
Editing a Listing . . . . . . . . . . . . . . . . . . . . . . . . . . . . . . . . . . . . . . 85
Accessing Edit Listing Details . . . . . . . . . . . . . . . . . . . . . . . . . . . . . . . . . . . . . . . 87Editing a Listing . . . . . . . . . . . . . . . . . . . . . . . . . . . . . . . . . . . . . . . . . . . . . . . . . . 88Summary . . . . . . . . . . . . . . . . . . . . . . . . . . . . . . . . . . . . . . . . . . . . . . . . . . . . . . . 90
Changing a Listing’s Status . . . . . . . . . . . . . . . . . . . . . . . . . . . . 93
Accessing Status/Price Change . . . . . . . . . . . . . . . . . . . . . . . . . . . . . . . . . . . . . . 95Performing a Basic Status Change . . . . . . . . . . . . . . . . . . . . . . . . . . . . . 96Performing a Residential Sold Conditional Change . . . . . . . . . . . . . . . . 97Performing a Residential Sold Status Change . . . . . . . . . . . . . . . . . . . . . 99Performing a Commercial Leased Status Change . . . . . . . . . . . . . . . . . . 99
Summary . . . . . . . . . . . . . . . . . . . . . . . . . . . . . . . . . . . . . . . . . . . . . . . . . . . . . . 101
Verifying Changes Made to a Listing . . . . . . . . . . . . . . . . . . . . 103
Using History . . . . . . . . . . . . . . . . . . . . . . . . . . . . . . . . . . . . . . . . . . . . . . . . . . . 105Summary . . . . . . . . . . . . . . . . . . . . . . . . . . . . . . . . . . . . . . . . . . . . . . . . . . . . . . 107
Add/Edit in Stratus
Searching for Brokerage Listings . . . . . . . . . . . . . . . . . . . . . . . 109
Initiating the search . . . . . . . . . . . . . . . . . . . . . . . . . . . . . . . . . . . . . . . . . . . . . . 111Modifying your search criteria . . . . . . . . . . . . . . . . . . . . . . . . . . . . . . . . . . . . . 113Narrowing the Search Results List . . . . . . . . . . . . . . . . . . . . . . . . . . . . . . . . . . 113Sorting Search Results. . . . . . . . . . . . . . . . . . . . . . . . . . . . . . . . . . . . . . . . . . . . 114
Sorting by a single column . . . . . . . . . . . . . . . . . . . . . . . . . . . . . . . . . . .114Sorting by multiple columns . . . . . . . . . . . . . . . . . . . . . . . . . . . . . . . . . .114
Printing Search Results . . . . . . . . . . . . . . . . . . . . . . . . . . . . . . . . . . . . . . . . . . . 115Summary . . . . . . . . . . . . . . . . . . . . . . . . . . . . . . . . . . . . . . . . . . . . . . . . . . . . . . 117
Appendix A . . . . . . . . . . . . . . . . . . . . . . . . . . . . . . . . . . . . . . . . . . 119

Add/Edit in New Stratus

Notes
Add/Edit in Stratus 1
About This Workbook
Learning objectives
This user guide is designed for TREB Members and office administrators who want to learn how to use the Add/Edit component in Stratus. After completing the material in this user guide, you will be able to:
• Use the Manager Menu in TorontoMLS• Add a new listing from scratch• Add, enhance and delete photos• Upload and manage document attachments• Correct the location of a listing’s marker on a map • Add a listing by cloning an existing listing• Edit a listing• Change a listing’s status• Verify changes to a listing• Search for office listings.
The user guide uses the following conventions:
• The names of objects that require user action, such as menu items, buttons, or function keys on the keyboard are in bold. Example: Click Print View.
• Labels such as names for dialogue boxes, toolbars or fields are capitalized. Example: The Print dialogue box appears.
• If you must press two or more keys simultaneously, they are separated by a + symbol. Example: To close open programs, press the Ctrl + Alt + Del keys on your keyboard.

Notes
2 Add/Edit in Stratus
Throughout the user guide, you will see three types of icons in the left margin:
TIP: The light bulb signals a tip that will help make your task of using Stratus easier.
NOTE: The note signals information that you should be aware of.
MLS® RULES & POLICIES: This logo reminds you of an MLS® rule or policy that may be applicable to the procedure. For a complete set of MLS® Rules and Policies, please refer to the Stratus Home Page - MLS Information Tab. Then, click MLS® Rules and Policies on the Left Side Navigation Toolbar. As with all MLS® Rules and Policies, failure to comply may result in a complaint to Professional Standards.
Although TREB endeavours to ensure the accuracy and timeliness of information, it is not guaranteed. TREB accepts no responsibility for any loss arising from any use or reliance on the information contained herein.
Prerequisites
The procedures in this user guide reflect the appearance and functionality of Add/Edit in Stratus, at the date of publication. You will require an Internet connection and the browsers Internet Explorer, Safari, Firefox, Chrome and Opera. The minimum system requirements for the new interface are:
• Internet Explorer 9• Safari 4• Firefox 6• Chrome - any version.

Chapter 1
A Few Tips Before Getting Started


Notes
Add/Edit in Stratus 5
Chapter 1: A Few Tips Before Getting Started
Important Note on System Usage
Add/Edit in Stratus is for use on PC or Mac computers. It is not designed for use on tablets or smartphones of any kind.
Can I use the browser BACK button?
No. Use the buttons, tabs and Breadcrumb Path within Stratus. Using the browser BACK button can cause errors during your session.
Can anyone access the Add/Edit feature of Stratus?
No. To add and maintain listings using Add/Edit, you must be assigned Add/Edit privileges for your company or firm. See your Broker of Record/Manager for more information.
Can listings from any class be entered?
Yes. You may enter listings that are Residential Freehold, Residential Condo & Other, and Commercial. The data entry screens that appear vary by class and whether the property is being offered for sale or for lease.
Can I use my keyboard to move my cursor around the screen?
Yes. You can use your Tab key to move to the next sequential field.

Chapter 1: A Few Tips Before Getting Started
Notes
6 Add/Edit in Stratus
What should I do if I can’t complete all data entry screens in one session?
You may save your draft at any time. The draft is a temporary document, available only to the user who creates it.
Drafts remain active for 30 calendar days and are purged after that time. If you edit the draft, you will only be able to save it for thirty days from the initial date. Even if you create the listing draft for another Salesperson’s listings, only you can update it. Once you complete the draft and save it as a listing, any user in the office with Add/Edit privileges can edit it.
Does Stratus automatically save my draft?
When you start a new listing, Stratus assigns a draft number and displays it at the bottom of each section of the Listing Detail Edit Form. As you work, Stratus auto-saves the draft once every minute. You must save the draft at the end of your work session to ensure that data entered after the last auto-save is included.
How do I get from one section of the Listing Detail Edit Form to the next?
Click the tab of the desired section on the Top Tab Menu or press the tab key on the keyboard to move to the next field at the top of the next section or scroll down the page using the mouse wheel or down arrow.
What if I don’t know what information goes in a particular data field?
Click on a field label (e.g., Holdover Days) for a popup explanation of the field and to display information about what kind of response you should enter (e.g., a number or text; Y for yes, N for no). Click OK to close popup help.

Notes
Add/Edit in Stratus 7
Chapter 1: A Few Tips Before Getting Started
How do I know what fields are mandatory?
Stratus indicates required fields with a blue asterisk (*). If you submit a listing before completing all required fields, Stratus displays a message for the first empty field, flagging the field in red. Enter the data, then resubmit the listing until Stratus accepts it.
Required fields may be dynamic, based on your entry at other fields. For example, if you select “Sale” (instead of “Lease”), then Taxes are required. (Occasionally, when saving, Stratus prompts for fields that were not marked Required in previous sections. This occurs if a value entered at a later page triggers a required response at an earlier section.)
Required fields vary by class. For Commercial listings, the Type field at the Details tab (specifying Farm, Industrial, Office, etc.) determines most of the listing’s required fields.
Will Stratus pre-fill some of the fields?
Yes. For example, once you enter Area, Municipality, Community, Street #, Street Name and Street Abbreviation, Stratus attempts to locate the property in the Street Dictionary. If a match is found, the system pre-fills fields like Postal Code, Map #, Map Column and Map Row.
Is there a way to look up street names?
Yes. On the Location section in the Street Name field, you may type the beginning characters of the street name and then pause. Stratus fills the drop-down list with options that match the starting character(s) you typed.

Chapter 1: A Few Tips Before Getting Started
Notes
8 Add/Edit in Stratus
Is there a way to look up Area, Municipality, and Community?
Yes. Click Re-Districting Map in the Links menu on the screen’s Left Side Panel. Type the address of the property in the search field, then click Search. The property appears in the map. Ensure that all of the map layers are check marked. Zoom out until you can see the Area, Municipality, and/or Community names.
Does the system flag any errors?
When possible, Stratus prevents incorrect data entry. For example, at price fields, you cannot enter a non-numeric character. Stratus rejects dollar signs and commas, automatically deleting the character as you type it.
At other fields, Stratus flags errors when you tab or click away from a field (for example, you enter an Expiry Date earlier than the Contract Date). Stratus indicates incorrect entries with a red label, requiring that you change the response before proceeding.
Can I select more than one item in a data field?
Some fields, like the Property Features and Other Structures on the Exterior tab, allow selection of more than one feature. Select as many features as allowed (usually two). If you select too many, the system alerts you when you tab away from the field. To select more than one item, click the check box beside each feature.
Is there a specific format for entering dates?
Yes. You can enter dates in the following formats:

Notes
Add/Edit in Stratus 9
Chapter 1: A Few Tips Before Getting Started
What is the difference between Edit Listing Details and Status/Price Change?
Under the Edit Listing tab use Edit Listing Details to:
• make a Price Change or Extension;• modify Remarks, or add an Open House; or• change the listing's property characteristics (e.g., Basement features,
Room descriptions).
Use Status/Price Change to change status to:
• Sold Conditional, Leased Conditional• Sold, Leased• Terminated• Suspended.
Date Format Meaning
09/30/2013 or9/30/13
September 30, 2013
9/30 Assumes current year
T or t Today’s date displays when you Tab to next field
T+1 Tomorrow’s date displays when you Tab to next field
T-1 Yesterday’s date displays when you Tab to next field

Chapter 1: A Few Tips Before Getting Started
Notes
10 Add/Edit in Stratus
Summary
Now that you have read some general tips about Stratus Add/Edit, you are ready to learn how to use the Manager option which is covered in the next chapter.

Chapter 2
Using the Permissions Manager


Notes
Add/Edit in Stratus 13
Chapter 2: Using the Permissions Manager
Setting Add/Edit privileges
In order to access the Permissions Manager, you will need to log on to Stratus.
To set Add/Edit privileges:
1. From the Info Centre, on the Left Side Panel, scroll down to the bottom of the Links menu.
2. Click Permissions Manager.
3. In the Firm Code field, type the code for your firm, then click Find.
Permissions Manager

Chapter 2: Using the Permissions Manager
Notes
14 Add/Edit in Stratus
4. In the list of names that appears, click the name of the person for whom you want to set Add/Edit privileges. The name appears in the Salesperson field to the right.
TIP: The codes in the Add/Edit column are defined as follows:
• None: No access to Add/Edit• Extras-Only Self: Multiple Photos, Virtual Tours, Edit Listing’s
Map Location & Document Attachments for oneself• Extras-Only Office: Multiple Photos, Virtual Tours, Edit Listing’s
Map Location & Document Attachments within the office• Extras-Only Firm: Multiple Photos, Virtual Tours, Edit Listing’s
Map Location & Document Attachments within the firm• Full-Restrict Self: Full access for oneself except for Status
changes, Price changes & Extensions• Full-Restrict Office: Full access for Office except for Status
changes, Price changes & Extensions• Full-Restrict Firm: Full access for Firm except for Status changes,
Price changes & Extensions• Full Self: Full Add/Edit privileges for oneself• Full Office: Full Add/Edit privileges within the office• Full Firm: Full Add/Edit privileges within the firm
Firm Code
Find
Salesperson
Add/Edit

Notes
Add/Edit in Stratus 15
Chapter 2: Using the Permissions Manager
• Click the down arrow beside Add/Edit and select one of the following: None, Extras-Only Self, Extras-Only Office, Extras-Only Firm, Full-Restrict Self, Full-Restrict Office, Full-Restrict Firm, Full Self, Full Office, Full Firm.
5. Click Submit.
6. To change the settings for another Salesperson, repeat steps 4-5.
You have successfully set Add/Edit privileges.
Summary
After completing the material in this chapter, you should be able to:
• set Add/Edit privileges
Now that you know how to use the Permissions Manager, you are ready to learn how to access the training mode, which is covered in the next chapter.

Chapter 2: Using the Permissions Manager
Notes
16 Add/Edit in Stratus

Chapter 3
Enabling Training Mode for Add/Edit

Enabling Training Mode
The training mode allows you to practice adding and editing listings without affecting the actual database.
NOTE: The training mode for Add/Edit applies to the current session only. To use training mode in subsequent sessions, you must enable it each time you log in.
To enable training mode for Add/Edit:
1. From the Info Centre, on the Left Side Panel, scroll down to the bottom of the Links menu.
Left Side Panel
Links Menu Commands
Training Mode (Add/Edit)

Notes
Add/Edit in Stratus 19
Chapter 3: Enabling Training Mode for Add/Edit
TIP: If the Left Side Panel is not visible, it is collapsed. The Links drop-down menu will be visible in the top menu bar to the right of the screen.
2. To access Training Mode, click on the option Training Mode (Add/Edit).
3. The Info Centre appears again, with the Training Mode banner in the bottom right corner of every screen.
Training Mode (Add/Edit)

Chapter 3: Enabling Training Mode for Add/Edit
Notes
20 Add/Edit in Stratus
4. To access Add/Edit in Training Mode, click Add/Edit on the Left Side Panel.
You have successfully enabled the Add/Edit training mode.
Training Mode banner
Add/Edit

Notes
Add/Edit in Stratus 21
Chapter 3: Enabling Training Mode for Add/Edit
Summary
After completing the material in this chapter, you should be able to enable the Add/Edit training mode in Stratus. Now that you know how to enable the training mode, you may go to the next chapter to learn how to add a listing.

Chapter 3: Enabling Training Mode for Add/Edit
Notes
22 Add/Edit in Stratus

Chapter 4
Adding a Listing


Notes
Add/Edit in Stratus 25
Chapter 4: Adding a Listing
Accessing Add Listing
The Add Listing feature of Stratus allows you to add listings of any class (i.e., Residential Freehold, Residential Condo & Other or Commercial) to the MLS® database. The Listing Detail Edit form allows you to input property information quickly and easily. You can complete all fields and make the listing available immediately to MLS® users or save a partially completed listing in Draft form to complete later. Add/Edit automatically saves the partially entered listing as a Draft. Should there be any disruption to the entry process, you may access the listing from the Drafts tab in Add/Edit.
Add/Edit in Stratus works well on Internet Explorer, Safari, Firefox, and Chrome. The minimum browser requirements for optimum performance in the new interface are:
• Internet Explorer 9• Safari 4• Firefox 6• Chrome - any recent version
It is important to note that Add/Edit in Stratus is for use on PC or Mac computers. It is not designed for use on tablets or smartphones of any kind.
TIP: When a listing is first added to the database, the Last Status or LSC is set to New. It remains New until its status is changed, such as Price Change, Extension, Sold, etc.
MLS® RULES & POLICIES: R-365 states that “In all instances when an MLS Listing Agreement commences, the Listing Brokerage shall process the MLS Listing through the MLS System within two (2) TREB business days following the commencement date of the MLS Listing Agreement.”

Chapter 4: Adding a Listing
Notes
26 Add/Edit in Stratus
To add a listing:
1. At the Left Side Panel, select the Add/Edit option.
2. In the Add/Edit Listing Maintenance section, click the Add Listing tab. The Add Listing menu appears.
NOTE: It may take a few moments to load the Add Listing screen.
3. On the Add Listing screen in the Select Property Class section, select a property class, then select whether the property will be For Sale or For Lease. In our example, we chose Residential Freehold and For Sale.
Add/Edit

Notes
Add/Edit in Stratus 27
Chapter 4: Adding a Listing
4. Click Continue. The Location Section, for the type of selected property, appears.
NOTE: Fields marked by a blue asterisk are mandatory.
NOTE: The following sections focus primarily on how to complete mandatory fields for a Residential Freehold property. The requirements for your particular property may vary slightly.
Completing the Location section
TIP: To ensure that you have the correct Area, Municipality and Community, go to Links, click the Re-Districting Map and type in the correct address, Municipality and Province into the Find field. Place check marks beside Municipality and Community and then zoom out to a suitable zoom level.
To complete the Location section:
1. On the Location screen, click the down arrow beside the Area field and select the appropriate area or region. Navigate to the municipality field by pressing Tab or clicking into the list to select the Municipality.
TIP: Click on any field label (e.g., Holdover Days or A/C) for a pop-up explanation of the field and to display information about what kind of response you should enter (e.g., a number or text; Y for yes, N for no). Click OK to close pop-up help.
2. Click the drop-down beside Municipality, select the appropriate municipality, then press Tab. (The list of choices is dependent upon the selection made in Area.) In our example we chose Markham.
NOTE: An odd exception to Municipality is Toronto. The location of a property is a combination of three factors: Area, Municipality, and Community. Toronto is both an area and a municipality. Since Add/Edit requires all three

Chapter 4: Adding a Listing
Notes
28 Add/Edit in Stratus
location factors, something had to be substituted for Municipality and this is the list of old MLS® districts in Toronto.
3. Click the drop-down beside Community, select the appropriate community name, then press Tab. In our example, we chose Markham Village.
4. Click in the Street # field and type the street number of the listing. Our example property is 42 Eastwood Crescent, so we entered the number 42.
TIP: Lots are entered as L#. For example, L17.
5. Click in the Street Name field and type the first few characters of the street name. As you type, a list of possible matching street names automatically appears; click the desired street name.
TIP: Concessions are entered in the format C# Township (e.g., C1 Georgina). Enter c1, or c2, etc., into the Street Name field, then click on the desired concession.
Street #
Street Name
Drop-down List
Notes
Add/Edit in Stratus 29
Chapter 4: Adding a Listing
TIP: If the street name is not in the list and you know the correct spelling of the street name, click and type the name in the Street Name field to override the street dictionary.
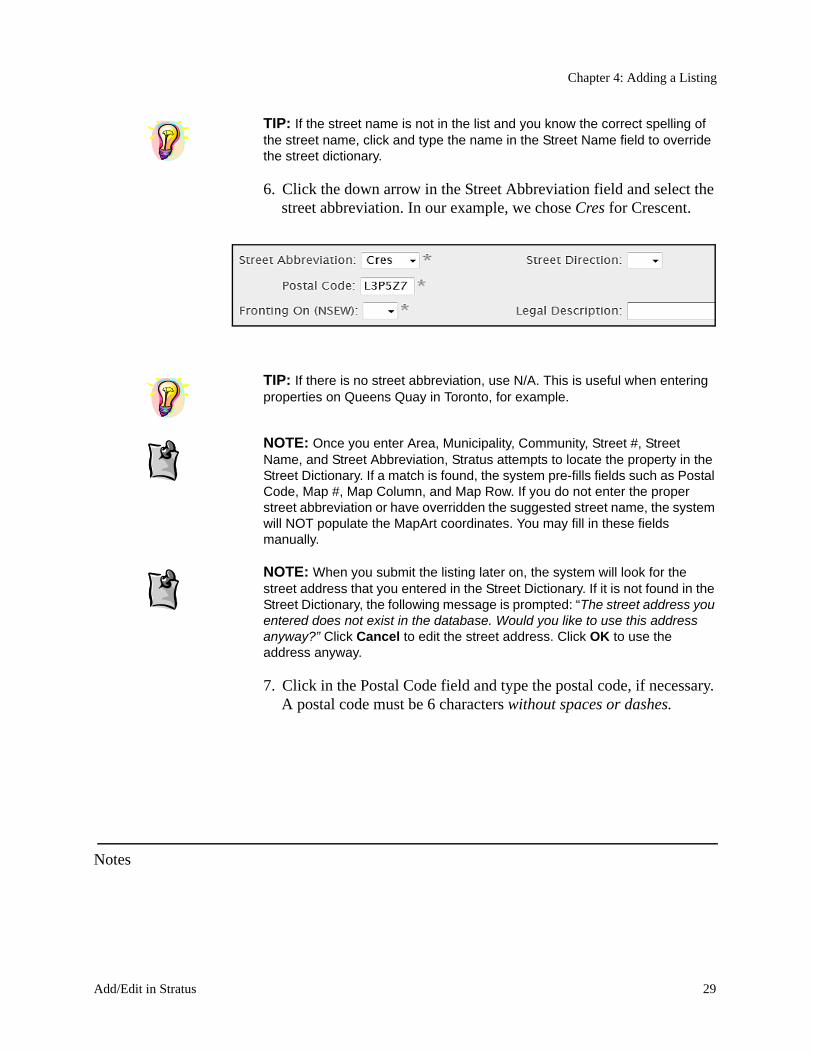
6. Click the down arrow in the Street Abbreviation field and select the street abbreviation. In our example, we chose Cres for Crescent.
TIP: If there is no street abbreviation, use N/A. This is useful when entering properties on Queens Quay in Toronto, for example.
NOTE: Once you enter Area, Municipality, Community, Street #, Street Name, and Street Abbreviation, Stratus attempts to locate the property in the Street Dictionary. If a match is found, the system pre-fills fields such as Postal Code, Map #, Map Column, and Map Row. If you do not enter the proper street abbreviation or have overridden the suggested street name, the system will NOT populate the MapArt coordinates. You may fill in these fields manually.
NOTE: When you submit the listing later on, the system will look for the street address that you entered in the Street Dictionary. If it is not found in the Street Dictionary, the following message is prompted: “The street address you entered does not exist in the database. Would you like to use this address anyway?” Click Cancel to edit the street address. Click OK to use the address anyway.
7. Click in the Postal Code field and type the postal code, if necessary. A postal code must be 6 characters without spaces or dashes.

Chapter 4: Adding a Listing
Notes
30 Add/Edit in Stratus
TIP: If you don’t know the postal code, you can enter a zero (0) and edit the field later.
8. Click the down arrow in the Fronting On (NSEW) field and choose the appropriate direction, for the side of the street where the front door is located.
9. Click into the Legal Description field and complete the field.
NOTE: If you wish to verify the Legal Description of this property, you may use the Public Records link on the left-hand navigation panel and search for this address. Alternatively, you may search for an old listing record for this property in Stratus and click Propertylink PDR on the top of the Broker Full report.
10.If the Lot Front and Lot Depth fields are completed, enter the correct Lot Size Code.
NOTE: The Zoning field for Commercial listings is mandatory. To access zoning information for most municipalities from the TMLS home page, click Commercial Division. On the left sidebar, click Zoning.
11.Click in the Direction/Cross Streets field and type the names of the major cross streets that are close to the property.
TIP: If the MapArt page number, column number and row letter do not automatically appear, type them in correctly from the MapArt book. This will ensure that your listings will be found when those fields are used in searches. The system will map listings based on longitude and latitude, known as geocoding.
12.Complete any other fields as desired.
Lot Size Code

Notes
Add/Edit in Stratus 31
Chapter 4: Adding a Listing
13.If you would like to continue working on this listing later, at any time, click Save Draft. In the prompt that appears, click OK.
NOTE: Stratus saves your draft for 30 days from the initial saving date.
14.To proceed to the next section, scroll down or press Tab in the last field of the current section, or on the Top Tab Menu, click the desired section name.
Completing the Amounts/Dates section
To complete the Amounts/Dates section:
1. Click in the List Price field and enter the asking price without dollar signs or decimals. In our example, we entered 409900 for $409,900.
2. If the property is for sale, click in the Taxes field and enter the most current annual tax amount. In our example we entered 4020.44 for $4,020.44.
Save Draft

Chapter 4: Adding a Listing
Notes
32 Add/Edit in Stratus
3. If the property is for sale: click in the Tax Year field and type the year that the tax amount pertains to.
MLS® RULES & POLICIES: R-390 states that “Where realty taxes are required to appear on TREB’s MLS® System, the amount to be shown shall be the current year’s annual taxes or if not available the prior year’s annual taxes”. Therefore, the only time that tax amounts can be $0 is when the property is brand new and taxes have yet to be assessed on the property.
4. Click in the Contract Date field and type the commencement date from the first page of the listing contract.
TIP: The Contract Date (contract commencement) cannot be greater than today’s date. If, for example, you type T+1 into the Contract Date field (for tomorrow’s date), the field name will turn red to indicate an entry error.
MLS® RULES & POLICIES: R-365 states that “In all instances when an MLS Listing Agreement commences, the Listing Brokerage shall process the MLS Listing through the MLS System within two (2) TREB business days following the commencement date of the MLS Listing Agreement.”
MLS® RULES & POLICIES: R-330 states that “The term of an MLS® Listing shall not be reduced to fewer than sixty (60) days, calculated from the commencement date.”
MLS® RULES & POLICIES: R-325 states that “An MLS® Listing Agreement shall run for a period of not less than sixty (60) days from the commencement date.”
5. Click in the Expiry Date field and type the expiry date.
Expiry Date

Notes
Add/Edit in Stratus 33
Chapter 4: Adding a Listing
6. Click in the Possession Date field and enter the date when a Buyer may take possession of the property.
7. Click in the Holdover Days field and type the number of days for the holdover.
8. Click in the Seller/Landlord Name field and type the name of the seller(s)/landlord(s).
TIP: Use the Mortgage Comments field to add any comments, such as Treat as Clear.
9. If you would like to continue working on this listing later, at any time, click Save Draft. In the prompt that appears, click OK.
Seller/Landlord Name
Mortgage Comments

Chapter 4: Adding a Listing
Notes
34 Add/Edit in Stratus
NOTE: Stratus saves your draft for 30 days from the date first saved.
10.To proceed to the next section, press Tab in the last field of the current section, or on the Top Tab Menu, click the desired section name.
Completing the Exterior section
To complete the Exterior section:
1. Click the down arrow to the right of the Type field and select the property type from the list. In our example, we chose Detached.
NOTE: The Type you choose determines what other fields are required. The following steps discuss the mandatory fields for a Detached property.
Save Draft

Notes
Add/Edit in Stratus 35
Chapter 4: Adding a Listing
TIP: Instead of clicking a field’s down arrow, you can type the first letter of the desired item to get to that section of the alphabetical list.
2. Click the down arrow to the right of the Style field and choose the Style. In our example, we chose 2-Storey.
3. Scroll down the Exterior list and choose one or two types of exterior by clicking on each item to place a check mark in the check box. You can also press the Tab key to move the highlighting from option to option down the list. When the desired choice is highlighted press the Space Bar to select it. To select another item, continue to press the Tab key, then press the Space Bar to place a check mark in the check box of the next desired item. This second method will speed up the data entry process. In our example, we chose Alum Siding and Brick.
4. Click the down arrow beside Garage Type and select the type of garage. In our example, we chose Attached.
5. Click in the Garages Spaces field and enter the number of garage spaces. In our example, we typed 2.
NOTE: For both Freehold and Condo listings the Garage Spaces field refers to the number of parking spaces available in the Garage Type field.
6. Click the down arrow beside Drive and select the type of Drive. In our example, we selected Pvt Double.
Exterior
Drive
Parking Spaces

Chapter 4: Adding a Listing
Notes
36 Add/Edit in Stratus
7. Click in the Parking Spaces field and enter the number of parking spaces. In our example, we entered 4.
MLS® RULES & POLICIES: For Freehold listings (Form 290&296), the “Garage spaces” field refers to the # of parking spaces available in the “Garage tyle” field. The “Parking spaces” field referes to the number of parking spaces available in the “Drive field”.
MLS® RULES & POLICIES: For Condo/Co-op/Co-ownership/Time-Share listings (Form 291&292), the “Garage spaces” field refers to the # of parking spaces available in the “Garage type” field. “Parking/Drive spaces” field refers to the # of parking spaces available in the “Parking/Drive field”.
For both types there is no field that refers to the total number of parking spaces in both the garage and parking/drive spaces.
8. Click the down arrow beside the Pool field and select the appropriate item. In our example, we selected None.
9. Click the down arrow beside the Water field and select the type of water source. In our example, we selected Municipal.
10.Click the down arrow beside the Sewers field and select the type of sewer. In our example, we selected Sewers.
11.Click the down arrow beside Special Designation and select the appropriate item. In our example, we selected Unknown.
12.Complete any of the remaining optional fields as desired.
Sewers
Other Structures

Notes
Add/Edit in Stratus 37
Chapter 4: Adding a Listing
13.If you would like to continue working on this listing later, at any time, click Save Draft. In the prompt that appears, click OK.
NOTE: Stratus saves your draft for 30 days.
14.To proceed to the next section, press the tab key in the last field of the current section, or on the Top Tab Menu, click the desired section name.
Completing the Interior section
NOTE: The Type you chose (on the Exterior worksheet) affects what other fields are required. The following steps discuss the mandatory fields for a Detached property.
To complete the Interior section:
1. Click in the Rooms field and type the number of rooms (above grade).
Save Draft

Chapter 4: Adding a Listing
Notes
38 Add/Edit in Stratus
2. If desired, click in the Rooms + field, type the number of rooms below grade.
3. Click in the Bedrooms field and type the number of rooms (above grade).
4. If desired, click in the Bedrooms + field, type the number of rooms below grade.
5. Click in the Kitchens field and type the number of kitchens.
TIP: If the property has kitchens below grade, use the Kitchens+ field.
6. Click in the Washrooms field and type the number of washrooms (of one kind, e.g., 4-piece).
7. Click in the corresponding # Pieces field and type how many pieces the washroom(s) has/have. If the washrooms are 4-piece washrooms, then type 4.
8. Click in the corresponding Level field and select the level on which the washroom is located. If a washrooms is on the second floor, select, 2nd.
9. Complete the other Washroom fields, if desired.

Notes
Add/Edit in Stratus 39
Chapter 4: Adding a Listing
10.Click the down arrow beside the Family Room field and choose either Y (yes) are N (no). The property in our example has no family room, so we chose N.
11.Using the down arrow, scroll down the list in the Basement field to select the type of basement. In our example, we selected both Finished and Separate Entrance.
12.Click the down arrow beside the Fireplace/Stove field to select Y (yes) or N (no). In our example, the property has a fireplace, so we chose Y.
13.Click the down arrow beside the Heat Source field and choose the type of heat source. In our example, we chose Gas.
14.Click the down arrow beside the Heat Type field and choose the type of heat. In our example, we chose Forced Air.
15.Click the down arrow beside the A/C field to select the correct option. In our example, the property has central air, so we chose Central Air.
16.Complete any remaining optional fields as desired.
17.If you would like to continue working on this listing later, at any time, click Save Draft. In the prompt that appears, click OK.

Chapter 4: Adding a Listing
Notes
40 Add/Edit in Stratus
18.To proceed to the next section, press Tab in the last field of the current section, or, on the Top Tab Menu, click the desired section tab.
Completing the Rooms/Details section
To complete the Rooms/Details section:
1. In the Room 1 row, click the down arrow in the Level column and select the level that the room is on. In our first example, we chose Ground.
TIP: Instead of clicking a field’s down arrow, you can type the first letter of the desired item to get to that section of the alphabetical list. For example, once we were in the Level field, we typed “g” to take us to the items that begin with the letter “g”. If there is more than one item beginning with the same letter and you need to go further down the list, simply press the letter again until you get to the desired item. In some cases it may be quicker to

Notes
Add/Edit in Stratus 41
Chapter 4: Adding a Listing
type all the first letters of the item to access it. Finally, you may use the up or down arrow cursor keys to move through the list.
2. In the same row, click the down arrow in the Room column and select the type of room. In our first example, we chose Living.
3. In the same row, click in the Length field and type the length of the room in metres.
4. In the same row, click in the Width field and type the width of the room in metres.
5. In the same row, click the down arrow in the Description 1 field and select a description.
6. Repeat the preceding step for the fields Description 2 and Description 3.
7. For any other rooms, repeat the above steps.
8. If you would like to continue working on this listing later, at any time, click Save Draft. In the prompt that appears, click OK.

Chapter 4: Adding a Listing
Notes
42 Add/Edit in Stratus
9. To proceed to the next section, press Tab in the last field of the current section, or, on the Top Tab Menu, click the desired section tab.
Completing the Comments section
To complete the Comments section:
1. If desired, go to the Remarks for Clients field and enter information that you would like a client to see.
NOTE: The Remarks for Clients field allows up to a maximum of 463 characters. These comments appear in Broker Full, Client Full and Flyer report formats. The comments are also seen by the public when they view the listing on REALTOR.ca and other websites.

Notes
Add/Edit in Stratus 43
Chapter 4: Adding a Listing
2. If desired, go to the Extras field and enter any items that are included with the property.
NOTE: The Extras field allows up to a maximum of 240 characters. Extras appear in the Broker Full and Client Full Reports.They are also viewed by the public on REALTOR.ca and other websites.
3. If desired, go to the Remarks for Brokerages field and enter any information for Brokers.
NOTE: The Remarks for Brokerages field allows up to a maximum of 280 characters. Remarks for Brokers appear in the Broker Full report. Remarks for Brokerages are NOT seen in Client reports and are NOT published on REALTOR.ca or other websites.
4. If you would like to continue working on this listing later, click Save Draft at any time. In the prompt that appears, click OK.
5. To proceed to the next section, press Tab in the last field of the current section, or, on the Top Tab Menu, click the desired section tab.

Chapter 4: Adding a Listing
Notes
44 Add/Edit in Stratus
Completing the Other section
To complete the Other section:
1. If the Brokerage name is not pre-filled, click in the first Listing Brokerage field and begin entering the name of the Listing Brokerage and then press the Tab key on your keyboard. A list of Brokerages that begin with the text you entered populates, in the second Listing Brokerage field.
2. In the second Listing Brokerage field, click the down arrow and select the Listing Brokerage from the list.
3. Click in the List Brokerage Phone# field and enter the phone number.
NOTE: Enter all phone numbers using dashes to separate the sections. For example, type 416-222-2222.
4. Click in the List Brokerage Fax# field and enter the fax number.

Notes
Add/Edit in Stratus 45
Chapter 4: Adding a Listing
5. Click the down arrow beside the Salesperson 1 field and select the Salesperson from the list. This step will not be necessary if you are logged in as the Salesperson.
6. Click in the Commission Co-op Brokerage field and enter the commission percentage that the Co-operating Brokerage will receive.
MLS® RULES & POLICIES: R-715 states that “HST shall be in addition to the amount of commission payable unless otherwise noted in the “Commission to Co-operating Brokerage” field.”
Furthermore, R-720 states that “If HST applies to a sale then commission to the Co-operating Brokerage shall be based on the sale price less HST, unless otherwise stated on TREB’s MLS® System.”
MLS® RULES & POLICIES: R-725 states that “For a commercial lease or sub-lease transaction, the commission offered to the Co-operating Brokerage shall indicate whether commission is calculated on gross, semi-gross or net basis, and whether based on usable or rentable area.”
7. Select whether a Seller Property Information Statement is on file.
8. Click the down arrow beside the Permission To Advertise field and select either Y for yes or N for no.
9. Click the down arrow beside Distribute to Internet Portals and select either Y for yes or N for no.
Chapter 4: Adding a Listing
Notes
46 Add/Edit in Stratus
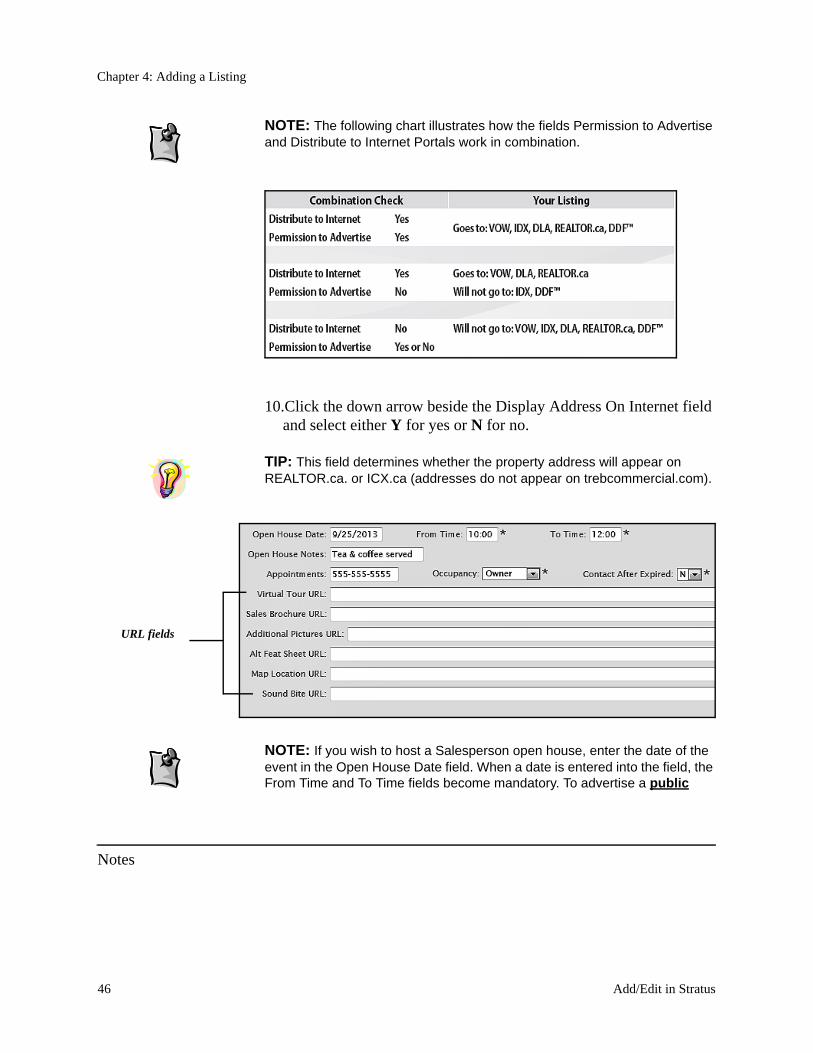
NOTE: The following chart illustrates how the fields Permission to Advertise and Distribute to Internet Portals work in combination.
10.Click the down arrow beside the Display Address On Internet field and select either Y for yes or N for no.
TIP: This field determines whether the property address will appear on REALTOR.ca. or ICX.ca (addresses do not appear on trebcommercial.com).
NOTE: If you wish to host a Salesperson open house, enter the date of the event in the Open House Date field. When a date is entered into the field, the From Time and To Time fields become mandatory. To advertise a public
URL fields

Notes
Add/Edit in Stratus 47
Chapter 4: Adding a Listing
open house on REALTOR.ca or www.TorontoReal EstateBoard.com, you must add the open house date into Manage My Profile.
NOTE: Brokerages should confirm appointments for showings or inspections through the Co-operating Brokerage office as opposed to the Co-operating Salesperson’s cell phone. Confirming appointments directly to the Salesperson’s cell phone does not create a paper trail or a record of the appointment.
11.Click the down arrow beside the Occupancy field and select the type of occupancy.
12.Click the down arrow beside Contact After Expired and select Y for yes or N for no.
13.Enter the URLs for your Virtual Tours, etc., if available. These fields may need to be completed at a later time. The URLs are for files stored on various Internet servers (e.g., virtual tours, additional photos, alternate feature sheets, etc.). All six of these fields are sent to REALTOR.ca and ICX.ca for display to the public. The Virtual Tour URL is the only one which appears in Stratus.
a. The Virtual Tour URL is the website address of the virtual tour for the property. It is usually sent to you by the virtual tour provider/host. Using this field will place a virtual tour button on the listing in Stratus as well as a link within REALTOR.ca and ICX.ca.
\ MLS® RULES & POLICIES: R-106 states that “Information published on TREB’s MLS® System and Virtual Tour shall contain information pertaining to the property to which the MLS® Listing Agreement pertains and shall not include: (a) any internet links, e-mail links or references to any internet links; or (b) any information that promotes goods or services. Furthermore, a Virtual Tour on TREB’s MLS® System shall not include any information regarding any identification of the Listing Brokerage, the Listing Broker/Salesperson or the Virtual Tour Company.”
b. Sales Brochure URL is the website address of a feature sheet for the property that you wish to display in REALTOR.ca or

Chapter 4: Adding a Listing
Notes
48 Add/Edit in Stratus
ICX.ca. The brochure must be stored on an Internet server and its URL is typed into this field. This link does not appear on Stratus listings. Remember to adhere to REBBA 2002 advertising guidelines when creating the brochure.
c. Additional Pictures URL is a link to additional photos of the property that you wish to display in REALTOR.ca or ICX.ca. The photos must be stored on an Internet server, and their URL is what should be typed into this field. This link does not appear on Stratus listings. Remember to adhere to the rules and policies governing photos.
MLS® RULES & POLICIES: R-385 states that “Photographs or other graphic images of a property, with wording or other embellishments not related to the property, shall not be accepted for an MLS® Listing to be serviced through TREB’s MLS® System.”
d. Alt Feat Sheet URL is essentially the URL of a website that you’ve set up for the property, rather than a feature sheet. Like the other five links, it would be stored on an Internet server and its address is typed into this field. Unlike the other five fields it doesn’t open within REALTOR.ca or ICX.ca; it opens a separate site. Also, unlike the other five fields, it can be branded. This link does not appear on Stratus listings.
e. Map Location is the map URL for the address. You can map the property in Google Maps, save the link, and paste it into the field; or in Bing maps, you can click Share, copy the URL, and paste into this field. This link does not appear on Stratus listings.
f. Sound Bite URL is for a link to a verbal description of the property. It would have to be stored on a Web server and would be a link that would play within REALTOR.ca and ICX.ca. This link does not appear on Stratus listings.

Notes
Add/Edit in Stratus 49
Chapter 4: Adding a Listing
TIP: If you would like to continue working on this listing later, at any time, click Save Draft, then OK. Stratus saves your draft for 30 days.
Completing the Photos Section
Stratus allows you to upload up to 20 photos including the primary exterior photo, enhance them, and reorder them. It is recommended that you upload images that are 100KB each or less. For best results, take all the photos using landscape orientation. After adding photos, editing or rearranging them, it is a good idea to click Save Draft.
MLS® RULES & POLICIES: R-385 states that “Photographs or other graphic images of a property, with wording or other embellishments not related to the property, shall not be accepted for an MLS® Listing to be serviced through TREB’s MLS® System.”
Adding an Exterior Image using iLOOKABOUT
With the introduction of iLOOKABOUT in New Stratus, you may select a streetview photo taken by iLOOKABOUT’s fleet of roaming vehicles. Each property in the library can be manipulated and edited before adding it to your listing in Stratus. However, if you do not wish to use the iLOOKABOUT photo library or a photo has not been taken, you may simply upload your own image from your computer’s hard drive.
To locate an exterior image from iLOOKABOUT:

Chapter 4: Adding a Listing
Notes
50 Add/Edit in Stratus
1. On the Photos section of the listing detail edit form, click Photo Library in the Action toolbar.
2. The iLOOKABOUT application window opens. The iLOOKABOUT window contains two sections: the Tool panel on the left and the Viewports to the right. You will also see anywhere from two to six Viewports.
Photo Library
Photos

Notes
Add/Edit in Stratus 51
Chapter 4: Adding a Listing
Tool Panel
Search Single Property
Search
Viewports (you will see between 2-6)

Chapter 4: Adding a Listing
Notes
52 Add/Edit in Stratus
3. In the Search Single Property panel, click the Address tab.
4. Select the correct province from the Province drop-down.
5. Type the address of the property slowly. As you are typing, a list of possible matches appears. Select the correct address from the list.
Address tab
Province
Address
Search

Notes
Add/Edit in Stratus 53
Chapter 4: Adding a Listing
6. Click the Search button to the right of the address you typed. The Viewports update to display the StreetScape and Map views of the subject property.
7. If desired, click X at the top right corner of the Map Viewport.
TIP: To change a Viewport to StreetScape, click the StreetScape Viewport icon on the top left corner of the existing Viewport.
8. If desired, adjust the photo’s angle by clicking and dragging the photo to the left or right.
9. If desired, adjust the photo’s clarity by modifying the zoom level. To do so, click the zoom+ or zoom- buttons on either end of the zoom scale.
StreetScape Viewport
Map Viewport
Close Map Viewport
StreetScape Viewport icon

Chapter 4: Adding a Listing
Notes
54 Add/Edit in Stratus
10. Click the Save to Stratus button on the top right corner of the Viewport.
11. Click Yes to confirm that you want to use the photo for your listing in Stratus.
Zoom scale
Arrows to adjust angle
Save to Stratus

Notes
Add/Edit in Stratus 55
Chapter 4: Adding a Listing
12.The photo is uploaded to your listing and you are returned to Add/Edit.
NOTE: If you are unable to locate an exterior image for your listing from the iLOOKABOUT library, you may either upload your own photo or use an older photo from TREB’s archived photo library. To use an old photo, click the Single Best Photo View icon located on the top right corner of the Viewport. Several images of the property appear. Select the photo you wish to use, then click the Save to Stratus icon on the top right corner of the Viewport.
Uploading Photos
You may upload up to 20 photos per listing in Stratus. However, here are some tips for you to observe before doing so.
TIP ABOUT ASPECT RATIO: Pictures must maintain a 4:3 (landscape) aspect ratio; otherwise, they appear stretched. A common mistake is to hold the camera sideways and take a portrait shot. Ideally, when you divide the picture’s width by its height, you should get 1.33. Common examples include

Chapter 4: Adding a Listing
Notes
56 Add/Edit in Stratus
640 x 480, 800 x 600, 1024 x 768 (pixels). Cameras are often set to this default ratio, but it’s best to check the settings.
TIP ABOUT IDEAL IMAGE SIZE: Do you have to use photos that are 640 x 480 pixels? No. You can upload bigger photos but avoid smaller than 640 x 480. Stratus photos are displayed in various sizes with 640 x 480 being the biggest (obtained when you click to enlarge a photo from the photo gallery).
TIP ABOUT FILE SIZE: The limitation of 100KB for each photo is set to allow good performance on the Internet (nightly file transference to REALTOR.ca, etc.). All photos are therefore automatically compressed using a moderate level of JPEG compression.
TIP ABOUT BATCH PHOTO RESIZING SOFTWARE: In the event that you have a lot of pictures that you want to resize, there’s no need to do them one at a time. There are free conversion programs available online. PC World Magazine rates FastStone as a good choice that is fast and easy to use.
MLS® RULES & POLICIES: R-431 states that “Members shall not use any marketing materials prepared by or created for another Member, including but not limited to, photographs, floor plans, virtual tours, personal marketing materials or feature sheets without the written consent of that Member who created or purchased the material.”
To add photos:
1. In the Photos section, click Upload on the Action Toolbar at the top of the page.
Upload
Photos

Notes
Add/Edit in Stratus 57
Chapter 4: Adding a Listing
2. In the Upload Photos dialogue box, click Browse.
3. In the Select Files to upload dialogue box, select the primary exterior photo first and click Open. Then click Browse again to select the remaining eight photos. Hold down the Control key on your keyboard as you select the eight additional photos.
NOTE: In Stratus, photos appear in the order that they are added or reordered.
4. Click Open to send the files to the Upload Photos dialogue box.
Browse

Chapter 4: Adding a Listing
Notes
58 Add/Edit in Stratus
5. Type the name of the room and its outstanding features in the Description field. You may use up to 80 characters for this description.
6. Click Upload to view the photo gallery.
Click to add description
Upload
Cancel

Notes
Add/Edit in Stratus 59
Chapter 4: Adding a Listing
Correcting photos with an asterisk
When a listing is submitted, the system will automatically scale and crop the photos to system-standard dimensions. When more than 5% of the photo will be cropped, an asterisk appears on the photo, allowing you to manually crop these photos.
Asterisk
Chapter 4: Adding a Listing
Notes
60 Add/Edit in Stratus
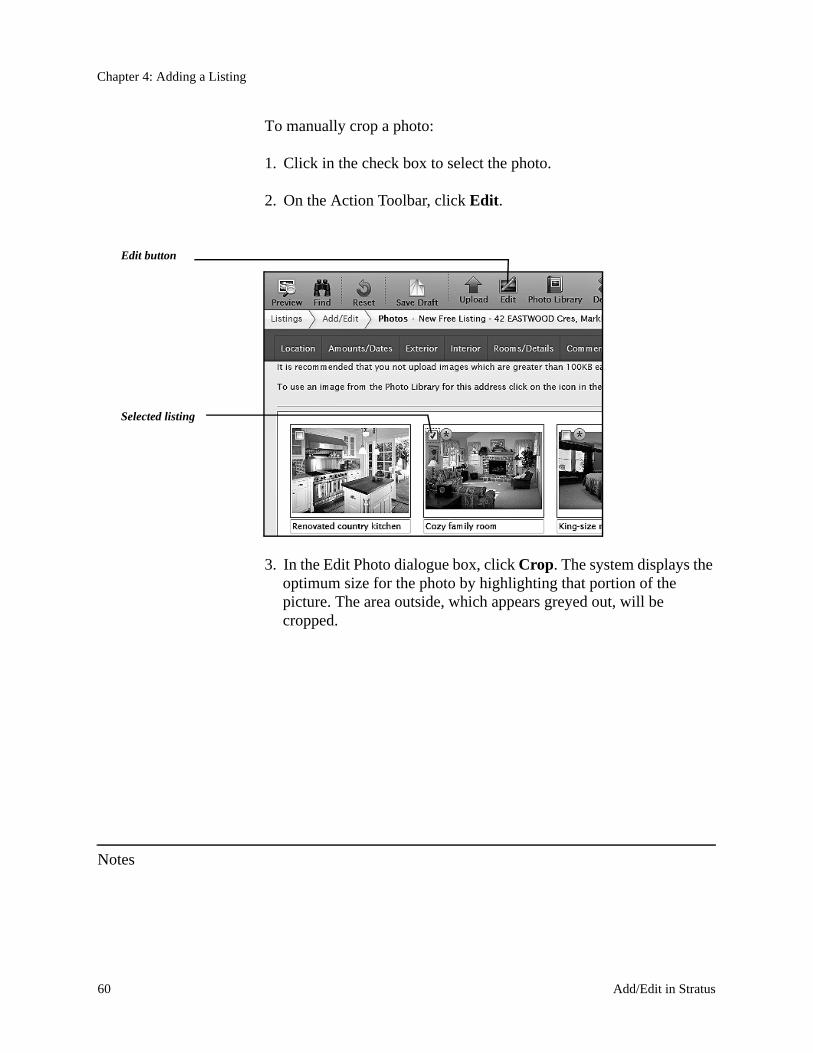
To manually crop a photo:
1. Click in the check box to select the photo.
2. On the Action Toolbar, click Edit.
3. In the Edit Photo dialogue box, click Crop. The system displays the optimum size for the photo by highlighting that portion of the picture. The area outside, which appears greyed out, will be cropped.
Edit button
Selected listing

Notes
Add/Edit in Stratus 61
Chapter 4: Adding a Listing
4. Modify what portion of the picture is to be cropped by dragging the highlighted portion to the left or right (up or down, depending on the size of the original photo).
5. Click Apply to complete the crop action.
6. Click Save. The photo reappears in the photo work area. The asterisk will have been removed and the photo resized.
Crop
Highlighted portion
Greyed out portion
Asterisk removed

Chapter 4: Adding a Listing
Notes
62 Add/Edit in Stratus
Editing a photo
Use the Edit photo option to enhance a listing’s photos. You can darken, brighten, change contrast, rotate, delete, resize and crop photos. Use the navigation arrows, Previous and Next to move between photos.
To edit a photo:
1. Click in the check box to select the photo.
2. On the Action Toolbar, click Edit. The Edit Photo dialogue box opens.
CancelSave

Notes
Add/Edit in Stratus 63
Chapter 4: Adding a Listing
3. On the Edit Photo Action Toolbar, click the desired action.
4. To change the brightness:
a. In the Edit Photo dialogue box click Darken or Brighten one time and review the results.
b. If additional correction is required, repeat step 1 above, as needed.
5. To change the Contrast:
a. Click “- Contrast” to decrease the contrast between the photos light and dark colours.
b. Click “+ Contrast” to increase the contrast between the photos light and dark colours.
TIP: Avoid over-correction by clicking the button once and reviewing the results before repeating.
6. To rotate the selected photo:
a. There are two rotate buttons on the Action Toolbar. Click the desired direction to rotate the photo clockwise or counter-clockwise.
NOTE: To Crop a photo, see “Correcting photos with an asterisk” on page 59.
7. Click Save at the bottom of the Edit Photo dialogue box.

Chapter 4: Adding a Listing
Notes
64 Add/Edit in Stratus
Deleting a photo
To delete a photo:
1. Click in the check box to select the photo.
2. Click Delete on the Action Toolbar.
3. Click Save at the bottom of the dialogue box.
NOTE: The system saves changes automatically in the photos work area.
Changing the order of the photos
To move a photo:
1. Click and drag the photo you wish to move to its desired position.
2. Release the mouse button to drop the photo at the new location.
3. Drag and drop additional photos as needed.
Completing the Attachments section
Using the Attachments feature, listing documents such as Floor Plans, Seller Property Information Statements, Financials, Feature Sheets, Environmentals, Schedules, Disclosures and Other Property Information can be attached to a listing. For Listing Salespeople, the repetitive task of faxing additional documents to inquiring Salespeople will be eliminated by uploading them right into Stratus Add/Edit.
TIP: The file types that can be uploaded include PDF, JPG, PNG, GIF (non-animated), Microsoft Word Documents (DOC or DOCX), RTF, or TXT. PDF

Notes
Add/Edit in Stratus 65
Chapter 4: Adding a Listing
Schedules should not come from WEBForms™ as they could be altered by other Salespeople.
Each document has a maximum size limit of 750KB. Files that are larger than that will not upload properly.
NOTE: The Fax Attachments feature has been discontinued.
At the Attachments section of the Listing Detail Edit form, you can upload up to eight attachments and preview, describe, and delete them.
To attach documents to the listing:
1. In the Attachments section, click Upload.
2. In the Upload Attachments dialogue box, click Browse.
3. In the Select Files to Upload dialogue box, hold down the control key on the keyboard and click on the desired files to attach.
Upload
Attachments
Browse

Chapter 4: Adding a Listing
Notes
66 Add/Edit in Stratus
4. Click Open.
5. In the Upload Attachments dialogue box click on the Description drop-down menu for each attachment.
6. Click on the desired description.
7. When finished with all the attachments, click Upload.
8. To view one of the attachments, double-click the icon in the attachments gallery.
Description Drop-Down menu

Notes
Add/Edit in Stratus 67
Chapter 4: Adding a Listing
9. To delete an attachment, click in the check box to select it, then click Delete on the Action Toolbar.
Completing the Map Section
At the Map section of the listing detail edit form, you can add or change latitude and longitude values for a listed property. You can use the map controls to locate the listing or you can use Locate by Address.
Delete
Check box
Attachments Gallery

Chapter 4: Adding a Listing
Notes
68 Add/Edit in Stratus
To Locate By Address:
1. Click Locate By Address on the Action bar.
2. In the Enter the address field, ensure that the correct address, abbreviation, area, municipality, and province (ON for Ontario) is entered.
Locate By Address
Map Controls

Notes
Add/Edit in Stratus 69
Chapter 4: Adding a Listing
3. Click OK. The marker on the map moves to the correct location.
NOTE: The system saves changes automatically in the map work area.
You may also move the listing marker on the map to change your location. Move and zoom your way to the correct location. You can locate the desired location using Road or Aerial view. To change the map location, hold down the Control key while you click the desired location on the map. The listing map marker will move to the desired location.
NOTE: The system saves changes automatically in the Map work area.
Instructions
Listing map marker
Chapter 4: Adding a Listing
Notes
70 Add/Edit in Stratus
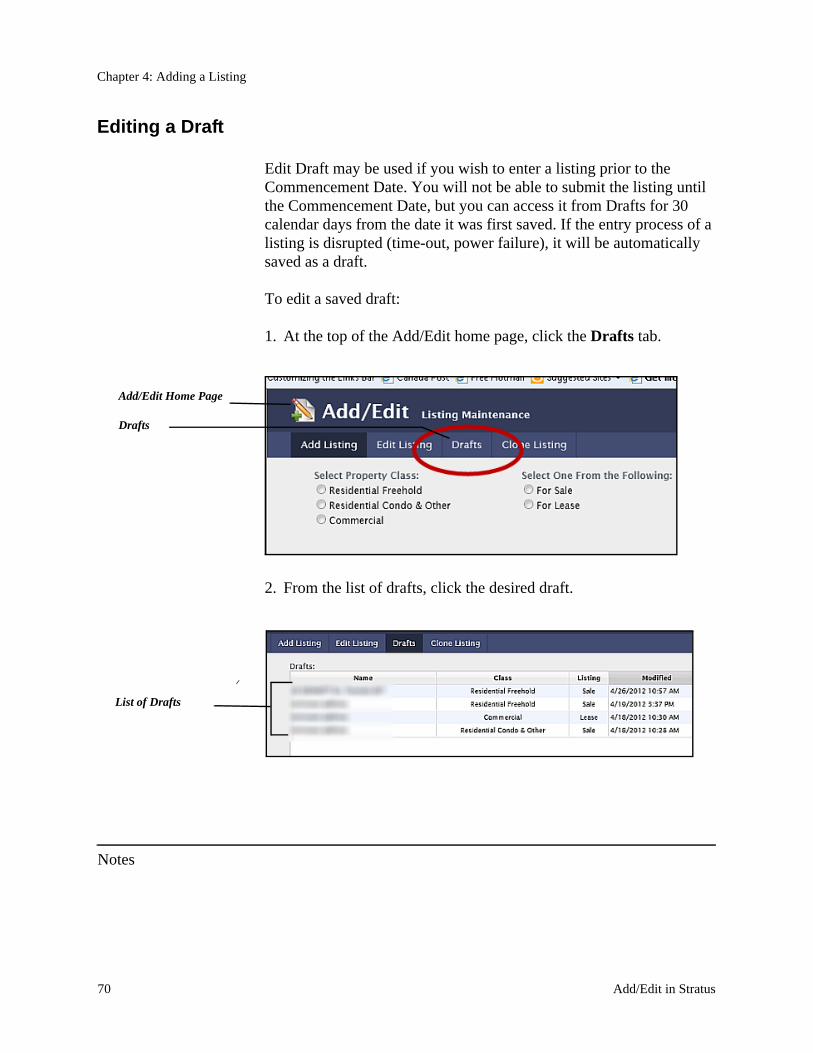
Editing a Draft
Edit Draft may be used if you wish to enter a listing prior to the Commencement Date. You will not be able to submit the listing until the Commencement Date, but you can access it from Drafts for 30 calendar days from the date it was first saved. If the entry process of a listing is disrupted (time-out, power failure), it will be automatically saved as a draft.
To edit a saved draft:
1. At the top of the Add/Edit home page, click the Drafts tab.
2. From the list of drafts, click the desired draft.
Add/Edit Home Page
Drafts
List of Drafts

Notes
Add/Edit in Stratus 71
Chapter 4: Adding a Listing
3. Click any section tab, then add or change the response at any field. (For more information on how to complete each worksheet page, see the appropriate section starting on page 27.)
TIP: If the draft is incomplete and you need to add information to it later, click Save Draft. Stratus confirms that the draft is saved. Click OK. Stratus saves your draft for 30 calendar days from the first time it is saved.
If the draft is accurate and complete, go to page 73 to learn how to submit it.
Deleting a saved draft
To delete a saved draft:
1. At the top of the Add/Edit home page, click the Drafts tab.
2. Click to select the desired draft.
3. With the draft selected, click Delete.
Select the Draft

Chapter 4: Adding a Listing
Notes
72 Add/Edit in Stratus
4. To confirm the deletion, click Delete.
Selected Draft
Delete

Notes
Add/Edit in Stratus 73
Chapter 4: Adding a Listing
Submitting the Listing
Before submitting the listing, ensure that the information is complete and accurate by following the four-step error checking system below:
• Check that the address appears as on the signed contract.• Check the list price and taxes, ensuring that there are not too many
zeros. Compare these numbers to the signed contract.• Check that the room dimensions are correct.• Check for any typing errors in the Remarks sections.
To submit the listing once the Listing Detail Edit Form is accurate and complete:
1. At the bottom of the form, below the Map Section, click Submit.
2. If there are errors, such as required fields being left blank, the fields will be listed in red in the order in which they appear starting from the beginning of the Listing Detail Edit Form to the end. Click the first red error message to go to that field.
3. Enter the correct information into each field, then press tab.
4. In each Section, click into the fields with red labels (those with errors) and enter the correct or required information.
List of errors

Chapter 4: Adding a Listing
Notes
74 Add/Edit in Stratus
5. Ensure that all fields are completed or corrected and that all red error messages are removed; then, at the bottom of the Edit Form, click Submit. The Confirm Street Address dialogue box appears.
6. Click OK to confirm the address. Click Cancel to edit the address. The Add/Edit Complete dialogue box appears.

Notes
Add/Edit in Stratus 75
Chapter 4: Adding a Listing
The Add/Edit Complete dialogue box offers the opportunity to edit or add to the sections that were in the Listing Detail Edit Form, such as the Photos and Attachments options. Click on Virtual Tours to order a virtual tour or extra photos.
To order virtual tours:
1. Select Virtual Tours, then click Continue. The Virtual Tours dialogue box opens.

Chapter 4: Adding a Listing
Notes
76 Add/Edit in Stratus
2. Select Members Plus to view a list of vendors providing virtual tour services.
To finalize the listing from the Add/Edit Complete dialogue box follow these steps:

Notes
Add/Edit in Stratus 77
Chapter 4: Adding a Listing
1. Select Listing Detail View, then click Continue.
2. Print the listing, if desired.
3. Record the MLS® listing number, if desired.
You have successfully submitted the listing.
NOTE: Ontario Regulation 579/05 made under the Real Estate and Business Brokers Act, 2002 in the section regarding Educational Requirements, Insurance, Records, and Other Matters with respect to the Retention time for records states that “A brokerage shall retain for at least six years all
Listing Detail View
Continue
Exit

Chapter 4: Adding a Listing
Notes
78 Add/Edit in Stratus
documents and records that it is required to make under the Act or the regulations.”
Summary
After completing the material in this chapter, you should be able to:
• access the Listing Detail Edit Form sections• complete the Location section• complete the Amounts/Dates section• complete the Exterior section• complete the Interior section• complete the Rooms/Details section• complete the Comments section• complete the Other section• complete the Photos section• complete the Attachments section• complete the Map section• edit a saved draft• submit the listing.
Now that you know how to add a listing to the database, you are ready to go to the next chapter, which describes how to clone a listing.

Chapter 5
Cloning an Existing Listing


Notes
Add/Edit in Stratus 81
Chapter 5: Cloning an Existing Listing
If a property was previously listed, it can be cloned. Cloning allows you to avoid retyping unchanged property information from a previous listing. Both available and unavailable listings can be cloned.
Stratus copies information from the existing listing to the Listing Detail Edit form for the new listing. Carefully review all copied fields, changing information where appropriate. Add/Edit in Stratus does not copy listing-specific fields (such as List Price, Contract Date, Expiry Date, Listing Brokerage and Salesperson, etc.).
To clone a listing:
1. From the Stratus home page, click Add/Edit. The Add/Edit landing page appears.
2. On the Top Tab Menu, click Clone Listing.
3. In the MLS# field, enter the MLS# of the existing listing, then click Open.
Clone Listing

Chapter 5: Cloning an Existing Listing
Notes
82 Add/Edit in Stratus
4. The listing will display. Confirm that it is the desired listing, then click Continue.
5. Stratus creates a new Listing Detail Edit form with data filled from the existing listing. Review entries on all sections and make required changes. (For information on each type of section, see page 7.)
6. Enter data into empty fields.
MLS#

Notes
Add/Edit in Stratus 83
Chapter 5: Cloning an Existing Listing
7. If the Edit form is incomplete and you need to add information to it in the future, click Save Draft.
NOTE: Many changes to Stratus have been made since its initial release. Listings from the past may not completely reflect the nature of the property due to old fields disappearing and being amalgamated into others. Always review the listing before submitting to guarantee its accuracy and that it describes the property correctly.
TIP: Stratus saves your draft up to 30 days.
NOTE: Before proceeding to the next step, you should check all fields for possible errors. Here are some suggestions on error checking:
• Are all prices and addresses (e.g., unit number), the same as in the new listing contract?
• Is the legal description correct?
• Are the dimensions of all rooms correct? Consider that the room dimensions could have changed since the last time the property was listed, or that they were previously entered incorrectly. Compare the room dimensions with those in the new data sheets.
• Look for any possible differences between the listing you are cloning and the listing for which you now have a signed contract. If you miss any important difference, you may be held legally responsible.
8. When the Edit form is accurate and complete, click Submit.
9. If desired, record the listing number.
You have successfully cloned an existing listing.

Chapter 5: Cloning an Existing Listing
Notes
84 Add/Edit in Stratus
Summary
After completing the material in this chapter, you should be able to clone an existing listing. Now that you know how to clone listings, you are ready to go to the next chapter on how to edit a listing.

Chapter 6
Editing a Listing

Notes
Add/Edit in Stratus 87
Chapter 6: Editing a Listing
Accessing Edit Listing Details
Use Edit Listing to make corrections or update remarks in a listing. Use Edit Listing to:
• make a Price Change or Extension;• modify or add text to the Remarks or Extras fields, or add an Open
House; or• change the listing's property characteristics (e.g., Basement features,
Room descriptions).
Editing and managing document attachments as well as editing photos can be done in Stratus. You may also use the Map Section to edit the listing’s map location. Please note, however, that MLS® Rules prevent the editing of some fields (Street #, Street Name, Street Abbreviation, Street Direction, Apt/Unit, Contract Date, and Listing Brokerage).
MLS® RULES & POLICIES: If you would like to suppress an edit (such as a price correction) from appearing in the Listing’s History while it is still active, you may request a special edit by the MLS Processing Department. For a copy of this form, please see “Active MLS® listing that requires special edit by MLS® processing” on page 124.
Furthermore, when you change a price or extend a listing, remember that the Form 240 Amendment to Listing Agreement on page 125, signed by the Seller, must go on file with the listing.
MLS® RULES & POLICIES: As of September 1, 2014, any requests for changes to Listings by a Listing Brokerage, after seven (7) business days from the date the property has been reported sold firm or expired, a fee of $50 plus applicable taxes will be charged for each MLS® Listing Number that requires the change. The exceptions to this Policy would be changes to the initial sold price or a change to the Closing Date. Please understand that it will be the Listing Brokerage that will be invoiced for these changes. For a copy of

Chapter 6: Editing a Listing
Notes
88 Add/Edit in Stratus
the necessary form, please see “Change/Correction to MLS® Listing that has been reported Sold” on page 126.
Reruns occur in the following three ways:
a. Modifying mandatory fields: Any changes to mandatory fields will appear in the Notice Pages search and result in a transaction record in the listing’s history.
b. Modifying non-mandatory fields: Any changes to non-mandatory fields will appear in the Notice Pages search and result in a transaction record in the listing’s history.
c. No modifications: If you don’t make any field change, the transaction will appear in the listing’s history.
Editing a Listing
NOTE: Once you click Submit, changes are being processed and clicking the browser’s BACK button will not undo the changes and can create errors in the data. If you have submitted an edited listing and then wish to go back to make changes, do NOT use the browser BACK button. Instead, access the listing again in the Edit Listing tab from the Add/Edit Top Tab menu. Enter the MLS# and make your corrections or additions to the edited listing.
TIP: You can edit a listing through the Add/Edit feature as described below or by clicking the Edit button when viewing a listing’s details. If you use the Edit button, go directly to step 5.
To edit a listing:
1. On the Left Side Panel, click Add/Edit. The Add/Edit landing page appears.
2. In the Tab menu, click Edit Listing.

Notes
Add/Edit in Stratus 89
Chapter 6: Editing a Listing
3. The Edit Listing dialogue box appears.
4. Enter the MLS#, then click Open.
5. Stratus displays identifying information for the listing. If it is the correct listing to edit, click Edit Listing Details. If you wish to
MLS #
Open
Edit Listing Details

Chapter 6: Editing a Listing
Notes
90 Add/Edit in Stratus
Manage Photos, Attachments or Map Location, select the desired option.
6. Stratus displays the listing’s Edit form. Click any section tab, then add or edit data in any field. Repeat as required.
MLS® RULES & POLICIES: You cannot edit all mandatory fields in Add/Edit; for example, property address and contract date cannot be altered. If the property address needs to be changed, you must contact the MLS® department for further instructions.
MLS® RULES & POLICIES: To change Contract or Expiry Dates, Listing or Original Price, or the Status of a listing, use the Active MLS® Listing That Requires Special Edit By MLS® Processing form signed by the Broker of Record/Manager. For copy of this form, please see “Active MLS® listing that requires special edit by MLS® processing” on page 124.
7. When you are finished, click Submit.
Summary
After completing the material in this chapter, you should be able to edit a listing. Now that you know how to edit a listing, you are ready to

Notes
Add/Edit in Stratus 91
Chapter 6: Editing a Listing
learn about changing a listing’s status, which is covered in the next chapter.

Chapter 6: Editing a Listing
Notes
92 Add/Edit in Stratus

Chapter 7
Changing a Listing’s Status


Notes
Add/Edit in Stratus 95
Chapter 7: Changing a Listing’s Status
Accessing Status/Price Change
Use Status/Price Change to change a listing’s contract status. Stratus tracks status changes in History. (To learn how to access the History, see “Using History” on page 105.)
Use Status Change for:
• Price Change• Sold Conditional• Leased Conditional• Sold• Leased• New (after a deal has fallen through)• Suspended• Terminated.
NOTE: Terminations may be made in your office by the Broker of Record/Manager or Administrator only. The Termination/Cancellation form, fully signed by the Seller and Broker/Manager must be kept on file. Otherwise, the Termination/Cancellation form may be faxed to the MLS® Department at TREB for processing.
NOTE: The requisite Forms signed by the Seller for suspensions, cancellations, conditional and firm sales must all go on file with all the listing contracts and forms. As stated in REBBA 2002, “A brokerage shall retain for at least six years all documents and records that it is required to make under the Act or the regulations.” This documentation is to be made available to TREB on demand (R-305, of MLS® Rules and Policies).
RULES AND POLICIES NOTE: R-610 states that “The sale, lease or sub-lease of a residential or commercial MLS Listing shall be reported by the Listing Brokerage through the MLS System, whether conditional or firm, to TREB within two (2) TREB business days following acceptance of an Offer.
Reporting by the Listing Brokerage of a commercial sale/lease price shall contain the unit of measurement in which the original listing was posted. All changes in the status of a previously Reported conditional sale shall be Reported to TREB within two (2) TREB business days of the change.

Chapter 7: Changing a Listing’s Status
Notes
96 Add/Edit in Stratus
(a) The residential sale price shall be Reported to TREB within two (2) TREB business days of either:
(i) Reporting of a firm transaction; or(ii) removal of all condition(s)
(b) A commercial sale price shall be Reported either:(i) at the time of Reporting a firm transaction; or(ii) at the same time as Reporting a firm transaction, and request that the price be suppressed untilafter closing; or(iii) within five (5) TREB business days of closing of the transaction.
MLS® RULES & POLICIES: R-306 states that “A Member submitting an MLS® Listing or Cancellation or a suspension of an MLS® Listing to TREB’s MLS® System represents and warrants to TREB that the Member had been so authorized by the person legally entitled to sell the property and agrees to indemnify and hold TREB harmless from all claims of third parties if this is not the case.”
Furthermore, R-381 states that “The Listing Brokerage shall update TREB’s MLS® System within two (2) TREB business days following Cancellation or suspension of an MLS® Listing Agreement.”
Performing a Basic Status Change
To perform a status change:
1. On the Left Side Panel of Stratus, click Add/Edit.
2. Click Edit Listing.
3. In the MLS# field, enter the MLS# of the existing listing, then click Open.

Notes
Add/Edit in Stratus 97
Chapter 7: Changing a Listing’s Status
4. Review displayed information to ensure that the correct property displays.
5. Click on the Status/Price Change option.
NOTE: If you change the price or extend the listing with this option, you must have the Amendment To Listing Agreement Form 240 signed by the Seller. Place this signed form on file with the other documents and records that are required. For a copy of Form 240, see “Amendment to Listing Agreement - Form 240” on page 125.
Performing a Residential Sold Conditional Change
The following example shows the status of a residential listing being changed to Sold Conditional.
1. From the New Status drop-down list, select the new status. In our example, we chose Sold Conditional.
MLS #
Status/Price Change

Chapter 7: Changing a Listing’s Status
Notes
98 Add/Edit in Stratus
2. Complete the required fields (all fields with a blue asterisk).
NOTE: The condition in the Condition field is optional.
3. Complete any other fields as required.
4. Click Submit.
MLS® RULES & POLICIES: R-345 states that “MLS® Listings appearing on TREB’s MLS® System shall be immediately available (subject to applicable legislation, the rights of and reasonable accommodation to the occupancy) for showings, inspections and registration of Offers.
In the event an existing listing becomes unavailable for showings, inspections or registrations of Offers, the listing shall be suspended. While under suspension, a record of all requests by Co-operating Brokerages for showings, inspections, and registrations of Offers hall be kept by the Listing Brokerage. Upon the Seller rescinding the suspension, the Listing Brokerage shall immediately notify all Co-operating Brokerages who have requested showings, inspections or registration of Offers.”
To make a price change:
1. On the Left Side Panel of Stratus, click Add/Edit.
New Status drop-down
Notes
Add/Edit in Stratus 99
Chapter 7: Changing a Listing’s Status
2. Click Edit Listing.
3. In the MLS# field, enter the MLS# of the existing listing, then click Open.
4. Click on the same option Status/Price Change.
5. Click the Price Change tab and enter the new price into the New List Price field.
6. Click Submit.
Performing a Residential Sold Status Change
NOTE: Sold Date field on the MLS System refers to the date as to when the property becomes unavailable. Some scenarios include a) In the event of a Firm Offer (when there is no condition(s) on the Offer at all), the Sold Date would be the date the Offer was accepted by the Seller, or b) In the event of a Conditional Offer, the Sold Date would be the date as to when the condition(s) on the Offer was removed/waived.
Performing a Commercial Leased Status Change
The following example shows the status of a commercial listing being changed to Leased.
1. From the drop-down list, select the new status. In our example, we chose Leased.

Chapter 7: Changing a Listing’s Status
Notes
100 Add/Edit in Stratus
NOTE: To report residential listings sold, follow the same steps. You will not have the options to “not disclose” with residential listings.
2. Complete the required fields (all fields with a blue asterisk).
NOTE: When reporting solds for Commercial listings, you have three choices with regard to reporting the sold price. You can:
• report the sold price now• enter the sold price but suppress it on the system until the closing date• defer entering the sold price until the closing date by entering a “0” (zero)
in the Sold Price field. In this case, the sold price must be reported within 5 TREB business days of closing of the transaction.
3. Complete the required fields (all fields with a blue asterisk).
TIP: When reporting residential or commercial listings as sold, if the Co-operating Broker is not a TREB Member, click in the Co-Operating Firm field, type “non-treb”, then press your Tab key. All following fields will be automatically filled correctly.
4. Complete any other fields as desired.

Notes
Add/Edit in Stratus 101
Chapter 7: Changing a Listing’s Status
5. Click Submit.
You have successfully changed a residential or commercial listing’s status to sold. Refer to Chapter 8 for information on how to verify changes made to a listing.
Summary
After completing the material in this chapter, you should be able to change a listing’s status. Now that you know how to change status, you are ready to learn how to verify changes that you made to a listing, which is covered in the next chapter.

Chapter 7: Changing a Listing’s Status
Notes
102 Add/Edit in Stratus

Chapter 8
Verifying Changes Made to a Listing


Notes
Add/Edit in Stratus 105
Chapter 8: Verifying Changes Made to a Listing
You can verify changes made in Edit Listing or Status Change by looking at the listing’s history. The quickest way to locate the history is by using the MLS# Search. The history can also be found by clicking the History button found on the Action Toolbar in any search results list or in detail view of a listing.
Using History
You can use History to verify Status changes, such as a Conditional Sale or a Firm Sale. There is no confirmation number given in the Add/Edit system when these important transactions are reported. Therefore, the confirmation is the printed History report, which includes all transactions that have been made to the listing. Place the printed transaction report in the file with any contracts for the listing.
To look up a listing’s history:
1. On the Left Side Panel, click Search.
2. Click the MLS# Search tab.
3. In the text area, type the MLS# of the listing to be verified.
4. Click View History.
MLS# Search
Type MLS# here
View History

Chapter 8: Verifying Changes Made to a Listing
Notes
106 Add/Edit in Stratus
The listing displays as it appeared the first day in the system. Below the listing, is a complete list of every transaction for that listing contract. Transactions include any change made to a listing done through the Edit Listing or Change Status functions of Add/Edit.
5. To print the listing’s history, click Print on the Action Toolbar.
6. In the Print dialogue box, select a printer and then click Print.
Listing, first day on market
History

Notes
Add/Edit in Stratus 107
Chapter 8: Verifying Changes Made to a Listing
You have successfully searched for listing’s history and printed the report.
Summary
After completing the material in this chapter, you should be able to check the History of a listing. Now that you know how to verify changes made to a listing, you are ready to learn how to search Brokerage listings, which is covered in the next chapter.

Chapter 8: Verifying Changes Made to a Listing
Notes
108 Add/Edit in Stratus

Chapter 9
Searching for Brokerage Listings


Notes
Add/Edit in Stratus 111
Chapter 9: Searching for Brokerage Listings
Initiating the search
There is a convenient and easy way to use search to find listings held by your Brokerage: My Brokerage’s History. This Pre-Defined search is programmed to show you your Brokerage’s current and past listings back a maximum of two years for residential listings and four years for commercial listings.
To search My Brokerage’s History:
7. From the search screen in Stratus, click Pre-Defined Searches. A scrollable list of Pre-Defined searches appears.
8. In the list of searches, select My Brokerage’s History.
9. In Class, Availability, or Sale or Lease, make the desired selections.
10.Click Continue. The My Brokerage’s History search form appears.
11.In the form, select the Area, Municipalities, or Communities in which to search.
Pre-Defined
My Brokerage’s History

Chapter 9: Searching for Brokerage Listings
Notes
112 Add/Edit in Stratus
TIP: Use the Ctrl key to select more than one Municipality or Community.
12.If you want to limit your results to a particular class, select one or more items for Class, as in the example below.
NOTE: Remember that any search is limited to 200 results. You may require several searches to get a complete list of all of the Brokerage’s history.
13.If you want to limit your results based on status, select one or more items from Status.
14.You may want to search by either List or Sold Price. Doing so would help to eliminate leases if you don’t want to view them.
15.Since you will see two years of data (four for commercial), it is advisable to control your results by selecting a date range. You may choose from Contract Date, Sold Date, or List Date.
16.Click Submit. The listing results appear.

Notes
Add/Edit in Stratus 113
Chapter 9: Searching for Brokerage Listings
Modifying your search criteria
To modify your search criteria:
1. At the top of the one-line summary screen, click the Revise Criteria button.
2. Revise your criteria as desired and resubmit the search.
Narrowing the Search Results List
You can select specific listings from the Search Results to display as a subset.
To narrow the Search Results List:
1. At the Search Results List, check the box next to the sequence number for each listing you want to include in the narrowed Search Results List.
2. On the Action Toolbar, click the Narrow button. The listings you checked display in a new list.
You have successfully narrowed your search results. To sort the results, go to the next section.
Revise Criteria

Chapter 9: Searching for Brokerage Listings
Notes
114 Add/Edit in Stratus
Sorting Search Results
Stratus displays the listings found by your search in a simple one-line format. You can sort the list by any column, for example, by Style. You can also perform a multi-level sort by several columns, e.g., by List Brokerage; within List Brokerage by Contract Date; within Contract Date by List Price. You can sort in either ascending (increasing) order (a to z), or in descending (decreasing) order (z to a).
Sorting by a single column
To sort by any single column:
1. Click any column heading to sort it in ascending order and click it again to sort in descending order.
Now that you know how to sort by a single column, go to the next section to sort by multiple columns.
Sorting by multiple columns
You can sort by several columns in sequence of selection. The first sort is the broadest category, within which the other columns are sorted. The second sort is the next-broadest category, within which the next category is sorted.
To sort by multiple columns:
1. Click the column header of the first column that represents the broadest category of interest. Then click again to choose Increasing or Decreasing order.

Notes
Add/Edit in Stratus 115
Chapter 9: Searching for Brokerage Listings
2. Hold down the control key on your keyboard, then click on the column that represents the next-broadest category of interest. Click again to choose Increasing or Decreasing order.
3. Continue holding down the control key and click on the next desired column to choose the next narrower category you want to sort by. Repeat the click to choose Increasing or Decreasing order.
4. The selected column headers will be highlighted. In the following example, results are sorted first by Community, then by Style, and finally by Price.
You have successfully sorted your Search Results List. To print your Search Results, go to the next section.
Printing Search Results
After you view the search results list, you may want to print it, or print the list after sorting it.

Chapter 9: Searching for Brokerage Listings
Notes
116 Add/Edit in Stratus
To print the Search Results List:
1. On the Action Toolbar, click Print.
2. In the Print Options dialogue box, select your preferences of List Rows or Detail Views, For All or Selected listings, and Also Include Criteria.
3. Click Print, and the Print dialogue box appears.

Notes
Add/Edit in Stratus 117
Chapter 9: Searching for Brokerage Listings
4. In the Orientation section of the Print dialogue box, select Auto portrait/landscape; or if not available, select Landscape.
You have successfully printed the Search Results List.
Summary
After completing the material in this chapter, you should be able to search for Brokerage listings and work with the Search Results list.
Orientation

Chapter 9: Searching for Brokerage Listings
Notes
118 Add/Edit in Stratus
Add/Edit in Stratus 119
Appendix A
Data Integrity Service (DIS)
Members may make verifiable complaints regarding MLS® Listings by e-mail to [email protected] or to a facsimile hotline number at 416-386-0281.
In contrast to making a formal Professional Standards complaint, this process for requesting corrections to MLS® listings provide an easier opportunity for all Members to contribute to the integrity of the MLS® System and receive more immediate results.
The MLS® Rules were revised effective January 1st, 2006 and the DIS program has been expanded to reflect them (this would include available and unavailable listings).
DIS concerns are specific to infractions to the following MLS® rules.
1) When the MLS® Listing contains information that does not pertain to the property or that promotes goods or services
R-105Information published on TREB’s MLS® System shall relate directly to the listed real estate and the MLS® Listing Agreement, and accordingly shall not include any information that promotes goods and services, provided that the Brokerage Remarks field may include the name, address, telephone and/or facsimile number and/or e-mail address (but not a link to that e-mail address) of Member(s) to be contacted for more information concerning the property.
2) When Virtual Tours contain any identifying information of the Brokerage/Broker/Salesperson or the third parties or internet links that does not relate directly to the property
R-106

120 Add/Edit in Stratus
Information published on TREB’s MLS® System and Virtual Tour shall contain information pertaining to the property to which the MLS® Listing Agreement pertains and shall not include:
(a) any internet links, e-mail links or references to any internet links; or(b) any information that promotes goods or services.
Furthermore, a Virtual Tour on TREB’s MLS® System shall not include any information regarding any identification of the Listing Brokerage, the Listing Broker/Salesperson or the Virtual Tour Company. (Effective November 1, 2007)
3) When mandatory fields are not completed (e.g., taxes, maintenance fees, lot sizes, legal descriptions)
R-304(a) No Member shall submit an MLS® Listing to TREB’s MLS® System that contravenes the TREB MLS® Rules or Policies and/or the TREB By-Law. TREB may, in its sole discretion, deem any such MLS® Listing to be invalid and either remove it from TREB’s MLS® System or refuse to publish such MLS® Listing.
(b) Without limiting the generality of the foregoing and the other provisions of the MLS® Rules or Policies, any such MLS® Listing shall not be accepted by TREB as an MLS® Listing:
(i) if it excludes any Members from showing the property;(ii) if it excludes any Members from acting as a Co-operating Brokerage; (iii) if it does not provide compensation to the Co-operating Brokerage for the sale of the listed property; (iv) if all Mandatory Fields have not been completed.
(c) If a submitted MLS® Listing is deemed invalid as hereinbefore provided, TREB shall send notice to the Listing Brokerage who shall, within two (2) TREB business days, remedy the information through a Re-run, or process a Cancellation. On an “Incomplete” MLS® Listing that requires changes to Mandatory Fields, the Listing Brokerage is required to process a Re-run by the date specified in the notification to the Member provided by TREB.

Add/Edit in Stratus 121
4) When there is two or more MLS® Listings on the MLS® System for the same trade from the same Seller for the same property
R-312Only one MLS® Listing for any one Trade function signed by the same Seller may be placed on TREB’s MLS® System at any one time.
5) When an MLS® Listing contains wordings such as: "No showings", "Off the market", "No inspections", "No registration of Offers"
R-345MLS® Listings appearing on TREB’s MLS® System shall be immediately available (subject to applicable legislation, the rights of and reasonable accommodation to the occupancy) for showings, inspections and registration of Offers.
In the event an existing listing becomes unavailable for showings, inspections or registration of Offers, the listing shall be suspended.
While under suspension a record of all requests by Co-operating Brokerages for showings, inspections and registration of Offers shall be kept by the Listing Brokerage.
Upon the Seller rescinding the suspension the Listing Brokerage shall immediately notify all Co-operating Brokerages who have requested showings, inspections or registration of Offers.
(Effective May 12, 2008)
6) When the Sellers' Name(s) is not disclosed on the MLS® System
R-360MLS® Listings on TREB’s MLS® System shall contain all information necessary for preparing an Offer for Sale, Lease or Sub-Lease.
7) When an MLS® Listing is designated as an "Office" Listing
R-370Where an MLS® Listing is designated as an “Office” listing in the Listing Salesperson field, the Broker of Record/Manager’s name or the name of a Member who is familiar with the property shall also appear after the word “Office”.

122 Add/Edit in Stratus
8) When wordings or other embellishments not related to the property appear on the photograph
R-385Photographs or other graphic images of a property, with wording or other embellishments not related to the property, shall not be accepted for an MLS® Listing to be serviced through TREB’s MLS® System.
9) When taxes are inputted and they are not the current or prior year's annual taxes
R-390Where realty taxes are required to appear on TREB’s MLS® System, the amount to be shown shall be the current year’s annual taxes or if not available the prior year’s annual taxes.
10) When the sold conditional date has expired and the status has not been updated
R-610The sale, lease or sub-lease of a residential or commercial MLS® Listing shall be reported by the Listing Brokerage through TREB's MLS® System, whether conditional or firm, to TREB within two (2) TREB business days following acceptance of an Offer.
Reporting by the Listing Brokerage of a commercial sale/lease price shall contain the unit of measurement in which the original listing was posted. All changes in the status of a previously Reported conditional sale shall be Reported to TREB within two (2) TREB business days of the change.
(a) The residential sale price shall be Reported to TREB within two (2) TREB business days of either:
(i) Reporting of a firm transaction; or(ii) removal of all condition(s)
(b) A commercial sale price shall be Reported either: (i) at the time of Reporting a firm transaction; or(ii) at the same time as Reporting a firm transaction, and request that the price be suppressed until after closing; or(iii) within five (5) TREB business days of closing of the transaction.

Add/Edit in Stratus 123
11) When there is no commission offered to a Co-operating Brokerage
R-100The MLS® Rules and Policies shall be interpreted in accordance with RECO Rules, the CREA Rules, and all applicable laws and regulatory requirements.
If any MLS® Rules or Policies or CREA Rules conflict with the RECO Rules or any applicable laws or regulatory requirements, the conflicting MLS® Rules or Policies or CREA Rules will be considered inoperative to the extent of such conflict.
CREA Rule 17.1.1.3:Compensation to Co-operating BrokerThe listing REALTOR® agrees to pay to the co-operating (i.e.selling) REALTOR® compensation for the co-operative selling ofthe property. An offer of compensation of zero is not acceptable.
If there appears to be a possible violation of the above MLS® Rules in an MLS® Listing, a notification letter and a copy of the MLS® Listing will be faxed to the Broker of Record, Manager(s) and Salesperson(s)/Broker(s). The notification letter will contain suggested remedial action(s) and the MLS® Listing concerned has to be in compliance within (2) TREB business days.
If the MLS® Listing is not in compliance within two (2) TREB business days of the notification, a complaint will be forwarded to the Professional Standards Department for further action.

124 Add/Edit in Stratus
Active MLS® listing that requires special edit by MLS® processing

Add/Edit in Stratus 125
Amendment to Listing Agreement - Form 240

126 Add/Edit in Stratus
Change/Correction to MLS® Listing that has been reported Sold
Add/Edit in Stratus
Index
AAdd Listing 25Add/Edit privileges 13Adding a listing 26Additional Pictures URL 48Alt Feat Sheet URL 48Amounts/Dates section 31Attachments section 64
BBack button and errors 88Brokerage search
modifying criteria 113narrowing results 113printing 115sorting 114starting 111
CClone listing 81Comments section 42Commercial sales 99Concessions, entering as street name 28Conditional sales 97Contract date 32
DDefinitions of fields 27Deleting a saved draft 71
EEdit listing 88Editing a Draft 70Editing a photo 62Exterior section 34
FFields
definitions 27File Types - Attachments 64
HHistory search 105
LListing, adding new 26Locate By Address 68Location section 27

Add/Edit in Stratus
Lots, entering as street number 28M
Mandatory fields 27Map Location 48Map Section 67MapArt coordinates, autofilling 29Mortgage 33My Brokerage’s History search
modifying criteria 113narrowing results 113printing 115sorting 114starting 111
NNew listing 26New status 25
OOther section 44
PPhotos Section 49Postal code, entering 29Practice loading listings using training mode 18Price format 31
RRoom size unit of measurement 41Rooms/Details section 40
SSales Brochure URL 47Save Draft 31Save worksheet 31Sound Bite URL 48Status change 96Street abbreviation, using N/A 29Street names
concession streets 28entering 28using the street dictionary 28
Submitting the listing 73T
Taxes 32Termination 95Training mode 18

Add/Edit in Stratus
UUploading Photos 55
VVirtual tours
Virtual Tour URL 47Z
Zoning Field Commercial Listings 30

Add/Edit in Stratus
![Stratus [stratus] The word stratus is a Latin word which means “flattened” or “spread out” or “layers” Stratus Clouds.](https://static.fdocuments.in/doc/165x107/56649dc55503460f94ab81ce/stratus-stratus-the-word-stratus-is-a-latin-word-which-means-flattened.jpg)


![Yearly Plan Add Maths Form 4-Edit Kuching[1]](https://static.fdocuments.in/doc/165x107/577d362a1a28ab3a6b925ade/yearly-plan-add-maths-form-4-edit-kuching1.jpg)