Adafruit Microphone Amplifier Breakout - tet.pub.rotet.pub.ro/pages/altele/Documentatie/Microfon...
15
Adafruit Microphone Amplifier Breakout Created by Bill Earl Last updated on 2016-11-02 10:00:44 PM UTC
Transcript of Adafruit Microphone Amplifier Breakout - tet.pub.rotet.pub.ro/pages/altele/Documentatie/Microfon...

Adafruit Microphone Amplifier BreakoutCreated by Bill Earl
Last updated on 2016-11-02 10:00:44 PM UTC

233
55566
689
10101011
14151515
Guide Contents
Guide ContentsOverview
Specifications:
Assembly and WiringAssembly:
Prepare the header strip:Add the breakout board:And Solder!
Wiring:Measuring Sound LevelsScrolling Sound Level Meter
Assemble the MatrixConnect the MatrixUpload the CodeAdjust the Gain
More Cool Projects!DownloadsDatasheetsSchematic:
© Adafruit Industries https://learn.adafruit.com/adafruit-microphone-amplifier-breakout Page 2 of 15

Overview
This guide shows how to connect the Adafruit Electret Microphone Amplifier tomeasure sound levels with your Arduino.
The Microphone Amplifier mates an Electret Capsule Microphone (http://adafru.it/aW6) witha MAX4466 Operational Amplifier (http://adafru.it/aW7) optimized for use in microphonepre-amplifier applications. The flexible supply voltage and and adjustable gain make thismodule adaptable to a wide variety of audio applications.
Specifications:
Supply Voltage: 2.4v-5vOutput: Rail-to-Rail - up to to 5vp-pFrequency Response: 20Hz - 20 KHzAdjustable Gain 25x-125xAvailable From: Adafruit of course! (http://adafru.it/1063)
© Adafruit Industries https://learn.adafruit.com/adafruit-microphone-amplifier-breakout Page 3 of 15

© Adafruit Industries https://learn.adafruit.com/adafruit-microphone-amplifier-breakout Page 4 of 15

Assembly and Wiring
Assembly:The board comes with all surface-mount components pre-soldered. The included headerstrip can be soldered on for convenient use on a breadboard or with 0.1" connectors.
Prepare the header
© Adafruit Industries https://learn.adafruit.com/adafruit-microphone-amplifier-breakout Page 5 of 15
strip:
Cut the strip to length ifnecessary. It will be easier tosolder if you insert it into abreadboard - long pins down.
Add the breakoutboard:
Place the breakout board overthe pins.
(You can prop up the free edgeof the board with some extra pinsto better align it for soldering.)
And Solder!
Be sure to solder all pins forreliable electrical contact.
(For tips on soldering, be sure tocheck out our Guide to ExcellentSoldering (http://adafru.it/aTk)).
Wiring:© Adafruit Industries https://learn.adafruit.com/adafruit-microphone-amplifier-breakout Page 6 of 15
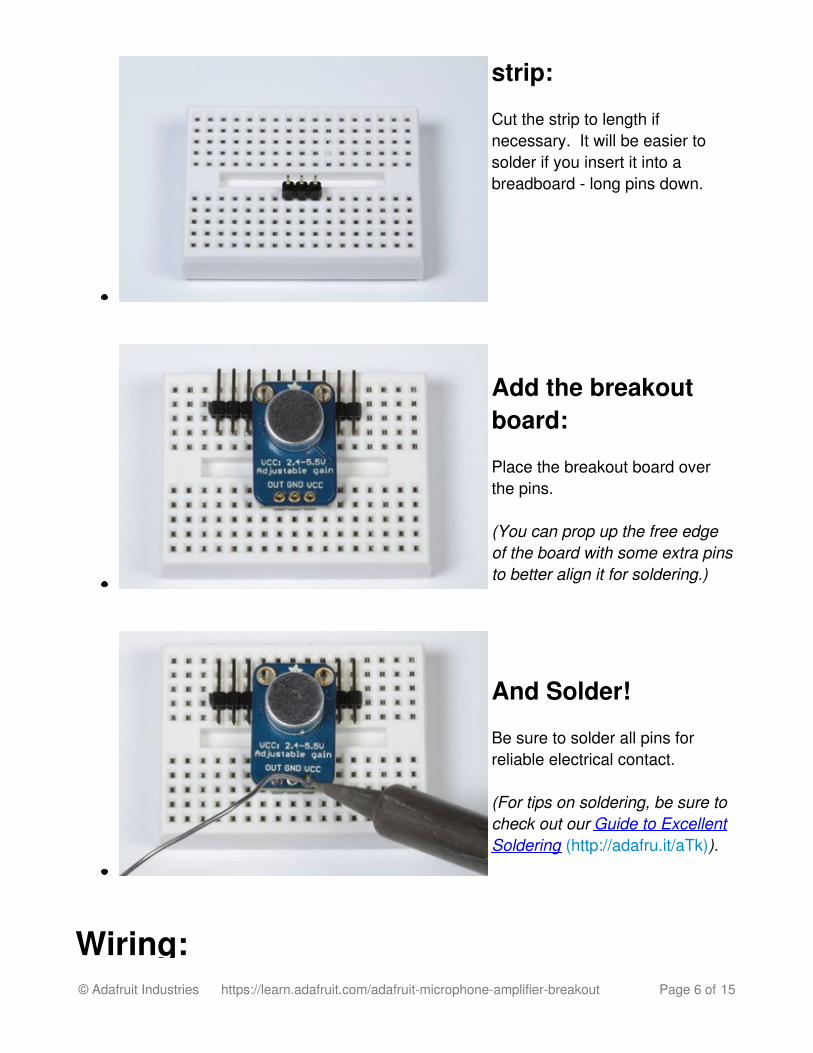
Wiring:The amplifier has only 3 connections, so wiring is simple:
GND -> GNDVCC -> 3.3VOUT -> AIN0
VCC can be anywhere from 2.4-5VDC. For the best performance, we use the 3.3v pinbecause it is the "quietest" supply on the Arduino.
The output will have a DC bias of VCC/2 so when its perfectly quiet, the voltage will be asteady VCC/2 (1.65v).
© Adafruit Industries https://learn.adafruit.com/adafruit-microphone-amplifier-breakout Page 7 of 15

Measuring Sound LevelsThe Audio signal from the output of the amplifier is a varying voltage. To measure thesound level, we need to take multiple measurements to find the minimum and maximumextents or "peak to peak amplitude" of the signal.
In the example below, we choose a sample window of 50 milliseconds. That is sufficient tomeasure sound levels of frequencies as low as 20 Hz - the lower limit of human hearing.
After finding the minimum and maximum samples, we compute the difference and convert itto volts and the output is printed to the serial monitor.
/****************************************Example Sound Level Sketch for the Adafruit Microphone Amplifier****************************************/
const int sampleWindow = 50; // Sample window width in mS (50 mS = 20Hz)unsigned int sample;
void setup() { Serial.begin(9600);}
void loop() { unsigned long startMillis= millis(); // Start of sample window unsigned int peakToPeak = 0; // peak-to-peak level
unsigned int signalMax = 0; unsigned int signalMin = 1024;
// collect data for 50 mS while (millis() - startMillis < sampleWindow) { sample = analogRead(0); if (sample < 1024) // toss out spurious readings { if (sample > signalMax) { signalMax = sample; // save just the max levels } else if (sample < signalMin)
© Adafruit Industries https://learn.adafruit.com/adafruit-microphone-amplifier-breakout Page 8 of 15

{ signalMin = sample; // save just the min levels } } } peakToPeak = signalMax - signalMin; // max - min = peak-peak amplitude double volts = (peakToPeak * 5.0) / 1024; // convert to volts
Serial.println(volts);}
OK, so that's not very exciting. What else can you do with it?
Scrolling Sound Level MeterSo now we will take the peak-to-peak measurement and use it to drive a Bicolor LED
© Adafruit Industries https://learn.adafruit.com/adafruit-microphone-amplifier-breakout Page 9 of 15
Matrix (http://adafru.it/902) to display the sound level. To make it more interesting, we willscroll the display so that the last 8 measurements are graphed in real-time.
To do this you will need to download the Adafruit GFX Library (http://adafru.it/aJa)and LEDBackpack Library (http://adafru.it/aLI). The Wire Library is included in the Arduino IDEinstallation.
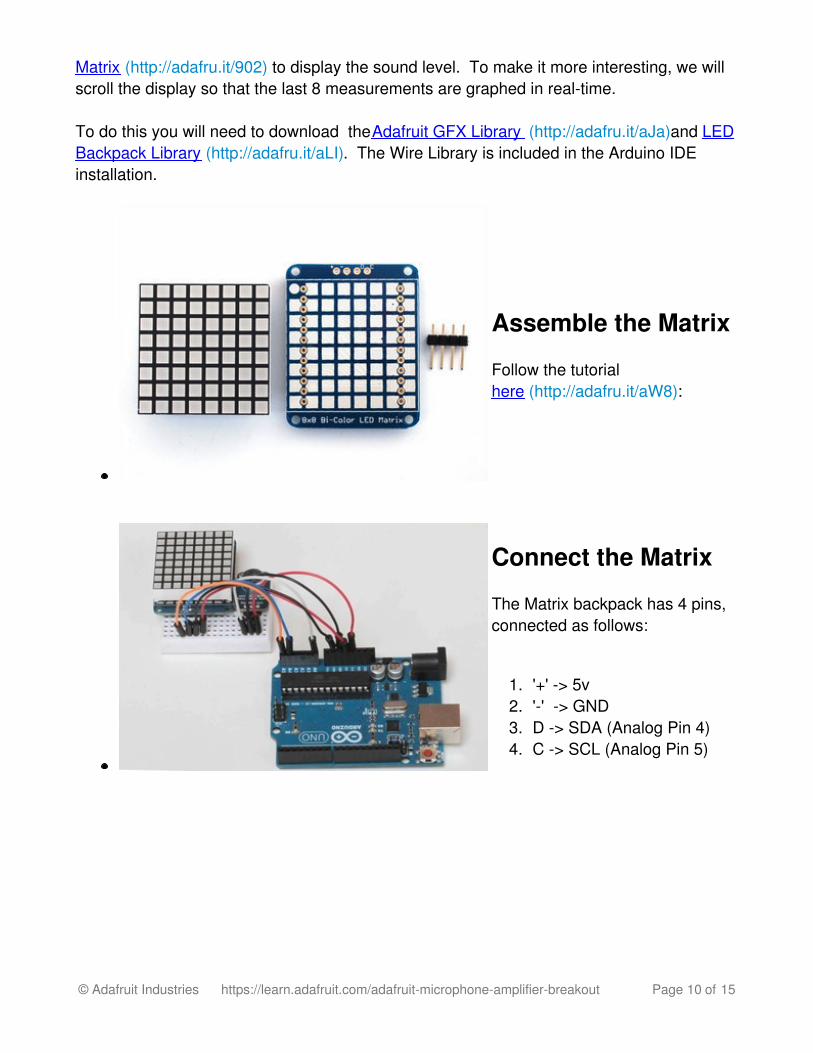
Assemble the Matrix
Follow the tutorialhere (http://adafru.it/aW8):
Connect the Matrix
The Matrix backpack has 4 pins,connected as follows:
1. '+' -> 5v2. '-' -> GND3. D -> SDA (Analog Pin 4)4. C -> SCL (Analog Pin 5)
© Adafruit Industries https://learn.adafruit.com/adafruit-microphone-amplifier-breakout Page 10 of 15

Upload the Code
Paste the code below into theArduino IDE and upload it. Speak in a normal voice about 6-8 inches from the microphoneand the sound level meter matrixdisplay should start scrolling.
Adjust the Gain
Although the amplifier is capableof a rail-to-rail signal (3.3v in thiscase), the code maps a 1v peak-to-peak signal to the full scale ofthe display.
This can be changed in the code. Or you can adjust the gaintrimmer-pot of the amplifier with asmall straight-bladed screwdriver. The amplifier gain is adjustablefrom 25x to 125x.
Make all gain adjustments gently. If you feel resistance, stop. The tiny trim pot is delicateand it is easy to damage by turning past the stop.
/****************************************Scrolling Sound Meter Sketch for the Adafruit Microphone Amplifier****************************************/
#include <Wire.h>#include "Adafruit_LEDBackpack.h"#include "Adafruit_GFX.h"
// Include the Matrix code for displayAdafruit_BicolorMatrix matrix = Adafruit_BicolorMatrix();
const int maxScale = 8;
© Adafruit Industries https://learn.adafruit.com/adafruit-microphone-amplifier-breakout Page 11 of 15
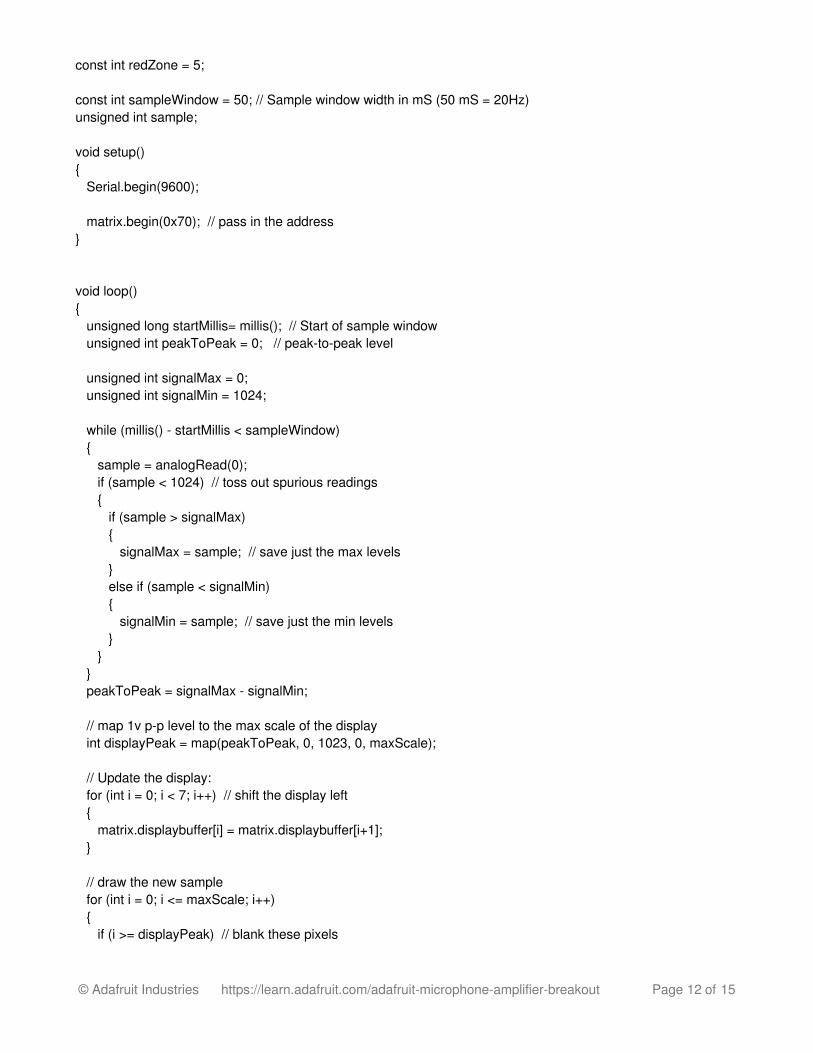
const int redZone = 5;
const int sampleWindow = 50; // Sample window width in mS (50 mS = 20Hz)unsigned int sample;
void setup() { Serial.begin(9600);
matrix.begin(0x70); // pass in the address}
void loop() { unsigned long startMillis= millis(); // Start of sample window unsigned int peakToPeak = 0; // peak-to-peak level
unsigned int signalMax = 0; unsigned int signalMin = 1024;
while (millis() - startMillis < sampleWindow) { sample = analogRead(0); if (sample < 1024) // toss out spurious readings { if (sample > signalMax) { signalMax = sample; // save just the max levels } else if (sample < signalMin) { signalMin = sample; // save just the min levels } } } peakToPeak = signalMax - signalMin;
// map 1v p-p level to the max scale of the display int displayPeak = map(peakToPeak, 0, 1023, 0, maxScale);
// Update the display: for (int i = 0; i < 7; i++) // shift the display left { matrix.displaybuffer[i] = matrix.displaybuffer[i+1]; }
// draw the new sample for (int i = 0; i <= maxScale; i++) { if (i >= displayPeak) // blank these pixels
© Adafruit Industries https://learn.adafruit.com/adafruit-microphone-amplifier-breakout Page 12 of 15

{ matrix.drawPixel(i, 7, 0); } else if (i < redZone) // draw in green { matrix.drawPixel(i, 7, LED_GREEN); } else // Red Alert! Red Alert! { matrix.drawPixel(i, 7, LED_RED); } } matrix.writeDisplay(); // write the changes we just made to the display}
© Adafruit Industries https://learn.adafruit.com/adafruit-microphone-amplifier-breakout Page 13 of 15

More Cool Projects!For more fun with the Adafruit Microphone Amplifier, check out the outstanding WaveShield Voice Changer (http://adafru.it/aW9) project:And the Tiny Arduino Music Visualizer (http://adafru.it/aWa)!
© Adafruit Industries https://learn.adafruit.com/adafruit-microphone-amplifier-breakout Page 14 of 15

Downloads
DatasheetsLink to the MAX4466 datasheet (http://adafru.it/aW7) (the main amplifier chip)The electret microphone used (http://adafru.it/aW6)
Schematic:Click to embiggen
© Adafruit Industries Last Updated: 2016-11-02 10:00:43 PM UTC Page 15 of 15


![Circuit Figure - University of California, San Diegovlsicad.ucsd.edu/Publications/Reports/TR-990014.pdfKa w aguc hi and Sakurai [5] use the di usion equations for analyzing capacitiv](https://static.fdocuments.in/doc/165x107/5af2bd9b7f8b9ad0619115d0/circuit-figure-university-of-california-san-w-aguc-hi-and-sakurai-5-use-the.jpg)