Adafruit IO Basics: GPS · PDF fileOverview This guide is part of a series of guides that...
13
Adafruit IO Basics: GPS Created by Todd Treece Last updated on 2015-07-17 05:50:08 PM EDT
Transcript of Adafruit IO Basics: GPS · PDF fileOverview This guide is part of a series of guides that...

Adafruit IO Basics: GPSCreated by Todd Treece
Last updated on 2015-07-17 05:50:08 PM EDT

23445
8999
Guide Contents
Guide ContentsOverviewAdafruit IO Setup
Creating the FeedsAdding the Blocks to a Dashboard
WiringArduino Code
Arduino SketchMQTT CSV Location Format
© Adafruit Industries https://learn.adafruit.com/adafruit-io-basics-gps Page 2 of 13

Overview
This guide is part of a series of guides that cover the basics of using Adafruit IO. It will show youhow to map live GPS location information on Adafruit IO using a FONA 808 Shield and ArduinoUno.
If you haven't worked your way through the Adafruit IO feed and dashboard basics guides, youshould do that before continuing with this guide so you have a basic understanding of Adafruit IO.
Adafruit IO Basics: Feeds (http://adafru.it/f09)Adafruit IO Basics: Dashboards (http://adafru.it/fCJ)
You should also go through the FONA 808 Shield Setup Guide (http://adafru.it/fDv) beforecontinuing with this guide. If you have went through all of the prerequisites, you are now ready tomove on to the Adafruit IO setup. Let's get started!
© Adafruit Industries https://learn.adafruit.com/adafruit-io-basics-gps Page 3 of 13

Adafruit IO SetupThe first thing you will need to do is to login to your Adafruit IO account (http://adafru.it/eZ8) andget your Adafruit IO Key if you haven't already. Click the AIO KEY button on the right hand side ofthe window to retrieve your key.
A window will pop up with your Adafruit IO key. Keep a copy of this in a safe place. We'll need itlater.
Creating the Feeds
You will now need to create a feed called "GPS". If you need help getting started with creatingfeeds on Adafruit IO, check out the Adafruit IO Feed Basics guide (http://adafru.it/f20).
© Adafruit Industries https://learn.adafruit.com/adafruit-io-basics-gps Page 4 of 13

Once you have created the GPS feed, you will need to create a feed called "GSMloc".
After you have finished, your feed list should look like the image shown below.
Adding the Blocks to a Dashboard
Next, add two Map blocks and one Gauge block to a new or existing dashboard. If you need helpgetting started with Dashboards on Adafruit IO, check out the Adafruit IO Dashboard Basicsguide (http://adafru.it/f21).
© Adafruit Industries https://learn.adafruit.com/adafruit-io-basics-gps Page 5 of 13

Select the GPS feed for the first map block, and click Create Block to add the new block to thedashboard.
Select the GSMloc feed for the second map block, change the map type to Street Map, and clickCreate Block to add the new block to the dashboard.
Use the GPS feed as the data source for the gauge block, and set the max value to 120. ClickCreate Block to add the new block to the dashboard. Arrange the blocks on your dashboard like theimage shown below.
© Adafruit Industries https://learn.adafruit.com/adafruit-io-basics-gps Page 6 of 13

Next, we will look at how to connect the FONA 808 Shield the Arduino Uno.
© Adafruit Industries https://learn.adafruit.com/adafruit-io-basics-gps Page 7 of 13
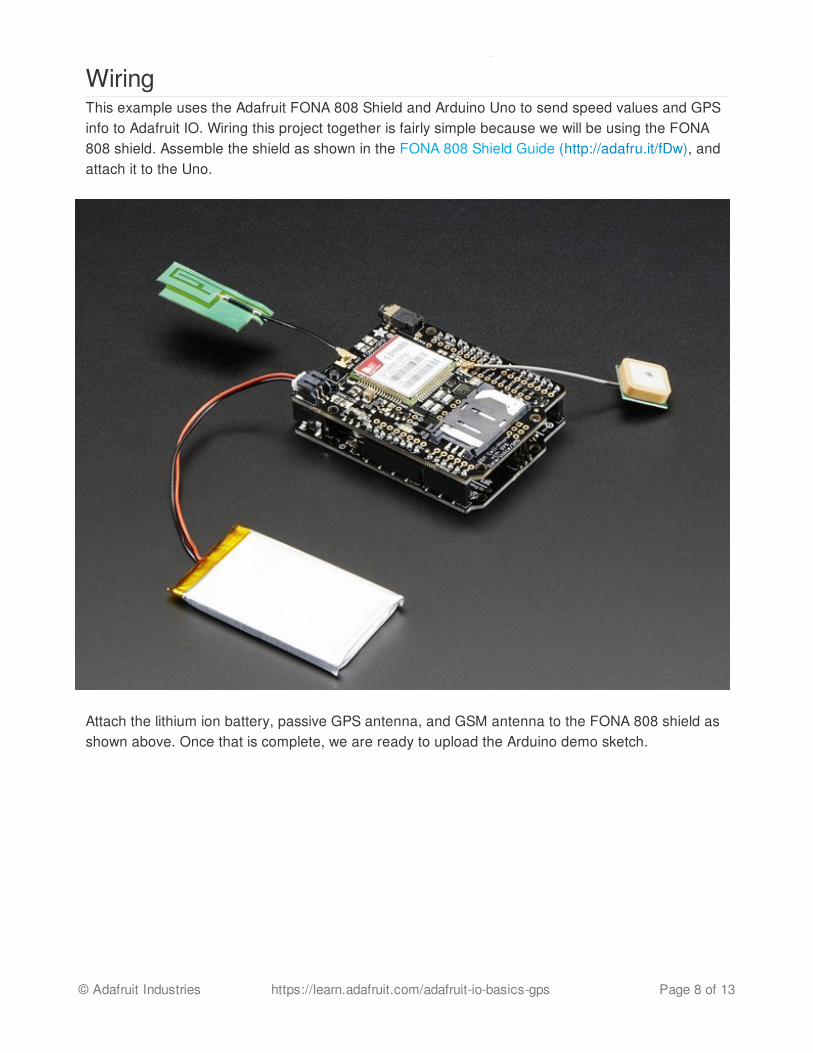
WiringThis example uses the Adafruit FONA 808 Shield and Arduino Uno to send speed values and GPSinfo to Adafruit IO. Wiring this project together is fairly simple because we will be using the FONA808 shield. Assemble the shield as shown in the FONA 808 Shield Guide (http://adafru.it/fDw), andattach it to the Uno.
Attach the lithium ion battery, passive GPS antenna, and GSM antenna to the FONA 808 shield asshown above. Once that is complete, we are ready to upload the Arduino demo sketch.
© Adafruit Industries https://learn.adafruit.com/adafruit-io-basics-gps Page 8 of 13

Arduino CodeYou will need the following Arduino libraries installed to compile the example sketch:
Adafruit FONA (http://adafru.it/dDD)Adafruit SleepyDog Library (http://adafru.it/fp8)Adafruit MQTT Library (http://adafru.it/fp6)
The easiest way to install them is by using the Arduino IDE v.1.6.4+ LibraryManager (http://adafru.it/fCN).
Arduino Sketch
The Arduino sketch for this project is fairly straight forward. If you haven't downloaded or clonedthe Adafruit IO Basics GitHub repo (http://adafru.it/f27), you should do that first. We will be usingthe gps sketch located in the Arduino FONA folder.
Adafruit IO Basics Sketches
http://adafru.it/f28
You will need to replace the Adafruit IO username and key placeholders in the sketch with yourAdafruit IO username and the key that you retrieved in the Adafruit IO Setup section of this guide.
You will then need to check that the names of your GPS & GSMloc feeds match the feed namesdefined in the sketch. We will be using the CSV input MQTT topics to send location info along withour data.
MQTT CSV Location Format
The Adafruit IO MQTT CSV feed topic expects data published in the following format:
#define AIO_USERNAME "...your AIO username..."#define AIO_KEY "...your AIO key..."
// Notice MQTT CSV location topics for Adafruit IO// follow the form: <username>/feeds/<feedname>/csvconst char GSMLOC_FEED[] PROGMEM = AIO_USERNAME "/feeds/gsmloc/csv";Adafruit_MQTT_Publish gsmloc = Adafruit_MQTT_Publish(&mqtt, GSMLOC_FEED);const char GPSLOC_FEED[] PROGMEM = AIO_USERNAME "/feeds/gps/csv";Adafruit_MQTT_Publish gpsloc = Adafruit_MQTT_Publish(&mqtt, GPSLOC_FEED);
© Adafruit Industries https://learn.adafruit.com/adafruit-io-basics-gps Page 9 of 13

So if we were sending speed in MPH as our sensor value, the data would look like this:
Latitude and longitude are expressed in decimal degrees, and elevation is recorded in metersabove sea level.
Most of the work of converting GPS and GSM location info in to the proper format is handled by theFONA Arduino library. However, we will need to convert the floating point data returned by theFONA library to the CSV format expected by Adafruit IO.
sensor_value,latitude,longitude,elevation
23,39.283277, -76.611818,10
float latitude, longitude, speed_kph, heading, speed_mph, altitude;
// if you ask for an altitude reading, getGPS will return false if there isn't a 3D fix boolean gps_success = fona.getGPS(&latitude, &longitude, &speed_kph, &heading, &altitude);
if (gps_success) {
Serial.print("GPS lat:"); Serial.println(latitude); Serial.print("GPS long:"); Serial.println(longitude); Serial.print("GPS speed KPH:"); Serial.println(speed_kph); Serial.print("GPS speed MPH:"); speed_mph = speed_kph * 0.621371192; Serial.println(speed_mph); Serial.print("GPS heading:"); Serial.println(heading); Serial.print("GPS altitude:"); Serial.println(altitude);
// snprintf(sendbuffer, 120, "%d,%f,%f,0", x, latitude, longitude); // but that doesnt work in arduino char *p = sendbuffer; // add speed value dtostrf(speed_mph, 2, 6, p); p += strlen(p); p[0] = ','; p++;
// concat latitude
© Adafruit Industries https://learn.adafruit.com/adafruit-io-basics-gps Page 10 of 13

The FONA 808 also can provide GSM location data. We will be sending this data to the secondfeed so that we can compare the accuracy of the GPS data to the GSM location data.
dtostrf(latitude, 2, 6, p); p += strlen(p); p[0] = ','; p++;
// concat longitude dtostrf(longitude, 3, 6, p); p += strlen(p); p[0] = ','; p++;
// concat altitude dtostrf(altitude, 2, 6, p); p += strlen(p);
// null terminate p[0] = 0;
Serial.print("Sending: "); Serial.println(sendbuffer);
if (! gpsloc.publish(sendbuffer)) { Serial.println(F("Failed")); txfailures++; } else { Serial.println(F("OK!")); txfailures = 0; }
Watchdog.reset();
}
boolean gsmloc_success = fona.getGSMLoc(&latitude, &longitude);
if (gsmloc_success) {
Serial.print("GSMLoc lat:"); Serial.println(latitude); Serial.print("GSMLoc long:"); Serial.println(longitude);
// snprintf(sendbuffer, 120, "%d,%f,%f,0", x, latitude, longitude); // but that doesnt work in arduino char *p;
© Adafruit Industries https://learn.adafruit.com/adafruit-io-basics-gps Page 11 of 13

When you are finished reviewing the sketch and have finished making the necessary configchanges, upload the sketch to your Uno using the Arduino IDE. You should also open up yourAdafruit IO dashboard so you can monitor the maps and speedometer.
// paste in 'value' first, just an incrementer for GSMLoc itoa(x, sendbuffer, 10); p = sendbuffer+strlen(sendbuffer); p[0] = ','; p++;
// concat latitude dtostrf(latitude, 2, 6, p); p += strlen(p); p[0] = ','; p++;
// concat longitude dtostrf(longitude, 3, 6, p); p += strlen(p); p[0] = ','; p++; p[0] = '0'; p++; // 0 altitude // null terminate p[0] = 0;
Serial.print("Sending: "); Serial.println(sendbuffer); if (! gsmloc.publish(sendbuffer)) { Serial.println(F("Failed")); txfailures++; } else { Serial.println(F("OK!")); txfailures = 0; }
}
x++;
// wait a couple seconds before starting over Watchdog.reset(); delay(2000); Watchdog.reset();
}
© Adafruit Industries https://learn.adafruit.com/adafruit-io-basics-gps Page 12 of 13

If everything goes as expected, you will see the location update in the dashboard. You shouldmake sure to open the Arduino IDE's serial monitor if you are having issues with the sketch. It willprovide valuable debugging info.
You will need to make sure the FONA's GPS antenna is in clear view of the sky for this demo towork. Flip the FONA shield's switch from Charge to Run, and you should now have a remotelocation logging device!
© Adafruit Industries Last Updated: 2015-07-17 05:50:08 PM EDT Page 13 of 13