Activity Alerts Implementation Guide -...
39
Copyright © 2015 ObserveIT. All rights reserved. All trademarks, trade names, service marks and logos referenced herein belong to their respective companies. This document is for informational purposes only. Activity Alerts Implementation Guide Contents About This Document ........................................................................................................ 2 Intended Audience.............................................................................................................. 2 Related Documentation ...................................................................................................... 2 Support ............................................................................................................................... 2 1 Activity Alerts Overview ................................................................................................ 3 1.1 Common Alert Scenarios ............................................................................................ 3 2 Understanding Alert Rules – Sample Walkthrough ......................................................... 5 2.1 Sample 1: A User Logs in After Hours ......................................................................... 5 2.2 Sample 2: A User Transfers Large Files Using a Cloud Application ............................. 6 2.3 Sample 3: A Remote Vendor Potentially Changes Registry Values on a Sensitive Server ................................................................................................................... 7 2.4 Sample 4: Abusing Privileged Permissions in Unix to Create a Backdoor User .......... 8 3 Rule Structure and Logic.............................................................................................. 11 3.1 General Rule Details ................................................................................................. 11 3.2 Flexible Rule Design .................................................................................................. 11 3.3 Rule Conditions ......................................................................................................... 12 3.4 Alert Frequency ........................................................................................................ 15 3.5 Rule Logic .................................................................................................................. 16 4 Steps for Creating Alert Rules ...................................................................................... 17 5 Defining Alert Rules .................................................................................................... 19 5.1 Defining Alert Rule Conditions.................................................................................. 19 5.1.1 Who Performs the Activities that Trigger Alerts? ......................................... 19 5.1.2 What Activities Trigger Alerts? ..................................................................... 20 5.1.3 On Which Computers do the Activities Occur? ............................................ 29 5.1.4 When do the Activities Occur? ..................................................................... 30 5.1.5 From Which Client Computers?.................................................................... 31 5.2 Assigning Alert Status ............................................................................................... 32 5.3 Setting Alert Risk Level ............................................................................................. 32 5.4 Managing Alert Email Notifications .......................................................................... 32 5.5 Saving Alert Rules ..................................................................................................... 33 5.6 Activating Alert Rules................................................................................................ 33 6 Viewing Generated Alerts in ObserveIT ....................................................................... 34 6.1 Viewing Alerts in Email Notifications ........................................................................ 34 6.1.1 Individual Alert Email Notifications .............................................................. 34 6.1.2 Alert Digest Emails ........................................................................................ 35 6.2 Viewing a List of Activity Alerts................................................................................. 36 6.3 Viewing Alerts in Slideshow Mode ........................................................................... 37 6.4 Viewing Alerts in Session Diaries .............................................................................. 37 6.5 Viewing Alerts in the Session Player ......................................................................... 38 6.6 Generating Custom Reports about Alerts ................................................................ 38
Transcript of Activity Alerts Implementation Guide -...

Copyright © 2015 ObserveIT. All rights reserved. All trademarks, trade names, service marks and logos referenced herein belong to their respective companies. This document is for informational purposes only.
Activity Alerts Implementation Guide
Contents About This Document ........................................................................................................ 2
Intended Audience .............................................................................................................. 2 Related Documentation ...................................................................................................... 2 Support ............................................................................................................................... 2
1 Activity Alerts Overview ................................................................................................ 3
1.1 Common Alert Scenarios ............................................................................................ 3 2 Understanding Alert Rules – Sample Walkthrough ......................................................... 5
2.1 Sample 1: A User Logs in After Hours ......................................................................... 5 2.2 Sample 2: A User Transfers Large Files Using a Cloud Application ............................. 6 2.3 Sample 3: A Remote Vendor Potentially Changes Registry Values on a Sensitive Server ................................................................................................................... 7 2.4 Sample 4: Abusing Privileged Permissions in Unix to Create a Backdoor User .......... 8
3 Rule Structure and Logic .............................................................................................. 11
3.1 General Rule Details ................................................................................................. 11 3.2 Flexible Rule Design .................................................................................................. 11 3.3 Rule Conditions ......................................................................................................... 12 3.4 Alert Frequency ........................................................................................................ 15 3.5 Rule Logic .................................................................................................................. 16
4 Steps for Creating Alert Rules ...................................................................................... 17
5 Defining Alert Rules .................................................................................................... 19
5.1 Defining Alert Rule Conditions .................................................................................. 19 5.1.1 Who Performs the Activities that Trigger Alerts? ......................................... 19 5.1.2 What Activities Trigger Alerts? ..................................................................... 20 5.1.3 On Which Computers do the Activities Occur? ............................................ 29 5.1.4 When do the Activities Occur? ..................................................................... 30 5.1.5 From Which Client Computers? .................................................................... 31
5.2 Assigning Alert Status ............................................................................................... 32 5.3 Setting Alert Risk Level ............................................................................................. 32 5.4 Managing Alert Email Notifications .......................................................................... 32 5.5 Saving Alert Rules ..................................................................................................... 33 5.6 Activating Alert Rules ................................................................................................ 33
6 Viewing Generated Alerts in ObserveIT ....................................................................... 34
6.1 Viewing Alerts in Email Notifications ........................................................................ 34 6.1.1 Individual Alert Email Notifications .............................................................. 34 6.1.2 Alert Digest Emails ........................................................................................ 35
6.2 Viewing a List of Activity Alerts................................................................................. 36 6.3 Viewing Alerts in Slideshow Mode ........................................................................... 37 6.4 Viewing Alerts in Session Diaries .............................................................................. 37 6.5 Viewing Alerts in the Session Player ......................................................................... 38 6.6 Generating Custom Reports about Alerts ................................................................ 38

Copyright © 2015 ObserveIT. All rights reserved. 22
About This Document This document explains how to create Activity Alert Rules for both Windows and Unix/Linux platforms to
address your business needs. It describes the alert rule structure, syntax, and logic, and guides you through
the steps of configuring both simple and advanced rules. It also provides tips and best practices.
Intended Audience This document is intended for administrators and IT security personnel in charge of configuring the ObserveIT system to trigger alerts based on user activities. This document assumes familiarity with the ObserveIT Enterprise product. This document focuses on the implementation of alert rules. It also provides a quick overview of the
available alert review capabilities.
Related Documentation
The ObserveIT product documentation is available at this URL: http://www.observeit.com/documentation/index.html. For full details about configuring and using ObserveIT activity alerts, refer to Monitoring Activity Alerts in the User Guide.
Support If you have any questions or require assistance, visit the ObserveIT technical support portal at
http://www.observeit.com/Support.

Copyright © 2015 ObserveIT. All rights reserved. 33
1 Activity Alerts Overview ObserveIT Activity Alerts provide a proactive, real-time detection and defense mechanism. ObserveIT
Activity Alerts provide instant warning to administrators and IT security personnel about abnormal,
suspicious, malicious, or out-of-policy user activity so that they can respond quickly and efficiently. This is an
important defense against threats to system integrity, IT security, regulatory compliance, and company
policies.
The ObserveIT Insider Threat Intelligence dashboard provides a user-centric view of risky users in the
system. From this dashboard, administrators can view and investigate alerts based on recorded user activity
that contributed to the definition of risky users. In the ObserveIT Web Console, administrators can configure
and fully customize flexible rules which define the conditions in which user actions will cause alerts to be
generated (based on robust combinations of criteria—Who, Did What, On Which Computer, When, and
From Which Client), and how often the alerts are generated upon recurrence of an activity (whether once
per session, or every time they occur). Administrators can define enriched alert rules based on specific (user-
defined) interactions with sensitive application elements, so that each time that a user views or interacts
with a predefined sensitive In-App element, an alert will be generated.
For example, the rules can trigger an alert when a particular user logged in to a particular computer, or when
a user attempts to access sensitive servers outside normal business hours. The rules can target any
potentially risky activity, such as when a user interacts with application sensitive elements, runs a specific
application or process, visits a specific website URL, or executes commands to perform actions that may
impact system security. The possibilities for defining alert rules are vast, where you can literally combine any
criteria that you may need to trigger alerts upon potentially dangerous user activities and harmful intrusions
into your system.
When a possible threat is detected, an alert is generated and the ObserveIT Web Console displays a
summary of the suspicious behavior, session details, and an actual video of the user’s exact actions. Alerts
are integrated throughout the ObserveIT system with alert indications, risk severity level, alert status, and
details appearing throughout the Web Management Console, in video replays, session screenshots, and alert
email notifications. The user-friendly graphical alert display allows the reviewer to quickly assess the threat
and take immediate action if needed. Alerts can be assigned a status according to administrator assessment
and assigned a risk level according to their severity. For details, see Assigning Alert Status and Setting Alert
Risk Level.
Security and compliance officers can easily review generated alerts using powerful filters, flag alerts for
follow-up, delete false alerts, and print and export selected alerts. Customized reports can also be
configured, providing summary information about activity alerts on all monitored Windows and Unix-based
servers.
Administrators can assign a notification policy to each alert rule to designate who gets notified by email and
at what frequency. The alert notification policy determines whether the recipients receive immediate
notification with separate emails upon each alert, digest emails of alert activity per specified number of
minutes, or digest emails on a daily basis at a fixed time. For example, IT security officers in charge of
handling high-severity alerts can be notified immediately upon every alert with a separate email for each
alert notification. Alert activities of lower priority can be sent to relevant personnel in digest emails at
predetermined intervals. Other individuals, such as compliance officers or managers, may require only a
daily summary of the day’s alerts.
Alerts can be integrated into the organization’s existing SIEM system via the ObserveIT Monitor Log.
1.1 Common Alert Scenarios The following scenarios are some examples of the types of suspicious user activity on which alerts can be
generated in ObserveIT:
Users accessing sensitive customer/patient records.
User attempts to steal credit card numbers, phone numbers, email addresses, etc.

Copyright © 2015 ObserveIT. All rights reserved. 44
A non-administrator user opening a sensitive system file (for example, the hosts file).
A Unix user running a program or executing a command which grants the user additional permissions
(for example, via the su or sudo commands).
A DBA executing a DROP TABLE or DROP INDEX command on a production database.
External vendors logging in to database servers during non-working days.
Users browsing sensitive websites from work, or uploading company data to cloud storage.
Copyright © 2015 ObserveIT. All rights reserved. 55
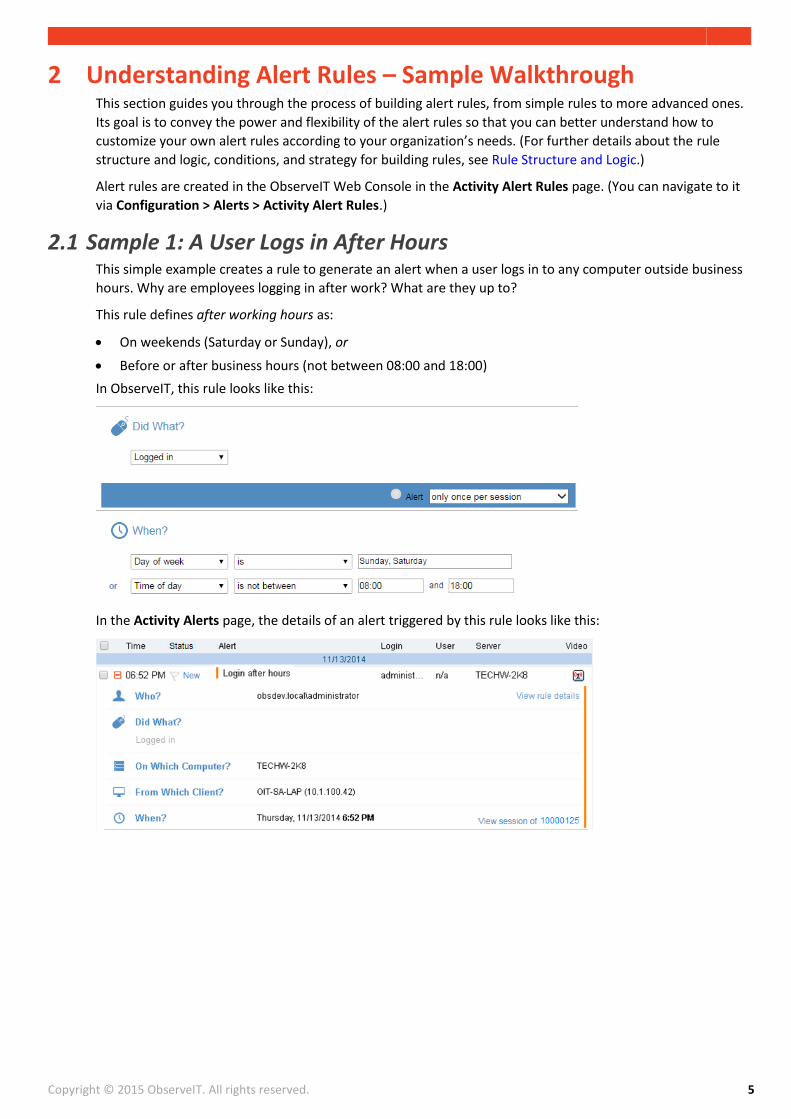
2 Understanding Alert Rules – Sample Walkthrough This section guides you through the process of building alert rules, from simple rules to more advanced ones.
Its goal is to convey the power and flexibility of the alert rules so that you can better understand how to
customize your own alert rules according to your organization’s needs. (For further details about the rule
structure and logic, conditions, and strategy for building rules, see Rule Structure and Logic.)
Alert rules are created in the ObserveIT Web Console in the Activity Alert Rules page. (You can navigate to it
via Configuration > Alerts > Activity Alert Rules.)
2.1 Sample 1: A User Logs in After Hours This simple example creates a rule to generate an alert when a user logs in to any computer outside business
hours. Why are employees logging in after work? What are they up to?
This rule defines after working hours as:
On weekends (Saturday or Sunday), or
Before or after business hours (not between 08:00 and 18:00)
In ObserveIT, this rule looks like this:
In the Activity Alerts page, the details of an alert triggered by this rule looks like this:

Copyright © 2015 ObserveIT. All rights reserved. 66
In slideshow mode, the same alert looks like this:
Additional Points to Consider Beyond the basic options presented in this scenario, you can:
Specify additional criteria to alert when a certain user or user group logs in, at what time, on what target
computer, and on which client machine. For further details, see Rule Conditions.
Check the date/time of activity, whether before, after, between certain days or hours, or not on certain
days by using any of the available operators. For further details, see When do the Activities Occur?
Configure general settings for every alert rule. For further details, see General Rule Details.
View the generated alerts in the ObserveIT Web Console. For further details, see Viewing Generated
Alerts in ObserveIT.
2.2 Sample 2: A User Transfers Large Files Using a Cloud Application This example demonstrates how to create a rule to alert when users attempt to transfer large company files
using a cloud service instead of via a secured company FTP site. This rule may be helpful to alert when
company data may be at risk of being exposed to the public.
This rule specifies WeTransfer as the online file-transferring platform.
In ObserveIT, the rule looks like this:
+
An alert is generated only once—the first time in a session when the user visits www.wetransfer.com (and
not for subsequent pages visited in this site). This helps you identify that this site was accessed, and that the
user may be attempting to transfer company data over the cloud, in an unsecured manner to unknown
outside parties. You can always track additional uses of WeTransfer in the session by using the ObserveIT
Search and Session Player functionalities.
Copyright © 2015 ObserveIT. All rights reserved. 77
Additional Points to Consider You can define rules to alert when:
A user visits any unique webpage in the WeTransfer site. For example, “Visited URL: Any part of URL
contains wetransfer” would generate two separate alerts when a user accesses the following two pages
on this site: www.wetransfer.com/mobile and www.wetransfer.com/plus. For further details, see Any
Part of URL.
A user visits a specific area of the WeTransfer site. For example, “Visited URL: URL prefix contains
wetransfer.com/plus” would generate an alert when a user accesses the WeTransfer Plus area (which
enables users to transfer very large files, up to 10GB). For further details, see URL Prefix.
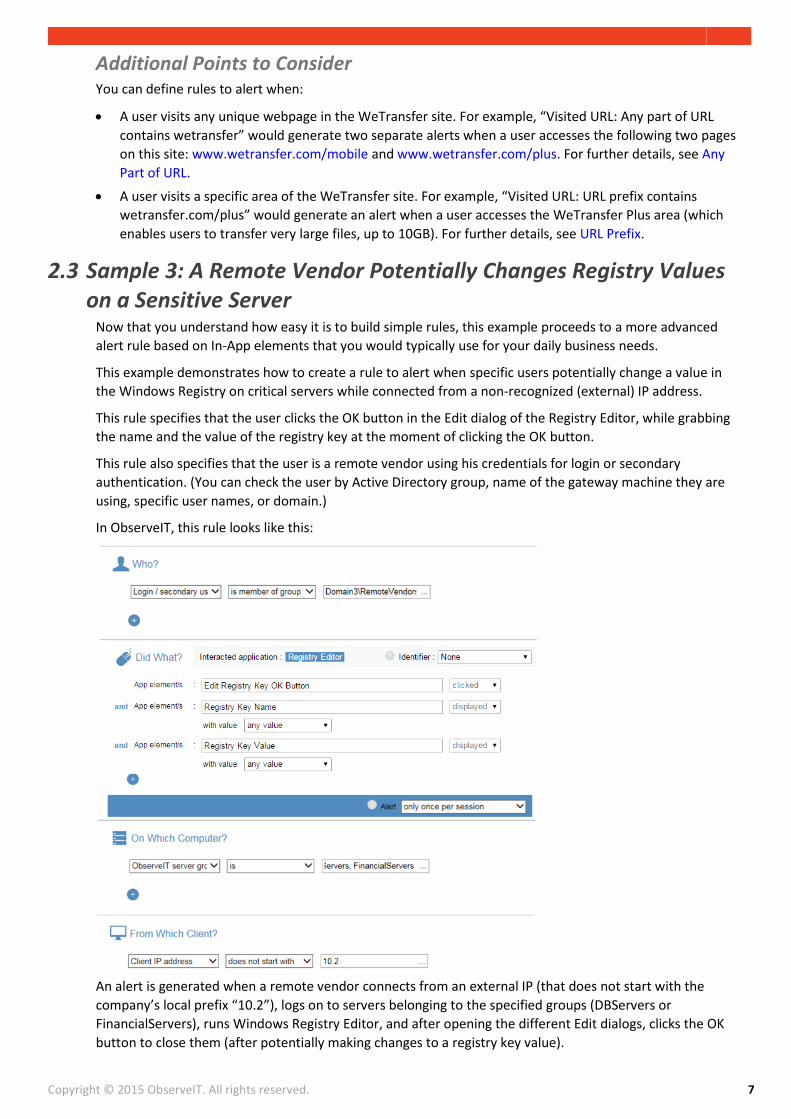
2.3 Sample 3: A Remote Vendor Potentially Changes Registry Values on a Sensitive Server
Now that you understand how easy it is to build simple rules, this example proceeds to a more advanced
alert rule based on In-App elements that you would typically use for your daily business needs.
This example demonstrates how to create a rule to alert when specific users potentially change a value in
the Windows Registry on critical servers while connected from a non-recognized (external) IP address.
This rule specifies that the user clicks the OK button in the Edit dialog of the Registry Editor, while grabbing
the name and the value of the registry key at the moment of clicking the OK button.
This rule also specifies that the user is a remote vendor using his credentials for login or secondary
authentication. (You can check the user by Active Directory group, name of the gateway machine they are
using, specific user names, or domain.)
In ObserveIT, this rule looks like this:
An alert is generated when a remote vendor connects from an external IP (that does not start with the
company’s local prefix “10.2”), logs on to servers belonging to the specified groups (DBServers or
FinancialServers), runs Windows Registry Editor, and after opening the different Edit dialogs, clicks the OK
button to close them (after potentially making changes to a registry key value).

Copyright © 2015 ObserveIT. All rights reserved. 88
Additional Points to Consider A wide variety of user activity can be monitored and alerted, such as when:
Specific applications or processes are run, when URLs in Web browsers are visited, and when certain text
is displayed in window titles. For further details, see Rule Conditions.
Groups of users and/or users that are part of a certain domain perform a suspicious activity. This is the
typical use-case, rather than tracking a specific user. This enables tracking users more easily, when you
may not know specific user names. For further details, see Who Performs the Activities that Trigger
Alerts?
You can define rules to:
Include AND/OR logic. For example, to alert when an administrator adds or removes a user, you can
define: “Command name is useradd, userdel”. For further details, see Rule Logic.
Check for various parameters, users, domains, servers, computers, client machines, and so on. You can
use naming conventions in the rule, such as the “Computer name starts with LAP”. For further details,
see Defining Alert Rule Conditions (and related subsections, such as On Which Computers do the
Activities Occur? and From Which Client Computers?).
Check for users by login name, secondary identification, or both. For further details, see Who Performs
the Activities that Trigger Alerts?
Check for users by permissions. For example, only users who have Administrator permissions (and
therefore may do harm), or non-admin users who have NO admin rights who may be performing
unauthorized activities—Why are they trying to use Regedit? For further details, see Permission Level.
Set the scope of the alert frequency, how often to generate an alert for a recurring activity. The default
alert frequency is to alert only once per active ObserveIT session, but perhaps for some scenarios you
may want to generate alerts more often, such as every time someone runs Regedit application – even if
it happens multiple times within a single ObserveIT session. For further details, see Alert Frequency.
2.4 Sample 4: Abusing Privileged Permissions in Unix to Create a Backdoor User
Now that you understand how to build advanced rules, this example proceeds to create an alert rule specific
to Unix/Linux environments.
This example demonstrates how to create a rule to alert when someone creates a local admin user (with
root permissions) that could be a potential security risk to the system. The new admin user would then be
able to log in undetected (unmonitored by the system) and perform malicious actions. For example, a user
obtained temporary root permissions in order to accomplish a specific task, and abused it to add the
backdoor user that he/she can use in the future.
This rule specifies that a non-root user assumes root permissions to add an admin user locally, as follows:
Obtains root permissions in order to have permissions to add the user. For example, as shown in the
Unix screen below, someone from the QA team logged in to Unix as ‘qa’, executed ‘sudo su’ to
change their permissions to root, and then ran useradd, and
Adds the user with root permissions, using arguments and switches.
For example: useradd joe –o –u 0.
In Unix, the command execution looks like this:
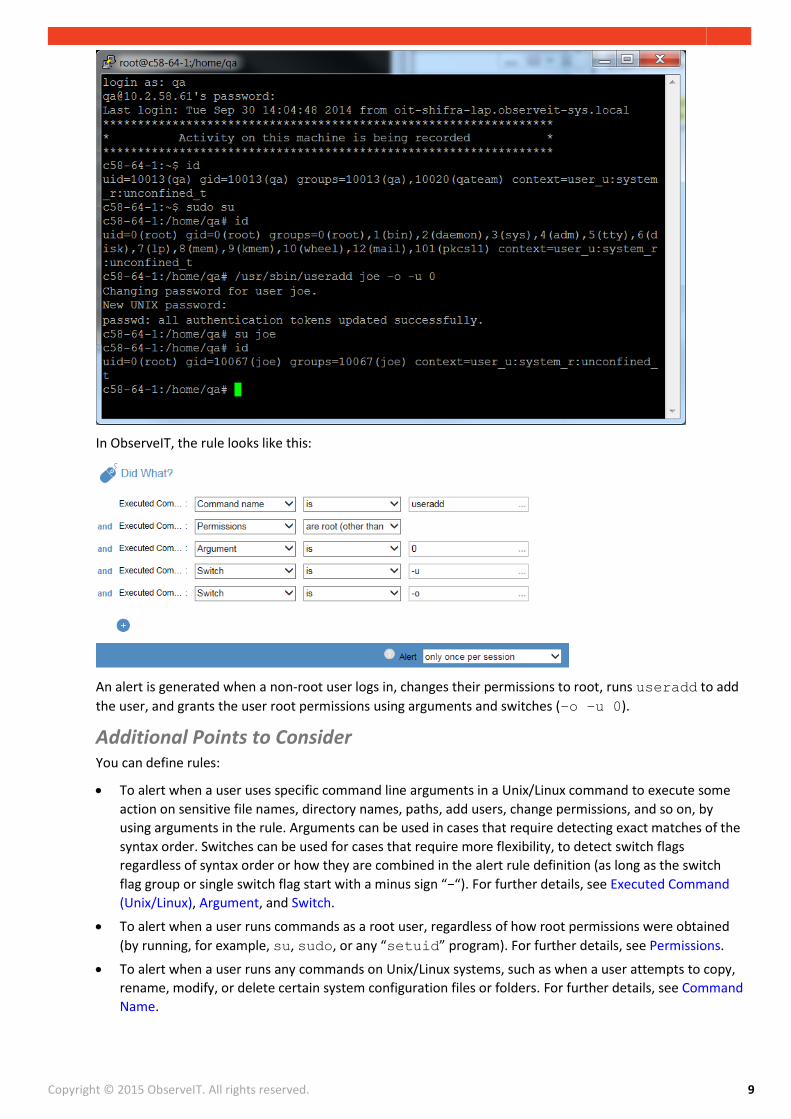
Copyright © 2015 ObserveIT. All rights reserved. 99
In ObserveIT, the rule looks like this:
An alert is generated when a non-root user logs in, changes their permissions to root, runs useradd to add
the user, and grants the user root permissions using arguments and switches (–o –u 0).
Additional Points to Consider You can define rules:
To alert when a user uses specific command line arguments in a Unix/Linux command to execute some
action on sensitive file names, directory names, paths, add users, change permissions, and so on, by
using arguments in the rule. Arguments can be used in cases that require detecting exact matches of the
syntax order. Switches can be used for cases that require more flexibility, to detect switch flags
regardless of syntax order or how they are combined in the alert rule definition (as long as the switch
flag group or single switch flag start with a minus sign “−“). For further details, see Executed Command
(Unix/Linux), Argument, and Switch.
To alert when a user runs commands as a root user, regardless of how root permissions were obtained
(by running, for example, su, sudo, or any “setuid” program). For further details, see Permissions.
To alert when a user runs any commands on Unix/Linux systems, such as when a user attempts to copy,
rename, modify, or delete certain system configuration files or folders. For further details, see Command
Name.

Copyright © 2015 ObserveIT. All rights reserved. 1010
Now that you have seen some sample scenarios of how your rule logic is expressed in ObserveIT, you are
almost ready to build your own custom rules. Proceed to the next section, Rule Structure and Logic, to
understand the structure and logic of the activity alert rules.

Copyright © 2015 ObserveIT. All rights reserved. 1111
3 Rule Structure and Logic This section describes the structure of the alert rules, including rule details, flexible rule design, rule
conditions, and the logic behind the rule conditions.
3.1 General Rule Details For every alert rule, you can define the following general properties (note that some are mandatory):
Name of the alert rule that briefly describes the activity, so that you can easily identify what happened
when the alert is triggered. (Only unique names are allowed. When you try to create a rule with a name
already in use, an error message appears, and the system does not allow you to save the rule. You can
always edit and change the name of an existing rule, as needed.)
Description of the rule (optional) that summarizes the details of the activity that will trigger an alert.
Status of the alert rule–Active or Inactive. See Activating Alert Rules.
Alert rule risk level to specify whether Critical, High, Medium, or Low (color-coded in ObserveIT, as dark
red, red, orange, gray) so that you can quickly identify the risk level and respond accordingly (see Setting
Alert Risk Level).
Notification policy (optional) to determine who receives email alert notifications and how frequently
(see Managing Email Notifications and Viewing Alerts in Email Notifications).
Event conditions (Who?, Did What?, On Which Computer?, When?, From Which Client?) to specify the
activity alert criteria that, when met, will trigger an alert (see Rule Conditions).
You can save the rule at any time and activate it once it is ready to be used (see Saving Rules and Activating
Rules).
3.2 Flexible Rule Design The configuration of activity alert rules is extremely flexible. You can merge several conditions and options
into one rule to combine and detect a wide range of alert criteria (specific users, computer, URLs,
applications, commands, and so on), or you can divide the criteria among several rules to maintain separate
alert definitions.

Copyright © 2015 ObserveIT. All rights reserved. 1212
You do not need separate rules, for example, to alert when a user browses different social media sites. You
can combine the list of sites together into a single alert rule (for example, Facebook, Twitter, Linked In). An
alert will be generated the first time the user visits each of these sites (in this case, in the same session).
You can enter any free text values in the text box on the right. When you have a long list, you can click the
ellipsis “…” to open a popup dialog that allows you to add and edit the long text strings and lists (such as
URLs, IP addresses, user names, computer names, and so on). This enables you to easily define your rule
logic and criteria.
For example, you can enter a long list of URLs:
Since the list is long, it is truncated in the text box in the rule, for example: .
3.3 Rule Conditions ObserveIT alert rules comprise conditions that define the criteria for triggering an alert (Who?, Did What?,
On Which Computer?, When?, From Which Client?). You can use these flexible conditions and options to
define your alert rule to determine what activities and specific circumstances will trigger an alert. Alerts are
generated on the activity defined in Did What? section (either login or other specified activity performed
during the session). By specifying the specific time, computer, client machine, or by which user an activity is
performed, you can define the scope of the activity and limit the number of generated alerts. In other words,
alert rules specify a particular activity that will generate an alert, along with optional conditions which limit
the context in which that activity will generate an alert.
By default, the first instance of every event/activity always triggers an alert. For example, an alert is generated the first time a particular application is run, a window opens displaying a particular title, a specific website URL is visited, a particular command is executed, and so on. The Alert option in the Did What? section enables you to define how often an alert should be generated upon recurrence of an activity–whether once per session or each time the alert occurs. For details, see Alert Frequency.
The following table lists the conditions and related options for defining the scope of the alert. For in-depth
explanations of each option and illustrative examples, click the specific links in the table below, or see
Defining Alert Rules for the complete content.
Condition Description
Who? Who logged in to the computer?
Login account [domain\]name Use to alert according to the name (and optionally domain) of the account with which the user logged in. You can specify Active Directory group membership.
Secondary user [domain\]name Use to alert according to the name (and optionally domain) of the user used for secondary authentication (defined in the Active Directory or ObserveIT). You can specify Active Directory group membership.

Copyright © 2015 ObserveIT. All rights reserved. 1313
Login/secondary user [domain\]name
Use to alert according to the login account or secondary authentication user that logged in (as described above). You can specify Active Directory group membership.
Did What? What particular activity triggered an alert? This condition has platform-specific options.
Logged In ()
Use to alert when a user logs in to either a Windows or Unix/Linux computer. (The user may be, for example, any of the users defined in the Who? condition above.) You can restrict alert generation for "Logged in" events by specifying additional criteria, such as who logged in, when, on which computer the login took place, or from which client machine.
Interacted with Application (Windows)Interacted with Application (Windows)
Use to define Alert Rules based on specific user interactions with application sensitive elements (In-App Elements). A submenu will display all applications/websites in which In-App elements were marked.
Ran Application (Windows) Use these options (Application name, Application full path, Process name, Window title, or Permission level) to generate an alert when a user runs one or more particular applications on a Windows computer. Running certain applications may signal, for example, that the user may be tampering with settings that may affect system security, user permissions, installed software/services, or accessing sensitive data.
Application name Use to alert when a user runs a specific application.
Application full path Use to alert according to the full path of the application the user is running.
Process name Use to alert when a user runs a specific process related to the active application—to detect the process name (for example,
“regedit”) rather than the application name (“Registry Editor”).
Window title Use to alert according to keywords that appear in the titles of windows with which the user interacts.
Permission level Use to alert according to the permissions level of the logged in user running the application (whether admin or not).
Visited URL (Windows) Use these options (Site, URL prefix, Any part of URL) to prevent users accessing sensitive or prohibited websites or webpages. An alert is generated when a user visits a particular website, webpage, area of a website, or Web application in a Web browser in Windows.
Site Use to alert when a user visits a specific website, regardless of specific pages opened in the site.
URL prefix Use to alert when a user visits a specific area of a website, according to the URL prefix that you define, which can be any portion of the URL (any substring).
Any part of URL Use to alert each time a user visits a unique website URL that contains the specified keyword (or string). No matter where in the URL the keyword appears, an alert is generated.
Executed SQL Command (Windows)
Use this option to generate an alert when a user executes a particular SQL command against a database (in Windows). An alert can be generated if a user accesses a database in order to perform harmful activity.
Statement Use to alert when a user executed an SQL statement or command that matches specific keywords.

Copyright © 2015 ObserveIT. All rights reserved. 1414
Executed Command (Unix/Linux)
Use these options (Command name, Parent command, Top level command, Setuid mode, Full path, Argument, Switch, Permissions) to generate an alert when a user executes a particular Unix/Linux command. This is useful to track when a user performs some action on sensitive data, files, directories, paths, user permissions, or system configuration settings.
Command name Use to alert when a user executed a Unix/Linux command.
Parent Command
Use to alert if a command is run from another command using its name, or when a command is not run by a specific command.
Top Level Command Use to alert upon the execution of commands run from within an application running under the shell, such as sudo (top level).
Setuid Mode Use to alert if an unauthorized setuid program is run, as this
program runs as root and the commands it runs internally will
also run as root.
Full path Use to alert according to the explicit path of the command.
Argument Use to alert when a user uses specific command line parameters in a command.
Switch Use to alert when you need more search combinations than the "Argument" option, in order to find exactly what you need.
For example, if you are looking in an alert rule for the argument "–r", the switch option allows you to use: "–rf" or "–fr" which extends the range of your search options.
Permissions Use these options to alert if a user tries to switch identity or run commands under a different identity (privileged escalation). For example, running commands under 'root'.
Alerts are based on the permissions used to run the command, whether the user's own permissions (those granted during login), root permissions, or other permissions. For further details, see Permissions are own, Permissions other than own, Permissions are root, and Permissions are root (other than own).
On Which Computer?
On which computer (or within which group of computers/servers) did the activity occur?
Computer [domain\]name Use to alert according to the name (and optionally domain) of the computer on which an activity occurred.
ObserveIT server group name Use to alert according to the name of the server group on which an activity occurred. (The server group is defined in the ObserveIT Web Console Server Groups page.)
Computer IP address Use to alert according to the IP address of the computer on which an activity occurred.
OS name Use to alert according to the name of the operating system on which an activity occurred. (Use the OS names and details that are displayed in the ObserveIT Web Console Servers page.) You must include the full OS name when using the “is/is not” operators.
Agent version number Use to alert according to the version number of the ObserveIT Agent under which an activity occurred.
When? On what day and/or at what time was the activity performed?
Day of week Use to alert according to particular days of the week.
Time of day Use to alert according to particular times.
Specific date Use to alert according to particular dates.
Specific date and time Use to alert according to a particular range of dates and times.

Copyright © 2015 ObserveIT. All rights reserved. 1515
From Which Client?
From which client computer did the user connect to the monitored computer (on which the activity occurred)?
Client name Use to alert according to the name (and optionally domain) of the client computer from which the user connected to the monitored computer (as described in On Which Computer?).
Client IP address Use to alert according to the IP address of the client computer from which the user connected to the monitored computer. IPv4 and IPv6 formats are supported.
3.4 Alert Frequency What is the frequency of the alert generation? How often do you want to generate alerts for serious events
which may impact the system?
The first instance of every event/activity always triggers an alert. For example, an alert is generated the first time a particular application is run, a window opens displaying a particular title, a specific website URL is visited, a particular command is executed, and so on.
An alert can be triggered by a specific event (for example, a Window title containing "host"), which may
repeat itself for succeeding screenshots (for example, if the user keeps working in Notepad the word "hosts"
is triggered from almost every recorded screen). In this case, generating an alert for every screen is not
feasible, and it would probably be sufficient to generate an alert only once in a user session. To prevent too
many alerts from being generated for the same event, ObserveIT lets you define the frequency of alert
generation which controls the number of times an alert can be triggered.
For most activities, the default of “alert only once per session” is ideal. However, you may want to know
about each instance when an application or process is opened.
The Alert option in the Did What? section enables you to define how often an alert should be generated
upon recurrence of an activity–whether once per session or each time the alert occurs.
Alert Only Once Per Session Select this option to prevent alerts from being generated more than once per user session or per
application/process. For example, you might select this option if you do not want to be alerted every time
the user browses an illegal Website, but only at the first instance during a session.
This is the default frequency, where one alert is generated per active ObserveIT session (which by default
lasts 15 minutes, and is set in the Configuration > Server Policies page). An alert is generated only the first
time a user runs an application in a session—such as when a user runs the Internet Information Services (IIS)
Worker Process (w3wp) to stop system services:
When more than one application is specified in the rule, the alert is triggered the first time each application is used in the session (for example, cmd or services).
Alert Each Time Select this option to allow alerts to be generated each time they occur. For example, you might select this
option to generate an alert each time that an unauthorized user accesses a specific sensitive file (such as,
Registry Editor, Microsoft Management Console (MMC)) during a session.

Copyright © 2015 ObserveIT. All rights reserved. 1616
For example, the following conditions would generate an alert every time the mmc process is rerun (upon
every new process ID) and the window title “Network Connection” is displayed:
3.5 Rule Logic The underlying rule logic determines how conditions and criteria correlate. The validity of the alert criteria is
tested by the rule engine, and only when an activity meets all the criteria will an alert be generated.
The rule conditions relate to each other logically using “AND” logic (for example, Who, Did What, On
Which Computer, and When).
The criteria specified within each condition section (Who?, Did What?, On Which Computer?, When?,
From Which Client?) relate to each other logically using either “AND” or “OR” logic. You can specify
within the condition whether all the criteria must be met ("AND" logic), or whether any of the conditions
may apply ("OR" logic). For example, one rule can alert when a certain process is run and when certain
text is displayed in the window title. Another rule can alert when either “this command” or “that
command” is executed.
You can define multiple values for a condition using a comma to separate the values to indicate “OR”
logic, such as “reboot, shutdown” to denote “reboot or shutdown”– .
You can combine “OR” and “AND” logic by using a combination of comma-separated values and
options—such as in the following rule which generates an alert when a user opens either an Excel or
Word file containing sensitive company data, and the keywords, “budget”, “finance”, or “strategy,”
appear in the window title:
Proceed to the next section which describes the steps for creating alert rules.

Copyright © 2015 ObserveIT. All rights reserved. 1717
4 Steps for Creating Alert Rules Before building your alert rules, consider the following points:
What are the specific problems you are trying to solve? For which user activities would you want to
receive alerts? For which users/groups might alerting be most valuable to you? Is it important to
consider the day/date/time for these activities? Is it important to differentiate between host computers
and/or client computers used for these activities?
How frequently do you require alerts for each activity of interest?
What is the status you want to assign to each alert?
What risk level (Critical, High, Medium, or Low) should be assigned to each alert? Decide for which alerts
you want someone to receive email notifications, and at what frequency.
Consider creating reports that provide summary information about alerts on all monitored Windows
and/or Unix-based servers.
The steps for creating an alert rule are:
1. Navigate to the Create Alert Rule page in the ObserveIT Web Console:
Go to Configuration > Alerts > Activity Alert Rules and click the Create New Alert Rule button.
2. Create the rule. Enter a name and description for the rule. (See General Rule Details.)
3. Define alert rule conditions. (See Defining Alert Rule Conditions.)
4. Define the status of the alert rule–Active or Inactive.
5. Define the alert risk level. (See Setting Alert Risk Level.)
6. Assign an email notification policy to the rule. (See Managing Email Notifications.)
7. Save the rule. (See Saving Rules.)
8. Activate the rule. (See Activating Rules.)
9. (Recommended) Test the rule, to see if alerts are triggered as you intended. (See Viewing Generated
Alerts in ObserveIT.)

Copyright © 2015 ObserveIT. All rights reserved. 1818

Copyright © 2015 ObserveIT. All rights reserved. 1919
5 Defining Alert Rules This section walks you through the process of defining alert rules, including in-depth explanations of the
alert rule criteria and what conditions and scenarios to consider when creating your rules for triggering
alerts.
Note: Sample rules are supplied with the product; these easily-customized built-in alert rules represent common use cases in which administrators might want to receive alerts following suspicious user activity. It is recommended that you first copy, then edit and activate these alert rules to suit your organization’s security needs, since new product releases may update the samples.
5.1 Defining Alert Rule Conditions The main part of creating alert rules is defining the criteria (Who?, Did What?, On Which Computer?,
When?, From Which Client?) that, when met, will trigger an alert. By specifying where, when, and by whom
an activity is performed, you can define the scope of the activity and limit the number of generated alerts.
All the conditions, except for specific Did What? activities, can be used in both Windows and Unix/Linux
environments. Each condition has its own set of parameters for which you can choose from a list of available
options (fields and operators) and specify input values.
5.1.1 Who Performs the Activities that Trigger Alerts? Which user triggered the alert? Who are the risky users in your organization? You can specify the Who?
criteria to create a rule to generate an alert only when specific individuals or groups of users perform an
activity. For example, you can limit the scope of the alert rule to who was logged in or who ran an
application, visited a website URL, executed a command, and so forth. (For details about the many user
activities you can monitor, see What Activities Trigger Alerts?)
Options for Defining the "Who?" Conditions What are the user’s credentials? Users may be specified by login account name and/or secondary login
account name:
Login account [domain\]name: Use this option to generate an alert based on one or more login account
names (optionally including a domain) with which the user(s) logged in. You can specify Active Directory
group membership by using the “is member of group” operator. The user may be a member of a user
group—such as “employee Joe” in the following rule:
Secondary user [domain\]name: (This option is similar to the Login account option described above.)
Use this option to generate an alert based on the user accounts used for secondary authentication.
(Secondary authentication accounts are defined in the Active Directory or directly in ObserveIT.)
Secondary authentication is typically used to differentiate between various admin users who log in using
the same shared admin-level account (for example, administrator or root).

Copyright © 2015 ObserveIT. All rights reserved. 2020
Login/secondary user [domain\]name: Use this option to generate an alert based on either the login
account name or secondary login account name used, and you can specify Active Directory group
membership (as described above)—such as when a member of the remote vendors group logs in:
5.1.2 What Activities Trigger Alerts? For what particular activities do you want to receive real-time alerts? What are the suspicious, dangerous,
malicious, or out-of-policy user activities that may threaten your systems or data? Which sensitive
application data did users interact with?
You can specify Did What? criteria to create a rule to generate an alert when a particular activity is
performed, such as when a user logs in, runs a specific application or process, visits a particular page or area
of a website, or executes particular commands with or without specific switches.
You can also specify the maximum frequency that each defined alert will trigger (for example, whether once
per session, or on every occurrence). See Alert Frequency.
Options for Defining the “Did What?” Conditions All the Did What? activities are either Windows or Unix/Linux-specific, except for login which is relevant for
both platforms. For details about each of the Did What? options, see Logged In, Interacted with Application,
Ran Application, Visited URL, Executed SQL Command, and Executed Command (Unix/Linux).
Logged In (Windows and Unix/Linux)
Use this option to generate an alert when a user logs in to either a Windows or Unix/Linux computer. Note
that “Logged in” is the default activity that appears when creating a new alert rule, and that it cannot be
combined with any other activity. You can restrict alert generation for “Logged in” events by specifying
additional criteria, such as who logged in, when, on which computer the login took place, or from which
client machine.
Considerations and Tips
Note: Without specifying some additional criteria related to this activity, many alerts will be generated—in fact every time someone logs in to any monitored computer! Therefore, it is important to specify particular users, servers, days/times, and so forth—so that you receive only relevant alerts.

Copyright © 2015 ObserveIT. All rights reserved. 2121
Interacted with Application (Windows)
Use the Interacted with Application option to generate an alert when a user interacts by clicking (“Clicked”)
or by viewing (”Displayed”) predefined application sensitive elements (known as In-App Elements). By
marking sensitive data at element level within applications/websites, you can expose risky user activity and
subsequently generate alerts which can be viewed in the ObserveIT Web Console (Activity Alerts, Session
Player) and in the Insider Threat Intelligence dashboard.
The following example shows a typical condition you might define for alerting when a user interacts with an
element in the Registry Editor. By changing a value in the registry, severe issues could result with the
operating system or the installed software/services.
Additional Points to Consider
Upon selecting the “Interacted with Application” menu, a submenu displays all applications/websites in
which at least one element was marked using the ObserveIT Marking Tool.
The header of the “Did What?” section displays two unique fields:
Interacted application – The name of the application selected in the submenu. Each “Did What?”
condition relates to a single application/website.
Identifier – A dropdown list displaying all pre-marked In-App elements in the selected
application/website, from which the user can choose one. The goal of the identifier is to help the
security person that reviews the triggered alerts (in the Activity Alerts screen) to quickly understand
the context of the triggered alert. The value of the identifier field in runtime is documented and
displayed together with the triggered alert. For example, an alert can be defined to be triggered
each time a record of a patient whose doctor is “John Medic” is viewed by any user (in a Health
system). By choosing the pre-marked field Patient Name as identifier, this name of the patient will
be displayed to the security person together with the triggered alert.
A single element or multiple elements can be chosen from the multiple-selection dropdown list opened
upon clicking the first field in the row. Multiple selection is available only for elements that were marked
for the same interaction type (Clicked, Displayed). Upon selecting the first element, all elements that do
not have the same interaction in common are automatically disabled for selection.
Upon selecting the interaction type Clicked, there will be no more options in the conditions. When
selecting the interaction type Displayed, additional options enable evaluation of the value of the
element in runtime against a specific condition (such as, a value that starts with “super”).
Ran Application (Windows)
Use the Ran Application options to generate an alert when a user runs one or more particular applications
on a Windows computer (see Application name, Application full path, Process name, Window title,
Permission level). Running certain applications may signal, for example, that the user may be tampering with
settings that may affect system security, user permissions, installed software/services, or accessing sensitive
data.
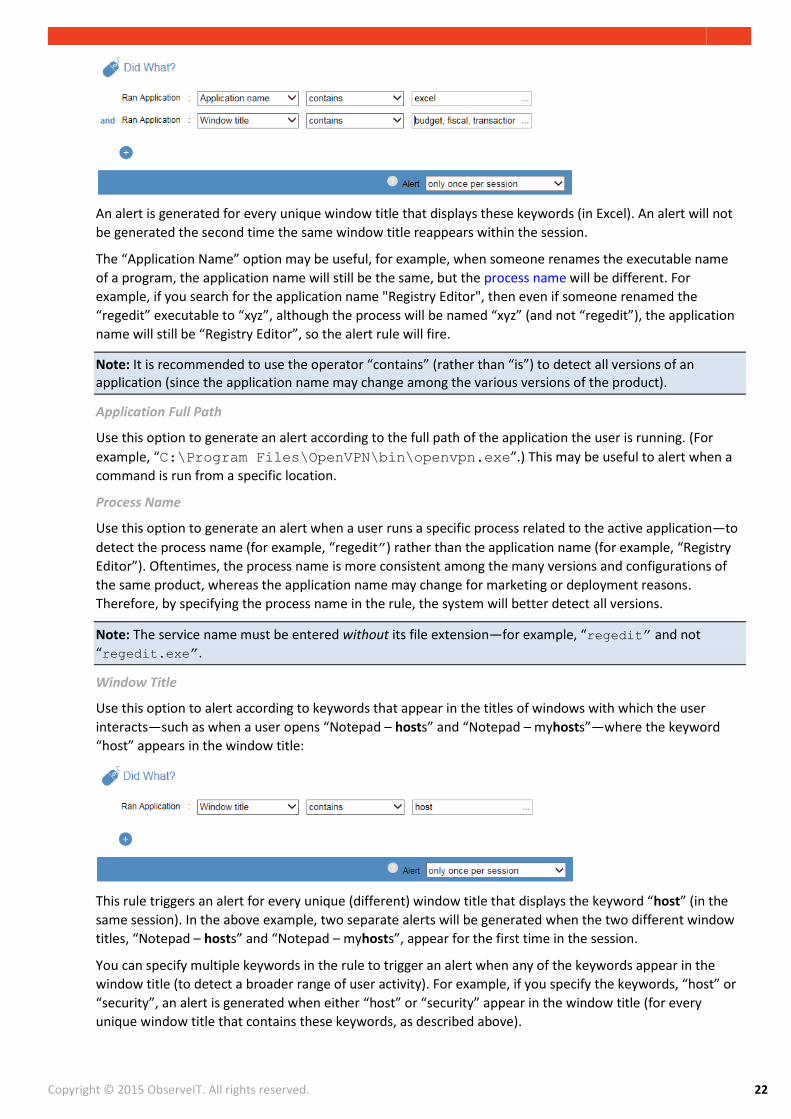
Application Name
Use this option to generate an alert when a user runs a specific application—such as when a user opens an
Excel file containing sensitive company data, and the keywords, “budget, fiscal, or transactions,” appear in
the window title:
Copyright © 2015 ObserveIT. All rights reserved. 2222
An alert is generated for every unique window title that displays these keywords (in Excel). An alert will not
be generated the second time the same window title reappears within the session.
The “Application Name” option may be useful, for example, when someone renames the executable name
of a program, the application name will still be the same, but the process name will be different. For
example, if you search for the application name "Registry Editor", then even if someone renamed the
“regedit” executable to “xyz”, although the process will be named “xyz” (and not “regedit”), the application
name will still be “Registry Editor”, so the alert rule will fire.
Note: It is recommended to use the operator “contains” (rather than “is”) to detect all versions of an application (since the application name may change among the various versions of the product).
Application Full Path
Use this option to generate an alert according to the full path of the application the user is running. (For
example, “C:\Program Files\OpenVPN\bin\openvpn.exe”.) This may be useful to alert when a
command is run from a specific location.
Process Name
Use this option to generate an alert when a user runs a specific process related to the active application—to
detect the process name (for example, “regedit”) rather than the application name (for example, “Registry
Editor”). Oftentimes, the process name is more consistent among the many versions and configurations of
the same product, whereas the application name may change for marketing or deployment reasons.
Therefore, by specifying the process name in the rule, the system will better detect all versions.
Note: The service name must be entered without its file extension—for example, “regedit” and not “regedit.exe”.
Window Title
Use this option to alert according to keywords that appear in the titles of windows with which the user
interacts—such as when a user opens “Notepad – hosts” and “Notepad – myhosts”—where the keyword
“host” appears in the window title:
This rule triggers an alert for every unique (different) window title that displays the keyword “host” (in the
same session). In the above example, two separate alerts will be generated when the two different window
titles, “Notepad – hosts” and “Notepad – myhosts”, appear for the first time in the session.
You can specify multiple keywords in the rule to trigger an alert when any of the keywords appear in the
window title (to detect a broader range of user activity). For example, if you specify the keywords, “host” or
“security”, an alert is generated when either “host” or “security” appear in the window title (for every
unique window title that contains these keywords, as described above).

Copyright © 2015 ObserveIT. All rights reserved. 2323
Permission Level
Use this option to generate an alert according to the permissions level of the user that is running the
application (whether admin or not). This may be valuable to detect when a user runs a particular application,
one which may possibly signal malicious intent—such as when a user attempts to access the hosts file
without admin permissions:
Considerations and Tips
Determine the applications and sensitive data files that you want to monitor, and the users who are
accessing them. For example, only administrators have permissions to use certain system applications,
such as cmd.exe, so you may want to alert when non-admin users run cmd or when admins managed
to run cmd at unusual hours (they obtained UAC permissions somehow).
Wildcards are not supported. For partial searches, use the operator “contains” instead of “is”. (For
example, “Window title contains budget, fiscal, transactions”.)
Visited URL (Windows)
Use the Visited URL options (Site, URL prefix, Any part of URL) to generate an alert when a user visits a
particular website, webpage, area of a website, or Web application in a Web browser in Windows. Is the
user accessing sensitive or prohibited websites or webpages? This is useful to prevent possible hacking
attempts or data theft.
Site
Use this option to generate an alert when a user visits a specific website, regardless of which pages were
opened in the site. This is useful to track users accessing unauthorized or inappropriate sites (during work
hours)—such as when a user browses social media sites (Facebook, Twitter, or Linked In):
According to the above rule:
An alert will be triggered the first time in the session the user visits any one of these sites (when the URL
domain contains the matching text: “facebook” or “twitter” or “linked in”). For example, when the user
visits the Facebook login page: www.facebook.com/login?.... or the Linked In login page:
www.linkedin.com/company/login.
Because “Alert” is set to “only once per session”, an alert will not be triggered when any other pages or
areas within the website are visited within the same session. For example, when the user visits a friend’s
page after logging in to Facebook (www.facebook.com/friend?....).
URL Prefix
Use this option to generate an alert when a user visits a specific area of a website, according to the URL
prefix that you define. This is very useful if you want to be alerted when someone visited a particular area of
a Web application, for example, the “Leads” section in the Salesforce website, but you do not want to be
Copyright © 2015 ObserveIT. All rights reserved. 2424
alerted on each and every individual lead that they are reviewing (which if you want, can be achieved using
Any part of URL described below).
What is a URL prefix? In ObserveIT, “prefix” in this context can be any portion of the URL (any substring), and
does not necessarily have to start at the very beginning of the URL. The “URL prefix” is thus the text (string)
that you specify, which can start and end at any point in the URL. For example, you can specify
“google.com/accounts” to generate an alert when a user visits the Google Accounts page versus alerting
when a user visits the home page of the site, “https://www.google.com/”.
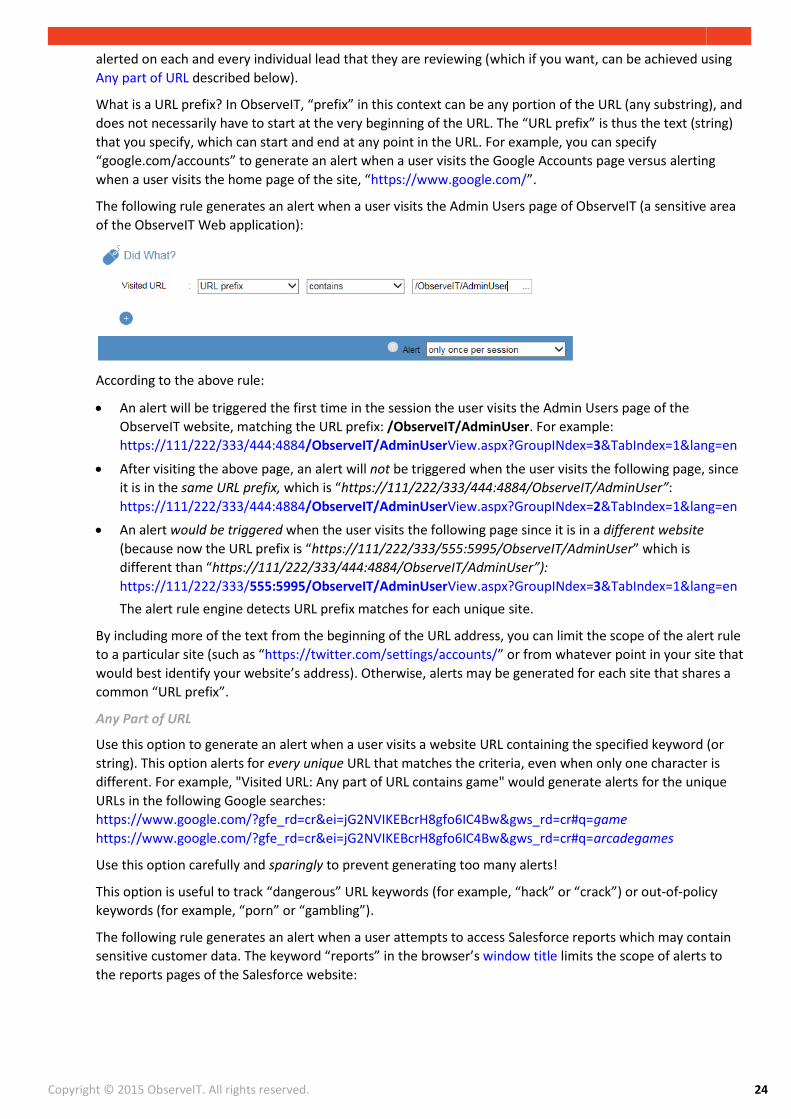
The following rule generates an alert when a user visits the Admin Users page of ObserveIT (a sensitive area
of the ObserveIT Web application):
According to the above rule:
An alert will be triggered the first time in the session the user visits the Admin Users page of the
ObserveIT website, matching the URL prefix: /ObserveIT/AdminUser. For example:
https://111/222/333/444:4884/ObserveIT/AdminUserView.aspx?GroupINdex=3&TabIndex=1&lang=en
After visiting the above page, an alert will not be triggered when the user visits the following page, since
it is in the same URL prefix, which is “https://111/222/333/444:4884/ObserveIT/AdminUser”:
https://111/222/333/444:4884/ObserveIT/AdminUserView.aspx?GroupINdex=2&TabIndex=1&lang=en
An alert would be triggered when the user visits the following page since it is in a different website
(because now the URL prefix is “https://111/222/333/555:5995/ObserveIT/AdminUser” which is
different than “https://111/222/333/444:4884/ObserveIT/AdminUser”):
https://111/222/333/555:5995/ObserveIT/AdminUserView.aspx?GroupINdex=3&TabIndex=1&lang=en
The alert rule engine detects URL prefix matches for each unique site.
By including more of the text from the beginning of the URL address, you can limit the scope of the alert rule
to a particular site (such as “https://twitter.com/settings/accounts/” or from whatever point in your site that
would best identify your website’s address). Otherwise, alerts may be generated for each site that shares a
common “URL prefix”.
Any Part of URL
Use this option to generate an alert when a user visits a website URL containing the specified keyword (or
string). This option alerts for every unique URL that matches the criteria, even when only one character is
different. For example, "Visited URL: Any part of URL contains game" would generate alerts for the unique
URLs in the following Google searches:
https://www.google.com/?gfe_rd=cr&ei=jG2NVIKEBcrH8gfo6IC4Bw&gws_rd=cr#q=game
https://www.google.com/?gfe_rd=cr&ei=jG2NVIKEBcrH8gfo6IC4Bw&gws_rd=cr#q=arcadegames
Use this option carefully and sparingly to prevent generating too many alerts!
This option is useful to track “dangerous” URL keywords (for example, “hack” or “crack”) or out-of-policy
keywords (for example, “porn” or “gambling”).
The following rule generates an alert when a user attempts to access Salesforce reports which may contain
sensitive customer data. The keyword “reports” in the browser’s window title limits the scope of alerts to
the reports pages of the Salesforce website:

Copyright © 2015 ObserveIT. All rights reserved. 2525
Executed SQL Command (Windows)
Use the Executed SQL Command option to generate an alert when a user executes a particular SQL
command against a database (in Windows). This option is very important since it can help track when a user
accesses a database and performs a potentially harmful activity, or even when a DBA performs certain
actions at unusual hours or on particularly sensitive data. (For example, when a user runs the “SELECT”
statement in the middle of the night in an attempt to steal company data.)
Statement
Use this option to generate an alert when a user executes an SQL statement or command that matches
specific keywords—such as when a user runs “UPDATE” and “DROP” to tamper with credit card data:
An alert is generated when each command is used uniquely the first time in a session (for example, DROP
TABLE CREDIT_CARD). The rule recognizes exact usage of the command and will not generate an alert
upon a second execution in the same session.
However, if any values change, a separate alert is generated upon each unique instance. For example, this
rule will trigger two separate alerts for the following two instances where the UPDATE CREDIT_CARD
command is executed in the same session but with different values assigned:
UPDATE CREDIT_CARD
SET Blocked = 1
WHERE CreditCardNumber = 6542789512345614
UPDATE CREDIT_CARD
SET Blocked = 1
WHERE CreditCardNumber = 1234561234561234
Considerations and Tips
Executing SQL commands could seriously impact the database. Therefore, it is important to create a rule
with this criteria to alert whenever any changes are made to the database.
Executed Command (Unix/Linux)
When safeguarding your system against Unix/Linux commands, your privileged users are the group that are
the most risky. Privileged users such as admins who have the access and expertise into the Unix operating
system, are the user group that have the know-how to use the commands to steal data, destroy systems,

Copyright © 2015 ObserveIT. All rights reserved. 2626
and get away with it. Thus it is extremely important to monitor and alert on Unix commands and privileged
users who may want to perform unauthorized or malicious activities that could adversely affect system
security or data.
Use the Executed Command options (Command name,
Copyright © 2015 ObserveIT. All rights reserved. 2727
Parent Command, Top Level Command, Setuid Mode, Full path, Argument, Switch, Permissions) to generate
an alert when a user executes a particular Unix/Linux command. This is useful to track when a user performs
some action on sensitive data, files, directories, paths, user permissions, or system configuration settings.
Are they performing some unauthorized or malicious activities that will adversely affect system security or
data?
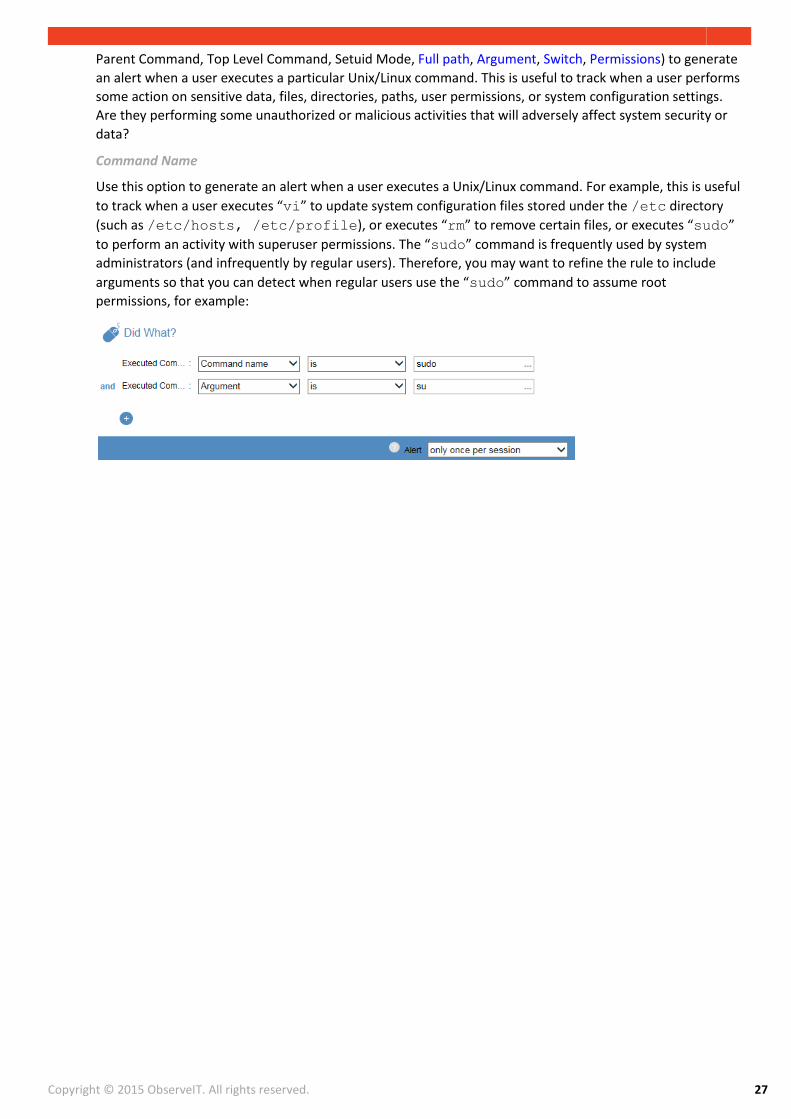
Command Name
Use this option to generate an alert when a user executes a Unix/Linux command. For example, this is useful
to track when a user executes “vi” to update system configuration files stored under the /etc directory
(such as /etc/hosts, /etc/profile), or executes “rm” to remove certain files, or executes “sudo”
to perform an activity with superuser permissions. The “sudo” command is frequently used by system
administrators (and infrequently by regular users). Therefore, you may want to refine the rule to include
arguments so that you can detect when regular users use the “sudo” command to assume root
permissions, for example:

Copyright © 2015 ObserveIT. All rights reserved. 2828
Parent Command
Use this option to be alerted if a command is run from another command using its name, or when a
command is not run by a specific command.
Following is an example of the conditions you could define to be alerted if the root shell command is opened
from unauthorized commands.
Top Level Command
Use this option to be alerted upon the execution of commands run from within an application running under
the shell, such as sudo (top level). For example, alert upon the execution of external commands from within
a text editor run via sudo.
Following is an example of the conditions you could define to generate an alert if sudo is used to run a
script.
Setuid Mode
Use this option to be alerted if an unauthorized setuid program is run, as this program runs as root
and the commands it runs internally will also run as root.
To ensure that only authorized setuid programs are running on the system, you could define the
following condition:
Full Path
Use this option to generate an alert according to the full path of the command. This may be useful to detect
when a command is run from a specific location. For example, you can specify “/bin/rm” to generate an
alert when a user runs the rm command from the native operating system.

Copyright © 2015 ObserveIT. All rights reserved. 2929
Argument
Use this option to generate an alert based on specific command line arguments provided by the user. The
Argument option is useful to alert when a user attempts to execute some action on sensitive file names,
directory names, paths, and so on—such as in the following rule which generates an alert when a user might
be maliciously removing a user’s profile:
Switch
Use this option to alert when a user uses specific command line switches in a command. (A switch is a
command line argument that starts with a minus sign “−“, for example,
“rm −r”, “rm –rf”.) The Switch option provides an easy way to alert on specific command line switches in
a way that the Argument option cannot. The reason is that the Switch option detects all variations of the
switch flags regardless of syntax order, or whether separated or combined in the alert rule definition, as long
as the switch flag group or single switch flag start with “−”. For example, if you define: “Command name is
ps” and “Switch is –e, -l, -f”, an alert will be generated for all variations (“ps −elf” and “ps −fle” and “ps −fe”
and “ps −e −l −f”, and so on).
To detect a command such as “rm −rf”, you have to define the rule as “switch is –r, -f” and the system will
detect all combinations such as “rm –fr”, “rm –rf”, “rm –r -f”:
Permissions
Use the following options to alert when a user uses particular permissions. A user can log in with regular
credentials, their own or someone else’s, and then assumes root permissions via the sudo/su command,
or by running any “setuid” program that grants root permissions. The system compares the permissions of
the original logged-in user with those of the current effective user running the action.
Permissions are own: Use this option to generate an alert when a user logged in with his/her own
credentials and ran the specified commands under his/her original permissions (granted at the time of
login).
Permissions other than own: Use this option to generate an alert when a user runs the specified
commands with permissions that are different from the logged-in user:

Copyright © 2015 ObserveIT. All rights reserved. 3030
Permissions are root: Use this option to generate an alert when a user runs a specific scenario using root
permissions (regardless of whether the user logged in originally as root or changed permissions after
login):
Permissions are root (other than own): Use this option to generate an alert when a user logs in with
non-root credentials, assumes root permissions using the sudo/su command, and then runs the
specified commands as root user (or runs any “setuid” program that grants root permissions):
5.1.3 On Which Computers do the Activities Occur? On which computer (or within which group of computers/servers) did the activity occur? Use the On Which
Computer? options to limit the scope of the specified activities to one or more particular computers. This
may be useful to generate alerts for activities that are performed on critical computers or sensitive servers.
Options for Defining the “On Which Computer?” Conditions
Computer [Domain\]Name
Use this option to generate an alert according to the name (and optionally domain) of the computer on
which an activity occurred (for example, “LOCAL\DB, DomainA\FIN”). This option is useful if it is critical know
when the activity is being performed on a particular computer—such as one with “SQL” in its name:

Copyright © 2015 ObserveIT. All rights reserved. 3131
ObserveIT Server Group Name
Use this option to limit the scope of the alert to particular server groups defined within ObserveIT—such as
when a user tries to log in to sensitive database servers (“DBServers” or “FinancialServers"):
The server groups are defined in the Configuration > Server Group page in the Web Console.
Computer IP Address
Use this option to limit the scope of the alert to computers with one or more particular IP addresses—such
as when a user performs an activity from a computer within an organization where the IPs begin with “10.1”:
OS Name
Use this option to limit the scope of the alert to computers running a particular operating system (for
example, “Windows Server 2012 R2, Ubuntu, Solaris 11”). (Use the OS names and details that are displayed
in the OS Version list in the Configuration > Servers page in the Web Console.) This option may be useful, for
example, if you want to catch Windows users accessing Unix Ubuntu machines.
Note: You must include the full OS name when using the “is/is not” operators. Therefore, it is recommended instead to use the operators “contains” or “starts with” so that you can specify partial searches for OS names (such as “Windows” or “Win”).
Agent Version Number
Use this option to limit the scope of the alert to computers running a particular version number of the
ObserveIT Agent under which an activity occurred (for example, “5.5, 5.6.9”).
Considerations and Tips
You may want to know when users perform activities on particular critical computers. Therefore,
specifying the computer alert criteria can be very helpful.
5.1.4 When do the Activities Occur? On what day and/or at what time was the activity performed? Use the When? options to limit the scope of
the alert to particular days/dates/times. This may be useful to generate alerts for activities that are
performed during suspicious times, such as outside regular business hours.
Options for Defining the “When?” Conditions
Day(s) of Week: Use this option to limit the scope of the alert to particular days of the week. For
example, “Day of week is Saturday, Sunday” or “Day or week is not Tuesday”.
Time(s) of Day: Use this option to limit the scope of the alert to particular times. For example, “Time of
day is before 10:59” or “Time of day is between 08:00 and 18:00”.

Copyright © 2015 ObserveIT. All rights reserved. 3232
Specific Date(s): Use this option to limit the scope of the alert to particular dates. For example, “Specific
date is 25/12/2014” or “Specific date is not between 15/09/2014 and 30/09/2014”. You can use this
option to include a list of holiday dates throughout the year.
Specific Date(s) and Time(s): Use this option to limit the scope of the alert to a particular range of dates
and times—such as when activities are performed outside regular business hours, during weekends or
holidays, not during the month of August:
Note that the date format is: dd/mm/yyyy and the time format is: hh:mm:ss.
Considerations and Tips
Consider what activities are relevant for your organization to track during regular work hours and those
important to track when they occur outside business hours. Note also the exceptions which should not
be monitored, such as when specific IT administrators perform maintenance work over the weekend.
5.1.5 From Which Client Computers? From which client computer did the user connect to the monitored computer (on which the activity
occurred, as described in On Which Computer?)? Use the From Which Client? options to limit the scope of
the alert to cases where a user connected to a monitored computer from one or more particular client
computers.
Options for Defining the “From Which Client?" Conditions
Client Name: Use this option to alert according to the name (and optionally domain) of the client
computer from which the user connected to the monitored computer. For example, “Client name is
OITLAP, OITPC” or “Client name does not start with OIT” or “Client name contains LOCAL\LAPTOP”.
Client IP Address: Use this option to alert according to the IP address of the client computer from which
the user connected to the monitored computer. IPv4 and IPv6 formats are supported. For example,
“Client IP address is 10.1.0.16, 10.1.2.100” or “Client IP address is not
fe80:0000:0000:0000:c033:d38d:88d7:de73”—or “Client IP address does not start with 10.1” to alert
when a user tries to log in to a monitored computer from an IP address outside the organization:
Considerations and Tips
It may be valuable to specify IP addresses of particular external or internal client machines to track from
where particular users (such as remote vendors or employees) are accessing your system, or from where
they are performing particular activities that may affect system security.

Copyright © 2015 ObserveIT. All rights reserved. 3333
5.2 Assigning Alert Status Alerts can be assigned one of the following statuses according to administrator assessment:
New: Newly-configured alerts that have not yet been assigned any other status.
Reviewing: Alerts that are currently being reviewed by the administrator for follow-up action.
Issue: High risk alerts that require attention by the administrator and contribute to the user risk score
during user risk analysis. User risk score is a value attributed to user actions, which depend on risk
severity levels.
Non-Issue: Alerts that have been reviewed by the administrator and are considered low risk. These alerts
will not contribute to the user risk score during user risk analysis.
In the Activity Alerts page, an administrator can change the status of a selected alert(s) by clicking the
Change status link. A popup enables you to select the required status. You can select multiple alerts for
changing their status at the same time.
Note: If you change the status to Non-Issue, the alert score will be reset to zero and the user risk score will be reduced.
5.3 Setting Alert Risk Level Administrators can assign a risk level to each alert rule according to the severity of the alert (based on their
organization’s needs). The alert risk levels are Critical, High, Medium, and Low, and are color-coded in
ObserveIT (as Dark Red, Red, Orange, and Gray). This makes it easier to review generated alerts, generate
reports, and in particular, this enables ObserveIT administrators to quickly identify the risk level and respond
accordingly (see Viewing Generated Alerts in ObserveIT). Administrators can decide according to the severity
how often email alert notifications are received (see Managing Email Notifications).
5.4 Managing Alert Email Notifications Administrators can assign a notification policy to each alert rule to designate who gets notified by email and
at what frequency (whether immediate notification with separate emails upon each alert, digest emails of
alert activity per specified number of minutes, or digest emails on a daily basis at a fixed time). This enables
IT security officers to receive immediate warnings of high-risk activities, while reducing email overhead for
those of low risk.

Copyright © 2015 ObserveIT. All rights reserved. 3434
When an alert is triggered, and an email notification is received (per the rule’s policy), the ObserveIT
user/administrator can click a link in the email to open the alert in the Activity Alerts page of the Web
Console for further investigation (see Viewing Alerts in Email Notifications).
Administrators configure alert notification policies in the Alert Notification Policies page of the ObserveIT
Web Console and assign a notification policy to an alert rule in the Create Alert Rule page.
5.5 Saving Alert Rules When you have completed configuring each rule, remember to save the settings. You can save a rule that is
not activated and activate it later, when needed. (For example, you may want to complete the rule at a later
stage or modify it further before activating it.)
You can save the alert rule by clicking Save at the bottom of the Create Alert Rule page.
5.6 Activating Alert Rules Rules are inactive by default and must be activated to trigger alerts. (Inactive rules are ignored by the rule
engine.) You can edit a rule and save it multiple times before you activate it.
To activate the rule, in the Edit (or Create) Alert Rule page, set the Status to Active, and click Save at the
bottom of the page.
After you have activated the rule, your rule creation is complete. It is recommended to test the rule to see if
an alert is triggered. For further details, see Viewing Generated Alerts in ObserveIT.

Copyright © 2015 ObserveIT. All rights reserved. 3535
6 Viewing Generated Alerts in ObserveIT When an alert is generated, alert indicators and details appear throughout the ObserveIT system:
In email alert notifications (if assigned via a Notification Policy): Alert emails contain summary
information of the alert and include links to the Web Console for viewing session details and screenshots
in slideshow or video mode.
In the Activity Alerts list: The Activity Alerts page displays a list of all the activity alerts and related
details.
Within session videos: Accessible from reports, alert emails, and in the Activity Alerts, Server, User Diary,
and related Search pages. (The sessions that contain alerts are marked with appropriate indicators.)
The user-friendly graphical display of the generated alerts enables you to quickly assess the threat and take
immediate action if needed.
6.1 Viewing Alerts in Email Notifications Alerts can be sent to one or more email addresses as defined in the Notification Policy associated with each
alert rule. For further details about notification policies, see Managing Email Notifications.
Alert emails display the following details:
Colored severity bar (on the left) indicating the alert severity level (Dark Red=Critical, Red=High,
Orange=Medium, Gray=Low)
Alert rule name (in bold)
Alert ID
Conditions that triggered the alert (Who, Did What, On Which Computer, When, From Which Client)
View Details and Watch Video buttons for accessing the Web Console to view details in either a
maximized view of the alert in slideshow mode, or in a video of the recorded session to view what the
user was doing when the alert was triggered.
6.1.1 Individual Alert Email Notifications Individual email notifications display details of the alert:
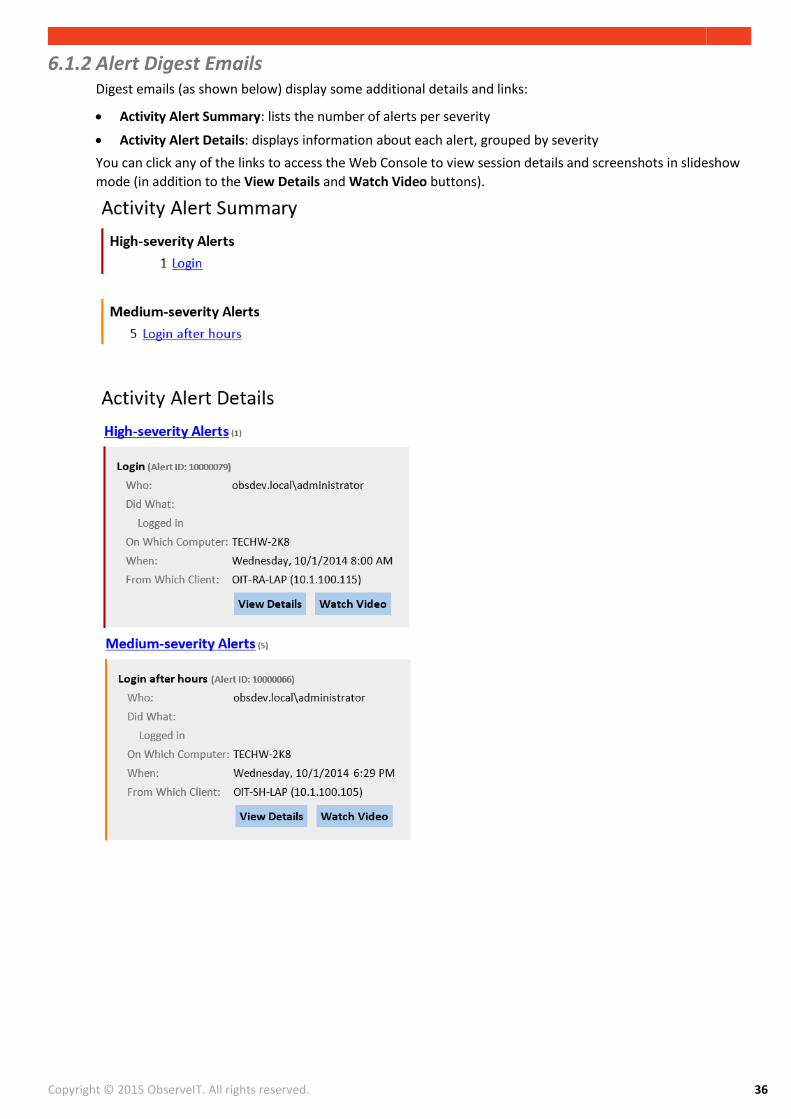
Copyright © 2015 ObserveIT. All rights reserved. 3636
6.1.2 Alert Digest Emails Digest emails (as shown below) display some additional details and links:
Activity Alert Summary: lists the number of alerts per severity
Activity Alert Details: displays information about each alert, grouped by severity
You can click any of the links to access the Web Console to view session details and screenshots in slideshow
mode (in addition to the View Details and Watch Video buttons).
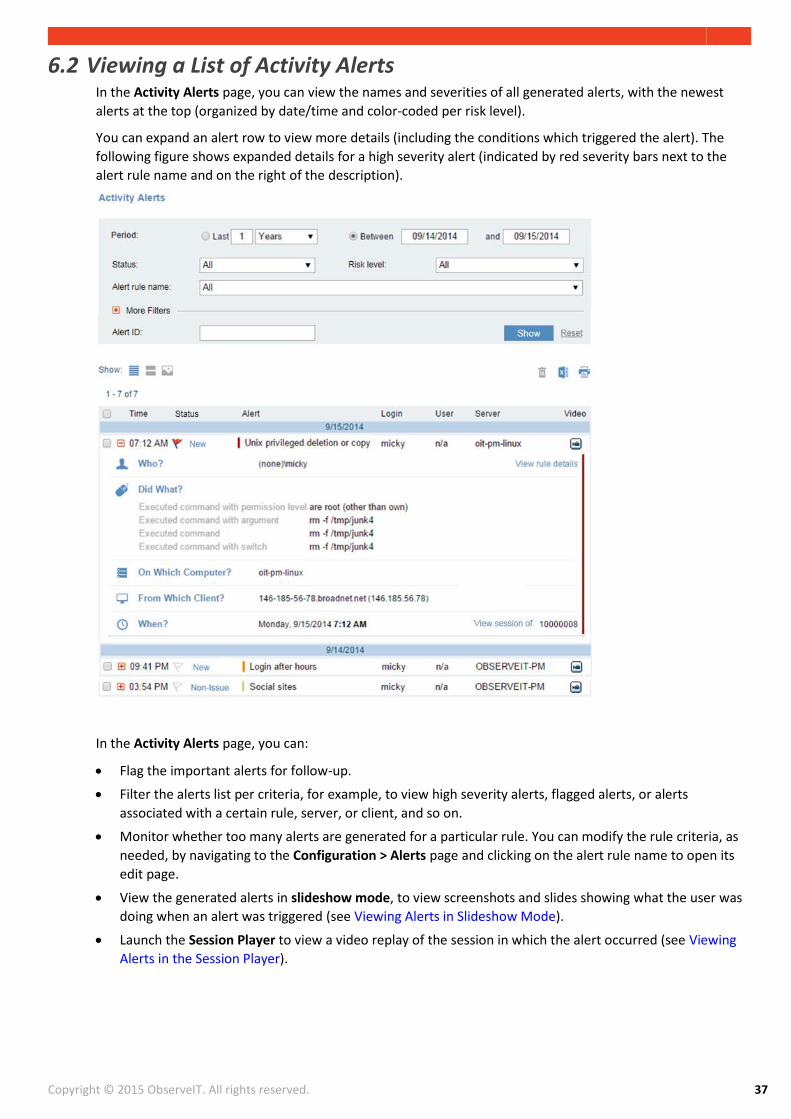
Copyright © 2015 ObserveIT. All rights reserved. 3737
6.2 Viewing a List of Activity Alerts In the Activity Alerts page, you can view the names and severities of all generated alerts, with the newest
alerts at the top (organized by date/time and color-coded per risk level).
You can expand an alert row to view more details (including the conditions which triggered the alert). The
following figure shows expanded details for a high severity alert (indicated by red severity bars next to the
alert rule name and on the right of the description).
In the Activity Alerts page, you can:
Flag the important alerts for follow-up.
Filter the alerts list per criteria, for example, to view high severity alerts, flagged alerts, or alerts
associated with a certain rule, server, or client, and so on.
Monitor whether too many alerts are generated for a particular rule. You can modify the rule criteria, as
needed, by navigating to the Configuration > Alerts page and clicking on the alert rule name to open its
edit page.
View the generated alerts in slideshow mode, to view screenshots and slides showing what the user was
doing when an alert was triggered (see Viewing Alerts in Slideshow Mode).
Launch the Session Player to view a video replay of the session in which the alert occurred (see Viewing
Alerts in the Session Player).

Copyright © 2015 ObserveIT. All rights reserved. 3838
6.3 Viewing Alerts in Slideshow Mode Session screenshots are available in slideshow mode (accessed by clicking the relevant alert icon or link in
the Activity Alerts Gallery View, and in the Server and User Diaries). You can browse through the
screenshots to see exactly what the user was doing when an alert was triggered. The slides at the bottom
show the alert name, severity, date, and time. You can click a slide to view the alert session details
(maximized).
The Alert Details Panel displays a summary of the alert, including alert name, severity, ID, conditions, and
links to view the alert rule details.
From the slideshow, you can open the Session Player to replay a video of all the session slides in which alerts
occurred (see Viewing Alerts in the Session Player).
6.4 Viewing Alerts in Session Diaries The recorded sessions that contain alerts are marked with colored indicators (in the relevant Server Diary,
User Diary, and Search pages). The following figure shows a session with a high severity alert (marked with a
red ring), and the details of the activity that triggered the alert.
You can view more details by clicking the alert icon, which opens a popup displaying a list of the alerts
(and number of alert instances) that were generated during that session.
You can click an alert link in the popup (or click the View all button) to view the alert details in slideshow
mode (see Viewing Alerts in Slideshow Mode) and in the Activity Alerts page (see Viewing a List of Activity
Alerts).

Copyright © 2015 ObserveIT. All rights reserved. 3939
6.5 Viewing Alerts in the Session Player In the Session Player, you can view and replay the recorded sessions in which alerts were triggered. Alert
details are displayed for each alert, as the replay progresses. The Alert Details Panel displays a summary of
the alert activity including alert name, severity, conditions, and the number of alerts in the session (in the
upper right corner—1/3 in the example shown below).
Alert indicators appear on the Replay Timeline Bar (at the bottom) and in the User Activities List (on the
right). You can click an alert icon on the Replay Timeline Bar to view the names of the alert rules and
number of instances. The icon (ring) is colored per the highest severity alert in the session. For example, the
red alert icon shown on the bottom left of the below screenshot represents the highest severity of the three
alerts triggered in the session.
6.6 Generating Custom Reports about Alerts ObserveIT enables you to create customized reports that provide summary information about activity alerts
on monitored Windows and/or Unix-based servers. For example, critical alerts on Windows machines
grouped by alert rule name during the last month. Alerts are based on suspicious login events or user
activities that occur during a session. Administrators can define enriched alert rules based on specific (user-
defined) interactions with sensitive application elements, so that each time that a user views or interacts
with a predefined sensitive element, an alert will be generated.
For details on how to configure and view customized activity alerts reports, please refer to “Viewing
Reports” in the ObserveIT product documentation.