About the P11 Headset - Turtle Beach · About the P11 Headset Product support and warranty...
9
Transcript of About the P11 Headset - Turtle Beach · About the P11 Headset Product support and warranty...


About the P11 Headset
Product support and warranty information: TurtleBeach.com/support
Ear Force P11 Headset with In-line Amplifier
Stereo Audio Splitter Cable Turtle Beach Sticker
What’s in the Box
The Ear Force P11 amplified headset gives serious gamers competitive edge by combining chat and stereogame sound into an immersive audio experience.
The integrated design of the P11 overcomes the limitation ofcommunicator headsets that block game sound from one earand eliminates voice chat interference caused by the headsetmicrophone picking up sound from external speakers.
Pump up the volume without disturbing friends, familyor neighbors. Hear every nuance of the game — from anopponent sneaking up behind you to your teammate’s voiceright next to you. Trash talk online. Block out distractions. It’s everything you need for an amazing gaming experience.
Table of Contents
PS3™ Setup (HDMI video) pg. 1
PS3 Setup (composite video) pg. 3
PS3 Audio Settings pg. 5
PS3 Chat Settings pg. 6
Using the Amplifier pg. 7
PC/Mac Setup pg. 9
Important Safety Information pg. 11
TURTLEBEACH.COM
1 2
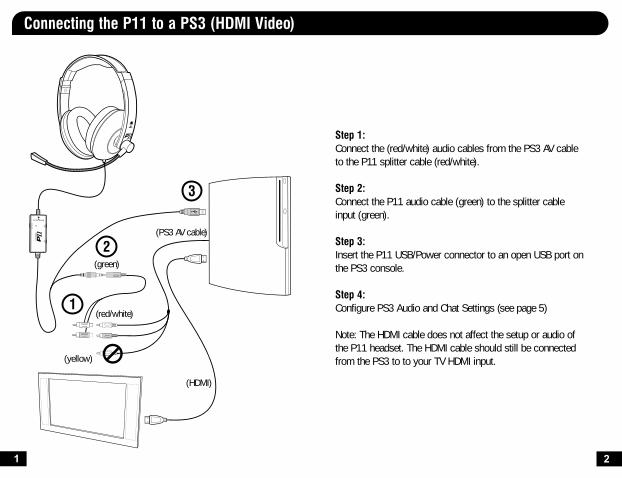
Connecting the P11 to a PS3 (HDMI Video)
Step 1:Connect the (red/white) audio cables from the PS3 AV cable to the P11 splitter cable (red/white).
Step 2:Connect the P11 audio cable (green) to the splitter cable input (green).
Step 3:Insert the P11 USB/Power connector to an open USB port on the PS3 console.
Step 4:Configure PS3 Audio and Chat Settings (see page 5)
Note: The HDMI cable does not affect the setup or audio of the P11 headset. The HDMI cable should still be connected from the PS3 to to your TV HDMI input.
1
3
2
(red/white)
(HDMI)
(PS3 AV cable)
(yellow)
(green)

3 4
Connecting the P11 to a PS3 (Composite Video)
1
3
4
2
(red/white)
(red/white)
(green)
(yellow)
Step 1:Connect the (red/white) audio cables from the PS3 AV cable to the P11 splitter cable (red/white).
Step 2:Connect the P11 audio splitter cable (red/white) to the stereo audio input (red/white) jacks on your TV. You will be able to hear the game audio on the TV as well as the P11. (Optional) The connection to your TV is optional and only used if you want to hear sound on the TV and headset at the same time. If your TV only has a white RCA input, connect the white RCA cable to that input jack and leave the red and yellow RCA cables hanging.
Step 3:Connect the PS3 audio cable (green) to the splitter cable input (green).
Step 4:Insert the P11 USB/Power connector to an open USB port on the PS3 console.
Step 5:Configure PS3 Audio and Chat Settings (see page 5)
Note: The yellow RCA (composite) video cable does not affect the setup or audio of the P11 headset. This cable should still be connected to the yellow RCA (composite) video input jack on your TV.
(PS3 AV cable)

5 6
Step 1:After powering on the PS3, go to “Settings” > “Accessory Settings” > “Audio Device Settings”.
Step 2:Click on “Input Device” and select “Turtle Beach USB Headset” from the options.
Step 3:Click on “Output Device” and select “Turtle Beach USB Headset” from the options.
Step 4:Click on “Microphone Level” and adjust the level of your chat output so that the bar graph barely reaches the red area when you speak loudly. Click “OK” to
Configuring the PS3 Chat Settings
Audio Device Settings
Microphone Level 3
Output Device Turtle Beach USB Headset
Back OptionsX Enter
OK
Audio Device Settings
Vocie ChangerKeyboard TypeKey Repeat IntervalKey Repeat Speed
Mouse Type
12/14 12:15 PM0
Sets the audio input and output devices for voice/videochat and other communicatin features.
Camera Device SettingsManage Bluetooth Devices
Audio Device Settings
Microphone Level 3
Output Device Turtle Beach USB Headset
Back OptionsX Enter
OK
Audio Device Settings
Microphone Level 3
Back OptionsX Enter
OK
Analog Step 1After powering on the PS3, go to “Settings” > “Sound Settings” > “Audio Output Settings”.
Step 2Select ” Audio Input Connector / SCART / AV Multi” to send the audio output to the P11.
Step 3Press “X” to save this setting.
HDMI or Digital (optical) Step 1
After powering on the PS3, go to “Settings” > “Sound Settings” > “Audio Multi-Output”. This will allow you to use the standard PS3 AV cable simultaneously with an HDMI or digital (optical) audio output.
Configuring the PS3 Audio Settings
Audio Output Settings
12/14 12:15 PM0
OnSets to output audio through multiple connectorssimultaneously. Audio output to connectors that arenot selected in [Audio Output Settings] is downscaledto 2 Ch.
Audio Output Settings
Select the connector on the TV or AV amplifier (receiver).
Turn on the power of the connected device.Cancel

7 8
Using the Amplifier
1 — Mic Mute Switch Enables/disables the chat microphone.
2 — Mic Mute LEDLED turns green when mic is active and red when muted.
3 — Game Audio VolumeSets the level of the stereo game audio.
4 — Chat VolumeSets the level of chat audio from other players.
Mic Monitor Feature The P11 “microphone monitor” feature lets you hear what you’re saying as you speak into the microphone, so you won’t have to talk as loud with the headset covering your ears. This feature is turned off when the microphone is muted.
GAM
ECH
AT
ON MIC M
UTE
2
31
4

9 10
GAMECHAT
ON MIC MUTE
Connecting the P11 to a PC or Mac®
Step 1:Connect the P11’s green 3.5mm audio plug to the speaker or headphone output of your PC/Mac sound card.
Step 2:Insert the P11’s USB/Power connector to an open USB port on your PC/Mac to power the headset/amplifier.
When used as a computer gaming headset, the P11 functions as two independent headsets in one package:
Amplified Stereo Headphones:The green 3.5mm plug sends the stereo game signal from the computer sound card to the P11 headphone amplifier so you can hear game sounds, music and other sounds from your computer. The overall volume level is set by the game volume control on the P11 amplifier.
USB Stereo Headset:The USB connection is used for mic and chat signals and ap-pears as “Turtle Beach USB Headset” in Windows® and Mac operating systems. This lets you assign the P11 mic and chat in your game software as a USB audio device.
PC/Mac Operating System SetupPlease visit TurtleBeach.com/P11 and download the PC/Mac setup instructions for further details.
1
2
(green)

11
For more products, accessories and general product information, please visit
TurtleBeach.com
For warranty information and product support, please visitTurtlebeach.com/support
FCC Caution: Any changes or modifications not expressly approved by the party responsible for compliance could void the user’s authority to operate the equipment. This device complies with part 15 of the FCC Rules. Operation is subject to the following two conditions: (1) This device may not cause harmful interference, and (2) this device must accept any interference received, including interference that may cause undesired operation.
This product is CE marked according to the provisions of the R&TTE Directive (99/5/EC)Grantee Code/Reg Number: XGB/GC229855FCC Code: XGB-TB2135Voyetra Turtle Beach, Inc.
Copyright © 2011 Voyetra Turtle Beach, Inc. (VTB, Inc.) All Rights Reserved. No part of this document may be reproduced without prior written consent from Voyetra Turtle Beach, Inc. Turtle Beach, the Turtle Beach logo, Voyetra and Ear Force are registered trademarks of VTB, Inc. PlayStation is a registered trademark and PS3 is a trademark of Sony Computer Entertainment, Inc. Mac is a registered trademark of Apple Inc. Windows is a registered trademark of Microsoft Corporation. All other trademarks are properties of their respective owners and are hereby acknowledged. Made in China. Part Number: TBS-2135-01 V1
Safety Notice
To avoid potential damage to the device, always disconnect all cables before transporting it.
WARNING: Permanent hearing damage can occur if a headset is used at high volumes for extended periods of time, so it is important to keep the volume at a safe level. Over time, your ears adapt to loud volume levels, so a level that may not cause initial discomfort can still damage your hearing. If you experience ringing in your ears after listening with the headset, it means the volume is set too loud. The louder the volume, the less time it takes to affect your hearing. So, please take care to listen at moderate levels.
• Before placing a headset on your ears, turn the volume down completely, then slowly increase it to a comfortable level.
• Turn down the volume if you can’t hear people speaking near you.
• Avoid turning up the volume to block out noisy surroundings.
IC Radiation Exposure Statement for CanadaThis equipment complies with IC radiation exposure limits set forth for an uncontrolled environment. To maintain compliance with IC RF exposure compliance requirements, Please avoid direct contact to the transmitting. End users must follow the specific operating instructions for satisfying RF Exposure compliance. The equipment must not be co-located or operating in conjunction with any other antenna or transmitter. Operation is subject to the following two conditions: (1) this device may not cause interference, and (2) this device must accept any interference, including interference that may cause undesired operation of the device. Caution: The device is incapable of transmitting in the band 5600-5650 MHz band in Canada.