About Downton Abbey® - Andover Fabrics Abbey-Violets Quilt.pdf · Downton Abbey's Dowager Countess...
7
Free Pattern Download Available 8/28/13 1384 Broadway New York, NY 10018 Tel. (800) 223-5678 • andoverfabrics.com Downton Abbey® FABRICS BY KATHY HALL About Downton Abbey® Bold and elegant, like the Dowager herself, this collection of fabrics is punctuated by prints and paisleys as big as her presence. The gray, purple, and black colors come straight from her wardrobe, and the patterns speak to her undeniable flair, steeped in refined tradition. Violet's Quilt Quilt Design: Heidi Pridemore Quilt Size: 64" x 82" andoverfabrics.com Downton™ and Downton Abbey®. ©2013 Carnival Film & Television Limited, All Rights Reserved.
Transcript of About Downton Abbey® - Andover Fabrics Abbey-Violets Quilt.pdf · Downton Abbey's Dowager Countess...

Free Pattern Download Available
8/28/13
1384 Broadway New York, NY 10018Tel. (800) 223-5678 • andoverfabrics.com
Downton Abbey®FABRICS BY KATHY HALL
About Downton Abbey®Bold and elegant, like the Dowager herself, this collection of fabrics is punctuated by prints and paisleys as big as her presence. The gray, purple, and black colors come straight from her wardrobe, and the patterns speak to her undeniable flair, steeped in refined tradition.
Violet's QuiltQuilt Design:Heidi Pridemore
Quilt Size: 64" x 82"
andoverfabrics.com
Downton™ and Downton Abbey®. ©2013Carnival Film & Television Limited, All Rights Reserved.

Free Pattern Download Available at www.andoverfabrics.com 8/28/13
Violet's QuiltIntroducing Andover Fabrics new Collection: DOWNTON ABBEY by Kathy HallQuilt designed by Heidi Pridemore
Quilt finished 64" x 82"
This quilt design embraces Violet Crawley, Downton Abbey's Dowager Countess of Grantham's personality with its dignified appearance and timeless elegance. The blocks may look complex but are easy enough for confident beginners to accomplish. Simple fusible applique adds a touch of the English garden to the design. Perfect for your drawing room.
Cutting Directions
Yardage Fabric
Fabric Requirements
Fabric A block centers ½ yard 7318-K Fabric B block centers ½ yard 7318-PFabric C blocks, vines 2 yards 7319-K Fabric D blocks, borders 1 ½ yards 7320-K Fabric E blocks 1 ½ yards 7319-P Fabric F blocks ⅓ yard 7320-PFabric G blocks, borders 2 ¾ yards 7330-OGLFabric H blocks, binding 1 ¾ yards 7330-GKFabric I blocks, flowers ⅞ yard 7390-PFabric J flowers ⅜ yard 7390-BRFabric K flowers ⅛ yard 7331-PKFabric L leaves ¼ yard 7332-OG Backing 5 ¼ yards 7320-P
Note: Read assembly directions before cutting patches. Borders are cut to exact length required plus ¼” seam allowance. WOF designates the width of fabric from selvedge to selvedge (approximately 42” wide). Fabric A Fussy cut (3) 8 ½” squares.
Fabric B Fussy cut (3) 8 ½” squares.
Fabric C Cut (4) 6 ½” x WOF strips. Sub-cut the strips into (21) 6 ½” squares. Cut (3) 4 ½” x WOF strips. Sub-cut the strips into (24) 4 ½” squares. See instructions to cut (8) vines (½” bias strips).
Fabric D Cut (4) 2 ½” x WOF strips. Sew the strips together, end to end, and cut (2) 2 ½” x 62 ½” strips. Cut (3) 2 ½” x WOF strips. Sew the strips together, end to end, and cut (2) 2 ½” x 48 ½” strips. Cut (4) 2 ½” x WOF strips. Sew the strips together, end to end, and cut (2) 2 ½” x 78 ½” strips.
Fabric D Cut (4) 2 ½” x WOF strips. Sew the strips (cont.) together, end to end, and cut (2) 2 ½” x 64 ½” strips. Cut (1) 2 ⅞” x WOF strip. Sub-cut the strip into (12) 2 ⅞” squares. Cut (1) 2 ½” x WOF strip. Sub-cut the strip into (12) 2 ½” squares.
Fabric E Cut (4) 6 ½” x WOF strips. Sub-cut the strips into (21) 6 ½” squares. Cut (3) 4 ½” x WOF strips. Sub-cut the strips into (24) 4 ½” squares.
Fabric F Cut (1) 2 ⅞” x WOF strip. Sub-cut the strip into (12) 2 ⅞” squares. Cut (1) 2 ½” x WOF strip. Sub-cut the strip into (12) 2 ½” squares.
Fabric G Cut (5) 5 ½” x WOF strips. Sew the strips together, end to end, and cut (2) 5 ½” x 52 ½” strips and (2) 5 ½” x 44 ½” strips. Cut (2) 2 ½” x WOF strips. Sub-cut the strips into (3) 2 ½” x 16 ½” strips. Cut (2) 2 ½” x 34 ½” strips.
Page 2 of 7

Violet's Quilt
Free Pattern Download Available at www.andoverfabrics.com 8/28/13
Making the Quilt1.
2.
3.
4.
5.
6.
Fabric G Cut (7) 3 ½” x WOF strips. Sub-cut the (cont.) strips into (84) 3 ½” squares. Cut (8) 2 ½” x WOF strips. Sub-cut the strips into (120) 2 ½” squares. Cut (2) 2 ⅞” x WOF strips. Sub-cut the strips into (24) 2 ⅞” squares.
Fabric H Cut (7) 3 ½” x WOF strips. Sub-cut the strips into (84) 3 ½” squares. Cut (3) 2 ½” x WOF strips. Sub-cut the strips into (48) 2 ½” squares. Cut (8) 2 ½” x WOF strips for the binding.
Fabric I Cut (3) 2 ½” x WOF strips. Sub-cut the strips into (48) 2 ½” squares. See instructions to cut (6) large flowers. See instructions to cut (18) small flowers.
Fabric J See instructions to cut (6) large inner flowers. See instructions to cut (18) small inner flowers.
Fabric K See instructions to cut (6) large flower centers. See instructions to cut (18) small flower centers.
Fabric L See instructions to cut (40) leaves.
Backing Cut (2) 90” x WOF strips. Sew the strips together and trim to make (1) 72” x 90” square backing.
Block One Place (1) 2 ⅞” Fabric D square on top of (1) 2 ⅞” Fabric G square, right sides together. Draw a line across the diagonal of the top square (Diagram 1). Sew ¼” away from each side of the drawn diagonal line (Diagram 1). Cut the (2) squares apart on the drawn diagonal line (Diagram 2) to make (2) D/G units (Diagram 3). Trim D/G units to measure 2 ½”. Repeat to make (24) D/G units total.
Sew (1) 2 ½” Fabric G square, (1) 2 ½” Fabric D square and (2) D/G units together to make (1) Block One corner block (Diagram 4). Repeat to make (12) Block One corner blocks.
Place (1) 2 ½” Fabric G square on the top left corner of (1) 4 ½” Fabric E square, right sides together (Diagram 5). Sew across the diagonal of the smaller square from the upper right corner to the lower left corner (Diagram 5). Flip open the triangle formed and press (Diagram 6). Trim away the excess fabric from behind the triangle ¼” away from the sewn seam.
Follow Diagram 7 for the seam direction to add a 2 ½” Fabric G square to the top right corner and (1) 2 ½” Fabric H square to each of the lower corners of the 4 ½” Fabric E square to make (1) Block One side block (Diagram 8).
Repeat Steps 3-4 to make (24) Block One side blocks total.
Follow Diagram 9 to sew together (8) Block One side units, (4) Block One corner units and (1) 8 ½” Fabric B square to make (1) Block One. Repeat to make (3) 16 ½” Block One squares total.
DG
make 24
DDD
G
GG
make 12
Diagram 1 Diagram 2 Diagram 3
Diagram 4
Diagram 5
Diagram 7
Diagram 6
Diagram 8
Diagram 9
E
G G
H H
make 24
B
Page 3 of 7

Violet's Quilt
Free Pattern Download Available at www.andoverfabrics.com 8/28/13
7.
8.
9.
10.
11.
12.
13.
14.
15.
16.
17.
Block TwoRepeat Step 1 using (12) 2 ⅞ ” Fabric G squares and (12) 2 ⅞” Fabric F squares to make (24) F/G 2 ½” units for Block Two.
Diagram 10
Diagram 11
Diagram 12
Diagram 13
Sew (1) 2 ½” Fabric G square, (1) 2 ½” Fabric F square and (2) F/G units together to make (1) Block Two corner block (Diagram 10). Repeat to make (12) Block Two corner blocks.
Repeat Steps 3-4 using (48) 2 ½” Fabric G squares, (48) 2 ½” Fabric I squares and (24) 4 ½” Fabric C squares to make (24) Block Two side units total (Diagram 11).
Follow Figure 12 to sew together (8) Block One side units, (4) Block One corner units and (1) 8 ½” Fabric A square to make (1) Block Two. Repeat to make (3) 16 ½” Block Two squares total.
Block FourFollow Steps 3-4 (84) 3 ½” Fabric H squares and (21) 6 ½” Fabric E squares to make (21) Block Fours total.
Block ThreeFollow Steps 3-4 using (84) 3 ½” Fabric G squares and (21) 6 ½” Fabric C squares to make (21) Block Threes total.
Quilt TopRefer to Diagram 13 when assembling the quilt top.
Sew (1) Block One, (1) 2 ½” x 16 ½” Fabric G strip and (1) Block Two together, in that order, to make Row One. Repeat to make Row Three.
Sew (1) Block Two, (1) 2 ½” x 16 ½” Fabric G strip and (1) Block One together, in that order, to make Row Two.
Sew the (3) block rows and (2) 2 ½” x 34 ½” Fabric G strips together to make the quilt top.
Sew (1) 5 ½” x 52 ½” Fabric G strip to each side of the quilt top. Sew (1) 5 ½” x 44 ½” Fabric G strip to the top and bottom of the quilt top.
Following the manufacturer’s instructions, trace the listed number of each template onto the paper side of the fusible web. Roughly cut out each template about ⅛” outside the drawn lines.
G
G
G
FFF
G G
I I
C
A
G
G
G
G
G G G
G
G
Page 4 of 7
Violet's Quilt
Free Pattern Download Available at www.andoverfabrics.com 8/28/13
18.
19.
20.
21.
22.
23.
24.
25.
26.
27.
28.
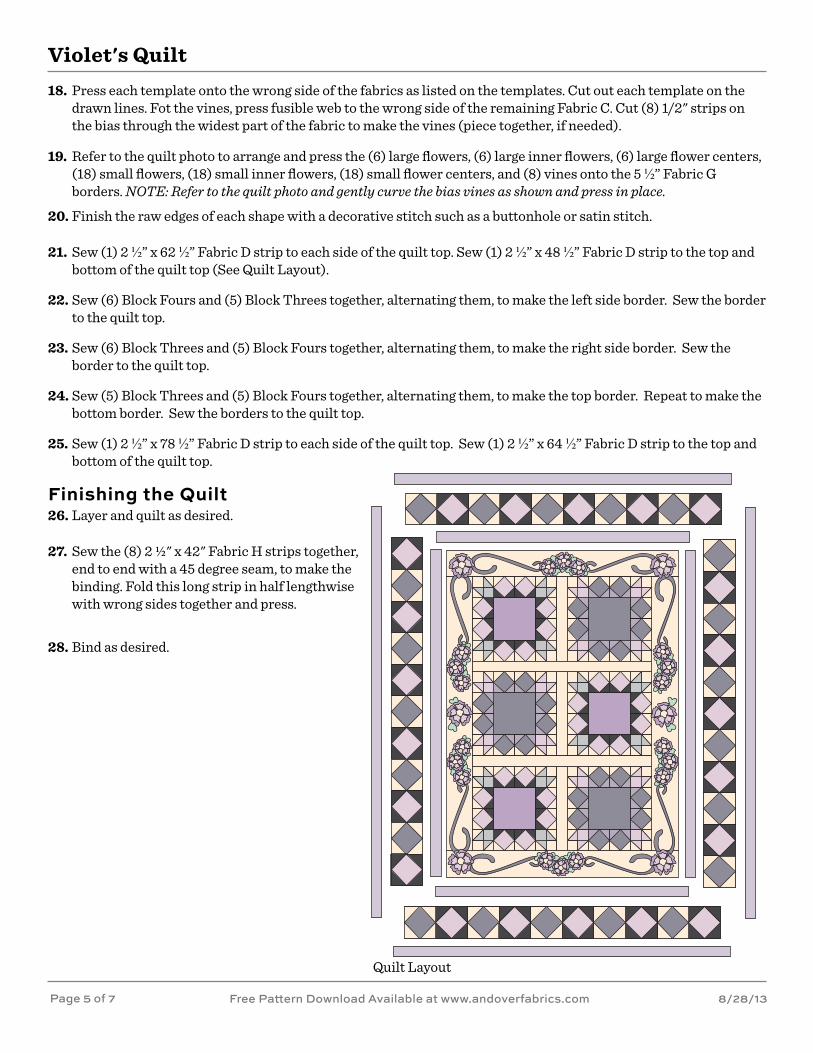
Quilt Layout
Press each template onto the wrong side of the fabrics as listed on the templates. Cut out each template on the drawn lines. Fot the vines, press fusible web to the wrong side of the remaining Fabric C. Cut (8) 1/2" strips on the bias through the widest part of the fabric to make the vines (piece together, if needed).
Refer to the quilt photo to arrange and press the (6) large flowers, (6) large inner flowers, (6) large flower centers, (18) small flowers, (18) small inner flowers, (18) small flower centers, and (8) vines onto the 5 ½” Fabric G borders. NOTE: Refer to the quilt photo and gently curve the bias vines as shown and press in place.
Finish the raw edges of each shape with a decorative stitch such as a buttonhole or satin stitch.
Sew (1) 2 ½” x 62 ½” Fabric D strip to each side of the quilt top. Sew (1) 2 ½” x 48 ½” Fabric D strip to the top and bottom of the quilt top (See Quilt Layout).
Sew (6) Block Fours and (5) Block Threes together, alternating them, to make the left side border. Sew the border to the quilt top.
Sew (6) Block Threes and (5) Block Fours together, alternating them, to make the right side border. Sew the border to the quilt top.
Sew (5) Block Threes and (5) Block Fours together, alternating them, to make the top border. Repeat to make the bottom border. Sew the borders to the quilt top.
Sew (1) 2 ½” x 78 ½” Fabric D strip to each side of the quilt top. Sew (1) 2 ½” x 64 ½” Fabric D strip to the top and bottom of the quilt top.
Finishing the QuiltLayer and quilt as desired.
Sew the (8) 2 ½" x 42" Fabric H strips together, end to end with a 45 degree seam, to make the binding. Fold this long strip in half lengthwise with wrong sides together and press.
Bind as desired.
Page 5 of 7

Free Pattern Download Available1384 Broadway New York, NY 10018
Tel. (800) 223-5678 • andoverfabrics.com
Downton Abbey®
8/21/13
*Indicates fabrics used in quilt pattern. Fabrics shown are 30% of actual size.
7318-K* 7318-P* 7319-K* 7319-P* 7320-K* 7320-P*
7321-G* 7321-R* 7322-B* 7322-R* 7323-GN*
7327-B* 7327-O* 7328-B* 7328-OG* 7329-B* 7329-O*
7323-RB*
7324-B* 7324-E* 7325-B* 7325-ET* 7326-B* 7326-E*
TheWomen’s Collection
Dowager Countess
Collection
Lady EdithCollection
Lady Mary Collection
Lady Sybil Collection
7317-N*
7330-ET* 7330-GK* 7330-OGL*
7332-B* 7332-K* 7332-OG* 7390-BR* 7390-P* 7390-RB*
7331-EB 7331-PK 7331-RG
Violet's Quilt
Free Pattern Download Available at www.andoverfabrics.com 8/28/13
Large FlowerTrace 6Fabric I
Small FlowerTrace 18Fabric I
Large Inner FlowersTrace 6Fabric J
Large FlowerCentersTrace 6Fabric K Small Flower
CentersTrace 18Fabric K
LeavesTrace 40Fabric L
Small Inner FlowersTrace 18Fabric J
Full-size Templates
Page 6 of 7

FABRICS BY KATHY HALL
Free Pattern Download Available1384 Broadway New York, NY 10018
Tel. (800) 223-5678 • andoverfabrics.com
Downton Abbey®
8/21/13
*Indicates fabrics used in quilt pattern. Fabrics shown are 30% of actual size.
7318-K* 7318-P* 7319-K* 7319-P* 7320-K* 7320-P*
7321-G* 7321-R* 7322-B* 7322-R* 7323-GN*
7327-B* 7327-O* 7328-B* 7328-OG* 7329-B* 7329-O*
7323-RB*
7324-B* 7324-E* 7325-B* 7325-ET* 7326-B* 7326-E*
TheWomen’s Collection
Dowager Countess
Collection
Lady EdithCollection
Lady Mary Collection
Lady Sybil Collection
7317-N*
7330-ET* 7330-GK* 7330-OGL*
7332-B* 7332-K* 7332-OG* 7390-BR* 7390-P* 7390-RB*
7331-EB 7331-PK 7331-RG