A Silver Lining in the Cloud Deployment of SAS® Visual...
19
1 Paper 10728-2016 A Silver Lining in the Cloud: Deployment of SAS® Visual Analytics 7.2 on AWS Vimal Raj Arockiasamy, and Rajesh Inbasekaran, Kavi Global, Barrington, IL ABSTRACT Amazon Web Services (AWS) as a platform for analytics and data warehousing has gained significant adoption over the years. With SAS® Visual Analytics being one of the preferred tools for data visualization and analytics, it is imperative to be able to deploy SAS® Visual Analytics on AWS. This ensures swift analysis and reporting on large amounts of data with SAS® Visual Analytics by minimizing the movement of data across environments. This paper focuses on installing SAS® Visual Analytics 7.2 in an Amazon Web Services environment, migration of metadata objects and content from previous versions to the deployment on the cloud, and ensuring data security. INTRODUCTION Amazon Web Services (AWS) Elastic Compute Cloud (EC2) instance with Red Hat Enterprise Linux Server release 6.5 is being used to demonstrate a practical scenario where SAS® 9.4 environment which is equipped with SAS® Visual Analytics 7.2 is installed and configured. The installation process can be listed down as following steps. 1. Launch, Connect and Configure AWS instance. 2. Perform Pre-Installation Tasks. 3. Deploy SAS Visual Analytics Server and Middle Tier. 4. Perform Post-Installation Tasks. After the entire installation step is completed the migration of metadata objects could be done in following ways. 1. Migration 2. Deploy and Promote 3. Upgrade In this paper, the second option is performed to complete the migration task. Following the migration, the data security should be ensured using the Security Groups and networks ACLs which allow controlling inbound and outbound network access to and from the AWS instance. Businesses and enterprises which are looking to integrate SAS components to their infrastructure tend to use cloud service providers such as Amazon to fulfill their requirements faster and cost effectively. The familiarity of AWS Management console and its associated services such as networking, security, databases, and storage methods is recommended in order to follow along. In addition, knowledge of SAS Visual Analytics installation and metadata administration will help the readers to understand this paper better. LAUNCH, CONNECT AND CONFIGURE AWS INSTANCE Steps below are a guide to creating an EC2 instance using AWS Management console. 1. Log in to AWS Management console and click the VPC icon from the services list. Then click the “Start VPC Wizard” and select “VPC with public and private Subnets” from the left pane
-
Upload
nguyenliem -
Category
Documents
-
view
222 -
download
1
Transcript of A Silver Lining in the Cloud Deployment of SAS® Visual...

1
Paper 10728-2016
A Silver Lining in the Cloud: Deployment of SAS® Visual Analytics 7.2 on AWS
Vimal Raj Arockiasamy, and Rajesh Inbasekaran,
Kavi Global, Barrington, IL
ABSTRACT
Amazon Web Services (AWS) as a platform for analytics and data warehousing has gained significant adoption over the years. With SAS® Visual Analytics being one of the preferred tools for data visualization and analytics, it is imperative to be able to deploy SAS® Visual Analytics on AWS. This ensures swift analysis and reporting on large amounts of data with SAS® Visual Analytics by minimizing the movement of data across environments. This paper focuses on installing SAS® Visual Analytics 7.2 in an Amazon Web Services environment, migration of metadata objects and content from previous versions to the deployment on the cloud, and ensuring data security.
INTRODUCTION
Amazon Web Services (AWS) Elastic Compute Cloud (EC2) instance with Red Hat Enterprise Linux Server release 6.5 is being used to demonstrate a practical scenario where SAS® 9.4 environment which is equipped with SAS® Visual Analytics 7.2 is installed and configured.
The installation process can be listed down as following steps.
1. Launch, Connect and Configure AWS instance.
2. Perform Pre-Installation Tasks.
3. Deploy SAS Visual Analytics Server and Middle Tier.
4. Perform Post-Installation Tasks.
After the entire installation step is completed the migration of metadata objects could be done in following ways.
1. Migration
2. Deploy and Promote
3. Upgrade
In this paper, the second option is performed to complete the migration task. Following the migration, the data security should be ensured using the Security Groups and networks ACLs which allow controlling inbound and outbound network access to and from the AWS instance.
Businesses and enterprises which are looking to integrate SAS components to their infrastructure tend to use cloud service providers such as Amazon to fulfill their requirements faster and cost effectively. The familiarity of AWS Management console and its associated services such as networking, security, databases, and storage methods is recommended in order to follow along. In addition, knowledge of SAS Visual Analytics installation and metadata administration will help the readers to understand this paper better.
LAUNCH, CONNECT AND CONFIGURE AWS INSTANCE
Steps below are a guide to creating an EC2 instance using AWS Management console.
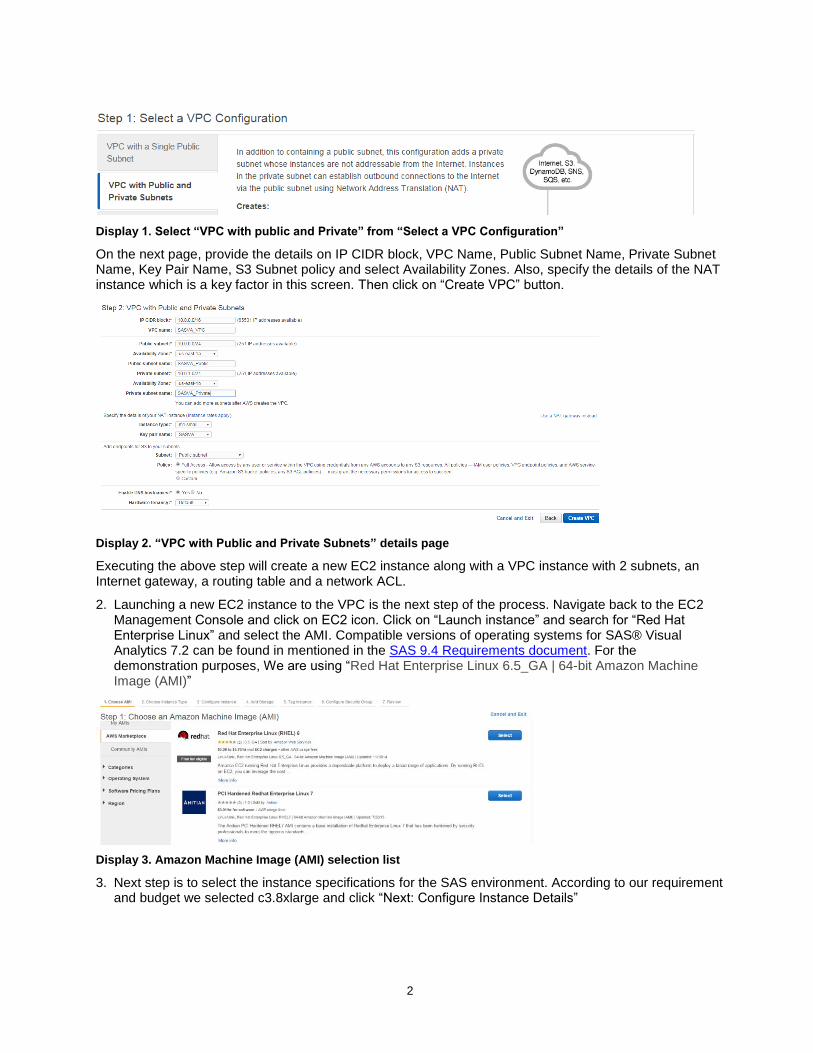
1. Log in to AWS Management console and click the VPC icon from the services list. Then click the “Start VPC Wizard” and select “VPC with public and private Subnets” from the left pane
2
Display 1. Select “VPC with public and Private” from “Select a VPC Configuration”
On the next page, provide the details on IP CIDR block, VPC Name, Public Subnet Name, Private Subnet Name, Key Pair Name, S3 Subnet policy and select Availability Zones. Also, specify the details of the NAT instance which is a key factor in this screen. Then click on “Create VPC” button.
Display 2. “VPC with Public and Private Subnets” details page
Executing the above step will create a new EC2 instance along with a VPC instance with 2 subnets, an Internet gateway, a routing table and a network ACL.
2. Launching a new EC2 instance to the VPC is the next step of the process. Navigate back to the EC2 Management Console and click on EC2 icon. Click on “Launch instance” and search for “Red Hat Enterprise Linux” and select the AMI. Compatible versions of operating systems for SAS® Visual Analytics 7.2 can be found in mentioned in the SAS 9.4 Requirements document. For the demonstration purposes, We are using “Red Hat Enterprise Linux 6.5_GA | 64-bit Amazon Machine Image (AMI)”
Display 3. Amazon Machine Image (AMI) selection list
3. Next step is to select the instance specifications for the SAS environment. According to our requirement and budget we selected c3.8xlarge and click “Next: Configure Instance Details”

3
Display 4. EC2 instance Type specification page
4. “Configure Instance Details” is the next step of the EC2 Configuration. Select the VPC created in the earlier step to populate the Subnet field. Select “Enable” to auto assign the Public-IP field and click “Protect against accidental termination” in the Enable termination protection field.
Display 5. “Configure Instance Details” page
Once completed, click on “Next: Add Storage” button to continue.
5. In “Add Storage” page, type in a number representing the volume type in “Size” column. We have chosen 500 GB as the root volume size and 2000 GB as the EBS volume size. Storage can be added later if required and EBS volumes are highly available and reliable storage volumes that can be attached to any running instance that is in the same Availability Zone.
Display 6. “Add Storage” page with customizable sizes and volume types
Click “Next: Tag Instance” to continue.
6. Enter a unique key-value pair and Click on “Next: Configure Security Group” to continue to the next step.
Display 7. “Tag Instance” page

4
7. Firewall rules for the VPC are added in this step. For inbound/outbound traffic information, refer the SAS pre-installation checklist for ports. Setting the source to “Anywhere” at any port “0.0.0.0” is not recommended.
Display 8. “Configure Security Group” page
After listing ports and sources, click on the “Review and Launch Button”.
Warning messages may appear to alert about AWS charges security settings.
Display 9. “Review and Launch” page
8. Click on the “Launch” button. A popup appears requesting to “Choose an existing key pair” or “Create new key pair”. Existing key pair which was created before can be used and also new key pair must be created if there is no key pair present. We have chosen an existing Key Pair.
Display 10. Key pair selection/creation screen
Click on “Launch instance”.
Display 11. Launch status details

5
9. Review the internet gateway if it is attached to the VPC created in the earlier step. Create a custom route table that sends traffic destined outside the VPC to the Internet gateway, and then associate it with one subnet, making it a public subnet. To create a secure connectivity method to the internet, connecting from a Private Network EC2 residing in a Public Network NAT (Network Address Translation) instance A NAT instance should be enabled to receive Internet-bound traffic from instances in a private subnet as well as SSH traffic from your network. Please refer the AWS Documentation on how to set up a NAT instance. Finally, allocate a new Elastic IP address and associate that with the newly launched instance.
10. Once an EC2 instance is successfully launched, next step is to set up client connections SSH, At this point, download PuttyGen to convert your AWS .pem credentials to a .ppk file. Then download and install Xming and Putty according to their respective instructions. Once Xming is installed, launch the Xming application before launching the putty session. Now open a putty session and type in the Public-IP address or hostname of the EC2 instance in the “Host Name” field. Then expand on “SSH” under “Connection” to click on “Auth” and browse to select the location of the .ppk file.
Display 12. Configuring Putty 1
Display 13. Configuring Putty 2
On the same section, click on “X11” and select “Enable X11 forwarding”. Save the session and click “Open” button. In the terminal window that is opened, type “ec2-user” as the username to log into the instance.
Similarly, configure the FTP client WinSCP, to connect to the EC2 instance.
PERFORM PRE INSTALLATION TASKS
1. Browse to the SAS Download Manager download page and log in with a SAS profile. Download the SAS Download Manager for Linux x64 and copy the file to /home/ec2-user in the EC2 instance using WinSCP which was configured in the previous step.
Display 14. SAS Download Manager Selection
2. Run the following commands to create required local users and assign them to the new SAS user groups “sas” and “sasusers”
sudo groupadd sas
sudo groupadd sasusers
sudo useradd sasinst sassrv sasdemo lasradm
sudo passwd sasinst

6
sudo passwd sassrv
sudo passwd sasdemo
sudo passwd lasradm
sudo usermod –G sas sasinst sassrv
sudo usermod –G sasusers sasdemo lasradm
3. Create a directory in /opt named sas under which create directories like sasconfig, sasapp, sasdepot, and thirdparty and give the permissions as mentioned below. Then copy esdclient__94360__lax__xx__web__1 from /home/ec2-user to the sas directory
sudo chmod 777 sasdepot
sudo chmod 755 sasconfig sasapp sasdata thirdparty
sudo cp esdclient__94360__lax__xx__web__1 /opt/sas
sudo chmod 777 esdclient__94360__lax__xx__web__1
4. Start the SAS Download Manager using the below command and follow the screens to download the depot
./ esdclient__94250__lax__xx__web__1
5. The hostname for the instance must be the same as the DNS name. Please update the /etc/hosts file Confirm the name by using the following command:
echo '------------------START------------------' ; \
echo '--The actual hostname is:'; hostname ; \
echo '--the contents of /etc/hosts is '; cat /etc/hosts ; \
echo '--The ip returned by hostname -I is' ; hostname -I ; \
echo '--The hostname, as returned by hostname -A is' ; hostname -A ; \
echo '--Reverse lookup gives:' ; nslookup `hostname -i` ; \
echo '--------------------END----------------'
6. Create and provide write access to the following directory /etc/opt/vmware/vfabric
cd /etc/opt
sudo mkdir vmware
cd vmware
sudo mkdir vfabric
sudo chown -R sasinst:sas /etc/opt/vmware/
7. SAS Visual Analytics requires changes to the security limits placed on end users. This enables the required number of processes and file allocations for the SAS® Visual Analytics software to function correctly. Check the limit using the below command
ulimit –a

7
Display 15. Ulimit
Add the following to the end of the limits.conf file.
sudo vi /etc/security/limits.conf
* soft nproc 10240
* hard nproc 10240
* soft nofile 20480
* hard nofile 20480
The second file which must be edited is 90-nproc.conf.
sudo vi /etc/security/limits.d/90-nproc.conf
* soft nofile 20480
* hard nofile 20480
Reboot the instance after making the changes.
8. A Junit jar file is required for certain SAS® 9.4 products when used with the SAS® Deployment Tester to function properly. Download junit 4.8.1 or greater and copy to the /opt/sas/thirdparty directory using WinSCP client.
9. SAS Visual Analytics requires python with a version between 2.6 and 3.0 to be installed, where the SAS® Information Retrieval Studio can run and update the search database.
Run the following command as root to install the python package:
sudo yum install python (May already be installed)
Find where python is already installed:
sudo find . -name "python*" –print (this location will be required later during the deployment)
Install the C compiler using the following command
sudo yum install gcc
10. The SAS Installation account will have to be able to schedule tasks using cron in order to periodically update the search database. It is possible that that the use of the AutoLoad LASR server also require sasinst, or lasradm, to be able to use cron. Issue the following commands, as the sasinst account and then as the lasradm account to check for cron scheduler.
su - sasinst
cat <(crontab -l) <(echo "1 2 3 4 5 echo Cron Test") | crontab - ; crontab -l ; crontab -r ; crontab -l
su - lasradm

8
cat <(crontab -l) <(echo "1 2 3 4 5 echo Cron Test") | crontab - ; crontab -l ; crontab -r ; crontab –l
11. The RedHat Enterprise Linux operating system is recommended to have the some of the general packages to be installed. The following packages are required. Some are absolutely required and some are "nice to have" and can be useful in certain scenarios. Some of these packages may already be installed.
Libnuma - SAS Visual Analytics requires libnuma to be installed on the server. sudo yum install numactl
Glibc - SAS Foundation 9.4 requires GLIBC 2.12 sudo yum install glibc
X11 Libraries - SAS Visual Analytics requires specific libX packages, 64 bit, to be installed so that
the SAS Deployment Wizard can run.
sudo yum -y install libXext.x86_64 libXp.x86_64 libXtst.x86_64 xorg-x11-xauth.x86_64
Libpng - Some parts of Base SAS may require the use of the libpng library. In addition, Visual Analytics Printing Service requires the libpng library. sudo yum install libpng
General Packages - The RedHat Enterprise Linux operating system is recommended to have
the following packages installed.
sudo yum install nfs-utils.x86_64 sudo yum install nfs-utils-lib.x86_64
sudo yum install firefox sudo yum install compat-libstdc++-33 sudo yum install libuuid.i686
sudo yum install libSM.i686 sudo yum install libXrender.i686 sudo yum install fontconfig.i686 sudo yum install libstdc++.i686 sudo yum install zlib.i686 sudo yum install ksh sudo yum install apr
At - The SAS Operating System Scheduler makes use of the at command and daemon. If you plan on using this scheduler, ensure that at is installed and configured. sudo yum install at sudo service atd start Run the following command to check the status of the At - sudo service atd status
NTP - It is recommended to have an accurate time in a SAS Visual Analytics environment. While failure to do so may not cause issues with the software itself, it may lead to unnecessary confusion when looking at time stamps.
9
rpm -q ntp; service ntpd status date
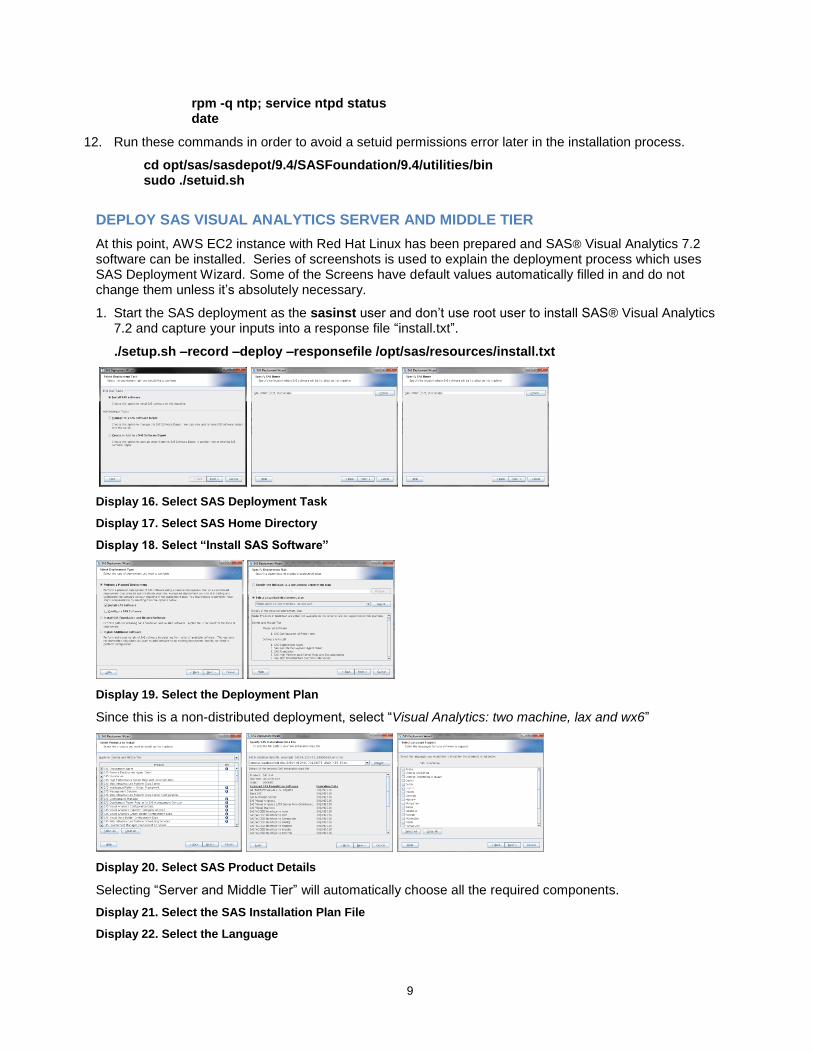
12. Run these commands in order to avoid a setuid permissions error later in the installation process.
cd opt/sas/sasdepot/9.4/SASFoundation/9.4/utilities/bin sudo ./setuid.sh
DEPLOY SAS VISUAL ANALYTICS SERVER AND MIDDLE TIER
At this point, AWS EC2 instance with Red Hat Linux has been prepared and SAS® Visual Analytics 7.2 software can be installed. Series of screenshots is used to explain the deployment process which uses SAS Deployment Wizard. Some of the Screens have default values automatically filled in and do not change them unless it’s absolutely necessary.
1. Start the SAS deployment as the sasinst user and don’t use root user to install SAS® Visual Analytics 7.2 and capture your inputs into a response file “install.txt”.
./setup.sh –record –deploy –responsefile /opt/sas/resources/install.txt
Display 16. Select SAS Deployment Task
Display 17. Select SAS Home Directory
Display 18. Select “Install SAS Software”
Display 19. Select the Deployment Plan
Since this is a non-distributed deployment, select “Visual Analytics: two machine, lax and wx6”
Display 20. Select SAS Product Details
Selecting “Server and Middle Tier” will automatically choose all the required components.
Display 21. Select the SAS Installation Plan File
Display 22. Select the Language

10
Display 23. Select Regional Settings
Display 24. Select Authentication Type
Display 25. Enter the SAS Environment URL
Display 26. SAS Document Conversion Environment Details
Leave the default information on this page. Host name is same as the value you entered in Display 25 which will be automatically filled in by the SDW.
Display 27. SAS Remote Communication Configuration
Display 28. Checking System
Display 29. Review Required Software
Display 30. Specify Software Location
Specify the location for the python directory and click “Next” to continue.
Display 31. Final Steps of the Installation
Make sure no errors or warnings in the “Deployment Complete” Page and then click finish completing the installation process.
2. Start the deployment wizard to configure SAS® Visual Analytics 7.2 and capture your inputs into a response file “configuration.txt”.
./setup.sh –record –deploy –responsefile /opt/sas/resources/configuration.txt

11
Display 32. Select Deployment Task and Specify SAS Home Directory
Display 33. Select “Configure SAS Software”
Display 34. Select the Deployment Plan and Step
Display 35. Select Configuration Prompting Level
Display 36. Select the Configuration Information
Display 37. Enter Local Machine Name
Display 38. Migration, IWA, Token-based Authentication & Override Backup Location
Leave these options blank and continue.
Display 39. Specify SAS Metadata Server

12
Enter the Host Name of EC2 instance.
Display 40. Deployment Account Type and Automatic Script Execution
Display 41. SAS Internal Account: Unrestricted Administrator
Display 42. SAS Internal Account: Trusted User
Display 43. SAS Internal Account: Anonymous Web User
Display 44. Allow Guest Access and Anonymous Web Access
Display 45. External Account: SAS Spawned Servers Account & First User
Display 46. Server Encryption and Estimated System Size
Display 47. Email Server Details.
Display 48. SAS Object Spawner Ports

13
Display 49. SAS Application Server: Server Context
Display 50. SAS Workspace Server and Pooled Workspace Server
Display 51. SAS Stored Process Server Ports.
Display 52. SAS Web Infrastructure Platform Data Server
Display 53. SAS DATA Step Batch Server
Display 54. OS System Services Scheduling Server and Deployment Tester Server
Display 55. SAS Web Server Configuration and Web Application Server: JMS Configuration
Display 56. Web Application Server Configuration

14
Display 57. Web Applications: Automatic Deployment
Display 58. Scheduling Services Configurations
Display 59. SAS Web Application Themes
Display 60. IP Multicast
Display 61. SAS Content Server
Display 62. SAS Web Infrastructure Platform Database
Display 63. SAS Environment Manager Configurations
Display 64. SAS Environment Manager Agent
Display 65. SAS Flex Application Themes

15
Enter the EC2 Host name if not auto filled.
Display 66. SAS VA High-Performance Configuration Information
Display 67. SAS VA Public Data Provider and Library Configurations
Display 68. SAS VA LASR Analytics Server Library and Public LASR Libraries
Display 69. SAS VA Analytics Services Database Credentials
Display 70. SAS Visual Data Builder Database Credentials
Display 71. SAS Information Retrieval Studio
Display 72. Search Interface to SAS Content Feeder Configuration
Display 73. SAS Internal Account: Search Interface to SAS Content User
Display 74. SAS Deployment Backup and Recovery Tool
Display 75. Deployment Complete
SAS Visual Analytics deployment is Successful if “Deployment Complete” screen shows no errors.
Display 76. Additional Resources

16
PERFORM POST-INSTALLATION TASKS
After the successful installation and configuration of SAS® Visual Analytics 7.2 there are some post installation tasks to be completed. Perform all the tasks and validations that are required in instructions.html, which is produced at the end of SAS deployment wizard installation and configuration process. Warnings and issues occurred during the automated portion of your configuration must be addressed before proceeding. Instruction.html will contain a list of warnings and errors as well as the fixes.
SAS DEPLOYMENT BACKUP
At the end of any SAS deployment, it is recommended to perform an integrated backup across all SAS systems. This backup should be created using the SAS Deployment Backup and Recovery Tool. Performing a full backup will ensure that we have a decent restore point in the future as well as confirm that the Backup Tool itself has been configured properly.
ADDING “LASRADM” USER IN METADATA
LASR administrator (lasradm) account is the recommended user for starting LASR servers and loading data into it. While sasdemo is usually defined as part of a typical deployment, lasradm is not, and it has to
be added as a metadata user. Use SAS Management Console to add lasradm as a metadata user. Then log into the SAS Visual Analytics Hub as lasradm and start LASR Analytic Server.
Display 77. LASR Server Started
SETTING UP AUTOLOAD
Autoload provides the capability to periodically synchronize in-memory data against tables in a designated directory. Tables already in memory will be refreshed if the source table has been changed. If the source tables are not already in memory they will be automatically loaded. Tables can also be unloaded from memory if the table is placed in the “Unload” directory. An append capability also exists to add data to a table already in memory. The public Autoload LASR server and library are created during configuration. Private Autoload libraries and servers can be created as well. Instructions included below only address the public Autoload setup. By default, the location for the public Autoload application is owned by the SAS installer account. Therefore, if the account used to load tables into LASR is not in the same group as the installer account it will not have appropriate permissions to schedule the Autoload task. To remedy this situation, change the ownership of the default public Autoload application directory and subdirectories to the LASR administrator.
1) Change ownership of the default directory structure to the LASR administrator account (typically lasradm).
cd /opt/sas/sasconfig/Lev1/Applications/SASVisualAnalytics/
chown -R lasradm:sasusers VisualAnalyticsAdministrator
2) As the LASR administrator account, execute the schedule.sh script. This script does not echo messages to the screen.
cd VisualAnalyticsAdministrator
./schedule.sh
3) To verify that it ran properly, check the cron table for this account. The script should have created an entry that runs every 15 minutes.

17
crontab -l
Once the script has been scheduled all that remains is to copy a table to the Autoload directory and then a
check to verify it is loaded to the Public LASR server. It is recommended that tables copied to the
Autoload data directory be secured appropriately via Linux permissions.
In addition to the above post installation task, there are other tasks specific to SAS Visual Analytics which is out of scope from this paper such as enabling/disabling guest access, audit reporting, SAS Web Application Server performance tuning, customizing the FLEX themes and relocate LASR Signature and Log Files.
PROMOTION
Promotion is a related concept to migration; promotion is the process of copying selected metadata and associated content within or between planned deployments of SAS software. After the new deployment of SAS Visual Analytics 7.2 uses the export/import functionality of the promotion tools to move the content from the old deployment, also called manual migration. The promotion framework is designed to allow customers to selectively move content from one deployment to another. There are limits to the content that can be exported using promotion; however, this option offers the most flexibility in changing the deployed topology. Below are the steps performed to promote metadata objects and content from previous versions to the deployment on the cloud,
Export/Import Users as a SAS package file
Export/Import Groups as a SAS package file
Create the Server Context
Export/Import Libraries as a SAS package file
Create New LASR Analytic Server
Export/Import Folders as a SAS package file
Export/Import Reports as a SAS package file
An important final step after the promotion or manual migration is Validation step to ensure the success of a migration. When validation is complete, the system can be rolled out to the user community.
SECURITY
In the big data era securing the data is a challenge for any business environment. SAS has already implemented the row level security in SAS Visual Analytics. Along with row level security, we also could leverage the network security features of Amazon EC2 which work in conjunction with Amazon VPC to provide security and robust networking functionality for your compute resources. Creating a VPN connection between the VPC and your corporate network (by attaching a virtual private gateway and creating custom route table).Please refer the AWS VPC user guide. Your compute instances are located in a Virtual Private Cloud (VPC) with an IP range that you specify. You decide which instances are exposed to the Internet and which remain private. Security Groups and networks ACLs allow you to control inbound and outbound network access to and from your instances. If not using the default VPC you need to create a new VPC and launch instances into that VPC to leverage advanced networking features such as private subnets, outbound security group filtering, network ACLs, Dedicated Instances, and VPN connections.
Display 78. Security Group

18
CONCLUSION
Amazon Web Services (AWS) Elastic Compute Cloud (EC2) instance is one of the cost effective method to deploy SAS Visual Analytics. This kind of deployment on AWS is reliable, secure, flexible and inexpensive. Thus setting up an AWS cloud instance of SAS Visual Analytics ensures swift analysis and reporting on large amounts of data by minimizing the movement of data across environments.
REFERENCES
(1) SAS 9.4 Pre-installation Checklist for Ports. :
http://support.sas.com/documentation/cdl/en/biig/69172/HTML/default/viewer.htm#n02027intelplatf
orm00install.htm
(2) Amazon Web Services Virtual Private Cloud User Guide
http://docs.aws.amazon.com/AmazonVPC/latest/UserGuide/VPC_VPN.html
(3) Amazon EC2 Key Pairs
https://docs.aws.amazon.com/AWSEC2/latest/UserGuide/ec2-key-pairs.html
(4) Internet Gateways:
http://docs.aws.amazon.com/AmazonVPC/latest/UserGuide/VPC_Internet_Gateway.html
(5) NAT Instances:
http://docs.aws.amazon.com/AmazonVPC/latest/UserGuide/VPC_NAT_Instance.html#NATInstance
(6) PuTTY Download Page:
http://www.chiark.greenend.org.uk/~sgtatham/putty/download.html
(7) WinSCP Downloads Page
http://winscp.net/eng/download.php
(8) Xming Download Page:
https://sourceforge.net/projects/xming/
(9) Pre-Installation Steps for the SAS® 9.4 Middle Tier:
http://support.sas.com/resources/thirdpartysupport/v94/appservers/preinstall.html
(10) How to Implement SAS 9.4 on an Amazon Web Services Cloud Server Instance:
http://support.sas.com/resources/papers/proceedings15/2883-2015.pdf
(11) The Top Five Things You Need to Know about Migration
http://support.sas.com/resources/papers/proceedings14/SAS369-2014.pdf
CONTACT INFORMATION
Your comments and questions are valued and encouraged. Contact the author at:
Vimal Raj Arockiasamy Kavi Global (847) 387 6760 [email protected] http://www.kaviglobal.com

19
Rajesh Inbasekaran Kavi Global (847) 387 6760 [email protected] http://www.kaviglobal.com
SAS and all other SAS Institute Inc. product or service names are registered trademarks or trademarks of SAS Institute Inc. in the USA and other countries. ® indicates USA registration.
Other brand and product names are trademarks of their respective companies.