A Re-creation of the Lost Statue of Athena from the ... · A Re-creation of the Lost Statue of...
48
Transcript of A Re-creation of the Lost Statue of Athena from the ... · A Re-creation of the Lost Statue of...


A Re-creation of the Lost Statue of Athena from the Parthenon in Athens, Greece
Costume-Con 32Historical Dress, Master Division Designed and made by Rae Bradbury-Enslin
This costume is entered in the Historical Dress category because it depicts a specific work of art, and because the category rules allowed modern methods for its construction. The original statue was made of wood, gold, ivory and marble, so there was obviously no way I could use period techniques or materials to recreate it as a costume. My methods for building the pedestal, props, and Athena’s clothing included numerous contemporary sculpting and sewing techniques, along with the use of non-period materials that resembled ivory and gold. When applicable, I’ll describe methods and materials for the garments as worn by the people of ancient Greece, many of which I necessarily deviated from in order to create the look of the statue.
ATHENA PARTHENOS
Exterior and interior cover images are from the Nashville Parthenon

This project began in 1991 when I first saw a photograph of the Parthenon exhibit housed in the Royal Ontario museum in Toronto. It depicted the statue of Athena from the Parthenon, which was the focal point of the Acropolis in Athens, Greece. The Parthenon (from Parthenos, meaning virgin) was founded as a temple in honor of Athena, the Greek goddess of wisdom, warfare and the arts. She was the patron goddess of the city of Athens and by the standard of any age, the sheer scope of the Parthenon and its wonders was utterly awe-inspiring.
Construction began in 447 BC and was mostly completed by 438 BC, although exterior decora-tion continued for several more years. During this time the celebrated sculptor Pheidias under-took the daunting task of creating a forty-foot
chryselephantine (gold and ivory) statue of the goddess herself to grace the interior. She was carved from a wood core that was then encased in other materials to create her skin and garments. Her clothing was comprised of segmented bronze plates covered by removable gold plating, and her skin was surfaced simi-larly with ivory. Although the statue stood for several hundred years, it was damaged over the centuries by fire, earthquakes and marauding troops. Lost to antiquity, no trace of it remains. Only the ruins of the temple in which it stood have withstood the ravages of time. Historians are unsure of the statue’s precise fate, but it was survived by numerous Roman and Greek copies, many of which still exist today. There are also modern reproductions that pay homage to this historic work of art.
OVERVIEW

I knew two decades ago that I wanted to recreate the statue as a costume, but I felt it was beyond my skills at the time. It stayed in the back of my mind until 2011, when I finally decided I was ready to address the many challenges involved and began to work on it in earnest. I drew inspi-ration from numerous drawings and reproduc-tions, but in some cases references weren’t always clear, or the various statues differed in their interpretations of a specific portion. In those instances I followed my instincts and used artistic license based on my findings about the original statue to create my version, since precisely duplicating this long-vanished work of art simply wasn’t possible.
The Toronto statue was my original inspiration however. I find it particularly fitting that after all this time–and by complete coincidence–I should be competing this presentation in the same city where resides the statue that first inspired me.
This project has easily been one of the most challenging costumes I’ve ever created. I’ve had to hone rusty skills, learn entirely new techniques, and come up with creative methods to achieve the look of a statue, while keeping weight down and ensuring onstage assembly would be practical and safe. I have greatly admired this piece for many years, and I’m thrilled to have finally struggled my way through creating my own version of it.
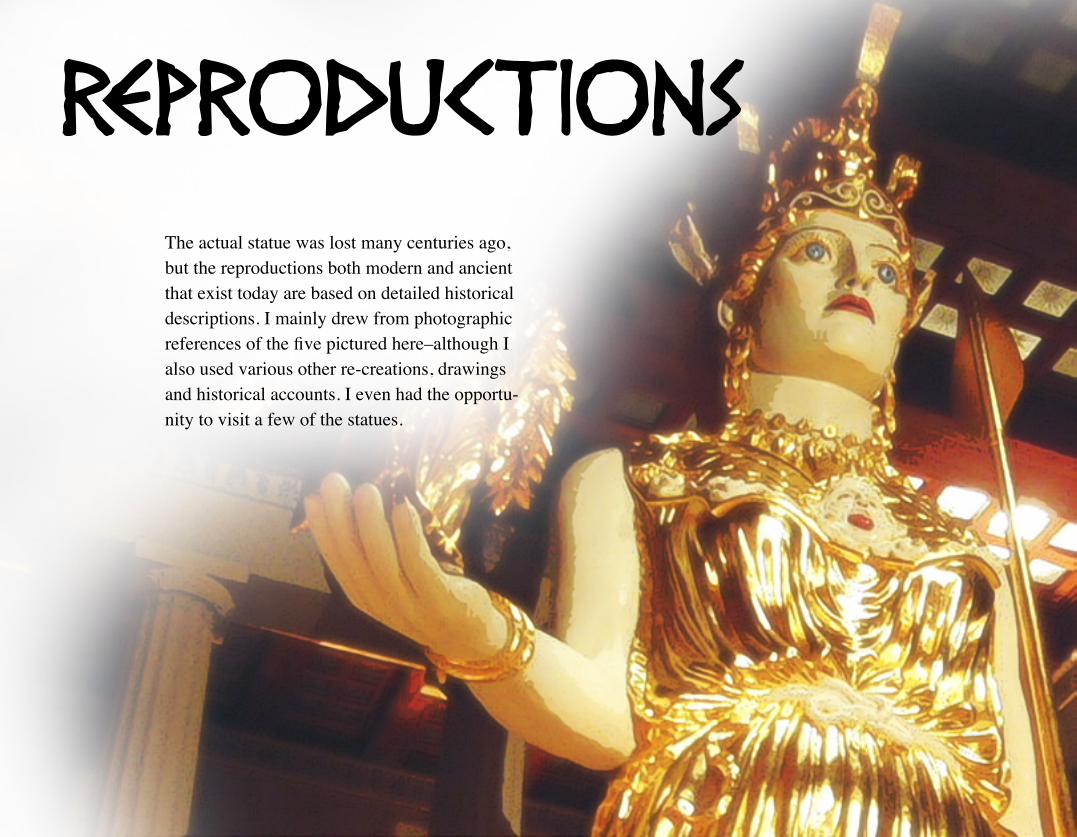
The actual statue was lost many centuries ago, but the reproductions both modern and ancient that exist today are based on detailed historical descriptions. I mainly drew from photographic references of the five pictured here–although I also used various other re-creations, drawings and historical accounts. I even had the opportu-nity to visit a few of the statues.
REPRODUCTIONS

Athena Severen, Boston Museum of Fine Arts
Roman, 138-238 BC
(I visited this statue in January of 2013.)
Athena Parthenos, Louvre
Roman, 1st–2nd century AD
Athena Parthenos, The Parthenon, Nash-ville, TN
Sculpted by Alan LeQuire. (Pictured)Completed 2002.
(I have corresponded a bit with the artist, who directed me to many excellent photographic sources of his work. I also visited this statue in September of 2013.)
Athena Parthenos, Royal Ontario Museum in Toronto
A photo of this statue is what originally inspired me to make the costume.
(I plan to visit it when I’m in Toronto for Costume-Con.)
Athena Varvakeion, National Archeo-logical Museum of Athens
Roman, 2nd century BC
The most complete surviving ancient copy of the statue.

PEDESTALThe statue’s pedestal by itself was almost the height of a man. It was made of marble quar-ried near the Parthenon site. The marble blocks surrounded an interior structure that held the wood supports for the statue. On the front was a frieze that represented the birth of Pandora.

Pedestals on the various Parthenon reproductions vary greatly. Some were quite wide, with significant space on either side of the main figure and her accompanying elements, as shown here with the Toronto and Nashville statues.
Some were much more compact, like the reproductions above. I opted to go a bit smaller with mine to facilitate my stage presentation. My pedestal frieze was comfortably able to house four-teen figures. A comparison of friezes revealed quite a bit of variety, with only certain characters appearing in all versions. I was careful to keep the ones that appeared significant, while amalgam-ating or removing those that didn’t.

Each piece fits down through the top of the pedestal into corresponding slots, to keep them from wobbling.
Pedestal base made of milk crates. It was encased by heavy duty foam core covered by marble print contact paper.
Since I wasn’t sure how many figures would fit on my smaller pedestal, I started with Pandora in the center and the equine sculptures on each end, and then filled the figures in between them.
Pandora, the central figure of the frieze.
A plywood platform evenly distributes my weight. I used ceiling moulding to make the top and bottom gold trim. The pedestal is modular and lightweight for travel and stage.
I used push molds to create the initial figures for the friezes, but each one was then shaped individually out of polymer clay. Hair, clothing, furnishings and weapons were sculpted by hand for each figure.

Finished frieze, painted gold and affixed to the pedestal front.
Somewhere in the last twenty-three years of my interest in the Parthenos I read an account which mentioned that for many years after the statue was gone, the pedestal remained. On it you could see the imprints of where Athena’s feet had been. I was unable to rediscover this anecdote to confirm it but I decided to add the toe prints to my own pedestal anyway, to mark where I would place my feet during my presentation.
Pedestal top showing the various holes where the addi-tional sculptures are inserted.
Completed pedestal with column, spear, snake and shield in place.
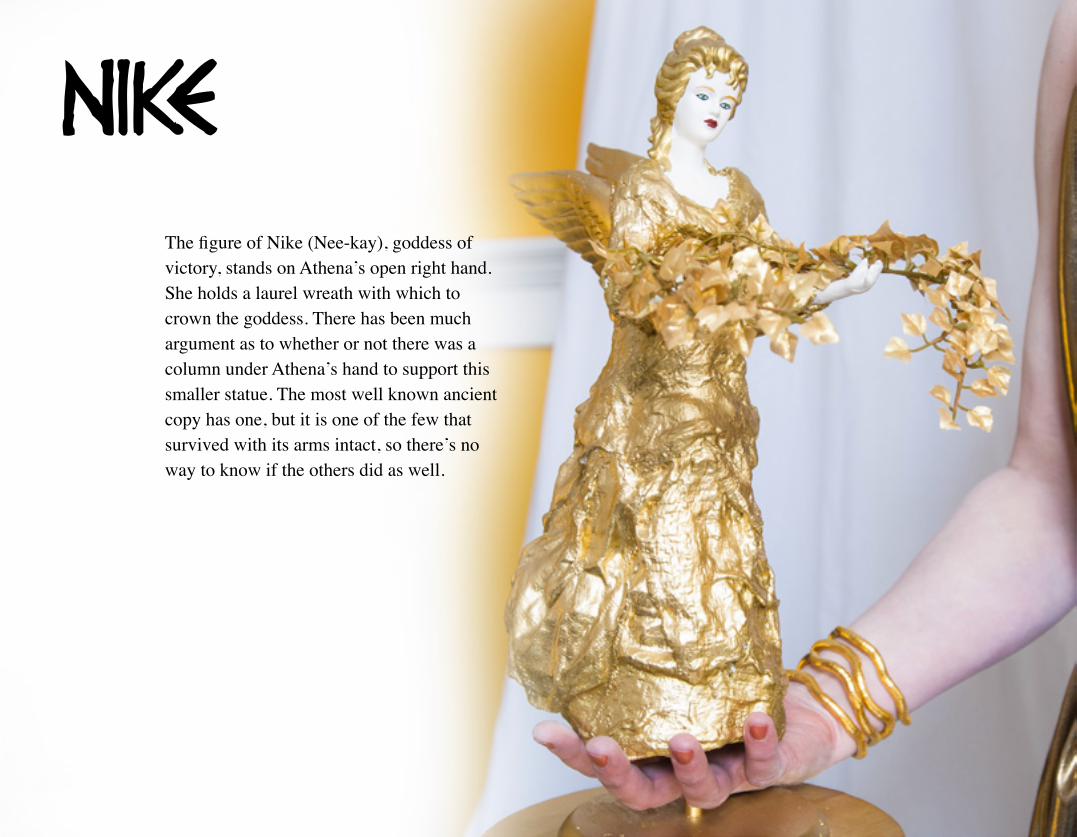
The figure of Nike (Nee-kay), goddess of victory, stands on Athena’s open right hand. She holds a laurel wreath with which to crown the goddess. There has been much argument as to whether or not there was a column under Athena’s hand to support this smaller statue. The most well known ancient copy has one, but it is one of the few that survived with its arms intact, so there’s no way to know if the others did as well.
NIKE

My Nike was created from a porcelain angel head and hands.
The statue of Nike appears relatively similar in all the reproductions that I studied. I decided to add the much-debated column to my costume because I like the balance that it adds to the statue overall. It also aided in my stage presentation.
Her base was made of wooden discs, glued together and mounted to the armature base.
Nike base mounted on the column, a cardboard tube covered with contact paper that matched the pedestal base.
I sculpted a foam clay body and added wooden wings.
Draped plaster bandaging was used for her robes.

Athena is a goddess of warfare, so the statue includes her weapons of war. Some accounts have her spear leaning against her shoulder, some locate it in the crook of her arm, and some suggest that she held it in her left hand. The length also varied greatly from one statue to another.
SPEAR

My spear is built from PVC tubing. I made it in two parts to make transportation simpler.
Since descriptions vary as to its exact placement, I put mine in the crook of my arm, simply because I felt it was the best fit and because most of the repro-ductions had it placed there. Spears from the era would have been bronze heads on a wooden shaft.
The spearhead, made from Apoxie Sculpt clay and painted gold.
The spearhead is built over a PVC joint that fits snugly over the tubing, similar to how the real thing would have fitted over a spear shaft.

The snake at Athena’s feet is thought to represent Erichthonius, a mythical king of Athens, and through him the Athenians themselves. Its position on the pedestal is coiled underneath her shield, clearly symbolic of her protection.
SNAKE

Basic shape created from foam pipe insula-tion, duct taped into position and stuffed to fill out creases.
The snake was quite challenging as a sculpture. I positioned him as best fit my pedestal, but other-wise didn’t deviate significantly from the shape of the various reproductions, other than to shorten the tail so I wouldn’t have to step over it.
Apoxie Sculpt was used to make the scales. Each scale was rolled, flattened, and added individually.
Finished snake sculpt, with top scales blended into the head.
The head was free sculpted with Apoxie Sculpt before scales were begun.
Snake in a body cast of plaster bandage to make structure more firm.

The exterior of the shield represents the Amazonachy (Am-a-ZO-nack-ee), a war between the Greeks led by Theseus, and the Amazons. In the center of the shield is the head of Medusa, slain by Perseus and presented to Athena. It was affixed to her shield as a protec-tive emblem.
SHIELD - EXTERIOR

My exterior sculpture is based on artists’ reconstructions from broken ancient reproductions, as well as the Nashville and Ontario statues. Historically, a heavily ornamented shield like this one probably would have been sculpted similarly to the way I did mine, rather than being worked with a hammer. The ancient method was called lost wax casting. I’ll describe that process in more detail later in my documentation.
Athena’s shield was, without question, the most intricate and difficult part of the costume to complete. The exterior contains numerous highly detailed sculptures that required me to learn an entirely new set of modeling and casting techniques.
I used a plastic saucer toboggan for my base. (Metal was too heavy and would have been more difficult to sculpt and paint upon.)
I used a second toboggan from which to cut pieces to fit into the holes where the handles had been. I then mounted the whole thing on a disc of wood, to create the proper shape.
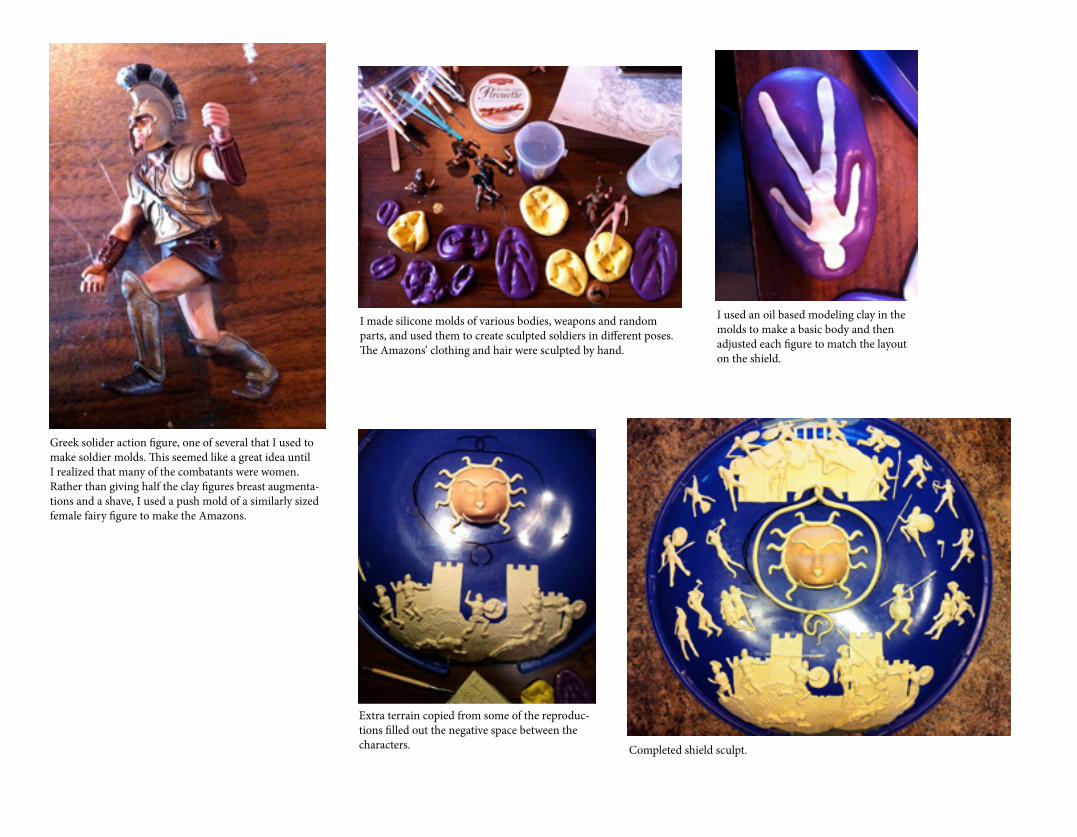
Greek solider action figure, one of several that I used to make soldier molds. This seemed like a great idea until I realized that many of the combatants were women. Rather than giving half the clay figures breast augmenta-tions and a shave, I used a push mold of a similarly sized female fairy figure to make the Amazons.
Completed shield sculpt.
I made silicone molds of various bodies, weapons and random parts, and used them to create sculpted soldiers in different poses. The Amazons’ clothing and hair were sculpted by hand.
I used an oil based modeling clay in the molds to make a basic body and then adjusted each figure to match the layout on the shield.
Extra terrain copied from some of the reproduc-tions filled out the negative space between the characters.
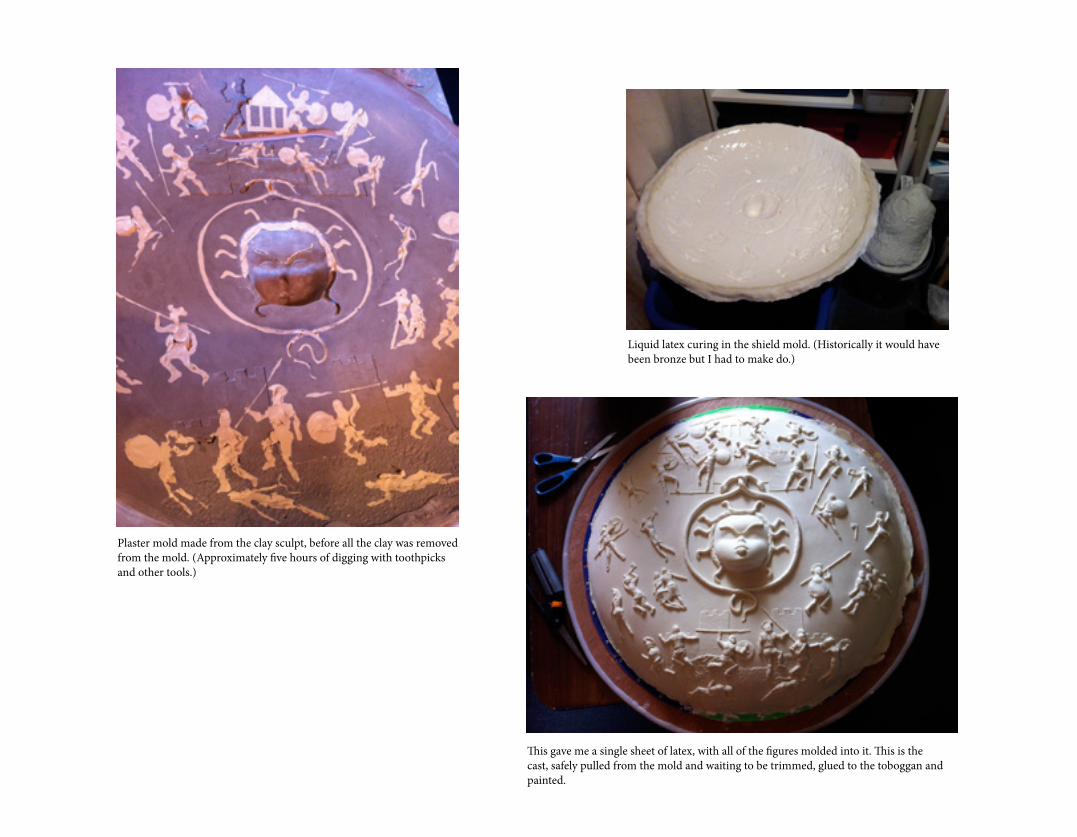
Plaster mold made from the clay sculpt, before all the clay was removed from the mold. (Approximately five hours of digging with toothpicks and other tools.)
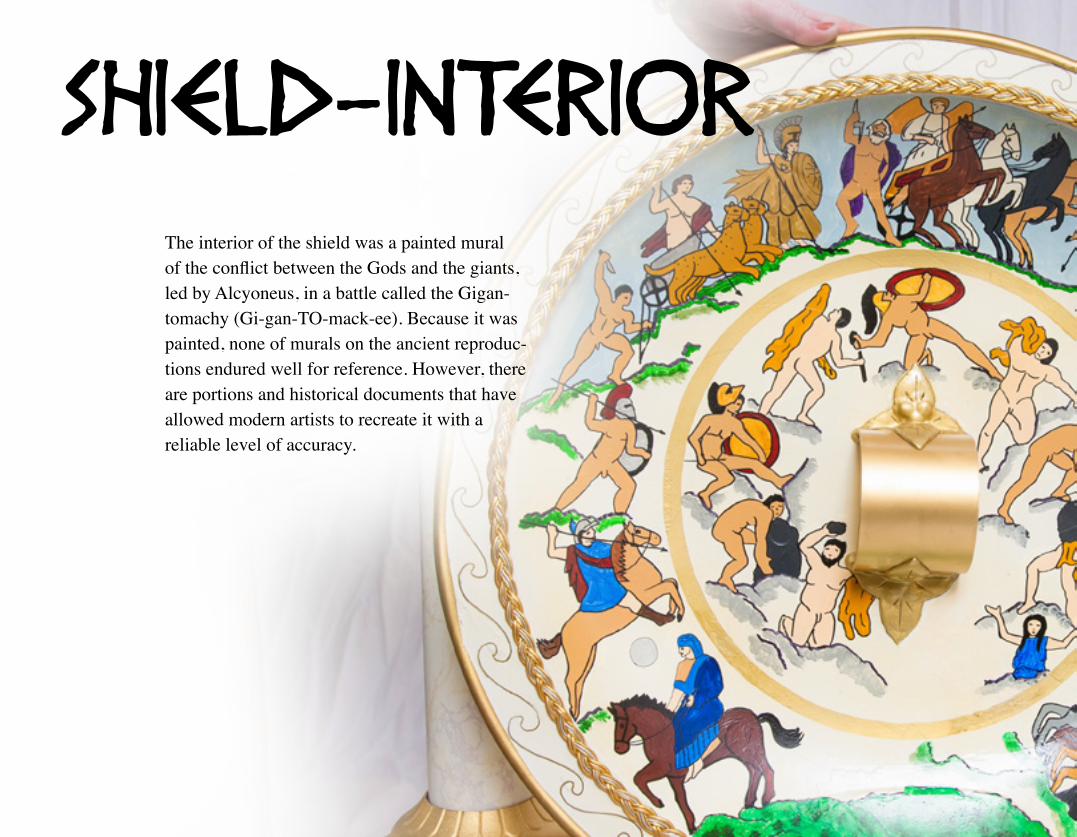
Liquid latex curing in the shield mold. (Historically it would have been bronze but I had to make do.)
This gave me a single sheet of latex, with all of the figures molded into it. This is the cast, safely pulled from the mold and waiting to be trimmed, glued to the toboggan and painted.
The interior of the shield was a painted mural of the conflict between the Gods and the giants, led by Alcyoneus, in a battle called the Gigan-tomachy (Gi-gan-TO-mack-ee). Because it was painted, none of murals on the ancient reproduc-tions endured well for reference. However, there are portions and historical documents that have allowed modern artists to recreate it with a reliable level of accuracy.
SHIELD-INTERIOR

White painted base for interior mural.
Half of a PVC joint attached with hinges creates the arm guard. The decorative leaves that cover the screws are more Apoxie Sculpt.
I projected a drawing of the mural reconstruction onto the shield to size and place the figures.
Blocking in the colors. (Note that the Athena figure at the top is already completed, in the hope that she’d look upon the entire project with more favor.)
I used the Nashville statue’s rendition of the mural as a basis for my colors.
Colors finished, before outlining. My rather rusty drawing skills were adequate to the task of completing this portion of the project. The style of drawing from the time period was relatively simplistic, so the somewhat cartoonish style is actually historically accurate.

Because the Athena statue was over forty feet tall, Pheidias enlarged her upper body propor-tions so she would look more natural when viewed from below. This is common practice in large scale sculpture, but represented a chal-lenge for me because when I made the shield to the proper size, my hand was out of position for holding it correctly. To resolve this problem, I had to modify the shield stand, which I feel was my only major deviation from the historical models.
PROPORTIONS

Most of the reproductions have a small wedge propping the shield, but none were more than a few inches high, as illustrated above. The sole purpose was simply to keep the gigantic shield from breaking loose, rolling off the platform and squashing random Athenians. This didn’t solve my problem.
This illustration demonstrates the difference between my proportions and those of the statue. (The Nashville Athena was based on the dimensions of the original sculpture, so she shows the issue most clearly.) When our heights are made comparable our legs are essentially the same length, but the statue’s upper body is greatly enlarged. This puts her shoulders and arms at a much lower level. As a result, she is able to easily rest her palm on her shield, whereas my shield is out of my reach by several inches. Seeing the statue at full size was what finally enabled me to see why I was having the problem. It was very much a eureka moment.
My compromise was twofold. I decided that since the wedge had to be quite a bit larger than was typical, I would make it ornamental so it appeared more integrated to the rest of the platform. I used gold painted wood trim to decorate it. I also altered my pose slightly–my palm doesn’t rest flat on top of the shield. (Otherwise the stand would have had to be raised even higher.) I felt these changes were reasonable, based on the unforeseen differ-ence in my body proportions from those of the statue.

Athena’s main garment is called a peplos. It was common clothing for several centuries in ancient Greece. (750 BC-30 BC) Initially made of wool, later versions may have used fabrics such as linen or silk.
PEPLOS

The garment was made from a wide rect-angle of fabric. The top edge was first folded over horizontally, forming a flap called an apotygma. This portion could be short, hanging just above the breasts, or long, hanging to mid-thigh, like the one Athena is wearing. The whole piece was then folded in half vertically.
The intricate drapes and folds of a peplos were painstakingly recreated on the statue.
An opening was allowed for the arm, and then the fabric was pinned at the shoulder using a pin called a fibula.
The neckline was adjusted, and then pinned over the right shoulder, leaving the open side of the fabric draped down the right side of the body. A belt (also called a girdle) held it in place.
The vertical fold was wrapped around the left side of the body.

Right side showing the open draping. Undergarments were not worn with a peplos, so the wearer’s body would be visible through the opening when in motion.
Completed peplos, compared with the left side of Athena Severen. (My mannequin’s apotygma is a bit longer than the statue’s, because it was a perfectly good bed sheet and I didn’t want to cut it.)

Gold is expensive, and wooden clothing would leave splinters in my delicate lady parts. Clearly, I couldn’t use those materials. Period fabrics also would have been inappropriate to achieve the proper look of metal plating. I had to come up with a fabric that emulated the beautiful folds and drapes of a real peplos, with the same metallic sheen of the statue’s golden garments. I used a modern swimwear fabric that I felt most closely approximated the look of Athena’s gilded apparel.
(Note: My apotygma has been shortened by about four inches since my documentation photos were taken.)
Unfortunately my fabric was one-sided, so I was unable to fold it over in a historically correct fashion without showing the black underside. Instead I made a separate skirt with a tunic top styled like a peplos. The look is essentially the same, and the lack of the fold at the collar was conveniently hidden by the aegis that Athena wears over her shoulders. I cheated the opening on the right side of the costume, also because
of the black underside. (And because I didn’t feel that I needed to flash the Costume-Con audience.) None of the statue reproductions show Athena’s body through the side opening, so I simply sewed mine closed and attached a separate drape to emulate the loose edges of the fabric. The interior of the fabric was spray painted gold. The upper drape on the tunic is also artificial, and was accomplished by simply bunching more of the tunic fabric under the belt on that side.

Athena was said to wear an aegis, which is defined as a protective shield, but also trans-lates to a mantle worn over the upper body. It protected her in battle in a literal sense, and symbolically represented her protection of the Greeks. The aegis was characterized as being made from some type of magical goat or sheep pelt, or alternately the armored skin of a scaled creature. It was also described variously as a mantle, shield, or cloak. Descriptions of this mythical armor varied greatly, but sources were in agreement that it was worn specifically by Zeus and Athena.
AEGIS

The aegis on each statue was slightly different, but in general they all consisted of round golden scales on a chest covering, with coiled snakes as additional decoration. The head of Medusa was affixed to the front. I liked the look of the gilded statues with ivory colored snakes, so I designed mine that way. I started with a heavy canvas to hold the shape, then attached oversize gold pailette sequins.
Shiny nylon rope with a braided pattern that resembled snake scales was used to make snake trim--which I found prefer-able to attaching painted rubber snakes.
The rubber snakes did contribute however. I used them to make molds for several polymer clay heads to cap each rope.
Unlike the rest of the garb worn by the statue, no similar garment appears to have been in common usage among the Greek populace of the times. My aegis is therefore based solely on the depictions found on the statue reproductions.
Finished snakes with head caps.
I completed the ties for Athena’s girdle using the same method.
I then tried using a doll head as a base, and I made her hair more clearly snake-like.
Most early portrayals of Medusa were quite ugly, like this coin. I found it to be practically unrec-ognizable since portrayals of the mythological character changed centuries ago to a more comely likeness. My first attempt was based on the ugly images, but was so comical-looking on my costume that I found it to be a rather jarring distraction. This allowed me to keep the surreal, angry features
of the statue, while making her more recognizable as Medusa to modern observers.

Athena’s sandals were a platform style. The statue’s pose allows the front of the platforms to show from under the hem of her peplos. These platforms had tiny friezes that represent the Centauromachy (Sen-tor-RO-mack-ee), a skir-mish between the centaurs and the Lapiths of the Peneus Valley that took place when a group of centaurs became drunk at a Greek wedding and attempted to abduct the bride.
SANDALS

It was difficult to find clear photos of the frieze on the sandals. Fortunately, the Centauromachy was the subject of marble friezes elsewhere on the Parthenon, and I was able to find photos of those easily enough. I used these marbles to create simple line drawings of eight of the sculptures.
I used these modern platform flip flops as a base. The thickness was ideal and didn’t require any further engineering.
The platform style sandals worn by Athena were popular in period, and were styled just like modern flip flops, with a strap that separated the big toe from the other four. They were usually built with leather straps attached to a layered leather sole, although occasionally the sole would be of wood.
I was concerned that if I just sculpted tiny clay friezes onto the sandals that they might crack and fall off if the soles flexed as I walked. So instead I digitally created embroideries that I applied to gold fabric. I then glued that to the shoe platforms, creating tiny 3D figures that would stay put.

Athena’s jewelry varied from statue to statue. In all versions she wore snake bracelets twined around her wrists and sometimes her upper arms. The Nashville and Ontario statues had necklaces and earrings, which I decided to incorporate into my design.
JEWELRY

Her jewelry was closely based on historical pieces like the necklace and earrings above.
I appreciated that Mr. LeQuire replaced the winged siren from the historical earrings with Athena’s Little Owl. (Athene Noctua) I felt that her companion and symbol was oddly underrepresented in most of the statues, considering how much other symbolism was present. I was pleased by this small opportunity to add it to mine. (This photo was provided to me by the sculptor.)
I found the clearest references on photos of the Nashville statue.
My necklace and earrings were created from various bits and pieces that I had on hand–including a small pair of owl earrings–to come as close as I could to their historical coun-terparts.
My snake bracelets were purchased pieces that fit the description nicely.

The final element of Athena’s costume was her helmet. She wore what was known as an Attic helmet—an open-faced helmet with hinged ear plates made in the region of Attica, located near Athens. The Parthenon helmet had three spec-tacular crests which were affixed to sculpted crest mounts. The center was a sphinx, and the two side figures were described as either winged horses or gryphons.
HELMET

Athena’s helmet was far too ornate to have been worn by the average foot soldier. With its many sculpted elements and crests, it was clearly symbolic of Athena, not literal. (Although, presumably if one is a goddess, one can wear whatever one wishes into battle and still kick ass.)
As mentioned with the shield, my materials differed greatly from those of the ancient Greeks. However, my method was actually very similar to theirs. I smoothed a layer of clay over the helmet base and then roughed out the figures for the three crest mounts. The Greeks would have carved wax for this step.
A vase painting of Achilles and Patroclus illustrates a more typical soldier’s style of Attic helmet. The decorative crest on the top was made of horsehair most likely mounted in a removable leather or wooden sheath, which would have been easily replaced as it got worn out or damaged. (Feathers were also used, but Athena’s sculpted crests resemble hair more than plumes.)
This ceremonial helmet is similar to Athena’s in its sculpted surface. Like her shield, helmets of this type were usually made of bronze using the lost wax casting method. It would have been created first as a wax form, then molded in plaster. The wax would be melted out, creating a nega-tive, and then the molten bronze poured into the mold. The finished result would be cleaned up, and faults hammered out. Then it would be buffed and polished.
I smoothed it as much as possible and finished it with a strip of evenly rolled clay to create the band around the edge. Crest mount figures were hand sculpted, except for a vinyl angel head that I used for the sphinx figure.
This extremely creepy anonymous internet model is wearing the inex-pensive plastic helmet that I used for a base. The ear and brow pieces were used in the finished helmet because of their similarity to those of the Nash-ville statue.

I cast my helmet out of latex instead of bronze. (I was pretty sure I couldn’t melt bronze on my stovetop...)
The plastic earpieces were just what I needed and made perfect molds exactly as they were. I filled them with polymer clay, then removed and baked it.
First layer of plaster for the helmet mold
The horse figures were cast separately to simplify the seams.
Latex shell glued to the toy helmet, doll head fitted into sphinx body, horses attached, brow and ear pieces affixed, and wings added to the figures.
The seams are smoothed with Apoxie-Sculpt, and everything is ready to be painted.
Finished plaster mold. Greek armorers would have ended up with something very similar at this stage of the process.
Their mold would have been heated to melt out the wax. My clay was oil-based, which enabled me to peel it away from the plaster.
I glued each one into the opposite earpiece to create solid two-sided shapes instead of hollow plastic pieces.

Not all of the helmet reproductions have this detail, but the statue was sometimes represented with additional charging horses across the brow of Athena’s helmet. This cameo shows them more clearly than any of my statue photos.
Broken horse bodies and the remains of their legs can be seen across the brow piece of the helmet on the Athena Severen reproduction.
I had attempted the horses earlier in the project, only to decide that all the tiny legs made the helmet too cluttered. But I found a number of small latex horse heads that were just the right size and decided to add them after all–sadly, after principle photography was finished.
I felt that with all the gleaming gold on the statue, using actual horsehair for the crests would have been very drab. I also planned to move around on stage, so I didn’t want to simply sculpt the crests as solid pieces because I thought they’d look unnatural. I used these floral picks, which seemed a good compromise.
Crest mounts were made of balsa wood, with cut out craft foam to create some decorative interest on the sides. Finished crests. The helmet is modular for easier storage and trans-
port. The dowels insert into tubes on each crest mount.

Athena’s sculpted hair consisted of close-cropped golden curls around her face with longer tendrils on the sides and back. This created a lovely contrast with her ivory skin.
FINAL TOUCHES

It’s true. The revered Grecian goddess of wisdom, warfare and the arts rocked an ancient mullet.
The only wig I could find in that style was an inexpensive Halloween store version. Apparently the more sophis-ticated wig companies don’t make this style. Or at least they won’t admit to it…
A hairstylist friend assisted me with curling the wig, which I then painted gold to fully set the curls and make them look sculpted.
Some of the statues had a band that gathered the curls together, but my wig shortened up quite a bit when curled, and I felt the hair sat better without one. The styles seemed to vary a lot, so I felt that this was a good approximation of her hairstyle
Very few of my photos showed the back of Athena’s hair, but the Severen statue illustrates the spiral curls that appeared to be most prevalent.
But to achieve Athena’s ivory complexion, I used what women have been using for centuries: layers and layers of paint. I added a pair of gray contact lenses so that my version of the goddess would have the gray eyes for which she was famous.
I didn’t think it would be ideal to wear makeup on my arms, hands and feet, so I made a bodysuit of ivory colored fabric. (Shading was added later with an airbrush.)

GALLERY


Costumes of the Greeks and the Romans, Thomas Hope
The World of Roman Costume, Edited by Judith Lynn Sebesta & Larissa Bonfante
The Iconography of Sculptured Statue Bases in the Archaic and Classical Periods, Angeliki Kosmopoulou
Romische Helm, Marcus Junkelmann
Partial Coverage History of Lingerie II: Ancient Greeks, website
Wikipedia.com, website
Alan Lequire, sculptor for the full-size statue of Athena, Nashville Parthenon (He wants to see photos when I’m done.)
Various reproductions of Athena Parthenos, both antique and modern
The Parthenon Museum in Nashville, TN
SOURCES

The list of people to whom I owe many thanks...Craig Enslin for documentation layout and design assistance, and for putting up with this obsession of mine for the entirety of our relationship and not killing me
Jeremy O’Neail for teaching me casting techniques for the helmet and shield
Dan and Suzanne Plumpton for spectacular photography of the finished costume
Bill Kennedy, Carol Salemi, and Trina Noakes for prop wrangling, makeup concepts, and helping me channel my inner goddess
Joe Niedbala for airbrushing, documentation concept, and printing
Laurel Hill for suggestions on how to make a pedestal that I wouldn’t fall through
Rick Smith for helping me figure out how to cut crown moulding properly
Sandra Snow for assistance in sculpting
Crystal Eisenhard-Richard for wig styling
Stephen Favarger for introducing me to ancient Greek historical re-enactment and costume, and for showing me that darn picture of the statue in the first place
Alan Lequire for providing reference photos of his own work and encouraging me
A dozen or so other friends who were in on the secret, for all their support, excitement, and feedback when this project finally got going after twenty years
... and to Rustoleum, because they make the best metallic gold spray paint EVER
ACKNOWLEDGEMENTS


![ATHENA - Coordinate System Document...[RD02] ATHENA Mission Requirements Document (MRD), ATHENA-ESA-URD-0010 [RD03] ATHENA Product Tree, ATHENA-ESA-PT-0001 [RD04] Ariane 5 User’s](https://static.fdocuments.in/doc/165x107/5ff23cd84225de2c7f4f21b6/athena-coordinate-system-document-rd02-athena-mission-requirements-document.jpg)