
A QUILT PATTERN BY Suzy in partnership with Active...
5
Finished size: 60" x 60" | Fabric: Saltwater @SuzyQuilts @BirchFabrics #AhoySailorQuilt #BirchFabrics 100% ORGANIC FABRIC MADE WITH LOVE, NOT PESTICIDES. birchfabrics.com + [email protected] AHOY SAILOR A QUILT PATTERN BY uilts Suzy in partnership with Active hyperlinks, so click where you see an underline!
Transcript of A QUILT PATTERN BY Suzy in partnership with Active...

Finished size: 60" x 60" | Fabric: Saltwater @SuzyQuilts @BirchFabrics #AhoySailorQuilt #BirchFabrics
100% ORGANIC FABRIC MADE WITH LOVE, NOT PESTICIDES.birchfabrics.com + [email protected]
AHOY SAILORA QUILT PATTERN BY
uiltsSuzy in partnership with
Active hyperlinks, so click where you see an underline!

uiltsSuzy SUZYQUILTS.COM | COPYRIGHT 2016 SUZY QUILTS All rights reserved. Duplication of any kind is prohibited. 2+
FQ = Fat Quarter: pre-cut fabric measuring approximately 18" x 21" – for this pattern a 1/4 yd. or FQ can be used | WOF = Width of Fabric: cotton broadcloth commonly used for quilting is 42" | Seam Allowance = 1/4 inch
IN DEPTH TUTORIAL! For a full list of quilting terms, tools and supplies, visit bit.ly/quilting-supplies
FABRIC
Ahoy Sailor 1/2 yd. 2 - 6 1/2" x WOF
Anchors Aweigh 1/2 yd. 2 - 6 1/2" x WOF
Sea Snails 1/2 yd. 2 - 6 1/2" x WOF
Mermaids Day 1/2 yd. 2 - 6 1/2" x WOF
Mermaids Night 1 FQ 1 - 4 7/8" x 7 3/4"; 1 - 3 1/2" x 5 1/2"
Whales Sky 1 FQ 1 - 4 7/8" x 7 3/4"; 1 - 3 1/2" x 5 1/2"
Flotsam Coral 1 FQ 1 - 4 7/8" x 7 3/4"; 1 - 3 1/2" x 5 1/2"
Flotsam Seamint 1 FQ 1 - 4 7/8" x 7 3/4"; 1 - 3 1/2" x 5 1/2"
Stars of the Sea 1 FQ 1 - 4 7/8" x 7 3/4"; 1 - 3 1/2" x 5 1/2"
Eight Arms 1 FQ 1 - 4 7/8" x 7 3/4"; 1 - 3 1/2" x 5 1/2"
CUTTING FABRIC
Sailor Stripe 3/4 yd. 1 - 4 7/8" x 7 3/4"; 1 - 3 1/2" x 5 1/2" 6 - 2 1/2" x WOF
Poplin Shroom 1/4 yd. 14 - 1 1/2" x 8 1/2"
Poplin Cream 1 3/4 yds. 7 - 4 7/8" x 7 3/4"; 14 - 4 3/8" x 7 1/4" 14 - 3/4" x 7 1/4"; 14 - 3/4" x 8 1/2"; 14 - 1 7/8" squares*; 2 - 8 1/2" x WOF sub-cut to 4 - 5" x 8 1/2", 6 - 5 1/2" x 8 1/2", 3 - 6 1/2" x 8 1/2"; 1 - 10 1/2" x WOF sub-cut to 4 - 10 1/2" x 8 1/2", 1 - 6 1/2" x 8 1/2"
Binding 1/2 yd. 7 - 2 1/4" x WOF
Backing 3 3/4 yds.
CUTTING
* Cut each 1 7/8" square in half, on the diagonal, for a total of 28 triangles.
SAILOR STRIPEMERMAID NIGHTMERMAID DAYSEA SNAILSANCHORS AWEIGHAHOY SAILOR
HERE BE MONSTERS (backing)
EIGHT ARMSSTARS OF THE SEAFLOTSAM SEAMINT(binding)
FLOTSAM CORALWHALES SKY
1. To make the large sail on the sailboat, pair 1 - color 7 3/4" x 4 7/8" with 1 - Cream 7 3/4" x 4 7/8". Lay them side by side, the Cream rectangle with the back side facing up,** and using either a regular lead pencil or water soluble marker, draw a dot as a guidemark 1/2" away from two of the corners. Using those dots as guides, draw guidelines on the Cream fabric Fig.1.
2. Place the Cream rectangle, back facing up, on top of the color rectangle. *TIP! to make sure your dots are correctly aligned, use a pin to poke through both fabrics on the dot. Fig.2
1/2"1/2"
Fig. 1
** Birch solid poplin is reversible, there is no back or front. This is mentioned in case a different fabric is used.
Large Sails
TIP! when cutting rectangles for the sail pieces, be sure that all pieces are cut in the same direction (shortest sides of rectangles facing the same way) so that your prints will face the same direction in your final sailboats (especially helpful for the Sailor Stripe).
uiltsSuzy SUZYQUILTS.COM | COPYRIGHT 2016 SUZY QUILTS All rights reserved. Duplication of any kind is prohibited. 3+
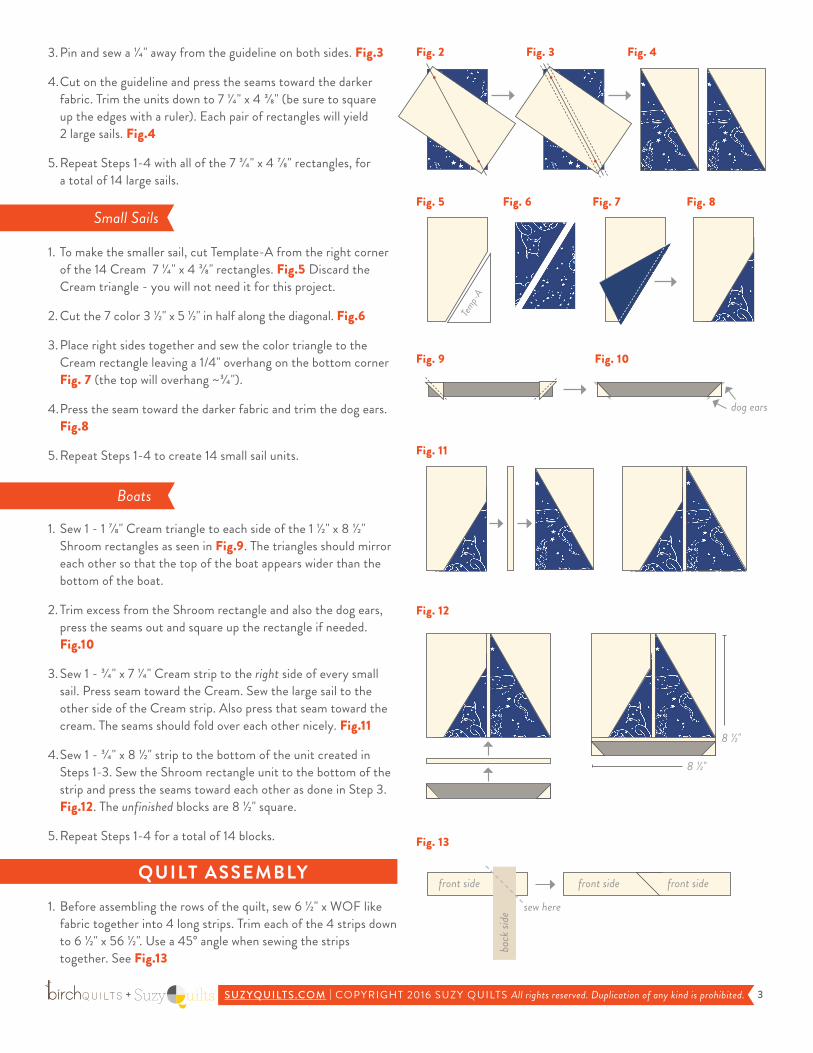
3. Pin and sew a 1/4" away from the guideline on both sides. Fig.3
4. Cut on the guideline and press the seams toward the darker fabric. Trim the units down to 7 1/4" x 4 3/8" (be sure to square up the edges with a ruler). Each pair of rectangles will yield 2 large sails. Fig.4
5. Repeat Steps 1-4 with all of the 7 3/4" x 4 7/8" rectangles, for a total of 14 large sails.
Fig. 2 Fig. 3 Fig. 4
Temp-A
Fig. 5 Fig. 6 Fig. 7 Fig. 8
1. To make the smaller sail, cut Template-A from the right corner of the 14 Cream 7 1/4" x 4 3/8" rectangles. Fig.5 Discard the Cream triangle - you will not need it for this project.
2. Cut the 7 color 3 1/2" x 5 1/2" in half along the diagonal. Fig.6
3. Place right sides together and sew the color triangle to the Cream rectangle leaving a 1/4" overhang on the bottom corner Fig. 7 (the top will overhang ~3/4").
4. Press the seam toward the darker fabric and trim the dog ears. Fig.8
5. Repeat Steps 1-4 to create 14 small sail units.
1. Sew 1 - 1 7/8" Cream triangle to each side of the 1 1/2" x 8 1/2" Shroom rectangles as seen in Fig.9. The triangles should mirror each other so that the top of the boat appears wider than the bottom of the boat.
2. Trim excess from the Shroom rectangle and also the dog ears, press the seams out and square up the rectangle if needed. Fig.10
3. Sew 1 - 3/4" x 7 1/4" Cream strip to the right side of every small sail. Press seam toward the Cream. Sew the large sail to the other side of the Cream strip. Also press that seam toward the cream. The seams should fold over each other nicely. Fig.11
4. Sew 1 - 3/4" x 8 1/2" strip to the bottom of the unit created in Steps 1-3. Sew the Shroom rectangle unit to the bottom of the strip and press the seams toward each other as done in Step 3. Fig.12. The unfinished blocks are 8 1/2" square.
5. Repeat Steps 1-4 for a total of 14 blocks.
Fig. 9 Fig. 10
dog ears
Fig. 11
8 1/2"
8 1/2"
QUILT ASSEMBLY1. Before assembling the rows of the quilt, sew 6 1/2" x WOF like
fabric together into 4 long strips. Trim each of the 4 strips down to 6 1/2" x 56 1/2". Use a 45° angle when sewing the strips together. See Fig.13
sew here
back
side
front side front side front side
Fig. 12
Fig. 13
Boats
Small Sails

uiltsSuzy SUZYQUILTS.COM | COPYRIGHT 2016 SUZY QUILTS All rights reserved. Duplication of any kind is prohibited. 4+
2. Lay the sailboats out to make sure all of the colors are well dispersed. Tip! To help disperse the fabric prints evenly, only use 1 set of 7 blocks in the top of the quilt, and the other set of identical blocks on the bottom of the quilt.
3. Once blocks are arranged as desired, sew them into 4 separate rows – two rows have 4 boats, and 2 rows have 3 boats as seen in Fig.14. Press seams away from the boat blocks to decrease bulk.
4. Once sailboat rows are sewn together, there is a total of 8 rows: 4 sailboat rows and 4 - 6 1/2" x 56 1/2" strips. Sew the strips to the sailboat rows and press seams toward the strips.
5. Once the quilt top is assembled, sew the 6 Sailor Stripe 2 1/2" x WOF border strips together. Refer to Fig.13.
6. Trim the long strip created in Step 5 to 2 - 2 1/2" x 56 1/2" and 2 - 2 1/2" x 60 1/2". Pin and sew the shorter strips to the base and top of the quilt. Press seams out toward the border. Pin and sew the final 2 border strips to the sides of the quilt. Press seams out again. Tip! To save time, you can pin the long strip created in Step 5 to one side of the quilt. Before sewing, trim the strip with scissors an inch away from the edge. Sew the strip and press the seam. With a ruler and rotary cutter, square up the corner and trim the border strip. Continue to pin, sew and square up each corner until all border strips are sewn to the quilt top.
10 1/2" x 8 1/2"
10 1/2" x 8 1/2"
10 1/2" x 8 1/2"
10 1/2" x 8 1/2"
5" x
8 1/2"
5" x
8 1/2"
5 1/2"
x 8
1/2"
5 1/2"
x 8
1/2"
5 1/2"
x 8
1/2"
6 1/2" x 8 1/2" 6 1/2" x 8 1/2"
5" x
8 1/2"
5" x
8 1/2"
5 1/2"
x 8
1/2"
5 1/2"
x 8
1/2"
5 1/2"
x 8
1/2"
6 1/2" x 8 1/2" 6 1/2" x 8 1/2"
Fig. 14
uiltsSuzy SUZYQUILTS.COM | COPYRIGHT 2016 SUZY QUILTS All rights reserved. Duplication of any kind is prohibited. 5+
FINISHING THE QUILT
1. Layer the backing wrong side up, the batting and quilt top right side up. Baste as desired. Quilt as desired.
2. Trim the excess batting and backing and square up the quilt.
3. Join the binding strips together with a diagonal seam. Trim and press seams open. Refer to Fig.13
4. Once all of the strips are sewn together, fold in half, wrong sides together, and press flat to create the binding. Sew binding to your quilt by lining up the raw edges.
5. After binding is sewn to your quilt, fold over and either machine stitch or whip stitch the binding to finish off the edges of the quilt.
6. Post your finished quilt to Instagram and use #AhoySailorQuilt
Check out the Suzy Quilts YouTube channel for more tutorial videos! bit.ly/suzyquilts
IN DEPTH BINDING TUTORIAL This easy-to-follow tutorial and video will show every step in sewing binding on a quilt. Click bit.ly/quilt-binding
IN DEPTH TUTORIAL! This step-by-step tutorial and video will explain how to machine quilt. Click bit.ly/machine-quilt
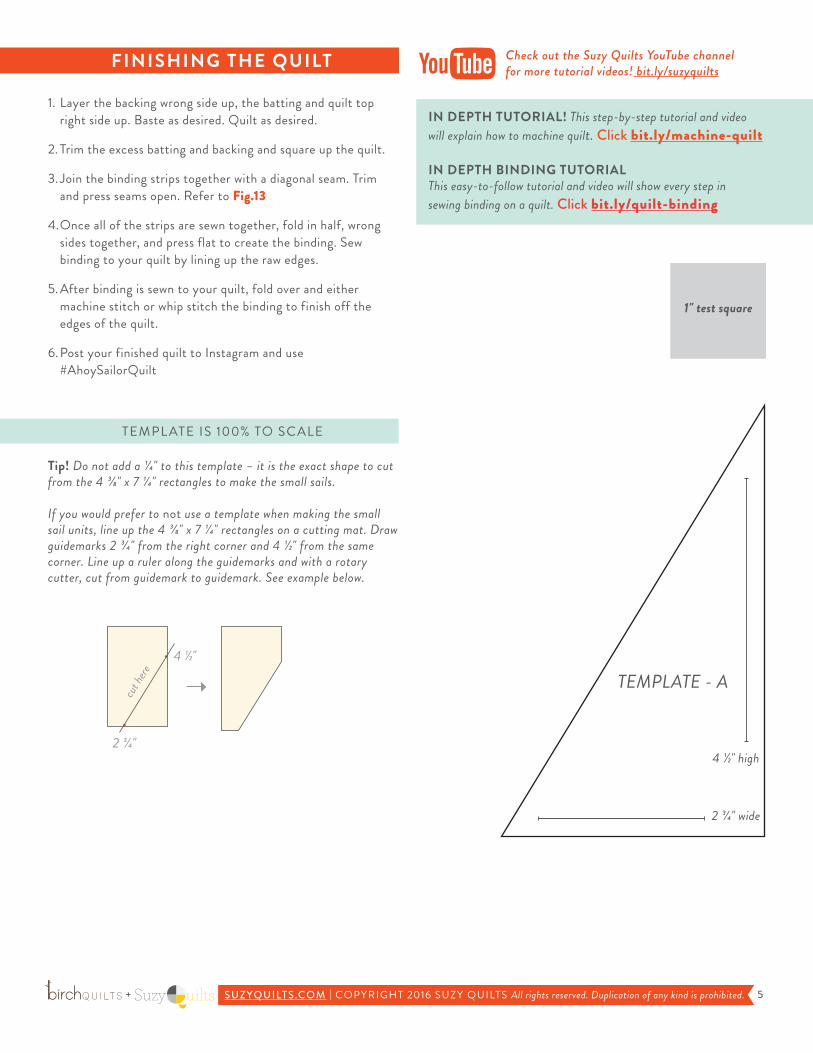
1" test square
TEMPLATE - A
4 1/2" high
2 3/4" wide
TEMPL ATE IS 100% TO SCALE
Tip! Do not add a 1/4" to this template – it is the exact shape to cut from the 4 3/8" x 7 1/4" rectangles to make the small sails.
If you would prefer to not use a template when making the small sail units, line up the 4 3/8" x 7 1/4" rectangles on a cutting mat. Draw guidemarks 2 3/4" from the right corner and 4 1/2" from the same corner. Line up a ruler along the guidemarks and with a rotary cutter, cut from guidemark to guidemark. See example below.
4 1/2"
2 3/4"
cut h
ere