
A Game by Pedro P. Mendoza (Note: Art, graphics and … A Game by Pedro P. Mendoza (Note: Art,...
14
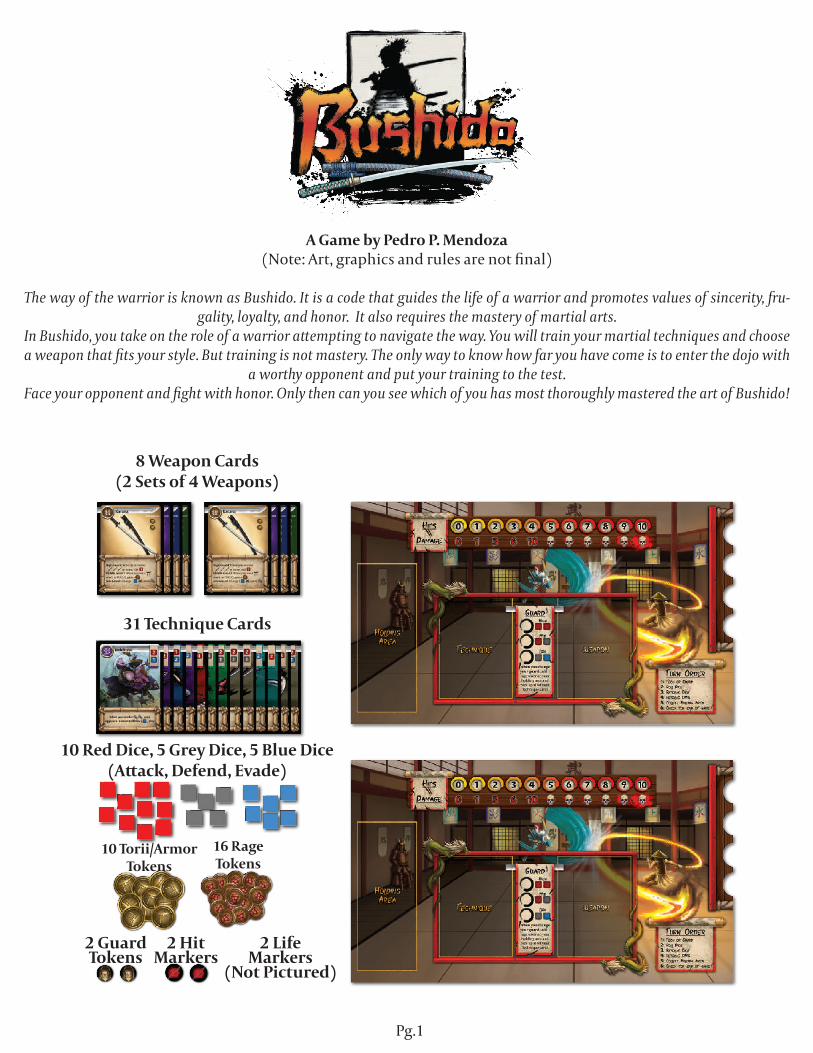
Pg.1 A Game by Pedro P. Mendoza (Note: Art, graphics and rules are not final) The way of the warrior is known as Bushido. It is a code that guides the life of a warrior and promotes values of sincerity, fru- gality, loyalty, and honor. It also requires the mastery of martial arts. In Bushido, you take on the role of a warrior aempting to navigate the way. You will train your martial techniques and choose a weapon that fits your style. But training is not mastery. The only way to know how far you have come is to enter the dojo with a worthy opponent and put your training to the test. Face your opponent and fight with honor. Only then can you see which of you has most thoroughly mastered the art of Bushido! 8 Weapon Cards (2 Sets of 4 Weapons) 31 Technique Cards 2 Guard Tokens 2 Hit Markers 2 Life Markers (Not Pictured) 10 Torii/Armor Tokens 16 Rage Tokens 10 Red Dice, 5 Grey Dice, 5 Blue Dice (Aack, Defend, Evade)
Transcript of A Game by Pedro P. Mendoza (Note: Art, graphics and … A Game by Pedro P. Mendoza (Note: Art,...
Pg.1
A Game by Pedro P. Mendoza(Note: Art, graphics and rules are not final)
The way of the warrior is known as Bushido. It is a code that guides the life of a warrior and promotes values of sincerity, fru-gality, loyalty, and honor. It also requires the mastery of martial arts.
In Bushido, you take on the role of a warrior attempting to navigate the way. You will train your martial techniques and choose a weapon that fits your style. But training is not mastery. The only way to know how far you have come is to enter the dojo with
a worthy opponent and put your training to the test.Face your opponent and fight with honor. Only then can you see which of you has most thoroughly mastered the art of Bushido!
8 Weapon Cards(2 Sets of 4 Weapons)
31 Technique Cards
2 Guard Tokens
2 Hit Markers
2 Life Markers
(Not Pictured)
10 Torii/ArmorTokens
16 Rage Tokens
10 Red Dice, 5 Grey Dice, 5 Blue Dice(Attack, Defend, Evade)
Pg.2
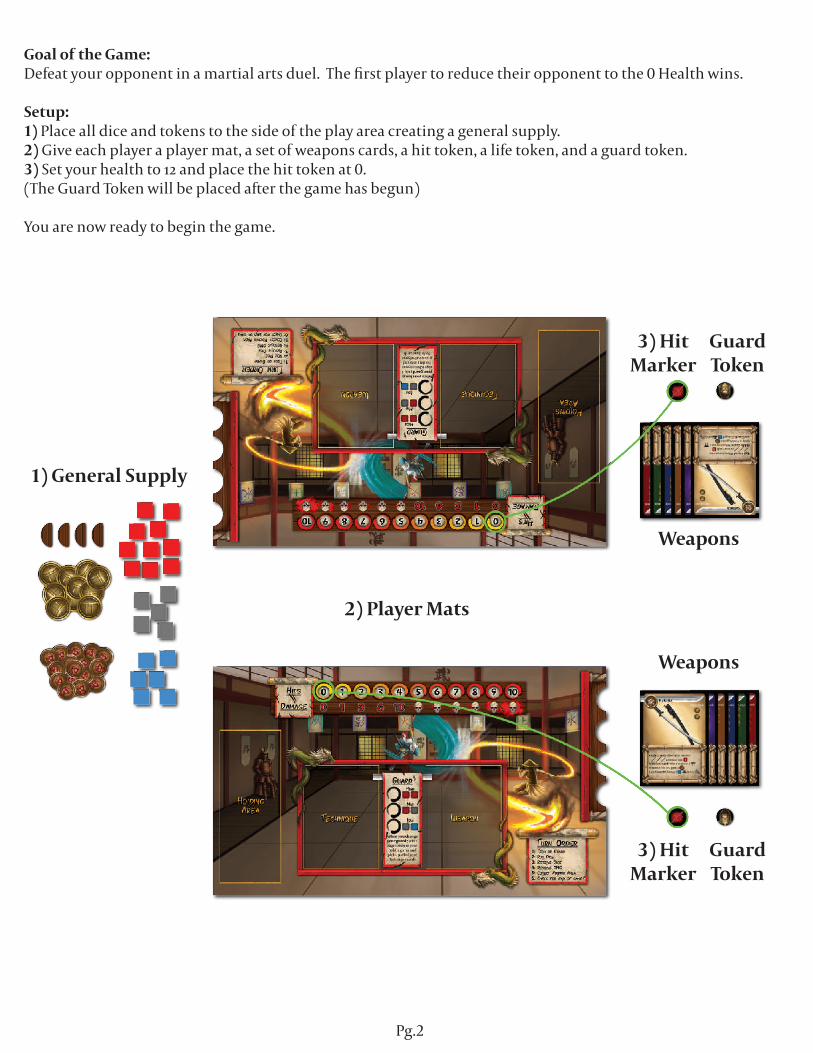
Goal of the Game:Defeat your opponent in a martial arts duel. The first player to reduce their opponent to the 0 Health wins.
Setup:1) Place all dice and tokens to the side of the play area creating a general supply.2) Give each player a player mat, a set of weapons cards, a hit token, a life token, and a guard token.3) Set your health to 12 and place the hit token at 0. (The Guard Token will be placed after the game has begun)
You are now ready to begin the game.
1) General Supply
Weapons
2) Player Mats
3) Hit Marker
3) Hit Marker
Guard Token
Guard Token
Weapons
Pg.3
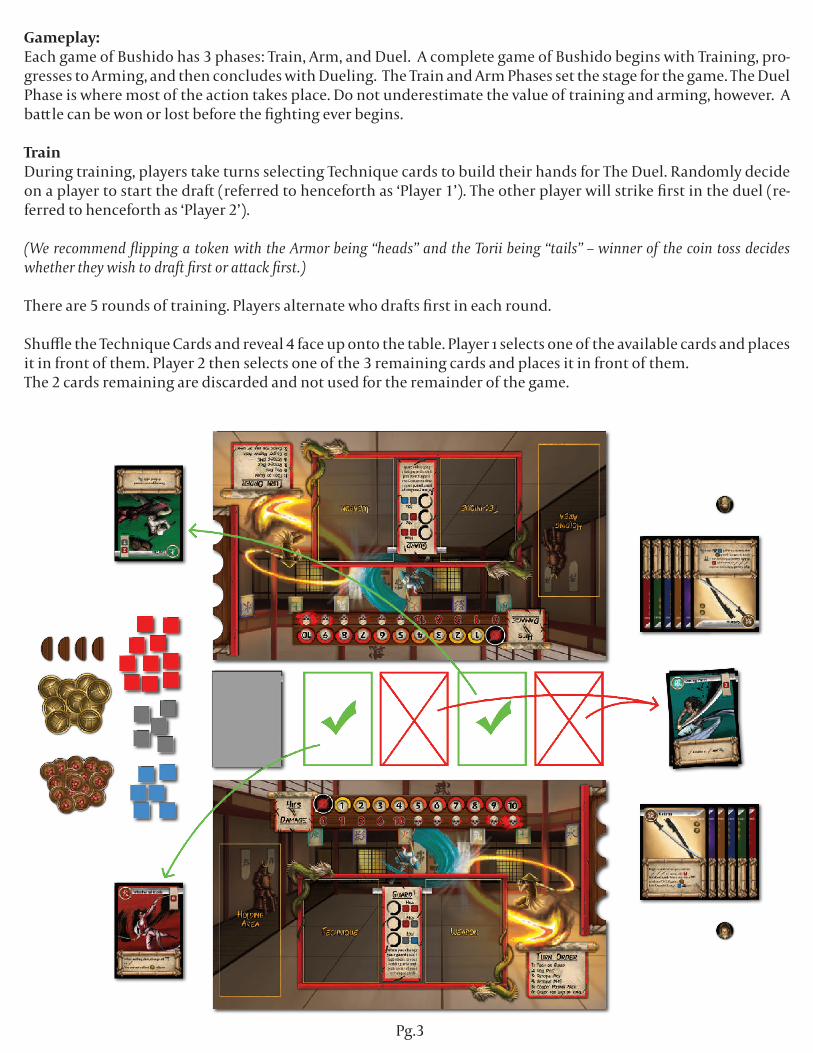
Gameplay:Each game of Bushido has 3 phases: Train, Arm, and Duel. A complete game of Bushido begins with Training, pro-gresses to Arming, and then concludes with Dueling. The Train and Arm Phases set the stage for the game. The Duel Phase is where most of the action takes place. Do not underestimate the value of training and arming, however. A battle can be won or lost before the fighting ever begins.
TrainDuring training, players take turns selecting Technique cards to build their hands for The Duel. Randomly decide on a player to start the draft (referred to henceforth as ‘Player 1’). The other player will strike first in the duel (re-ferred to henceforth as ‘Player 2’).
(We recommend flipping a token with the Armor being “heads” and the Torii being “tails” – winner of the coin toss decides whether they wish to draft first or attack first.)
There are 5 rounds of training. Players alternate who drafts first in each round.
Shuffle the Technique Cards and reveal 4 face up onto the table. Player 1 selects one of the available cards and places it in front of them. Player 2 then selects one of the 3 remaining cards and places it in front of them.The 2 cards remaining are discarded and not used for the remainder of the game.
Pg.4
Repeat the above draft with Player 1 selecting first in round 1, round 3, and round 5 and Player 2 selecting first in round 2 and round 4.
When each player has 5 cards in front of them, move on to to the Arm phase.
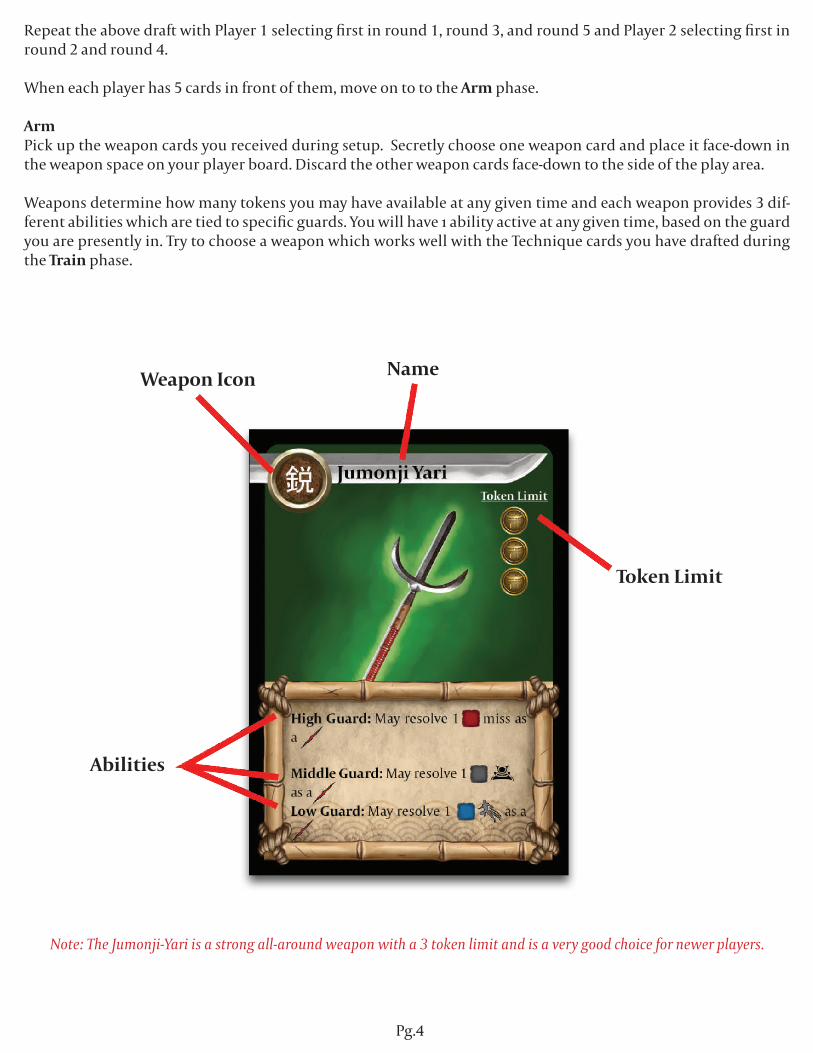
Arm Pick up the weapon cards you received during setup. Secretly choose one weapon card and place it face-down in the weapon space on your player board. Discard the other weapon cards face-down to the side of the play area.
Weapons determine how many tokens you may have available at any given time and each weapon provides 3 dif-ferent abilities which are tied to specific guards. You will have 1 ability active at any given time, based on the guard you are presently in. Try to choose a weapon which works well with the Technique cards you have drafted during the Train phase.
Note: The Jumonji-Yari is a strong all-around weapon with a 3 token limit and is a very good choice for newer players.
Token Limit
NameWeapon Icon
Abilities
Pg.5
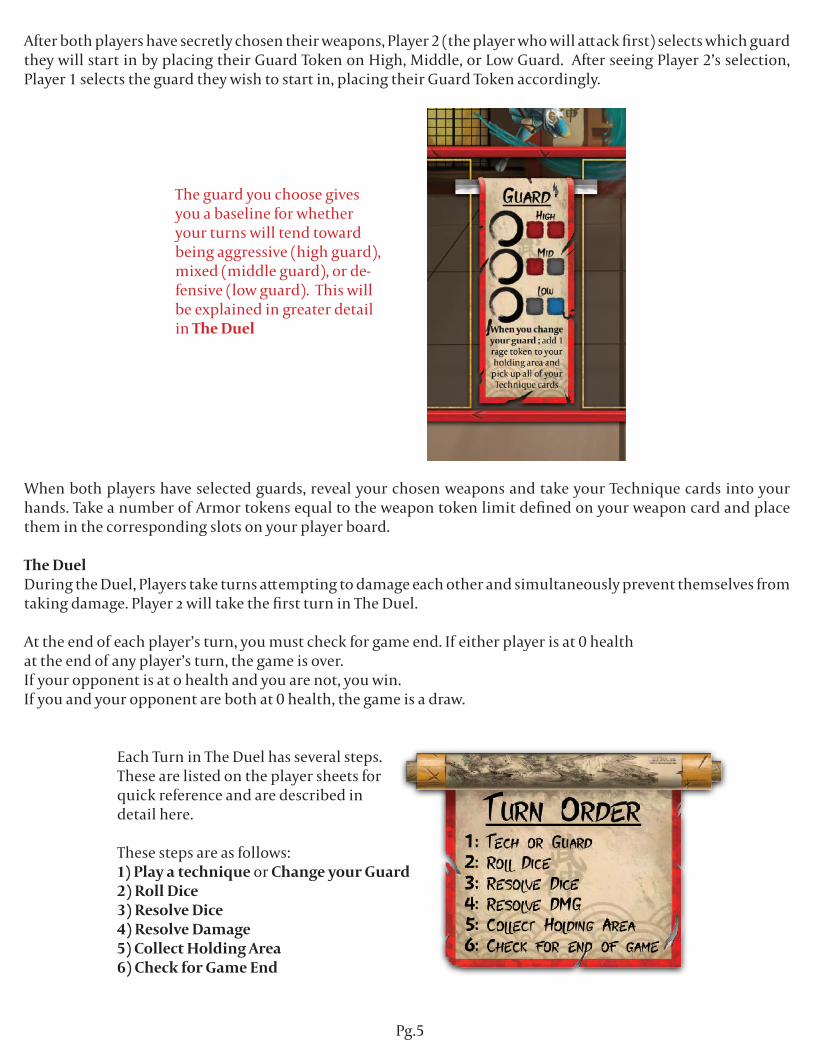
After both players have secretly chosen their weapons, Player 2 (the player who will attack first) selects which guard they will start in by placing their Guard Token on High, Middle, or Low Guard. After seeing Player 2’s selection, Player 1 selects the guard they wish to start in, placing their Guard Token accordingly.
When both players have selected guards, reveal your chosen weapons and take your Technique cards into your hands. Take a number of Armor tokens equal to the weapon token limit defined on your weapon card and place them in the corresponding slots on your player board.
The DuelDuring the Duel, Players take turns attempting to damage each other and simultaneously prevent themselves from taking damage. Player 2 will take the first turn in The Duel.
At the end of each player’s turn, you must check for game end. If either player is at 0 health at the end of any player’s turn, the game is over.If your opponent is at 0 health and you are not, you win.If you and your opponent are both at 0 health, the game is a draw.
Each Turn in The Duel has several steps. These are listed on the player sheets for quick reference and are described in detail here.
These steps are as follows:1) Play a technique or Change your Guard2) Roll Dice3) Resolve Dice4) Resolve Damage5) Collect Holding Area6) Check for Game End
The guard you choose gives you a baseline for whether your turns will tend toward being aggressive (high guard), mixed (middle guard), or de-fensive (low guard). This will be explained in greater detail in The Duel
Pg.6
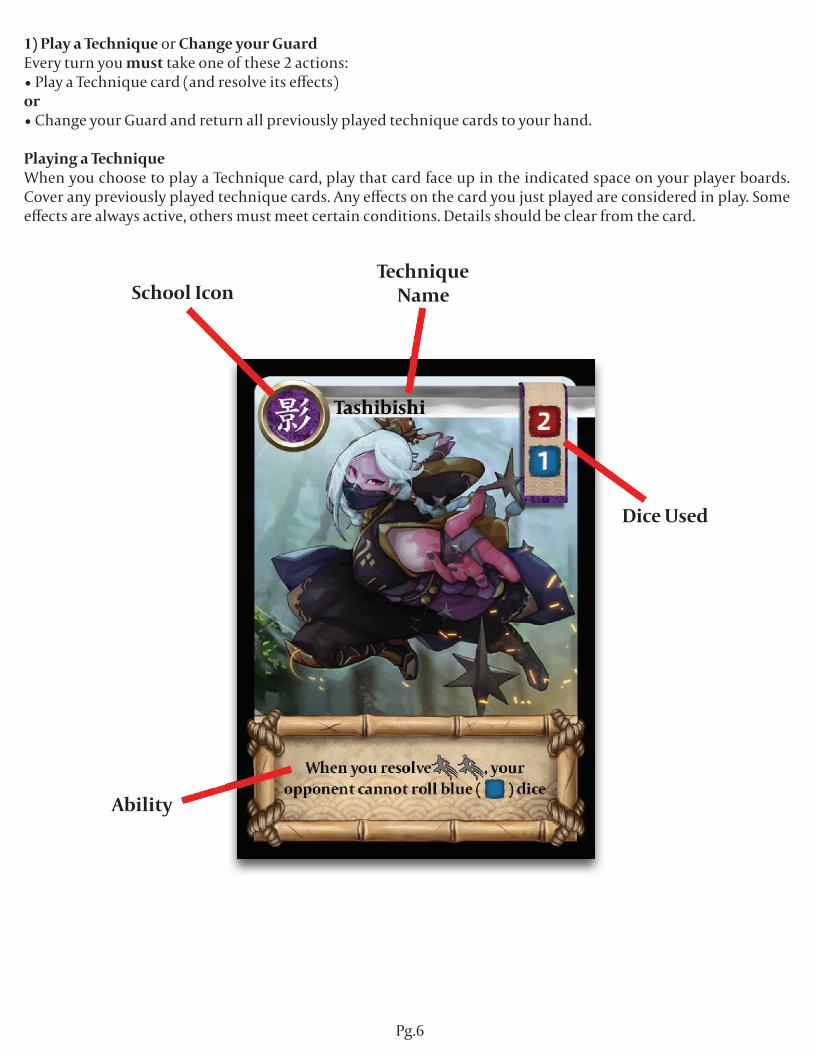
1) Play a Technique or Change your GuardEvery turn you must take one of these 2 actions:• Play a Technique card (and resolve its effects)or• Change your Guard and return all previously played technique cards to your hand.
Playing a TechniqueWhen you choose to play a Technique card, play that card face up in the indicated space on your player boards. Cover any previously played technique cards. Any effects on the card you just played are considered in play. Some effects are always active, others must meet certain conditions. Details should be clear from the card.
Technique NameSchool Icon
Dice Used
Ability
Pg.7
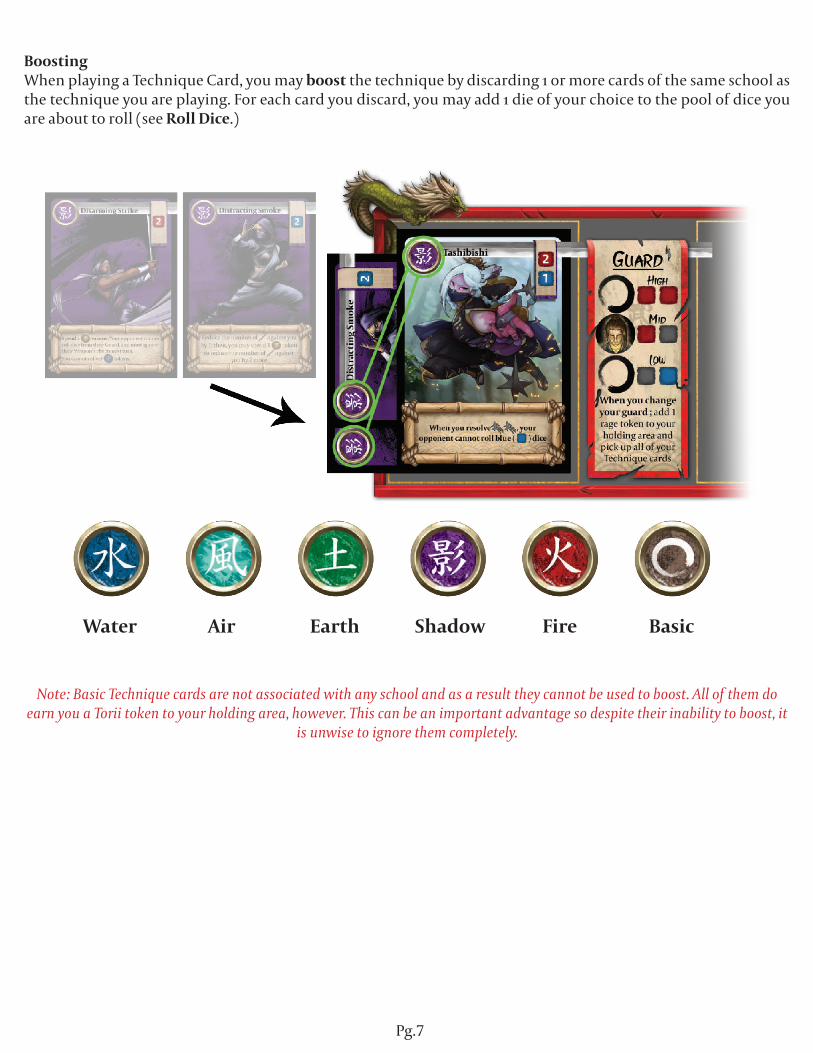
BoostingWhen playing a Technique Card, you may boost the technique by discarding 1 or more cards of the same school as the technique you are playing. For each card you discard, you may add 1 die of your choice to the pool of dice you are about to roll (see Roll Dice.)
Note: Basic Technique cards are not associated with any school and as a result they cannot be used to boost. All of them do earn you a Torii token to your holding area, however. This can be an important advantage so despite their inability to boost, it
is unwise to ignore them completely.
Water Air Earth Shadow Fire Basic
Pg.8
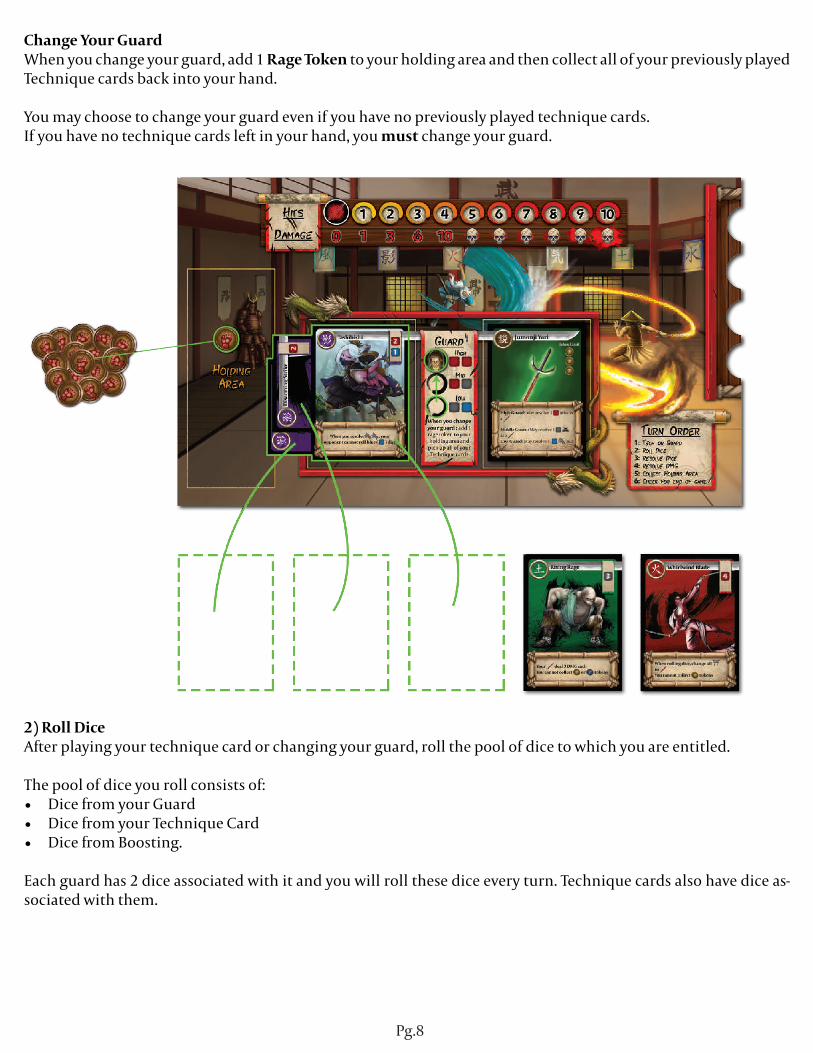
Change Your GuardWhen you change your guard, add 1 Rage Token to your holding area and then collect all of your previously played Technique cards back into your hand.
You may choose to change your guard even if you have no previously played technique cards.If you have no technique cards left in your hand, you must change your guard.
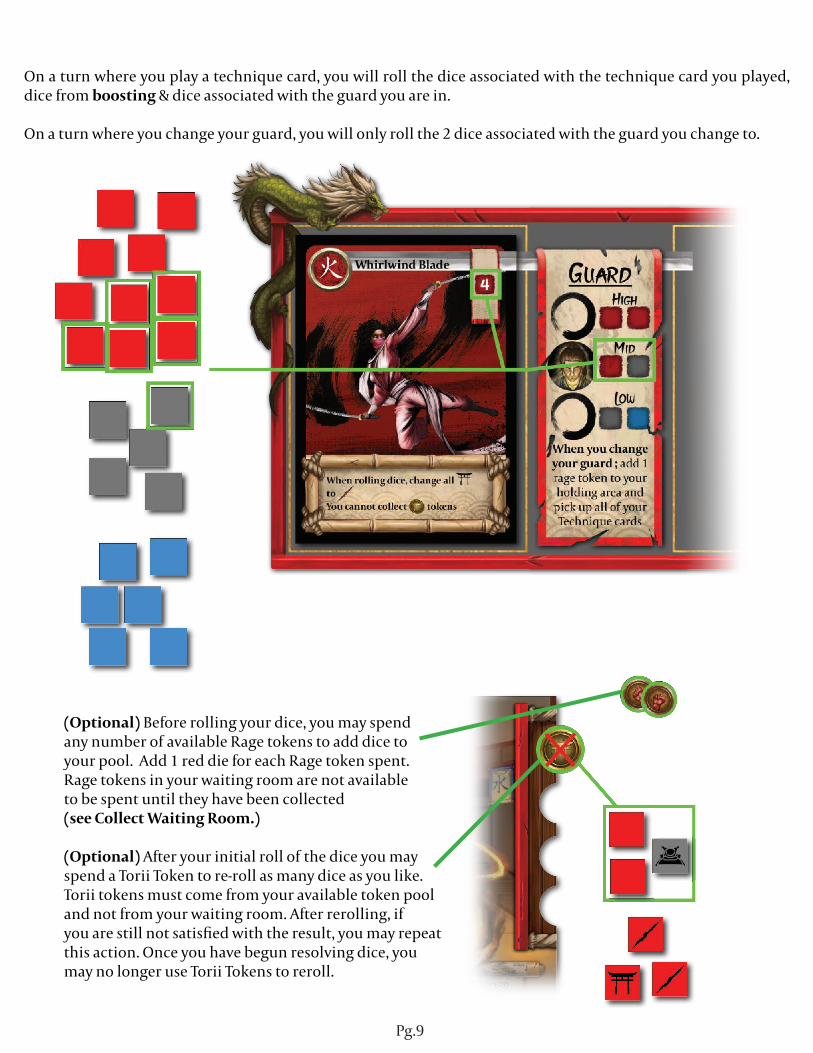
2) Roll DiceAfter playing your technique card or changing your guard, roll the pool of dice to which you are entitled.
The pool of dice you roll consists of:• Dice from your Guard• Dice from your Technique Card• Dice from Boosting.
Each guard has 2 dice associated with it and you will roll these dice every turn. Technique cards also have dice as-sociated with them.
Pg.9
On a turn where you play a technique card, you will roll the dice associated with the technique card you played, dice from boosting & dice associated with the guard you are in.
On a turn where you change your guard, you will only roll the 2 dice associated with the guard you change to.
(Optional) Before rolling your dice, you may spend any number of available Rage tokens to add dice to your pool. Add 1 red die for each Rage token spent. Rage tokens in your waiting room are not available to be spent until they have been collected (see Collect Waiting Room.)
(Optional) After your initial roll of the dice you may spend a Torii Token to re-roll as many dice as you like. Torii tokens must come from your available token pool and not from your waiting room. After rerolling, if you are still not satisfied with the result, you may repeat this action. Once you have begun resolving dice, you may no longer use Torii Tokens to reroll.
Pg.10
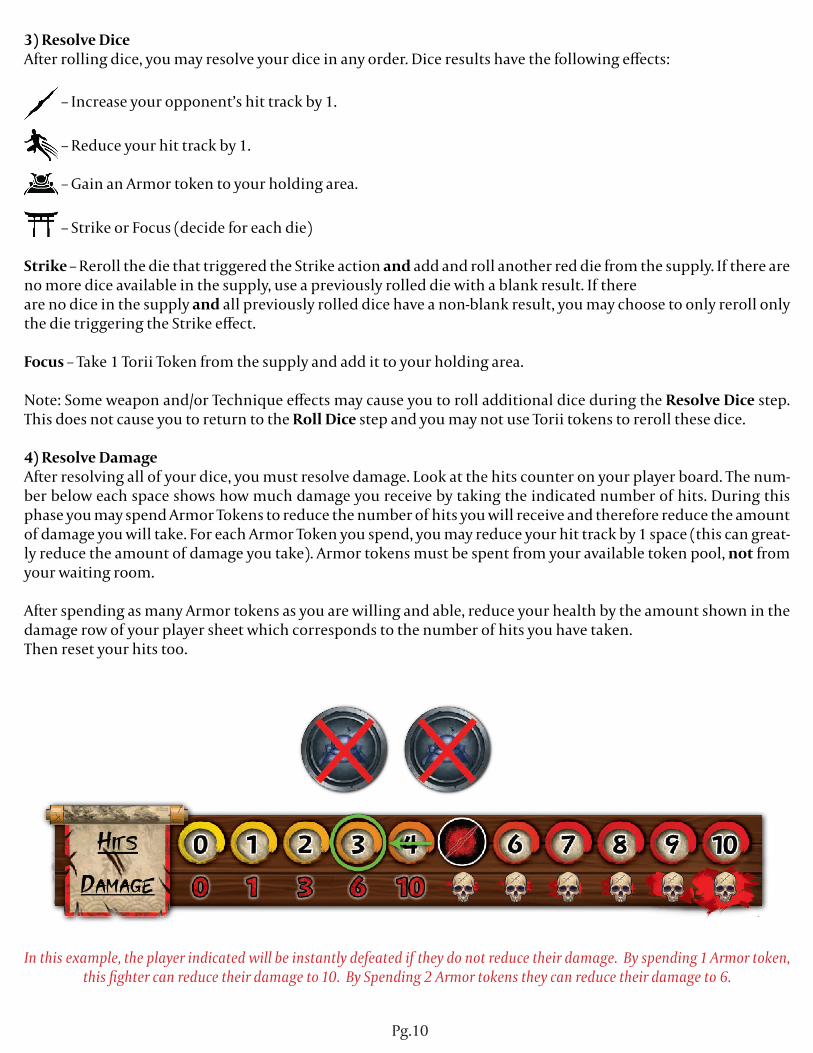
3) Resolve DiceAfter rolling dice, you may resolve your dice in any order. Dice results have the following effects:
– Increase your opponent’s hit track by 1.
– Reduce your hit track by 1.
– Gain an Armor token to your holding area.
– Strike or Focus (decide for each die)
Strike – Reroll the die that triggered the Strike action and add and roll another red die from the supply. If there are no more dice available in the supply, use a previously rolled die with a blank result. If thereare no dice in the supply and all previously rolled dice have a non-blank result, you may choose to only reroll only the die triggering the Strike effect.
Focus – Take 1 Torii Token from the supply and add it to your holding area.
Note: Some weapon and/or Technique effects may cause you to roll additional dice during the Resolve Dice step. This does not cause you to return to the Roll Dice step and you may not use Torii tokens to reroll these dice.
4) Resolve DamageAfter resolving all of your dice, you must resolve damage. Look at the hits counter on your player board. The num-ber below each space shows how much damage you receive by taking the indicated number of hits. During this phase you may spend Armor Tokens to reduce the number of hits you will receive and therefore reduce the amount of damage you will take. For each Armor Token you spend, you may reduce your hit track by 1 space (this can great-ly reduce the amount of damage you take). Armor tokens must be spent from your available token pool, not from your waiting room.
After spending as many Armor tokens as you are willing and able, reduce your health by the amount shown in the damage row of your player sheet which corresponds to the number of hits you have taken. Then reset your hits to0.
In this example, the player indicated will be instantly defeated if they do not reduce their damage. By spending 1 Armor token, this fighter can reduce their damage to 10. By Spending 2 Armor tokens they can reduce their damage to 6.
Pg.11
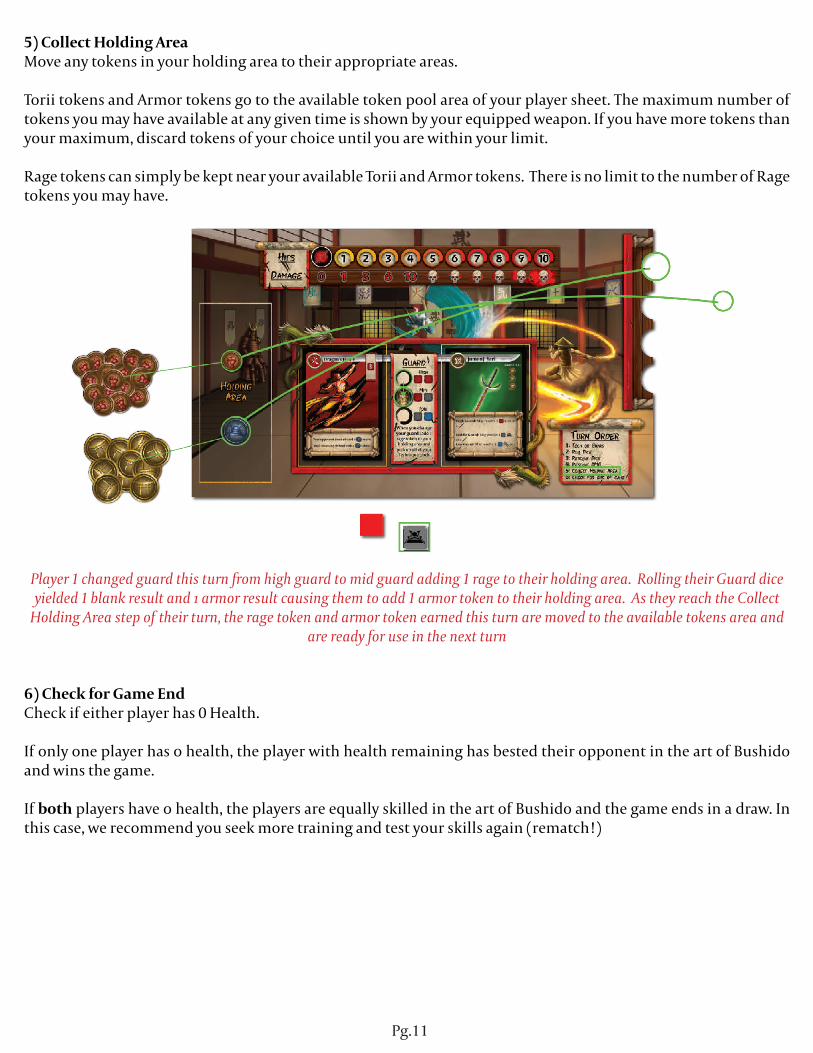
5) Collect Holding AreaMove any tokens in your holding area to their appropriate areas.
Torii tokens and Armor tokens go to the available token pool area of your player sheet. The maximum number of tokens you may have available at any given time is shown by your equipped weapon. If you have more tokens than your maximum, discard tokens of your choice until you are within your limit.
Rage tokens can simply be kept near your available Torii and Armor tokens. There is no limit to the number of Rage tokens you may have.
Player 1 changed guard this turn from high guard to mid guard adding 1 rage to their holding area. Rolling their Guard dice yielded 1 blank result and 1 armor result causing them to add 1 armor token to their holding area. As they reach the Collect
Holding Area step of their turn, the rage token and armor token earned this turn are moved to the available tokens area and are ready for use in the next turn
6) Check for Game EndCheck if either player has 0 Health.
If only one player has 0 health, the player with health remaining has bested their opponent in the art of Bushido and wins the game.
If both players have 0 health, the players are equally skilled in the art of Bushido and the game ends in a draw. In this case, we recommend you seek more training and test your skills again (rematch!)
Pg.12
Variants:Advanced DraftFor experienced players we recommend the following change to the Train phase of the game. Instead of the nor-mal draft, each player should draw 2 cards from the face-down deck of Technique cards. Chose 1 of the drawn cards and give the other to your opponent face-down. Repeat this 3 times so each player has 6 cards (3 they choose and 3 that were selected for them).
Look at your 6 cards and choose 1 to discard secretly.
This leaves you with 5 cards in your hand (2-3 of which are known to your opponent.)
After this draft, move on to Arm as normal.
This advanced draft allows for a bit more surprise for your opponent – they will not know exactly what cards you have or what schools you are strong in. By hiding a key Technique for a crucial moment you may be able to pull off some wonderfully unex-pected moves.
4-Player Game (2 sets required)
Sometimes the way of the warrior demands you fight not only for yourself. Bound by loyalty, duty, and honor, you must protect others to truly master the way.
Overview:The 4-Player version of Bushido is a team game that requires 2 sets of the base game to play. The following rules assume you are already familiar with the rules for the core game and will explain the differences in a 4-Player game. If you are not yet familiar with the core rules, please go back and familiarize yourself with those rules now.
Goal of the Game:Defeat 1 Opponent on the opposing team. The first team to reduce either opponent to 0 Health wins.
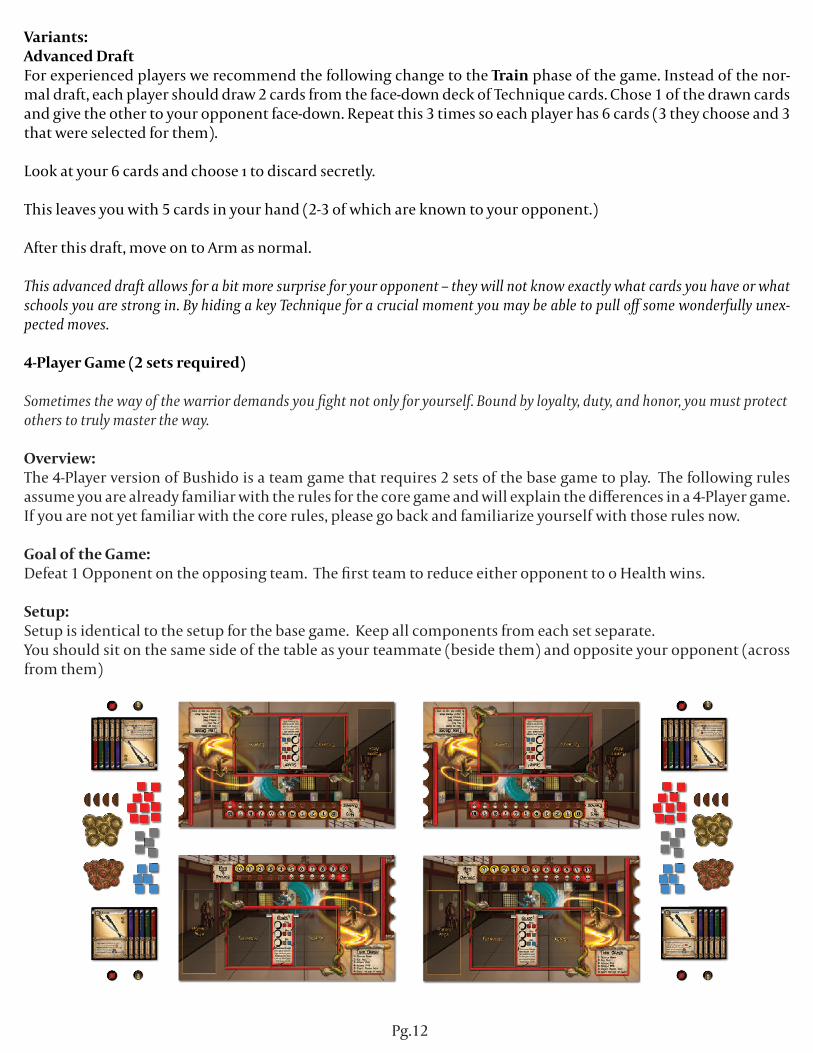
Setup:Setup is identical to the setup for the base game. Keep all components from each set separate.You should sit on the same side of the table as your teammate (beside them) and opposite your opponent (across from them)

Pg.13
Gameplay:In a 4-player game of bushido you will work with a partner to defeat an opponent from the other team. You will always attack the opponent directly across the table from you. When a single player is reduced to 0 health the game will end with the team which still has both players winning the game. Should 2 players reach 0 health simultane-ously, the game will continue with the remaining 2 players finishing the duel. In this way, it is possible to win even after you have been defeated. Teams win or lose together.
TrainingElect 1 player from each team to roll off to determine which team will draft first and which team will attack first.Training is identical to the base game though teammates should synchronize their drafting such they progress at the same pace. Teammates should openly discuss what they are drafting and both players on a team should draft a card for their respective decks before the opposing players’ draft. Team mates draft from separate decks. You draft from a shared deck with an opponent across the table from you just as in the base game. There will be value for teammates in drafting cards from the same school and additional value in drafting the same techniques when possible. These advantages will be described in the Dueling phase below.
ArmingTeammates should confer on which weapons they intend to use and then put them face down just as in the Arming phase of the 2-player game. They can show each other the cards they are playing and discuss them in general terms so as not to give information to their opponents.Just as in the 2-player game, the first attackers will pick their guards then the first drafters will choose theirs. Team-mates may start the game in different guards and may choose different weapons.After all players have selected their guards, reveal all weapons, collect the appropriate number of tokens, and pro-ceed to the duel.
DuelingThe dueling phase of the Bushido team game is where the most drastic differences are.Open communication between players is allowed an encouraged to facilitate powerful attacks and strategic de-fenses. In this phase, as in previous phases, teammates play and resolve their turns simultaneously.
School Synchronization: When teammates play cards of the same school on the same turn, those cards act to boost each other. Each player adds a die of their choice to their dice pool before rolling. (Remember: Basic Techniques don’t belong to any school and therefore do not boost here.)
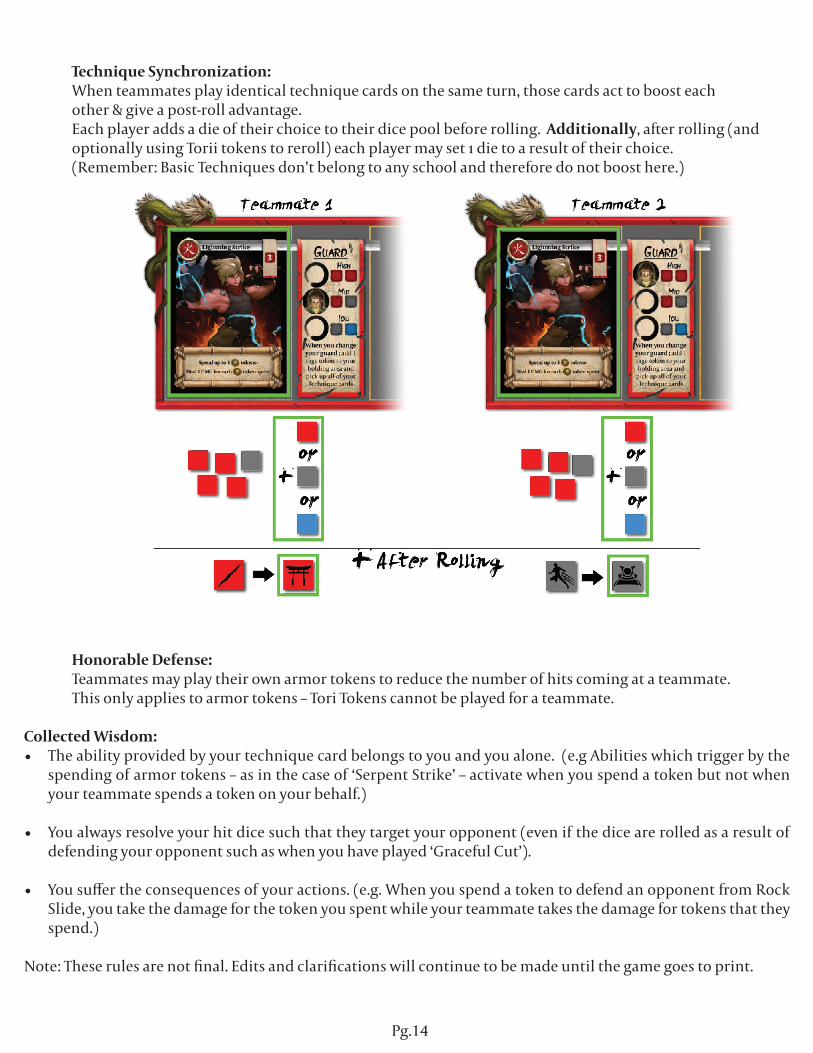
Pg.14
Technique Synchronization: When teammates play identical technique cards on the same turn, those cards act to boost each other & give a post-roll advantage. Each player adds a die of their choice to their dice pool before rolling. Additionally, after rolling (and optionally using Torii tokens to reroll) each player may set 1 die to a result of their choice. (Remember: Basic Techniques don’t belong to any school and therefore do not boost here.)
Honorable Defense: Teammates may play their own armor tokens to reduce the number of hits coming at a teammate. This only applies to armor tokens – Tori Tokens cannot be played for a teammate.
Collected Wisdom:• The ability provided by your technique card belongs to you and you alone. (e.g Abilities which trigger by the
spending of armor tokens – as in the case of ‘Serpent Strike’ – activate when you spend a token but not when your teammate spends a token on your behalf.)
• You always resolve your hit dice such that they target your opponent (even if the dice are rolled as a result of defending your opponent such as when you have played ‘Graceful Cut’).
• You suffer the consequences of your actions. (e.g. When you spend a token to defend an opponent from Rock Slide, you take the damage for the token you spent while your teammate takes the damage for tokens that they spend.)
Note: These rules are not final. Edits and clarifications will continue to be made until the game goes to print.