600 Uc Guid Sub-Zero built in friridge/freezere
40
B UILT -I N R EFRIGERATION U SE &C ARE I NFORMATION
-
Upload
fishsniper325 -
Category
Documents
-
view
66 -
download
2
description
user manual
Transcript of 600 Uc Guid Sub-Zero built in friridge/freezere
B U I L T - I N R E F R I G E R A T I O N
USE & CARE INFORMATION
C O N T E N T S
Sub-Zero Built-In Refrigeration 3
Sub-Zero Built-In Features 4
Sub-Zero Built-In Models 5
Sub-Zero Built-In Use & Care 12
Keeping Food at Its Best 25
Food Storage Recommendations 29
Troubleshooting Guide 35
Service Information 38
Sub-Zero Warranty 39
SUB-ZERO® is a registered trademark of Sub-Zero Freezer Company, Inc.
As you read this Use & Care Information,take particular note of the CAUTION andWARNING symbols when they appear.This information is important for safe andefficient use of the Sub-Zero equipment.
In addition, this Use & Care Information maysignal an IMPORTANT NOTE which highlightsinformation that is especially important.
signals a situation where minor injury orproduct damage may occur if you do notfollow instructions.
states a hazard that may cause seriousinjury or death if precautions are notfollowed.
3
THANK YOU
Thank you for purchasing your new Sub-ZeroBuilt-In unit. With Sub-Zero, you can rely on a60-year tradition of quality and reliability. TheBuilt-In line brings together the latest andfinest features in home refrigeration to giveyou the freshest food possible.
Sub-Zero’s design, beauty and quality arereflected in the broad range of standardfeatures that put Sub-Zero in a class by itself.The custom-design appearance of theSub-Zero Built-In line gives you options noother line offers, whether you have chosen aframed, overlay, stainless steel or glass doorstyle unit.
Your Sub-Zero is protected by a warranty thatis one of the finest in the industry. Take amoment to read the warranty statement onpage 39 and refer to it should service becomenecessary.
This Use & Care Information book will answermost of your questions about the features,operation and maintenance of your Built-Inunit. If you have questions that are notaddressed here, call Sub-Zero CustomerService at 800-222-7820 or visit our website,subzero.com.
S U B - Z E R O BUILT- IN R E F R I G E R AT I O N
DUAL R E F R I G E R AT I O N
The Built-In line continues the Sub-Zerotradition of superior quality and reliability.Sub-Zero pioneered the development of ourexclusive dual refrigeration system, givingyou optimum fresh and freezer food storagein ideal self-contained sections. Both refriger-ator and freezer maintain accurate, consistenttemperatures. Dual refrigeration keeps yourfood fresh longer than any other systemavailable.
With dual refrigeration, the freezer maintainsa constant temperature within one degree ofthe temperature you set within our range of-5˚F (-21˚C) to +5˚F (-15˚C), without unwantedmoisture and odor from the refrigerator. Simi-larly, you can adjust the refrigerator tempera-ture within a range of 34˚F (1˚C) to 45˚F (7˚C),for proper humidity levels tailored for longerfood life expectancy.
The dual refrigeration system also meansthere is no transfer of fresh food odors tofrozen food or ice. The Sub-Zero system doesnot freeze the moisture out of the air in thefresh food section.
Sub-Zero dual refrigeration is also moreenergy efficient than old-fashioned singlerefrigeration systems. When the refrigeratoris used frequently during the day it does notrequire the freezer to circulate its very cold,dry air to the refrigerator. Instead, the refrig-erator uses moist air to keep fresh foods freshand energy use minimal.
C O N TA C TI N F O R M AT I O N
Sub-ZeroCustomer Service:800-222-7820
Website:subzero.com
4
With the installation of a harness kit, theseappliances are Star-K compliant to meetstrict religious regulations in conjunctionwith specific instructions found onwww.star-k.org. For details about theharness kit, contact your Sub-Zero dealer.
BUILT- IN F E AT U R E S
Classic framed models—the look that madeSub-Zero famous—feature an advancedgrille design, innovative handle design andelegant hinges.
Overlay models blend seamlessly into youroverall room design and complementsurrounding cabinetry.
Classic stainless steel or the premiumfinishes of platinum or carbon stainlesssteel models feature new wrapped doors,1" (25 mm) diameter stainless steel handlesand stainless steel grille designed specifi-cally to enhance the aesthetics of today'sprofessional looking kitchens.
Models 601RG, 611G and 650G offer aunique feature—a glass door. These unitseach come in the framed or overlay design,or classic, platinum or carbon stainlesssteel, and meet stringent energy require-ments.
Glass door models add a contemporarylook that is quite unique and innovative,with subdued interior lighting.
Shallow-depth design means access is easyto any area of the refrigerator.
All Built-In combination refrigerator / freezerunits have the exclusive Sub-Zero dualrefrigeration system, which ensures thefreshest food and energy efficiency at thesame time. You have precise independentcontrol of the refrigerator and freezersections.
All Built-In units have a microprocessor togive you better control, automatic defrost-ing that senses, then adapts to your usepatterns, and a service indicator light. Ourmicroprocessor continuously monitors eachsection, and should a problem arise, theprocessor will turn on the SERVICE indica-tor light in the Control Center display panel.
Controls are up front and easy to use.They give you digital readings for quick,easy-to-read reference. Up-front controlsalso keep you informed about the operationof the unit on a continuous basis.
Bright lighting spreads even illuminationthroughout each section. The source of theillumination is concealed.
A door alarm will let you know with anaudible beeping if your refrigerator orfreezer door is left ajar.
The high humidity crisper drawer is largeand deep, with smooth sides for easycleaning. The compartment featuresremovable dividers, with the exception ofModels 661, 642 and 685.
The cantilevered shelves make reposition-ing quick and easy. They’re easy to cleanand spill proof. They are steel reinforcedto provide durability and reliability.
In-door shelves are all adjustable forcomplete flexibility.
The dairy compartment is adjustable,with easy, one-door access, compartmentdividers and a clean design. The dairyshelf is magnetically sealed to maintainfreshness.
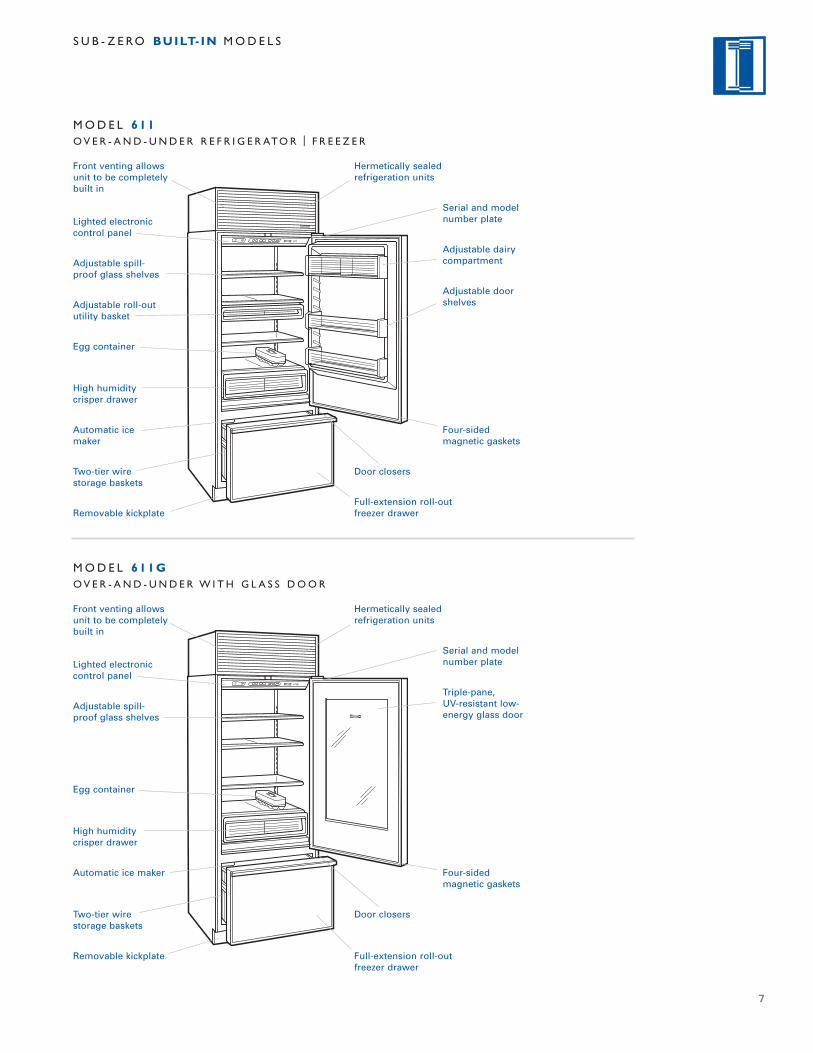
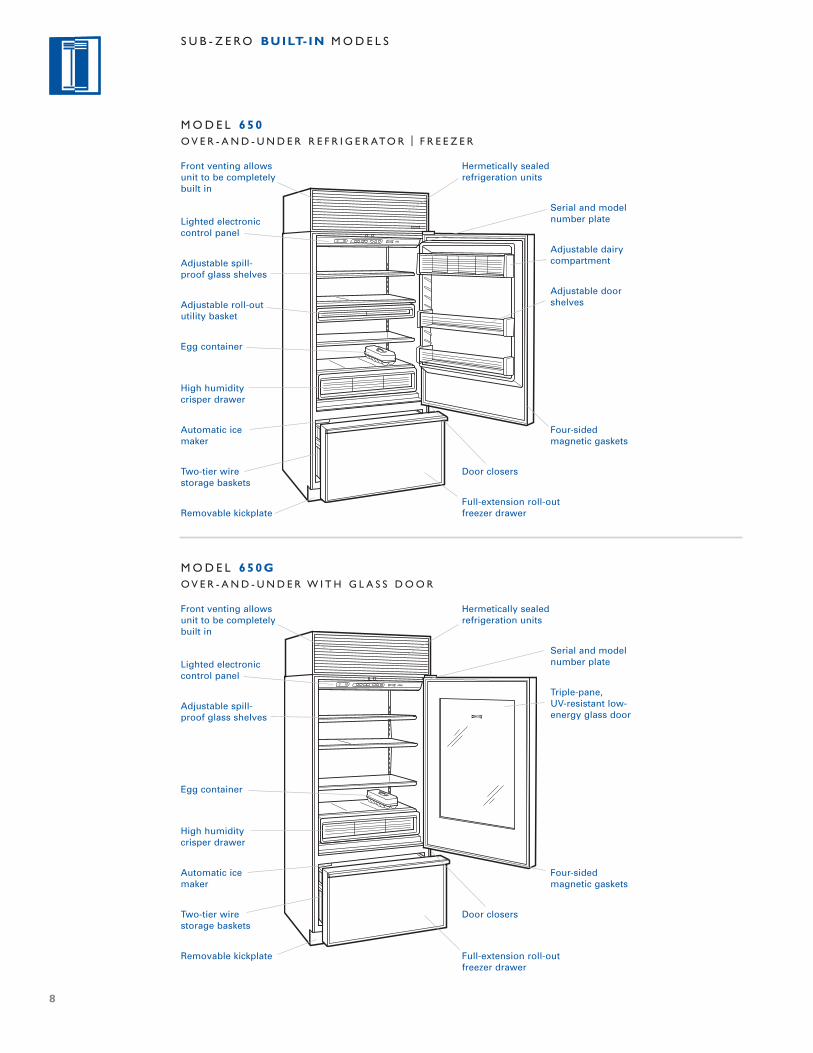
Models 611, 611G, 650 and 650G offer afull-extension freezer drawer.
The ice maker provides high-quality,crescent-shaped ice that won’t stick to theside of the glass.
Magnetic gaskets around all doors giveextra-tight seals.
Our solid-core doors improve insulationand structural integrity.
Solid, adjustable kickplate gives a truebuilt-in look and conforms to AmericanInstitute of Architects standards.
S U B - Z E R O BUILT- IN F E AT U R E S
A C C E S S O R I E S
Optional acces-sories are availablethrough yourSub-Zero dealer. Toobtain local dealerinformation, visitthe Locator sectionof our website,subzero.com.
5
WA R R A N T Y
Sub-Zero productsare covered by atwo, five andtwelve year resi-dential warranty(exclusions apply).See warrantydetails at the endof this guide.
Adjustable doorshelves
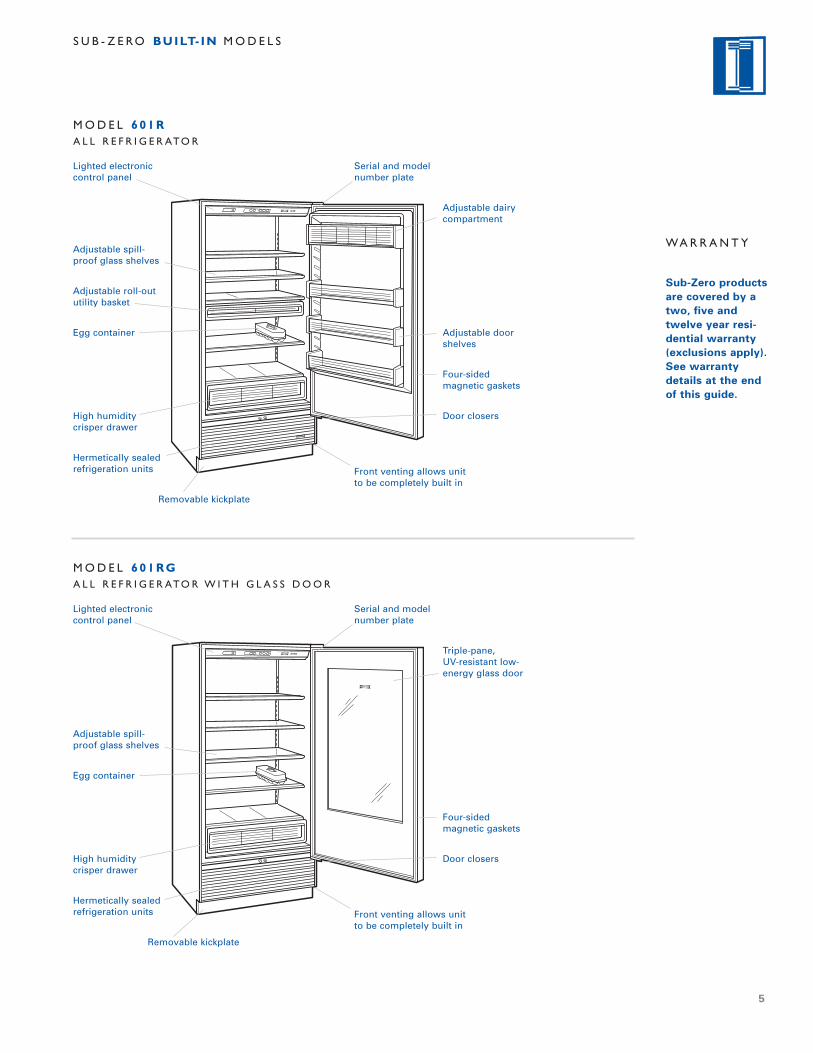
Front venting allows unitto be completely built in
Removable kickplate
Four-sidedmagnetic gaskets
Adjustable roll-oututility basket
Adjustable spill-proof glass shelves
Serial and modelnumber plate
Adjustable dairycompartment
High humiditycrisper drawer
Hermetically sealedrefrigeration units
Egg container
Lighted electroniccontrol panel
Door closers
Front venting allows unitto be completely built in
Removable kickplate
Four-sidedmagnetic gaskets
Adjustable spill-proof glass shelves
Serial and modelnumber plate
Triple-pane,UV-resistant low-energy glass door
High humiditycrisper drawer
Hermetically sealedrefrigeration units
Egg container
Lighted electroniccontrol panel
Door closers
S U B - Z E R O BUILT- IN M O D E L S
M O D E L 601RA L L R E F R I G E R ATO R
M O D E L 601RGA L L R E F R I G E R ATO R W I T H G L A S S D O O R
6
S U B - Z E R O BUILT- IN M O D E L S
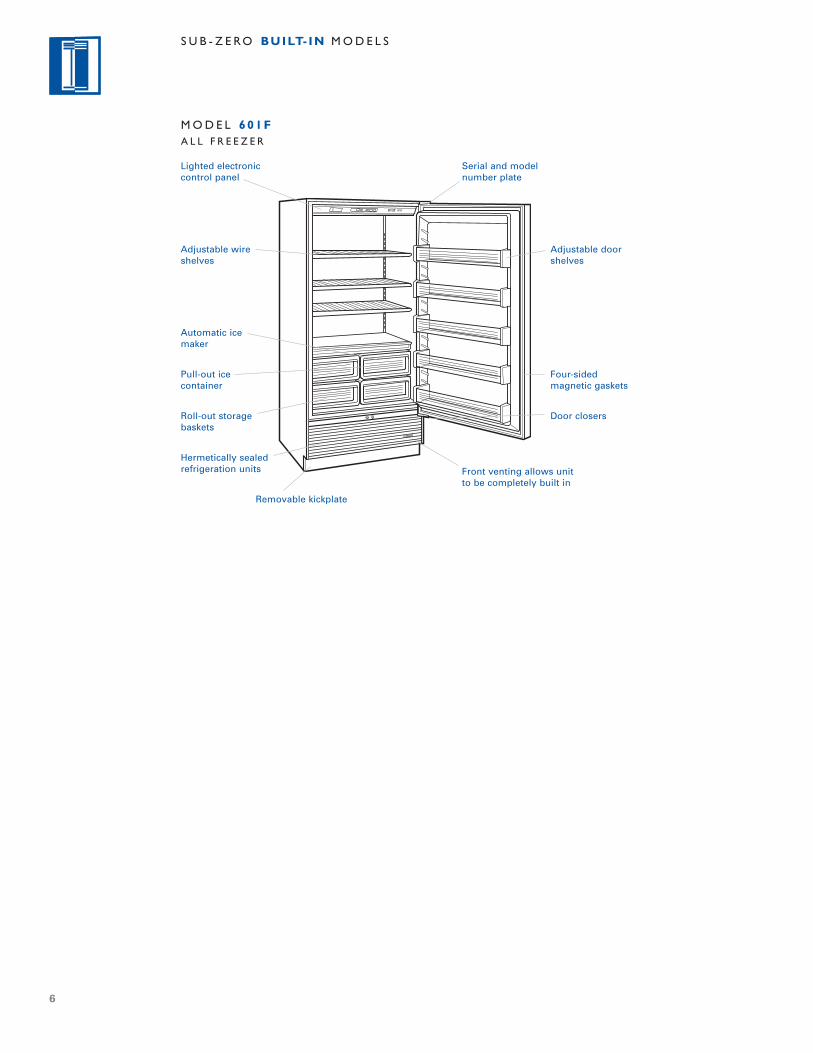
M O D E L 601FA L L F R E E Z E R
Adjustable doorshelves
Front venting allows unitto be completely built in
Removable kickplate
Four-sidedmagnetic gaskets
Adjustable wireshelves
Serial and modelnumber plate
Roll-out storagebaskets
Hermetically sealedrefrigeration units
Automatic icemaker
Lighted electroniccontrol panel
Door closers
Pull-out icecontainer
7
Triple-pane,UV-resistant low-energy glass door
Four-sidedmagnetic gaskets
Door closers
Removable kickplate
High humiditycrisper drawer
Adjustable spill-proof glass shelves
Lighted electroniccontrol panel
Hermetically sealedrefrigeration units
Front venting allowsunit to be completelybuilt in
Serial and modelnumber plate
Automatic ice maker
Two-tier wirestorage baskets
Full-extension roll-outfreezer drawer
Egg container
Adjustable dairycompartment
Adjustable doorshelves
Four-sidedmagnetic gaskets
Door closers
Removable kickplate
High humiditycrisper drawer
Adjustable roll-oututility basket
Adjustable spill-proof glass shelves
Lighted electroniccontrol panel
Hermetically sealedrefrigeration units
Front venting allowsunit to be completelybuilt in
Serial and modelnumber plate
Automatic icemaker
Two-tier wirestorage baskets
Full-extension roll-outfreezer drawer
Egg container
S U B - Z E R O BUILT- IN M O D E L S
M O D E L 611O V E R - A N D - U N D E R R E F R I G E R ATO R | F R E E Z E R
M O D E L 611GO V E R - A N D - U N D E R W I T H G L A S S D O O R
8
Adjustable dairycompartment
Adjustable doorshelves
Four-sidedmagnetic gaskets
Door closers
Removable kickplate
High humiditycrisper drawer
Adjustable roll-oututility basket
Adjustable spill-proof glass shelves
Lighted electroniccontrol panel
Hermetically sealedrefrigeration units
Front venting allowsunit to be completelybuilt in
Serial and modelnumber plate
Automatic icemaker
Two-tier wirestorage baskets
Full-extension roll-outfreezer drawer
Egg container
Triple-pane,UV-resistant low-energy glass door
Four-sidedmagnetic gaskets
Door closers
Removable kickplate
High humiditycrisper drawer
Adjustable spill-proof glass shelves
Lighted electroniccontrol panel
Hermetically sealedrefrigeration units
Front venting allowsunit to be completelybuilt in
Serial and modelnumber plate
Automatic icemaker
Two-tier wirestorage baskets
Full-extension roll-outfreezer drawer
Egg container
S U B - Z E R O BUILT- IN M O D E L S
M O D E L 650O V E R - A N D - U N D E R R E F R I G E R ATO R | F R E E Z E R
M O D E L 650GO V E R - A N D - U N D E R W I T H G L A S S D O O R
9
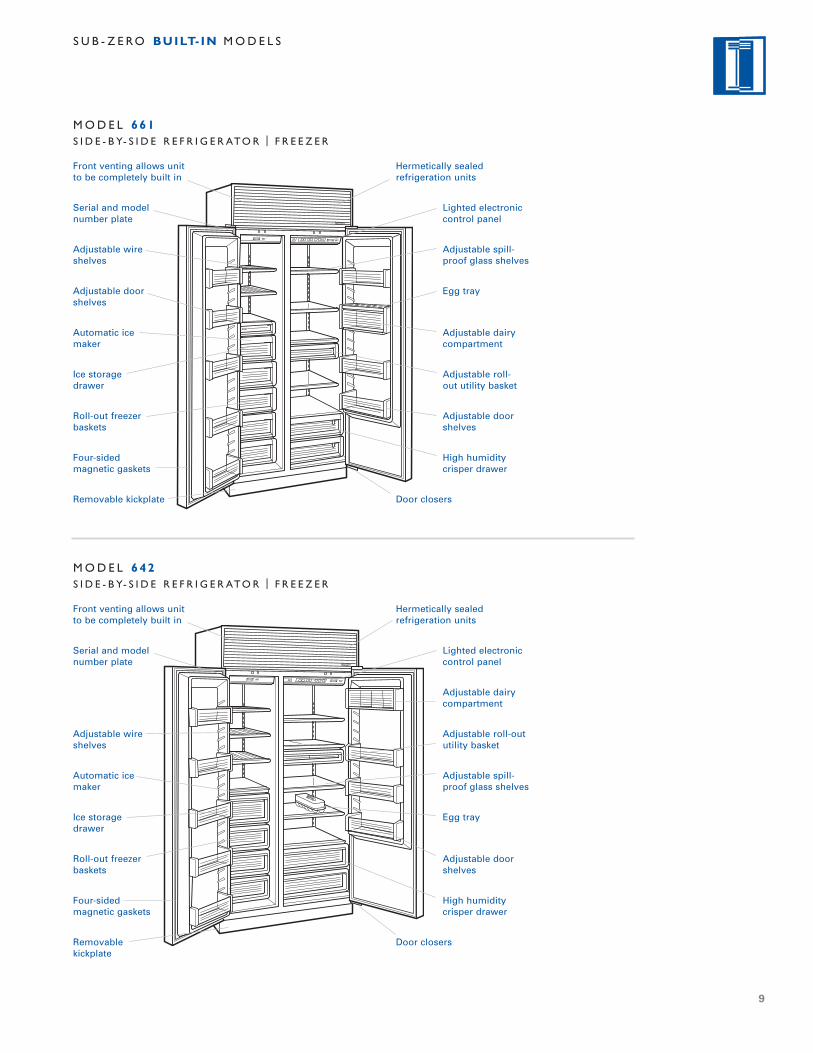
Adjustable dairycompartment
Adjustable roll-oututility basket
High humiditycrisper drawer
Removablekickplate
Ice storagedrawer
Adjustable wireshelves
Serial and modelnumber plate
Hermetically sealedrefrigeration units
Front venting allows unitto be completely built in
Lighted electroniccontrol panel
Roll-out freezerbaskets
Four-sidedmagnetic gaskets
Door closers
Automatic icemaker
Adjustable doorshelves
Adjustable spill-proof glass shelves
Egg tray
Adjustable spill-proof glass shelves
Egg tray
High humiditycrisper drawer
Removable kickplate
Ice storagedrawer
Adjustable doorshelves
Adjustable wireshelves
Serial and modelnumber plate
Hermetically sealedrefrigeration units
Front venting allows unitto be completely built in
Lighted electroniccontrol panel
Roll-out freezerbaskets
Four-sidedmagnetic gaskets
Door closers
Automatic icemaker
Adjustable doorshelves
Adjustable dairycompartment
Adjustable roll-out utility basket
S U B - Z E R O BUILT- IN M O D E L S
M O D E L 661S I D E - B Y- S I D E R E F R I G E R ATO R | F R E E Z E R
M O D E L 642S I D E - B Y- S I D E R E F R I G E R ATO R | F R E E Z E R
10
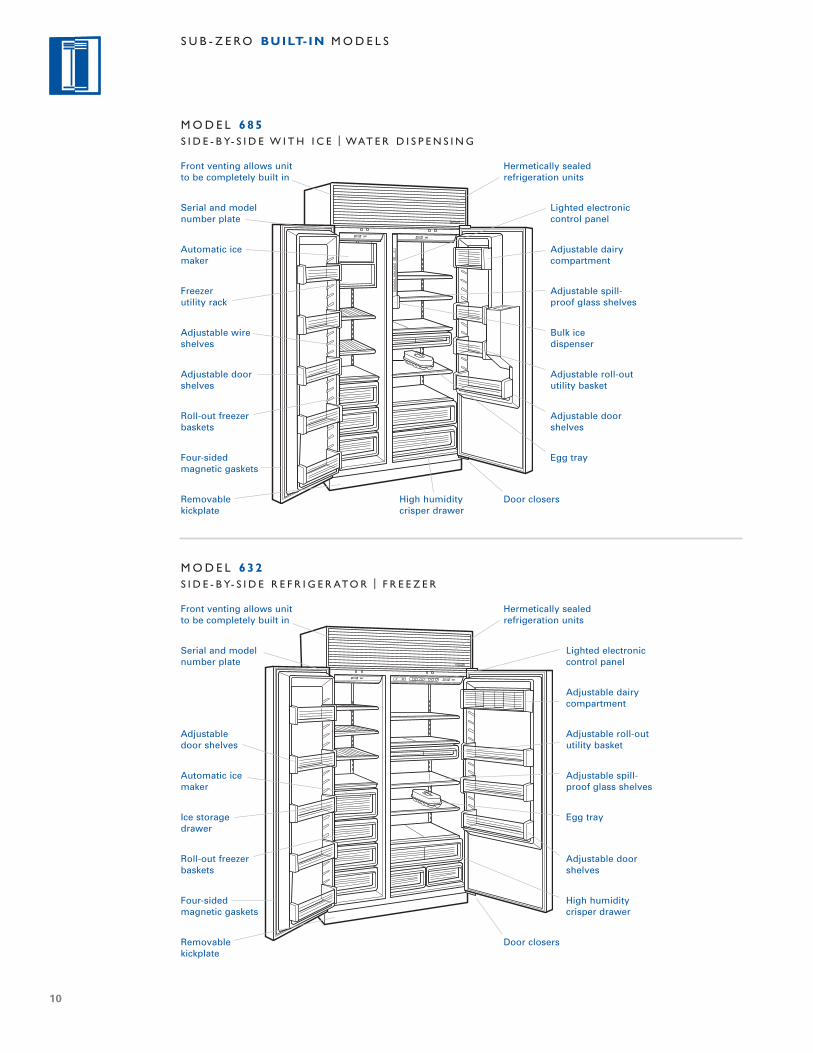
Adjustable dairycompartment
Adjustable roll-oututility basket
High humiditycrisper drawer
Removablekickplate
Ice storagedrawer
Adjustabledoor shelves
Serial and modelnumber plate
Hermetically sealedrefrigeration units
Front venting allows unitto be completely built in
Lighted electroniccontrol panel
Roll-out freezerbaskets
Four-sidedmagnetic gaskets
Door closers
Automatic icemaker
Adjustable doorshelves
Adjustable spill-proof glass shelves
Egg tray
Adjustable dairycompartment
Adjustable spill-proof glass shelves
Egg tray
Removablekickplate
Adjustable doorshelves
Freezerutility rack
Automatic icemaker
Serial and modelnumber plate
Hermetically sealedrefrigeration units
Front venting allows unitto be completely built in
Lighted electroniccontrol panel
Roll-out freezerbaskets
Four-sidedmagnetic gaskets
Door closers
Adjustable wireshelves
Adjustable doorshelves
Bulk icedispenser
Adjustable roll-oututility basket
High humiditycrisper drawer
S U B - Z E R O BUILT- IN M O D E L S
M O D E L 632S I D E - B Y- S I D E R E F R I G E R ATO R | F R E E Z E R
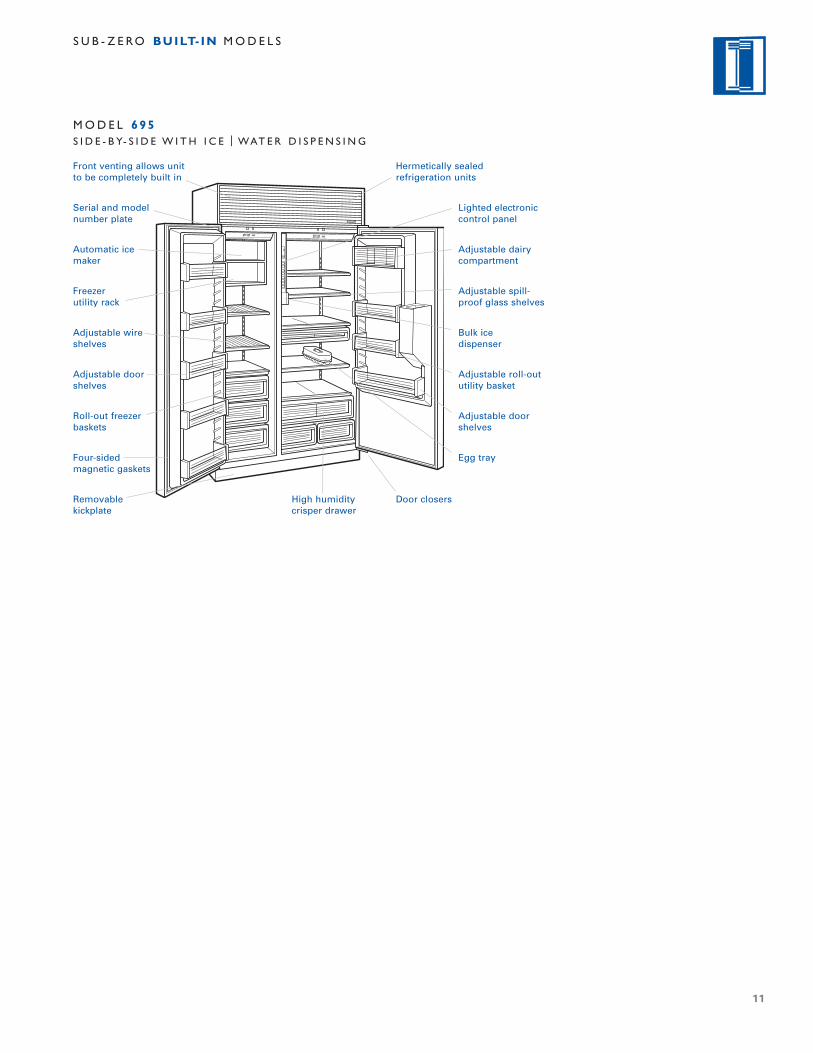
M O D E L 685S I D E - B Y- S I D E W I T H I C E | WAT E R D I S P E N S I N G
11
Adjustable dairycompartment
Adjustable spill-proof glass shelves
Egg tray
Removablekickplate
Adjustable doorshelves
Freezerutility rack
Automatic icemaker
Serial and modelnumber plate
Hermetically sealedrefrigeration units
Front venting allows unitto be completely built in
Lighted electroniccontrol panel
Roll-out freezerbaskets
Four-sidedmagnetic gaskets
Door closers
Adjustable wireshelves
Adjustable doorshelves
Bulk icedispenser
Adjustable roll-oututility basket
High humiditycrisper drawer
S U B - Z E R O BUILT- IN M O D E L S
M O D E L 695S I D E - B Y- S I D E W I T H I C E | WAT E R D I S P E N S I N G
12
ELECTRONIC CONTROL S Y S T E M
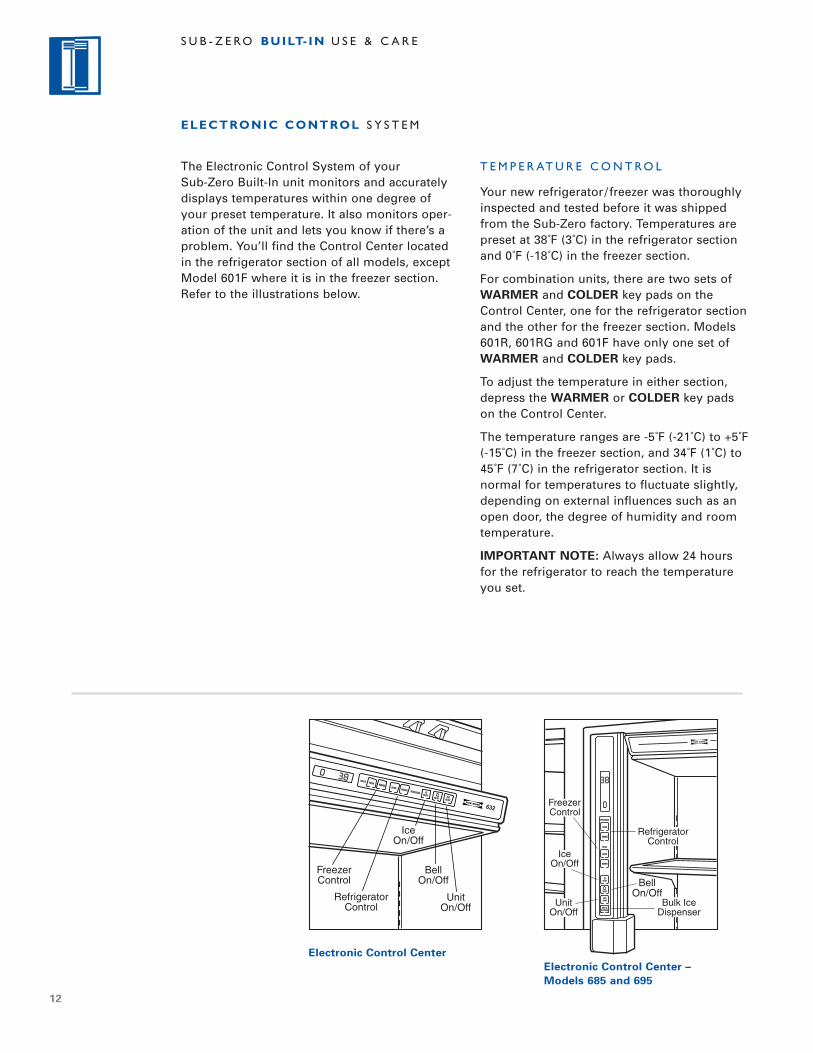
The Electronic Control System of yourSub-Zero Built-In unit monitors and accuratelydisplays temperatures within one degree ofyour preset temperature. It also monitors oper-ation of the unit and lets you know if there’s aproblem. You’ll find the Control Center locatedin the refrigerator section of all models, exceptModel 601F where it is in the freezer section.Refer to the illustrations below.
T E M P E R AT U R E C O N T R O L
Your new refrigerator / freezer was thoroughlyinspected and tested before it was shippedfrom the Sub-Zero factory. Temperatures arepreset at 38˚F (3˚C) in the refrigerator sectionand 0˚F (-18˚C) in the freezer section.
For combination units, there are two sets ofWARMER and COLDER key pads on theControl Center, one for the refrigerator sectionand the other for the freezer section. Models601R, 601RG and 601F have only one set ofWARMER and COLDER key pads.
To adjust the temperature in either section,depress the WARMER or COLDER key padson the Control Center.
The temperature ranges are -5˚F (-21˚C) to +5˚F(-15˚C) in the freezer section, and 34˚F (1˚C) to45˚F (7˚C) in the refrigerator section. It isnormal for temperatures to fluctuate slightly,depending on external influences such as anopen door, the degree of humidity and roomtemperature.
IMPORTANT NOTE: Always allow 24 hoursfor the refrigerator to reach the temperatureyou set.
S U B - Z E R O BUILT- IN U S E & C A R E
Freezer Control
Refrigerator Control
Bell On/Off
Unit On/Off
FREEZER COLDER WARMER COLDER WARMER
UNITON/OFF
ON/OFF
ICEON/OFF
REFRIGERATOR
632
Ice On/Off
FREEZER
COLDER
WARMER
COLDER
WARMER
UNITON/OFF
ICEON/OFF
REFRIGERATOR
BULK ICEDISPENSER
RefrigeratorControl
FreezerControl
IceOn/Off
UnitOn/Off
Bulk IceDispenser
BellOn/OffON/OFF
Electronic Control CenterElectronic Control Center –Models 685 and 695
13
P O W E R
All Built-In units feature a UNIT ON/OFF keypad on the Control Center. This key pad willturn off all electrical power to the unit. Whenthe power is off, the OFF indicator light will bevisible in the Control Center display panel. ThisUNIT ON/OFF key pad means you don’t haveto shut off power at the circuit breaker or wallreceptacle. The key pad can be used duringservice or extended vacations.
A L A R M F E AT U R E
All Built-In units have an alarm feature that willmake an audible beeping sound if the door isleft ajar.
The alarm will sound after 30 seconds. It canbe deactivated for cleaning or resupplying yourunit by depressing the "BELL" ON/OFF keypad. When the alarm is activated, a bell symbolwill be visible in the Control Center displaypanel.
I C E M A K E R C O N T R O L
All Built-In units (except Models 601R and601RG) feature an ICE ON/OFF key pad onthe Control Center. This key pad switches thepower to the ice maker system on or off. Whenthe ice maker system is on, the ICE indicatorlight will be illuminated in the Control Centerdisplay panel. Use the ICE ON/OFF key padto shut down the ice maker during extendedvacations.
S A B B AT H M O D E ( S TA R - K )
All Built-In units feature the Sabbath Mode.This is for certain religious observances wherethe lights and ice maker function need to beturned off.
To initiate Sabbath Mode, while the unit is onpress the UNIT ON/OFF key pad so that OFFis visible in the Control Center display panel.Your unit will be off.
Then press and hold the UNIT ON/OFF keypad for 10 seconds. This will turn the unit backon and will disable the lights and ice maker. Toreturn the unit to normal operating conditions,press and release the UNIT ON/OFF key pad.
If you have questions about Star-K compliance,visit www.star-k.org.
V I S U A L S E RV I C E D I S P L AY
The Control Center monitors refrigerator andfreezer temperatures as well as the ice makersystem. If there is a temperature or ice makerproblem, you’ll be alerted by a flashingSERVICE indicator light. This same SERVICElight will also flash if the condenser needscleaning. Before calling for service, pleasecheck and see if your condenser area needscleaning. Refer to Condenser Cleaning,page 22.
S U B - Z E R O BUILT- IN U S E & C A R E
14
S U B - Z E R O BUILT- IN U S E & C A R E
REFRIGERATOR S TO R A G E
H I G H H U M I D I T Y C R I S P E R D R AW E R
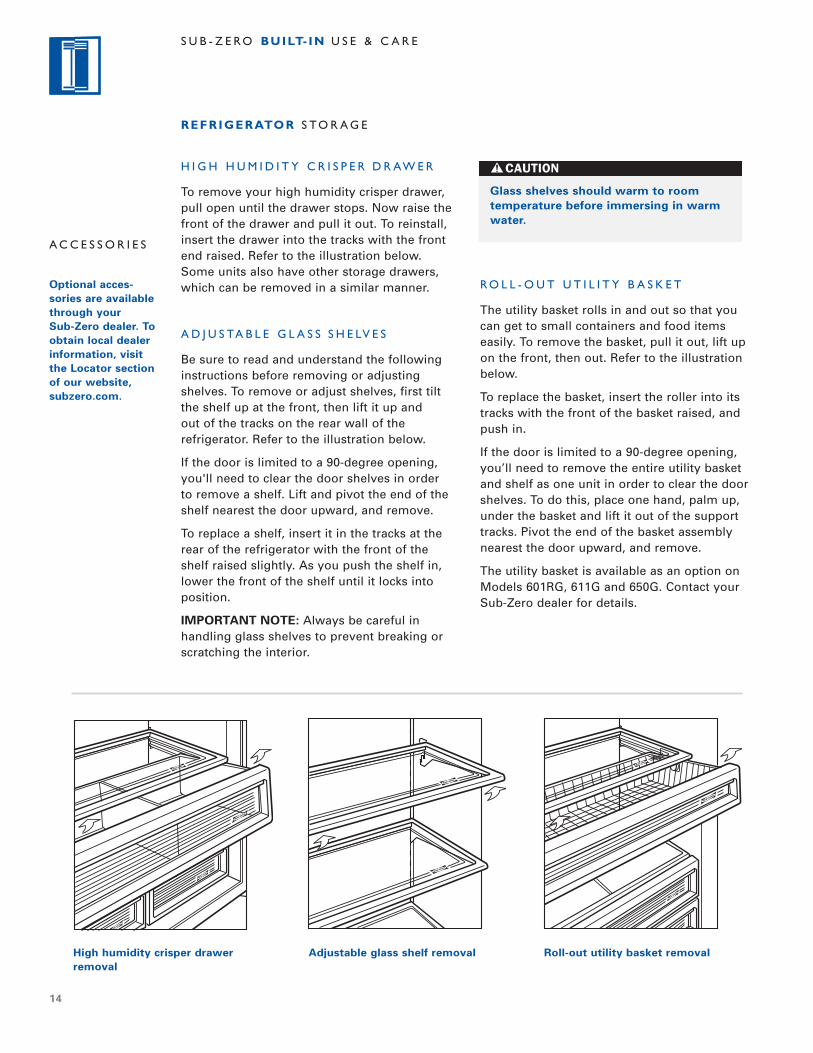
To remove your high humidity crisper drawer,pull open until the drawer stops. Now raise thefront of the drawer and pull it out. To reinstall,insert the drawer into the tracks with the frontend raised. Refer to the illustration below.Some units also have other storage drawers,which can be removed in a similar manner.
A D J U S TA B L E G L A S S S H E LV E S
Be sure to read and understand the followinginstructions before removing or adjustingshelves. To remove or adjust shelves, first tiltthe shelf up at the front, then lift it up andout of the tracks on the rear wall of therefrigerator. Refer to the illustration below.
If the door is limited to a 90-degree opening,you'll need to clear the door shelves in orderto remove a shelf. Lift and pivot the end of theshelf nearest the door upward, and remove.
To replace a shelf, insert it in the tracks at therear of the refrigerator with the front of theshelf raised slightly. As you push the shelf in,lower the front of the shelf until it locks intoposition.
IMPORTANT NOTE: Always be careful inhandling glass shelves to prevent breaking orscratching the interior.
R O L L - O U T U T I L I T Y B A S K E T
The utility basket rolls in and out so that youcan get to small containers and food itemseasily. To remove the basket, pull it out, lift upon the front, then out. Refer to the illustrationbelow.
To replace the basket, insert the roller into itstracks with the front of the basket raised, andpush in.
If the door is limited to a 90-degree opening,you’ll need to remove the entire utility basketand shelf as one unit in order to clear the doorshelves. To do this, place one hand, palm up,under the basket and lift it out of the supporttracks. Pivot the end of the basket assemblynearest the door upward, and remove.
The utility basket is available as an option onModels 601RG, 611G and 650G. Contact yourSub-Zero dealer for details.
High humidity crisper drawerremoval
Adjustable glass shelf removal Roll-out utility basket removal
Glass shelves should warm to roomtemperature before immersing in warmwater.
A C C E S S O R I E S
Optional acces-sories are availablethrough yourSub-Zero dealer. Toobtain local dealerinformation, visitthe Locator sectionof our website,subzero.com.
15
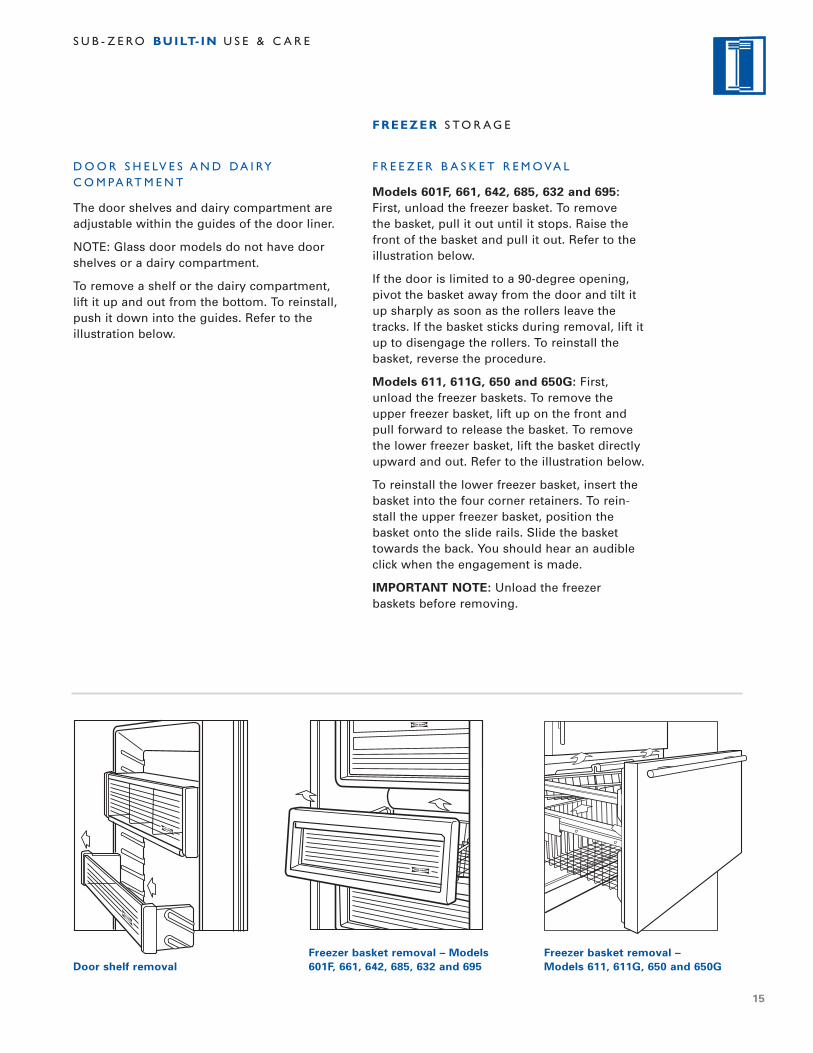
D O O R S H E LV E S A N D D A I RYC O M PA RT M E N T
The door shelves and dairy compartment areadjustable within the guides of the door liner.
NOTE: Glass door models do not have doorshelves or a dairy compartment.
To remove a shelf or the dairy compartment,lift it up and out from the bottom. To reinstall,push it down into the guides. Refer to theillustration below.
FREEZER S TO R A G E
F R E E Z E R B A S K E T R E M O VA L
Models 601F, 661, 642, 685, 632 and 695:First, unload the freezer basket. To removethe basket, pull it out until it stops. Raise thefront of the basket and pull it out. Refer to theillustration below.
If the door is limited to a 90-degree opening,pivot the basket away from the door and tilt itup sharply as soon as the rollers leave thetracks. If the basket sticks during removal, lift itup to disengage the rollers. To reinstall thebasket, reverse the procedure.
Models 611, 611G, 650 and 650G: First,unload the freezer baskets. To remove theupper freezer basket, lift up on the front andpull forward to release the basket. To removethe lower freezer basket, lift the basket directlyupward and out. Refer to the illustration below.
To reinstall the lower freezer basket, insert thebasket into the four corner retainers. To rein-stall the upper freezer basket, position thebasket onto the slide rails. Slide the baskettowards the back. You should hear an audibleclick when the engagement is made.
IMPORTANT NOTE: Unload the freezerbaskets before removing.
Door shelf removalFreezer basket removal – Models601F, 661, 642, 685, 632 and 695
Freezer basket removal –Models 611, 611G, 650 and 650G
S U B - Z E R O BUILT- IN U S E & C A R E

16
ICE MAKER O P E R AT I O N
The ice maker in your Sub-Zero freezer is fullyautomatic and has been tested at the factory.To start making ice, activate the ICE ON/OFFkey pad on the Control Center.
For Models 601F, 611, 611G, 650, 650G, 661,642, 685, 632 and 695, the ice maker systemwill shut off if the ice bucket is not in place.
I C E P R O D U C T I O N
The ice maker is designed to produce enoughice for normal family use. The timing of ice-making cycles will vary depending on loadconditions, door openings and room tempera-ture. On average, you can expect a cycle of ice(eight cubes per cycle) every two hours.
The ice maker operates on water pressure of20 to 100 psi. In some cases, a reverseosmosis water filter system may not be able tomaintain the minimum pressure.
IMPORTANT NOTE: If ice is not used regularlyit tends to fuse together. To avoid this, emptyand replace the ice in the container as needed.
FREEZER S TO R A G E
I C E B U C K E T R E M O VA L
Models 611, 611G, 650 and 650G: To removethe ice bucket, pull the freezer drawer or basketout until it stops and lift the ice bucket out.
Models 601F, 661, 642 and 632: To removethe ice bucket, pull it out until it stops, and liftthe back of the bucket up to clear the carrierassembly. Next, lift the ice bucket out. If thedoor is limited to a 90-degree opening, repeatthe procedure, but when lifting the ice bucketout, pivot the right side of the bucket towardyou and out. This will allow the ice bucket toclear the door.
Models 685 and 695: To remove the icebucket, you must first remove the freezer utilityrack. See Freezer Utility Rack, below. Lift up onthe ice bucket handle and pull out, supportingthe bottom of the ice bucket with one hand.Refer to the illustration below.
F R E E Z E R U T I L I T Y R A C K
Models 685 and 695: The freezer utility rack isspecifically designed to accommodate and holdfrozen juice containers. To remove the rack, liftup and pull out at the bottom with one handwhile you support the top with your otherhand.
S U B - Z E R O BUILT- IN U S E & C A R E
Ice bucket removal –Models 685 and 695
WAT E R D I S P E N S E R O P E R AT I O N
To operate the water dispenser for Models 685and 695, set a glass on the water grille of theglasswell, and press and hold the WATER keypad on the glasswell until the glass is filled.
The first time you use the water dispenser,purge the water system and storage tank forthree minutes. This will clear out any air in thesystem, along with foreign material in the newplumbing connection.
Initially, for water to dispense properly, theWATER key pad must be depressed and helduntil water flows from the dispenser. You mayhave to hold the key pad for 60 seconds forwater to fill the internal reservoir tank.
IMPORTANT NOTE: The chilled water reser-voir tank is mounted inside the refrigeratorsection. It will take several hours to chill thewater to the refrigerator temperature duringthe original fill or after a lot of water is used.
17
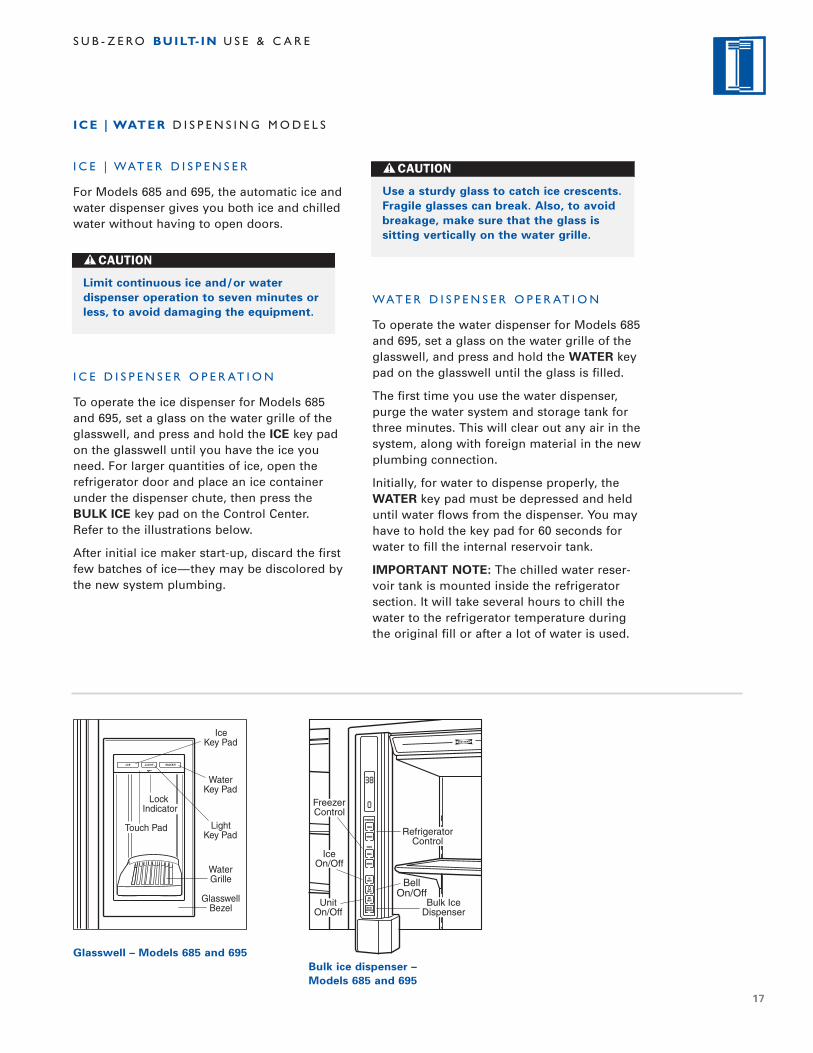
ICE | WATER D I S P E N S I N G M O D E L S
I C E | WAT E R D I S P E N S E R
For Models 685 and 695, the automatic ice andwater dispenser gives you both ice and chilledwater without having to open doors.
I C E D I S P E N S E R O P E R AT I O N
To operate the ice dispenser for Models 685and 695, set a glass on the water grille of theglasswell, and press and hold the ICE key padon the glasswell until you have the ice youneed. For larger quantities of ice, open therefrigerator door and place an ice containerunder the dispenser chute, then press theBULK ICE key pad on the Control Center.Refer to the illustrations below.
After initial ice maker start-up, discard the firstfew batches of ice—they may be discolored bythe new system plumbing.
WaterGrille
WaterKey Pad
LightKey Pad
IceKey Pad
Touch Pad
Lock Indicator
GlasswellBezel
FREEZER
COLDER
WARMER
COLDER
WARMER
UNITON/OFF
ICEON/OFF
REFRIGERATOR
BULK ICEDISPENSER
RefrigeratorControl
FreezerControl
IceOn/Off
UnitOn/Off
Bulk IceDispenser
BellOn/OffON/OFF
Glasswell – Models 685 and 695Bulk ice dispenser –Models 685 and 695
Use a sturdy glass to catch ice crescents.Fragile glasses can break. Also, to avoidbreakage, make sure that the glass issitting vertically on the water grille.
Limit continuous ice and/or waterdispenser operation to seven minutes orless, to avoid damaging the equipment.
S U B - Z E R O BUILT- IN U S E & C A R E
18
S U B - Z E R O BUILT- IN U S E & C A R E
L O C K
For Models 685 and 695, the lock feature isused to prevent unintended ice and waterdispensing. When the dispenser is locked, allkey pads on the glasswell are deactivated toallow cleaning or to prevent small childrenfrom using the dispenser.
To activate the lock feature, hold down theLIGHT key pad on the glasswell until the keypad lights flash once and the red LOCK icon isilluminated (approximately five seconds). Thelights will remain in the state they were inbefore the lock feature was activated.
To deactivate the lock feature, hold down theLIGHT key pad until the key pad lights flashonce and the red LOCK icon is no longer illu-minated (approximately five seconds). Thelights will remain in the state they were inbefore the lock feature was deactivated.
I C E D I S P E N S I N G
Models 685 and 695 have a feature that limitsthe maximum amount of ice that is dispensedeach time the ICE key pad on the glasswell ispressed.
To dispense ice, hold down the ICE key pad forapproximately two seconds. The dispenser willmeter out ice for about two seconds, collectthe ice directly above the glass, then drop theice into the glass. If less ice is desired, hold theICE key pad down for less than two seconds. Ifmore ice is desired, hold the ICE key pad downuntil the dispensing cycle repeats.
IMPORTANT NOTE: Be sure that dispenserkey pads are clean and dry when pressed toavoid problems with the dispenser operation.
ICE | WATER D I S P E N S I N G M O D E L S
D I S P E N S E R L I G H T S
For Models 685 and 695, there are threelighting states than can be cycled by pressingthe LIGHT key pad on the glasswell.
All lights OFF
All lights ON (blue key pad and whiteglasswell)
Key pad lights ON only
During water or ice dispensing, all lights willilluminate until dispensing is complete, thenlights will return to their previous state.
D I S P E N S E R WAT E R G R I L L E
For Models 685 and 695, a water grille at thebase of the glasswell will catch and evaporatesmall spills. Because there is no drain in thisarea, do not pour water into the water grille.To clean the area, remove the water grille bypressing the front left corner of the grille andlifting it out.
19
VACATION T I M E
For extended vacations, shut off power to theunit. Empty the unit and block the doors openslightly. A 1" (25 mm) space will let fresh air into keep the interior dry and fresh smelling.
For short vacations, remove all perishableitems. Shut off the ice maker and empty theice bucket. Do not change the control settings.
If the unit is put into service temporarily andlater shut off, block the doors open to allowfresh air to circulate inside the unit. Be sure toshut off power to the unit.
If your religious observances (Sabbath Mode)require turning off the lights and ice maker,refer to Sabbath Mode, page 13.
I C E D I S P E N S E R O P E R AT I N G T I P S
If there’s no ice, make sure the ice makersystem is turned on and ICE is illuminatedin the Control Center display panel.
Make sure there is a supply of ice in the icebucket. See Ice Bucket Removal, page 16.
Make sure the ice bucket is all the way inand engaging the auger motor at the backof the bucket. If it is not all the way back,push on the ice bucket and depress the ICEkey pad on the glasswell at the same time.
To ensure that the ice bucket is properlypositioned, check to make sure that thefreezer utility rack has been properlyinstalled. See Freezer Utility Rack, page 16.
Press the ICE key pad on the glasswell. Ifyou do not hear auger motor noise, waitfive minutes, then try again. If you do nothear auger noise after the second try, callyour Sub-Zero authorized service center.
If the ice dispenser is not used for a longperiod, the ice may fuse together. To avoidthis, empty the ice bucket as needed.
Be sure to block doors open when unit isnot in service. Moisture buildup duringeven the shortest amount of runningtime could attack the metal.
S U B - Z E R O BUILT- IN U S E & C A R E
20
S U B - Z E R O BUILT- IN U S E & C A R E
C O N D E N S E R F A N M OTO R
All Built-In models have a fan behind the grilleto cool the compressor area. This fan runs witheither compressor.
A U TO M AT I C D E F R O S T
Your Sub-Zero unit is equipped with an auto-matic defrost system. The refrigerator sectionwill defrost during each off cycle of the refrig-erator compressor. The freezer section iscontrolled by an energy-saving AdaptiveDefrost system, which defrosts as needed.
S O U N D S
You may hear some noises in the normal oper-ation of the unit. Surrounding acoustics likewalls, floors and cabinets may affect the soundof your unit. For example, a gurgling orrunning water sound is probably refrigerantcirculating through the tubing. In Models 685and 695, the ice dispenser valve inside therefrigerator door snaps closed five secondsafter either the ICE or WATER key pad isreleased.
During the ice maker cycle you may hear thesound of ice dropping into the container or thesolenoid valve operating while refilling the icemaker with water. During the freezer defrostyou may hear crackling and/or sizzling as theheat from the defrost element clears the frostfrom the freezer coil and water runs into thewater pan.
While the compressors are in operation, youmay hear a slight hum. During the start-up andshutdown of the compressor, you may feelvibration for a few seconds.
Some of these noises may be enhanced whenthe unit door(s) are open.
OPERATIONS
D O O R A N D D R AW E R C L O S I N G
Models 611, 611G, 650 and 650G: Yourrefrigerator door has a door closing cam tohelp in closing the door. With the door openedto about 120 degrees, the cam will hold in theopen position if the door is stopped. As youclose the door, the cam will take over at about15 degrees to help close the door.
Your freezer drawer has a self-closing mecha-nism. The incline, built into roller assemblieson the drawer, uses gravity to assist in closingthe drawer.
If your Built-In unit is positioned in a corner,you may want to install an optional door stopkit, which limits door opening to 90 degrees.This door stop is provided with each Model611, 611G, 650 and 650G and is shipped in aplastic bag in the grille area.
D O O R C L O S I N G
Models 601R, 601RG, 601F, 661, 642, 685,632 and 695: Your refrigerator and freezerdoors have spring-loaded closure mechanisms.As the doors are closed, the door closureengages to help close and seal the doors. Anoptional 90-degree or 105-degree door stop isavailable through your Sub-Zero dealer.
A C C E S S O R I E S
Optional acces-sories are availablethrough yourSub-Zero dealer. Toobtain local dealerinformation, visitthe Locator sectionof our website,subzero.com.
CLEANING
S TA I N L E S S S T E E L E X T E R I O R
Classic and platinum stainless steelfinishes: To clean the exterior of the classicand platinum stainless steel finishes, use asoft, nonabrasive stainless steel cleaner likeSignature Polish and apply with a soft 100%lint-free cloth.
Signature Polish is available from SignatureLimited Laboratory, P. O. Box 13436, Dayton,Ohio 45413-0436, or 877-376-5474 (toll free).
Carbon stainless steel finish: Carbonstainless steel can be cleaned with mild soapand water.
The carbon stainless steel finish uses theinterest of brushed steel to bring out themaximum metallic luster of its charcoal back-ground.
Different light types and source locations canresult in variations in shading on differentcomponents and areas of large appliances.These variations are normal with the carbonfinish and add to the unique character ofcolored stainless steel.
To bring out the natural luster of all threefinishes, lightly wipe the surface with a water-dampened microfiber cloth followed by a drypolishing chamois. All work should follow thegrain direction of the finish. Better results areobtained by keeping the cloth in continuouscontact with the stainless steel.
21
I N T E R I O R C L E A N I N G
To clean interior surfaces and removable parts,wash with a mild solution of soap and luke-warm water with a little baking soda. Do notuse vinegar. Rinse and dry thoroughly. Avoidgetting water on lights, Control Center anddisplay panel.
G L A S S W E L L C L E A N I N G
To clean the glasswell of Models 685 and 695,use a mild solution of soap and water with alittle baking soda. Wipe up spills afterremoving the dispenser water grille.
For the stainless steel areas of the glasswell onModels 685 and 695, you may use the Stain-less Steel Exterior cleaning procedure.
Under no circumstances should you usea metallic or highly abrasive cleaner orcloth, as this will remove the carbonfinish or scratch the classic or platinumfinishes.
Do not submerge or pour hot water overcold glass shelves.
S U B - Z E R O BUILT- IN U S E & C A R E
S I G N AT U R EP O L I S H
Signature Polishis available fromSignature LimitedLaboratory,P. O. Box 13436,Dayton, Ohio45413-0436, orcall 877-376-5474(toll free).
22
G R I L L E R E M O VA L
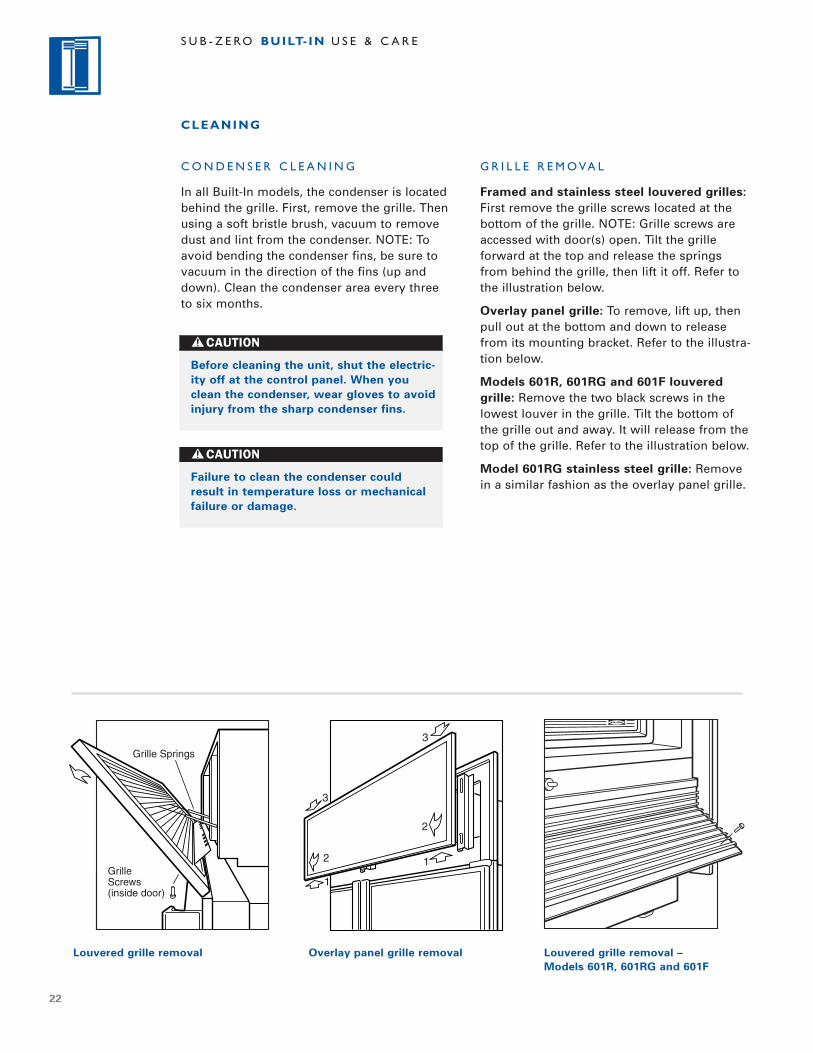
Framed and stainless steel louvered grilles:First remove the grille screws located at thebottom of the grille. NOTE: Grille screws areaccessed with door(s) open. Tilt the grilleforward at the top and release the springsfrom behind the grille, then lift it off. Refer tothe illustration below.
Overlay panel grille: To remove, lift up, thenpull out at the bottom and down to releasefrom its mounting bracket. Refer to the illustra-tion below.
Models 601R, 601RG and 601F louveredgrille: Remove the two black screws in thelowest louver in the grille. Tilt the bottom ofthe grille out and away. It will release from thetop of the grille. Refer to the illustration below.
Model 601RG stainless steel grille: Removein a similar fashion as the overlay panel grille.
S U B - Z E R O BUILT- IN U S E & C A R E
Grille Springs
Grille Screws (inside door)
1
1
2
2
3
3
Louvered grille removal Overlay panel grille removal Louvered grille removal –Models 601R, 601RG and 601F
CLEANING
C O N D E N S E R C L E A N I N G
In all Built-In models, the condenser is locatedbehind the grille. First, remove the grille. Thenusing a soft bristle brush, vacuum to removedust and lint from the condenser. NOTE: Toavoid bending the condenser fins, be sure tovacuum in the direction of the fins (up anddown). Clean the condenser area every threeto six months.
Before cleaning the unit, shut the electric-ity off at the control panel. When youclean the condenser, wear gloves to avoidinjury from the sharp condenser fins.
Failure to clean the condenser couldresult in temperature loss or mechanicalfailure or damage.
23
C L E A N I N G C O M B I N AT I O N U N I T S
For Models 611, 611G, 650, 650G, 661, 642,632, 685 and 695, it is possible to turn off onesection of your combination unit for anextended period without disrupting the other.
First, turn the unit off, then push and hold theWARMER key pad of the section you want todisable. Then, turn the unit back on bydepressing the UNIT ON/OFF key pad. Thedisabled section will be indicated with "--" inthe Control Center display panel. Repeat theprocess to turn the section back on. SeeElectronic Control System, page 12.
C L E A N I N G T H E I C E C H U T E
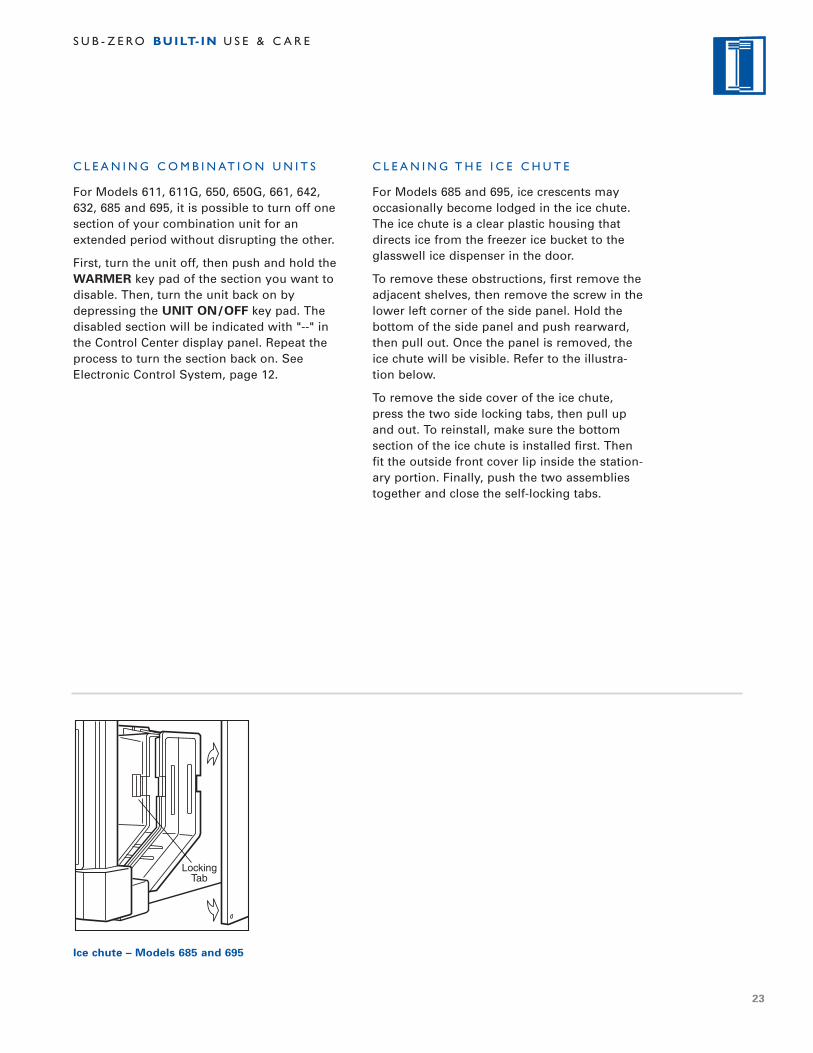
For Models 685 and 695, ice crescents mayoccasionally become lodged in the ice chute.The ice chute is a clear plastic housing thatdirects ice from the freezer ice bucket to theglasswell ice dispenser in the door.
To remove these obstructions, first remove theadjacent shelves, then remove the screw in thelower left corner of the side panel. Hold thebottom of the side panel and push rearward,then pull out. Once the panel is removed, theice chute will be visible. Refer to the illustra-tion below.
To remove the side cover of the ice chute,press the two side locking tabs, then pull upand out. To reinstall, make sure the bottomsection of the ice chute is installed first. Thenfit the outside front cover lip inside the station-ary portion. Finally, push the two assembliestogether and close the self-locking tabs.
Locking Tab
Ice chute – Models 685 and 695
S U B - Z E R O BUILT- IN U S E & C A R E
24
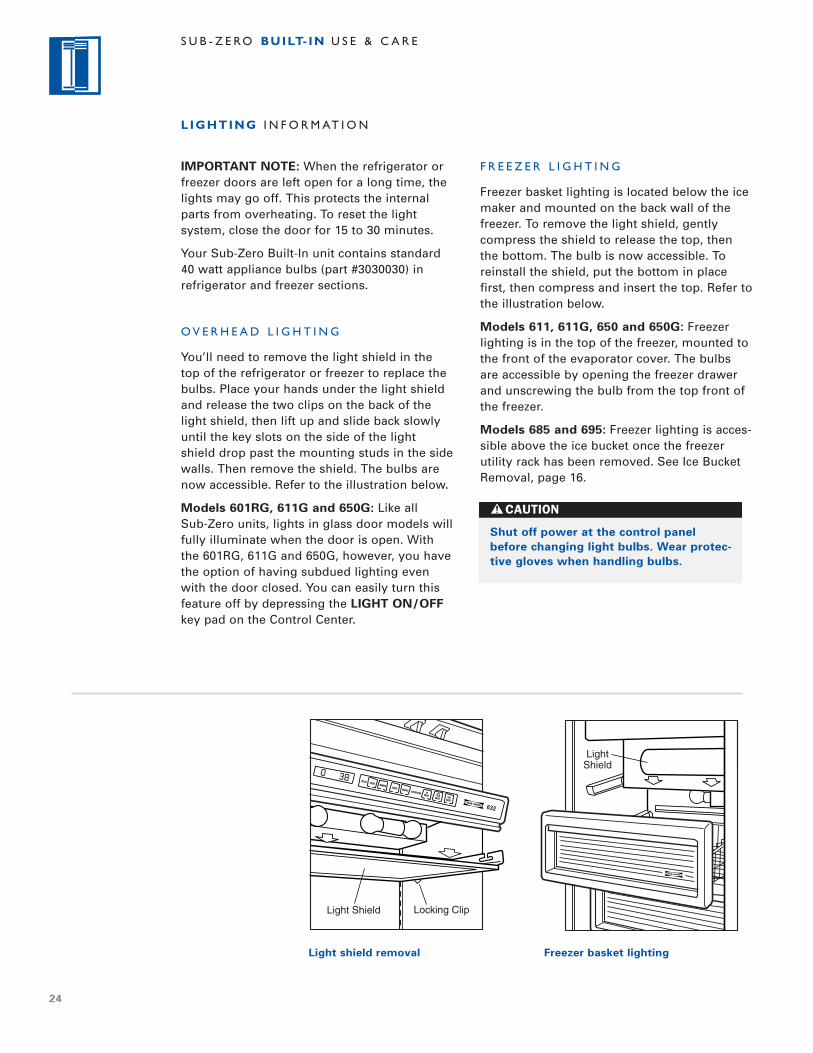
F R E E Z E R L I G H T I N G
Freezer basket lighting is located below the icemaker and mounted on the back wall of thefreezer. To remove the light shield, gentlycompress the shield to release the top, thenthe bottom. The bulb is now accessible. Toreinstall the shield, put the bottom in placefirst, then compress and insert the top. Refer tothe illustration below.
Models 611, 611G, 650 and 650G: Freezerlighting is in the top of the freezer, mounted tothe front of the evaporator cover. The bulbsare accessible by opening the freezer drawerand unscrewing the bulb from the top front ofthe freezer.
Models 685 and 695: Freezer lighting is acces-sible above the ice bucket once the freezerutility rack has been removed. See Ice BucketRemoval, page 16.
Locking ClipLight Shield
FREEZER COLDER WARMER COLDER WARMER
UNITON/OFF
ON/OFF
ICEON/OFF
REFRIGERATOR
632
Light Shield
Light shield removal Freezer basket lighting
S U B - Z E R O BUILT- IN U S E & C A R E
LIGHTING I N F O R M AT I O N
IMPORTANT NOTE: When the refrigerator orfreezer doors are left open for a long time, thelights may go off. This protects the internalparts from overheating. To reset the lightsystem, close the door for 15 to 30 minutes.
Your Sub-Zero Built-In unit contains standard40 watt appliance bulbs (part #3030030) inrefrigerator and freezer sections.
O V E R H E A D L I G H T I N G
You’ll need to remove the light shield in thetop of the refrigerator or freezer to replace thebulbs. Place your hands under the light shieldand release the two clips on the back of thelight shield, then lift up and slide back slowlyuntil the key slots on the side of the lightshield drop past the mounting studs in the sidewalls. Then remove the shield. The bulbs arenow accessible. Refer to the illustration below.
Models 601RG, 611G and 650G: Like allSub-Zero units, lights in glass door models willfully illuminate when the door is open. Withthe 601RG, 611G and 650G, however, you havethe option of having subdued lighting evenwith the door closed. You can easily turn thisfeature off by depressing the LIGHT ON/OFFkey pad on the Control Center.
Shut off power at the control panelbefore changing light bulbs. Wear protec-tive gloves when handling bulbs.
25
K E E P I N G FOOD FRESH
Your Sub-Zero unit features our unique dualcompressor refrigeration system to keepfood fresher longer. However, the quality andsafety of your food also depends on how youhandle it.
The information in this section gives you themost up-to-date handling and storagerecommendations to help you keep food at itsbest. If you have specific questions that are notaddressed here, contact your University orCounty Extension Service or your local utilitycompany.
Most food inevitably deteriorates over time.From the very beginning until it is consumed,food undergoes changes. Microorganisms getinto food, multiply and cause spoiling.
Enzymes that occur naturally in food continuethe ripening process even after the food isharvested. Improper temperatures cause foodto deteriorate faster. Changes in humiditycause wilting and shriveling that can lead tospoiling.
Sub-Zero’s exclusive dual refrigeration systemis specifically designed to combat thesechanges and keep your food fresh longer. Theindividual refrigerator and freezer systemshave been designed to maintain accurate,consistent temperatures and proper humiditylevels for longer food life expectancy. Dualrefrigeration eliminates transfer of fresh foododors to frozen food or ice and does not freezethe moisture out of the air in the fresh foodsection.
In addition, good handling practices canminimize the rate of changes in food.
H A N D L I N G R E C O M M E N D AT I O N S
Follow the recommended storage times andtemperatures in this guide. Your Sub-Zerounit helps to slow the ripening process bytailoring temperatures to each section asneeded.
Use specially designed compartments fordairy foods, deli foods and fresh produce.These compartments maintain temperatureand humidity levels that keep specific foodgroups fresh.
Rotate food in refrigeration units, using afirst-in, first-out system.
When food does spoil, it’s usually obvious.It becomes moldy, has an off-odor, looksrotten or discolored. But there are timeswhen spoiling may not be so apparent. Ifyou think a food has been stored too long,discard it. Don’t taste it to check if it’s okay.
While the bacteria that cause food spoilagewill not cause food borne illness or foodpoisoning, taste tests are not a good idea.
K E E P I N G FOOD AT ITS BEST
26
K E E P I N G FOOD SAFE TO EAT
Most food borne illness is caused by bacteriasuch a staphylococcus, salmonella, E-coli andclostridium botulinum, the bacteria that causesbotulism. These bacteria grow rapidly attemperatures between 40˚F (4˚C) and 140˚F(60˚C), a range that’s called the Danger Zone.Never leave food in the danger zone for morethan two hours. When the bacteria have multi-plied to the millions in warm temperatures,they cause illness. Some bacteria cause flu-likesymptoms, while others cause serious illnessor even death. Young children, the elderly andpeople who are already ill are more likely tobecome sick from food poisoning.
To reduce your risk of food borne illness, usethe following techniques to keep your foodsafe to eat:
W H E N YO U ’ R E S H O P P I N G
Place packages of raw meat, seafood orpoultry in plastic bags to keep them fromdripping on other foods.
Shop for meat, seafood and poultry last.Don’t leave these foods in a hot car whenyou’ve finished shopping. Take along acooler in hot weather or when you have totravel long distances.
Check use by and sell by dates on foods tomake sure they’re fresh. Use extra carewhen buying deli food. Buy only theamount you will use in 1–2 days. Discardhot or cold deli food that has been at roomtemperature for more than two hours.
W H E N YO U S TO R E F O O D
Monitor temperatures of the refrigeratorand freezer sections on the electroniccontrol panel of your Sub-Zero unit.Keep the refrigerator temperature at 40˚F(4˚C) or below and freezer temperature at0˚F (-18˚C).
Follow the recommended refrigerator andfreezer storage times and temperatures inthis guide.
Store raw meat, poultry and seafoodseparate from other foods. Keep juices fromthese packages from dripping on otherfood.
Never taste food that looks or smellsstrange to test its freshness. Discard it.
For refrigerator storage, leave raw meat,poultry and seafood in its original wrapperunless it is torn. Repeated handling canintroduce bacteria to these foods.
Wrap food stored in the refrigerator unit infoil or plastic wrap, or place it in plasticbags or airtight containers to keep it fromdrying out. Date all packages.
For freezer storage, use freezer wrap,freezer-quality plastic bags or aluminum foilover the commercial wrap if foods will bestored in the freezer for more than a coupleof months. This minimizes dehydration andquality loss. Single layers of aluminum foilmay tear and cause freezer burn.
K E E P I N G FOOD AT ITS BEST
27
W H E N YO U P R E PA R E F O O D
Clean everything that comes in contact withfood.
Wash your hands for 20 seconds before andafter handling food.
Sanitize counters, equipment and utensilsafter handling raw meat, seafood or poultry.Rinse with a dilute chlorine bleach solution,one teaspoon to a quart of water.
Use clean kitchen towels, sponges andcloths. Replace sponges every few weeks.
Use disposable plastic gloves if you havean infected cut or burn on your hands.
Thaw food in the refrigerator or microwaveoven, not on the counter. When you thawfood in a microwave oven, cook it immedi-ately.
Marinate food only in the refrigerator.
Rinse poultry and seafood in cold waterbefore cooking.
Avoid cross-contamination in preparingfood. Keep raw meat, poultry and seafoodand their juices away from other food. Forexample, don’t use the same surface andutensils for preparing raw meat, poultryand seafood that you use for preparingsalad ingredients.
Thoroughly clean your plastic and woodencutting boards. Wash with hot water andsoap and rinse with a diluted chlorinebleach solution of one teaspoon to a quartof water.
W H E N YO U C O O K F O O D
Cook meat to an internal temperature of165˚F (74˚C) or above, poultry to 180˚F(82˚C) or above. For cuts more than 2" (51mm) thick, use a meat thermometer tocheck the temperature. For thinner cuts,clear juices (not pink) are a sign ofdoneness.
If you are cooking frozen meat or poultrythat has not been defrosted, increase thecooking time to 11/2 times the time requiredfor thawed items.
Roast meats or poultry in oven tempera-tures of 325˚F (163˚C) or above.
Cook eggs until the yolk and white are firm,not runny.
Don’t use recipes in which eggs remain rawor partially cooked.
If your microwave has a temperature probe,use it. Check temperatures of meat andpoultry in at least three spots. Rotate foodsduring microwaving.
Don’t taste raw or partially cooked meat,poultry, eggs or fish.
W H E N YO U H AV E L E F TO V E R S
Refrigerate or freeze cooked leftovers insmall, covered containers within 2 hoursafter cooking. Make sure there is adequateair space around the containers so that foodcan cool down quickly.
Remove the stuffing from meat or poultryand store it separately.
Date packages of leftovers and use within asafe period of time.
Cover and reheat leftovers thoroughlybefore serving.
Bring sauces, soups and gravy to a boil.Heat other foods to 165˚F (74˚C).
If you think food may be spoiled, discard it.When in doubt, throw it out.
K E E P I N G FOOD AT ITS BEST
28
FRESH FOOD S TO R A G E
Shelf life of fresh foods varies depending onhow fresh it is when you buy it. To keep yourfood fresher longer, follow the recommendedstorage tips.
Vegetables: Wash vegetables in cool waterand drain. Store in airtight containers or plasticwrap. Vegetables stay fresh longer in highhumidity storage.
Fruits: Wash and dry fresh fruits. Store morearomatic fruits in plastic bags. Most fruits stayfresh longer in low humidity storage.
Prepackaged Meats: Store in original packag-ing. After opening, rewrap tightly in plasticwrap or aluminum foil.
Fresh Meats, Fish and Poultry: Remove storewrappings, then rewrap in plastic wrap, foil orwaxed paper and refrigerate immediately.
Eggs: Store eggs unwashed in their carton ora portable egg tray. Use within 2 weeks.
Milk, Cream and Cottage Cheese: Keepcarton closed. Store on refrigerator shelf anduse within 5 days.
Cheese: Store in original packaging until readyto use. After opening, rewrap tightly in plasticwrap or aluminum foil.
Leftovers: Let cool and cover tightly withplastic wrap or foil. Airtight plastic containerswork well to prevent drying out and odortransfer.
FROZEN FOOD S TO R A G E
Freezer Storage: Wrap foods in materialdesigned for frozen food storage. The wrapmust seal out air and moisture. Do notrefreeze thawed meats.
Ice Cream: The firmness of the ice cream willdepend on its cream content. Higher qualityice creams usually have a higher creamcontent, requiring colder freezer temperaturesto maintain their firmness. Soft ice cream isnot always an indication of a temperatureproblem.
Make sure your refrigerator and freezer doorsclose freely and completely. Overloading willaffect temperatures inside the unit. Do not fillyour freezer with large quantities of unfrozenfoods expecting them to fast freeze. Give thefreezer ample time to circulate cold air aroundunfrozen items before adding additional items.
S U G G E S T E D FOOD STORAGE
The food storage charts on the following pagesgive you specific information to help you keepfood safe and keep it at its best quality. Therecommended storage temperatures will helpyou determine optimal storage conditions foryour food. As a general rule, food that ishandled properly and kept at temperaturesbelow 40˚F (4˚C) will be safe to eat.
Storing food at temperatures below 40˚F (4˚C)keeps it out of the Danger Zone. The storagetimes for refrigeration will help keep food fromspoiling or becoming dangerous to eat. Thetime limits for frozen foods are to maintainflavor and texture. Food kept frozen longerthan the recommended time will still be safe toeat, but its quality may diminish.
K E E P I N G FOOD AT ITS BEST
29
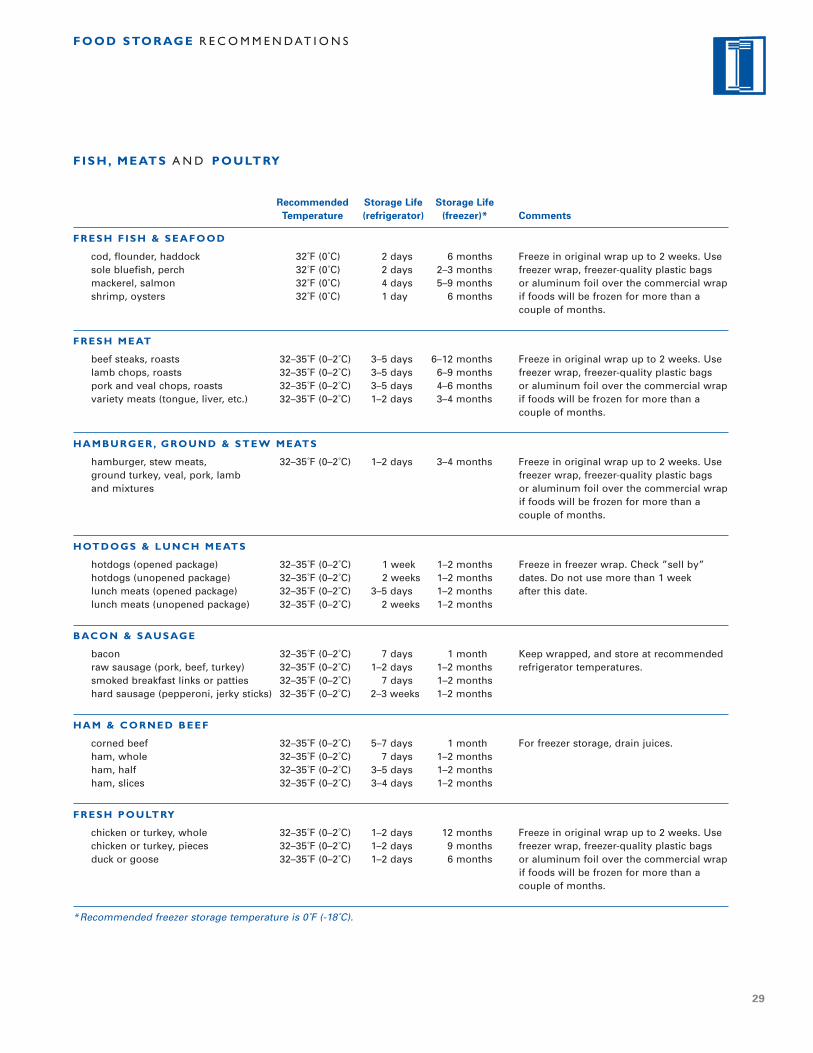
FISH, MEATS A N D POULTRY
FRESH F ISH & SEAFOOD
cod, flounder, haddock 32˚F (0˚C) 2 days 6 months Freeze in original wrap up to 2 weeks. Usesole bluefish, perch 32˚F (0˚C) 2 days 2–3 months freezer wrap, freezer-quality plastic bagsmackerel, salmon 32˚F (0˚C) 4 days 5–9 months or aluminum foil over the commercial wrapshrimp, oysters 32˚F (0˚C) 1 day 6 months if foods will be frozen for more than a
couple of months.
FRESH MEAT
beef steaks, roasts 32–35˚F (0–2˚C) 3–5 days 6–12 months Freeze in original wrap up to 2 weeks. Uselamb chops, roasts 32–35˚F (0–2˚C) 3–5 days 6–9 months freezer wrap, freezer-quality plastic bagspork and veal chops, roasts 32–35˚F (0–2˚C) 3–5 days 4–6 months or aluminum foil over the commercial wrapvariety meats (tongue, liver, etc.) 32–35˚F (0–2˚C) 1–2 days 3–4 months if foods will be frozen for more than a
couple of months.
HAMBURGER, GROUND & STEW MEATS
hamburger, stew meats, 32–35˚F (0–2˚C) 1–2 days 3–4 months Freeze in original wrap up to 2 weeks. Useground turkey, veal, pork, lamb freezer wrap, freezer-quality plastic bagsand mixtures or aluminum foil over the commercial wrap
if foods will be frozen for more than acouple of months.
HOTDOGS & LUNCH MEATS
hotdogs (opened package) 32–35˚F (0–2˚C) 1 week 1–2 months Freeze in freezer wrap. Check ”sell by”hotdogs (unopened package) 32–35˚F (0–2˚C) 2 weeks 1–2 months dates. Do not use more than 1 weeklunch meats (opened package) 32–35˚F (0–2˚C) 3–5 days 1–2 months after this date.lunch meats (unopened package) 32–35˚F (0–2˚C) 2 weeks 1–2 months
BACON & SAUSAGE
bacon 32–35˚F (0–2˚C) 7 days 1 month Keep wrapped, and store at recommendedraw sausage (pork, beef, turkey) 32–35˚F (0–2˚C) 1–2 days 1–2 months refrigerator temperatures.smoked breakfast links or patties 32–35˚F (0–2˚C) 7 days 1–2 monthshard sausage (pepperoni, jerky sticks) 32–35˚F (0–2˚C) 2–3 weeks 1–2 months
HAM & CORNED BEEF
corned beef 32–35˚F (0–2˚C) 5–7 days 1 month For freezer storage, drain juices.ham, whole 32–35˚F (0–2˚C) 7 days 1–2 monthsham, half 32–35˚F (0–2˚C) 3–5 days 1–2 monthsham, slices 32–35˚F (0–2˚C) 3–4 days 1–2 months
FRESH POULTRY
chicken or turkey, whole 32–35˚F (0–2˚C) 1–2 days 12 months Freeze in original wrap up to 2 weeks. Usechicken or turkey, pieces 32–35˚F (0–2˚C) 1–2 days 9 months freezer wrap, freezer-quality plastic bagsduck or goose 32–35˚F (0–2˚C) 1–2 days 6 months or aluminum foil over the commercial wrap
if foods will be frozen for more than acouple of months.
*Recommended freezer storage temperature is 0˚F (-18˚C).
Recommended Storage Life Storage LifeTemperature (refrigerator) (freezer)* Comments
FOOD STORAGE R E C O M M E N D AT I O N S
30
FOOD STORAGE R E C O M M E N D AT I O N S
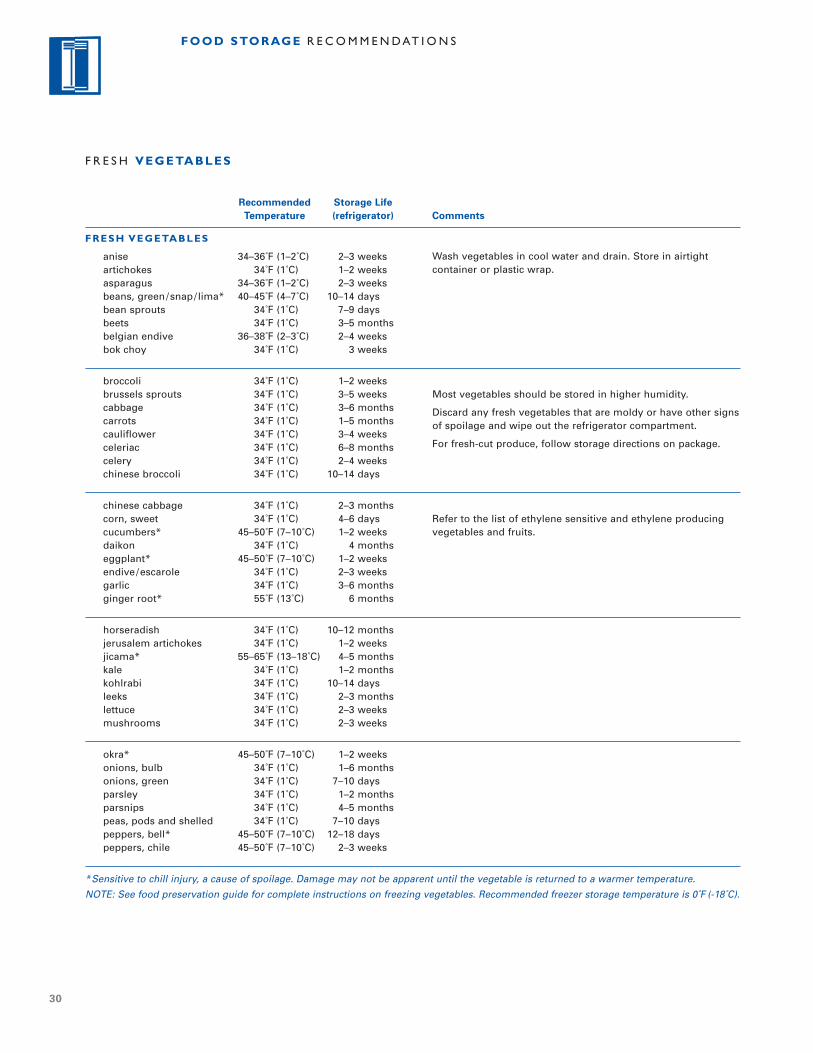
F R E S H VEGETABLES
FRESH VEGETABLES
anise 34–36˚F (1–2˚C) 2–3 weeksartichokes 34˚F (1˚C) 1–2 weeksasparagus 34–36˚F (1–2˚C) 2–3 weeksbeans, green/snap/ lima* 40–45˚F (4–7˚C) 10–14 daysbean sprouts 34˚F (1˚C) 7–9 daysbeets 34˚F (1˚C) 3–5 monthsbelgian endive 36–38˚F (2–3˚C) 2–4 weeksbok choy 34˚F (1˚C) 3 weeks
broccoli 34˚F (1˚C) 1–2 weeksbrussels sprouts 34˚F (1˚C) 3–5 weekscabbage 34˚F (1˚C) 3–6 monthscarrots 34˚F (1˚C) 1–5 monthscauliflower 34˚F (1˚C) 3–4 weeksceleriac 34˚F (1˚C) 6–8 monthscelery 34˚F (1˚C) 2–4 weekschinese broccoli 34˚F (1˚C) 10–14 days
chinese cabbage 34˚F (1˚C) 2–3 monthscorn, sweet 34˚F (1˚C) 4–6 dayscucumbers* 45–50˚F (7–10˚C) 1–2 weeksdaikon 34˚F (1˚C) 4 monthseggplant* 45–50˚F (7–10˚C) 1–2 weeksendive/escarole 34˚F (1˚C) 2–3 weeksgarlic 34˚F (1˚C) 3–6 monthsginger root* 55˚F (13˚C) 6 months
horseradish 34˚F (1˚C) 10–12 monthsjerusalem artichokes 34˚F (1˚C) 1–2 weeksjicama* 55–65˚F (13–18˚C) 4–5 monthskale 34˚F (1˚C) 1–2 monthskohlrabi 34˚F (1˚C) 10–14 daysleeks 34˚F (1˚C) 2–3 monthslettuce 34˚F (1˚C) 2–3 weeksmushrooms 34˚F (1˚C) 2–3 weeks
okra* 45–50˚F (7–10˚C) 1–2 weeksonions, bulb 34˚F (1˚C) 1–6 monthsonions, green 34˚F (1˚C) 7–10 daysparsley 34˚F (1˚C) 1–2 monthsparsnips 34˚F (1˚C) 4–5 monthspeas, pods and shelled 34˚F (1˚C) 7–10 dayspeppers, bell* 45–50˚F (7–10˚C) 12–18 dayspeppers, chile 45–50˚F (7–10˚C) 2–3 weeks
*Sensitive to chill injury, a cause of spoilage. Damage may not be apparent until the vegetable is returned to a warmer temperature.
NOTE: See food preservation guide for complete instructions on freezing vegetables. Recommended freezer storage temperature is 0˚F (-18˚C).
Recommended Storage Life Temperature (refrigerator) Comments
Wash vegetables in cool water and drain. Store in airtightcontainer or plastic wrap.
Most vegetables should be stored in higher humidity.
Discard any fresh vegetables that are moldy or have other signsof spoilage and wipe out the refrigerator compartment.
For fresh-cut produce, follow storage directions on package.
Refer to the list of ethylene sensitive and ethylene producingvegetables and fruits.
31
FOOD STORAGE R E C O M M E N D AT I O N S
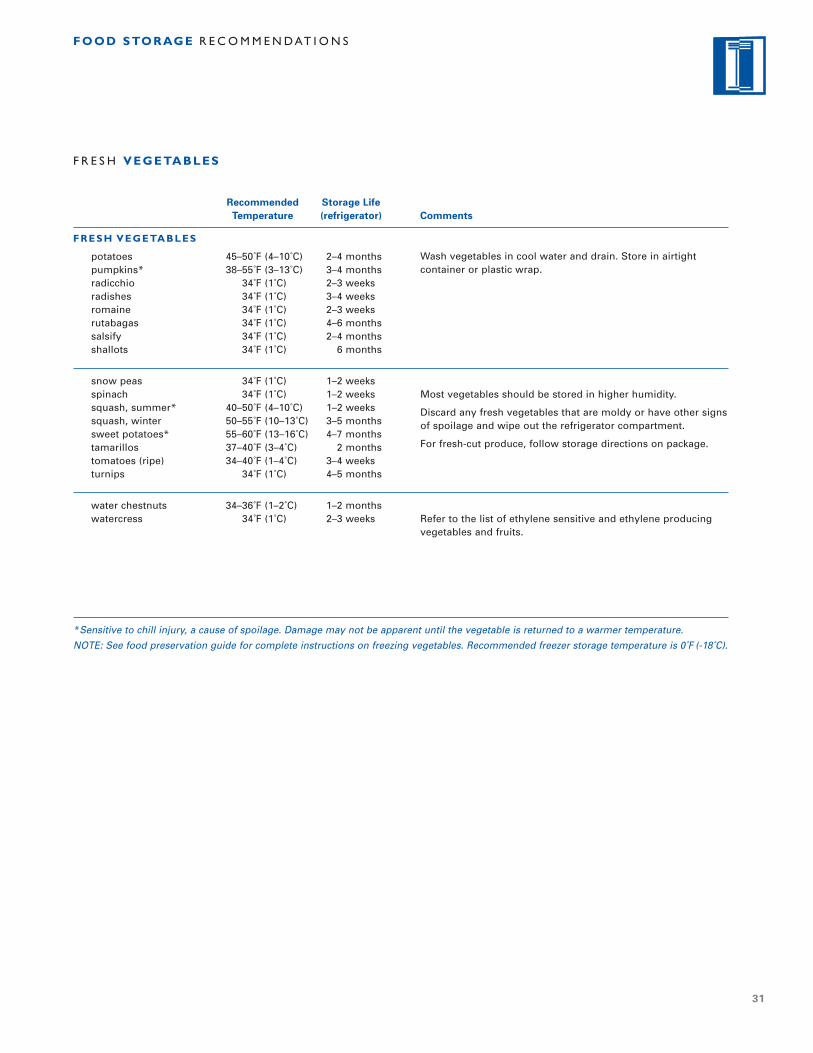
FRESH VEGETABLES
potatoes 45–50˚F (4–10˚C) 2–4 monthspumpkins* 38–55˚F (3–13˚C) 3–4 monthsradicchio 34˚F (1˚C) 2–3 weeksradishes 34˚F (1˚C) 3–4 weeksromaine 34˚F (1˚C) 2–3 weeksrutabagas 34˚F (1˚C) 4–6 monthssalsify 34˚F (1˚C) 2–4 monthsshallots 34˚F (1˚C) 6 months
snow peas 34˚F (1˚C) 1–2 weeksspinach 34˚F (1˚C) 1–2 weekssquash, summer* 40–50˚F (4–10˚C) 1–2 weekssquash, winter 50–55˚F (10–13˚C) 3–5 monthssweet potatoes* 55–60˚F (13–16˚C) 4–7 monthstamarillos 37–40˚F (3–4˚C) 2 monthstomatoes (ripe) 34–40˚F (1–4˚C) 3–4 weeksturnips 34˚F (1˚C) 4–5 months
water chestnuts 34–36˚F (1–2˚C) 1–2 monthswatercress 34˚F (1˚C) 2–3 weeks
*Sensitive to chill injury, a cause of spoilage. Damage may not be apparent until the vegetable is returned to a warmer temperature.
NOTE: See food preservation guide for complete instructions on freezing vegetables. Recommended freezer storage temperature is 0˚F (-18˚C).
Recommended Storage Life Temperature (refrigerator) Comments
Wash vegetables in cool water and drain. Store in airtightcontainer or plastic wrap.
Most vegetables should be stored in higher humidity.
Discard any fresh vegetables that are moldy or have other signsof spoilage and wipe out the refrigerator compartment.
For fresh-cut produce, follow storage directions on package.
Refer to the list of ethylene sensitive and ethylene producingvegetables and fruits.
F R E S H VEGETABLES
32
FOOD STORAGE R E C O M M E N D AT I O N S
F R E S H FRUITS
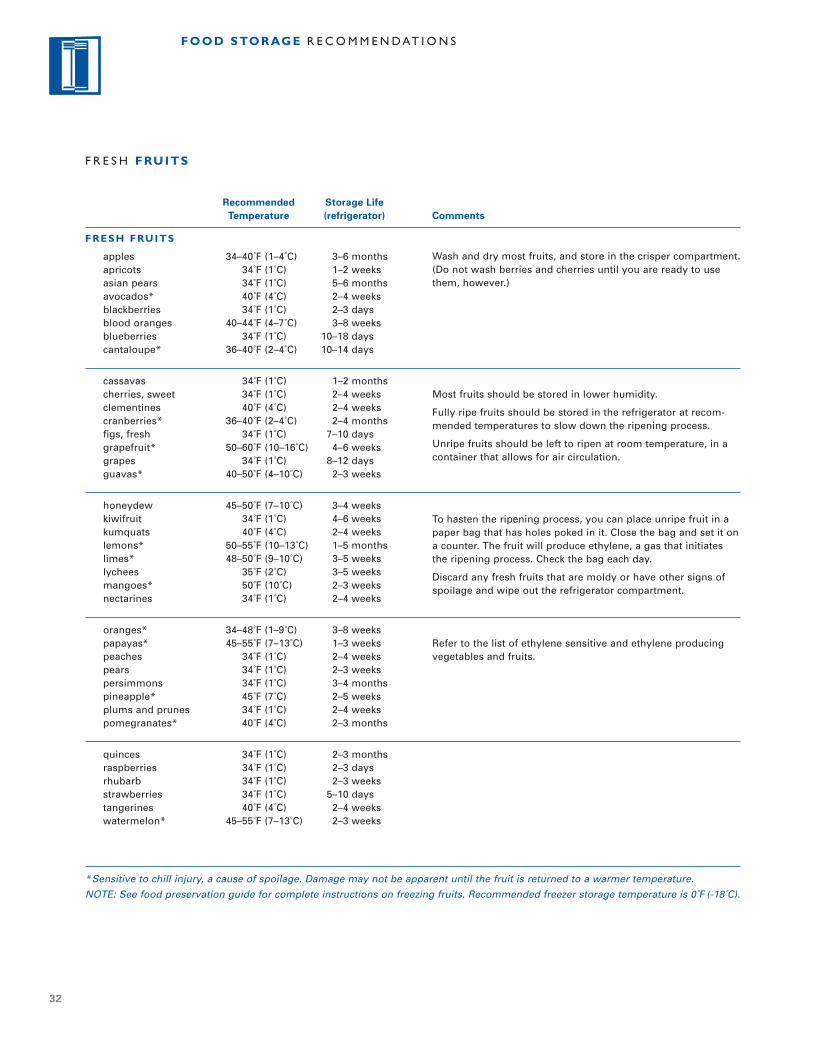
FRESH FRUITS
apples 34–40˚F (1–4˚C) 3–6 monthsapricots 34˚F (1˚C) 1–2 weeksasian pears 34˚F (1˚C) 5–6 monthsavocados* 40˚F (4˚C) 2–4 weeksblackberries 34˚F (1˚C) 2–3 daysblood oranges 40–44˚F (4–7˚C) 3–8 weeksblueberries 34˚F (1˚C) 10–18 dayscantaloupe* 36–40˚F (2–4˚C) 10–14 days
cassavas 34˚F (1˚C) 1–2 monthscherries, sweet 34˚F (1˚C) 2–4 weeksclementines 40˚F (4˚C) 2–4 weekscranberries* 36–40˚F (2–4˚C) 2–4 monthsfigs, fresh 34˚F (1˚C) 7–10 daysgrapefruit* 50–60˚F (10–16˚C) 4–6 weeksgrapes 34˚F (1˚C) 8–12 daysguavas* 40–50˚F (4–10˚C) 2–3 weeks
honeydew 45–50˚F (7–10˚C) 3–4 weekskiwifruit 34˚F (1˚C) 4–6 weekskumquats 40˚F (4˚C) 2–4 weekslemons* 50–55˚F (10–13˚C) 1–5 monthslimes* 48–50˚F (9–10˚C) 3–5 weekslychees 35˚F (2˚C) 3–5 weeksmangoes* 50˚F (10˚C) 2–3 weeksnectarines 34˚F (1˚C) 2–4 weeks
oranges* 34–48˚F (1–9˚C) 3–8 weekspapayas* 45–55˚F (7–13˚C) 1–3 weekspeaches 34˚F (1˚C) 2–4 weekspears 34˚F (1˚C) 2–3 weekspersimmons 34˚F (1˚C) 3–4 monthspineapple* 45˚F (7˚C) 2–5 weeksplums and prunes 34˚F (1˚C) 2–4 weekspomegranates* 40˚F (4˚C) 2–3 months
quinces 34˚F (1˚C) 2–3 monthsraspberries 34˚F (1˚C) 2–3 daysrhubarb 34˚F (1˚C) 2–3 weeksstrawberries 34˚F (1˚C) 5–10 daystangerines 40˚F (4˚C) 2–4 weekswatermelon* 45–55˚F (7–13˚C) 2–3 weeks
*Sensitive to chill injury, a cause of spoilage. Damage may not be apparent until the fruit is returned to a warmer temperature.
NOTE: See food preservation guide for complete instructions on freezing fruits. Recommended freezer storage temperature is 0˚F (-18˚C).
Recommended Storage Life Temperature (refrigerator) Comments
Wash and dry most fruits, and store in the crisper compartment.(Do not wash berries and cherries until you are ready to usethem, however.)
Most fruits should be stored in lower humidity.
Fully ripe fruits should be stored in the refrigerator at recom-mended temperatures to slow down the ripening process.
Unripe fruits should be left to ripen at room temperature, in acontainer that allows for air circulation.
To hasten the ripening process, you can place unripe fruit in apaper bag that has holes poked in it. Close the bag and set it ona counter. The fruit will produce ethylene, a gas that initiatesthe ripening process. Check the bag each day.
Discard any fresh fruits that are moldy or have other signs ofspoilage and wipe out the refrigerator compartment.
Refer to the list of ethylene sensitive and ethylene producingvegetables and fruits.
33
DELI FOODS, DAIRY PRODUCTS A N D OT H E R FOODS
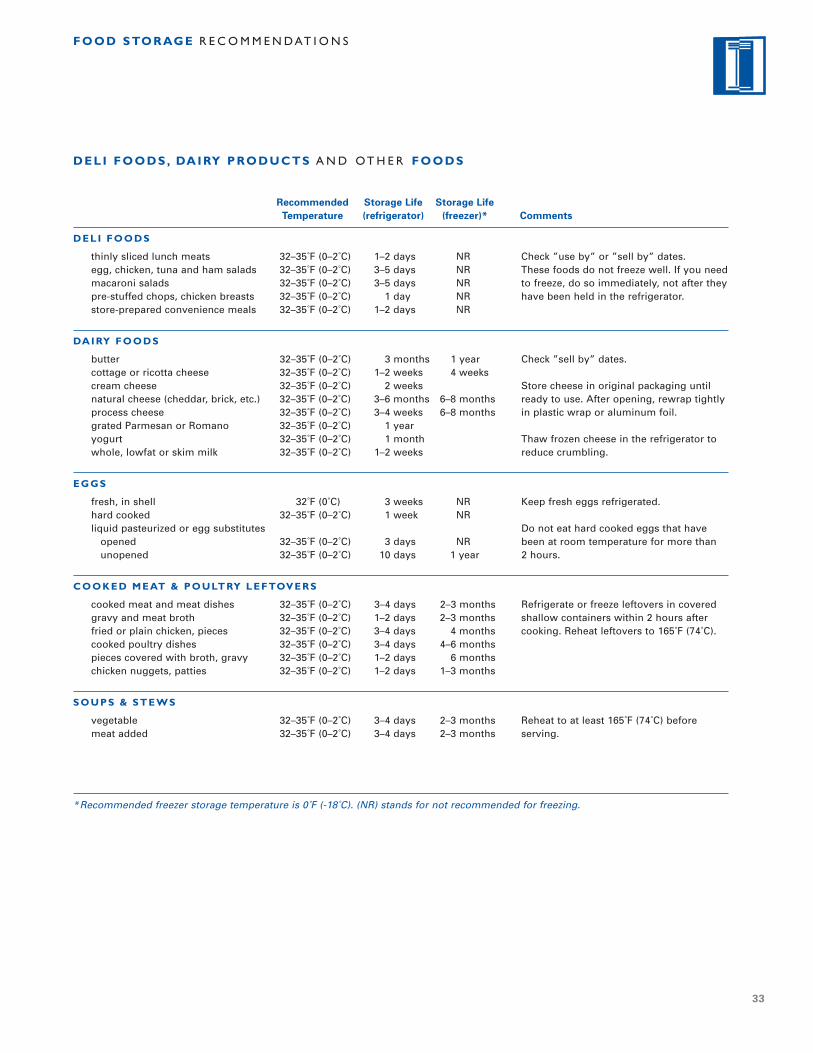
DELI FOODS
thinly sliced lunch meats 32–35˚F (0–2˚C) 1–2 days NR Check ”use by” or ”sell by” dates.egg, chicken, tuna and ham salads 32–35˚F (0–2˚C) 3–5 days NR These foods do not freeze well. If you needmacaroni salads 32–35˚F (0–2˚C) 3–5 days NR to freeze, do so immediately, not after theypre-stuffed chops, chicken breasts 32–35˚F (0–2˚C) 1 day NR have been held in the refrigerator.store-prepared convenience meals 32–35˚F (0–2˚C) 1–2 days NR
DAIRY FOODS
butter 32–35˚F (0–2˚C) 3 months 1 year Check ”sell by” dates.cottage or ricotta cheese 32–35˚F (0–2˚C) 1–2 weeks 4 weekscream cheese 32–35˚F (0–2˚C) 2 weeks Store cheese in original packaging untilnatural cheese (cheddar, brick, etc.) 32–35˚F (0–2˚C) 3–6 months 6–8 months ready to use. After opening, rewrap tightlyprocess cheese 32–35˚F (0–2˚C) 3–4 weeks 6–8 months in plastic wrap or aluminum foil.grated Parmesan or Romano 32–35˚F (0–2˚C) 1 yearyogurt 32–35˚F (0–2˚C) 1 month Thaw frozen cheese in the refrigerator towhole, lowfat or skim milk 32–35˚F (0–2˚C) 1–2 weeks reduce crumbling.
EGGS
fresh, in shell 32˚F (0˚C) 3 weeks NR Keep fresh eggs refrigerated.hard cooked 32–35˚F (0–2˚C) 1 week NRliquid pasteurized or egg substitutes Do not eat hard cooked eggs that have
opened 32–35˚F (0–2˚C) 3 days NR been at room temperature for more thanunopened 32–35˚F (0–2˚C) 10 days 1 year 2 hours.
COOKED MEAT & POULTRY LEFTOVERS
cooked meat and meat dishes 32–35˚F (0–2˚C) 3–4 days 2–3 months Refrigerate or freeze leftovers in coveredgravy and meat broth 32–35˚F (0–2˚C) 1–2 days 2–3 months shallow containers within 2 hours afterfried or plain chicken, pieces 32–35˚F (0–2˚C) 3–4 days 4 months cooking. Reheat leftovers to 165˚F (74˚C).cooked poultry dishes 32–35˚F (0–2˚C) 3–4 days 4–6 monthspieces covered with broth, gravy 32–35˚F (0–2˚C) 1–2 days 6 monthschicken nuggets, patties 32–35˚F (0–2˚C) 1–2 days 1–3 months
SOUPS & STEWS
vegetable 32–35˚F (0–2˚C) 3–4 days 2–3 months Reheat to at least 165˚F (74˚C) beforemeat added 32–35˚F (0–2˚C) 3–4 days 2–3 months serving.
*Recommended freezer storage temperature is 0˚F (-18˚C). (NR) stands for not recommended for freezing.
Recommended Storage Life Storage LifeTemperature (refrigerator) (freezer)* Comments
FOOD STORAGE R E C O M M E N D AT I O N S
34
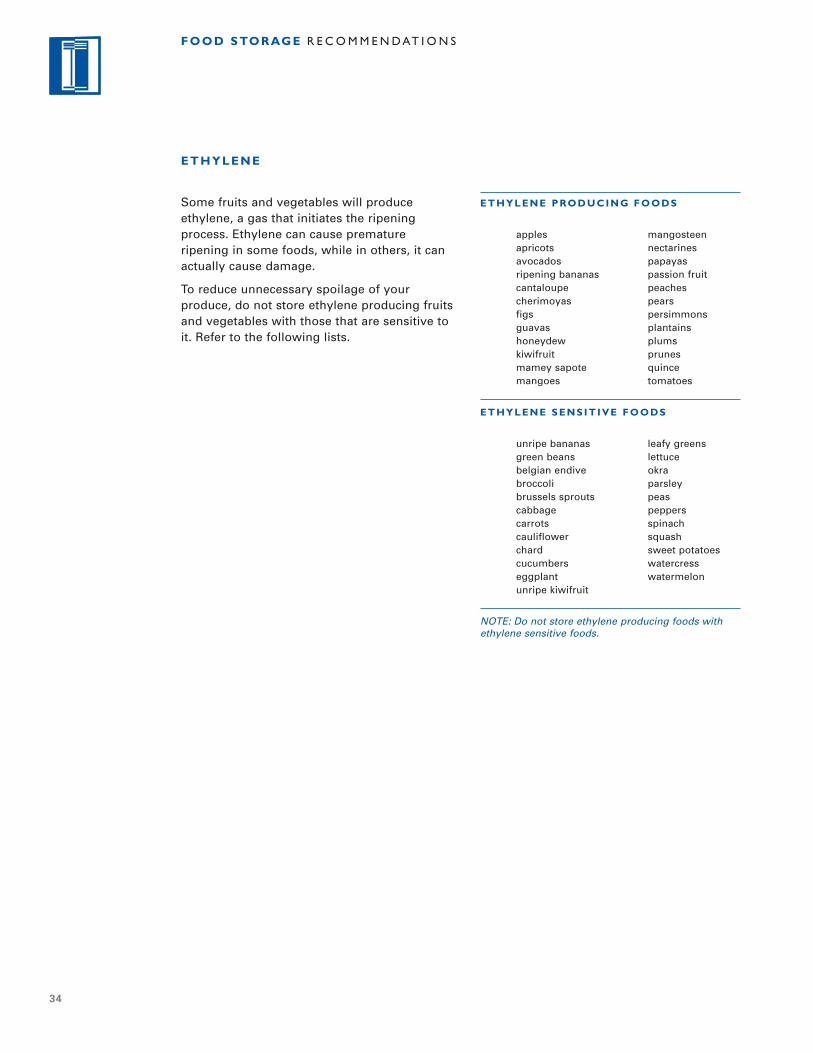
ETHYLENE PRODUCING FOODS
apples mangosteenapricots nectarinesavocados papayasripening bananas passion fruitcantaloupe peachescherimoyas pearsfigs persimmonsguavas plantainshoneydew plumskiwifruit prunesmamey sapote quincemangoes tomatoes
ETHYLENE SENSITIVE FOODS
unripe bananas leafy greensgreen beans lettucebelgian endive okrabroccoli parsleybrussels sprouts peascabbage pepperscarrots spinachcauliflower squashchard sweet potatoescucumbers watercresseggplant watermelonunripe kiwifruit
NOTE: Do not store ethylene producing foods withethylene sensitive foods.
ETHYLENE
Some fruits and vegetables will produceethylene, a gas that initiates the ripeningprocess. Ethylene can cause prematureripening in some foods, while in others, it canactually cause damage.
To reduce unnecessary spoilage of yourproduce, do not store ethylene producing fruitsand vegetables with those that are sensitive toit. Refer to the following lists.
FOOD STORAGE R E C O M M E N D AT I O N S
35
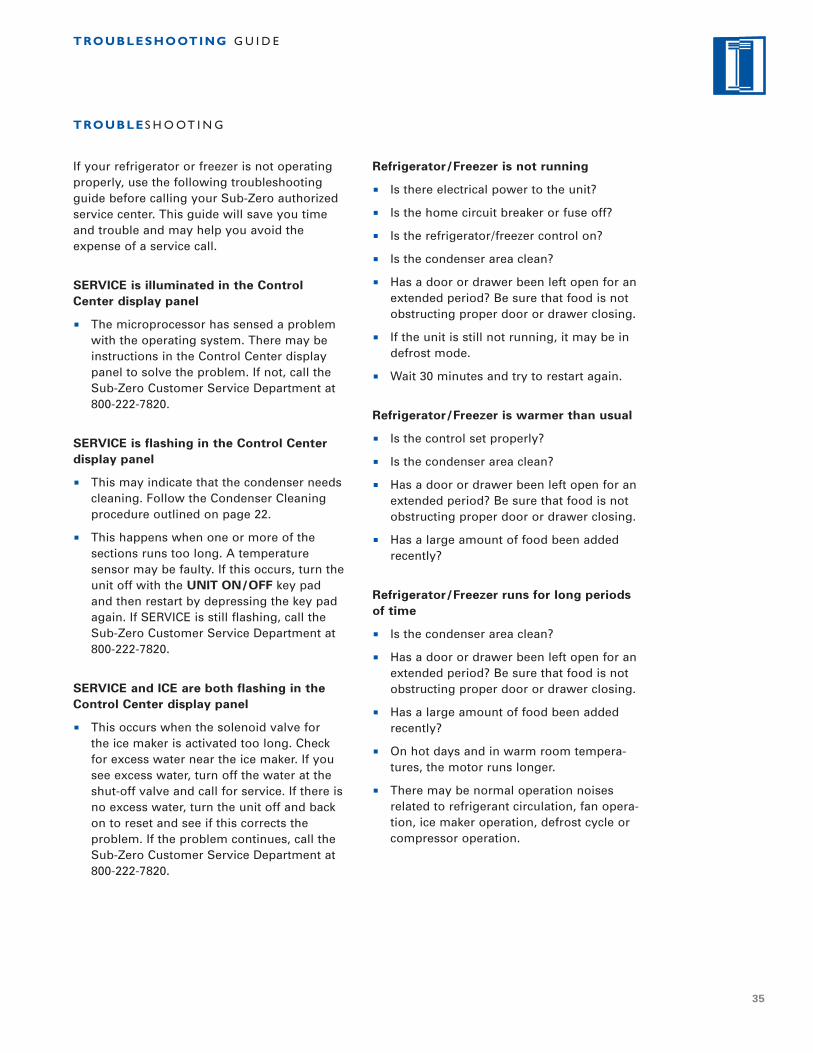
TROUBLES H O OT I N G
If your refrigerator or freezer is not operatingproperly, use the following troubleshootingguide before calling your Sub-Zero authorizedservice center. This guide will save you timeand trouble and may help you avoid theexpense of a service call.
SERVICE is illuminated in the ControlCenter display panel
The microprocessor has sensed a problemwith the operating system. There may beinstructions in the Control Center displaypanel to solve the problem. If not, call theSub-Zero Customer Service Department at800-222-7820.
SERVICE is flashing in the Control Centerdisplay panel
This may indicate that the condenser needscleaning. Follow the Condenser Cleaningprocedure outlined on page 22.
This happens when one or more of thesections runs too long. A temperaturesensor may be faulty. If this occurs, turn theunit off with the UNIT ON/OFF key padand then restart by depressing the key padagain. If SERVICE is still flashing, call theSub-Zero Customer Service Department at800-222-7820.
SERVICE and ICE are both flashing in theControl Center display panel
This occurs when the solenoid valve forthe ice maker is activated too long. Checkfor excess water near the ice maker. If yousee excess water, turn off the water at theshut-off valve and call for service. If there isno excess water, turn the unit off and backon to reset and see if this corrects theproblem. If the problem continues, call theSub-Zero Customer Service Department at800-222-7820.
Refrigerator/Freezer is not running
Is there electrical power to the unit?
Is the home circuit breaker or fuse off?
Is the refrigerator/freezer control on?
Is the condenser area clean?
Has a door or drawer been left open for anextended period? Be sure that food is notobstructing proper door or drawer closing.
If the unit is still not running, it may be indefrost mode.
Wait 30 minutes and try to restart again.
Refrigerator/Freezer is warmer than usual
Is the control set properly?
Is the condenser area clean?
Has a door or drawer been left open for anextended period? Be sure that food is notobstructing proper door or drawer closing.
Has a large amount of food been addedrecently?
Refrigerator/Freezer runs for long periodsof time
Is the condenser area clean?
Has a door or drawer been left open for anextended period? Be sure that food is notobstructing proper door or drawer closing.
Has a large amount of food been addedrecently?
On hot days and in warm room tempera-tures, the motor runs longer.
There may be normal operation noisesrelated to refrigerant circulation, fan opera-tion, ice maker operation, defrost cycle orcompressor operation.
TROUBLESHOOTING G U I D E
36
There is no ice
Is the ice bucket in position?
Is the ice maker turned on?
Is SERVICE ICE flashing in the ControlCenter display panel? See Visual ServiceDisplay, page 13.
Is the water supply connected?
There is an odor inside the unit
Clean the unit thoroughly.
Cover all food tightly.
Clean the unit drain pipe.
Clean the drain pan.
Light bulb needs to be replaced
See Lighting Information, page 24.
You need product information
Call the Sub-Zero Customer Service Depart-ment at 800-222-7820 or visit our website,subzero.com, for planning, installation andproduct information.
You need service
Check the model and serial number ofyour unit on the plate located at the top ofthe side frame, inside the unit, close to thehinge. Call your Sub-Zero authorizedservice center, contact your dealer or theSub-Zero Customer Service Department,P. O. Box 44130, Madison, WI 53744-4130,800-222-7820. You may also check theservice center locator on our website,subzero.com.
TROUBLES H O OT I N G
Refrigerator/Freezer is frosted up
Has a door or drawer been left open for anextended period? Be sure that food is notobstructing proper door or drawer closing.
Are door(s) and/or drawer closing andsealing properly? Contact your dealer ifdoor(s) are not adjusted properly. NOTE:When opening the freezer drawer, you maynotice a side-to-side motion in the drawer.This motion is normal, with the tolerancebuilt into the drawer slides. When thedrawer is closed it will automatically adjustand close with correct alignment.
You hear unusual noises
These noises may be normal operatingsounds related to refrigerant circulation, fanoperation, ice maker operation, defrostcycle or compressor operation. Noises maybe more noticeable when door(s) are open.
You hear occasional buzzing
Is the water supply connected to ice makerand turned on?
Condensation forms inside the unit
This is normal during periods of higherhumidity (summer) and with frequent dooropenings.
Are door(s) and/or drawer closing andsealing properly?
Condensation forms outside the unit
During periods of high humidity, somecondensation may appear on outsidesurfaces. The condensation will disappearwhen the humidity drops. Be sure thatdoor(s) and/or drawer are closing andsealing properly. If condensation persists,contact your Sub-Zero authorized servicecenter.
Outside of the freezer section heats up
Clean the condenser area.
TROUBLESHOOTING G U I D E
Shut off power to the unit at the circuitbreaker before replacing light bulbs. Wearprotective gloves when handling bulbs.
37
T E M P E R AT U R E
IMPORTANT NOTE: Unless the unit is beingserviced, make sure the power for your unit ison. If the unit is not on, OFF will be visible inthe Control Center display panel.
Q: How do I adjust the temperatures?
A: To adjust temperatures, refer to Tempera-ture Control, page 12.
Q: What are the suggested temperaturesettings?
A: The recommended settings are 38˚F (3˚C)for the refrigerator section and 0˚F(-18˚C) for the freezer section.
Q: Condensation is forming on the inside andoutside of my unit.
A: In climates with higher humidity, condensa-tion will form and is considered normal.Leaving the door open for a long period oftime may also contribute to condensationforming on the inside your unit.
Q: My unit isn’t cooling properly.
A: Clean the condenser area as outlined onpage 22.
D O O R O P E R AT I O N
Q: Why is my door hard to open?
A: Your unit was designed for an airtight seal.A vacuum seal can form after the door isclosed. Wait several seconds for pressure toequalize before reopening the door.
Q: The door on my unit is opening too fast andhitting the wall or surrounding cabinets.
A: The unit may not be leveled properly or adoor stop may be required. Contact yourSub-Zero dealer for details on the doorstop kit.
F R E Q U E N T LY A S K E D QUESTIONS
I C E P R O D U C T I O N
IMPORTANT NOTE: Make sure that the poweris on for your ice maker. ICE will be visible inthe Control Center display panel.
IMPORTANT NOTE: Dispose of the first bucketof ice produced by your new unit to ensurethat pipe residue or other particles associatedwith new water lines are not consumed.
Q: My ice maker isn’t producing very much ice.
A: On average, you can expect a cycle of ice(eight cubes per cycle) every two hours.
Q: My ice is freezing together and clumping.
A: If ice is not used regularly it tends to fusetogether. You may need to discard the iceand allow ice to be replenished.
Q: My ice tastes funny and is discolored.
A: Sub-Zero Built-In units do not have anintegrated water filtration system. Contact alocal plumber to discuss water filtrationoptions.
N O I S E
Q: Why do I hear my unit running constantly?
A: It is normal to hear the operation of fansand motors. Sounds will be accentuatedbased on the placement of the unit andoverall room design.
TROUBLESHOOTING G U I D E
38
SERVICE I N F O R M AT I O N
This Use & Care Information book gives youthe tools necessary to preserve food atoptimum quality in your Built-In unit. Keepdoors and drawers closed as much as possiblewhenever the unit is operating.
If you do need service, be sure to have themodel and serial number when you call. You’llfind these numbers on the model and serialnumber plate located at the top of the sideframe, inside the unit, close to the hinge. Forwarranty purposes, you will also need the dateof installation and the name of your Sub-Zerodealer. Record this information below forfuture reference.
Model Number
Serial Number
Installation Date
Sub-Zero Authorized Service Center and Phone
Sub-Zero Dealer and Phone
B E F O R E C A L L I N G F O R S E RV I C E
Before calling a Sub-Zero authorized servicecenter, refer to the Troubleshooting Guide onpages 35–37. Check the household fuse orcircuit breaker to see if it has been blown ortripped and that the electrical connection tothe appliance has not been disconnected.A power outage may also have caused adisruption in service.
P R O D U C T R E G I S T R AT I O N
Register your new Sub-Zero today so that wemay ensure your satisfaction. You may registerby one of the following options:
1) Mail in the completed Sub-Zero ProductRegistration Card.
2) Register online at subzero.com.
3) Register by phone by calling the Sub-ZeroCustomer Service Department at800-222-7820.
The model and serial numbers of your unitare printed on the enclosed Sub-Zero ProductRegistration Card. If you provide us with youre-mail address, we will send you exciting newproduct updates and recipes as they becomeavailable, along with information on specialevents.
SERVICE I N F O R M AT I O N
C O N TA C TI N F O R M AT I O N
Sub-ZeroCustomer Service:800-222-7820
Website:subzero.com
The information and images in this guide are thecopyright property of Sub-Zero Freezer Company,Inc. Neither this book nor any information orimages contained herein may be copied or usedin whole or in part without the express writtenpermission of Sub-Zero Freezer Company, Inc.
©Sub-Zero Freezer Company, Inc. all rightsreserved.
S U B - Z E R O F R E E Z E R C O M PA N Y P R O D U C T S
L I M I T E D W A R R A N T Y
RESIDENTIAL USE ONLY
FULL FIVE YEAR SEALED SYSTEM WARRANTY
LIMITED SIXTH THROUGH TWELFTH YEAR WARRANTY ON THE SEALED SYSTEM
FULL TWO YEAR WARRANTY ON TOTAL PRODUCT*
FULL FIVE YEAR SEALED SYSTEM WARRANTY
For five years from the date of original installation, your Sub-Zero warranty covers all parts and laborto repair or replace any components that prove to be defective in materials or workmanship in thesealed system. The sealed system consists of the compressor, condenser, evaporator, drier and allconnecting tubing.
FULL TWO YEAR WARRANTY*
For two years from the date of original installation, your Sub-Zero warranty covers all parts andlabor to repair or replace any part of the product, that proves to be defective in materials or work-manship.
LIMITED SIXTH THROUGH TWELFTH YEAR SEALED SYSTEM WARRANTY
From the 6th through the 12th year from the date of original installation, your Sub-Zero warrantycovers all parts that prove to be defective in materials or workmanship in the sealed system (partsonly). The sealed system consists of the compressor, condenser, evaporator, drier and all connectingtubing.
TERMS APPLICABLE TO EACH WARRANTY
All service provided by Sub-Zero under the above warranty must be performed by an authorizedSub-Zero service center, unless otherwise specified by Sub-Zero. Service will be provided in thehome during the normal business hours. This warranty applies only to products installed for normalresidential use. Details regarding a non-residential warranty are available upon request.
The warranty applies only to products installed in any one of the fifty states of the United States, theDistrict of Columbia or the ten provinces of Canada. This warranty does not cover any parts or laborto correct any defect caused by negligence, accident or improper use, maintenance, installation,service or repair, including but not limited to improper removal and reinstallation (whether in the unitor at a remote location) of the condensing unit.
THE REMEDIES DESCRIBED ABOVE FOR EACH WARRANTY ARE THE ONLY ONES THATSUB-ZERO WILL PROVIDE, EITHER UNDER THESE WARRANTIES OR UNDER ANY WARRANTYARISING BY OPERATION OF LAW. SUB-ZERO WILL NOT BE RESPONSIBLE FOR ANY CONSE-QUENTIAL OR INCIDENTAL DAMAGES ARISING FROM THE BREACH OF THESE WARRANTIESOR ANY OTHER WARRANTIES, WHETHER EXPRESS, IMPLIED OR STATUTORY.
Some states do not allow the exclusion or limitation of incidental or consequential damages, so theabove limitation or exclusion may not apply to you. This warranty gives you specific legal rights andyou may also have other legal rights, which vary from state to state.
To receive parts and/or service and the name of the Sub-Zero authorized service center nearest you,contact your Sub-Zero dealer, distributor or Sub-Zero Freezer Company, Customer Service Depart-ment, P.O. Box 44130, Madison Wisconsin, 53744-4130; check the Locator section of our website,subzero.com, or call 800-222-7820.
*Stainless Steel (classic, platinum and carbon) doors, panels, product frames and stainless interiorsurfaces are covered by a limited 60 day parts and labor warranty for cosmetic defects.
*Replacement water filter cartridges are not covered by the product warranty.
39
3 7 5 8 6 8 0 9 / 2 0 0 5
S U B - Z E R O F R E E Z E R C O M PA N Y, I N C . P. O. B OX 4 4 1 3 0 M A D I S O N , W I 5 3 7 4 4 - 4 1 3 0 8 0 0 - 2 2 2 - 7 8 2 0 S U B Z E R O. C O M