4.1 Version · - HTML compression or not in your Prestashop store. - Active and in stock items...
23
4.1 Version What is PC Creator Module? PC Creator Module is a computer configurator, also known as PC a la carte or personalized. Installing this module you will be able to configure the whole hardware for many computers, selecting products from your store. The customer can generate the computer cost in real time through a dynamic Budget and this way; get a static link for social sharing or loading all selected items to your store cart. The Budget generated by visitors is dynamic; it will always keep prices up to date, taking them from your store database. Standard Logics for configuration The module allows configuring six required components and 19 optional. The required components will depend on the options configured for each of them. For example, a motherboard will depend on a certain processor, etc. Required Components: - Socket base - Processor - Motherboard - RAM Memory - Hard Disk - Cabinet or Case Optional Components: - Cooler - Secondary Hard Disk - Power Supply - Graphic Card - Sound Card - Frontal Card Reader - DVD / CD Recorder - CD / DVD Reader - Screen - Keyboard - Mouse - Speakers - TV Card - NET / WIFI Adapters - Electric Protection - Web Cam - Earphones/ Microphone - Printer - Operating System As an optional, you can add a cost for technical support and computer assembling; this amount will be shown in the page containing the generated Budget and the customer can choose between hiring assembling or not; in case he does, the amount will be added to the total Budget.
-
Upload
trinhthuan -
Category
Documents
-
view
220 -
download
0
Transcript of 4.1 Version · - HTML compression or not in your Prestashop store. - Active and in stock items...
4.1 Version
What is PC Creator Module?
PC Creator Module is a computer configurator, also known as PC a la carte or personalized.
Installing this module you will be able to configure the whole hardware for many computers, selecting products
from your store.
The customer can generate the computer cost in real time through a dynamic Budget and this way; get a static link
for social sharing or loading all selected items to your store cart.
The Budget generated by visitors is dynamic; it will always keep prices up to date, taking them from your store
database.
Standard Logics for configuration
The module allows configuring six required components and 19 optional.
The required components will depend on the options configured for each of them. For example, a motherboard will
depend on a certain processor, etc.
Required Components:
- Socket base
- Processor
- Motherboard
- RAM Memory
- Hard Disk
- Cabinet or Case
Optional Components:
- Cooler
- Secondary Hard Disk
- Power Supply
- Graphic Card
- Sound Card
- Frontal Card Reader
- DVD / CD Recorder
- CD / DVD Reader
- Screen
- Keyboard
- Mouse
- Speakers
- TV Card
- NET / WIFI Adapters
- Electric Protection
- Web Cam
- Earphones/ Microphone
- Printer
- Operating System
As an optional, you can add a cost for technical support and computer assembling; this amount will be shown in the
page containing the generated Budget and the customer can choose between hiring assembling or not; in case he
does, the amount will be added to the total Budget.

Configuration Helper
Many visitors may not have much knowledge about hardware, and that´ s why they do not know which computer is
the best for them. For this reason the module allows to implement a second page called “Configuration Helper”;
this one must be activated and configured by the store administrator; in it, all different pre-configured computers
for every possible use will be loaded, for example:
You can create a computer for Video Games and load all products related to this kind of computer, whenever the
customer selects “Video Games” the module will list all items which are part of the computer, showing the button
to generate budget in just one click. You can create as many uses as you think convenient, the more you create the
more possibilities to find the use your customer or visitor is looking for, for example:
- Sound
- Video
- Graphics
- Design
- Programming
- Home
- Commerce
- Etc.
Remember that robots and browsers will index all options.
The module is optimized for working under the following conditions:
- SEO for each page
- SEO for every generated Budget
- Active or not cache in your Prestashop store.
- Friendly or not URLs in your Prestashop store.
- Active or not Multi-Shop in your Prestashop store.
- JavaScript code compression or not in your Prestashop store.
- HTML compression or not in your Prestashop store.
- Active and in stock items listing in your Prestashop store.
- Budget Deleting by administrator.
- Full Text Management and edition by administrator.
- Box image management and edition.
- “Read more” links to the product page will be generated with attributes if the item had any.
Brief Configuration details:
Once the module is uploaded to your store, using FTP or Prestashop installer, proceed installing the module:
1 – Installing the module:
2 – Module´s administration area:
Once the module is installed, enter its configuration area by clicking “Configure”

3 - Different module areas description:
Once you entered the module´s administration area, you will find the page Home; in the following image you will
notice its main components:
Watch every point shown in the image, next, every function of these is explained:
Section 1:
Language bar, if your store has more than one active language, you can use this tool to configure computers for
every one of them. It is very simple to use and do not need further explanations to understand its use
Notice: In the image you can see a store with just one active language; this tool is useful only in stores which have
more than one language.
Section 2:
Category selector, this tool has been added in order to improve the module´s performance and is thought for using
in stores which have many active products.
It is important you understand how it Works, to avoid overloading the server when listing items in the different
configuration areas selectors
The module´s selectors will list all active products in your store; if your store has many products to list, for example,
more than 100 items, this can delay loading selectors. For this reason it is advisable you select from the module´s
home page, which category you will use in the configuration area. You can change category also inside the
configuration area you are using.
You can see then how to configure a computer in order to understand the use for the filter mentioned in this
point.
Section 3:
In this area you will find all budgets generated by customers or visitors. From this list you can watch budgets or
delete them. Remember budgets are thought to have a perpetual life in your store.
All amounts and prices of the generated budgets will be always up to date, for it gets prices directly from the store
and generates dynamically the total Budget. This way budgets can be shared in social nets or using direct links by
visitors or customers.

Important:
- If you delete a Budget, link to that Budget will display the Prestashop error 404 page.
- If you delete a product which is part of a budget, the customer or visitor will be notify that the item is no
longer available, and will be asked to generate a new budget.
- If a product which is part of a Budget is not active or is out of stock, the Budget page will show the item,
but if it is loaded to the cart, Prestashop will display the message Product not in stock. This will depend on
your store´s configuration, if you chose to allow purchasing items not in stock; this message will not be
shown in the shopping cart.
Section 4:
In this point, you will enter the General Configuration; in this area you can configure two modes which are not
active by default, these are:
- Charge for computer assembling,
- Show the Help Page, this option prints one or more pre-configured computers including all the
components.
These options are created only when you enter this area for the first time, therefore the module may ask you to
confirm this action displaying the following message:
“Please enter working language again to generate this configuration.”
As shown in the following image:
Just click the Language Flag. At that time, all necessary instances for this section will be created.
Once the language is loaded, it will display the following configuration form:
Where every marked point corresponds to the following:
1-a: You can choose showing the Configuration Helper Page.
By default the instance is created using the mode “Yes”.
This means that:

It creates all links necessary for the customer and descriptions for every page.
2-b: If you want to charge an amount for assembling and configuration of the computer the customer configures,
you must create an item in your store which will contain this amount. Then go back to this area and enter the
product ID in this field.
If you do not want to charge this service leave the ID value in “0” zero.
Notice: You can add this amount whenever you want to, it will take effects even in already generated budgets.
3-c: These are the module´s Help bubbles; you will find these helps in all form fields which need it. Clicking them, a
pop-up window will appear, containing help regarding the section you are in.
As shown in the following image:
Section 5:
“Edit Information”, from this section you can configure all text shown to the customer and browsers. You can even
modify the image that is shown in the module box in your store front page.

This point is very simple to understand, as you can watch in the image every field has its correspondent help which
will make easy to comprehend every data to be edited.
Note:
This information is created by default when installing the module and is fully editable once installed. Must
remember that information will be added for every language and will have to edit it in every corresponding
language, for this, you can use the work language bar of the module or Prestashop´s, placed in both sides of the
form field.
If after installing this module you add more languages to your store, it will create information for the pages
dynamically using the default information, this will only be performed by the time a visitor enters one of the
module´s pages in the added language.
Section 6:
“Add Socket”, in this section you must add all socket base you will need to create all different computers.
This is the main point for all product configurations and additions, for this, it is important you add in just one time
all socket base you are going to use.
In the module´s home page all added sockets will be listed (Section 9) and from here you can edit socket names and
add items to every socket.
Section 7:
“Add Optionals”, clicking this icon you will enter the optional manager; here you can add all optional components
you want for the computers.
Optionals do not depend on sockets base or required items; that means these will be visible for all computers.
Section 8:
“Configuration Helper”, from here you can enter the pre- configured computers management area.
This tool was created to help the customer or visitor to decide which computer is the best for him. Many people
have not enough knowledge about hardware so they do not know which kind of computer fits their needs the best.

This configurator works easily and fast as much as for the customer as for the administrator.
You must create all different kinds of use the computers can have and then load all items for this use and it will
generate a list containing products related to that computer.
Important: Before creating a help computer, you must create a socket base. All computers created in this section
need to have five items minimum, these will represent a basic computer component as:
- Motherboard, RAM memory, Hard Disk, CPU, Cabinet.
The main idea is that you can add an unlimited number of items, you must remember that each product must
represent a component of the computer you are offering; although in this section the module has not a maximum
limit for the products to be added, we recommend to follow this rule:
One product = 1 component (hardware).
It is advisable not to exceed 25 items, but not excluding.
Section 9:
Added socket List
Here you will see the added socket list and from the Actions Menu of it, you will be able to:
- Edit
- Delete
- Add required
Once you create a socket, they will be listed in this section, as shown in the image:
Here a brief explanation for this module. Next we will explain step by step how to use each tool in it.
Socket Base Addition ( Step by Step):
1 – Enter the module´s admnistration área clicking “Configure”:

2 – Once you are in the administrator home page, click on “Add Socket”:
3 – In the form, enter the name for the socket you are using to create a computer, for example:
“Socket 775 Intel” then press “Save”:
4 – Once the new socket is saved, you can watch it in the module´s home page by clicking “Back to list”.

In the image you can see the socket added in the example; you can add all sockets to be used without leaving the
socket addition area and then go back to the module´s home to watch the list you created. From this list you can
edit socket, delete them and add items to them.
Required Products Addition ( Step by Step):
Required Products are:
1- CPU
2- Motherboard
3- RAM Memory
4- Hard Disk
5- Cabinet.
These products depend on the socket you select.
1 – Once you added the sockets to be used, go back to the module´s home page and there, select the category
which will contain the products for every one of the required items, for example, “CPU”.
2- Press Load Products. It is important you perform this action before entering the required area, in order to avoid
overloading the server, as previously explained.
3 – Once you loaded products to the filter, click on the icon “View” of the socket you will add ítems to:
Doing this, you will enter the required addition area.
Before to continue with this point, notice the following image and then read each section which explains every area
in it:

Point 1: Product by category loading selector.
As you can see, you can load products of other categories for every component.
Point 2: Required components toolbar. Is the beginning for the configuration, if you do not click one of this icons,
the module will not perform any action.
Point 3: Product State Bar, here you will find the number of added products to each component, independently
which category it is in.
Point 4: Name of the socket base which items will be added to for every component.
Point 5: Product dynamic selector and Product Counter only for the category it is in.
Having explained in detail the image, we go on with our example:
We will begin adding Processors to our Socket.
4 – Click the icon “CPU” in the required components bar (point 2):
Notice that when you do this, it displays in the state bar all products for this component and the button “Save”:

5 – Proceed selecting products for this component “Processors” by clicking the product selector:
Mark all products for this processor. Notice that the selector has an internal search, if the store has many products,
this tool will be very useful for you.
Once you selected all ítems press “Save”.
6 – Once saved products click again on the icon “Processors” to list ítems loaded to it.

Note: If you want to delete a product, just click on the product selector, delete it and save again.
Repeat the same steps to load products for each component, remember you can change the category from the
filter without leaving this area.
Optional Products Addition (Step by step):
Optional components allowed by the module are:
- Cooler
- Secondary Hard Disk
- Power Supply
- Graphic Card
- Sound Card
- Front Card Reader
- DVD / CD Recorder
- CD / DVD Reader
- Screen
- Keyboard
- Mouse
- Speakers
- TV Card
- NET / WIFI Adapters
- Electric Protection
- Web Cam
- Earphones / Microphone
- Printer
- Operating System
Remember before entering any configuration area, first you have to select the category which will list products for
the component you are about to add:

1 – Click on the icon “Add Optionals”:
2 – Having done this, you will enter the optional components addition area
3 – Click “Add Optionals”:

Done this you will enter the optional components load:
It Works the same as the required components area.
We continue with our example, we are going to add products to the component “Mouse”; the present explanation
is valid for all components:
4 – Click on the icon “Mouse”:
Then select all products to be added to this component and press “Save”:

Once saved, click again on the icon “Mouse” to view added products:
You can edit added products, just deleting from the selector, as explained in the point Required Products.
The procedure is the same for every optional component you want to add.
To delete a component, go to the main list and use the icon “Delete” in the list:

Creating a help Computer (Step by Step):
First Step:
Once installed the module, click on Configuration to enter the module´s working area:
Second Step:
Once there, click on “General Configuration” in the toolbar:
This zone will work
This zone will work with all active languages in your store, however it will create configuration instances only when
they are active, these instances involves database tables and other items, needed for this action. For this, if the
module didn´t create the instances, it might ask for your permission to do it when you enter, displaying the
following message:
To allow the module generate the instances, just click the toolbar and it will automatically generate configuration
points for the language you choose, if the mode Multi-shop is active in your Prestashop store, it will also create the
instances for the current shop.

This is developed this way to make the module agile and not to overload its initial installation, saving server
resources. The PC Creator module has several points that work the same way, for example, creating pages by
language, these will only be created in the customer side if the language exists and when the customer clicks on
that language.
Having explained this point we continue with our example:
Notice in this point you will find two form fields, one is a selector to activate the page “Configuration Helper” We
will explain it in this handbook.
The next field is to add the product ID of the amount to charge for the computer assembling. For further
information read the handbook related to this point.
Third Step:
Once the instance is created, the PC Creator will be activated by default. Press “Save” to apply changes and update
necessary tpl in the cache.
In Prestashop 1.5.6 versions you might have to delete cache from:
Advanced /Performance, to perform cache update.
This inconvenient happens only in 1.5.6 version and is not related to the module.
Explained this, we continue in this point.
To watch the change go to your store homepage:

If the change was applied, a new link must be displayed in the PC Creator box.
Click on the new link and will be lead to the Configuration Helper page.
Notice now the head was modified, including the PC Creator page; it has a new carousel grid containing links to
both pages:
Fourth Step:
Now we are going to add items to the Help page, for this, click on the “Configuration Helper” in the toolbar:
When entering this section, you will find an empty list and addition buttons, click on the button “Help Computer
Addition”.
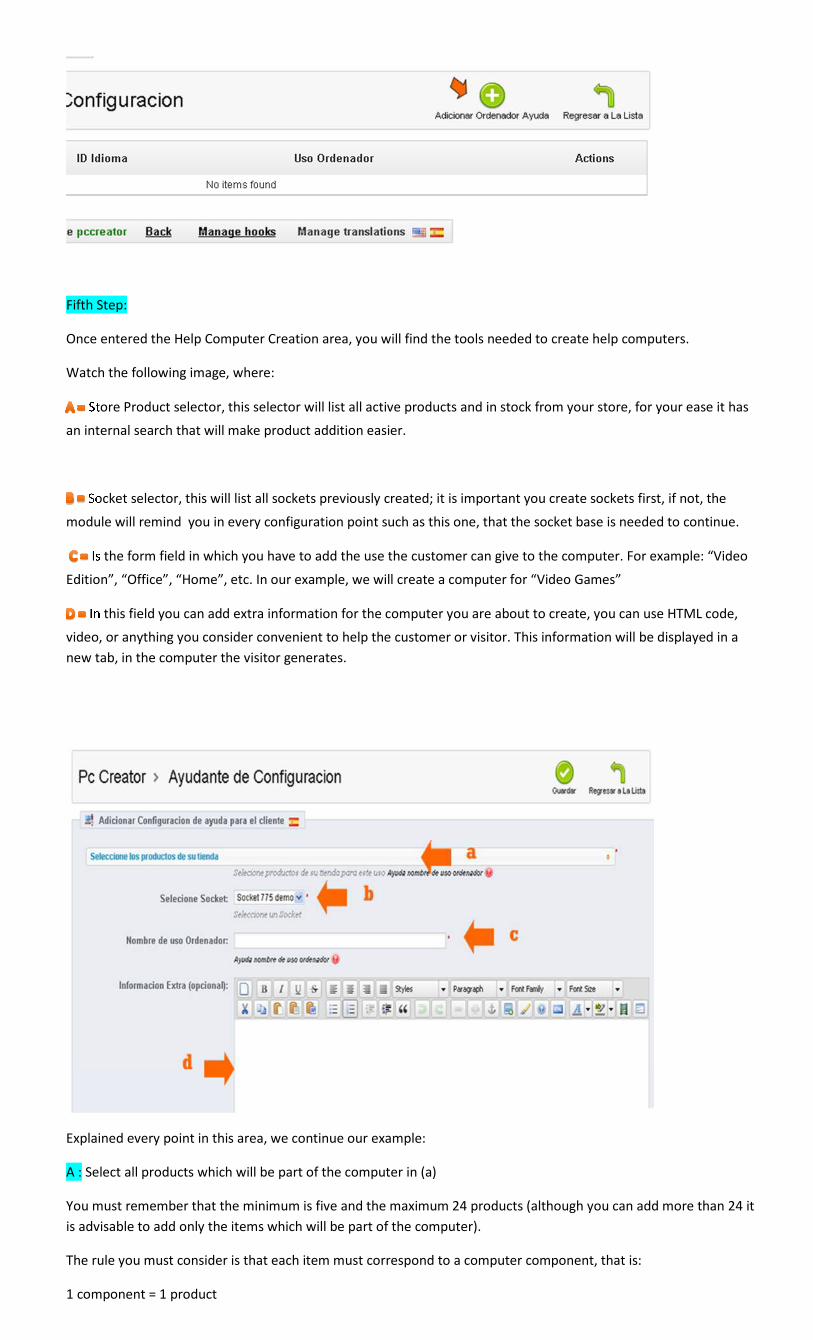
Fifth Step:
Once entered the Help Computer Creation area, you will find the tools needed to create help computers.
Watch the following image, where:
Store Product selector, this selector will list all active products and in stock from your store, for your ease it has
an internal search that will make product addition easier.
Socket selector, this will list all sockets previously created; it is important you create sockets first, if not, the
module will remind you in every configuration point such as this one, that the socket base is needed to continue.
Is the form field in which you have to add the use the customer can give to the computer. For example: “Video
Edition”, “Office”, “Home”, etc. In our example, we will create a computer for “Video Games”
In this field you can add extra information for the computer you are about to create, you can use HTML code,
video, or anything you consider convenient to help the customer or visitor. This information will be displayed in a
new tab, in the computer the visitor generates.
Explained every point in this area, we continue our example:
A : Select all products which will be part of the computer in (a)
You must remember that the minimum is five and the maximum 24 products (although you can add more than 24 it
is advisable to add only the items which will be part of the computer).
The rule you must consider is that each item must correspond to a computer component, that is:
1 component = 1 product

Example:
CPU = one product
Hard Disk = one product
Video Card = one product.
Etc etc…
In our example, we will select 20 products.
B: Select the kind of socket the computer you are creating will have.
C: Enter the name for the use your customer can give to the computer, in our example we will enter Videogames.
D Enter all information you consider convenient to help your customer, in our example we will enter in bold type
“Hello World”
Having done this, click “Save”.
Then click “Go to List”
Now you will see the list has our help computer added:
From the menu Actions, you can delete the created computer.
You can also edit it, in case you want to modify the use name or add more ítems or delete them.
Sixth Step:
To watch the created computer, go to your store home:
Then click on the link in the PC Creator box to go to the Configuration Helper page.
Once there, select the option created in the previous step “Videogames” and all added products will be
automatically added.

In the Information tab, all information you have added will be listed, in our example:
“Hello World”.
Final Notes:
As you can see it is very simple to create a pre-configured computer.
What you must insist is in understanding that each product you add must correspond to a computer component,
and above all, in the kind of use your visitor or customer can give to it.
- Try to cover a wide range of use possibilities, this way you will offer a computer for every visitor. Example:
Office, Commerce, Gaming and Leisure, Home, Programming, Photo Edition, Video Edition, Education, Etc.
FRONT 4.1 NEW VERSION NEW VERSION

Update History:
v4.0.0.1 - (2013-12-08)
[+] FO : Enables quantity selector for different components.
[+] FO : Incorporates plug-in to manage only numeric characters in quantity inputs.
[+] FO : Fix Bug : Message Form sent in the generating Budget page avoiding Budget generation.
v4.0.0.0 - (2013-11-29)
[+] BO : Creates new database tables as configuration by categories manager.
[+] BO : Modifies DB inquiries incorporating the new manager.
[+] FO : Modifies the css style.
[+] FO : Modifies jquery to display error messages for users.
[+] FO : Modifies tpl files to avoid possible inconvenient with deleted items.
[+] FO : Modifies printer.tpl file to display messages regarding products which are no longer available in your
store.
[+] IU : New use documentation.
v3.5.0.0 - (2013-11-25)
[-] BO : Fix Bug : Problem loading select containing deleted items in your store.
[-] FO : Fix Bug : Problem loading select containing deleted items in your store.
v3.3.0.1 - (2013-10-29)
[+] BO : Adds a filter to list items in every configuration by category.

v3.2.0.0 - (2013-10-23)
[+] BO : Fix Bug : Solution for items deleted by administrator.
[-] FO : Fix Bug : Deletes options for items deleted from your store.
[-] FO : Fix Bug : Displays error message in the Budget page, when a product is no longer existing in your store.
[-] FO : Fix Bug : Avoids loading cart when an item is no longer existing.
Versions lower than 3.1.0.0
Correspond to Prestashop 1.4 versions which are unattended since September 2013.
Documentation valid for Pc Creator Versión 4.1
- December 8, 2013 -